clutch kit - superatv
TRANSCRIPT

INSTALLATION INSTRUCTIONS
© 2016 SuperATV.com® All Rights Reserved. Rev IN-CK-1-001 5/23/2017
Thank You For Choosing
Tire size, machine modifications, rider preferences, and machine usage are all factors to consider when tuning Clutch Kit. Specifics for every application are not within SuperATV’s testing scope. By experimenting with different weight combinations, end user can achieve performance best suited for their riding needs and machine.
Clutch Kit2753 Michigan Road • Madison, Indiana 47250 • 812-574-7777
Read instructions and view illustrations before beginning.
Liability StatementSuperATV’s® products are designed to best fit user’s ATV/UTV under stock conditions. Adding, modifying, or fabricating any factory or aftermarket parts will void any warranty provided by SuperATV® and is not recommended. SuperATV’s® products could interfere with other aftermarket accessories. If user has aftermarket products on machine, contact SuperATV® to verify that they will work together.Although SuperATV® has thousands of satisfied customers, user should be aware that installing lift kits, long travel, or suspension kits, tires, etc. will change the ride of machine and may increase maintenance and part wear. Operating any off-road machine while, or after, consuming alcohol and/or drugs increases risk of bodily harm or death. No warranty or representation is made as to this product’s ability to protect user from severe injury or death. SuperATV® urges operators and occupants to wear a helmet and appropriate riding gear at all times.By purchasing and installing SuperATV® products, user agrees that should damages occur, SuperATV® will not be held responsible for loss of time, use, labor fees, replacement parts, or freight charges. SuperATV®, nor any 3rd party, will not be held responsible for any direct, indirect, incidental, special, or consequential damages that result from any product purchased from SuperATV®. The total liability of seller to user for all damages, losses, and causes of action, if any, shall not exceed the total purchase price paid for the product that gave rise to the claim.SuperATV® will warranty only parts provided by SuperATV®. Any damage or problems with OEM housings, bearings, seals, or other manufacturers’ products will not be covered by SuperATV®. SuperATV® parts and products are not warrantied if item was not installed properly, misused, or modified.Installing, adding, modifying, or fabricating any factory or aftermarket product to your ATV/UTV may violate certain local, state, and federal laws. Be advised that laws vary depending on town, city, county, state, etc. Use of certain products on public streets, roads, or highways may be in violation law. The Buyer is solely and exclusively legally and personally responsible for any violation of the law by the installation or use of the product. You must abide by all local, state, and federal laws, including but not limited to vehicle safety, traffic laws, and ordinances. It is your responsibility to know the laws and how they apply to you. The Buyer is responsible to fully understand the capability and limitations of his/her vehicle according to manufacturer specifications, warnings and instructions and agrees to hold SuperATV® harmless from any damage resulting from failure to adhere to such specifications, warnings and/ or instructions. The Buyer is also responsible to obey all applicable federal, state, and local laws and ordinances when operating his/her vehicle while using this product, and the Buyer agrees to hold SuperATV® harmless from any violation thereof.
Need help with your installation?
www.superatv.com
8:00am - 9:00pm EST M-Th8:00am - 7:00pm EST Friday9:00am - 2:00pm EST Saturday
1-855-743-3427

2 IN-CK-1-001
Prim
ary
Sprin
g
Whe
n in
stal
ling
any
wei
ght t
o C
lutc
h A
rms,
Vib
ra-T
ITE®
Thr
eadl
ocke
r mus
t be
used
.
Seco
ndar
y Sp
ring
Sprin
gs a
nd C
lutc
h A
rms
show
n ar
e fo
r rep
rese
ntat
ion
only
:-Kitsaremachinespecific.S
pringswillbeadiffe
rentcolorand
C
lutc
h A
rms
will
con
tain
diff
eren
t com
bina
tions
of w
eigh
ts.
- N
ot a
ll Se
cond
ary
(Driv
en) C
lutc
hes
use
a re
mov
able
Hel
ix; n
ot a
ll ki
ts w
ill in
clud
e a
new
Hel
ix.
Hel
ix
Was
hers
are
loca
ted
belo
w fo
am. U
se fo
am to
kee
p W
ashe
rs in
pla
ce.
*
Clu
tch
Arm
Ass
embl
yC
lutc
h A
rm A
ssem
bly
Clu
tch
Arm
Ass
embl
y
CK
A-0
01-0
.5G
WC
KA
-001
-1.5
GW
CK
A-0
01-5
.8G
F
CK
A-0
01-3
.5G
F
CK
A-0
01-2
.0G
F
CK
A-0
01-2
.5G
F
CK
A-0
01-0
.8G
FVi
bra-
TITE
® T
hrea
dloc
ker
#10-
24 x
2”
Lg. S
houl
der B
olt
#10-
24 N
yloc
k N
ut
3x 3x
CK
A-0
01-3
.0G
W
**
*
3 IN-CK-1-001
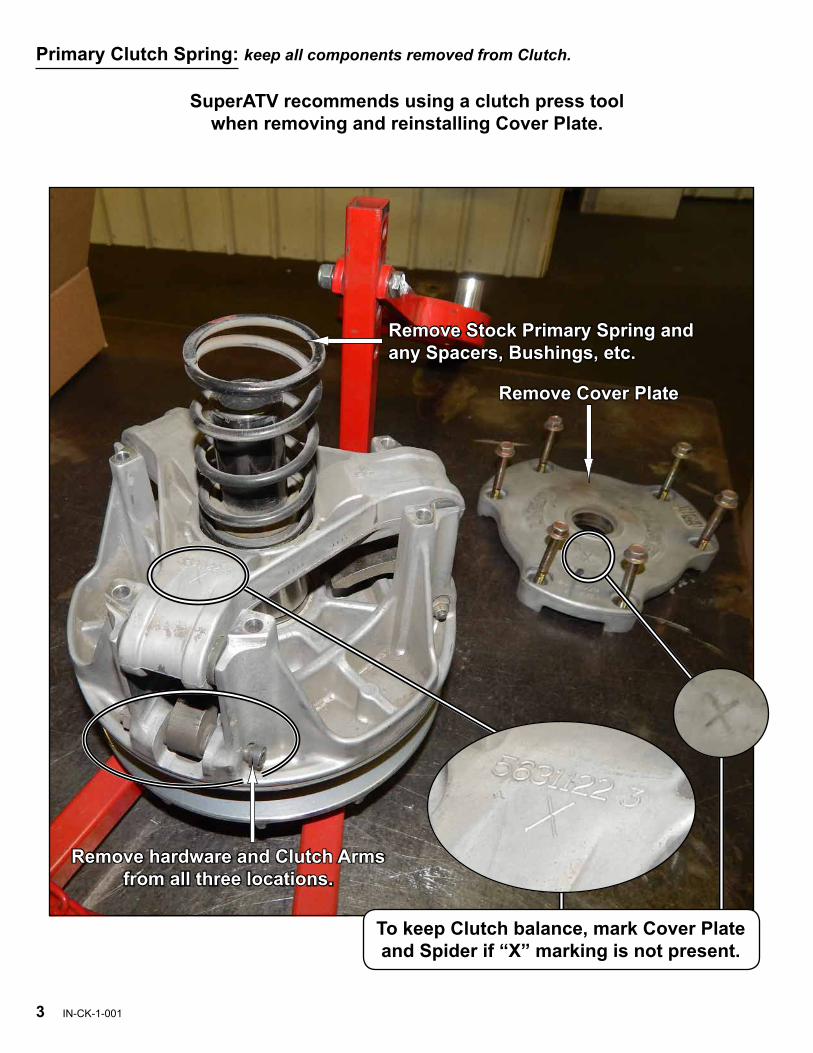
Remove hardware and Clutch Arms from all three locations.
Remove Cover Plate
Remove Stock Primary Spring and any Spacers, Bushings, etc.
Primary Clutch Spring: keep all components removed from Clutch.
To keep Clutch balance, mark Cover Plate and Spider if “X” marking is not present.
SuperATV recommends using a clutch press tool when removing and reinstalling Cover Plate.
4 IN-CK-1-001
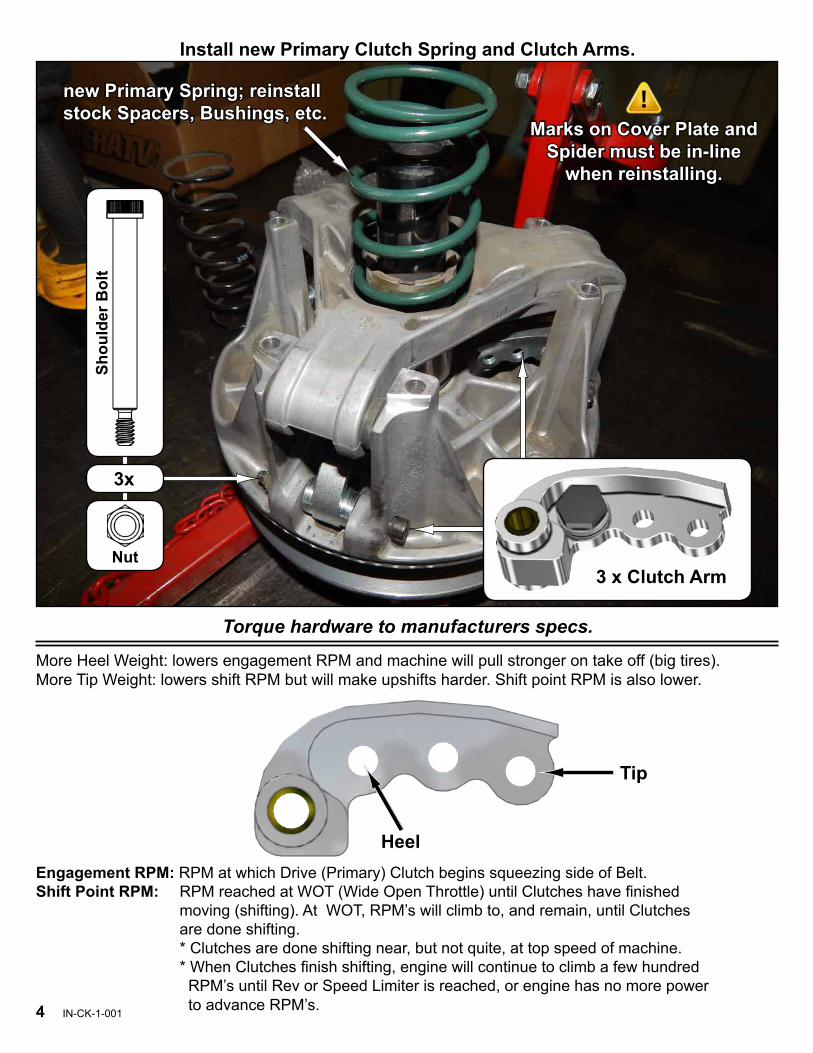
Engagement RPM: RPM at which Drive (Primary) Clutch begins squeezing side of Belt.Shift Point RPM: RPM reached at WOT (Wide Open Throttle) until Clutches have finished
moving (shifting). At WOT, RPM’s will climb to, and remain, until Clutches are done shifting.
* Clutches are done shifting near, but not quite, at top speed of machine. * When Clutches finish shifting, engine will continue to climb a few hundred
RPM’s until Rev or Speed Limiter is reached, or engine has no more power to advance RPM’s.
new Primary Spring; reinstall stock Spacers, Bushings, etc.
More Heel Weight: lowers engagement RPM and machine will pull stronger on take off (big tires).More Tip Weight: lowers shift RPM but will make upshifts harder. Shift point RPM is also lower.
Heel
Tip
3 x Clutch Arm
Install new Primary Clutch Spring and Clutch Arms.
Torque hardware to manufacturers specs.
Marks on Cover Plate and Spider must be in-line
when reinstalling.
3x
Nut
Shou
lder
Bol
t

5 IN-CK-1-001
remove stock hardware and Helix
Secondary (Driven) Clutch Spring and Helix: keep all components removed.
(heat may need to be applied to bolts in order to remove)

6 IN-CK-1-001
Use SuperATV Clutch Compressor Tool (CCT-1-001) and undo Retaining Ring
Retaining Ring
Remove Spider Assembly and Secondary (Driven) Clutch Spring Remove Retaining Ring
Remove Clutch Compressor
7 IN-CK-1-001
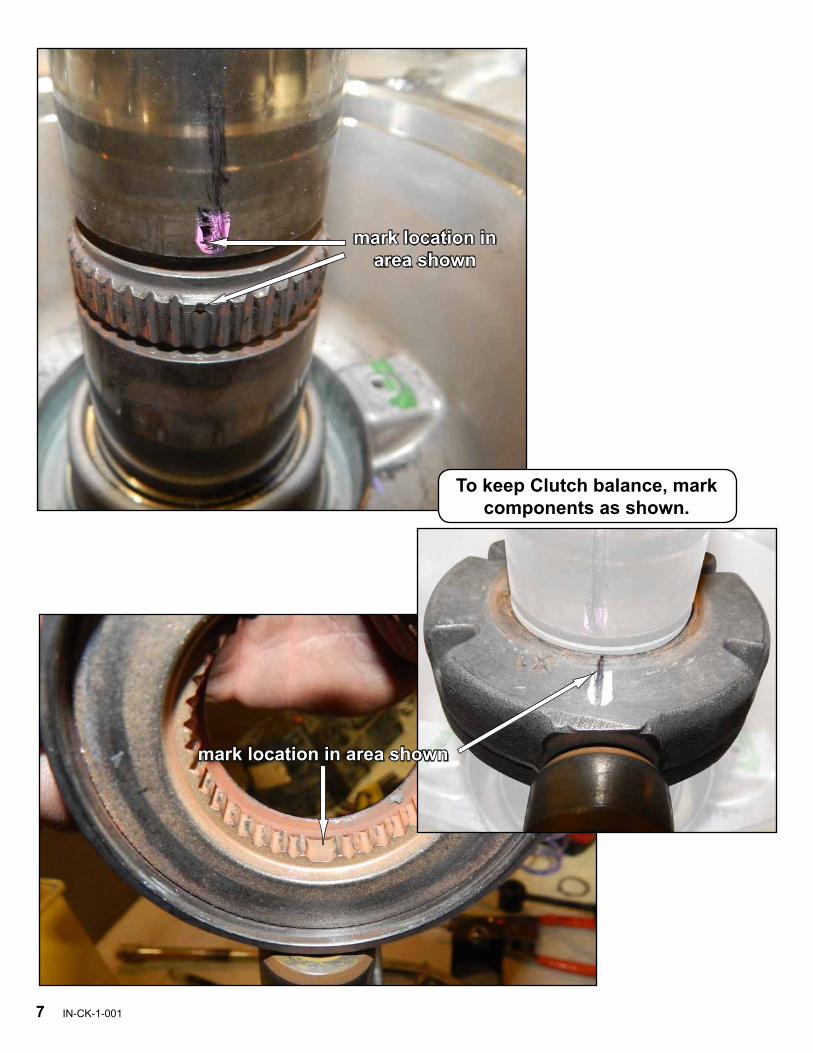
mark location in area shown
mark location in area shown
To keep Clutch balance, mark components as shown.

8 IN-CK-1-001
Install new Secondary (Driven) Clutch Spring
- Reinstall previously removed components.- Use Compression Tool and resecure Retaining Ring.
keep in-line when reinstalling
new Secondary Spring
Remove

9 IN-CK-1-001
- Reverse steps taken during removal and reinstall Primary and Secondary (Driven) Clutch to machine. Torque all hardware to manufacturers specs.
- Test drive machine and note how machine performs with new Clutch Kit.- If initial setup is not ideal for your riding needs, try a different combination of Weights.
- Install new Helix with stock hardware.- Torque hardware to manufacturers specs.
new Helix