cm system installing cm system - percussion help site · and application data 1.2 gb + 1.2 gb for...
TRANSCRIPT

CM System
Installing CM System
Version 7.3
Printed on 12 June 2013

Copyright and Licensing Statement
All intellectual property rights in the SOFTWARE and associated user documentation, implementation
documentation, and reference documentation are owned by Percussion Software or its suppliers and are
protected by United States and Canadian copyright laws, other applicable copyright laws, and
international treaty provisions. Percussion Software retains all rights, title, and interest not expressly
grated. You may either (a) make one (1) copy of the SOFTWARE solely for backup or archival purposes
or (b) transfer the SOFTWARE to a single hard disk provided you keep the original solely for backup or
archival purposes. You must reproduce and include the copyright notice on any copy made. You may not
copy the user documentation accompanying the SOFTWARE.
The information in CM System documentation is subject to change without notice and does not represent a
commitment on the part of Percussion Software, Inc. This document describes proprietary trade secrets of
Percussion Software, Inc. Licensees of this document must acknowledge the proprietary claims of
Percussion Software, Inc., in advance of receiving this document or any software to which it refers, and
must agree to hold the trade secrets in confidence for the sole use of Percussion Software, Inc.
The software contains proprietary information of Percussion Software; it is provided under a license
agreement containing restrictions on use and disclosure and is also protected by copyright law. Reverse
engineering of the software is prohibited.
Due to continued product development this information may change without notice. The information and intellectual property contained herein is confidential between Percussion Software and the client and remains the exclusive property of Percussion Software. If you find any problems in the documentation, please report them to us in writing. Percussion Software does not warrant that this document is error-free.
No part of this publication may be reproduced, stored in a retrieval system, or transmitted in any form or
by any means, electronic, mechanical, photocopying, recording or otherwise without the prior written
permission of Percussion Software.
Copyright © 1999-2013 Percussion Software.
All rights reserved
Licenses and Source Code
CM System uses Mozilla's JavaScript C API. See http://www.mozilla.org/source.html for the source code.
In addition, see the Mozilla Public License (http://www.mozilla.org/source.html).
Netscape Public License
Apache Software License
IBM Public License
Lesser GNU Public License
Other Copyrights
The CM System installation application was developed using InstallShield, which is a licensed and
copyrighted by InstallShield Software Corporation.
The Sprinta JDBC driver is licensed and copyrighted by I-NET Software Corporation.
The Sentry Spellingchecker Engine Software Development Kit is licensed and copyrighted by Wintertree
Software.
The Java™ 2 Runtime Environment is licensed and copyrighted by Sun Microsystems, Inc.
The Oracle JDBC driver is licensed and copyrighted by Oracle Corporation.

The Sybase JDBC driver is licensed and copyrighted by Sybase, Inc.
The AS/400 driver is licensed and copyrighted by International Business Machines Corporation.
The Ephox EditLive! for Java DHTML editor is licensed and copyrighted by Ephox, Inc.
This product includes software developed by CDS Networks, Inc.
The software contains proprietary information of Percussion Software; it is provided under a license
agreement containing restrictions on use and disclosure and is also protected by copyright law. Reverse
engineering of the software is prohibited.
Due to continued product development this information may change without notice. The information and
intellectual property contained herein is confidential between Percussion Software and the client and
remains the exclusive property of Percussion Software. If you find any problems in the documentation,
please report them to us in writing. Percussion Software does not warrant that this document is error-free.
No part of this publication may be reproduced, stored in a retrieval system, or transmitted in any form or by any means, electronic, mechanical, photocopying, recording or otherwise without the prior written permission of Percussion Software.
Microsoft Word, Microsoft Office, Windows®, Window 95™, Window 98™, Windows NT® and MS-
DOS™ are trademarks of the Microsoft Corporation.
Schema documentation was created using XMLSpy™.
Percussion Software 600 Unicorn Park Drive Woburn, MA 01801 U.S.A.
781.438.9900
Internet E-Mail: [email protected]
Website: http://www.percussion.com


v
Contents
System Requirements and Installation Prerequisites .............................................................................. 7
System Requirements ............................................................................................................................... 8
Server System Requirements ................................................................................................................ 8
Developer Tools System Requirements .................................................................................................. 9
Desktop Client Components ................................................................................................................... 9
Repository Database Requirements ..................................................................................................... 10
Installation Prerequisites ........................................................................................................................ 11
Prerequisites for Installation to Unix and Linux .................................................................................... 11
Environments ...................................................................................................................................... 11
Prerequisites For Upgrade from CM System Version 5.7 and Earlier .................................................... 11
Installation.................................................................................................................................................. 13
Installation Flow Charts .......................................................................................................................... 14
New Installation ................................................................................................................................... 15
Upgrade Installation ............................................................................................................................ 16
Starting Installations ............................................................................................................................... 17
Installing Remote Client Components .................................................................................................. 17
Installation Sequence .............................................................................................................................. 18
Welcome and Product Licensing .......................................................................................................... 19
Installation Configuration .................................................................................................................... 22
Product Selection ................................................................................................................................ 26
Upgrade Configuration ........................................................................................................................ 31
Repository Configuration .................................................................................................................... 36
Server Properties ................................................................................................................................. 42
Installation Summary ........................................................................................................................... 47

v
Completing the Installation .................................................................................................................. 49
Additional Installation Issues ................................................................................................................... 57
Important Security Measures ................................................................................................................. 58
Assigning New Passwords to Default Users .......................................................................................... 58
Replacing the Default Users with New Users ....................................................................................... 59
CM System Workbench Options ............................................................................................................. 60
Technical Support ................................................................................................................................... 61

7
C H A P T E R 1
System Requirements and Installation Prerequisites
CM System includes the following components:
Repository Database
Microsoft SQL Server
Oracle
MySQL
Server, including Publishing System
The following remote components:
Developer Tools
Multi-server Manager
Optional target database for database publishing
Microsoft SQL Server
Oracle
MySQL
In a Windows environment all components can be installed. In a UNIX environment you can only install
the Repository Database and the Server (and optional database publishing target).
8 Installing CM System
System Requirements
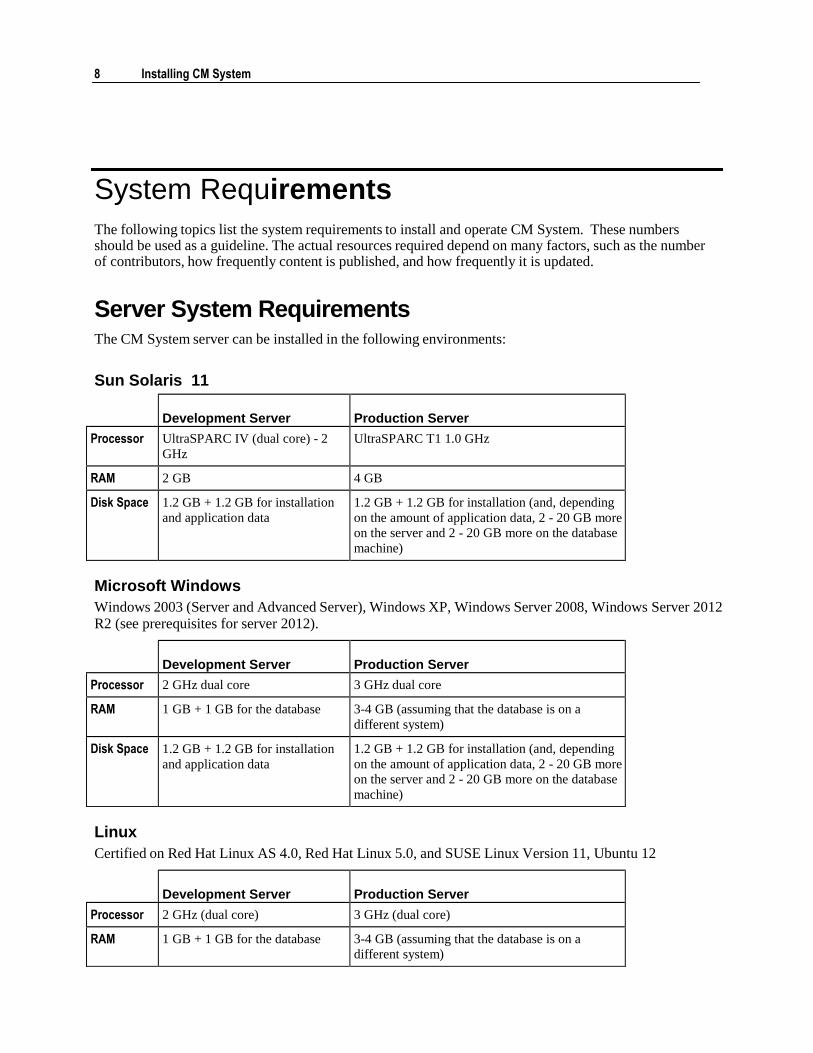
The following topics list the system requirements to install and operate CM System. These numbers should be used as a guideline. The actual resources required depend on many factors, such as the number of contributors, how frequently content is published, and how frequently it is updated.
Server System Requirements
The CM System server can be installed in the following environments:
Sun Solaris 11
Development Server
Production Server
Processor UltraSPARC IV (dual core) - 2
GHz
UltraSPARC T1 1.0 GHz
RAM 2 GB 4 GB
Disk Space 1.2 GB + 1.2 GB for installation
and application data
1.2 GB + 1.2 GB for installation (and, depending
on the amount of application data, 2 - 20 GB more
on the server and 2 - 20 GB more on the database
machine)
Microsoft Windows
Windows 2003 (Server and Advanced Server), Windows XP, Windows Server 2008, Windows Server 2012 R2 (see prerequisites for server 2012).
Development Server
Production Server
Processor 2 GHz dual core 3 GHz dual core
RAM 1 GB + 1 GB for the database 3-4 GB (assuming that the database is on a
different system)
Disk Space 1.2 GB + 1.2 GB for installation
and application data
1.2 GB + 1.2 GB for installation (and, depending
on the amount of application data, 2 - 20 GB more
on the server and 2 - 20 GB more on the database
machine)
Linux
Certified on Red Hat Linux AS 4.0, Red Hat Linux 5.0, and SUSE Linux Version 11, Ubuntu 12
Development Server
Production Server
Processor 2 GHz (dual core) 3 GHz (dual core)
RAM 1 GB + 1 GB for the database 3-4 GB (assuming that the database is on a
different system)

Development Server
Production Server
Disk Space 1.2 GB + 1.2 GB for installation
and application data
1.2 GB + 1.2 GB for installation (and, depending
on the amount of application data, 2 - 20 GB more
on the server and 2 - 20 GB more on the database
machine)
Developer Tools System Requirements
The Developer Tools are certified only in a Windows environment, including:
Windows XP Professional 2003 (NOTE: Not currently certified on Windows XP Service Pack 2)
Windows 2003 Server platform
Windows Vista, Windows 7
Windows Server 2008, Note: Windows R2 is supported in 64 bit mode.
Windows Server 2012 R2
Hardware Requirements
Processor Pentium IV or faster 2 GHz
RAM 1 GB or greater recommended
Disk Space 400 MB to run installed product (800 MB during installation)
Desktop Client Components
Client JRE support: JRE8u45
The Rhythmyx 7.3 with patch 730_20150405 is tested against the following browsers and operating system
platforms. Due to frequent release versions of these browsers we are committed to support any current release
versions of these browsers:
Internet Explorer 11(In
Compatibility mode only) Firefox 35.0.1 Safari 8.0.3
Windows 7 yes yes -
Linux – Centos 7 yes yes -
Mac (OS X Yosemite
10.10.2)
- - yes
Internet Explorer 11, 10 and 9 is supported in Compatibility mode only.
Internet Explorer 9 is supported for using the JAWS screen reader
Starting Google Chrome version 42, the default support for NPAPI was removed. For this
reason we no longer support Google chrome browser. Though we removed our support, until
September 2015 you may continue to use chrome by enabling the NPAPI manually by following
instructions provided below.

Installing CM System
Installing CM System
Enabling NPAPI in Chrome Version 42 and later As of Chrome Version 42, an additional configuration step is required to continue using NPAPI plugins.
1.In your URL bar, enter:
chrome://flags/#enable-npapi
2.Click the Enable link for the Enable NPAPI configuration option.
3.Click the Relaunch button that now appears at the bottom of the configuration page.
Reference for Java support in chrome:
https://java.com/en/download/faq/chrome.xml#npapichrome
JavaScript must not be disabled within the browser to use the interface.
The Rhythmyx 7.3 with patch 730_20150405 is tested against JRE8u45. We are committed to test our patch releases against latest JRE prior to its release. If in case would want to try latest JRE before we support, we suggest to test the latest JRE on a small number of users before distributing to a large set. Should you experience any issues with latest JRE, please contact technical support or post your experience/issues to percussion forum at forum.percussion.com.
Repository Database Requirements
Before installing any CM System components, be sure you have a relational database management
system installed. CM System currently supports:
RDBMS
Supported Versions
Oracle 10g, 11g, 12c and 18c
NOTE: When installing the Repository to Oracle 10g or 11g, the installation user must have
CONNECT and RESOURCE privileges, and must also have Create View permission. This
permission is implicitly granted with the CONNECT Role in Oracle 10g, but must be
explicitly granted in Oracle 11g.
MS SQL Server MS SQL Server 2005, 2008, 2012,2016 and 2017
NOTE: Do not use the "-" (dash) character, special characters, or embedded spaces or
the installation will fail.
MySQL MySQL 5.5.x
NOTE: You must have a jdbc driver installed. If you have not already downloaded the
driver go to http://dev.mysql.com/downloads/connector/j and download 5.1.17 or higher.
Note that CM System does not perform any escaping or character conversion when inserting characters
into the database. Therefore, the character encoding of the underlying database character set should match
the encoding of the characters you want to store in the Repository. If the encoding of the database does not
match the encoding used in CM System, some functionality may be lost. For example, if you use
Microsoft Word as a Content Editor and Oracle as your database, Word SmartQuotes might not work if
your database uses a character set other than UTF-8.
Percussion Software makes the following recommendations:
Use UTF-8 if the majority of the characters you use match the ASCII character set. This is
the recommended option for Western languages.

Use UTF-16 or UCS2 if the majority of the characters you use fall outside of the ASCII
character set.
This is the recommended option for most Asian languages.
Non-Unicode character sets are not recommended for CM System.
Installation Prerequisites
Before beginning installation, be sure to implement the following prerequisites.
Prerequisites for Installation to Unix and Linux Environments
Before installing to a Unix environment, you will need to create a user to install and run CM System. If
you run multiple instances of the CM System server, you must create a user for each instance.
You must install CM System from the root of the user’s directory.
Prerequisites for Installation to Windows Server 2012
1. Grant read/write permissions to the drive for any users that will install or start/stop the Rhythmyx
server.
2. Open the following ports in Windows firewall:
a. 9992
b. 9443 (If using ssl)
Prerequisites For Upgrade from CM System Version 5.7 and Earlier
When upgrading from CM System Version 5.7 and earlier, you must modify any applications that have
backend credentials defined locally. CM System now runs in a web application server container rather than
acting as a Web server itself, and all security is provided by the container. Thus, local backend credentials
are no longer valid and must be removed. If you attempt to install without removing local backend
credentials, the installer will terminate with a warning message
An application includes local backend credentials if the Backend Data Access tab of the Application
Security Settings dialog includes any entry in addition to or instead of CM System Repository.


13
C H A P T E R 2
Installation
For upgrades and reinstallations:
If you are upgrading or reinstalling the CM System Server or the CM System Repository
Database, shut down the CM System Server and any running applications first.
If you are upgrading or reinstalling a client component, shut down that component locally.
You do not need to shut down the CM System
Server. Install the components in the following order:
1 Install the Repository Database from the CD-ROM. (Note: You cannot install the Server until you have installed the Repository Database, as the Server’s programs and files depend on the tables in the Repository Database).
2 Install the Server from the downloaded installation package.
3 Install the client components by browsing to the Server’s web pages and downloading their
installers.
Note: If you are evaluating CM System and want to install all CM System components onto the
same machine in one installer use the Suite Installer from the CD-ROM.

14 Installing CM System
Installation Flow Charts
The following flow charts illustrate the installation sequence for CM System.

Chapter 2 Installation 15

16 Installing CM System
New Installation
Figure 1: Installation
Sequence

Chapter 2 Installation 17
Upgrade Installation
Figure 2: Upgrade installation sequence

18 Installing CM System
Starting Installations
The installation application and process you use depends on the components of the CM System system you
are installing and the environment into which you are installing CM System.
When installing into Solaris or Linux, copy the extracted installation package to a directory on the
machine where you want to run the installation. (NOTE: The /resource directory MUST be included
when copying files from the disk to the machine. If you do not include this directory, the installation will
fail.)
When installing to Solaris or Linux, the user performing the installation must be the owner of all files copied from the installation package, must have read permissions on all installer files, and must have execute permissions on the setup script (setupui.sh or setupconsole.sh) that you want to run.
The directory for each operating system contains the setup installer, which installs the CM System server
and repository.
You can launch the installer in either command line (terminal window) mode or using a graphic user interface. The command line installer provides more options for tracking and logging the installation process.
To launch the installer as a GUI in a Windows environment, browse to the Windows directory on extracted
installation package and double-click on the installation application. When installing in Windows Server
2012 R2, Error dialog appears, Title: "Installer UI Mode Error", Text: "Installer User Interface Mode Not
Supported". Workaround for this is:
1. right-click on the setup.exe and select "Properties" from the context menu.
2. Click on the "Compatibility" tab
3. In the "Compatibility mode" section, check-off "Run this program in compatibility mode for:"
4. Select "Windows 7" from the drop-list
5. Click OK
6. Re-run setup.exe by double-clicking it.
To launch the installer in Windows using command-line mode, open a Command Prompt window, change
to the directory where the installation application is located, and enter setup.exe.
To launch the installer in Linux or Solaris, change to the directory where the installer files reside, and run the shell script for the mode you wish to use. To run in command line mode use SetupConsole.sh. To run the installer as a graphic user interface use SetupUI.sh.
Installing Remote Client Components
You can install the Developer Tools as a remote client on Microsoft Windows operating systems.
(Installing as a remote client on other operating systems is not certified.) To install the Developer Tools
as a remote client, start a Web browser and enter:
server:port/Rhythmyx/Administration/DeveloperTools/install.htm
Where:
server is the name or IP address of the CM System server machine;
port is the port the CM System server listens
on; For example:
FastForward:9992/Rhythmyx/Administration/DeveloperTools/install.htm

Chapter 2 Installation 19
Installation Sequence
All CM System components follow a similar installation sequence, whether installed from the CD-
ROM, Suite Installer or browser.

20 Installing CM System
Welcome and Product Licensing
The first phase of the installation wizard is welcoming and product licensing. When you start the
installation wizard, it displays welcoming information:
Figure 3: Installation window
Figure 4: Commannd-line welcome text

Chapter 2 Installation 21
To proceed,
in the graphic installation wizard, click the [Next] button;
in the command-line installation wizard, press the <Enter> key.
Also note two additional options in the command-line wizard:
To go back to the previous step in the wizard, enter "back". Note that this string can
include any mix of upper- and lower-case characters.
To end the installation wizard at any time, enter "quit". Note that this string can
include any mix of upper- and lower-case characters.
Where a list of options is available, the default options is indicated by an arrow (->).
Pressing the <Enter> key without entering an option accepts the default option.
The installation wizard now displays the License Agreement.
Figure 5: License Agreement

22 Installing CM System

Chapter 2 Installation 23
Read the license agreement.
Figure 6: Command-line license agreement
In the graphic installation wizard, scroll through the agreement.
In the command-line wizard, press the <Enter> key when you finish reading each screen.
To accept the license agreement:
in the graphic installer, select the I accept the terms of the license agreement radio button and
click the Next button;
in the command line installer, enter "Y" (upper- or lower-case) and press the <Enter> key to
accept the license agreement and continue with the installation.

Installation Configuration
The second phase of the installation wizard is installation configuration. During this phase you specify
whether you are performing a new installation or an upgrade, and define the installation location.
After you accept the license agreement, the wizard proceeds to installation type configuration. Options
are new installation and upgrade installation.
Figure 7: Installation type
Figure 8: Command-line installation type
To specify the type of installation:
in the graphic installation wizard, select the radio button for the type of installation you are
performing, then click the [Next] button to continue with the wizard.

in the command-line installation wizard enter
1 to perform a new installation;
2 to perform an upgrade installation (default option).
Press the <Enter> key to continue with the wizard.
The next step in the wizard is to configure the installation directory.
When performing a new installation, the default location for the installation is:
C:\Rhythmyx in Windows
Figure 9: Installation directory
/Rhythmyx. (in Unix and Linux).
Figure 10: Default location for Unix and Linux in command-line mode
In a new Installation, to change the installation location:
in the graphic installation wizard, enter the path in the Location field, or use the
[Browse] button to browse to the new location;
in the command-line wizard, enter the new path.
In a new Installation, to accept the location
in the graphic installation wizard, click the [Next] button;
in the command-line installation wizard, press the <Enter> key.
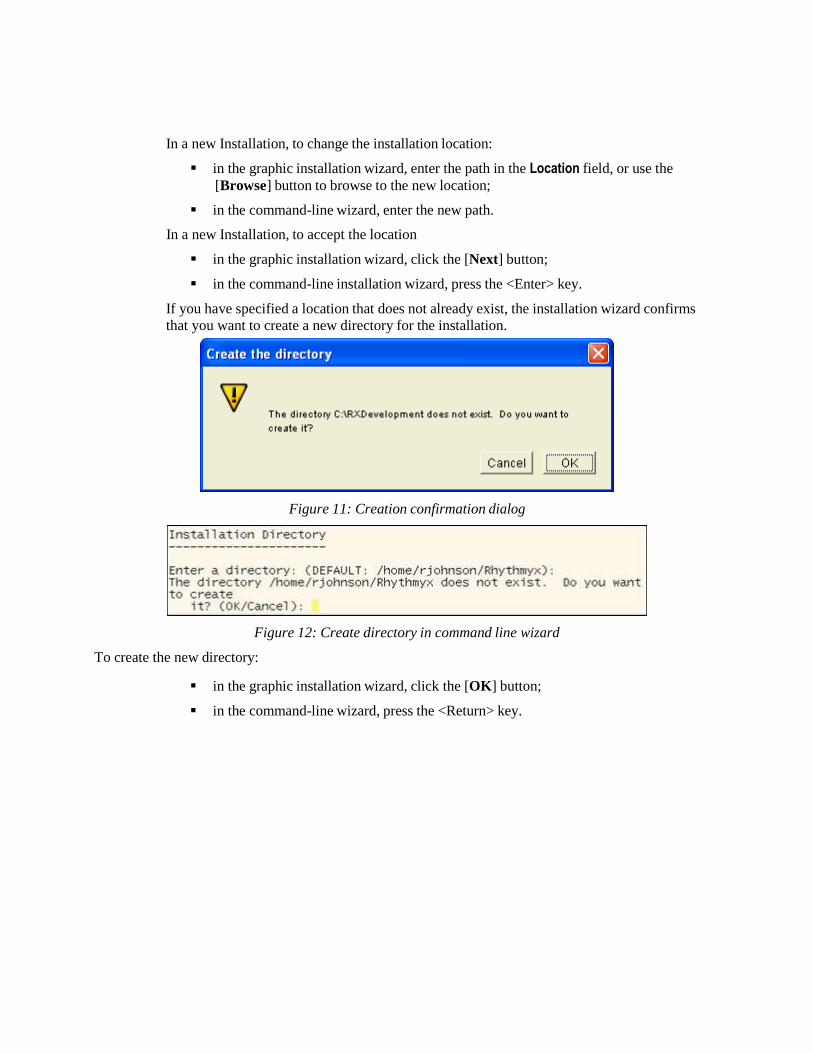
If you have specified a location that does not already exist, the installation wizard confirms
that you want to create a new directory for the installation.
Figure 11: Creation confirmation dialog
Figure 12: Create directory in command line wizard
To create the new directory:
in the graphic installation wizard, click the [OK] button;
in the command-line wizard, press the <Return> key.

If the specified location already contains a CM System installation, the wizard informs you
that it will perform an upgrade.
Figure 13: Installation upgrade confirmation
Figure 14: Installation message in command-line wizard
If you do not want to upgrade the installation:
in the graphic installation wizard, click the [Cancel] button and specify a different
directory;
in the command-line wizard, enter "cancel" (any combination of upper- and lower-
case characters) and press the <Enter> key; the installation wizard returns to
installation directory configuration.
When performing an upgrade, click the drop arrow in the Directory field and choose the
installation you want to upgrade.
If you are performing a new installation, the next phase of the installation wizard is Product Selection (see page 26). If you are performing an upgrade, the next phase of the installation wizard is Upgrade Configuration (see page 31).

Product Selection
The third phase of the installation wizard is product selection. During this phase you enter your license
number and installation codes and specify the CM System elements you want to install.
After you specify the installation location, the wizard requests your license number and installation code.
These codes are printed on the jacket of the CM System installation disk.
The graphic installation wizard displays a dialog where you can enter these codes. Enter the
codes in the appropriate fields, and click the [Next] button to continue.
Figure 15: Installation information

If either code is invalid the wizard displays an error dialog detailing the error. Correct the
error to continue.
Figure 16: Invalid code dialog
The command line wizard requests each code individually. Enter the requested code.
Figure 17: Entering the CM System license code in the command-line wizard.
If either of the codes you enter is invalid, the wizard returns an error message. Enter a valid
code to continue with the installation.
Figure 18: License code error in command-line wizard
Next, specify the installation type. Options include:
Typical
All elements will be installed.
Custom
Only specified installation elements will be installed.
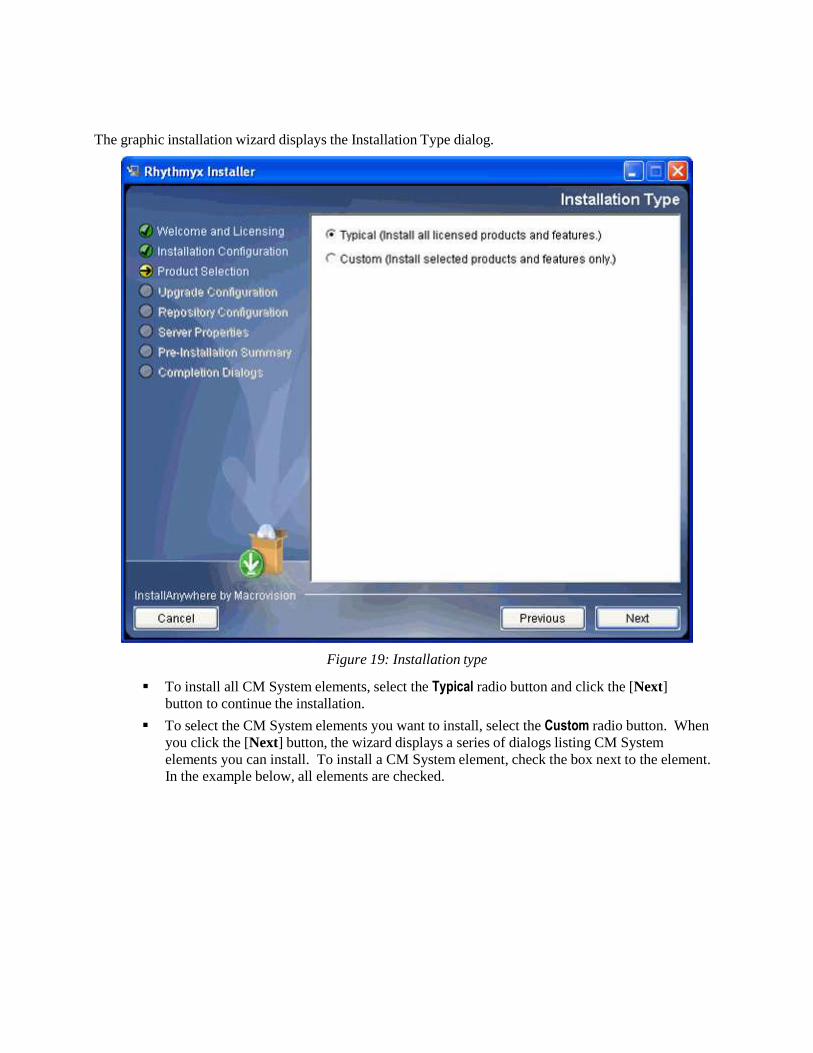
The graphic installation wizard displays the Installation Type dialog.
Figure 19: Installation type
To install all CM System elements, select the Typical radio button and click the [Next]
button to continue the installation.
To select the CM System elements you want to install, select the Custom radio button. When
you click the [Next] button, the wizard displays a series of dialogs listing CM System
elements you can install. To install a CM System element, check the box next to the element.
In the example below, all elements are checked.

Figure 20: Custom installation
NOTE: On an upgrade installation, the options you currently have installed are disabled on the custom
configuration dialogs are disabled. These options will be upgraded by default.
Click the [Next] button on the dialog to accept the options you selected. Continue through all of the pages
of options. Some options have pre-requisites. If you attempt to install an option without a required
prerequisite, the wizard displays an error message.
The command line wizard asks you to specify the installation type.
Figure 21: Specify installation type in command-line wizard
To install all CM System elements, accept the default option (1).

To select the CM System elements you want to install, enter 2 and press the <Enter> key.
The installation wizard displays a series of configuration options:
Figure 22: Example installation configuration options
Arrows indicate selected options. To change selected options, enter the numeric values in a comma-separated list. For example, to install only the Repository and server but not FastForward in the illustration above, enter 2,3. Press the <Enter> key to accept your configuration.
A new installation continues with Repository Configuration (see page 36).
Upgrade Configuration
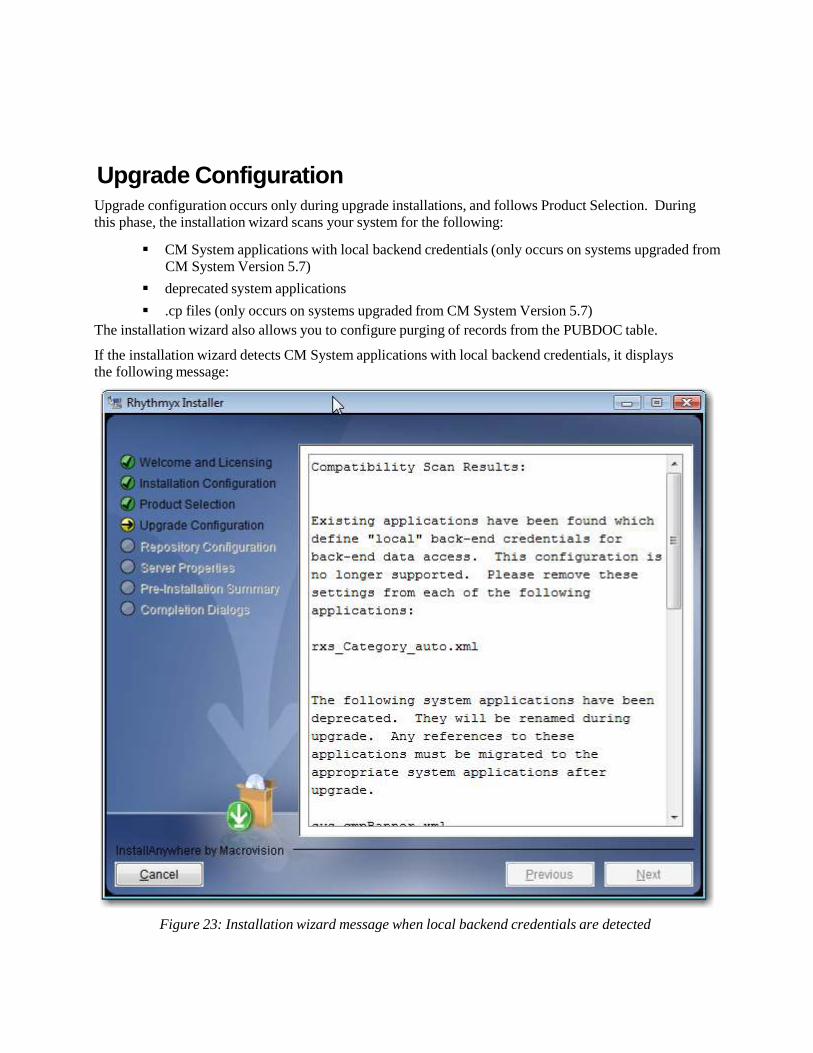
Upgrade configuration occurs only during upgrade installations, and follows Product Selection. During
this phase, the installation wizard scans your system for the following:
CM System applications with local backend credentials (only occurs on systems upgraded from
CM System Version 5.7)
deprecated system applications
.cp files (only occurs on systems upgraded from CM System Version 5.7)
The installation wizard also allows you to configure purging of records from the PUBDOC table.
If the installation wizard detects CM System applications with local backend credentials, it displays
the following message:
Figure 23: Installation wizard message when local backend credentials are detected

Figure 24: Installation wizard message when local backend credentials are defined, in command line
mode
If the installation wizard displays this message, you cannot proceed. You must cancel the installation and remove any locally-defined backend credentials in your implementation. Note that the dialog specifies which applications include locally-defined backend credentials.
If the installation wizard detects deprecated system applications, it displays the following message:
Figure 25: Command-line installation wizard message when deprecated system applications are detected

Figure 26: Command-line installation wizard message when deprecated system applications are detected
These applications are renamed during upgrade processing. You must update any code references to these
applications.
During the upgrade, the RXPUBDOCS table, stores metadata describing the published output of Content
Items, is modified. Processing this table can take a long time, so the installation wizard provides the
option of purging records prior to a specified date. Any records prior to the date you specify will be
purged from the system and permanently removed from the Repository, so you will not be able to access
details of Publication logs (although the logs themselves will still be available). Enter the latest date for
which you want to preserve the data in RXPUBDOCS.

Figure 27: Purge RXPUBDOCS dialog
Figure 28: Purge RXPUBDOCS dialog in command-line mode

If the installation wizard detects any .cp files, it displays the following message:
Figure 29: Installation wizard message when .cp files are detected
Figure 30: Command-line installation wizard message when .cp files are detected

Repository Configuration
The next phase of the installation wizard is repository configuration. This phase follows production select
for a new installation and upgrade configuration for an upgrade installation. During this phase of the
installation wizard, you specify the database to use for the CM System Repository.
The first step in Repository configuration is to specify the JDBC driver for the Repository RDBMS.
Options include
jtds: SQL Server ((Microsoft SQL Server)
Oracle:thin
To specify the JDBC driver
in the graphic installation wizard, choose the JDBC driver from the drop list, and click the
[Next] button to accept your choice;
Figure 31: Repository database selection dialog

in the command-line wizard, enter the ID that corresponds with the JDBC driver used to
connect to your RDBMS:
ID Driver RDBMS
1 jtds:sqlserver Microsoft SQL Server
2 oracle:thin Oracle
Figure 32: Specifying the JDBC driver in the command-line wizard
Note that you can only enter one ID. If you enter multiple IDs, the system does not accept
your response and displays the request again.
The next step is to specify the connection data for the database. Connection data includes the connect
string, and the user ID and password that the CM System server will use to connect to that server. The
following table illustrates the syntax of the connect string for each RDBMS.
Driver
Syntax
Sample
Oracle @<server>:<port>:<SID> @255.255.255.36:1521:ORCL
jtds <//server>:<port>(;instance=
instanceName)
//dbserver:
//dbserver:50000;instance=Rhythmyx

To specify the connection data:
in the graphic installation wizard, enter the connect string in the Database server field, and
enter the User ID and Password that CM System will use to connect to the database server,
then click the [Next] button to continue;
Figure 33: Repository database selection
in the command-line wizard
enter the connect string and press the <Enter> key;
enter the login user that CM System will use to connect to the database server
and press the <Enter> key;

enter the password for the user you specified.
Figure 34: Specifying the RDBMS connetion in the command-line wizard
Press the return key when you have defined all required connection data.
If any of the data is incorrect, the installation wizard returns an error message:
Figure 35: Validation error message
Figure 36: Database specification error in command-line wizard
The final step in Repository configuration is to specify the database or schema used for the CM System
Repository and name the datasource.
In the graphic installation wizard
when installing the Repository to Oracle, select the Schema for the
Repository (options include all schemas defined in the instance);
when installing the Repository to SQL Server, select the Owner for the Repository (options include all database owners defined on the server) and the Database to which the Repository will be installed (options include all databases defined in the instance);

in all cases, specify the name of the Datasource the server will use to connect to the
database; the default name of the datasource is Rhythmyx Data, but you can change it to any other name.
Figure 37: Schema and database definition

in the command-line installation wizard:
When installing the Repository to Oracle, enter the ID of the schema for the repository. Options include all schemas defined in the instance; the default option is the first schema. Press the <Enter> key when you have specified the schema you want to use.
Figure 38: Selecting the schema for a Repository installation to Oracle in the command-line wizard
When installing the Repository to Microsoft SQL Server, specify the database owner; enter the ID of the database owner from the list provided. Options include all database owners defined in the instance; the default is the first option. Press the <Enter> key to accept your selection.
Figure 39: Specifying the database owner for a SQL Server installation in the command-line wizard

Next, specify the database you want to use. Enter the ID of the database you want to use
from the list provided. Options include all databases defined in the instance; the default
isthe first option. Press the <Enter> key to accept your selection.
Figure 40: Specifying the SQL Server database for the Repository in the command-line wizard.
After you specify the schema or database for the Repository, the installation wizard asks you to specify the name of the datasource CM System will user to connect to the database or schema you specified. The name defaults to RhythmyxData, but you can change it to any other name you prefer.
Figure 41: Configuring the name of the CM System datasource in the command-line wizard
Press the <Enter> key to accept the name and continue with the installation.
Server Properties
The final phase in the installation wizard is to define CM System server properties. In this phase,
you define the type of server you are installing, the ports the CM System server will listen on, and, in
a Windows environment, the name of the CM System service.
When you complete Repository configuration, the installation wizard asks you to define the CM
System server type. Options include:
System master
A system master is a CM System server that supports both content maintenance and
publishing. Every installation requires at least one system master.

Publishing hub
A publishing hub is a CM System server used solely for publishing. Content maintenance is not allowed on a publishing hub. Publishing hubs are optional and are generally used in environments with a high volume of publishing activity.
To specify the server type:
in the graphic installation wizard, select the server type you want to install;
Figure 42: Server Type

in the command-line installation wizard, enter the ID of the server type you want to install.
Options include:
1 System master
2 Publishing Hub
Figure 43: Configuring the server type in the command-line wizard
Next, the Installation wizard asks you to define the CM System server properties.
In a Windows environment, you must define the name and description of the CM
System service, as well as the CM System port.
In the graphic installation wizard, enter the Rhythmyx service name (defaults to Rhythmyx Server) and Rhythmyx Service description ( defaults to Percussion Rhythmyx Server). You can accept the default name and description or enter a new one. Enter the CM System port. This value defaults to 9992, but you can change it to any other valid port. Click the [Next] button when you are done.

In addition to the specified port, CM System uses the next six ports for internal purposes.
You should confirm that other applications are not using these ports. If you need to
change one of these ports, check the Customize additional ports box. When you click the
[Next] button, the wizard displays the Application Server Settings dialog. You can
change any of these ports to another valid port.
Figure 44: Server properties
In a Solaris or Linux environment, specify the CM System port, and optionally, the additional
ports used by the Rhythmyx container.
The command-line wizard asks you to specify the Rhythmyx port. The default port is
9992.
Figure 45: Specifying the Rhythmyx port in the command-line wizard on Solairs or Linux

In addition to the specified port, CM System uses the next six ports for internal purposes.
You should confirm that other applications are not using these ports. The wizard then asks
if you want to configure the additional ports used by the CM System container. Regardless
of your answer, the wizard displays a warning that each port configured for CM System
must be unique. If you choose to configure the ports, the wizard displays each
of the additional ports being used with the currently specified port value. You can change
any of these values.
Figure 46: Configuring CM System container ports in the command-line wizard on Solaris and Linux

Installation Summary
Once you have configured all the installation data, CM System displays an installation summary.
Figure 47: Pre-installation summary

Figure 48: Installation summary in command-line wizard
Review the installation details as configured.
If you need to change any installation configurations:
In the graphic installation wizard, click the [Previous] button until you reach the dialog listing
the data you need to change. Modify the data and proceed through the installation wizard
again.
In the command-line installation wizard enter Back (any combination of upper- and lower-
case letters); repeat until you reach the portion of the wizard you need to modify..
To launch the installation:
in the graphic installation wizard, click the [Next] button;
in the command-line installation wizard, press the <Enter> key.

Completing the Installation
During installation, the installation wizard displays the progress of the installation:
Figure 49: Installation progress messages
Figure 50: Installation progress in the command-line wizard

When installation is complete, the installation wizard displays the readme:
Figure 51: Readme window

Figure 52: Readme on console

To complete the installation:
in the graphic installation wizard, click the [Done] button;
in the command-line installation press the <Enter> key.
If an error occurs during installation, the installation wizard displays messages informing you of the error
and the location of detailed log files:
Figure 53: Install screen with error messages

Figure 54: Log location message
Figure 55: Initial error report in command-line wizard
Figure 56: Final error message in command-line wizard

When upgrading from Version 6.5.2 or earlier, re-index your content after completing the installation.
NOTE: If you are installing to Solaris or Linux, you must run /Rhythmyx/InstallDaemon.sh to
complete the installation:

57
C H A P T E R 3
Additional Installation Issues
This chapter addresses miscellaneous issues related to installation of CM System.

58
Important Security Measures
Important: Every new CM System installation includes a backend Database Security Provider. The backend Database Security Provider includes the following default users for each Role:
Role
DEFAULT USERS
Admin admin1
admin2
Author author1
author1
QA qa1
qa2
Editor editor1
editor2
Designer designer1
designer2
Artist artist1
artist2
You can use every default user and the password "demo" to access the Rhythmyx Server Administrator.
NOTE: The Admin Role also contains the Member rxserver. This Member is used internally in Rhythmyx
as part of the Aging process. DO NOT REMOVE THIS MEMBER UNDER ANY CIRCUMSTANCES.
To prevent unintended access to your system choose one of the following options:
assign new passwords to the default users, or
replace the default users with new users.
Assigning New Passwords to Default Users
To assign new passwords to the default users using SQL:
1 Open the USERLOGIN table in the database.
2 In the Password column, change the password for each default user.
Each new password becomes effective as soon as you enter it.
To assign new passwords to the default users using an Oracle SQL*Plus application:
1 At the prompt change the pass work for the admin1 role by entering the following script:
update userlogin set password='somethingnotdemo' where userid='admin1';
2 Repeat for each default user, changing userid accordingly.

Chapter 3 Additional Installation Issues 59
Each new password becomes effective as soon as you change it.
Replacing the Default Users with New Users
NOTE: In addition to the default users admin1 and admin2, the Admin Role also contains the Member
rxserver. This Member is used internally in CM System as part of the Aging process. DO NOT
REMOVE THIS MEMBER UNDER ANY CIRCUMSTANCES. If you remove this Member, Workflow
authentication will fail.
To replace the default users with new users:
1 Open the USERLOGIN table in the database.
2 Add a new user to each role with the same permissions as the default users, but give the new
users different names (such as ‘anthonyadmin’ and ‘dianedesigner’) and passwords.
3 After creating a new user for each role, delete the default users from your database.

60 Installing CM System
Rhythmyx Workbench Options
The Rhythmyx Workbench runs on the Eclipse platform. When the Workbench is installed (whether as part of a complete suite installation or with the other Developer Tools), it runs as a stand-alone executable application. (Note: Like all Developer Tools, the Workbench can only be installed to Microsoft Windows. Installation of the Workbench to Solaris or Linux is not supported.)
The Rhythmyx Workbench can also be added as a plugin to an existing Eclipse installation. Your Eclipse
installation must meet the following criteria:
Only Eclipse Version 3.0 and 3.1 are supported.
You must have the Web Standard Tools (WST) plugin installed. Download the Web Standard
Tools plugin from http://download.eclipse.org/webtools/downloads/
(http://download.eclipse.org/webtools/downloads/). Use the version of WST appropriate to
your version of Eclipse.
The minimum supported JDK Version for CM System is version 1.5.
To add the Rhythmyx Workbench to Eclipse, unzip the following files to your Eclipse installation.
RhythmyxWorkbench.zip
RhythmyxWorkbenchHelp.zip
To access CM System, in Eclipse, open the Rhythmyx perspective. The Rhythmyx perspective will
prompt you to log in to the CM System server.
NOTE: If you see an error similar to the following:
java.lang.UnsupportedClassVersionError:
com/percussion/workbench/ui/PSWorkbenchPlugin (Unsupported major.minor
version 49.0)
your Eclipse installation is using JRE Version 1.4. Upgrade the JRE to Version 1.5.
When you upgrade CM System, update your CM System plugin by unzipping the upgraded versions of
RhyhthmyxWorkbench.zip and RhythmyxWorkbenchHelp.zip to your Eclipse installation.

Chapter 3 Additional Installation Issues 61
Technical Support
Contact Percussion Technical Support by phone or e-mail.
Boston
600 Unicorn Park Drive
Woburn, MA 01801 U.S.A.
8:30 AM to 6 PM EST, Monday - Friday
Phone: 781.438.9900
Toll Free: 800.283.0800
Fax: 781.438.9955
Email: [email protected]