codewarrior™ development tools - nxp...
TRANSCRIPT

CodeWarrior™ Development Tools
IDE 5.9 Windows® Automation Guide
Revised: June 25, 2008
Freescale™ and the Freescale logo are trademarks of Freescale Semiconductor, Inc. CodeWarrior is a trademark or reg-istered trademark of Freescale Semiconductor, Inc. in the United States and/or other countries. All other product or ser-vice names are the property of their respective owners.
Copyright © 2005–2008 by Freescale Semiconductor, Inc. All rights reserved.
Information in this document is provided solely to enable system and software implementers to use Freescale Semicon-ductor products. There are no express or implied copyright licenses granted hereunder to design or fabricate any inte-grated circuits or integrated circuits based on the information in this document.
Freescale Semiconductor reserves the right to make changes without further notice to any products herein. FreescaleSemiconductor makes no warranty, representation or guarantee regarding the suitability of its products for any partic-ular purpose, nor does Freescale Semiconductor assume any liability arising out of the application or use of any productor circuit, and specifically disclaims any and all liability, including without limitation consequential or incidental dam-ages. “Typical” parameters that may be provided in Freescale Semiconductor data sheets and/or specifications can anddo vary in different applications and actual performance may vary over time. All operating parameters, including “Typ-icals”, must be validated for each customer application by customer's technical experts. Freescale Semiconductor doesnot convey any license under its patent rights nor the rights of others. Freescale Semiconductor products are not de-signed, intended, or authorized for use as components in systems intended for surgical implant into the body, or otherapplications intended to support or sustain life, or for any other application in which the failure of the Freescale Semi-conductor product could create a situation where personal injury or death may occur. Should Buyer purchase or useFreescale Semiconductor products for any such unintended or unauthorized application, Buyer shall indemnify and holdFreescale Semiconductor and its officers, employees, subsidiaries, affiliates, and distributors harmless against allclaims, costs, damages, and expenses, and reasonable attorney fees arising out of, directly or indirectly, any claim ofpersonal injury or death associated with such unintended or unauthorized use, even if such claim alleges that FreescaleSemiconductor was negligent regarding the design or manufacture of the part.
How to Contact Us
Corporate Headquarters Freescale Semiconductor, Inc.
7700 West Parmer Lane
Austin, TX 78729
U.S.A.
World Wide Web http://www.freescale.com/codewarrior
Technical Support http://www.freescale.com/support
Table of Contents
1 Getting Started 7Overview of This Manual . . . . . . . . . . . . . . . . . . . . . . . . . . . . . . . . . . . . . . . . . . . 7
Related Documentation. . . . . . . . . . . . . . . . . . . . . . . . . . . . . . . . . . . . . . . . . . . . . 8
IDE Command-Line Tools . . . . . . . . . . . . . . . . . . . . . . . . . . . . . . . . . . . . . . . 8
Tcl Scripting . . . . . . . . . . . . . . . . . . . . . . . . . . . . . . . . . . . . . . . . . . . . . . . . . . 8
Perl Scripting. . . . . . . . . . . . . . . . . . . . . . . . . . . . . . . . . . . . . . . . . . . . . . . . . . 8
VBScript Scripting . . . . . . . . . . . . . . . . . . . . . . . . . . . . . . . . . . . . . . . . . . . . . 9
Microsoft COM Automation. . . . . . . . . . . . . . . . . . . . . . . . . . . . . . . . . . . . . . 9
2 IDE Batch-Mode Processing 11Overview. . . . . . . . . . . . . . . . . . . . . . . . . . . . . . . . . . . . . . . . . . . . . . . . . . . . . . . 11
Running the IDE Command-Line Tool. . . . . . . . . . . . . . . . . . . . . . . . . . . . . . . . 11
IDE Command-Line Tool Reference . . . . . . . . . . . . . . . . . . . . . . . . . . . . . . . . . 12
Startup Operations. . . . . . . . . . . . . . . . . . . . . . . . . . . . . . . . . . . . . . . . . . . . . 12
Build Operations . . . . . . . . . . . . . . . . . . . . . . . . . . . . . . . . . . . . . . . . . . . . . . 13
Script Operation . . . . . . . . . . . . . . . . . . . . . . . . . . . . . . . . . . . . . . . . . . . . . . 14
Extended Commands. . . . . . . . . . . . . . . . . . . . . . . . . . . . . . . . . . . . . . . . . . . 14
Help Function . . . . . . . . . . . . . . . . . . . . . . . . . . . . . . . . . . . . . . . . . . . . . . . . 14
3 Command Window Scripting 15Migrating from TCLD 2.0 to Command Window 3.0 . . . . . . . . . . . . . . . . . . . . 16
Migrating from Command Window 3.0 to 3.1 . . . . . . . . . . . . . . . . . . . . . . . . . . 16
Command Window Interface . . . . . . . . . . . . . . . . . . . . . . . . . . . . . . . . . . . . . . . 17
Running Tcl Scripts . . . . . . . . . . . . . . . . . . . . . . . . . . . . . . . . . . . . . . . . . . . . . . 19
Tcl Built-in Commands . . . . . . . . . . . . . . . . . . . . . . . . . . . . . . . . . . . . . . . . . . . 20
CodeWarrior Commands . . . . . . . . . . . . . . . . . . . . . . . . . . . . . . . . . . . . . . . . . . 20
about . . . . . . . . . . . . . . . . . . . . . . . . . . . . . . . . . . . . . . . . . . . . . . . . . . . . . . . 20
alias . . . . . . . . . . . . . . . . . . . . . . . . . . . . . . . . . . . . . . . . . . . . . . . . . . . . . . . . 21
attach . . . . . . . . . . . . . . . . . . . . . . . . . . . . . . . . . . . . . . . . . . . . . . . . . . . . . . . 21
bp. . . . . . . . . . . . . . . . . . . . . . . . . . . . . . . . . . . . . . . . . . . . . . . . . . . . . . . . . . 22
cd . . . . . . . . . . . . . . . . . . . . . . . . . . . . . . . . . . . . . . . . . . . . . . . . . . . . . . . . . . 23
change . . . . . . . . . . . . . . . . . . . . . . . . . . . . . . . . . . . . . . . . . . . . . . . . . . . . . . 24
3IDE 5.9 Windows Automation Guide

Table of Contents
cls. . . . . . . . . . . . . . . . . . . . . . . . . . . . . . . . . . . . . . . . . . . . . . . . . . . . . . . . . .29
cmdregistry . . . . . . . . . . . . . . . . . . . . . . . . . . . . . . . . . . . . . . . . . . . . . . . . . .30
config . . . . . . . . . . . . . . . . . . . . . . . . . . . . . . . . . . . . . . . . . . . . . . . . . . . . . . .30
connect. . . . . . . . . . . . . . . . . . . . . . . . . . . . . . . . . . . . . . . . . . . . . . . . . . . . . .37
copy . . . . . . . . . . . . . . . . . . . . . . . . . . . . . . . . . . . . . . . . . . . . . . . . . . . . . . . .37
debug . . . . . . . . . . . . . . . . . . . . . . . . . . . . . . . . . . . . . . . . . . . . . . . . . . . . . . .38
dir. . . . . . . . . . . . . . . . . . . . . . . . . . . . . . . . . . . . . . . . . . . . . . . . . . . . . . . . . .39
disassemble . . . . . . . . . . . . . . . . . . . . . . . . . . . . . . . . . . . . . . . . . . . . . . . . . .39
display . . . . . . . . . . . . . . . . . . . . . . . . . . . . . . . . . . . . . . . . . . . . . . . . . . . . . .41
ep::pause . . . . . . . . . . . . . . . . . . . . . . . . . . . . . . . . . . . . . . . . . . . . . . . . . . . .46
ep::script . . . . . . . . . . . . . . . . . . . . . . . . . . . . . . . . . . . . . . . . . . . . . . . . . . . .48
evaluate . . . . . . . . . . . . . . . . . . . . . . . . . . . . . . . . . . . . . . . . . . . . . . . . . . . . .49
exit . . . . . . . . . . . . . . . . . . . . . . . . . . . . . . . . . . . . . . . . . . . . . . . . . . . . . . . . .50
finish . . . . . . . . . . . . . . . . . . . . . . . . . . . . . . . . . . . . . . . . . . . . . . . . . . . . . . .51
getpid . . . . . . . . . . . . . . . . . . . . . . . . . . . . . . . . . . . . . . . . . . . . . . . . . . . . . . .51
go . . . . . . . . . . . . . . . . . . . . . . . . . . . . . . . . . . . . . . . . . . . . . . . . . . . . . . . . . .51
help . . . . . . . . . . . . . . . . . . . . . . . . . . . . . . . . . . . . . . . . . . . . . . . . . . . . . . . .52
history . . . . . . . . . . . . . . . . . . . . . . . . . . . . . . . . . . . . . . . . . . . . . . . . . . . . . .52
kill . . . . . . . . . . . . . . . . . . . . . . . . . . . . . . . . . . . . . . . . . . . . . . . . . . . . . . . . .53
log . . . . . . . . . . . . . . . . . . . . . . . . . . . . . . . . . . . . . . . . . . . . . . . . . . . . . . . . .53
make. . . . . . . . . . . . . . . . . . . . . . . . . . . . . . . . . . . . . . . . . . . . . . . . . . . . . . . .53
mem . . . . . . . . . . . . . . . . . . . . . . . . . . . . . . . . . . . . . . . . . . . . . . . . . . . . . . . .54
next . . . . . . . . . . . . . . . . . . . . . . . . . . . . . . . . . . . . . . . . . . . . . . . . . . . . . . . .57
nexti . . . . . . . . . . . . . . . . . . . . . . . . . . . . . . . . . . . . . . . . . . . . . . . . . . . . . . . .57
project . . . . . . . . . . . . . . . . . . . . . . . . . . . . . . . . . . . . . . . . . . . . . . . . . . . . . .58
pwd . . . . . . . . . . . . . . . . . . . . . . . . . . . . . . . . . . . . . . . . . . . . . . . . . . . . . . . .58
quitIDE . . . . . . . . . . . . . . . . . . . . . . . . . . . . . . . . . . . . . . . . . . . . . . . . . . . . .59
radix . . . . . . . . . . . . . . . . . . . . . . . . . . . . . . . . . . . . . . . . . . . . . . . . . . . . . . . .59
reg . . . . . . . . . . . . . . . . . . . . . . . . . . . . . . . . . . . . . . . . . . . . . . . . . . . . . . . . .60
removeobj . . . . . . . . . . . . . . . . . . . . . . . . . . . . . . . . . . . . . . . . . . . . . . . . . . .62
reset . . . . . . . . . . . . . . . . . . . . . . . . . . . . . . . . . . . . . . . . . . . . . . . . . . . . . . . .62
restart . . . . . . . . . . . . . . . . . . . . . . . . . . . . . . . . . . . . . . . . . . . . . . . . . . . . . . .63
restore . . . . . . . . . . . . . . . . . . . . . . . . . . . . . . . . . . . . . . . . . . . . . . . . . . . . . .64
save . . . . . . . . . . . . . . . . . . . . . . . . . . . . . . . . . . . . . . . . . . . . . . . . . . . . . . . .64
setvisible . . . . . . . . . . . . . . . . . . . . . . . . . . . . . . . . . . . . . . . . . . . . . . . . . . . .65
4 IDE 5.9 Windows Automation Guide
Table of Contents
sourcedisplay. . . . . . . . . . . . . . . . . . . . . . . . . . . . . . . . . . . . . . . . . . . . . . . . . 66
stack. . . . . . . . . . . . . . . . . . . . . . . . . . . . . . . . . . . . . . . . . . . . . . . . . . . . . . . . 66
status . . . . . . . . . . . . . . . . . . . . . . . . . . . . . . . . . . . . . . . . . . . . . . . . . . . . . . . 67
step . . . . . . . . . . . . . . . . . . . . . . . . . . . . . . . . . . . . . . . . . . . . . . . . . . . . . . . . 67
stepi . . . . . . . . . . . . . . . . . . . . . . . . . . . . . . . . . . . . . . . . . . . . . . . . . . . . . . . . 68
stop . . . . . . . . . . . . . . . . . . . . . . . . . . . . . . . . . . . . . . . . . . . . . . . . . . . . . . . . 69
switchtarget . . . . . . . . . . . . . . . . . . . . . . . . . . . . . . . . . . . . . . . . . . . . . . . . . . 69
system . . . . . . . . . . . . . . . . . . . . . . . . . . . . . . . . . . . . . . . . . . . . . . . . . . . . . . 69
var . . . . . . . . . . . . . . . . . . . . . . . . . . . . . . . . . . . . . . . . . . . . . . . . . . . . . . . . . 70
wait . . . . . . . . . . . . . . . . . . . . . . . . . . . . . . . . . . . . . . . . . . . . . . . . . . . . . . . . 71
watchpoint . . . . . . . . . . . . . . . . . . . . . . . . . . . . . . . . . . . . . . . . . . . . . . . . . . . 71
window . . . . . . . . . . . . . . . . . . . . . . . . . . . . . . . . . . . . . . . . . . . . . . . . . . . . . 72
4 Microsoft COM Automation 73Viewing OLE/COM Objects. . . . . . . . . . . . . . . . . . . . . . . . . . . . . . . . . . . . . . . . 73
Creating a CodeWarrior Instance . . . . . . . . . . . . . . . . . . . . . . . . . . . . . . . . . . . . 77
Managing Files in Projects . . . . . . . . . . . . . . . . . . . . . . . . . . . . . . . . . . . . . . . . . 78
Manipulating Projects . . . . . . . . . . . . . . . . . . . . . . . . . . . . . . . . . . . . . . . . . . . . . 80
Removing Object Code From Projects . . . . . . . . . . . . . . . . . . . . . . . . . . . . . 80
RemoveObjectCode. . . . . . . . . . . . . . . . . . . . . . . . . . . . . . . . . . . . . . . . . . . . 81
RemoveObjectCodeWithOptions . . . . . . . . . . . . . . . . . . . . . . . . . . . . . . . . . 81
Building Projects . . . . . . . . . . . . . . . . . . . . . . . . . . . . . . . . . . . . . . . . . . . . . . 82
Build . . . . . . . . . . . . . . . . . . . . . . . . . . . . . . . . . . . . . . . . . . . . . . . . . . . . . . . 82
BuildWithOptions . . . . . . . . . . . . . . . . . . . . . . . . . . . . . . . . . . . . . . . . . . . . . 83
BuildAndWaitToComplete . . . . . . . . . . . . . . . . . . . . . . . . . . . . . . . . . . . . . . 84
BuildAndWaitToCompleteWithOptions . . . . . . . . . . . . . . . . . . . . . . . . . . . . 86
A Combined Example . . . . . . . . . . . . . . . . . . . . . . . . . . . . . . . . . . . . . . . . . . 88
Compiling Projects . . . . . . . . . . . . . . . . . . . . . . . . . . . . . . . . . . . . . . . . . . . . . . . 90
Compiling From Projects . . . . . . . . . . . . . . . . . . . . . . . . . . . . . . . . . . . . . . . 90
Compiling From Build Targets . . . . . . . . . . . . . . . . . . . . . . . . . . . . . . . . . . . 92
CompileFiles . . . . . . . . . . . . . . . . . . . . . . . . . . . . . . . . . . . . . . . . . . . . . . . . . 92
CompileFilesAndWaitToComplete . . . . . . . . . . . . . . . . . . . . . . . . . . . . . . . . 93
CompileFilesWithChoice . . . . . . . . . . . . . . . . . . . . . . . . . . . . . . . . . . . . . . . 95
Linking Projects . . . . . . . . . . . . . . . . . . . . . . . . . . . . . . . . . . . . . . . . . . . . . . . . . 97
GetLinkerName. . . . . . . . . . . . . . . . . . . . . . . . . . . . . . . . . . . . . . . . . . . . . . . 97
5IDE 5.9 Windows Automation Guide

Table of Contents
Linking Against Sub-Targets . . . . . . . . . . . . . . . . . . . . . . . . . . . . . . . . . . . . .98
LinkAgainstSubTarget . . . . . . . . . . . . . . . . . . . . . . . . . . . . . . . . . . . . . . . . . .98
Linking Against Sub-Projects . . . . . . . . . . . . . . . . . . . . . . . . . . . . . . . . . . . .99
LinkAgainstSubProjectTarget . . . . . . . . . . . . . . . . . . . . . . . . . . . . . . . . . . .100
Generating Debugger Output . . . . . . . . . . . . . . . . . . . . . . . . . . . . . . . . . . . . . .101
Debug. . . . . . . . . . . . . . . . . . . . . . . . . . . . . . . . . . . . . . . . . . . . . . . . . . . . . .101
Displaying IDE Messages . . . . . . . . . . . . . . . . . . . . . . . . . . . . . . . . . . . . . . . . .104
Using Version Control System . . . . . . . . . . . . . . . . . . . . . . . . . . . . . . . . . . . . .105
VersionControl. . . . . . . . . . . . . . . . . . . . . . . . . . . . . . . . . . . . . . . . . . . . . . .105
Index 109
6 IDE 5.9 Windows Automation Guide

1Getting Started
This manual describes how to use external applications and scripting environments to automate the CodeWarrior™ IDE to perform certain tasks, such as manipulating CodeWarrior projects, building targets, compiling and linking project files, debugging projects, displaying IDE messages, and using version control features in the IDE.
This chapter has these sections:
• Overview of This Manual
• Related Documentation
Overview of This ManualThis manual contains information specific to CodeWarrior IDE automation on a Windows host. For unix, refer to the IDE Unix Automation Guide. Table 1.1 describes the information contained in each chapter in this manual.
Table 1.1 Contents of chapters
Chapter Description
Getting Started describes changes in TCLD 2.0 command window commands to Command Window 3.0 commands, and related documentation
IDE Batch-Mode Processing describes use of the CodeWarrior IDE command-line executable program, and provides a reference to command-line switches
7IDE 5.9 Windows Automation Guide
Getting StartedRelated Documentation
Related DocumentationThis section describes the supplementary CodeWarrior documentation, third-party documentation, and references to helpful code examples and web sites.
IDE Command-Line ToolsThis manual only describes one of many components of the CodeWarrior command-line tool set. For information about other CodeWarrior command-line tools, refer to the Build Tools Reference manual and the CodeWarrior IDE User’s Guide.
Tcl ScriptingFor in-depth information about the Tcl scripting language, refer to the Tcl8.3/Tk8.3 Manual in the CodeWarrior help system or the Tcl web site:
http://www.tcl.tk
NOTE Command hints and short command forms are not available for built-in Tcl commands.
Perl ScriptingFor in-depth information about the Perl scripting language, refer the Perl web site:
http://www.perl.org
You can find the latest version of Perl at:
Command Window Scripting describes how to control the CodeWarrior IDE using the Tcl scripting language, describes the CodeWarrior Command Window, and provides a reference of Command Window options
Microsoft COM Automation describes how to use Component Object Model (COM) objects that the IDE exposes and the methods you can call to work with those objects using the OLE/COM Object Viewer
Table 1.1 Contents of chapters (continued)
Chapter Description
8 IDE 5.9 Windows Automation Guide

Getting StartedRelated Documentation
http://www.cpan.org/src
VBScript ScriptingFor in-depth information about the VBScript scripting language, refer this URL:
http://msdn.microsoft.com/en-us/library/t0aew7h6(VS.85).aspx
Microsoft COM AutomationTo control the IDE, your Perl/VBScript scripts must manipulate the IDE’s COM objects. To get a copy of Microsoft’s OLE/COM Object Viewer, download and install oleview_setup.exe, which is a part of the Windows Resource Kit Tool, from the Microsoft web site.
NOTE To open OLE/COM Object Viewer after installing it, double-click oleview.exe in c:\Program Files\Resource Kit
Also, to manipulate COM objects through Perl, you need the Win32::OLE module. You might also want to use the other WIN32::OLE modules (such as Win32::OLE::Enum). You can get these modules at:
http://www.cpan.org/
9IDE 5.9 Windows Automation Guide

Getting StartedRelated Documentation
10 IDE 5.9 Windows Automation Guide

2IDE Batch-Mode Processing
This chapter describes how to control the CodeWarrior™ IDE with the command-line executable program.
This chapter has these sections:
• Overview
• Running the IDE Command-Line Tool
• IDE Command-Line Tool Reference
OverviewThe CodeWarrior IDE provides command-line access to different components of the IDE. You access the components by executing command-line tools. This chapter focuses specifically on the CodeWarrior IDE command-line tool.
The CodeWarrior IDE command-line tool allows you to instruct the IDE to manipulate and build projects, compare source files, run Tcl scripts, and obtain the version of the IDE. The IDE command-line tool for the Windows host is an executable program named cmdIDE.exe, and is located in the directory where you install the CodeWarrior development tools.
NOTE Command-line compiler, linker, and debugger tools may be available on your particular platform. Refer to the Build Tools Reference manual for information about other command-line tools available on your platform.
You interact with command-line tools through a text-based console or terminal rather than a graphical user interface. You can also specify command-line tool options (also called switches) on the command line.
Running the IDE Command-Line ToolThe IDE command-line tool performs operations on files you specify on the command line. If the tool successfully finishes its operation, a new prompt appears on the command line. Otherwise, it reports any problems as text messages on the command line before a new prompt appears.
11IDE 5.9 Windows Automation Guide

IDE Batch-Mode ProcessingIDE Command-Line Tool Reference
You can also write scripts that automate the process to build your software. Scripts contain a list of commands and command-line tools to invoke, one after another.
For example, the make tool, a common software development tool, uses scripts to manage dependencies among source code files and invoke command-line compilers, assemblers, and linkers as needed, much like the CodeWarrior project manager.
IDE Command-Line Tool ReferenceThis section lists the various operations and switches you can use to have the IDE perform certain tasks.
The syntax for invoking the IDE command-line tool on Windows is:
cmdIDE [[files...] [function [options...] ...]]
The files parameter is a list of zero or more files on which the IDE should operate. The IDE processes files in the order you specify them on the command line. If you specify one or more CodeWarrior project files, the first project file on the command line is the CodeWarrior default project.
The function parameter is the operation you want the IDE to perform. You may specify multiple functions in a single command line for the IDE to perform.
The options parameter is a list of zero or more command-line switches that tell the IDE how to perform the specified operation. If you use a switch that is inappropriate for an operation, the IDE ignores the switch and completes processing of all other switches.
The files, options, and switches you specify on the command line depends on the operation you want the IDE to perform. The rest of this section describes the various functions and corresponding switches the IDE understands.
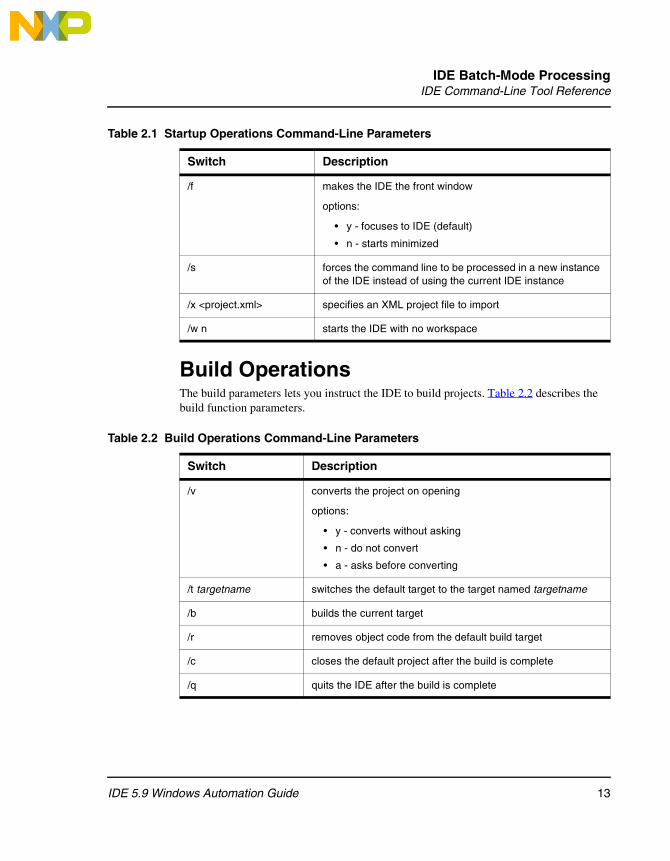
Startup OperationsThe startup operations lets you instruct the IDE to start the CodeWarrior IDE and run the specified script. Table 2.1 describes the parameters for the startup operations.
12 IDE 5.9 Windows Automation Guide
IDE Batch-Mode ProcessingIDE Command-Line Tool Reference
Build OperationsThe build parameters lets you instruct the IDE to build projects. Table 2.2 describes the build function parameters.
Table 2.1 Startup Operations Command-Line Parameters
Switch Description
/f makes the IDE the front window
options:
• y - focuses to IDE (default)
• n - starts minimized
/s forces the command line to be processed in a new instance of the IDE instead of using the current IDE instance
/x <project.xml> specifies an XML project file to import
/w n starts the IDE with no workspace
Table 2.2 Build Operations Command-Line Parameters
Switch Description
/v converts the project on opening
options:
• y - converts without asking
• n - do not convert
• a - asks before converting
/t targetname switches the default target to the target named targetname
/b builds the current target
/r removes object code from the default build target
/c closes the default project after the build is complete
/q quits the IDE after the build is complete
13IDE 5.9 Windows Automation Guide

IDE Batch-Mode ProcessingIDE Command-Line Tool Reference
Script OperationThe debug parameters lets you instruct the IDE to start the Command Window and run the specified script.
Syntax
cmdIDE /d scriptfile
Parameters
scriptfile
Supply the name or fully-qualified path to a Command Window script file (see “Command Window Scripting”).
Extended CommandsYou can use extended commands to add/ remove a source tree or turn on/off black-box recording. Table 2.3 describes the extended commands:
Help FunctionThe help function tells the IDE to print a summary of all command-line arguments to the terminal.
Syntax
cmdIDE /?
Table 2.3 Extended Commands
Command Description
/addabsolute | /addenv | /addregkey <name> <source>
adds source tree entry
parameters:
• name: specifies the source tree to be added
• source: specifes absolute path, environment variable or register key
/removetree <name> removes the source tree entry named name
/bbrecon|/bbrecoff turns on/off black-box recording (on by default). Provides additional information in crash dumps
14 IDE 5.9 Windows Automation Guide

3Command Window Scripting
You can control IDE functions with Tcl commands and Tcl-based CodeWarrior commands.
You can run these commands in one of three ways:
• directly through the IDE Command Window
• from a script file that you invoke with the “source” command in the Command Window
• or from a script file that you specify as an IDE command-line parameter (as shown in the section “Syntax”).
This chapter has these sections:
• Migrating from TCLD 2.0 to Command Window 3.0
• Migrating from Command Window 3.0 to 3.1
• Command Window Interface
• Running Tcl Scripts
• Tcl Built-in Commands
• CodeWarrior Commands
15IDE 5.9 Windows Automation Guide

Command Window ScriptingMigrating from TCLD 2.0 to Command Window 3.0
Migrating from TCLD 2.0 to Command Window 3.0
Migrating from Command Window 3.0 to 3.1The IDE Command Window 3.1 has the following improvements as compared to 3.0:
• improved Multi-Core
• maintains its own thread context, instead of relying on which thread window had focus last
• new option config AutoThreadSwitch allows you to select an automatic thread switch behavior, including no switch
• improved Command Synchronization
• improved the synchronization of commands like debug, restart, make, step, and go
• new option config runControlSync command to specify different synchronization behaviors
• new option config DebugTimeout to help with fine-tuning synchronization problems
• improved memory, register, and variable Access
Table 3.1 Command Window 3.0 Commands
Command Comment
run The run command is no longer supported. Instead, use the Tcl built-in command source.
load This command has been replaced by:
project -open for loading a project
use restore for loading target memory from a file created by the save command.
close This command has been replaced by project -close.
break This command has been replaced by the command bp.
input, output These StarCore® commands have been removed.
16 IDE 5.9 Windows Automation Guide

Command Window ScriptingCommand Window Interface
• improved memory space handling
• does not require a defined memory space if only one exists
• ability to query list of available memory spaces
• new option config MemIdentifier sets the default memory space
• improved formatting
• ability to specify data conversion, like %x to display in hex and %u to display unsigned decimal
• ability to swap data
• ability to insert colons for better readability, for example, 0x0000:00f0:0000:0000 instead of 0x000000f000000000
• ability to pad data with leading 0's, if desired
• for memory, ability to control the display width and the hardware access size independently
• for memory, displays both hex and ascii, same as the Memory window
• new option MemSwap command to specify default memory swapping behavior
• new options config MemWidth and config MemAccess commands to specify the default memory display width and access width
• ability to view register details information
• ability to view variables with the display command
• new commands reg, mem, and var duplicating the syntax and functionality of display and change but without the potential for ambiguity
• new commands attach and connect
• new namespace capability
• Command Window commands are now all in the namespace 'cmdwin', which is imported into the global namespace by default
• scroll bar added to window
Command Window InterfaceThe Command Window (Figure 3.1) is a window in the CodeWarrior IDE that lets you interactively execute Tcl commands.
To access this window in the Windows-hosted IDE, select View > Command Window from the menu bar. To access this window in the IDE hosted by Linux® or Solaris™, select Window > Command Window from the menu bar.
17IDE 5.9 Windows Automation Guide

Command Window ScriptingCommand Window Interface
Figure 3.1 The Command Window
Table 3.2 describes each of the three parts of the Command Window.
To browse through all available command hints, press the space bar at an empty command prompt. The highlighted characters represent the short form of the command.
Command hints and short command forms are not available for built-in Tcl commands. Documentation for these commands is located in the Tcl8.3/Tk8.3 Manual in the CodeWarrior Help System, and at the Tcl web site:
http://www.tcl.tk
Issuing Commands
To issue a Tcl command, type the command at the command prompt (%>). For CodeWarrior commands, you may type either the normal or the short form of the command. If you specify a short-form command, pressing space or tab will auto-complete it.
Table 3.2 Command Window Parts
Part Description
Text area displays the command prompt, %>, and the text output of commands
Status line displays the status of the last executed command
Help line displays command hints for the CodeWarrior commands
18 IDE 5.9 Windows Automation Guide

Command Window ScriptingRunning Tcl Scripts
History Functions
To repeat the last command entered, press Enter on your keyboard. To browse through the command history, press the up arrow or down arrow keys.
Scroll Functions
To scroll the text area of the Command Window:
• Click the scroll bar arrows
• Press the page up or page down keys on your keyboard to scroll the text area by the number of lines set with the config command. The default value is the number of lines currently displayed. This value is updated when you resize the Command Window
• Press Control-up arrow or Control-down arrow on your keyboard to scroll the text window up or down by one line
• Press Control-left arrow or Control-right arrow on your keyboard to scroll the text window left or right by one character
Copy and Paste Functions
To copy portions of the text window to the clipboard, hold down the left mouse button and drag the selection box around the desired text. Press Enter on your keyboard or select Edit > Copy from the CodeWarrior menu bar.
To paste text from the clipboard into the text area of the Command Window, click the left mouse button or select Edit > Paste from the CodeWarrior menu bar.
Running Tcl ScriptsThe built-in Tcl command source lets you run a sequence of Tcl commands that you have placed into a text file.
The command-line IDE lets you specify a Tcl script as a parameter. This makes it possible to run Tcl scripts from the system command-line without first opening the IDE Command Window. See “Syntax” for more information.
Each time you open the Command Window, the IDE searches for a script file named tcld.tcl in the (%SystemRoot%) directory. If the IDE finds this script file, the IDE
19IDE 5.9 Windows Automation Guide
Command Window ScriptingTcl Built-in Commands
attempts to run it. Place commands into this script file that you want the IDE to run each time you open the Command Window or run a Tcl script.
TIP By convention, Tcl script files have the filename extension .tcl.
Tcl Built-in CommandsThe Tcl built-in commands are documented in the Tcl8.3/Tk8.3 Manual, located within the CodeWarrior Help System.
To display the version of your Tcl interpreter, type this command into the Command Window:
puts [info tclversion]
You can obtain additional information about Tcl here:
http://www.tcl.tk
CodeWarrior CommandsThere are numerous CodeWarrior commands that you may use within the Tcl scripts or in the Command Window. This section describes each of these commands.
NOTE Shortcut command syntax (if available) is listed first, followed by formal syntax.
Note that the backslashes in Windows pathnames work only for the Tcl built-in commands, such as cd, pwd, dir, and load. For other commands, Tcl processes each backslash as an escape character and performs a "backslash substitution", thus garbling the original pathname.
This backslash substitution can be avoided in one of three ways:
• Using forward slashes in place of backslashes, which is more portable to Unix as well
• Enclosing the pathname within the curly braces
• Using two backslashes
about
Displays version information about the command window.
20 IDE 5.9 Windows Automation Guide
Command Window ScriptingCodeWarrior Commands
alias
Creates, removes, or lists an alias for a command.
NOTE Aliased commands are not available from within scripts. To create a different command name or syntax, you can wrap an existing command with a Tcl proc.
alias [<alias> [<command>]]
Shortcut
al
Parameters
alias
Supply the name of the alias.
command
Supply the command.
Examples
To display all current aliases:
alias
To create an alias that issues the dir command when ls is typed:
alias ls dir
NOTE Note that <command> must be a single string. For more complex substitutions, please use the Tcl proc command.
To remove the alias ls:
alias ls
attach
Attaches to process on target hardware.
attach [project_file(*.mcp)]
21IDE 5.9 Windows Automation Guide

Command Window ScriptingCodeWarrior Commands
Shortcut
at
Parameters
project_file
Supply the name of a CodeWarrior project
Examples
To attach using settings of current target of default project:
attach
To attach using settings of current target of project.mcp:
attach project.mcp
bp
Sets, removes, or lists breakpoints.
bp
bp func_name|machine_addr
bp file_name line_number [column_number]
bp func_name|brkpt_num|all OFF|enable|disable
bp brkpt_num cond expr-elements...
Shortcut
b
Parameters
func_name|machine_addr
Supply the name or machine code address of the function on which you want to set the breakpoint.
file_name line_number [column_number]
Supply the name of the file, the line number, and (optionally) the column number where you want to set the breakpoint.
22 IDE 5.9 Windows Automation Guide
Command Window ScriptingCodeWarrior Commands
func_name|brkpt_num|all OFF|enable|disable
Supply the function name containing an existing breakpoint, the breakpoint number of an existing breakpoint, or all. Supply one of OFF, enable, or disable indicating the action you want to take on the breakpoint.
brkpt_num cond expr-elements
Supply the breakpoint number of an existing breakpoint, the condition to apply to the breakpoint, and the expressions you want to execute when the debugger encounters the condition.
Examples
To display all current breakpoints:
bp
To set a breakpoint at function fn():
bp fn
To set a breakpoint in file file.cpp at line 101, column 1:
bp file.cpp 101 1
To remove the breakpoint at function fn():
bp fn off
To set a breakpoint at memory address p:10343:
bp p:10343
To remove breakpoint number 4 (use break to look for the number):
bp #4 off
To disable breakpoint number 4:
bp #4 disable
To set the condition for breakpoint number 4 to trigger only if x == 3:
bp #4 cond x == 3
See also
radix
cd
Changes directory.
cd [path]
23IDE 5.9 Windows Automation Guide

Command Window ScriptingCodeWarrior Commands
Examples
To display the current working directory:
cd
To change the current working directory to drive C:
cd C:
To change the current working directory to D:/cw/0622/test:
cd D:/cw/0622/test
To change the current working directory to the parent of the current working directory:
cd ..
To use a wild card to change the current working directory to C:\Program Files:
cd C:/p*s
To change the current working directory to C:\notes\lib:
cd C:/n*/l*
To change the current working directory to C:\Acrobat3:
cd c:/*3
Comments
After you have entered a portion of a directory name, press Tab on the keyboard to complete the directory name automatically.
change
Changes memory, registers, or variable.
change <item> [<options>...]
Shortcut
c
Memory Syntax
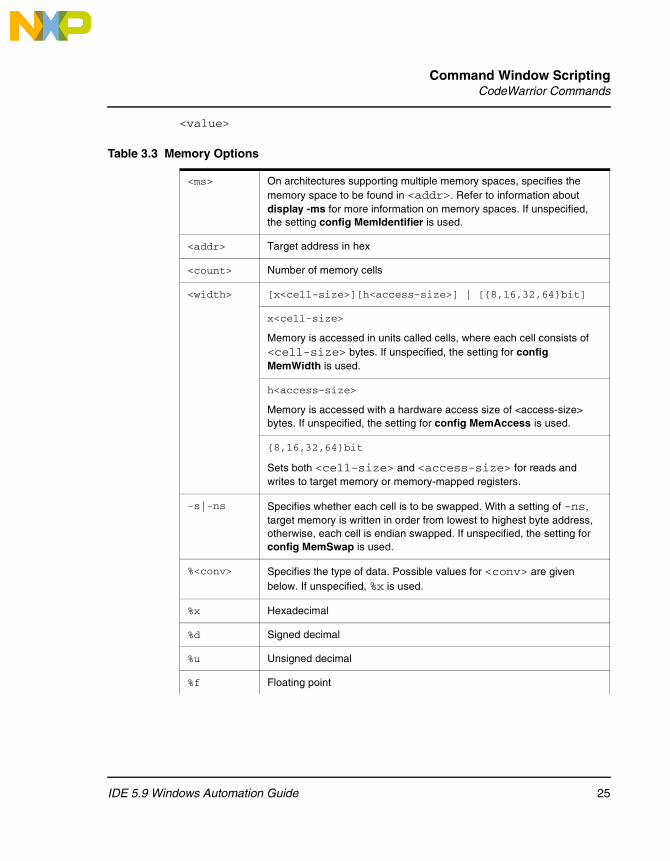
change [<ms>:]<addr> [<count>][<width>] [-s|-ns] [%<conv>]
24 IDE 5.9 Windows Automation Guide
Command Window ScriptingCodeWarrior Commands
<value>
Table 3.3 Memory Options
<ms> On architectures supporting multiple memory spaces, specifies the memory space to be found in <addr>. Refer to information about display -ms for more information on memory spaces. If unspecified, the setting config MemIdentifier is used.
<addr> Target address in hex
<count> Number of memory cells
<width> [x<cell-size>][h<access-size>] | [{8,16,32,64}bit]
x<cell-size>
Memory is accessed in units called cells, where each cell consists of <cell-size> bytes. If unspecified, the setting for config MemWidth is used.
h<access-size>
Memory is accessed with a hardware access size of <access-size> bytes. If unspecified, the setting for config MemAccess is used.
{8,16,32,64}bit
Sets both <cell-size> and <access-size> for reads and writes to target memory or memory-mapped registers.
-s|-ns Specifies whether each cell is to be swapped. With a setting of -ns, target memory is written in order from lowest to highest byte address, otherwise, each cell is endian swapped. If unspecified, the setting for config MemSwap is used.
%<conv> Specifies the type of data. Possible values for <conv> are given below. If unspecified, %x is used.
%x Hexadecimal
%d Signed decimal
%u Unsigned decimal
%f Floating point
25IDE 5.9 Windows Automation Guide

Command Window ScriptingCodeWarrior Commands
Other Memory Syntax
change [<ms>:]<a1>{..<a2>|#<n>} [<width>] [-{s|ns}] [%<conv>] <value>
Register Syntax
change [{r|nr}:]<reg> [<n>] [-s|-ns] [%<conv>] <value>
change [{r|nr}:]<reg>{..<reg>|#<n>} [-s|-ns] [%<conv>] <value>
%[E<n>]F Fractional
Normally fractional values occupy the range (-1,1), where all bits in the value are to the right of the decimal point. On some architectures, a certain number of high order bits are defined to be to the left of the decimal. The option E<n> may be used to indicate that the uppermost <n> bits are to the left of the decimal. For example, a 40-bit value with 8 bits to the left of the decimal would have a format of %E8F and a range of (-256,256).
%s Ascii
Table 3.4 Other Memory Options
<a1>{..<a2>|#<n>} Specifies a range of memory either by two endpoints, <a1> and <a2>, or by a startpoint and a count, <a1> and <n>. This alternate syntax is provided mainly for backwards compatibility. The new form of <addr> and <count> should be easier to use and thus preferred.
Table 3.3 Memory Options (continued)
26 IDE 5.9 Windows Automation Guide
Command Window ScriptingCodeWarrior Commands
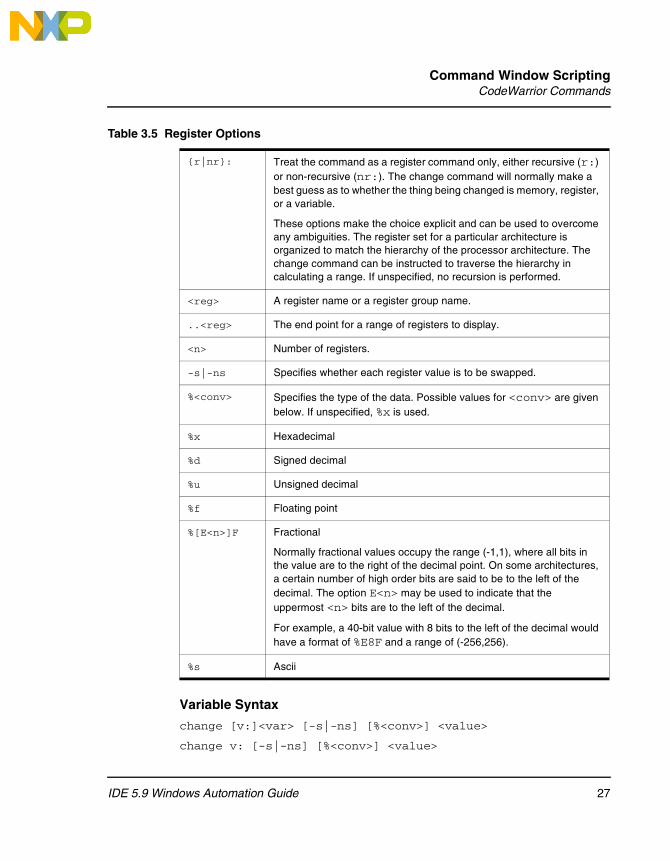
Variable Syntax
change [v:]<var> [-s|-ns] [%<conv>] <value>
change v: [-s|-ns] [%<conv>] <value>
Table 3.5 Register Options
{r|nr}: Treat the command as a register command only, either recursive (r:) or non-recursive (nr:). The change command will normally make a best guess as to whether the thing being changed is memory, register, or a variable.
These options make the choice explicit and can be used to overcome any ambiguities. The register set for a particular architecture is organized to match the hierarchy of the processor architecture. The change command can be instructed to traverse the hierarchy in calculating a range. If unspecified, no recursion is performed.
<reg> A register name or a register group name.
..<reg> The end point for a range of registers to display.
<n> Number of registers.
-s|-ns Specifies whether each register value is to be swapped.
%<conv> Specifies the type of the data. Possible values for <conv> are given below. If unspecified, %x is used.
%x Hexadecimal
%d Signed decimal
%u Unsigned decimal
%f Floating point
%[E<n>]F Fractional
Normally fractional values occupy the range (-1,1), where all bits in the value are to the right of the decimal point. On some architectures, a certain number of high order bits are said to be to the left of the decimal. The option E<n> may be used to indicate that the uppermost <n> bits are to the left of the decimal.
For example, a 40-bit value with 8 bits to the left of the decimal would have a format of %E8F and a range of (-256,256).
%s Ascii
27IDE 5.9 Windows Automation Guide

Command Window ScriptingCodeWarrior Commands
Other Variable Syntax
change v <var> [-s|-ns] [%<conv>] <value>
v This alternate syntax is provided mainly for backwards compatibility.
Memory Examples
All memory examples assume the following settings:
Table 3.6 Variable Options
v: Treat the command as a variable command only. The change command will normally make a best guess as to whether the thing being changed is memory, register, or a variable. This option makes the choice explicit and can be used to overcome any ambiguities. If this option appears with no <var> following it, then all variables pertinent to the current scope will be printed.
<var> Symbolic name of the variable to print. Can be a C expression as well.
-s|-ns Specifies whether the variable data is to be swapped.
%<conv> Specifies the type of data. Possible values for <conv> are given below. If unspecified, %x is used.
%x Hexadecimal
%d Signed decimal
%u Unsigned decimal
%f Floating point
%[E<n>]F Fractional
Normally fractional values occupy the range (-1,1), where all bits in the value are to the right of the decimal point. On some architectures, a certain number of high order bits are defined to be to the left of the decimal. The option E<n> may be used to indicate that the uppermost <n> bits are to the left of the decimal. For example, a 40-bit value with 8 bits to the left of the decimal would have a format of %E8F and a range of (-256,256).
%s Ascii
28 IDE 5.9 Windows Automation Guide

Command Window ScriptingCodeWarrior Commands
radix = hex
config MemIdentifier = 0
config MemWidth = 4
config MemAccess = 4
config MemSwap = no
To change memory range 0x10000-3 to 0x10 (because radix is hex):
change 10000 10
To change memory range 0x10000-3, memory space 1, to 0x20
change 1:10000 20
To change each of 16 cells in the memory range 0x10000-3f to 0x20
change 10000 16 20
To change each of 16, 1-byte cells to 0x31, using a hardware access size of 8-bytes per write.
change 10000 16x1h8 31
Change memory range 0x10000-3 to c8000000.
change 10000 -s %d 200
Register Examples
To change register R1 to 0x123
change R1 123
To change registers R1 through R5 to 0x5432
change R1..R5 5432
To change register R1 in the General Purpose Register group to 0x100
change “General Purpose Register/R1” 100
Variable Examples
To change the value of variable var to 16 (0x10).
change var 10
cls
Clears the screen.
cls
29IDE 5.9 Windows Automation Guide

Command Window ScriptingCodeWarrior Commands
Shortcut
cl
cmdregistry
Displays custom commands registered by all Command Definition Files.
cmdregistry [no options]
Shortcut
cmdr
Examples
To display custom commands registered by all Command Definition Files:
cmdregistry
config
Configures and displays Command Window settings.
config <option> [<sub-option>] <value>
config
config project | target [<target-name>]
Shortcut
conf
Table 3.7 Config Options
none With no options, config displays the current configuration settings.
onScriptError abort | continue
Controls whether the script will continue after an error. When set to continue, one subtlety is that a catch of a CodeWarrior command will never catch an error.
30 IDE 5.9 Windows Automation Guide

Command Window ScriptingCodeWarrior Commands
color {rmcsen} <red> <green> <blue> [<bg-red> <bg-green> <bg-blue>]
Selects the display color for text foreground and background. There are multiple text types, each with its own coloration, each selectable by choosing one of “rmcsen”. The default text color is specified with an n. Other text types are: register r, memory m, command c, script s, and error e. Colors are specified with a <red> <green> <blue> triple of 8-bit values.
scroll lineNum Sets the number of lines for page-up and page-down scrolling.
page on | off For commands that generate multiple pages of output, enables or disables the buffering of output.
hexPrefix <prefix> Sets the string to be used as the prefix for hex values.
binPrefix <prefix> Sets the string to be used as the prefix for binary values.
showCommas off | on When on, decimal data is displayed with commas inserted every three digits. Hex and binary data is displayed with a colon inserted every four digits.
hexPadding on | off When on, hex values are padded with leading zeroes.
decPadding off | on When on, decimal values are padded with leading zeroes.
memIdentifier <mem-space-id>
Sets the string to be used for the main memory space prefix.
memReadMax <max-bytes> Limits the amount of memory to be read in a single command. This prevents the Command Window from locking up on abnormally large memory read requests.
memCache off | on With memCache off, the Command Window will always read target memory. This setting is useful if your target memory may change while the target is paused. With memCache on, the Command Window will cache target memory reads while your target is paused. This setting will improve the performance of the Command Window.
Table 3.7 Config Options (continued)
31IDE 5.9 Windows Automation Guide

Command Window ScriptingCodeWarrior Commands
memSwap off | on When set, memory values are swapped on cell boundaries by default.
memWidth <bits> Specifies the default width for display of memory data.
memAccess <bits> Specifies the default hardware access size for target memory.
debugTimeout <seconds> The maximum amount of time to wait for a debug command to finish. You can also press ESC key to stop waiting.
runControlSync off | script-only | on
Sets how to synchronize run control commands. If set to “on”, then all run control commands will wait until a thread stopped event. If set to “off”, then all run control commands will return immediately. If set to “script-only”, then all run control commands will wait while running a script but will return immediately while running interactively.
autoThreadSwitch off | interactive-only | on
Allows the user to control whether the Command Window will perform automatic thread-switching. Possible settings are always on, always off, and on when running interactively, i.e. not from a script. If enabled, automatic thread switching is done in the following cases:1) If no thread is currently selected or if the current thread exits, then the first one detected will become the current.2) If the current thread is running and another thread stops, then the current thread will switch to the stopped thread.
variable <sub-option> [on | off]
Enables or disables certain fields in the output of the “evaluate” command. If neither on nor off are specified, then the field is enabled. Possible values for <sub-option> are:echo - the variable namelocation - the address of the variablesize - the size of the variable is bytestype - the variable type
Table 3.7 Config Options (continued)
32 IDE 5.9 Windows Automation Guide

Command Window ScriptingCodeWarrior Commands
Examples
To display the current config settings:
config
To display the current build target:
config target
To display the current project:
config project
To change the default build target to XXX:
config target XXX
To abort the script if a command fails (onScriptError):
config o abort
To set the error text color to red:
config c e $ff $0 $0
variable format <format> Controls the output format of the “evaluate” command. Possible values for <format> are:- | Defaultd | Signedu | Unsignedx | h | Hexc | Chars | CStringp | PascalStringf | Floate | Enumi | FixedFractb | BinaryBooleanSignedFixedo | w | Unicode
project Displays all open projects. See also the “project” command.
target [<default-target>] With no options, displays the default target. The value <default-target> may be used to set the default target.
Table 3.7 Config Options (continued)
33IDE 5.9 Windows Automation Guide
Command Window ScriptingCodeWarrior Commands
To set the register display color to black, background color to white:
config color r $0 $0 $0 $ff $ff $ff
NOTE Refer to Table 3.8 for a list of text color codes.
To set page-up, page-down scrolling size to hexadecimal 10 (decimal 16) lines:
config scroll $10
To display hexadecimal numbers with the prefix “0x”:
config hexprefix 0x
To show hexadecimal and binary numbers with a colon, as in $0000:0000, and show decimal numbers with a comma, as in 1,000,000.00:
config ShowCommas on
To show hex and binary numbers with leading zeroes, as in 0x0000:
config HexPadding off
To use “m” as the memory identifier:
config memidentifier m
To display expressions and variable names for the “evaluate” command:
config var echo on
To set default display format to decimal (see Table 3.9):
config var format d
To disable the display of types for expressions or variables:
config var types off
To display location information for variables:
config var location on
To display size information for variables:
config var size on
To limit memory commands to 2048 (decimal) bytes, preventing a large memory read command from tying up the IDE:
config MemReadMax 2048
CodeWarrior pre-fetches chunks of memory when memory caching is on. Turning memory caching off reduces performance but provides the user with better control for memory accesses. Note that this command only works in the Command Window. To turn off caching of target memory:
config MemCache off
34 IDE 5.9 Windows Automation Guide
Command Window ScriptingCodeWarrior Commands
To wait up to 10 seconds for debug command to finish:
config DebugTimeout 10
To run control commands that will wait for thread-stopped event:
config RunControlSync on
If commands are being entered interactively, i.e. not from a script, automatic thread switching will be performed. If no thread is currently selected or if the current thread exits, then the first one detected will become the current. If the current thread is running and another thread stops, then the current thread will switch to the stopped thread.
config AutoThreadSwitch interactive-only
To include the variable name in the output of the “evaluate” command:
config var echo on
To set the default display format of the “evaluate” command to decimal:
config var format d
The format may be one of the following strings or the corresponding character abbreviation:
Default(-), Signed(d), Unsigned(u), Hex(h|x), Char(c)
CString(s), PascalString(p), Float(f), Enum(e), Fixed(i)
Fract(no abbreviation), Binary(b), Boolean(no abbreviation), SignedFixed(no abbreviation)
Unicode(o|w)
To exclude the variable type name in the output of the “evaluate” command:
config var type off
To include the memory address in the output of the “evaluate” command:
config var location on
To include the variable size in the output of the “evaluate” command:
config var size on
To wrap line output that exceeds 80 characters in length:
config wordwrap 80
35IDE 5.9 Windows Automation Guide

Command Window ScriptingCodeWarrior Commands
Table 3.8 Codes for Text Color
Message Type Code
command c
errors e
memory m
normal n
register r
script s
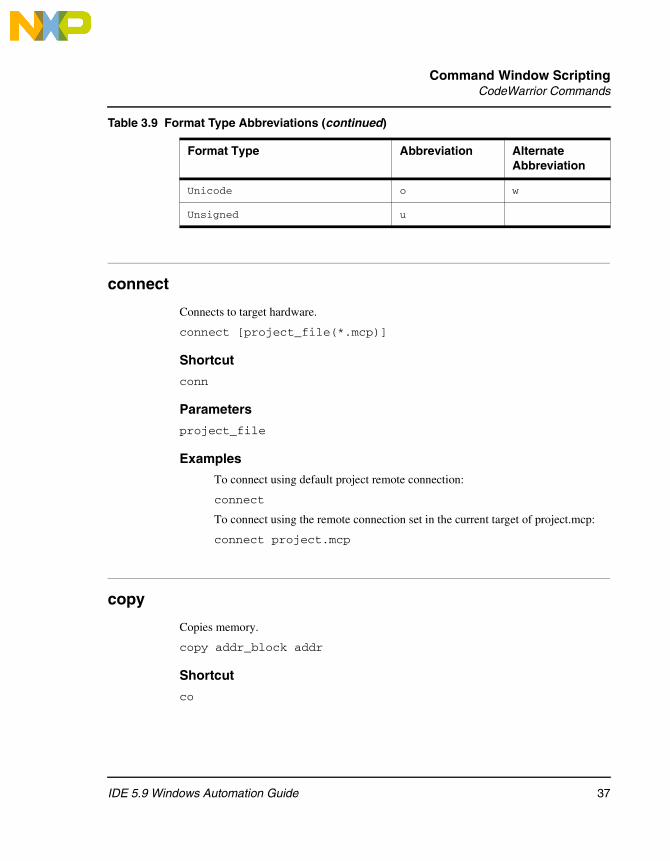
Table 3.9 Format Type Abbreviations
Format Type Abbreviation Alternate Abbreviation
Binary b
Boolean
Char c
CString s
Default -
Enum e
Fixed i
Float f
Fract
Hex h x
PascalString p
Signed d
SignedFixed
36 IDE 5.9 Windows Automation Guide
Command Window ScriptingCodeWarrior Commands
connect
Connects to target hardware.
connect [project_file(*.mcp)]
Shortcut
conn
Parameters
project_file
Examples
To connect using default project remote connection:
connect
To connect using the remote connection set in the current target of project.mcp:
connect project.mcp
copy
Copies memory.
copy addr_block addr
Shortcut
co
Unicode o w
Unsigned u
Table 3.9 Format Type Abbreviations (continued)
Format Type Abbreviation Alternate Abbreviation
37IDE 5.9 Windows Automation Guide

Command Window ScriptingCodeWarrior Commands
Examples
To copy memory addresses 00 through 1F to address 30:
copy p:00..1f p:30
To copy 10 memory locations beginning at memory address 20 to memory beginning at address 50:
copy p:20#10 p:50
See also
radix
debug
Starts a debugging session for a project.
debug [project_file(*.mcp) [number of projects]] | [executable_file(*.elf | *.eld)]
Shortcut
de
Examples
To debug the current default project:
debug
To open the project des.mcp and start debugging the default build target in it:
debug des.mcp
To start a debugging session for the project file named 8102.mcp with three sub-projects to debug, waiting until all four projects are open before starting the debug session:
debug 8102.mcp 4
Comments
Only use the [number of projects] parameter for 8102 projects.
38 IDE 5.9 Windows Automation Guide

Command Window ScriptingCodeWarrior Commands
dir
Lists the contents of a directory.
dir [path|files|-d]
Shortcut
dir
Examples
dir
dir *.txt
dir c:/tmp
disassemble
Disassembles instructions at the memory block.
disassemble
disassemble reset
disassemble pc|<ms>:<addr> [<count>]
Shortcut
di
Table 3.10 Options
[none] With no options, the next block of instructions is displayed. After a target stop event, the next block starts at the PC.
<ms> On architectures supporting multiple memory spaces, specifies the memory space in which <addr> is to be found. If unspecified, the setting “config MemIdentifier” is used.
<addr> Target address in hex.
pc The current program counter.
39IDE 5.9 Windows Automation Guide

Command Window ScriptingCodeWarrior Commands
Other Syntax
disassemble <ms>:<a1>{..<a2>|#<n>}
<a1>{..<a2>|#<n>} Specifies a range of memory either by two endpoints, <a1> and <a2>, or by a startpoint and a count, <a1> and <n>. This alternate syntax is provided mainly for backwards compatibility. The new form of <addr> and <count> should be easier to use and thus preferred. The instruction count will be set to the number of disassembled instructions.
Examples
To display the next block of instructions:
disassemble
To reset the next block to the PC and the instruction count to one screenful:
disassemble reset
To display instructions starting at the PC:
disassemble pc
To display 4 instructions starting at the PC. Sets the instruction count to 4:
disassemble pc 4
To display instructions starting at program memory address 0x1000:
disassemble p:1000
To display 4 instructions starting at program memory address 1000. Sets the instruction count to 4:
disassemble p:1000 4
To display instructions from program memory address block 0 to 1f:
disassemble p:0..1f
To disassemble 16 bytes starting at program memory 0x50:
disassemble p:$50#10
<count> Number of instructions to be displayed.
reset Reset the next block to the PC and the instruction count to one screenful.
Table 3.10 Options (continued)
40 IDE 5.9 Windows Automation Guide
Command Window ScriptingCodeWarrior Commands
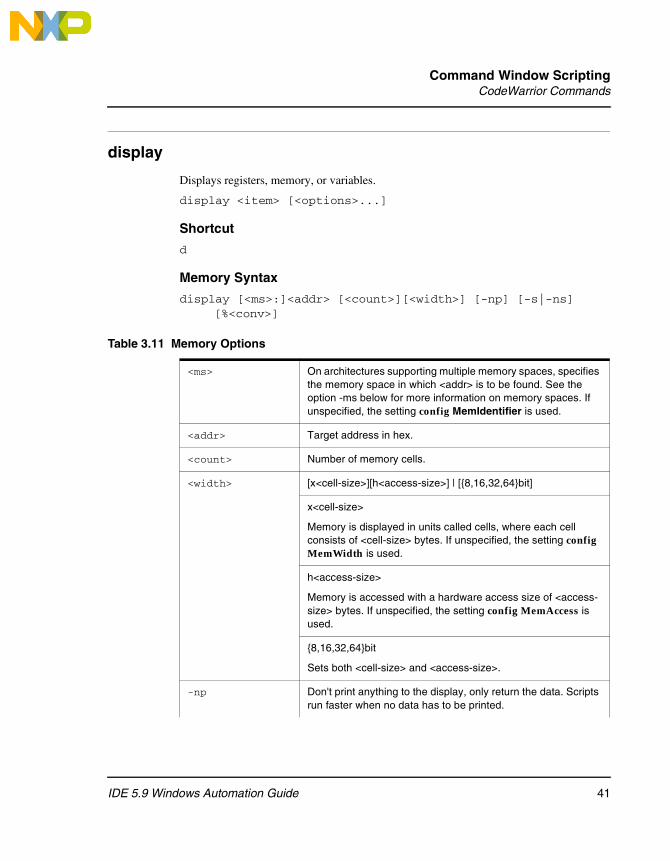
display
Displays registers, memory, or variables.
display <item> [<options>...]
Shortcut
d
Memory Syntax
display [<ms>:]<addr> [<count>][<width>] [-np] [-s|-ns] [%<conv>]
Table 3.11 Memory Options
<ms> On architectures supporting multiple memory spaces, specifies the memory space in which <addr> is to be found. See the option -ms below for more information on memory spaces. If unspecified, the setting config MemIdentifier is used.
<addr> Target address in hex.
<count> Number of memory cells.
<width> [x<cell-size>][h<access-size>] | [{8,16,32,64}bit]
x<cell-size>
Memory is displayed in units called cells, where each cell consists of <cell-size> bytes. If unspecified, the setting config MemWidth is used.
h<access-size>
Memory is accessed with a hardware access size of <access-size> bytes. If unspecified, the setting config MemAccess is used.
{8,16,32,64}bit
Sets both <cell-size> and <access-size>.
-np Don't print anything to the display, only return the data. Scripts run faster when no data has to be printed.
41IDE 5.9 Windows Automation Guide
Command Window ScriptingCodeWarrior Commands
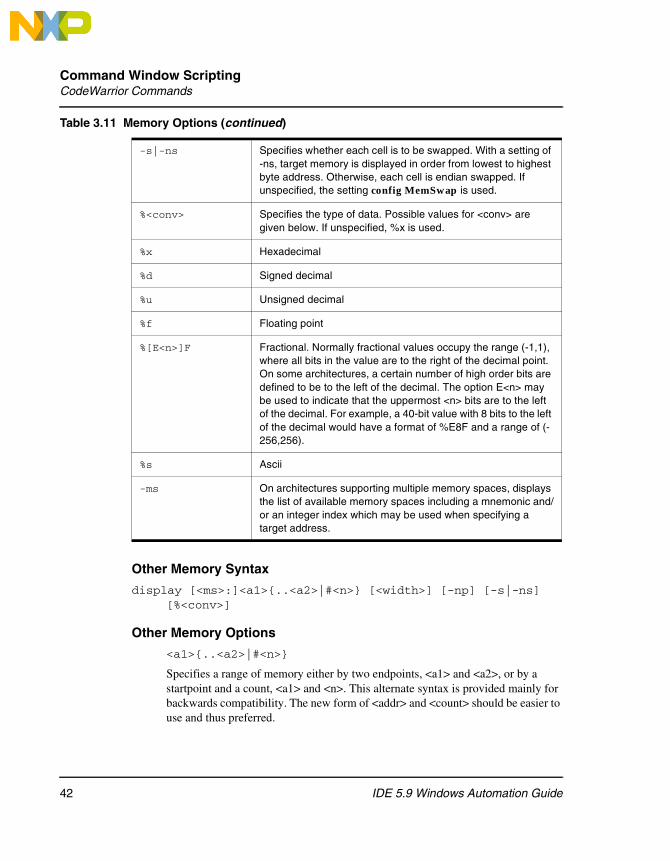
Other Memory Syntax
display [<ms>:]<a1>{..<a2>|#<n>} [<width>] [-np] [-s|-ns] [%<conv>]
Other Memory Options
<a1>{..<a2>|#<n>}
Specifies a range of memory either by two endpoints, <a1> and <a2>, or by a startpoint and a count, <a1> and <n>. This alternate syntax is provided mainly for backwards compatibility. The new form of <addr> and <count> should be easier to use and thus preferred.
-s|-ns Specifies whether each cell is to be swapped. With a setting of -ns, target memory is displayed in order from lowest to highest byte address. Otherwise, each cell is endian swapped. If unspecified, the setting config MemSwap is used.
%<conv> Specifies the type of data. Possible values for <conv> are given below. If unspecified, %x is used.
%x Hexadecimal
%d Signed decimal
%u Unsigned decimal
%f Floating point
%[E<n>]F Fractional. Normally fractional values occupy the range (-1,1), where all bits in the value are to the right of the decimal point. On some architectures, a certain number of high order bits are defined to be to the left of the decimal. The option E<n> may be used to indicate that the uppermost <n> bits are to the left of the decimal. For example, a 40-bit value with 8 bits to the left of the decimal would have a format of %E8F and a range of (-256,256).
%s Ascii
-ms On architectures supporting multiple memory spaces, displays the list of available memory spaces including a mnemonic and/or an integer index which may be used when specifying a target address.
Table 3.11 Memory Options (continued)
42 IDE 5.9 Windows Automation Guide

Command Window ScriptingCodeWarrior Commands
Register Syntax
display [{r|nr}:]<reg> [<n>] [-{d|nr|nv|np} ...] [-s|-ns] [%<conv>]
display [{r|nr}:]<reg>{..<reg>|#<n>} [-{d|nr|nv|np} ...] [-s|-ns] [%<conv>]
display all|r:|nr: [-{d|nr|nv|np} ...] [-s|-ns] [%<conv>]
display [-]regset
Table 3.12 Register Options
{r|nr}: Treat the command as a register command only, either recursive (r:) or non-recursive (nr:). The display command will normally make a best guess as to whether the thing being displayed is memory, register, or a variable. These options make the choice explicit and can be used to overcome any ambiguities. The register set for a particular architecture is organized to match the hierarchy of the processor architecture. The display command can be instructed to traverse the hierarchy in calculating a range. If unspecified, no recursion is performed.
<reg> A register name or a register group name.
..<reg> The end point for a range of registers to display.
<n> Number of registers.
-d Print detailed data book information.
-nr Print only register groups, that is, no registers.
-nv Print only register group and register names, that is, no values.
-np Don't print anything to the display, only return the data. Scripts run faster when no data has to be printed.
-s|-ns Specifies whether each register value is to be swapped.
%<conv> Specifies the type of the data. Possible values for <conv> are given below. If unspecified, %x is used.
%x Hexadecimal
%d Signed decimal
%u Unsigned decimal
%f Floating point
43IDE 5.9 Windows Automation Guide

Command Window ScriptingCodeWarrior Commands
Variable Syntax
display [v:]<var> [-np] [-s|-ns] [%<conv>]
display v: [-np] [-s|-ns] [%<conv>]
%[E<n>]F Fractional
Normally fractional values occupy the range (-1,1), where all bits in the value are to the right of the decimal point. On some architectures, a certain number of high order bits are said to be to the left of the decimal. The option E<n> may be used to indicate that the uppermost <n> bits are to the left of the decimal. For example, a 40-bit value with 8 bits to the left of the decimal would have a format of %E8F and a range of (-256,256).
%s Ascii
regset Display the register group hierarchy.
Table 3.13 Variable Options
v: Treat the command as a variable command only. The display command will normally make a best guess as to whether the thing being displayed is memory, register, or a variable. This option makes the choice explicit and can be used to overcome any ambiguities. If this option appears with no <var> following it, then all variables pertinent to the current scope will be printed.
<var> Symbolic name of the variable to print. Can be a C expression as well.
-np Don't print anything to the display, only return the data. Scripts run faster when no data has to be printed.
-s|-ns Specifies whether the variable data is to be swapped.
%<conv> Specifies the type of data. Possible values for <conv> are given below. If unspecified, %x is used.
%x Hexadecimal
%d Signed decimal
%u Unsigned decimal
%f Floating point
Table 3.12 Register Options (continued)
44 IDE 5.9 Windows Automation Guide

Command Window ScriptingCodeWarrior Commands
Memory Examples
All memory examples assume the following settings:
radix = hex
config MemIdentifier = 0
config MemWidth = 4
config MemAccess = 4
config MemSwap = no
Display memory range 0x10000-3 as one cell.
display 10000
Display memory range 0x10000-3, memory space 1, as one cell.
display 1:10000
Display memory range 0x10000-3f as 16 cells.
display 10000 16
Display 16, 1-byte cells, with a hardware access size of 8-bytes per read.
display 10000 16x1h8
Display one byte, with a hardware access size of one byte.
display 10000 8bit
Return one cell, but don't print it to the Command Window.
display 10000 -np
Display one cell with the data endian-swapped.
display 10000 -s
Display one cell in decimal format.
display 10000 %d
%[E<n>]F Fractional
Normally fractional values occupy the range (-1,1), where all bits in the value are to the right of the decimal point. On some architectures, a certain number of high order bits are defined to be to the left of the decimal. The option E<n> may be used to indicate that the uppermost <n> bits are to the left of the decimal. For example, a 40-bit value with 8 bits to the left of the decimal would have a format of %E8F and a range of (-256,256).
%s Ascii
Table 3.13 Variable Options (continued)
45IDE 5.9 Windows Automation Guide
Command Window ScriptingCodeWarrior Commands
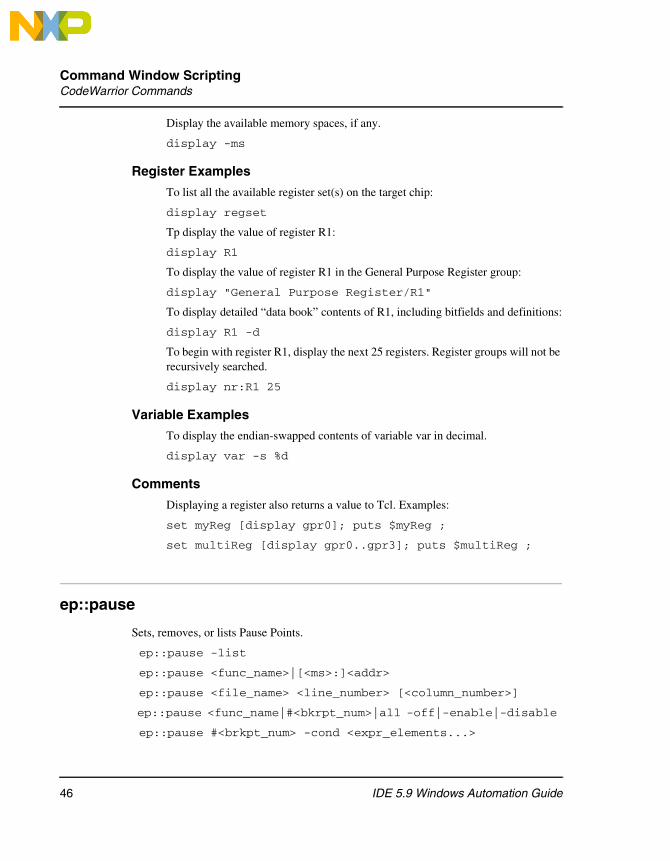
Display the available memory spaces, if any.
display -ms
Register Examples
To list all the available register set(s) on the target chip:
display regset
Tp display the value of register R1:
display R1
To display the value of register R1 in the General Purpose Register group:
display "General Purpose Register/R1"
To display detailed “data book” contents of R1, including bitfields and definitions:
display R1 -d
To begin with register R1, display the next 25 registers. Register groups will not be recursively searched.
display nr:R1 25
Variable Examples
To display the endian-swapped contents of variable var in decimal.
display var -s %d
Comments
Displaying a register also returns a value to Tcl. Examples:
set myReg [display gpr0]; puts $myReg ;
set multiReg [display gpr0..gpr3]; puts $multiReg ;
ep::pause
Sets, removes, or lists Pause Points.
ep::pause -list
ep::pause <func_name>|[<ms>:]<addr>
ep::pause <file_name> <line_number> [<column_number>]
ep::pause <func_name|#<bkrpt_num>|all -off|-enable|-disable
ep::pause #<brkpt_num> -cond <expr_elements...>
46 IDE 5.9 Windows Automation Guide

Command Window ScriptingCodeWarrior Commands
Shortcut
ep::pa
Parameters
<func_name>|[<ms>:]<addr
Supply the name or machine code address of the function on which you want to set the pause point
<file_name> <line_number> [<column_number>]
Supply the name of the file, the line number, and (optionally) the column number where you want to set the pause point
<func_name|#<bkrpt_num>|all -off|-enable|-disable
Supply the function name containing an existing pause point, the pause point number of an existing pause point, or all. Supply one of off, enable, or disable indicating the action you want to take on the pause point.
#<brkpt_num> -cond <expr_elements...>
Supply the pause point number of an existing pause point, the condition to apply to the pause point, and the expressions you want to execute when the debugger encounters the condition.
Examples
To displays all pause points:
ep::pause -list
To set a pause point in file.cpp at line 22:
ep::pause file.cpp 22
To set a pause point at function main execution:
ep::pause main
To clear pause point 4:
ep::pause #4 -off
To disable pause point on function main:
ep::pause main -disable
To set a condition on pause point #4:
ep::pause #4 -cond "x == 3"
47IDE 5.9 Windows Automation Guide
Command Window ScriptingCodeWarrior Commands
ep::script
Sets, removes, or lists Script Points.
ep::script -list
ep::script <func_name>|[<ms>:]<addr> -cmds "<commands>"|-file "<scriptfile>" [-stop|-go]
ep::script <file_name> <line_number> [<column_number>] -cmds "<commands>"|-file "<scriptfile>" [-stop|-go]
ep::script <func_name|#<bkrpt_num>|all -off|-enable|-disable
ep::script #<brkpt_num> -cond <expr_elements...>
Shortcut
ep::sc
Parameters
<func_name>|[<ms>:]<addr> -cmds "<commands>"|-file "<scriptfile>" [-stop|-go]
Supply the name or machine code address of the function on which you want to set the script point and the command or script file to be executed. Supply stop or go indicating whether to stop or continue the execution.
<file_name> <line_number> [<column_number>] -cmds "<commands>"|-file "<scriptfile>" [-stop|-go]
Supply the name of the file, the line number, and (optionally) the column number where you want to set the script point. Supply the command or script file to be executed and one of stop or go to indicate whether to stop or continue the execution.
<func_name|#<bkrpt_num>|all -off|-enable|-disable
Supply the function name containing an existing script point, the script point number of an existing script point, or all. Supply one of off, enable, or disable indicating the action you want to take on the script point.
#<brkpt_num> -cond <expr_elements...>
Supply the script point number of an existing script point, the condition to apply to the script point, and the expressions you want to execute when the debugger encounters the condition.
48 IDE 5.9 Windows Automation Guide

Command Window ScriptingCodeWarrior Commands
Examples
To display all script points:
ep::script -list
To set a script point in file.cpp at line 22 that will execute script file script.tcl and stop execution:
ep::script file.cpp 22 -file "script.tcl" -stop
To set a script point at function main that displays memory and continues execution:
ep::script main -cmds "display 0..ff" -go
To clear script point 4:
ep::script #4 -off
To disable script point on function main:
ep::script main -disable
To set a condition on script point #4:
ep::script #4 -cond "x == 3"
evaluate
Displays C variable type or value.
evaluate [#formatchar|#fullformatname] [variable_Name]
Shortcut
e
Examples
To list the types for all the variables in current and global stack:
evaluate
To return the value of variable 'i':
evaluate i
To return the value of variable 'i' formatted in binary (Table 3.14):
evaluate #b i
49IDE 5.9 Windows Automation Guide
Command Window ScriptingCodeWarrior Commands
exit
Closes the command line window.
exit
Shortcut
ex
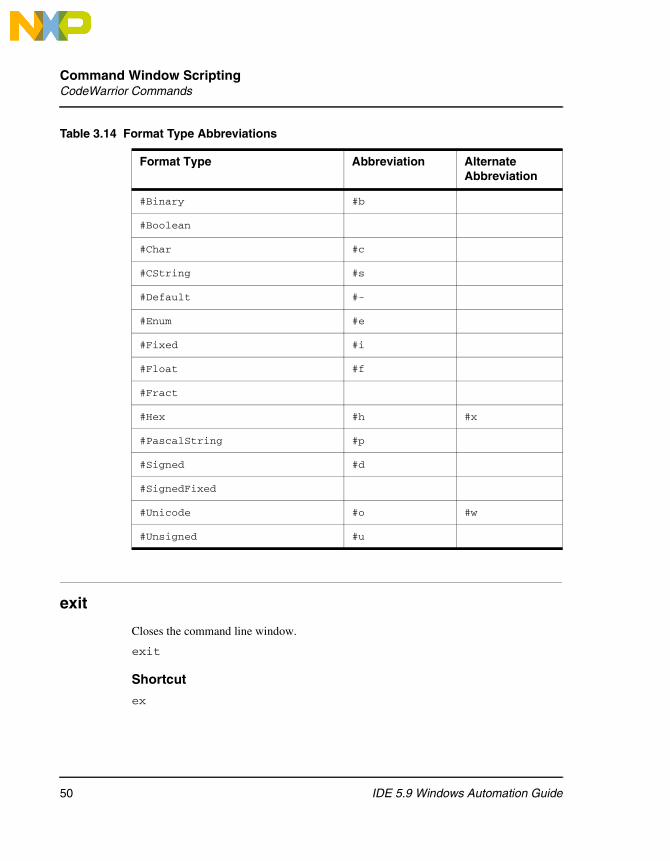
Table 3.14 Format Type Abbreviations
Format Type Abbreviation Alternate Abbreviation
#Binary #b
#Boolean
#Char #c
#CString #s
#Default #-
#Enum #e
#Fixed #i
#Float #f
#Fract
#Hex #h #x
#PascalString #p
#Signed #d
#SignedFixed
#Unicode #o #w
#Unsigned #u
50 IDE 5.9 Windows Automation Guide

Command Window ScriptingCodeWarrior Commands
finish
Executes until the current function returns.
finish
Shortcut
f
See also
step, next, stepi, nexti
getpid
Returns the process ID of the last stopped debug process.
getpid
Shortcut
ge
See Also
switchtarget
go
Start target program from the current instruction.
go [ALL | NOWAIT | time_period]
Shortcut
g
Comments
If run from the command window, go returns immediately.
If run from a script file, the Command Window polls for keyboard input until the target stops (for example, the target encounters a breakpoint). It will then run the
51IDE 5.9 Windows Automation Guide
Command Window ScriptingCodeWarrior Commands
next command. You may press the ESC key to stop the script if the target never stops and the Command Window continues to poll.
go 1
Stop polling the target if a breakpoint is not encountered within 1 second. The Tcl variable still_running is set to 1.
go nowait
If run from a script file, Tcld will execute the next script command without waiting for the target to stop.
help
Displays help for commands.
help [command] | [shortcut]
Shortcut
h
Examples
To list all the Command Window commands:
help
To display help on the command break:
help break
To display help on the command break:
help b
history
Lists the command history.
history
Shortcut
hi
52 IDE 5.9 Windows Automation Guide

Command Window ScriptingCodeWarrior Commands
kill
Closes the current debug session.
kill [all]
Shortcut
k
log
Logs commands or a session.
log [OFF] [C(commands)|S(session) filename ]
Shortcut
lo
Examples
To display currently opened log files:
log
To log all display entries to the file session1.log:
log s session.log
To log internal command contents to the file command.log:
log c command.log
To terminate command logging:
log off c
To terminate all logging:
log off
make
Builds the specified project or the default project if none is specified.
make [project file(*.mcp)]
53IDE 5.9 Windows Automation Guide
Command Window ScriptingCodeWarrior Commands
Shortcut
m
Examples
To build the default project:
make
To build the project test.mcp:
make test.mcp
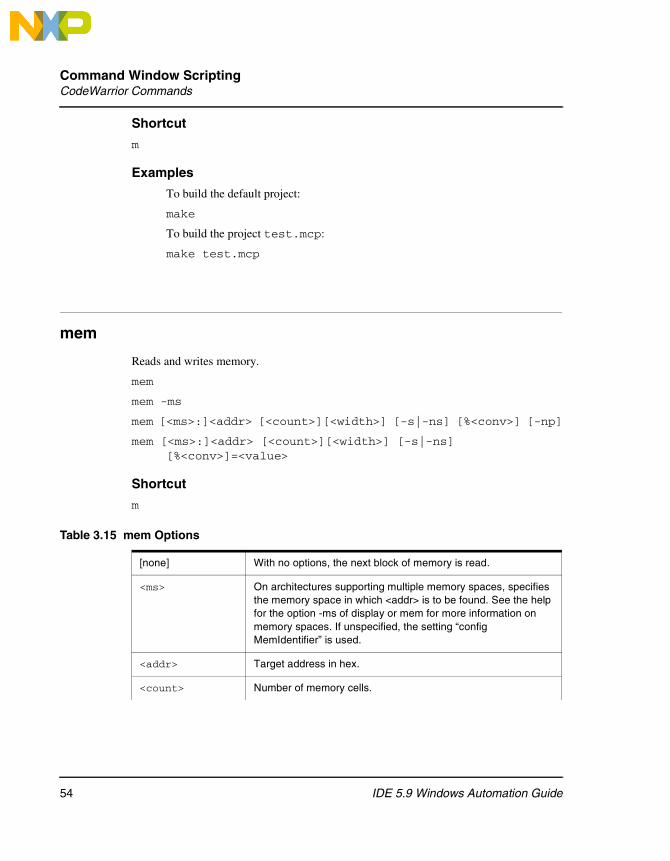
mem
Reads and writes memory.
mem
mem -ms
mem [<ms>:]<addr> [<count>][<width>] [-s|-ns] [%<conv>] [-np]
mem [<ms>:]<addr> [<count>][<width>] [-s|-ns] [%<conv>]=<value>
Shortcut
m
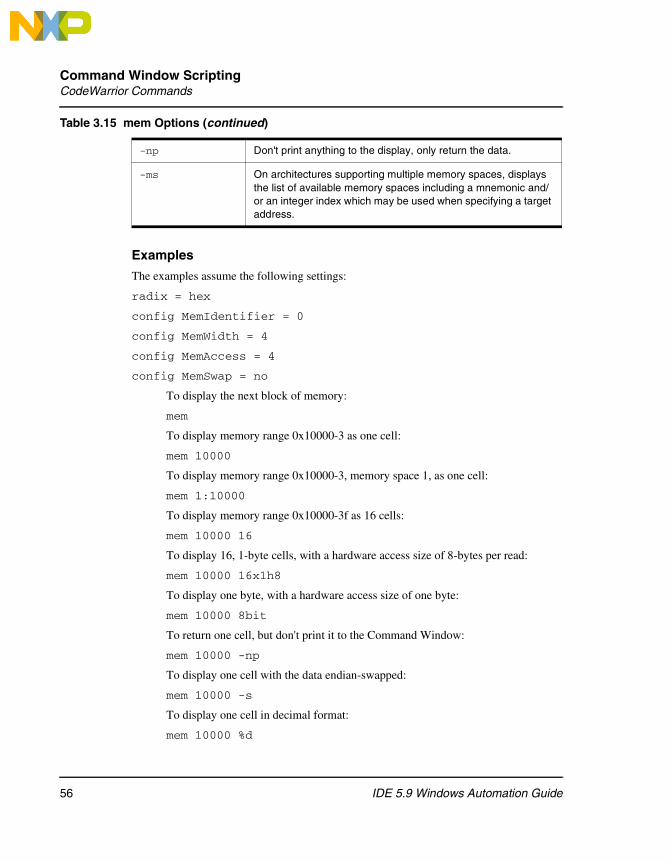
Table 3.15 mem Options
[none] With no options, the next block of memory is read.
<ms> On architectures supporting multiple memory spaces, specifies the memory space in which <addr> is to be found. See the help for the option -ms of display or mem for more information on memory spaces. If unspecified, the setting “config MemIdentifier” is used.
<addr> Target address in hex.
<count> Number of memory cells.
54 IDE 5.9 Windows Automation Guide

Command Window ScriptingCodeWarrior Commands
<width> [x<cell-size>][h<access-size>] | [{8,16,32,64}bit]
x<cell-size>
Memory is accessed in units called cells, where each cell consists of <cell-size> bytes. If unspecified, the setting for config MemWidth is used.
h<access-size>
Memory is accessed with a hardware access size of <access-size> bytes. If unspecified, the setting for config MemAccess is used.
{8,16,32,64}bit
Sets both <cell-size> and <access-size>
-s|-ns Specifies whether each cell is to be swapped. With a setting of -ns, target memory is written in order from lowest to highest byte address. Otherwise, each cell is endian swapped. If unspecified, the setting “config MemSwap” is used.
%<conv> Specifies the type of the data. Possible values for <conv> are given below. If unspecified, %x is used.
%x Hexadecimal
%d Signed decimal
%u Unsigned decimal
%f Floating point
%[E<n>]F Fractional.
Normally fractional values occupy the range (-1,1), where all bits in the value are to the right of the decimal point. On some architectures, a certain number of high order bits are defined to be to the left of the decimal. The option E<n> may be used to indicate that the uppermost <n> bits are to the left of the decimal. For example, a 40-bit value with 8 bits to the left of the decimal would have a format of %E8F and a range of (-256,256).
%s Ascii
Table 3.15 mem Options (continued)
55IDE 5.9 Windows Automation Guide
Command Window ScriptingCodeWarrior Commands
Examples
The examples assume the following settings:
radix = hex
config MemIdentifier = 0
config MemWidth = 4
config MemAccess = 4
config MemSwap = no
To display the next block of memory:
mem
To display memory range 0x10000-3 as one cell:
mem 10000
To display memory range 0x10000-3, memory space 1, as one cell:
mem 1:10000
To display memory range 0x10000-3f as 16 cells:
mem 10000 16
To display 16, 1-byte cells, with a hardware access size of 8-bytes per read:
mem 10000 16x1h8
To display one byte, with a hardware access size of one byte:
mem 10000 8bit
To return one cell, but don't print it to the Command Window:
mem 10000 -np
To display one cell with the data endian-swapped:
mem 10000 -s
To display one cell in decimal format:
mem 10000 %d
-np Don't print anything to the display, only return the data.
-ms On architectures supporting multiple memory spaces, displays the list of available memory spaces including a mnemonic and/or an integer index which may be used when specifying a target address.
Table 3.15 mem Options (continued)
56 IDE 5.9 Windows Automation Guide
Command Window ScriptingCodeWarrior Commands
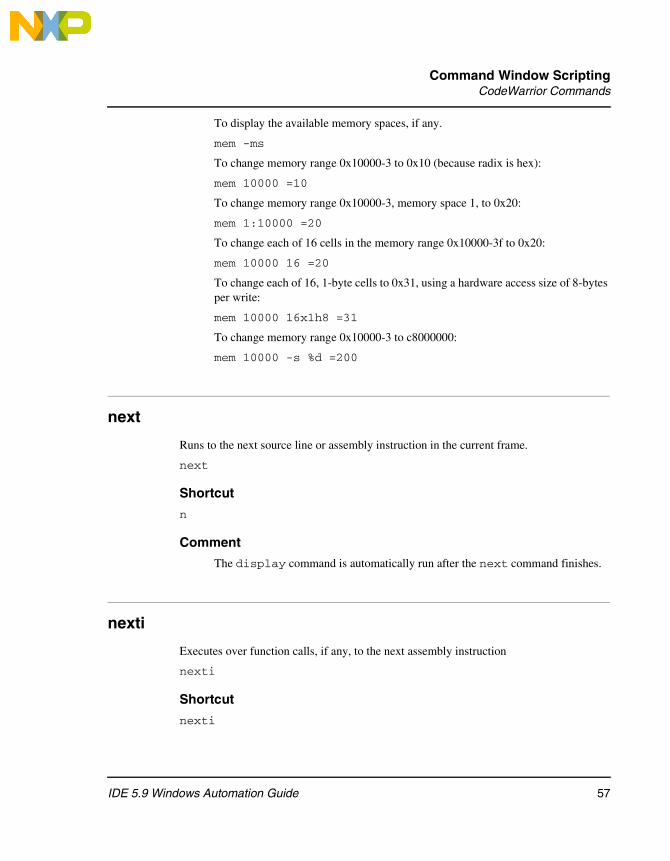
To display the available memory spaces, if any.
mem -ms
To change memory range 0x10000-3 to 0x10 (because radix is hex):
mem 10000 =10
To change memory range 0x10000-3, memory space 1, to 0x20:
mem 1:10000 =20
To change each of 16 cells in the memory range 0x10000-3f to 0x20:
mem 10000 16 =20
To change each of 16, 1-byte cells to 0x31, using a hardware access size of 8-bytes per write:
mem 10000 16x1h8 =31
To change memory range 0x10000-3 to c8000000:
mem 10000 -s %d =200
next
Runs to the next source line or assembly instruction in the current frame.
next
Shortcut
n
Comment
The display command is automatically run after the next command finishes.
nexti
Executes over function calls, if any, to the next assembly instruction
nexti
Shortcut
nexti
57IDE 5.9 Windows Automation Guide

Command Window ScriptingCodeWarrior Commands
Examples
To executes the thread to the next assembly instruction unless the current instruction is a function call, in which case the thread is executed until the function returns:
nexti
See also
stepi, step, next, finish
project
Opens or closes a project file or ELF file.
project -o[pen] file (.mcp|.elf|.elf)
project -c[lose]
project
Shortcut
proj
Examples
To open the project des.mcp:
proj -o des.mcp
To close the default project:
proj -c
To list open projects:
proj
pwd
Displays current working directory.
pwd
58 IDE 5.9 Windows Automation Guide
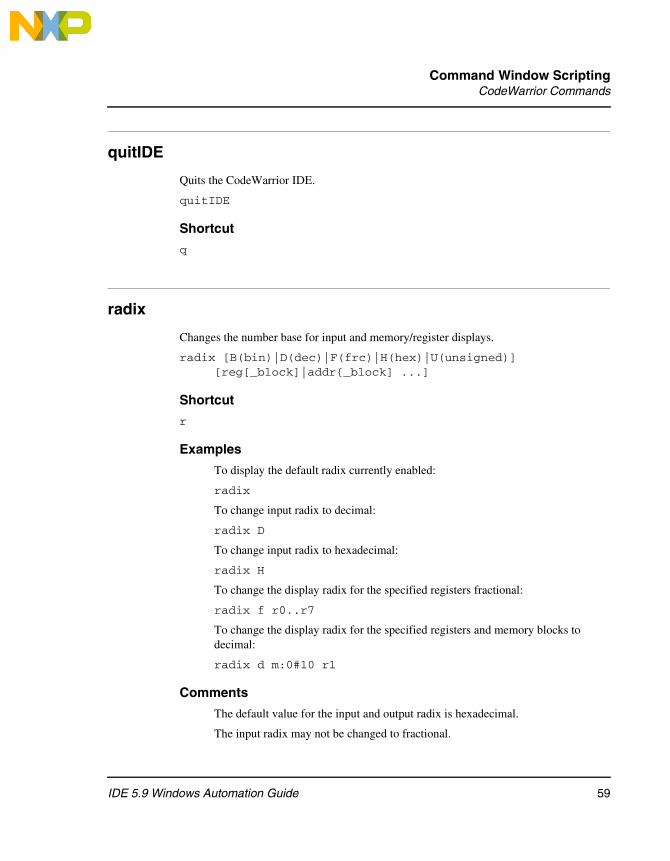
Command Window ScriptingCodeWarrior Commands
quitIDE
Quits the CodeWarrior IDE.
quitIDE
Shortcut
q
radix
Changes the number base for input and memory/register displays.
radix [B(bin)|D(dec)|F(frc)|H(hex)|U(unsigned)][reg[_block]|addr{_block] ...]
Shortcut
r
Examples
To display the default radix currently enabled:
radix
To change input radix to decimal:
radix D
To change input radix to hexadecimal:
radix H
To change the display radix for the specified registers fractional:
radix f r0..r7
To change the display radix for the specified registers and memory blocks to decimal:
radix d m:0#10 r1
Comments
The default value for the input and output radix is hexadecimal.
The input radix may not be changed to fractional.
59IDE 5.9 Windows Automation Guide
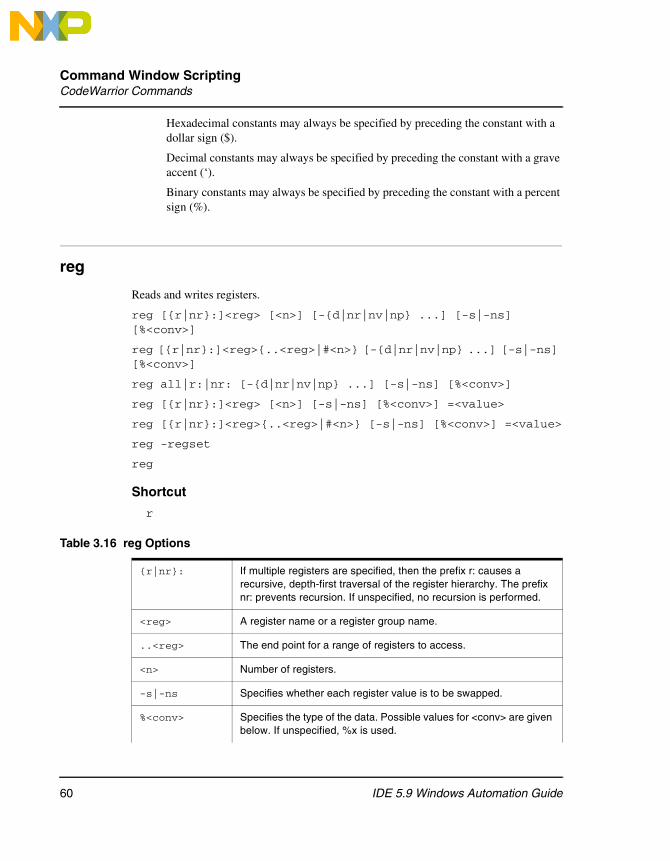
Command Window ScriptingCodeWarrior Commands
Hexadecimal constants may always be specified by preceding the constant with a dollar sign ($).
Decimal constants may always be specified by preceding the constant with a grave accent (‘).
Binary constants may always be specified by preceding the constant with a percent sign (%).
reg
Reads and writes registers.
reg [{r|nr}:]<reg> [<n>] [-{d|nr|nv|np} ...] [-s|-ns] [%<conv>]
reg [{r|nr}:]<reg>{..<reg>|#<n>} [-{d|nr|nv|np} ...] [-s|-ns] [%<conv>]
reg all|r:|nr: [-{d|nr|nv|np} ...] [-s|-ns] [%<conv>]
reg [{r|nr}:]<reg> [<n>] [-s|-ns] [%<conv>] =<value>
reg [{r|nr}:]<reg>{..<reg>|#<n>} [-s|-ns] [%<conv>] =<value>
reg -regset
reg
Shortcut
r
Table 3.16 reg Options
{r|nr}: If multiple registers are specified, then the prefix r: causes a recursive, depth-first traversal of the register hierarchy. The prefix nr: prevents recursion. If unspecified, no recursion is performed.
<reg> A register name or a register group name.
..<reg> The end point for a range of registers to access.
<n> Number of registers.
-s|-ns Specifies whether each register value is to be swapped.
%<conv> Specifies the type of the data. Possible values for <conv> are given below. If unspecified, %x is used.
60 IDE 5.9 Windows Automation Guide

Command Window ScriptingCodeWarrior Commands
Examples
To list all the available register sets on the target chip:
reg -regset
To display the value of register R1:
reg R1
To display the value of register R1 in the General Purpose Register group:
reg “General Purpose Register/R1”
To display detailed “data book” contents of R1, including bitfields and definitions:
reg R1 -d
To beginning with register R1, display the next 25 registers. Register groups are not recursively searched:
reg nr:R1 25
%x Hexadecimal
%d Signed decimal
%u Unsigned decimal
%f Floating point
%[E<n>]F Fractional. Normally fractional values occupy the range (-1,1), where all bits in the value are to the right of the decimal point. On some architectures, a certain number of high order bits are defined to be to the left of the decimal. The option E<n> may be used to indicate that the uppermost <n> bits are to the left of the decimal. For example, a 40-bit value with 8 bits to the left of the decimal would have a format of %E8F and a range of (-256,256).
%s Ascii
-d Print detailed data book information.
-nr Print only register groups, i.e. no registers.
-nv Print only register group and register names, i.e. no values.
-np Don't print anything to the display, only return the data.
regset Display the register group hierarchy.
Table 3.16 reg Options (continued)
61IDE 5.9 Windows Automation Guide
Command Window ScriptingCodeWarrior Commands
To change register R1 to 0x123:
reg R1 =123
To change registers R1 through R5 to 0x5432:
reg R1..R5 =5432
To change register R1 in the General Purpose Register group to 0x100:
reg “General Purpose Register/R1” =100
removeobj
Removes object code and binaries
removeobj [#a[lltargets]] [#c[ompact]] [#r[ecurse]][project file(*.mcp)]
Shortcut
rem
Examples
To remove binaries for the default target for default project:
removeobj
To remove binaries for all targets for the default project:
removeobj #all
To remove binaries and compact data for the default project and all subprojects:
removeobj #recurse #compact
To remove binaries for the project test.mcp:
removeobj test.mcp
reset
Resets the target hardware.
reset [h/ard | s/oft][run]
Shortcut
reset
62 IDE 5.9 Windows Automation Guide

Command Window ScriptingCodeWarrior Commands
Examples
If hard or soft is not specified with the reset command, then the default depends on the hardware support. If soft is supported, then that is the default. Otherwise, if hard is supported, then that is the default.
reset
To perform soft reset, if supported:
reset soft
To perform hard reset, if supported:
reset hard
To allow the target to run after the reset, also called “reset to user”. Otherwise, the target is halted at the reset vector.
reset run
restart
Restarts the debugging session.
restart
Shortcut
re
Examples
restart
This command will download the code again.
Comments
NOTE For remote connections, this command causes the debugger to download code again.
If you change the debugging session memory where the program code stores the startup CRT code, the command restart will not set the PC back to the main() function.
63IDE 5.9 Windows Automation Guide

Command Window ScriptingCodeWarrior Commands
restore
Writes file contents to memory.
restore -h *.lod [addr|offset] [8bit|16bit|32bit|64bit]
restore -b *.lod addr [8bit|16bit|32bit|64bit]
Shortcut
rest
Example
To load the contents of hexfile dat.lod into memory:
restore -h dat.lod
To load the contents of binary file dat.lod into memory beginning at $20:
restore -b dat.lod p:$20
To load the contents of binary file dat.lod into memory with an offset of $20, relative to the address saved in dat.lod:
restore -h dat.lod $20
Comments
The [8bit | ...] option controls the access size for reads and writes to target memory or memory-mapped registers.
See Also
save
save
Saves memory contents to a file.
save -h/-b addr_block... filename [-a/-o] [8bit|16bit|32bit|64bit]
Shortcut
sa
64 IDE 5.9 Windows Automation Guide

Command Window ScriptingCodeWarrior Commands
Examples
To save two memory blocks to filename.lod in hexadecimal format. If filename.lod exists, appends data to existing file:
save -h p:0..10 p:20..28 filename -a
To save memory blocks to filename.lod in binary format. If filename.lod exists, overwrites existing file:
save -b p:0..10 p:20..28 filename -o
Comments
The [8bit | ...] option controls the access size for reads and writes to target memory or memory-mapped registers.
setvisible
Hides or makes a command visible.
setvisible on|off <name> ...
<name> is either a fully qualified command or a command namespace.
Shortcut
setv
Examples
To make the command “cmdwin::step” visible:
setvisible on cmdwin::step
To hide the command “cmdwin::step”
setvisible off cmdwin::step
To make all commands in the namespace “com::acme::cmds” visible:
setvisible on com::acme::cmds
NOTE Built-in Tcl commands cannot be hidden.
65IDE 5.9 Windows Automation Guide
Command Window ScriptingCodeWarrior Commands
sourcedisplay
Changes the source view in the front-most debugger thread window.
sourcedisplay [code|asm|mixed|cycle]
Shortcut
so
Examples
To cycle through available display modes:
sourcedisplay cycle
To change the view to display source code:
sourcedisplay code
To change the view to display assembly:
sourcedisplay asm
To change the view to display both source and assembly:
sourcedisplay mixed
stack
Displays the call stack.
stack [num_frames] [-default]
Shortcut
stac
Examples
To print the entire call stack unless limited with stack -default:
stack
To print the 6 innermost call stack levels:
stack 6
To print the 6 outer-most call stack levels:
stack -6
66 IDE 5.9 Windows Automation Guide
Command Window ScriptingCodeWarrior Commands
To limit the number of stack frames shown to the 6 innermost levels:
stack 6 -default
To remove the stack frame limit:
stack -default
status
Displays the debug status of all active targets.
status
Shortcut
sta
step
Steps through the target program.
step [into|over|out|asm|all]
step [into|li(lines)|out|in(struction)|all]
step [nve|nxt|fwd|end|aft]
Shortcut
st
Examples
To step over a source line:
step
step li
step over
To step a single assembly instruction:
step asm
sep in
step instruction
67IDE 5.9 Windows Automation Guide
Command Window ScriptingCodeWarrior Commands
To step into a source line:
step into
To step out of a function:
step out
For supported targets, step a single assembly instruction on all cores:
step all
For supported targets, optimized code debugging step non optimized action:
step nve
For supported targets, optimized code debugging step next action:
step nxt
For supported targets, optimized code debugging step forward action:
step fwd
For supported targets, optimized code debugging step end of statement action:
step end
For supported targets, optimized code debugging step end all previous action:
step aft
Comments
The display command is automatically run after a successful step command.
stepi
Executes to the next assembly instruction.
stepi
Shortcut
stepi
Examples
To execute exactly one assembly instruction:
stepi
See also
nexti, step, next, finish
68 IDE 5.9 Windows Automation Guide

Command Window ScriptingCodeWarrior Commands
stop
Stops the target program after the command go, step out, or next.
stop
Shortcut
s
switchtarget
During multi-core debugging, select the debug session to which the IDE sends debug commands.
switchtarget [pid]
Shortcut
sw
Examples
To list currently available debug sessions:
switchtarget
To select the debug session whose PID is 0:
switchtarget 0
system
Executes a system command.
system [command]
Shortcut
sy
Examples
To delete any file with the extension .tmp:
system del *.tmp
69IDE 5.9 Windows Automation Guide

Command Window ScriptingCodeWarrior Commands
var
Reads and writes variables or C-expressions.
var [v:]<var> [-np] [-s|-ns] [%<conv>]
var v: [-np] [-s|-ns] [%<conv>]
var [v:]<var> [-s|-ns] [%<conv>] =<value>
Shortcut
v
Table 3.17 var Options
v: If this option appears with no <var> following it, then all variables pertinent to the current scope are printed.
<var> Symbolic name of the variable to print. Can also be a C expression.
-s|-ns Specifies whether the variable data is to be swapped.
%<conv> Specifies the type of data. Possible values for <conv> are given below. If unspecified, %x is used.
%x Hexadecimal
%d Signed decimal
%u Unsigned decimal
%f Floating point
%[E<n>]F Fractional. Normally fractional values occupy the range (-1,1), where all bits in the value are to the right of the decimal point. On some architectures, a certain number of high order bits are defined to be to the left of the decimal. The option E<n> may be used to indicate that the uppermost <n> bits are to the left of the decimal. For example, a 40-bit value with 8 bits to the left of the decimal would have a format of %E8F and a range of (-256,256).
%s Ascii
-np Don't print anything to the display, only return the data.
70 IDE 5.9 Windows Automation Guide
Command Window ScriptingCodeWarrior Commands
Examples
To display the endian-swapped contents of variable myVar in decimal:
var myVar -s %d
To change the value of variable myVar to 16 (0x10):
var myVar=10
wait
Waits for a specified time.
wait [milliseconds]
Shortcut
w
Examples
To wait until the user hits ESC:
wait
To wait for 2 seconds:
wait 2000
watchpoint
Adds, removes, or displays a watchpoint.
watchpoint [variable_name|watchpoint_id OFF]
Shortcut
wat
Examples
To display the watchpoint list:
watchpoint
To add watchpoint on variable i:
watchpoint i
71IDE 5.9 Windows Automation Guide
Command Window ScriptingCodeWarrior Commands
window
Opens a specific IDE debugger window.
window [breakpoints | expressions | globals | memory | processes | registers | symbolics]
Shortcut
win
Examples
To open the symbolics window associated with the current debug session:
window
To open the debugger breakpoints window:
window breakpoints
To open the debugger expressions window:
window expressions
To open the debugger globals window:
window globals
To open a memory window:
window memory
To open the processes window:
window processes
To open the debugger registers window:
window registers
To open the symbolics window associated with the current debug session:
window symbolics
72 IDE 5.9 Windows Automation Guide

4Microsoft COM Automation
This chapter describes how to automate certain tasks performed by the CodeWarrior IDE. These tasks include:
• Managing project files
• Building, compiling, linking, and debugging projects
• Using the version control system
• Logging CodeWarrior messages
While you can use any of the several different scripting tools (Perl, VBScript) to create automation scripts for the IDE. The CodeWarrior IDE uses Perl. Perl offers an industry-standard, flexible way to create scripts to control various objects, including the IDE. All the examples in this chapter use Perl.
This chapter has these sections:
• Viewing OLE/COM Objects
• Creating a CodeWarrior Instance
• Managing Files in Projects
• Manipulating Projects
• Compiling Projects
• Linking Projects
• Generating Debugger Output
• Displaying IDE Messages
• Using Version Control System
Viewing OLE/COM ObjectsYou can view the Component Object Model (COM) objects the IDE exposes and the methods you can call to work with those objects using the OLE/COM Object Viewer (Figure 4.1). The following sub-sections describe how to work with the OLE/COM Object Viewer.
• Setting the View to Expert Mode
• Opening the CodeWarrior Type Library
• Finding Method Details
73IDE 5.9 Windows Automation Guide

Microsoft COM AutomationViewing OLE/COM Objects
Setting the View to Expert Mode
The remainder of these instructions assume that you have set your Object Viewer to Expert Mode. To do so:
1. Select View > Expert Mode.
This setting provides more detail than would otherwise appear in the Object Viewer.
Opening the CodeWarrior Type Library
To view the interfaces and enumerations that you can use to control the IDE:
1. In the left pane, expand the Type Libraries list (Figure 4.1).
Figure 4.1 Expand Type Libraries List
74 IDE 5.9 Windows Automation Guide

Microsoft COM AutomationViewing OLE/COM Objects
2. Double-click the Metrowerks CodeWarrior IDE (Ver 1.1) item in the Type Libraries tree.
The ITypeLib Viewer (Figure 4.2) appears, showing the interfaces and enumerations you can use to control the IDE.
Figure 4.2 ITypeLib Viewer
3. Select View > Group by type kind in the ITypeLib Viewer window. All the entries are grouped (Figure 4.3).
75IDE 5.9 Windows Automation Guide

Microsoft COM AutomationViewing OLE/COM Objects
Figure 4.3 Grouping Entries
4. Expand the Dispinterfaces list (Figure 4.4) to display the interfaces and methods you can use in a Perl script.
Figure 4.4 Expand Dispinterfaces List
NOTE Use the Dispinterfaces list, rather than the Interfaces list, when scripting in Perl. The methods in the Dispinterfaces list show the correct return types and parameters for Perl scripting.
76 IDE 5.9 Windows Automation Guide

Microsoft COM AutomationCreating a CodeWarrior Instance
Finding Method Details
To see the details of the methods within an interface:
1. In the ITypeLib Viewer’s left pane, expand the interface you want to use from the Interfaces list.
2. Click the method you want to use.
The right pane shows the definition of the selected method (Figure 4.5).
Figure 4.5 Select Method
Because the Object Viewer uses Interface Definition Language (IDL), you can see which parameters provide input and which parameters hold return values.
NOTE When using Perl to script CodeWarrior COM objects, remove the “I” from the beginning of each interface name. For example, use CodeWarriorApp rather than ICodeWarriorApp.
Creating a CodeWarrior InstanceBefore you can manipulate the IDE in any way, you must first create a CodeWarrior instance. The following block of code shows how to get the IDE’s application object (CodeWarriorApp):
# Win32::OLE gives access to COM objects,# including the IDE’s COM # objectsuse Win32::OLE;
77IDE 5.9 Windows Automation Guide
Microsoft COM AutomationManaging Files in Projects
# Create an instance of CodeWarrior$CW = Win32::OLE->new("CodeWarrior.CodeWarriorApp");
Managing Files in ProjectsYou can use Perl scripts to add and remove files within projects.
• Adding Files to Projects
• Removing Files From Projects
Adding Files to Projects
To add a file, you must get a reference to a project. You must then add the file to one or more targets within the project. The following script shows how to add a file to all the targets within a project:
# Script to add a file to all targets within a project
# Win32::OLE gives access to COM objects,# including the IDE’s COM # objectsuse Win32::OLE;
# Create an instance of CodeWarrior$CW = Win32::OLE->new("CodeWarrior.CodeWarriorApp");
# Get the command line arguments$projecttoopen = @ARGV[0];$filetoadd = @ARGV[1];
# Open the project# OpenProject(BSTR filePath,# VARIANT_BOOL fMakeVisible,# ECodeWarriorConvertOption convertOption,# ECodeWarriorRevertPanelOption revertOption)
$project = $CW->OpenProject($projecttoopen, true, 0, 0);
# Get the target list object# Targets()
$targets = $project->Targets();
# Count the targets in the list# Count()
78 IDE 5.9 Windows Automation Guide

Microsoft COM AutomationManaging Files in Projects
$numtargets = $targets->Count();
# Add the file to each target# Item (long index)# AddFile (BSTR path,# BSTR groupPath)
for ($i = 0; $i < $numtargets; $i++){ $targets->Item($i)->AddFile($filetoadd, "");}
# end of script
To use this script, type:
perl addfile.pl someproject.mcp somefile.***
NOTE You can modify the above script to add multiple files or to read file names from an input file.
Removing Files From Projects
To remove a file, you must get a reference to a project. You must then remove the file from one or more targets within the project. The following script shows how to remove a file from all the targets within a project:
# Script to remove a file from all targets within a project
# Win32::OLE gives access to COM objects,# including the IDE’s COM objectsuse Win32::OLE;
# Create an instance of CodeWarrior$CW = Win32::OLE->new("CodeWarrior.CodeWarriorApp");
# Get the command line arguments$projecttoopen = @ARGV[0];$filetoremove = @ARGV[1];
# Open the project# OpenProject(BSTR filePath,# VARIANT_BOOL fMakeVisible,# ECodeWarriorConvertOption convertOption,
79IDE 5.9 Windows Automation Guide
Microsoft COM AutomationManipulating Projects
# ECodeWarriorRevertPanelOption revertOption)$project = $CW->OpenProject($projecttoopen, true, 0, 0);
# Get the collection of files that match the file spec#FindFileByName(BSTR filename)$projectfiles = $project->FindFileByName($filetoremove);
# Get the number of files to remove# Count()$filecount = $projectfiles->Count();
# Remove the files# Item(long index)# RemoveFile(ICodeWarriorProjectFile* projectFile)for ($i = 0; $i < $filecount; $i++){ $file = $projectfiles->Item($i); $project->RemoveFile($file);}
# end of script
NOTE You can modify the above script to remove multiple files or to read file names from an input file.
Manipulating ProjectsYou can use Perl script to manipulate projects in the IDE. You can remove the object code from a project before building it (or at any time).
Removing Object Code From ProjectsThe IDE exposes separate methods for removing object code. Thus, you can remove object code at any time. However, common practice calls for removing object code before building the project.
CodeWarriorProject offers two methods to remove object code:
• RemoveObjectCode
• RemoveObjectCodeWithOptions
80 IDE 5.9 Windows Automation Guide
Microsoft COM AutomationManipulating Projects
RemoveObjectCode
The RemoveObjectCode method removes the object code from the specified project. This method includes an option to remove the data files created during the latest build.
The following script shows an example using the RemoveObjectCode method:
# Script to remove the object code from a project
# Win32::OLE gives access to COM objects,# including the IDE’s COM objectsuse Win32::OLE;
# Create an instance of CodeWarrior$CW = Win32::OLE->new("CodeWarrior.CodeWarriorApp");
# Get the command line argument$projecttoopen = @ARGV[0];
# Open the project# OpenProject(BSTR filePath,# VARIANT_BOOL fMakeVisible,# ECodeWarriorConvertOption convertOption,# ECodeWarriorRevertPanelOption revertOption)$project = $CW->OpenProject($projecttoopen, true, 0, 0);
# Remove the object code# RemoveObjectCode(ECodeWarriorWhichTargetOptions whichTarget, # 0 = all; 1 = current# VARIANT_BOOL deleteDataFiles)$project->RemoveObjectCode(0, true);
# end of script
RemoveObjectCodeWithOptions
The RemoveObjectCodeWithOptions method removes the object code from the specified project. This method includes an option to remove the data files created during the latest build and an option to remove object code from all subprojects included within the specified project.
The following script shows an example using the RemoveObjectCodeWithOptions method:
81IDE 5.9 Windows Automation Guide

Microsoft COM AutomationManipulating Projects
# Script to remove the object code from a project and all subprojects
# Win32::OLE gives access to COM objects,# including the IDE’s COM objectsuse Win32::OLE;
# Create an instance of CodeWarrior$CW = Win32::OLE->new("CodeWarrior.CodeWarriorApp");
# Get the command line argument$projecttoopen = @ARGV[0];
# Open the project# OpenProject(BSTR filePath,# VARIANT_BOOL fMakeVisible,# ECodeWarriorConvertOption convertOption,# ECodeWarriorRevertPanelOption revertOption)$project = $CW->OpenProject($projecttoopen, true, 0, 0);
# Remove the object code# RemoveObjectCodeWithOptions(# ECodeWarriorWhichTargetOptions whichTarget, # 0 = all; 1 = current# VARIANT_BOOL recurseSubProject,# VARIANT_BOOL deleteDataFiles)$project->RemoveObjectCodeWithOptions(0, true, true);
# end of script
Building Projects CodeWarriorProject offers four methods to build a project:
• Build
• BuildWithOptions
• BuildAndWaitToComplete
• BuildAndWaitToCompleteWithOptions
• A Combined Example
Build
The Build method builds the specified project, with no options and no error messages.
82 IDE 5.9 Windows Automation Guide
Microsoft COM AutomationManipulating Projects
The following script shows an example using the Build method:
# Script to build a project
# Win32::OLE gives access to COM objects,# including the IDE’s COM objectsuse Win32::OLE;
# Create an instance of CodeWarrior$CW = Win32::OLE->new("CodeWarrior.CodeWarriorApp");
# Get the command line argument$projecttoopen = @ARGV[0];
# Open the project# OpenProject(BSTR filePath,# VARIANT_BOOL fMakeVisible,# ECodeWarriorConvertOption convertOption,# ECodeWarriorRevertPanelOption revertOption)$project = $CW->OpenProject($projecttoopen, true, 0, 0);
# Build the project# Build()$project->Build();
# end of script
BuildWithOptions
The BuildWithOptions method builds the specified project, with the option to skip dependencies.
The following script shows an example using the BuildWithOptions method:
# Script to build a project and not run after the build
# Win32::OLE gives access to COM objects,# including the IDE’s COM objectsuse Win32::OLE;
# Create an instance of CodeWarrior$CW = Win32::OLE->new("CodeWarrior.CodeWarriorApp");
# Get the command line argument$projecttoopen = @ARGV[0];
83IDE 5.9 Windows Automation Guide

Microsoft COM AutomationManipulating Projects
# Open the project# OpenProject(BSTR filePath,# VARIANT_BOOL fMakeVisible,# ECodeWarriorConvertOption convertOption,# ECodeWarriorRevertPanelOption revertOption)$project = $CW->OpenProject($projecttoopen, true, 0, 0);
# Build the project# BuildWithOptions(ECodeWarriorBuildOptions options, # 0 = Normal; 1 = Skip Dependencies# ECodeWarriorRunMode runMode) # 0 = Don't run; 1 = Run; 2 = Run in Debug Mode$project->BuildWithOptions(0, 0);
# end of script
BuildAndWaitToComplete
The BuildAndWaitToComplete method builds the specified project and waits until the build is complete to create a collection of all the messages created during the build.
The following script shows an example using the BuildAndWaitToComplete method:
# Script to build a project, wait until all build messages have been collected,# and then print the messages
# Win32::OLE gives access to COM objects,# including the IDE’s COM objectsuse Win32::OLE;
# Create an instance of CodeWarrior$CW = Win32::OLE->new("CodeWarrior.CodeWarriorApp");
# Get the command line argument$projecttoopen = @ARGV[0];
# Open the project# OpenProject(BSTR filePath,# VARIANT_BOOL fMakeVisible,# ECodeWarriorConvertOption convertOption,# ECodeWarriorRevertPanelOption revertOption)$project = $CW->OpenProject($projecttoopen, true, 0, 0);
84 IDE 5.9 Windows Automation Guide

Microsoft COM AutomationManipulating Projects
# Build the project# BuildAndWaitToComplete()$messages = $project->BuildAndWaitToComplete();
# Print the build messages# Errors()# ErrorCount()# Warnings()# WarningCount()# Informations()# InformationCount()# Definitions()# DefinitionCount()# Item(long index)# ErrorNumber()# MessageText()$errors = $messages->Errors();$numerrors = $messages->ErrorCount();$warnings = $messages->Warnings();$numwarnings = $messages->WarningCount();$informations = $messages->Informations();$numinformations = $messages->InformationCount();$definitions = $messages->Definitions();$numdefinitions = $messages->DefinitionCount();
print ("Number of Errors: $numerrors\n");print ("----------------------------------\n");for ($i = 0; $i < $numerrors; $i++){ $errortoprint = $errors->Item($i); $errornum = $errortoprint->ErrorNumber(); $stringtoprint = $errortoprint->MessageText(); print("$errornum: $stringtoprint\n");}
print ("\nNumber of Warnings: $numwarnings\n");print ("----------------------------------\n");for ($i = 0; $i < $numwarnings; $i++){ $warningtoprint = $warnings->Item($i); $Warningnum = $warningtoprint->ErrorNumber(); $stringtoprint = $warningtoprint->MessageText(); print("$warningnum: $stringtoprint\n");}
print ("\nNumber of Informations: $numinformations\n");print ("----------------------------------\n");
85IDE 5.9 Windows Automation Guide

Microsoft COM AutomationManipulating Projects
for ($i = 0; $i < $numinformations; $i++){ $informationtoprint = $informations->Item($i); $informationnum = $informationtoprint->ErrorNumber(); $stringtoprint = $informationtoprint->MessageText(); print("$informationnum: $stringtoprint\n");}
print ("\nNumber of Definitions: $numdefinitions\n");print ("----------------------------------\n");for ($i = 0; $i < $numdefinitions; $i++){ $definitiontoprint = $definitions->Item($i); $definitionnum = $definitiontoprint->ErrorNumber(); $stringtoprint = $definitiontoprint->MessageText(); print("$definitionnum: $stringtoprint\n");}
# end of script
BuildAndWaitToCompleteWithOptions
The BuildAndWaitToCompleteWithOptions method builds the specified project and waits until the build is complete to create a collection of all the messages created during the build. It offers the option to skip dependencies.
The following script shows an example using the BuildAndWaitToCompleteWithOptions method:
# Script to build a project, wait until all build messages have been collected,# and then print the messages
# Win32::OLE gives access to COM objects,# including the IDE’s COM objectsuse Win32::OLE;
# Create an instance of CodeWarrior$CW = Win32::OLE->new("CodeWarrior.CodeWarriorApp");
# Get the command line argument$projecttoopen = @ARGV[0];
# Open the project# OpenProject(BSTR filePath,
86 IDE 5.9 Windows Automation Guide
Microsoft COM AutomationManipulating Projects
# VARIANT_BOOL fMakeVisible,# ECodeWarriorConvertOption convertOption,# ECodeWarriorRevertPanelOption revertOption)$project = $CW->OpenProject($projecttoopen, true, 0, 0);
# Build the project# BuildAndWaitToCompleteWithOptions(# ECodeWarriorBuildOptions options) # 0 = Normal; 1 = Skip Dependencies$messages = $project->BuildAndWaitToCompleteWithOptions(0);
# Print the build messages# Errors()# ErrorCount()# Warnings()# WarningCount()# Informations()# InformationCount()# Definitions()# DefinitionCount()# Item(long index)# ErrorNumber()# MessageText()$errors = $messages->Errors();$numerrors = $messages->ErrorCount();$warnings = $messages->Warnings();$numwarnings = $messages->WarningCount();$informations = $messages->Informations();$numinformations = $messages->InformationCount();$definitions = $messages->Definitions();$numdefinitions = $messages->DefinitionCount();
print ("Number of Errors: $numerrors\n");print ("----------------------------------\n");for ($i = 0; $i < $numerrors; $i++){ $errortoprint = $errors->Item($i); $errornum = $errortoprint->ErrorNumber(); $stringtoprint = $errortoprint->MessageText(); print("$errornum: $stringtoprint\n");}
print ("\nNumber of Warnings: $numwarnings\n");print ("----------------------------------\n");for ($i = 0; $i < $numwarnings; $i++){ $warningtoprint = $warnings->Item($i); $Warningnum = $warningtoprint->ErrorNumber();
87IDE 5.9 Windows Automation Guide

Microsoft COM AutomationManipulating Projects
$stringtoprint = $warningtoprint->MessageText(); print("$warningnum: $stringtoprint\n");}
print ("\nNumber of Informations: $numinformations\n");print ("----------------------------------\n");for ($i = 0; $i < $numinformations; $i++){ $informationtoprint = $informations->Item($i); $informationnum = $informationtoprint->ErrorNumber(); $stringtoprint = $informationtoprint->MessageText(); print("$informationnum: $stringtoprint\n");}
print ("\nNumber of Definitions: $numdefinitions\n");print ("----------------------------------\n");for ($i = 0; $i < $numdefinitions; $i++){ $definitiontoprint = $definitions->Item($i); $definitionnum = $definitiontoprint->ErrorNumber(); $stringtoprint = $definitiontoprint->MessageText(); print("$definitionnum: $stringtoprint\n");}
# end of script
A Combined ExampleBuild scripts often remove object code from a project and then build the project. The following example uses RemoveObjectCodeWithOptions and BuildAndWaitToComplete to perform those tasks:
# Script to remove all object code, build a project, wait until# all build messages have been collected, and print the messages
# Win32::OLE gives access to COM objects,# including the IDE’s COM objectsuse Win32::OLE;
# Create an instance of CodeWarrior$CW = Win32::OLE->new("CodeWarrior.CodeWarriorApp");
# Get the command line argument$projecttoopen = @ARGV[0];
# Open the project
88 IDE 5.9 Windows Automation Guide

Microsoft COM AutomationManipulating Projects
# OpenProject(BSTR filePath,# VARIANT_BOOL fMakeVisible,# ECodeWarriorConvertOption convertOption,# ECodeWarriorRevertPanelOption revertOption)$project = $CW->OpenProject($projecttoopen, true, 0, 0);
# Remove the object code# RemoveObjectCodeWithOptions(# ECodeWarriorWhichTargetOptions whichTarget, # 0 = all; 1 = current# VARIANT_BOOL recurseSubProject,# VARIANT_BOOL deleteDataFiles)$project->RemoveObjectCodeWithOptions(0, true, true);
# Build the project# BuildAndWaitToComplete()$messages = $project->BuildAndWaitToComplete();
# Print the build messages# Errors()# ErrorCount()# Warnings()# WarningCount()# Informations()# InformationCount()# Definitions()# DefinitionCount()# Item(long index)# ErrorNumber()# MessageText()$errors = $messages->Errors();$numerrors = $messages->ErrorCount();$warnings = $messages->Warnings();$numwarnings = $messages->WarningCount();$informations = $messages->Informations();$numinformations = $messages->InformationCount();$definitions = $messages->Definitions();$numdefinitions = $messages->DefinitionCount();
print ("Number of Errors: $numerrors\n");print ("----------------------------------\n");for ($i = 0; $i < $numerrors; $i++){ $errortoprint = $errors->Item($i); $errornum = $errortoprint->ErrorNumber(); $stringtoprint = $errortoprint->MessageText(); print("$errornum: $stringtoprint\n");}
89IDE 5.9 Windows Automation Guide

Microsoft COM AutomationCompiling Projects
print ("\nNumber of Warnings: $numwarnings\n");print ("----------------------------------\n");for ($i = 0; $i < $numwarnings; $i++){ $warningtoprint = $warnings->Item($i); $Warningnum = $warningtoprint->ErrorNumber(); $stringtoprint = $warningtoprint->MessageText(); print("$warningnum: $stringtoprint\n");}
print ("\nNumber of Informations: $numinformations\n");print ("----------------------------------\n");for ($i = 0; $i < $numinformations; $i++){ $informationtoprint = $informations->Item($i); $informationnum = $informationtoprint->ErrorNumber(); $stringtoprint = $informationtoprint->MessageText(); print("$informationnum: $stringtoprint\n");}
print ("\nNumber of Definitions: $numdefinitions\n");print ("----------------------------------\n");for ($i = 0; $i < $numdefinitions; $i++){ $definitiontoprint = $definitions->Item($i); $definitionnum = $definitiontoprint->ErrorNumber(); $stringtoprint = $definitiontoprint->MessageText(); print("$definitionnum: $stringtoprint\n");}
# end of script
Compiling ProjectsYou can compile collections of files within a project or target. The following sections explain how to do:
• Compiling From Projects
• Compiling From Build Targets
Compiling From ProjectsCodeWarriorProject offers one method for compiling collections of files (including collection that consist of one file):
90 IDE 5.9 Windows Automation Guide

Microsoft COM AutomationCompiling Projects
CompileFilesWithChoiceThe CompileFilesWithChoice method performs one of the following actions on the specified collection of files:
• Check Syntax
• Preprocess
• Precompile
• Compile
• Disassemble
Because CompileFilesWithChoice associates with the project, it compiles the file for all targets. See “Compiling From Build Targets” for how to compile files for a single target.
The following script shows how to use CompileFilesWithChoice to compile an individual file within a project:
# Script to compile a file within a project
# Win32::OLE gives access to COM objects,# including the IDE’s COM objectsuse Win32::OLE;
# Create an instance of CodeWarrior$CW = Win32::OLE->new("CodeWarrior.CodeWarriorApp");
# Get the command line arguments$projecttoopen = @ARGV[0];$filetocompile = @ARGV[1];
# Open the project# OpenProject(BSTR filePath,# VARIANT_BOOL fMakeVisible,# ECodeWarriorConvertOption convertOption,# ECodeWarriorRevertPanelOption revertOption)$project = $CW->OpenProject($projecttoopen, true, 0, 0);
# Get a file collection (required by the compiling method)$filecoll = $project->FindFileByName($filetocompile);
#Compile the file# CompileFilesWithChoice(# ICodeWarriorProjectFileCollection* collection,# ECodeWarriorCompileChoice compileChoice);# ECodeWarriorCompileChoice
91IDE 5.9 Windows Automation Guide
Microsoft COM AutomationCompiling Projects
# 0 = Check Syntax# 1 = Preprocess# 2 = Precompile# 3 = Compile# 4 = Disassemble$project->CompileFilesWithChoice($filecoll, 3);
# Note: Ignoring the return value
# end of script
This example script compiles a single file, but you can modify it to compile a number of files or to read filenames from an input file.
Compiling From Build TargetsThe CodeWarriorTarget method offers three methods for compiling collections of files (including collection that consist of one file):
• CompileFiles
• CompileFilesAndWaitToComplete
• CompileFilesWithChoice
CompileFiles
The CompileFiles method compiles the specified collection of files within the target.
The following script shows how to use CompileFiles to compile an individual file within a target:
# Script to compile a file within a target
# Win32::OLE gives access to COM objects,# including the IDE’s COM objectsuse Win32::OLE;
# Create an instance of CodeWarrior$CW = Win32::OLE->new("CodeWarrior.CodeWarriorApp");
# Get the command line arguments$projecttoopen = @ARGV[0];$targettoopen = @ARGV[1];$filetocompile = @ARGV[2];
92 IDE 5.9 Windows Automation Guide

Microsoft COM AutomationCompiling Projects
# Open the project# OpenProject(BSTR filePath,# VARIANT_BOOL fMakeVisible,# ECodeWarriorConvertOption convertOption,# ECodeWarriorRevertPanelOption revertOption)$project = $CW->OpenProject($projecttoopen, true, 0, 0);
# Get the target$targettouse = $project->FindTarget($targettoopen);
# Get the project file collection# containing the file to compile$filecoll = $project->FindFileByName($filetocompile);
# Compile the file# CompileFiles(ICodeWarriorProjectFileCollection* collection);$targettouse->CompileFiles($filecoll);
# end of script
This example script compiles a single file, but you can modify it to compile a number of files or to read filenames from an input file.
CompileFilesAndWaitToComplete
The CompileFilesAndWaitToComplete method compiles the specified collection of files within the target. CompileFilesAndWaitToComplete generates messages, which your script can print or save.
The following script shows how to use CompileFilesAndWaitToComplete to compile an individual file within a target:
# Script to compile a file within a target,# gather the resulting messages,# and print the messages
# Win32::OLE gives access to COM objects,# including the IDE’s COM objectsuse Win32::OLE;
# Create an instance of CodeWarrior$CW = Win32::OLE->new("CodeWarrior.CodeWarriorApp");
# Get the command line arguments$projecttoopen = @ARGV[0];
93IDE 5.9 Windows Automation Guide

Microsoft COM AutomationCompiling Projects
$targettoopen = @ARGV[1];$filetocompile = @ARGV[2];
# Open the project# OpenProject(BSTR filePath,# VARIANT_BOOL fMakeVisible,# ECodeWarriorConvertOption convertOption,# ECodeWarriorRevertPanelOption revertOption)$project = $CW->OpenProject($projecttoopen, true, 0, 0);
# Get the target$targettouse = $project->FindTarget($targettoopen);
# Get the project file collection# containing the file to compile$filecoll = $project->FindFileByName($filetocompile);
# Compile the file and create the messages# CompileFilesAndWaitToComplete(ICodeWarriorProjectFileCollection* collection);$messages = $targettouse->CompileFilesAndWaitToComplete($filecoll);
# Print the messages# Errors()# ErrorCount()# Warnings()# WarningCount()# Informations()# InformationCount()# Definitions()# DefinitionCount()# Item(long index)# ErrorNumber()# MessageText()$errors = $messages->Errors();$numerrors = $messages->ErrorCount();$warnings = $messages->Warnings();$numwarnings = $messages->WarningCount();$informations = $messages->Informations();$numinformations = $messages->InformationCount();$definitions = $messages->Definitions();$numdefinitions = $messages->DefinitionCount();
print ("Number of Errors: $numerrors\n");print ("----------------------------------\n");for ($i = 0; $i < $numerrors; $i++){ $errortoprint = $errors->Item($i);
94 IDE 5.9 Windows Automation Guide

Microsoft COM AutomationCompiling Projects
$errornum = $errortoprint->ErrorNumber(); $stringtoprint = $errortoprint->MessageText(); print("$errornum: $stringtoprint\n");}
print ("\nNumber of Warnings: $numwarnings\n");print ("----------------------------------\n");for ($i = 0; $i < $numwarnings; $i++){ $warningtoprint = $warnings->Item($i); $Warningnum = $warningtoprint->ErrorNumber(); $stringtoprint = $warningtoprint->MessageText(); print("$warningnum: $stringtoprint\n");}
print ("\nNumber of Informations: $numinformations\n");print ("----------------------------------\n");for ($i = 0; $i < $numinformations; $i++){ $informationtoprint = $informations->Item($i); $informationnum = $informationtoprint->ErrorNumber(); $stringtoprint = $informationtoprint->MessageText(); print("$informationnum: $stringtoprint\n");}
print ("\nNumber of Definitions: $numdefinitions\n");print ("----------------------------------\n");for ($i = 0; $i < $numdefinitions; $i++){ $definitiontoprint = $definitions->Item($i); $definitionnum = $definitiontoprint->ErrorNumber(); $stringtoprint = $definitiontoprint->MessageText(); print("$definitionnum: $stringtoprint\n");}
# end of script
This example script compiles a single file, but you can modify it to compile a number of files or to read filenames from an input file.
CompileFilesWithChoice
The CompileFilesWithChoice method performs one of the following actions on the specified collection of files:
95IDE 5.9 Windows Automation Guide

Microsoft COM AutomationCompiling Projects
• Check Syntax
• Preprocess
• Precompile
• Compile
• Disassemble
The following script shows how to use CompileFilesWithChoice to compile an individual file within a target:
# Script to perform one of a number of possible actions# on a file within a target
# Win32::OLE gives access to COM objects,# including the IDE’s COM objectsuse Win32::OLE;
# Create an instance of CodeWarrior$CW = Win32::OLE->new("CodeWarrior.CodeWarriorApp");
# Get the command line arguments$projecttoopen = @ARGV[0];$targettoopen = @ARGV[1];$filetocompile = @ARGV[2];$action = @ARGV[3];
# Open the project# OpenProject(BSTR filePath,# VARIANT_BOOL fMakeVisible,# ECodeWarriorConvertOption convertOption,# ECodeWarriorRevertPanelOption revertOption)$project = $CW->OpenProject($projecttoopen, true, 0, 0);
# Get the target$targettouse = $project->FindTarget($targettoopen);
# Get the project file collection# containing the file to compile$filecoll = $project->FindFileByName($filetocompile);
# Compile the file# CompileFilesWithChoice(# ICodeWarriorProjectFileCollection* collection,# ECodeWarriorCompileChoice compileChoice);# ECodeWarriorCompileChoice:# 0 = Check Syntax# 1 = Preprocess# 2 = Precompile
96 IDE 5.9 Windows Automation Guide

Microsoft COM AutomationLinking Projects
# 3 = Compile# 4 = Disassemble$targettouse->CompileFilesWithChoice($filecoll, $action);
# Note: Ignoring the return value
# end of script
This example script compiles a single file, but you can modify it to compile a number of files or to read filenames from an input file.
Linking ProjectsCodeWarriorTarget lets you obtain the linker name and specify whether to link against specific files in targets.
Obtaining the Linker NameThe COM Application Programming Interface (API) exposes a method that lets you obtain the name of the current linker plug-in. To do so, use:
• GetLinkerName
GetLinkerName
The GetLinkerName method obtains the name of the linker for a target.
The following script shows how to use GetLinkerName to obtain the name of the linker for a target:
# Script to get the name of the current linker
# Win32::OLE gives access to COM objects,# including the IDE’s COM objectsuse Win32::OLE;
# Create an instance of CodeWarrior$CW = Win32::OLE->new("CodeWarrior.CodeWarriorApp");
# Get the command line arguments$projecttoopen = @ARGV[0];$targettoopen = @ARGV[1];
97IDE 5.9 Windows Automation Guide
Microsoft COM AutomationLinking Projects
# Open the project# OpenProject(BSTR filePath,# VARIANT_BOOL fMakeVisible,# ECodeWarriorConvertOption convertOption,# ECodeWarriorRevertPanelOption revertOption)$project = $CW->OpenProject($projecttoopen, true, 0, 0);
# Get the target# FindTarget(BSTR Name)$target = $project->FindTarget($targettoopen);
# Get the linker name# GetLinkerName()$linkername = $target->GetLinkerName();
# Print the linker nameprint("Linker for $targettoopen: $linkername\n");
# end of script
Linking Against Sub-TargetsThe COM API exposes a method that lets you specify whether to link against subtargets. To do so, use:
• LinkAgainstSubTarget
LinkAgainstSubTarget
The LinkAgainstSubTarget method set whether to link against a specified subtarget within a target.
The following script shows how to use LinkAgainstSubTarget to set whether to link against a specified subtarget within a target:
# Script to set whether to link against a particular subtarget
# Win32::OLE gives access to COM objects,# including the IDE’s COM objectsuse Win32::OLE;
# Create an instance of CodeWarrior$CW = Win32::OLE->new("CodeWarrior.CodeWarriorApp");
# Get the command line arguments
98 IDE 5.9 Windows Automation Guide
Microsoft COM AutomationLinking Projects
$projecttoopen = @ARGV[0]; # Use the full path$targettoopen = @ARGV[1]; # Use the target name$subtargettoopen = @ARGV[2]; # Use the subtarget name$linkornot = @ARGV[3]; # Use true or false
# Open the project# OpenProject(BSTR filePath,# VARIANT_BOOL fMakeVisible,# ECodeWarriorConvertOption convertOption,# ECodeWarriorRevertPanelOption revertOption)$project = $CW->OpenProject($projecttoopen, true, 0, 0);
# Get the target# FindTarget(BSTR Name)$target = $project->FindTarget($targettoopen);
# Get the subtarget and set whether to link against it# SubTargets()# Count()# Item(long index)# Target()# Name()# LinkAgainstSubTarget(# ICodeWarriorSubTarget* Target, # VARIANT_BOOL val);$subtargs = $target->SubTargets();$numsubtargs = $subtargs->Count();
for($i = 0; $i < $numsubtargs; $i++){ if ($subtargs->Item($i)->Target()->Name() eq $subtargettoopen) { $subtargettouse = $subtargs->Item($i); $target->LinkAgainstSubTarget($subtargettouse, $linkornot); exit; } }
This example script sets whether to link against a single target, but you can modify it to link against a number of subtargets or to read subtarget names from an input file.
Linking Against Sub-ProjectsThe COM API exposes a method that lets you specify whether to link against subprojecttargets (that is, targets within subprojects). To do so, use:
• LinkAgainstSubProjectTarget.
99IDE 5.9 Windows Automation Guide

Microsoft COM AutomationLinking Projects
LinkAgainstSubProjectTarget
The LinkAgainstSubProjectTarget method sets whether to link against a specified subprojecttarget within a target.
The following script shows how to use LinkAgainstSubProjectTarget to set whether to link against a specified subprojecttarget within a target:
# Script to set whether to link against a particular subtarget
# Win32::OLE gives access to COM objects,# including the IDE’s COM objectsuse Win32::OLE;
# Create an instance of CodeWarrior$CW = Win32::OLE->new("CodeWarrior.CodeWarriorApp");
# Get the command line arguments$projecttoopen = @ARGV[0]; # Use the full path$targettoopen = @ARGV[1]; # Use the target name$subprojecttoopen = @ARGV[2]; # Use the subprojectname$subprojecttargettoopen = @ARGV[3]; # Use the subprojecttarget name$linkornot = @ARGV[4]; # Use true or false
# Open the project# OpenProject(BSTR filePath,# VARIANT_BOOL fMakeVisible,# ECodeWarriorConvertOption convertOption,# ECodeWarriorRevertPanelOption revertOption)$project = $CW->OpenProject($projecttoopen, true, 0, 0);
# Get the target# FindTarget(BSTR Name)$target = $project->FindTarget($targettoopen);
# Get the subproject, get the subprojecttarget,# and set whether to link against it# GetSubProjects()# Count()# Item(long index)# Targets()# Name()# LinkAgainstSubProjectTarget(# ICodeWarriorSubProjectTarget* Target, # VARIANT_BOOL val);$subpjcts = $target->GetSubProjects();
100 IDE 5.9 Windows Automation Guide

Microsoft COM AutomationGenerating Debugger Output
$numsubpjcts = $subpjcts->Count();
for($i = 0; $i < $numsubpjcts; $i++){ if ($subpjcts->Item($i)->Name() eq $subprojecttoopen) { $subpjcttouse = $subpjcts->Item($i); $subpjctargets = $subpjcttouse->Targets(); $numsubpjcttargets = $subpjcttargets->Count(); for($j = 0; $j < $numsubpjcttargets; $j++) { if ($subpjcttgts->Item($j)->Name() eq $subprjttargettoopen) { $target->LinkAgainstSubProjectTarget(subpjcttargets->Item($j)); exit; # stop at the first match } } } }
This example script sets whether to link against a single subproject within a target, but you can modify it to link against a number of sub projects within a target or to read subproject target names from an input file.
Generating Debugger OutputUsing the COM API to debug, actually tells the IDE to build the target and create the debugging output. You can then capture the output for display or saving.
Debugging a Target
CodeWarriorTarget offers a single method for debugging a target:
• Debug
Debug
Debug starts a debugging session for a target.
To use the Debug method, you must first use the SetupDebugging method, as shown in the sample script.
101IDE 5.9 Windows Automation Guide

Microsoft COM AutomationGenerating Debugger Output
The following script shows how to use Debug:
# Script to debug a target and print the resulting messages
# Win32::OLE gives access to COM objects,# including the IDE’s COM objectsuse Win32::OLE;
# Create an instance of CodeWarrior$CW = Win32::OLE->new("CodeWarrior.CodeWarriorApp");
# Get the command line arguments$projecttoopen = @ARGV[0]; # Use the full path$targettodebug = @ARGV[1]; # Use the target name
# Open the project# OpenProject(BSTR filePath,# VARIANT_BOOL fMakeVisible,# ECodeWarriorConvertOption convertOption,# ECodeWarriorRevertPanelOption revertOption)
$project = $CW->OpenProject($projecttoopen, true, 0, 0);
# Get the target# FindTarget(BSTR Name)$target = $project->FindTarget($targettodebug);
# Enable debugging for this target# SetupDebugging(VARIANT_BOOL inTurnOn)$target->SetupDebugging(true);
# Start debugging# Debug()$messages = $target->Debug();
# Print the messages# Errors()# ErrorCount()# Warnings()# WarningCount()# Informations()# InformationCount()# Definitions()# DefinitionCount()# Item(long index)# ErrorNumber()# MessageText()$errors = $messages->Errors();
102 IDE 5.9 Windows Automation Guide
Microsoft COM AutomationGenerating Debugger Output
$numerrors = $messages->ErrorCount();$warnings = $messages->Warnings();$numwarnings = $messages->WarningCount();$informations = $messages->Informations();$numinformations = $messages->InformationCount();$definitions = $messages->Definitions();$numdefinitions = $messages->DefinitionCount();
print ("Number of Errors: $numerrors\n");print ("----------------------------------\n");for ($i = 0; $i < $numerrors; $i++){ $errortoprint = $errors->Item($i); $errornum = $errortoprint->ErrorNumber(); $stringtoprint = $errortoprint->MessageText(); print("$errornum: $stringtoprint\n");}
print ("\nNumber of Warnings: $numwarnings\n");print ("----------------------------------\n");for ($i = 0; $i < $numwarnings; $i++){ $warningtoprint = $warnings->Item($i); $Warningnum = $warningtoprint->ErrorNumber(); $stringtoprint = $warningtoprint->MessageText(); print("$warningnum: $stringtoprint\n");}
print ("\nNumber of Informations: $numinformations\n");print ("----------------------------------\n");for ($i = 0; $i < $numinformations; $i++){ $informationtoprint = $informations->Item($i); $informationnum = $informationtoprint->ErrorNumber(); $stringtoprint = $informationtoprint->MessageText(); print("$informationnum: $stringtoprint\n");}
print ("\nNumber of Definitions: $numdefinitions\n");print ("----------------------------------\n");for ($i = 0; $i < $numdefinitions; $i++){ $definitiontoprint = $definitions->Item($i); $definitionnum = $definitiontoprint->ErrorNumber(); $stringtoprint = $definitiontoprint->MessageText(); print("$definitionnum: $stringtoprint\n");}
103IDE 5.9 Windows Automation Guide
Microsoft COM AutomationDisplaying IDE Messages
# end of script
This example script generates debugging information for a single target, but you could modify it to work for multiple targets or to read targets from an input file. You could also write the resulting output to text files.
Displaying IDE MessagesThe COM API lets you log CodeWarrior IDE messages on your screen.
Logging IDE Output
CodeWarriorBuildMessages and CodeWarriorMessages offers the following methods for logging IDE messages:
• Errors
• ErrorCount
• MessageText
The following script shows how to use the above mentioned methods:
# compile and get list of messages (CodeWarriorBuildMessages) my $messages = $target->BuildAndWaitToComplete();
# if messages undefined, maybe the build hung if ( !defined($messages) ) { print LOG ("Messages undefined! perhaps the IDE hung.\n"); exit(1); }
# report any errors if ($messages->ErrorCount > 0) {
print LOG ("---------------------------------------------\n"); print LOG ($messages->ErrorCount . " errors on build:\n");
# print out the version of CodeWarrior actually used $toolpath = $CW->FullName(); print LOG ("buildtool is $toolpath\n");
# CodeWarriorMessageCollection $errors my $errors = $messages->Errors();
104 IDE 5.9 Windows Automation Guide

Microsoft COM AutomationUsing Version Control System
for (my $i = 0; $i < $errors->Count(); $i++) { # CodeWarriorMessage my $m = $errors->Item($i); print LOG ( "\n" ); print LOG (substr($m->FileSpec->FullPath, $dirLen+1) . "\n"); if ( defined($m->projectFile) ) { print LOG (substr($m->projectFile->Name, $dirLen+1) . "\n"); } else { print LOG ("message project file not defined!\n"); } if (defined($m->Target)) { print LOG ($m->Target()->Name() . "\n"); } else { print LOG ("message target not defined!\n"); } print LOG ( "\n" . $m->MessageText() . "\n" ); }
print LOG ("----------------------------------------------\n"); }
Using Version Control SystemThe COM API lets you check files into and out of a version control system. To use the version control methods, you must have set the various version control settings in the IDE, either for the current project or globally.
Using Version Control
CodeWarriorProject offers a single method for accessing a version control system:
• VersionControl
VersionControl
The following script shows how to use VersionControl:
# Script to perform VCS operations on files # of a specified type within a project
# Win32OLE gives access to COM objects,# including the IDE¼s COM objects
105IDE 5.9 Windows Automation Guide

Microsoft COM AutomationUsing Version Control System
use Win32OLE;
# Create an instance of CodeWarrior$CW = Win32OLE->new("CodeWarrior.CodeWarriorApp");
# Get the command line arguments$projecttoopen = @ARGV[0]; # Use the full path$filename = @ARGV[1]; # Use the file name or wildcards # (such as "*.c")$inorout = @ARGV[2]; # Use "checkin" or "checkout"
# Open the project# OpenProject(BSTR filePath,# VARIANT_BOOL fMakeVisible,# ECodeWarriorConvertOption convertOption,# ECodeWarriorRevertPanelOption revertOption)
$project = $CW->OpenProject($projecttoopen, true, 0, 0);
# Get the filecollection object# FindFileByName(BSTR fileName)$filecoll = $project->FindFileByName($filename);
# Get the number of files# Count()$numfiles = $filecoll->Count();
# Get the version control client# VersionControl()$vcc = $project->VersionControl();
# Connect to the version control database# Connect()# IsConnected()if (!$vcc->IsConnected()){ $vcc->Connect();}
# Perform the VCS operationif ($inorout eq "checkin"){ for($i = 0; $i < $numfiles; $i++) { $filetocheck = $filecoll->Item($i); $state = $filetocheck->VCSState()->CKIDState(); $thisfilename = $filetocheck->Name(); if($state == 0)
106 IDE 5.9 Windows Automation Guide

Microsoft COM AutomationUsing Version Control System
{ print("
} elsif ($state == 1) { print("
} elsif ($state == 2) { print("
} elsif ($state == 3) { print("
$filetocheck->Checkin(); } elsif ($state == 4) { print("
} }}else{ for($i = 0; $i < $numfiles; $i++) { $filetocheck = $filecoll->Item($i); $state = $filetocheck->VCSState()->CKIDState(); $thisfilename = $filetocheck->Name(); if($state == 0) { print("
} elsif ($state == 1) { print("
} elsif ($state == 2) { print("
107IDE 5.9 Windows Automation Guide
Microsoft COM AutomationUsing Version Control System
$filetocheck->Checkout(); } elsif ($state == 3) { print("
} elsif ($state == 4) { print("
$filetocheck->Checkout(); } }}
# Disconnect from the version control database# Disconnect()# IsConnected()if ($vcc->IsConnected()){ $vcc->Disconnect();}
# end of script
108 IDE 5.9 Windows Automation Guide
Index
AAdding a File 78, 79alias 21attach 21
Bbp 22Build 82build manipulation 13BuildAndWaitToComplete 84BuildAndWaitToCompleteWithOptions 86building
projects 82builds 13BuildWithOptions 83built-in Tcl commands 20
Ccd 23chapter contents 7cls 29cmdIDE 12cmdIDE.exe 11CodeWarrior commands 20CodeWarrior IDE command-line tool 11CodeWarrior Instance, Creating 77CodeWarrior Type Library, Opening 74command
alias 21bp 22cd 23cls 29config 30copy 37debug 38dir 39disassemble 39ep::pause 46ep::script 48evaluate 49exit 50
finish 51getpid 51go 51help 52history 52kill 53log 53make 53next 57nexti 57project 58pwd 58quitIDE 59radix 59removeobj 62restart 63restore 64save 64sourcedisplay 66stack 66status 67step 67stepi 68stop 69switchtarget 69system 69wait 71watchpoint 71window 72
Command Window 15copy and paste 19history 19scrolling 19
Command Window GUI interface 17Command Window parts
description 18command-line
compiler 11extended commands 14IDE tool 11linker 11manipulating build 13
109IDE 5.9 Windows Automation Guide
manipulating debug 14manipulating startup 12
command-line debugger 11CompileFiles 92CompileFilesAndWaitToComplete 93CompileFilesWithChoice 95compiler 11compiling files
from projects 90from targets 92
Compiling projects 90config 30copy 37Creating a CodeWarrior Instance 77
DDebug 101debug 14, 38debug manipulation 14debugger 11debugging a target 101Details, Method, Finding 77dir 39disassemble 39
Eep::pause 46ep::script 48ErrorCount 104Errors 104evaluate 49exit 50extended commands 14
FFile
Adding 78, 79Removing 79
files, compilingfrom projects 90from targets 92
files, managing 78Finding Method Details 77
finish 51
Ggenerating debugger output 101GetLinkerName 97getpid 51getting the linker name 97go 51
Hhelp 52history 19, 52how to start Command Window 17
IIDE command-line tool 11IDE, logging output 104Instance, CodeWarrior, Creating 77
Kkill 53
LLinkAgainstSubProjectTarget 100LinkAgainstSubTarget 98linker 11
name, getting 97settings, specifying 98
linking projects 97log 53logging IDE output 104
Mmake 53Managing project files 78manipulating builds 13manipulating debug 14manipulating projects 80manipulating startup 12MessageText 104Method Details, Finding 77
110 IDE 5.9 Windows Automation Guide

Nnext 57nexti 57
OObject Code, Removing 80OLE/COM Object Viewer 73OLE/COM Object Viewer, Using 73Opening the CodeWarrior Type Library 74
Pproject 58project files, managing 78project, building 82projects, compiling files in 90pwd 58
QquitIDE 59
Rradix 59reg 60related documentation
IDE command-Line tools 8removeobj 62RemoveObjectCode 81RemoveObjectCodeWithOptions 81Removing
a File 79Object Code 80
restart 63restore 64running Tcl scripts 19
Ssave 64sourcedisplay 66specifying linker settings 98stack 66starting Command Window 17startup manipulation 12status 67
step 67stepi 68stop 69switchtarget 69system 69
Ttarget, debugging 101targets, compiling files in 92Tcl 15Tcl Built-in commands 20Tcl command
alias 21bp 22cd 23cls 29config 30copy 37debug 38dir 39disassemble 39ep::pause 46ep::script 48evaluate 49exit 50finish 51getpid 51go 51help 52history 52kill 53log 53make 53next 57nexti 57project 58pwd 58quitIDE 59radix 59removeobj 62restart 63restore 64save 64sourcedisplay 66
111IDE 5.9 Windows Automation Guide
stack 66status 67step 67stepi 68stop 69switchtarget 69system 69wait 71watchpoint 71window 72
Tcl scriptsrunning 19
tcld.tcl 19Type Library, CodeWarrior, Opening 74
UUsing
OLE/COM Object Viewer 73Version Control 105
Using OLE/COM Objects exposed by IDE tobuild projects 82compile projects 90create a CodeWarrior instance 77generate debugger output 101link project files 97log IDE output 104manage files in projects 78remove object code from projects 80use version control system 105
Vvar 70version control 105Version Control, Using 105VersionControl 105Viewing OLE/COM Objects 73viewing OLE/COM objects exposed by
CodeWarrior IDE 73
Wwait 71watchpoint 71window 72
112 IDE 5.9 Windows Automation Guide