collaboration compass user guide - lytec.com 2_ collaboration compass... · a confirmation message...
TRANSCRIPT

Collaboration Compass User Guide Page 1
Collaboration Compass™ User Guide
June 2007

Collaboration Compass User Guide Page 2
Introduction
The purpose of this document is to provide instruction to users of Collaboration Compass™ and serve as the user guide.
1. Self Registration
Self-Registration allows new users to register for access to Collaboration Compass™ and corresponding applications.
1. Access Collaboration Compass™ with the following url: http://collaborationcompass.com
2. Click Register
Please Note: Users who do not access their account for 180 consecutive days, may be removed from the system. In order to regain access to the Collaboration Compass™, the user must complete the registration process with a new user ID

Collaboration Compass User Guide Page 3
3. Review the disclaimer and click Accept, located at the bottom of the page.
4. Enter the required information indicated by the red asterisk, select news subscriptions by holding down the Ctrl key and clicking each subscription needed.
5. Click Submit, located at the bottom of the page
Please Note: An invalid submitter ID will delay approval.
6. A confirmation message will display, indicating your registration has been accepted; Click OK to return to Identity Manager home page

Collaboration Compass User Guide Page 4
7. Registration staff will review the user request within 24 hours. Users who are approved will receive an email from the team. Users with invalid Submitter IDs will be contacted for additional information.
Upon receipt of the Collaboration Compass Registration Completed email, users will have access to the Collaboration Compass™ and the RelayHealth Payor Agreement Library
2. Forgotten Password
A temporary password can be generated by using the Forgotten Password function.
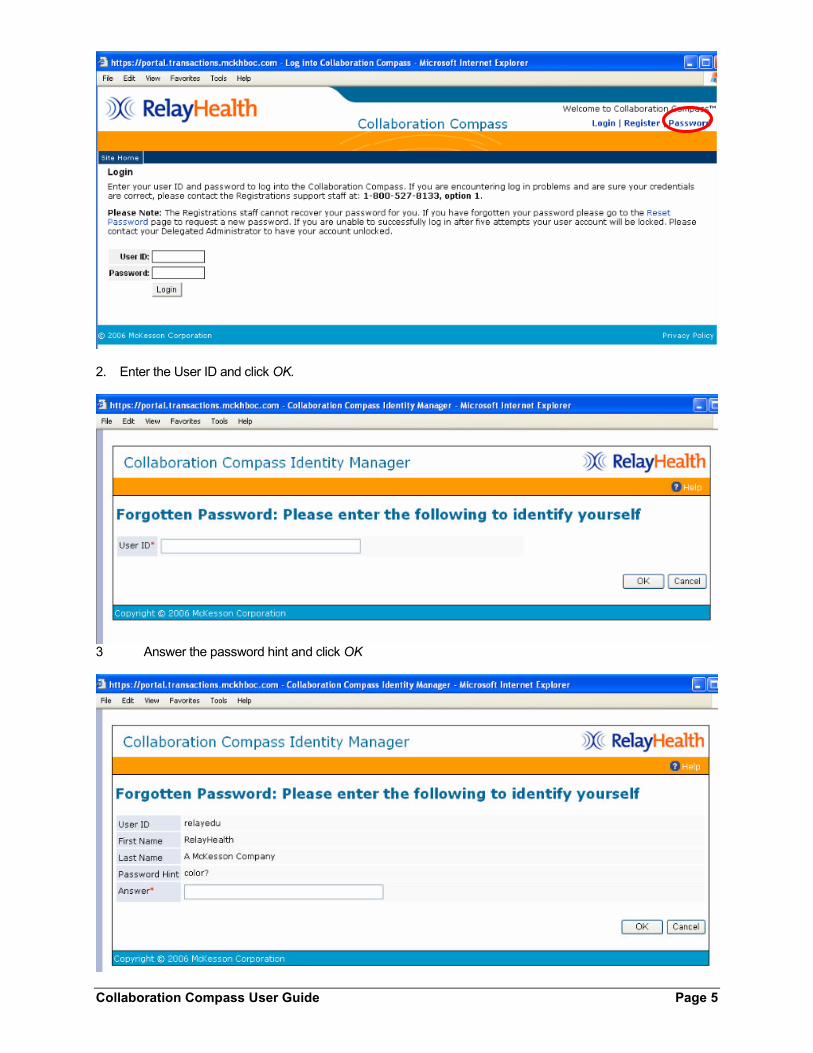
1. Click Password
Collaboration Compass User Guide Page 5
2. Enter the User ID and click OK.
3 Answer the password hint and click OK

Collaboration Compass User Guide Page 6
3. A temporary password will be displayed, copy (CTRL C) the temporary password; the password will also be emailed to the address in the user profile
4. Click OK to return to the Collaboration Compass™ login screen
5. Use the temporary password to log in; once logged in, the user will be required to change their password
6. After entering the new password, click Change Password
7. Click Continue on the next screen.
3. Accessing Identity Manager
To access Identity Manager users will need to be logged into Collaboration Compass™. Access within Identity Manager is based on the roles assigned within each user’s profile.
1. Access Collaboration Compass™ with the following url: http://.collaborationcompass.com

Collaboration Compass User Guide Page 7
2. Login to Collaboration Compass™ by clicking Login
3. Enter the appropriate User ID and password; click Login
4. Click My Account on the top right of the page to access Identity Manager

Collaboration Compass User Guide Page 8
4. My Account
My Account allows users to view their roles and modify or view their profile and password.
1. Clicking on My Account brings you to the following screen.
5.1. Change My Password The Change My Password function allows users to change their password if they know their current password. Change My Password may only be accessed if the user is signed in to Identity Management.
1. Click Change My Password

Collaboration Compass User Guide Page 9
Clear the password field, type in the new password, and retype to confirm
2. Click Submit
3. Click OK to return to the Identity Manager home page

Collaboration Compass User Guide Page 10
5.2. Change My Password Hint Change My Password Hint allows users to change the Challenge question and answer, which is used for
security purposes.
1. Click Change My Password Hint

Collaboration Compass User Guide Page 11
2. Update the question and/or answer and click Submit
3. Click OK
5.3. Modify My Profile Modify My Profile allows users to change their demographic information, like the email address or phone number associated with their account.
1. Click Modify My Profile

Collaboration Compass User Guide Page 12
2. Update the necessary information and click Submit
Please Note: Users may only change the submitter ID to another within their scope.
3. Click OK to return to the Identity Manager home page

Collaboration Compass User Guide Page 13
5.4. View My Profile
View My Profile displays the user’s current demographic information and any Access or Admin roles associated with the user setup.
Access Roles grant users access to RelayHealth applications, like the ASP Eligibility application or the Agreements Website.
Admin Roles allow a user to view and modify other users within their established scope. For example, it allows Business Partners to view and modify their customers’ users.
1. Click View My Profile

Collaboration Compass User Guide Page 14
2. The Profile tab allows users to view their demographic information and News Subscriptions, as well as the Submitter ID associated with their user ID
3. To view Access Roles, click the Access Roles tab
• Members of a role are granted the rights associated with a role
• Administrators of a role may assign it to other users
4. To view Admin Roles, click the Admin Roles Tab
• Members of a role are granted the rights associated with a role
• Administrators of a role may assign it to other users

Collaboration Compass User Guide Page 15
5. Click Close to return to the Identity Manager home screen
5.5. View My Roles
View My Roles displays a list of Access and Admin roles associated with a user account.
Access Roles grant users access to RelayHealth applications, like the ASP Eligibility application or the Agreements Website.
Admin Roles allow a user to view and modify other users within their established scope. For example, it allows Business Partners to view and modify their customers’ users.
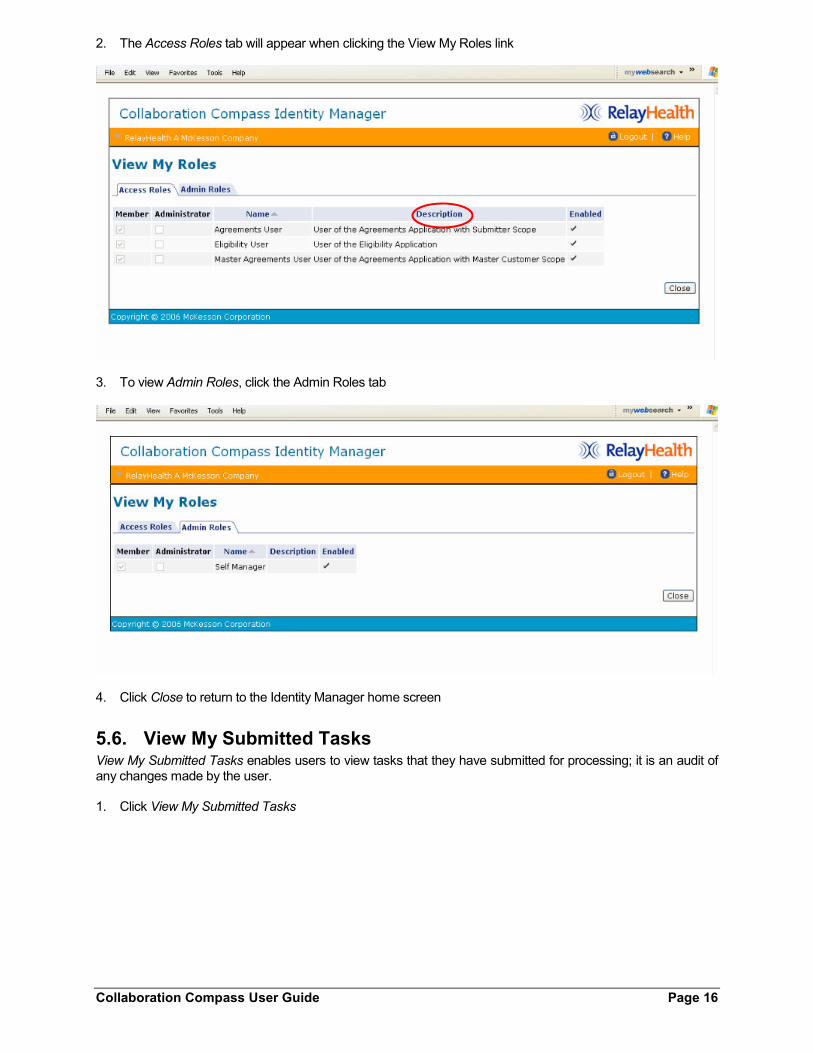
1. Click View My Roles
Collaboration Compass User Guide Page 16
2. The Access Roles tab will appear when clicking the View My Roles link
3. To view Admin Roles, click the Admin Roles tab
4. Click Close to return to the Identity Manager home screen
5.6. View My Submitted Tasks View My Submitted Tasks enables users to view tasks that they have submitted for processing; it is an audit of any changes made by the user.
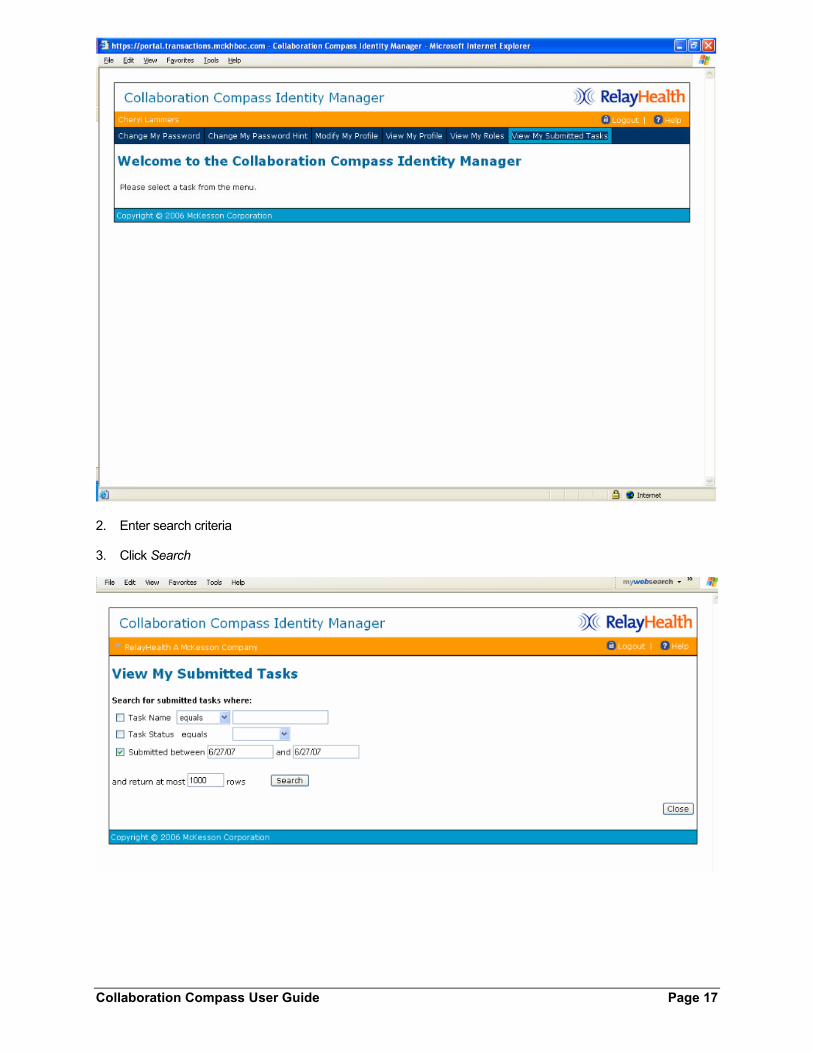
1. Click View My Submitted Tasks
Collaboration Compass User Guide Page 17
2. Enter search criteria
3. Click Search

Collaboration Compass User Guide Page 18
4. Click the Edit icon to view the desired task
Please Note: Users will see Completed or Audited in the Status column for each task. Completed tasks are changes submitted to the application and completed. Audited tasks were viewed but no change was submitted. An audit entry is inserted each time an item is viewed.
5. Click Close to return to the Identity Manager home page

Collaboration Compass User Guide Page 19
6. Customizing Your Pages
Overview You have the ability to customize the content and layout of your Home page. On other pages, you have the ability to minimize and maximize portlets.
The following is an example of what is meant by a portlet:
Click here to customize your page

Collaboration Compass User Guide Page 20
6.1. Adding Content To add content to your Home page, complete the following steps:
Main Path
1. Click the “Content” link at the top left of the page. See illustration in Overview section.
2. Select the portlets you wish to add to your page by clicking the check box for each portlet.
3. Click the “Add Selected” or “Add and Arrange Portlets” button.
The following describes each of the elements found on the Add Content page:
Expand All Clicking this link expands all sections to display all portlets.
Collapse All Clicking this link collapses all sections and only the section headings will appear.
Preview Icon Clicking this icon displays a preview of the content of that portlet.
Portlet List Each portlet contains a description of the portlet and a check box for selection.
Add Selected Clicking this button displays either your Home page or the Applications page with the selected portlets added to the page.
Add and Arrange Portlets Clicking this button displays adds the selected portlets and displays the Layout page.
Select portlets
Click to add your selections
Preview portlets

Collaboration Compass User Guide Page 21
6.2. Layout To arrange the layout of portlets on your Home page, complete the following steps:
Main Path
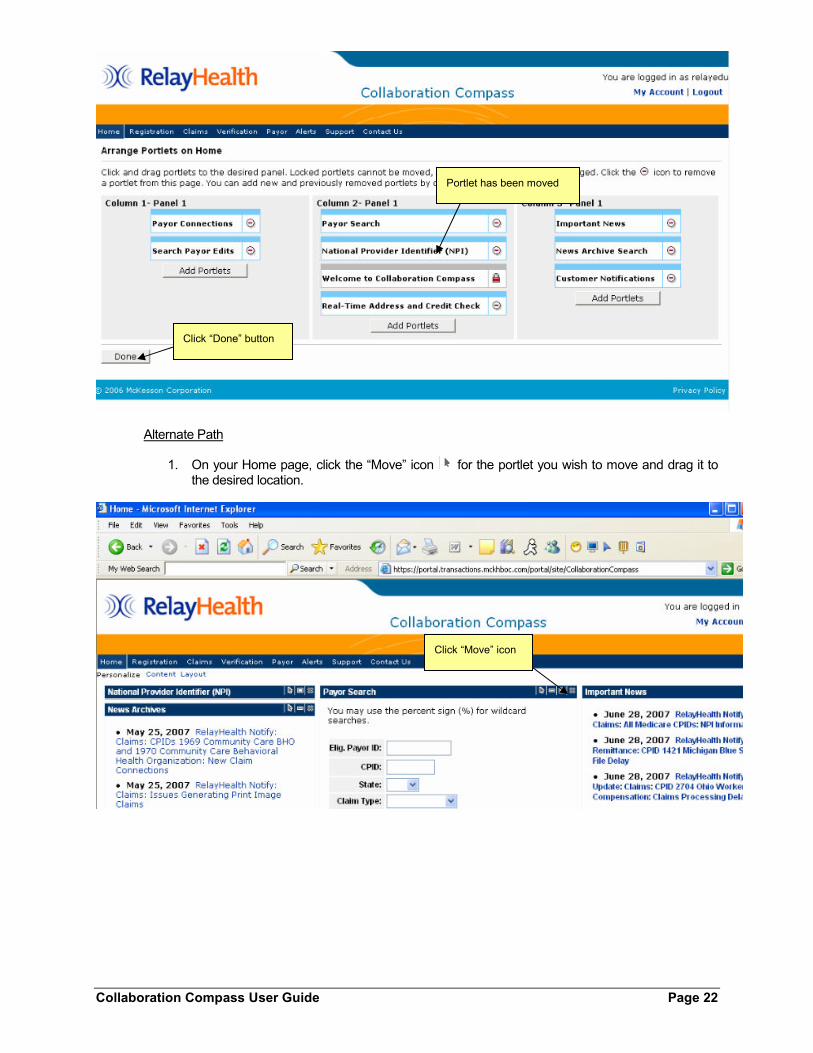
1. Click the “Layout” link at the top left of the page. See illustration in Overview section.
2. Click on the portlet you would like to move and drag it to the desired location.
3. Click the “Done” button.
Click on portlet to move
Drag portlet to desired location
Collaboration Compass User Guide Page 22
Alternate Path
1. On your Home page, click the “Move” icon for the portlet you wish to move and drag it to the desired location.
Portlet has been moved
Click “Move” icon
Click “Done” button

Collaboration Compass User Guide Page 23
The following describes each of the elements found on the Layout page:
Instructional Text Gives instruction on arranging portlets on a page.
Portlet Each portlet will be displayed in it’s location on the page. Clicking on the portlet will allow you to drag it to a new location on the page.
Remove Icon Clicking this icon removes the portlet from the page.
Drag portlet to desired location
Portlet has been moved

Collaboration Compass User Guide Page 24
Portlet List Each portlet contains a description of the portlet and a check box for selection.
Add Portlets Clicking this button displays the Add Content page.
Done Clicking this button displays either your Home page or the Applications page with your layout changes.
6.3. Minimizing/Maximizing Portlets Minimizing a portlet will collapse the portlet and only display the header bar. To minimize a portlet, click the
minimize icon.
Maximizing a portlet will restore the portlet to its normal size. To maximize a portlet, click the maximize
icon. The maximize icon will only appear when a portlet is minimized.
6.4. Removing Portlets To remove portlets on your Home page or the Applications page, complete the following steps:
Main Path
1. Click the “Remove” icon for the portlet you wish to remove.
Minimize portlet
Maximize portlet
Remove portlet

Collaboration Compass User Guide Page 25
Alternate Path
1. Click the “Layout” link at the top left of the page. See illustration in Overview section.
2. Click the “Remove” icon on the Layout page.
3. Click the “Done” button.
7. Home
Your Home page will contain whatever portlets you choose to appear on the page. You can have as many portlets as you wish on the page (see Adding Content) and arrange them in the layout of your choice (see Layout).
8. Site Home
The Site Home page contains a description of the Transaction Services and the services provided.
9. Claims
8.1. Claims Control The Claims Control page displays a portlet with a description of the Claims Control application and if the user has the appropriate permissions, a link to the application is displayed. Clicking the link will open the application in a new window.
Click “Remove” icon
Click “Done” button

Collaboration Compass User Guide Page 26
9. Verification
9.2. Eligibility The Eligibility page displays a portlet with a description of the Real-Time Eligibility application and if the user has the appropriate permissions, a link to the application is displayed. Clicking the link will open the application in a new window.
9.3. Address Check The Address Check page displays a portlet with a description of the Real-Time Address and Credit Check application and if the user has the appropriate permissions, a link to the application is displayed. Clicking the link will open the application in a new window.
9.4. Credit Check The Credit Check page displays a portlet with a description of the Real-Time Address and Credit Check application and if the user has the appropriate permissions, a link to the application is displayed. Clicking the link will open the application in a new window.
Link to application
Link to application
Link to application

Collaboration Compass User Guide Page 27
10. Payor
10.5. Payor Agreements The Payor Agreements page displays a portlet with a description of the Payor Agreements Library application and if the user has the appropriate permissions, a link to the application is displayed. Clicking the link will open the application in a new window.
11. Alerts
11.6. What’s New To display the important news items and all customer notifications, choose the What’s New item under the Alerts navigation item.
The What’s New page contains the following information:
� Important News
� Important News Search
To perform an Important News search, enter the criteria of your choice and click the “Search” button. The results of the search are displayed in a new window.
� Customer Notifications
� Customer Notification Search
To perform a Customer Notification search, enter the criteria of your choice and click the “Search” button. The results of the search are displayed in a new window.
Link to application
Link to application
Collaboration Compass User Guide Page 28
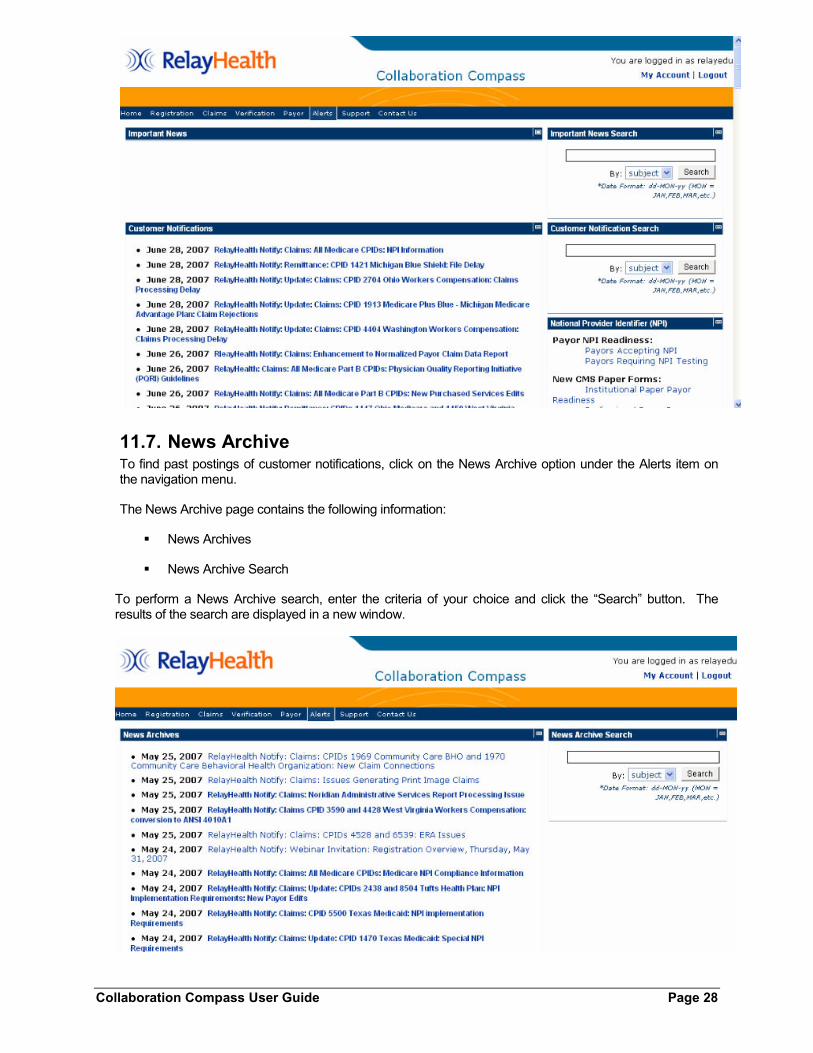
11.7. News Archive To find past postings of customer notifications, click on the News Archive option under the Alerts item on the navigation menu.
The News Archive page contains the following information:
� News Archives
� News Archive Search
To perform a News Archive search, enter the criteria of your choice and click the “Search” button. The results of the search are displayed in a new window.

Collaboration Compass User Guide Page 29
12. Support
To display the main Support page, click on the Support item on the navigation bar. The main Support page contains the following information:
� Support Services
� Support Schedules
� Case Standards
� Support Links
12.8. Payor From the Support item on the navigation bar, click on the Payor option to display the Payor page. The Payor page contains the following information:
� Payor Connections
Payor connections for existing and new professional and institutional claims (state and commercial) are accessible. Remittances, eligibility, upcoming formats, and ANSI formatted payors are also available.
The payor connections reports may be generated in an online, report format (click "Report") or exported to a text file (click "File").
� Payor Search
The Payor Search utility pulls together all of the payor information (edits, agreement requirements, guides, etc.) available on RelayHealth web site into a comprehensive payor data resource.
To perform a Payor Search, enter the criteria of your choice and click the “Search” button. The results of the search are displayed in a new window. To clear all criteria fields, click the “Reset” button.
� Search Payor Edits

Collaboration Compass User Guide Page 30
The Payor Edits utility allows users to view ANSI payor-specific edits for any payors that currently have connections with RelayHealth and receive an ANSI claim file.
To search Payor Edits, enter the criteria of your choice and click the “Search” button. The results of the search are displayed in a new window. To clear all criteria fields, click the “Reset” button.
12.9. Customer Education/Training From the Support item on the navigation bar, click the Customer Education/Training option to display the Customer Education and Training page.
RelayHealth offers webinar training for clients on various topics. The Customer Education and Training page contains information about webinars and a list of upcoming webinars.

Collaboration Compass User Guide Page 31
12.10. Communication Options From the Support item on the navigation bar, click on the Communication Options option to display the Communication Options page.
RelayHealth offers a variety of secure, HIPAA-friendly data transmission options to meet our customers’ needs. Whether you’re performing ‘traditional’ transactions like batch claims submission, or using our ‘real-time’ offerings like Eligibility or Address and Credit, our communications services connect you with RelayHealth.
The Communication Options page contains the following information:
� Communication Options
� Software Downloads

Collaboration Compass User Guide Page 32
12.11. Documentation From the Support item on the navigation bar, click the Documentation item to display the Documentation page. The Documentation page contains the following information:
� Frequently Asked Questions
Get most of your ‘Frequently Asked Questions’ answered here. Please feel free to e-mail us with any additional questions that would be beneficial.
� EDI Specifications
There are four extremely valuable tools to enable successful electronic data exchange to RelayHealth.
14. Contact Us
From the main navigation menu, click the Contact Us item to contact RelayHealth support regarding enrollment, testing, or support issues.
The Contact Us page contains the following information:
� Product Support
� Contact RelayHealth