color touchscreen thermostat
TRANSCRIPT

User Guide
Read and save these instructions.
For help please visit honeywellhome.com
Color Touchscreen Programmable Thermostat
M37768
72
Find rebates: HoneywellHome.com/Rebates
RTH9585WF1004 RTH9585WF1012Smart Series
In the box you will find• Thermostat
• Wallplate
• Screws and anchors
• Quick Start Guide
Features of your thermostatWith your new thermostat, you can:
• Connect to the Internet to monitor and control your heating/cooling system.
• View and change your heating/cooling system settings.
• View and set temperature and schedules.
• Receive alerts via email and get automatic upgrades.
• View outdoor temperature and humidity (requires Wi-Fi set up and registration).
• Thermostat ID Card
• Wire labels
• User Guide
• C-wire adapter and C-wire addendum

69-2715EF—07 ii
WelcomeCongratulations on your purchase of a color touchscreen programmable thermostat. When registered to Total Connect Comfort, you can remotely monitor and control the heating and cooling system in your home or business—you can stay connected to your comfort system wherever you go.
Total Connect Comfort is the perfect solution if you travel frequently, own a vacation home, a business, or manage an investment property or if you are simply looking for peace of mind.
This thermostat works with common 24 volt systems such as forced air, hydronic, heat pump, oil, gas, and electric. It will not work with millivolt systems, such as a gas fireplace, or with 120/240 volt systems such as baseboard electric heat.
MERCURY NOTICE: Do not place your old thermostat in the trash if it contains mercury in a sealed tube. Contact the Thermostat Recycling Corporation at www.thermostat-recycle.org or 1-800-238-8192 for information on how and where to properly and safely dispose of your old thermostat.
CAUTION: ELECTRONIC WASTE NOTICE.The product should not be disposed of with other household waste. Check for the nearest authorized collection centers or authorized recyclers. The correct disposal of end-of-life equipment will help prevent negative consequences for the environment and human health.
NOTICE: To avoid possible compressor damage, do not run air conditioner if the outside temperature drops below 50°F (10°C).
Need help?Visit honeywellhome.com/wifi-thermostat or call 1-855-733-5465 for assistance before returning the thermostat to the store.

69-2715EF—07 1
About your new thermostatHome screen quick reference ................ 1Business screen quick reference .......... 2
InstallationInstalling your thermostat ........................ 3Connecting to your Wi-Fi network .... 10Registering your thermostat online ... 13
OperationSetting the time/date .............................. 15Setting the fan............................................. 15Selecting system mode .......................... 16Preset energy-saving schedules........ 16Adjusting program schedules ............. 17Overriding schedules–home................ 18Overriding schedules–business ......... 18Viewing equipment status .................... 19Setting vacation hold–home ............... 19Setting holiday/event schedules– business ...................................................... 20 Setting custom events–business ...... 20
Setting holiday schedule–business... 21 Setting holiday override–business ... 22Initiating occupancy mode–business ..22Customizing screen color ...................... 23Setting preferences .................................. 23Cleaning the thermostat screen ........ 24Adjusting security settings ................... 24Software updates ....................................... 25Unregistering your thermostat ........... 25Smart Response Technology ............... 25Pre-occupancy purge .............................. 26Compressor protection ........................... 26Auto changeover ........................................ 26Setting advanced preferences ............ 28Changing system setup ......................... 28
AppendicesFrequently asked questions ................. 30Getting help and responding to alerts ............................................................. 31Troubleshooting ......................................... 32Limited warranty ........................................ 34
Table of contents
Quick reference: home use
FAN. Select fan mode.
HOME. Touch to display Home screen.
Current time.
Outdoor conditions. Outdoor temperature and humidity appear after registration.
Current status. Shows system mode (heat/cool).
MODE. Select system mode (heat, cool, auto, em heat).
SETTINGS. Touch to display options. Start here to set a program schedule.
Current setting. Change temperature setting and select temporary or permanent hold.
Indoor conditions. Shows indoor temperature and humidity.

69-2715EF—07 2
Quick reference: business use
Setting up your thermostatSetting up your programmable touchscreen thermostat is easy. It is preprogrammed and ready to go as soon as it is installed and registered.
Install your thermostat.
Connect it to your home wireless network.
Register online for remote access.
Before you begin, you may want to watch a brief installation video. Use the QR Code® at the front of this guide, or go to honeywellhome.com/wifi-thermostat
2
3
1
FAN. Select fan mode.
HOME. Touch to display Home screen.
Current time.
Outdoor conditions. Outdoor temperature and humidity appear after registration.
Current status. Shows system mode (heat/cool).
Override. Touch to temporarily override the program schedule.
MODE. Select system mode (heat, cool, auto, em heat).
SETTINGS. Touch to display options. Start here to set a program schedule.
Thermostat location. Quickly identify which thermostat is in control of a specific area.
Current setting. Change temperature setting and select temporary or permanent hold.
Indoor conditions. Shows indoor temperature and humidity.

3 69-2715EF—07
Installing your thermostat
You might need the following tools to install this thermostat:
• No. 2 Phillips screwdriver• Pen• Pencil• Level (optional)
• Drill and bits (3/16” for drywall, 7/32” for plaster) (optional)
• Hammer (optional)• Electrical tape (optional)
1 Switch OFF power to your heating/cooling system.
Important! To protect your equipment, switch OFF the power to your heating/cooling system at the breaker box or the system switch.
or
M31535Circuit breaker
box
Heating/cooling system
power switch
C
M33823A
If you have an older thermostat with a sealed mercury tube, turn to page ii for proper disposal instructions.
Terminal designation
2 Remove old thermostat faceplate and leave wires connected.
2a Take a picture of the wire connections for later reference.
2b If no wire is connected to a terminal labeled C or no C terminal exists on the old thermostat, view the Alternate Wiring videos at honeywellhome.com/wifi-thermostat or reference the C-wire addendum in the box.
Important! C wire is required and is the power source for your thermostat. Without a C wire, your thermostat will not power up.
Note: You will need a picture of your wire connections to wire the new thermostat.

69-2715EF—07 4
Installing your thermostat
3 Label the wires.
Use the supplied sticky tags to label each wire as you disconnect it. Label wires according to the old thermostat terminal designations, not by wire color.
Note: If no tag matches a terminal designation, write the appropriate letter on a blank sticky tag.
4 Remove wallplate.
Remove the old wallplate from the wall after all wires have been labeled and disconnected.
Blank tags
Sticky tag
Terminal designationC
C
MCR31537
Note: Wrap the wires around a pencil to prevent them from falling back into the wall.
LEVELHERE
R
Y
W
G
MCR34499
CK
RcR
W-O/B
YGW2-Aux/EY2L
C
5 Mount wallplate for thermostat.
Mount your new wallplate using screws and anchors included with the thermostat.
If necessary:
Drill 3/16-in holes for drywall.
Drill 7/32-in holes for plaster.
Note: You may be able to use your existing wall anchors. Hold the wallplate up to the existing anchors to check for alignment.
Wallplate

5 69-2715EF—07
Important! This thermostat requires a C, or common, wire for power. The C, or common, wire brings 24 VAC power to the thermostat. If you are replacing an existing thermostat, it might not have a C wire connected to it. Many older mechanical or battery operated thermostats do not require a C wire. See the C Wire Addendum document included in this package for more information.
Note: Not all heating/cooling systems label the 24 VAC common C. Check your system manual or contact the manufacturer to find out which terminal is the 24 VAC common.
View the Alternate Wiring videos at honeywellhome.com/wifi-thermostat
WiringFor conventional heating/cooling systems (natural gas, oil or electric furnace, air conditioner), see page 5. See “Glossary” on page 33 for further definition.
For a heat pump system, see page 6. See “Glossary” on page 33 for further definition.
Installing your thermostat
MCR34540
CK
RcR
W-O/B
YGW2-Aux/EY2L
WY
G
RC
Wiring (Conventional System)6A Wire the thermostat to your conventional system.
a Starting with the C Wire, match the sticky tag on the wire to the terminal labels.
You must have a C wire. b Straighten wire and gently slide into terminal hole until it clicks into place. (If you need to remove a wire, use a pen tip to press the terminal release and then pull wire out.)
Note: Refer to the wiring picture you took in Step 2.
Tip: To make it easier to slide the wire into place, use a pen tip to hold down the terminal release.
Note: The wiring for your application might be different than the wiring shown below.
Labels don’t match? See alternate wiring keys on pages 7-8.
Terminal release
Remove jumper loop ONLY if you have both R and Rc wires.
EXAMPLE WIRING Yours may look different

69-2715EF—07 6
Installing your thermostat
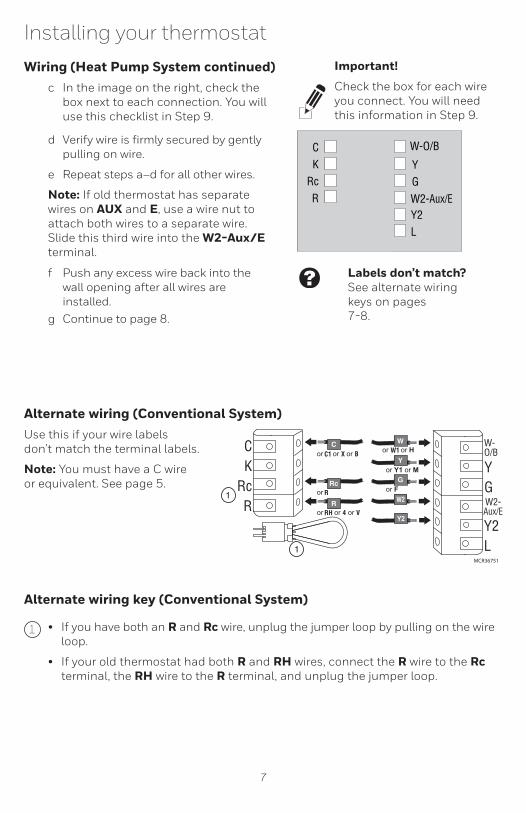
Wiring (Conventional System continued) c In the image on the right, check the box next to each connection. You will use this checklist in Step 9.
d Verify wire is firmly secured by gently pulling on wire. e Repeat steps a–d for all other wires. f Push any excess wire back into the wall opening after all wires are installed. g Continue to page 8.
Labels don’t match? See alternate wiring keys on pages 7-8.
Important!
Check the box for each wire you connect. You will need this information in Step 9.
CK
RcR
W-O/B
YGW2-Aux/EY2L
Wiring (Heat Pump System)6B Wire thermostat to your heat pump.
a Starting with the C Wire, match the sticky tag on the wire to the terminal labels.
You must have a C wire. See page 5. b Slide wire gently into terminal hole until it clicks into place. (If you need to remove a wire, use a pen tip to press the terminal release and then pull the wire out.)
Note: Refer to the wiring picture you took in Step 2.
Tip: To make it easier to slide the wire into place, use a pen tip to hold down the terminal release.
Note: The wiring for your application might be different than the wiring shown below.
MCR34566
CK
RcR
W-O/B
YGW2-Aux/EY2L
OY
G
RC
AUX
Labels don’t match? See alternate wiring keys on pages 7-8.
Terminal release
Remove jumper loop ONLY if you have both R and Rc wires.
EXAMPLE WIRING Yours may look different
7 69-2715EF—07
Installing your thermostat
Wiring (Heat Pump System continued) c In the image on the right, check the box next to each connection. You will use this checklist in Step 9.
d Verify wire is firmly secured by gently pulling on wire.
e Repeat steps a–d for all other wires.
Note: If old thermostat has separate wires on AUX and E, use a wire nut to attach both wires to a separate wire. Slide this third wire into the W2-Aux/E terminal.
f Push any excess wire back into the wall opening after all wires are installed. g Continue to page 8.
Labels don’t match? See alternate wiring keys on pages 7-8.
Important!
Check the box for each wire you connect. You will need this information in Step 9.
CK
RcR
W-O/B
YGW2-Aux/EY2L
Alternate wiring (Conventional System)Use this if your wire labels don’t match the terminal labels.
Note: You must have a C wire or equivalent. See page 5.
Alternate wiring key (Conventional System)
1 • If you have both an R and Rc wire, unplug the jumper loop by pulling on the wire loop.
• If your old thermostat had both R and RH wires, connect the R wire to the Rc terminal, the RH wire to the R terminal, and unplug the jumper loop.
MCR36751
C
R
W
Y
G
1
1
CK
RcR
W-O/B
YGW2-Aux/E
Y2L
W1
W2
Y2RH 4 V
RcR
C1 X B

69-2715EF—07 8
Installing your thermostat
Alternate wiring (Heat Pump System)Use this if your wire labels don’t match the terminal labels.
Note: You must have a C wire or equivalent. See page 5.
If you have both an R and Rc wire, unplug the jumper loop by pulling on the wire loop.
If your old thermostat had both R and RH wires, connect the R wire to the Rc terminal, the RH wire to the R terminal, and unplug the jumper loop.
If your old thermostat had both V and VR wires, check honeywellhome.com/wifi-thermostat for help.
If your old thermostat had separate O and B wires, and is controlling a single zone heat pump system, attach the B wire to the C. If there is more than one thermostat controlling the system, call Resideo zoning at 800-828-8367 for wiring assistance.
If your old thermostat had separate Y1, W1, and W2 wires, check honeywellhome.com/wifi-thermostat for help.
If the old thermostat has separate wires on Aux and E, use a wire nut to attach both wires to a separate wire. Slide this third wire into the W2-Aux/E terminal.
This is the system monitor. If the monitor finds a problem, you will see an orange alert button on the thermostat home screen.
Alternate wiring key (Heat Pump System)
2
1
4
6
3
5
7 Attach thermostat to wallplate.
Align the thermostat with the wallplate and then snap into place.
Thermostat
Wallplate
LEVELHERE
M34498A
MCR36752
C
R
O
Y
G
2
CK
RcR
W-O/B
YGW2-Aux/E
Y2L
3
4
5AUX
X X2
Y2
1
B
6
X B
RcR
V VR
1
LF
W W1 W2
9 69-2715EF—07
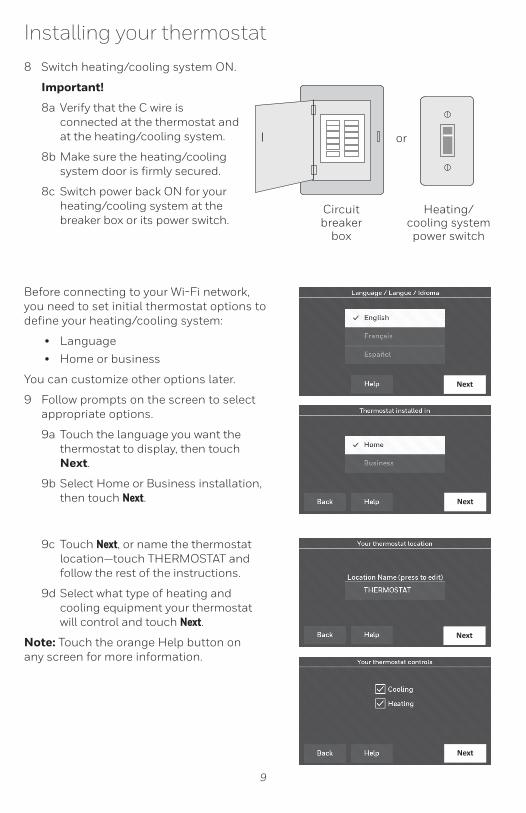
Installing your thermostat8 Switch heating/cooling system ON.
Important!
8a Verify that the C wire is connected at the thermostat and at the heating/cooling system.
8b Make sure the heating/cooling system door is firmly secured.
8c Switch power back ON for your heating/cooling system at the breaker box or its power switch.
M31544
or
Circuit breaker
box
Heating/cooling system
power switch
Before connecting to your Wi-Fi network, you need to set initial thermostat options to define your heating/cooling system:
• Language
• Home or business
You can customize other options later.
9 Follow prompts on the screen to select appropriate options.
9a Touch the language you want the thermostat to display, then touch Next.
9b Select Home or Business installation, then touch Next.
Next
Next
9c Touch Next, or name the thermostat location—touch THERMOSTAT and follow the rest of the instructions.
9d Select what type of heating and cooling equipment your thermostat will control and touch Next.
Note: Touch the orange Help button on any screen for more information.
Next
Next

69-2715EF—07 10
Installing your thermostat9e Select your system type and touch
Next. The system type determines other selections for completing initial setup. Use the checklist from Step 6A-d when making selections.
9f Touch Next after making selections on each screen.
9g Touch Done on the last screen. The thermostat displays an option to connect to your Wi-Fi network.
Note: Touch the orange Help button on any screen for more information.
Next
Connecting to your Wi-Fi network
After touching Done on the final screen of the initial set up, the thermostat displays an option to connect to your Wi-Fi network.
1 Connect the Wi-Fi network.
Touch Yes to connect the thermostat to your Wi-Fi network. The screen displays the message “Searching for wireless networks. Please wait...” after which it displays a list of all Wi-Fi networks it can find.
Note: If you cannot complete this step now, touch I’ll do it later. The thermostat will display the home screen. Complete this process by selecting SETTINGS > Wi-Fi Setup. Continue with Step 2.
2 Select the network.
2a Touch the name of the network you want to use. The thermostat displays a password page.
Yes
Your Network
Note: If your home network is not shown on the list, touch Rescan.

11 69-2715EF—07
2b Using the keyboard, touch the characters that spell out your home network password.
2c Touch Done. The thermostat displays “Connecting to your network. Please wait...” then shows a “Connection Successful” screen.
2d Touch OK to display the registration information screen.
2e Note your Thermostat MAC and Thermostat CRC. You need these numbers to complete online registration.
Done
OK
Connecting to your Wi-Fi network
To register your thermostat, follow the instructions beginning on page 13.
Note: The Register Online screen remains active until you complete registration and/or touch Done.
Note: If you touch Done before you register online, your home screen displays an orange alert button telling you to register. Touching that button displays registration information and an option to snooze the task.
Done
Register online for remote
access

69-2715EF—07 12
Reconnecting your Wi-Fi network1 Touch SETTINGS.
2 Select Wi-Fi Setup.
3 Touch the name of the network you want to use. The thermostat may display a password page.
4 To enter a password, touch characters to spell out your home network password, then touch Done.
5 The thermostat displays “Connecting to your network. Please wait...” then a “Connection Successful” screen.
6 Touch Next.
• If your thermostat is registered, you will see your signal strength and other status information. Touch Done.
• If the screen displays “Register Online for Remote Access,” follow instructions on page 13.
SETTINGS
Wi-Fi Setup
Disconnecting your Wi-Fi network1 Touch SETTINGS.
2 Select Wi-Fi Setup.
3 Touch Disconnect from Network. The thermostat will display a question to confirm your selection.
4 Touch Yes to confirm that you want to disconnect from the network. The thermostat will display the Wi-Fi Setup screen.
5 Touch OK to display the menu.
SETTINGS
Wi-Fi Setup
Disconnect from Network
OK

13 69-2715EF—07
M31570
M31570
To view and set your thermostat remotely, you must have a Total Connect Comfort account. Use the following steps.
1 Open the Total Connect Comfort web site.
Go to mytotalconnectcomfort.com
View the Thermostat Registration video at honeywellhome.com/wifi-thermostat
Registering your thermostat online
2 Login or create an account.
If you have an account, click Login
– or –
click Create An Account
2a Follow the instructions on the screen.
2b Check your email for an activation message from My Total Connect Comfort. This may take several minutes.
Note: If you do not receive a response, check your junk mailbox or use an alternate e-mail address.
2c Follow activation instructions in the email.
2d Log in.

69-2715EF—07 14
Registering your thermostat online
3 Register your thermostat.
After you are logged in to your Total Connect Comfort account, register your thermostat.
3a Follow the instructions on the screen. After adding your thermostat location, you must enter the thermostat’s unique identifiers:
• MAC ID
• MAC CRC
Note: These IDs are listed on the Register Online screen or on the Thermostat ID Card included in the thermostat package. The IDs are not case sensitive.
© 2018 Resideo Technologies, Inc. All rights reserved. The Honeywell Home logo is used under license from Honeywell International Inc.
Printed in U.S.A.
Resideo Inc., 1985 Douglas Drive North, Golden Valley, MN 55422
69-2723EFS-03
Thermostat ID CardUse the MAC ID and CRC ID to register this product at mytotalconnectcomfort.com
Carte d’identification de thermostatUtilisez l’identification MAC et l’identification CRC pour enregistrer ce produit à mytotalconnectcomfort.com
Tarjeta de identificación del termostatoUtilice la identificación MAC y la identificación CRC para inscribir este producto en mytotalconnectcomfort.com
www.resideo.com
MAC ID MAC CRC
When the thermostat is successfully registered, the Total Connect Comfort registration screen will display a SUCCESS message.
You can now control your thermostat from anywhere through your laptop, tablet, or smartphone.
°72GET IT ONTotal Connect Comfort free
app is available for Apple® iPhone®, iPad® and iPod touch® devices at iTunes® or at Google Play® for all Android™ devices.
Search for local rebates Your thermostat may now be eligible for local rebates. Search for offers in your area at HoneywellHome.com/Rebates

15 69-2715EF—07
Setting the time/date
1 Touch the current time. The screen displays Set Time/Set Date.
2 Touch Set Time or Set Date.
3 Touch p or q until the proper time/date is displayed.
4 Touch Done to save or Cancel to ignore changes.
Note: This thermostat will automatically update for daylight saving time (if observed in your area) and all date/time information is stored. If the thermostat is connected to Wi-Fi and registered to Total Connect Comfort, the current time is updated from the internet.
12:12 am
Done
Setting the fan
1 Touch FAN to display fan settings.
2 Touch On, Automatic, Circulate, or Follow Schedule.
3 Note: Follow Schedule option only appears if the fan is set for On or Circulate for one or more program periods.Touch Done to save and exit.
On: Fan is always on.Automatic: Fan runs only when the heating or cooling system is on.Circulate: Fan runs randomly about 35% of the time (home use only).Follow Schedule: Follow Schedule is not an option if all programs are set to fan auto (see pages 16-18).
Note: Touch On, Automatic, or Circulate to temporarily override the programmed fan schedule.
FAN
Done

69-2715EF—07 16
Preset energy-saving schedulesThis thermostat uses default Energy Saver settings that can reduce your heating/cooling expenses. To customize settings, see next page.
Wake 6:00 am 70° 78° 70° 78°
Leave 8:00 am 62° 85° 62° 85°
Return 6:00 pm 70° 78° 70° 78°
Sleep 10:00 pm 62° 82° 62° 82°
Cool (Mon-Fri)Start time
Heat (Mon-Fri)Period
Heat (Sat-Sun)
Cool (Sat-Sun)
Hom
e U
se
Occupied 1 8:00 am 70° 75° On
Unoccupied 1 10:00 pm 55° 85° Auto
Occupied 2* 12:00 am 70° 75° On
Unoccupied 2* 12:00 am 55° 85° Auto
CoolStart time HeatPeriod Fan
Bus
ines
s U
se
* Period 2 is cancelled by default. If you activate it, the values shown above are default settings.
Setting system mode
1 Touch MODE to display system settings.
2 Touch desired option:Heat: Thermostat controls only the heating system.Cool: Thermostat controls only the cooling system.Off: Heating/cooling systems are off.Automatic: Thermostat selects heating or cooling as needed depending on the indoor temperature.Emergency Heat (heat pumps with aux. heat): Controls auxiliary/emergency heat. Compressor is locked out.
3 Touch Done to save and exit.
Note: The Automatic and Emergency Heat system settings may not appear, depending on how your thermostat was installed. See “Auto changeover” on page 26.
MODE
Done

17 69-2715EF—07
Adjusting program schedules
1 Touch SETTINGS.
2 Select Create/Edit Schedule.
• Touch View/Edit to view the full schedule and make a quick adjustment.
• Touch Guide Me to create a schedule by answering simple questions.
• Touch I’ll do it myself to manually create a program schedule.
Note: To reduce costs, use the pre-set Energy Saver settings described on page 16.
SETTINGS
Create / Edit Schedule
If you selected I’ll do it myself on the Create/Edit Schedule screen follow these steps:
1 Select the days to schedule, touch Next.
2 Touch Wake to set your Wake time for selected days.
Next
6:00 am
Heat: 70°Cool: 78°Fan: Auto
WAKE
3 Touch p or q to set Heat and Cool temperatures for the Wake period, then touch Done.
4 Touch other time periods (Leave, Return, Sleep) to set time and temperatures for each.
5 Touch Done to save and exit.
Note: Touch Delete Period to eliminate any unwanted time period.
Note: Touch Fan Settings to customize fan settings for any time period.
Note: When configured for business, the thermostat uses Occupied and Unoccupied instead of Wake, Leave, Return, and Sleep.
Done

69-2715EF—07 18
Overriding schedules: home use1 Touch p or q to adjust the
temperature (right side of screen) and the Hold Until time. The schedule will resume when the Hold Until time expires.
2 Touch Permanent to keep the same temperature until you change it or resume the program schedule.
3 Touch Cancel Hold at any time to resume the program schedule.
PERMANENT
Overriding schedules: business use
Touch p or q to adjust the temperature. It will be maintained until the hold time you set.
• To change the hold time, touch the Hold Until arrow buttons. This time can be adjusted up to the maximum time set on the Override Duration screen in Advanced Preferences (page 27).
• Touch Override to use a pre-set occupied temperature if a person uses the room during an unoccupied period. The new temperature will be maintained for 1 hour and can be adjusted up to the maximum time set on the Override Duration screen in Advanced Preferences (page 27).
The programmed schedule will resume when the override timer expires. Touch Cancel Hold at any time to resume the program schedule.
OVERRIDE

19 69-2715EF—07
Viewing equipment status1 Touch SETTINGS.
2 Select Equipment Status.
3 Touch p or q to view the status of all the equipment your thermostat is controlling. Depending on how your thermostat was installed, the Equipment Status screen can report data about the following systems:
• Heating and cooling
• Fan
• Thermostat information
SETTINGS
Equipment Status
Done
Setting vacation hold: home useThis feature helps you save energy while you are away, and restores comfortable settings just before you return home.
1 Touch SETTINGS.
2 Select Vacation Mode.
3 Touch p or q to select the date you leave, then touch Next for further scheduling details, including times of day, temperature settings, return date, and return settings.
4 Review your selections on the last display, and touch Done to save your settings. Touch Back, then Cancel to ignore the changes.
SETTINGS
Next
Done
Vaca�on Mode
69-2715EF—07 20
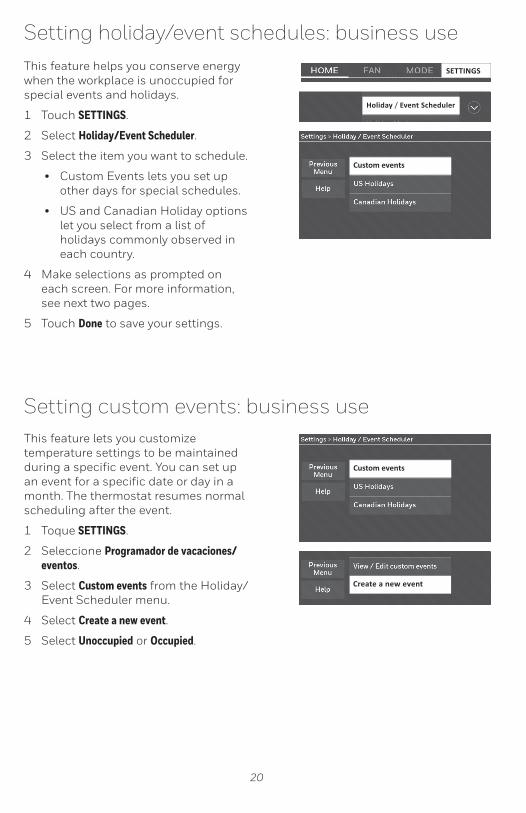
Setting holiday/event schedules: business useThis feature helps you conserve energy when the workplace is unoccupied for special events and holidays.
1 Touch SETTINGS.
2 Select Holiday/Event Scheduler.
3 Select the item you want to schedule.
• Custom Events lets you set up other days for special schedules.
• US and Canadian Holiday options let you select from a list of holidays commonly observed in each country.
4 Make selections as prompted on each screen. For more information, see next two pages.
5 Touch Done to save your settings.
SETTINGS
Custom events
Holiday / Event Scheduler
Setting custom events: business useThis feature lets you customize temperature settings to be maintained during a specific event. You can set up an event for a specific date or day in a month. The thermostat resumes normal scheduling after the event.
1 Toque SETTINGS.
2 Seleccione Programador de vacaciones/eventos.
3 Select Custom events from the Holiday/Event Scheduler menu.
4 Select Create a new event.
5 Select Unoccupied or Occupied.
Custom events
Create a new event
21 69-2715EF—07
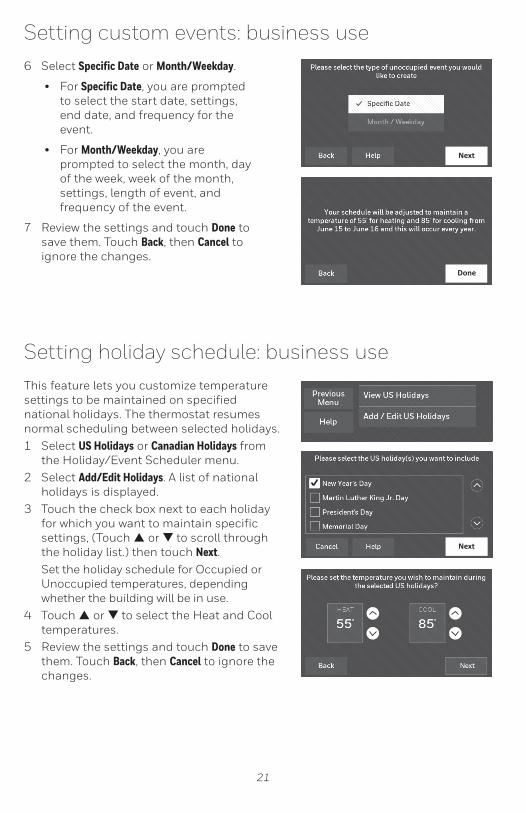
Setting custom events: business use6 Select Specific Date or Month/Weekday.
• For Specific Date, you are prompted to select the start date, settings, end date, and frequency for the event.
• For Month/Weekday, you are prompted to select the month, day of the week, week of the month, settings, length of event, and frequency of the event.
7 Review the settings and touch Done to save them. Touch Back, then Cancel to ignore the changes.
Done
Next
Setting holiday schedule: business useThis feature lets you customize temperature settings to be maintained on specified national holidays. The thermostat resumes normal scheduling between selected holidays.1 Select US Holidays or Canadian Holidays from
the Holiday/Event Scheduler menu.2 Select Add/Edit Holidays. A list of national
holidays is displayed.3 Touch the check box next to each holiday
for which you want to maintain specific settings, (Touch p or q to scroll through the holiday list.) then touch Next.Set the holiday schedule for Occupied or Unoccupied temperatures, depending whether the building will be in use.
4 Touch p or q to select the Heat and Cool temperatures.
5 Review the settings and touch Done to save them. Touch Back, then Cancel to ignore the changes.
Next

69-2715EF—07 22
Setting holiday override: business useThis feature lets you customize temperature settings to be maintained from now until a specified date. The thermostat resumes normal scheduling on the date you select.
1 Touch SETTINGS.
2 Select Holiday Mode to display temperatures while you are away on holiday.
3 Touch p or q to select the Heat and Cool temperatures, then touch Next to select return date.
4 Review the settings and touch Done to save them. Touch Back, then Cancel to ignore the changes.
Note: The cool temperature can only be set higher than the unoccupied program setting and the heat temperature can only be set lower than the unoccupied program setting.
SETTINGS
Holiday Mode
Done
Initiating occupancy mode: business useThis feature keeps the temperature at an energy-saving level until you touch OVERRIDE. When you arrive, touch the button to maintain a comfortable temperature while the room is occupied.
Touch the p or q buttons to set the temperature or the Hold Until time. The temperature is maintained until the time you set. Temperature returns to an energy-saving level after the timer expires, or the “Occupied” period ends.
OVERRIDE

23 69-2715EF—07
Customizing screen colorYou can customize your thermostat display to match your décor.
1 Touch SETTINGS.
2 Touch Color Themes.
3 Select the name of a color to use a predefined background, or select Custom to define you own background color and text.
• If you select a color name, the screen shows an example on the left. Touch Done to accept that selection.
• If you touch Custom, the screen gives you instructions. Touch Next to step through the choices; touch Done when you are satisfied with your changes.
Color Themes
Done
Next
SETTINGS
Setting preferencesPreference menu options let you select how the thermostat displays information or responds to certain situations.
1 Touch SETTINGS and select Preferences.
2 Select an option and follow prompts:• Reminders • Utility Schedule Options• Backlight• Smart Response Technology*• Advanced Preferences• Restore Default Schedule• Restore Factory Defaults
3 Touch Done to save your settings. Touch Cancel to ignore changes.
* Smart Response is not available if thermostat is configured for business.
SETTINGS
Preferences

69-2715EF—07 24
Cleaning the thermostat screenWhen you select the Clean Screen option, the screen is locked so you don’t accidentally change settings while you clean.
1 Touch SETTINGS.
2 Select Clean Screen. A prompt asks if you want to clean the screen for 30 seconds.
3 Touch Yes. A countdown timer displays elapsed time until the screen is reactivated.
Note: Do NOT spray any liquid directly on the thermostat. Spray liquids onto a cloth, then use the damp cloth to clean the screen. Use water or household glass cleaner. Avoid abrasive cleansers.
SETTINGS
Clean Screen
Yes
Adjusting security settingsYou can adjust security options to prevent unauthorized changes to system settings.
1 Touch SETTINGS and select Security Settings.
2 Select Change Lock Mode.
3 Select an option and follow prompts:Unlocked: Full access allowed.Partially locked: Only temperature can be changed.Fully locked: No access allowed.
Note: If you choose to use a password for additional security, write it here for reference:
SETTINGS
Security Se�ngs
Change Lock Mode

25 69-2715EF—07
Software updates
The Wi-Fi app periodically issues updates to the software for this thermostat. The updates occur automatically through your Wi-Fi connection. All your settings are saved, so you will not need to make any changes after the update occurs.
Updates occur in the early morning. After your thermostat receives the software, it reboots. The screen then shows “Updating software…” with a green progress bar. When the update is complete, your home screen will appear as usual.
Note: If you are not connected to Wi-Fi or registered at Total Connect Comfort, you will not get automatic updates.
Unregistering your thermostatIf you remove the thermostat from your Total Connect Comfort website account (for example, you’re moving and leaving the thermostat behind), follow these steps:
1 On mytotalconnectcomfort.com log into your account.
2 Under My Account, select Edit My Profile.
3 Click the Delete My Account button.
Your thermostat will display an orange button that says Register Online.
Smart Response TechnologyThis feature (home use only) allows the thermostat to “learn” how long the heating/cooling system takes to reach programmed temperature settings, so the temperature is reached at the time you set.
For example: Set the Wake time to 6:00 am, and the temperature to 70°. The heat will come on before 6:00 am, so the temperature is 70° by 6:00 am.
Note: Select Smart Response Technology in the Preferences menu (“Setting preferences” on page 23). Smart Response is not available if thermostat is configured for business.
The message “in recovery” is displayed when the system is activated before a scheduled time period.

69-2715EF—07 26
Pre-occupancy purgeThis business use feature turns on the fan 1 to 3 hours before each “occupied” time period, to provide a comfortable work environment when you arrive.
Compressor protectionThe thermostat keeps the compressor off for a few minutes before restarting, to prevent equipment damage. During this “off” time, the message “waiting for equipment” is displayed on screen.
Auto changeoverThis feature is used in climates where both air conditioning and heating are used on the same day.
When the system is set to Automatic, the thermostat automatically selects heating or cooling depending on the indoor temperature.
Heat and cool settings must be at least 3 degrees apart. The thermostat will automatically adjust settings to maintain this 3-degree separation.
Note: Select Auto Changeover on the Heating and Cooling System Changeover screen under Advanced Preferences. See “Setting advanced preferences” on page 27.

27 69-2715EF—07
Setting advanced preferences
You can change options for a number of system functions. Although many options, such as language and temperature indication settings are the same for all setups, others depend on the type of system you have.
1 Touch SETTINGS. The thermostat displays a list of options.
2 Select Preferences > Advanced Preferences. The thermostat displays the first screen of options that you can change.
3 On each screen, make changes as needed, then touch Next to display new options. Repeat this step until you have made all changes.
Tables on pages 27-28 explain the screens and options under Advanced Preferences.
4 When you have made all changes, press Done to save and exit.
SETTINGS
Preferences
Advanced Preferences
Next
Advanced Preferences Options (SETTINGS > Preferences > Advanced Preferences)
Screen Title Settings and Options (Options vary depending on setup.)
Scheduling OptionsSelect Non-programmable or Programmable. Programmable uses default or customized programming to automatically raise and lower temperature settings for different times of day.
Temperature Indication Scale Select Fahrenheit or Celsius.
Heating and Cooling System Changeover Select Manual or Automatic.
Number of Schedule Periods Select 2 Periods Per Day or 4 Periods Per Day. (see page 16).
Pre-occupancy Purge Duration*
Select how long the fan will run before each occupied period: Off, 1, 2, or 3 hours.
Type of Override*Select Standard to maintain the programmed periods or Initiate Occupancy to use energy-saving settings until a user presses Start Occupancy.
Override Duration* Select how long to maintain temperature during an override: 1-10 hours or No Limit.
* These settings are only available if thermostat is configured for business.
69-2715EF—07 28
Setting advanced preferences
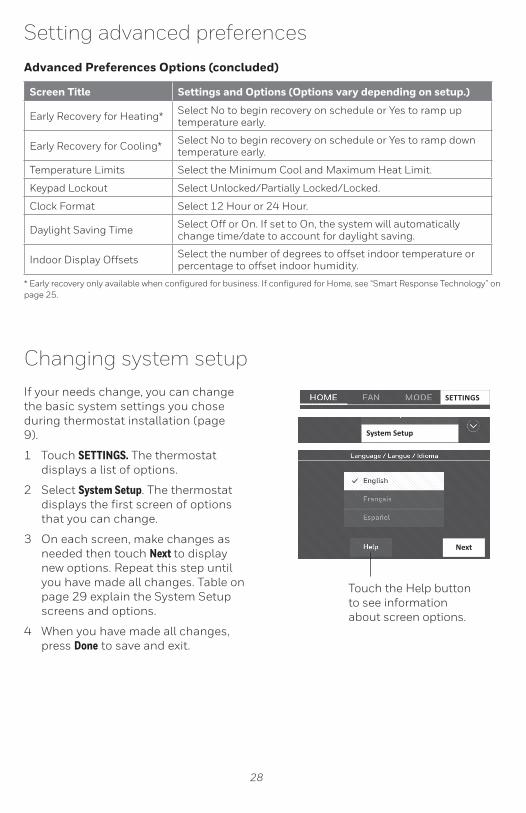
Advanced Preferences Options (concluded)
Screen Title Settings and Options (Options vary depending on setup.)
Early Recovery for Heating* Select No to begin recovery on schedule or Yes to ramp up temperature early.
Early Recovery for Cooling* Select No to begin recovery on schedule or Yes to ramp down temperature early.
Temperature Limits Select the Minimum Cool and Maximum Heat Limit.
Keypad Lockout Select Unlocked/Partially Locked/Locked.
Clock Format Select 12 Hour or 24 Hour.
Daylight Saving Time Select Off or On. If set to On, the system will automatically change time/date to account for daylight saving.
Indoor Display Offsets Select the number of degrees to offset indoor temperature or percentage to offset indoor humidity.
* Early recovery only available when configured for business. If configured for Home, see “Smart Response Technology” on page 25.
Changing system setup
System Setup
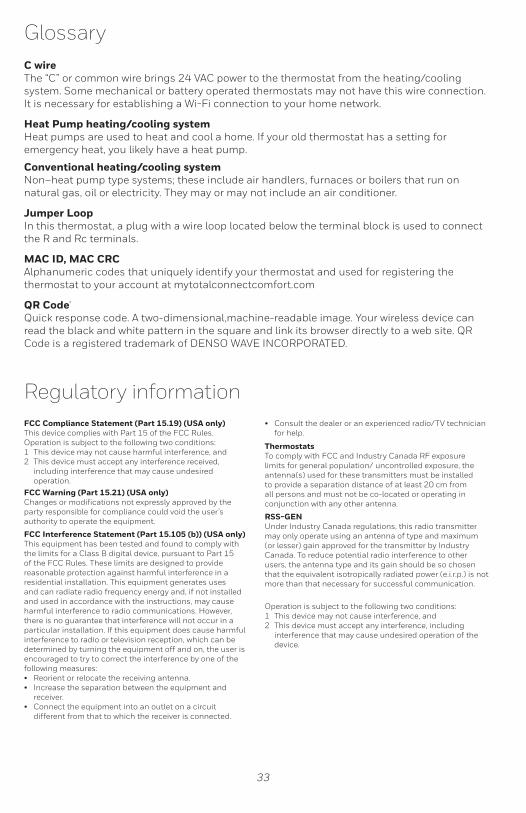
SETTINGSIf your needs change, you can change the basic system settings you chose during thermostat installation (page 9).
1 Touch SETTINGS. The thermostat displays a list of options.
2 Select System Setup. The thermostat displays the first screen of options that you can change.
3 On each screen, make changes as needed then touch Next to display new options. Repeat this step until you have made all changes. Table on page 29 explain the System Setup screens and options.
4 When you have made all changes, press Done to save and exit.
Next
Touch the Help button to see information about screen options.

29 69-2715EF—07
Changing system setup
System Setup Options (SETTINGS > System Setup)
Screen Title Settings and Options (Options vary depending on setup.)
Language English/Français/Español.
Thermostat installed in
Home/Business (Thermostat is used in a residential (default) or commercial setting).
Your thermostat location
Touch THERMOSTAT button to display a screen where you can enter a custom name using a keypad. If you have only one thermostat, you can leave the name as THERMOSTAT. For business installations you can check a box to display the thermostat name on the home screen.
Your thermostat controls Select Heating or Cooling or both (default).
Your system typeSelect Forced Air (default), Heat Pump, or Hot Water or Steam. Each option offers different choices on the following screens. See Step 9e under Installing your Thermostat on page 10.
Your forced air heating system type
Select type of furnace. This menu option only appears if Forced Air is selected for “Your System Type”.
Efficiency of your heating system
Select Standard Efficiency Forced Air (default) or High Efficiency Forced Air.
Your heating system type
If you selected Hot Water or Steam on “Your system type,” select the specific heating system here.
Number of cooling stages
Select 1 Stage (default) or 2 Stages. If you are unsure, note which wires you have connected: ‘Y’ wire only (1 stage) or ‘Y’ and ‘Y2’(refer to your check list in Step 6 on page 5.)
Number of heating stages
Select 1 Stage (default) or 2 Stages. If you are unsure, note which wires you have connected: ‘W’ wire only (1 stage) or ‘W’ and ‘W2’ (refer to your check list in Step 6 on page 5.) Number of heat stages only appears if “Forced Air” is selected for “Your System Type”.
Your fan controlSelect whether your thermostat (default) or heating system controls the fan. Your fan control only appears if “Electric” is selected for “Your Forced Air Heating System Type”.
Type of changeover valve
If you selected Heat Pump on “Your system type,“ select whether it uses a cooling changeover valve (default) or heating changeover valve. f you are unsure, note which wires you have connected: refer to your check list in Step 6 on page 6.
Number of heat pump compressor stages
Select 1 Stage (default) or 2 Stages. If you are unsure, note which wires you have connected: ‘Y’ wire only (1 stage) or ‘Y’ and ‘Y2’(refer to your check list in Step 6 on page 6.).
Your backup heatNo or Yes (default) you can determine whether you have backup heat by refering to your check list in Step 6 on page 6. Your backup heat only appears if “Your System Type” is set to Heat Pump.
Note: Touch the orange Help button on any screen for more information.

69-2715EF—07 30
Frequently asked questions
: Q Will my thermostat still work if I lose my Wi-Fi connection?: A Yes, the thermostat will operate your heating and/or cooling system with or
without Wi-Fi.
: Q How do I find the password to my router?: A Contact the manufacturer of the router or check the router documentation.
: Q Why isn’t my thermostat connecting to my Wi-Fi router even though it is very close to the thermostat?
: A Verify that the password entered for the Wi-Fi router is correct.
: Q My thermostat is unable to register to the Total Connect Comfort website.: A Verify that the thermostat is correctly enrolled on your home Wi-Fi network. At
SETTINGS > Wi-Fi Setup, check for the Wi-Fi signal strength icon. Verify that the Wi-Fi router has a good internet connection. On your computer, verify that you can open the site at mytotalconnectcomfort.com If you cannot open the site, switch off the internet modem for a few seconds, then power it back on.
: Q I registered on the Total Connect Comfort website but was unable to login using my new account.
: A Check your email and ensure that you received an activation email. Follow the instructions to activate your account and then login to the website.
: Q I have signed up on Total Connect Comfort website and have not received a confirmation email.
: A Check for the email in your Junk or Deleted folder.
: Q Is there a way to extend the signal strength?: A Most standard routers can be set up to be a repeater. You can also purchase and
install a Wi-Fi repeater.
For more FAQs, see honeywellhome.com/wifi-thermostat

31 69-2715EF—07
Getting help and responding to alertsYour thermostat offers two types of assistance, if these assistance options do not answer your questions, review the FAQs (page 30) and troubleshooting tips (page 32).
On screen help
Most displays include an orange Help button.
1 Touch Help to display instructions for using the screen.
2 Touch OK to redisplay the original screen.
Help
OK
On screen alerts
Your home screen will display a large orange button when you need to correct a setting or system problem.
1 Touch the button, the thermostat displays instructions for completing the task to which you were alerted.
2 Touch OK on the instruction display, then carry out the task. When the task is complete, the alert button will no longer be displayed.
Replace AirFilter
OK

69-2715EF—07 32
If you have difficulty with your thermostat, please try the following suggestions. Most problems can be corrected quickly and easily.
Display is blank
• Check circuit breaker and reset if necessary.• Make sure power switch at heating and cooling system is on.• Make sure furnace door is closed securely.• Make sure C wire is connected (see page 5).
Cannot change system setting to Cool
• Check that System Setup screen “Your thermostat controls” or “Your system type” is set to match your heating and cooling equipment (see page 29).
Fan does not turn on when heat is required
• Check that System Setup screen “Your fan control” is set to match your heating equipment (see page 28).
“Wait” appears on the screen
• Compressor protection feature is engaged. Wait 5 minutes for the system to restart safely, without damage to the compressor.
Heat pump issues cool air in heat mode, or warm air in cool mode
• Check your setting for System Setup screen “Type of changeover valve” to make sure it is properly configured for your system (see page 28).
Heating or cooling system does not respond
• Touch MODE to set system to Heat. Make sure the temperature is set higher than the Inside temperature.
• Touch MODE to set system to Cool. Make sure the temperature is set lower than the Inside temperature.
• Check circuit breaker and reset if necessary.• Make sure power switch at heating and cooling system is on.• Make sure furnace door is closed securely.• If “Wait” is displayed, the compressor protection timer is on. Wait
5 minutes for the system to restart safely, without damaging the compressor (see page 26).
Heating system is running in cool mode
• Check that System Setup screen “Your thermostat controls” or “Your system type” is set to match your heating and cooling equipment (see “System Setup Options (SETTINGS > System Setup)” on page 29).
Troubleshooting
Electrical RatingsTerminal Voltage (50/60Hz) Max. Current Rating
W-O/B 20-30 Vac 1.0 A
W2 (Aux/E) 20-30 Vac 1.0 A
Y Cooling 20-30 Vac 1.0 A
Y2 Cooling 20-30 Vac 1.0 A
G Fan 20-30 Vac 0.5 A
33 69-2715EF—07
GlossaryC wireThe “C” or common wire brings 24 VAC power to the thermostat from the heating/cooling system. Some mechanical or battery operated thermostats may not have this wire connection. It is necessary for establishing a Wi-Fi connection to your home network.
Heat Pump heating/cooling systemHeat pumps are used to heat and cool a home. If your old thermostat has a setting for emergency heat, you likely have a heat pump.
Conventional heating/cooling systemNon–heat pump type systems; these include air handlers, furnaces or boilers that run on natural gas, oil or electricity. They may or may not include an air conditioner.
Jumper LoopIn this thermostat, a plug with a wire loop located below the terminal block is used to connect the R and Rc terminals.
MAC ID, MAC CRCAlphanumeric codes that uniquely identify your thermostat and used for registering the thermostat to your account at mytotalconnectcomfort.com
QR Code®
Quick response code. A two-dimensional,machine-readable image. Your wireless device can read the black and white pattern in the square and link its browser directly to a web site. QR Code is a registered trademark of DENSO WAVE INCORPORATED.
Regulatory informationFCC Compliance Statement (Part 15.19) (USA only)This device complies with Part 15 of the FCC Rules. Operation is subject to the following two conditions:1 This device may not cause harmful interference, and2 This device must accept any interference received,
including interference that may cause undesired operation.
FCC Warning (Part 15.21) (USA only)Changes or modifications not expressly approved by the party responsible for compliance could void the user’s authority to operate the equipment.
FCC Interference Statement (Part 15.105 (b)) (USA only)This equipment has been tested and found to comply with the limits for a Class B digital device, pursuant to Part 15 of the FCC Rules. These limits are designed to provide reasonable protection against harmful interference in a residential installation. This equipment generates uses and can radiate radio frequency energy and, if not installed and used in accordance with the instructions, may cause harmful interference to radio communications. However, there is no guarantee that interference will not occur in a particular installation. If this equipment does cause harmful interference to radio or television reception, which can be determined by turning the equipment off and on, the user is encouraged to try to correct the interference by one of the following measures:• Reorient or relocate the receiving antenna.• Increase the separation between the equipment and
receiver.• Connect the equipment into an outlet on a circuit
different from that to which the receiver is connected.
• Consult the dealer or an experienced radio/TV technician for help.
ThermostatsTo comply with FCC and Industry Canada RF exposure limits for general population/ uncontrolled exposure, the antenna(s) used for these transmitters must be installed to provide a separation distance of at least 20 cm from all persons and must not be co-located or operating in conjunction with any other antenna.
RSS-GENUnder Industry Canada regulations, this radio transmitter may only operate using an antenna of type and maximum (or lesser) gain approved for the transmitter by Industry Canada. To reduce potential radio interference to other users, the antenna type and its gain should be so chosen that the equivalent isotropically radiated power (e.i.r.p.) is not more than that necessary for successful communication.
Operation is subject to the following two conditions:1 This device may not cause interference, and2 This device must accept any interference, including
interference that may cause undesired operation of the device.

69-2715EF—07 34
1-year limited warrantyResideo warrants this product to be free from defects in workmanship or materials, under normal use and service, for a period of one (1) year from the date of first purchase by the original purchaser. If at any time during the warranty period the product is determined to be defective due to workmanship or materials, Resideo shall repair or replace it (at Resideo’s option).
If the product is defective,
(i) return it, with a bill of sale or other dated proof of purchase, to the place from which you purchased it; or
(ii) call Resideo Customer Care at 1-800-633-3991. Customer Care will make the determination whether the product should be returned to the following address: Resideo Return Goods, 1985 Douglas Dr. N., Golden Valley, MN 55422, or whether a replacement product can be sent to you.
This warranty does not cover removal or reinstallation costs. This warranty shall not apply if it is shown by Resideo that the defect was caused by damage which occurred while the product was in the possession of a consumer.
Resideo’s sole responsibility shall be to repair or replace the product within the terms stated above. RESIDEO SHALL NOT BE LIABLE FOR ANY LOSS OR DAMAGE OF ANY KIND, INCLUDING ANY INCIDENTAL OR CONSEQUENTIAL DAMAGES RESULTING, DIRECTLY OR INDIRECTLY, FROM ANY BREACH OF ANY WARRANTY, EXPRESS OR IMPLIED, OR ANY OTHER FAILURE OF THIS PRODUCT.
Some states do not allow the exclusion or limitation of incidental or consequential damages, so this limitation may not apply to you.
THIS WARRANTY IS THE ONLY EXPRESS WARRANTY RESIDEO MAKES ON THIS PRODUCT. THE DURATION OF ANY IMPLIED WARRANTIES, INCLUDING THE WARRANTIES OF MERCHANTABILITY AND FITNESS FOR A PARTICULAR PURPOSE, IS HEREBY LIMITED TO THE ONE YEAR DURATION OF THIS WARRANTY. Some states do not allow limitations on how long an implied warranty lasts, so the above limitation may not apply to you.
This warranty gives you specific legal rights, and you may have other rights which vary from state to state. If you have any questions concerning this warranty, please write Resideo Customer Care, 1985 Douglas Dr, Golden Valley, MN 55422 or call 1-800-633-3991.
The operation of this equipment is subject to the following two conditions: (1) this equipment or device may not cause harmful interference, and (2) this equipment or device must accept any interference, including interference that may cause undesired operation.

35 69-2715EF—07

33-00269ES-05Resideo Technologies Inc. 1985 Douglas Drive North, Golden Valley, MN 554221-800-468-150233-00269ES—05 M.S. Rev. 09-20 | Printed in United Stateswww.resideo.com
© 2020 Resideo Technologies, Inc. All rights reserved.The Honeywell Home trademark is used under license from Honeywell International, Inc. This product is manufactured by Resideo Technologies, Inc. and its affiliates.Todos los derechos reservados. La marca comercial Honeywell Home se utiliza bajo licencia de Honeywell International, Inc.Este producto es fabricado por Resideo Technologies, Inc. y sus afiliados.

Buscar rebajas: HoneywellHome.com/Rebates
Lea y guarde estas instrucciones.
Para obtener ayuda, visite honeywellhome.com
Guía delusuario
Termostato con pantalla táctil a color, programable
M37768
72
RTH9585WF1004 RTH9585WF1012 Serie inteligente
En la caja, encontrará lo siguiente:• Termostato
• Placa de pared
• Tornillos y anclajes
• Guía para el encendido rápido
Características del termostatoCon el nuevo termostato, podrá realizar lo siguiente:
• Conectarse a Internet para supervisar y controlar el sistema de calefacción/refrigeración.
• Ver y modificar las configuraciones del sistema de calefacción/refrigeración.
• Ver y configurar la temperatura y los cronogramas.
• Recibir alertas por correo electrónico y obtener actualizaciones automáticas.
• Ver la temperatura y humedad exterior (requiere configuración WiFi y estar registrado).
• Tarjeta de identificación del termostato
• Etiquetas de los cables
• Guía del usuario
• Adaptador del cable C y anexo del cable C
24 V ~ 60 Hz, 1.0 A

69-2715EF—07 ii
BienvenidoFelicitaciones por la compra del termostato inteligente con pantalla táctil a color. Cuando se registre en Total Connect Comfort, puede supervisar y controlar de manera remota el sistema de calefacción y refrigeración de su hogar o empresa; puede permanecer conectado a su sistema de confort dondequiera que vaya.
Total Connect Comfort es la solución perfecta si usted viaja frecuentemente, tiene un hogar de vacaciones, una empresa, o si administra una propiedad de inversión o, simplemente, busca tranquilidad.
Este termostato funciona con sistemas comunes de 24 V, como los de aire forzado, hidrónicos, bombas de calor, de aceite, de gas y eléctricos. No funciona con sistemas de millivolts, como una chimenea de gas, o con sistemas de 120 V/240 V, como la calefacción eléctrica de zócalo.
AVISO SOBRE MERCURIO: No coloque el termostato existente en la basura si este contiene mercurio en un tubo sellado. Comuníquese con Thermostat Recycling Corporation en www.thermostat-recycle.org o al 1-800-238-8192 para obtener información sobre cómo y dónde desechar el termostato de manera adecuada y segura.
MISE EN GARDE : AVIS DE DÉCHETS ÉLECTRONIQUESSi este producto está reemplazando a un equipo de control existente que contiene mercurio en un tubo sellado, no coloque dicho equipo en la basura. Contacte al organismo encargado del manejo y disposición de desechos de su localidad para obtener instrucciones sobre cómo reciclar y desechar adecuadamente.
AVISO: Para evitar posibles daños al compresor, no utilice el aire acondicionado si la temperatura externa es inferior a 50 °F (10 °C).
¿Necesita ayuda? Visite honeywellhome.com/wifi-thermostat o llame al 1-855-733-5465 para obtener asistencia antes de devolver el termostato a la tienda.

1 69-2715EF—07
ÍndiceAcerca de su nuevo termostato
Referencia rápida: uso doméstico................... 1Referencia rápida: uso empresarial ................ 2
InstalaciónInstalación del termostato .................................. 3Conexión de la red WiFi ..................................... 10Registro del termostato en línea ................... 13
FuncionamientoConfiguración de la hora y la fecha ............ 15Configuración del ventilador .......................... 15Configuración de la modalidad del sistema 16Cronogramas predeterminados para ahorro de energía .................................................. 16Ajuste de los cronogramas del programa 17Anulación de las programaciones: doméstico ................................................................. 18Anulación de las programaciones: empresarial .............................................................. 18Visualización del estado del equipo ............ 19Configuración del mantenimiento en vacaciones: doméstico ................................ 19Configurar programación de días festivos/eventos: comercial................................................ 20Configuración de eventos personalizados: empresarial ........................... 20
Configuración de la programación de días festivos: empresarial ........................... 21Configuración de la anulación de días festivos: uso empresarial ................. 22Inicio de la modalidad de ocupación: empresarial .............................................................. 22Cómo personalizar el color de la pantalla 23Configuración de las preferencias ............... 23Limpieza de la pantalla del termostato .... 24Ajuste de las configuraciones de seguridad ............................................................ 24Actualizaciones de software ........................... 25Baja del termostato ............................................. 25Tecnología Smart Response ........................... 25Purga previa a la ocupación............................ 26Protección del compresor ................................ 26Conversión automática ..................................... 26Configuración de preferencias avanzadas ..................................... 27Cambio de la configuración del sistema .. 28
ApéndicesPreguntas frecuentes ......................................... 30Cómo obtener ayuda y reaccionar ante las alertas ....................................................... 31Localización y solución de problemas....... 32Poliza de garantia ................................................. 35
Referencia rápida: uso domésticoVENTILADOR. Seleccione una modalidad para el ventilador.
HOGAR. Presione para visualizar la pantalla de inicio.
Fecha y hora actuales.Condiciones exteriores. Después de registrarla, se muestra la temperatura y la humedad exterior.
Estado actual. Muestra la modalidad del sistema (calefacción/refrigeración).
MODO. Seleccione la modalidad del sistema (calefacción, refrigeración, automático, calefacción de emergencia activada).AJUSTES. Presione para visualizar las opciones. Comience aquí para configurar un cronograma del programa.
Configuración actual Cambie la configuración de la temperatura y seleccione el mantenimiento temporal o permanente.Condiciones interiores. Muestra la temperatura y la humedad interior.

69-2715EF—07 2
Referencia rápida: uso empresarial
Configuración del termostatoConfigurar el termostato con pantalla táctil, programable es fácil. Está preprogramado y listo para funcionar tan pronto como se instale y se registre.
Instale su termostato.
Conéctelo a su red inalámbrica doméstica.
Regístrelo a través de Internet para obtener acceso remoto.
Antes de comenzar, le recomendamos que mire un breve video de instalación. Utilice el QR Code® ubicado al principio de esta guía o visite honeywellhome.com/wifi-thermostat
2
3
1
VENTILADOR. Seleccione una modalidad para el ventilador.
HOGAR. Presione para visualizar la pantalla de inicio.
Fecha y hora actuales.
Condiciones exteriores. Después de registrarla, se muestra la temperatura y la humedad exterior.
Estado actual. Muestra la modalidad del sistema (calefacción/refrigeración).
Anulación. Toque esta opción para anular temporalmente el cronograma del programa.
MODO. Seleccione la modalidad del sistema (calefacción, refrigeración, automático, calefacción de emergencia activada).
AJUSTES. Presione para visualizar las opciones. Comience aquí para configurar un cronograma del programa.
Ubicación del termostato. Toque una flecha para cambiar la configuración de la temperatura y seleccionar una configuración temporal.
Configuración actual Toque una flecha para cambiar la configuración de la temperatura y seleccionar una configuración temporal.
Condiciones interiores. Muestra la temperatura y la humedad interior.

3 69-2715EF—07
Instalación del termostato
Es posible que necesite las siguientes herramientas para instalar el termostato:
• Destornillador Phillips n.° 2• Bolígrafo• Lápiz• Nivel (opcional)
• Taladro y brocas (3/16 in [4.8 mm] en paneles de yeso, 7/32 in [5.6 mm] en yeso) (opcional)
• Martillo (opcional)• Cinta aislante (opcional)
1 DESCONECTE la energía eléctrica del sistema de calefacción/refrigeración.
¡Importante! Para proteger el equipo, DESCONECTE la energía eléctrica de su sistema de calefacción/refrigeración en la caja de interruptores de circuito o el interruptor del sistema.
o
M31535Caja de interruptores del circuito
Interruptor de energía del sistema de
calefacción/refrigeración
C
M33823A
Si el termostato existente tiene un tubo de mercurio sellado, vaya a la página ii para obtener instrucciones sobre cómo desecharlo adecuadamente.
Designación de los terminales
2 Retire la placa frontal del termostato existente y deje los cables conectados.
2a Tome una fotografía de las conexiones de los cables a modo de referencia.
2b Si no hay ningún cable conectado al terminal etiquetado con la C, o si el termostato viejo no tiene terminal C, vea los videos sobre Cableado alterno en honeywellhome.com/wifi-thermostat o consulte el Apéndice para cables C incluido en la caja.
¡Importante! Se requiere el cable C, que es la fuente de energía de su termostato. Si no tiene el cable C, su termostato no se encenderá.
Nota: Necesitará una foto de sus conexiones de cableado para cablear el termostato nuevo.

69-2715EF—07 4
Instalación del termostato
3 Etiquete los cables.
Utilice las etiquetas adhesivas suministradas para identificar cada cable a medida que los desconecta. Etiquete los cables conforme a las designaciones de los terminales del termostato existente, no según el color de los cables.
Nota: Si ninguna etiqueta coincide con la designación de los terminales, escriba la letra correcta en una etiqueta adhesiva en blanco.
4 Retire la placa de pared.
Quite la placa de pared existente de la pared después de que haya etiquetado y desconectado todos los cables.
Etiquetas en blanco
Etiqueta adhesiva
Designación de los terminales
C
C
MCR31537
Nota: Enrosque los cables alrededor de un lápiz para evitar que caigan en el hueco de la pared.
LEVELHERE
R
Y
W
G
MCR34499
CK
RcR
W-O/B
YGW2-Aux/EY2L
C
5 Monte la placa de pared para termostato.
Monte la nueva placa de pared con los tornillos y anclajes incluidos con el termostato.
Si fuese necesario:
Taladre agujeros de 3/16 in (4.8 mm) en paneles de yeso.
Taladre agujeros de 7/32 in (5.6 mm) en yeso.
Nota: Puede utilizar los anclajes de pared existentes. Levante la placa de pared en los anclajes existentes para comprobar la alineación.
Placa de pared

5 69-2715EF—07
Instalación del termostato¡Importante! Este termostato requiere un cable de alimentación C o común. El cable de alimentación C, o común, alimenta al termostato con una potencia de 24 V AC. Si está reemplazando un termostato previo, tal vez no haya un cable C conectado a aquel. Muchos termostatos mecánicos más viejos, o que funcionan a batería, no necesitan un cable C. Para obtener más información, consulte el documento Apéndice para Cables C incluido en este paquete.
Nota: No todos los sistemas de calefacción/refrigeración identifican el terminal común C de 24 V CA. Revise su manual del sistema o comuníquese con el fabricante para conocer cuál es el terminal común de 24 V CA.
Mire los videos sobre cableado alternativo en honeywellhome.com/wifi-thermostat
CableadoPara obtener información sobre los sistemas de calefacción/refrigeración convencionales (gas natural, aceite o eléctricos, aire acondicionado), consulte la página 5. Para obtener más definiciones, consulte el “Glosario” en la página 33.
Para obtener información sobre un sistema de bomba de calor, consulte la página 6. Para obtener más definiciones, consulte el “Glosario” en la página 33.
MCR34540
CK
RcR
W-O/B
YGW2-Aux/EY2L
WY
G
RC
Cableado (sistema convencional)6A Coloque el cableado del termostato en su sistema convencional. a Comience por el cable C; una la etiqueta adhesiva del cable con las etiquetas de los terminales. Debe tener un cable C. b Enderece el cable e introdúzcalo con | cuidado en el agujero del terminal hasta escuchar un clic. (Si desea retirar un cable, utilice la punta de un bolígrafo para presionar la liberación del terminal y, luego, retire el cable).
Nota: Consulte la foto del cableado que tomó en el paso 2.
Consejo: Para colocar el cable de manera más sencilla, use la punta de un bolígrafo para mantener presionada la liberación del terminal.
Nota: Es posible que el cableado de su aplicación sea diferente del cableado que se muestra a continuación.
¿Las etiquetas no coinciden? Consulte las claves para la instalación de cableado alternativo en las páginas 7 y 8.
Liberación del terminal
Extraiga el lazo del puente SOLO si tiene los cables R y Rc.
EJEMPLO DE CABLEADO El suyo puede ser diferente

69-2715EF—07 6
Instalación del termostato
Cableado (sistema convencional - continuación) c En la imagen de la derecha, revise la casilla próxima a cada conexión. Utilizará esta lista de comprobación en el paso 9.
d Compruebe que el cable esté fijo jalándolo con cuidado. e Repita los pasos de la “a” a la “d” para el resto de los cables. f Introduzca el excedente de cables en la abertura de la pared después de haber instalado todos los cables. g Continúe con la página 8. ¿Las etiquetas no coinciden?
Consulte las claves para la instalación de cableado alternativo en las páginas 7 y 8.
CK
RcR
W-O/B
YGW2-Aux/EY2L
¡Importante!
Marque la casilla por cada cable que conecte. Necesitará esta información en el paso 9.
Cableado (sistema de bomba de calor)6B Coloque los cables del termostato en su bomba de calor.
a Comience por el cable C; una la etiqueta adhesiva del cable con las etiquetas de los terminales.
Debe tener un cable C.
b Introduzca el cable con cuidado en el agujero del terminal hasta escuchar un clic. (Si desea retirar un cable, utilice la punta de un bolígrafo para presionar la liberación del terminal y, luego, retire el cable).
Nota: Consulte la foto del cableado que tomó en el paso 2.
Consejo: Para colocar el cable de manera más sencilla, use la punta de un bolígrafo para mantener presionada la liberación del terminal.
¿Las etiquetas no coinciden? Consulte las claves para
la instalación de cableado alternativo en las páginas 7 y 8.
Nota: Es posible que el cableado de su aplicación sea diferente del cableado que se muestra a continuación.
Liberación del terminal
MCR34566
CK
RcR
W-O/B
YGW2-Aux/EY2L
OY
G
RC
AUX
Extraiga el lazo del puente SOLO si tiene los cables R y Rc.
EJEMPLO DE CABLEADO El suyo puede ser diferente

7 69-2715EF—07
Instalación del termostato
Cableado (sistema de bomba de calor - continuación) c En la imagen de la derecha, revise la casilla próxima a cada conexión. Utilizará esta lista de comprobación en el paso 9.
d Compruebe que el cable esté fijo jalándolo con cuidado. e Repita los pasos de la “a” a la “d” para el resto de los cables.
Nota: Si el termostato existente tiene cables separados en AUX y E, utilice un empalme para cables para fijar ambos cables a otro cable. Coloque este tercer cable en el terminal W2-Aux/E.
f Introduzca el excedente de cables en la abertura de la pared después de haber instalado todos los cables. g Continúe con la página 8.
¿Las etiquetas no coinciden? Consulte las
claves para la instalación de cableado alternativo en las páginas 7 y 8.
¡Importante!
Marque la casilla por cada cable que conecte. Necesitará esta información en el paso 9.
CK
RcR
W-O/B
YGW2-Aux/EY2L
Clave para cableado alternativo (sistema convencional)
1 • Si tiene el cable R y el cable Rc, desenchufe el circuito del puente; para ello, jale el circuito del cable.
• Si su termostato existente tenía cables R y RH, conecte el cable R al terminal Rc, el cable RH al terminal R y desenchufe el circuito del puente.
Cableado alternativo (sistema convencional)Utilícelo si las etiquetas de los cables no coinciden con las etiquetas de los terminales.
Nota: Debe tener un cable C o uno equivalente. Consulte la página 5.
MSCR34541
C
R
W
Y
G
1
1
CK
RcR
W-O/B
YGW2-Aux/E
Y2L
W1
W2
Y2RH 4 V
RcR
C1 X B

69-2715EF—07 8
Si tiene el cable R y el cable Rc, desenchufe el circuito del puente; para ello, jale el circuito del cable.
Si su termostato existente tenía cables R y RH, conecte el cable R al terminal Rc, el cable RH al terminal R y desenchufe el circuito del puente.
Si su termostato existente tenía cables R y RH, conecte el cable R al terminal Rc, el cable RH al terminal R y desenchufe el circuito del puente.Si su termostato existente tenía cables V y VR, visite honeywellhome.com/wifi-thermostat para obtener ayuda.
Si su termostato anterior tiene cables O y B separados y controla un sistema con bomba de calor de zona única, una el cable B con el C. Si el sistema es controlado por más de un termostato, comuníquese con el servicio de zonificación de Resideo al 800 828 8367 para obtener asistencia con el cableado.
Si su termostato existente tenía cables Y1, W1 y W2 separados, visite honeywellhome.com/wifi-thermostat para obtener ayuda.
Si el termostato existente tiene cables separados en Aux y E, utilice un empalme de cables para unir ambos cables a un cable independiente. Coloque este tercer cable en el terminal W2-Aux/E.
Este es el monitor del sistema. Si el monitor detecta un problema, visualizará un botón anaranjado de alerta en la pantalla de inicio del termostato.
Clave para cableado alternativo (sistema de bomba de calor)
2
1
4
6
3
5
Instalación del termostato
Cableado alternativo (sistema de bomba de calor)Utilícelo si las etiquetas de los cables no coinciden con las etiquetas de los terminales.
Nota: Debe tener un cable C o uno equivalente. Consulte la página 5.
7 Conecte el termostato a la placa de pared.
Alinee el termostato con la placa de pared y, luego, presiónelo para que calce en su lugar.
Termostato
Placa de paredLEVELHERE
M34498A
MSCR34542
C
R
O
Y
G
2
CK
RcR
W-O/B
YGW2-Aux/E
Y2L
3
4
5AUX
X X2
Y2
1
B
6
X B
RcR
V VR
1
LF
W W1 W2

9 69-2715EF—07
Instalación del termostato
M31544
8 ENCIENDA el sistema de calefacción/refrigeración.
¡Importante!
8a Compruebe que el cable C esté conectado al termostato y al sistema de calefacción/refrigeración.
8b Verifique que la puerta del sistema de calefacción/refrigeración esté fija.
8c Vuelva a ENCENDER su sistema de calefacción/refrigeración en la caja de interruptores de circuito o el interruptor de energía.
Caja de interruptores del circuito
Interruptor de energía del sistema de
calefacción/refrigeración
o
Antes de conectarse a su red WiFi, debe configurar las opciones iniciales del termostato para establecer su sistema de calefacción/refrigeración:
• Idioma
• Hogar o Comercial
En otro momento, puede personalizar otras opciones.
9 Siga las instrucciones que aparecen en la pantalla para seleccionar las opciones adecuadas.
9a Toque el idioma que desea que el termostato muestre y, luego, toque Siguiente.
9b Seleccione Instalación para el hogar o comercio, luego toque Siguiente.
9c Toque Siguiente o identifique la ubicación del termostato—toque THERMOSTAT y siga el resto de las instrucciones.
9d Seleccione el tipo de equipo de calefacción y refrigeración que controlará su termostato y toque Siguiente.
Nota: Para obtener más información, toque el botón anaranjado de ayuda que se encuentra en cualquier pantalla.
Siguiente
Siguiente
Siguiente
Siguiente

69-2715EF—07 10
Conexión de la red WiFiDespués de tocar Terminado en la pantalla final de la configuración inicial, el termostato muestra una opción para conectar su red WiFi.
1 Conecte la red WiFi.
Toque Sí para conectar el termostato a su red WiFi. En la pantalla, se visualiza el mensaje “Búsqueda de redes inalámbricas. Espere…”; luego, se muestra una lista de todas las redes WiFi que se han encontrado..
Nota: Si, en este momento, no puede completar este paso, toque Lo haré después. El termostato mostrará la pantalla de inicio. Finalice este proceso seleccionando AJUSTES > Configuración WiFi. Continúe con el Paso 2.
2 Seleccione la red.
2a Toque el nombre de la red que desea utilizar. El termostato muestra una página de contraseña.
Sí
Your Network
Nota: En caso de que su red doméstica no aparezca en la lista, toque Reescanear.
Instalación del termostato9e Seleccione el tipo de sistema y toque
Siguiente. El tipo de sistema determina otras opciones para finalizar el proceso de configuración inicial. Utilice la lista de comprobación del paso 6A-d cuando haga uso de las opciones.
9f Toque Siguiente después de hacer uso de las opciones de cada pantalla.
9g Toque Terminado en la última pantalla. El termostato muestra una opción para conexión a su red Wi-Fi.
Nota: Para obtener más información, toque el botón anaranjado de ayuda que se encuentra en cualquier pantalla.
Siguiente

11 69-2715EF—07
Para registrar su termostato, siga las instrucciones disponibles a partir de la página 13.
Nota: La pantalla Registro a través de Internet permanece activa hasta que haya completado el registro o hasta que toque Terminado.
Nota: Si toca Terminado antes de registrarlo a través de Internet, la pantalla de inicio muestra un botón anaranjado de alerta que le informa que debe registrar su termostato. Al tocar dicho botón, aparece la información de registro y una opción para posponer dicha tarea.
Terminado
Regístrelo através de
Internet paraobtener acceso
remoto
Conexión de la red WiFi
2b Use el teclado para introducir la contraseña de su red doméstica.
2c Toque Terminado. El termostato muestra el mensaje “Conectándose a su red. Espere...” y, luego, aparece la pantalla “Conexión satisfactoria.”
2d Toque OK para visualizar la pantalla de información de registro.
2e Ingrese los números de identificación MAC y CRC de su termostato. Necesita estos números para completar el registro a través de Internet.
Terminado
OK

69-2715EF—07 12
Reconexión de su red WiFi.
AJUSTES
Con�guración Wi-Fi
1 Toque AJUSTES.
2 Seleccione Configuración WiFi.
3 Toque el nombre de la red que desea utilizar. El termostato puede mostrar una página de contraseña.
4 Para ingresar una contraseña, toque caracteres para deletrear su contraseña de red doméstica, luego toque Terminado.
5 El termostato muestra “Conectándose a su red. Favor esperar...” luego una pantalla de “Conexión satisfactoria.”
6 Toque Siguiente.
• Si su termostato está registrado, verá la potencia de su señal y otra información del estatus. Toque Terminado.
• Si la pantalla muestra “Regístrelo a través de Internet para obtener acceso remoto” siga las instrucciones de la página 13.
Desconexión de la red WiFi1 Toque AJUSTES.
2 Seleccione Configuración WiFi.
3 Toque Desconectar de la red. El termostato mostrará una pregunta para confirmar su selección.
4 Toque Sí para confirmar que desea desconectarse de la red. El termostato mostrará la pantalla de configuración WiFi.
5 Toque OK para mostrar el menú.
AJUSTES
Con�guración Wi-Fi
Desconectar de la red
Sí

13 69-2715EF—07
2 Inicie sesión o cree una cuenta.
Si tiene una cuenta, haga clic en Login (Inicio de sesión),
o bien,
haga clic en Create An Account (Crear una cuenta).
2a Siga las instrucciones en la pantalla.
2b Revise su correo electrónico para verificar si tiene un mensaje de activación de My Total Connect Comfort. Esto puede demorar varios minutos.
Nota: Si no recibió un mensaje de activación, revise su correo no deseado o use otra dirección de correo electrónico.
2c Siga las instrucciones de activación que se encuentran en el correo electrónico.
2d Inicie sesión.
Registro del termostato en línea
M31570
M31570
Para ver y configurar el termostato de manera remota, debe tener una cuenta en Total Connect Comfort. Siga los siguientes pasos.
1 Abra el sitio web Total Connect Comfort.
Vaya a mytotalconnectcomfort.com
Mire el video Registro del termostato en honeywellhome.com/wifi-thermostat

69-2715EF—07 14
Cuando el termostato se haya registrado correctamente, la pantalla de registro de Total Connect Comfort le mostrará el mensaje REGISTRO EXITOSO.
Ahora, puede controlar su termostato desde cualquier lugar a través de su computadora portátil, computadora tipo tableta o teléfono inteligente.
°72La aplicación gratuita de Total Connect Comfort se encuentra disponible para los dispositivos Apple® iPhone®, iPad® y iPod touch® en iTunes® o en Google Play®, para todos los dispositivos Android™.
Registro del termostato en línea
3 Registre su termostato.
Después de que haya iniciado sesión en su cuenta Total Connect Comfort, registre el termostato.
3a Siga las instrucciones en la pantalla. Después de añadir la ubicación del termostato, debe ingresar los datos particulares de su termostato, a saber:
• MAC ID
• MAC CRC
Nota: Estas identificaciones se encuentran en la pantalla Registro a través de Internet o en la tarjeta de identificación del termostato que se incluye en el paquete del termostato. Las identificaciones no distinguen mayúsculas de minúsculas.
© 2018 Resideo Technologies, Inc. All rights reserved. The Honeywell Home logo is used under license from Honeywell International Inc.
Printed in U.S.A.
Resideo Inc., 1985 Douglas Drive North, Golden Valley, MN 55422
69-2723EFS-03
Thermostat ID CardUse the MAC ID and CRC ID to register this product at mytotalconnectcomfort.com
Carte d’identification de thermostatUtilisez l’identification MAC et l’identification CRC pour enregistrer ce produit à mytotalconnectcomfort.com
Tarjeta de identificación del termostatoUtilice la identificación MAC y la identificación CRC para inscribir este producto en mytotalconnectcomfort.com
www.resideo.com
MAC ID (Número de
identificación personal MAC)
MAC CRC (Número de
identificación personal CRC)
Buscar rebajas locales Ahora, su termostato puede ser elegible para descuentos locales. Busque ofertas en su área en HoneywellHome.com/Rebates

15 69-2715EF—07
Configuración de la hora y la fecha
1 Toque la hora actual. La pantalla muestra Configurar hora/Configurar fecha.
2 Toque Configurar hora o Configurar fecha.
3 Toque s o t hasta que aparezcan la hora y la fecha correctas.
4 Toque Terminado para guardar o Cancelar para ignorar los cambios.
Nota: Este termostato se actualizará automáticamente para el horario de verano (si se observa en su área) y almacena toda la información de fecha/hora. Si el termostato está conectado a Wi-Fi y registrado a Total Connect Comfort, la hora actual se actualiza desde el Internet.
6:30 pm
Terminado
Configuración del ventilador
1 Toque la opción VENTILADOR para mostrar las configuraciones del ventilador.
2 Toque Encendido, Automático, Circulación o Seguir el cronograma.
Nota: La opción Seguir el cronograma aparece únicamente si el ventilador está configurado en modo Encendido o Circulación para uno o más períodos del programa.
3 Toque Terminado para guardar y salir.Encendido: El ventilador está siempre encendido.Automático: El ventilador funciona solo cuando el sistema de calefacción o refrigeración está encendido.Circulación: El ventilador funciona de forma aleatoria, aproximadamente, el 35% del tiempo (uso doméstico únicamente).Seguir el cronograma: La opción Seguir el cronograma no está disponible si todos los programas están configurados en modo automático (Consulte las páginas 16-18).
Nota: Presione Encendido, Automático o Circulación para anular temporariamente el programa del ventilador configurado.
VENTILADOR
Terminado

69-2715EF—07 16
Cronogramas predeterminados para ahorro de energía
Este termostato usa las configuraciones de ahorro de energía predeterminadas que pueden disminuir los gastos de calefacción/refrigeración. Para personalizar el termostato, consulte la siguiente página.
Despertar 6:00 am 70 °F (21.1 °C) 78 °F (25.5 °C) 70 °F (21.1 °C) 78 °F (25.5 °C)
Salir 8:00 am 62 °F (16.6 °C) 85 °F (29.4 °C) 62 °F (16.6 °C) 85 °F (29.4 °C)
Regresar 6:00 pm 70 °F (21.1 °C) 78 °F (25.5 °C) 70 °F (21.1 °C) 78 °F (25.5 °C)
Dormir 10:00 pm 62 °F (16.6 °C) 82 °F (27.7 °C) 62 °F (16.6 °C) 82 °F (27.7 °C)
Refrigeración (de lunes a
viernes)
Hora de inicio
Calefacción (de lunes a
viernes)Período
Calefacción (sábados y domingos)
Refrigeración (sábados y domingos)
Uso
dom
ésti
co
Ocupado 1 8:00 am 70 °F (21.1 °C) 75 °F (23.8 °C) Encendido
Desocupado 1 10:00 pm 55 °F (12.7 °C) 85 °F (29.4 °C) Automático
Ocupado 2* 12:00 am 70 °F (21.1 °C) 75 °F (23.8 °C) Encendido
Desocupado 2* 12:00 am 55 °F (12.7 °C) 85 °F (29.4 °C) Automático
RefrigeraciónHora de
inicio CalorPeríodo Ventilador
Uso
em
pres
aria
l
* El período 2 se cancela de forma predeterminada. Si lo activa, los valores mostrados anteriormente se convierten en configuraciones predeterminadas.
Configuración de la modalidad del sistema1 Toque MODO para mostrar las
configuraciones del sistema.
2 Toque la opción deseada:
Calefacción: El termostato controla solamente el sistema de calefacción.
Refrigeración: El termostato controla solamente el sistema de refrigeración.
Apagado: Se apagan los sistemas de calefacción/refrigeración.
Automático: El termostato selecciona la calefacción o la refrigeración según fuera necesario, conforme a la temperatura interior.
Calefacción de emergencia (bombas de calor con calefacción auxiliar): Controla la calefacción auxiliar/de emergencia. El compresor se bloquea.
3 Toque Terminado para guardar y salir.
MODO
Terminado
Note: Es posible que no aparezcan las configuraciones del sistema Automático y Calefacción de emergencia; esto depende de cómo se instaló el termostato. Consulte la sección “Conversión automática” en la página 26.

17 69-2715EF—07
Ajuste de los cronogramas del programa1 Toque AJUSTES.
2 Seleccione Crear/editar horario.
• Toque Ver/editar para ver la programación completa y realizar ajustes rápidos.
• Toque Guíame para crear una programación respondiendo preguntas simples.
• Toque Lo haré yo mismo para crear de forma manual un cronograma del programa.
Nota: Para disminuir costos, use las configuraciones de ahorro de energía preestablecidas que se describen en la página 16.
AJUSTES
Crear / Editar horario
Si seleccionó Lo haré yo mismo en la pantalla Crear/editar programación, siga los siguientes pasos:
1 Seleccione los días para programar, toque Siguiente.
2 Toque Despertar para establecer el horario del período Despertar para los días seleccionados.
Siguiente
Cal: 70°Refr: 78°
Vent: Auto6:00 am
DESPERTAR3 Presione s o t para configurar
la temperatura de Calefacción y Refrigeración del período Despertar. Luego, toque Terminado.
4 Toque otros períodos (Salir, Regresar, Dormir) para configurar la hora y las temperaturas para cada uno de ellos.
5 Toque Terminado para guardar y salir.
Nota: Toque Borrar período para eliminar los períodos no deseados.
Nota: Toque Ventilador ajustes para personalizar las configuraciones del ventilador para cualquier período.
Nota: Cuando se configura para uso comercial, el termostato usa Ocupado y Desocupado en lugar de Despertar, Salir, Regresar, y Dormir.
Terminado

69-2715EF—07 18
Anulación de las programaciones: uso doméstico1 Toque s o t para configurar la
temperatura (lado derecho de la pantalla) y la hora indicada en Sostener Hasta. La programación se reanudará cuando finalice el tiempo de “Sostener Hasta”.
2 Toque PERMANENTE para mantener la misma temperatura hasta que la cambie o reinicie el cronograma del programa.
3 Toque Reiniciar Horario en cualquier momento para reanudar el cronograma del programa.
PERMANENTE
Anulación de las programaciones: uso empresarial
Toque s o t para configurar la temperatura. La temperatura nueva se mantendrá hasta el tiempo de “pausa” que usted configure.
• Para cambiar el tiempo de pausa, toque los botones con flechas Sostener hasta. Puede configurar este tiempo hasta el tiempo máximo configurado en la pantalla Duración de la anulación en Preferencias avanzadas (página 27).
• Toque Anulación para utilizar una temperatura de ocupación preestablecida si una persona usa la habitación durante un período desocupado. La nueva temperatura podrá mantenerse durante una hora y regularse hasta el tiempo máximo configurado en la pantalla Duración de la anulación en Preferencias avanzadas (página 27).
El cronograma programado se reanudará cuando el temporizador de anulación finalice. Toque Reiniciar Horario en cualquier momento para reanudar el cronograma del programa.
ANULACIÓN

19 69-2715EF—07
Visualización del estado del equipo1 Toque AJUSTES.
2 Seleccione Estatus del equipo.
3 Toque s o t para ver el estado de todos los equipos que controla su termostato. Según la manera en que se instaló su termostato, la pantalla de estado del equipo puede generar información sobre los siguientes sistemas:
• Calefacción y refrigeración
• Ventilador
• Información del termostato
AJUSTES
Estatus del equipo
Terminado
Configuración del mantenimiento en vacaciones: uso doméstico
Esta función le permite ahorrar energía mientras se encuentra fuera de casa, y restituye las configuraciones de confort poco antes de que regrese a su casa.
1 Toque AJUSTES
2 Seleccione Modo vacaciones.
3 Toque s o t para seleccionar la fecha en que se marcha; luego, toque Siguiente para obtener más detalles sobre la programación; se incluyen horas del día, configuraciones de temperatura, fecha de regreso y configuraciones para el regreso.
4 Revise lo que ha elegido en la última pantalla y toque Terminado para guardar sus configuraciones. Toque Previo; luego, Cancelar para ignorar los cambios.
AJUSTES
Siguiente
Terminado
Modo vaciones
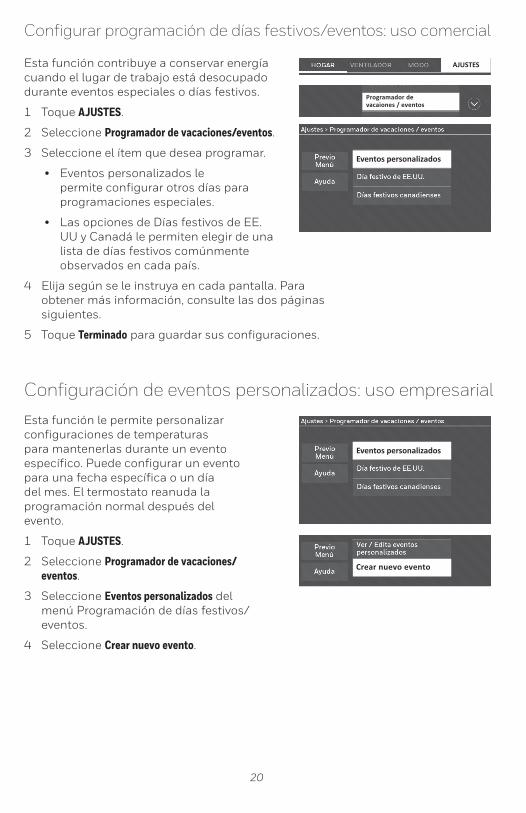
69-2715EF—07 20
Configurar programación de días festivos/eventos: uso comercial
Esta función contribuye a conservar energía cuando el lugar de trabajo está desocupado durante eventos especiales o días festivos.
1 Toque AJUSTES.
2 Seleccione Programador de vacaciones/eventos.
3 Seleccione el ítem que desea programar.
• Eventos personalizados le permite configurar otros días para programaciones especiales.
• Las opciones de Días festivos de EE. UU y Canadá le permiten elegir de una lista de días festivos comúnmente observados en cada país.
4 Elija según se le instruya en cada pantalla. Para obtener más información, consulte las dos páginas siguientes.
5 Toque Terminado para guardar sus configuraciones.
AJUSTES
Eventos personalizados
Programador de vacaiones / eventos
Configuración de eventos personalizados: uso empresarial
Esta función le permite personalizar configuraciones de temperaturas para mantenerlas durante un evento específico. Puede configurar un evento para una fecha específica o un día del mes. El termostato reanuda la programación normal después del evento.
1 Toque AJUSTES.
2 Seleccione Programador de vacaciones/eventos.
3 Seleccione Eventos personalizados del menú Programación de días festivos/eventos.
4 Seleccione Crear nuevo evento.
Eventos personalizados
Crear nuevo evento

21 69-2715EF—07
Configuración de eventos personalizados: uso empresarial
5 Seleccione Desocupado or Ocupado.
6 Seleccione Fecha específica o Mes/Día de la semana.
• Para la opción Fecha específica, debe seleccionar la fecha de inicio, las configuraciones, la fecha de finalización y la frecuencia del evento.
• Para la opción Mes/Día de la semana, debe seleccionar un mes, un día de la semana, una semana del mes, las configuraciones, la duración del evento y la frecuencia del evento.
7 Revise las configuraciones y toque Terminado para guardarlas. Toque Previo; luego, Cancelar para ignorar los cambios.
Terminado
Siguiente
Configuración de la programación de días festivos: uso empresarial
Esta función le permite personalizar configuraciones de temperaturas para mantenerlas durante días festivos nacionales específicos. El termostato reanuda la programación normal entre uno y otro día festivo seleccionado.1 Seleccione Días festivos de EE. UU. o Canadá del
menú Programación de días festivos/evento.2 Seleccione Agregar/Editar días festivos. Aparecerá
una lista de los días festivos nacionales.3 Toque la casilla al lado de cada día festivo en
el cual desea mantener una configuración específica, (toque s o t para desplazarse por la lista de días festivos) y, luego, toque Siguiente.Configure la programación de días festivos para temperaturas de ocupado o desocupado, dependiendo si el edificio estará en uso.
4 Toque s o t para seleccionar las temperaturas de calefacción y refrigeración.
5 Revise las configuraciones y toque Terminado para guardarlas. Toque Previo; luego, Cancelar para ignorar los cambios.
Siguiente
Siguiente
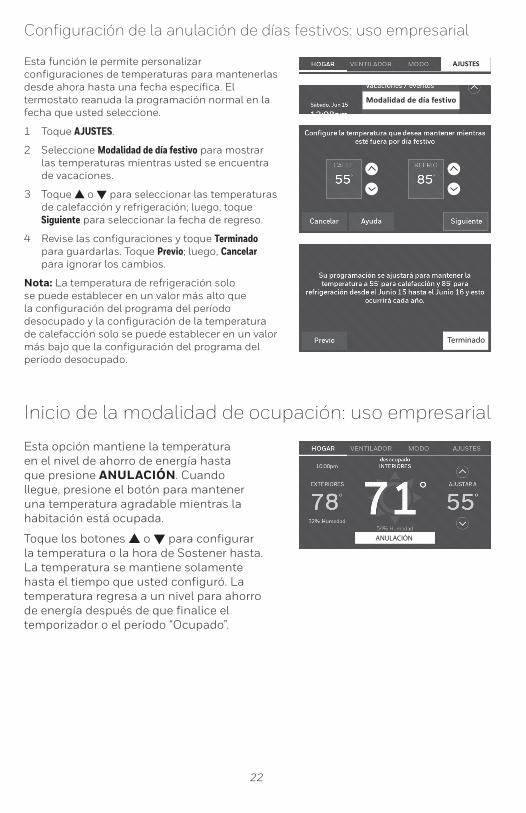
69-2715EF—07 22
Configuración de la anulación de días festivos: uso empresarial
Esta función le permite personalizar configuraciones de temperaturas para mantenerlas desde ahora hasta una fecha específica. El termostato reanuda la programación normal en la fecha que usted seleccione.
1 Toque AJUSTES.
2 Seleccione Modalidad de día festivo para mostrar las temperaturas mientras usted se encuentra de vacaciones.
3 Toque s o t para seleccionar las temperaturas de calefacción y refrigeración; luego, toque Siguiente para seleccionar la fecha de regreso.
4 Revise las configuraciones y toque Terminado para guardarlas. Toque Previo; luego, Cancelar para ignorar los cambios.
Nota: La temperatura de refrigeración solo se puede establecer en un valor más alto que la configuración del programa del período desocupado y la configuración de la temperatura de calefacción solo se puede establecer en un valor más bajo que la configuración del programa del período desocupado.
AJUSTES
Modalidad de día fest ivo
Terminado
Inicio de la modalidad de ocupación: uso empresarial
Esta opción mantiene la temperatura en el nivel de ahorro de energía hasta que presione ANULACIÓN. Cuando llegue, presione el botón para mantener una temperatura agradable mientras la habitación está ocupada.
Toque los botones s o t para configurar la temperatura o la hora de Sostener hasta. La temperatura se mantiene solamente hasta el tiempo que usted configuró. La temperatura regresa a un nivel para ahorro de energía después de que finalice el temporizador o el período “Ocupado”.
ANULACIÓN

23 69-2715EF—07
Cómo personalizar el color de la pantallaPuede personalizar la pantalla del termostato para adaptarla a su decoración.
1 Toque AJUSTES.
2 Toque Temas de color.
3 Elija el nombre de un color para usar en un fondo predeterminado o seleccione Personalizar para definir su propio color de fondo y texto.
• Si selecciona el nombre de un color, la pantalla muestra un ejemplo a la izquierda. Toque Terminado para aceptar esa preferencia.
• Si toca Personalizado, la pantalla le muestra instrucciones. Toque Siguiente para avanzar por las opciones; toque Terminado cuando esté satisfecho con sus cambios.
Temas de color
Terminado
Siguiente
AJUSTES
Configuración de las preferenciasLas opciones del menú de preferencias le permiten seleccionar cómo el termostato muestra la información o responde ante ciertas situaciones.
1 Toque AJUSTES y seleccione Preferencias.
2 Seleccione una opción y siga las instrucciones:• Recordatorios • Opciones del programa del servicio
eléctrico• Luz posterior• Tecnologia Smart Response*• Preferencias avanzadas• Restablecer programación
predeterminada• Restaurar configuraciones de fábrica
3 Toque Terminado para guardar sus configuraciones. Toque Cancelar para ignorar los cambios.
AJUSTES
Preferencias
* Cuando el termostato está configurado para uso comercial, la respuesta inteligente no está disponible.
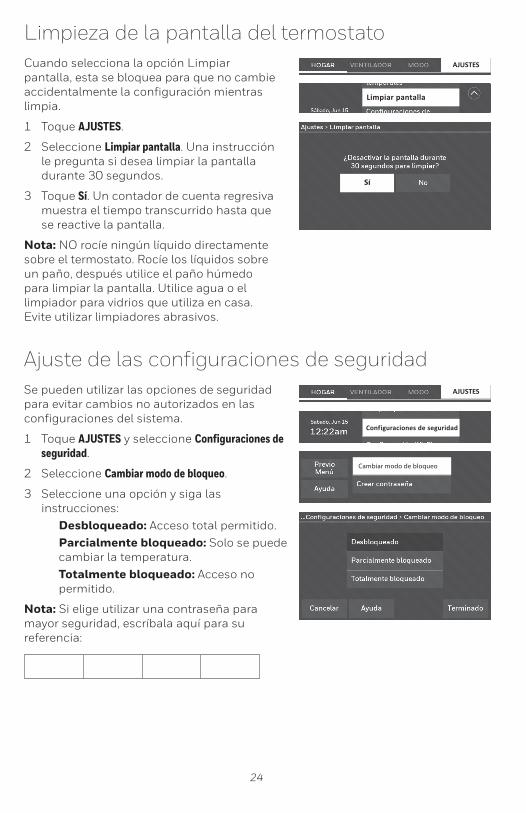
69-2715EF—07 24
Limpieza de la pantalla del termostatoCuando selecciona la opción Limpiar pantalla, esta se bloquea para que no cambie accidentalmente la configuración mientras limpia.
1 Toque AJUSTES.
2 Seleccione Limpiar pantalla. Una instrucción le pregunta si desea limpiar la pantalla durante 30 segundos.
3 Toque Sí. Un contador de cuenta regresiva muestra el tiempo transcurrido hasta que se reactive la pantalla.
Nota: NO rocíe ningún líquido directamente sobre el termostato. Rocíe los líquidos sobre un paño, después utilice el paño húmedo para limpiar la pantalla. Utilice agua o el limpiador para vidrios que utiliza en casa. Evite utilizar limpiadores abrasivos.
AJUSTES
Limpiar pantalla
Sí
Ajuste de las configuraciones de seguridadSe pueden utilizar las opciones de seguridad para evitar cambios no autorizados en las configuraciones del sistema.
1 Toque AJUSTES y seleccione Configuraciones de seguridad.
2 Seleccione Cambiar modo de bloqueo.
3 Seleccione una opción y siga las instrucciones:
Desbloqueado: Acceso total permitido.Parcialmente bloqueado: Solo se puede cambiar la temperatura.Totalmente bloqueado: Acceso no permitido.
Nota: Si elige utilizar una contraseña para mayor seguridad, escríbala aquí para su referencia:
AJUSTES
Conf iguraciones de seguridad
Cambiar modo de bloqueo

25 69-2715EF—07
Actualizaciones del softwareLa aplicación de Wi-Fi solicita actualizaciones periódicamente al software para este termostato. Las actualizaciones se efectúan automáticamente a través de su conexión WiFi. Todas sus configuraciones permanecen guardadas, de modo que no necesita hacer cambios después de que ocurra la actualización.
Las actualizaciones se realizan durante las primeras horas del día. Una vez que su termostato reciba el software, este se reinicia. Luego, la pantalla muestra el mensaje “Actualizando el software...” y se observa una barra de progreso verde. Cuando finaliza la actualización, su pantalla de inicio aparecerá como es habitual.
Nota: Si no está conectado a WiFi ni registrado en Total Connect Comfort, no recibirá actualizaciones automáticas.
Baja del termostatoSi usted retira el termostato de su cuenta en el sitio web Total Connect Comfort (por ejemplo, si se muda y deja el termostato), siga los siguientes pasos:
1 Desde mytotalconnectcomfort.com, inicie sesión en su cuenta.
2 En Mi cuenta, seleccione Editar mi perfil.
3 Haga clic en el botón Borrar mi cuenta.
Su termostato mostrará un botón anaranjado que sugiere Registrarlo a través de Internet..
Tecnología Smart Response*Esta característica (uso doméstico únicamente) permite que el termostato “sepa” cuánto demora el sistema de calefacción/refrigeración en alcanzar las configuraciones de temperatura programadas, de manera que se alcance esa temperatura a la hora que usted configuró.
Por ejemplo: Configure la hora de despertarse a las 6:00 a. m. y la temperatura en 70 °F (21.1 °C). La calefacción se encenderá antes de las 6:00 a. m., para que la temperatura esté en 70 °F (21.1 °C) a las 6:00 a. m.
Nota: Seleccione Tecnología Smart Response en el menú Preferencias (página 23).* Cuando el termostato está configurado para uso comercial, la respuesta inteligente no está disponible.
Se mostrará el mensaje “in recovery” (en recuperación) cuando el sistema esté activado antes de un período programado.

69-2715EF—07 26
Protección del compresor
El termostato conserva el compresor apagado durante unos minutos antes de volver a arrancar, para evitar daños al equipo. Durante el tiempo que permanece apagado, el mensaje “esperando por el equipo” se muestra en la pantalla.
Purga previa a la ocupaciónEsta función de uso empresarial enciende el ventilador de 1 a 3 horas antes del período “ocupado”, para brindar un ambiente de trabajo confortable cuando usted llegue.
Conversión automáticaEsta función se usa en climas en los que el acondicionador de aire y la calefacción se utilizan durante el mismo día.
Cuando el sistema está configurado en Automático, el termostato elige automáticamente cuándo calentar o refrigerar, según la temperatura interior.
Las configuraciones de calefacción y refrigeración deben tener, al menos, una diferencia de tres grados. El termostato ajustará automáticamente las configuraciones para mantener esta diferencia de tres grados.
Nota: Seleccione Conversión automática en la pantalla Conversión del sistema de calefacción y refrigeración que se encuentra en Preferencias avanzadas. Consulte la sección Configuración de preferencias avanzadas en la página 27).

27 69-2715EF—07
Configuración de preferencias avanzadasPuede cambiar las opciones en diversas funciones del sistema. Si bien muchas de las opciones, como las configuraciones que indican el idioma y la temperatura, son las mismas para todas configuraciones, existen otras que dependen del tipo de sistema que posea.
1 Toque AJUSTES. El termostato muestra una lista de opciones.
2 Seleccione Preferencias > Preferencias avanzadas. El termostato muestra la primera pantalla de opciones que puede modificar.
3 En cada pantalla, realice los cambios necesarios; luego, toque Siguiente para visualizar las nuevas opciones. Vuelva a realizar este paso hasta que haya realizado todos los cambios.
Las tablas que figuran en las páginas 27-28 explican las pantallas y las opciones disponibles en Preferencias avanzadas.
4 Cuando haya implementado todas las modificaciones, presione Terminado para guardar y salir.
AJUSTES
Preferencias
Preferencias avanzadas
Siguiente
Configuración de preferencias avanzadasOpciones de Preferencias avanzadas (SETTINGS > Preferencias > Preferencias avanzadas)
Título de la pantalla Configuraciones y opciones (Las opciones varían según la configuración)
Opciones de programación
Seleccione la opción No programable o Programable. La opción Programable usa programación predeterminada o personalizada para subir y bajar automáticamente las configuraciones de temperatura en distintos momentos del día.
Escala de indicación de temperatura Seleccione Fahrenheit o Celsius.
Cambio del sistema de calefacción y refrigeración Seleccione Manual o Automático.
Cantidad de períodos programados
Seleccione dos períodos por día o cuatro períodos por día. (Consulte la página 16).
Duración de la purga previa a la ocupación*
Seleccione cuánto tiempo funcionará el ventilador antes de cada período ocupado: Apagado, 1, 2 o 3 horas.
Tipo de anulación*Seleccione la opción Estándar (Standard) para mantener los períodos programados o la opción Iniciar la modalidad de ocupación para usar las configuraciones de ahorro de energía hasta que un usuario presione Iniciar ocupación.
Duración de la anulación* Seleccione cuánto tiempo se debe mantener la temperatura durante una anulación: 1-10 horas o Sin límite.
* Estas configuraciones solo están disponibles cuando el termostato está configurado para uso comercial.

69-2715EF—07 28
Configuración de preferencias avanzadasOpciones de preferencias avanzadas (finalización)
Título de la pantalla Configuraciones y opciones (Las opciones varían según la configuración)
Recuperación temprana para calefacción*
Seleccione No para comenzar la recuperación según la programación o Sí para aumentar la temperatura antes.
Recuperación temprana para refrigeración*
Seleccione No para comenzar la recuperación según la programación o Sí para disminuir la temperatura temprano.
Límites de temperatura Seleccione el límite mínimo de refrigeración y el límite máximo de calefacción.
Bloqueo del teclado Seleccione Desbloqueado/Parcialmente bloqueado/Bloqueado.
Formato del reloj Seleccione 12 horas o 24 horas.
Horario de verano Seleccione Desactivado (Off) o Activado (On). Si selecciona Activado (On), el sistema cambiará automáticamente el horario o la fecha según el horario de verano.
Desplazamiento de pantalla en interiores
Seleccione la cantidad de grados necesarios para desplazar la temperatura en interiores o el porcentaje para desplazar la humedad en interiores.
* La recuperación temprana solo está disponible cuando se configura para uso comercial. Si se configura para uso doméstico, consulte “Tecnología de respuesta inteligente” en la página 25.
Cambio de la configuración del sistema
Con�guración del sistema
AJUSTESSi sus necesidades cambian, puede modificar las configuraciones básicas del sistema del AJUSTES que eligió cuando instaló el termostato (página 9).
1 Toque AJUSTES. El termostato muestra una lista de opciones.
2 Seleccione Configuración del sistema. El termostato muestra la primera pantalla de opciones que puede modificar.
3 En cada pantalla, realice los cambios necesarios; luego, toque Siguiente para visualizar las nuevas opciones. Vuelva a realizar este paso hasta que haya realizado todos los cambios. Las tabla de las página 29 explican las pantallas y las opciones de la configuración del sistema.
4 Cuando haya implementado todas las modificaciones, presione Terminado para guardar y salir.
Siguiente
Toque el botón de ayuda para obtener información sobre las opciones de la pantalla.

29 69-2715EF—07
Cambio de la configuración del sistema
Opciones de la configuración del sistema (AJUSTES > Configuración del sistema )
Note: Para obtener más información, toque el botón anaranjado de ayuda que se encuentra en cualquier pantalla.
Título de la pantalla Configuraciones y opciones (Las opciones varían según la configuración)
Idioma English/Français/Español.
Termostato instalado en Hogar/comercio (El termostato se utiliza en un ambiente residencial (predeterminado) o comercial).
Ubicación de su termostato
Toque el botón TERMOSTATO para mostrar una pantalla donde pueda ingresar un nombre personalizado utilizando un teclado numérico. Si tiene solo un termostato, puede dejarle el nombre como THERMOSTATO. En instalaciones comerciales, puede marcar una casilla para mostrar el nombre del termostato en la pantalla de inicio.
Controles del termostatoSeleccione el tipo de caldera. Esta opción del menú aparece únicamente si en “Su tipo de sistema” está seleccionado Aire forzado.
Tipo de sistema
Seleccione Aire forzado (predeterminado), bomba de calor o agua caliente o vapor. Cada opción ofrece diferentes posibilidades en las siguientes pantallas. Consulte el paso 9e bajo Instalación del termostato en la página 10.
Tipo de sistema de calefacción/refrigeración por aire forzado
Seleccione el tipo de alimentación del sistema de aire forzado: Gas/fuel (predeterminado) o eléctrico.
Eficacia del sistema de calefacción
Seleccione Aire forzado de eficacia estándar (predeterminado) o Aire forzado de gran eficacia.
Tipo de sistema de calefacción
Si seleccionó agua caliente o vapor en “Tipo de Sistema”, seleccione el sistema de calefacción específico aquí.
Cantidad de etapas de refrigeración
Seleccione 1 etapa (predeterminado) o 2 etapas. Si no está seguro, observe cuáles cables ha conectado: Cable ‘Y’ solamente (1 etapa) o ‘Y’ y ‘Y2’ (refiérase a su lista de comprobación en el paso 6 “Instalación del termostato” de la página 5.) La cantidad de etapas de enfriamiento no aparecen si se estableció “Bomba de calor” o si las etapas de enfriamiento están establecidas en “0”.
Cantidad de etapas de calefacción
Seleccione 1 etapa (predeterminado) o 2 etapas. Si no está seguro, observe cuáles cables ha conectado: Cable ‘W’ solamente (1 etapa) o ‘W’ y ‘W2’ (refiérase a su lista de comprobación en el paso 6 “Instalación del termostato” de la página 5.) La cantidad de etapas de enfriamiento solo aparecen si está establecido “Aire forzado” en “Su Tipo de Sistema”.
Control del ventilador
Seleccione qué controla el ventilador: el termostato (predeterminado) o el sistema de calefacción. El control del ventilador solo aparece si está establecido “Eléctrico” en “Su Tipo de Sistema de Calefacción de Circulación Forzada”.
Tipo de válvula de cambio
Si seleccionó la bomba de calor en “Tipo de sistema”, elija si utiliza una válvula de cambio de refrigeración (predeterminado) o una válvula de cambio de calefacción. Si no está seguro, observe cuáles cables ha conectado: refiérase a su lista de comprobación en el paso 6 de la página 6.
Cantidad de etapas del compresor de la bomba de calor
Seleccione 1 etapa (predeterminado) o 2 etapas. Si no está seguro, observe cuáles cables ha conectado: Cable ‘Y’ solamente (1 etapa) o ‘Y’ y ‘Y2’ (refiérase a su lista de comprobación en el paso 6 de la página 6.)
Calefacción de reserva
Mediante No o Sí (predeterminado) puede determinar si tiene calefacción de reserva consultando su lista de comprobación en el paso 6 de la página 6.) La calefacción de respaldo solo aparece si “Su Tipo de Sistema” está establecido en Bomba de calor.

69-2715EF—07 30
Preguntas frecuentes: P ¿Mi termostato seguirá funcionando si pierdo la conexión WiFi?: R Sí, el termostato pondrá en funcionamiento el sistema de calefacción o
refrigeración con o sin conexión WiFi.
: P ¿Cómo encuentro la contraseña de mi enrutador?: R Comuníquese con el fabricante del enrutador o revise la documentación del
enrutador.
: P ¿Por qué el termostato no se conecta al enrutador WiFi aunque se encuentren muy cerca?
: R Verifique que la contraseña ingresada en el enrutador WiFi sea correcta.
: P No puedo registrar mi termostato en el sitio web Total Connect Comfort.: R Verifique que el termostato esté inscrito correctamente en su red doméstica WiFi.
Desde AJUSTES > Configuración WiFi, verifique el icono de la potencia de la señal WiFi. Verifique que el enrutador WiFi tenga una buena conexión a Internet. Verifique en su computadora que pueda abrir el sitio en mytotalconnectcomfort.com. Si no puede abrir el sitio, apague el módem de Internet durante algunos segundos y vuelva a encenderlo.
: P Me registré en el sitio web Total Connect Comfort, pero no pude iniciar sesión con mi nueva cuenta.
: R Revise su correo electrónico y asegúrese de haber recibido un mensaje de activación. Siga las instrucciones para activar su cuenta y, luego, inicie sesión en el sitio web.
: P Me he registrado en el sitio web Total Connect Comfort y no he recibido un mensaje de confirmación por correo electrónico.
: R Revise que el mensaje no esté en la carpeta Correo no deseado o Eliminados.
: P ¿Hay alguna forma de ampliar la potencia de la señal?: R La mayoría de los enrutadores estándar se pueden configurar para que actúen
como repetidores. También puede comprar e instalar un repetidor WiFi.
Para consultar más preguntas frecuentes, visite honeywellhome.com/wifi-thermostat

31 69-2715EF—07
Cómo obtener ayuda y reaccionar ante las alertasSu termostato proporciona dos tipos de asistencia. En caso de que estas opciones de asistencia no aclaren sus dudas, consulte las preguntas más frecuentes (página 30) y los consejos sobre la localización y solución de problemas (página 32).
Ayuda en la pantalla
La mayoría de las pantallas incluyen un botón anaranjado de ayuda.
1 Toque Ayuda para visualizar las instrucciones de uso de la pantalla.
2 Toque OK para volver a mostrar la pantalla original.
Ayuda
OK
Cómo obtener ayuda y reaccionar ante las alertasAlertas de pantalla
Su pantalla principal mostrará un botón grande anaranjado cuando necesite corregir una configuración o un problema del sistema.
1 Toque el botón, el termostato muestra instrucciones para finalizar la tarea sobre la cual se le alertó.
2 Toque OK en la pantalla de instrucciones y luego lleve a cabo la tarea. Cuando la tarea haya finalizado, el botón de alerta no seguirá mostrándose.
Reemplaceel filtro de
aire
OK

69-2715EF—07 32
Localización y solución de problemasSi tiene dificultades con el termostato, intente seguir las sugerencias que se indican a continuación. La mayoría de los problemas se pueden solucionar de manera fácil y rápida.
La pantalla está en blanco
• Revise el interruptor de circuito y, si es necesario, reinícielo.• Asegúrese de que el interruptor de energía del sistema de calefacción y
refrigeración esté encendido.• Asegúrese de que la puerta del sistema de calefacción esté bien cerrada.• Asegúrese de que el cable C esté conectado (consulte la página 5).
No se puede cambiar la configuración del sistema a Refrigeración
• Revise que la pantalla de configuración del sistema “Controles del termostato” o “Tipo de sistema” está configurado de modo que se pueda utilizar con su equipo de calefacción y refrigeración (consulte la página 29).
El ventilador no se enciende cuando se requiere utilizar la calefacción
• Revise que la pantalla de configuración del sistema “Control del ventilador” esté configurada para que corresponda con su equipo de calefacción (consulte la página 28).
Aparece el mensaje “Wait” (Espere) en la pantalla
• La función de la protección del compresor está funcionando. Espere cinco minutos para que se reinicie el sistema de forma segura, sin dañar el compresor.
Los problemas con la bomba de calor hacen que se enfríe el aire en la modalidad de calefacción, o que se caliente el aire en la modalidad de refrigeración
• Revise la configuración de la pantalla de programación del sistema “Tipo de válvula de cambio” para comprobar que está adecuadamente configurada para su sistema (consulte la página 28).
El sistema de calefacción o refrigeración no responde
• Toque MODO para configurar el sistema a Calefacción. Asegúrese de que la temperatura sea más alta que la temperatura interior.
• Toque MODO para configurar el sistema a Refrigeración. Asegúrese de que la temperatura sea más baja que la temperatura interior.
• Revise el interruptor de circuito y, si es necesario, reinícielo.• Asegúrese de que el interruptor de energía del sistema de calefacción y
refrigeración esté encendido.• Asegúrese de que la puerta del sistema de calefacción esté bien cerrada.• Si, en la pantalla, aparece “Esperar” (“Wait”), el temporizador de
protección del compresor está encendido. Espere cinco minutos para que el sistema se vuelva a iniciar de forma segura, sin dañar el compresor (consulte la página 26).
El sistema de calefacción está funcionando en la modalidad de refrigeración
• Revise que la pantalla de configuración del sistema “Controles del termostato” o “Tipo de sistema” está configurada de modo que se pueda utilizar con su equipo de calefacción y refrigeración (consulte “Opciones de la configuración del sistema (AJUSTES > Configuración del sistema )” de la página 29).

33 69-2715EF—07
GlosarioCable CEl cable “C”, o común, le transmite 24 V CA al termostato desde el sistema de calefacción/refrigeración. Algunos termostatos mecánicos o de baterías pueden no tener esta conexión de cableado. Es necesario para establecer una conexión WiFi a su red doméstica.
Sistema de refrigeración/calefacción de bomba de calorLas bombas de calor se utilizan para calentar y refrigerar una casa. Si su termostato antiguo tiene un ajuste para la calefacción de emergencia, es probable que tenga una bomba de calor.
Sistema de calefacción/refrigeración convencionalEstos sistemas no cuentan con una bomba de calor. Incluyen controladores de aire, equipos de calefacción o calderas que funcionan con gas natural, aceite o electricidad. Pueden o no incluir un aire acondicionado.
Circuito del puenteEn este termostato, se utiliza un enchufe con un circuito del cable que se ubica debajo del bloque del terminal para conectar los terminales R y Rc.
MAC ID, MAC CRCCódigos alfanuméricos que identifican exclusivamente el termostato y se utilizan para registrarlo con su cuenta en mytotalconnectcomfort.com
QR Code®
Código de respuesta rápida. Una imagen bidimensional de lectura mecánica. Su dispositivo inalámbrico puede leer el patrón en blanco y negro que se encuentra en el cuadrado y vincular su navegador, directamente, a un sitio web. QR Code es una marca registrada de DENSO WAVE INCORPORATED.
Rangos eléctricosTerminal Voltaje (50 Hz/ 60 Hz) Max. valoración de la corriente
W-O/B 20 V - 30 V CA 1,0 A
W2 (Aux/E) 20 V - 30 V CA 1,0 A
Y Refrigeración 20 V - 30 V CA 1,0 A
Y2 Refrigeración 20 V - 30 V CA 1,0 A
G Ventilador 20 V - 30 V CA 0,5 A

69-2715EF—07 34
Información reguladoraDeclaración de conformidad con las regulaciones FCC (Sección 15.19) (solo en los EE. UU.)Este dispositivo cumple con la Sección 15 de las regulaciones FCC. El funcionamiento está sujeto a las dos condiciones siguientes:1 Este dispositivo no debe causar interferencia perjudicial.2 Este dispositivo deberá aceptar cualquier interferencia
que se reciba, incluso la interferencia que pudiese causar el funcionamiento no deseado.
Advertencia de la FCC (Sección 15.21) (solo en los EE. UU.)Los cambios o las modificaciones que no hayan sido expresamente aprobados por la parte responsable del cumplimiento de las regulaciones podrían anular la autoridad del usuario para hacer funcionar el equipo.
Declaración de la FCC sobre interferencias (Sección 15.105(b)) (solo en los EE. UU.)Este equipo fue probado y cumple con los límites de los dispositivos digitales clase B, conforme a la Sección 15 de las regulaciones FCC. Estos límites están diseñados para ofrecer una protección razonable contra la interferencia perjudicial en una instalación residencial. Este equipo genera usos y puede irradiar energía de frecuencia de radio y, si no se instala y se utiliza según las instrucciones, puede producir una interferencia perjudicial en la comunicación radial. Sin embargo, no se garantiza que no habrá interferencia en una instalación particular. Si este equipo produce una interferencia perjudicial en la recepción televisiva o radial, lo cual puede determinarse al apagar y encender el equipo, se recomienda que el usuario intente corregir la interferencia con una o más de las siguientes medidas:• Vuelva a orientar y ubicar la antena receptora.• Aumente la distancia entre el equipo y el receptor.
• Conecte el equipo a un tomacorriente en un circuito diferente a aquel en el que está conectado el receptor.
• Consulte con su distribuidor o con un técnico experto en radio/televisión para recibir ayuda.
TermostatosPara cumplir con los límites de exposición RF que establece la FCC y la industria de Canadá para la población en general/exposición no controlada, la o las antenas usadas para estos transmisores se deben instalar a una distancia de, al menos, 20 cm de todas las personas, y no se deben ubicar ni utilizar junto con otra antena o transmisor.
RSS-GENDe acuerdo con las regulaciones de la industria de Canadá, este transmisor de radio puede funcionar únicamente utilizando un tipo de antena y una ganancia máxima (o inferior) aprobada para el transmisor por la industria de Canadá. Para disminuir la interferencia potencial del radio con otros usuarios, el tipo de antena y su ganancia deben ser elegidas de tal forma que la potencia isótropa radiada equivalente (e.i.r.p.) no sea mayor de lo necesario para una comunicación eficaz.
El funcionamiento está sujeto a las dos condiciones siguientes:1 Este dispositivo no debe causar interferencia.2 Este dispositivo deberá aceptar cualquier interferencia,
incluso la interferencia que pudiese causar el funcionamiento no deseado del dispositivo.

35 69-2715EF—07
IMPORTADO EN MEXICO POR: Instromet Mexicana S. de R.L. de C.V. Avenida Insurgentes 2453, Piso 6, Tizapan, Alvaro Obregon, Ciudad de Mexico, CP 01090 Telefono: 01 (55) 800 00423
Instromet Mexicana S. de R.L. de C.V. garantiza que éste producto está libre de defectos en su mano de obra y materiales contra cualquier defecto de fabricación y funcionamiento, bajo uso normal, por el término de 2 años a partir de la fecha de la compra por el consumidor. Si se determina que el producto esta defectuoso o presenta algún funcionamiento erróneo, Instromet Mexicana S. de R.L. de C.V. deberá reparar o reemplazar (a opción de Instromet) el producto bajo las siguientes condiciones:
1. Regresar el producto y la póliza de garantía, acompañado de la factura de venta o algún otro comprobante de compra fechado al establecimiento donde se realizó la compra, o a la siguiente dirección. En la cual también tendrá la información para obtener las partes, componentes, consumibles y accesorios del producto: Av. Salvador Nava Martinez 3125, Col. Colinas del Parque. San Luis Potosi, SLP Mexico 78294.
2. O puedes llamar al centro de atención al cliente al 01-800-083-5925 para México (ver teléfonos para otros países) donde se determinará si el producto debe regresarse o si se enviará un reemplazo del producto al consumidor sin costo alguno cubriendo los gastos que se deriven del cumplimiento de la presente garantía incluyendo los gastos de transporte. No es necesario pedir piezas ni accesorios. El producto será reemplazado bajo esta garantía.
Nota: Esta garantía no cubre gastos de mano de obra por re-instalación. No ampara el reemplazo de la pieza si el defecto ocurre por daño causado por el consumidor o desgaste normal.
La única responsabilidad de Instromet será reparar o reemplazar el producto dentro de los términos establecidos más arriba. Instromet Mexicana S. de R.L. de C.V. no será responsable de ninguna pérdida o daño de ningún tipo, incluidos los daños incidentales o derivados, que resulten, de manera directa o indirecta, del incumplimiento de la garantía, expresa o implícita, o de cualquier otra falla de este producto.
Esta garantía es la única garantía expresa que Instromet Mexicana S. de R.L. de C.V. ofrece respecto de este producto. La duración de cualquier garantía implícita, incluidas las garantías de comerciabilidad e idoneidad para un fin específico, se limita por el presente a la duración de dos años de esta garantía.
Esta garantía no es válida en los siguientes casos:
1. Cuando el producto haya sido utilizado en condiciones distintas a las normales (aquellas para las que está destinado).
2. Cuando el producto no ha sido operado de acuerdo con el instructivo de uso e instalación proporcionado.
3. Cuando el producto ha sido alterado o reparado por personas no autorizadas por Instromet Mexicana S. de R.L. de C.V.
Datos del producto:
Marca: _________________________ Modelo: _________________________ Número de serie: _________________________
Nombre del consumidor: _____________________________ Dirección (calle y número): ____________________________
Delegación o municipio: _____________________________________________________________________________________
Ciudad, estado y código postal: ______________________________________________________________________________
La operación de este equipo está sujeta a las siguientes dos condiciones: (1) es posible que este equipo o dispositivo no cause interferencia perjudicial y (2) este equipo o dispositivo debe aceptar cualquier interferencia. Incluyendo la que pueda causar su operación no deseada.
POLIZA DE GARANTIA
Sello del establecimiento y fecha de compra

33-00269ES-05
www.resideo.com
© 2020 Resideo Technologies, Inc. All rights reserved.The Honeywell Home trademark is used under license from Honeywell International, Inc. This product is manufactured by Resideo Technologies, Inc. and its affiliates.Todos los derechos reservados. La marca comercial Honeywell Home se utiliza bajo licencia de Honeywell International, Inc.Este producto es fabricado por Resideo Technologies, Inc. y sus afiliados.
Resideo Technologies Inc. 1985 Douglas Drive North, Golden Valley, MN 55422 1-800-468-150233-00269ES—05 M.S. Rev. 09-20 | Impreso en EE. UU.