common office procedures - handout - osu center for ... office... · 3 cryosurgery - mechanism •...
TRANSCRIPT

1
Alisha N. Plotner, MDInterim Division Director
Assistant Professor-ClinicalDivision of Dermatology
The Ohio State University Wexner Medical Center
Common Office Procedures
Cryosurgery
Shave biopsy
Punch biopsy

2
Skin anatomy reviewSkin anatomy review• Knowledge of skin
anatomy critical to an effective procedure and understanding potential complications
• Epidermal thickness 0.05-1.5mm
• Dermal thickness 0.6-3mm
Image from National Cancer Institute
CryosurgeryCryosurgery• Application of low
temperatures to produce local tissue destruction
• Liquid nitrogen is
< -196 C
• Applied via cotton-tip applicator or spray-tip cryosurgery can
3
Cryosurgery - mechanismCryosurgery - mechanism• Creates intra- and extra-cellular ice crystals,
disrupts cell membrane integrity and causes vascular stasis
• Freeze fast, thaw slowly
• Better intracellular ice formation is more damaging
• Repeat freeze-thaw cycles for maximal destruction
• General parameters for benign and pre-malignant lesions:
• 1 to 2 cycles of 3-10 second freeze with 2mm lateral spread
Cryosurgery - indicationsCryosurgery - indications• Benign lesions - skin tags, seborrheic keratosis,
warts, molluscum, prurigo nodules, sebaceous hyperplasia
• Pre-malignant lesions - actinic keratosis, actinic cheilitis
• Malignant lesions – superficial basal cell carcinoma, squamous cell carcinoma in situ
• Rarely used for thin lesions when other treatments are contraindicated
• Require longer freezing times to reach lower tissue temperature

4
Cryosurgery videoCryosurgery video
CryosurgeryCryosurgery
• Acute side effects
• Pain, edema, erythema, blister, crust
• Complications
• Common : secondary infection, hypopigmentation
• Uncommon : scarring, nail dystrophy,
alopecia
Cell Type Temperaturerange for
destruction
Keratinocytes -20 to -30 C
Melanocytes - 4 to – 7 C
Dermal fibroblasts
-30 to – 35 C

5
Cryosurgery Cryosurgery • Relative contraindications
• Cold intolerance, e.g. cold urticaria
• Ill-defined lesion, location (eyelid), tanned or dark skin
• Post-procedure care
• Daily soap and water cleansing
• White petrolatum ointment for crusted lesions
• Sun protection
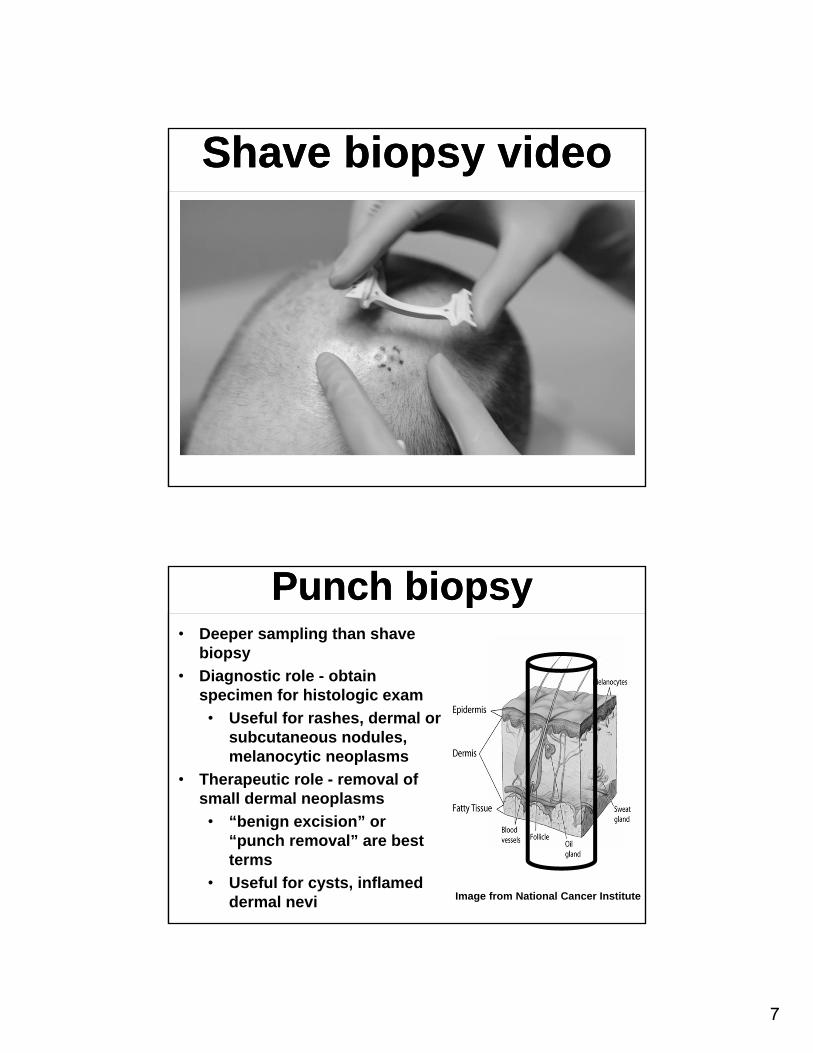
Shave biopsyShave biopsy• Most common skin biopsy technique
• Diagnostic role - obtain specimen for histologic exam
• Therapeutic role - remove an inflamed or symptomatic skin lesion
• If the intent is complete lesion removal then the term “shave excision” or “shave removal” is used

6
Shave biopsyShave biopsy• Best for epidermal and
superficial dermal processes
• Biopsy of suspected basal cell carcinoma or squamous cell carcinoma
• Removal of skin tags and other benign exophyticneoplasms
Image from National Cancer Institute
Shave biopsyShave biopsy• Local anesthesia used to produce a wheal
under the lesion • Use a 15 blade or single-edged razor blade
held semi-curved• Move through skin in a sawing motion
horizontally• Entering epidermis to depth of superficial
dermis • Goal is a shallow, saucer-shaped defect with
a single intact specimen• Submit specimen in 10% formalin or Michel’s
solution for immunofluorescence
7
Shave biopsy videoShave biopsy video
Punch biopsyPunch biopsy• Deeper sampling than shave
biopsy
• Diagnostic role - obtain specimen for histologic exam
• Useful for rashes, dermal or subcutaneous nodules, melanocytic neoplasms
• Therapeutic role - removal of small dermal neoplasms
• “benign excision” or “punch removal” are best terms
• Useful for cysts, inflamed dermal nevi Image from National Cancer Institute
8
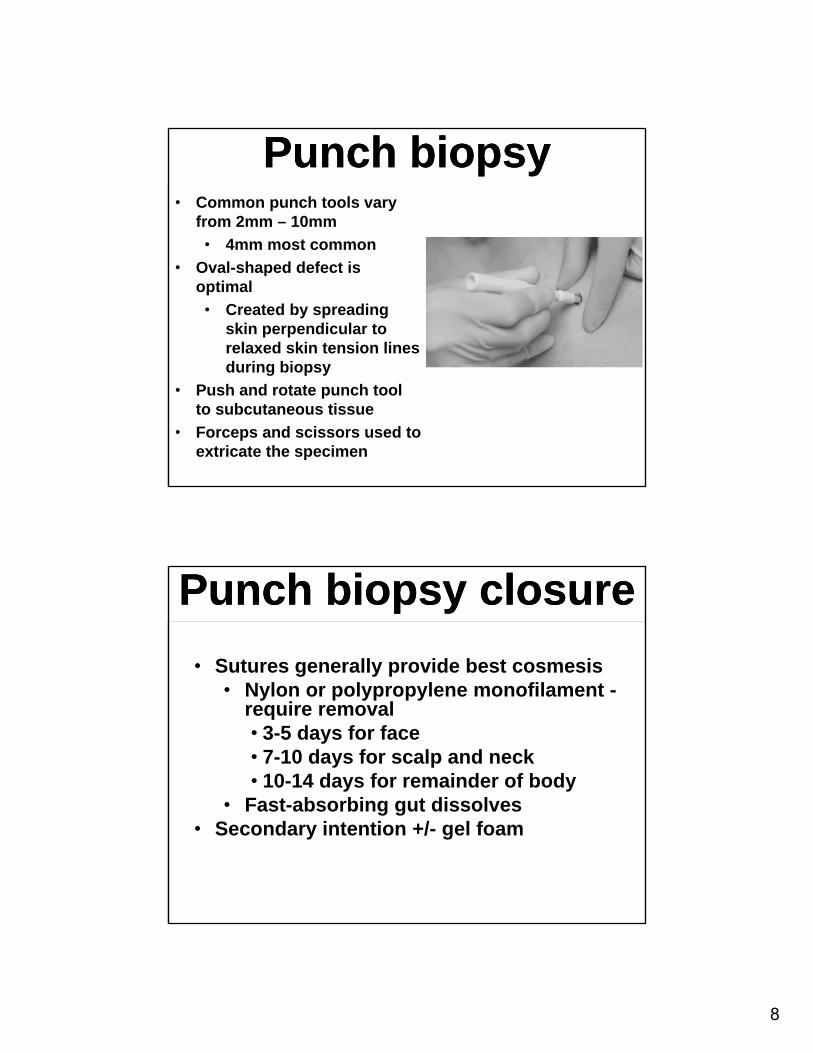
Punch biopsyPunch biopsy• Common punch tools vary
from 2mm – 10mm
• 4mm most common
• Oval-shaped defect is optimal
• Created by spreading skin perpendicular to relaxed skin tension lines during biopsy
• Push and rotate punch tool to subcutaneous tissue
• Forceps and scissors used to extricate the specimen
Punch biopsy closurePunch biopsy closure
• Sutures generally provide best cosmesis• Nylon or polypropylene monofilament -
require removal• 3-5 days for face• 7-10 days for scalp and neck• 10-14 days for remainder of body
• Fast-absorbing gut dissolves• Secondary intention +/- gel foam

9
Punch biopsy videoPunch biopsy video
Skin biopsy side effects and wound care
Skin biopsy side effects and wound care
• Side effects
• Pain, bleeding, crusting
• Secondary infection
• Delayed healing, especially hands, feet, lower legs in elderly person
• Scar
• Wound care
• Daily cleansing with soap and water
• White petrolatum ointment + bandage changed daily
• Sun protection

10
Skin biopsy – bleeding riskSkin biopsy – bleeding risk• Caution if severe thrombocytopenia,
bleeding disorder or anticoagulant use
• Biopsy may still be performed but hemostasis may be delayed
• Lower legs, hands, feet, digits, lips, and scalp prone to bleeding
• Use anesthetic with epinephrine – onset at 7 minutes, maximal at 15 minutes
• May need electrocoagulation and/or pressure dressing
• History of keloid scarring
• Infection at biopsy site
• Anesthetic allergy
• More common with esthers than amides
• Often due to a preservative rather than the anesthetic itself
• Options • Anesthetic of alternate class in a preservative-free
formulation
• 1% diphenhydramine solution
• Normal saline
Skin biopsy relative contraindications
Skin biopsy relative contraindications

11
ConclusionsConclusions• Knowledge of skin anatomy is critical to
successful performance of dermatologic procedures and understanding side effects
• When performing cryosurgery tailor length of freeze and number of cycles to “thickness” of target lesion• Freeze fast and thaw slowly for best results
• Shave biopsy is best for epidermal and superficial dermal pathology
• Punch biopsy is best when assessment of dermal (or deeper) pathology is necessary
Anne C. Sullivan, MDClinical Assistant Professor
OSU Department of OrthopaedicsThe Ohio State University Wexner Medical Center
Office Procedures:Joint Injection
Techniques

12
Joint Injection TechniquesGeneral Considerations
Joint Injection TechniquesGeneral Considerations
• Definitions: Injection; Aspiration• Most comments apply to Injection and
Aspiration• Routine (Office) and Urgent settings
• Indications and Contraindications• Safety
• Site identification and consent• Prevent infection, injury, tissue damage• Patient comfort
• Technique• Effective injection/aspiration• Anatomy knowledge essential to
success
Indications-AspirationIndications-Aspiration• Diagnosis of infection or inflammatory arthritis,
‒ Gout, RA, Pseudogout, etc.‒ Send specimen for microbiological or fluid
studies• Management of septic arthritis
‒ Serial aspiration ‒ May be (rarely) used as part of management
strategy‒ Decrease bioburden in some selected cases‒ Option in poor surgical candidate‒ May also be used to monitor clinical
response
• Send follow up specimens for evaluation

13
Indications: Therapeutic Injection
Indications: Therapeutic Injection
• Pain or inflammation of joint: ‒ Osteoarthritis/ Degenerative Joint Disease‒ Rheumatoid Arthritis, inflammatory
arthropathy• Tendonitis/ Tenosynovitis /Bursitis
• May result in tendon attrition—Use Caution! ‒ Inject BURSA or TENDON SHEATH, NOT
substance of tendon‒ Rotator cuff tendinopathy/subacromial
Bursitis‒ Trigger finger, DeQuervain’s tenosynovitis‒ Trochanter, olecranon, other Bursae
Indications: Therapeutic Injection
Indications: Therapeutic Injection
• Some enthesopathies
‒ Tennis Elbow /Lateral epicondylitis (rupture is sometimes therapeutic)
‒ Golfer’s elbow /Medial epicondylitis)
‒ Caution at Achilles or Plantar fascia--rupture Is NOT good result!

14
Indications: AspirationCaution
Indications: AspirationCaution
• Historical Note:
• Setting of injury or trauma:
‒ Aspiration to obtain further diagnostic information
‒ Hemarthrosis: ligament injury,
‒ Fat globules: bony injury.
• Now essentially a historical (or third world) use
‒ Advanced imaging produces far better information
‒ Avoid risk of injury, infection, or patient discomfort.
Contraindications:Aspiration / Therapeutic Injection
Contraindications:Aspiration / Therapeutic Injection
• Skin infection, contamination, or compromise at injection site‒ May be able to use alternate approach or location
• Infection of joint or bursa ‒ CONTRA-indication to Therapeutic injection‒ INDICATION for Diagnostic aspiration
• Presence of Joint Prosthesis—‒ Consult Ortho or refer patient back to treating surgeon
• Patient refusal

15
Contraindications:Aspiration / Therapeutic Injection
Contraindications:Aspiration / Therapeutic Injection
• Relative Contraindications:‒ Anatomic difficulty
• Severe scarring, ankylosis, Deep structure (Hip Joint)
• Excessive soft tissue envelope • Consider image guidance
‒ Coagulopathy
• relative contraindication
• depending on strength of indication, may be managed proactively
Complications:Injection/Aspiration
Complications:Injection/Aspiration
• Infection
‒ Any injection or invasive procedure includes risk of contamination or space involved, leading to infection
• Rarely seen, but extensive precautions are taken.
• Iatrogenic injury to nerve, blood vessel, cartilage, etc.
• Hemarthrosis, local bruising
• Medication reaction or effect

16
SafetySite Identification and Consent
SafetySite Identification and Consent
• Informed consent‒ Review procedure, risks and benefits with
Patient‒ May be verbal or written—Document!
• Determine correct site -- Patient agreement‒ Follow your institutional protocol‒ Each site of procedure should be identified
• Alert patient‒ Verbal confirmation of appropriate site
• Non-participating patient–include representative‒ Mark site according to institutional protocol
Safety: Infection PreventionSkin Prep
Safety: Infection PreventionSkin Prep
• Decrease contamination/sterilize skin‒ Avoid accidental inoculation of fluid filled
space‒ Limited blood supply, immunity, large volume
• DO NOT place needle through non-intact skin!‒ Rash, cellulitis, psoriatic plaque, abrasion, etc.‒ May need alternate technique or delay
procedure• Skin Cleanse with antiseptic
‒ Alcohol, Povidone-iodine and/or Chlorhexidine

17
Safety: Infection PreventionSkin Prep
Safety: Infection PreventionSkin Prep
• Using basic sterile technique to prep:‒ Always wear gloves‒ Scrub field in circular pattern
• starting from center and moving outward‒ Do not touch field with non-sterile object‒ May use sterile alcohol swab to wipe injection
site ‒ If Hair removal needed (rare)
• snip or use clipper, not razor• Allow alcohol to dry
‒ drying action hydrolyses bacteria to kill• Perform procedure immediately to avoid re-
contamination
Safety: Patient comfortSafety: Patient comfort• Try to make the experience as pleasant as possible
‒ Avoid further discomfort or complications‒ Positioning, relaxation, Watching? “Needle Phobia”?
• Use of Analgesics‒ Topical, local
• Accurate, confident injection technique ‒ Know your anatomy and equipment
• Needle and fluid “feel”‒ If difficult to reach target accurately
• Consider referral for image guided injection‒ Reassures anxious patient

18
Safety: Infection Prevention
Safety: Infection Prevention
• Use “no-touch” technique to place needle‒ important to avoid contaminating “field” by
touching prepped area with unsterile object, e.g. glove
‒ use of sterile gloves or sterile drape is optional• may require prepping larger field, and help
of assistant. • may be helpful if you need to palpate area
for accuracy• Cover with sterile dressing following injection
‒ Compressive wrap optional
Injection video –Knee anatomy, Skin prep and
Analgesia
Injection video –Knee anatomy, Skin prep and
Analgesia
19
Safety: Avoid injurySafety: Avoid injury• Direct mechanical injury,
‒ bone, nerve, soft tissue, cartilage
• Vascular:
‒ Intravascular injection, bleeding/ bruising
• Skin compromise:
‒ Fistula formation
• Important to know anatomy of the area
• Medication Safety
‒ Avoid allergy, side effects
Safety: MedicationSteroid
Safety: MedicationSteroid
• Efficacy generally accepted but little evidence
• Systemic side effects –
‒ Short term:
• hyperglycemia
Persists for variable period following injection
‒ Long term:
• AVN,
• impaired immunity,
• adrenal suppression
‒ Relatively rare with common injection dosing and occasional use

20
Safety: MedicationSteroid
Safety: MedicationSteroid
• True Allergy uncommon‒ May include allergy to carrier or other
component of formulation‒ Still reported- rarely
• Local effects‒ Increased risk of infection
• Possible increased risk of future periprosthetic infection
‒ skin depigmentation‒ tendon attrition/ tears‒ Actual effect on joint unknown, difficult to
pinpoint
Safety: MedicationLocal anesthetics
Safety: MedicationLocal anesthetics
• Lidocaine, bupivacaine, etc.
• Allergy
• Toxicity
‒ High intra-articular concentration recently linked to chondrolysis
‒ CNS and Cardiovascular effects
• Large dose
• Inadvertent intravascular injection

21
Safety: MedicationsHyaluronates
Safety: MedicationsHyaluronates
• Allergy
‒ Some products derived from poultry tissue
‒ Cross reactive with chicken or egg allergy
‒ Avoid by using different product
• Toxicity
‒ Local reaction reported with some
• Rare and self limited
• No known long term effects or risks
• Efficacy questionable
‒ Indicated only for OA of knee
‒ No longer recommended by American Academy of Orthopaedic Surgeons
Injection/Aspiration Technique
Injection/Aspiration Technique
General comments :• Sterile prep of area
‒ Collect needed materials ahead of time• Consider aspiration of the area just prior to injection
‒ MAY yield fluid, confirming needle tip in “space”‒ Not always successful:
• Smaller space, Minimal effusion• Edematous inflammatory tissue may obstruct
needle on aspiration.‒ Safety: confirm that needle is NOT intravascular. ‒ No blood return
• Fluid flow ‒ Free flow of fluid -> needle reached the target

22
Injection SetupInjection Setup
Injection/ Aspiration Technique Tips and Tricks-Needles
Injection/ Aspiration Technique Tips and Tricks-Needles
• Use same size needle for injecting/aspirating same fluid each time‒ allows a consistent “feel” for the flow
• Small gauge needle may produce too much resistance to flow:‒ false feeling of not being in the space with
injection attempt‒ may yield a false “dry tap” with aspiration
attempt• Large needle: flow may feel ‘too easy’ even if not in
joint. • Negative pressure may result in aspiration of
tissue into needle and cause obstruction‒ Brief Positive injection pressure may clear
needle• Needle length: Spinal needle for deep structures
‒ Larger gauge due to flexibility and resistance to flow (18 or 20g)

23
Specific Technique: Knee
• Relevant anatomy– Joint capsule extends from just below joint line to above patella, including suprapatellar pouch
– Fibular head is lateral side, below joint line
• Not part of knee joint
– PREpatellar bursa DOES NOT communicate with joint normally, SUPRAPatellar Bursa DOES.
Anterolateral view Right Knee,lateral injection sites marked *
*Joint capsule
Prepatellarbursa
SuprapatellarBursa
Specific injection techniqueKnee
• Approach: anterior medial (1)– Knee flexed, patient seated
• Medial femoral condyle
• Needle aims directly posterior
• Touch but do not penetrate articular cartilage
• Approach: anterior lateral (2)– Knee flexed, patient seated
• Lateral arthroscopic portal
• Location corresponds to lateral joint line, just lateral to Patella tendon
• Aim needle posteromedially to enter femoral notch
• Fluid should flow freely, otherwise advance slightly and gently apply pressure again
– Needle may be in prepatellar fat pad
1
Patella
Patella tendon
lateral medial
2

24
Simulation of Knee Injection with Anatomic Model
Simulation of Knee Injection with Anatomic Model
Specific injection technique: Knee
Injection site
IT Band• Approach: lateral suprapatellar
– Knee extended, patient supine or seated
– Inject suprapatellar pouch from lateral side
– Palpate IT band (Posterior) and Quad Tendon (Anterior)
– Insert needle at level just proximal to superior pole of patella
– Should feel resistance at capsule, then “Pop” through
– Needle should be able to pivot proximal and distal under patella/ quad tendon

25
Injection of pre-injected Knee with Viscosupplementation
Injection of pre-injected Knee with Viscosupplementation
Specific technique:Greater Trochanteric Bursa Injection
Specific technique:Greater Trochanteric Bursa Injection
• Approaches:‒ Posterolateral “hip” / upper thigh‒ Patient generally lies in lateral decubitus with
affected side up‒ Can be done with patient standing and leaning
over a table• Spinal needle sometimes needed for length
– if large soft tissue envelope

26
• Indications
– Trochanteric “bursitis”• Maximally Painful area of posterolateral trochanter
– may not correspond to physical fluid sac
• Differentiate from Gluteus Medius tendon insertion
• Inject point of maximal tenderness
(NOT G. Medius!)
Avoid injection of tendon to avoid attritional tear
Specific technique:Greater Trochanteric Hip Injection
Gluteus MediusTendon
GreaterTrochanteric bursa
Sciatic nerve
*
!
Injection site
Specific technique:Greater Trochanteric Bursa Injection
Specific technique:Greater Trochanteric Bursa Injection

27
Specific Technique: Shoulder
Subacromial Injection
Specific Technique: Shoulder
Subacromial Injection• Relevant anatomy
‒ Subacromial bursa is separate from Glenohumeral joint if rotator cuff is intact
‒ Lies between the Acromion and the rotator cuff tendons
• Positioning:‒ Supine/ Beach chair or seated upright
(preferred)• Seated position opens up subacromial
space due to gravity on arm• NOTE: If there is full thickness Rotator Cuff
tear, medication also reaches the Glenohumeral joint
Specific Technique: Shoulder• Multiple Shoulder injection
targets– Subacromial Bursa
• Most commonly performed• Topic of this instruction• Several approaches• Useful for Rotator Cuff Tendonitis, subacromial bursitis/ impingement
– Acromioclavicular Joint• Small joint superoanterior to GH joint, lateral end of clavicle
• May be difficult due to osteophytes
– Glenohumeral Joint (‘Intra‐articular Shoulder’)• Not common, usually performed by orthopaedic surgeon
• More difficult to perform
Subacromial Bursa
Anterior view of Left Shoulder
Tendons of Rotator cuff
*
28
AcknowledgementAcknowledgement
• Thank you to Brian Valus, PA-C, for his expert assistance in preparing this presentation, including live patient demonstrations; and to Kimberly Polley for her administrative support in arranging patient participation for the injection videos.
• Many thanks also to the patients who consented to participate in the demonstrations for educational purposes.
ReferencesReferences
• Bailie DS, Ellenbecker TS. Severe chondrolysis after shoulder arthroscopy: a case series. J. Shoulder Elbow Surg. 2009; 18:742-747.
• Henry Gray (1821–1865). Anatomy of the Human Body. 1918. (www. Bartelby.com)
• Brian C. Werner, MD, Jourdan M. Cancienne, MD, James A. Browne, MD The Timing of Total Hip Arthroplasty After Intraarticular Hip Injection Affects Postoperative Infection Risk. J Arthroplasty. 2016 Apr;31(4):820-3. doi: 10.1016/j.arth.2015.08.032. Epub 2015 Sep
• Sterile technique: https://onesource.osumc.edu/departments/PerioperativeServices/Documents/UHRossPolicies/Aseptic%20Technique%20UH.pdf
• TREATMENT OF OSTEOARTHRITIS OF THE KNEE EVIDENCE-BASED GUIDELINE 2ND EDITION Board of directors of AAOS, May, 2013