community viewer (cv) version 3.1 va staff user guidecv)/… · cv provides a toolbar that enables...
TRANSCRIPT

Community Viewer (CV) Version 3.1
VA Staff User Guide
September 2019 Version 1.2
Department of Veterans Affairs (VA)
Office of Information and Technology (OIT)

Community Viewer 3.1 VA Staff User Guide i September 2019
Revision History Date Version Description Author 09/05/2019 1.2 Resubmitted for approval AbleVets 09/03/2019 1.1 Incorporated feedback AbleVets 08/21/2019 1.0 Delivered for review AbleVets 07/17/2019 0.1 Initial draft created from last approved AbleVets

Community Viewer 3.1 VA Staff User Guide ii September 2019
Table of Contents 1. Introduction ........................................................................................ 1
1.1. Purpose of the Guide ........................................................................................................ 2 1.1.1. Guide Conventions ........................................................................................................... 2 1.1.2. Terminology ....................................................................................................................... 2 1.2. Assumptions ..................................................................................................................... 2 1.3. System Requirements ...................................................................................................... 3 1.4. Getting Help ....................................................................................................................... 3
2. Logging in to CV ................................................................................ 4 2.1. System Notifications......................................................................................................... 5 2.1.1. Viewing System Status ..................................................................................................... 5 2.1.2. Viewing Announcements ................................................................................................. 6 2.2. Editing Your User Profile at Login .................................................................................. 7 2.3. The CV Portal Toolbar ...................................................................................................... 7 2.3.1. Default View ....................................................................................................................... 7 2.3.2. Profile Settings .................................................................................................................. 8 2.3.3. Using the Accessible Theme’s Functionality ............................................................... 11 2.3.3.1. Keyboard Focus and Portal Navigation .................................................................... 12 2.3.3.2. Accessible Theme Portal Navigation ......................................................................... 14 2.4. Logging Out of the Current CV Session ....................................................................... 14
3. Using CV ........................................................................................... 15 3.1. The Widget Tray .............................................................................................................. 15 3.2. About the Community Care PPMS Provider Management Widget ............................ 15 3.3. About CCP Profiles ......................................................................................................... 16 3.4. About Searches ............................................................................................................... 16 3.4.1. Searching Providers ....................................................................................................... 16 3.4.2. Searching Patients .......................................................................................................... 17 3.5. Creating and Managing CCP Passwords ..................................................................... 19 3.5.1. Creating CCP Passwords ............................................................................................... 19 3.5.2. Resetting Provider Passwords ...................................................................................... 20 3.6. Assigning and Unassigning Patients............................................................................ 21 3.6.1. Creating Patient Assignments ....................................................................................... 21 3.6.2. Removing Patient Assignments .................................................................................... 24 3.6.3. Setting Record Display Limits ....................................................................................... 24
4. Troubleshooting ............................................................................... 26 4.1. Login Page Errors ........................................................................................................... 26 4.2. Provider Search Errors ................................................................................................... 27 4.3. Patient Search Errors ..................................................................................................... 28

Community Viewer 3.1 VA Staff User Guide iii September 2019
5. Acronyms and Abbreviations ......................................................... 29
Table of Figures Figure 1: CV Authorized Use Only Warning .............................................................................................. 1 Figure 2: Login Page .................................................................................................................................... 5 Figure 3: System Status Indicator ................................................................................................................ 6 Figure 4: CV Portal Tools ............................................................................................................................ 7 Figure 5: Default View ................................................................................................................................ 8 Figure 6: The CV Settings Dialog................................................................................................................ 9 Figure 7: Default Theme .............................................................................................................................. 9 Figure 8: Blue UI Theme ........................................................................................................................... 10 Figure 9: Gray UI Theme ........................................................................................................................... 10 Figure 10: Green UI Theme ....................................................................................................................... 11 Figure 11: Accessible (508-Compliant) UI Theme .................................................................................... 11 Figure 12: Navigation Using Elements with Keyboard Focus ................................................................... 14 Figure 13: Widget Tray .............................................................................................................................. 15 Figure 14: Community Care PPMS Provider Management Widget .......................................................... 16 Figure 15: PPMS Provider Search ............................................................................................................. 17 Figure 16: My Site Patient Search ............................................................................................................. 18 Figure 17: Enterprise Patient Search .......................................................................................................... 19 Figure 18: CCP Password Generation or Reset Dialog ............................................................................. 20 Figure 19: PPMS Patient Assignment Pane ............................................................................................... 22 Figure 20: Patient Search Dialog Box ........................................................................................................ 23 Figure 21: The Patient Search Dialog Box, Showing Results ................................................................... 24 Figure 22: Data Access Controls ............................................................................................................... 25
Table of Tables Table 1: Keyboard Accessible Keystrokes ................................................................................................ 12 Table 2: Assignment Rules Examples ....................................................................................................... 21 Table 3: Login Page Error Message Troubleshooting ............................................................................... 26 Table 4: Provider Search Error Messages and Resolution Steps ............................................................... 27 Table 5: Patient Search Error Messages and Resolution Steps .................................................................. 28 Table 6: Acronyms and Abbreviations ...................................................................................................... 29

Community Viewer 3.1 VA Staff User Guide 1 September 2019
1. Introduction Community Viewer (CV) is a browser-based software application that facilitates the secure exchange of data between Department of Veterans Affairs (VA) systems and authorized non-VA providers, known as Community Care Providers (CCPs). The exchange of data improves the coordination of care and continuity of care for VA patients receiving treatment outside of the VA network. CV pulls information from VA health care systems in real time for viewing within a web browser. VA Staff assign patients to CCPs through CV, allowing them access to view consolidated patient data from multiple Veterans Information Systems and Technology Architecture (VistA) systems. This User Guide is intended for VA Staff who use the functionality within the Community Care Provider Profile Management System (PPMS) Provider Management widget.
NOTE: CV does NOT replace the creation and uploading of documentation packages to the Third-Party Administrator (TPA) portals. VA Staff must continue to create and upload documentation packages as specified in their facility’s current standard operating procedure (SOP).
Please read and bear in mind the warning displayed in Figure 1 before using CV.
Figure 1: CV Authorized Use Only Warning

Community Viewer 3.1 VA Staff User Guide 2 September 2019
VA Staff use the Community Care PPMS Provider Management widget to perform the following tasks:
• View CCP profiles • Assign/unassign patients • Search patient assignments • Manage CCP access to patient data • Perform My Site and Enterprise patient searches • Generate or reset passwords
1.1. Purpose of the Guide The purpose of this user guide is to familiarize VA Staff with the important features and navigational elements of CV.
1.1.1. Guide Conventions This document is designed for both online and hardcopy consumption.
• Cross-References are indicated by blue, underlined text, and provide a hyperlink to figures, tables, and other sections within this guide
• Emphasis is expressed by bold, underlined, and italicized text
• The information symbol calls the reader’s attention to additional information
1.1.2. Terminology The following standard terms are used throughout this guide:
• VA Staff Portal: The landing page, or default view, of CV that appears after logging in; the portal page displays widgets and the tools that enable quick access to basic features
• Widget: A component of the CV interface that enables a user to view information or perform a function
• Widget Tray: An expandable and collapsible tray at the bottom of the portal page that provides access to the widgets available for placement on the portal page
1.2. Assumptions The user guide is written from the perspective of VA Staff and assumes that:
• You can open, navigate, and use a web browser • You can use web-based applications, their menu options, and navigation tools • You have the Uniform Resource Locator (URL) for the CV Login page, system user names,
a Personal Identification Verification (PIV) card, and the VistA Access/Verify codes required to launch CV
Community Viewer 3.1 VA Staff User Guide 3 September 2019
1.3. System Requirements CV is a front-end web application, designed to run in a web browser on the VA network. Accessing CV through a browser or device that is not fully compatible with the application may result in certain features not working as expected.
NOTE: Mobile devices are not supported in this release.
It is recommended that CV be accessed from a desktop or laptop PC using a supported browser, such as:
• Internet Explorer (IE) v11 • Chrome v76 • Microsoft Edge v44 • Safari v12
1.4. Getting Help Authorized users who have trouble logging in to CV or experience other application issues should call the Enterprise Service Desk (ESD) for assistance or create a ticket using the YourIT self-service portal.
IT Enterprise Service Desk Phone: 855-673-4357 YourIT Self-Service Portal: https://yourit.va.gov/va
Prior to contacting the ESD for support, please refer to Logging in to CV for detailed information about how to access CV, and to Troubleshooting for suggested resolution steps and troubleshooting information.

Community Viewer 3.1 VA Staff User Guide 4 September 2019
2. Logging in to CV Before logging in to and utilizing CV functionality, please read the Sensitive Information warning in Figure 1. CV authenticates all VA users using their PIV card (also known as a Smart Card) and their VistA Access and Verify codes. During log in, first-time CV users are prompted to enter their agency, site, and user interface (UI) theme settings. This data is used to create a CV user profile, and it is utilized during future login sessions. 1. Ensure your PIV card is inserted into your computer or card reader 2. Open a supported Internet browser 3. Enter the URL for the CV web application into the address bar of the browser 4. When prompted with a certificate list, select the PIV Authentication certificate 5. When prompted, enter your PIV Personal Identification Number (PIN) 6. Click I Accept after reading the important user consent information regarding accessing a
Government information system (Figure 1) 7. Enter the following information in the fields on the Login page (Figure 2):
a. VistA Access code b. VistA Verify code c. Select “VA” from the Agency field d. Select your local VistA from the Site dropdown
NOTE: Users should review the Announcements and System Status panes on the Login page for information that may impact CV functionality or data availability. See Viewing System Status and Viewing Announcements for detailed information.
8. Click Login

Community Viewer 3.1 VA Staff User Guide 5 September 2019
Figure 2: Login Page
2.1. System Notifications The CV Login page displays system notifications to alert you to system outages, scheduled system activities, and important upgrades. The Login page also displays a notification when your VistA Verify code must be reset. The CV Help link opens CV online help, which guides you through the steps to reset your Verify code.
2.1.1. Viewing System Status CV’s Health Monitor provides system status updates and monitors the services CV uses to connect to VA data sources. The services that are monitored include: Master Veteran Index (MVI), VistA Data Service (VDS), and jMeadows Data Service. The system status is displayed in two areas: 1. On the Login page (Figure 2) 2. Atop the VA Staff Portal (Figure 3)
When all monitored systems and services are online and connected, a green icon appears next to the status with the message, “CV data sources available” (Figure 2).

Community Viewer 3.1 VA Staff User Guide 6 September 2019
When one or more monitored systems or services are offline or unavailable, a yellow warning icon appears with the message, “CV is having problems.” When CV’s Health Monitor is unable to retrieve and report system status information, a red icon
appears with the message, “System status is unavailable.” When this status appears, you may not be able to log in to CV or view patient data until the connection is restored. See Getting Help for information on how to contact the ESD.
Figure 3: System Status Indicator
2.1.2. Viewing Announcements System announcements are provided by VA and displayed on the Login page (Figure 2) when scheduled system activities may impact the user or CV system availability. The View More Announcements link opens additional announcement information.
NOTE: Announcements are separate from the system status messages displayed on the Login page. See Viewing System Status for details.

Community Viewer 3.1 VA Staff User Guide 7 September 2019
2.2. Editing Your User Profile at Login You can customize your profile from the Login page. First-time CV users are prompted to enter their agency, site, and UI theme settings before logging in. Once saved, the profile information is used each time you log in to CV. UI theme preferences can also be set within CV. See Profile Settings. 1. Click the Edit Profile link on the Login page
a. Profile options are presented 2. Enter your VistA Access and Verify codes in the fields provided 3. Enter your agency and site in the fields provided 4. Select the desired UI theme 5. Click Save and Login
2.3. The CV Portal Toolbar CV provides a toolbar that enables quick access to basic features. The toolbar is in the upper right corner of the application window (Figure 4).
• Select the UI theme: Click the Settings icon to select the UI theme (See Profile Settings)
• Access online help: Click the Help icon to open web-based help
• Log out: Click the Logout icon to terminate the current CV session
Figure 4: CV Portal Tools
2.3.1. Default View After logging in to CV, the Provider Portal opens, displaying the VA Staff Portal tab. The default view of the VA Staff Portal is blank. The Community Care PPMS Provider Management widget is not open by default. You must launch it from the Widget Tray. Click the Open Widget Tray link in the lower right corner (Figure 5) to open the Widget Tray. Click, hold, and drag the Community Care PPMS Provider Management icon from the Widget Tray to the portal, and drop the widget in the desired location. Your widget configurations are saved to your profile and used each time you log in to CV.

Community Viewer 3.1 VA Staff User Guide 8 September 2019
Figure 5: Default View
2.3.2. Profile Settings
Profile settings are accessible within CV by clicking the Settings icon, located in the upper right corner of the portal pages (Figure 5).
NOTE: The configuration options are limited to choosing a UI theme in this release.
Selecting a UI Theme sets the font color, foreground, and background colors of CV. Themes apply to all application elements, including widgets, toolbars, and dialog boxes. Theme choices are Default, Green, Blue, Gray, and Accessible. The Accessible theme (Figure 11) is 508-compliant, and it is designed to work with the accessibility tools installed on your device.
1. Click the Settings icon a. The CV Settings dialog opens (Figure 6)
2. Click the radio button next to the desired theme 3. Click Save to apply the selected theme -OR- 4. Click Cancel to exit the CV Settings dialog and restore the previous theme

Community Viewer 3.1 VA Staff User Guide 9 September 2019
Figure 6: The CV Settings Dialog
UI theme choices are displayed in figures 7 through 11.
Figure 7: Default Theme

Community Viewer 3.1 VA Staff User Guide 10 September 2019
Figure 8: Blue UI Theme
Figure 9: Gray UI Theme

Community Viewer 3.1 VA Staff User Guide 11 September 2019
Figure 10: Green UI Theme
Figure 11: Accessible (508-Compliant) UI Theme
2.3.3. Using the Accessible Theme’s Functionality The Accessible theme includes larger fonts, enhanced tab and keystroke functionality, and screen reader compatibility to support Federal accessibility requirements and Section 508 compliance.
NOTE: The Accessible theme is available for users who have adaptive technologies installed on their computers.

Community Viewer 3.1 VA Staff User Guide 12 September 2019
2.3.3.1. Keyboard Focus and Portal Navigation Keyboard focus is the highlighting of portal elements that enables interaction with, and the navigation of, the web application through the keyboard and keystrokes. The portal element in focus is outlined in gold (Figure 11) as a visual indicator of keyboard focus. CV enables the use of Windows keystrokes (Tab, Shift + Tab, arrow keys, Enter) and keyboard shortcuts to move the focus to all menus and activate all functions on the menus. All application components are accessible via the keyboard when the Accessible theme is in use.
NOTE: If you focus on an element within the widget that has hover text, the text appears after a small delay as if the user hovered over the element with a mouse cursor.
Pressing Enter or the Spacebar when an element that provides action is in keyboard focus performs the associated action. For example, pressing Enter or the Spacebar when the Settings icon is in focus, voiced “List box button, Settings,” opens the CV Settings dialog. Using the arrow keys or the Tab key allows a user to move between keyboard focus items to navigate through portal elements. Table 1 provides a complete list of accessible keystrokes.
Table 1: Keyboard Accessible Keystrokes Keystroke Description
Application and Portal Navigation Alt+4 Press to transfer keyboard focus to the main or top portal element:
Focus is transferred to the Provider Portal tab on a portal page. Focus is transferred to the first link or data element in a widget. Focus is transferred to the dialog box’s Close button (X).
Alt+5 Press on a page with two panes to toggle keyboard focus between the main or top element on left and right panes.
ENTER Press to transfer keyboard focus to the highlighted widget. Press to activate an element in focus.
TAB Press to transfer keyboard focus to other UI items. ESC Press to return keyboard focus to the pane containing the UI item with keyboard
focus or to exit a window or widget. SPACEBAR Press to activate any UI item. Arrow Keys When keyboard focus is on a widget, press the arrow keys to change page viewing
in a widget's data table. When keyboard focus is on a dropdown, press the down arrow to view the contents.
Portal Tabs Arrow Keys Use the left and right arrow keys to navigate between tabs.

Community Viewer 3.1 VA Staff User Guide 13 September 2019
Keystroke Description TAB Press one or more times when focus is on a portal tab to place Add Tab (+) in
keyboard focus. Add a Tab: 1) Press the Tab key until Add Tab (+) is in focus. 2) Press Enter. 3) The new tab dialog box opens and prompts you to enter a name for the new
tab. 4) Tab to the Add button to confirm the new tab name or tab to the Cancel button
to discard the new tab. ENTER Press while the portal tab (+) is in focus, voiced as “Add Tab button,” to add a new
portal tab. ESC Focus on a tab and press ESC to remove it.
Windows and Dialog Boxes TAB Press the Tab key to move the keyboard focus to other UI items within the window.
Adding Widgets to the Portal Pages
Enter Press while the widget tray Open Widget Tray link is in focus to add a widget.
Alt + 1, 2, or 3 Add a widget to a Portal page from the Widget Tray: 1) Determine in which column (1, 2, or 3) of the Portal page to place the widget. 2) Focus on the desired widget icon in the Widget Tray. 3) Press Alt + 1, 2, or 3, depending on the desired column.

Community Viewer 3.1 VA Staff User Guide 14 September 2019
2.3.3.2. Accessible Theme Portal Navigation An element with keyboard focus is the starting point for portal navigation. Pressing the Enter or Spacebar keys when a portal element or icon has keyboard focus mimics a mouse click. Figure 12 depicts the Patient Assignments pane of the Community Care PPMS Provider Management widget.
• Focus can be changed by pressing Tab key • Pressing the Tab key in this example shifts the keyboard focus from the My Site radio
button to the Patient Search field • Typing at least two characters in the Patient Search field and pressing Enter, with focus
either in the search field or on or the Search button, initiates a search • Press Tab to navigate through the results
• Tab once to focus first on the entire row of the patient result, then Tab again to put focus on the radio button associated with that record
• Press Spacebar with a radio button in focus to select a patient from the results • If you have a radio button selected, press the arrow keys up or down to navigate through
the radio buttons for each patient result • If you have no radio buttons selected, Shift + Tab to navigate back up through the result
rows • Use Alt + 5 on to toggle between the Patient Search and Patient Assignments panes.
Figure 12: Navigation Using Elements with Keyboard Focus
2.4. Logging Out of the Current CV Session
You may intentionally log out to end a CV session by clicking Logout at any time. If you fail to log out, the current session terminates automatically after 30 minutes of inactivity. You are redirected to the Login page when you attempt any new activity.

Community Viewer 3.1 VA Staff User Guide 15 September 2019
3. Using CV 3.1. The Widget Tray
The Provider Portal contains the VA Staff Portal tab, which holds the Community Care PPMS Provider Management widget. You can launch the Community Care PPMS Provider Management widget from the Widget Tray if it is not displayed immediately after you log in. Click the Open Widget Tray link in the lower right corner of the portal to open the Widget Tray (Figure 13). Click, hold, and drag the icon from the Widget Tray to the portal page, and drop the widget in the desired location.
Figure 13: Widget Tray
3.2. About the Community Care PPMS Provider Management Widget
The Community Care PPMS Provider Management widget within the VA Staff Portal (Figure 14) provides a read-only view of individual CCP profile data and is the starting point for multiple tasks, including assigning a VA patient to a CCP, setting limits on the CCP’s access to the patient's VA medical record, and generating or resetting CCP passwords. The following tasks (links) are available:
• Manage PPMS Provider (CCP)/Patient Assignment • Search Patient Assignments

Community Viewer 3.1 VA Staff User Guide 16 September 2019
Figure 14: Community Care PPMS Provider Management Widget
3.3. About CCP Profiles All CCP profiles in the Community Care PPMS Provider Management widget are read only. CCP profiles are created and maintained within PPMS. VA Staff can only view profile data from active, individual CCPs.
3.4. About Searches The Community Care PPMS Provider Management widget’s search features are used to find a provider or a patient. Search functionality is also used to find a list of patients assigned to a provider.
NOTE: All search figures depict searches within and information from test databases.
3.4.1. Searching Providers When using the Manage PPMS Provider (CCP)/Patient Assignment feature in the Community Care PPMS Provider Management widget, you can search for providers by entering a 10-digit National Provider Identifier (NPI) in the Search Providers field and selecting the Search button (Figure 15). The Search button remains disabled if you enter any value other than 10 digits. You can also use the PPMS Provider Locator or NPI Registry links to find the NPI value if you do not already have it.

Community Viewer 3.1 VA Staff User Guide 17 September 2019
Figure 15: PPMS Provider Search
3.4.2. Searching Patients There are two types of patient searches in CV from the Search Patient Assignments feature:
• My Site Search: Searches the user’s local VistA (also known as facility or site) • The patients listed in the search results are registered to that local VistA only (Figure 16)
• Enterprise Search: Searches all VistAs across the Enterprise • The patients listed in the search results are registered to one or more VistAs (Figure 17)
When searching for a patient within your site: 1. Select the Search Patient Assignments link 2. Confirm the My Site radio button is selected by default 3. Enter search criteria into the Patient Search field:
a. A minimum of two characters of the patient’s last name -OR- b. The patient's last name, followed by a comma and either the first initial or full spelling of
the patient's first name (Smith, J or Smith, John) -OR- c. The patient's full Social Security Number (SSN) (123456789) -OR- d. The first letter of the patient's last name followed by the last 4 digits of the patient’s SSN
(S6789) 4. Click Search or press Enter

Community Viewer 3.1 VA Staff User Guide 18 September 2019
Figure 16: My Site Patient Search
When searching for a patient across the Enterprise: 1. Select the Search Patient Assignments link 2. Select the Enterprise radio button 3. Enter the patient’s SSN into the required Patient SSN field (required) 4. Enter the patient’s full last name into the required Last Name field (required) 5. Enter the patient’s date of birth (DOB) in the optional DOB field (optional) 6. Enter the patient’s first name in the optional First Name field (optional) 7. Click Search or press Enter

Community Viewer 3.1 VA Staff User Guide 19 September 2019
Figure 17: Enterprise Patient Search
Please see Assigning and Unassigning Patients for detailed instructions on how to run either a My Site or Enterprise search from the Manage Providers pane.
3.5. Creating and Managing CCP Passwords
3.5.1. Creating CCP Passwords VA Staff are required to generate a password before CCPs can log in for the first time. Follow these steps to automatically generate or manually create a CCP’s password. 1. Open the Community Care PPMS Provider Management widget 2. Click the Manage PPMS Provider (CCP)/Patient Assignment link
Community Viewer 3.1 VA Staff User Guide 20 September 2019
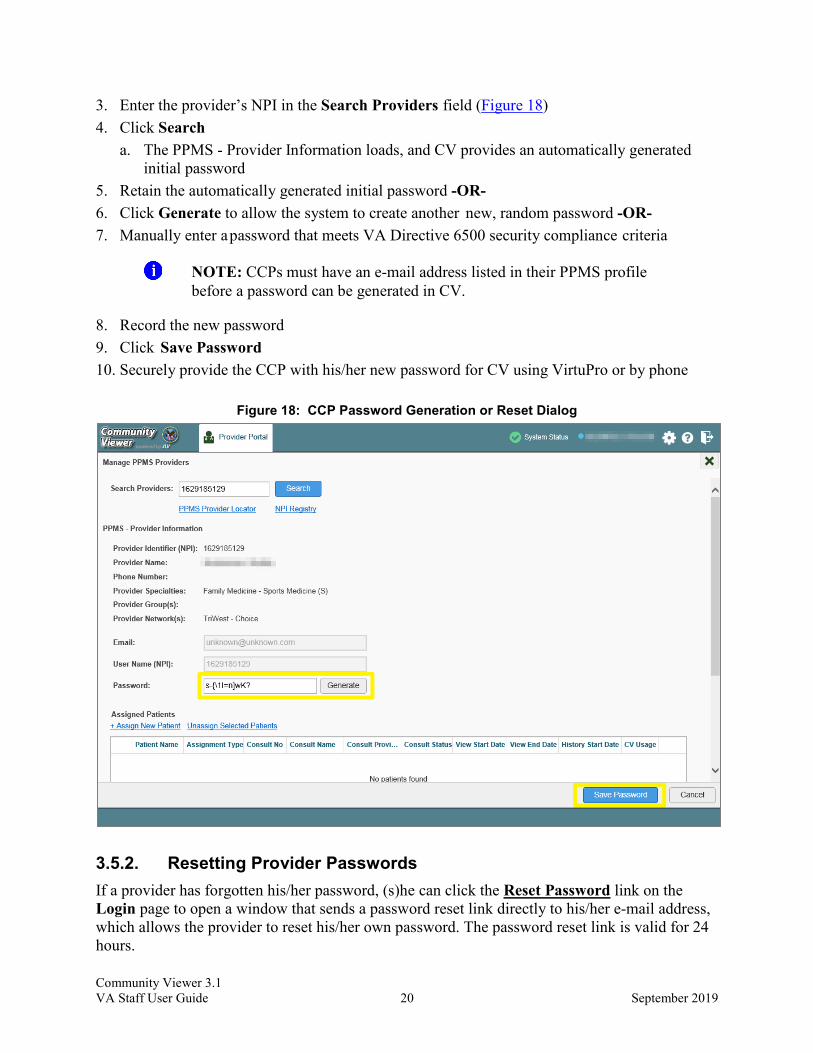
3. Enter the provider’s NPI in the Search Providers field (Figure 18) 4. Click Search
a. The PPMS - Provider Information loads, and CV provides an automatically generated initial password
5. Retain the automatically generated initial password -OR- 6. Click Generate to allow the system to create another new, random password -OR- 7. Manually enter a password that meets VA Directive 6500 security compliance criteria
NOTE: CCPs must have an e-mail address listed in their PPMS profile before a password can be generated in CV.
8. Record the new password 9. Click Save Password 10. Securely provide the CCP with his/her new password for CV using VirtuPro or by phone
Figure 18: CCP Password Generation or Reset Dialog
3.5.2. Resetting Provider Passwords If a provider has forgotten his/her password, (s)he can click the Reset Password link on the Login page to open a window that sends a password reset link directly to his/her e-mail address, which allows the provider to reset his/her own password. The password reset link is valid for 24 hours.
Community Viewer 3.1 VA Staff User Guide 21 September 2019
Password resets can also be performed manually by VA Staff by following the steps listed in Creating CCP Passwords, and selecting the Reset Password button to activate the Password field where you can either enter a password manually or select the Generate Password button.
3.6. Assigning and Unassigning Patients You can assign patients to CCPs using the Community Care PPMS Provider Management widget.
NOTE: VA Staff cannot create CCP accounts in CV. See About CCP Profiles for more information.
CV uses the following rules to manage patient assignments:
• A Veteran may be assigned to more than one CCP for the following Assignment Types: • Consult • Episode of Care
• A specific Veteran/consult combination may only be assigned to a single CCP
Table 2: Assignment Rules Examples Veteran John Davis has multiple active referrals to be assigned:
Referral 1 Episode of Care for Optometry
Assign to CCP A A Veteran may have multiple, active assignments for an Episode of Care
Referral 2 Consult for Cardiology
Assign to CCP B This specific consult can only be assigned to one CCP at a time
Referral 3 Consult for Chiropractic
Assign to CCP C This specific consult can only be assigned to one CCP at a time
3.6.1. Creating Patient Assignments Once the CCP’s account has been created in PPMS, VA Staff can assign them patients in CV. 1. Click the Manage Provider PPMS (CCP)/Patient Assignment link in the Community
Care PPMS Provider Management widget 2. Enter the provider’s NPI in the Search Providers field 3. Click Search
a. The provider’s information displays under PPMS Provider Information b. The provider’s patient assignments display under Assigned Patients

Community Viewer 3.1 VA Staff User Guide 22 September 2019
4. Click the + Assign New Patient link under Assigned Patients (Figure 19) a. The Patient Search dialog opens
Figure 19: PPMS Patient Assignment Pane
5. Enter the patient name in the blank field at the top of the Patient Search dialog (Figure 20) 6. Select the My Site or Enterprise search option and enter the search criteria (Please refer to
Searching Patients for details)

Community Viewer 3.1 VA Staff User Guide 23 September 2019
Figure 20: Patient Search Dialog Box
7. Click Search 8. Select a patient from the search results list (Figure 21) 9. Select the Assignment Type from the dropdown: Consult (available when search was
performed through My Site only) or Episode of Care a. If Consult is specified, select one consult record from the list that appears (Consult status
must be Active or Scheduled for the consult to appear in the list.)

Community Viewer 3.1 VA Staff User Guide 24 September 2019
Figure 21: The Patient Search Dialog Box, Showing Results
10. If desired, adjust the default View Start Date, View End Date, and History Start Date fields to restrict the patient data seen by the CCP
11. Click Assign 12. A notification is generated
a. Review the message and edit as needed 13. Click Send E-mail
3.6.2. Removing Patient Assignments When it is necessary to unassign one or more patients from a CCP: 1. Repeat steps 1–3 from Creating Patient Assignments to navigate to the Manage PPMS
Providers page 2. Select checkboxes for each patient you want to unassign 3. Click the Unassign Selected Patients link under Assigned Patients
3.6.3. Setting Record Display Limits VA Staff can limit the patient records made available to the assigned CCP. There are two settings that control access to patient data:
• View Start Date and View End Date: These fields set the length of time the CCP has access to a patient’s records through CV • The default View Start Date is the date the patient is assigned to the CCP • The default View End Date is 3 months from the default start date

Community Viewer 3.1 VA Staff User Guide 25 September 2019
• History Start Date: This setting represents how far back in a patient's VA medical history the CCP is permitted to view • The default history start date is 3 months prior to the current date • If the history start date is set to 01/01/2012, for example, the CCP has access to the
patient's records from 2012 to the present Data access controls are set by VA Staff during the patient assignment process.
1. Click the Calendar icon next to the View Start Date and the View End Date fields 2. Select the start and end dates (Figure 22)
3. Alternatively, click the Calendar icon next to the History Start Date 4. Select a date 5. Click Assign
Figure 22: Data Access Controls

Community Viewer 3.1 VA Staff User Guide 26 September 2019
4. Troubleshooting 4.1. Login Page Errors Access to CV is limited to registered, authorized users. CV validates VA user access against information retrieved from your PIV (Smart Card). If you have trouble logging in to CV, please review Table 3 before contacting the ESD.
Table 3: Login Page Error Message Troubleshooting Error Message Resolution Steps There is an issue preventing your access to Community Viewer. Please contact your VA Contractor or your VA Medical Center for assistance.
WHY? A CCP attempted to log in without an active status. FIX IT: Update the status to “active” in PPMS.
Could not save User Profile
WHY? The error occurred during PIV authentication for VA users. It is either a PIV card processing problem or the wrong security certificate was chosen. FIX IT: 1) Close your browser window 2) Reinsert your PIV card and relaunch CV 3) Select a certificate that is not expired and specifies: “Issuer: Veterans
Affairs User CA B1” 4) If this is unsuccessful, close all open IE windows/tabs, then open IE and
try CV again Not a valid ACCESS/VERIFY CODE pair
WHY? 1) CV could not match your Access and Verify codes to the Site selected in the dropdown; or 2) A username and password were entered instead of Access/Verify codes. FIX IT: 1) Veterans Health Administration (VHA) users must select the parent VistA
host site for their facility 2) Reenter your Access and Verify codes (Computerized Patient Record
System [CPRS] or VistA codes for VHA users) Page cannot be displayed
WHY? The CV URL requires certain IE settings. FIX IT: 1) Click the Tools menu (press ALT-X) in IE 2) Select Internet Options 3) When the dialog opens, select the Advanced tab 4) Scroll down in the list until you see the Secure Sockets Layer (SSL) 2.0
setting (Windows 7 machine), or the Secure Sockets Layer 3.0 setting (Windows 10 machine), and ensure it is NOT checked
5) Ensure that Transport Layer Security (TLS) 1.0, 1.1, and 1.2 ARE checked
6) Click OK to close the dialog box, then relaunch CV (The page should load.)

Community Viewer 3.1 VA Staff User Guide 27 September 2019
Error Message Resolution Steps Smart Card required WHY? Your PIV (Smart Card) was not read by Windows Security and CV
before opening the CV URL. FIX IT: 1) Close all browser sessions/browser-based applications 2) Reinsert PIV (Smart Card) and relaunch CV 3) If this is unsuccessful, fully reboot your system to refresh all connections
(This resolves greater than 95% of any remaining problems.) VERIFY CODE must be changed before continued use
WHY? Your CPRS VERIFY CODE has expired. FIX IT: 1) Open CPRS or VistA
a) If prompted for a PIV card certificate by CPRS, click Cancel 2) Select the Change Verify Code checkbox on the sign-on dialog before
clicking OK 3) You are prompted to create a new Verify code 4) Once your Verify code is changed for CPRS, CV recognizes the new code
immediately
4.2. Provider Search Errors The following error messages may appear when searching for a provider in the Community Care PPMS Provider Management widget. If you encounter error messages while searching for providers, please review Table 4 before contacting the ESD.
Table 4: Provider Search Error Messages and Resolution Steps Error Message Resolution Steps
Patients may only be assigned to active individual (Type I) providers. Utilize PPMS to locate an individual (Type I) provider associated to the group (Type II) provider you entered.
WHY? CV can only retrieve individual (Type 1) providers. Provider groups (Type II) are not supported. FIX IT: Locate an individual (Type I) provider associated with the group (Type II) in PPMS.
Patients may only be assigned to active individual (Type I) providers. Utilize PPMS to research why the provider you entered is not active.
WHY? CV can only retrieve providers with an active status. FIX IT: Use PPMS to research why the provider you searched does not have an active status.
Email is required to ensure notifications occur when patients are assigned. To continue with this provider, add the provider’s email address in PPMS and search again.
WHY? The e-mail address is blank in the PPMS profile. FIX IT: Update the provider’s e-mail address in PPMS.

Community Viewer 3.1 VA Staff User Guide 28 September 2019
Error Message Resolution Steps
NPI entered not found. Validate the NPI in the NPI Registry. If the NPI is valid, follow the appropriate business process in PPMS.
WHY? NPIs must be 10-digits and belong to active, individual (Type 1) providers. FIX IT: Use the PPMS Provider Locator or NPI Registry links to verify the NPI value. If the NPI value is valid, follow the appropriate business process to add the provider to PPMS.
4.3. Patient Search Errors The following error messages may appear when searching for a patient in the Community Care PPMS Provider Management widget. If you encounter error messages while searching for patients, please review Table 5 before contacting the ESD.
Table 5: Patient Search Error Messages and Resolution Steps Error Message Resolution Steps An invalid search criterion was entered. Please enter at least 2 characters.
WHY? You entered an invalid patient name. FIX IT: Please try your search again. When searching by patient name, enter at least two characters of the patient’s last name. Search results display the closest match to the characters entered in the format of [last name], [first name].
An invalid SSN format was entered. Please enter a 9-digit SSN.
WHY? You entered an invalid SSN. FIX IT: Please try your search again. When searching by patient SSN, you are required to enter the patient’s full 9-digit SSN. Dashes are allowed (e.g., 123-45-6789).
An invalid last 5 format was entered. Please enter the first letter of the last name followed by the last 4-digits of the SSN.
WHY? You entered an invalid patient name or SSN. FIX IT: Please try your search again. Patient search allows you to search for a patient using the first initial of the patient’s last name and the last four digits of the patient’s SSN. Please try your search again using the first initial of the patient’s last name and the last four digits of the patient’s SSN.
An error occurred during your search. Please try your search again.
WHY? This message may display when invalid patient identifiers are entered or an error occurs either at the service layer or with an external system. FIX IT: Please try your search again.
Community Viewer 3.1 VA Staff User Guide 29 September 2019
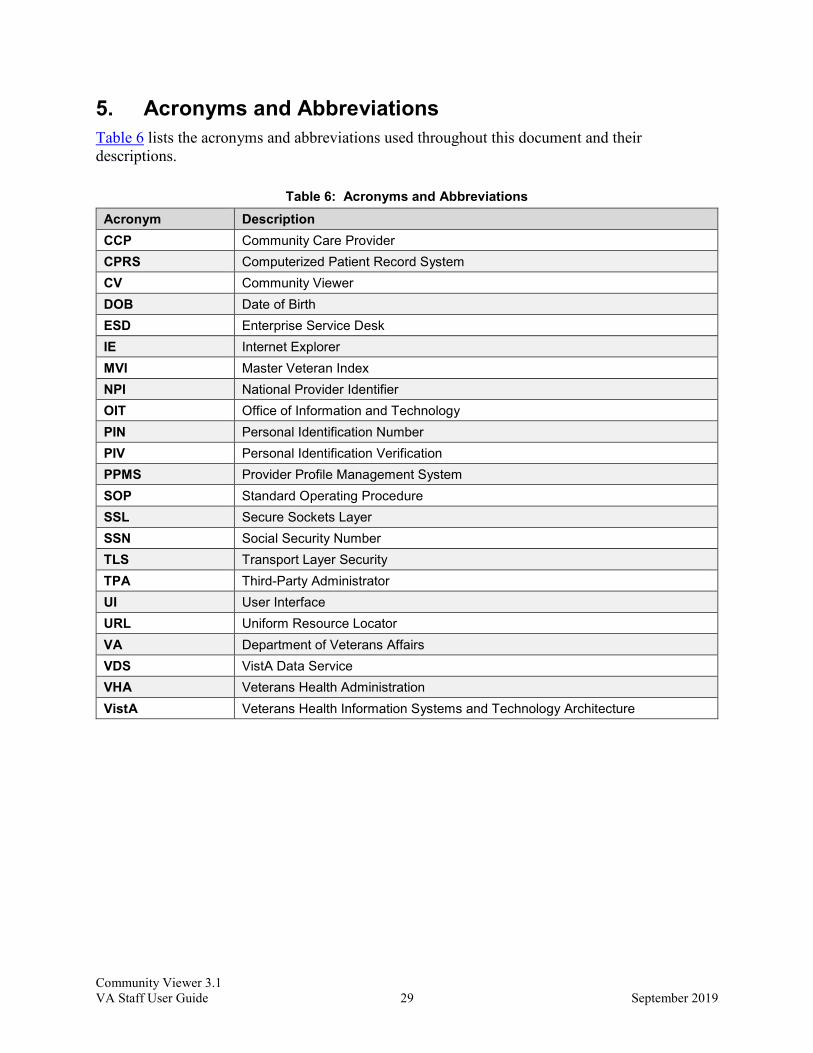
5. Acronyms and Abbreviations Table 6 lists the acronyms and abbreviations used throughout this document and their descriptions.
Table 6: Acronyms and Abbreviations Acronym Description CCP Community Care Provider CPRS Computerized Patient Record System CV Community Viewer DOB Date of Birth ESD Enterprise Service Desk IE Internet Explorer MVI Master Veteran Index NPI National Provider Identifier OIT Office of Information and Technology PIN Personal Identification Number PIV Personal Identification Verification PPMS Provider Profile Management System SOP Standard Operating Procedure SSL Secure Sockets Layer SSN Social Security Number TLS Transport Layer Security TPA Third-Party Administrator UI User Interface URL Uniform Resource Locator VA Department of Veterans Affairs VDS VistA Data Service VHA Veterans Health Administration VistA Veterans Health Information Systems and Technology Architecture