compact 4kg front load washing machine …€¦ · 2 introduction please read these instructions...
TRANSCRIPT

Compact 4kg Front Load Washing Machine
Instructions for use

2
Introduction Please read these instructions for use carefully and all other information enclosed with the washing machine. Keep all documentation in a safe place for future reference or for any future owners.
This appliance is intended to be used in RV’s and similar applications such as: - Caravans - Motor Homes - Campers
If the appliance is used in a manner inconsistent with the above, it may reduce the life of the appliance and may void the manufacturer’s warranty. Any damage to the appliance or other damage or loss arising through use that is not consistent with RV use shall not be accepted by the manufacturer to the fullest extent permitted by law.
Notes on disposal All packaging material used is environmentally-friendly and recyclable. Please dispose of the packaging via environmentally-friendly means.
Your local council will be able to give you details of current means of disposal
Valuable materials can be salvaged from an old appliance via scrap reprocessing.
Note: pull out the mains plug from any old appliance. Cut the power cable and dispose of it, together with the plug.
When disposing of an old washing machine, please ensure that the door lock is rendered inoperable to prevent children shutting themselves in the appliance.

3
Contents Page
Introduction 2
General delivery notes 4
Safety notes 4
Quick start guide 5
Description of controls 6
Wash program guide 12
Program selector 14
Detergent drawer 16
Detergents, washing aids and amounts to use 17
Economical washing tips 19
Washing procedure 20
Cleaning and routine maintenance 22
Troubleshooting 24
Specifications 25
Setup & Installation 26
Warranty Statement 28
BEFORE SWITCHING ON THE APPLIANCE MAKE SURE IT IS CORRECTLY INSTALLED AND THAT THE FIXING SCREWS ARE REMOVED AS SHOWN ON PAGE 26.
4
General delivery notes Please check that the following items are delivered with the appliance:
- Instruction manual - Inlet hose
Check that no damage has occurred during transit, and if so, call your nearest Authorised Camec Dealer.
Safety notes.
Note: For cleaning or maintenance of the washing machine.
A) Turn off the power point and pull out the plug. B) Turn off the tap. C) Ensure that the mains supply is earthed, and if it is not, seek assistance from a
qualified person. D) Do not touch the appliance when your hands or feet are wet or damp. Do not
use the appliance with bare feet. E) The use of adapters, multiple connectors and/or extension cords is not
recommended.
Note: Water temperature can reach 90°C during the wash cycle.
F) Check there is no water left in the drum before opening the door. G) This appliance is not intended for use by persons (including children) with reduced physical, sensory or mental capabilities, or lack of experience and knowledge, unless they have been given supervision or instruction concerning use of the appliance by a person responsible for their safety.
Children should be supervised to ensure that they do not play with the appliance. H) Do not pull the power cable or the appliance itself to remove the plug from
the socket. I) The appliance must not be exposed to weather conditions (rain, direct sun, etc...) L) When moving the appliance never lift it by the controls or by the detergent drawer.
5
M) Note! If the appliance is installed on a carpeted floor ensure that the ventilation holes on the base of the appliance are not obstructed.
N) If the appliance is not running properly or breaks down, switch it off, turn off the tap and do not tamper with the appliance. Consult only an authorised Camec Dealer for possible repair. Failure to comply with the above can compromise the safety of the appliance.
Quick start guide Washing - Open the door by using the handle “A” (Fig. 1, page 6) - Select laundry and put it in the machine. - Close the door. - Put detergent in the compartment(s) as indicated in the program guide in this
instruction manual. - Select program. - The display will show the settings for the program selected.
Press additional function buttons (if required)
- Press the “Start/Pause” button (page 7) - The program will start.
Ensure that the machine is correctly installed in line with the instructions found on page 26.
After washing
- The word “End” will appear on the display. - Wait for the door lock to be released
(about 2 minutes after the program has finished). The “Door Security” indicator light will go out.
- Switch off the washing machine by turning the selector to the “OFF” position.
- Open the door and remove the laundry.

6

7
Door handle
Press the finger-bar inside the door handle to open the door. A
NOTE: When the "Start/Pause" button has been pressed, the appliance can take few seconds before it starts operating.
“START/PAUSE” function
Press to start the selected cycle .
Changing the settings after the program has started (PAUSE) Press and hold the “START/PAUSE” button for about 2 seconds. Flashing lights on the option buttons & time remaining indicator will indicate that the machine has been paused. Adjust as required and press the “START/PAUSE” button again to resume washing. If you wish to add or remove items during the wash cycle, wait 2 minutes until the safety device unlocks the door. When you have done this, close the door, press the "Start/Pause” button and the appliance will continue the cycle where it left off.
CANCELLING A PROGRAM To cancel a program, turn the selector to the OFF position. Select a different program. Re-set the program selector to the “OFF” position.
C
B Program Start light
This lights up when the START button has been pressed.

8
Note: Cycle option buttons should be selected before pressing the "Start/Pause" button.
AQUAPLUS function D Pressing this button activates a special new wash cycle in the Cotton and Mixed Fabrics programs, thanks to a new Sensor System. This option treats the fibers of garments with care and therefore is a useful feature for people with delicate skin. The load is washed in a much larger quantity of water and this, together with a specialised combined action of the drum rotation cycles, where water is filled and emptied, will ensure your garments have been cleaned and rinsed to perfection. The amount of water in the wash is increased so that the detergent dissolves perfectly, ensuring an efficient cleaning action. The amount of water is also increased during the rinse procedure so as to remove all traces of detergent from the fibers. This function has been specifically designed for people with delicate and sensitive skin, for whom even a very small amount of detergent can cause irritation or allergy. You can also use this function for children’s clothing and for delicate fabrics in general, or when washing garments made of toweling, where the fibers tend to absorb a greater quantity of detergent. To ensure the best performance for your wash, this function is always activated on the Delicates and Woolens/Hand wash programs.
“COLD WASH” function E By pressing this button it is possible to convert every program into a cold washing one, without modifying other settings (water level, times, etc...).
9
“DELAY START” button F This button allows you to to delay the start of the cycle for up to 24 hours. To delay the start use the following procedure: Set the required program. Press the “Delay Start” button once to activate it (h00 appears on the display) and then press it again to set a 1 hour delay (h01 appears on the display); the pre-set delay increases by 1 hour each time the button is pressed, until h24 appears on the display, at which point pressing the button again will reset the delay start to zero. Confirm by pressing the “START/PAUSE” button (the light on the display starts to flash). The countdown will begin and when it has finished the program will start automatically.
It is possible to cancel the delay start function with the following procedure: Press and hold the button for 5 seconds until the display shows the settings for the program selected. At this stage it is possible to start the program previously selected by pressing the “START/PAUSE” button or to cancel the process by setting the selector to the OFF position and then selecting another program.
The spin cycle is very important to remove as much water as possible from the laundry without damaging the fabrics. You can adjust the spin speed of the machine to suit your needs. By pressing this button, it is possible to reduce the maximum speed, and if you wish, the spin cycle can be cancelled. To reactivate the spin cycle you can press the button until you reach the spin speed you would like to set. To help protect your fabrics, it is not possible to increase the spin speed above the speed automatically set by the wash program.
It is possible to modify the spin speed at any time without pausing the machine.
SPIN SPEED function G

10
1
2
3 4 “DIGITAL” Display H
The display’s indicator system allows you to be constantly informed of the status of the washing machine:
1) SPIN SPEED Once the program has been selected, the maximum spin speed allowed for that program appears on the display. Pressing the spin button will reduce the speed by 100 rpm each time the button is pressed. The minimum speed allowed is 400 rpm, or it is possible to omit the spin cycle by pressing the spin button repeatedly. 2) DELAY START LIGHT This flashes when the delayed start has been activated. 3) “DOOR SECURITY” indicator light The “Door Security” indicator light is illuminated when the door is fully closed and the machine is ON. When "Start/Pause" is pressed on the machine with the door closed the indicator will flash momentarily and then illuminate.
If the door is not closed the indicator will continue to flash.
A special safety setting prevents the door from being opened immediately after the end of the cycle. Please wait for 2 minutes after the wash cycle has finished and the “Door Security” light has gone out before opening the door. At the end of the cycle turn the program selector to "OFF". 4) CYCLE DURATION When a program is selected the display automatically shows the cycle duration, which can vary depending on the options selected. Once the program has started the display will indicate the time remaining to the end of the wash. The appliance calculates the time to the end of the selected program based upon a standard loading. During the cycle, the appliance corrects the time based on the size and composition of the load.

11
PROGRAM selector with “OFF” position

12
WASH PROGRAMME GUIDE PROGRAM FOR: PROGRAMME
SELECTOR ON:
WEIGHT MAX kg
TEMP. °C DETERGENT SOFTNER
I
Cottons Cotton, linen Whites 4 90° ● ●
Cotton, mixed Fast coloured’s ** 4 60° ● ●
Fast coloured’s ** 4 40° ● ●
Non fast coloured’s 4 30° ● ●
Synthetics Nylon, perlon, mixed
cotton Fast coloured’s 2 50° ● ●
Non fast coloured’s 2 40° ● ●
Mixed, delicate synthetics
Shirts 2 30°
● ●
Delicates Delicates
2 30° ● ●
“MACHINE WASHABLE”
woolens Hand wash
1 30° ● ●
Rapid & Special Programmes EcoMix 20° 4 20° ● ●
Fast spin/ Drain only
- -
Rinse - - ●
Rapid Daily wash 14’ 1 30° ● ●
Rapid Daily wash 30’
2 30° ● ●
Resistant fabrics 2 40° ● ●

13
Please read these notes
** STANDARD COTTON PROGRAMMES ACCORDING TO (EU) No 1015/2010 and No 1061/2010 COTTON PROGRAMME with a temperature of 60°C COTTON PROGRAMME with a temperature of 40°C These programmes are suitable to clean normally soiled cotton laundry and they are the most efficient programmes in terms of combined energy and water consumption for washing cotton laundry. These programmes have been developed to be compliant with the temperature on the wash label on the garments and the actual water temperature may slightly differ from the declared temperature of the cycle.
The 30 minute rapid program can also be used as a prewash cycle in the case of heavily soiled garments, before selecting the main wash program.

14
Program selector
For the various types of fabrics and various degrees of dirt the washing machine has different program bands according to: wash cycle, temperature and length of cycle (see table of washing cycle programs on P12).
COTTONS
DELICATES This is a new style wash cycle which alternates washing and soaking and is particularly recommended for very delicate fabrics. The wash cycle and corresponding rinses are carried out with high water levels to ensure the best results.
WOOL & HAND WASH PROGRAM This program allows for a complete washing cycle for garments specified as “Machine-Washable” Wool fabrics and laundry items specified as “Hand Wash only” on the fabric label. The program has a maximum temperature of 30°C and concludes with 3 rinses, one for fabric conditioner, and a slow spin.
"EcoMix" PROGRAM This innovative program allows you to wash different fabrics and colours together, such as cottons, synthetics and mixed fabrics at only 20 °C and provides an excellent cleaning performance. Consumption on this program is about 40% that of a conventional 40°C. cottons wash.
The cottons programs have been designed for a quality wash and the rinses, with specific spin intervals, ensure perfect rinsing. The final spin gives the most efficient removal of water.
MIXED AND SYNTHETIC FABRICS The main wash and the rinse gives best results due to the rotation cycles of the drum and specific water levels. A gentle spin ensures that the fabrics are less creased.

15
FAST SPIN & DRAIN The spin program completes the spin at the maximum spin speed. This can be reduced by using the Spin Speed option button or excluded if you want to drain only.
DEDICATED “RINSE” PROGRAM This program carries out three rinses with an intermediate spin (which can be excluded by using the correct button). It can be used for rinsing any type of fabric, eg. use after hand-washing.
DAILY WASH 30°C – RAPID 14’ A complete washing cycle (wash, rinse and spin); able to wash in approximately 14 minutes: - a maximum load of 1 kg; - lightly soiled fabrics (cotton and mixed fabrics) It is recommended with this program that a 20% detergent loading dose (compared to the normal one) is used in order to avoid detergent waste.
DAILY WASH 30°C – RAPID 30’ A complete washing cycle (wash, rinse and spin); able to wash in approximately 30 minutes: - a maximum load of 2 kg;
- lightly soiled fabrics (cotton and mixed fabrics) It is recommended with this program that a 20% detergent loading dose (compared to the normal one) is used in order to avoid detergent waste.
RAPID 59' This specially designed program maintains a high quality wash performance whilst greatly reducing the wash time. The program is designed for a maximum load of 2 kg with a temperature of 40°C and concludes with 2 rinses and a high speed spin sequence.
Auto load level The washing machine is equipped with a self-adjusting water level system. This system enables the machine to use the amount of water needed to wash and rinse the laundry in relation to the particular load. This results in a reduction of the water and electricity used, without in any way compromising the washing and rinsing performance. In fact the amount of water and electricity used will always be appropriate for the clothes load. The washing machine automatically ensures excellent washing results at minimum cost whilst respecting the environment.

16
The detergent drawer is split into 2 compartments:
-The compartment labelled "I" is for main wash detergent. -The compartment labelled " " is for special additives ie. fabric softeners, fragrances, starch, brighteners etc.
Detergent drawer P
IMPORTANT: ONLY USE LIQUID PRODUCTS IN THE SECOND COMPARTMENT.
17
Detergents, washing aids and amounts to use
Choice of detergent General purpose detergents - Powder detergents. For a thorough wash, with bleaching agent, particularly suitable for
use in hot wash programmes (60°C and over), for heavily soiled and stained laundry. - Liquid detergents. Particularly suitable for grease stains, such as greasy skin marks,
cosmetics and oil. These detergents may not be as effective for washing stained laundry, as they may not
contain bleach.
- Please only use detergents specified for use with “Front Load” washing machine.
Additional laundry aids - Prewash substances. For the programmed treatment of stains prior to the main wash.
Using them means the subsequent wash can be at a low temperature or with bleach-free detergents.
- Fabric softener. Prevents static build-up in synthetic fabrics and softens fabrics. If you use a tumble dryer, clothes are softened even without the use of a fabric softener. Do not put solvents in the washing machine! Keep detergents and other laundry products out of children’s reach. Before pouring in the detergent check that there are no foreign bodies in the detergent drawer. Dosage details are usually shown on the detergent packaging. Please follow those instructions.

18
Dosages Only use detergents which are suitable for use in a Front Load washing machine. You will obtain the best results from your wash with the minimum use of chemical products and the best care for your laundry if you take into consideration the degree of soiling as well as the type of detergent to choose.
The amount of detergent to use depends on: � the degree of soiling: it is possible to reduce the amount of detergent used depending on
how dirty the load is. � amount of laundry: it is possible to reduce the amount of detergent when washing only a
small amount of laundry.
Liquid detergent dosage Liquid detergents should be used in accordance with the instructions supplied by the brand and poured in to the first compartment of the detergent drawer. Powder detergent dosage For concentrated powder detergents, follow the manufacturer’s instructions as to how much detergent to add to the wash.| For standard and low concentration detergents: for normally soiled laundry choose a program without prewash. Put the detergent in compartment “2” of the drawer. For heavily soiled laundry, choose a program with prewash. Put 1/4 of the detergent in compartment “1”, 3/4 in compartment “2” of the drawer.

19
Economical Washing Tips Tips on using your appliance in the most environmentally-friendly and economical way.
Do a full load in your washing machine To prevent any possible waste of energy, water or detergent we recommend that you put a full load in your washing machine, not exceeding the recommended maximum load size. Up to 50% energy saving can be made with one full load compared to two half load washes
When is prewashing really needed? Only with particularly dirty loads. Energy savings of 5 to 15% can be made by not selecting the prewash option for normal soiled laundry.
Which wash temperature should you choose? Using stain removers before machine washing reduces the need to wash at temperatures over 60°C. Energy savings of up to 50% can be made by using a 60°C wash temperature rather than 90°C.
20
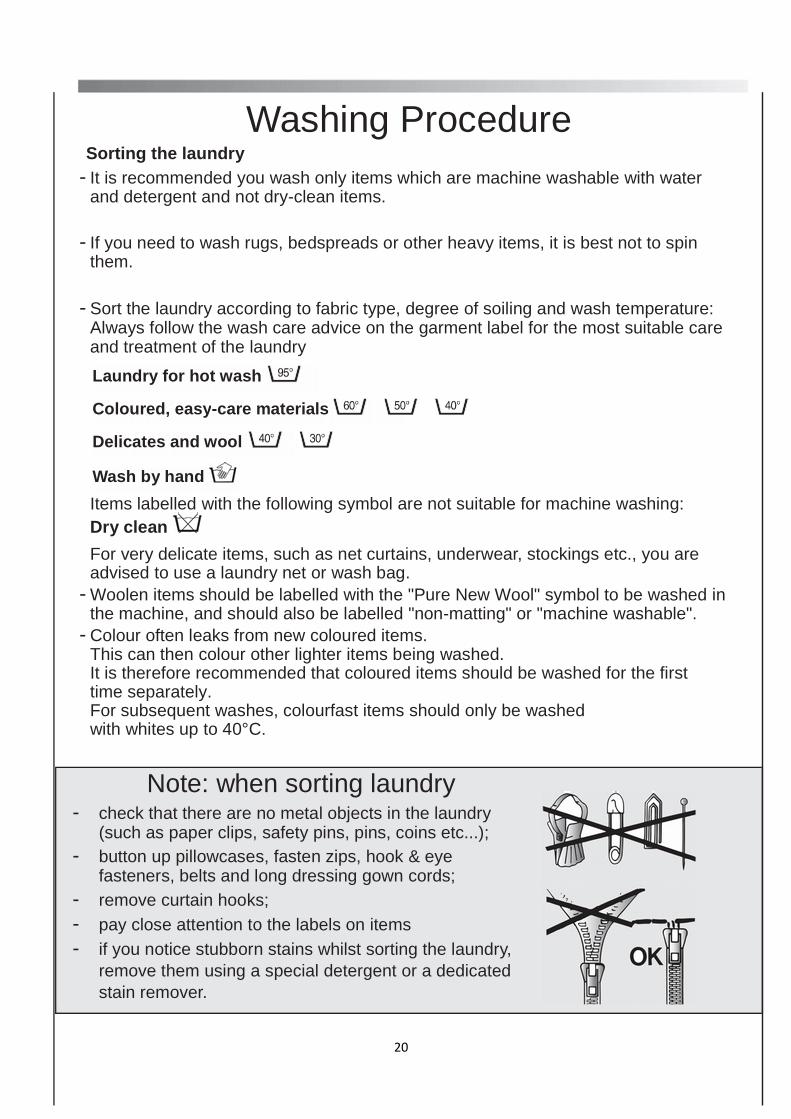
Washing Procedure Sorting the laundry
- It is recommended you wash only items which are machine washable with water and detergent and not dry-clean items.
- If you need to wash rugs, bedspreads or other heavy items, it is best not to spin them.
- Sort the laundry according to fabric type, degree of soiling and wash temperature: Always follow the wash care advice on the garment label for the most suitable care and treatment of the laundry
Items labelled with the following symbol are not suitable for machine washing: Dry clean
For very delicate items, such as net curtains, underwear, stockings etc., you are advised to use a laundry net or wash bag.
- Woolen items should be labelled with the "Pure New Wool" symbol to be washed in the machine, and should also be labelled "non-matting" or "machine washable".
- Colour often leaks from new coloured items. This can then colour other lighter items being washed. It is therefore recommended that coloured items should be washed for the first time separately. For subsequent washes, colourfast items should only be washed with whites up to 40°C.
Note: when sorting laundry - check that there are no metal objects in the laundry
(such as paper clips, safety pins, pins, coins etc...); - button up pillowcases, fasten zips, hook & eye
fasteners, belts and long dressing gown cords; - remove curtain hooks; - pay close attention to the labels on items - if you notice stubborn stains whilst sorting the laundry,
remove them using a special detergent or a dedicated stain remover.
Laundry for hot wash
Coloured, easy-care materials
Delicates and wool
Wash by hand

21
Washing Procedure cont’d
Preparing the laundry A) Select the laundry.
Loading the laundry B) Open the door.
C) Put the laundry in the washing machine. Close the door again, ensuring that no items
of laundry are obstructing the lock.
Putting detergent in machine D) Open the drawer, choose the detergent and put it in the correct amount, according to the manufacturer’s instructions and the advice on page 17.
Add any other laundry aids (see page 17). Close the drawer again.
Selecting the wash program
Refer to the program guide or the program descriptions on the machine to select the most suitable program. Turn the selector knob: the required program is activated. Press additional function buttons (if required). Check that the tap is turned on and that the drainage hose is positioned correctly. Press the "Start/Pause" button. The program runs with the program selector stationary on the selected program until cycle ends. Note: If there is any disruption in the power supply while the machine is operating, a special memory stores the selected program and, when the power is restored, it continues where it left off.
When the program is finished The word “End” will appear on the display. Wait for the door lock to be released (about 2 minutes after the program has finished). The "Door Security" indicator light will go out. Switch off the machine by turning the program selector on the “OFF” position. Open the door and remove the laundry. Turn off the tap.

22
After cleaning, replace the filter, replace by turning the notch at the end of the filter clockwise. Then follow the procedures above in reverse order.

23
Cleaning the door glass Regularly clean the door glass with a damp cloth. A build up of soiling and residues from the water may result in water leaking from the door. Do not use abrasive cleaners as they can scratch the surface.
Storing the appliance or long periods when appliance is not in use If the appliance is being stored or is out of use for long periods, all remaining water must be completely removed from the hoses. Ensure the mains power is off, then unhook the drainage hose and point it downwards into a basin until all the water has emptied out. When finished, put the drainage hose buck in its correct location.

24
TROUBLESHOOTING Possible causes of problems and their remedies…
If the fault should persist, contact a Camec Authorised repairer.
Drain hose bent
–
water

25
Important 1 The use of environmentally friendly detergents without phosphates may produce the following
results: The used rinse water may be cloudier due to the presence of zeolites in suspension. This does
not compromise the efficiency of the rinses. The presence of white powder (zeolites) on the washing at the end of the washing cycle. This
does not remain embedded in the fabric and does not alter the colour. The presence of foam in the last rinse water which is not necessarily a sign of inadequate
rinsing.
2 If your washing machine fails to function, carry out the checks on the previous page before contacting a Camec Authorised Dealer.
Specifications
■ Max. load of dry laundry ■ Water pressure ■ Max spin speed ■ Max water usage per cycle ■ Rated Voltage ■ Current Consumption
Measurements ■ Width ■ Depth ■ Height
4 kg
0,05 - 0,8 MPa
1000 RPM
38.3L 240V @ 50Hz
110W Cold Wash 230W Spin Dry 1300W Complete Hot Wash
510 mm 430 mm 700 mm
NB: For further specifications regarding electrical data, see the data panel on the front of the washing machine (door area) - as shown in diagram above.

26
IMPORTANT: DO NOT REMOVE THE FOAM ON TOP
THE CROSSPIECE.
WARNING: DO NOT LEAVE THE PACKAGING WITHIN REACH OF CHILDREN AS IT IS A POTENTIAL SOURCE OF DANGER.
SETUP & INSTALLATION Remove the polystyrene base and place the machine near its permanent position.
Carefully cut through the hose retaining clip at the rear of the appliance (diagram 1). Unscrew the two top screws A and remove the top cover, sliding it off horizontally (diagram 2).
Remove the cardboard protection. Unscrew the two bolts B on the crosspiece (with 19mm spanner) & remove the polystyrene spacer under it (diagram 3). Please do not re-fit the bolts.
Replace the cover with the two screws A. Please ensure when fitting the cover that the locating pins are inserted correctly in their slots, positioned on the side of the cabinet as shown in the diagram 4. Lean the machine forward and remove the plastic bags containing the two polystyrene blocks at the sides, pluuling downwards (diagram 5). Apply the sheet of corrugated insulation material to the base as show in the diagram 6.
Level the machine using the front feet Turn the nut clockwise to unlock the screw adjuster.

27
Rotate the foot to raise or lower the machine until it stands evenly on the RV floor. Lock the foot in position by turning the nut anti-clockwise until it touches the machine,.

28
Note: it is advisable to turn off the tap after each wash to isolate the washing machine from the water supply.
For the washing machine to function properly the terminal end of the drain hose (mouth) must be at a minimum of 50 cm and a maximum of 85 cm from the ground.
ELECTRICAL CONNECTIONS This washing machine is specified to operate at a voltage of 220-240 V, 50 Hz single-phase. After installation, the appliance must be positioned so that the plug is accessible. The socket in your RV and the plug on the appliance must be of the same type. It is generally not advisable to use multiple adapters and/or extension leads.

29

30
V1.1 © 2014 Camec Pty. Ltd. As Camec continually strives to improve our products, specifications and design are subject to change without notice. Please dispose of thoughtfully, recognizing local regulations.
MADE IN CHINA