compaq alphaserver gs60/gs60e/gs140 systems...
TRANSCRIPT
November 2003
Hewlett-Packard Company
Compaq AlphaServer GS60/GS60E/GS140 Systems
V6.6 Firmware Update Procedures And Release Notes

Compaq AlphaServer GS60/GS60E/GS140 Firmware Update Procedures and Release Notes II
2002 Hewlett-Packard Company.
COMPAQ, the Compaq logo, DEC, the DEC logo, DECPC, ALPHAbook, AlphaPC, AlphaStation, AlphaServer, VMS, OpenVMS, and Tru64 are trademarks of Compaq Information Technologies Group, L.P. in the U.S. and/or other coutries. Microsoft and Windows NT are trademarks of Microsoft Corporation. UNIX is a trademark of The Open Group. All other product names mentioned herein may be trademarks of their respective companies. Compaq Computer Corporation is a wholly-owned subsidiary of the Hewlett-Packard Company.
Confidential computer software. Valid license from HP required for possession, use or copying. Consistent with FAR 12.211 and 12.212, Commercial Computer Software, Computer Software Documentation, and Technical Data for Commercial Items are licensed to the U.S. Government under vendor’s standard commercial license. HP shall not be liable for technical or editorial errors or omissions contained herein. The information in this document is provided “as is” without warranty of any kind and is subject to change without notice. The warranties for HP products are set forth in the express limited warranty statements accompanying such products. Nothing herein should be construed as constituting an additional warranty.

Compaq AlphaServer GS60/GS60E/GS140 Firmware Update Procedures and Release Notes III
Table of Contents
1 Introduction............................................................................................................................................1-1
1.1 Firmware and Operating System Revision Matrix ........................................................................................ 1-1 1.2 Configuration Utilities .................................................................................................................................. 1-1 1.3 Hardware Manuals ........................................................................................................................................ 1-2
2 AlphaServer GS60/GS60E/GS140 Firmware Update Procedures .....................................................2-3
2.1 Console Firmware Components – Revision Information .............................................................................. 2-3 2.2 Revision Information for the Loadable Firmware Update Utility ................................................................. 2-3 2.3 !!! IMPORTANT CAUTIONS TO NOTE BEFORE UPDATING FIRMWARE!!!.................................... 2-4
2.3.1 Operation With Mixed Firmware Revisions is NOT Supported ......................................................... 2-4 2.3.2 Required MINIMUM Console Firmware Revision ............................................................................ 2-4
2.4 AlphaServer GS60/GS60E/GS140 Firmware Update Procedure.................................................................. 2-5 2.4.1 Example of Booting LFU from the Local CD-ROM Drive ................................................................ 2-6 2.4.2 Example of Booting LFU from the InfoServer ................................................................................... 2-8 2.4.3 Example of Updating CPU Modules with LFU ................................................................................ 2-10 2.4.4 Saving and Restoring EEPROM Settings ......................................................................................... 2-12 2.4.5 Rebuilding Non-Volatile RAM (NVR)............................................................................................. 2-13
3 AlphaServer GS60/GS60E/GS140 Console and Diagnostic Release Notes...................................3-15
3.1 Console and Diagnostic Enhancements and New Features ......................................................................... 3-15 3.1.1 Console Enhancements and New Features........................................................................................ 3-15 3.1.2 Diagnostic Enhancements and New Features.................................................................................... 3-15
3.2 Console and Diagnostic Bugs and Restrictions........................................................................................... 3-17 3.2.1 Console Bugs and Restrictions ......................................................................................................... 3-17 3.2.2 Diagnostic Restrictions ..................................................................................................................... 3-18
4 Invoking ARC Utility Programs ..........................................................................................................4-18
4.1 ARC Commands ......................................................................................................................................... 4-18 4.1.1 RUNECU Command ........................................................................................................................ 4-19 4.1.2 Stepping Through the ECU Dialog Boxes ........................................................................................ 4-20 4.1.3 RUN Command ................................................................................................................................ 4-20
Appendix A - Discrepancies in AlphaServer GS60/140 and 8200/8400 Operations Manual.........4-23

Compaq AlphaServer GS60/GS60E/GS140 Firmware Update Procedures and Release Notes IV
Table of Tables
Table 1 AlphaServer GS60/GS60E/GS140 FW/SW Revision Matrix..................................................................... 1-1 Table 2 Configuration Utility Revisions .................................................................................................................. 1-1 Table 3 Hardware Manuals ...................................................................................................................................... 1-2 Table 4 Console V6.6 Firmware Components and Revisions .................................................................................. 2-3 Table 5 LFU V6.6 Firmware Revisions ................................................................................................................... 2-3 Table 6 Minimum Required Console Revison ......................................................................................................... 2-5

Introduction
Compaq AlphaServer GS60/GS60E/GS140 Firmware Update Procedures and Release Notes 1-1
1 Introduction This guide is intended for managers of the following systems:
• Compaq AlphaServer GS60
• Compaq AlphaServer GS60E
• Compaq AlphaServer GS140
This guide describes how to update the system’s firmware on E2063-DA and E2067-DA CPU modules using the Loadable Firmware Update (LFU) utility. It also provides release notes pertaining to the Console and Diagnostic Firmware.
The console firmware described in this document cannot be used with AlphServer 8200/8400 systems. For information on AlphaServer 8200/8400 system firmware, consult the Digital AlphaServer 8200 and AlphaServer 8400 Systems V6.4 Firmware Update Procedures And Release Notes.
1.1 Firmware and Operating System Revision Matrix The following table shows the compatibility between the firmware revisions and revisions of OpenVMS and Tru64 UNIX (formerly Digital UNIX).
Table 1 AlphaServer GS60/GS60E/GS140 FW/SW Revision Matrix
Console FW LFU OpenVMS Tru64 UNIX
V6.6 V6.6 V7.1-2, V7.2, V7.3 and variants
V4.0E, V5.0, V5.1, V5.2 and variants
1.2 Configuration Utilities The EISA and RAID Configuration Utilities are available on separate media (floppy disks) for use on Compaq AlphaServer GS60/GS60E/GS140 Systems. For compatibility with this firmware release, the following minimum revisions of the configuration utilities must be used if required:
Table 2 Configuration Utility Revisions
Utility Kit Number Part Number Minimum Required Rev.
EISA Config. Utility for VMS & UNIX
QA-01YAA-HC AK-Q2CRJ-CA V1.9
RAID Config. Utility QB-2XHAH-SB - V3.2

Introduction
Compaq AlphaServer GS60/GS60E/GS140 Firmware Update Procedures and Release Notes 1-2
1.3 Hardware Manuals These Firmware Release Notes do not describe how to use the console commands nor do they list their error codes. You can find information about these subjects in the associated documentation listed in the following table:
Table 3 Hardware Manuals
Title Part Number
AlphaServer GS60 and 8200 Installation Guide EK-T8230-IN
AlphaServer GS140 and 8400 Installation Guide EK-T8430-IN
AlphaServer GS60/140 and 8200/8400 Operations Manual EK-T8030-OP
AlphaServer 8200/8400 System Service Manual EK-T8030-SV

AlphaServer GS60/GS60E/GS140 Firmware Update Procedures
Compaq AlphaServer GS60/GS60E/GS140 Firmware Update Procedures and Release Notes 2-3
2 AlphaServer GS60/GS60E/GS140 Firmware Update Procedures
This chapter describes how to run the Loadable Firmware Update Utility (LFU) to update the AlphaServer GS60/GS140 console and I/O adapter firmware.
For more information about the Loadable Firmware Update Utility commands and console commands, see the AlphaServer GS60/140 and 8200/8400 Operations Manual.
2.1 Console Firmware Components – Revision Information The LFU V6.6 image contains the Console V6.6. The V6.6 Console consists of the following firmware components:
Table 4 Console V6.6 Firmware Components and Revisions
Component Revision Information (KN7CG) Revision Information (KN7CH)
SRM Console Code V6.6 V6.6
SROM V2.4 V2.4
VMS PALcode V1.96-1 V1.96-101
UNIX PALcode V1.90-1 V1.90-101
ISP1020/1040 FW V5.57 V5.57
AlphaBIOS V5.68-0 V5.68-0
2.2 Revision Information for the Loadable Firmware Update Utility The current LFU Release GS140_66 (for AlphaServer GS60/GS60E/GS140 Systems) is booted from the local SCSI CD-ROM drive or InfoServer using the Alpha Systems Firmware Update CD V6.6. Detailed instructions for booting the LFU are included in the following sections.
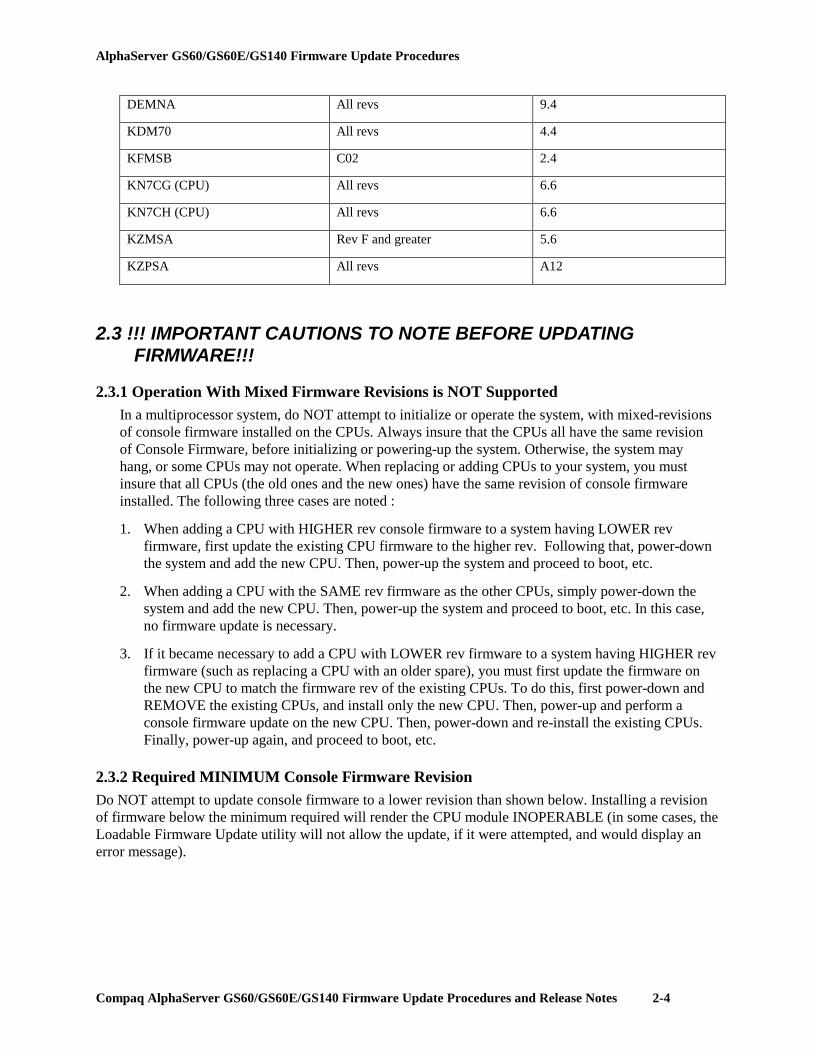
This LFU release contains the firmware revisions shown in the following table :
Table 5 LFU V6.6 Firmware Revisions
Name Hardware Rev Firmware Rev
CIPCA All revs A420
CIXCD All revs 7
DEFPA (DFXAA) All revs 3.20
DEMFA All revs 2.1
AlphaServer GS60/GS60E/GS140 Firmware Update Procedures
Compaq AlphaServer GS60/GS60E/GS140 Firmware Update Procedures and Release Notes 2-4
DEMNA All revs 9.4
KDM70 All revs 4.4
KFMSB C02 2.4
KN7CG (CPU) All revs 6.6
KN7CH (CPU) All revs 6.6
KZMSA Rev F and greater 5.6
KZPSA All revs A12
2.3 !!! IMPORTANT CAUTIONS TO NOTE BEFORE UPDATING FIRMWARE!!!
2.3.1 Operation With Mixed Firmware Revisions is NOT Supported In a multiprocessor system, do NOT attempt to initialize or operate the system, with mixed-revisions of console firmware installed on the CPUs. Always insure that the CPUs all have the same revision of Console Firmware, before initializing or powering-up the system. Otherwise, the system may hang, or some CPUs may not operate. When replacing or adding CPUs to your system, you must insure that all CPUs (the old ones and the new ones) have the same revision of console firmware installed. The following three cases are noted :
1. When adding a CPU with HIGHER rev console firmware to a system having LOWER rev firmware, first update the existing CPU firmware to the higher rev. Following that, power-down the system and add the new CPU. Then, power-up the system and proceed to boot, etc.
2. When adding a CPU with the SAME rev firmware as the other CPUs, simply power-down the system and add the new CPU. Then, power-up the system and proceed to boot, etc. In this case, no firmware update is necessary.
3. If it became necessary to add a CPU with LOWER rev firmware to a system having HIGHER rev firmware (such as replacing a CPU with an older spare), you must first update the firmware on the new CPU to match the firmware rev of the existing CPUs. To do this, first power-down and REMOVE the existing CPUs, and install only the new CPU. Then, power-up and perform a console firmware update on the new CPU. Then, power-down and re-install the existing CPUs. Finally, power-up again, and proceed to boot, etc.
2.3.2 Required MINIMUM Console Firmware Revision Do NOT attempt to update console firmware to a lower revision than shown below. Installing a revision of firmware below the minimum required will render the CPU module INOPERABLE (in some cases, the Loadable Firmware Update utility will not allow the update, if it were attempted, and would display an error message).

AlphaServer GS60/GS60E/GS140 Firmware Update Procedures
Compaq AlphaServer GS60/GS60E/GS140 Firmware Update Procedures and Release Notes 2-5
Table 6 Minimum Required Console Revison
CPU Minimum Console Revision
E2063-DA (Dual CPU, 525 MHz All Revs) V5.3-12
E2067-DA (Dual CPU, 700 MHz All Revs) V5.5-25
2.4 AlphaServer GS60/GS60E/GS140 Firmware Update Procedure
The LFU program is booted from the local CD-ROM drive or InfoServer.
When running the OpenVMS or Tru64 UNIX operating systems, the environment variable “console” MUST be set to “serial” in order to boot the Loadable Firmware Update Utility (LFU).
It is required that the console be initialized (P00>>> init) before booting the LFU.
If booting from your local CD-ROM drive, see the following section. If booting from the InfoServer, see the section following that.
The version numbers displayed by the system in the following examples may not match exactly those that you will see when following the procedure. They may vary depending on the initial configuration and revision of your system. Also, console build dates shown are examples only, and may not be accurate.
AlphaServer GS60/GS60E/GS140 Firmware Update Procedures
Compaq AlphaServer GS60/GS60E/GS140 Firmware Update Procedures and Release Notes 2-6
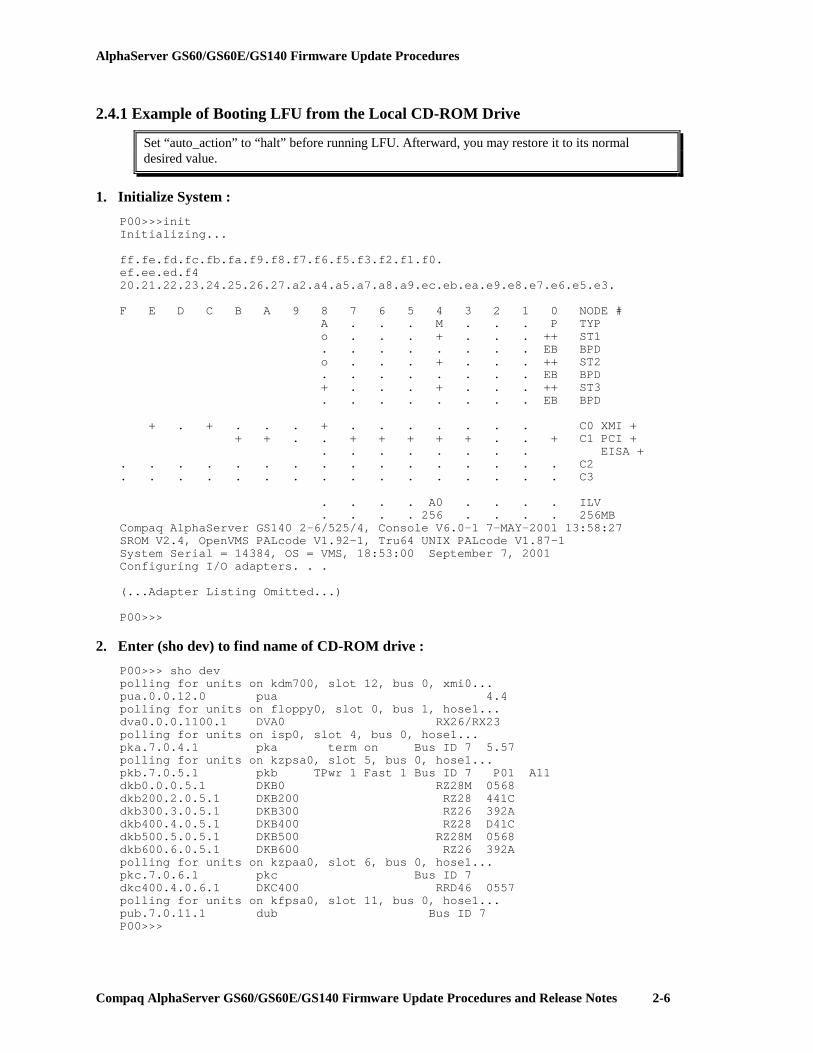
2.4.1 Example of Booting LFU from the Local CD-ROM Drive
Set “auto_action” to “halt” before running LFU. Afterward, you may restore it to its normal desired value.
1. Initialize System : P00>>>initInitializing...
ff.fe.fd.fc.fb.fa.f9.f8.f7.f6.f5.f3.f2.f1.f0.ef.ee.ed.f420.21.22.23.24.25.26.27.a2.a4.a5.a7.a8.a9.ec.eb.ea.e9.e8.e7.e6.e5.e3.
F E D C B A 9 8 7 6 5 4 3 2 1 0 NODE #A . . . M . . . P TYPo . . . + . . . ++ ST1. . . . . . . . EB BPDo . . . + . . . ++ ST2. . . . . . . . EB BPD+ . . . + . . . ++ ST3. . . . . . . . EB BPD
+ . + . . . + . . . . . . . C0 XMI ++ + . . + + + + + . . + C1 PCI +
. . . . . . . . EISA +. . . . . . . . . . . . . . . . C2. . . . . . . . . . . . . . . . C3
. . . . A0 . . . . ILV
. . . . 256 . . . . 256MBCompaq AlphaServer GS140 2-6/525/4, Console V6.0-1 7-MAY-2001 13:58:27SROM V2.4, OpenVMS PALcode V1.92-1, Tru64 UNIX PALcode V1.87-1System Serial = 14384, OS = VMS, 18:53:00 September 7, 2001Configuring I/O adapters. . .
(...Adapter Listing Omitted...)
P00>>>
2. Enter (sho dev) to find name of CD-ROM drive : P00>>> sho devpolling for units on kdm700, slot 12, bus 0, xmi0...pua.0.0.12.0 pua 4.4polling for units on floppy0, slot 0, bus 1, hose1...dva0.0.0.1100.1 DVA0 RX26/RX23polling for units on isp0, slot 4, bus 0, hose1...pka.7.0.4.1 pka term on Bus ID 7 5.57polling for units on kzpsa0, slot 5, bus 0, hose1...pkb.7.0.5.1 pkb TPwr 1 Fast 1 Bus ID 7 P01 A11dkb0.0.0.5.1 DKB0 RZ28M 0568dkb200.2.0.5.1 DKB200 RZ28 441Cdkb300.3.0.5.1 DKB300 RZ26 392Adkb400.4.0.5.1 DKB400 RZ28 D41Cdkb500.5.0.5.1 DKB500 RZ28M 0568dkb600.6.0.5.1 DKB600 RZ26 392Apolling for units on kzpaa0, slot 6, bus 0, hose1...pkc.7.0.6.1 pkc Bus ID 7dkc400.4.0.6.1 DKC400 RRD46 0557polling for units on kfpsa0, slot 11, bus 0, hose1...pub.7.0.11.1 dub Bus ID 7P00>>>

AlphaServer GS60/GS60E/GS140 Firmware Update Procedures
Compaq AlphaServer GS60/GS60E/GS140 Firmware Update Procedures and Release Notes 2-7
3. Enter (boot) command, to boot CD on drive : P00>>>boot dkc400(boot dkc400.4.0.6.1 -flags 0)SRM boot identifier: scsi 1 6 0 4 400 ef00 11000boot adapter: kzpaa0 rev 1 in bus slot 6 off of kftha0 in TLSB slot 8block 0 of dkc400.4.0.6.1 is a valid boot blockreading 1082 blocks from dkc400.4.0.6.1bootstrap code read inBuilding FRU table.......FRU table size = 279f(10143)base = 200000, image_start = 0, image_bytes = 87400initializing HWRPB at 2000initializing page table at 1f2000initializing machine statesetting affinity to the primary CPUjumping to bootstrap code
4. The system will respond by displaying system-specific “READ ME FIRST” information on the screen, followed by display of the default firmware update utility bootfile name, and the prompt “Bootfile:” At this point, you may press the RETURN or ENTER key to load the latest (current) update, or you may type a specific bootfile name to load a previous (older) version. Bootfile: <enter>
Starting new console, Please wait a minute...
Starting Firmware Update UtilityUnpacking Firmware Files
(...File Listing Omitted...)
***** Loadable Firmware Update Utility *****---------------------------------------------------------------------------Function Description
---------------------------------------------------------------------------Display Displays the system's configuration table.Exit Done exit LFU (reset).List Lists the device, revision, firmware name, and update revision.Lfu Restarts LFU.Modify Modifies port parameters and device attributes.Readme Lists important release information.Update Replaces current firmware with loadable data image.Verify Compares loadable and hardware images.? or Help Scrolls this function table.
---------------------------------------------------------------------------
UPD>

AlphaServer GS60/GS60E/GS140 Firmware Update Procedures
Compaq AlphaServer GS60/GS60E/GS140 Firmware Update Procedures and Release Notes 2-8
2.4.2 Example of Booting LFU from the InfoServer
Set “auto_action” to “halt” before running LFU. Afterward, you may restore it to its normal desired value. Normal booting time can be as long as one minute.
1. Initialize System : P00>>>initInitializing...
ff.fe.fd.fc.fb.fa.f9.f8.f7.f6.f5.f3.f2.f1.f0.ef.ee.ed.f420.21.22.23.24.25.26.27.a2.a4.a5.a7.a8.a9.ec.eb.ea.e9.e8.e7.e6.e5.e3.
F E D C B A 9 8 7 6 5 4 3 2 1 0 NODE #A . . . M . . . P TYPo . . . + . . . ++ ST1. . . . . . . . EB BPDo . . . + . . . ++ ST2. . . . . . . . EB BPD+ . . . + . . . ++ ST3. . . . . . . . EB BPD
+ . + . . . + . . . . . . . C0 XMI ++ + . . + + + + + . . + C1 PCI +
. . . . . . . . EISA +. . . . . . . . . . . . . . . . C2. . . . . . . . . . . . . . . . C3
. . . . A0 . . . . ILV
. . . . 256 . . . . 256MBCompaq AlphaServer GS140 2-6/700/8, Console V6.1-1 18-OCT-2001 10:17:21SROM V2.4, OpenVMS PALcode V1.93-101, Tru64 UNIX PALcode V1.88-101System Serial = 8400, OS = VMS, 11:45:04 September 7, 2001Configuring I/O adapters. . .
(...Adapter Listing Omitted...)
P00>>>
2. Enter (sho net) to find name of network adapter : P00>>> sho netpolling for units on demna0, slot 14, bus 0, xmi0...exa0.0.0.14.0 08-00-2B-27-DA-A6polling for units on tulip0, slot 12, bus 0, hose1...ewa0.0.0.12.1 00-00-F8-20-84-A9 Twisted-PairP00>>>
3. Enter (boot) command as shown, using desired network adapter, and specifying the correct filename (GS140_V62 in this example) :
P00>>>boot exa0 -file GS140_V62(boot exa0.0.0.14.0 -file GS140_V62 -flags 0)SRM boot identifier: mop 0 14 0 0 0 102a 0c03 08-00-2B-27-DA-A6 1boot adapter: demna0 rev 904 in bus slot 14 off of kftha0 in TLSB slot 8
Trying MOP boot......................................................
Network load complete.Host name: BOOBOOHost address: aa-00-24-62-84-76

AlphaServer GS60/GS60E/GS140 Firmware Update Procedures
Compaq AlphaServer GS60/GS60E/GS140 Firmware Update Procedures and Release Notes 2-9
bootstrap code read inbase = 200000, image_start = 0, image_bytes = 3bc800initializing HWRPB at 2000initializing page table at 1f0000initializing machine statesetting affinity to the primary CPUjumping to bootstrap code0123456789 9876543210
Starting new console, Please wait a minute...
Starting Firmware Update UtilityUnpacking Firmware Files
(...File Listing Omitted...)
***** Loadable Firmware Update Utility *****---------------------------------------------------------------------------Function Description
---------------------------------------------------------------------------Display Displays the system's configuration table.Exit Done exit LFU (reset).List Lists the device, revision, firmware name, and update revision.Lfu Restarts LFU.Modify Modifies port parameters and device attributes.Readme Lists important release information.Update Replaces current firmware with loadable data image.Verify Compares loadable and hardware images.? or Help Scrolls this function table.
---------------------------------------------------------------------------
UPD>
2.4.1.2 Second example of booting LFU from CD
1. Initialize System : P00>>>iInitializing...
ff.fe.fd.fc.fb.fa.f9.f8.f7.f6.f5.f4.f3.f2.f1.f0.ef.ee.ed.f4.ff.fe.fd.fc.fb.fa.f9.f8.f7.f6.f5.f4.f3.f2.f1.f0.ef.ee.ed.a2.a4.a5.a7.a8.a9.f4.ec.eb.ea.e9.e8.e7.e6.e5.e3.
F E D C B A 9 8 7 6 5 4 3 2 1 0 NODE #A A M . M . . . P TYPo o + . + . . . ++ ST1. . . . . . . . EB BPDo o + . + . . . ++ ST2. . . . . . . . EB BPD+ + + . + . . . ++ ST3. . . . . . . . EB BPD
. + + + + + + + C0 PCI ++ + . + . + + + . . . + C1 PCI +
. . . . . . . . EISA +
. . . . . . . . . . . . . . . . C4
. . . . . . . . . . . . . . . . C5+ . . . . . + . . . + + + + C6 XMI +
. . . . . . . . . . . . . . . . C7
. . A1 . A0 . . . . ILV
AlphaServer GS60/GS60E/GS140 Firmware Update Procedures
Compaq AlphaServer GS60/GS60E/GS140 Firmware Update Procedures and Release Notes 2-10
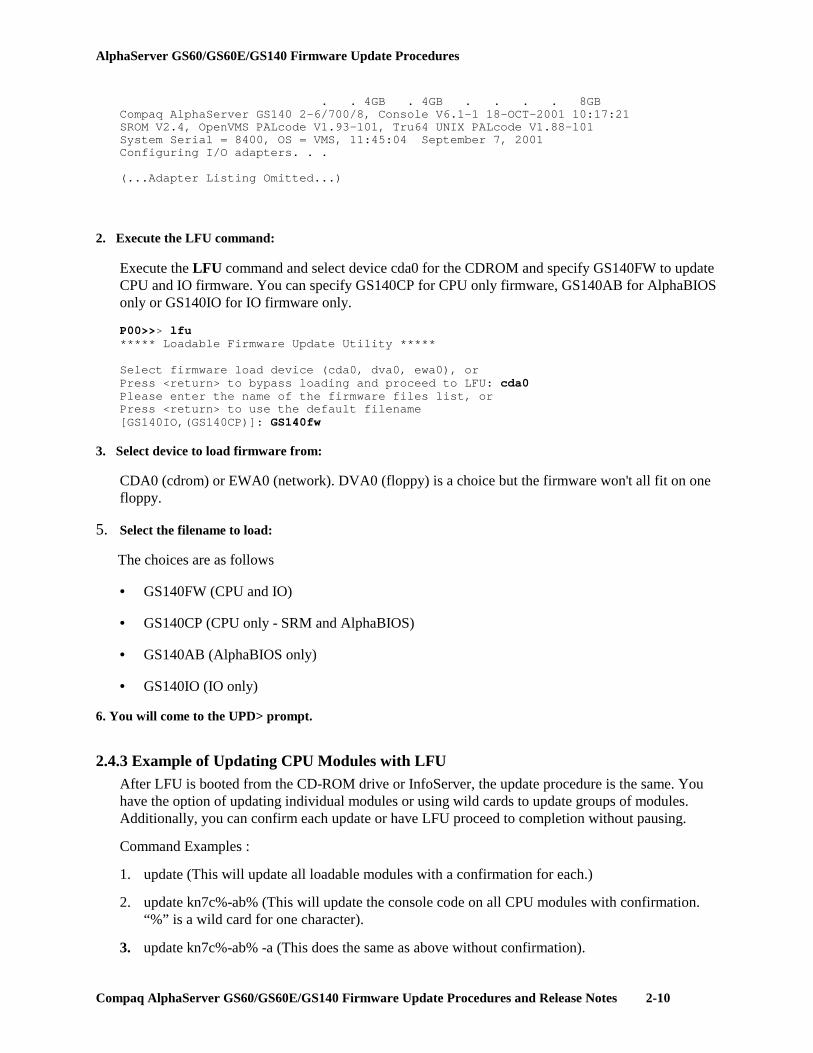
. . 4GB . 4GB . . . . 8GBCompaq AlphaServer GS140 2-6/700/8, Console V6.1-1 18-OCT-2001 10:17:21SROM V2.4, OpenVMS PALcode V1.93-101, Tru64 UNIX PALcode V1.88-101System Serial = 8400, OS = VMS, 11:45:04 September 7, 2001Configuring I/O adapters. . .
(...Adapter Listing Omitted...)
2. Execute the LFU command:
Execute the LFU command and select device cda0 for the CDROM and specify GS140FW to update CPU and IO firmware. You can specify GS140CP for CPU only firmware, GS140AB for AlphaBIOS only or GS140IO for IO firmware only.
P00>>> lfu***** Loadable Firmware Update Utility *****
Select firmware load device (cda0, dva0, ewa0), orPress <return> to bypass loading and proceed to LFU: cda0Please enter the name of the firmware files list, orPress <return> to use the default filename[GS140IO,(GS140CP)]: GS140fw
3. Select device to load firmware from:
CDA0 (cdrom) or EWA0 (network). DVA0 (floppy) is a choice but the firmware won't all fit on one floppy.
5. Select the filename to load:
The choices are as follows
• GS140FW (CPU and IO)
• GS140CP (CPU only - SRM and AlphaBIOS)
• GS140AB (AlphaBIOS only)
• GS140IO (IO only)
6. You will come to the UPD> prompt.
2.4.3 Example of Updating CPU Modules with LFU After LFU is booted from the CD-ROM drive or InfoServer, the update procedure is the same. You have the option of updating individual modules or using wild cards to update groups of modules. Additionally, you can confirm each update or have LFU proceed to completion without pausing.
Command Examples :
1. update (This will update all loadable modules with a confirmation for each.)
2. update kn7c%-ab% (This will update the console code on all CPU modules with confirmation. “%” is a wild card for one character).
3. update kn7c%-ab% -a (This does the same as above without confirmation).

AlphaServer GS60/GS60E/GS140 Firmware Update Procedures
Compaq AlphaServer GS60/GS60E/GS140 Firmware Update Procedures and Release Notes 2-11
Proceed to update the firmware (in this example, only the CPU modules are updated with console firmware and not AlphaBIOS) : UPD> update kn7c%-ab% -aWARNING: updates may take several minutes to complete for each device.
DO NOT ABORT!kn7cg-ab0 Updating to V6.1-2 ... Verifying V6.1-2... PASSED.
UPD>
AlphaServer GS60/GS60E/GS140 Firmware Update Procedures
Compaq AlphaServer GS60/GS60E/GS140 Firmware Update Procedures and Release Notes 2-12
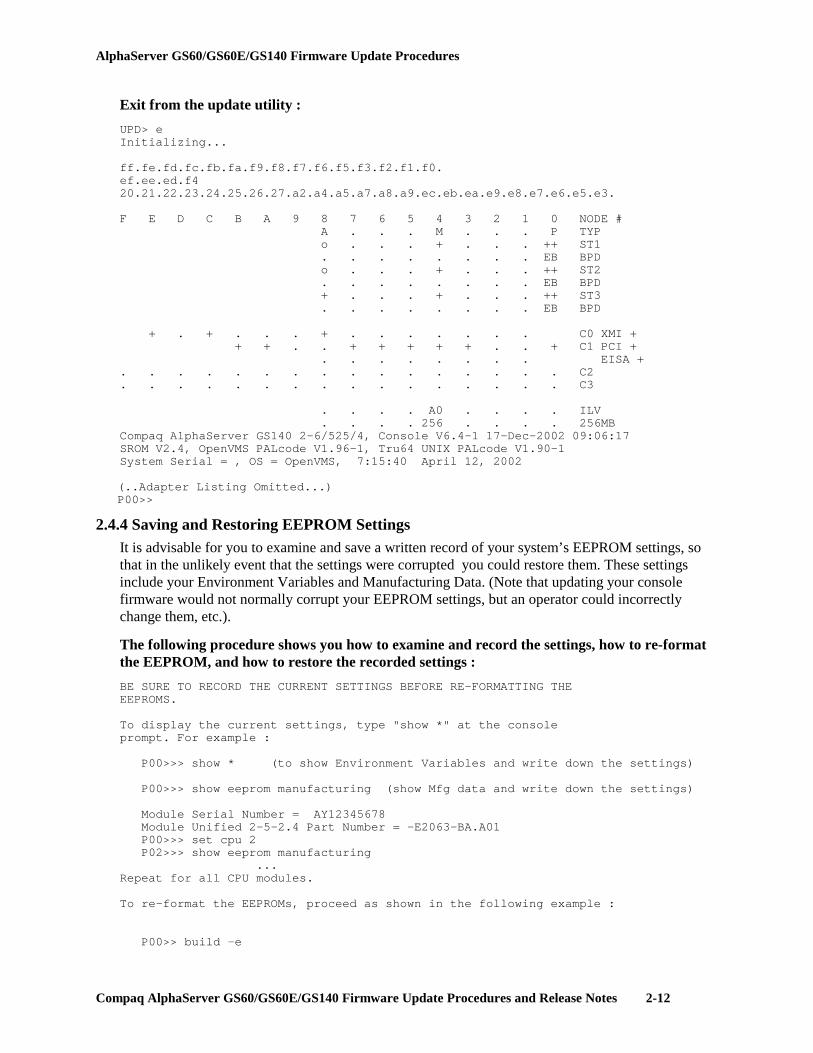
Exit from the update utility : UPD> eInitializing...
ff.fe.fd.fc.fb.fa.f9.f8.f7.f6.f5.f3.f2.f1.f0.ef.ee.ed.f420.21.22.23.24.25.26.27.a2.a4.a5.a7.a8.a9.ec.eb.ea.e9.e8.e7.e6.e5.e3.
F E D C B A 9 8 7 6 5 4 3 2 1 0 NODE #A . . . M . . . P TYPo . . . + . . . ++ ST1. . . . . . . . EB BPDo . . . + . . . ++ ST2. . . . . . . . EB BPD+ . . . + . . . ++ ST3. . . . . . . . EB BPD
+ . + . . . + . . . . . . . C0 XMI ++ + . . + + + + + . . + C1 PCI +
. . . . . . . . EISA +. . . . . . . . . . . . . . . . C2. . . . . . . . . . . . . . . . C3
. . . . A0 . . . . ILV
. . . . 256 . . . . 256MBCompaq AlphaServer GS140 2-6/525/4, Console V6.4-1 17-Dec-2002 09:06:17SROM V2.4, OpenVMS PALcode V1.96-1, Tru64 UNIX PALcode V1.90-1System Serial = , OS = OpenVMS, 7:15:40 April 12, 2002
(..Adapter Listing Omitted...)P00>>
2.4.4 Saving and Restoring EEPROM Settings It is advisable for you to examine and save a written record of your system’s EEPROM settings, so that in the unlikely event that the settings were corrupted you could restore them. These settings include your Environment Variables and Manufacturing Data. (Note that updating your console firmware would not normally corrupt your EEPROM settings, but an operator could incorrectly change them, etc.).
The following procedure shows you how to examine and record the settings, how to re-format the EEPROM, and how to restore the recorded settings : BE SURE TO RECORD THE CURRENT SETTINGS BEFORE RE-FORMATTING THEEEPROMS.
To display the current settings, type "show *" at the consoleprompt. For example :
P00>>> show * (to show Environment Variables and write down the settings)
P00>>> show eeprom manufacturing (show Mfg data and write down the settings)
Module Serial Number = AY12345678Module Unified 2-5-2.4 Part Number = -E2063-BA.A01P00>>> set cpu 2P02>>> show eeprom manufacturing
...Repeat for all CPU modules.
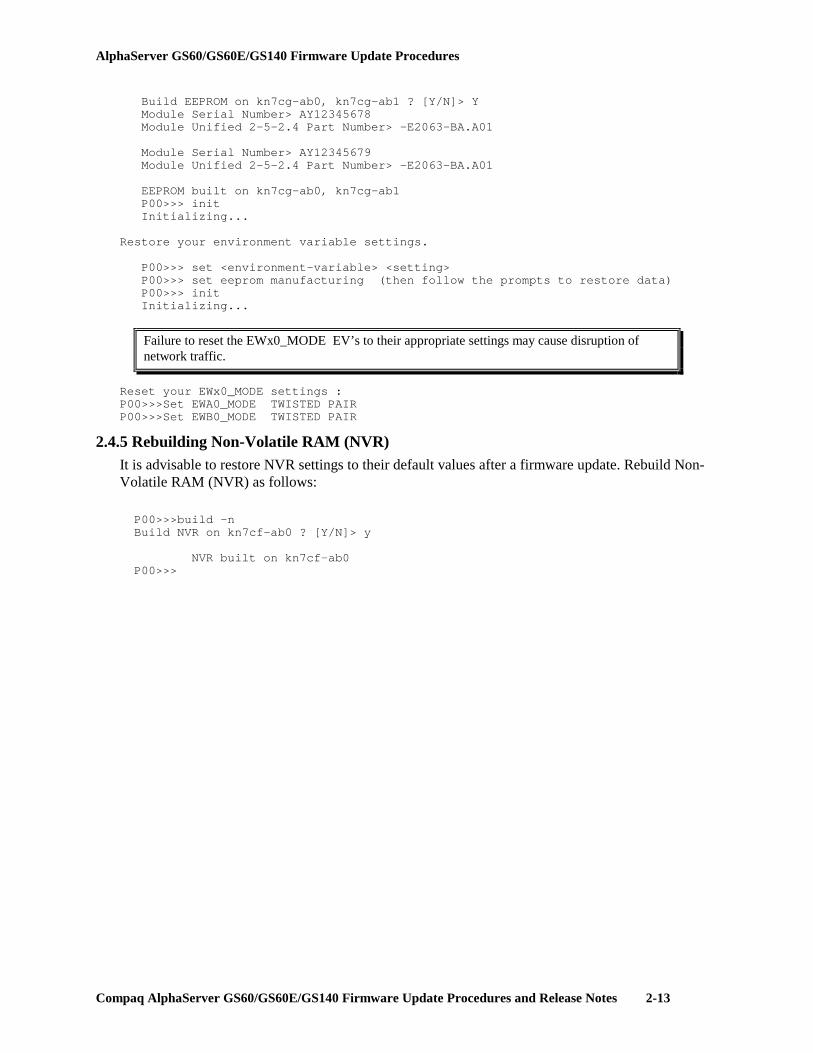
To re-format the EEPROMs, proceed as shown in the following example :
P00>> build -e
AlphaServer GS60/GS60E/GS140 Firmware Update Procedures
Compaq AlphaServer GS60/GS60E/GS140 Firmware Update Procedures and Release Notes 2-13
Build EEPROM on kn7cg-ab0, kn7cg-ab1 ? [Y/N]> YModule Serial Number> AY12345678Module Unified 2-5-2.4 Part Number> -E2063-BA.A01
Module Serial Number> AY12345679Module Unified 2-5-2.4 Part Number> -E2063-BA.A01
EEPROM built on kn7cg-ab0, kn7cg-ab1P00>>> initInitializing...
Restore your environment variable settings.
P00>>> set <environment-variable> <setting>P00>>> set eeprom manufacturing (then follow the prompts to restore data)P00>>> initInitializing...
Failure to reset the EWx0_MODE EV’s to their appropriate settings may cause disruption of network traffic.
Reset your EWx0_MODE settings :P00>>>Set EWA0_MODE TWISTED PAIRP00>>>Set EWB0_MODE TWISTED PAIR
2.4.5 Rebuilding Non-Volatile RAM (NVR) It is advisable to restore NVR settings to their default values after a firmware update. Rebuild Non-Volatile RAM (NVR) as follows:
P00>>>build -nBuild NVR on kn7cf-ab0 ? [Y/N]> y
NVR built on kn7cf-ab0P00>>>


AlphaServer GS60/GS60E/GS140 Console and Diagnostic Release Notes
Compaq AlphaServer GS60/GS60E/GS140 Firmware Update Procedures and Release Notes 3-15
3 AlphaServer GS60/GS60E/GS140 Console and Diagnostic Release Notes
3.1 Console and Diagnostic Enhancements and New Features The following are enhancements and new features contained in the AlphaServer GS60/GS60E/GS140 console/diagnostic firmware in this release:
3.1.1 Console Enhancements, New Features and Bug Fixes • Change the CPU initialization process to eliminate rare crashes on 6/525 systems..
3.1.2 Diagnostic Enhancements and New Features • It is recommended that the system be initialized before and after any "TEST" diagnostic is run. This
will insure that the system is in a known state before and after testing.
• The following is the current supported functionality of the TEST Command in this release :
See diagnostic restrictions when multiple network adapters are installed.
>>> test^-----Note that when "test" is issued with no
arguments various device exercisers arerun, but NO explicit memory tests arerun.
>>> test ms7cc*^-----Runs Memory Exerciser
>>> test pci*^-----Runs exercisers on PCI adapters.
>>> test kz*^-----Runs exercisers on kzmsa &
kzpsa adapters.
>>> test isp*^-----Runs exercisers on ISP1020/40 SCSI
interfaces.
Please note that there are no CPU tests that are callable via the "test" command. "P00>>>test kn7c*" is not supported.


Invoking ARC Utility Programs
Compaq AlphaServer GS60/GS60E/GS140 Firmware Update Procedures and Release Notes 3-17
3.2 Console and Diagnostic Bugs and Restrictions The following sections list known bugs and restrictions related to the AlphaServer GS60/GS140 console/diagnostic firmware in this release .
3.2.1 Console Bugs and Restrictions
• When the console KGPSA driver starts and the NVRAM has not been formatted, you will see the error message
kgpsaa0.0.0.2.4 - Nvram read failed.
See the WWIDMGR USERS MANUAL section on "set adapter" to correct this problem.
• The ECU utility is intermittent when run from the advanced/basic mode of console. The utility will load and appear to function but will exhibit an intermittent hang when attempting to add a new device.
Run this utility from diagnostic mode. Ex. P00>>>set mode diagnostic Console is in diagnostic mode P00>>>configure dev * P00>>>runecu
• Running the RA200FL utility from a CD is not supported.
• Booting from a KFMSB device into a dual-host DSSI cluster sometimes hangs the console. This will require a front-panel keyswitch reset.
• Occasionally, the display output may lose a character. This is most often seen as a shifted row in the console power-up map.
• The command "CDP" operating on a device attached to a KFESB adapter can sometimes hang the console. This will require a front-panel keyswitch reset.
• The KZMSA (SCSI XMI-bus) adapter does not support system disk booting from sub Logical Unit Numbers (LUNs).
• When booting over the network using the "bootp" protocol, if the first boot attempt fails, automatic and manual retries will not succeed. The machine must be initialized before retrying the boot command. If the problem persists, then a direct connection to the Boot Server may be required to avoid timeouts.
• Booting is not allowed from SCSI or DSSI adapters with controller letters greater than "z".
Invoking ARC Utility Programs
Compaq AlphaServer GS60/GS60E/GS140 Firmware Update Procedures and Release Notes 4-18
3.2.2 Diagnostic Restrictions • There are no CPU tests invoked via the "test" command. "P00>>>test kn7c*" is not supported. • The "test" command (with no command arguments) will hang while network adapters are being
configured if the system contains at least one Tulip (PCI Ethernet Adapter), one DEFPA (PCI FDDI adapter), and one XMI- based network adapter (DEMNA, DEMFA) and the system configuration is such that the above set of adapters are configured in the following order: Tulip,DEFPA, XMI network adapter.
Note that there may be other network adapters in the system. Any combination of the above three adapters configured in the required order will create the hang.
If the "test" command (with no command arguments) hangs under the conditions stated above, identical test coverage is achieved by testing the XMI and PCI
subsystems individually -> "test pci*" and "test xmi*".
4 Invoking ARC Utility Programs Refer to section 3.2.1, Console Bugs and Restrictions before attempting to run ARC-based utilities.
To help configure an AlphaServer GS60/GS140 system, various utilities are required which are based on the Advanced RISC Computing (ARC) Specification developed by Microsoft. The AlphaServer GS60/GS140 console firmware provides an ARC-compatible interface which allows these utilities to be invoked from the console command line. The utilities supported with this version of the AlphaServer GS60/GS140 console are:
• EISA Configuration Utility (ECU)
• RAID Configuration Utility (RCU)
• RA200FL Firmware Update Utility
• ISP1020/40 EEROM Configuration Utility
• KZPSA Configuration/Diagnostic Utility
4.1 ARC Commands Two commands, RUNECU and RUN, are provided to invoke ARC utility programs. Before running any ARC utilities, the ARC_ENABLE environment variable must be set to ON. The ADVANCED command set must be selected. P00>>>set arc_enable on ! enable ARC interfaceP00>>>set console_mode advanced ! enable Advanced filesystemP00>>>init ! re-init to load ARC EV's, etc...
NOTE: The RUNECU and RUN command are not available until the system has beeninitialized with ARC_ENABLE set to ON. ALSO, only a serial line interfaceis supported (no graphics). The terminal must be a VT320 or greater andset as follows:
- 8-bit character mode- '~' key set to send ESC.

Invoking ARC Utility Programs
Compaq AlphaServer GS60/GS60E/GS140 Firmware Update Procedures and Release Notes 4-19
After running ARC-based utilities, be sure to reset ARC_ENABLE to “OFF” and re-initialize the console.
P00>> Set ARC_ENABLE offP00>> INIT
4.1.1 RUNECU Command The RUNECU command automatically runs the EISA Configuration Utility from floppy disk. A disk containing the ECU must be inserted in the drive before the command is issued. P00>>>runecuLoading image...Transferring Control... # After about 1 minute the
# following appears:
EISA Configuration Utility Help=F1+-------- EISA Configuration Utility -------------------+| || (C) Copyright 1989, 1994 || Micro Computer Systems, Inc. || All Rights Reserved. || || This program is provided to help you set your || computer's configuration. You should use this || program the first time you set up your computer || and whenever you add additional boards or options. || || To continue, press ENTER. |+-------------------------------------------------------+| > OK=ENTER < |+-------------------------------------------------------+
After ENTER is pressed, the ECU will load the configuration filesfrom the floppy:
EISA Configuration Utility Help=F1+---------------------------------+| Loading configuration files. || || Please wait ... || |+---------------------------------+
After the files are verified, the ECU main menu displays:
EISA Configuration Utility+-------- Steps in configuring your computer ------------+| || Step 1: Important EISA configuration information || || Step 2: Add or remove boards || || Step 3: View or edit details || || Step 4: Examine required switches || || Step 5: Save and exit || |+--------------------------------------------------------+| >Select=ENTER< <Cancel=ESC> |+------+--------------------------Help-------------------+
|To learn about the EISA configuration process and|

Invoking ARC Utility Programs
Compaq AlphaServer GS60/GS60E/GS140 Firmware Update Procedures and Release Notes 4-20
|how it differs from ISA configuration, press ||ENTER. To read a short explanation of each of ||the configuration steps, use the UP arrow and ||DOWN arrow keys. |+-------------------------------------------------+
For those familiar with ECU serial operation, the environment variable TERM,set to VT320, is created automatically.
If a VCS connection is used, the graphics characters used by the ECU willappear as regular characters. This is a side effect of VCS, the program willstill run properly.
The first time the ECU is run, a message 'System Board ID mismatch' will bedisplayed by the ECU. Ignore the message and press return.
If you have changed the EISA configuration, it is necessary to rerunthe ECU to reformat the NVRAM data.
Important - There are two variants of the ECU, one for VMS and UNIX, and another one for Windows NT. Be sure to use the appropriate ECU diskette for your operating system.
4.1.2 Stepping Through the ECU Dialog Boxes The ECU will display a few dialog boxes on the monitor. When these begin to appear do the following :
• At the main dialog box, press “ENTER”
• At the “ID Mismatch” dialog box, press “ENTER” (and wait for about 30 seconds).
• At the main selection dialog box select : “5) Save and Exit”, press “ENTER”
• To the save configuration, press “ENTER”
• To the exit utility, press “ENTER”
The ECU should save the configuration information in NVRAM and then return to the ARC firmware menu. At this point the system should have valid ECU data and be in a consistent state for further system operation.
4.1.3 RUN Command The RUN command is used to run an ARC Utility program. RUN has four pre-defined shortcut symbols. These environmental variables become available when "arc_enable" is set to "on". The commands may be run from the other media by using the complete file specification.
1. RCU - Run the RAID Configuration Utility (fat:ra200srl.exe)
2. RA200FL - Update firmware on RAID controller (fat:ra200fl.exe)
3. EEROMCFG - Run the ISP1020/40 EEROM Configuration Utility (iso9660:[utility]eeromcfg.exe)
4. UTIL_CLI - Run the KZPSA Configuration Utility (iso9660:[utility]util_cli.exe) Options 1, 3 and 4 (RCU, EEROMCFG and UTIL_CLI) can be run from floppy orCD-ROM. Option 2 (RA200FL) must be run from floppy. Although the RAIDcontroller firmware update utility is on the Alpha Systems Firmware UpdateCD, it cannot be run from the CD on the AlphaServer GS60/GS140.

Invoking ARC Utility Programs
Compaq AlphaServer GS60/GS60E/GS140 Firmware Update Procedures and Release Notes 4-21
The RUN command syntax is:
run <filesys:><[directory]><program> [-d <device>][-p <n>][-s <parameter string>]
where <filesys:> is the media load type (FAT = floppy, ISO9660 = CD-Player),<[directory]>is the subdirectory where the utility resides,<program> is the command option selected, <device> is the console devicecontaining the program (default is dva0), <n> is the unit number of the PCIto configure, and <parameter string> are any optional parameters that must bepassed to the utility, which must be enclosed in quotes.The utility documentation specifies any required parameters.
To use this command, the ARC_ENABLE environment variable must be set to ON, Theconsole in advanced more and the system initialized.
Command line example for RCU (ra200srl) program from floppy :
p00>>> sho dev floppypolling for units on floppy0, slot 0, bus 1, hose6. . .dva0.0.01100.6 DVA0 RX26/RX23
P00>>> run rcu -p 1Loading image. . .Transferring control. . .Command line example for RCU (ra200srl) program from cdrom :
P00>>> show device isp3 !use SHOW DEVICE to find CD-ROMpolling for units on isp3, slot 5, bus 0, hose0...dkd400.4.0.5.0 DKD400 RRD44 0064dkd500.5.0.5.0 DKD500 RZ26L 440C
P00>>> run iso9660:[utility.swxcrmgr]ra200srl.exe -d dkd400 -p 0 Loading image...Transferring control...
Note: If you run RCU from cdrom, you will not be able to save your configuration.
Command line example for ra200fl program from floppy :
p00>>> sho dev floppypolling for units on floppy0, slot 0, bus 1, hose6. . .dva0.0.01100.6 DVA0 RX26/RX23
P00>>> run ra200fl -p 1 -s "swxcrfwp.249"Loading image. . .Transferring control. . .
Note - The ra200fl program must be run from floppy.
Example for ISP1020/40 EEPROM Configuration Utility from CD :
P00>>> show device isp3 !use SHOW DEVICE to find CD-ROMpolling for units on isp3, slot 5, bus 0, hose0...dkd400.4.0.5.0 DKD400 RRD44 0064dkd500.5.0.5.0 DKD500 RZ26L 440CP00>>> run eeromcfg -d dkd400 -p 0Loading image...Transferring control...
# The screen is erased, followed by:
----------------------------------------------------------------ISP1020/40 EEROM Configuration Utility
----------------------------------------------------------------

Invoking ARC Utility Programs
Compaq AlphaServer GS60/GS60E/GS140 Firmware Update Procedures and Release Notes 4-22
+=========== Select ISP1020/40 ==========+| Bus Virtual Slot Address || ||[ 0 0 01003000] || 0 1 01002000 || 0 4 01001000 || 0 5 01000000 ||----------------------------------------|| < (O)K > < E(x)it > |+========================================+
Example for KZPSA Configuration Utility from CD :
P00>>> show device isp3 !use SHOW DEVICE to find CD-ROMpolling for units on isp3, slot 5, bus 0, hose0...dkd400.4.0.5.0 DKD400 RRD44 0064dkd500.5.0.5.0 DKD500 RZ26L 440CP00>>> run util_cli -d dkd400 -p 0Loading image...Transferring control...
...

Appendix A - Discrepancies in AlphaServer GS60/140 and 8200/8400 Operations Manual
Compaq AlphaServer GS60/GS60E/GS140 Firmware Update Procedures and Release Notes 4-23
Appendix A - Discrepancies in AlphaServer GS60/140 and 8200/8400 Operations Manual
In the AlphaServer GS60/140 and 8200/8400 Operations Manual, order number EK-T8030-OP.C01, several discrepancies have been reported between certain console command behaviors and those described in the manual. In addition, the effect of certain SRM Console "special" characters may vary with the type of keyboard used. The following list is not meant to be exhaustive.
1. Page 7-6, Table 7-2,: Ctrl-D, Left Arrow. The left arrow performs as stated. Ctrl-D does not move the cursor but will invoke the console's X-Delta Debugger. If the debugger is invoked, return to the console prompt by typing: “;p <return>”
2. Page 7-6, Table 7-2: Ctrl-H, BS, F12. Ctrl-H brings the cursor directly to the beginning of the line. BS or Back Space will bring the cursor back to the beginning of the line, space by space, deleting the character to the left of the cursor as it does. F12 may not perform any function.
3. Page 7-6, Table 7-2,: Ctrl-J deletes the word to the left of the cursor.
4. Page 7-7, The delete key may not perform any function. To delete the character previously typed, the Back Space key may be used.
5. Page 7-7, Ctrl-D does not move the cursor but will invoke the console's X-Delta Debugger. If the debugger is invoked, return to the console prompt by typing: “;p <return>”
6. Page 7-52: The SHOW EEPROM SERIAL function is not supported. To display the system serial number, type “SHOW SYS_SERIAL_NUM”