compare between drawing arc methods in autocad system
TRANSCRIPT

Available online at www.worldscientificnews.com
WSN 21 (2015) 50-67 EISSN 2392-2192
Compare Between Drawing Arc Methods in AutoCAD System
Lubna Zaghlul Bashir
Technology University, Baghdad, Iraq
E-mail address: [email protected]
ABSTRACT
AutoCAD provides many different ways to accomplish the same task. For example, to activate a
command, you can select it from a menu or a toolbar, or type the command name at AutoCAD’s
command prompt. There is no right or wrong way to do something in AutoCAD. You will develop
techniques that you find most comfortable for the way you work and the types of drawings you create.
You may want to customize AutoCAD for your particular needs. There are also many common
drafting tasks that can be automated by using scripts and macros, or by writing or purchasing add-on
applications that run inside AutoCAD, tailoring the program for specific drafting and design
disciplines [1]. AutoCAD provides eleven different ways to create arcs. The different options are used
based on the geometry conditions of the design. To create an arc, you can specify various
combinations of center, endpoint, start point, radius, angle, chord length, and direction values. You
can create arcs in several ways.in this work we compare between different options of drawing arcs,
Results shows that the more commonly used options are the 3-Points option and the Center-Start-
End option.
Keywords: Line; Arc; Draw Bar; Modify Bar; Angle; Chord

World Scientific News 21 (2015) 50-67
-51-
1. BASIC OBJECTS IN AUTOCAD
Draw tool bar used to access AutoCAD draw commands you can also use draw pull
down menu or type the command in command line. The draw commands create objects such
as lines, rectangles, circles, arcs, and ellipses.an object is the smallest component of the
drawing. A drawing is made up of combinations of these objects. When creating objects with
draw commands, AutoCAD always prompt ask you to indicate points such as endpoints,
centers, radii, to describe size and location of the object to be drawn. Drawing commands can
be entered from the keyboard (command line), the draw toolbar, or the draw pull down menu.
Figure 9 shows draw bar [2,3].
1. 1. Line
Draw Line simple lines or series of lines segments .access to command line by one way
of the following:
1. Command Line:Line or L 2. Menu Bar: Draw Line
3. Draw Bar
When execute command line the program requires specify first point, display in
command line:
Specify first Point:
Specify next point or [Undo]:
Specify next point or [Close/Undo]:
Options:
C: this option close series of lines, connect first point with last point by line.
U: enter U for undo. AutoCAD backs up one segment, undoing it so that you can recreate
it [4-7].
1. 2. Circle
Provide Circle many ways to draw circles. Access the command from:
1. Command Line:Circle, C
2. Menu Bar:Draw Circle
3. Draw Bar:
Display following message:
Specify Center point for circle or [3P/2P/Ttr(tan tan radius)]:
Specify radius of circle or [ Diameter]:D
Specify diameter of circle<current default>:
Options:
3P(3 point):the circle passes through all three points specified.
2P(2 point) .the two points specify the location and diameter.
Ttr(tan tan radius) ٍ .specify two objects for the circle to be tangent to, then
specify the radius.

World Scientific News 21 (2015) 50-67
-52-
TTT (Draw CircleTan Tan Tan).[4,5,6,7,12].
1. 3. Arc
In AutoCAD, the Arc command is often used to produce arcs.
1. Command Line: Arc or a
2. Menu Bar: DrawArc
3. Draw Bar:
The following message appear:
Specify start point of arc or [Center]:
Specify second point of arc or [Center/ End]:
Specify end point of arc or [ Angle / chord length] :
Specify Center point of arc or [Angle/ Direction / Radius]:
Options:
Angle.Draw arc using angle.
Chord Length.Draw arc using chord length. [4-7,13].
2. DRAW ARCS
To create an arc, you can specify various combinations of center, endpoint, start point,
radius, angle, chord length, and direction values. You can create arcs in several ways. With
the exception of the first method, arcs are drawn counter clockwise from the start point to the
endpoint.
2. 1. Draw Arcs by Specifying Three Points
You can create an arc by specifying three points as In Figure 1 , the start point of the arc
snaps to the endpoint of a line. The second point of the arc snaps to the middle circle in the
illustration of Figure 1.
Figure 1. Drawing Arc by Specifying Three Points.

World Scientific News 21 (2015) 50-67
-53-
2. 2. Draw Arcs by Specifying Start, Center, End
You can create an arc using a start point, center, and a third point that determines the
endpoint. The distance between the start point and the center determines the radius. The
endpoint is determined by a line from the center that passes through the third point. The
resulting arc is always created counter clockwise from the start point. Using different options,
you can specify either the start point first or the center point first. Figure 2 illustrate drawing
arcs by specifying start, center ,end.
Figure 2. Draw Arcs By Specifying Start, Center, End.
2. 3. Draw Arcs by Specifying Start, Center, Angle
Figure 3. Draw Arcs By Specifying Start, Center, Included angle.
You can create an arc using a start point, center, and an included angle as illustrated in
Figure 3. The distance between the start point and the center determines the radius. The other
end of the arc is determined by specifying an included angle that uses the center of the arc as

World Scientific News 21 (2015) 50-67
-54-
the vertex. The resulting arc is always created Counter clockwise from the start point. Using
different options, you can specify either the start point first or the center point first.The
included angle determines the endpoint of the arc. Use the Start, End, Angle method when
you know both endpoints but cannot snap to a center point.
2. 4. Draw Arcs by Specifying Start, Center, Length
You can create an arc using a start point, center, and the length of a chord. The distance
between the start point and the center determines the radius. The other end of the arc is
determined by specifying the length of a chord between the start point and the endpoint of the
arc. The resulting arc is always created counter clockwise from the start point.
Using different options, you can specify either the start point first or the center point
first. The length of the chord of the arc determines the included angle. This method illustrated
in Figure 4.
Figure 4. Draw Arcs By Specifying Start, Center, Chord length
2. 5. Draw Arcs by Specifying Start, End, Angle
You can create an arc using a start point, endpoint, and an included angle. The included
angle between the endpoints of the arc determines the center and the radius of the arc.
2. 6. Draw Arcs by Specifying Start, End, Direction
You can create an arc using a start point, endpoint, and a tangent direction at the start
point as illustrated in Figure 5. The tangent direction can be specified either by locating a
point on the desired tangent line, or by entering an angle. You can determine which endpoint
controls the tangent by changing the order in which you specify the two endpoints.

World Scientific News 21 (2015) 50-67
-55-
Figure 5. Draw Arcs By Specifying Start, End, Direction.
2. 7. Draw Arcs by Specifying Start, End, Radius
You can create an arc using a start point, endpoint, and a radius as illustrated in figure 6.
The direction of the bulge of the arc is determined by the order in which you specify its
endpoints. You can specify the radius either by entering it or by specifying a point at the
desired radius distance [8,9].
Figure 6. Draw Arcs By Specifying Start, End, Radius.
3. USING THE ARC COMMAND
1. Click the down-arrow icon of the Arc command in the Draw toolbar to display the different
Arc construction options as shows in Figure 7.

World Scientific News 21 (2015) 50-67
-56-
AutoCAD provides eleven different ways to create arcs. Note that the different options are
used based on the geometry conditions of the design. The more commonly used options are
the 3 Points option and the Center-Start- End option.
2. Select the Center-Start-End option as shown. This option requires the selection of the
center point, start point and end point location, in that order, of the arc.
Figure 7. Different Arc Construction Options.
3. Move the cursor to the middle of the two horizontal lines and align the cursor to the two
end points as shown in Figure 8. Click once with the right mouse- button to select the
location as the Center point of the new arc.

World Scientific News 21 (2015) 50-67
-57-
Figure 8. Cursor Location at the Center Point of Arc.
4. Move the cursor downward and select the right endpoint of the bottom horizontal line as
the start point of the arc as shown in Figure 9.
Figure 9. Cursor Location at the Start Point of Arc.
5. Move the cursor to the right endpoint of the top horizontal line as shown. Pick this point as
the endpoint of the new arc as shown in Figure 10.
Figure 10. Cursor Location at the end Point of Arc.

World Scientific News 21 (2015) 50-67
-58-
6. On your own, repeat the above steps and create the other arc as shown in Figure 11. Note
that in most CAD packages, positive angles are defined as going counter clockwise; therefore
the starting point of the second arc is the endpoint on top [10,11].
Figure 11. Create The Arc.
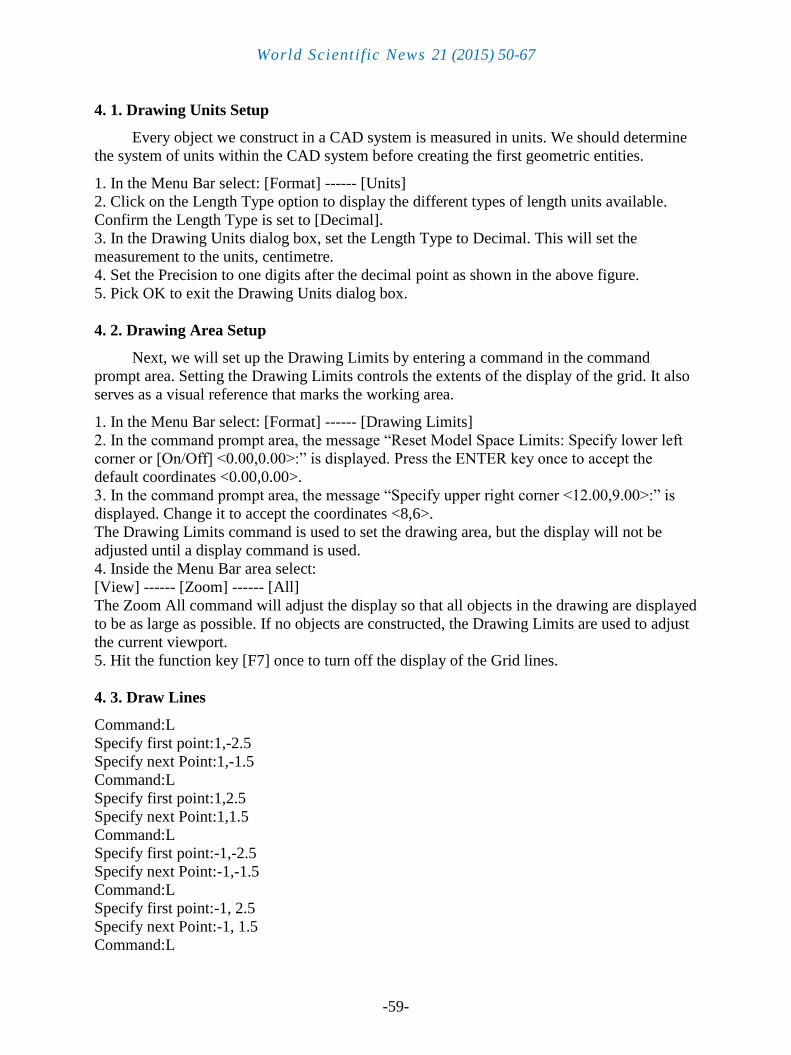
4. COMPARE BETWEEN DRAWING ARC METHODS.
In this work we compare between different arc methods by drawing Figure 12, in
board its sides (8×6 cm). Note the Center point of the figure is the point (0,0), apply
following drawing arc methods.
1. Draw Arcs by Specifying Three Points.
2. Draw Arcs by Specifying Start, Center, End.
3. Draw Arcs by Specifying Start, Center, Angle.
4. Draw Arcs by Specifying Start, Center, Length.
5. Draw Arcs by Specifying Start, End, Angle.
6. Draw Arcs by Specifying Start, End, Direction.
7. Draw Arcs by Specifying Start, End, Radius.
Figure 12. Apply Different Drawing Arc Methods.
World Scientific News 21 (2015) 50-67
-59-
4. 1. Drawing Units Setup
Every object we construct in a CAD system is measured in units. We should determine
the system of units within the CAD system before creating the first geometric entities.
1. In the Menu Bar select: [Format] ------ [Units]
2. Click on the Length Type option to display the different types of length units available.
Confirm the Length Type is set to [Decimal].
3. In the Drawing Units dialog box, set the Length Type to Decimal. This will set the
measurement to the units, centimetre.
4. Set the Precision to one digits after the decimal point as shown in the above figure.
5. Pick OK to exit the Drawing Units dialog box.
4. 2. Drawing Area Setup
Next, we will set up the Drawing Limits by entering a command in the command
prompt area. Setting the Drawing Limits controls the extents of the display of the grid. It also
serves as a visual reference that marks the working area.
1. In the Menu Bar select: [Format] ------ [Drawing Limits]
2. In the command prompt area, the message “Reset Model Space Limits: Specify lower left
corner or [On/Off] <0.00,0.00>:” is displayed. Press the ENTER key once to accept the
default coordinates <0.00,0.00>.
3. In the command prompt area, the message “Specify upper right corner <12.00,9.00>:” is
displayed. Change it to accept the coordinates <8,6>.
The Drawing Limits command is used to set the drawing area, but the display will not be
adjusted until a display command is used.
4. Inside the Menu Bar area select:
[View] ------ [Zoom] ------ [All]
The Zoom All command will adjust the display so that all objects in the drawing are displayed
to be as large as possible. If no objects are constructed, the Drawing Limits are used to adjust
the current viewport.
5. Hit the function key [F7] once to turn off the display of the Grid lines.
4. 3. Draw Lines
Command:L
Specify first point:1,-2.5
Specify next Point:1,-1.5
Command:L
Specify first point:1,2.5
Specify next Point:1,1.5
Command:L
Specify first point:-1,-2.5
Specify next Point:-1,-1.5
Command:L
Specify first point:-1, 2.5
Specify next Point:-1, 1.5
Command:L

World Scientific News 21 (2015) 50-67
-60-
Specify first point:1.5,-1
Specify next Point:3.5,-1
Command:L
Specify first point:1.5,1
Specify next Point:3.5,1
Command:L
Specify first point:-1.5, -1
Specify next Point:-3.5,-1
Command:L
Specify first point:-1.5, 1
Specify next Point:-3.5,1
4. 4. Draw Circles
Command:C
Specify Center point for circle:0,-2.5
Specify radius of circle:0.5
Command:C
Specify Center point for circle:0, 2.5
Specify radius of circle:0.5
Command:C
Specify Center point for circle:3.5,0
Specify radius of circle:0.5
Command:C
Specify Center point for circle:-3.5,0
Specify radius of circle:0.5
4. 5. Draw arcs
4. 5. 1. Drawing Arc Using 3Points
Command:a
Specify first point:-1,-2.5
Specify second point:0,-3.5
Specify end point:1,-2.5
Command:a
Specify first poin:3.5,-1
Specify second point:4.5,0
Specify end point:3.5,1
Command:a
Specify first point:1,2.5
Specify second point:0,3.5
Specify end point:-1,2.5
Command:a
Specify first point of arc:-3.5,1
Specify second pointof arc:-4.5,0
Specify end point:-3.5,-1
Command:a

World Scientific News 21 (2015) 50-67
-61-
Specify first poin:1.5,-1
Specify second point:1.25,-1.25
Specify end point:1,-1.5
Command:a
Specify first point:1,1.5
Specify second point:1.25,1.25
Specify end point:1.5,1
Command:a
Specify first point of arc:-1.5,1
Specify second pointof arc:-1.25,1.25
Specify end point:-1,1.5
Command:a
Specify first point:-1,-1.5
Specify second point:-1.25,-1.25
Specify end point:-1.5,-1
4. 5. 2. Drawing Arc Using Start/ Center/End
Command:a
Specify first point:-1,-2.5
Specify Center point of arc:0,-2.5
Specify end point:1,-2.5
Command:a
Specify first point of arc:3.5,-1
Specify Center point of arc:3.5,0
Specify end point:3.5,1
Command:a
Specify first point of arc:1,2.5
Specify Center point of arc:0,2.5
Specify end point:-1,2.5
Command: a
Specify first point of arc:-3.5,1
Specify Center point of arc:-3.5,0
Specify end point:-3.5,-1
Command:a
Specify first poin:1.5,-1
Specify Centerpoint:1.5,-1.5
Specify end point:1,-1.5
Command:a
Specify first point:1,1.5
Specify Centerpoint:1.5,1.5
Specify end point:1.5,1
Command:a
Specify first point of arc:-1.5,1
Specify Center point of arc:-1.5,1.5
Specify end point:-1,1.5
Command:a

World Scientific News 21 (2015) 50-67
-62-
Specify first point:-1,-1.5
Specify Center point:-1.5,-1.5
Specify end point:-1.5,-1
4. 5. 3. Drawing Arc Using Start/ Center/Angle
Command:a
Specify first point:-1,-2.5
Specify Center point of arc:0,-2.5
Specify included angle:180
Command:a
Specify first point of arc:3.5,-1
Specify Center point of arc:3.5,0
Specify included angle:180
Command:a
Specify first point of arc:1,2.5
Specify Center point of arc:0,2.5
Specify included angle:180
Command: a
Specify first point of arc:-3.5,1
Specify Center point of arc:-3.5,0
Specify included angle:180
Command:a
Specify first poin:1.5,-1
Specify Center point:1.5,-1.5
Specify included angle:90
Command:a
Specify first point:1,1.5
Specify Centerpoint:1.5,1.5
Specify included angle:90
Command:a
Specify first point of arc:-1.5,1
Specify Center point of arc:-1.5,1.5
Specify included angle:90
Command:a
Specify first point:-1,-1.5
Specify Center point:-1.5,-1.5
Specify included angle:90
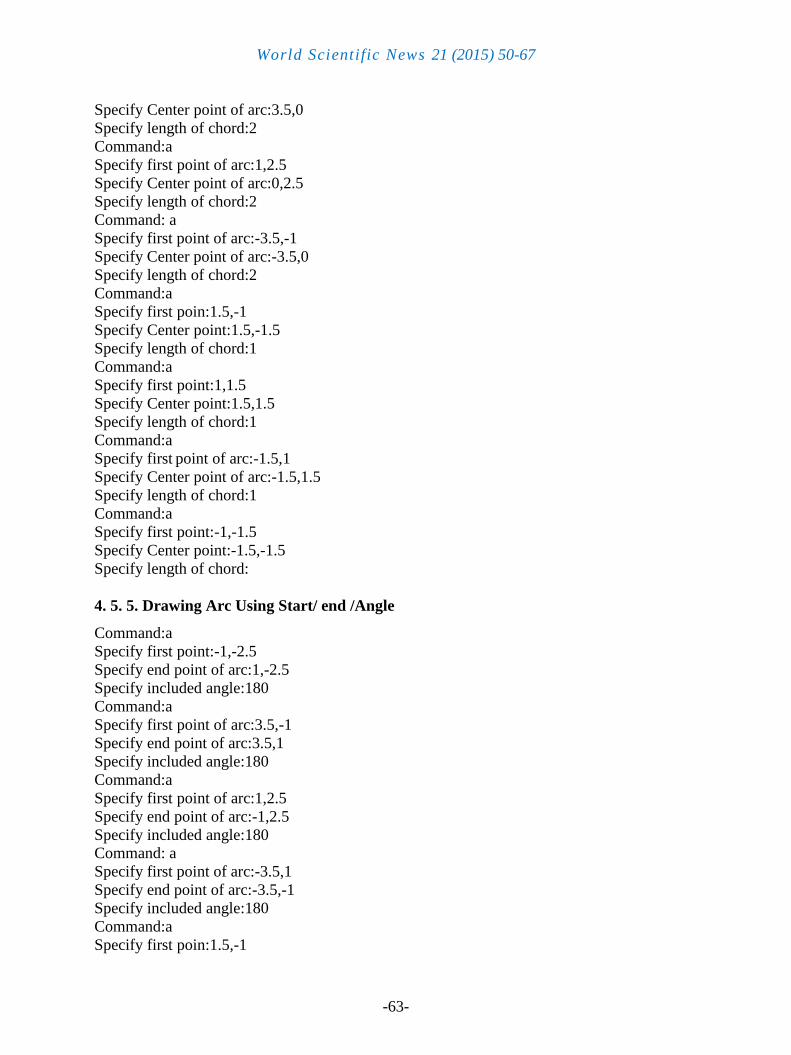
4. 5. 4. Drawing Arc Using Start/ Center/Length
Command:a
Specify first point:-1,-2.5
Specify Center point of arc:0,-2.5
Specify length of chord:2
Command:a
Specify first point of arc:3.5,-1
World Scientific News 21 (2015) 50-67
-63-
Specify Center point of arc:3.5,0
Specify length of chord:2
Command:a
Specify first point of arc:1,2.5
Specify Center point of arc:0,2.5
Specify length of chord:2
Command: a
Specify first point of arc:-3.5,-1
Specify Center point of arc:-3.5,0
Specify length of chord:2
Command:a
Specify first poin:1.5,-1
Specify Center point:1.5,-1.5
Specify length of chord:1
Command:a
Specify first point:1,1.5
Specify Center point:1.5,1.5
Specify length of chord:1
Command:a
Specify first point of arc:-1.5,1
Specify Center point of arc:-1.5,1.5
Specify length of chord:1
Command:a
Specify first point:-1,-1.5
Specify Center point:-1.5,-1.5
Specify length of chord:
4. 5. 5. Drawing Arc Using Start/ end /Angle
Command:a
Specify first point:-1,-2.5
Specify end point of arc:1,-2.5
Specify included angle:180
Command:a
Specify first point of arc:3.5,-1
Specify end point of arc:3.5,1
Specify included angle:180
Command:a
Specify first point of arc:1,2.5
Specify end point of arc:-1,2.5
Specify included angle:180
Command: a
Specify first point of arc:-3.5,1
Specify end point of arc:-3.5,-1
Specify included angle:180
Command:a
Specify first poin:1.5,-1
World Scientific News 21 (2015) 50-67
-64-
Specify end point:1,-1.5
Specify included angle:90
Command:a
Specify first point:1,1.5
Specify end point:1.5,1
Specify included angle:90
Command:a
Specify first point of arc:-1.5,1
Specify end point of arc:-1,1.5
Specify included angle:90
Command:a
Specify first point:-1,-1.5
Specify end point:-1.5,-1
Specify included angle:90
4. 5. 6. Drawing Arc Using Start/ end /Direction
Command:a
Specify first point:-1,-2.5
Specify end point of arc:1,-2.5
Specify direction of arc:315
Command:a
Specify first point of arc:3.5,-1
Specify end point of arc:3.5,1
Specify direction of arc:45
Command:a
Specify first point of arc:1,2.5
Specify end point of arc:-1,2.5
Specify direction of arc:135
Command: a
Specify first point of arc:-3.5,1
Specify end point of arc:-3.5,-1
Specify direction of arc:225
Command:a
Specify first poin:1.5,-1
Specify end point:1,-1.5
Specify direction of arc:225
Command:a
Specify first point:1,1.5
Specify end point:1.5,1
Specify direction of arc:315
Command:a
Specify first point of arc:-1.5,1
Specify end point of arc:-1,1.5
Specify direction of arc:45
Command:a
Specify first point:-1,-1.5

World Scientific News 21 (2015) 50-67
-65-
Specify end point:-1.5,-1
Specify direction of arc:135
4. 5. 7. Drawing Arc Using Start/ end /Radius
Command:a
Specify first point:-1,-2.5
Specify end point of arc:1,-2.5
Specify radius of arc:1
Command:a
Specify first point of arc:3.5,-1
Specify end point of arc:3.5,1
Specify radius of arc:1
Command:a
Specify first point of arc:1,2.5
Specify end point of arc:-1,2.5
Specify radius of arc:1
Command: a
Specify first point of arc:-3.5,-1
Specify end point of arc:-3.5,-1
Specify radius of arc:1
Command:a
Specify first poin:1.5,-1
Specify end point:1,-1.5
Specify radius of arc:0.5
Command:a
Specify first point:1,1.5
Specify end point:1.5,1
Specify radius of arc:0.5
Command:a
Specify first point of arc:-1.5,1
Specify end point of arc:-1,1.5
Specify radius of arc:0.5
Command:a
Specify first point:-1,-1.5
Specify end point:-1.5,-1
Specify radius of arc:0.5
4. 5. 8. Drawing Arc Using Center/Start /End
Command:a
Specify Center point of arc:0,-2.5
Specify first point:-1,-2.5
Specify end point:1,-2.5
Command:a
Specify Center point of arc:3.5,0
Specify first point of arc:3.5,-1
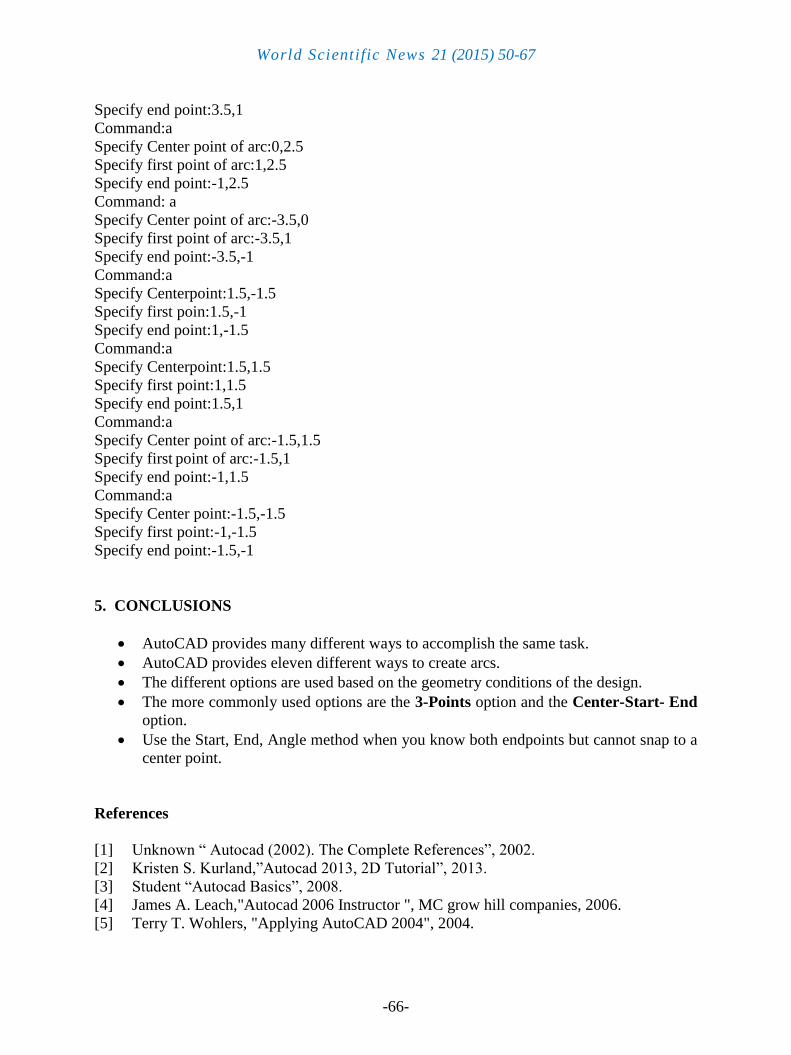
World Scientific News 21 (2015) 50-67
-66-
Specify end point:3.5,1
Command:a
Specify Center point of arc:0,2.5
Specify first point of arc:1,2.5
Specify end point:-1,2.5
Command: a
Specify Center point of arc:-3.5,0
Specify first point of arc:-3.5,1
Specify end point:-3.5,-1
Command:a
Specify Centerpoint:1.5,-1.5
Specify first poin:1.5,-1
Specify end point:1,-1.5
Command:a
Specify Centerpoint:1.5,1.5
Specify first point:1,1.5
Specify end point:1.5,1
Command:a
Specify Center point of arc:-1.5,1.5
Specify first point of arc:-1.5,1
Specify end point:-1,1.5
Command:a
Specify Center point:-1.5,-1.5
Specify first point:-1,-1.5
Specify end point:-1.5,-1
5. CONCLUSIONS
AutoCAD provides many different ways to accomplish the same task.
AutoCAD provides eleven different ways to create arcs.
The different options are used based on the geometry conditions of the design.
The more commonly used options are the 3-Points option and the Center-Start- End
option.
Use the Start, End, Angle method when you know both endpoints but cannot snap to a
center point.
References
[1] Unknown “ Autocad (2002). The Complete References”, 2002.
[2] Kristen S. Kurland,”Autocad 2013, 2D Tutorial”, 2013.
[3] Student “Autocad Basics”, 2008.
[4] James A. Leach,"Autocad 2006 Instructor ", MC grow hill companies, 2006.
[5] Terry T. Wohlers, "Applying AutoCAD 2004", 2004.

World Scientific News 21 (2015) 50-67
-67-
[6] Lubna Zaghlul Bashir,” Computers Principles Lecture”, Building and Construction
Department, Technology University, Iraq, 2014.
[7] Lubna Zaghlul Bashir, “Compare between Methods of Entering Coordinate System
(Absolute, Relative, Polar) in AutoCAD”, World Scientific News, 12 (2015) 49-69.
[8] Unknown” AutoCAD (2013). User's Guide, Auotodesk, January 2012.
[9] Kristen S. Kurland,”Autocad (2004). 2D Training Manual”, 2004.
[10] Randy H. Shih “Autocad 2013 Tutorial - First Level:2D Fundamentals”, 2013.
[11] Randy H. Shih “Autocad 2014 Tutorial”, 2014.
2004. والبرمجة، التعريب مركز ، للعلوم العربية الدار " AutoCAD2004" اومورا جورج [21]
الدار العربية للعلوم ، مركز –المرجع السريع AutoCAD2000 - الوريك تروبور و اوموورا جوورج [21]
1222التعريب والبرمجة
( Received 29 August 2015; accepted 15 September 2015 )