competition open-mouth deer - taxidermy arts · page 74 breakthrough issue 65 competition...
TRANSCRIPT

Page 74 BREAKTHROUGH Issue 65
CompetitionOpen-Mouth DeerPart 4 of a Four-Part Series:Tongue molding and finishing
by Dan RinehartWith Paul Cales
Paul Cales won Best in World Whitetail Deer with this mount at the
1997 World Taxidermy Championships®.

BREAKTHROUGH Issue 65 Page 75
WELCOME BACK to the final article on competitionopen-mouth whitetail instruction. In the last three ar-ticles, we cast and placed the upper and lower palates.We are now ready to perform finishing work on the
palates, mold position the tongue, and paint the mouth interior. We areon the final stretch so let’s get to it!
1. All the hair-like papillae along the inside interior of the mouth mustbe rebuilt. To start the process of rebuilding the papillae, we roll tiny ballsof Apoxie Sculpt. There are many papillae that need to be rebuilt, so rolla bunch of the Apoxie balls.2. Here you can see just how small these balls are. The Apoxie balls mustbe very small due to the fact that the papillae are very thin and narrow. Ac-tually, this one Apoxie ball will maketwo papillae.3. The hair-like papillae are thinwith a finely tapered edge. Moistenyour hands with water and roll theApoxie ball against the palm of yourhand. The result is an Apoxie coilthat is thinly tapered on both ends.By cutting this coil in half we createtwo identical hair-like papillae.
4. Here I have cut the coil in half and created two identical papillae readyfor placement.5. Each papillae is very delicate and should not be touched with yourhands. Instead, use a pin to pick up, hold, and place each papillae.
6. When placing the papillae, start at the back edge of the papillae area.
Once the first row of papillae is secured, secure the next papillae overlap-ping the first. Sculpture the papillae to flow together and be sure that thethin “hair-like” edge flows towards the back-interior of the mouth.
7. Here you can see one side completely layered with papillae and the sec-ond side being started. Complete the second side in the same manner asthe first and let the Apoxie cure. The interior mouth sculpting is nowcompleted and we can begin molding the tongue.
8. The first step in moldingthe tongue is to skin thetongue. This photo shows thetongue skinned and ready forwashing. To prepare thetongue, skin and remove theinside muscle of the tonguein the same way that youwould remove a sock. It is adelicate procedure, but sim-ple use a scalpel to separatethe outer skin of the tongue
from the inner muscle. Separate the tongue skin and muscle all the wayaround the tongue until you can begin rolling the skin off the muscle, to-wards the tip. You usually work in half-inch increments, separating andthen rolling the skin from the interior muscle. The result will be an in-verted tongue skin ready for fleshing.
9. Use a scalpel to fleshand thin the tongue.Don’t go crazy and fleshthe tongue to the pointwhere you start cuttingholes. In this situation, itis better to leave thetongue skin a little thickthan it is to make it ul-trathin and start cuttingholes.
10. Wash the tongue in cold water and Dawn dishwashing liquid. Thisremoves the dirt, oils, and surface materials.
WHITETAIL TAXIDERMY
1 2
3
4 5
6
7
8
9
10

Page 76 BREAKTHROUGH Issue 65
WHITETAIL TAXIDERMY
11. Once thoroughly washed, use a towel to dry the inner and outertongue skin.
12. We will use Apoxie to fill the tongue and hold the tongue in positionfor molding. Apoxie Sculpt is the perfect material to use for filling and po-sitioning the tongue due to the fact that it has zero shrinkage and excel-lent sculpting qualities. Mix the Apoxie 50:50 using water as a mixing lu-bricant.
13. Once the Apoxie is mixed,form the Apoxie into the shape of atongue.14. Rub a thin layer of water overthe Apoxie Sculpt and begin slidingthe tongue skin over the Apoxie. In-sert the Apoxie inch-by-inch untilit is fully inserted to the tip of thetongue. Sometimes there will bewater and air trapped in the tip of
the tongue. To remove any trapped air and water, simply use a pin to poplittle holes in the tip of the tongue. Both the air and water can then escapethrough these release holes. Once the tongue is completely filled with Apoxie, we need to place thetongue on the lower jaw and begin moving the tongue into any positionthat we desire in preparation for molding.
15. Lay a piece of plastic over the lower jaw. This plastic will act as a re-lease material between the tongue and lower jaw.16. Place the tongue in position over the lower jaw and begin formingand sculpting the tongue with the desired action.
17. This is the time to use paintbrushes or sculpting tools to formand position the tongue in anyshape you desire. Notice how thetongue automatically begins form-ing to the shape of the lower jaw andlip line. Since the Apoxie Sculpt isstill moveable, the tongue is able toconform to any dip or bump alongthe lower jaw and lip line. The resultis a perfect fit!18. Once the tongue has been po-sitioned along the lower jaw, weneed to place the lower jaw against
the upper palate. Since the Apoxie sculpt is still pliable, the upper surface
11
12
13
14
15 16
17
18
BREAKTHROUGH Issue 65 Page 77
of the tongue will form perfectly to the contours of the upper palate.Again, a perfect fit is created with the tongue and mouth interior flowingtogether naturally.
19. Secure the lower jaw to the upper jaw with pins.
20. Wrap a plastic bag around the head, sealing the tongue from air asmuch as possible. Air movement along the tongue can cause the tongueto dry and shrink. Such shrinkage would cause the surface of the tongueto distort and move. Drying and shrinkage is eliminated by sealing the en-tire head with a plastic bag while the Apoxie cures.
21. Begin molding as soon as the Apoxie cures.We will be securing the back of the tongue tothe damning material. Therefore, we need to drilla pilot hole through the tongue (starting at theback) for a securing screw.
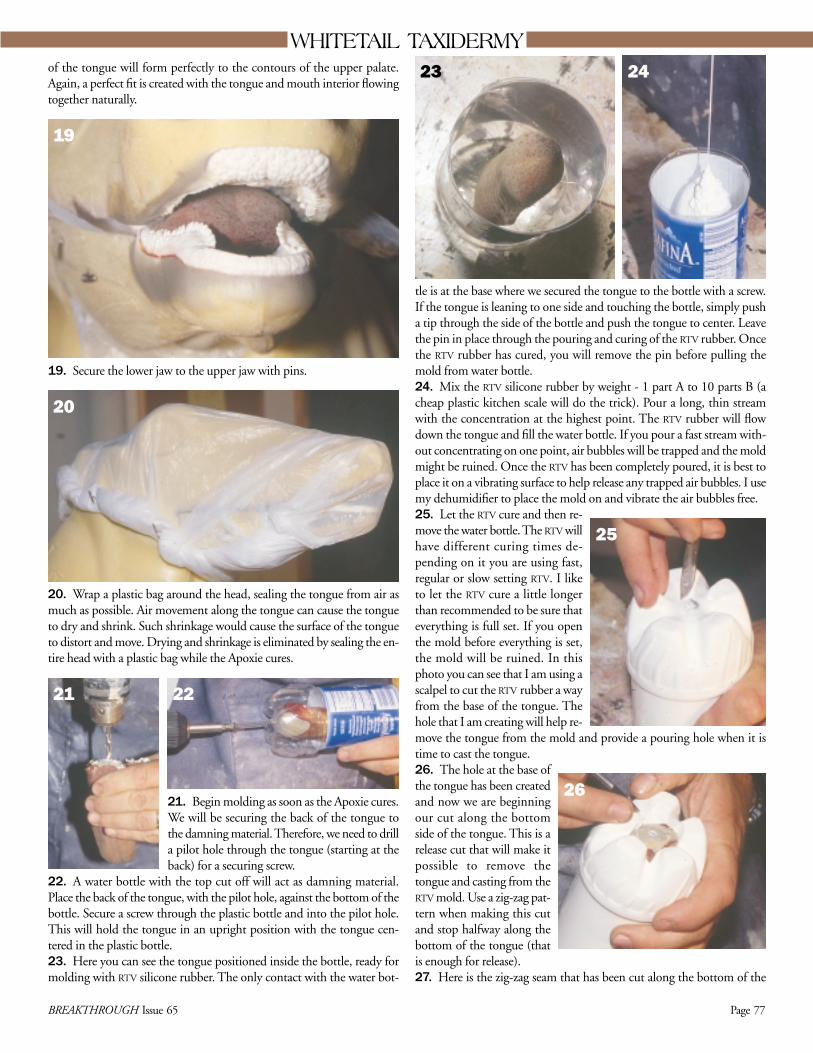
22. A water bottle with the top cut off will act as damning material.Place the back of the tongue, with the pilot hole, against the bottom of thebottle. Secure a screw through the plastic bottle and into the pilot hole.This will hold the tongue in an upright position with the tongue cen-tered in the plastic bottle.23. Here you can see the tongue positioned inside the bottle, ready formolding with RTV silicone rubber. The only contact with the water bot-
tle is at the base where we secured the tongue to the bottle with a screw.If the tongue is leaning to one side and touching the bottle, simply pusha tip through the side of the bottle and push the tongue to center. Leavethe pin in place through the pouring and curing of the RTV rubber. Oncethe RTV rubber has cured, you will remove the pin before pulling themold from water bottle.24. Mix the RTV silicone rubber by weight - 1 part A to 10 parts B (acheap plastic kitchen scale will do the trick). Pour a long, thin streamwith the concentration at the highest point. The RTV rubber will flowdown the tongue and fill the water bottle. If you pour a fast stream with-out concentrating on one point, air bubbles will be trapped and the moldmight be ruined. Once the RTV has been completely poured, it is best toplace it on a vibrating surface to help release any trapped air bubbles. I usemy dehumidifier to place the mold on and vibrate the air bubbles free.25. Let the RTV cure and then re-move the water bottle. The RTV willhave different curing times de-pending on it you are using fast,regular or slow setting RTV. I liketo let the RTV cure a little longerthan recommended to be sure thateverything is full set. If you openthe mold before everything is set,the mold will be ruined. In thisphoto you can see that I am using ascalpel to cut the RTV rubber a wayfrom the base of the tongue. Thehole that I am creating will help re-move the tongue from the mold and provide a pouring hole when it istime to cast the tongue.26. The hole at the base ofthe tongue has been createdand now we are beginningour cut along the bottomside of the tongue. This is arelease cut that will make itpossible to remove thetongue and casting from theRTV mold. Use a zig-zag pat-tern when making this cutand stop halfway along thebottom of the tongue (thatis enough for release).27. Here is the zig-zag seam that has been cut along the bottom of the
WHITETAIL TAXIDERMY
19
20
21 22
26
23 24
25

Page 78 BREAKTHROUGH Issue 65
WHITETAIL TAXIDERMYtongue. The zig-zag seam as-sures perfect alignment whenthe two sides are secured to-gether in preparation for mold-ing.28. We have sprayed somePolyteck silicon release into theRTV mold and are now ready topour the casting material,Easyflo 60 Liquid Plastic fromPolyteck. But first, the mold issecured with small pins.
29. Mix the Easyflo Liquid Plastic by vol-ume, 1 part A to 1 part B. Notice that theliquid plastic has a reddish, fleshy tone.This tone was created when Paul added alittle red paint pigment to the liquid plas-tic. Only a couple drops of paint pigmentare needed to create a light fleshy tint.Once the liquid plastic has cured, the pig-ment creates a natural fleshy colorationthat is easy and forgiving to blend with
other colors. You can get this paint pigment at a local paint store. Once theliquid plastic is mixed, pour it into the mold and let cure.30. The liquid plastic has cured and here is the finished tongue. Theflash from the camera lightened the color of the tongue to the point where
the pink tint is not visible in this photo. Nevertheless, the pigment has cre-ated a nice base color.
31. Coloration is the final step in completing the interior mouth work.The mouth interior must be fully colored prior to placing the tongue andsecuring the lower jaw. Prior to painting the palates and tongue, we needto protect the teeth using Gary Bowen’s Eye Protect. This liquid is paint-ed over the teeth, then solidifies and is peeled off after the palates have beenpainted. The Eye Protect is a masking material that keeps certain areas freefrom paint. In this case, the teeth are being protected. Use the Eye Protecton the lower jaw teeth as well.
32. Here is the upper palate prior to painting. The Eye Protect has driedon the teeth and we are ready for painting.33. A general base coat is applied to the entire surface of the upper palate,papilla and lip-line. In this instance we are using a natural flesh color.
Before we go any farther, I want to make an important point: interi-or mouth colorations change drastically from deer to deer. Obviously,colors such as neon orange are not possibility, however; a variety of colors(purples, flesh, brown, black, etc.) can be used together in many differentcombinations. The best advice I can give you is to study mouth col-orations of a variety of different deer and develop the coloration you like.34. Light and dark splotches are a common coloration characteristic onthe upper palate of a whitetail deer. To re-create them, we cut out indi-vidual templates that will be placed against the palate and act as a mask tocreate an airbrushed splotch. Here Paul is creating a template for a splotch.
27
28
29
30
31
32 33
Continued on page 79.

35. Place the template where you want the splotch and airbrush the areawith the desired color.
36. Notice that we have created a splotch on the back and midsection ofthe palate. Splotches can be in almost any combination of shapes, sizes,and quantities. In this case, the splotch color that we are using is LifetoneOff White with a hint of Deep Violet added. This creates a lighter splotchwhich we will surround with a darker color.37. To finish the upper palate, we mixed a color of approximately sixparts Lifetone Deep Violet to one part Jet Black. Once that color mix iscomplete, thin the entire mixture 50:50 with lacquer thinner. Use an air-brush to apply this color around the splotches and throughout the upperpalate. Now is the time to color the bottom jaw as you desire.38. Here we have it! The mouth completely finished and ready formounting. Everything inside the mouth was originally positioned, cast,and colored. The exceptional casting and molding material available todaymake lifelike details possible in an originally cast open-mouth whitetail.Yes, you can save a lot of work by just buying a premade interior mouth,however, by mastering molding and casting techniques, you can create life-like detail that will impress even the most critical judge. Also, moldingyour own mouth work enables you to re-create any expression and actionyou desire. The possibilities for realism become endless! At this point,
34 35
36 37
you can become a master of your work and create truly artistic pieces!I hope you have enjoyed this four-part series on
the techniques and procedures for creating interiormouth detail of a whitetail deer. Paul and I havetried to be as thorough as possible in helping youunderstand and master molding and casting tech-niques. To help you gain an even better under-standing of the processes we have discussed, Paul
and I have produced a two-video program demonstrating and describingall the intricate details shown in this series. This video program is profes-sionally recorded, edited and reproduced for the most understandableinstruction. The two-video set is available for $29.95 and includes threehours of intense instruction. Only a subscription to BREAKTHROUGH
matches that kind of value! You can order your own copy of this video se-ries by calling Whitetail Specialists at 1-800-378-4763 and asking forvideo #25011: World Champion Whitetail Mouth Casting.
Thanks for taking the time to read our articles and I hope your taxi-dermy is better for it. See you soon in another issue! ■
PAUL CALES (left)won Best in WorldWhitetail Deer at the1997 World Taxi-dermy Champi-onships®.DAN RINEHART(right) sculpts forWhitetail Specialists,a two-year old taxi-dermy supply compa-ny in Janesville, Wisconsin. He offers weekend training courses and a whole-sale fish service. Contact him at 1-800-FOR-DEER.
38
WHITETAIL TAXIDERMY