computerized sewing and embroidery machine...
TRANSCRIPT

Instruction Manual
Computerized Sewing and Embroidery Machine


1
When using an electrical appliance, basic safety should always be followed,including the following:
Read all instructions before using this sewing machine.
1. An appliance should never be left unattended when plugged in.
2. Always unplug this appliance from the electric outlet immediately after using andbefore cleaning.
3. The sewing machine is equipped with a LED lamp. If the LED lamp is broken, itmust be replaced by the manufacturer or its service agent in order to avoid ahazard.
DANGER
WARNING
-
-
To reduce the risk of electric shock:
To reduce the risk of burns, fire, electric shock, or injury to
persons:
1. Read the instruction carefully before you use the machine.
2. Keep the instructions at a suitable place close to the machine and hand it over ifyou give the machine to a third party.
3. Use the machine only in dry locations.
4. Never leave the machine unattended with children or elderly people due to theymay not be able to estimate the risk.
5. Don't let children play with the machine.
6. This appliance can be used by children aged from 8 years and above andpersons with reduced physical, sensory or mental capabilities or lack ofexperience and knowledge if they have been given supervision or instructionconcerning use of the appliance in a safe way and understand the hazardsinvolved.
7. Children shall not play with the appliance.
8. Cleaning and user maintenance shall not be made by children withoutsupervision.
9. Always switch off the machine if you carry out preparation for work (change theneedle, feed the yarn thru the machine.
10. Always unplug the machine if you leave it unattended, to avoid injury byexpediently switch on the machine.
11. Always unplug the machine if you changing the lamp or carry out maintenance(oiling, cleaning).
12. Don't use the machine if it's wet or in humid environment.
13. Never pull at the cord, always unplug the machine by gripping the plug.
Important safety instructions
2
14. Never place anything on the pedal.
15. Never use the machine if the air vents are blocked keep the air vents of themachine and the food pedal free from dust, fusel and leftovers.
16. The machine may only be used with foot pedal type
17. If the supply cord connected with foot pedal is damaged, it must be replaced bythe manufacturer or its service agent or a similarly qualified person, in order toavoid a hazard.
18. The sound pressure level at normal operation is smaller than 75dB(A).
19. Do not dispose of electrical appliances as unsorted municipal waste, useseparate collection facilities.
20. Contact your local government for information regarding the collection systemsavailable.
21. If electrical appliances are disposed of in landfills or dumps, hazardoussubstances can leak into the groundwater and get into the food chain, damagingyour health and well-being.
22. When replacing old appliances with new ones, the retailer is legally obligated totake back your old appliance for disposal at least for free of charge.
C-9000.
SAVE THESE INSTRUCTIONSThis sewing machine is intended for household use only.
3
GETTING READY TO SEW
SEWING BASICS
Contents
Principal parts of the machine ...............................................................................................................6Accessories ...........................................................................................................................................7
Connecting the machine........................................................................................................................8
Winding the bobbin...........................................................................................................................9-10
Inserting the bobbin .............................................................................................................................11
Threading the upper thread............................................................................................................12-13
Using the needle threader ...................................................................................................................14
Replacing the needle...........................................................................................................................16
Matching needle/ fabric/ thread ...........................................................................................................17
Changing the presser foot ...................................................................................................................18
Type of presser foot chart ....................................................................................................................19
Two-step presser foot lifter ..................................................................................................................20
To raise or drop the feed dogs.............................................................................................................20
mbroidery
Normal mode ..................................................................................................................................................21
mode.................................................................................................................................................22
E mode..........................................................................................................................................23
Using the net .......................................................................................................................................15
Adjusting presser foot pressure...........................................................................................................16
Information on the LCD Display .....................................................................................................21-24
Buttons of the machine........................................................................................................................25
Operation buttons...........................................................................................................................26-27
Function buttons.............................................................................................................................28-31
Memory
Pattern chart ...................................................................................................................................32-33
Selecting stitch ...............................................................................................................................37-38
Thread tension.....................................................................................................................................34
Useful skills.....................................................................................................................................35-36
Straight stitches and needle position...................................................................................................39
Zigzag stitches.....................................................................................................................................39
Stretch stitch........................................................................................................................................40
Overcasting stitches ............................................................................................................................41
Reverse ..........................................................................................................................................................35
Free arm .........................................................................................................................................................35
Sewing corners ...............................................................................................................................................35
Cutting the thread ...........................................................................................................................................36
Sewing on the heavy fabric.............................................................................................................................36
Using the overcasting foot ..............................................................................................................................41
Using the all purpose foot ...............................................................................................................................41
4
ORDINARY SEWING
Blind hem/ lingerie stitch......................................................................................................................42
Buttonhole stitch.............................................................................................................................43-46
Darning stitch .................................................................................................................................50-51
Zipper insertion...............................................................................................................................52-53
Narrow hemming .................................................................................................................................54
Cording ................................................................................................................................................55
Satin stitch sewing...............................................................................................................................56
Gathering.............................................................................................................................................57
Smocking.............................................................................................................................................58
Free motion darning, embroidery and monogramming ..................................................................59-60
Quilting ...........................................................................................................................................61-62
Fagoting...............................................................................................................................................62
Scallop stitch .......................................................................................................................................63
Walking foot .........................................................................................................................................64
Mirror ...................................................................................................................................................65
Memory...........................................................................................................................................69-73
Making a buttonhole on stretch fabrics ...........................................................................................................46
inserting a centered zipper .............................................................................................................................52
Inserting a side zipper.....................................................................................................................................53
Single cording .................................................................................................................................................55
Triple cording ..................................................................................................................................................55
Darning ...........................................................................................................................................................59
Embroidery .....................................................................................................................................................60
Monogramming...............................................................................................................................................60
Attaching the edge/ quilting guide...................................................................................................................61
Joining the pieces of the fabric .......................................................................................................................61
Patchwork stitching.........................................................................................................................................62
Scallop hem ....................................................................................................................................................63
Scallop edging ................................................................................................................................................63
Combining patterns.........................................................................................................................................69
Editing patterns...............................................................................................................................................71
Clearing patterns ............................................................................................................................................72
Adding patterns...............................................................................................................................................72
Recalling and sewing the memorized pattern.................................................................................................73
Bar tack stitch ......................................................................................................................................47
Eyelet Stitch.........................................................................................................................................48
Button sewing ......................................................................................................................................49
Patchwork stich ...................................................................................................................................62
Elongation............................................................................................................................................66
Using the twin needle .....................................................................................................................67-68
5
APPENDIX
EMBROIDERY
Warning functions.......................................................................................................................101-105
Maintenance...............................................................................................................................107-108
................................................................................................................109-111
Warning message.........................................................................................................................................101
Warning sound..............................................................................................................................................105
Cleaning the screen......................................................................................................................................107
Cleaning the sewing machine surface ..........................................................................................................107
Cleaning the hook.........................................................................................................................................107
Buzzer sound.....................................................................................................................................106
Trouble shooting guide
Important Embroidery information .......................................................................................................74
Attaching the embroidery foot..............................................................................................................77
Embroidery unit overview ...............................................................................................................78-80
Embroidery hoop overview.............................................................................................................81-84
Embroidery design types .....................................................................................................................85
Built-in embroidery pattern ..................................................................................................................86
Built-in embroidery letter ................................................................................................................87-88
Designs from USB..........................................................................................................................89-91
Starting to sew embroidery.............................................................................................................92-93
Editing the embroidery design........................................................................................................94-98
Load a Design after interruption ...................................................................................................99-100
Embroidery threads ........................................................................................................................................74
Lower threads .................................................................................................................................................74
Stabilizer .........................................................................................................................................................75
Adhesive Spray...............................................................................................................................................75
Iron-on interfacing...........................................................................................................................................76
Connecting the embroidery unit......................................................................................................................79
Removing the embroidery unit........................................................................................................................80
Attaching a stabilizer to the fabric...................................................................................................................81
Hopping the fabric...........................................................................................................................................82
Using embroidery sheet..................................................................................................................................83
Attaching the embroidery hoop.......................................................................................................................84
Removing the embroidery hoop......................................................................................................................84
Basic setting ...................................................................................................................................................94
Advanced setting ............................................................................................................................................97
GETTING READY TO SEW
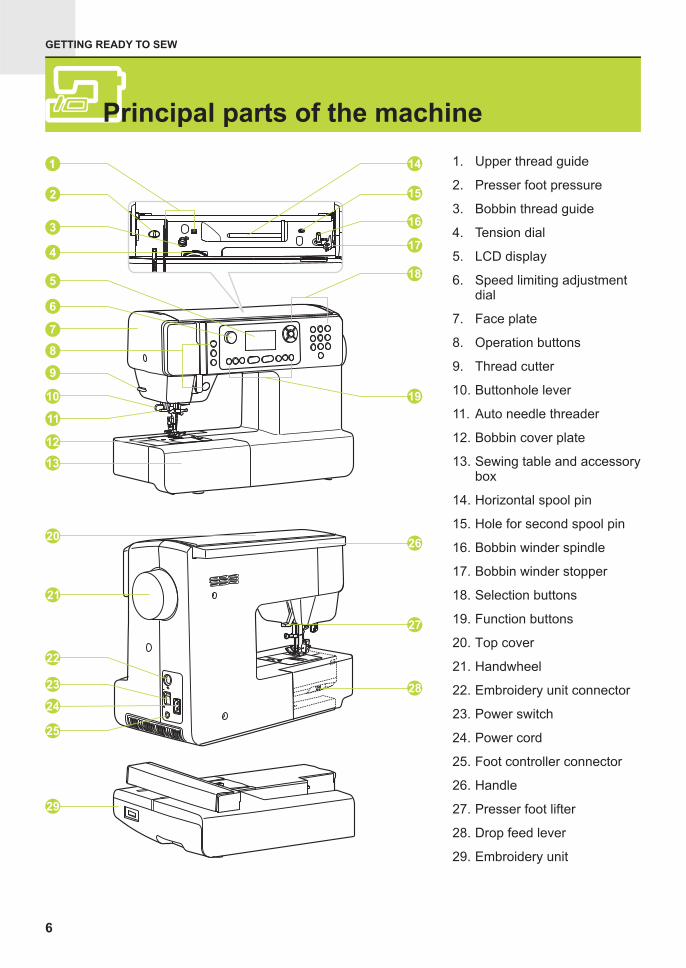
Principal parts of the machine
1. Upper thread guide
2. Presser foot pressure
3. Bobbin thread guide
4. Tension dial
5. LCD display
6. Speed limiting adjustmentdial
7. Face plate
8. Operation buttons
9. Thread cutter
10. Buttonhole lever
11. Auto needle threader
12. Bobbin cover plate
13. Sewing table and accessorybox
14. Horizontal spool pin
15. Hole for second spool pin
16. Bobbin winder spindle
17. Bobbin winder stopper
18. Selection buttons
19. Function buttons
20. Top cover
21. Handwheel
22. Embroidery unit connector
23. Power switch
24. Power cord
25. Foot controller connector
26. Handle
27. Presser foot lifter
28. Drop feed lever
29. Embroidery unit
6
GETTING READY TO SEW
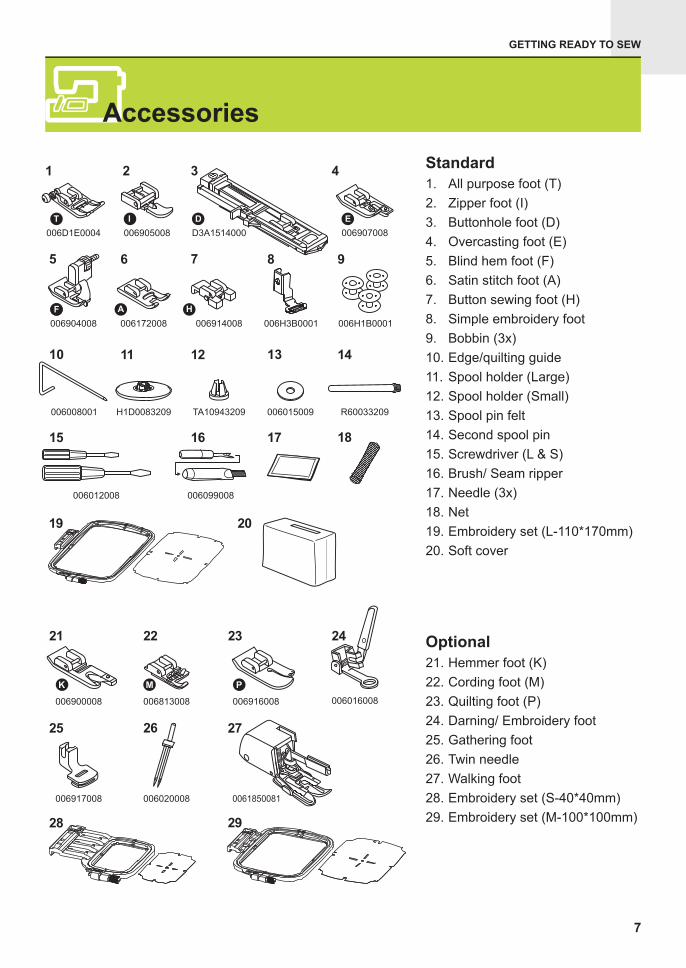
Standard
Optional
1. All purpose foot (T)
2. Zipper foot (I)
3. Buttonhole foot (D)
4. Overcasting foot (E)
5. Blind hem foot (F)
6. Satin stitch foot (A)
7. Button sewing foot (H)
8.
9. Bobbin (3x)
10.
11. Spool holder (Large)
12. Spool holder (Small)
13. Spool pin felt
14. Second spool pin
15. Screwdriver (L & S)
16. Brush/ Seam ripper
17. Needle (3x)
18. Net
19.
20.
21. Hemmer foot (K)
22. Cording foot (M)
23. Quilting foot (P)
24. Darning/ Embroidery foot
25. Gathering foot
26. Twin needle
27. Walking foot
28.
29.
Simple embroidery foot
Embroidery set (L-110*170mm)
Soft cover
Embroidery set (M-100*100mm)
Edge/quilting guide
Embroidery set (S-40*40mm)
006900008
21
006813008
22
006916008
23
006016008
006917008
25
0061850081
26 27
006020008
1 2 3
006905008 006907008D3A1514000
4
10
H1D0083209
11
TA10943209 006015009
1312
R60033209
14
5
006904008
7
006914008
8 9
006008001
6
006172008 006H1B0001
006012008
1615
006099008
006H3B0001
17 18
19 20
28 29
Accessories
7
24
006D1E0004
GETTING READY TO SEW
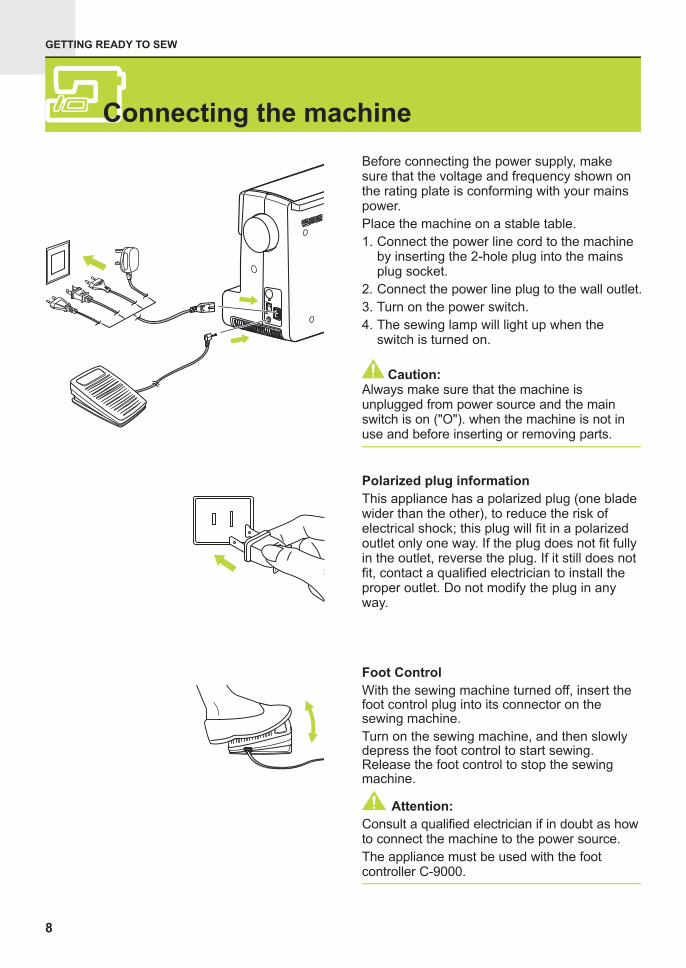
Before connecting the power supply, makesure that the voltage and frequency shown
Place the machine on a stable table.
1. Connect the power line cord to the machineby inserting the 2-hole plug into the
2. Connect the power line plug to the wall outlet.
3. Turn on the power switch.
4. The sewing lamp will light up when theswitch is turned on.
onthe rating plate is conforming with your mainspower.
mainsplug socket.
Caution:Always make sure that the machine isunplugged from power source and the mainswitch is on ("O"). when the machine is not inuse and before inserting or removing parts.
Polarized plug information
This appliance has a polarized plug (one bladewider than the other), to reduce the risk ofelectrical shock; this plug will fit in a polarizedoutlet only one way. If the plug does not fit fullyin the outlet, reverse the plug. If it still does notfit, contact a qualified electrician to install theproper outlet. Do not modify the plug in anyway.
Foot Control
With the sewing machine turned off, insert thefoot control plug into its connector on thesewing machine.
Turn on the sewing machine, and then slowlydepress the foot control to start sewing.Release the foot control to stop the sewingmachine.
Attention:
Consult a qualified electrician if in doubt as howto connect the machine to the power source.
The appliance must be used with the footcontroller C-9000.
Connecting the machine
8
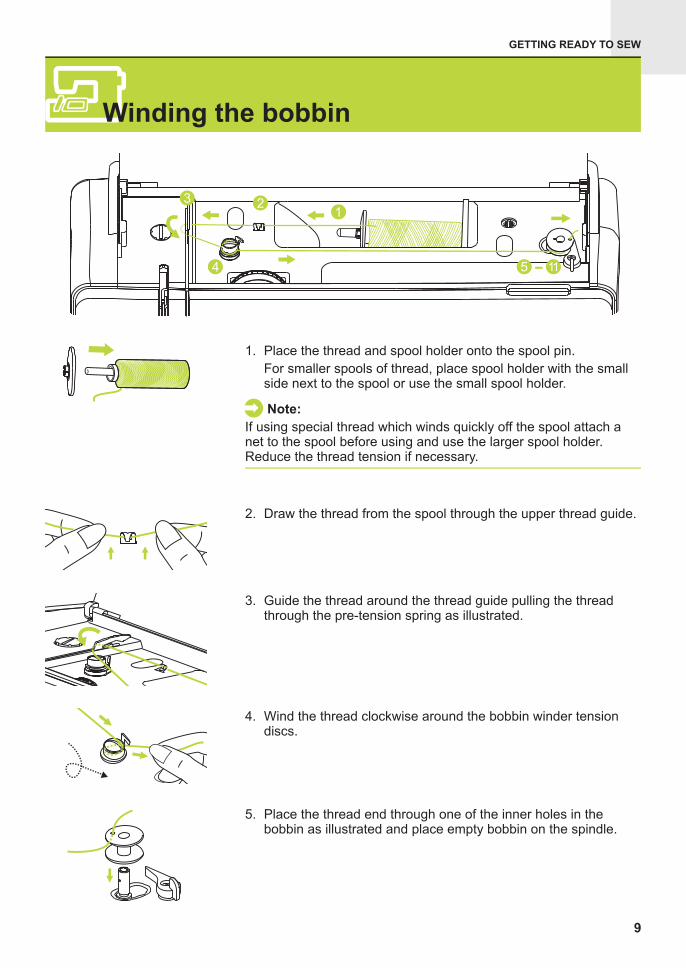
If using special thread which winds quickly off the spool attach anet to the spool before using and use the larger spool holder.Reduce the thread tension if necessary.
Note:
GETTING READY TO SEW
1. Place the thread and spool holder onto the spool pin.
For smaller spools of thread, place spool holder with the smallside next to the spool or use the small spool holder.
4. Wind the thread clockwise around the bobbin winder tensiondiscs.
5. Place the thread end through one of the inner holes in thebobbin as illustrated and place empty bobbin on the spindle.
Winding the bobbin
9
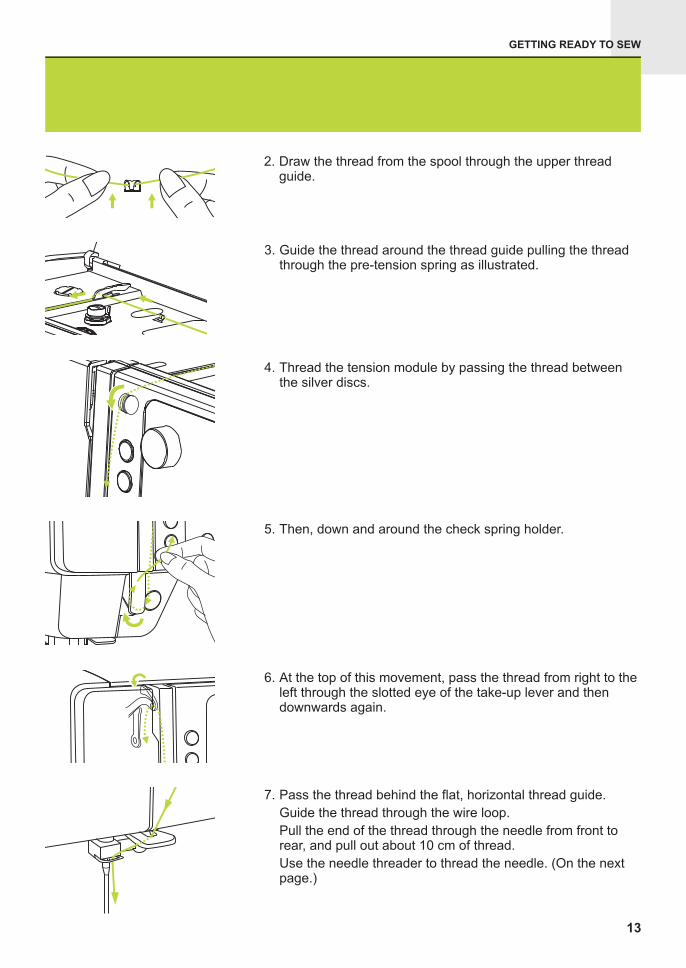
2. Draw the thread from the spool through the upper thread guide.
3. Guide the thread around the thread guide pulling the threadthrough the pre-tension spring as illustrated.
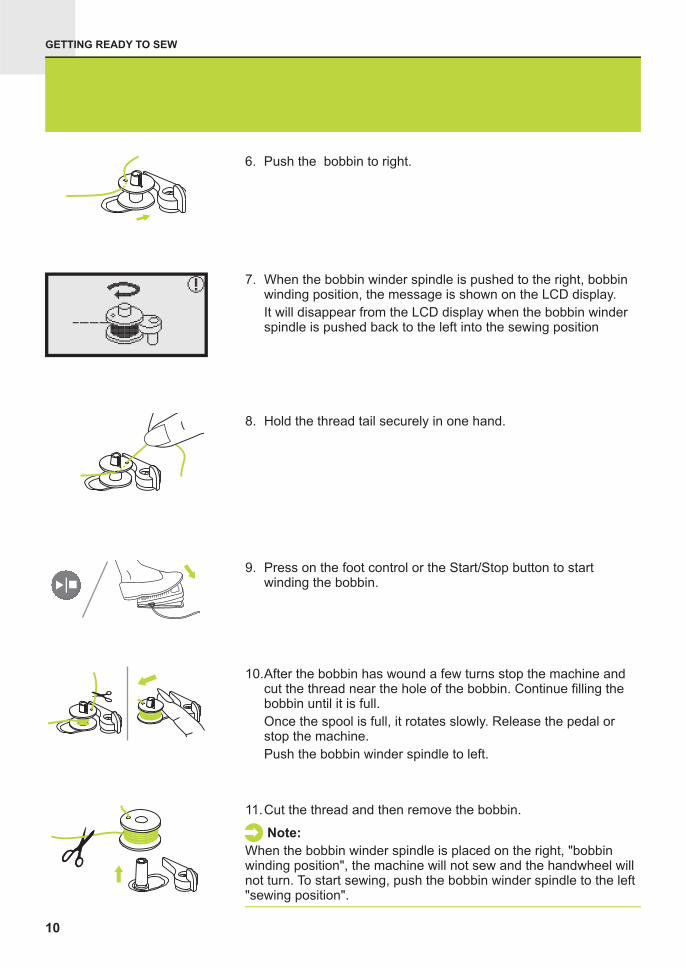
6. Push the bobbin to right.
GETTING READY TO SEW
10.After the bobbin has wound a few turns stop the machine andcut the thread near the hole of the bobbin. Continue filling thebobbin until it is full.
Once the spool is full, it rotates slowly. Release the pedal orstop the machine.
Push the bobbin winder spindle to left.
11.Cut the thread and then remove the bobbin.
Note:
When the bobbin winder is placed on the right, "bobbinwinding position", the machine will not sew and the handwheel willnot turn. To start sewing, push the bobbin winder spindle to the left"sewing position".
spindle
8. Hold the thread tail securely in one hand.
9. Press on the foot control or the Start/Stop button to startwinding the bobbin.
7. When the bobbin winder spindle is pushed to the right, bobbinwinding position, the message is shown on the LCD display.
It will disappear from the LCD display when the bobbin winderspindle is pushed back to the left into the sewing position
10
GETTING READY TO SEW
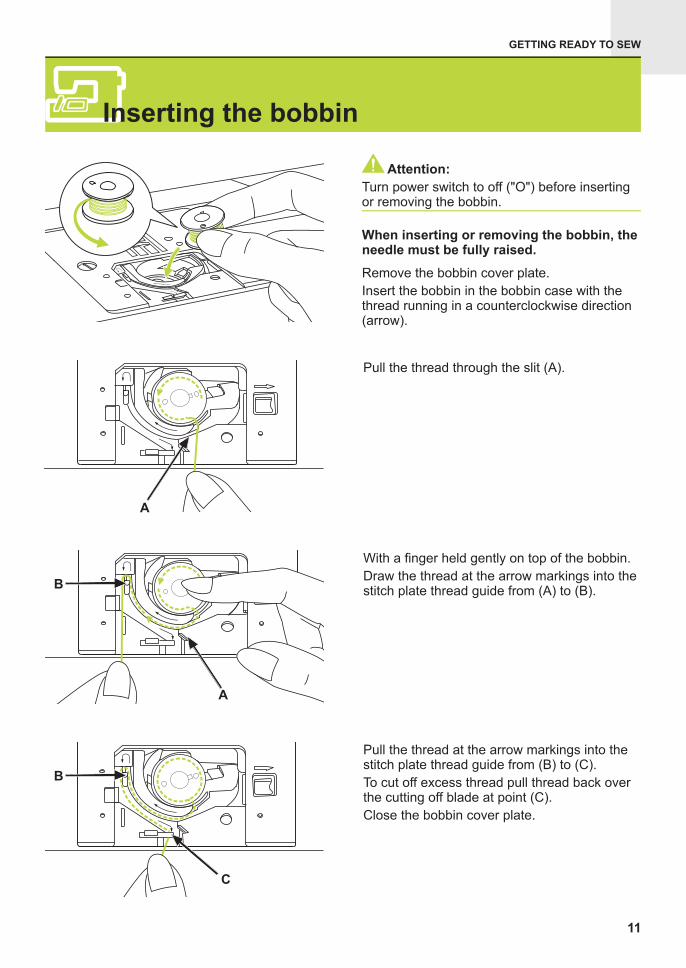
A
Pull the thread through the slit (A).
Attention:
Turn power switch to off ("O") before insertingor removing the bobbin.
When inserting or removing the bobbin, theneedle must be fully raised.
Remove the bobbin cover plate.
Insert the bobbin in the bobbin case with thethread running in a counterclockwise direction(arrow).
With a finger held gently on top of the bobbin.
the thread at the arrow markings into thestitch plate thread guide from (A) to (B)Draw
.
Pull the thread at the arrow markings into thestitch plate thread guide from (B) to (C).
To cut off excess thread pull thread back overthe cutting off blade at point (C).
Close the bobbin cover plate.
A
B
C
B
Inserting the bobbin
11
GETTING READY TO SEW
Threading the upper thread
12
Please Note:
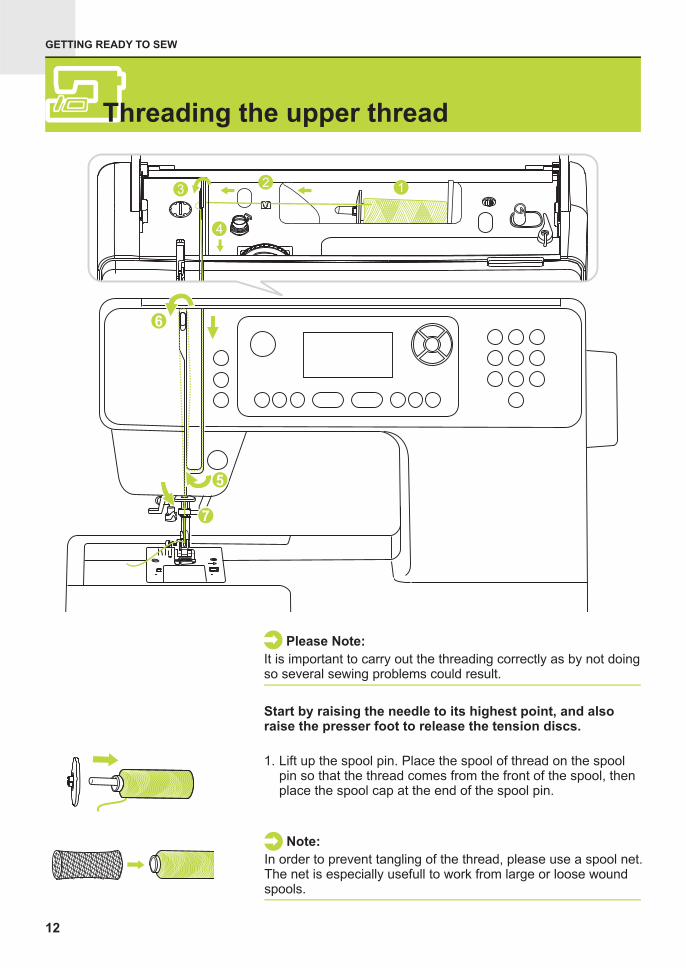
It is important to carry out the threading correctly as by not doingso several sewing problems could result.
Start by raising the needle to its highest point, and alsoraise the presser foot to release the tension discs.
1. Lift up the spool pin. Place the spool of thread on the spoolpin so that the thread comes from the front of the spool, thenplace the spool cap at the end of the spool pin.
Note:
In order to prevent tangling of the thread, please use a spool net.The net is especially usefull to work from large or loose woundspools.
GETTING READY TO SEW
13
5. Then, down and around the check spring holder.
6. At the top of this movement, pass the thread from right to theleft through the slotted eye of the take-up lever and thendownwards again.
7.
Guide the thread through the wire loop.
Pull the end of the thread through the needle from front torear, and pull out about 10 cm of thread.
Use the needle threader to thread the needle. (On the nextpage.)
Pass the thread behind the flat, horizontal thread guide.
4. Thread the tension module by passing the thread betweenthe silver discs.
3. Guide the thread around the thread guide pulling the threadthrough the pre-tension spring as illustrated.
2. Draw the thread from the spool through the upper threadguide.

GETTING READY TO SEW
The needle threader automatically turns to thethreading position and the hook pin passesthrough the needle eye.
Take the thread in front of the needle.
Hold the thread loosely and release the leverslowly. The hook will turn and pass the threadthrough the needle eye forming a loop.
Pull the thread through the needle eye.
Raise the needle to its highest position andlower the presser foot.
Lower the needle threader lever slowly anddraw the thread through the thread guide asillustrated and then to the right.
Attention:Turn power switch to the off position ("O").
Using the needle threader
14
GETTING READY TO SEW
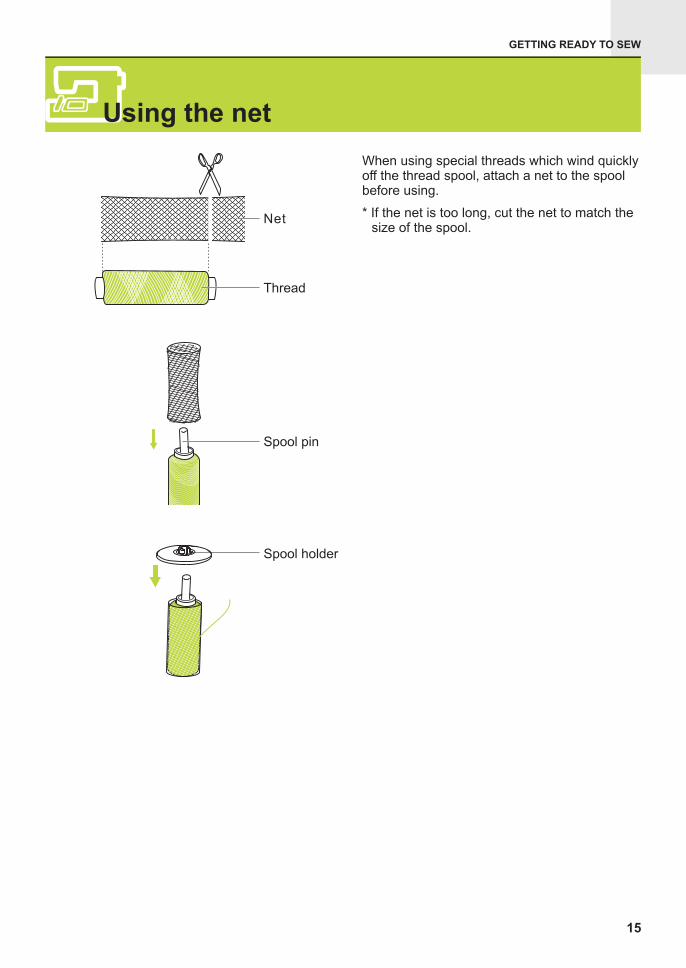
When using special threads which wind quicklyoff the thread spool, attach a net to the spoolbefore using.
* ut the net to match thesize of the spool.If the net is too long, c
Thread
Spool pin
Spool holder
Net
Using the net
15
GETTING READY TO SEW
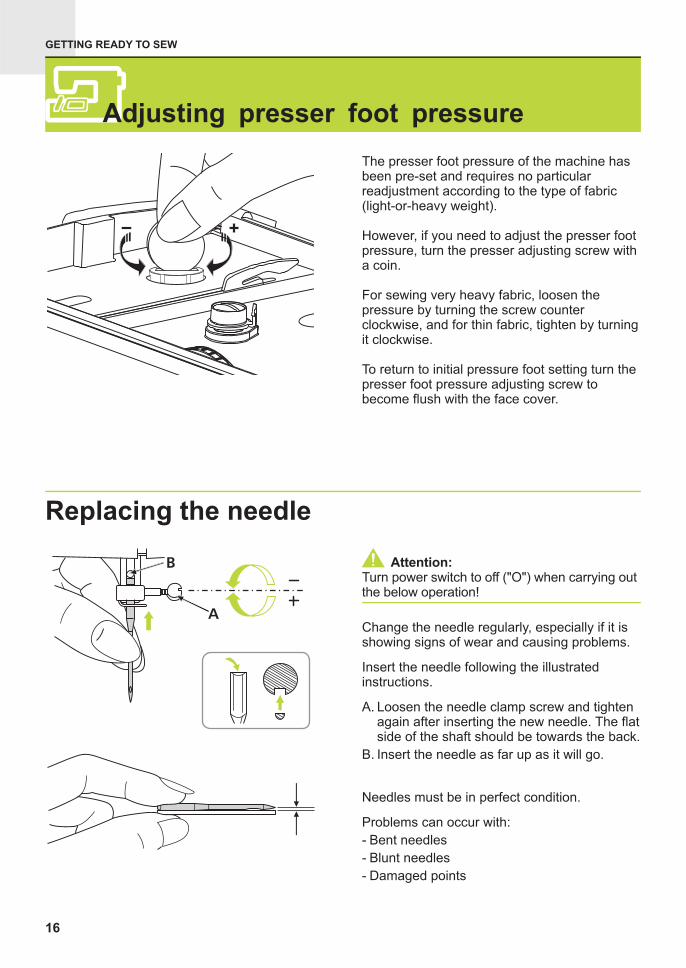
Change the needle regularly, especially if it isshowing signs of wear and causing problems.
Insert the needle following the illustratedinstructions.
A. Loosen the needle clamp screw and tightenagain after inserting the new needle. The flatside of the shaft should be towards the back.
B. Insert the needle as far up as it will go.
Needles must be in perfect condition.
Problems can occur with:
- Bent needles
- Blunt needles
- Damaged points
A
B Attention:Turn power switch to off ("O") when carrying outthe below operation!
16
Replacing the needle
The presser foot pressure of the machine hasbeen pre-set and requires no particularreadjustment according to the type of fabric(light-or-heavy weight).
However, if you need to adjust the presser footpressure, turn the presser adjusting screw witha coin.
For sewing very heavy fabric, loosen thepressure by turning the screw counterclockwise, and for thin fabric, tighten by turningit clockwise.
To return to initial pressure foot setting turn thepresser foot pressure adjusting screw tobecome flush with the face cover.
Adjusting presser foot pressure
GETTING READY TO SEW
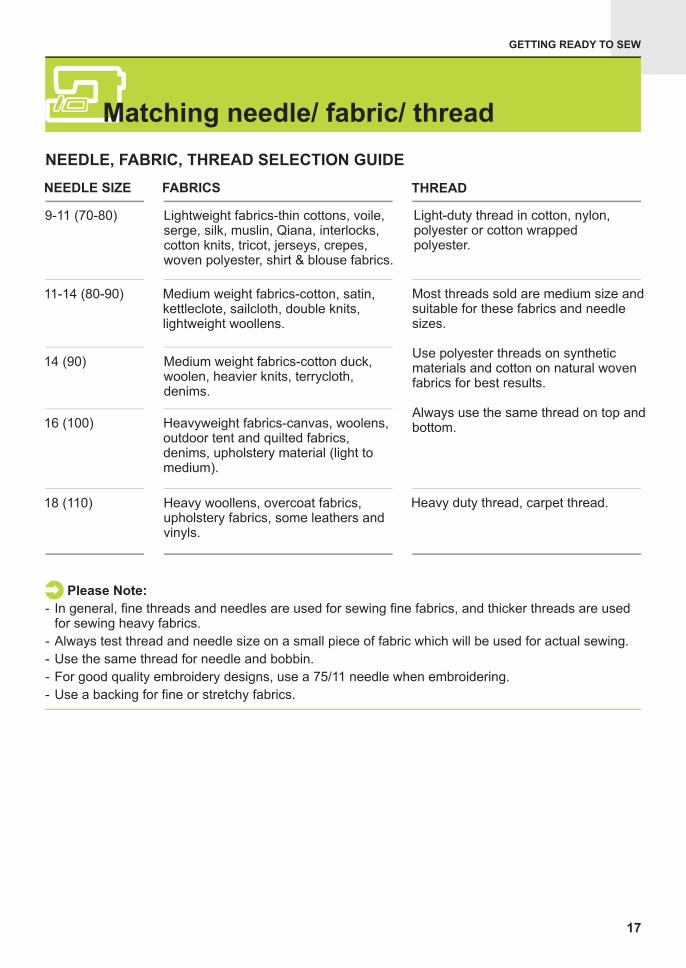
Heavy duty thread, carpet thread.
16 (100)
NEEDLE, FABRIC, THREAD SELECTION GUIDE
11-14 (80-90) Medium weight fabrics-cotton, satin,kettleclote, sailcloth, double knits,lightweight woollens.
Medium weight fabrics-cotton duck,woolen, heavier knits, terrycloth,denims.
Heavyweight fabrics-canvas, woolens,outdoor tent and quilted fabrics,denims, upholstery material (light tomedium).
Heavy woollens, overcoat fabrics,upholstery fabrics, some leathers andvinyls.
14 (90)
18 (110)
NEEDLE SIZE FABRICS THREAD
9-11 (70-80) Lightweight fabrics-thin cottons, voile,serge, silk, muslin, Qiana, interlocks,cotton knits, tricot, jerseys, crepes,woven polyester, shirt & blouse fabrics.
Light-duty thread in cotton, nylon,polyester or cotton wrappedpolyester.
Most threads sold are medium size andsuitable for these fabrics and needlesizes.
Use polyester threads on syntheticmaterials and cotton on natural wovenfabrics for best results.
Always use the same thread on top andbottom.
Please Note:
- In general, fine threads and needles are used for sewing fine fabrics, and thicker threads are usedfor sewing heavy fabrics.
- Always test thread and needle size on a small piece of fabric which will be used for actual sewing.
- Use the same thread for needle and bobbin.
- For good quality embroidery designs, use a 75/11 needle when embroidering.
- Use a backing for fine or stretchy fabrics.
Matching needle/ fabric/ thread
17
GETTING READY TO SEW
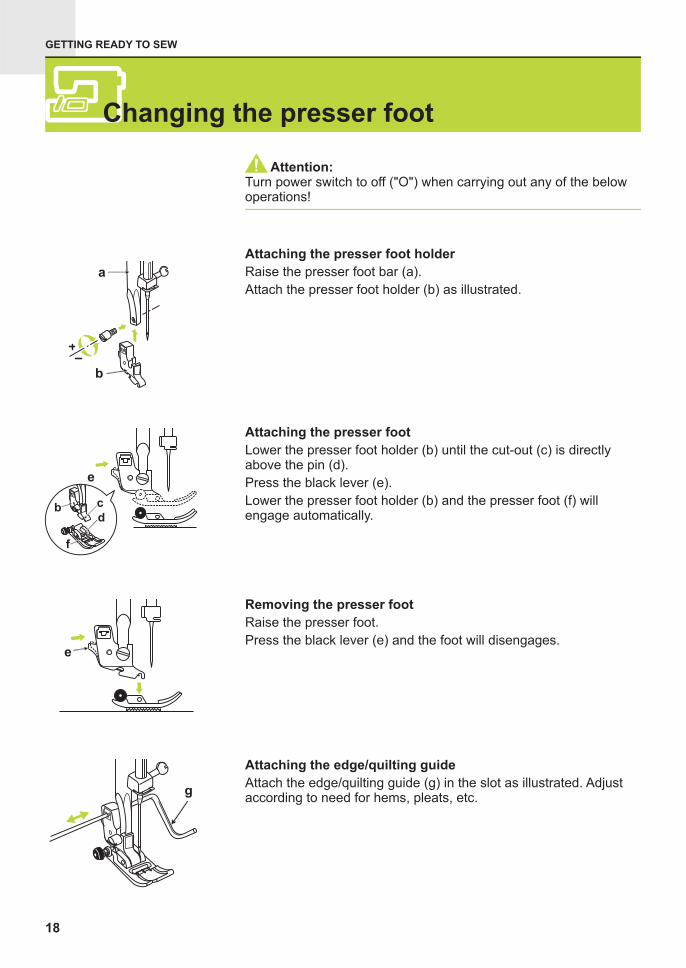
Turn power switch to off ("O") when carrying out any of the belowoperations!
Raise the presser foot bar (a).
Attach the presser foot holder (b) as illustrated.
Lower the presser foot holder (b) until the cut-out (c) is directlyabove the pin (d).
Press the (e).
Lower the presser foot holder (b) and the presser foot (f) willengage automatically.
Raise the presser foot.
Press the black lever (e) and the foot will disengages.
Attach the guide (g) in the slot as illustrated. Adjustaccording to need for hems, pleats, etc.
Attention:
Attaching the presser foot holder
Attaching the presser foot
Removing the presser foot
Attaching the guide
black lever
edge/quilting
edge/quilting
Changing the presser foot
18
b
a
d
c
f
d
e
e
g
GETTING READY TO SEW
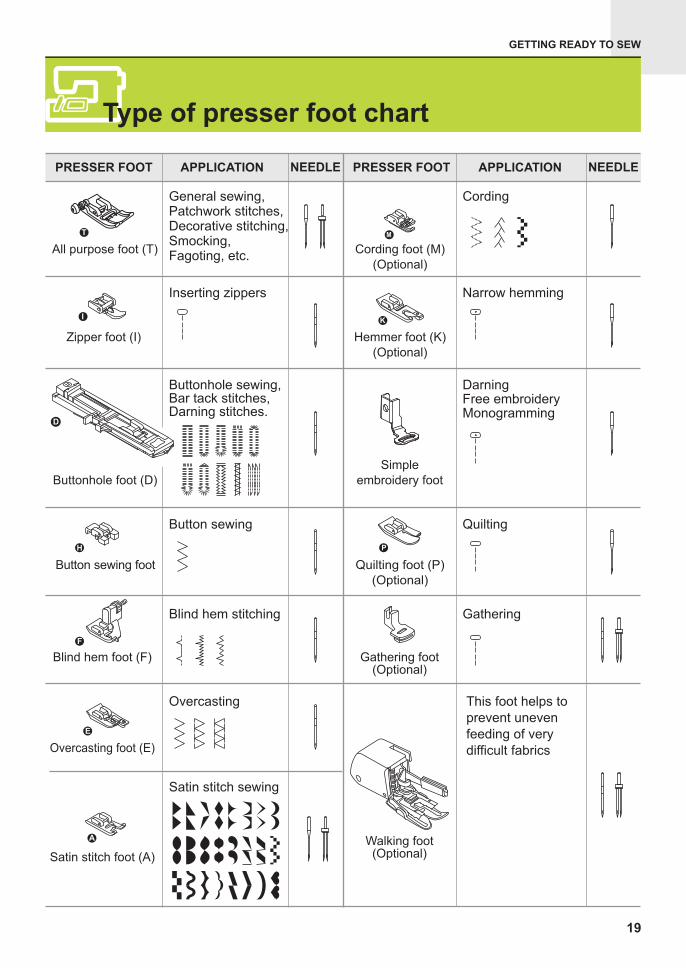
Overcasting foot (E)
Overcasting
DarningFree embroideryMonogramming
All purpose foot (T)
Zipper foot (I)
Simple
embroidery foot
Button sewing foot
APPLICATIONPRESSER FOOT
General sewing,Patchwork stitches,Decorative stitching,Smocking,Fagoting, etc.
PRESSER FOOT APPLICATION
Inserting zippers
Blind hem foot (F)
Blind hem stitching
Satin stitch sewing
Button sewing
Satin stitch foot (A)
NEEDLE NEEDLE
Hemmer foot (K)
(Optional)
Narrow hemming
Gathering foot(Optional)
Gathering
Quilting foot (P)
(Optional)
Quilting
Cording foot (M)
(Optional)
Cording
Walking foot(Optional)
This foot helps to
prevent uneven
feeding of very
difficult fabrics
Buttonhole sewing,Bar tack stitches,Darning stitches.
Type of presser foot chart
19
Buttonhole foot (D)

To raise or drop the feed dogs
The presser foot lifter raises and lowers yourpresser foot.
The second level is only used in embroiderymode to remove the hoop easily.
With the sewing table off the machine, the feeddog adjustment lever can be seen on the basein back of the sewing machine.
Sliding the lever to the " " (b) will lowerthe feed dog, for example during button sewing.If you wish to continue sewing normally, slidethe lever to the " " (a) in order to raisethe feed dogs.
The feed dog if you do not turnthe handwheel, even if the lever is slid to theright. Make a complete turn to raise the feeddogs.
will not rise up
a
ba
Two-step presser foot lifter
20
The needle must always be at the highestposition.
Note:
GETTING READY TO SEW
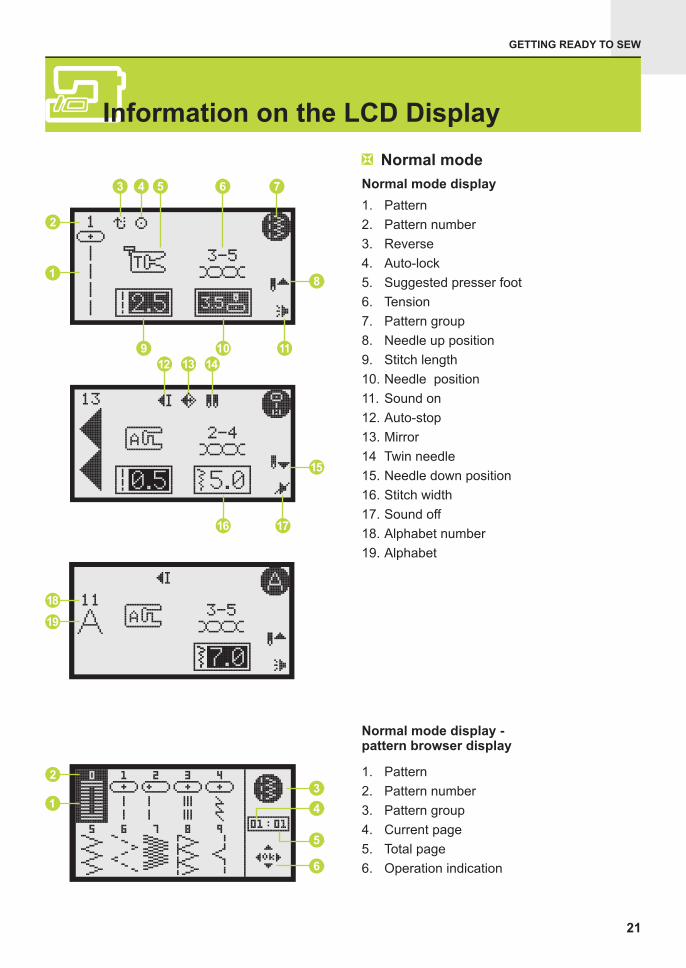
1. Pattern
2. Pattern number
3. Reverse
4. Auto-lock
5. Suggested presser foot
6. Tension
7. Pattern group
8. Needle up position
9. Stitch length
10. Needle position
11. Sound on
12. Auto-stop
13. Mirror
14 Twin needle
15. Needle down position
16. Stitch width
17. Sound off
18.
19.
Alphabet number
Alphabet
1. Pattern
2. Pattern number
3. Pattern group
4. Current page
5. Total page
6. Operation indication
Normal mode display
Normal mode display -pattern browser display
Information on the LCD Display
21
Normal mode
GETTING READY TO SEW
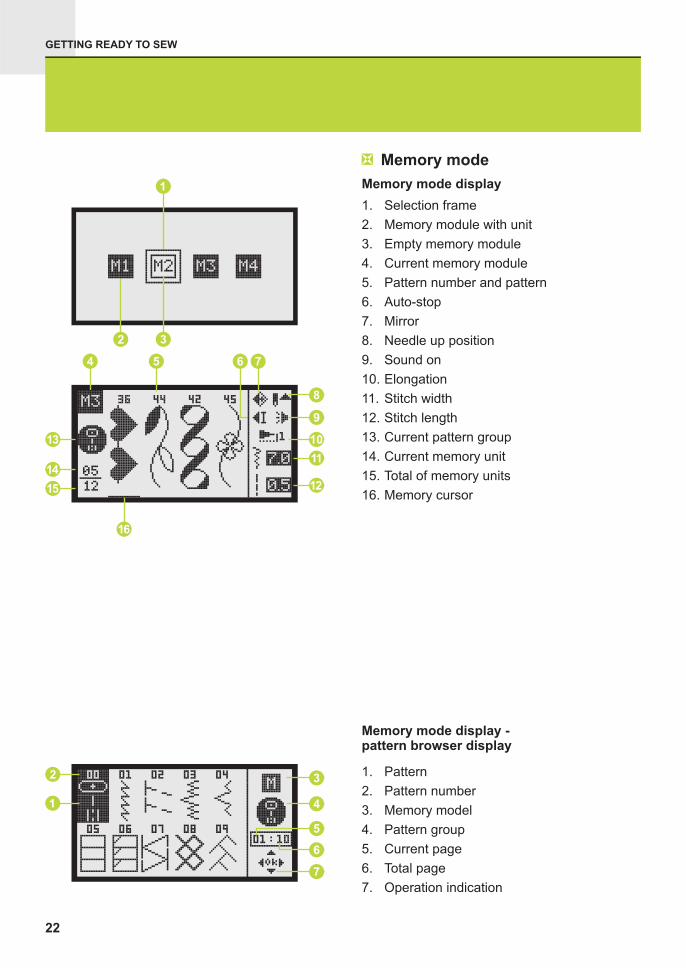
1. Selection frame
2.
3. Empty m
4. C
5. Pattern number and pattern
6. Auto-stop
7. Mirror
8. Needle up position
9. Sound on
10.
11. Stitch width
12. Stitch length
13. C attern group
14. C
15.
16. ursor
Memory module with unit
emory module
urrent memory module
urrent p
urrent memory unit
Total of memory units
Memory c
Elongation
1. Pattern
2. Pattern number
3. Memory model
4. Pattern group
5. Current page
6. Total page
7. Operation indication
Memory mode display
Memory mode display -pattern browser display
22
Memory mode
GETTING READY TO SEW
Embroidery mode display -Built-in Embroidery letter
Embroidery mode display -Built-in Embroidery pattern
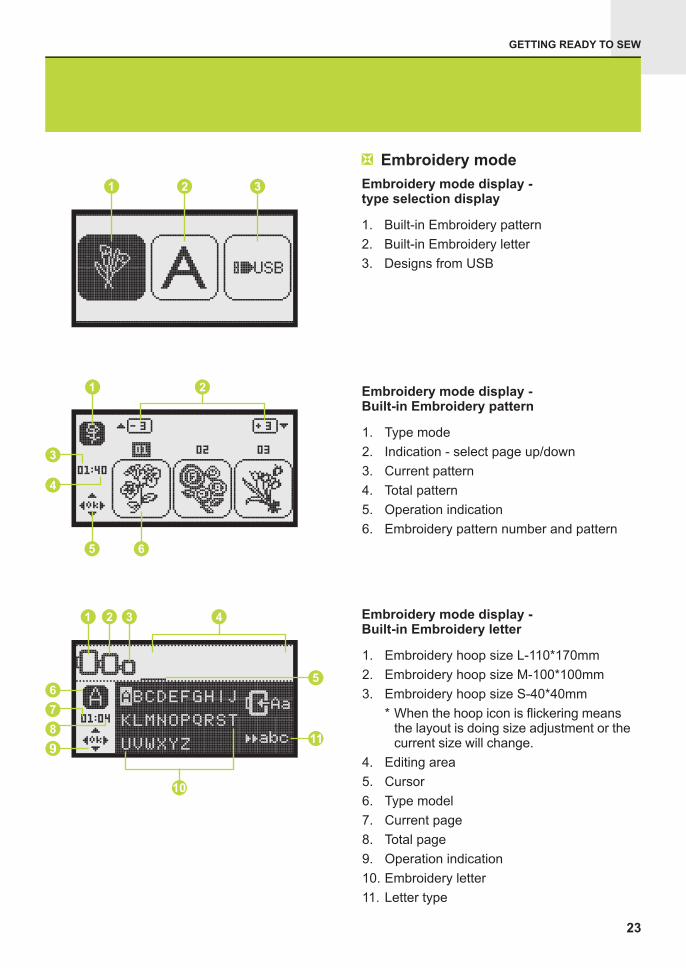
Embroidery mode
Embroidery mode display -type selection display
1. Built-in Embroidery pattern
2. Built-in Embroidery letter
3. Designs from USB
1. Type mode
2. Indication - select page up/down
3. Current pattern
4. Total pattern
5. Operation indication
6. Embroidery pattern number and pattern
23
1. Embroidery hoop size L-110*170mm
2. Embroidery hoop size M-100*100mm
3. Embroidery hoop size S-40*40mm
* When the hoop icon is flickering meansthe layout is doing size adjustment or thecurrent size will change.
4. Editing area
5. Cursor
6. Type model
7. Current page
8. Total page
9. Operation indication
10. Embroidery letter
11. Letter type
GETTING READY TO SEW
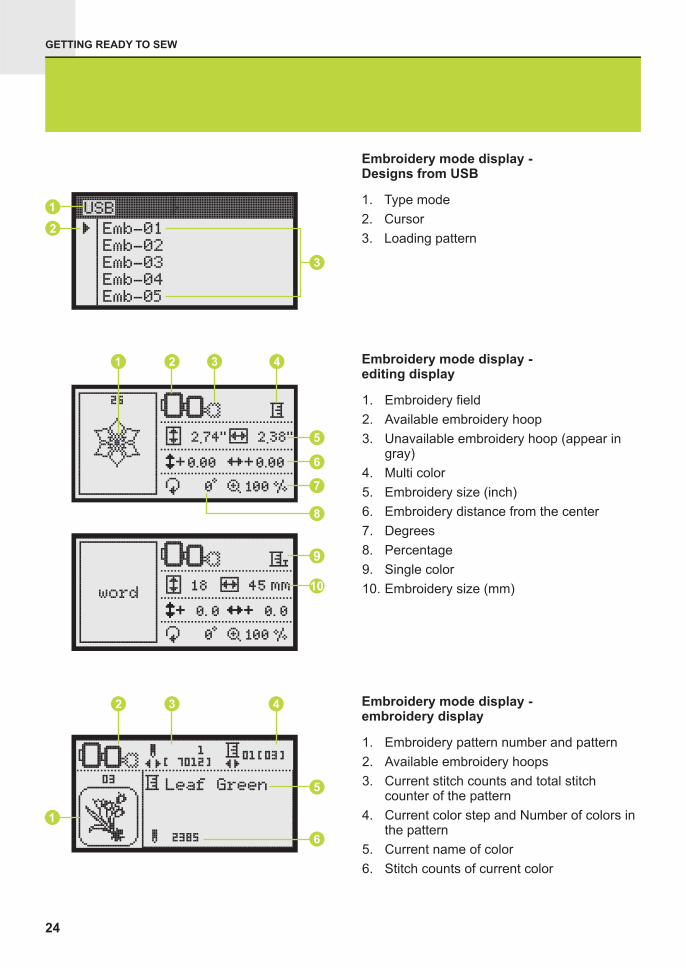
Embroidery mode display -editing display
Embroidery mode display -Designs from USB
1. Type mode
2. Cursor
3. Loading pattern
Embroidery mode display -embroidery display
1. Embroidery pattern number and pattern
2. Available embroidery hoops
3. Current stitch counts and total stitchcounter of the pattern
4. Current color step and Number of colors inthe pattern
5. Current name of color
6. Stitch counts of current color
24
1. Embroidery field
2. Available embroidery hoop
3. Unavailable embroidery hoop (appear ingray)
4. Multi color
5. Embroidery size (inch)
6. Embroidery distance from the center
7. Degrees
8. Percentage
9. Single color
10. Embroidery size (mm)
GETTING READY TO SEW
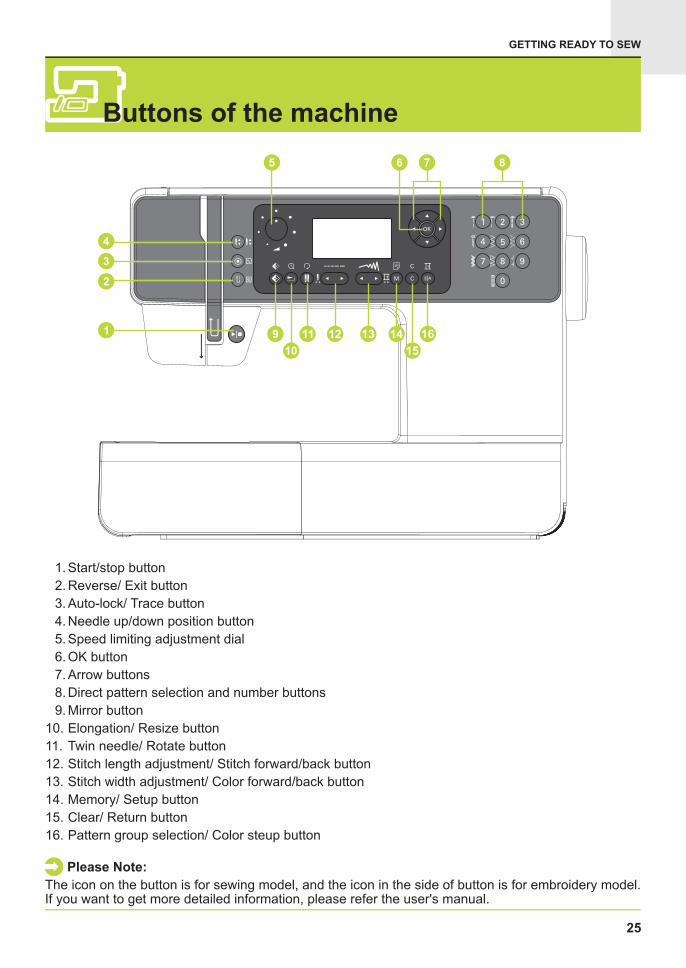
The icon on the button is for sewing model, and the icon in the side of button is for embroidery model.If you want to get more detailed information, please refer the user's manual.
Please Note:
Buttons of the machine
25
1.
4.
5.
7.
8. Direct pattern selection and number buttons
9.
12.
13.
15. Clear/ Return button
Start/stop button
2.
3.
Needle up/down position button
Speed limiting adjustment dial
6. OK button
Arrow buttons
Mirror button
10.
11.
Stitch length adjustment/ Stitch forward/back button
Stitch width adjustment/ Color forward/back button
14.
16.
Reverse/ Exit button
Auto-lock/ Trace button
Elongation/ Resize button
Twin needle/ Rotate button
Memory/ Setup button
Pattern group selection/ Color steup button
GETTING READY TO SEW
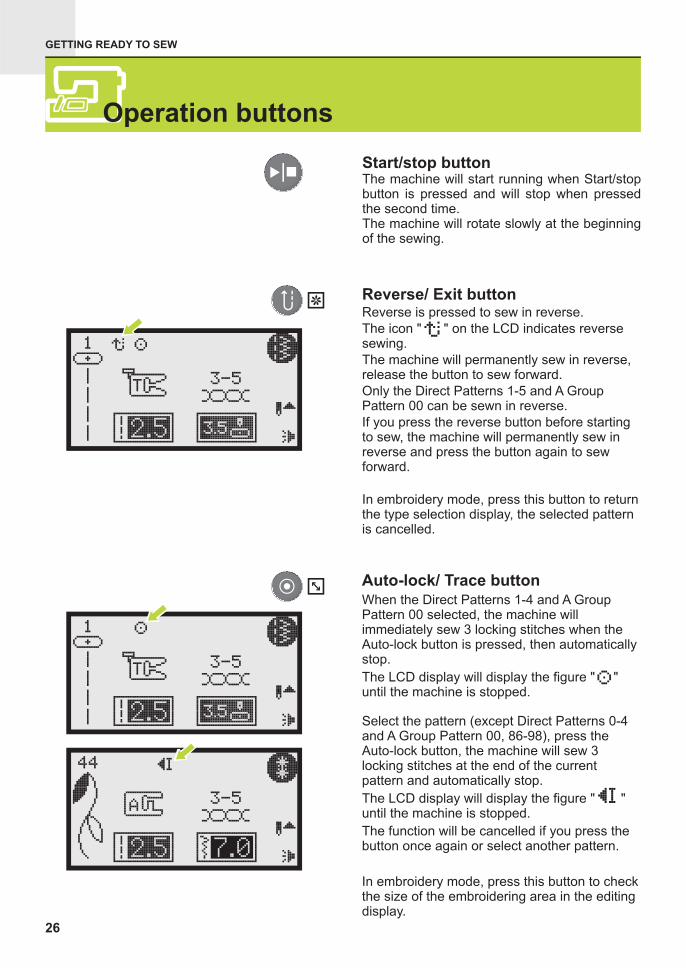
Start/stop buttonThe machine will start running when Start/stopbutton is pressed and will stop when pressedthe second time.The machine will rotate slowly at the beginningof the sewing.
Reverse/ Exit buttonReverse is pressed to sew in reverse.
The icon " " on the LCD indicates reversesewing.
The machine will permanently sew in reverse,release the button to sew forward.
Only the Direct Patterns 1-5 and A GroupPattern 00 can be sewn in reverse.
If you press the reverse button before startingto sew, the machine will permanently sew inreverse and press the button again to sewforward.
In embroidery mode, press this button to returnthe type selection display, the selected patternis cancelled.
Auto-lock/ Trace buttonWhen the Direct Patterns 1-4 and A GroupPattern 00 selected, the machine willimmediately sew 3 locking stitches when theAuto-lock button is pressed, then automaticallystop.
The LCD display will display the figure " "until the machine is stopped.
Select the pattern (except Direct Patterns 0-4and A Group Pattern 00, 86-98), press theAuto-lock button, the machine will sew 3locking stitches at the end of the currentpattern and automatically stop.
The LCD display will display the figure " "until the machine is stopped.
The function will be cancelled if you press thebutton once again or select another pattern.
In embroidery mode, press this button to checkthe size of the embroidering area in the editingdisplay.
Operation buttons
26
GETTING READY TO SEW
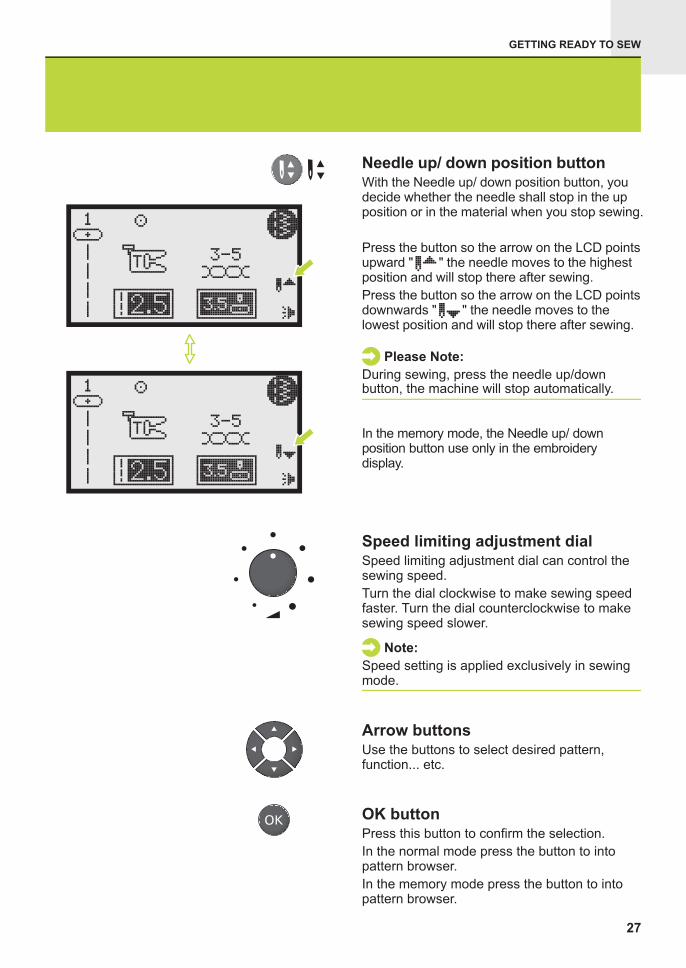
Needle up/ down position buttonWith the Needle up/ down position button, youdecide whether the needle shall stop in the upposition or in the material when you stop sewing.
Press the button so the arrow on the LCD pointsupward " " the needle moves to the highestposition and will stop there after sewing.
Press the button so the arrow on the LCD pointsdownwards " " the needle moves to thelowest position and will stop there after sewing.
Please Note:
During sewing, press the needle up/downbutton, the machine will stop automatically.
Speed limiting adjustment dialSpeed limiting adjustment dial can control thesewing speed.
Turn the dial clockwise to make sewing speedfaster. Turn the dial counterclockwise to makesewing speed slower.
Arrow buttonsUse the buttons to select desired pattern,function... etc.
OK buttonPress this button to confirm the selection.
In the normal mode press the button to intopattern browser.
In the memory mode press the button to intopattern browser.
27
Speed setting is applied exclusively in sewingmode.
Note:
In the memory mode, the Needle up/ downposition button use only in the embroiderydisplay.
GETTING READY TO SEW
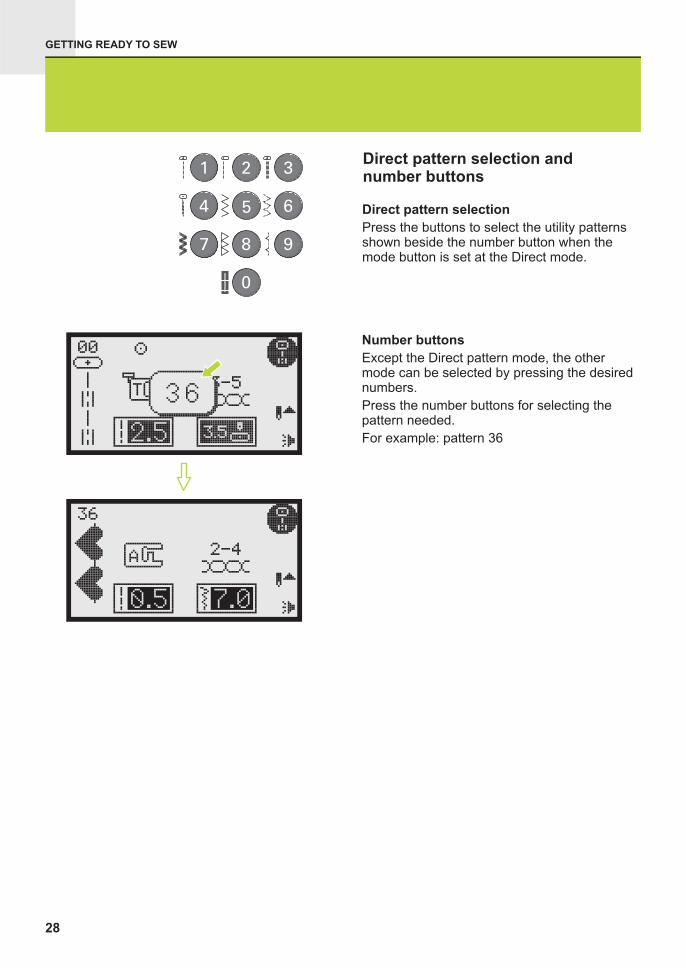
Direct pattern selection andnumber buttons
Direct pattern selection
Press the buttons to select the utility patternsshown beside the number button when themode button is set at the Direct mode.
Number buttons
Except the Direct pattern mode, the othermode can be selected by pressing the desirednumbers.
Press the number buttons for selecting thepattern needed.
For example: pattern 36
28
GETTING READY TO SEW
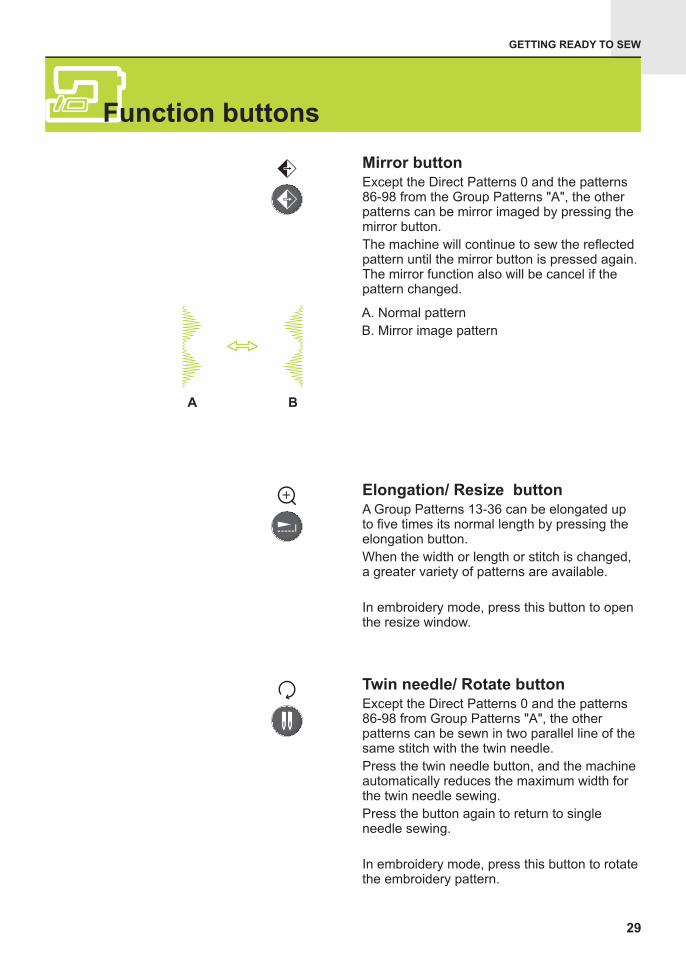
Mirror buttonExcept the Direct Patterns 0 and the patterns86-98 from the Group Patterns "A", the otherpatterns can be mirror imaged by pressing themirror button.
The machine will continue to sew the reflectedpattern until the mirror button is pressed again.The mirror function also will be cancel if thepattern changed.
A. Normal pattern
B. Mirror patternimage
Elongation/ Resize buttonA Group Patterns 13-36 can be elongated upto five times its normal length by pressing theelongation button.
When the width or length or stitch is changed,a greater variety of patterns are available.
In embroidery mode, press this button to openthe resize window.
A B
Twin needle/ Rotate buttonExcept the Direct Patterns 0 and the patterns86-98 from Group Patterns "A", the otherpatterns can be sewn in two parallel line of thesame stitch with the twin needle.
Press the twin needle button, and the machineautomatically reduces the maximum width forthe twin needle sewing.
Press the button again to return to singleneedle sewing.
In embroidery mode, press this button to rotatethe embroidery pattern.
Function buttons
29
GETTING READY TO SEW
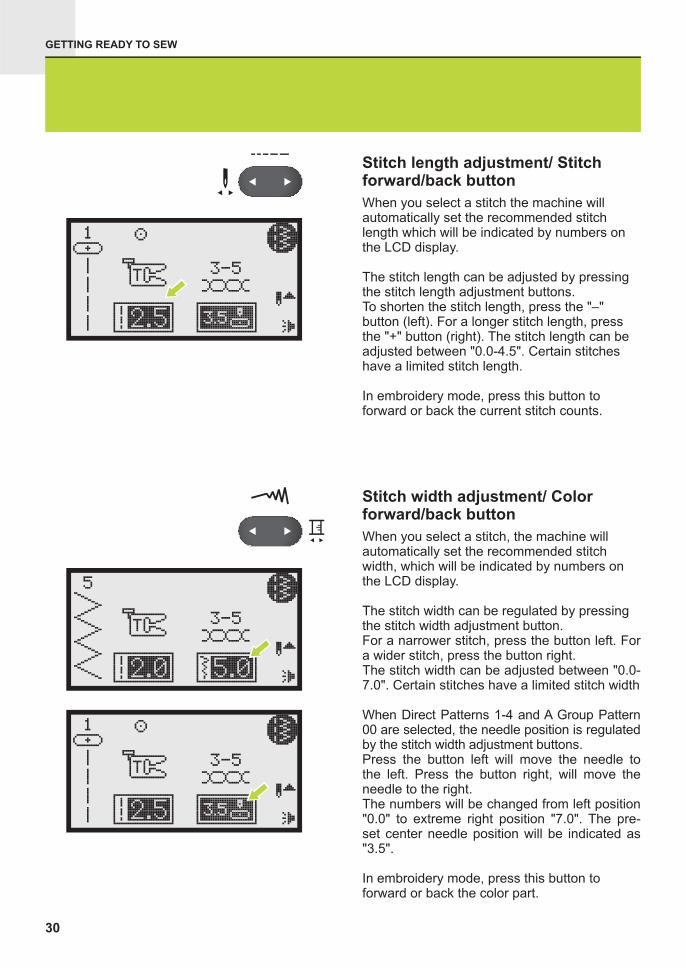
Stitch length adjustment/ Stitchforward/back button
When you select a stitch the machine willautomatically set the recommended stitchlength which will be indicated by numbers onthe LCD display.
The stitch length can be adjusted by pressingthe stitch length adjustment buttons.To shorten the stitch length, press the "–"button (left). For a longer stitch length, pressthe "+" button (right). The stitch length can beadjusted between "0.0-4.5". Certain stitcheshave a limited stitch length.
In embroidery mode, press this button toforward or back the current stitch counts.
Stitch width adjustment/ Colorforward/back button
When you select a stitch, the machine willautomatically set the recommended stitchwidth, which will be indicated by numbers onthe LCD display.
The stitch width can be regulated by pressingthe stitch width adjustment button.For a narrower stitch, press the button left. Fora wider stitch, press the button right.The stitch width can be adjusted between "0.0-7.0". Certain stitches have a limited stitch width
When Direct Patterns 1-4 and A Group Pattern00 are selected, the needle position is regulatedby the stitch width adjustment buttons.Press the button left will move the needle tothe left. Press the button right, will move theneedle to the right.The numbers will be changed from left position"0.0" to extreme right position "7.0". The pre-set center needle position will be indicated as"3.5".
In embroidery mode, press this button toforward or back the color part.
30
GETTING READY TO SEW
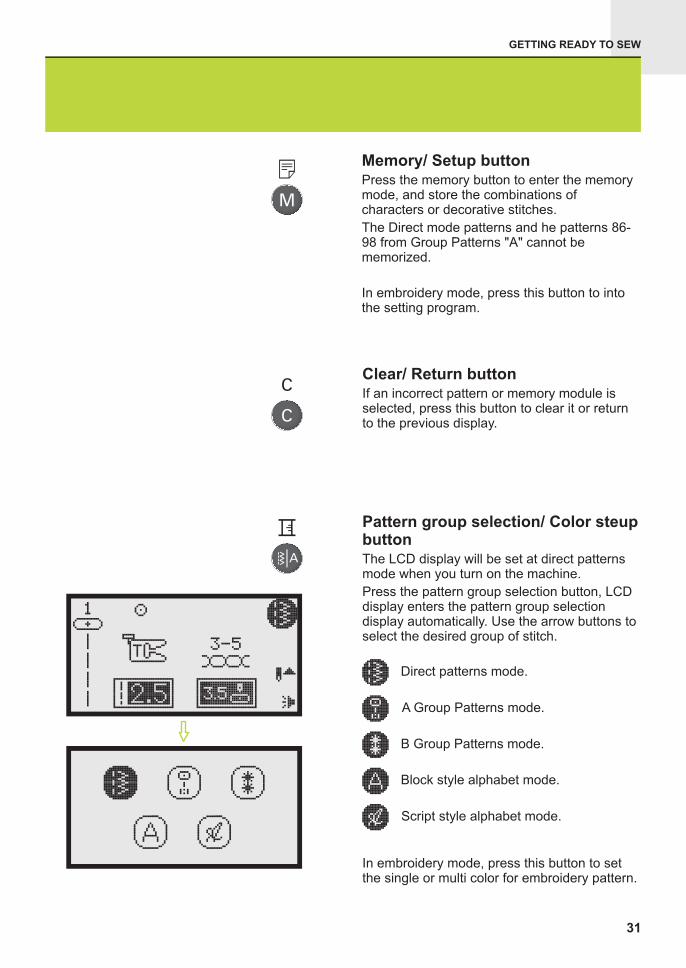
Pattern group selection/ Color steupbuttonThe LCD display will be set at direct patternsmode when you turn on the machine.
Press the pattern group selection button, LCDdisplay enters the pattern group selectiondisplay automatically. Use the arrow buttons toselect the desired group of stitch.
Direct patterns mode.
A Group Patterns mode.
B Group Patterns mode.
Block style alphabet mode.
Script style alphabet mode.
Clear/ Return buttonIf an incorrect pattern or memory module isselected, press this button to clear it or returnto the previous display.
Memory/ Setup buttonPress the memory button to enter the memorymode, and store the combinations ofcharacters or decorative stitches.
The Direct mode patterns and he patterns 86-98 from Group Patterns "A" cannot bememorized.
In embroidery mode, press this button to intothe setting program.
31
In embroidery mode, press this button to setthe single or multi color for embroidery pattern.
SEWING BASICS
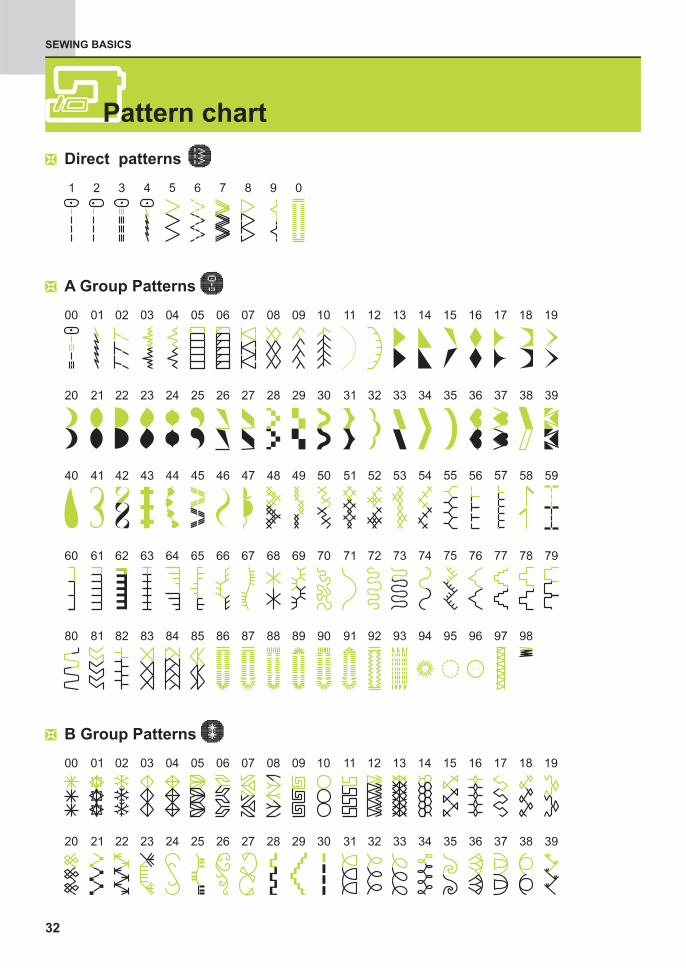
Direct patterns
A Group Patterns
B Group Patterns
Pattern chart
32
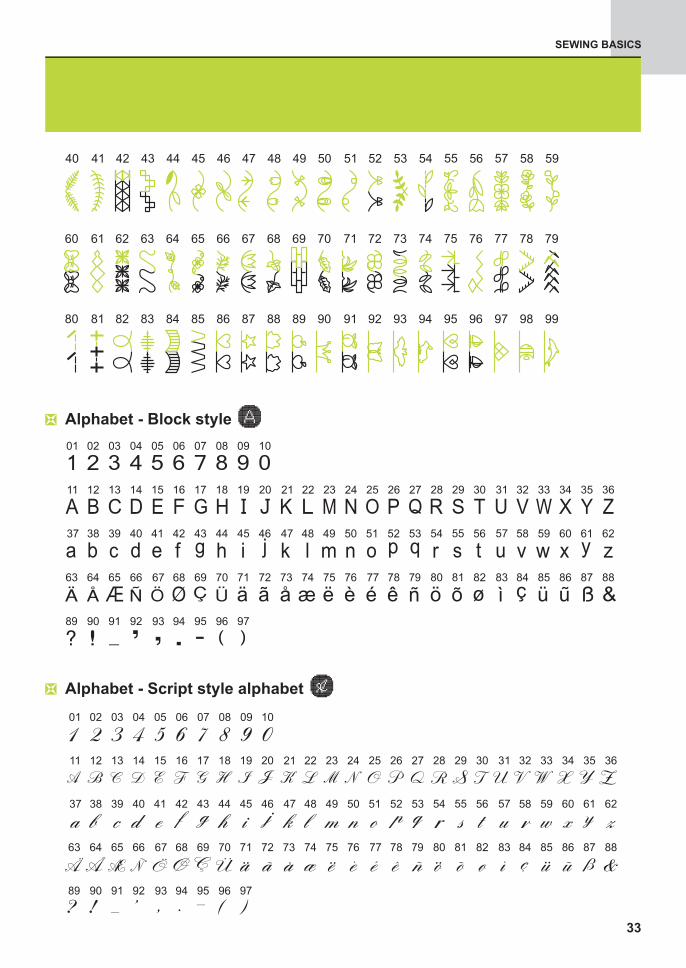
A Block stylelphabet -
A Script style alphabet - lphabet
SEWING BASICS
33
SEWING BASICS
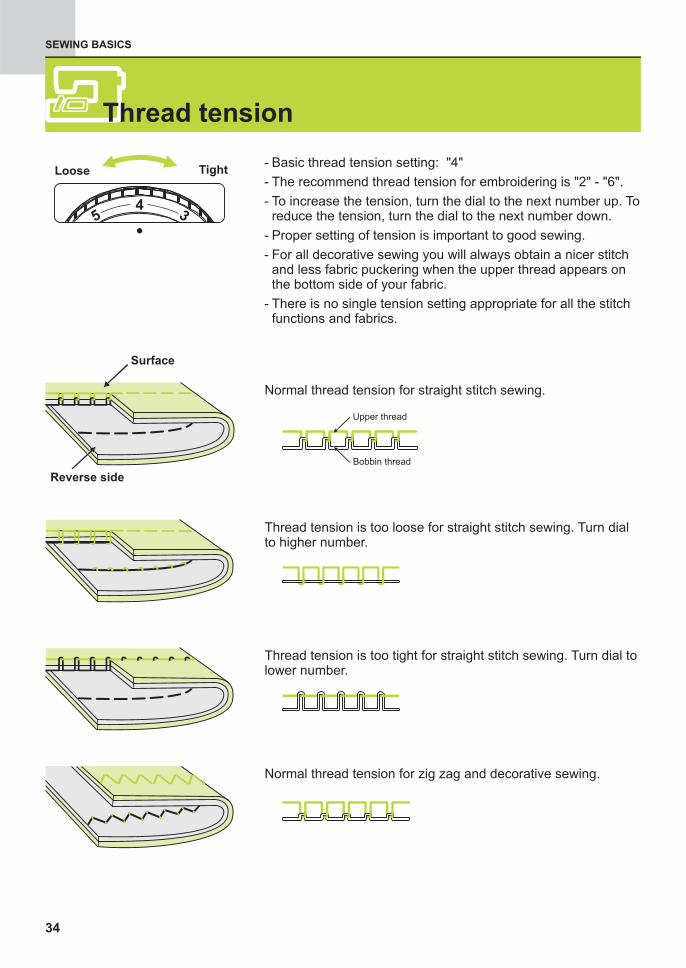
- Basic thread tension setting: "4"
- The recommend thread tension for embroidering is "2" - "6".
- To increase the tension, turn the dial to the next number up. Toreduce the tension, turn the dial to the next number down.
- Proper setting of tension is important to good sewing.
- For all decorative sewing you will always obtain a nicer stitchand less fabric puckering when the upper thread appears onthe bottom side of your fabric.
- There is no single tension setting appropriate for all the stitchfunctions and fabrics.
Thread tension is too loose for straight stitch sewing. Turn dialto higher number.
Thread tension is too tight for straight stitch sewing. Turn dial tolower number.
Normal thread tension for zig zag and decorative sewing.
Normal thread tension for straight stitch sewing.
Upper thread
Bobbin thread
Surface
Reverse side
TightLoose
Thread tension
34
SEWING BASICS
Free-arm sewing is convenient for sewingtubular areas such as pant hems and cuffs.
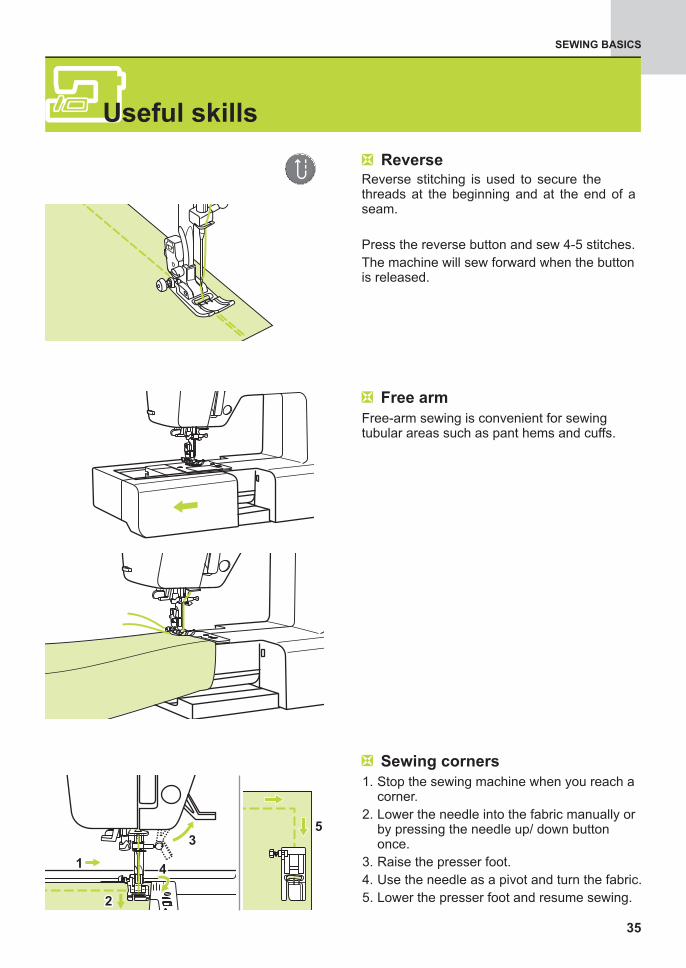
Reverse stitching is used to secure thethreads at the beginning and at the end of aseam.
Press the reverse button and sew 4-5 stitches.
The machine will sew forward when the buttonis released.
Reverse
Free arm
1. Stop the sewing machine when you reach acorner.
2. Lower the needle into the fabric manually orby pressing the needle up/ down buttononce.
3. Raise the presser foot.
4. Use the needle as a pivot and turn the fabric.
5. Lower the presser foot and resume sewing.
5
Sewing corners
Useful skills
35
22

SEWING BASICS
The black button on the left side of the presserfoot will lock the presser foot in a horizontalposition if you push it in before lowering thepresser foot. This ensures even feeding at thebeginning of a seam and helps when sewingmultiple layers of fabric such as sewing overseams when hemming jeans.
When you reach the point of an increasedthickness, lower the needle and raise thepresser foot. Press the toe of the foot and pushin the black button, then lower the foot andcontinue sewing.
The black button releases automatically aftersewing few stitches.
You also can place another piece of fabric withthe same thickness at the back of the seam.
Or support the presser foot while feeding byhand and sewing toward the folded side.
Cardboard orthick fabric
Sewing on the heavy fabric
Cutting the thread
The thread cutter serves two purposes.
1. Cut the thread after threading the needle
2. Cut the thread after finishing a seam.
To cut the thread after completing your workraise the presser foot.
Remove the fabric, draw the threads to the leftside of the face cover and cut using the threadcutter.
The threads are cut at the proper length to startthe next seam.
36
SEWING BASICS
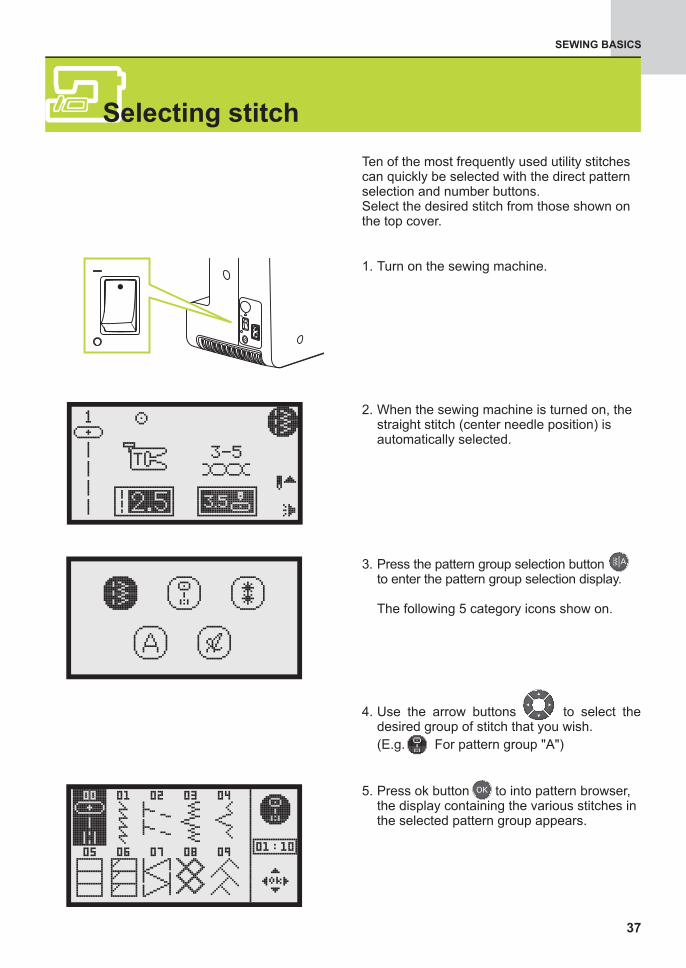
Ten of the most frequently used utility stitchescan quickly be selected with the d
.Select the desired stitch from those shown onthe top cover.
irect patternselection and number buttons
4. Use the arrow buttons to select thedesired group of stitch that you wish.
(E.g. For pattern group "A")
3. Press the pattern group selection buttonto enter the pattern group selection display.
The following 5 category icons show on.
5. Press ok button to into pattern browser,the display containing the various stitches inthe selected pattern group appears.
1. Turn on the sewing machine.
2. When the sewing machine is turned on, thestraight stitch (center needle position) isautomatically selected.
Selecting stitch
37
SEWING BASICS
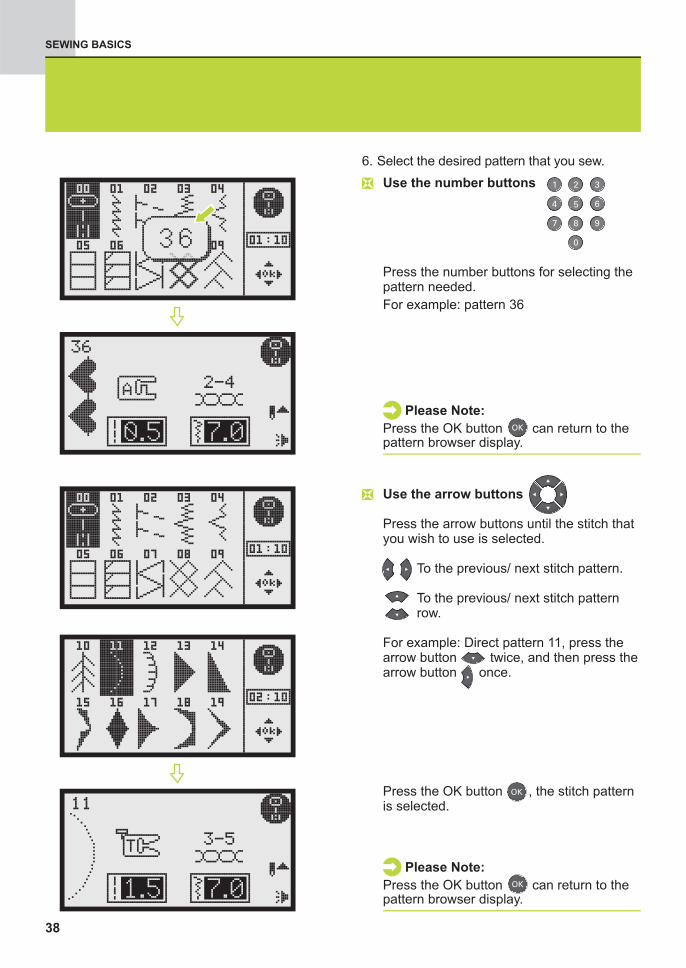
Use the number buttons
Press the number buttons for selecting thepattern needed.
For example: pattern 36
6. Select the desired pattern that you sew.
Use the arrow buttons
the arrow buttons
thearrow button twice, and then press thearrow button once.
Press until the stitch thatyou wish to use is selected.
To the previous/ next stitch pattern.
To the previous/ next stitch patternrow.
ressFor example: Direct pattern 11, p
Press the OK button , the stitch patternis selected.
Please Note:
Press the OK utton can return to thebpattern browser display.
Please Note:
Press the OK utton can return to thebpattern browser display.
38
0.0 2.0 3.5 5.0 7.0
0.5 1.0 2.0 3.0 4.5
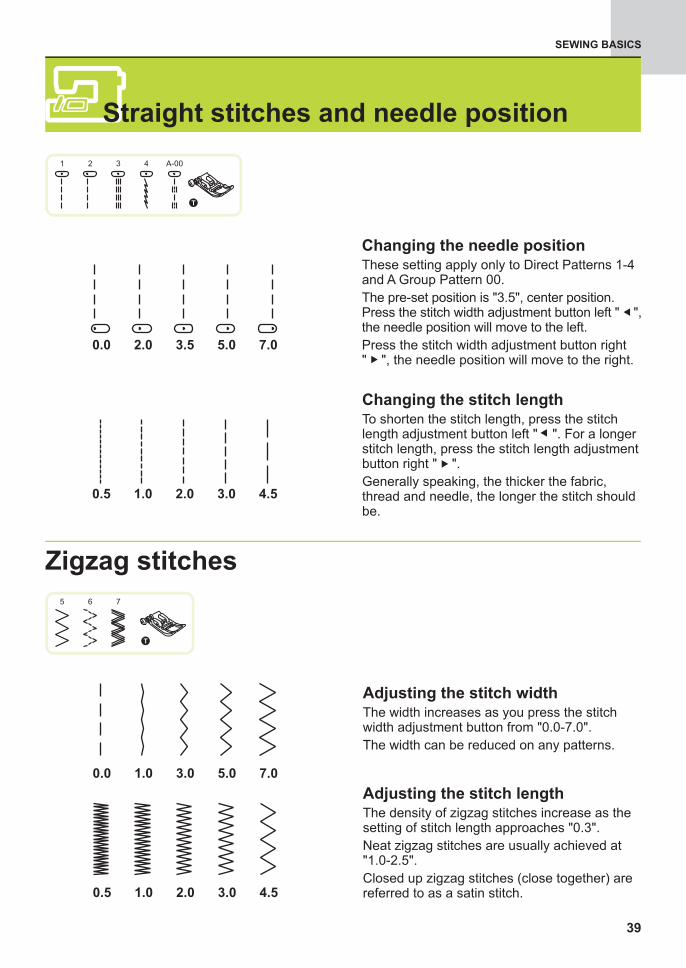
Changing the needle positionThese setting apply only to 1-4and
The pre-set position is "3.5", center position.Press the stitch width adjustment button left " ",the needle position will move to the left.
Press the stitch width adjustment button right" ", the needle position will move to the right.
Direct PatternsA Group Pattern 00.
....
....
Changing the stitch lengthTo shorten the stitch length, press the stitchlength adjustment button left " ". For a longerstitch length, press the stitch length adjustmentbutton right " ".
Generally speaking, the thicker the fabric,thread and needle, the longer the stitch shouldbe.
4 A-001 2 3
T
Zigzag stitches
Adjusting the stitch widthThe width increases as you press the stitchwidth adjustment button from "0.0-7.0".
The width can be reduced on any patterns.
Adjusting the stitch lengthThe density of zigzag stitches increase as thesetting of stitch length approaches "0.3".
Neat zigzag stitches are usually achieved at"1.0-2.5".
Closed up zigzag stitches (close together) arereferred to as a satin stitch.
0.0 1.0 3.0 5.0 7.0
0.5 1.0 2.0 3.0 4.5
5 6 7
T
Straight stitches and needle position
SEWING BASICS
39
SEWING BASICS
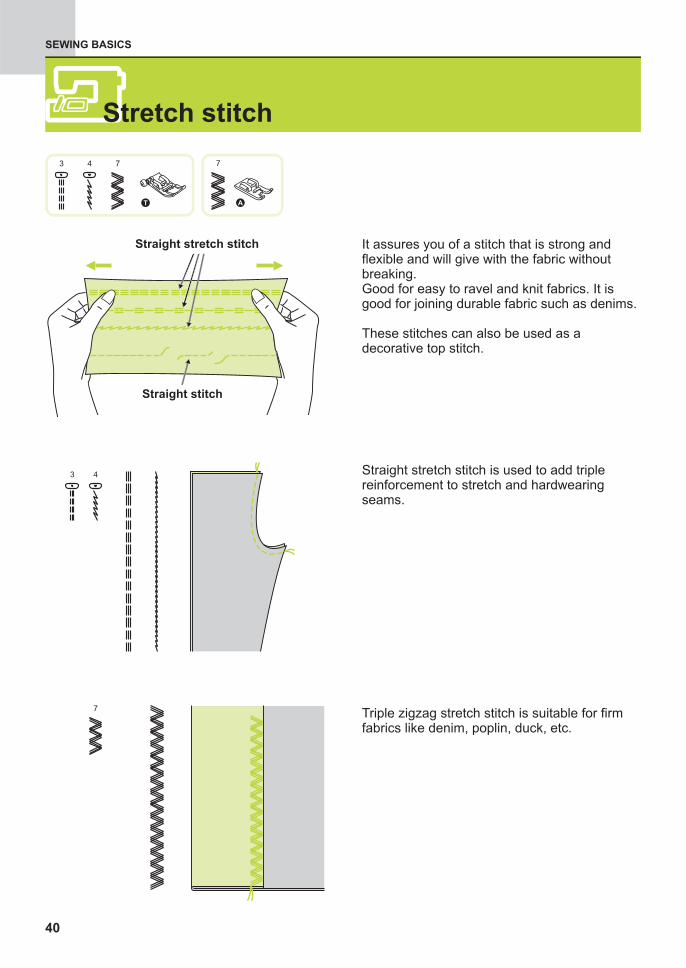
It assures you of a stitch that is strong andflexible and will give with the fabric withoutbreaking.Good for easy to ravel and knit fabrics. It isgood for joining durable fabric such as denims.
These stitches can also be used as adecorative top stitch.
Triple zigzag stretch stitch is suitable for firmfabrics like denim, poplin, duck, etc.
Straight stretch stitch is used to add triplereinforcement to stretch and hardwearingseams.
T
3 4 7
A
7
Stretch stitch
40
Straight stretch stitch
Straight stitch
ORDINARY SEWING
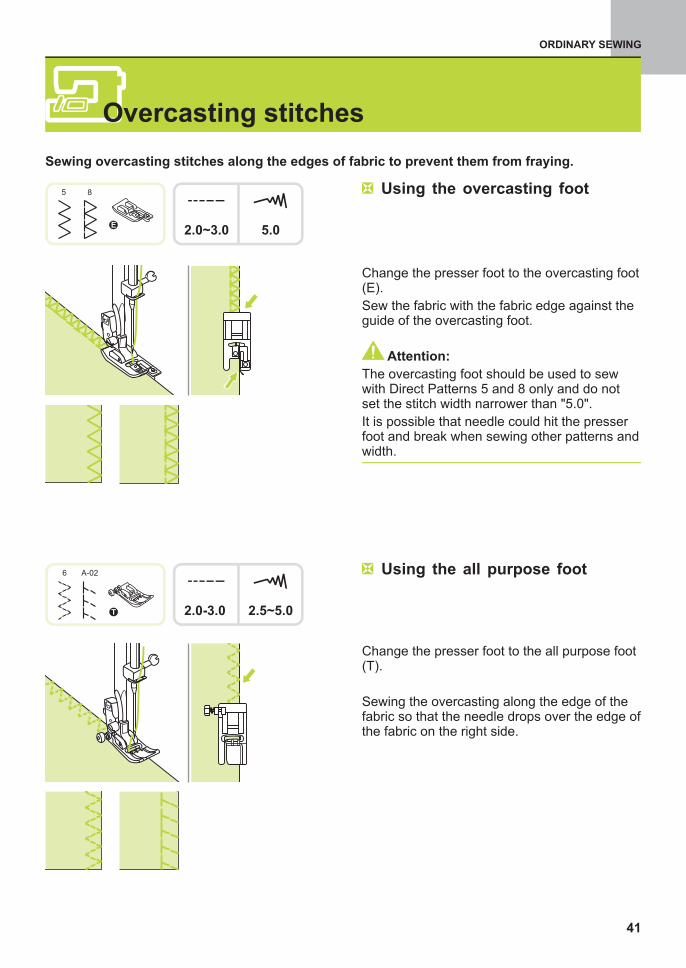
Change the presser foot to the all purpose foot(T).
Sewing the overcasting along the edge of thefabric so that the needle drops over the edge ofthe fabric on the right side.
Using the all purpose foot
Change the presser foot to the overcasting foot(E).
Sew the fabric with the fabric edge against theguide of the overcasting foot.
Attention:
The overcasting foot should be used to sewwith Direct Patterns 5 and 8 only and do notset the stitch width narrower than "5.0".
It is possible that needle could hit the presserfoot and break when sewing other patterns andwidth.
5.02.0~3.0
5 8
E
2.5~5.02.0-3.0
6 A-02
Using the overcasting foot
Overcasting stitches
41
Sewing overcasting stitches along the edges of fabric to prevent them from fraying.
ORDINARY SEWING
Fold the fabric as illustrated with the reverseside uppermost.
First carry out an overcasting stitch as shownin left picture.
Place the fabric under the foot. Turn thehandwheel forwards by hand until the needleswings fully to the left. It should just pierce thefold of the fabric. If it does not, adjust the stitchwidth accordingly.
Adjust the guide (b) by turning the knob (a) sothat the guide just rests against the fold.
Sew slowly, guiding the fabric carefully alongthe edge of the guide.
Turn over the fabric.
Please Note:
It takes practice to sew blind hem. Alwaysmake a sewing test first.
a
b
5mm
Reverseside
Reverseside
Overcastingstitch
5mm
2.5~4.01.0~2.0
9 A-03 A-04
F
9 : Blind hem/ lingerie for firm fabrics
A-03 : Blind hem for stretch fabrics
A-04 : Blind hem for stretch fabrics
Blind Hem
42
Secure the bottoms of skirts and pants with a blind hem, this stitch will sew without stitchesshowing on right side of fabric.
Reverseside
Rightside
ORDINARY SEWING
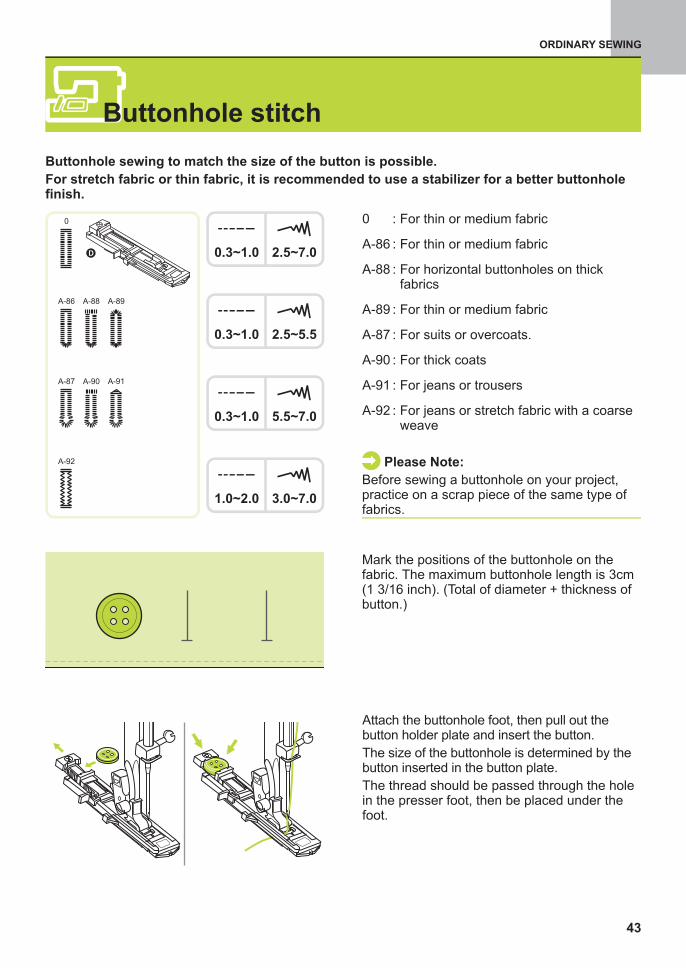
Mark the positions of the buttonhole on thefabric. The maximum buttonhole length is 3cm(1 3/16 inch). (Total of diameter + thickness ofbutton.)
Attach the buttonhole foot, then pull out thebutton holder plate and insert the button.
The size of the buttonhole is determined by thebutton inserted in the button plate.
The thread should be passed through the holein the presser foot, then be placed under thefoot.
Please Note:
Before sewing a buttonhole on your project,practice on a scrap piece of the same type offabrics.
0
A-87 A-91
A-92
A-90
A-86 A-88 A-89
2.5~7.00.3~1.0
2.5~5.5
5.5~7.0
3.0~7.01.0~2.0
0.3~1.0
0.3~1.0
0 : For thin or medium fabric
A-86 : For thin or medium fabric
A-88 : For horizontal buttonholes on thickfabrics
A-89 : For thin or medium fabric
A-87 : For suits or overcoats.
A-90 : For thick coats
A-91 : For jeans or trousers
A-92 : For jeans or stretch fabric with a coarseweave
Buttonhole stitch
43
Buttonhole sewing to match the size of the button is possible.
For stretch fabric or thin fabric, it is recommended to use a stabilizer for a better buttonholefinish.
ORDINARY SEWING
Please Note:
, the LCD willthe to remind you to lowerthe buttonhole lever.
The buttonhole stitch was selected and thestart/stop button was pressed while thebuttonhole lever is raised display
warning message
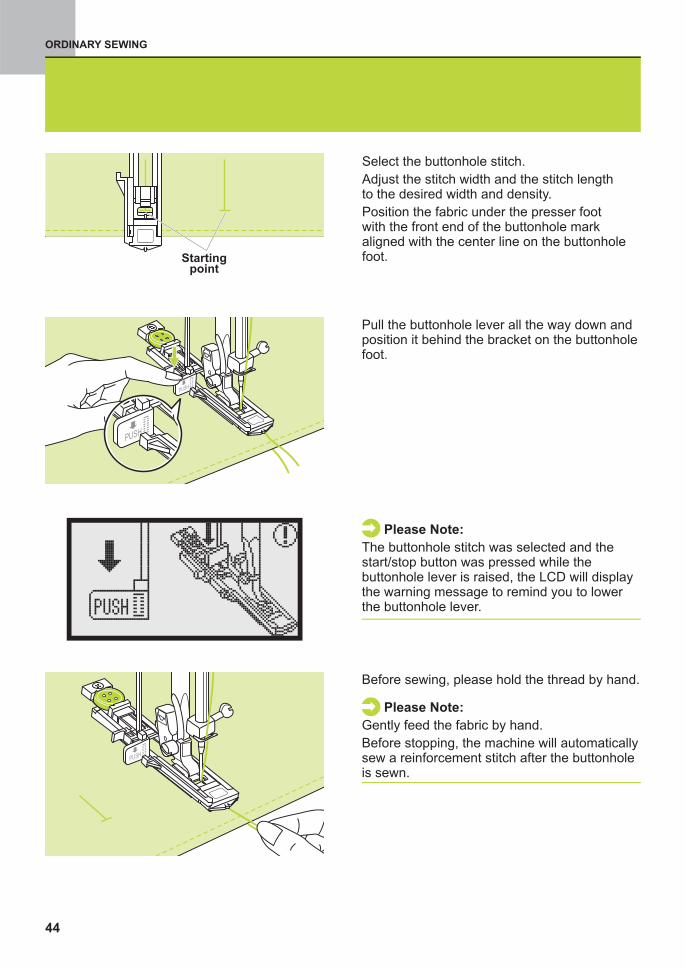
Before sewing, please hold the thread by hand.
Gently feed the fabric by hand.
Before stopping, the machine will automaticallysew a reinforcement stitch after the buttonholeis sewn.
Please Note:
Pull the buttonhole lever all the way down andposition it behind the bracket on the buttonholefoot.
44
Select the buttonhole stitch.
Adjust the stitch width and the stitch lengthto the desired width and density.
Position the fabric under the presser footwith the front end of the buttonhole markaligned with the center line on the buttonholefoot.Starting
point
ORDINARY SEWING
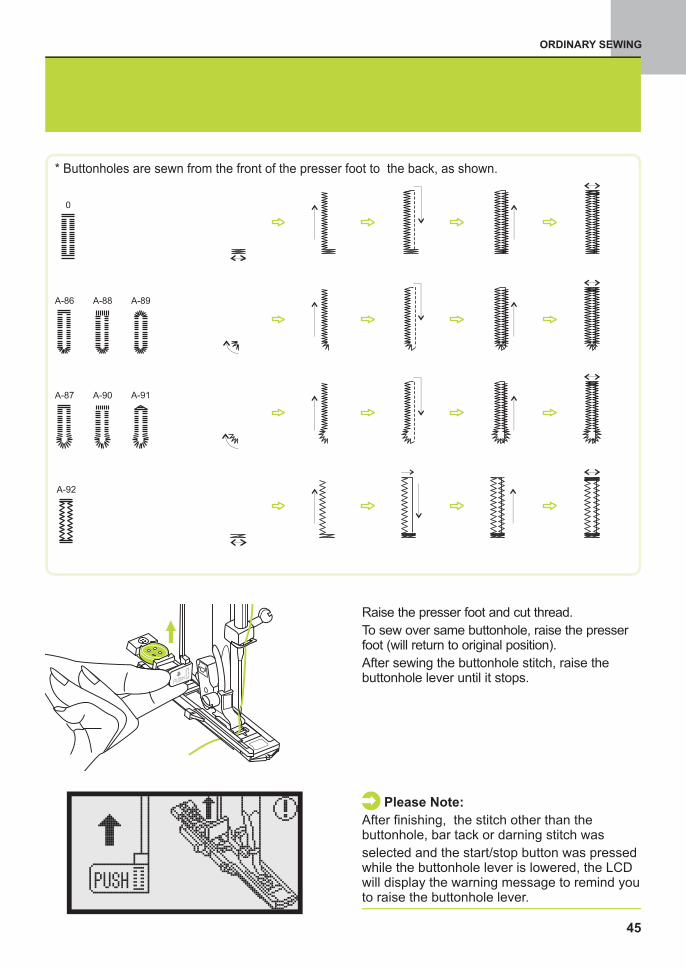
Raise the presser foot and cut thread.
To sew over same buttonhole, raise the presserfoot (will return to original position).
After sewing the buttonhole stitch, raise thebuttonhole lever until it stops.
* Buttonholes are sewn from the front of the presser foot to the back, as shown.
A-87 A-91A-90
A-92
A-86 A-88 A-89
0
Please Note:
After finishing,
, the LCDwill the to remind youto raise the buttonhole lever.
the stitch other than thebuttonhole, bar tack or darning stitch was
selected and the start/stop button was pressedwhile the buttonhole lever is lowered
display warning message
45
ORDINARY SEWING
Cut the center of the buttonhole being carefulnot to cut any stitches on either side. Use a pinas a stopper at the bar tack so you do not cuttoo much.
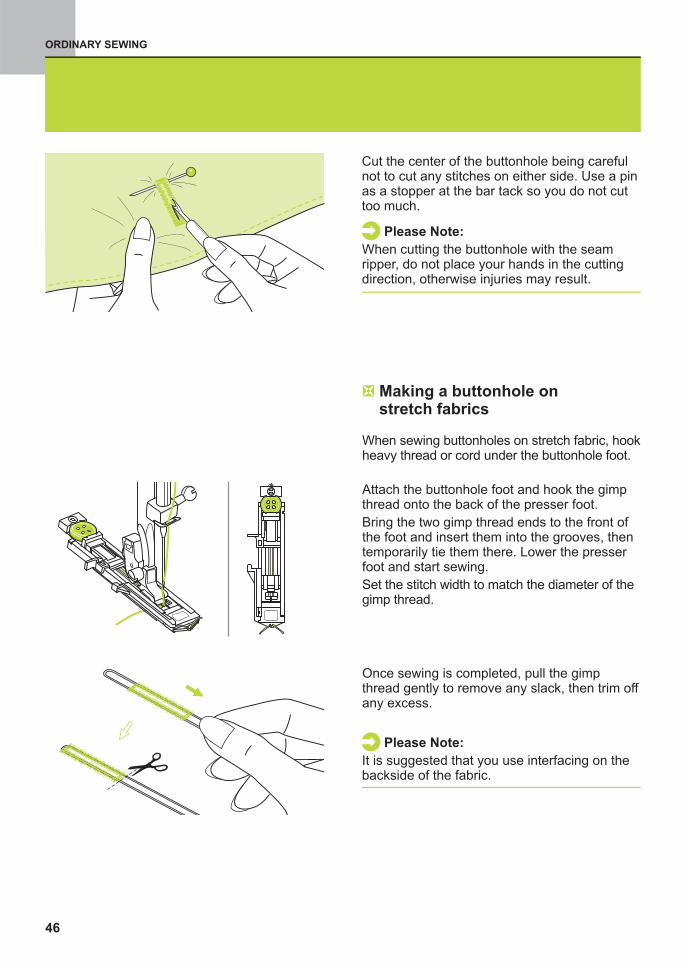
When sewing buttonholes on stretch fabric, hookheavy thread or cord under the buttonhole foot.
Attach the buttonhole foot and hook the gimpthread onto the back of the presser foot.
Bring the two gimp thread ends to the front ofthe foot and insert them into the grooves, thentemporarily tie them there. Lower the presserfoot and start sewing.
Set the stitch width to match the diameter of thegimp thread.
Once sewing is completed, pull the gimpthread gently to remove any slack, then trim offany excess.
Please Note:
It is suggested that you use interfacing on thebackside of the fabric.
Making a buttonhole onstretch fabrics
46
Please Note:
When cutting the buttonhole with the seamripper, do not place your hands in the cuttingdirection, otherwise injuries may result.
ORDINARY SEWING
Bar tack stitch
47
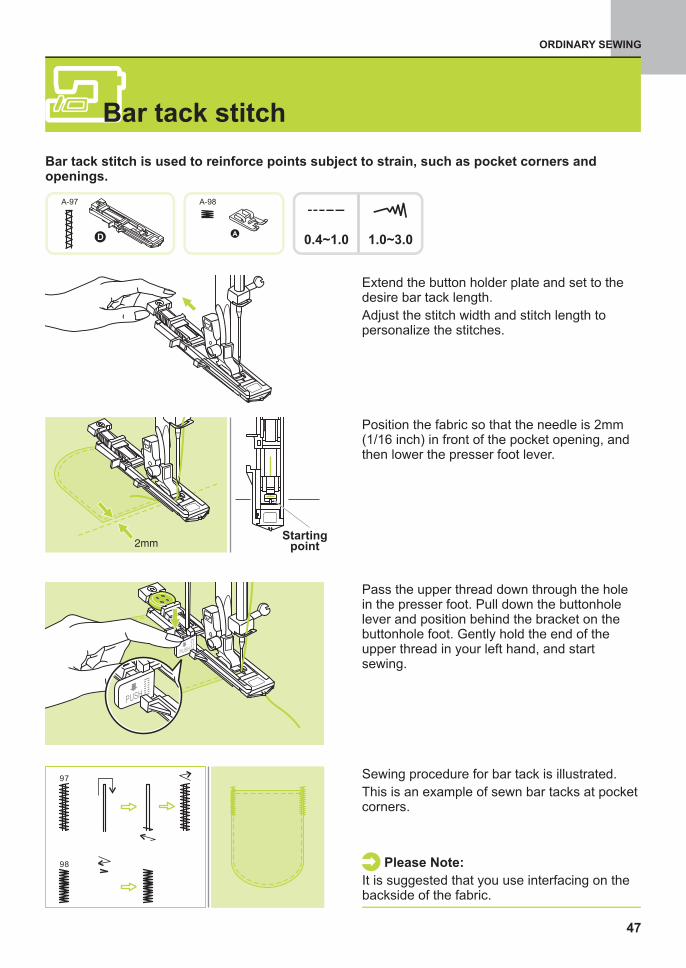
Position the fabric so that the needle is 2mm(1/16 inch) in front of the pocket opening, andthen lower the presser foot lever.
Pass the upper thread down through the holein the presser foot. Pull down the buttonholelever and position behind the bracket on thebuttonhole foot. Gently hold the end of theupper thread in your left hand, and startsewing.
Sewing procedure for bar tack is illustrated.
This is an example of sewn bar tacks at pocketcorners.
1.0~3.00.4~1.0
A-97
D
Extend the button holder plate and set to thedesire bar tack length.
Adjust the stitch width and stitch length topersonalize the stitches.
Bar tack stitch is used to reinforce points subject to strain, such as pocket corners andopenings.
Please Note:
It is suggested that you use interfacing on thebackside of the fabric.
A-98
A
97
98
���Starting
point
ORDINARY SEWING
A
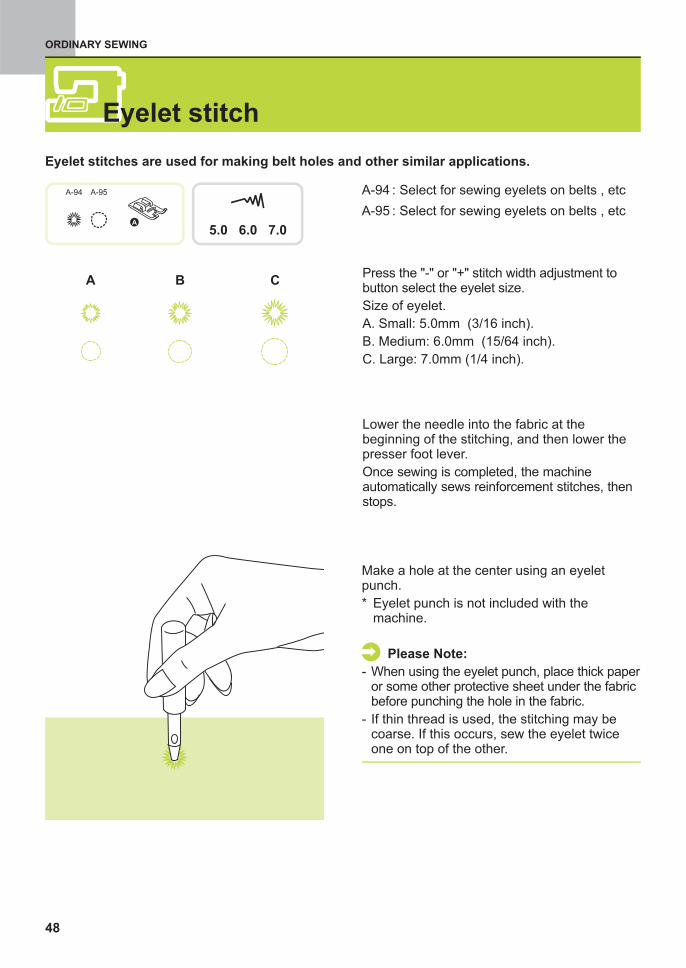
Press the "-" or "+" stitch width adjustment tobutton select the eyelet size.
Size of eyelet.
A. Small: 5.0mm (3/16 inch).
B. Medium: 6.0mm (15/64 inch).
C. Large: 7.0mm (1/4 inch).
Lower the needle into the fabric at thebeginning of the stitching, and then lower thepresser foot lever.
Once sewing is completed, the machineautomatically sews reinforcement stitches, thenstops.
5.0 6.0 7.0
A-94 A-94 : Select for sewing eyelets on belts , etc
A-95 : Select for sewing eyelets on belts , etc
A-95
A B C
Eyelet stitch
48
Eyelet stitches are used for making belt holes and other similar applications.
Make a hole at the center using an eyeletpunch.
* Eyelet punch is not included with themachine.
- When using the eyelet punch, place thick paperor some other protective sheet under the fabricbefore punching the hole in the fabric.
- If thin thread is used, the stitching may becoarse. If this occurs, sew the eyelet twiceone on top of the other.
Please Note:
ORDINARY SEWING
Change the presser foot to the button sewingfoot.
Position the work under the foot. Place thebutton in the desired position, lower the foot.
Select zig zag pattern. Adjust the stitch width to"2.5-4.5" according to the distance between thetwo holes of the button.
Turn the handwheel to check that the needlegoes cleanly into the left and right holes of thebutton.
For buttons with 4 holes, sew through the fronttwo holes first, push work forward and thensew through the back two holes.
Move the drop feed control to " " to lowerthe feed dogs.
2.4~4.5
A-96
H
When you finish the work, move the drop feedcontrol to " " to raise the feed dogs.
Please Note:
Button sewing
49
Before sewing, press the Auto-lock button tosew reinforcement stitches automatically at thebeginning and at the end of the stitch.
If a shank is required (ex. sew on coats orjackets), place a darning needle on top of thebutton and sew.
Pull end of the upper thread to the wrong sideof the fabric, then tie it with the bobbin thread.
a
ba
ORDINARY SEWING
Pull the button holder to rear.
Set the button guide plate on buttonhole foot tothe desired length.
Baste the upper fabric and the under fabrictogether.
Select the needle position. Lower the presserfoot over the center of the tear.
The size of one darn cycle is variable.
However, the maximum stitch length is 2.6cm(1 inch) and the maximum stitch width is 7mm(9/32 inch).
a. The length of sewing.
b. The width of sewing.
Stop
a
Start b
3.5~7.01.0~2.0
A-93
D
Darning stitch
50
Darning a small hole or a tear before it becomes larger can save a garment. Choose a finethread in a color as color as close to your garment possible.
���
ORDINARY SEWING
Pass the upper thread down through thehole in the presser foot.
Pull down the buttonhole lever.
The buttonhole lever is positioned behind thebracket on the buttonhole foot.
Gently hold the end of the upper thread in yourleft hand, and then start sewing.
If the sewing range is too big to sew, then wesuggest you can sew several times (or crosssew) to get better sewing result.
Darning stitches are sewn from the front of thepresser foot to the back, as shown.
51
Position the fabric so that the needle is 2mm(1/16 inch) in front of the area to be darned,and then lower the presser foot lever.
Please Note:
When lowering the presser foot, do not push inthe front of the presser foot, otherwise thedarning will not be sewn with the correct size.
If the fabric does not feed, for example,because it is too thick, increase the stitch length.
Please Note:
ORDINARY SEWING
Zipper Insertion
52
- Baste the zipper opening on the garment.
- Press open the seam allowance.
Place the zipper face down on the seamallowance with the teeth against the seamline. Baste the zipper tape.
- Attach the zipper foot. Attach the right side ofthe presser foot pin to the holder whensewing the left side of the zipper.
- Attach the left side of the presser foot pin tothe presser foot holder when sewing the rightside of the zipper.
- Stitching around the zipper.
- Remove the basting and press.
Inserting a centered zipper
Attention:Zipper foot should be used for sewing widthcenter needle position straight stitch only. It ispossible that needle could hit the presser footand break when sewing other patterns.
5mm
3.51.5~3.0
1
Wrongside
Reversestitches
Bastingstitching
Bastingstitching
Wrongside
Please Note:
When sewing, be sure that the needle does nottouch the zipper, otherwise the needle maybend or break.
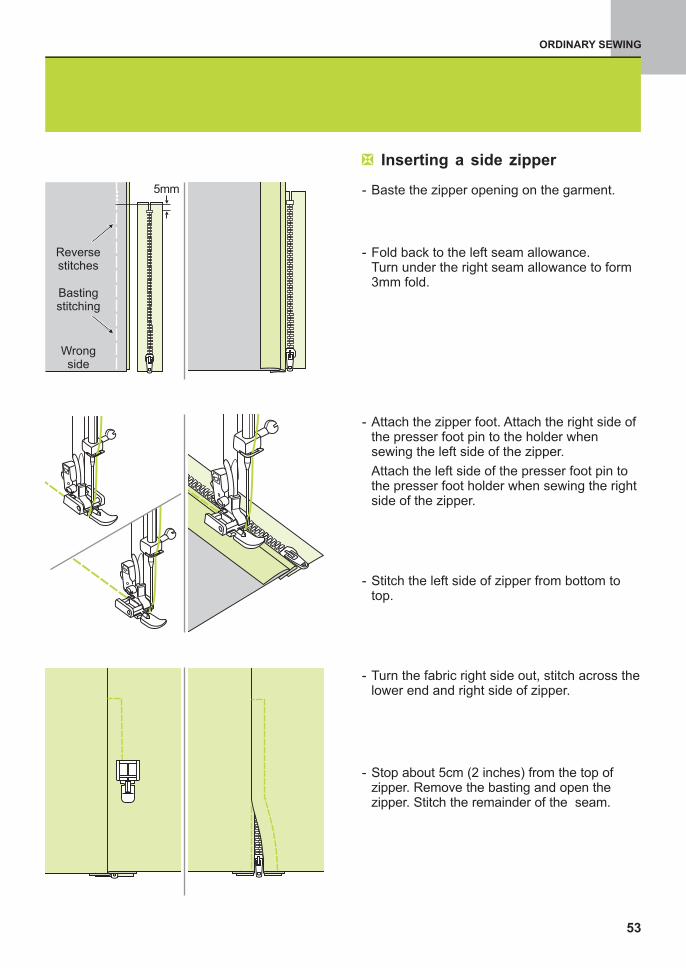
This foot can be set to sew on each side of the zipper, the The edge of the foot guides thezipper to ensure straight placement.
ORDINARY SEWING
Inserting a side zipper
- Baste the zipper opening on the garment.
- Fold back to the left seam allowance.Turn under the right seam allowance to form3mm fold.
- Attach the zipper foot. Attach the right side ofthe presser foot pin to the holder whensewing the left side of the zipper.
Attach the left side of the presser foot pin tothe presser foot holder when sewing the rightside of the zipper.
- Stitch the left side of zipper from bottom totop.
- Turn the fabric right side out, stitch across thelower end and right side of zipper.
- Stop about 5cm (2 inches) from the top ofzipper. Remove the basting and open thezipper. Stitch the remainder of the seam.
53
5mm
Wrongside
Reversestitches
Bastingstitching
ORDINARY SEWING
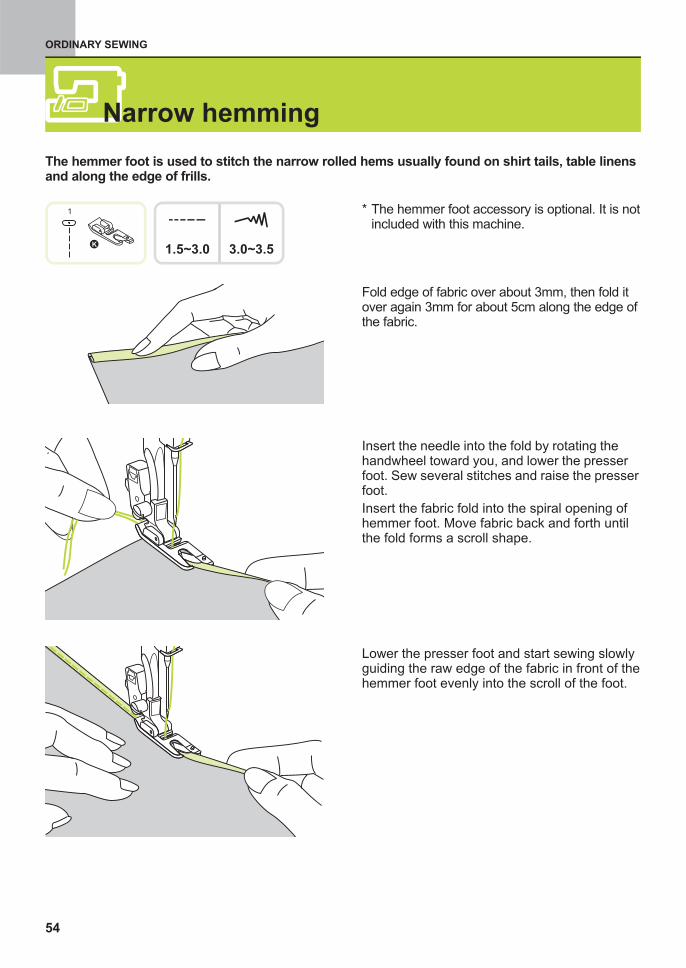
Fold edge of fabric over about 3mm, then fold itover again 3mm for about 5cm along the edge ofthe fabric.
Insert the needle into the fold by rotating thehandwheel toward you, and lower the presserfoot. Sew several stitches and raise the presserfoot.
Insert the fabric fold into the spiral opening ofhemmer foot. Move fabric back and forth untilthe fold forms a scroll shape.
Lower the presser foot and start sewing slowlyguiding the raw edge of the fabric in front of thehemmer foot evenly into the scroll of the foot.
* The hemmer foot accessory is optional. It is notincluded with this machine.
Narrow hemming
54
3.0~3.51.5~3.0
1
The hemmer foot is used to stitch the narrow rolled hems usually found on shirt tails, table linensand along the edge of frills.
ORDINARY SEWING
Cording
55
M
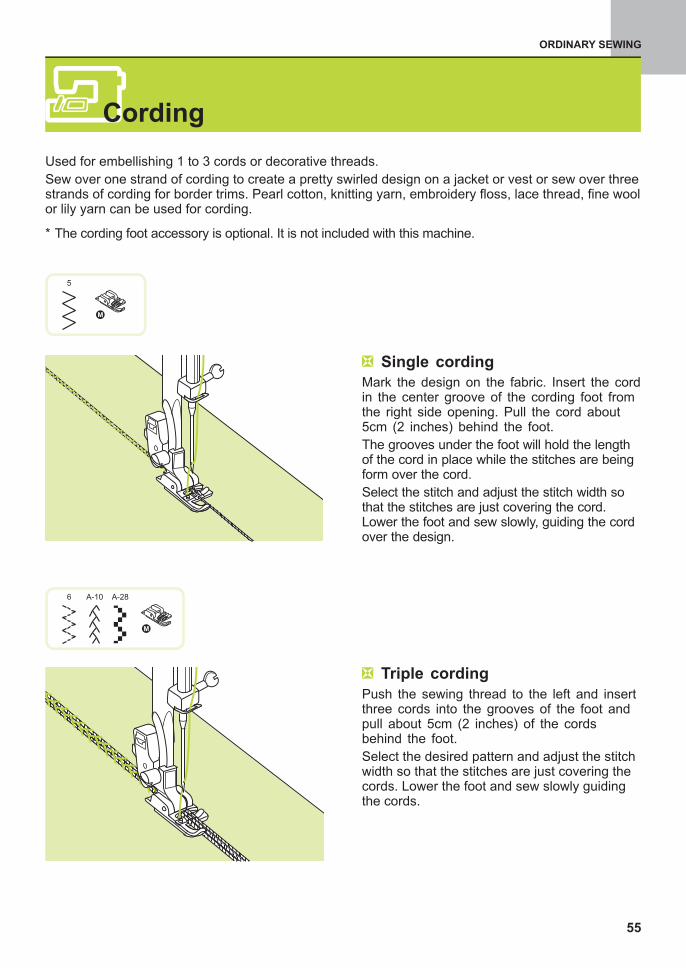
Push the sewing thread to the left and insertthree cords into the grooves of the foot andpull about 5cm (2 inches) of the cordsbehind the foot.
Select the desired pattern and adjust the stitchwidth so that the stitches are just covering thecords. Lower the foot and sew slowly guidingthe cords.
Mark the design on the fabric. Insert the cordin the center groove of the cording foot fromthe right side opening. Pull the cord about5cm (2 inches) behind the foot.
The grooves under the foot will hold the lengthof the cord in place while the stitches are beingform over the cord.
Select the stitch and adjust the stitch width sothat the stitches are just covering the cord.Lower the foot and sew slowly, guiding the cordover the design.
* The accessory is optional. It is not included with this machine.cording foot
5
6 A-10 A-28
Single cording
Triple cording
Used for embellishing 1 to 3 cords or decorative threads.
Sew over one strand of cording to create a pretty swirled design on a jacket or vest or sew over threestrands of cording for border trims. Pearl cotton, knitting yarn, embroidery floss, lace thread, fine woolor lily yarn can be used for cording.
ORDINARY SEWING
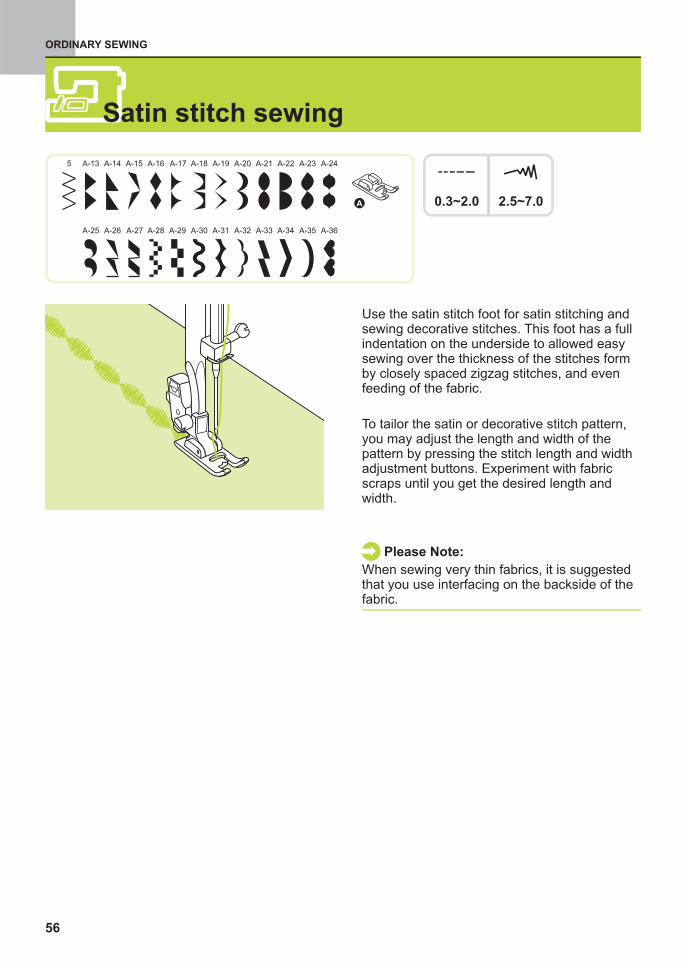
Use the satin stitch foot for satin stitching andsewing decorative stitches. This foot has a fullindentation on the underside to allowed easysewing over the thickness of the stitches formby closely spaced zigzag stitches, and evenfeeding of the fabric.
To tailor the satin or decorative stitch pattern,you may adjust the length and width of thepattern by pressing the stitch length and widthadjustment buttons. Experiment with fabricscraps until you get the desired length andwidth.
When sewing very thin fabrics, it is suggestedthat you use interfacing on the backside of thefabric.
Please Note:
0.3~2.0
A-15 A-16 A-17 A-18 A-19 A-20 A-21 A-22 A-23 A-24
A-25 A-26 A-27 A-28 A-29 A-30 A-31 A-32 A-33 A-34 A-35 A-36
A-14A-13
2.5~7.0
Satin stitch sewing
56
5
ORDINARY SEWING
Gathering
57
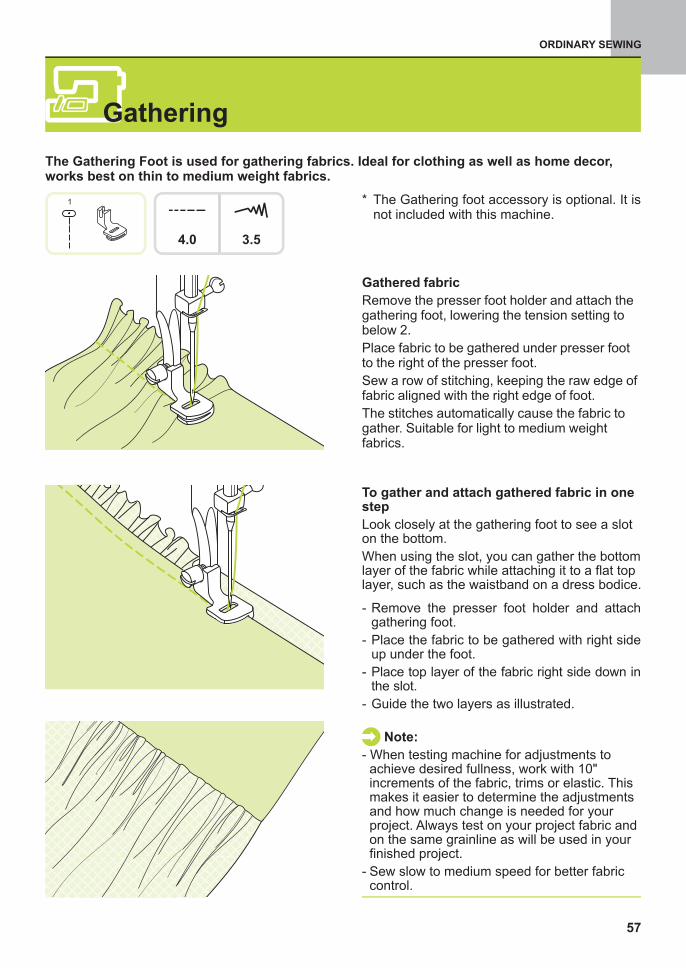
Gathered fabric
Remove the presser foot holder and attach thegathering foot, lowering the tension setting tobelow 2.
Suitable for light to medium weightfabrics.
Place fabric to be gathered under presser footto the right of the presser foot.
Sew a row of stitching, keeping the raw edge offabric aligned with the right edge of foot.
The stitches automatically cause the fabric togather.
To gather and attach gathered fabric in onestep
Look closely at the gathering foot to see a sloton the bottom.
When using the slot, you can gather the bottomlayer of the fabric while attaching it to a flat toplayer, such as the waistband on a dress bodice.
* The Gathering foot accessory is optional. It isnot included with this machine.
Note:
- When testing machine for adjustments toachieve desired fullness, work with 10"increments of the fabric, trims or elastic. Thismakes it easier to determine the adjustmentsand how much change is needed for yourproject. Always test on your project fabric andon the same grainline as will be used in yourfinished project.
- Sew slow to medium speed for better fabriccontrol.
- Remove the presser foot holder and attachgathering foot.
- Place the fabric to be gathered with right sideup under the foot.
- Place top layer of the fabric right side down inthe slot.
- Guide the two layers as illustrated.
3.54.0
1
The Gathering Foot is used for gathering fabrics. Ideal for clothing as well as home decor,works best on thin to medium weight fabrics.
ORDINARY SEWING
Smocking
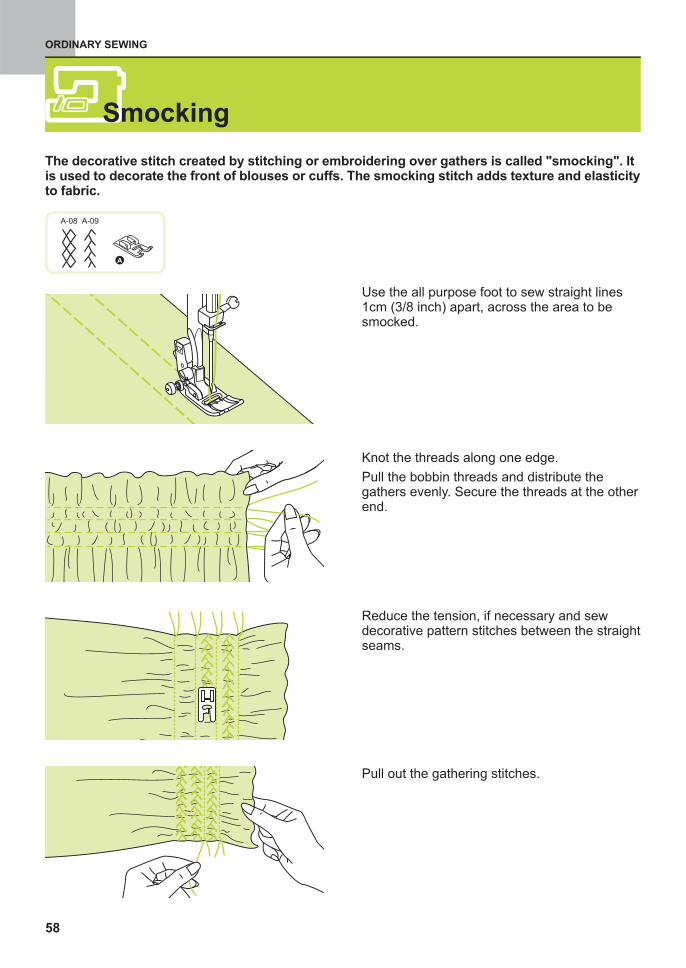
58
Use the all purpose foot to sew straight lines1cm (3/8 inch) apart, across the area to besmocked.
Knot the threads along one edge.
Pull the bobbin threads and distribute thegathers evenly. Secure the threads at the otherend.
Reduce the tension, if necessary and sewdecorative pattern stitches between the straightseams.
Pull out the gathering stitches.
The decorative stitch created by stitching or embroidering over gathers is called "smocking". Itis used to decorate the front of blouses or cuffs. The smocking stitch adds texture and elasticityto fabric.
A
A-08 A-09
ORDINARY SEWING
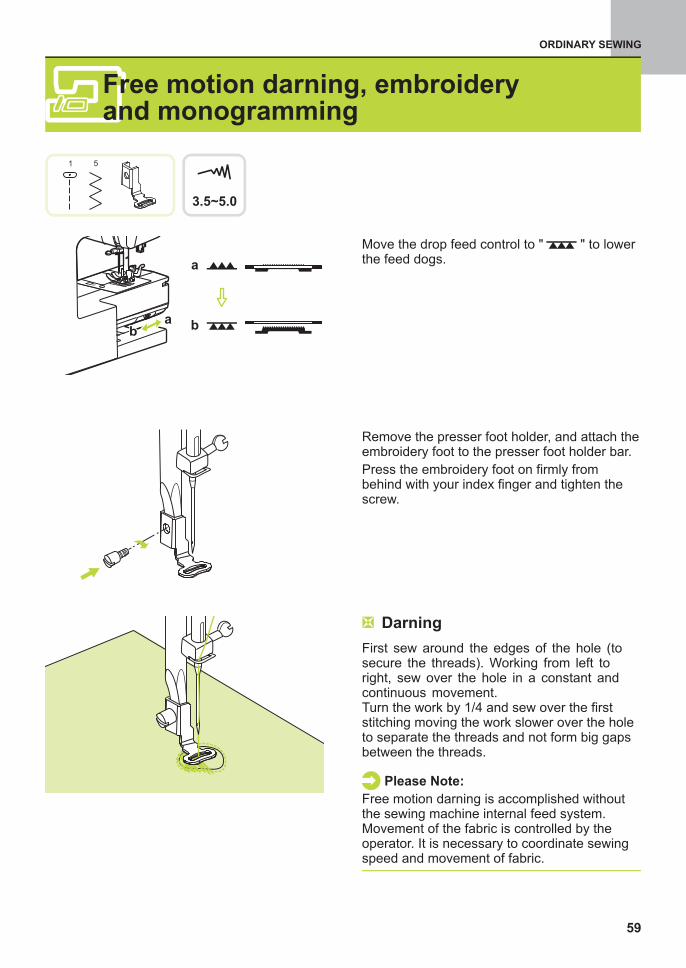
Remove the presser foot holder, and attach theembroidery foot to the presser foot holder bar.
Press the embroidery foot on firmly frombehind with your index finger and tighten thescrew.
Move the drop feed control to " " to lowerthe feed dogs.
3.5~5.0
1 5
First sew around the edges of the hole (tosecure the threads). Working from left toright, sew over the hole in a constant andcontinuous movement.Turn the work by 1/4 and sew over the firststitching moving the work slower over the holeto separate the threads and not form big gapsbetween the threads.
Free motion darning is accomplished withoutthe sewing machine internal feed system.Movement of the fabric is controlled by theoperator. It is necessary to coordinate sewingspeed and movement of fabric.
Please Note:
Darning
a
ba
Free motion darning, embroideryand monogramming
59
ORDINARY SEWING
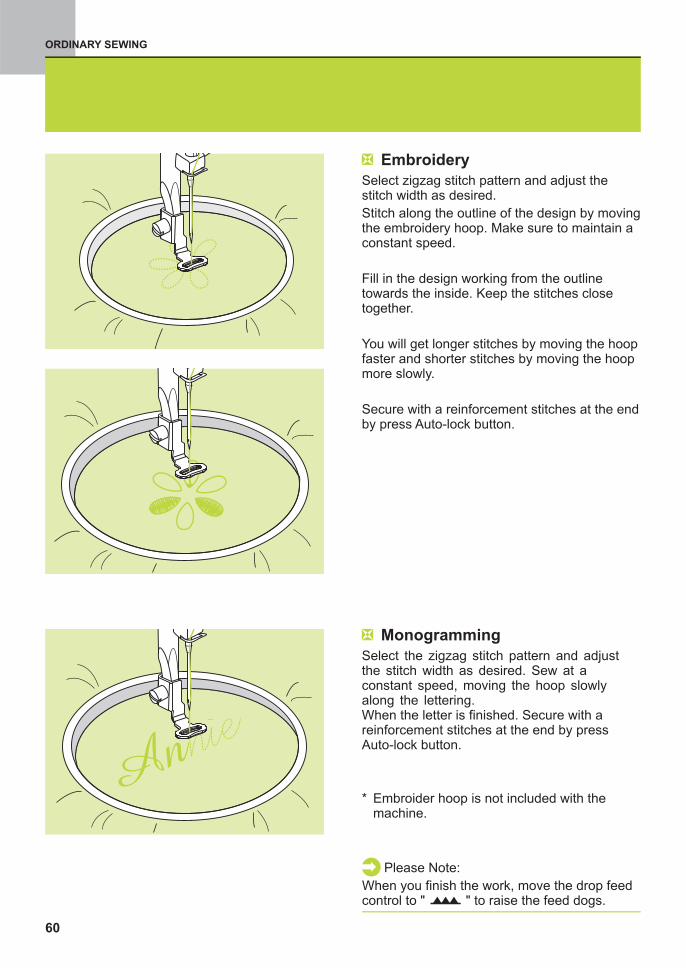
Select zigzag stitch pattern and adjust thestitch width as desired.
Stitch along the outline of the design by movingthe embroidery hoop. Make sure to maintain aconstant speed.
Fill in the design working from the outlinetowards the inside. Keep the stitches closetogether.
You will get longer stitches by moving the hoopfaster and shorter stitches by moving the hoopmore slowly.
Secure with a reinforcement stitches at the endby press Auto-lock button.
Select the zigzag stitch pattern and adjustthe stitch width as desired. Sew at aconstant speed, moving the hoop slowlyalong the lettering.When the letter is finished. Secure with areinforcement stitches at the end by pressAuto-lock button.
* Embroider hoop is not included with themachine.
Monogramming
Embroidery
60
Please Note:
When you finish the work, move the drop feedcontrol to " " to raise the feed dogs.
* The Quilting foot accessory is optional. It isnot included with this machine.
3.51.0~3.0
1 3
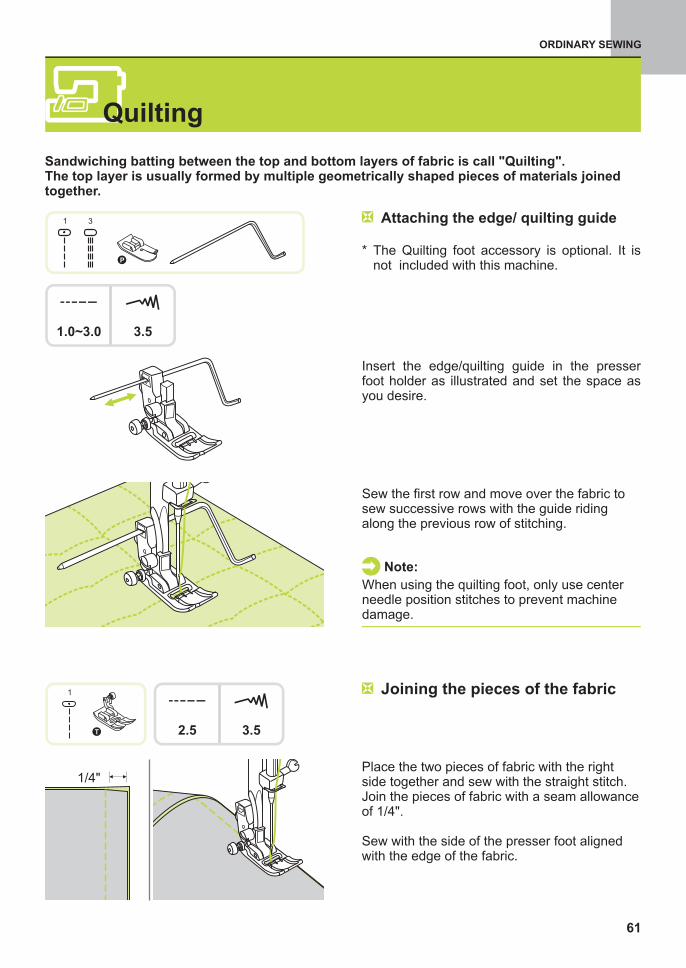
Insert the edge/quilting guide in the presserfoot holder as illustrated and set the space asyou desire.
Attaching the edge/ quilting guide
Sew the first row and move over the fabric tosew successive rows with the guide ridingalong the previous row of stitching.
Note:
When using the quilting foot, only use centerneedle position stitches to prevent machinedamage.
ORDINARY SEWING
Quilting
61
Sandwiching batting between the top and bottom layers of fabric is call "Quilting".The top layer is usually formed by multiple geometrically shaped pieces of materials joinedtogether.
Place the two pieces of fabric with the rightside together and sew with the straight stitch.Join the pieces of fabric with a seam allowanceof 1/4".
Sew with the side of the presser foot alignedwith the edge of the fabric.
1/4"
Joining the pieces of the fabric
3.52.5
1
T
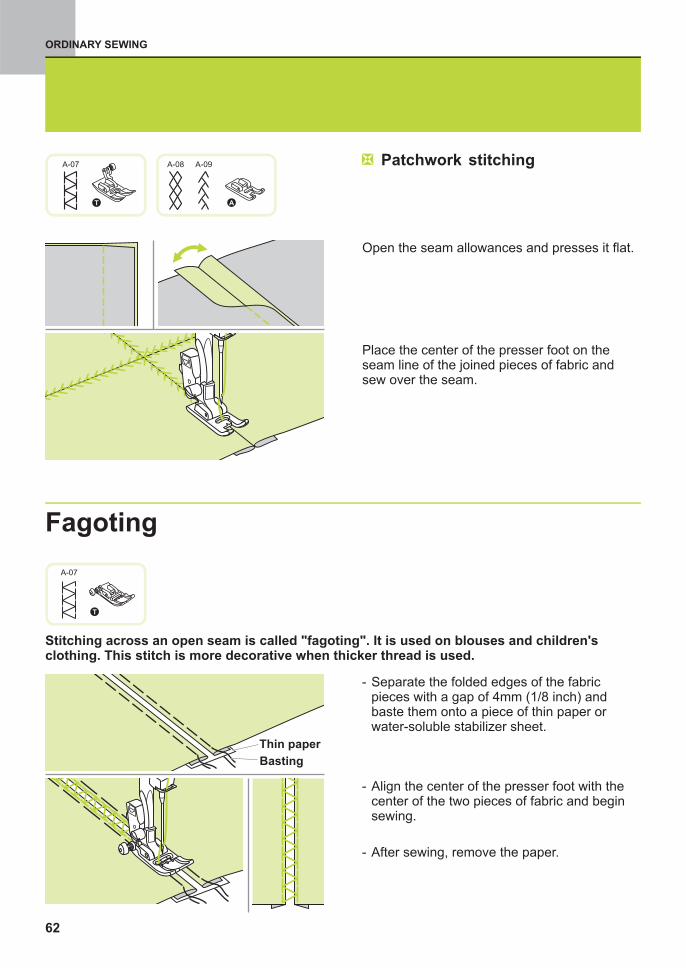
Open the seam allowances and presses it flat.
Patchwork stitching
T A
A-08 A-09A-07
Place the center of the presser foot on theseam line of the joined pieces of fabric andsew over the seam.
ORDINARY SEWING
62
Fagoting
T
Thin paper
Basting
- Separate the folded edges of the fabricpieces with a gap of 4mm (1/8 inch) andbaste them onto a piece of thin paper orwater-soluble stabilizer sheet.
- Align the center of the presser foot with thecenter of the two pieces of fabric and beginsewing.
- After sewing, remove the paper.
A-07
Stitching across an open seam is called "fagoting". It is used on blouses and children'sclothing. This stitch is more decorative when thicker thread is used.
ORDINARY SEWING
T
A-11
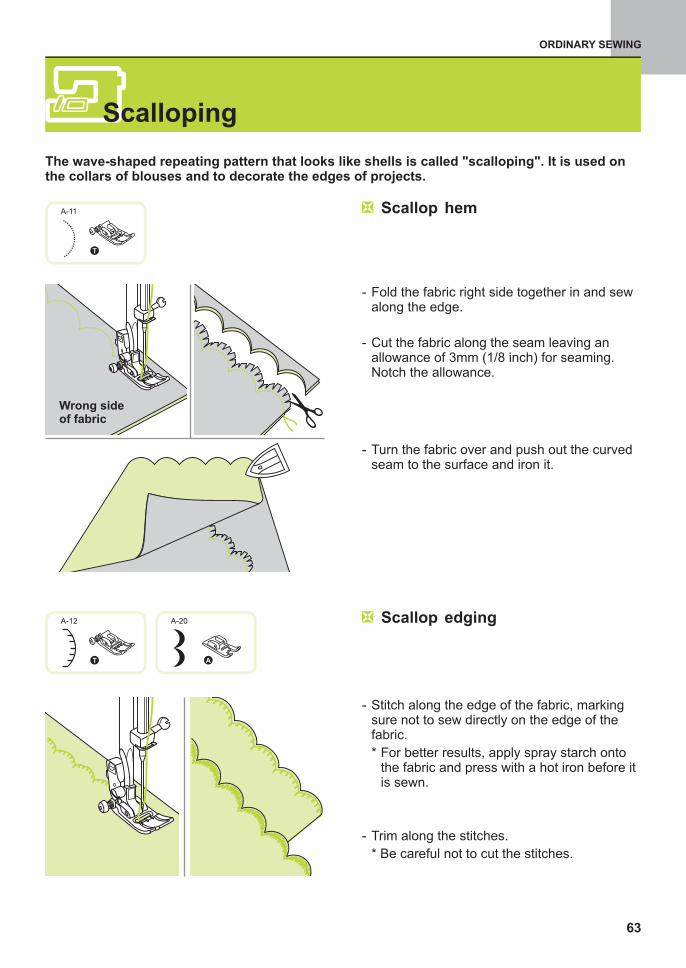
- Fold the fabric right side together in and sewalong the edge.
- Cut the fabric along the seam leaving anallowance of 3mm (1/8 inch) for seaming.Notch the allowance.
- Turn the fabric over and push out the curvedseam to the surface and iron it.
- Stitch along the edge of the fabric, markingsure not to sew directly on the edge of thefabric.
* For better results, apply spray starch ontothe fabric and press with a hot iron before itis sewn.
- Trim along the stitches.
* Be careful not to cut the stitches.
Scallop hem
Scallop edging
T
A-12 A-20
Scalloping
63
Wrong sideof fabric
The wave-shaped repeating pattern that looks like shells is called "scalloping". It is used onthe collars of blouses and to decorate the edges of projects.
ORDINARY SEWING
* The walking foot accessory is optional. It is not included with thismachine.
Always try to sew first without the walking foot accessory which should be used only whennecessary.
It is easier to guide the fabric and you have a better view of the seam when using the standard,regular foot on your machine. Your sewing machine offers excellent stitch quality on a wide range offabrics from delicate chiffons to multiple layers of denim.
The Walking Foot accessory equalizes the feeding of the upper and lower layers of fabric andimproves the matching of plaids, stripes and patterns. It also helps to prevent uneven feeding of verydifficult fabrics.
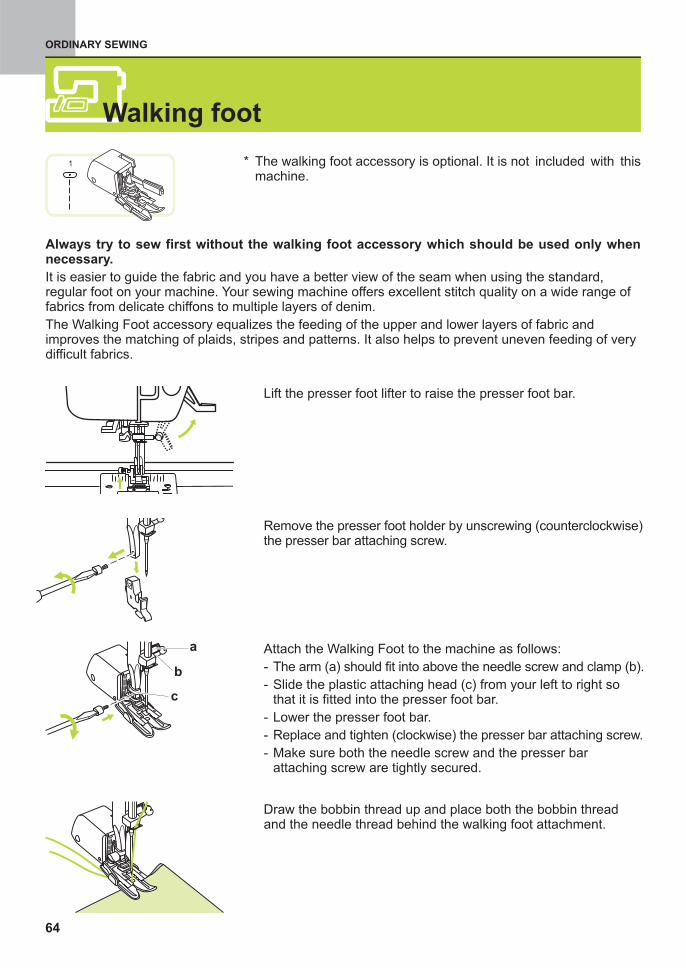
Lift the presser foot lifter to raise the presser foot bar.
Remove the presser foot holder by unscrewing (counterclockwise)the presser bar attaching screw.
Attach the Walking Foot to the machine as follows:
- The arm (a) should fit into above the needle screw and clamp (b).
- Slide the plastic attaching head (c) from your left to right sothat it is fitted into the presser foot bar.
- Lower the presser foot bar.
- Replace and tighten (clockwise) the presser bar attaching screw.
- Make sure both the needle screw and the presser barattaching screw are tightly secured.
Draw the bobbin thread up and place both the bobbin threadand the needle thread behind the walking foot attachment.
c
a
b
1
Walking foot
64
ORDINARY SEWING
Please Note:
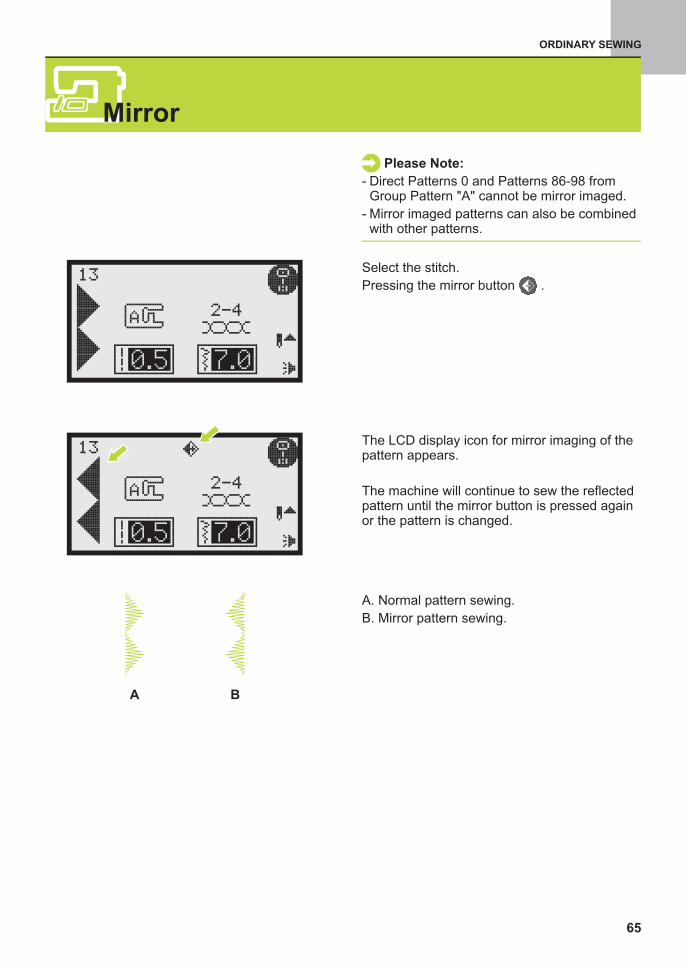
- Direct Patterns 0 and Patterns 86-98 fromGroup Pattern "A" cannot be mirror imaged.
- Mirror imaged patterns can also be combinedwith other patterns.
Select the stitch.
Pressing the mirror button .
The LCD display icon for mirror imaging of thepattern appears.
The machine will continue to sew the reflectedpattern until the mirror button is pressed againor the pattern is changed.
A. Normal pattern sewing.
B. Mirror pattern sewing.
A B
Mirror
65
ORDINARY SEWING
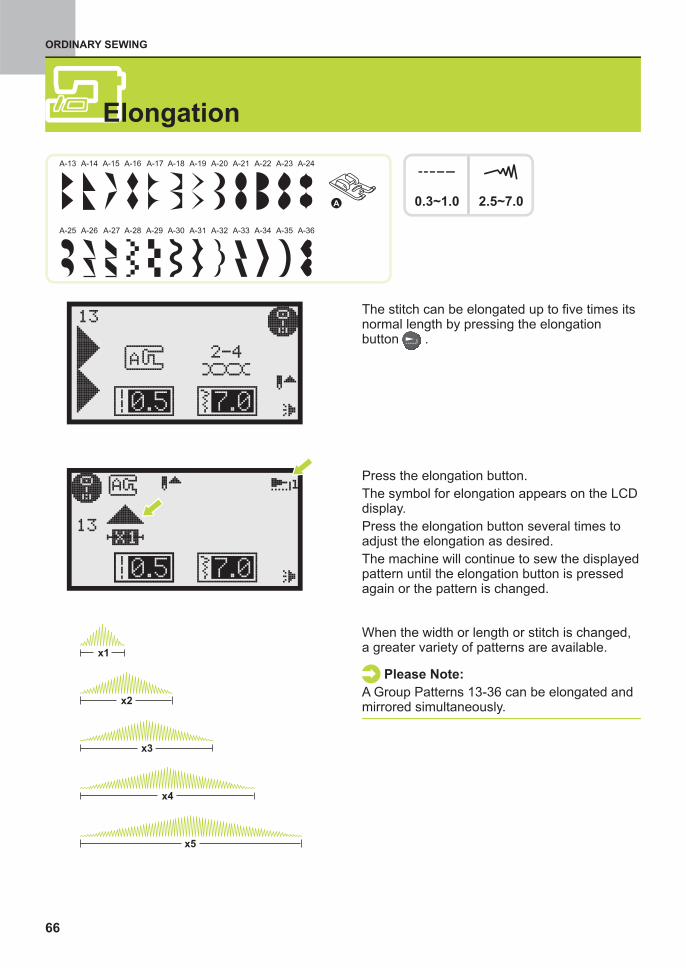
0.3~1.0 2.5~7.0
The stitch can be elongated up to five times itsnormal length by pressing the elongationbutton .
Press the elongation button.
The symbol for elongation appears on the LCDdisplay.
Press the elongation button several times toadjust the elongation as desired.
The machine will continue to sew the displayedpattern until the elongation button is pressedagain or the pattern is changed.
When the width or length or stitch is changed,a greater variety of patterns are available.
Please Note:
A Group Patterns 13-36 can be elongated andmirrored simultaneously.
x5
x4
x3
x2
x1
Elongation
66
A-15 A-16 A-17 A-18 A-19 A-20 A-21 A-22 A-23 A-24
A-25 A-26 A-27 A-28 A-29 A-30 A-31 A-32 A-33 A-34 A-35 A-36
A-14A-13
ORDINARY SEWING
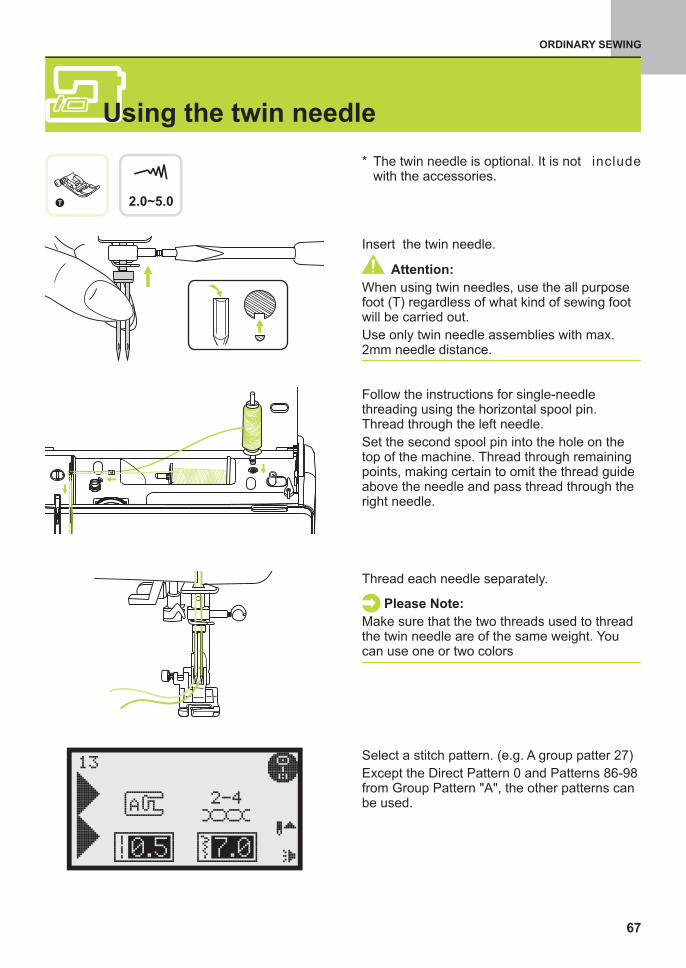
Insert the twin needle.
Follow the instructions for single-needlethreading using the horizontal spool pin.Thread through the left needle.
Set the second spool pin into the hole on thetop of the machine. Thread through remainingpoints, making certain to omit the thread guideabove the needle and pass thread through theright needle.
Thread each needle separately.
Please Note:
Make sure that the two threads used to threadthe twin needle are of the same weight. Youcan use one or two colors
* The twin needle is optional. It is not includewith the accessories.
Attention:
When using twin needles, use the all purposefoot (T) regardless of what kind of sewing footwill be carried out.
Use only twin needle assemblies with max.2mm needle distance.
2.0~5.0T
Select a stitch pattern. (e.g. A group patter 27)
Except the Direct Pattern 0 and Patterns 86-98from Group Pattern "A", the other patterns canbe used.
Using the twin needle
67
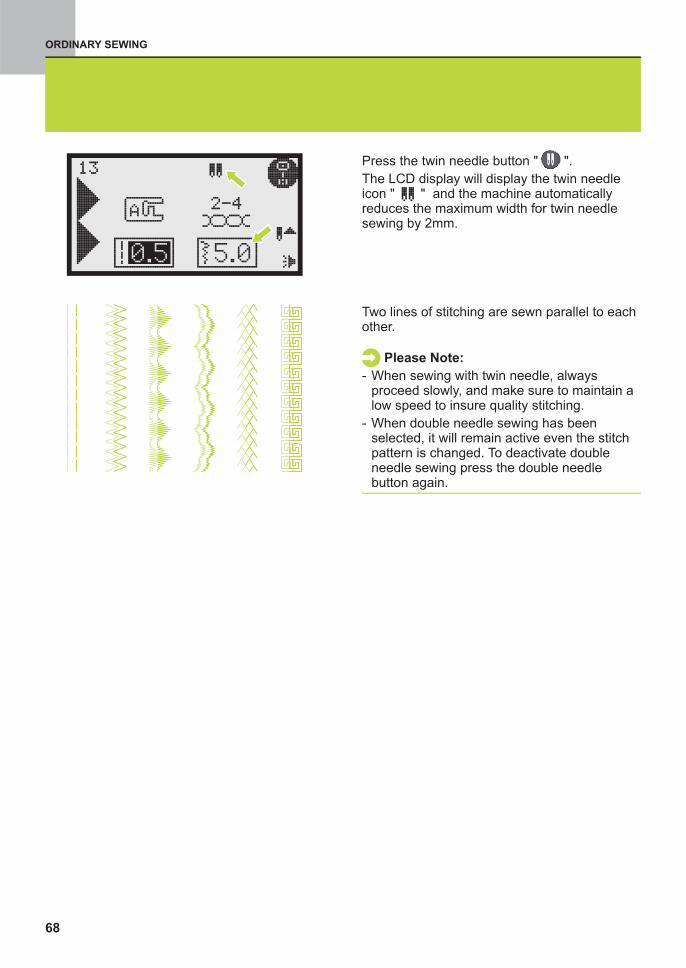
ORDINARY SEWING
Press the twin needle button " ".
The LCD display will display the twin needleicon " " and the machine automaticallyreduces the maximum width for twin needlesewing by 2mm.
Please Note:
- When sewing with twin needle, alwaysproceed slowly, and make sure to maintain alow speed to insure quality stitching.
- When double needle sewing has beenselected, it will remain active even the stitchpattern is changed. To deactivate doubleneedle sewing press the double needlebutton again.
Two lines of stitching are sewn parallel to eachother.
68
ORDINARY SEWING
Combined patterns can be stored for later use. Since stored patterns are not lost after thesewing machine is turned off, they can be recalled at any time. This is convenient for patterns,such as names, that will be used often.
Please Note:
- Multiple patterns selecting from pattern groups , , , can be combined together.
- Direct Patterns 0 and cannot be entered into memory.
- This machine has 4 modules of program memory and each module can retain 20 units of stitches.
- All the units in the memory can be edited to set its function such as Stitch length, Stitch width,Elongation, Mirror, and Auto-lock.
Patterns 86-98 from Group Pattern "A"
1. Press the memory button to enter the memory mode.
If you want to leave the memory module display, press theclear/ return button to return the normal display.
Combining patterns
2. Use the arrow buttons to select the number of the memorymodule. (For example: M3)
3. Press the OK button,
Upper left corner of LCD display shows the number of thememory module.
The memory display is enteredautomatically and the flashing cursor is in position for the firstpattern to be entered.
To store the combination of characters or decorative stitches.
Memory
69
ORDINARY SEWING
5. Press the OK button to into pattern browser, the displaycontaining the various stitches in the selected pattern groupappears.
6. Press the desired pattern number or the arrow buttons toselect desired pattern. ( A group pattern36)
The selected pattern displays on the LCD display and thecursor moves to the next position.
For example:
7. Repeat step 4~6 for more patterns to be stored in the memory.
When 20 patterns have been selected, the memory will befull. If another pattern is selected after the memory is full themachine will beep to prompt it.
4. Press the pattern group selection button to enter the patterngroup selection display.
(E.g. For pattern group "A")
Select the desired pattern group.
8. Press the memory button to leave the memory mode andreturn to the normal mode.
Attention:The selected pattern will be cleared from the memory moduleafter closing the machine if you do not press
again when you have completed your selection.the memory
button
70
ORDINARY SEWING
Editing patterns
1. Press the memory button to enter the memory mode.
2. Use the arrow buttons to select the number of the memorymodule. (For example: M3)
3. Press the OK Button, the LCD display containing the varioustypes of stitches will open and the cursor stay in 1st position.
4. Use the arrow buttons to select the pattern that you wish toedit while in the memory mode.
The stitch length, stitch width, Elongation, Mirror imaging andAuto-lock of the patterns can be adjusted.
71
ORDINARY SEWING
Clearing patterns
1. Use the arrow buttons to move the cursor to the pattern thatyou want to delete.
2. Press the clear/ return button to delete the selected patternand all patterns in the back will be moved one memoryposition forward.
Adding patterns
1. Use the arrow buttons to move the cursor to the pattern thatyou want to delete.
2. Press the desired pattern number or the arrow buttons toselect desired pattern. ( B group pattern 54)
All patterns in the back will be moved one memory positionbackward.
For example:
72
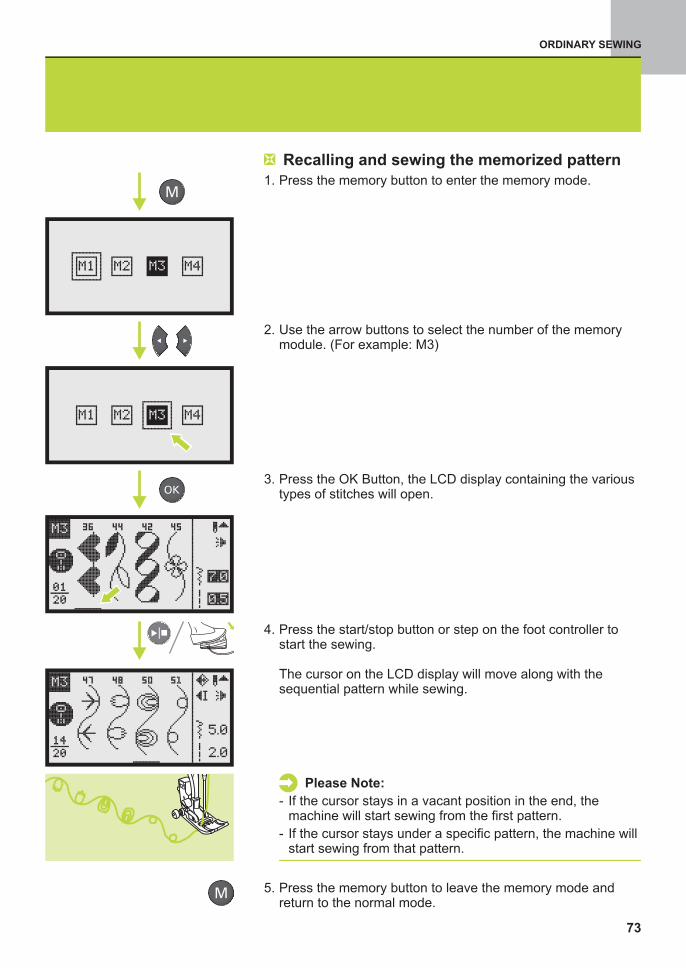
ORDINARY SEWING
Recalling and sewing the memorized pattern
1. Press the memory button to enter the memory mode.
2. Use the arrow buttons to select the number of the memorymodule. (For example: M3)
3. Press the OK Button, the LCD display containing the varioustypes of stitches will open.
4. Press the start/stop button or step on the foot controller tostart the sewing.
The cursor on the LCD display will move along with thesequential pattern while sewing.
5. Press the memory button to leave the memory mode andreturn to the normal mode.
Please Note:
- If the cursor stays in a vacant position in the end, themachine will start sewing from the first pattern.
- If the cursor stays under a specific pattern, the machine willstart sewing from that pattern.
73

EMBROIDERY
Important Embroidery information
74
Embroidery threads
A good quality thread is essential for embroidery to avoid poor stitch formation, thread breakage, etc.
Embroidery is particularly effective if you use 40wt glossy rayon or polyester embroidery threads asupper threads. They are available in a wide range of colors for beautiful embroidery.
Polyester with a brilliant sheen is a hard wearing colorfast thread and has a high tensile strengthwhich is suitable for all types of embroidery.
Rayon is a soft viscose fiber with a brilliant sheen and suitable for fine, delicate embroidery, or itemsthat will not receive excessive wear and tear.
Metallic thread is a light- to medium weight thread suitable for special effects in embroidery.Reduce the speed and the upper thread tension when embroidering with metallic threads.
- Correct size thread must correspond with correct size needle.- Replace the needle regularly.
Polyester threads
Rayon threads
Metallic threads
Embroidery needle
Note:
Use the s when using metallic or specialty threads.econd spool pin
Lower threads
Bobbin Fill (special bobbin thread)
Darning and embroidery thread
Bobbin Fill is an especially soft and light polyester thread suitable for bobbin thread. This specialbobbin thread ensures a steady thread tension and an optimal intertwining of the upper and bobbinthread.
Fine mercerized cotton thread which is suitable for embroidering on cotton.
Note:In most cases, bobbin thread for embroidery is either white or black. Some special cases require thesame thread in top and bobbin.
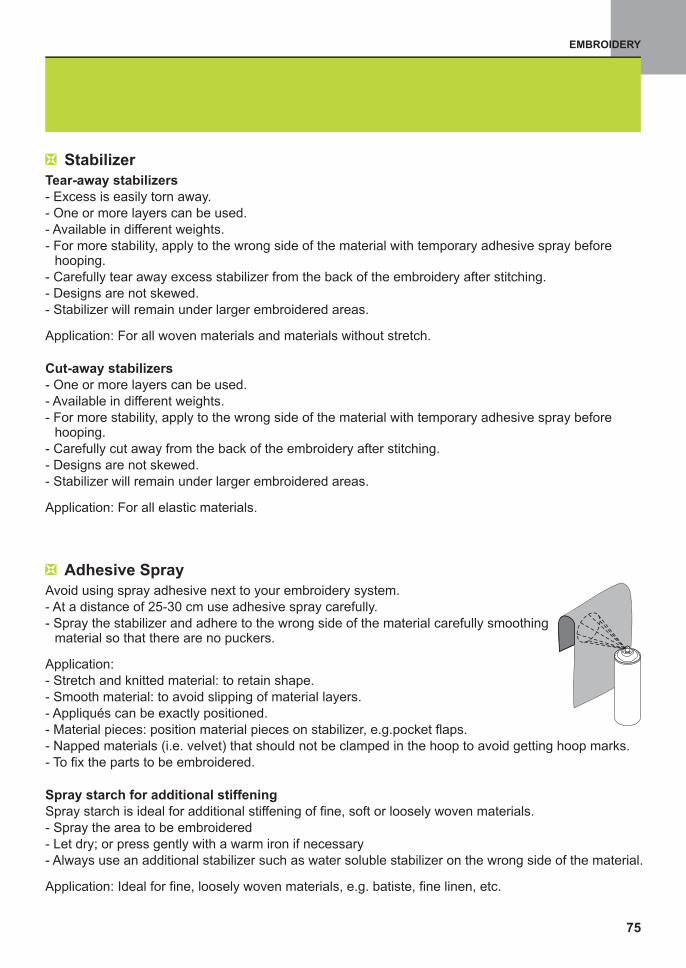
Stabilizer
Tear-away stabilizers
Cut-away stabilizers
- Excess is easily torn away.
- One or more layers can be used.
- Available in different weights.
- For more stability, apply to the wrong side of the material with temporary adhesive spray beforehooping.
- Carefully tear away excess stabilizer from the back of the embroidery after stitching.
- Designs are not skewed.
- Stabilizer will remain under larger embroidered areas.
Application: For all woven materials and materials without stretch.
- One or more layers can be used.
- Available in different weights.
- For more stability, apply to the wrong side of the material with temporary adhesive spray beforehooping.
- Carefully cut away from the back of the embroidery after stitching.
- Designs are not skewed.
- Stabilizer will remain under larger embroidered areas.
Application: For all elastic materials.
Adhesive Spray
Avoid using spray adhesive next to your embroidery system.
- At a distance of 25-30 cm use adhesive spray carefully.
- Spray the stabilizer and adhere to the wrong side of the material carefully smoothingmaterial so that there are no puckers.
Application:
- Stretch and knitted material: to retain shape.
- Smooth material: to avoid slipping of material layers.
- Appliqués can be exactly positioned.
- Material pieces: position material pieces on stabilizer, e.g.pocket flaps.
- Napped materials (i.e. velvet) that should not be clamped in the hoop to avoid getting hoop marks.
- To fix the parts to be embroidered.
Spray starch is ideal for additional stiffening of fine, soft or loosely woven materials.
- Spray the area to be embroidered
- Let dry; or press gently with a warm iron if necessary
- Always use an additional stabilizer such as water soluble stabilizer on the wrong side of the material.
Application: Ideal for fine, loosely woven materials, e.g. batiste, fine linen, etc.
Spray starch for additional stiffening
EMBROIDERY
75
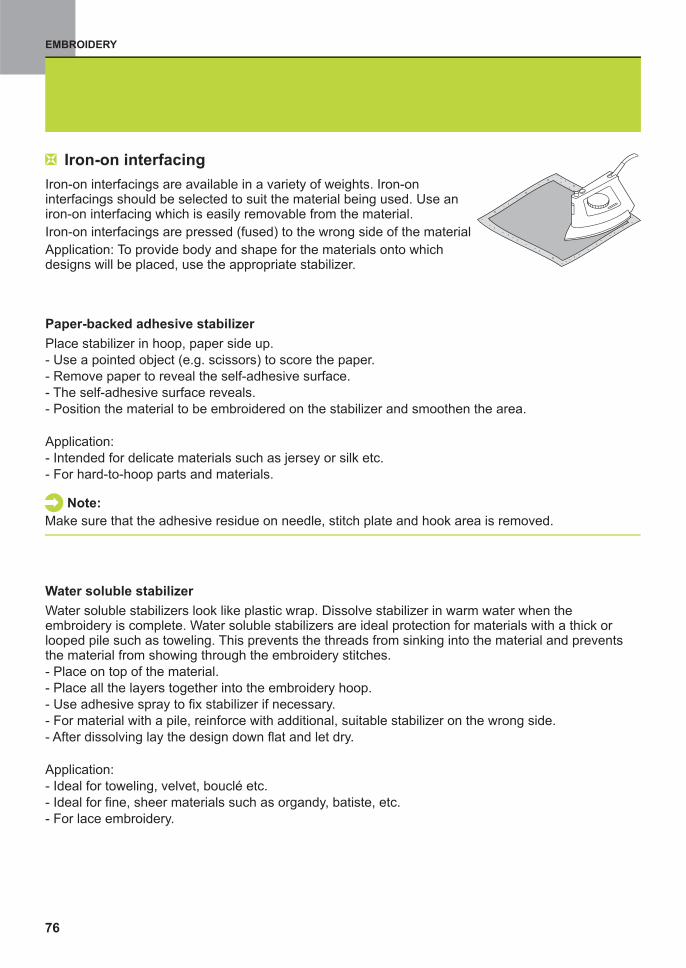
Iron-on interfacing
Iron-on interfacings are available in a variety of weights. Iron-oninterfacings should be selected to suit the material being used. Use aniron-on interfacing which is easily removable from the material.
Iron-on interfacings are pressed (fused) to the wrong side of the material
Application: To provide body and shape for the materials onto whichdesigns will be placed, use the appropriate stabilizer.
Paper-backed adhesive stabilizer
Place stabilizer in hoop, paper side up.
- Use a pointed object (e.g. scissors) to score the paper.
- Remove paper to reveal the self-adhesive surface.
- The self-adhesive surface reveals.
- Position the material to be embroidered on the stabilizer and smoothen the area.
Application:
- Intended for delicate materials such as jersey or silk etc.
- For hard-to-hoop parts and materials.
Water soluble stabilizer
Water soluble stabilizers look like plastic wrap. Dissolve stabilizer in warm water when theembroidery is complete. Water soluble stabilizers are ideal protection for materials with a thick orlooped pile such as toweling. This prevents the threads from sinking into the material and preventsthe material from showing through the embroidery stitches.
- Place on top of the material.
- Place all the layers together into the embroidery hoop.
- Use adhesive spray to fix stabilizer if necessary.
- For material with a pile, reinforce with additional, suitable stabilizer on the wrong side.
- After dissolving lay the design down flat and let dry.
Application:
- Ideal for toweling, velvet, bouclé etc.
- Ideal for fine, sheer materials such as organdy, batiste, etc.
- For lace embroidery.
Make sure that the adhesive residue on needle, stitch plate and hook area is removed.
Note:
EMBROIDERY
76
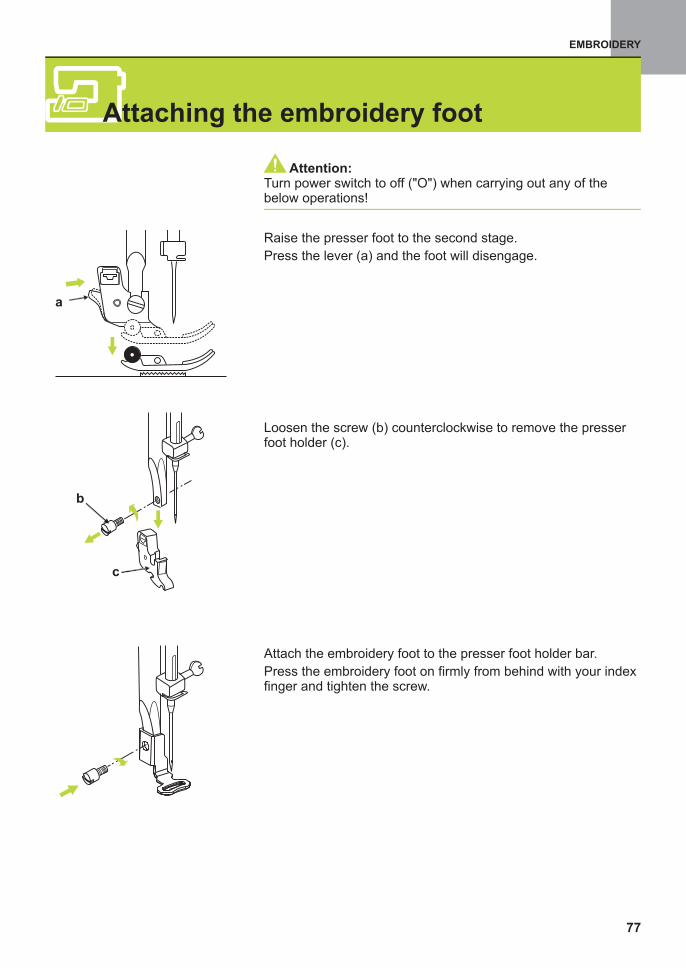
EMBROIDERY
Turn power switch to off ("O") when carrying out any of thebelow operations!
Attention:
Loosen the screw (b) counterclockwise to remove the presserfoot holder (c).
Attach the embroidery foot to the presser foot holder bar.
Press the embroidery foot on firmly from behind with your indexfinger and tighten the screw.
Raise the presser foot to the second stage.
Press the lever (a) and the foot will disengage.
Attaching the embroidery foot
77
b
c
a
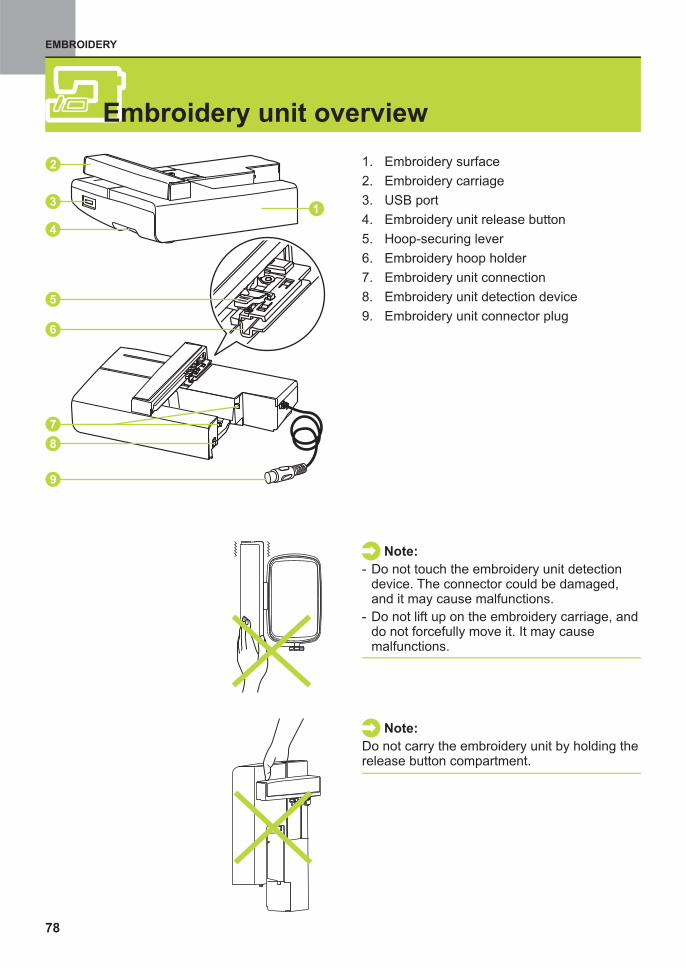
EMBROIDERY
Embroidery unit overview
1. Embroidery surface
2. Embroidery carriage
3. USB port
4. Embroidery unit release button
5. Hoop-securing lever
6. Embroidery hoop holder
7. Embroidery unit connection
8. Embroidery unit detection device
9. Embroidery unit connector plug
Note:
- Do not touch the embroidery. The connector could be damaged,
and it may cause malfunctions.
- Do not lift up on the embroidery carriage, anddo not forcefully move it. It may causemalfunctions.
unit detectiondevice
Note:
Do not carry the embroidery unit by holding therelease button compartment.
78
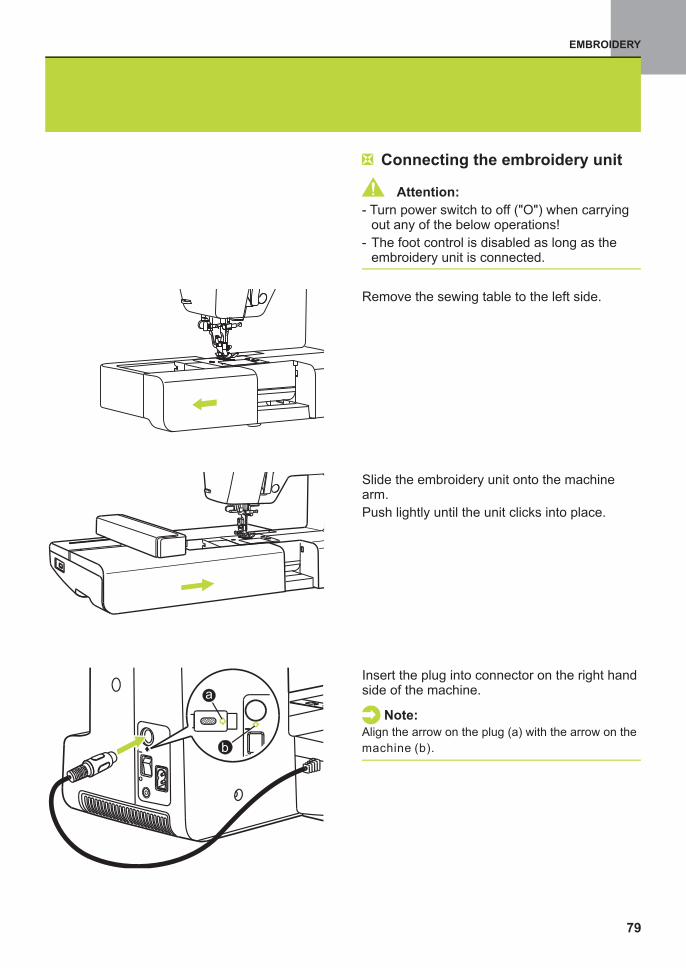
Connecting the embroidery unit
Remove the sewing table to the left side.
- Turn power switch to off ("O") when carryingout any of the below operations!
- The foot control is disabled as long as theembroidery unit is connected.
Attention:
Slide the embroidery unit onto the machinearm.
Push lightly until the unit clicks into place.
Insert the plug into connector on the right handside of the machine.
Note:
Align the arrow on the plug (a) with the arrow on the
machine (b).
EMBROIDERY
79
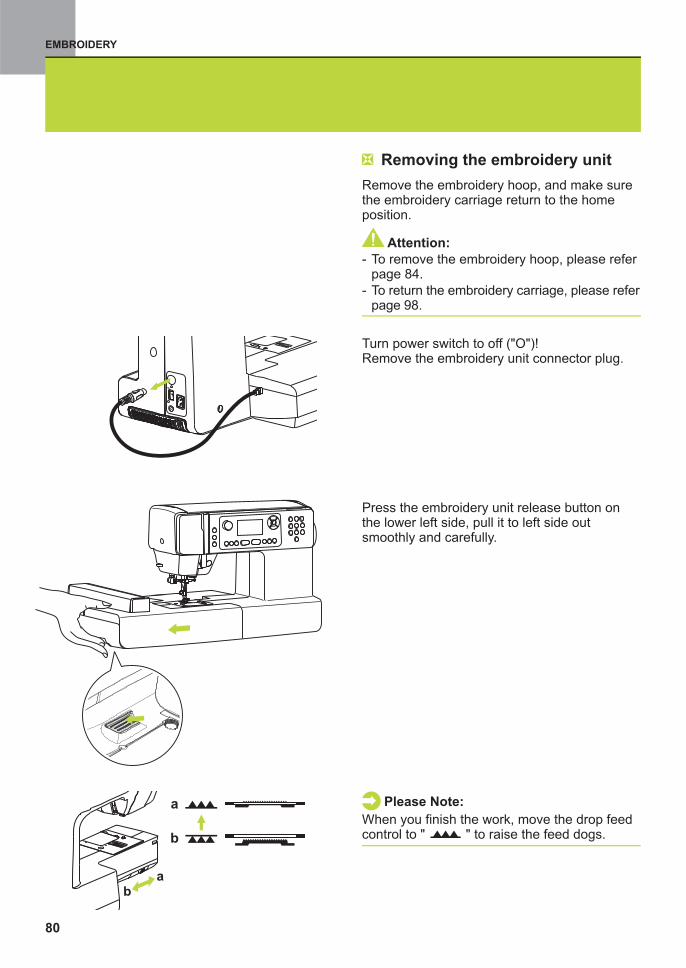
Removing the embroidery unit
Remove the embroidery hoop, and make surethe embroidery carriage return to the homeposition.
Turn power switch to off ("O")!Remove the embroidery unit connector plug.
Press the embroidery unit release button onthe lower left side, pull it to left side outsmoothly and carefully.
When you finish the work, move the drop feedcontrol to " " to raise the feed dogs.
Please Note:a
b
ab
EMBROIDERY
80
Attention:
- To remove the embroidery hoop, please referpage 84.
- To return the embroidery carriage, please referpage 98.
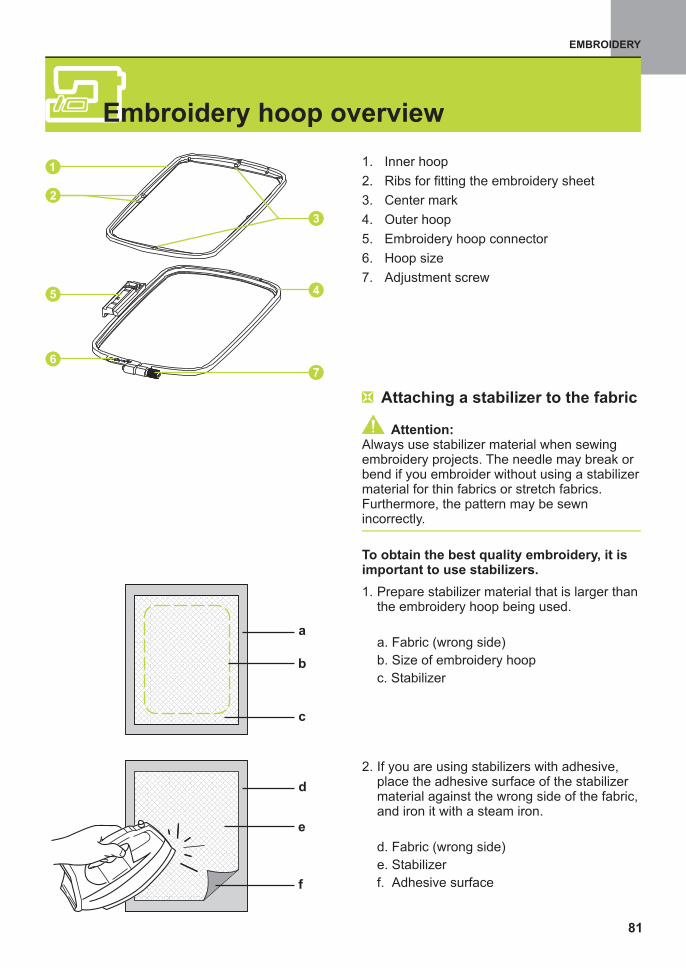
EMBROIDERY
Attaching a stabilizer to the fabric
1.
2. Ribs for fitting the e
3.
4.
5.
6.
7.
Inner hoop
sheet
Center mark
Outer hoop
Embroidery hoop connector
Hoop size
Adjustment screw
mbroidery
Embroidery hoop overview
1. Prepare stabilizer material that is larger thanthe embroidery hoop being used.
a.
b.
c.
Fabric (wrong side)
Size of embroidery hoop
Stabilizer
2. If you are using stabilizers with adhesive,place the adhesive surface of the stabilizermaterial against the wrong side of the fabric,and iron it with a steam iron.
d.
e.
f. surface
Fabric (wrong side)
Stabilizer
Adhesive
To obtain the best quality embroidery, it isimportant to use stabilizers.
Attention:Always use stabilizer material when sewingembroidery projects. The needle may break orbend if you embroider without using a stabilizermaterial for thin fabrics or stretch fabrics.Furthermore, the pattern may be sewnincorrectly.
d
e
a
b
c
f
81
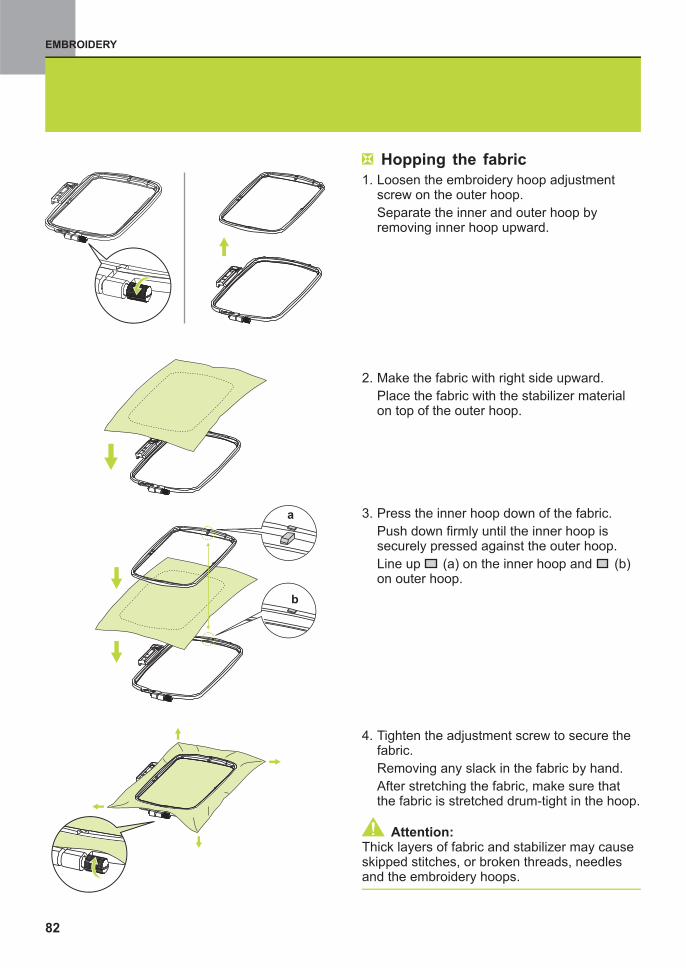
Hopping the fabric
1. Loosen the embroidery hoop adjustmentscrew on the outer hoop.
Separate the inner and outer hoop byremoving inner hoop upward.
2. Make the fabric with right side upward.
Place the fabric with the stabilizer materialon top of the outer hoop.
3. Press the inner hoop down of the fabric.
Push down firmly until the inner hoop issecurely pressed against the outer hoop.
hoophoop
Line up (a) on the inner and (b)on outer .
4. Tighten the adjustment screw to secure thefabric.
Removing any slack in the fabric by hand.
After stretching the fabric, make sure thatthe fabric is stretched drum-tight in the hoop.
a
b
EMBROIDERY
82
Attention:Thick layers of fabric and stabilizer may causeskipped stitches, or broken threads, needlesand the .embroidery hoops
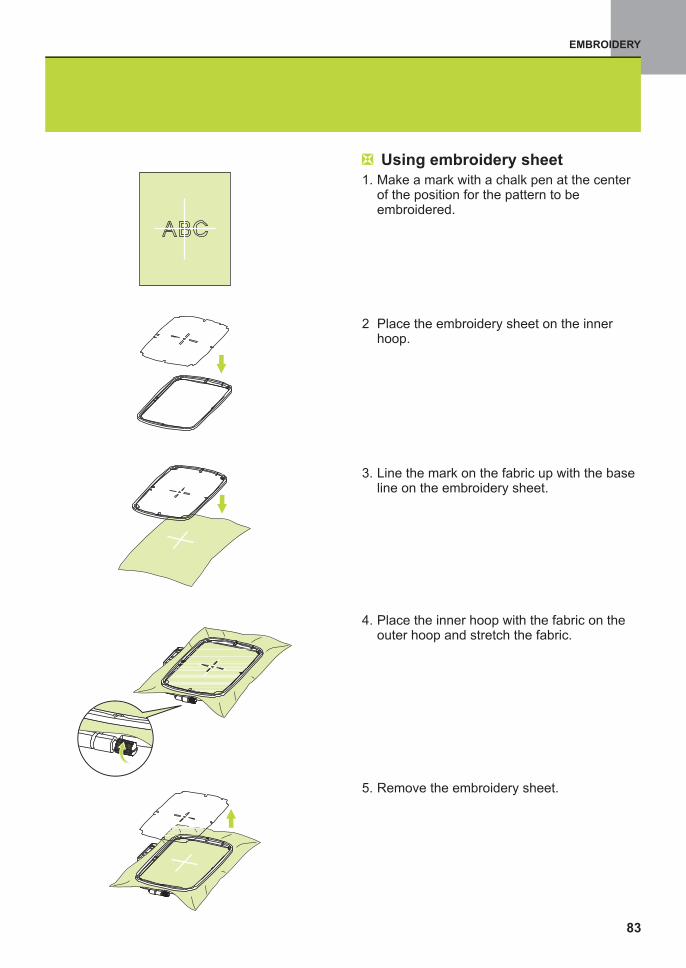
Using sheetembroidery
1. Make a mark with a chalk pen at the centerof the position for the pattern to beembroidered.
2 Place the embroidery sheet on the innerhoop.
3. Line the mark on the fabric up with the baseline on the embroidery sheet.
4. Place the inner hoop with the fabric on theouter hoop and stretch the fabric.
5. Remove the embroidery sheet.
EMBROIDERY
83

Attaching the embroidery hoop
Raise the needle .
Raise the presser foot to the second stage.
Place the embroidery hoop under the presser foot.
Attaching the embroidery hoop, make theembroidery hoop connector into the embroideryhoop holder from front to back until it clicks.
Removing the embroidery hoop
Raise the presser foot to the second stage.
Press down the hoop-securing lever, pull thehoop towards you smoothly and carefully.
EMBROIDERY
84
Attention:Do not embroider fabrics that are too thick.When attach the embroidery hoop to theembroidery unit, to check the fabric thickness.If there is space between the presser foot andthe fabric, the fabric can be embroidered. Ifthere is not space, do not embroider the fabric.Otherwise, the needle may break, resulting ininjury.
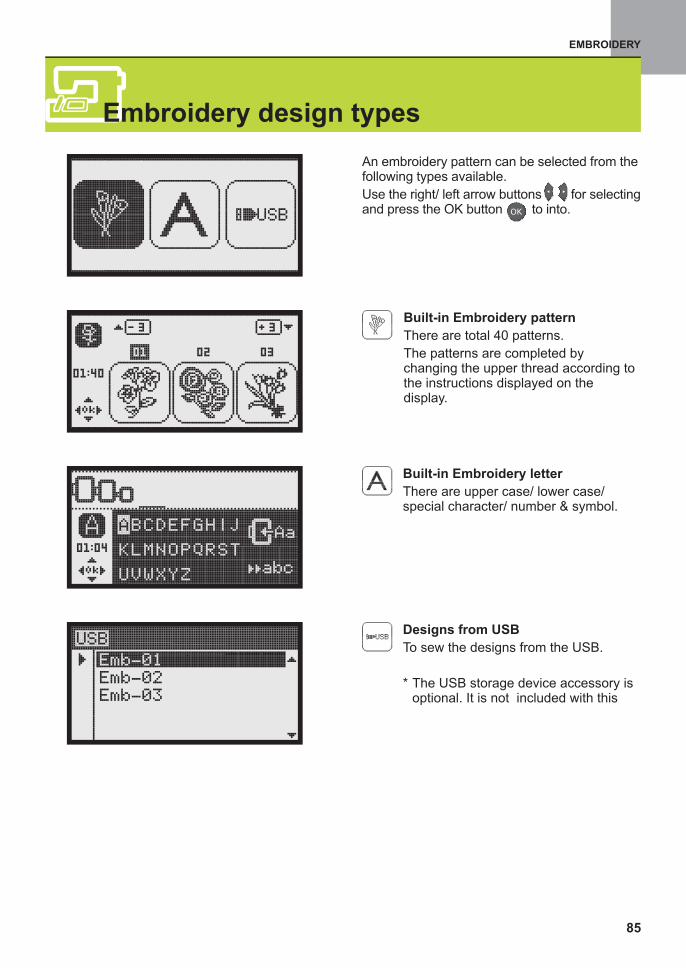
EMBROIDERY
Embroidery design types
An embroidery pattern can be selected from thefollowing types available.
Use the right/ left arrow buttons for selectingand press the OK button to into.
Built-in Embroidery letter
There are upper case/ lower case/special character/ number & symbol.
Built-in Embroidery pattern
There are total 40 patterns.
The patterns are completed bychanging the upper thread according tothe instructions displayed on thedisplay.
Designs from USB
To sew the designs from the USB.
* The USB storage device accessory isoptional. It is not included with this
85
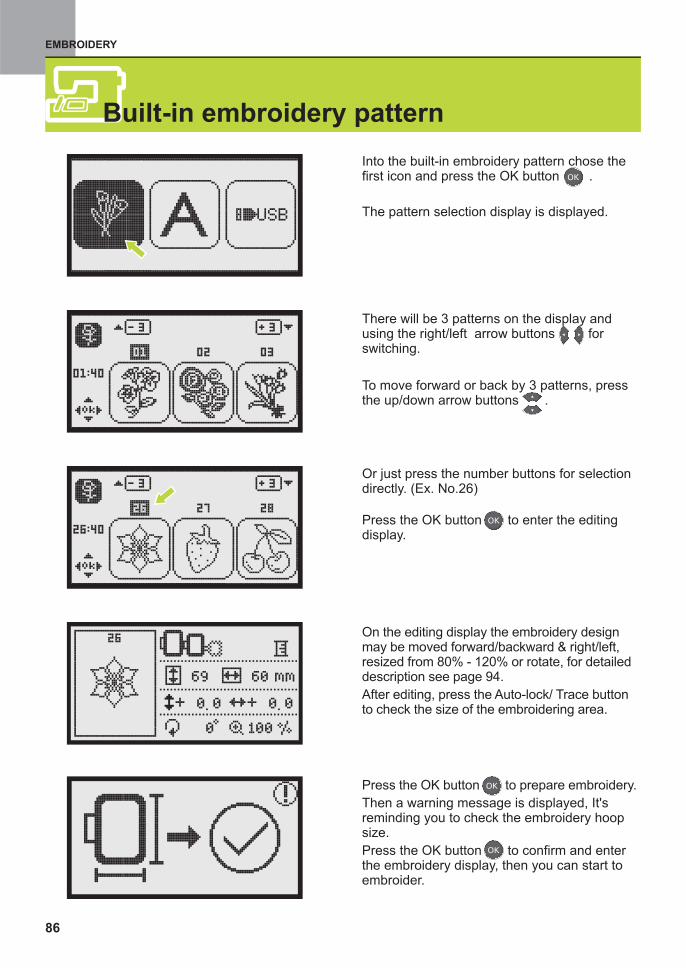
EMBROIDERY
Built-in embroidery pattern
Into the built-in embroidery pattern chose thefirst icon and press the OK button .
The pattern selection display is displayed.
There will be 3 patterns on the display andusing the right/left arrow buttons forswitching.
To move forward or back by 3 patterns, pressthe up/down arrow buttons .
Or just press the number buttons for selectiondirectly. (Ex. No.26)
Press the OK button to enter the editingdisplay.
On the editing display the embroidery designmay be moved forward/backward & right/left,resized from 80% - 120% or rotate, for detaileddescription see page 94.
After editing, press the Auto-lock/ Trace buttonto check the size of the embroidering area.
86
Press the OK button to prepare embroidery.
Then a warning message is displayed, It'sreminding you to check the embroidery hoopsize.
Press the OK button to confirm and enterthe embroidery display, then you can start toembroider.
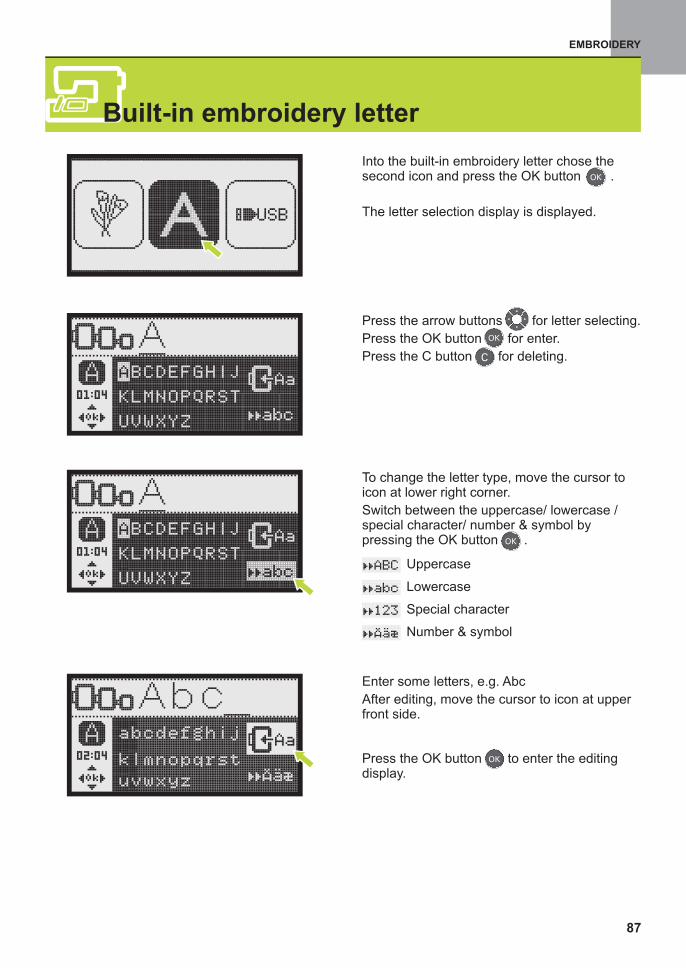
EMBROIDERY
Into the built-in embroidery letter chose thesecond icon and press the OK button .
The letter selection display is displayed.
Press the arrow buttons for letter selecting.
Press the OK button for enter.
Press the C button for deleting.
To change the letter type, move the cursor toicon at lower right corner.
Switch between the uppercase/ lowercase /special character/ number & symbol bypressing the OK button .
Uppercase
Lowercase
Special character
Number & symbol
Enter some letters, e.g. Abc
After editing, move the cursor to icon at upperfront side.
Built-in embroidery letter
87
Press the OK button to enter the editingdisplay.
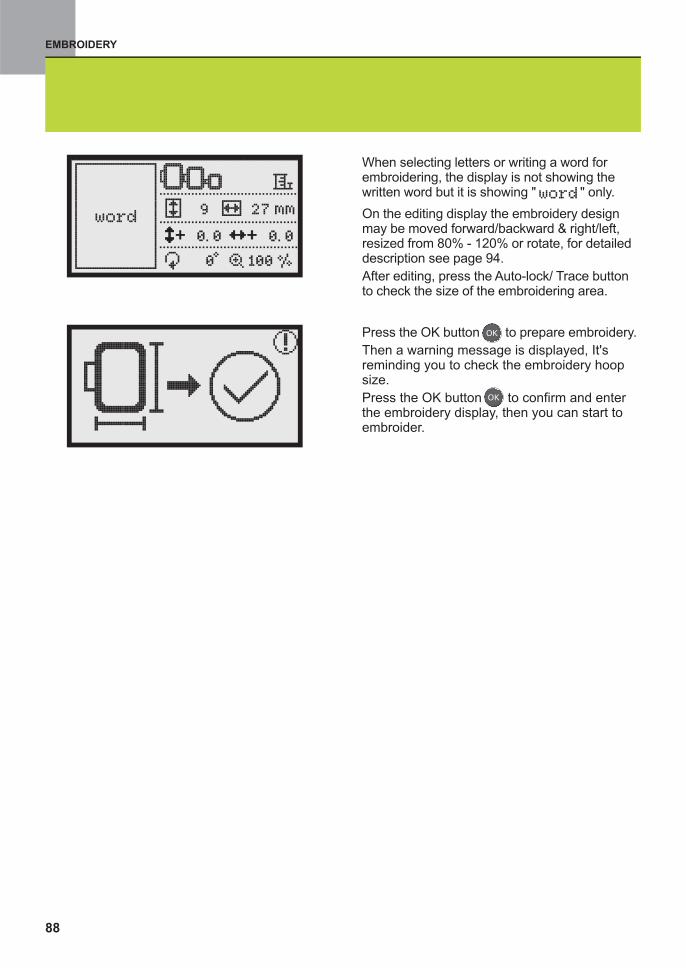
EMBROIDERY
Press the OK button to prepare embroidery.
Then a warning message is displayed, It'sreminding you to check the embroidery hoopsize.
Press the OK button to confirm and enterthe embroidery display, then you can start toembroider.
88
When selecting letters or writing a word forembroidering, the display is not showing thewritten word but it is showing " " only.
On the editing display the embroidery designmay be moved forward/backward & right/left,resized from 80% - 120% or rotate, for detaileddescription see page 94.
After editing, press the Auto-lock/ Trace buttonto check the size of the embroidering area.
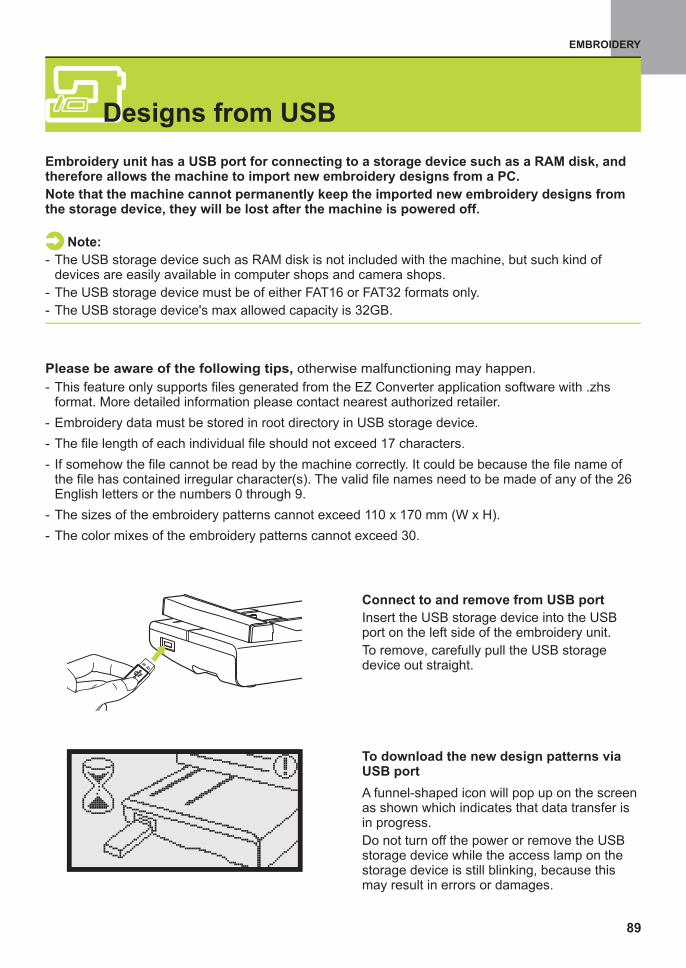
EMBROIDERY
Designs from USB
89
Embroidery unit has a USB port for connecting to a storage device such as a RAM disk, andtherefore allows the machine to import new embroidery designs from a PC.
Note that the machine cannot permanently keep the imported new embroidery designs fromthe storage device, they will be lost after the machine is powered off.
- The USB storage device such as RAM disk is not included with the machine, but such kind ofdevices are easily available in computer shops and camera shops.
- The USB storage device must be of either FAT16 or FAT32 formats only.
- The USB storage device's max allowed capacity is 32GB.
Note:
Please be aware of the following tips, otherwise malfunctioning may happen.
- This feature only supports files generated from the EZ Converter application software with .zhsformat. More detailed information please contact nearest authorized retailer.
- Embroidery data must be stored in root directory in USB storage device.
- The file length of each individual file should not exceed 17 characters.
- If somehow the file cannot be read by the machine correctly. It could be because the file name ofthe file has contained irregular character(s). The valid file names need to be made of any of the 26English letters or the numbers 0 through 9.
- The sizes of the embroidery patterns cannot exceed 110 x 170 mm (W x H).
- The color mixes of the embroidery patterns cannot exceed 30.
Insert the USB storage device into the USBport on the left side of the embroidery unit.
To remove, carefully pull the USB storagedevice out straight.
Connect to and remove from USB port
To download the new design patterns viaUSB port
A funnel-shaped icon will pop up on the screenas shown which indicates that data transfer isin progress.
Do not turn off the power or remove the USBstorage device while the access lamp on thestorage device is still blinking, because thismay result in errors or damages.
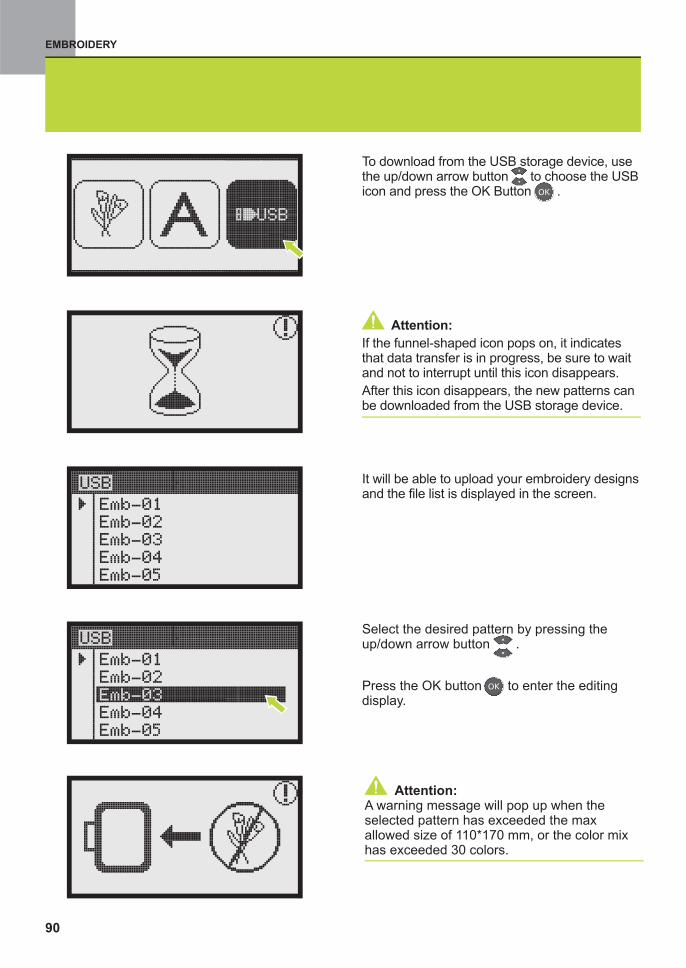
EMBROIDERY
90
If the funnel-shaped icon pops on, it indicatesthat data transfer is in progress, be sure to waitand not to interrupt until this icon disappears.
After this icon disappears, the new patterns canbe downloaded from the USB storage device.
Attention:
To download from the USB storage device, usethe up/down arrow button to choose the USBicon and press the OK Button .
Press the OK button to enter the editingdisplay.
Select the desired pattern by pressing theup/down arrow button .
It will be able to upload your embroidery designsand the file list is displayed in the screen.
Attention:A warning message pop up when theselected pattern has exceeded the maxallowed size of 110*170 mm, or the color mixhas exceeded 30 colors.
will
EMBROIDERY
91
When uploading Designs from USB storagedevice, the display is not showing the design butit is showing " " only.
Press the OK button to prepare embroidery.
Press the OK button to confirm and enterthe embroidery display, then you can start toembroider.
A warning message appears reminding you tocheck the embroidery hoop size.
On the editing display the embroidery designmay be moved forward/backward & right/left,resized from 80% - 120% or rotate.
After editing, press the Auto-lock/ Trace buttonto check the position of embroidering pattern onthe embroidery hoop.
EMBROIDERY
Starting to sew embroidery
After the preparations are done, you can tryembroidering.
Prepare embroidery thread of the color shownon the display.
Set the embroidery thread, thread the needleand embroidery foot.
- If the thread is pulled too tight, the needlemay break or bend.
- Do not let hands or objects hit the carriagewhile sewing. The pattern may misalign.
Attention:
Lower the presser foot.
Press start/stop button to start embroidering.
After sewing 5 to 6 stitches, press thestart/stop button again to stop the machine.
Pass the thread through the embroidery foothole, and hold it lightly in your left hand.
92

When the first color is completed, the machinestops automatically.
The raise presser foot message is displayed,raise the presser foot to the second stage.
After raising, change the thread color messageis displayed.
Re-thread with the next color and press OKbutton to confirm.
And repeat the same actions for embroidering.
Raise the presser foot.
Cut the thread at the beginning of the stitching.
Lower the presser foot.
Press the start/stop button to continueembroidering.
When the embroidery is completed, themachine stops automatically and the messageis displayed.
Press OK button to return to the patternselection display.
EMBROIDERY
93
To simply threading of the new thread color andfor easier trim of the jumping stitches theembroidery hoop can be moved forwards bypressing the Auto-lock/ Trace button button.
By pressing the Auto-lock/ Trace button again,the embroidery hoop goes back to the correctposition.
Note:
EMBROIDERY
Editing the embroidery design
Basic setting
You can edit and combine designs to createoriginal embroidery.
After selecting the embroidery pattern, pressOK button the editing display will display.
Embroidery hoop
These flash if the pattern was resized, the layoutwas adjusted, or the recommended embroideryhoop size was changed. Embroidery hoop iconsthat appear in gray cannot be used.
Mirror the design
Press this button to horizontally mirror theembroidery design.
The LCD display icon for mirror imaging of thepattern appears.
94
EMBROIDERY
Resize the design
Press the button to resize the embroiderydesign.
You can change the size of embroidery design
from 80% to 120% of the original size.
When you press, the resize window will open.
Press the OK button to save the new sizeand return the editing display.
Use the arrow buttons to change size, the sizewill change 5% each time you press the arrowbutton.
Press to enlarge the size of the pattern.
Press to reduce the size of the pattern.
Not all designs are suitable to be scaled to 80%.
Note:
95
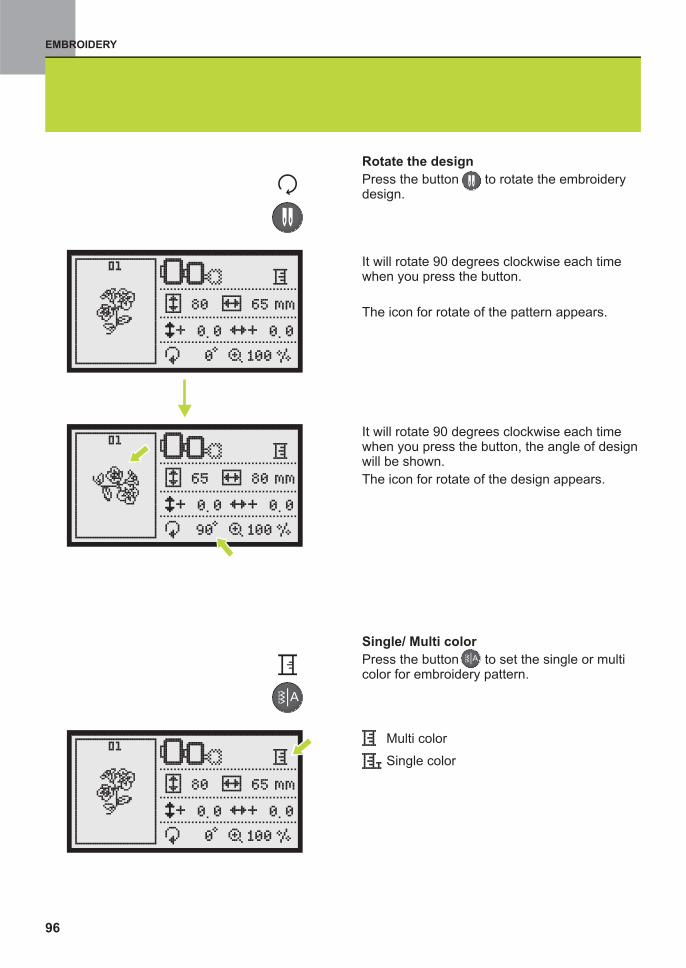
EMBROIDERY
Multi color
Single color
Rotate the design
Press the button to rotate the embroiderydesign.
It will rotate 90 degrees clockwise each timewhen you press the button.
The icon for rotate of the pattern appears.
It will rotate 90 degrees clockwise each timewhen you press the button, the angle of designwill be shown.
The icon for rotate of the design appears.
Single/ Multi color
Press the button to set the single or multicolor for embroidery pattern.
96
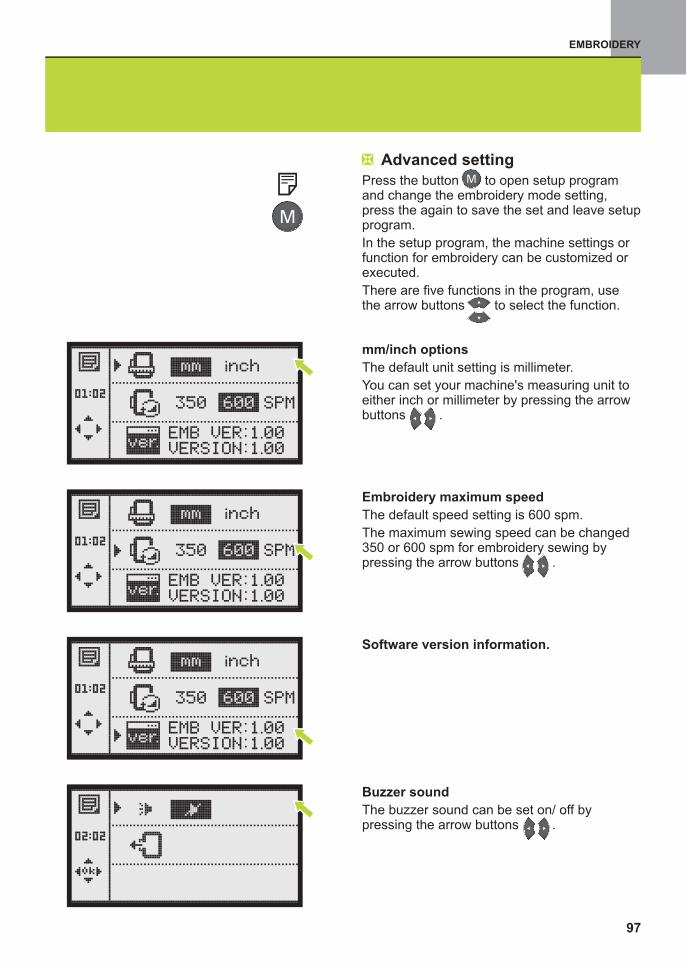
Advanced setting
Press the button to open setup programand change the embroidery mode setting,p
In the setup program, the machine settings orfunction for embroidery can be customized orexecuted.
There are five functions in the program, usethe arrow buttons to select the function.
ress the again to save the set and leave setupprogram.
mm/inch options
millimeter
You can set your machine's measuring unit toeither inch or millimeter by pressing the arrowbuttons .
The default unit setting is .
Embroidery maximum speed
600 spm
The maximum sewing speed can be changed350 or 600 spm for embroidery sewing bypressing the arrow buttons .
The default speed setting is .
Software version information.
Buzzer sound
The buzzer sound can be set on/ off bypressing the arrow buttons .
EMBROIDERY
97

Embroidery carriage return
Select this function, press the OK buttonand the carriage will move to the home position.
Attention:- The needle must be in the .
- Do not return the carriage with thee hoop attached.
highest position
mbroidery
EMBROIDERY
98
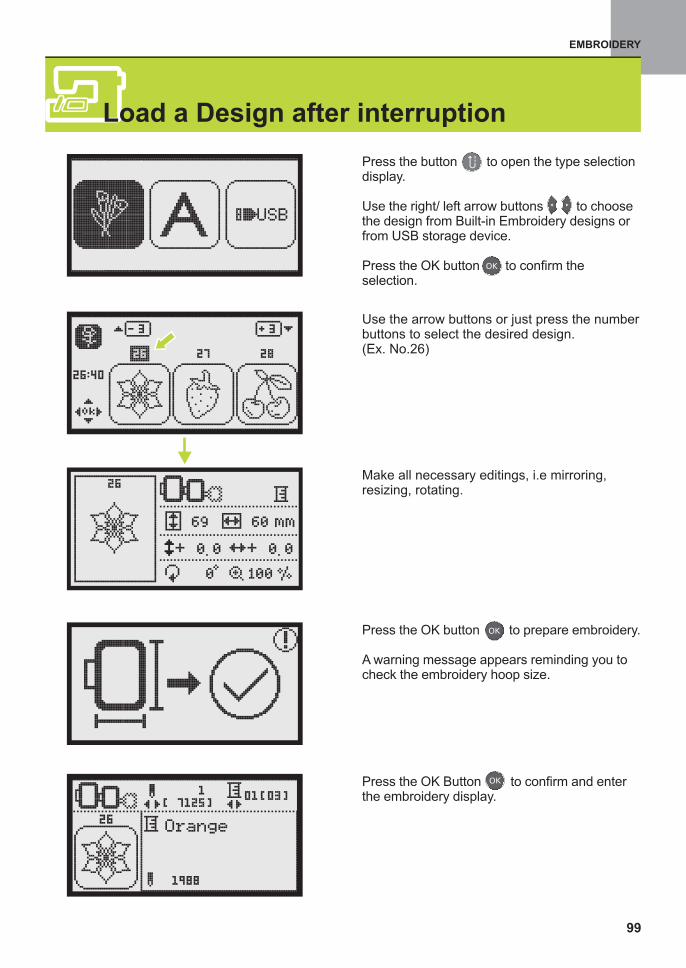
EMBROIDERY
Press the button to open the type selectiondisplay.
Use the right/ left arrow buttons to choosethe design from Built-in Embroidery designs orfrom USB storage device.
Press the OK button to confirm theselection.
Load a Design after interruption
Use the arrow buttons or just press the numberbuttons to select the desired design.(Ex. No.26)
Make all necessary editings, i.e mirroring,resizing, rotating.
Press the OK button to prepare embroidery.
A warning message appears reminding you tocheck the embroidery hoop size.
Press the OK Button to confirm and enterthe embroidery display.
99
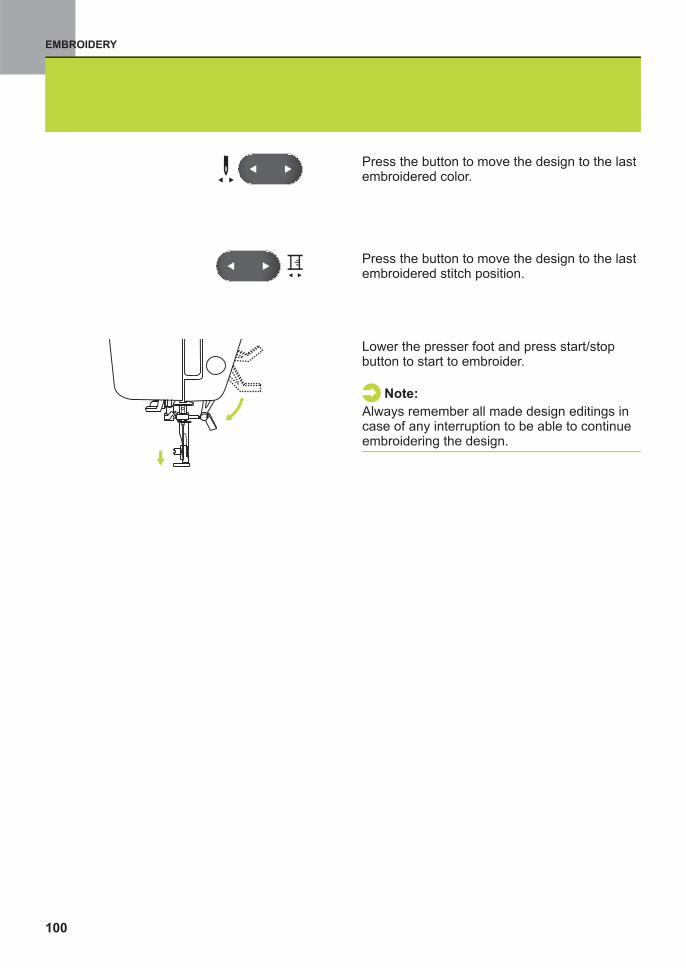
Press the button to move the design to the lastembroidered color.
Press the button to move the design to the lastembroidered stitch position.
Lower the presser foot and press start/stopbutton to start to embroider.
Always remember all made design editings incase of any interruption to be able to continueembroidering the design.
Note:
EMBROIDERY
100
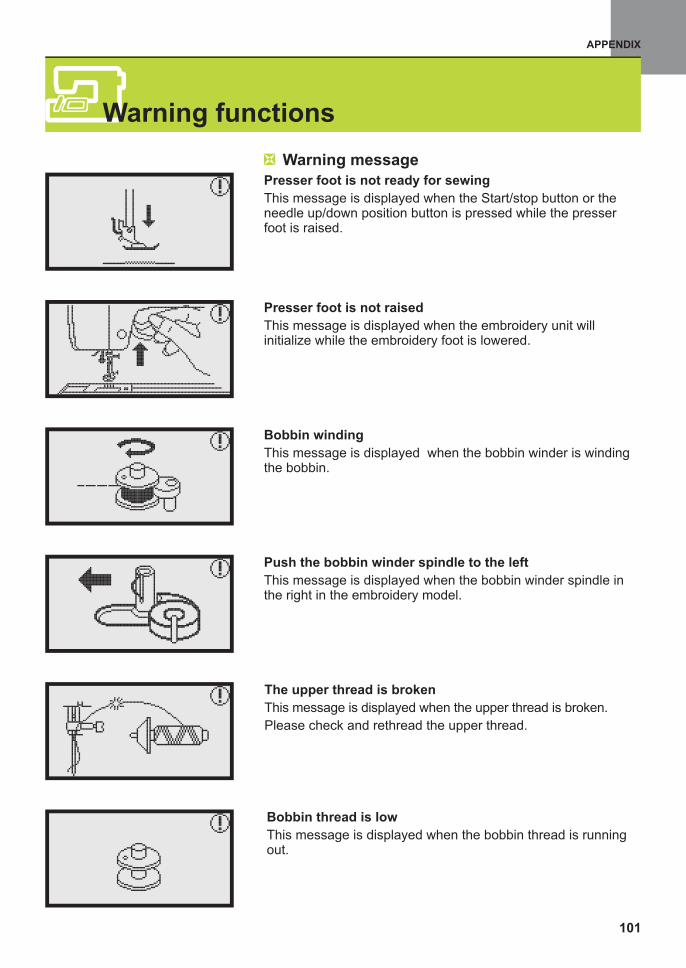
APPENDIX
Warning message
Presser foot is not ready for sewing
This message is displayed when the Start/stop button orbutton is pressed while the presser
foot is raised.
theneedle up/down position
Bobbin thread is low
This message is displayed when the bobbin thread is runningout.
The upper thread is broken
This message is displayed when the upper thread is broken.
Please check and rethread the upper thread.
Bobbin winding
This message is displayed when the bobbin winder is windingthe bobbin.
Push the bobbin winder spindle to the left
This message is displayed when the bobbin winder spindle inthe right in the embroidery model.
Presser foot is not raised
This message is displayed when the embroidery unit willinitialize while the embroidery foot is lowered.
Warning functions
101
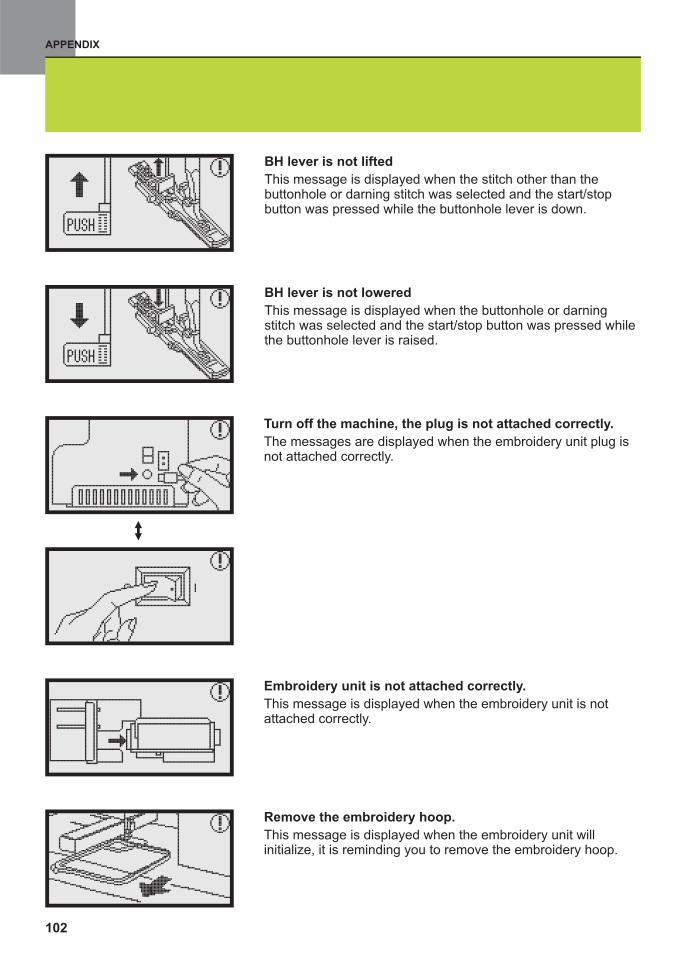
APPENDIX
102
Remove the embroidery hoop.
, it is reminding you to remove the embroidery hoop.This message is displayed when the embroidery unit willinitialize
Turn off the machine, the plug is not attached correctly.
The messages are displayed when the embroidery unit plug isnot attached correctly.
Embroidery unit is not attached correctly.
This message is displayed when the embroidery unit is notattached correctly.
BH lever is not lifted
stitch other than thebuttonhole or darning stitch was selected and the start/stopbutton was pressed while the buttonhole lever is down.
This message is displayed when the
BH lever is not lowered
he buttonhole or darningstitch was selected and the start/stop button was pressed whilethe buttonhole lever is raised.
This message is displayed when t
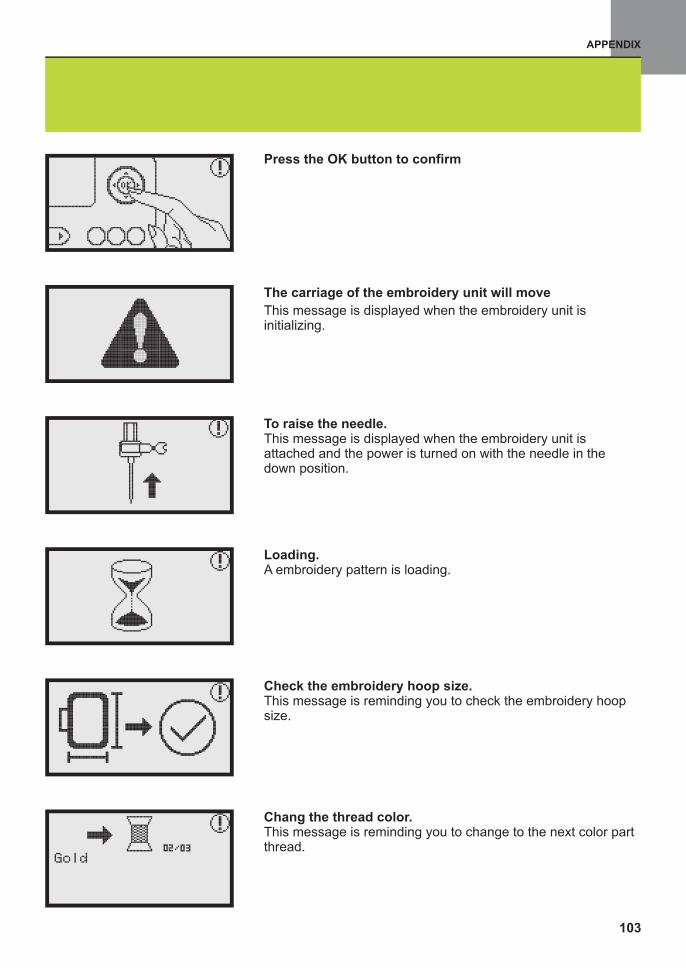
Check the embroidery hoop size.This message is reminding you to check the embroidery hoopsize.
Chang the thread color.This message is reminding you to change to the next color partthread.
APPENDIX
Loading.embroideryA pattern is loading.
Press the OK button to confirm
To raise the needle.This message is displayed when the embroidery unit isattached and the power is turned on with the needle in thedown position.
The carriage of the embroidery unit will move
This message is displayed when the embroidery unit isinitializing.
103
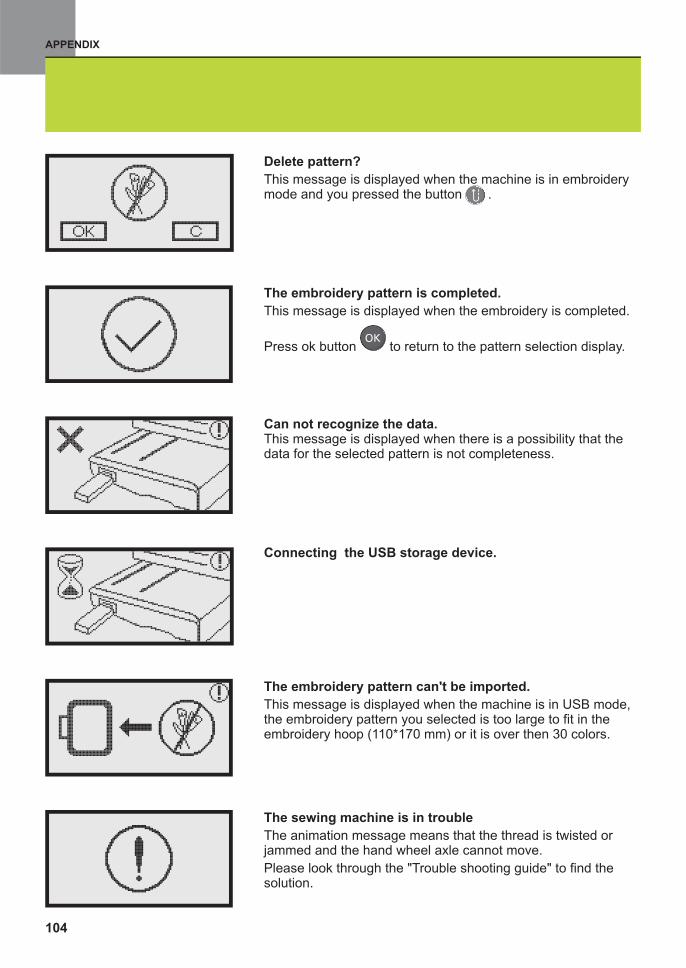
APPENDIX
The embroidery pattern is completed.
This message is displayed when the embroidery is completed.
Press ok button to return to the pattern selection display.
The sewing machine is in trouble
The animation message means that the thread is twisted orjammed and the hand wheel axle cannot move.
Please look through the "Trouble shooting guide" to find thesolution.
Can not recognize the data.This message is displayed when there is a possibility that thedata for the selected pattern is not completeness.
Connecting the USB storage device.
The embroidery pattern can't be imported.
This message is displayed when the machine is in USB mode,the embroidery pattern you selected is too large to fit in theembroidery hoop (110*170 mm) or it is over then 30 colors.
Delete pattern?
This message is displayed when the machine is in embroiderymode and you pressed the button .
104

Warning sound
- When operating correctly: 1 beep
- When the memory is full with 20 units of pattern: 3-shortbeeps
- When operating incorrectly: 3-short beeps
- When the sewing machine is in trouble and can't sew: 3-shortbeeps
It means that the thread is twisted or jammed and the handwheel axle can't move. Please look through the "Troubleshooting guide" to find the solution. After the problem hasbeen solved, the machine will continue to sew.
Please Note:
If the problem is still not solved, please contact your local dealer.
Attention:
During the sewing, if the thread get jammed inside the hookstopping the needle from moving and you continue pressing thefoot control, the security switch will stop the machine completely.
In order to restart the sewing machine, you will have to turn theon/off switch to the OFF position and then ON again.
105
APPENDIX
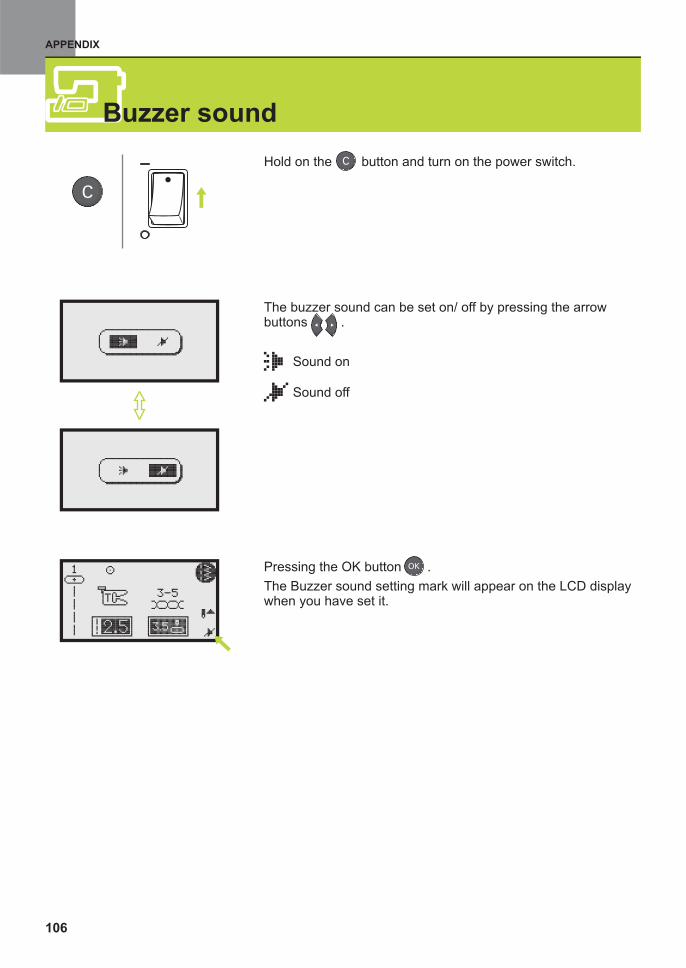
APPENDIX
Hold on the button and turn on the power switch.
The buzzer sound can be set on/ off by pressing the arrowbuttons .
Pressing the OK button .
The Buzzer sound setting mark will appear on the LCD displaywhen you have set it.
Sound off
Sound on
Buzzer sound
106
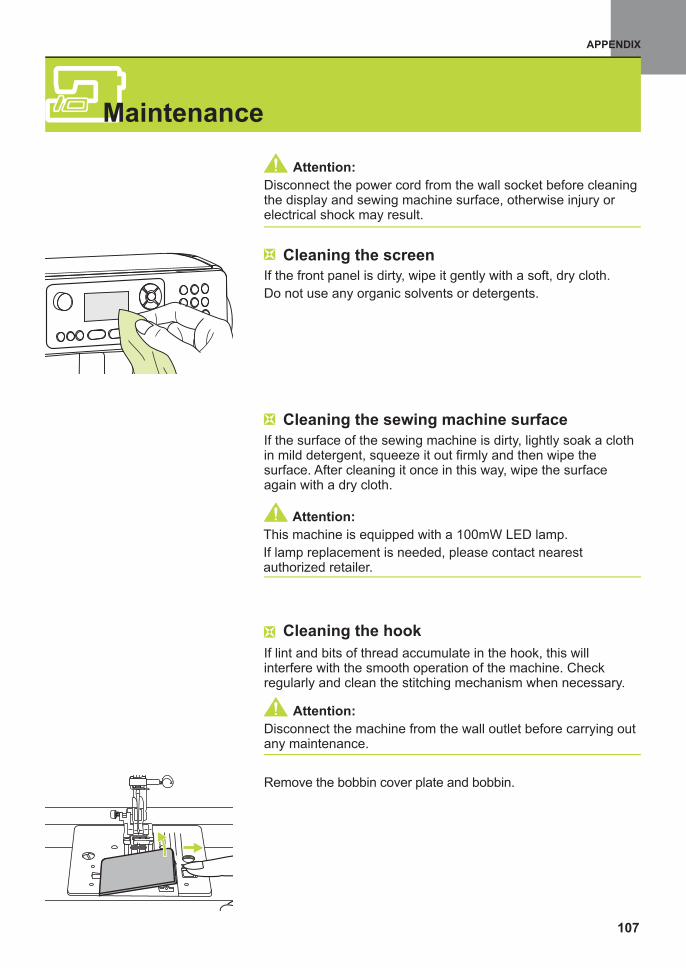
APPENDIX
Attention:
Disconnect the power cord from the wall socket before cleaningthe display and sewing machine surface, otherwise injury orelectrical shock may result.
Remove the bobbin cover plate and bobbin.
If lint and bits of thread accumulate in the hook, this willinterfere with the smooth operation of the machine. Checkregularly and clean the stitching mechanism when necessary.
If the front panel is dirty, wipe it gently with a soft, dry cloth.
Do not use any organic solvents or detergents.
Cleaning the screen
If the surface of the sewing machine is dirty, lightly soak a clothin mild detergent, squeeze it out firmly and then wipe thesurface. After cleaning it once in this way, wipe the surfaceagain with a dry cloth.
Cleaning the sewing machine surface
Cleaning the hook
Attention:
Disconnect the machine from the wall outlet before carrying outany maintenance.
Attention:
This machine is equipped with a 100mW LED lamp.
If lamp replacement is needed, please contact nearestauthorized retailer.
Maintenance
107
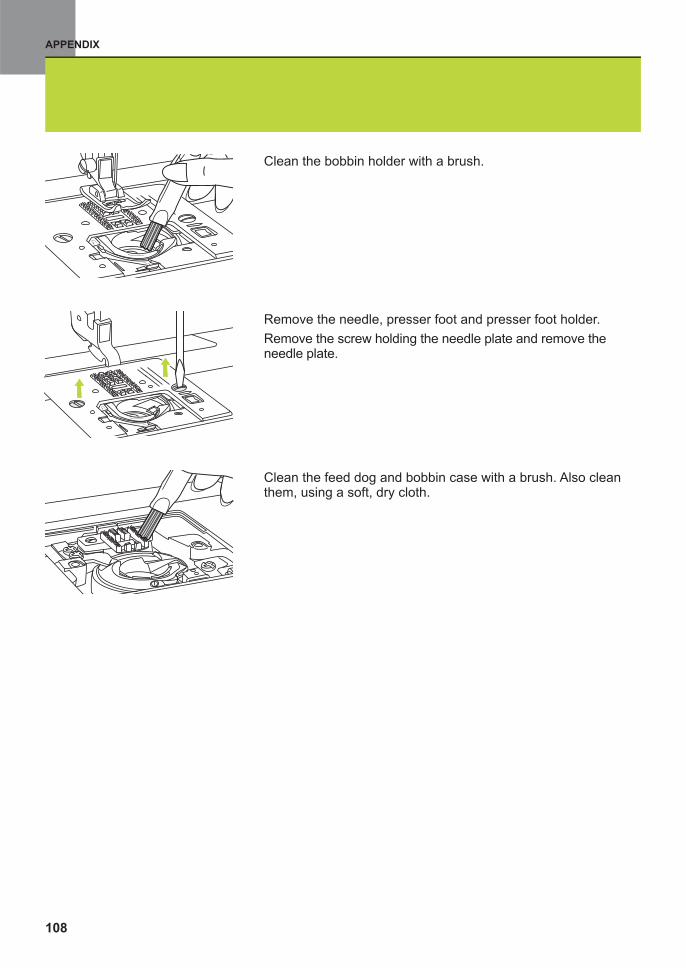
APPENDIX
Clean the bobbin holder with a brush.
Remove the needle, presser foot and presser foot holder.
Remove the screw holding the needle plate and remove theneedle plate.
Clean the feed dog and bobbin case with a brush. Also cleanthem, using a soft, dry cloth.
108
APPENDIX
Problem Cause Correction
Upper threadbreaks
Lower threadbreaks
Skippedstitches
Needlebreaks
Loosestitches
1. The machine is not threaded correctly.
2. The thread tension is too tight.
3. The thread is too thick for the needle.
4. The needle is not inserted correctly.
5. The thread is wound around the spoolholder pin.
6. The needle is damaged.
1. The bobbin case is not inserted correctly.
2. The bobbin case is threaded wrong.
3. The lower thread tension is too tight
1. The needle is not inserted correctly.
2. The needle is damaged.
3. The wrong size needle has been used.
4. The foot is not attached correctly.
5. The machine is not threaded correctly.
1. The needle is damaged.
2. The needle is not correctly inserted.
3. Wrong needle size for the fabric.
4. The wrong foot is attached.
5. The needle clamp screw is loose.
6. The presser foot that is used is notappropriate for the type of stitch that youwish to sew.
7. The upper thread tension is too tight.
1. The machine is not correctly threaded.
2. The bobbin case is not correctly
3. Needle/ fabric/ thread combination iswrong.
4. Thread tension is wrong.
1. Check the threading.
2. Thread the bobbin case as illustrated.
3. The needle size must suit the fabric andthread.
4. Correct the thread tension.
1. Insert a new needle.
2. Insert the needle correctly (flat sidetowards the back).
3. Choose a needle to suit the thread andfabric.
4. Select the correct foot.
5. Use the screwdriver to firmly tighten thescrew.
6. Attach the presser foot that is appro-priate for the type of stitch that you wishto sew.
7. Loosen the upper thread tension.
1. Remove and reinsert needle (flat sidetowards the back).
2. Insert a new needle.
3. Choose a needle to suit the thread.
4. Check and attach correctly.
5. Rethread the machine.
1. Remove and reinsert the bobbin caseand pull on the thread. The thread shouldpull easily.
2. Check both bobbin and bobbin case.
3. Loosen lower thread tension as described.
1. Rethread the machine.
2. Reduce the thread tension (lower number).
3. Select a larger needle.
4. Remove and reinsert the needle (flat sidetowards the back).
5. Remove the reel and wind thread ontoreel.
6. Replace the needle.
Reference
Before calling for service, check the following items. If the problem still persists, contact the place ofpurchase or your nearest authorized dealer.
12
34
17
16
12
16
11
11
-
16
16
17
-
12
16
16
17
-
16
-
34
12
11
17
34
Trouble shooting guide
109
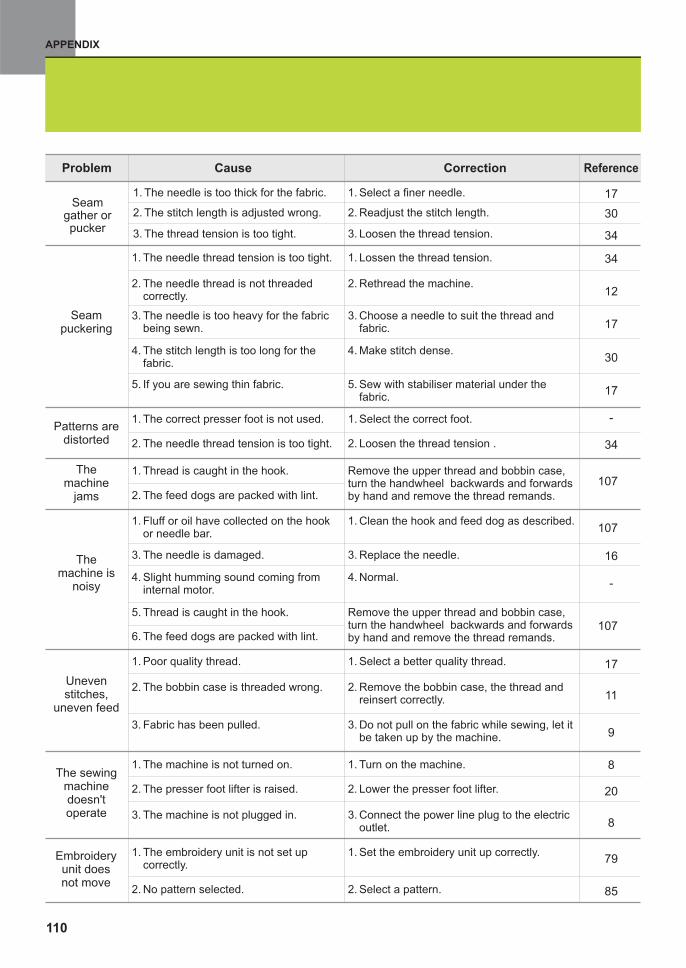
Problem Cause Correction Reference
Seampuckering
Patterns aredistorted
1. The needle thread tension is too tight.
2. The needle thread is not threadedcorrectly.
3. The needle is too heavy for the fabricbeing sewn.
4. The stitch length is too long for thefabric.
1. The correct presser foot is not used.
2. The needle thread tension is too tight.
1. Select the correct foot.
2. Loosen the thread tension .
1. Lossen the thread tension.
2. Rethread the machine.
3. Choose a needle to suit the thread andfabric.
4. Make stitch dense.
The sewingmachinedoesn'toperate
1. The machine is not turned on.
2. The presser foot lifter is raised.
1. Turn on the machine.
2. Lower the presser foot lifter.
Themachine
jams
Remove the upper thread and bobbin case,turn the handwheel backwards and forwardsby hand and remove the thread remands.
Themachine is
noisy
1. Fluff or oil have collected on the hookor needle bar.
3. The needle is damaged.
1. Clean the hook and feed dog as described.
3. Replace the needle.
Unevenstitches,
uneven feed
1. Poor quality thread.
2. The bobbin case is threaded wrong.
3. Fabric has been pulled.
1. Select a better quality thread.
2. Remove the bobbin case, the thread andreinsert correctly.
3. Do not pull on the fabric while sewing, let itbe taken up by the machine.
5. Thread is caught in the hook.
4. Slight humming sound coming frominternal motor.
4. Normal.
6. The feed dogs are packed with lint.
Remove the upper thread and bobbin case,turn the handwheel backwards and forwardsby hand and remove the thread remands.
1. Thread is caught in the hook.
2. The feed dogs are packed with lint.
3. Connect the power line plug to the electricoutlet.
3. The machine is not plugged in.
Seamgather orpucker
1. The needle is too thick for the fabric.
2. The stitch length is adjusted wrong.
3. The thread tension is too tight.
1. Select a finer needle.
2. Readjust the stitch length.
3. Loosen the thread tension.
Embroideryunit doesnot move
1. The embroidery unit is not set upcorrectly.
2. No pattern selected.
1. Set the embroidery unit up correctly.
2. Select a pattern.
17
30
34
34
12
17
30
-
34
16
-
17
11
9
8
20
8
79
85
107
107
107
5. If you are sewing thin fabric. 5. Sew with stabiliser material under thefabric.
17
110
APPENDIX
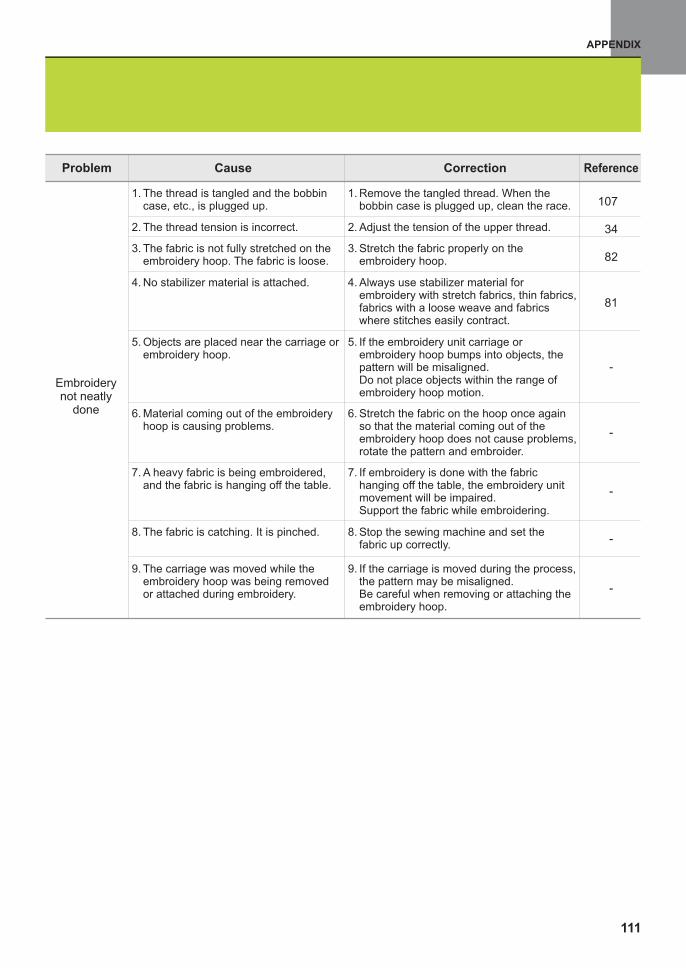
Problem Cause Correction
4. No stabilizer material is attached.
5. Objects are placed near the carriage orembroidery hoop.
6. Material coming out of the embroideryhoop is causing problems.
4. Always use stabilizer material forembroidery with stretch fabrics, thin fabrics,fabrics with a loose weave and fabricswhere stitches easily contract.
5. If the embroidery unit carriage orembroidery hoop bumps into objects, thepattern will be misaligned.Do not place objects within the range ofembroidery hoop motion.
6. Stretch the fabric on the hoop once againso that the material coming out of theembroidery hoop does not cause problems,rotate the pattern and embroider.
7. A heavy fabric is being embroidered,and the fabric is hanging off the table.
8. The fabric is catching. It is pinched.
7. If embroidery is done with the fabrichanging off the table, the embroidery unitmovement will be impaired.Support the fabric while embroidering.
8. Stop the sewing machine and set thefabric up correctly.
9. The carriage was moved while theembroidery hoop was being removedor attached during embroidery.
9. If the carriage is moved during the process,the pattern may be misaligned.Be careful when removing or attaching theembroidery hoop.
Embroiderynot neatly
done
3. The fabric is not fully stretched on theembroidery hoop. The fabric is loose.
3. Stretch the fabric properly on theembroidery hoop.
Reference
82
81
-
-
-
-
-
1. The thread is tangled and the bobbincase, etc., is plugged up.
2. The thread tension is incorrect.
1. Remove the tangled thread. When thebobbin case is plugged up, clean the race.
2. Adjust the tension of the upper thread.
107
34
111
APPENDIX


021H4B0102(EN)