conference transparency, accountability and …...iii. routing lists a. create a new routing list 1....
TRANSCRIPT

United States Department of Agriculture
Conference
Transparency,
Accountability and
Tracking (CTAT)
User Guide September 2016 Version 2.0
Office of the Chief Financial Officer Transparency and Accountability Reporting Division

Table of Contents
Page Applies To
I. CTAT Registration A. Access Request………………………………………………………. 1 All B. Roles/Functions…………………………………………………….. 1 All
II. CTAT Account Profiles
A. Users and Approvers 1. Self-Registration……………………………………………….. 2 All 2. Agency POC Manual Registration……………………… 3 POCs 3. Edit/Update Profile…………………………………………… 4 POCs 4. Access Levels…………………………………………………….. 6 All
B. Multiple Agency POCs…………………………………………….. 7 POCs
III. Routing Lists A. Create a New Routing List………………………………………. 8 POCs B. Update an Existing Routing List……………………………… 12 POCs
IV. Conference Requests
A. Create a New Conference……………………………………….. 14 Users, POCs B. Access an Existing Conference……………………………….. 16 Users, POCs
V. Conference Routing
A. Decision Page…………………………………………………………. 18 Approvers, POCs B. Decision Workflow………………………………………………… 22 All C. Manual Retrieval……………………………………………………. 24 Approvers D. Agency POC Approval…………………………………………….. 25 POCs
VI. Reports
A. View All Requests…………………………………………………… 26 POCs B. Filterable Reports………………………………………………….. 27 Users, POCs
VII. Conference Transparency Reporting
A. Post Conference Details…………………………………………. 28 Users, POCs B. Generating Reports………………………………………………... 30 Users, POCs C. Report Submission…………………………………………………. 32 POCs
VIII. Annual Plan
A. Add New Plan…………………………………………………………. 32 Users, POCs B. Edit Plan……………………………………………………….............. 34 Users, POCs C. Plan Submission………………………………………………......... 34 POCs
Appendix A – Add New Conference……………………………… A-1 Users, POCs

Page | 1
I. CTAT Registration
A. Access Request
1. Register in CTAT at https://www.eservices.usda.gov/ctat/ by clicking on RequestAccess.
2. Enter information, select agency, and click on the submit request access button. Note: The networkusername is pre-populated by the system. A successful access request notification will appear on thescreen, which indicates the request is now pending approval.
3. All initial registrations will consist of agencies’ points of contact (POC). The Office of the Chief FinancialOfficer (OCFO) will review the access requests and assign the agency POC role. Henceforth, POCs willmanage registrations for their agencies.
B. Roles/Functions
1. There are three roles available to agencies: user, approver, and POC. The user enters and submitsconference requests while the approver approves or denies them. In most instances the latter is part ofagency management; certain thresholds require approval authorities (see III.A.7). The agency POC, on

Page | 2
the other hand, has the ability to manage the settings for that agency, including managing users’ and approvers’ accounts, setting up routing lists, and submitting and approving conference requests, among others.
2. Except for certain instances, e.g., limited staff, roles will be distinct – users cannot be approvers, and
vice versa. However, agency POCs can fill in on most of the users’ and approvers’ functions to allow for a seamless conference approval process.
3. The table of contents shows each section in the user guide and which role(s)/function(s) it is most applicable to.
II. CTAT Account Profiles
A. Users and Approvers
1. Self-Registration a. Designated agency staff should register in CTAT (see I.A.1 and 2). The agency staff, POC, and OCFO
will receive email notifications (from [email protected]) of recently completed and approved or rejected registrations, similar to below.
b. The agency POC logs in – using Windows credentials or LincPass when prompted through the link
in I.A.1 – to approve the access request. On the homepage, click on Manage Users and the New User Request Access tab, select the appropriate role (i.e., Agency User or Agency Approver), and click on the Approve button.

Page | 3
2. Agency POC Manual Registration
a. Alternatively, the agency POC can manually add an agency user or approver to the site. Click on Manage Users, the Manage Users tab, and Add new user.
b. Enter the employee’s information, including the network username, select the role, and click on the submit user profile button. A successful submit message appears, which indicates the employee can now log in to the system.
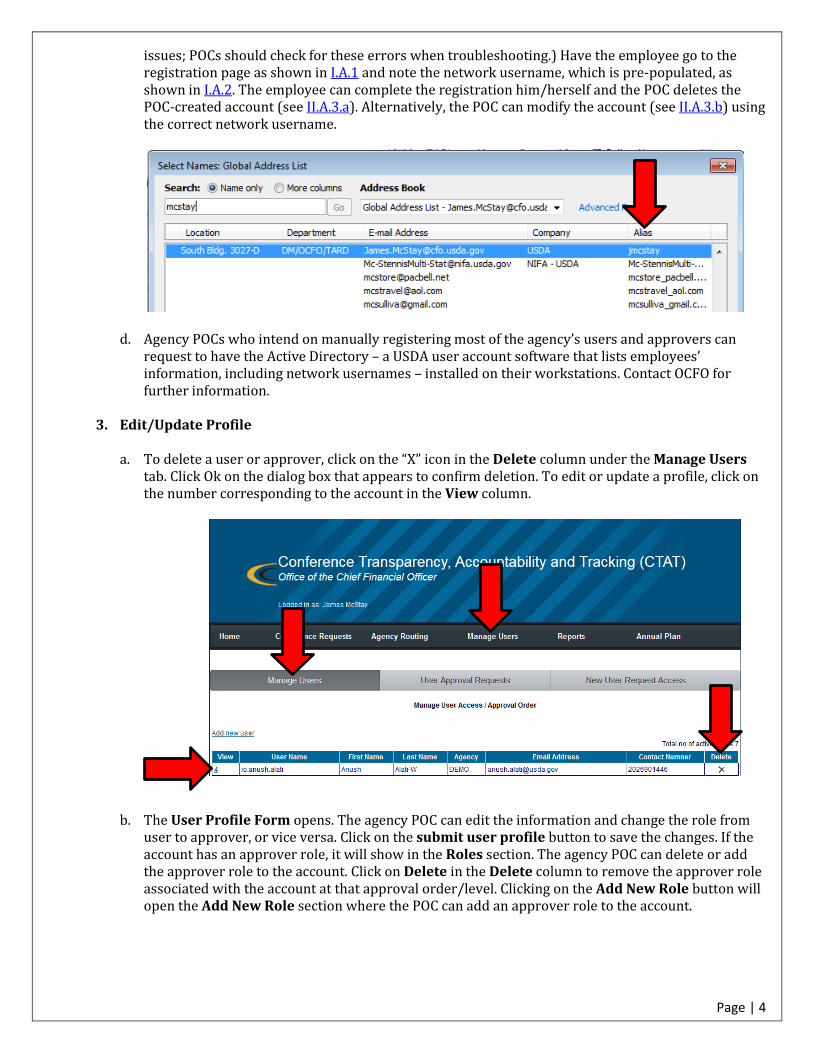
c. As opposed to self-registrations where the network username is pre-populated, POC registrations require manual entry. In most instances the network username is the employee’s alias in Outlook. However, in some cases the alias is different from the network username. When a POC registers agency staff and the latter are unable to log in or there are issues with accessing the website, it indicates a mismatch. (Network username typographical errors in II.A.2.b can also cause access
Page | 4
issues; POCs should check for these errors when troubleshooting.) Have the employee go to the registration page as shown in I.A.1 and note the network username, which is pre-populated, as shown in I.A.2. The employee can complete the registration him/herself and the POC deletes the POC-created account (see II.A.3.a). Alternatively, the POC can modify the account (see II.A.3.b) using the correct network username.
d. Agency POCs who intend on manually registering most of the agency’s users and approvers can request to have the Active Directory – a USDA user account software that lists employees’ information, including network usernames – installed on their workstations. Contact OCFO for further information.
3. Edit/Update Profile
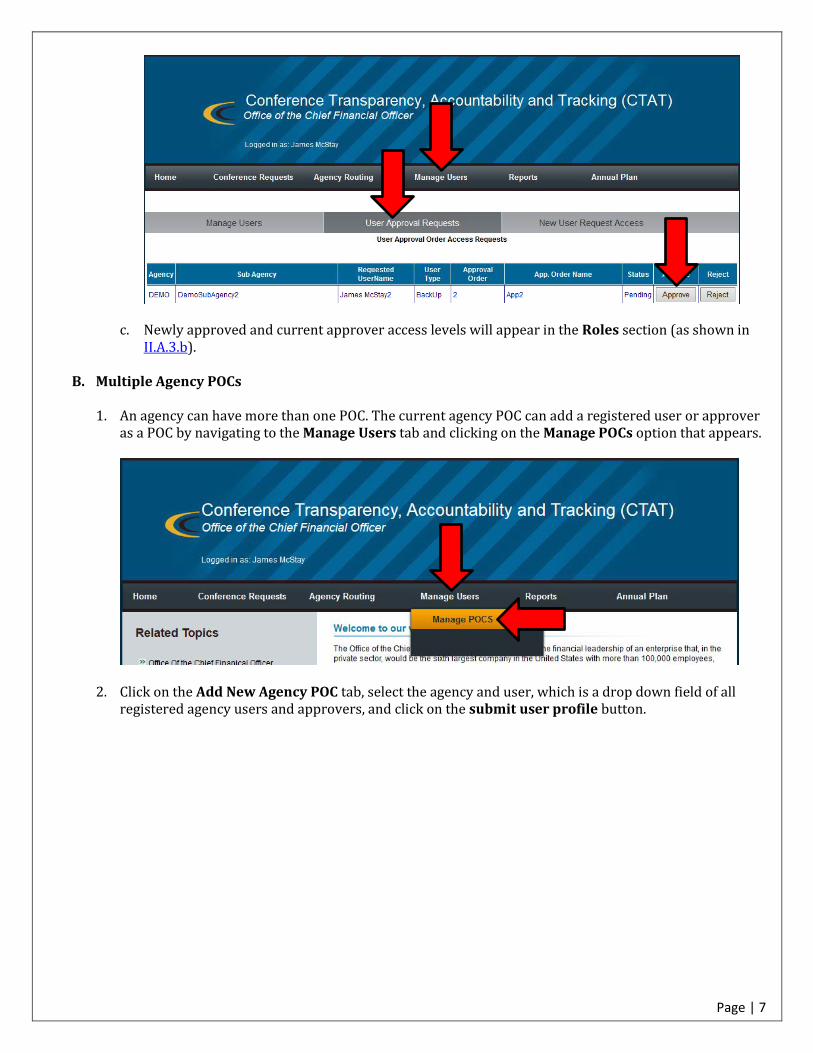
a. To delete a user or approver, click on the “X” icon in the Delete column under the Manage Users
tab. Click Ok on the dialog box that appears to confirm deletion. To edit or update a profile, click on the number corresponding to the account in the View column.
b. The User Profile Form opens. The agency POC can edit the information and change the role from user to approver, or vice versa. Click on the submit user profile button to save the changes. If the account has an approver role, it will show in the Roles section. The agency POC can delete or add the approver role to the account. Click on Delete in the Delete column to remove the approver role associated with the account at that approval order/level. Clicking on the Add New Role button will open the Add New Role section where the POC can add an approver role to the account.

Page | 5
c. Select the Agency; Sub-agency; Approval Order, i.e., the approver’s order on the list – “1” if the approver is first, “2” if second, etc.; and type of user, i.e., primary, backup or other. Note: the backup and other approver can approve/deny a conference request in the absence of the primary approver. The approval order is limited to the number of approvers entered when creating the routing list (in III.A.2). Lastly, the Approval Order Name is the designated name for that particular approver level, e.g., Approver 1, Office Reviewer 2, Agency Administrator Representative, etc. Click on the submit agency approver button when done.

Page | 6
4. Access Levels a. Users and approvers can confirm their access levels by logging in to CTAT – using Windows
credentials or LincPass when prompted through the link in I.A1 – and clicking on the My Profile tab. (Note: The users’ and approvers’ tab layout is slightly different from the agency POC’s.) The page with the User Profile Form and Roles sections appears. Users and approvers can update their information in the User Profile Form section; click on the submit user profile button to save the changes. The Roles section will indicate “No Roles Found…” for users but will list approvers’ approval levels. A user can request approver roles by clicking on the Request New Approver Role button.
b. The Add New Role section appears (see II.A.3.c), and the user fills in the required fields. The agency POC approves the change role request by going to the Manage Users and User Approval Requests tabs and clicking on Approve.
Page | 7
c. Newly approved and current approver access levels will appear in the Roles section (as shown inII.A.3.b).
B. Multiple Agency POCs
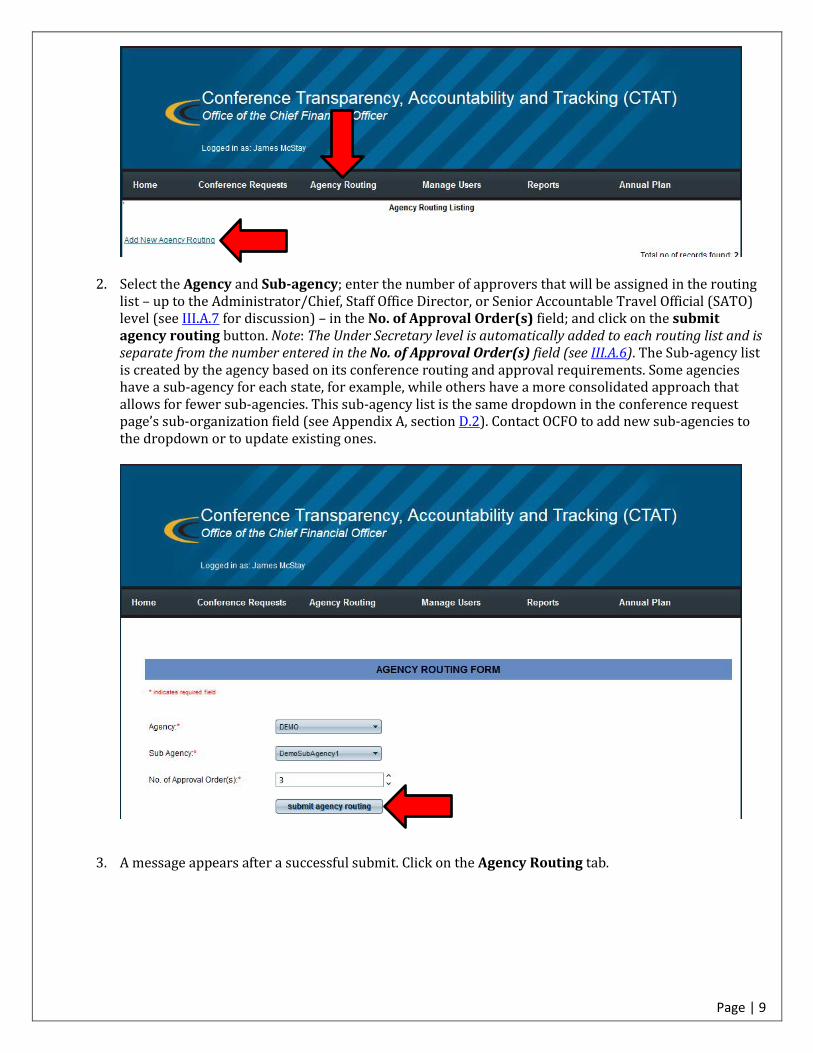
1. An agency can have more than one POC. The current agency POC can add a registered user or approveras a POC by navigating to the Manage Users tab and clicking on the Manage POCs option that appears.
2. Click on the Add New Agency POC tab, select the agency and user, which is a drop down field of allregistered agency users and approvers, and click on the submit user profile button.

Page | 8
3. POC access can be canceled by going to the Manage Agency POCs tab and clicking on the “X” icon in the last column.
III. Routing Lists A. Create a New Routing List
1. The routing list determines the order in which the conference request will route, i.e., from the agency user who entered the request to the last approver for final review and approval. The agency POC clicks on Agency Routing and Add New Agency Routing.
Page | 9
2. Select the Agency and Sub-agency; enter the number of approvers that will be assigned in the routing
list – up to the Administrator/Chief, Staff Office Director, or Senior Accountable Travel Official (SATO) level (see III.A.7 for discussion) – in the No. of Approval Order(s) field; and click on the submit agency routing button. Note: The Under Secretary level is automatically added to each routing list and is separate from the number entered in the No. of Approval Order(s) field (see III.A.6). The Sub-agency list is created by the agency based on its conference routing and approval requirements. Some agencies have a sub-agency for each state, for example, while others have a more consolidated approach that allows for fewer sub-agencies. This sub-agency list is the same dropdown in the conference request page’s sub-organization field (see Appendix A, section D.2). Contact OCFO to add new sub-agencies to the dropdown or to update existing ones.
3. A message appears after a successful submit. Click on the Agency Routing tab.

Page | 10
4. The Agency Routing Listing page opens. Click on the routing list’s corresponding number in the View
column.
5. The Agency Routing Form and Approvers Role Listing page opens. Click on the Add New Approver
button.

Page | 11
6. The Add New Approver section appears.
a. Select the Approval Order assigned to the approver being added, i.e., “1” if the approver is first on the routing list, “2” if second, etc. The highest number should be assigned to the Administrator/Chief, Staff Office Director, SATO, or their designees. The Under Secretary, which is automatically added to each routing list and is separate from the number entered in the approval order in III.A.2, should likewise be assigned an approver (see III.A.7 for discussion).
b. The Approval Order Name is the designated name to the approver at that particular level, e.g.,
Approver 1, Office Reviewer 2, Agency Administrator Representative, etc.
c. Select if this approver will be the primary, backup, or other approver for this approval order in the Pick type of user field. The backup and other approver can approve/deny conference requests in the absence of the primary.
d. In the select agency user field, select the employee that will be assigned the approver role in this
level. The drop down selection will include agency staff who have registered on the site or were manually registered by the agency POC.
Page | 12
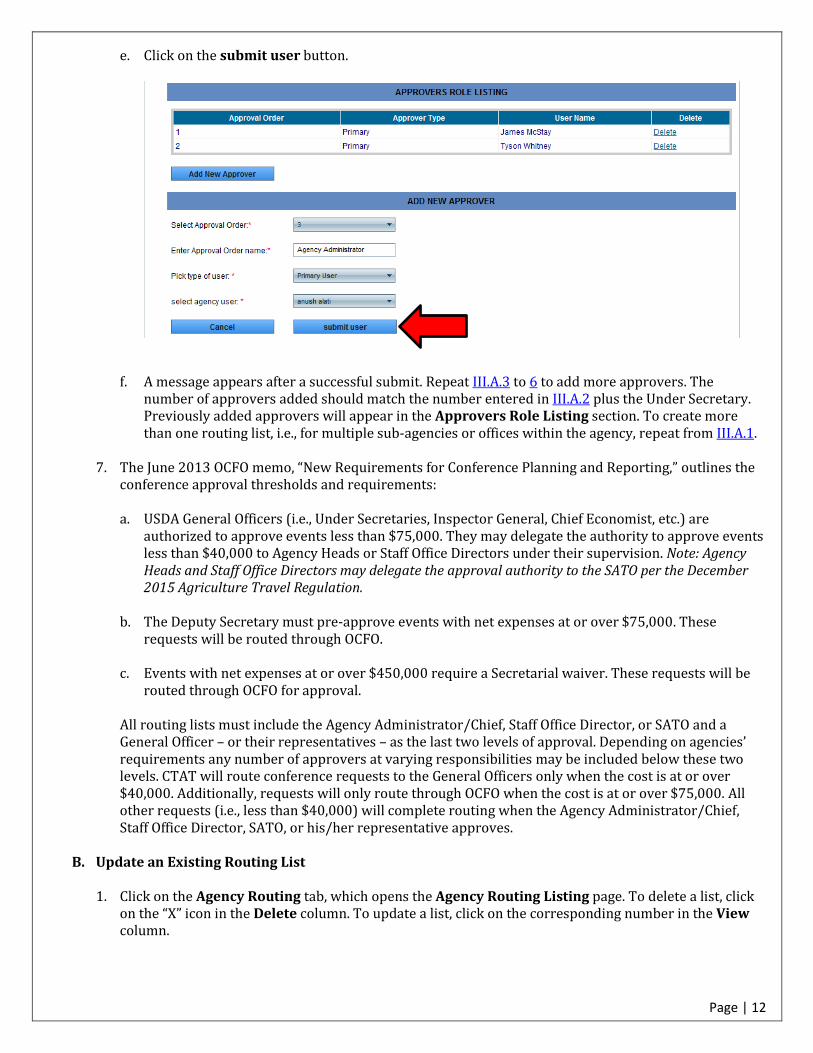
e. Click on the submit user button.
f. A message appears after a successful submit. Repeat III.A.3 to 6 to add more approvers. The
number of approvers added should match the number entered in III.A.2 plus the Under Secretary. Previously added approvers will appear in the Approvers Role Listing section. To create more than one routing list, i.e., for multiple sub-agencies or offices within the agency, repeat from III.A.1.
7. The June 2013 OCFO memo, “New Requirements for Conference Planning and Reporting,” outlines the
conference approval thresholds and requirements:
a. USDA General Officers (i.e., Under Secretaries, Inspector General, Chief Economist, etc.) are authorized to approve events less than $75,000. They may delegate the authority to approve events less than $40,000 to Agency Heads or Staff Office Directors under their supervision. Note: Agency Heads and Staff Office Directors may delegate the approval authority to the SATO per the December 2015 Agriculture Travel Regulation.
b. The Deputy Secretary must pre-approve events with net expenses at or over $75,000. These requests will be routed through OCFO.
c. Events with net expenses at or over $450,000 require a Secretarial waiver. These requests will be
routed through OCFO for approval.
All routing lists must include the Agency Administrator/Chief, Staff Office Director, or SATO and a General Officer – or their representatives – as the last two levels of approval. Depending on agencies’ requirements any number of approvers at varying responsibilities may be included below these two levels. CTAT will route conference requests to the General Officers only when the cost is at or over $40,000. Additionally, requests will only route through OCFO when the cost is at or over $75,000. All other requests (i.e., less than $40,000) will complete routing when the Agency Administrator/Chief, Staff Office Director, SATO, or his/her representative approves.
B. Update an Existing Routing List 1. Click on the Agency Routing tab, which opens the Agency Routing Listing page. To delete a list, click
on the “X” icon in the Delete column. To update a list, click on the corresponding number in the View column.

Page | 13
2. The Agency Routing Form and Approvers Role Listing page opens. To remove approvers, click on the Delete link in the Delete column. To add new approvers at any level and type (i.e., primary, backup, other), click on the Add New Approver button, proceed as shown in III.A.6.a through e, and repeat from III.B.1 for each approver as needed. Note: As mentioned in III.A.6.f, the number of approvers added should match the number entered in III.A.2 plus the Under Secretary.
3. To edit a level, delete the current approver, click on Add New Approver, and proceed as shown in III.A.6.a through e. The approval order selected (i.e., in III.A.6.a) should match the level being updated.

Page | 14
IV. Conference Requests
A. Create a New Conference
1. Once all appropriate agency staff have registered and the routing lists created, conference requests canbe entered and submitted. The agency user logs in to CTAT using Windows credentials or LincPasswhen prompted through the link in I.A1. Navigate to the Conference Requests tab and click on theAdd New Conference option that appears. Note: The user’s tab layout is slightly different from theagency POC’s.
2. Enter the conference details – from General Conference Information to Miscellaneous Attachments(see Appendix A for details on each section). Templates and other attachments (e.g., for conferences over $75,000) can be downloaded from the OCFO website athttps://www.ocfo.usda.gov/travel/conferencereporting.html and uploaded on applicable sections. Certain fields will open new sections or fields depending on the response. The conference request cannot be submitted unless all mandatory fields are filled in, which are indicated with red asterisks. Click on the Submit/Save as Draft button at the bottom of the page when completed. Note: When a user attempts to submit the request with incomplete information, a red “Required” text will appear next to the field.

Page | 15
3. A Review Alerts and Cost Calculations page will appear. The Review Alerts section indicates potential issues that may prevent the conference request from being approved. The agency user should review the request and address the alerts with the goal of eliminating the red alerts and/or limiting the yellow ones. A green alert indicates no issues. To edit the request, click on the Edit Conference Information button at the bottom left of the page. Note: Red and yellow alerts do not prevent a request from being submitted.
4. The Cost Calculations section shows a summary of costs based on information from the Overall Attendee Information (see Appendix A, section E) and the Overall Cost Information (see Appendix A, section F). The conference is considered a high cost event when the Cost per Attendee is over $3,000 or the Cost per Attendee per Day, over $600. A justification for high cost event should have been entered in the Justification field (see Appendix A, section A.5) under General Conference Information.
5. The agency user can submit the request for review or save it as draft for later submission. To submit,
click on the Submit for Review button; to save, click on Save as Draft.

Page | 16
B. Access an Existing Conference 1. To access the requests, the agency user clicks on the Conference Requests tab. The list of conference
requests saved or submitted by the user will appear. Saved requests will show “Draft” in the Status column; currently routing requests will show “Pending”; returned requests, “Additional Info”; completed requests, “Approved”; and rejected requests, “Disapproved.” To delete a request, click on the “X” icon corresponding to the conference in the Delete column. To view, edit, or submit the request click on the number in the View column corresponding to the conference. If the conference number is known, select the number from the Select Conference dropdown and click on the Get Conference button to retrieve the request instead of scrolling through the list. Note: As opposed to the user who can only access his/her requests, the agency POC can access all saved and submitted requests that were created by the agency’s users.
2. For conferences in draft or additional info status, the editable version of the request opens. Users can continue entering or editing information and save or submit for review when completed.
3. For pending, approved, or disapproved conferences the read-only version of the request opens, which has the following available options:

Page | 17
a. Save the request as pdf – Click on the PDF button and follow the instructions to save or open the request as a pdf file.
b. Print the request – Click on the Print button to print a hard copy of the request on a local printer.
c. View the detailed status of the request – Click on the View Approval Details button, which will open the Routing Workflow/Approval Details page. It consists of the Conference Submission Details, which shows when the request was created and last modified; the Approvers Decision Details, which shows the approvers’ decision history; the Required Approvers Routing Listing, which shows all the approvers the request will route through within the agency; and the Required OCFO Reviewers, an optional section that only appears for requests over $75,000 and shows the OCFO routing list.
Click on Go Back or the browser’s back button to return to the previous page.

Page | 18
V. Conference Routing A. Decision Page
1. Routing is triggered once the agency user submits a conference request for review. The first approver
in the routing list for the sub-agency entered in the conference request (see Appendix A, section D.2) receives an email notification (from [email protected]), which contains a link to the request; the conference number, a unique ID that identifies each request in the system; the approver’s order role number in the routing list, i.e., 1 for the first approver, 2 for the second, etc.; and the agency and sub-agency that initiated the request.
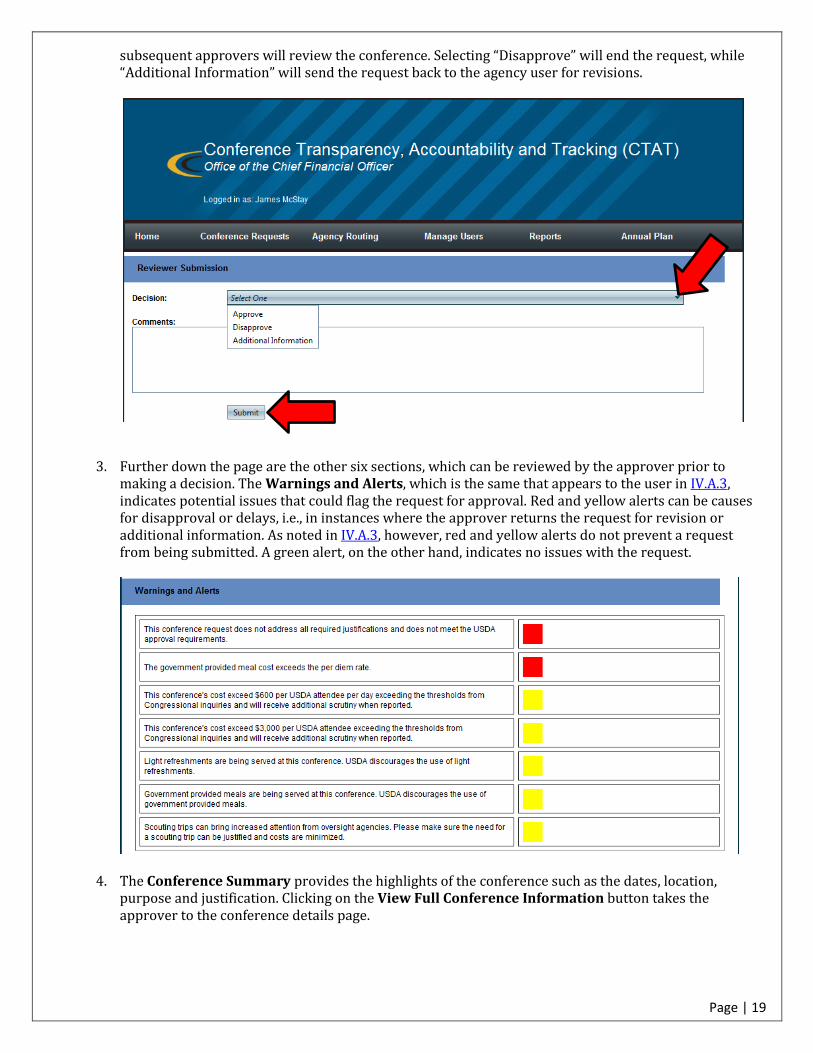
2. Clicking on the link provided in the email takes the approver to the conference decision page, which
consists of seven sections: Reviewer Submission, Warnings and Alerts, Conference Summary, Miscellaneous Attachments, Cost Calculations, Required Reviewers/Agency Approvers Routing Listing (an OCFO reviewers routing list section also appears for conferences over $75,000), and Approvers/Reviewers Decision Details. On the Reviewer Submission section, the approver selects a decision to approve, disapprove, or request additional information; enters comments, if any; and clicks on the Submit button. Selecting “Approve” elevates the request further up the routing list where
Page | 19
subsequent approvers will review the conference. Selecting “Disapprove” will end the request, while “Additional Information” will send the request back to the agency user for revisions.
3. Further down the page are the other six sections, which can be reviewed by the approver prior to
making a decision. The Warnings and Alerts, which is the same that appears to the user in IV.A.3, indicates potential issues that could flag the request for approval. Red and yellow alerts can be causes for disapproval or delays, i.e., in instances where the approver returns the request for revision or additional information. As noted in IV.A.3, however, red and yellow alerts do not prevent a request from being submitted. A green alert, on the other hand, indicates no issues with the request.
4. The Conference Summary provides the highlights of the conference such as the dates, location,
purpose and justification. Clicking on the View Full Conference Information button takes the approver to the conference details page.

Page | 20
a. Attachments can be viewed and/or saved by clicking on the Download button on each applicable section.
And clicking on the Open or Save button in the pop up window that appears at the bottom of the page.
b. User options such as saving in pdf and printing a hard copy of the request are available to
approvers. To return to the decision page, click on the Go Back or web browser’s return button.

Page | 21
5. The Miscellaneous Attachments section allows approvers to attach supporting documents. This is applicable in a situation, for example, where a designee is registered, logging into CTAT and moving the request on behalf of the approver, such as a secretary uploading a scanned conference approval request signed by the Administrator. To upload, click on the Select and Upload Selected Files buttons (see Appendix, section A.9 for instructions); the document should appear in a table below the Upload Selected Files button.
6. The Cost Calculations provides a high level summary of the costs, including the number of conference days and attendees paid for by the agency. The conference is a high cost event if the Cost per Attendee is over $3,000 or the Cost per Attendee per Day is over $600. Note: The justification for high cost events should have been entered in the Justification field (see Appendix A, section A.5) under the General Conference Information section.
7. The Approvers/Reviewers Decision Details shows the request’s decision history. It includes the
approver’s name, decision, comments and review date.
8. Lastly, the Required Reviewers/Agency Approvers Routing Listing section shows the list of approvers the request will route to within the agency, which includes the Under Secretary for conferences above $40,000. The OCFO approvers list appears below the agency routing list for conferences over $75,000.

Page | 22
B. Decision Workflow
1. When the first approver approves the conference request, it routes to the second approver for review,
and so on. The process is repeated starting at V.A.1 for the second and subsequent approvers until the request reaches completion when approved by the final approver. The request’s status changes from “Pending” to “Approved” in the Status column in the List of Conference Requests under the Conference Requests tab (see IV.B.1) and the View by Status, Date Range, Agency, and Cost queries available in the Reports tab.
2. When an approver at any level denies the request, the routing ends and the conference request’s status changes from “Pending” to “Disapproved.” The conference is disabled and can only be reactivated by contacting OCFO.
3. When an approver selects “Additional Information,” the request is routed back to the originating
agency user, who receives an email notification containing the conference number and a link to the request.

Page | 23
4. Clicking on the link takes the user directly to the conference request page where edits can be made.
Alternatively, the user can log in to CTAT and go to the List of Conferences under the Conference Requests tab. Search for and click on the conference number indicated in the notification email to access the request (see IV.B.1), the status of which shows “Additional Info.” In addition to the original sections – i.e., General Conference Information to Miscellaneous Attachments – two additional sections are available: a. The Reviewer Comments, which appears before the General Conference Information, shows the
approver who returned the request, comments, if any, and date they were entered.
b. The Comments to Reviewer, which appears after Miscellaneous Attachments, allows the user to enter comments in response to the approver’s.

Page | 24
5. The user clicks on the Submit with Additional Information button once all edits have been
completed. The Review Alerts and Costs Calculation page appears, and the user proceeds as explained in IV.A.3 through 5. When the user submits the request for review, the routing and approval process restarts from the first approver.
C. Manual Retrieval
1. The auto-generated email notifies an approver of a conference request recently submitted by a user or
approved by a preceding approver and pending immediate review by the current approver. Approvers can retrieve all requests pending their review by logging in to CTAT and clicking on the My Conference tab. Note: The approvers’ tab layout is similar to the users’.
2. The My Conference Requests page opens.
a. Approval Order Role – This is a drop down field that allows searching for pending requests at different approval orders assigned to approvers. For example, an approver who is first and third in one or more routing lists can select either “1” or “3” to review requests pending the approver’s review at those levels. For an approver assigned only one order/level, the selection will be limited to that one number.
b. Request Type – Select “Pending Requests” to retrieve requests pending at the level selected in (a). Note: The “Approved Requests” option retrieves conference requests that have been previously approved by the current approver. Selecting this option opens the read-only version of the request.

Page | 25
c. Agency and Sub-agency – The approver selects the agency and sub-agency. These fields will have more than one selection only if the approver is assigned to multiple agencies or sub agencies/offices.
Click on the Get Requests button to retrieve the requests based on the filters above. Click on the number in the View column to open the corresponding conference request. The decision page opens and the approver proceeds as explained in V.A.2 through 8. Note: Higher level approvers will be able to retrieve requests that have been submitted by users regardless of approval status by lower level approvers, which in effect gives the former the ability to bypass the latter.
D. Agency POC Approval 1. Agency POCs have the ability to move conferences to allow for continued routing in certain situations,
such as approver unavailability for time-sensitive requests. Agency POCs access requests similar to users (see IV.B.1); an Approve & Move Forward option is available for pending conferences. Clicking on this option takes the POC to the decision page where the conference can be reviewed and a decision entered (see V.A.2 through 8).

Page | 26
2. The POC can enter a decision for an approver at any level. The conference routes from the level the POC is entering a decision for and continues on as explained in V.B. For example, if the POC approves at the third approver’s level, the conference moves on to the fourth approver, and so on. Similarly, if the POC disapproves the request, the routing ends (see V.B.2); if the POC returns it, the request goes back to the user (see V.B.3).
VI. Reports
The POC can run reports of all the agency’s conference requests, which can be filtered by status, date range, agency/sub-agency, and cost. Click on one of the options that appear in the Reports tab.
A. View All Requests
1. The View All Requests option retrieves conference requests that are pending an approver’s review and shows where the requests are on the routing list. The Reviewers Listing column shows the agency approvers. The Under Secretary and OCFO Reviewers columns show the corresponding approvers at these levels – the former will only show an approver icon for conferences between $40,000 and $75,000, while the latter for those over $75,000.
2. The red approver icon indicates which approver the request is currently awaiting approval for. In the sample below, conference no. 1949, a less than $40,000 conference, is awaiting approver 2’s decision; conference no. 1915, a recently submitted request for less than $75,000, is with approver 1; and conference 1909, which is over $75,000 and has gone through the agency and Under Secretary levels, is nearing completion with the Associate CFO at OCFO.

Page | 27
3. The agency POC can send an email to remind the current approver to complete the review by clicking on the checklist icon in the Send Email Reminder column. The system will create and send an email to the approver without the agency POC having to manually send one through Outlook. The email will be similar to that in V.A.1 and will allow the approver to access the request directly.
B. Filterable Reports
1. Reports can be filtered by any of the following options: status, date range, agency/sub-agency, and cost.
Users can only run reports for requests they entered. POCs, on the other hand, can view all of the agency’s conferences. The View By Status filters for requests whether in the draft, additional info, pending, approved, or disapproved stage. The View By Date Range includes options for the conferences’ start and end dates. Conferences on or after the start date filter will be retrieved. Entering an end date limits the results to those that end on or before the said date. The View By Agency filters by sub-agency, i.e., the office as reflected in the agency’s routing lists that initiated the request. Lastly, the View By Cost retrieves requests greater/less than or equal to the entered values based on the conferences’ total costs (without salaries and benefits).
2. Select or enter the appropriate filters and click on the Get Reports button to retrieve the conferences. Note: The View by Status option provides the most detailed results. In addition to columns/fields that are available in the other options, it also includes the location, date created, event amount (i.e., conference cost), number of attendees, routing status, and final approver.

Page | 28
3. The results can be exported to an Excel spreadsheet or opened as a pdf file by clicking on the appropriate button.
VII. Conference Transparency Reporting
A. Post Conference Details
1. Select fields from approved conference requests are mapped onto the Post Conference Details under List of Conference Requests in the Conference Requests tab. This information can be used to satisfy

Page | 29
the quarterly conference transparency reporting (CTR) requirements to OCFO1. Click on the Post Conference Details link under the Enter Post Conference Details column to access the data.
2. The Post Conference Request Details page appears with pre-populated information. Most fields can
be edited, as appropriate. High cost conferences (cost per person > $3,000 or cost per person per day > $600) and sponsored conferences over $100,000 will trigger additional explanation fields that appear at the bottom of the page and must be filled in. Users or agency POCs must update the post-conference data (e.g., actual as opposed to estimated costs) as soon as information becomes available. Click on the Submit Conference Details button to save any changes.
1 The June 2013 OCFO memo, “New Requirements for Conference Planning and Reporting,” requires agencies to submit certified reports each quarter on conferences that were attended, hosted, or sponsored where net expenses exceeded $7,000.

Page | 30
B. Generating Reports 1. All approved conferences, whether updated in the Post Conference Details or not, will appear in the
post conferences report. To run the report, click on the View All Post Conferences option under the Reports tab.

Page | 31
2. The report can be filtered by sub-agency. Use the date filters and click on the Get Reports button to
generate a report for a particular quarter. For example, enter January 1, 2016 and March 31, 2016 for the start and end dates to retrieve all conferences for the 2nd quarter of FY 2016. The list of conferences that appear can be exported to a spreadsheet by clicking on the Open in Excel button.
3. Click on Open or Save on the pop window that appears at the bottom of the screen
4. Click on Yes on the Excel dialog box that appears.

Page | 32
5. The spreadsheet contains all the data elements required for CTR to OCFO, such as conference name, dates, location, number of attendees, and costs, among others. Further edits to the data can be made as needed, and the spreadsheet saved to a local drive.
C. Report Submission 1. The annual OCFO CTR memoranda establish the guidelines for CTR. The POC should coordinate with
agency staff responsible for CTR to ensure quarterly reports are generated from CTAT, updated as needed, and submitted to OCFO in a timely manner.
2. The draft and final CTRs and certifications will continue to be submitted to OCFO via emails. Future CTAT enhancements will include the ability to upload these documents in the View All Post Conferences option under the Reports tab.
VIII. Annual Plan A. Add New Plan
1. Annual conference plans are due to OCFO by August 31. To add a new plan, agency users or the POC
navigates to the Annual Plan tab and clicks on the Add New Conference option.
2. The Annual Plan page appears, which consists of drop down fields and text boxes. Enter or select the applicable information and click on the Submit New Conference button.

Page | 33
3. A successful submit message appears. Click on Home to get to the homepage. Repeat VIII.A.1 to 3 for each conference.

Page | 34
4. Click on the Annual Plan tab to view the list of all conferences entered. Select the fiscal year (FY) and click on Get Reports to filter the list by FY. To export the list – either filtered or unfiltered – click on the Open in Excel button and select Open (or Save) and Yes on the dialog boxes that appear (see VII.B.3 and 4). The spreadsheet will contain data entered in VIII.A.2.
B. Edit Plan 1. Each conference in an annual plan can be edited or deleted. Click on the Annual Plan tab to view the
list of conferences (see VIII.A.4). To delete a conference, click on the corresponding “X” icon in the Delete column; to edit, click on the number in the View column corresponding to the conference.
2. The Annual Plan page opens (see VIII.A.2). Edit the applicable fields and click on Submit New Conference. A successful submit message appears (see VIII.A.3). Click on Home and repeat VIII.B.1 and 2 for each conference as needed.
C. Plan Submission
1. OCFO will retrieve annual plans from CTAT by exporting the data to a spreadsheet as explained in
VIII.A.4.
2. Alternatively, agencies may submit their plans to OCFO at [email protected].
-END-

Page |A-1
APPENDIX A
Add New Conference
A. General Conference Information
1. The Conference Name is a drop down field with previously entered conferences as selections. For a
conference not previously entered, (i.e., new) select New Conference and type the name in the blank field that appears below the drop down field.
2. Type in (mm/dd/yyyy) or click on the calendar icon to enter the start and end dates of the conference. The end date must be later than the start date; otherwise, an error will be created.
3. Select the country, the state if U.S., and type in the city.
4. Enter the purpose for attending, hosting, or sponsoring the conference.
5. Enter the justification for attending, hosting, or sponsoring the conference. Also enter justification for high cost events: Cost per person over $3,000 or cost per person per day over $600.
1
2
2
3
3
3
4
5

Page |A-2
6. Curriculum based training and continuing professional education credits – Select Yes or No.
7. USDA facility – Select Yes or No.
8. Definition of a “conference” – Select Yes or No.
9. Upload a copy of the conference agenda.
a. Click on the blank field or the Select button and select the file from the local drive through the dialog box that opens. The file should appear above the blank field, next to a green circle, which indicates the file is ready to be uploaded.
b. Click on the Upload Selected Files button to complete the upload. The file will appear in a table below the Upload Selected Files button, which indicates it has been successfully uploaded.
10. Multiple USDA agencies – Select Yes, No, or Unknown.
6
7
8
9
10
11
a
b

Page |A-3
11. Select one or more roles. The sponsor option will open the Sponsoring Agency Information section immediately below the Role field.
a. Enter explanation on how lodging costs will be minimized.
b. Upgraded rooms – Select Yes or No.
c. Additional meeting rooms – Select Yes or No.
d. Outside conference planning services – Select Yes or No.
e. Scouting trips – Select Yes or No.
f. After hours events – Select Yes or No.
g. Alcohol provided – Select Yes or No.
B. Conference Justifications
1. Agency’s mission or Department’s strategic plan – Select Yes or No.
1
2
3
4
a
b
c
d
e
f
g

Page |A-4
2. Teleconference or the internet – Select Yes or No.
3. Number of employees justified – Select Yes or No.
4. The conference is a “must do” – Select Yes or No. Notes: a. Selecting No in any one of these questions will trigger an alert in the Warnings and Alerts page to notify
approvers that not all justifications have been addressed.
b. The user can hide sections of the form by clicking “Click to slide the …” that appear on top of each section.
C. Conference Sponsorship Information
1. Select the sponsoring organization – either a USDA agency or Other (non-USDA).
2. Select the co-sponsoring agency or N/A if unknown or not applicable.
3. Type in the non-USDA co-sponsoring organization if known; otherwise, enter N/A or unknown.
4. Type in the executive sponsor’s name and title.
5. Type in the sponsoring organization’s POC’s name and title.
1
2
3
4 4
5 5
Page |A-5
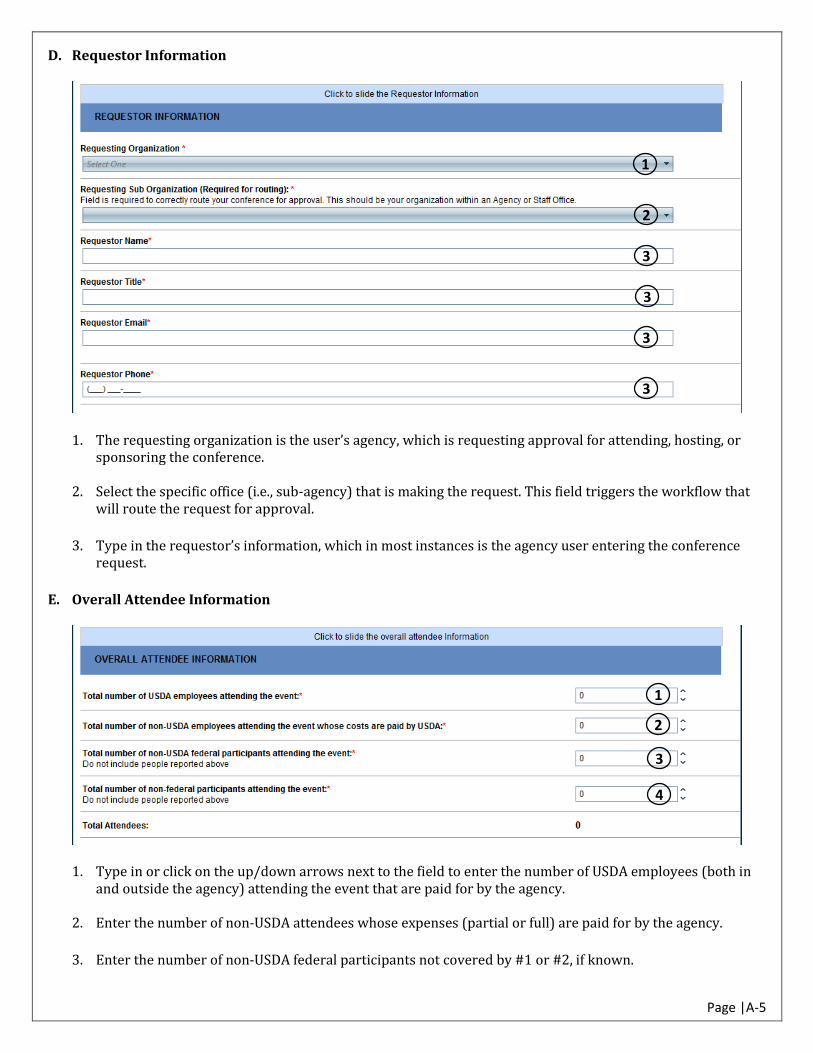
D. Requestor Information
1. The requesting organization is the user’s agency, which is requesting approval for attending, hosting, or
sponsoring the conference.
2. Select the specific office (i.e., sub-agency) that is making the request. This field triggers the workflow that will route the request for approval.
3. Type in the requestor’s information, which in most instances is the agency user entering the conference request.
E. Overall Attendee Information
1. Type in or click on the up/down arrows next to the field to enter the number of USDA employees (both in
and outside the agency) attending the event that are paid for by the agency.
2. Enter the number of non-USDA attendees whose expenses (partial or full) are paid for by the agency.
3. Enter the number of non-USDA federal participants not covered by #1 or #2, if known.
1
2
3
3
3
3
1
2
3
4

Page |A-6
4. Enter the number of non-federal participants not covered by #1 or #2, if known.
F. Overall Cost Information
1. Enter the total temporary duty (TDY) travel expenses for all participants.
a. Select Yes or No for the premium class travel.
b. Enter any scouting trip TDY expenses.
c. Attach the list of attendees whose travel costs are paid for by the agency. Use the Attendees Cost DetailSpreadsheet available from the OCFO website athttps://www.ocfo.usda.gov/travel/conferencereporting.html. See A.9 for upload instructions.
2. Enter the audio-visual (AV) costs, if applicable. A nonzero entry will require an explanation.
a. Enter the explanation for the AV costs.
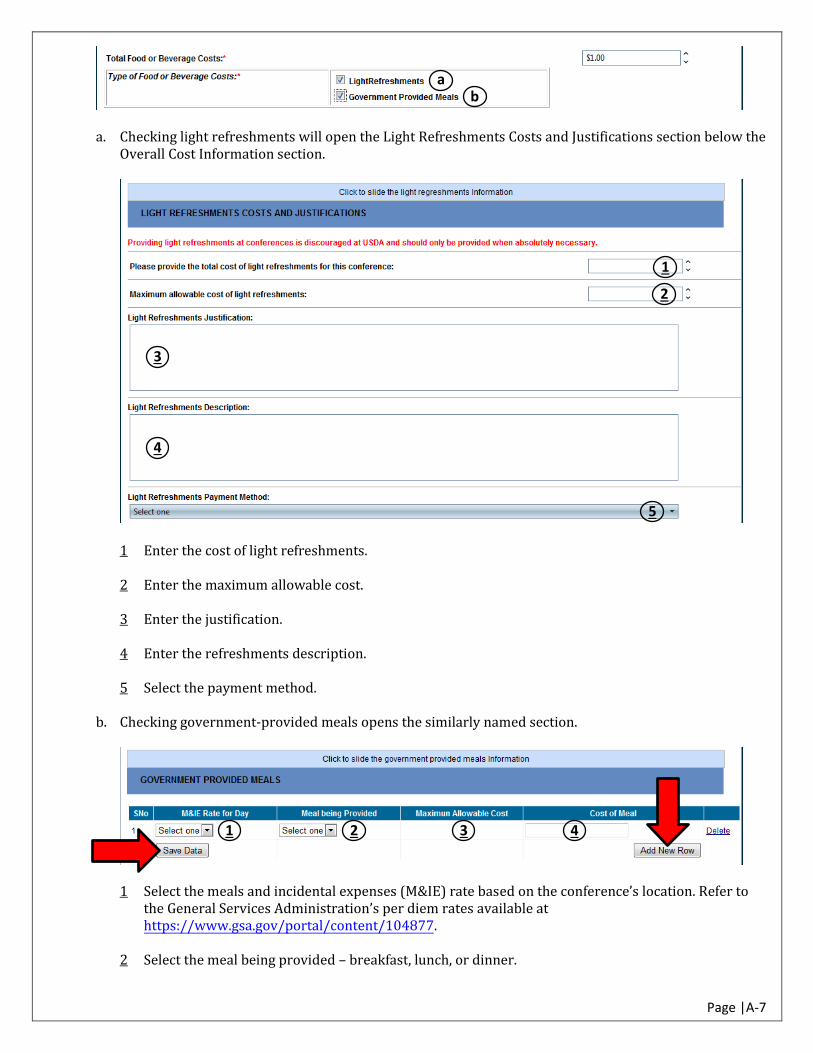
3. Enter the total food or beverage costs, if applicable. A nonzero entry will require identifying the type ofcost: light refreshments and/or government-provided meals.
1
2
3
4
5
6
7
8
9
a b
c
a
Page |A-7
a. Checking light refreshments will open the Light Refreshments Costs and Justifications section below theOverall Cost Information section.
1 Enter the cost of light refreshments.
2 Enter the maximum allowable cost.
3 Enter the justification.
4 Enter the refreshments description.
5 Select the payment method.
b. Checking government-provided meals opens the similarly named section.
1 Select the meals and incidental expenses (M&IE) rate based on the conference’s location. Refer to the General Services Administration’s per diem rates available at https://www.gsa.gov/portal/content/104877.
2 Select the meal being provided – breakfast, lunch, or dinner.
a b
1
2
3
4
5
1 2 3 4

Page |A-8
3 The maximum allowable cost will be automatically calculated.
4 Enter the cost of the meal; note that costs higher than the maximum allowable will trigger an alert in the Warnings and Alerts page.
Click on the Add New Row button for each additional meal and repeat the steps. Click on the Save Data button to save all entries.
4. Enter the promotional materials cost. A nonzero entry will require a justification and description.
a. Enter the promotional materials justification.
b. Enter the promotional materials description.
5. Enter the total registration fees, if applicable.
6. Enter the speaker fees, if applicable. A nonzero entry will require justification and an attached copy of the speaker’s credentials.
a. Enter the justification for the paid speaker(s).
b. Attach the speaker’s credentials. See A.9 for upload instructions.
7. Enter the total salaries and benefits of all attendees paid for by the agency. This should be the total in
column I of the Attendees Cost Detail Spreadsheet uploaded in F.1.c.
8. Enter any other costs. A nonzero entry will require an explanation.
a
b
a
b

Page |A-9
a. Enter explanation for other costs.
9. Select the payment method. G. Facility Information and Justifications
1. Select the facility where the conference will be held. Selecting commercial facility will require a
justification.
a. Enter justification for using a commercial facility.
2. Enter the justification for why teleconferencing is not an option.
3. Select the basis for the location. If “Cost comparison performed to select locations” is selected, a Cost Comparison section appears.
1
2
3
a
a

Page |A-10
a. Attach a cost comparison calculation. The cost comparison templates from the OCFO website athttps://www.ocfo.usda.gov/travel/conferencereporting.html may be used. See A.9 for uploadinstructions.
b. Select the location methodology and enter the justification for the preferred location.
c. Select the location methodology and enter the justification for the 2nd alternate location.
d. Select the location methodology and enter the justification for the 3rd alternate location.
a
b
b
c
c
d
d

Page |A-11
H. Accounting Information
1. Select the funding type.
2. Enter the accounting codes.
3. Select the contracting method used.
4. Funding support from non-federal organizations – Select Yes or No. If yes, additional fields are required.
a. Enter the organization’s name.
b. Enter the amount of funding support.
c. OGC opinion or other applicable form – Select Yes or No. If yes, attach certification.
1 Attach the OGC opinion or other applicable form. See A.9 for upload instructions.
1
2
3
a
b
c
1
4

Page |A-12
I. Miscellaneous Attachments
1. Upload any additional documents not covered by previous sections. See A.9 for upload instructions.
1