configuration guide for the sas system, version 9 for … guide for the sas ... sas/access interface...
TRANSCRIPT

Configuration Guide for the SAS® SystemVersion 9 for UNIX® Environments
Table of Contents
Chapter 1, Post-Installation Configuration for SAS/ACCESS Software.................................1
SAS/ACCESS Interface to DB2 Software.....................................................................................2SAS/ACCESS Interface to INFORMIX Software..........................................................................2SAS/ACCESS Interface to ODBC Software..................................................................................3SAS/ACCESS Interface to ORACLE Software.............................................................................3SAS/ACCESS Interface to PeopleSoft Software..........................................................................4SAS/ACCESS Interface to R/3 Software......................................................................................4SAS/ACCESS Interface to SAP BW Software..............................................................................4SAS/ACCESS Interface to SYBASE Software..............................................................................5
Chapter 2, Post-Installation Configuration for SAS/ASSIST Software...................................6
Adding a Master Profile.................................................................................................................6
Chapter 3, Post-Installation Configuration for SAS/CONNECT Software..............................8
User Authentication.......................................................................................................................8Storing and Locating SAS/CONNECT Script Files.......................................................................8
Chapter 4, Post-Installation Configuration for Enterprise Miner Server Software................9
Configuring Enterprise Miner Server Software..............................................................................9Setup Default Data Library........................................................................................................9Provide Information to Configure Enterprise Miner Client Software..........................................9
Chapter 5, Post-Installation Configuration for SAS/GRAPH Software.................................10
Chapter 6, Post-Installation Configuration for SAS Integration Technologies Software...11
User Authentication.....................................................................................................................11
Chapter 7, Post-Installation Configuration for SAS/IntrNet Software..................................12
User Authentication.....................................................................................................................12
Chapter 8, Post-Installation Configuration for the IT Service Vision Solution....................13
IT Service Vision Functionality....................................................................................................13Installing IT Service Vision..........................................................................................................13
Migration Considerations.........................................................................................................13Installation Customizations......................................................................................................13Configuring the SAS System for IT Service Vision..................................................................14Starting IT Service Vision........................................................................................................14
Site Library Considerations.........................................................................................................14First-time Installations..............................................................................................................14Upgrading Existing Installations...............................................................................................14Maintaining SITELIB with Previous IT Service Vision Installations.........................................15Modifying the Default Pointer to SITELIB Directory................................................................16
i 07/11/06

Chapter 9, Post-Installation Configuration for SAS/MDDB Server Software.......................17
Chapter 10, Post-Installation Configuration for National Language Support (NLS)..............18
Asian Language Support (ALS)...................................................................................................18Changing the Default DBCSLANG and DBCSTYPE Option Settings.....................................19Setting System Fonts with X Resource Files...........................................................................19Asian Font Catalogs.................................................................................................................20
Specifying the Font Catalog in the Configuration File........................................................................20 Specifying the Font Catalog in a SAS Session..................................................................................20
European Language Support (ELS)............................................................................................20Locale Setup Window..............................................................................................................21Configuring Your System for Locale........................................................................................21
Changing the Default LOCALE Option Setting..................................................................................21 Running SAS in a Different Locale.....................................................................................................21
Additional Information..............................................................................................................22 Locale Setup on the Remote Server..................................................................................................22 Devmaps and Keymaps for SAS/GRAPH Software...........................................................................23
Chapter 11, Post-Installation Configuration for SAS OLAP Server Software......................25
Setting up Access Control without SAS/EIS Software on Your Server.......................................25Starting the Access Control Setup Dialog Window.................................................................25Setting Your Access Control Key and Environment Programmatically...................................25Setting Your Access Control Definitions (Users, Groups, ACL) Programmatically.................28Write Access to SASHELP.AC and SASHELP.MB.................................................................36
Specifying OLAP Classes............................................................................................................36
Chapter 12, Post-Installation Configuration for Risk Dimensions Software.......................37
Starting the Risk Dimensions Application...................................................................................37
Chapter 13, Post-Installation Configuration for SAS/SECURE Software.............................38
SAS/SECURE Client for Windows..............................................................................................38SAS/SECURE Client for Java.....................................................................................................38Client Components......................................................................................................................38
Chapter 14, Post-Installation Configuration for SAS/SHARE Software...............................39
User Authentication.....................................................................................................................39System Configuration for the TCP/IP Communications Method.................................................39Client Components......................................................................................................................39
SAS/SHARE Data Provider ....................................................................................................40SAS ODBC Driver....................................................................................................................40SAS/SHARE Driver for JDBC..................................................................................................40SAS/SHARE SQL Library for C...............................................................................................40
NLS Information...........................................................................................................................40
Chapter 15, Post-Installation Configuration for WebHound, Release 4.2............................41
Configuring WebHound, Release 4.2..........................................................................................41
Chapter 16, Usage of Host Sort Routines..................................................................................42
Making Host Sort Routines Available..........................................................................................42
ii

Using Host Sort Routines in a SAS Session...............................................................................44
iii


Chapter 1, Post-Installation Configuration for SAS/ACCESS Software
Important: The steps outlined in this chapter assume that the SAS Representative at your site has installed SAS/ACCESS software and completed the first phase of SAS/ACCESS software configuration.
Refer to the System Requirements to determine if the combination of your operating system and the version or release of your DBMS is supported by the SAS/ACCESS interface you want to configure.
The first phase of SAS/ACCESS software configuration involves completing the steps in Chapter 2 of the Installation Instructions concerning how to perform SAS/ACCESS software configuration during the initial installation of the SAS System. However, SAS/ACCESS software configuration can be performed after the initial installation of the SAS System and the SAS Representative may not have completed the steps in Chapter 2 of the Installation Instructions. If so, then the SAS Representative needs to complete the steps documented in Chapter 3 of the Installation Instructions to finish the first phase of SAS/ACCESS software configuration.
Once the first phase of SAS/ACCESS software configuration has been completed, you can then proceed with the instructions in this chapter.
Before beginning the second phase of SAS/ACCESS software configuration, you should determine the following information about your DBMS:
• The version or release of the DBMS client shared libraries installed on your operating system. This is important due to potential incompatibilities between DBMS versions or releases.
• The location of the DBMS client shared libraries. This is important so that SAS/ACCESS software can be loaded at execution time.
Refer to the following sections for detailed DBMS-specific instructions on configuring your environment to interface with your SAS/ACCESS software.
1
2 Configuration Guide for the SAS System, Version 9 for UNIX Environments
SAS/ACCESS Interface to DB2 Software
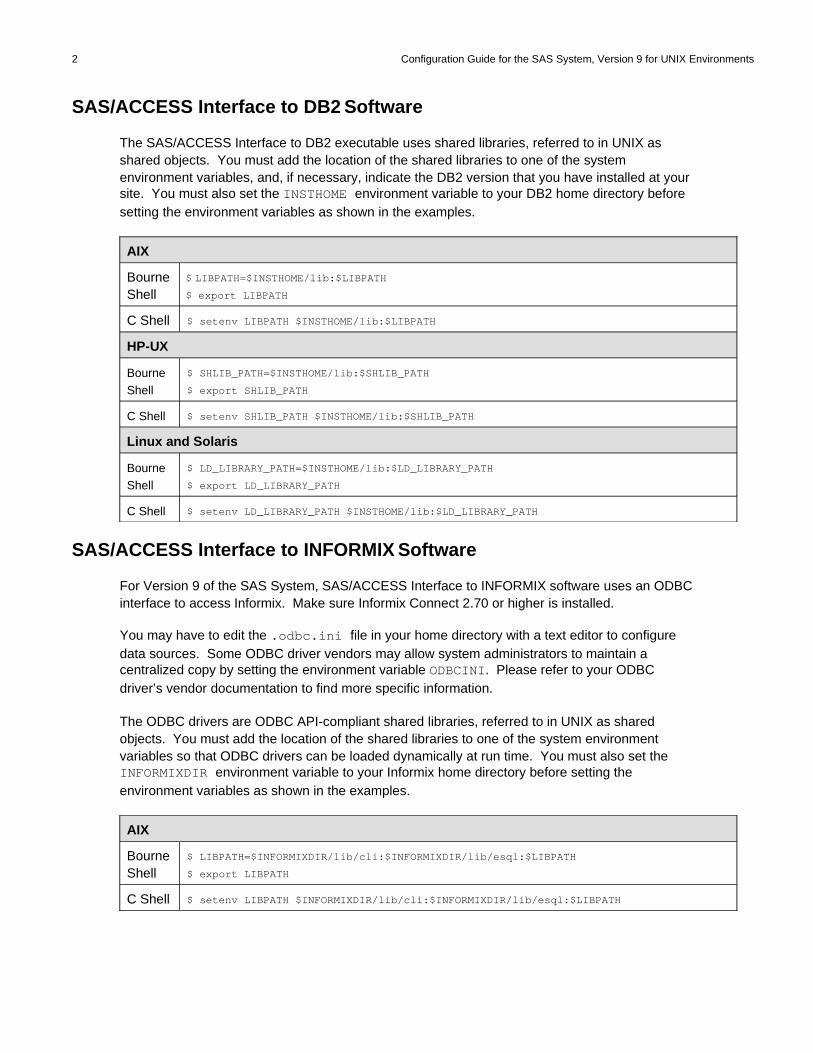
The SAS/ACCESS Interface to DB2 executable uses shared libraries, referred to in UNIX as shared objects. You must add the location of the shared libraries to one of the system environment variables, and, if necessary, indicate the DB2 version that you have installed at your site. You must also set the INSTHOME environment variable to your DB2 home directory before setting the environment variables as shown in the examples.
AIX
BourneShell
$ LIBPATH=$INSTHOME/lib:$LIBPATH
$ export LIBPATH
C Shell $ setenv LIBPATH $INSTHOME/lib:$LIBPATH
HP-UX
BourneShell
$ SHLIB_PATH=$INSTHOME/lib:$SHLIB_PATH
$ export SHLIB_PATH
C Shell $ setenv SHLIB_PATH $INSTHOME/lib:$SHLIB_PATH
Linux and Solaris
BourneShell
$ LD_LIBRARY_PATH=$INSTHOME/lib:$LD_LIBRARY_PATH
$ export LD_LIBRARY_PATH
C Shell $ setenv LD_LIBRARY_PATH $INSTHOME/lib:$LD_LIBRARY_PATH
SAS/ACCESS Interface to INFORMIX Software
For Version 9 of the SAS System, SAS/ACCESS Interface to INFORMIX software uses an ODBC interface to access Informix. Make sure Informix Connect 2.70 or higher is installed.
You may have to edit the .odbc.ini file in your home directory with a text editor to configure data sources. Some ODBC driver vendors may allow system administrators to maintain a centralized copy by setting the environment variable ODBCINI. Please refer to your ODBC driver’s vendor documentation to find more specific information.
The ODBC drivers are ODBC API-compliant shared libraries, referred to in UNIX as shared objects. You must add the location of the shared libraries to one of the system environment variables so that ODBC drivers can be loaded dynamically at run time. You must also set the INFORMIXDIR environment variable to your Informix home directory before setting the environment variables as shown in the examples.
AIX
BourneShell
$ LIBPATH=$INFORMIXDIR/lib/cli:$INFORMIXDIR/lib/esql:$LIBPATH
$ export LIBPATH
C Shell $ setenv LIBPATH $INFORMIXDIR/lib/cli:$INFORMIXDIR/lib/esql:$LIBPATH
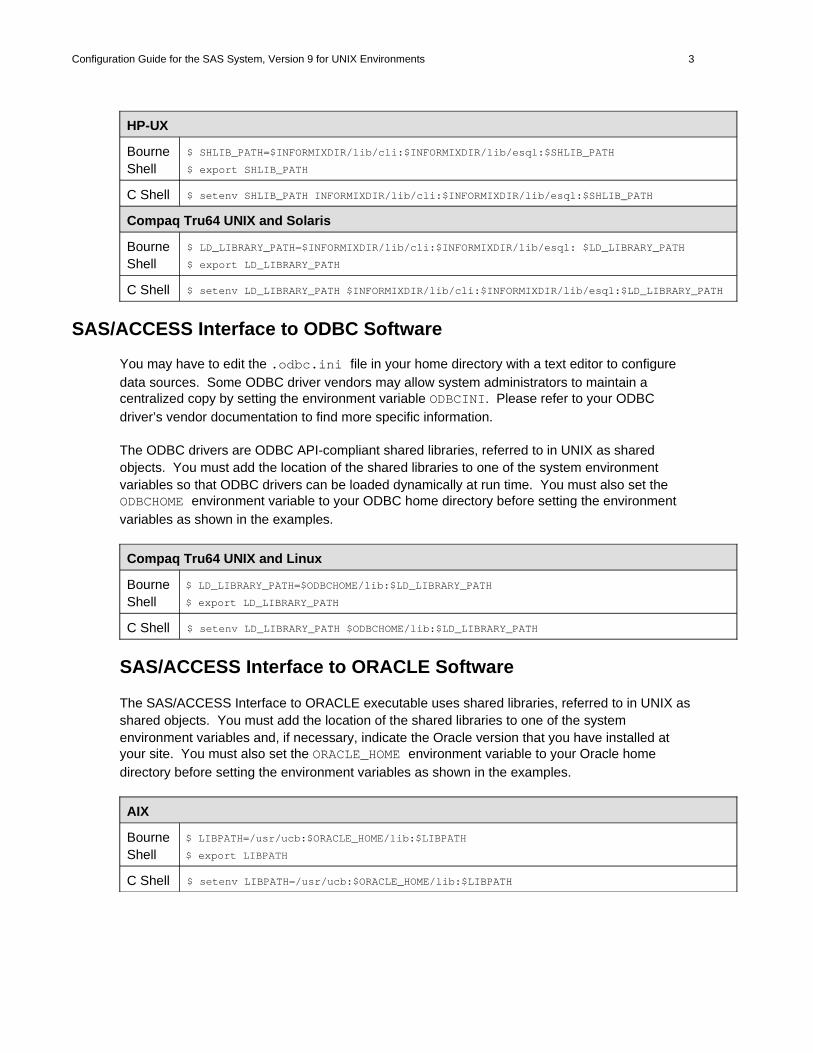
Configuration Guide for the SAS System, Version 9 for UNIX Environments 3
HP-UX
BourneShell
$ SHLIB_PATH=$INFORMIXDIR/lib/cli:$INFORMIXDIR/lib/esql:$SHLIB_PATH
$ export SHLIB_PATH
C Shell $ setenv SHLIB_PATH INFORMIXDIR/lib/cli:$INFORMIXDIR/lib/esql:$SHLIB_PATH
Compaq Tru64 UNIX and Solaris
BourneShell
$ LD_LIBRARY_PATH=$INFORMIXDIR/lib/cli:$INFORMIXDIR/lib/esql: $LD_LIBRARY_PATH
$ export LD_LIBRARY_PATH
C Shell $ setenv LD_LIBRARY_PATH $INFORMIXDIR/lib/cli:$INFORMIXDIR/lib/esql:$LD_LIBRARY_PATH
SAS/ACCESS Interface to ODBC Software
You may have to edit the .odbc.ini file in your home directory with a text editor to configure data sources. Some ODBC driver vendors may allow system administrators to maintain a centralized copy by setting the environment variable ODBCINI. Please refer to your ODBC driver’s vendor documentation to find more specific information.
The ODBC drivers are ODBC API-compliant shared libraries, referred to in UNIX as shared objects. You must add the location of the shared libraries to one of the system environment variables so that ODBC drivers can be loaded dynamically at run time. You must also set the ODBCHOME environment variable to your ODBC home directory before setting the environment variables as shown in the examples.
Compaq Tru64 UNIX and Linux
BourneShell
$ LD_LIBRARY_PATH=$ODBCHOME/lib:$LD_LIBRARY_PATH
$ export LD_LIBRARY_PATH
C Shell $ setenv LD_LIBRARY_PATH $ODBCHOME/lib:$LD_LIBRARY_PATH
SAS/ACCESS Interface to ORACLE Software
The SAS/ACCESS Interface to ORACLE executable uses shared libraries, referred to in UNIX as shared objects. You must add the location of the shared libraries to one of the system environment variables and, if necessary, indicate the Oracle version that you have installed at your site. You must also set the ORACLE_HOME environment variable to your Oracle home directory before setting the environment variables as shown in the examples.
AIX
BourneShell
$ LIBPATH=/usr/ucb:$ORACLE_HOME/lib:$LIBPATH
$ export LIBPATH
C Shell $ setenv LIBPATH=/usr/ucb:$ORACLE_HOME/lib:$LIBPATH

4 Configuration Guide for the SAS System, Version 9 for UNIX Environments
HP-UX
BourneShell
$ SHLIB_PATH=$ORACLE_HOME/lib:$SHLIB_PATH
$ export SHLIB_PATH
C Shell $ setenv SHLIB_PATH $ORACLE_HOME/lib:$SHLIB_PATH
Compaq Tru64 and Linux
BourneShell
$ LD_LIBRARY_PATH=/usr/ucblib:$ORACLE_HOME/lib:$LD_LIBRARY_PATH
$ export LD_LIBRARY_PATH
C Shell $ setenv LD_LIBRARY_PATH /usr/ucblib:$ORACLE_HOME/lib:$LD_LIBRARY_PATH
Solaris
BourneShell
$ LD_LIBRARY_PATH=$ORACLE_HOME/lib:/usr/ucblib:$LD_LIBRARY_PATH
$ export LD_LIBRARY_PATH
C Shell $ setenv LD_LIBRARY_PATH $ORACLE_HOME/lib:/usr/ucblib:$LD_LIBRARY_PATH
SAS/ACCESS Interface to PeopleSoft Software
SAS/ACCESS Interface to PeopleSoft software requires that a libname statement be executed before running it. This libname statement produces a libref to the database where the PeopleSoft data resides.
Following is an example of the libname statement:
libname psdb oracle user=userid pass=pass path='dbpath';
SAS/ACCESS Interface to R/3 Software
SAS/ACCESS Interface to R/3 software requires extensive installation setup before it can be used. Refer to the Installation Instructions for SAS/ACCESS Interface to R/3 Software on The SAS System, Version 9 included in your SAS software order for detailed installation instructions and configuration information.
SAS/ACCESS Interface to SAP BW Software
SAS/ACCESS Interface to SAP BW software requires extensive installation setup before it can be used. Refer to the Installation Instructions for SAS/ACCESS Interface to SAP BW Software on The SAS System, Version 9 included in your SAS software order for detailed installation instructions and configuration information.

Configuration Guide for the SAS System, Version 9 for UNIX Environments 5
SAS/ACCESS Interface to SYBASE Software
1. In Version 9 of the SAS System, the administrator or user must install a Sybase-stored procedure on the target Sybase server. Two files in the !SASROOT/misc directory - sas-spcp.txt and sas-spdf.txt – have been included to assist in the installation. sas-spcp.txt is a text file containing instructions on how to do the installation. sas-spdf.txt is the actual stored procedure script. The process utilizes two Sybase facilities, defncopy and isql.
2. The SAS/ACCESS Interface to SYBASE executable uses shared libraries, referred to in UNIX as shared objects. You must add the location of the shared libraries to one of the system environment variables and, if necessary, indicate the Sybase version that you have installed at your site. You must also set the SYBASE environment variable to your Sybase home directory before setting the environment variables as shown in the examples.
HP-UX
BourneShell
$ SHLIB_PATH=$SYBASE/lib:/lib:$SHLIB_PATH
$ export SHLIB_PATH
C Shell $ setenv SHLIB_PATH $SYBASE/lib:/lib:$SHLIB_PATH
Compaq Tru64, Linux, and Solaris
BourneShell
$ LD_LIBRARY_PATH=$SYBASE/lib:/lib:$LD_LIBRARY_PATH
$ export LD_LIBRARY_PATH
C Shell $ setenv LD_LIBRARY_PATH $SYBASE/lib:/lib:$LD_LIBRARY_PATH

Chapter 2, Post-Installation Configuration for SAS/ASSIST Software
This chapter describes how to add a master profile to SAS/ASSIST software. You can use a master profile to override the default SAS settings. This allows you to provide a customized setup for SAS/ASSIST software. With the master profile, you can control the profile options of all SAS/ASSIST users from one central place. For information on the profile options, refer to the SAS/ASSIST Software System Administrator’s Guide.
Adding a Master Profile
Complete the following steps to add a master profile to SAS/ASSIST software.
1. Specify the location of the master profile by creating a new directory to which all users of SAS/ASSIST software will have read access.
All users with write access to this directory will automatically have write access to the master profile in SAS/ASSIST software. Select a name that conforms to the naming conventions of your installation. The name of this new directory must be stored in an entry in the SASHELP library. This requires that you have write access to the SASHELP library.
On line 1 of the Program Editor window of the SAS Display Manager System, type the physical pathname of the master profile directory. Execute the Save command to store this pathname in the SASHELP.QASSIST catalog. Save it as SASHELP.QASSIST.PARMS.SOURCE. The location of the master profile will now be known by SAS/ASSIST software.
2. Create the master profile.
The first time SAS/ASSIST software is started, a master profile is created if SASHELP.QASSIST.PARMS.SOURCE contains the name of an existing physical pathname, and the person who starts SAS/ASSIST software has write access to this physical pathname.
3. Customize the master profile by starting SAS/ASSIST software and selecting:
Setup, thenProfiles, and thenMaster/group ...
If you have write access to the SAS library containing the master profile, you can specify default values. New users will use these default values when they start SAS/ASSIST software.
6
Configuration Guide for the SAS System, Version 9 for UNIX Environments 7
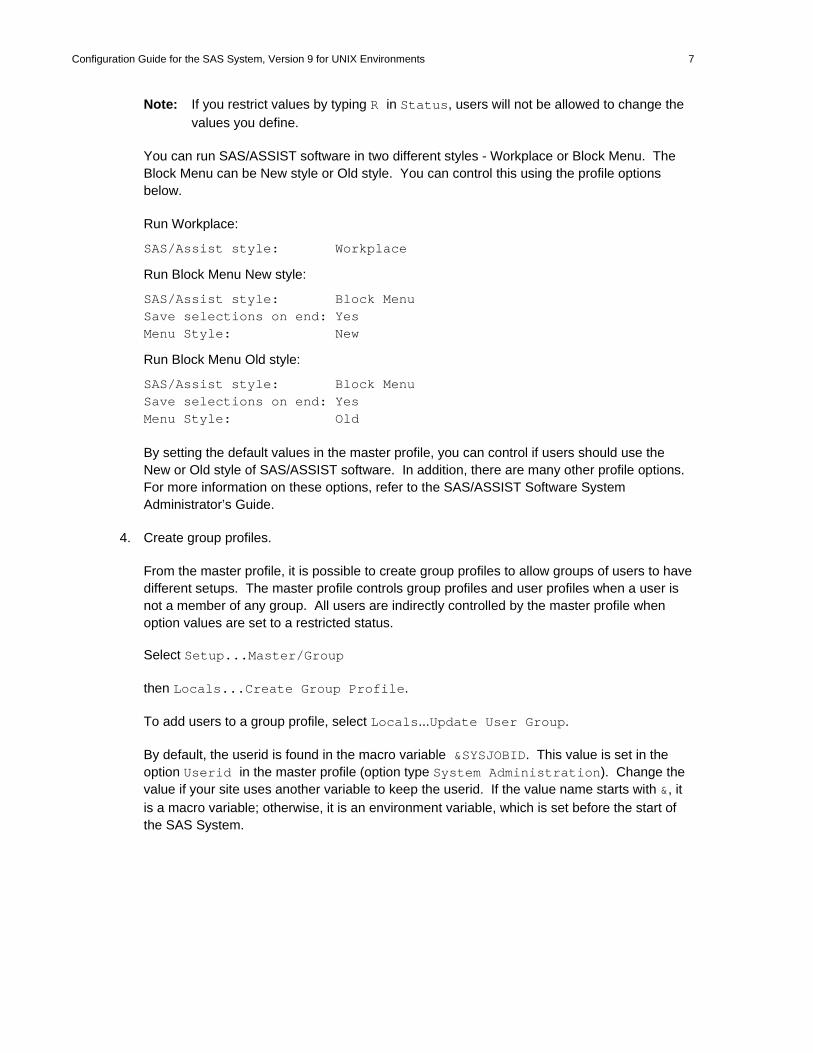
Note: If you restrict values by typing R in Status, users will not be allowed to change the values you define.
You can run SAS/ASSIST software in two different styles - Workplace or Block Menu. The Block Menu can be New style or Old style. You can control this using the profile options below.
Run Workplace:
SAS/Assist style: Workplace
Run Block Menu New style:
SAS/Assist style: Block MenuSave selections on end: YesMenu Style: New
Run Block Menu Old style:
SAS/Assist style: Block MenuSave selections on end: YesMenu Style: Old
By setting the default values in the master profile, you can control if users should use the New or Old style of SAS/ASSIST software. In addition, there are many other profile options. For more information on these options, refer to the SAS/ASSIST Software System Administrator’s Guide.
4. Create group profiles.
From the master profile, it is possible to create group profiles to allow groups of users to have different setups. The master profile controls group profiles and user profiles when a user is not a member of any group. All users are indirectly controlled by the master profile when option values are set to a restricted status.
Select Setup...Master/Group
then Locals...Create Group Profile.
To add users to a group profile, select Locals...Update User Group.
By default, the userid is found in the macro variable &SYSJOBID. This value is set in the option Userid in the master profile (option type System Administration). Change the value if your site uses another variable to keep the userid. If the value name starts with &, it is a macro variable; otherwise, it is an environment variable, which is set before the start of the SAS System.

Chapter 3, Post-Installation Configuration for SAS/CONNECT Software
TCP/IP is the access method supported for UNIX environments and their derivatives. Refer to the publication Communications Access Methods for SAS/CONNECT and SAS/SHARE Software for information on the access methods supported by other systems.
User Authentication
In order to run the SAS/CONNECT spawner on a UNIX operating system, you are required to complete the steps from the section “Configuring User Authentication” in the Installation Instructions for the SAS System, Version 9 for UNIX Environments. This allows SAS/CONNECT software, SAS/SHARE software, and SAS Integration Technologies software to authenticate a client’s identity and check a client’s authority to access resources.
Storing and Locating SAS/CONNECT Script Files
SAS/CONNECT software ships several sample script files that are used to establish a connection to a remote SAS session. The SASSCRIPT configuration option points to the location of the SAS/CONNECT script files. The SASSCRIPT option is used by SAS/ASSIST software and can be used by user-written SCL applications.
The script files are installed into the !SASROOT/misc/connect directory by default. The following line has been included in the sasv9.cfg file in order to define the default script file location:
-SASSCRIPT !SASROOT/misc/connect
If you want to move the script files to another directory, you must edit the sasv9.cfg file and update the SASSCRIPT option with the new directory location.
8

Chapter 4, Post-Installation Configuration for Enterprise Miner Server Software
Configuring Enterprise Miner Server Software
Setup Default Data Library
Create a data library on the server to which Enterprise Miner Client software users have read and write access. This data library should be a different directory from the SASROOT location, and ideally, on a different disk. To create the data library, make or designate a directory on an available disk and set appropriate permissions and ownership to allow remote users read and write access.
Provide Information to Configure Enterprise Miner Client Software
Provide the following information to users of Enterprise Miner Client software to complete the configuration steps necessary for Enterprise Miner Client software:
• the machine name and/or IP address of the server,• the SASROOT location for the SAS System installed on the server, and• the directory path of the default data library you created on the server.
Note: Do not use an NFS mount point.
Enterprise Miner Server software is invoked from the Enterprise Miner Client via SAS/CONNECT software. For more information on running Enterprise Miner software, refer to Getting Started with Enterprise Miner Software.
9
Chapter 5, Post-Installation Configuration for SAS/GRAPH Software
Documentation for the SAS/GRAPH Client Components can be found on the following SAS Web site:
http://www.sas.com/rnd/datavisualization/intro.htm
Documentation for the HTML Formatting Tools (including the DS2GRAF, DS2CSF, and META2HTM macros) can be found on the following SAS Web site:
http://www.sas.com/rnd/web/intrnet/format
If you wish to publish SAS/GRAPH output on a Web server or create SAS/IntrNet applications using SAS/GRAPH software, you may need to install SAS/GRAPH clients on your Web server. The SAS/GRAPH clients can be installed from the SAS Client-Side Components CD and the SAS Mid-Tier Components CD included with your SAS software order. See the installation instructions on the SAS Client-Side Components CD and the SAS Mid-Tier Components CD for more information on installing SAS/GRAPH clients on a Web server.
10

Chapter 6, Post-Installation Configuration for SAS
Integration Technologies Software
If you received SAS Integration Technologies software and have completed the installation of the SAS System, you have successfully installed the SAS server components of SAS Integration Technologies software. The SAS Client-Side Components CD that is included in your SAS software order contains SAS Integration Technologies client components and documentation for SAS Integration Technologies software.
User Authentication
You are required to complete the steps from the section “Configuring User Authentication” in the Installation Instructions for the SAS System, Version 9 for UNIX Environments. This allows SAS Integration Technologies software to authenticate a client’s identity and check a client’s authority to access resources.
11

Chapter 7, Post-Installation Configuration for SAS/IntrNet Software
If you received SAS/IntrNet software and have completed the installation of the SAS System, you have successfully installed the SAS server components of SAS/IntrNet software (referred to as the SAS/IntrNet server). The SAS Client-Side Components CD that is included in your SAS software order contains SAS/IntrNet client components and documentation for SAS/IntrNet software.
User Authentication
It is recommended that you complete the steps from the section “Configuring User Authentication” in the Installation Instructions for the SAS System, Version 9 for UNIX Environments. This allows SAS/CONNECT software and SAS/IntrNet software to authenticate a client’s identity and check a client’s authority to access resources.
12

Chapter 8, Post-Installation Configuration for the IT Service Vision Solution
IT Service Vision Functionality
IT Service Vision has both client and server components. Server software is required to process, reduce, and/or update the data in a performance data warehouse located on your system. Client software is required only if you want to access a performance data warehouse on a remote server system from a client PC platform.
IT Service Vision Server software runs on Microsoft Windows Server platforms, OS/390, and UNIX operating systems.
IT Service Vision Client software runs on Microsoft Windows platforms supported by Version 9 of the SAS System.
Installing IT Service Vision
Migration Considerations
If you have modified your SITELIB directory, you will need to save a copy of it so that you can merge it into the new SITELIB directory. Please see the instructions relating to “Site Library Considerations.”
If you have an existing IT Service Vision installation and want to migrate from Version 6 to Version 9 of the SAS System, refer to the conversion information in the directory !SASROOT/saspgm/cpe/itsvdocs/convert68.htm and at www.sas.com/itsvconv. While this documentation refers to conversion from Version 6 to Version 8 of the SAS System, most of it is also applicable to converting from Version 6 directly to Version 9 of the SAS System.
Installation Customizations
The IT Service Vision Solution will be installed in the !SASROOT folder. If you wish to see any additional SAS System components present on your media, select Load Selected Software from Media.
The IT Service Vision Server Setup Guide and QuickStart example galleries that have shipped with previous releases of IT Service Vision have been preserved in this release in tar files located in the itsvdocs directory. Users who are interested in viewing the QuickStart example galleries (qsexamps.tar) or the original IT Service Vision Server Setup Guide (setupdoc.tar) will need to expand the associated tar files located in the itsvdocs directory. This information will then be viewable from within the product.
13

14 Configuration Guide for the SAS System, Version 9 for UNIX Environments
For example, to expand the original IT Service Vision Server Setup Guide, change directories to the itsvdocs directory located at !SASROOT/saspgm/cpe/itsvdocs and enter the command:
tar xf setupdoc.tar
Note: Much of the information in the original IT Service Vision Server Setup Guide has been moved into online help and expansion may not be needed.
Configuring the SAS System for IT Service Vision
Verify that X resource SAS.dmsContrastCheck is set to True to assure that IT Service Vision message windows have the appropriate contrast between text and background, regardless of your personal settings for background and foreground colors.
Starting IT Service Vision
To start IT Service Vision from the UNIX command line, issue the command sasitsv, which is located in the !SASROOT directory. If the SAS System was installed in /usr/local/SAS_9.00, then the command to issue would be /usr/local/SAS_9.00/sasitsv.
To start IT Service Vision from within the SAS System, issue the itsv command. You can enter the itsv command in the SAS toolbar command area or after the Command===> prompt, which is obtained by choosing Globals, then Options, and then Command Line. You can also start IT Service Vision from within the SAS System by submitting the following statement via the Program Editor window:
%CPSTART();
Site Library Considerations
First-time Installations
If you are installing IT Service Vision for the first time, you may want, at some future date, to create a separate SITELIB directory to store site-wide options or customizations, such as your site’s preferred graphics device. The supplied version of this directory containing default values was created in !SASROOT/saspgm/cpe/sitelib during the default production installation of IT Service Vision.
Wherever you choose to locate the SITELIB directory, you must have write access to it, and all other IT Service Vision users must have read access. If you choose to relocate the SITELIB directory, follow the instructions in the section “Modifying the default pointer to SITELIB directory.”
Upgrading Existing Installations
If this is not your first installation of IT Service Vision, it is strongly recommended that you consider the location of your existing production SITELIB directory before you install. Without planning, you risk overlaying and losing existing PDB and site options.
Configuration Guide for the SAS System, Version 9 for UNIX Environments 15
When you installed IT Service Vision previously, a directory containing default values was created in !SASROOT/saspgm/cpe/sitelib. Since then, you may have created another SITELIB directory and reprogrammed IT Service Vision to use this new location as its default SITELIB. If you are not sure if this happened, you can find out by starting the SAS System and your existing IT Service Vision interactively, and then issuing the LIBNAME command from the command line in the toolbar. Note the location of the SITELIB directory.
In either case, you should close your LIBNAME window, the IT Service Vision application, and the SAS session and make a backup of the whole directory. This will ensure that you have a method of restoring the directory’s contents if a problem occurs after the update.
If this is not your first installation of IT Service Vision, you now need to consider the maintenance of the SITELIB directory. In the SASMISC directory, locate a member called CPSITEUP. This code will merge your old, production SITELIB directory with your newly installed version. Please read the following sections for details on site libraries and how to run the code.
Maintaining SITELIB with Previous IT Service Vision Installations
Note: The following section is relevant when this is not a first installation of IT Service Vision.
When a new version or release of IT Service Vision is installed, a new SITELIB directory is created. This ensures that you are able to access any SITELIB updates that may have been made in the product.
However, because you have the opportunity to update the menu and other SITELIB data sets, you will probably want to save your modifications and avoid re-engineering them in the new directory from scratch. To preserve your modifications, we have supplied code that will merge your existing production SITELIB data sets and catalogs in with the new versions. This code is contained in the !SASROOT/misc/cpe directory.
If you have an existing production SITELIB directory that contains site-wide options or data sets that you want to make available to the new version or release of IT Service Vision, locate the CPSITEUP member and review its contents.
The CPSITEUP code refers to three SITELIB libraries:
1. The newly installed SITELIB, which is referred to as NEWSITE,
2. The current, production/default SITELIB (whether it is the previously installed SITELIB or a subsequently relocated version), which is referred to as OLDSITE, and
3. PRODSITE, which is used in referring to your chosen location for the production SITELIB for the newly installed version or release of IT Service Vision.
16 Configuration Guide for the SAS System, Version 9 for UNIX Environments
So, before running CPSITEUP, ensure that the following updates have been made:
• NEWSITE points to your newly installed SITELIB.
• OLDSITE points to your current production/default SITELIB.
• PRODSITE points to a directory or library from which you want to run IT Service Vision. This could be the same location as OLDSITE or NEWSITE, in which case those libraries will be overwritten, or it could be somewhere new.
Run the CPSITEUP code, following the instructions at the top of the code.
If you have decided to use a SITELIB directory whose location is not that of the newly installed SITELIB, CPSITEUP will also update the pointer held in PGMLIB so that your chosen SITELIB becomes the new default SITELIB. You will not need to perform the task described in the following section “Modifying the default pointer to SITELIB directory.”
Other tools that are available for modifying site-wide options are the macros %CPPDBOPT and %CPHDAY, both of which are documented in the IT Service Vision Software: Macro Reference.
Modifying the Default Pointer to SITELIB Directory
A SITELIB directory and its files must be write-able by the IT Service Vision administrator and readable by all other IT Service Vision users.
When IT Service Vision is started using the %CPSTART macro, you have the option of specifying the SITELIB= parameter. This is not required and is usually not specified. If it is specified, the SITELIB= value is used as the SITELIB directory for only that invocation. Otherwise, the default SITELIB directory will be used.
This default value is stored in the PGMLIB library and is set at installation to be the name of the newly installed SITELIB directory. If you need to change that default, submit the following program:
Note: Update-access to the PGMLIB library and its components is required.
LIBNAME PGMLIB '!SASROOT/saspgm/cpe/pgmlib'; DATA PGMLIB.CPSITE;CPSITE="name.of.new-or-updated.SITELIB";RUN;

Chapter 9, Post-Installation Configuration for SAS/MDDB Server Software
SAS/MDDB Server software includes an OLE DB provider, Open OLAP Server. The Open OLAP Server allows you to access, update, and manipulate MDDB data on your SAS System from OLE DB-compliant and ADO-compliant applications on Windows operating systems. The Open OLAP Server requires that a client-side component, SAS Open OLAP Client for SAS/MDDB Server Software, be installed on your Windows operating systems.
The SAS Open OLAP Client for SAS/MDDB Server Software is packaged as a self-installing program for Windows operating systems. It is available on the SAS Client-Side Components CD.
17
Chapter 10, Post-Installation Configuration for National Language Support (NLS)
This chapter contains information on post-installation configuration for Asian and European language support.
Important: Before invoking a localized SAS System image from a UNIX shell, you must ensure that the UNIX locale environment variable LANG is set appropriately for the language of the SAS System version you want to run. The exact values to set will vary depending on your operating system support. To list the locales supported on your operating system, enter the following command:
$ locale -a
For example, to invoke a Japanese version of the SAS System in the HP-UX Korn shell environment, enter the following command:
$ LANG=ja_JP.SJIS; export LANG
For more information on setting locale environment variables, consult the documentation for your operating system.
Asian Language Support (ALS)
The SAS Display Manager System is not supported on Version 9 of the SAS System on the Linux operating system when you run a Chinese, Japanese, or Korean localization or when you process DBCS data. Restrictions in X libraries may produce unpredictable results. This limitation does not apply to any other UNIX operating system.
This section explains how to:
• change the default settings for the DBCSLANG and DBCSTYPE system options, and
• specify Asian font catalogs.
Note: The DBCSLANG and DBCSTYPE system options described in the next section should be used to set locale for Asian languages only. The LOCALE and ENCODING system options described in the SAS Help System are used to set locale for European languages.
18

Configuration Guide for the SAS System, Version 9 for UNIX Environments 19
Changing the Default DBCSLANG and DBCSTYPE Option Settings
When you install the SAS System and choose to load NLS language translations, the installation automatically sets default values for the DBCSLANG and DBCSTYPE system options based on the language selection and platform. For example, if you install Primary Japanese on the Solaris operating system, the configuration file (!SASROOT/nls/ja/sasv9.cfg) sets DBCSLANG to JAPANESE and DBCSTYPE to EUC.
If you need to change the default settings, edit the configuration file. For example, edit the configuration file to change DBCSTYPE to SJIS.
Setting System Fonts with X Resource Files
The SAS System may not have the correct font settings for your locale by default. To ensure that the correct fonts are defined for the SAS System, you must add them to your X Resource files.
Japanese X Resource template files containing DBCS font settings are located in !SASROOT/X11/resource_files as follows:
• ./Resource_CDE.ja - for the CDE environment• ./Resource_LNX.ja - for Linux• ./Resource_Sun.ja - for Solaris not using the CDE environment• ./Resource_DEC.ja - for Compaq Tru64 UNIX not using the CDE environment• ./Resource_HP.ja - for HP-UX not using the CDE environment• ./Resource_IBM.ja - for AIX not using the CDE environment• ./Resource_ReflX.ja - for ReflectionX users
Note: The template files in this directory are specifically for Japanese users. Other DBCS users should contact their Technical Support representative for assistance customizing the X Resource files for their environment.
To apply the X Resources in these template files, copy the appropriate template to one of the following locations, renaming it to SAS (in all uppercase):
/usr/lib/X11/app-defaults (on most UNIX systems)/usr/openwin/lib/X11/app-defaults) (on Solaris)$HOME (your home directory)
For example, on a Solaris system, you would use the following COPY command:
$ cp !SASROOT/X11/resource_files/Resource_CDE.ja /usr/openwin/lib/X11/app-defaults/SAS
In the example, !SASROOT refers to the root directory of your SAS System installation.
For more details, refer to the SAS 9 Companion for UNIX Environments.
20 Configuration Guide for the SAS System, Version 9 for UNIX Environments
Asian Font Catalogs
The default configuration files for Asian language editions already contain font definitions. (Although, please note that the configuration file for DBCS extensions does NOT contain font definitions.) Asian font catalogs reside in subdirectories (by language) for easy installation. If you want to change the font catalog, you can specify it in either the configuration file or in your SAS session.
Specifying the Font Catalog in the Configuration File
To specify the font catalog in the configuration file (!SASROOT/nls/langcode/sasv9.cfg), use the following statement to assign the font catalog in the file:
-set gfontx !SASROOT/nls/langcode/font-name
In this statement
• x represents a value from 0-9,
• langcode represents the two-character code for your language (for example, JA is the language code for Japanese), and
• font-name represents the name of the font catalog you want to use.
Specifying the Font Catalog in a SAS Session
To specify the font catalog in a SAS session, submit the following LIBNAME statement:
libname gfontx !SASROOT/nls/langcode/font-name
In this statement
• x represents a value from 0-9,
• langcode represents the two-character code for your language (for example, KO is the language code for Korean), and
• font-name represents the name of the font catalog you want to use.
European Language Support (ELS)
The following sections describe the Locale Setup Window, explain different methods for configuring your system for locale, and provide a list of devmap and keymap values that match the locales on your operating system. (As mentioned earlier in this chapter, the LOCALE and ENCODING system options are used to set locale for European languages. Note that these system options are documented in the SAS Help System.)
Configuration Guide for the SAS System, Version 9 for UNIX Environments 21
Locale Setup Window
In this release, the Locale Setup Window has been redesigned to work in conjunction with the new system options described in the SAS Help System.
When a new locale is set, the Locale Setup Window automatically sets the LOCALE system option. (Refer to the LOCALE system option documentation in the SAS Help System for complete information.) The hex value of the Euro character is set for the locale and is stored in the SAS Registry.
As in previous releases, the Locale Setup Window copies the host-to-host translation tables from the LOCALE catalog into SASUSER.PROFILE. However, the host-to-host tables (that is, the _0000xxx trantabs) are not required. If the tables exist in the search path, the SAS System will use them. Otherwise, a new mechanism is used to determine the correct method of transcoding.
The Locale Setup Window does not set the encoding for the SAS session.
Configuring Your System for Locale
If you want to configure your SAS session for a locale other than the default locale, you have methods from which to choose to reconfigure. This section explains those methods.
Changing the Default LOCALE Option Setting
When you install the SAS System and choose to load NLS language translations, the installation automatically sets the LOCALE system option to the default value for the language installed. The LOCALE system option is set in the system configuration file for each language installed.
For example, !SASROOT/nls/fr/sasv9.cfg sets LOCALE to French by default.
Note: The English version does not set the LOCALE by default.
If you want to change the default locale setting for SAS, you can set the LOCALE system option to the appropriate language in your system configuration file.
For example, you could edit !SASROOT/nls/fr/sasv9.cfg to change -locale French to -locale French_Canadian.
Running SAS in a Different Locale
To set the locale for the SAS System at your site, add the LOCALE system option to your configuration file. You can find a list of locale values in the SAS 9 Companion for UNIX Environments.
When you read or write a file, the SAS System expects the data in the external files to be in the session encoding. To specify a different encoding, refer to the documentation for the ENCODING system option in the FILENAME, INFILE, or FILE statement in the SAS 9 Companion for UNIX Environments.

22 Configuration Guide for the SAS System, Version 9 for UNIX Environments
When LOCALE is set, the ENCODING system option will be set to an encoding that supports the language for the locale. The SAS System expects user data to be in the encoding that matches the ENCODING option. If you prefer an encoding other than the most common encoding for the locale, you can also set the ENCODING system option in the configuration file.
When the ENCODING option is set, the TRANTAB option will always be set to match the ENCODING system option. The transport format trantabs (translation tables), set by the TRANTAB option, are used by the CPORT and CIMPORT procedures to transfer SAS data files. These trantabs are also used by the UPLOAD and DOWNLOAD procedures for transferring files and catalogs, remotely submitting code to the server, and returning logs and listings to the client.
However, the transport format trantabs are not used for SAS data set transfer. The Output Delivery System (ODS) will create output using the encoding that matches the ENCODING system option. If you would like your output created using a different encoding, please refer to the documentation for the Output Delivery System.
For more information, refer to the Base SAS 9 Procedures Guide for documentation about PROC CPORT and PROC CIMPORT. Refer to the SAS/CONNECT 9 User’s Guide for documentation on PROC UPLOAD and PROC DOWNLOAD.
Additional Information
Depending on the applications you run, additional setup may be required for your system. Refer to the following sections for more information about configuring your system to run with alternate locales.
Locale Setup on the Remote Server
You can use the Locale Setup Window to set up the remote SAS environment for data transfer.
Note that the remote server must be running a release of the SAS System prior to Version 9. Otherwise, the Locale Setup Window will not be able to set the environment on that server. If you are running Version 9 of the SAS System in a locale other than the default locale, you can set up the locale in the remote SAS environment either by running the Locale Setup Window or by submitting the %LSWBATCH() macro with the appropriate parameters. Both of these methods can be run after you sign on to the remote session.
If you are using SAS/CONNECT software to connect to a remote SAS server, you will need to set up the server session for the locale that SAS is using. You must set up the server after signing on to the remote session.
To set up the locale on the remote session, you can either run the Locale Setup Window or use the %LSWBATCH() macro. In the Locale Setup Window, select your locale and set the Remote Submit option before closing the window.
Configuration Guide for the SAS System, Version 9 for UNIX Environments 23
You can also achieve remote locale setup by running the %LSWBATCH() macro after you sign on to the remote session. To set up the locale in the remote session, run %LSWBATCH() with the LOCALE= and REMOTE= parameters. Set LOCALE= to match the LOCALE option you set for your client session. For example, if you are running OS/390 with LOCALE=Danish, use the following %LSWBATCH() macro after you sign on to the remote session:
%lswbatch (locale=Danish, remote=on);
Devmaps and Keymaps for SAS/GRAPH Software
If you are running SAS/GRAPH software and your SAS session locale is not the default, you will need to use the devmaps and keymaps for the locale. The devmap and keymap entries you need are in the SASHELP.LOCALE catalog. You will need to copy those that match the locale to your GFONT0.FONTS catalog.
Change the name of the entry to default so they will be loaded for you. For example, a Polish user on a UNIX platform would need to use the devmap and keymap named LAT2.
libname gfont0 'your-font-library';%lswgraph(LAT2);
Here is a list of the devmaps and keymaps that match the locales on your platform:

24 Configuration Guide for the SAS System, Version 9 for UNIX Environments
Locale Devmap and Keymap Name
Arabic arab
Bulgarian cyrl
Byelorussian cyrl
Croatian lat2
Czech lat2
Danish lat9
Dutch lat1
English lat1
English_Australia lat1
English_Britain lat9
English_Canada lat1
English_Caribbean lat1
English_Ireland lat9
English_Jamaica lat1
English_NewZealand lat1
English_SouthAfrica lat1
English_United States
lat1
Estonian lat6
Finnish lat9
French lat9
French_Belgium lat9
French_Canada lat1
French_France lat9
French_Switzerland lat9
German lat9
German_Austria lat9
German_Germany lat9
Locale Devmap and Keymap Name
German_Switzerland lat9
Greek grek
Hebrew hebr
Hungarian lat2
Icelandic lat1
Italian lat9
Italian_Italy lat9
Italian_Switzerland lat9
Latvian lat6
Lithuanian lat6
Norwegian lat9
Polish lat2
Portuguese lat1
Portuguese_Brazil lat1
Portuguese_Portugal lat1
Romanian lat2
Russian cyrl
Serbian cyrl
Slovakian lat2
Slovenian lat2
Spanish lat9
Spanish_Spain lat9
Spanish_LatinAmerica
lat1
Swedish lat9
Turkish lat5
Ukrainian cyrl

Chapter 11, Post-Installation Configuration for SAS
OLAP Server Software
Setting up Access Control without SAS/EIS Software on Your Server
Please keep in mind that Access Control Setup consists of three steps:
1. Set your Access Control Key - modifies SASHELP.MB
2. Set your Access Control environment (aclroot, ac_active flag, etc.) - modifies SASHELP.AC
3. Create your Access Control definitions (users, groups, the actual ACL) – data sets PASSWD, GROUPS, and ACL in aclroot
Each of these steps can be performed interactively in a set of windows (where available) or programmatically.
Starting the Access Control Setup Dialog Window
Use the command:
AF C=SASHELP.EISSRV.STARTAC.SCL <USER=uid PASSWD=password>
Follow the instructions in SAS OLAP Server Administrator's Guide, Release 8.1 to assist you through the setup process. On 3270 platforms, where the Access Control Setup GUI is not very comfortable to use, you may prefer to do your AC setup programmatically. Please see the following section for more information on that subject.
Setting Your Access Control Key and Environment Programmatically
Setting the Access Control Key
The Access Control Key is stored in the entry SASHELP.MB.ACLAPWM.SCL. You need write access to this entry in order to change the Access Control Key. Please refer to How to set up write access to SASHELP.AC and SASHELP.MB for more information.
25

26 Configuration Guide for the SAS System, Version 9 for UNIX Environments
Using a command
Use the following command to set the Access Control Key (for setting the Access Control Key to ADMIN):
AF C=SASHELP.EISSRV.SETAPW.SCL PW=ADMIN
1. To reset the Access Control Key to its initial status (no key set), pass in an empty string ("").
2. Use the special value "0" to use no Access Control Key.
3. Use the option ECHO=Y to dump the settings in the log.
Using a statement
Use the following command to submit the command as a SAS statement:
DM 'AF C=SASHELP.EISSRV.SETAPW.SCL PW=ADMIN';
Using SCL
Within SCL code, you can use the following method call to set the Access Control Key:
CALL METHOD ('SASHELP.EISSRV.APWUTIL','CREAAPWM', flag, pw-value, rc);
where:
flag is ‘0’ or ‘1’. A ‘0’ indicates to not use a control key; ‘1’ indicates to use a control key pw-value is the value of the new control key. If flag is ‘0’, this value is ignored rc is ‘0’ if the update was successful; ‘1’ if it was not successful
Setting the Access Control Environment
The Access Control Environment information is stored in the entry SASHELP.AC.ACLINIT.SCL. You need write access to this entry in order to change the Access Control Environment settings. Please refer to How to set up write access to SASHELP.AC and SASHELP.MB for more information.

Configuration Guide for the SAS System, Version 9 for UNIX Environments 27
Using a command
Use the following command to set the Access Control Environment:
AF C=SASHELP.EISSRV.SETAC.SCLAPW=access control keyACTIVE=Y/NACLROOT=access control root pathACLSERV=serverLOGIN=login applicationAUTOUSER=Y/NLIBSEC=Y/NPW_ENCRYPT=Y/NDISP_CLASS=access control start classQUERY_CLASS=access control query classSERVER_CLASS=access control server classADMIN_CLASS=access control administration classECHO=Y
Using a statement
Submit the previous command using a DM statement, e.g.,
DM 'AF C=SASHELP.EISSRV.SETAC.SCL APW=ADMIN ACTIVE=Y ACLROOT="path"';
Using SCL
Within SCL code, you can use the following method call to set the Access Control Environment:
CALL METHOD ('SASHELP.EISSRV.ACLUTIL', 'CREAACLI', rc, flag active, aclroot, aclserv, login_window, autouser_enabled, libsec, pw_encrypt, disp_class, query_class, server_class, admin_class);
Key Description
APW The Access Control Key (required for setac)
ACTIVE Y/N to switch access control on or off
ACLROOT The path of a directory that holds the ACL files
ACLSERV The name of the remote session or share server for ACLROOT. If the session is local, this parameter should be blank.
LOGIN
The four-level name of the AF application or APPLSCR to use as a login dialog. The default is SASHELP.EISSRV.GATE_KPR.FRAME - a dialog with entry for User ID and Password, and OK and Cancel buttons.There is one other login dialog provided with the system,SASHELP.EISSRV.GATE_KP2.FRAME, which has an additional Change Password button.
28 Configuration Guide for the SAS System, Version 9 for UNIX Environments
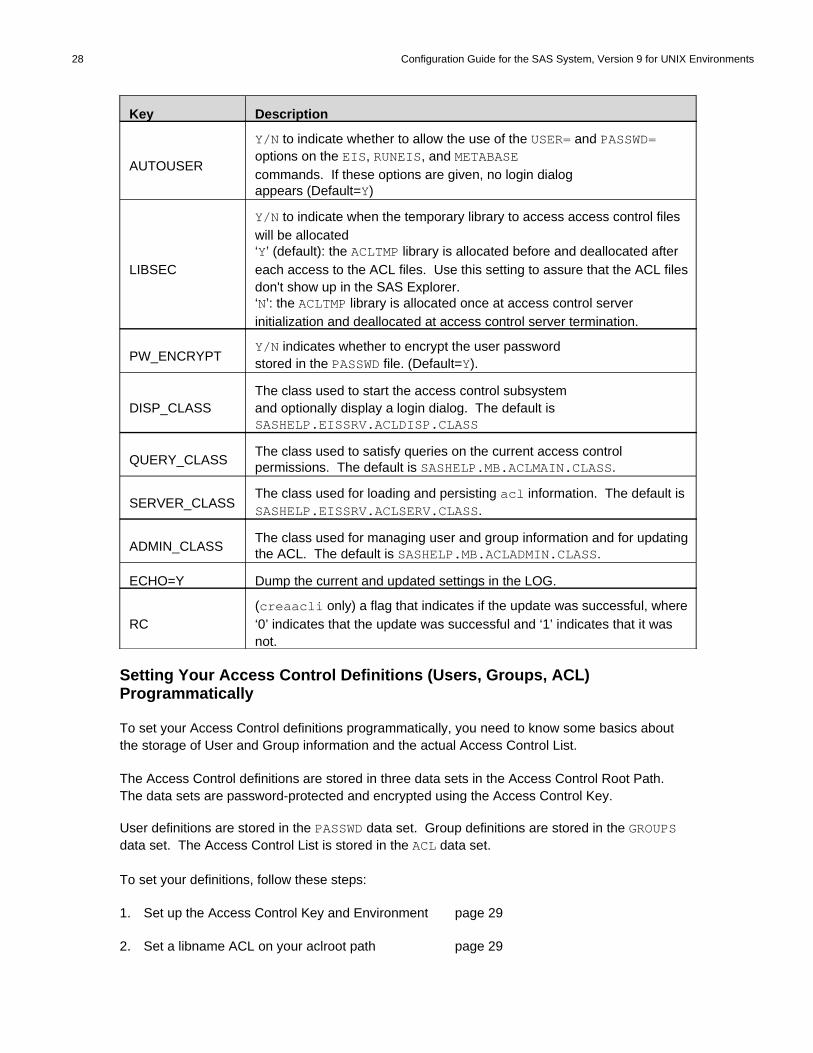
Key Description
AUTOUSER
Y/N to indicate whether to allow the use of the USER= and PASSWD= options on the EIS, RUNEIS, and METABASEcommands. If these options are given, no login dialogappears (Default=Y)
LIBSEC
Y/N to indicate when the temporary library to access access control files will be allocated‘Y’ (default): the ACLTMP library is allocated before and deallocated after each access to the ACL files. Use this setting to assure that the ACL files don't show up in the SAS Explorer.‘N’: the ACLTMP library is allocated once at access control server initialization and deallocated at access control server termination.
PW_ENCRYPTY/N indicates whether to encrypt the user passwordstored in the PASSWD file. (Default=Y).
DISP_CLASS The class used to start the access control subsystemand optionally display a login dialog. The default isSASHELP.EISSRV.ACLDISP.CLASS
QUERY_CLASSThe class used to satisfy queries on the current access control permissions. The default is SASHELP.MB.ACLMAIN.CLASS.
SERVER_CLASSThe class used for loading and persisting acl information. The default is SASHELP.EISSRV.ACLSERV.CLASS.
ADMIN_CLASSThe class used for managing user and group information and for updating the ACL. The default is SASHELP.MB.ACLADMIN.CLASS.
ECHO=Y Dump the current and updated settings in the LOG.
RC(creaacli only) a flag that indicates if the update was successful, where ‘0’ indicates that the update was successful and ‘1’ indicates that it was not.
Setting Your Access Control Definitions (Users, Groups, ACL) Programmatically
To set your Access Control definitions programmatically, you need to know some basics about the storage of User and Group information and the actual Access Control List.
The Access Control definitions are stored in three data sets in the Access Control Root Path. The data sets are password-protected and encrypted using the Access Control Key.
User definitions are stored in the PASSWD data set. Group definitions are stored in the GROUPS data set. The Access Control List is stored in the ACL data set.
To set your definitions, follow these steps:
1. Set up the Access Control Key and Environment page 29
2. Set a libname ACL on your aclroot path page 29

Configuration Guide for the SAS System, Version 9 for UNIX Environments 29
3. Define the groups page 29
4. Define the users page 32
5. Create your metabase registrations page 32
6. Create your ACL page 32
Initialize partial ACL data sets page 32
Edit the partial ACL data sets page 33
Merge the partial ACL data sets page 35
1. Set up the Access Control Environment
Here is a simple example of how to set up the Access Control Environment. Choose an Access Control Key, and create a location where you want to store your AC definitions. Then submit:
DM 'AF C=SASHELP.EISSRV.SETAPW.SCL PW=access control key';DM 'AF C=SASHELP.EISSRV.SETAC.SCL APW=access control key ACLROOT=”access control root path” PW_ENCRYPT=N’;
Note: By default, user passwords stored in the PASSWD data set are encrypted using the _encryptPassword method of the ACLSERV class. This adds an additional layer of protection to the information stored in the PASSWD data set. To be able to store plain text passwords in the PASSWD data set when managing the user setup outside of the Access Control definition dialogs, use PW_ENCRYPT=N option when setting up the access control environment.
2. Set a libname ACL on your aclroot path
LIBNAME ACL “access control root path”;
3. Define the groups
The GROUPS data set holds the names and descriptions of the access control groups. The data set has one record for each group defined to the system. When the GROUPS data set is initially created, two additional records are also added, one for the SYSTEM (Administrator) and another for the USERS (Users) group.
A group name can have from three to eight characters. Group names begin with a letter, and are followed by letters, numbers, or underscores. Letters must be in upper case.
30 Configuration Guide for the SAS System, Version 9 for UNIX Environments
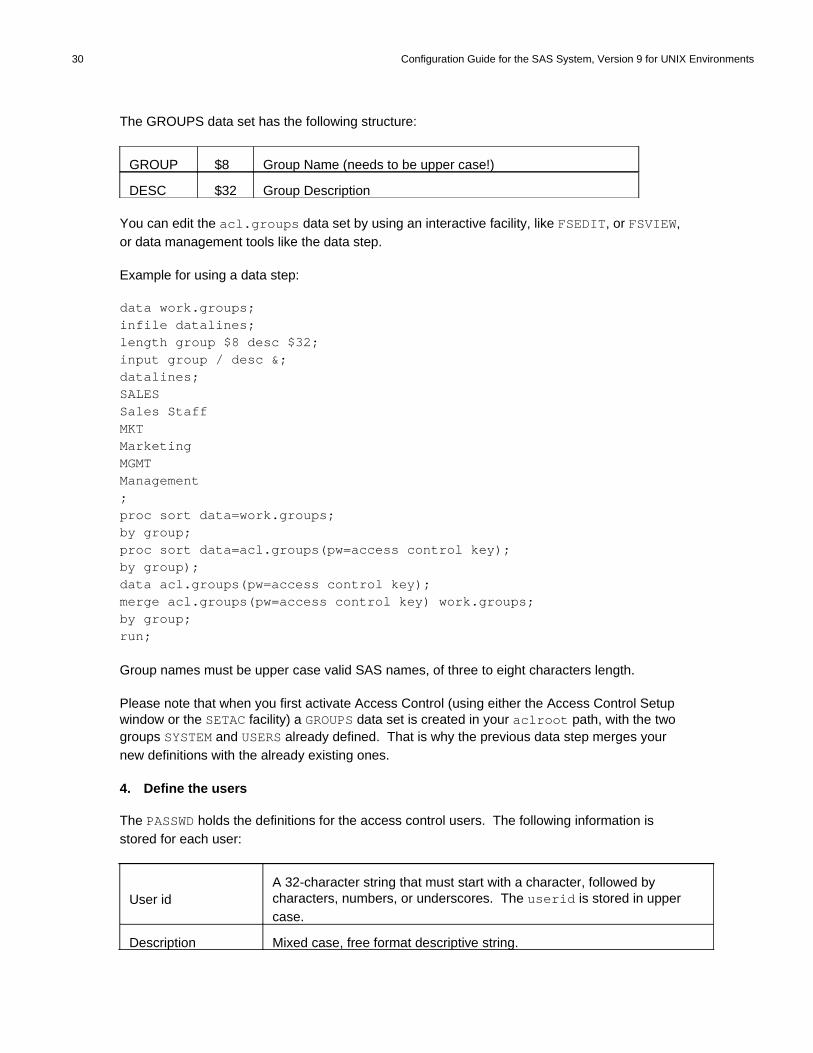
The GROUPS data set has the following structure:
GROUP $8 Group Name (needs to be upper case!)
DESC $32 Group Description
You can edit the acl.groups data set by using an interactive facility, like FSEDIT, or FSVIEW, or data management tools like the data step.
Example for using a data step:
data work.groups;infile datalines; length group $8 desc $32;input group / desc &;datalines;SALES Sales StaffMKT MarketingMGMT Management;proc sort data=work.groups;by group;proc sort data=acl.groups(pw=access control key);by group);data acl.groups(pw=access control key);merge acl.groups(pw=access control key) work.groups;by group;run;
Group names must be upper case valid SAS names, of three to eight characters length.
Please note that when you first activate Access Control (using either the Access Control Setup window or the SETAC facility) a GROUPS data set is created in your aclroot path, with the two groups SYSTEM and USERS already defined. That is why the previous data step merges your new definitions with the already existing ones.
4. Define the users
The PASSWD holds the definitions for the access control users. The following information is stored for each user:
User id A 32-character string that must start with a character, followed by characters, numbers, or underscores. The userid is stored in upper case.
Description Mixed case, free format descriptive string.

Configuration Guide for the SAS System, Version 9 for UNIX Environments 31
Groups Names of the groups a user belongs to, in upper case, separated by commas.
Password
A 16-character string that must start with a character, followed by characters, numbers, or underscores. By default, this password is stored encrypted using the _encryptPassword method of the ACLSERV class. Use PW_ENCRYPT=N when setting up the access control environment to use unencrypted passwords. Unencrypted passwords are stored in upper case.
Creation date/time A SAS datetime value indicating the creation time of the user’s record.
The data set holds one record for each user of the system. When the PASSWD data set is initially created, one record for the ADMIN user (password ADMIN) is added.
The PASSWD data set has the following structure:
USERID $32 User ID (upper case)
FULLNAME $32 User Description
GROUP $198 User Groups
PASSWORD $16 User Password
C_DATET $8 DateTime
You can edit the acl.passwd data set by using an interactive facility, like FSEDIT, or FSVIEW, or a data management tool like the data step.
Example for using the data step:
data work.passwd;infile datalines dsd;length userid fullname $32 group $198 password $16 c_datet 8;format c_datet datetime16.;c_datet=time();input userid / fullname & / group / password ;datalines;MJONESMarkus JonesSALESMJONES1OFIELDSOscar FieldsMKTOFIELDS1ABEANAbraham BeanSALES,MKT,MGMTABEAN1;
32 Configuration Guide for the SAS System, Version 9 for UNIX Environments
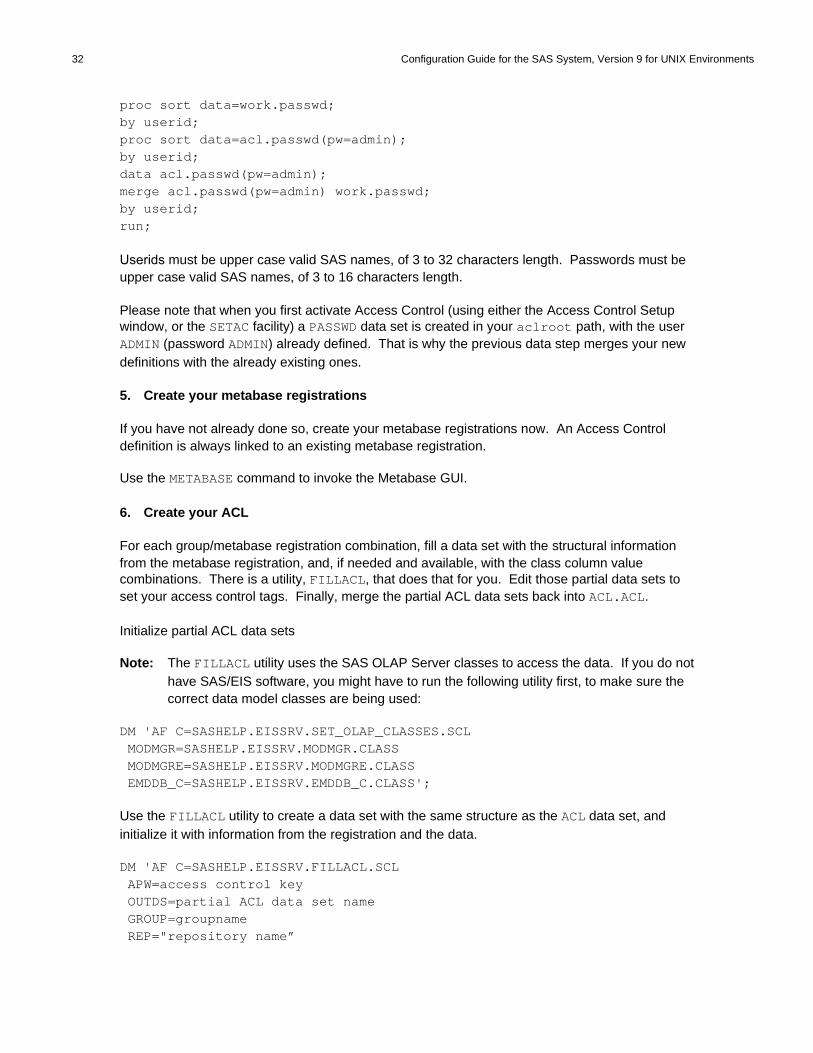
proc sort data=work.passwd;by userid;proc sort data=acl.passwd(pw=admin);by userid;data acl.passwd(pw=admin);merge acl.passwd(pw=admin) work.passwd;by userid;run;
Userids must be upper case valid SAS names, of 3 to 32 characters length. Passwords must be upper case valid SAS names, of 3 to 16 characters length.
Please note that when you first activate Access Control (using either the Access Control Setup window, or the SETAC facility) a PASSWD data set is created in your aclroot path, with the user ADMIN (password ADMIN) already defined. That is why the previous data step merges your new definitions with the already existing ones.
5. Create your metabase registrations
If you have not already done so, create your metabase registrations now. An Access Control definition is always linked to an existing metabase registration.
Use the METABASE command to invoke the Metabase GUI.
6. Create your ACL
For each group/metabase registration combination, fill a data set with the structural information from the metabase registration, and, if needed and available, with the class column value combinations. There is a utility, FILLACL, that does that for you. Edit those partial data sets to set your access control tags. Finally, merge the partial ACL data sets back into ACL.ACL.
Initialize partial ACL data sets
Note: The FILLACL utility uses the SAS OLAP Server classes to access the data. If you do not have SAS/EIS software, you might have to run the following utility first, to make sure the correct data model classes are being used:
DM 'AF C=SASHELP.EISSRV.SET_OLAP_CLASSES.SCL MODMGR=SASHELP.EISSRV.MODMGR.CLASS MODMGRE=SASHELP.EISSRV.MODMGRE.CLASS EMDDB_C=SASHELP.EISSRV.EMDDB_C.CLASS';
Use the FILLACL utility to create a data set with the same structure as the ACL data set, and initialize it with information from the registration and the data.
DM 'AF C=SASHELP.EISSRV.FILLACL.SCL APW=access control key OUTDS=partial ACL data set name GROUP=groupname REP="repository name”
Configuration Guide for the SAS System, Version 9 for UNIX Environments 33
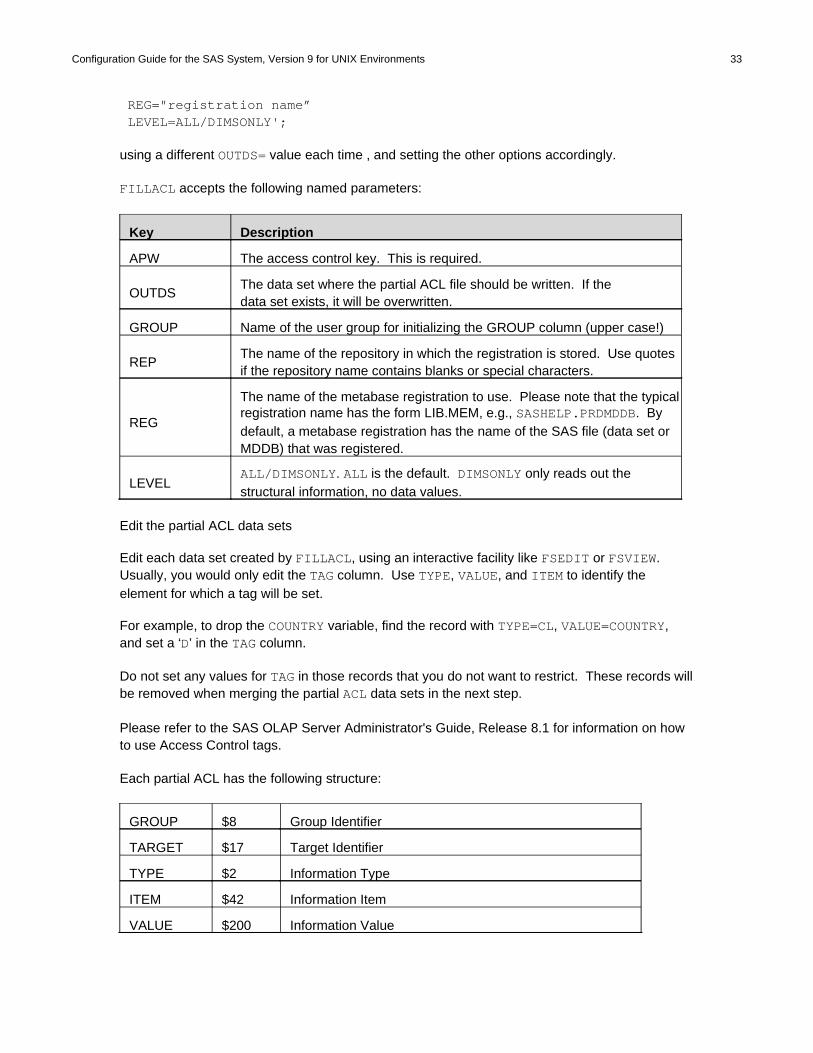
REG="registration name” LEVEL=ALL/DIMSONLY';
using a different OUTDS= value each time , and setting the other options accordingly.
FILLACL accepts the following named parameters:
Key Description
APW The access control key. This is required.
OUTDS The data set where the partial ACL file should be written. If the data set exists, it will be overwritten.
GROUP Name of the user group for initializing the GROUP column (upper case!)
REPThe name of the repository in which the registration is stored. Use quotes if the repository name contains blanks or special characters.
REG
The name of the metabase registration to use. Please note that the typical registration name has the form LIB.MEM, e.g., SASHELP.PRDMDDB. By default, a metabase registration has the name of the SAS file (data set or MDDB) that was registered.
LEVEL ALL/DIMSONLY. ALL is the default. DIMSONLY only reads out the structural information, no data values.
Edit the partial ACL data sets
Edit each data set created by FILLACL, using an interactive facility like FSEDIT or FSVIEW. Usually, you would only edit the TAG column. Use TYPE, VALUE, and ITEM to identify the element for which a tag will be set.
For example, to drop the COUNTRY variable, find the record with TYPE=CL, VALUE=COUNTRY, and set a ‘D’ in the TAG column.
Do not set any values for TAG in those records that you do not want to restrict. These records will be removed when merging the partial ACL data sets in the next step.
Please refer to the SAS OLAP Server Administrator's Guide, Release 8.1 for information on how to use Access Control tags.
Each partial ACL has the following structure:
GROUP $8 Group Identifier
TARGET $17 Target Identifier
TYPE $2 Information Type
ITEM $42 Information Item
VALUE $200 Information Value
34 Configuration Guide for the SAS System, Version 9 for UNIX Environments
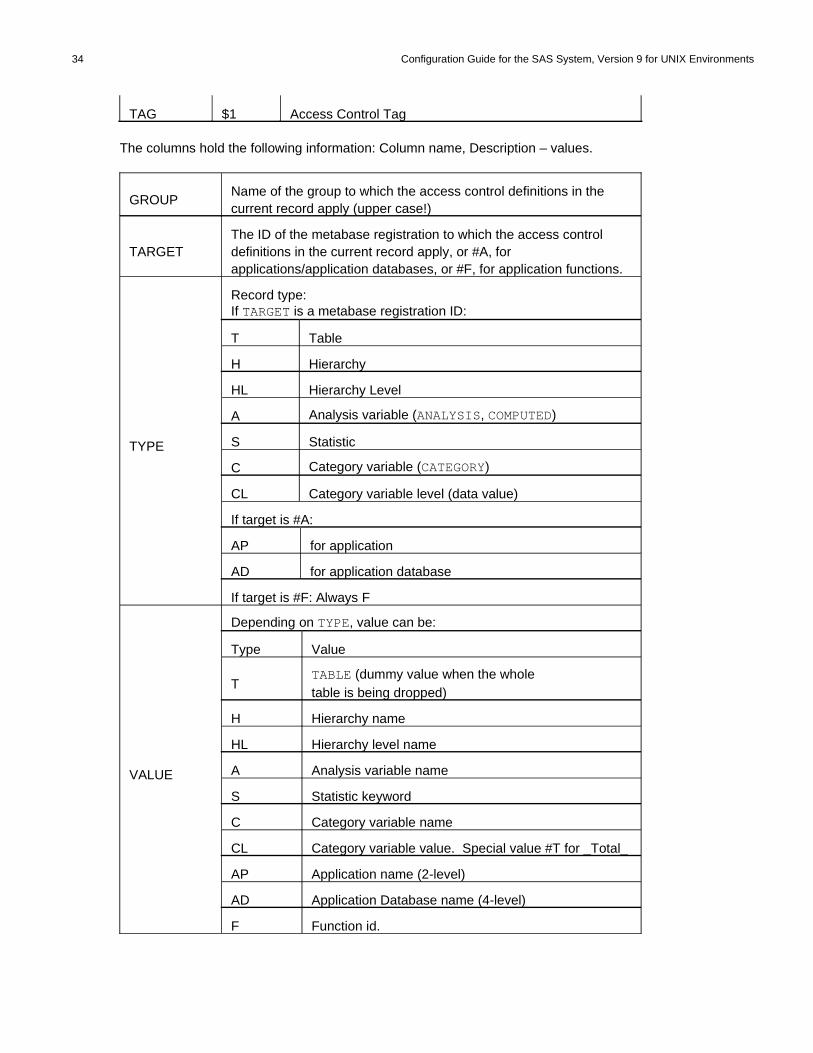
TAG $1 Access Control Tag
The columns hold the following information: Column name, Description – values.
GROUPName of the group to which the access control definitions in the current record apply (upper case!)
TARGETThe ID of the metabase registration to which the access control definitions in the current record apply, or #A, for applications/application databases, or #F, for application functions.
TYPE
Record type: If TARGET is a metabase registration ID:
T Table
H Hierarchy
HL Hierarchy Level
A Analysis variable (ANALYSIS, COMPUTED)
S Statistic
C Category variable (CATEGORY)
CL Category variable level (data value)
If target is #A:
AP for application
AD for application database
If target is #F: Always F
VALUE
Depending on TYPE, value can be:
Type Value
TTABLE (dummy value when the wholetable is being dropped)
H Hierarchy name
HL Hierarchy level name
A Analysis variable name
S Statistic keyword
C Category variable name
CL Category variable value. Special value #T for _Total_
AP Application name (2-level)
AD Application Database name (4-level)
F Function id.

Configuration Guide for the SAS System, Version 9 for UNIX Environments 35
ITEM
Additional identifier, set to identify what the VALUE refers to for
HL to identify the hierarchy
CL to identify the Category variable
S to identify the Analysis variable
TAG
Access Tag. This is the only column you would typically edit. Valid tags are as follows:
D Drop
K Keep
I Initial
H Hide
S Show
Valid TAGs by TYPE:
T D
A D, K, H
S D, K
H D, K
C D, K
CL D, K, I, H, S
HL D, K, I
AP D, K
AD D, K
F D, K
Merge the partial ACL data sets
The result is a collection of data sets. To merge them and remove the unneeded observations (the ones with TAG=''), submit:
data acl.acl(pw=access control key encrypt=yes);set work.onework.two..;if tag = '' then delete;run;

36 Configuration Guide for the SAS System, Version 9 for UNIX Environments
Write Access to SASHELP.AC and SASHELP.MB
1. Choose an empty library or path for use as a playpen. Later you can either merge it into your SASHELP library, or concatenate it in front of your SASHELP path.
libname playpen 'path';proc catalog; copy in=sashelp.ac out=playpen.ac; copy in=sashelp.mb out=playpen.mb; select aclapwm.scl;run;quit;
catname sashelp.ac (playpen.ac);catname sashelp.mb (playpen.mb sashelp.mb);
2. Set up your Access Control Key and Environment. When setting up your SAS application server, or distributing the application to your users, make sure the modified catalogs are concatenated in front of your SASHELP path by modifying the SAS CONFIG file, or the SAS clist accordingly.
Specifying OLAP Classes
The following utility program can be used to override the default OLAP Server classes and specify your custom OLAP Server classes.
DM ‘AF C=SASHELP.EISSRV.SET_OLAP_CLASSES.SCLMODMGR=MODMGRE=EMDDB_C=DP=MDVIEWER=MDMODEL=
‘;
SET_OLAP_CLASSES accepts the following named parameters:
Key Description
MODMGR The 4-level name of the model manager class.
MODMGRE The 4-level name of the model manager engine class.
EMDDB_C The 4-level name of the model coordinator class.
DP The 4-level name of the data provider class.
MDVIEWER The 4-level name of the OLAP metadata viewer class.
MDMODEL The 4-level name of the OLAP metadata model class.

Chapter 12, Post-Installation Configuration for Risk Dimensions
Software
Starting the Risk Dimensions Application
A UNIX script file called sasrisk is located in your SASROOT directory. Append your SASROOT directory name to your system PATH environment variable, and use sasrisk to start up the Risk Dimensions software.
37

Chapter 13, Post-Installation Configuration for SAS/SECURE
Software
SAS/SECURE software includes client components that you can use to create non-SAS System client applications that communicate with a SAS server in a secure environment. To use encryption between a non-SAS System client and a SAS Server with SAS/SECURE software licensed, you must install the SAS/SECURE client components on the client machine.
SAS/SECURE Client for Windows
The secwin.exe executable installs the files necessary for the IOM Bridge for COM to use the CryptoAPI algorithms. It also contains a TAR and ZIP file that is used to develop Java clients that utilize the encryption support.
SAS/SECURE Client for Java
The SAS/SECURE client for Java provides encryption support for Java applications. You can incorporate this support into applications that are written using the following components:
• SAS/SHARE driver for JDBC • SAS/CONNECT driver for Java• IOM Bridge for Java
Client Components
The SAS/SECURE client components are available on the SAS/SECURE CD included with your SAS software order.
38

Chapter 14, Post-Installation Configuration for SAS/SHARE
Software
User Authentication
You are required to complete the steps from the section “Configuring User Authentication” in the Installation Instructions for the SAS System, Version 9 for UNIX Environments. This allows SAS/SHARE software to authenticate a client’s identity and check a client’s authority to access resources.
System Configuration for the TCP/IP Communications Method
The SAS system option COMAMID= specifies which access method SAS/SHARE software should use for communication. You must specify COMAMID=TCP to use the TCP/IP access method, which is the only access method available for use with this release of SAS/SHARE servers running under UNIX operating systems.
Each SAS/SHARE server that runs on a network node must be defined as a service in the file /etc/services or /etc/inet/services on that node. Each entry in this file associates a service name with the port number and protocol used by that service. An entry for a SAS/SHARE server has the following form:
<server name> <port number>/tcp # <comments>
The server name must be one to eight characters in length. The first character must be a letter or underscore; the remaining seven characters can include letters, digits, underscores, the dollar $ sign, or the at @ sign.
An entry for a server whose name is MKTSERV might look like the following:
mktserv 5000/tcp # SAS/SHARE server for Marketing and Sales
The server name is specified with the SERVER= option in the LIBNAME statement and in the OPERATE procedure in user and server administrator programs.
Client Components
SAS/SHARE software includes client components that are used outside of your SAS System installation. SAS/SHARE client components are delivered with SAS/SHARE software and may be found in the !SASROOT/misc/share directory. See the readme.txt file in this directory for a description of each component. SAS/SHARE client components are also available on the SAS Client-Side Components CD included in your SAS software order. The SAS/SHARE client components are described below.
39

40 Configuration Guide for the SAS System, Version 9 for UNIX Environments
SAS/SHARE Data Provider
The SAS/SHARE Data Provider enables you to access, update, and manipulate SAS data using OLE DB- and ADO-compliant applications on Windows platforms.
SAS ODBC Driver
The SAS ODBC Driver enables you to access, update, and manipulate SAS data from ODBC-compliant applications on Windows platforms.
SAS/SHARE Driver for JDBC
The SAS/SHARE Driver for JDBC enables you to write applets, applications, and servlets that access and update SAS data. The Java Tools package that includes the SAS/SHARE driver for JDBC also includes the SAS/CONNECT driver for Java. If you are writing Java programs using these interfaces, you may also want to use the tunnel feature. This optional feature can be used with the Java applets you write to solve some common configuration problems.
SAS/SHARE SQL Library for C
The SAS/SHARE SQL Library for C provides an application programming interface (API) that enables your applications to send SQL queries and statements through a SAS/SHARE server to data on remote hosts.
NLS Information
Sites that develop or support international applications that use SAS/SHARE software should refer to Chapter 10, “Post-Installation Configuration for National Language Support (NLS).”

Chapter 15, Post-Installation Configuration for WebHound, Release 4.2
Important: WebHound, Release 4.2 is only supported on the Solaris operating system for this release of the SAS System.
Configuring WebHound, Release 4.2
To configure WebHound, Release 4.2:
1. Bring up SAS and type webhound on the SAS command line to open the WebHound Administrator GUI wizard.
2. Type the name, description, and directory of your WebHound webmart and enter the location of your Web server log file(s).
3. To process the data from your Web server log file(s), enter the following macro commands from the SAS Program Editor window:
%WebHound(name=<webmart_name>, program=extract);%WebHound(name=<webmart_name>, program=load);%WebHound(name=<webmart_name>, program=report);
where <webmart_name> is the name of your WebHound webmart that you defined using the WebHound Administrator GUI wizard.
4. To set up and configure the software needed to view drillable reports, see additional documents at http://www.sas.com/service/library/onlinedoc/webhound/index.html.
41
Chapter 16, Usage of Host Sort Routines
This chapter provides instructions for making host sort routines available to the SAS System. Supported host sort routines are SyncSort and CoSORT. To use host sort routines with the SAS System, complete the following steps:
1. Install the host sort library on your system by following the instructions provided by the vendor. Ensure that the host sort routine works outside of the SAS System.
2. Make the host sort library available to the SAS System by following the instructions in the following section, “Making Host Sort Routines Available.”
3. Submit an options statement in a SAS session to specify the host sort routine by following the instructions in the section “Using Host Sort Routines in a SAS Session.”
Making Host Sort Routines Available
This section describes the system-specific instructions for making host sort routines available to the SAS System.
For AIX
Use either of the following two methods.
Create symbolic links to the host sort libraries from one of the directories searched by default, such as /usr/lib, as shown in the following example for SyncSort:
$ ln –s /usr/local/syncsort/lib/libsyncsort.a /usr/lib
or:
Set the environment variable LIBPATH to the directory containing the host sort library, as shown in the following example for SyncSort:
Note: If you are running SAS programs through a batch facility, make sure the environment variables described below are set correctly.
Using Bourne Shell
$ LIBPATH=/usr/local/syncsort/lib:$LIBPATH$ export LIBPATH
Using C Shell
$ setenv LIBPATH /usr/local/syncsort/lib:$LIBPATH
42
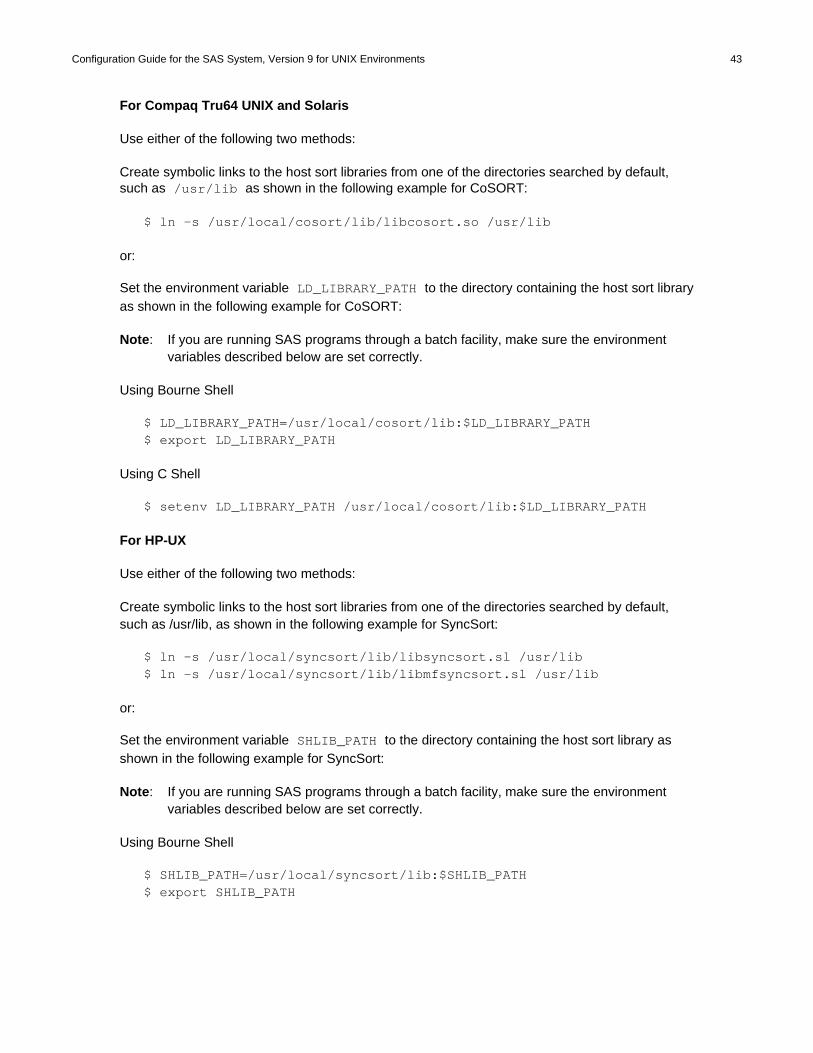
Configuration Guide for the SAS System, Version 9 for UNIX Environments 43
For Compaq Tru64 UNIX and Solaris
Use either of the following two methods:
Create symbolic links to the host sort libraries from one of the directories searched by default, such as /usr/lib as shown in the following example for CoSORT:
$ ln –s /usr/local/cosort/lib/libcosort.so /usr/lib
or:
Set the environment variable LD_LIBRARY_PATH to the directory containing the host sort library as shown in the following example for CoSORT:
Note: If you are running SAS programs through a batch facility, make sure the environment variables described below are set correctly.
Using Bourne Shell
$ LD_LIBRARY_PATH=/usr/local/cosort/lib:$LD_LIBRARY_PATH $ export LD_LIBRARY_PATH
Using C Shell
$ setenv LD_LIBRARY_PATH /usr/local/cosort/lib:$LD_LIBRARY_PATH
For HP-UX
Use either of the following two methods:
Create symbolic links to the host sort libraries from one of the directories searched by default, such as /usr/lib, as shown in the following example for SyncSort:
$ ln –s /usr/local/syncsort/lib/libsyncsort.sl /usr/lib$ ln –s /usr/local/syncsort/lib/libmfsyncsort.sl /usr/lib
or:
Set the environment variable SHLIB_PATH to the directory containing the host sort library as shown in the following example for SyncSort:
Note: If you are running SAS programs through a batch facility, make sure the environment variables described below are set correctly.
Using Bourne Shell
$ SHLIB_PATH=/usr/local/syncsort/lib:$SHLIB_PATH $ export SHLIB_PATH
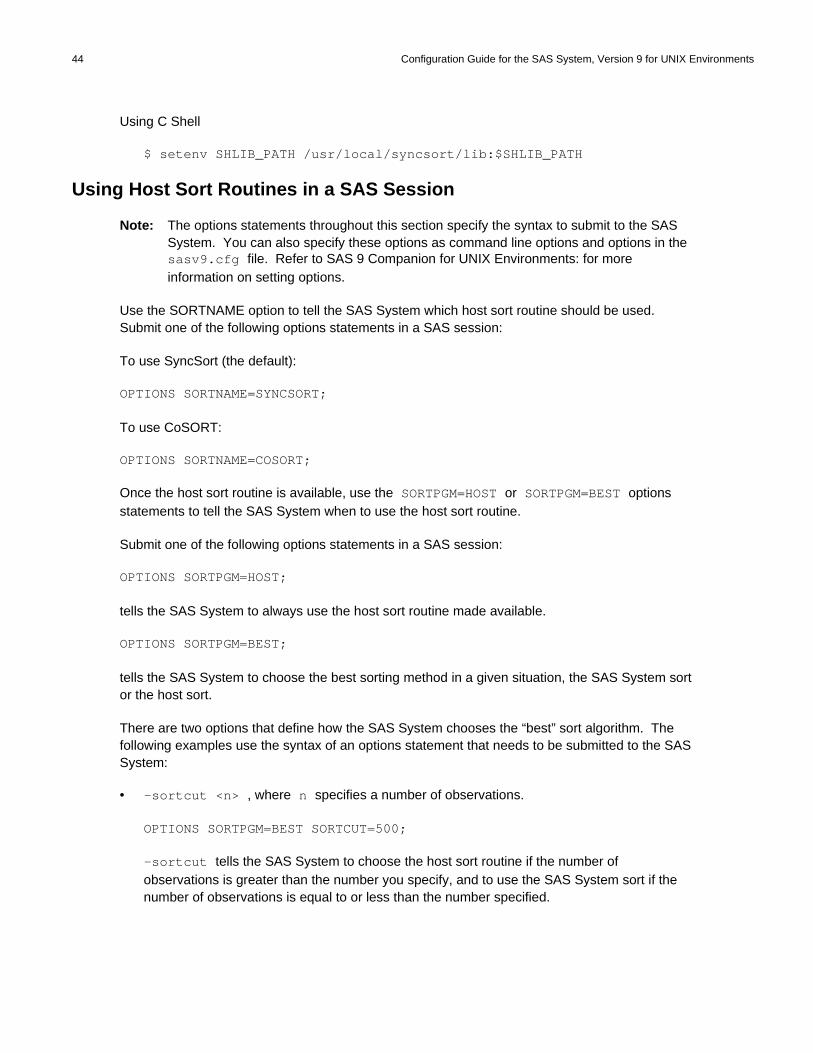
44 Configuration Guide for the SAS System, Version 9 for UNIX Environments
Using C Shell
$ setenv SHLIB_PATH /usr/local/syncsort/lib:$SHLIB_PATH
Using Host Sort Routines in a SAS Session
Note: The options statements throughout this section specify the syntax to submit to the SAS System. You can also specify these options as command line options and options in the sasv9.cfg file. Refer to SAS 9 Companion for UNIX Environments: for more information on setting options.
Use the SORTNAME option to tell the SAS System which host sort routine should be used. Submit one of the following options statements in a SAS session:
To use SyncSort (the default):
OPTIONS SORTNAME=SYNCSORT;
To use CoSORT:
OPTIONS SORTNAME=COSORT;
Once the host sort routine is available, use the SORTPGM=HOST or SORTPGM=BEST options statements to tell the SAS System when to use the host sort routine.
Submit one of the following options statements in a SAS session:
OPTIONS SORTPGM=HOST;
tells the SAS System to always use the host sort routine made available.
OPTIONS SORTPGM=BEST;
tells the SAS System to choose the best sorting method in a given situation, the SAS System sort or the host sort.
There are two options that define how the SAS System chooses the “best” sort algorithm. The following examples use the syntax of an options statement that needs to be submitted to the SAS System:
• -sortcut <n> , where n specifies a number of observations.
OPTIONS SORTPGM=BEST SORTCUT=500;
-sortcut tells the SAS System to choose the host sort routine if the number of observations is greater than the number you specify, and to use the SAS System sort if the number of observations is equal to or less than the number specified.

Configuration Guide for the SAS System, Version 9 for UNIX Environments 45
• -sortcutp <size>[kKmM], where <size> specifies a file size in either kilobytes or megabytes.
OPTIONS SORTPGM=BEST SORTCUTP=40M;
-sortcutp tells the SAS System to choose the host sort routine if the size of the data being sorted exceeds the size you specify, and to use the SAS System sort if the size of the data is equal to or smaller than the size you specify.
If these options are not defined or these options are set to zero, the SAS System chooses the SAS System sort routine. If you specify both options and either condition is met, the SAS System chooses the host sort routine.
You can change the work directory used for temporary sort files by using the option sortdev <dir>, where <dir> is the directory in which you want the temporary files to be created. For example, submit the following statement if you want the temporary files to be created in /tmp:
OPTIONS SORTPGM=BEST SORTCUT=500 sortdev="/tmp";
You can specify the host sort option sortanom t to print timing and resource information to the SAS log after each phase of a sort. The following is an example of this option:
OPTIONS SORTPGM=HOST SORTANOM=t;
You can specify the host sort option sortanom v to print to the SAS log the arguments passed to the sort, which may be useful for tuning or debugging:
OPTIONS SORTPGM=HOST SORTANOM=v;
You can attempt to increase your sort performance by increasing the values of the sortsize and memsize SAS options. However, make sure that sortsize is at least 4M less than memsize.
You can see other SAS performance statistics in the SAS log using the FULLSTIMER option:
OPTIONS FULLSTIMER;