configure ise 2.2 pic with active directory wmi · pdf fileconfigure ise 2.2 pic with active...
TRANSCRIPT
Configure ISE 2.2 PIC with Active DirectoryWMI Provider Contents
IntroductionPrerequisitesRequirementsComponents UsedBackground InformationNetwork DiagramWork FlowConfigureConfigure ISE PIC DeploymentStep 1 (Optional). Install Trusted Certificates.Step 2 (Optional). Install System Certificates.Step 3. Add secondary node to the deployment.Configure Active Directory ProvidersStep 1. Join ISE PIC to the domain.Step 2. Add PassiveID agents.VerifyDeploymentDeployment pageDashboard pageSubscribersSystem SummaryProviders and sessionsHome pageLive SessionsTroubleshootDeploymentCommon issue: secondary node is not reacheableActive Directory and WMICommon issue: ISE PIC throws "Unable to run executable on
Introduction
This document describes how to configure and troubleshoot Identity Services Engine PassiveIdentity Connector (ISE PIC) deployment with Active Directory Windows ManagementInstrumentation (AD WMI) provider. ISE PIC is a lightweight ISE version which focuses on PassiveID features.
ISE PIC is a single ID solution for all Cisco Security Portfolio which uses passive identity only. Itmeans that authorization or policies cannot be configured on ISE PIC. It supports different

Providers (Agents, WMI, Syslog, API) and can be integrated via REST API. It has abilities to queryendpoints (Is User logged in? Is endpoint still connected?)
Prerequisites
Requirements
Cisco recommends that you have basic knowledge of these topics:
Cisco Identity Service Engine●
Microsoft Active Directory●
Microsoft WMI●
Components Used
The information in this document is based on these software and hardware versions:
Cisco Identity Service Engine Passive Identity Connector version 2.2.0.470●
Microsoft Windows 7 Service Pack 1●
Microsoft Windows Server 2012 r2●
The information in this document was created from the devices in a specific lab environment. All ofthe devices used in this document started with a cleared (default) configuration. If your network islive, make sure that you understand the potential impact of any command.
Background Information
Maximum amount of nodes in ISE PIC deployment is 2. This example shows how to configure theISE PIC deployment for High Availability, so 2 Virtual Machines (VMs) are used. In an ISE PICdeployment, nodes can have roles: Primary and Secondary. In this only one node can be Primaryat a time and roles can only be changed manually through GUI. In case of Primary failure allfeatures still run on Secondary except for UI. Only manual promotion to Primary enables the UI.
This example shows how to configure WMI Provider for Active Directory. WMI consists of a set ofextensions to the Windows Driver Model that provides an operating system interface throughwhich instrumented components provide information and notification. WMI is Microsoft'simplementation of the Web-Based Enterprise Management (WBEM) and Common InformationModel (CIM) standards from the Distributed Management Task Force (DMTF).
Note: More information about WMI can be found on official Microsoft site: About WMI
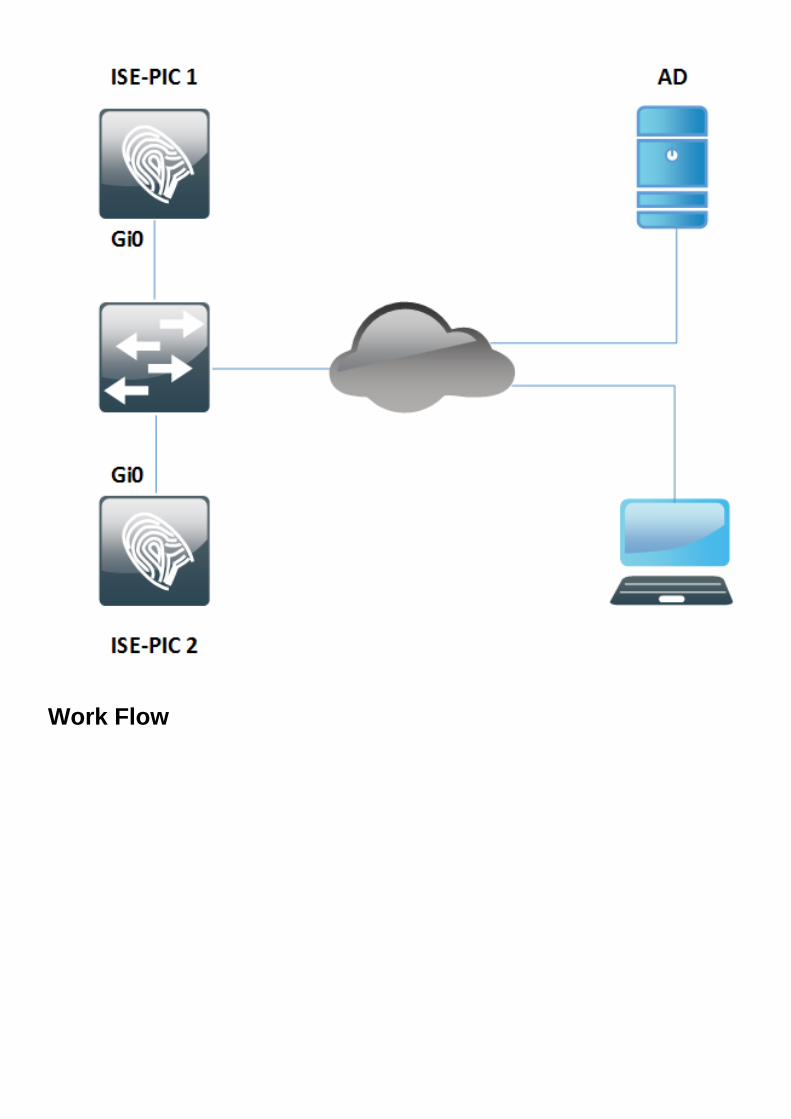
Network Diagram
The information in the document uses the network setup shown in the image:
Work Flow
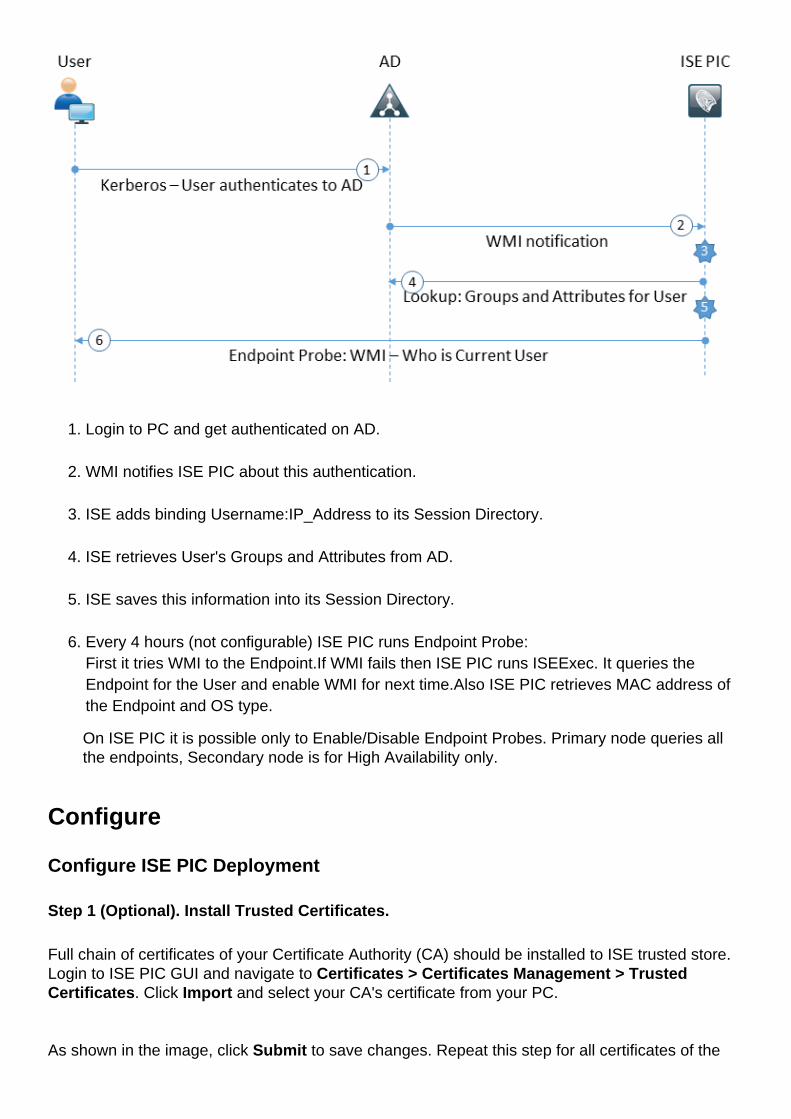
Login to PC and get authenticated on AD.1.
WMI notifies ISE PIC about this authentication.2.
ISE adds binding Username:IP_Address to its Session Directory.3.
ISE retrieves User's Groups and Attributes from AD.4.
ISE saves this information into its Session Directory.5.
Every 4 hours (not configurable) ISE PIC runs Endpoint Probe:First it tries WMI to the Endpoint.If WMI fails then ISE PIC runs ISEExec. It queries theEndpoint for the User and enable WMI for next time.Also ISE PIC retrieves MAC address ofthe Endpoint and OS type.
6.
On ISE PIC it is possible only to Enable/Disable Endpoint Probes. Primary node queries allthe endpoints, Secondary node is for High Availability only.
Configure
Configure ISE PIC Deployment
Step 1 (Optional). Install Trusted Certificates.
Full chain of certificates of your Certificate Authority (CA) should be installed to ISE trusted store.Login to ISE PIC GUI and navigate to Certificates > Certificates Management > TrustedCertificates. Click Import and select your CA's certificate from your PC.
As shown in the image, click Submit to save changes. Repeat this step for all certificates of the
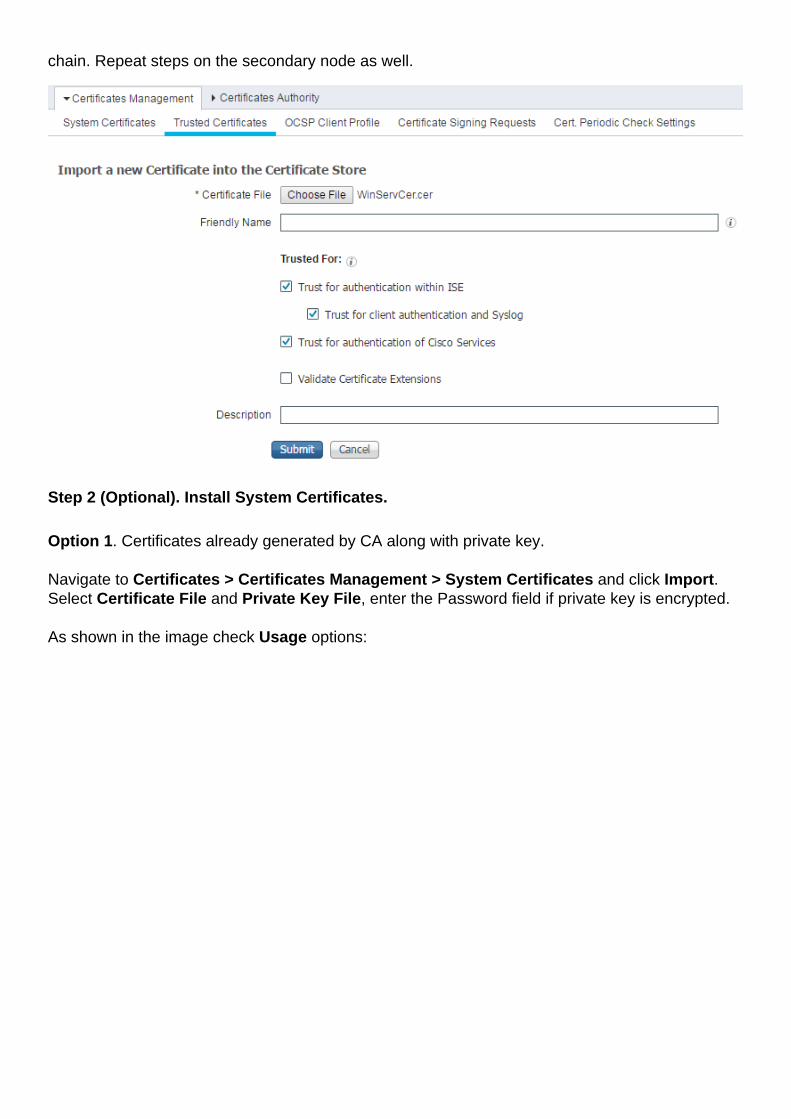
chain. Repeat steps on the secondary node as well.
Step 2 (Optional). Install System Certificates.
Option 1. Certificates already generated by CA along with private key.
Navigate to Certificates > Certificates Management > System Certificates and click Import.Select Certificate File and Private Key File, enter the Password field if private key is encrypted.
As shown in the image check Usage options:
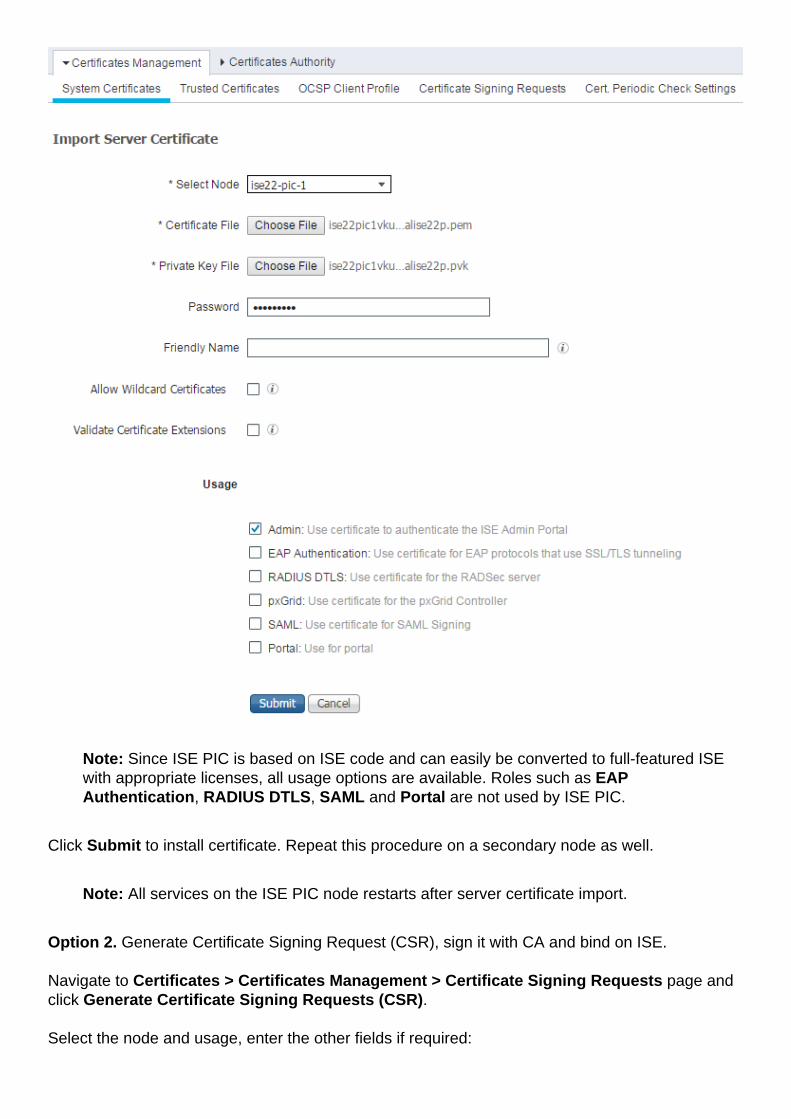
Note: Since ISE PIC is based on ISE code and can easily be converted to full-featured ISEwith appropriate licenses, all usage options are available. Roles such as EAPAuthentication, RADIUS DTLS, SAML and Portal are not used by ISE PIC.
Click Submit to install certificate. Repeat this procedure on a secondary node as well.
Note: All services on the ISE PIC node restarts after server certificate import.
Option 2. Generate Certificate Signing Request (CSR), sign it with CA and bind on ISE.
Navigate to Certificates > Certificates Management > Certificate Signing Requests page andclick Generate Certificate Signing Requests (CSR).
Select the node and usage, enter the other fields if required:
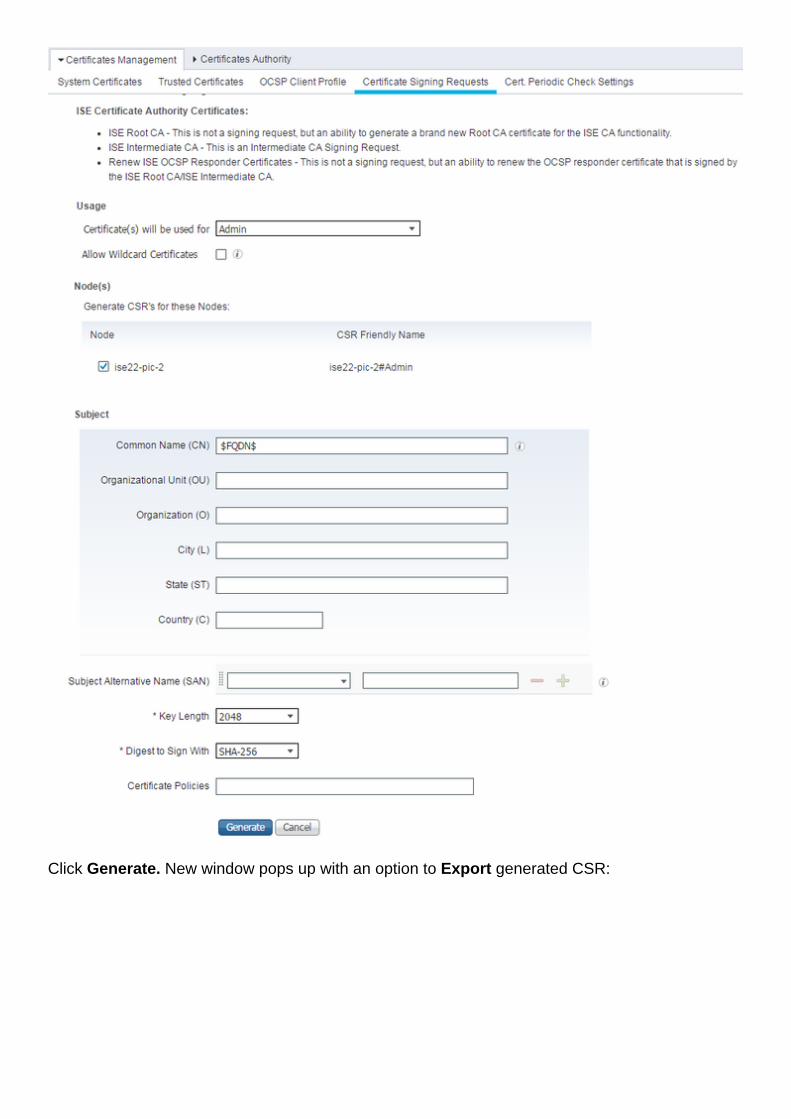
Click Generate. New window pops up with an option to Export generated CSR:
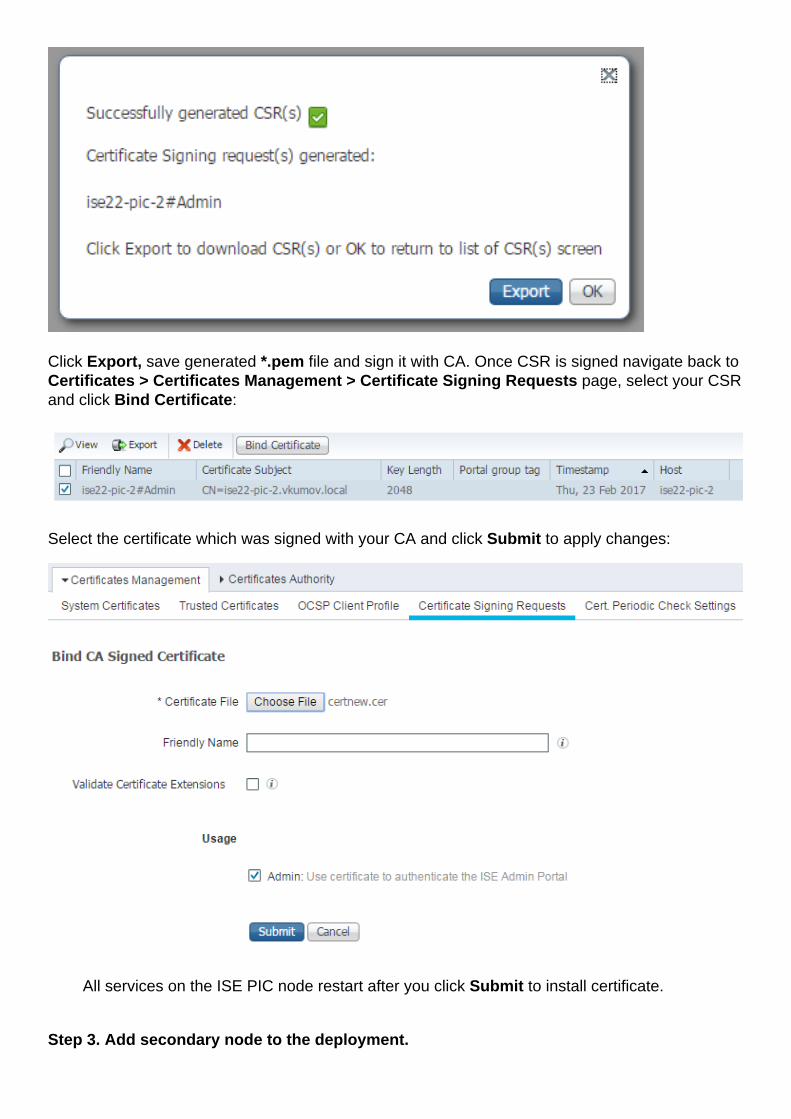
Click Export, save generated *.pem file and sign it with CA. Once CSR is signed navigate back toCertificates > Certificates Management > Certificate Signing Requests page, select your CSRand click Bind Certificate:
Select the certificate which was signed with your CA and click Submit to apply changes:
All services on the ISE PIC node restart after you click Submit to install certificate.
Step 3. Add secondary node to the deployment.

ISE PIC allows to have 2 nodes in a deployment for High Availability. It does not require to have atwo-way trust of certificates (comparing to usual ISE deployment). In order to add a secondarynode to the deployment, navigate to Administration > Deployment page on your primary ISEPIC node, as shown in the image:
Enter Fully Qualified Domain Name (FQDN) of the secondary node, administrator credentials ofthat node and click Save. In case primary ISE PIC node is not able to verify admin certificate ofthe second node it asks for confirmation before it installs that certificate in trusted store.
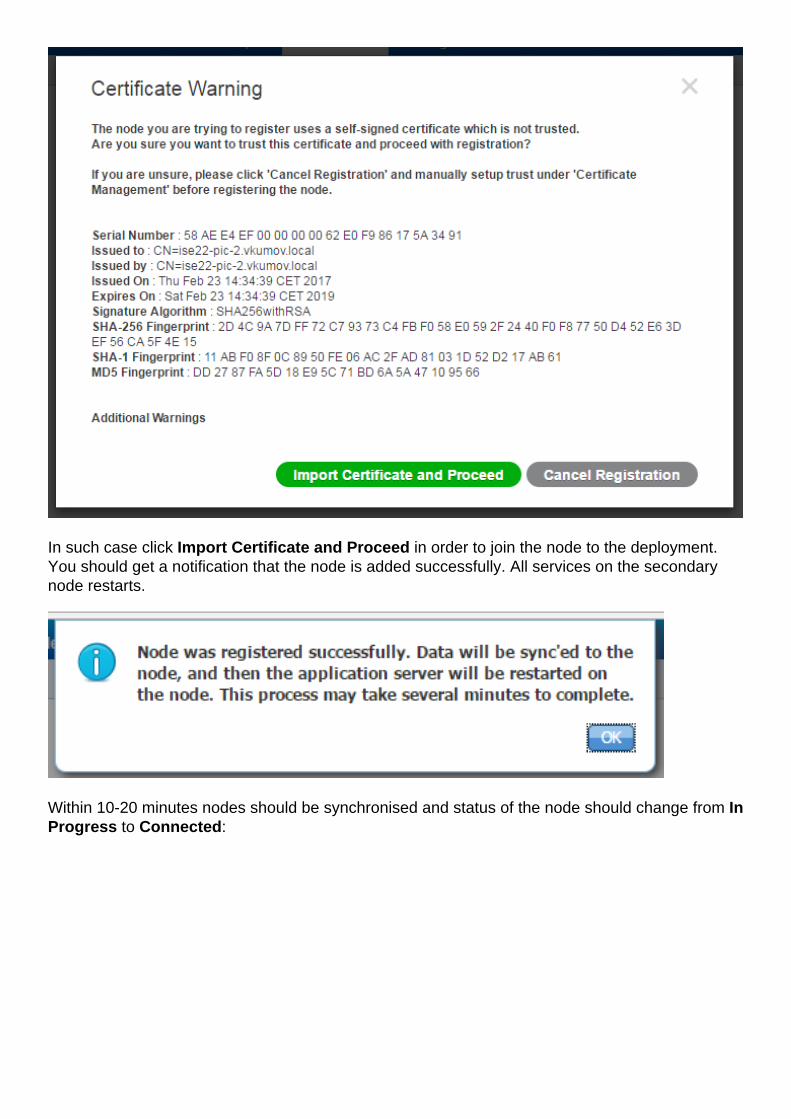
In such case click Import Certificate and Proceed in order to join the node to the deployment.You should get a notification that the node is added successfully. All services on the secondarynode restarts.
Within 10-20 minutes nodes should be synchronised and status of the node should change from InProgress to Connected:
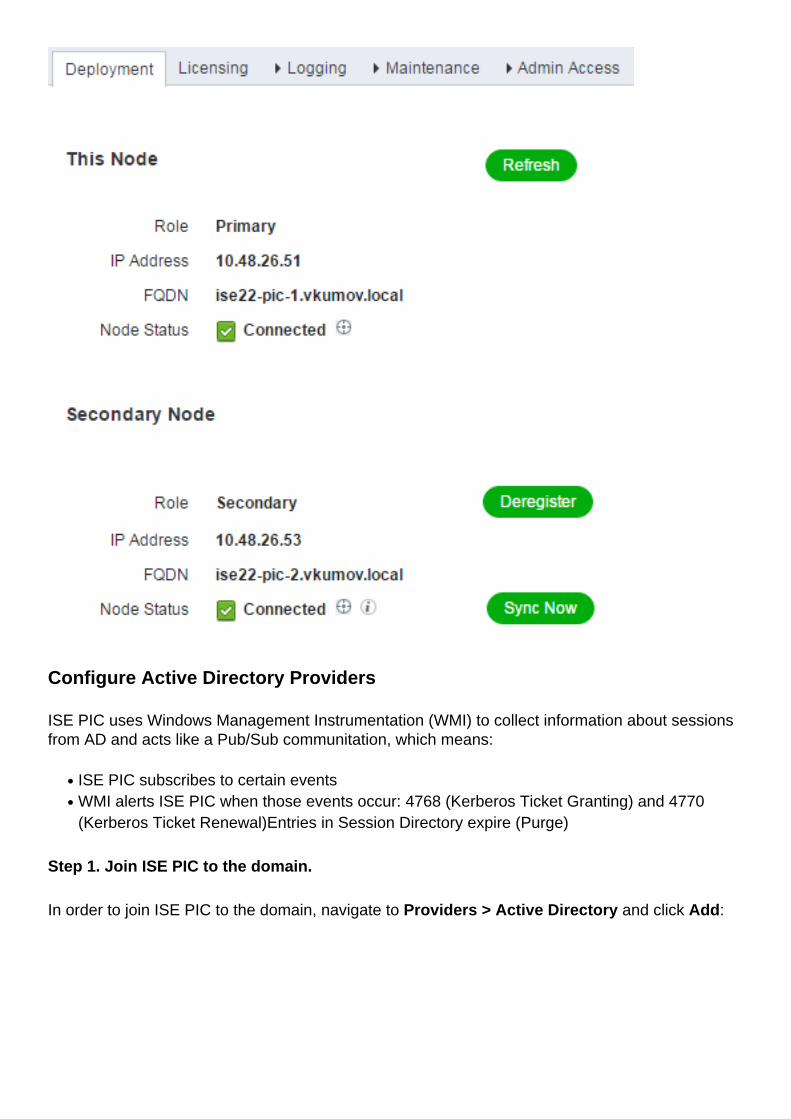
Configure Active Directory Providers
ISE PIC uses Windows Management Instrumentation (WMI) to collect information about sessionsfrom AD and acts like a Pub/Sub communitation, which means:
ISE PIC subscribes to certain events●
WMI alerts ISE PIC when those events occur: 4768 (Kerberos Ticket Granting) and 4770(Kerberos Ticket Renewal)Entries in Session Directory expire (Purge)
●
Step 1. Join ISE PIC to the domain.
In order to join ISE PIC to the domain, navigate to Providers > Active Directory and click Add:
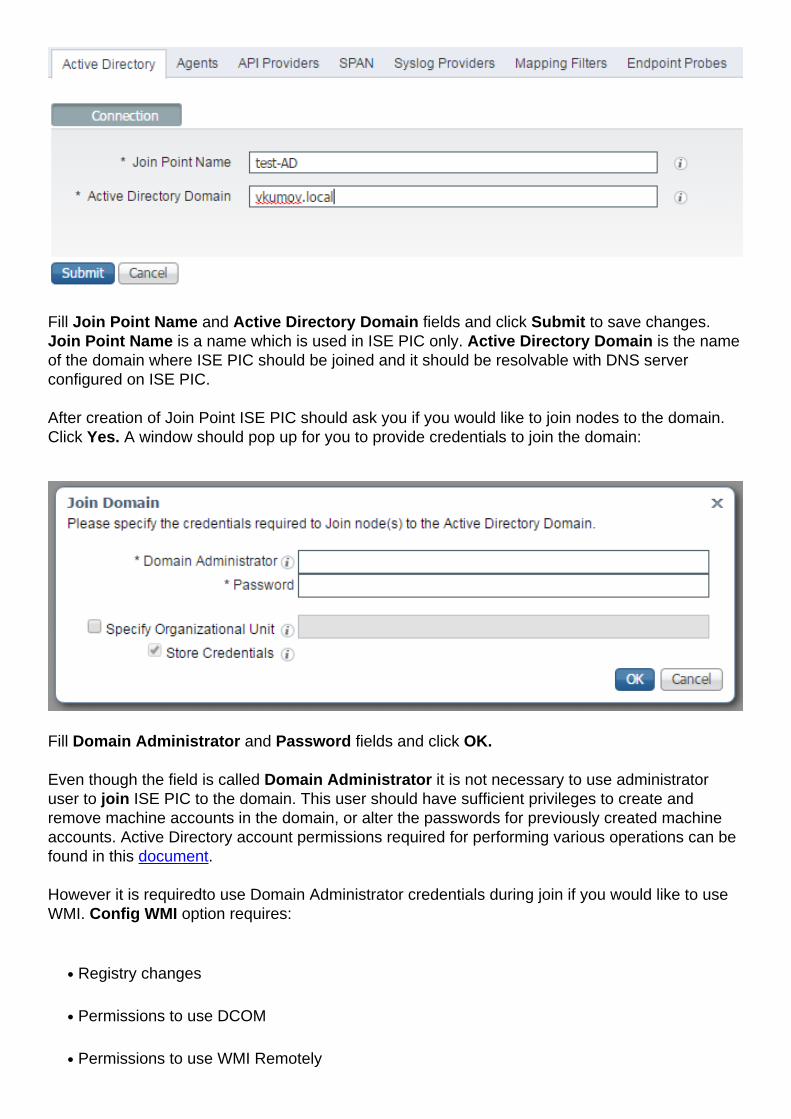
Fill Join Point Name and Active Directory Domain fields and click Submit to save changes.Join Point Name is a name which is used in ISE PIC only. Active Directory Domain is the nameof the domain where ISE PIC should be joined and it should be resolvable with DNS serverconfigured on ISE PIC.
After creation of Join Point ISE PIC should ask you if you would like to join nodes to the domain.Click Yes. A window should pop up for you to provide credentials to join the domain:
Fill Domain Administrator and Password fields and click OK.
Even though the field is called Domain Administrator it is not necessary to use administratoruser to join ISE PIC to the domain. This user should have sufficient privileges to create andremove machine accounts in the domain, or alter the passwords for previously created machineaccounts. Active Directory account permissions required for performing various operations can befound in this document.
However it is requiredto use Domain Administrator credentials during join if you would like to useWMI. Config WMI option requires:
Registry changes●
Permissions to use DCOM●
Permissions to use WMI Remotely●
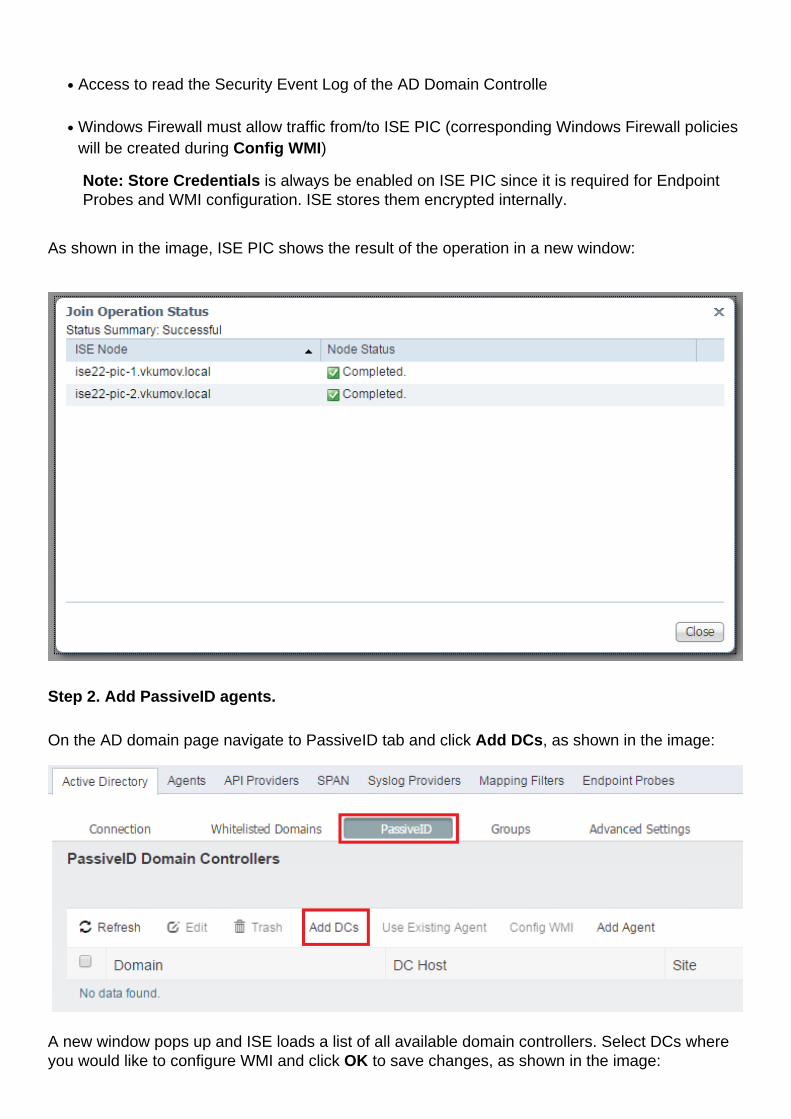
Access to read the Security Event Log of the AD Domain Controlle●
Windows Firewall must allow traffic from/to ISE PIC (corresponding Windows Firewall policieswill be created during Config WMI)
●
Note: Store Credentials is always be enabled on ISE PIC since it is required for EndpointProbes and WMI configuration. ISE stores them encrypted internally.
As shown in the image, ISE PIC shows the result of the operation in a new window:
Step 2. Add PassiveID agents.
On the AD domain page navigate to PassiveID tab and click Add DCs, as shown in the image:
A new window pops up and ISE loads a list of all available domain controllers. Select DCs whereyou would like to configure WMI and click OK to save changes, as shown in the image:

Selected DCs are added to the list of PassiveID Domain Controllers. Select your DCs and clickConfig WMI button:
ISE PIC shows a message that configuration process is in progress:
After couple of minutes it shows you a message that WMI is successfully configured on selectedDCs:
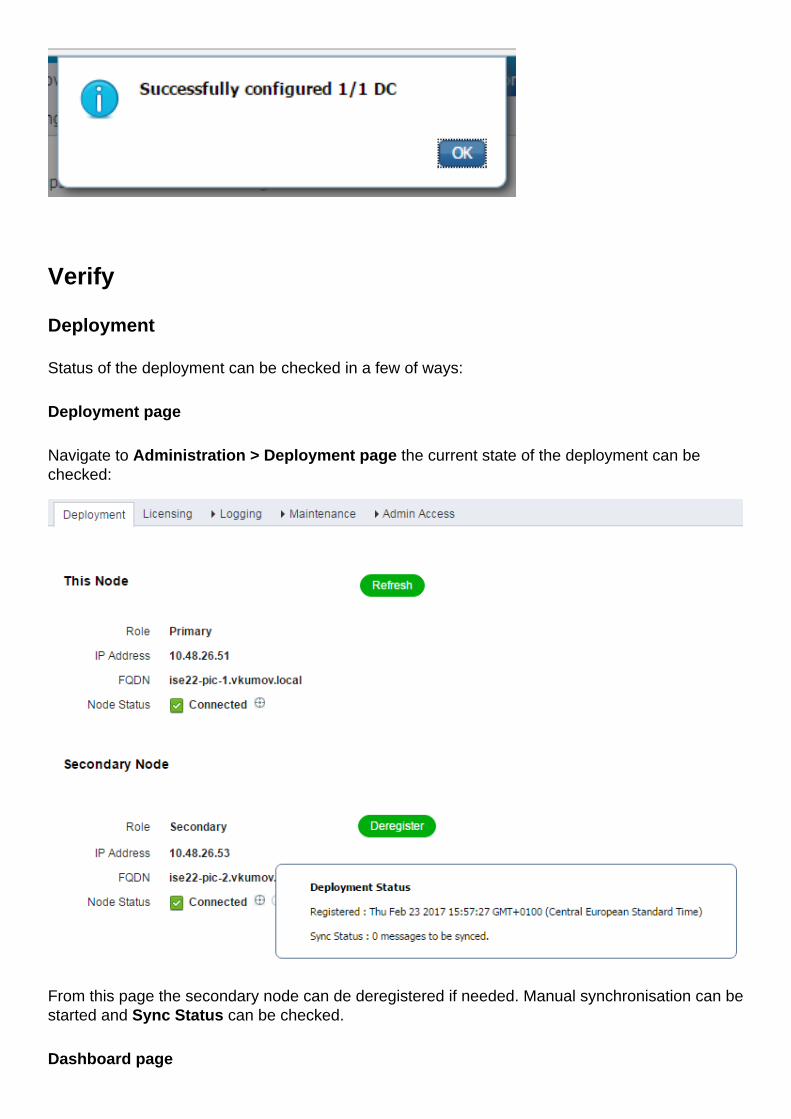
Verify
Deployment
Status of the deployment can be checked in a few of ways:
Deployment page
Navigate to Administration > Deployment page the current state of the deployment can bechecked:
From this page the secondary node can de deregistered if needed. Manual synchronisation can bestarted and Sync Status can be checked.
Dashboard page

On a main ISE PIC page there is a dashlet called Subscribers. With this dashlet you can checkthe current status of your ISE PIC nodes, as shown in the image:
ISE PIC creates 2 subscribers for each node - admin and mnt. All of them should be inOnline status which means that nodes are reacheable and operational.
Subscribers
Subscribers page is an extended version of subscribers dashlet from Home page of ISE PIC.This page shows all pxGrid related, however status of ISE PIC nodes can be checked here aswell:
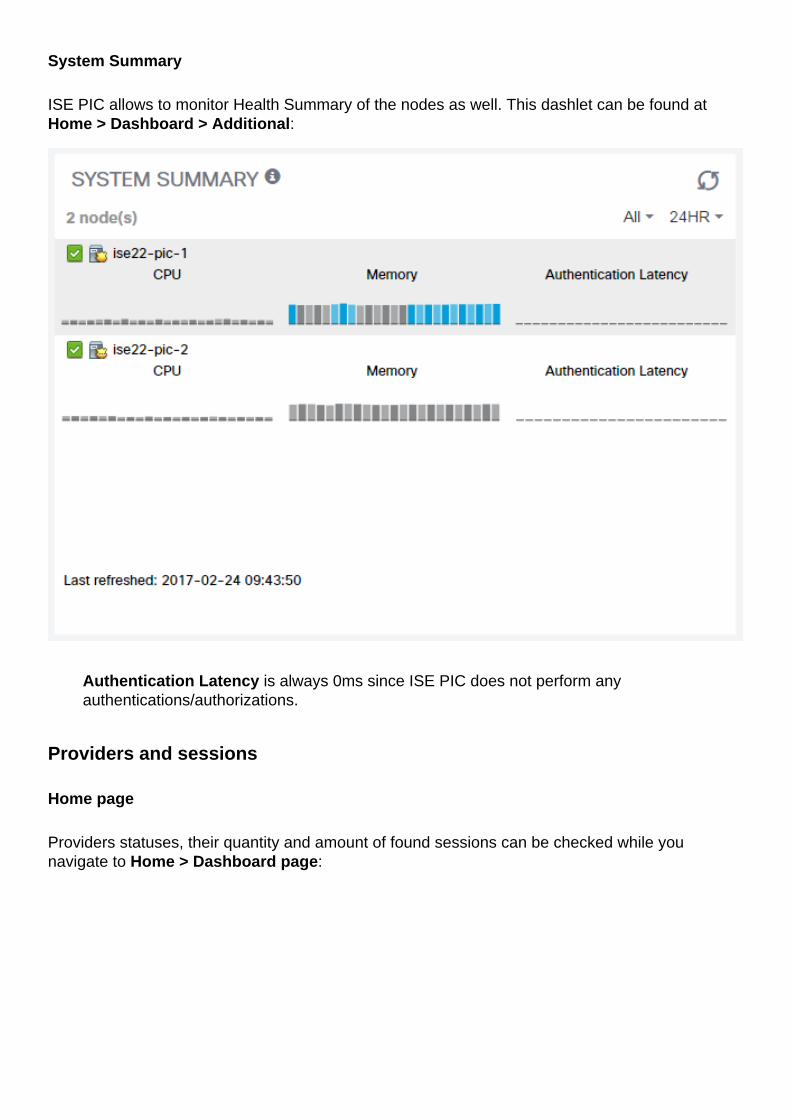
System Summary
ISE PIC allows to monitor Health Summary of the nodes as well. This dashlet can be found atHome > Dashboard > Additional:
Authentication Latency is always 0ms since ISE PIC does not perform anyauthentications/authorizations.
Providers and sessions
Home page
Providers statuses, their quantity and amount of found sessions can be checked while younavigate to Home > Dashboard page:

Live Sessions
Detailed information about all found users sessions can be found at Live Sessions page:
It contains such information as:
Provider - what providers were used to identify this session●
Initiated and Updated - timestamps when the session is initiated and updated accordingly●
IP Address - the address of the Endpoint●
Action - actions which ISE can perform (for example, check endpoint status, or if ISE PIC isintegrated with pxGrid then send a request to clear session)
●
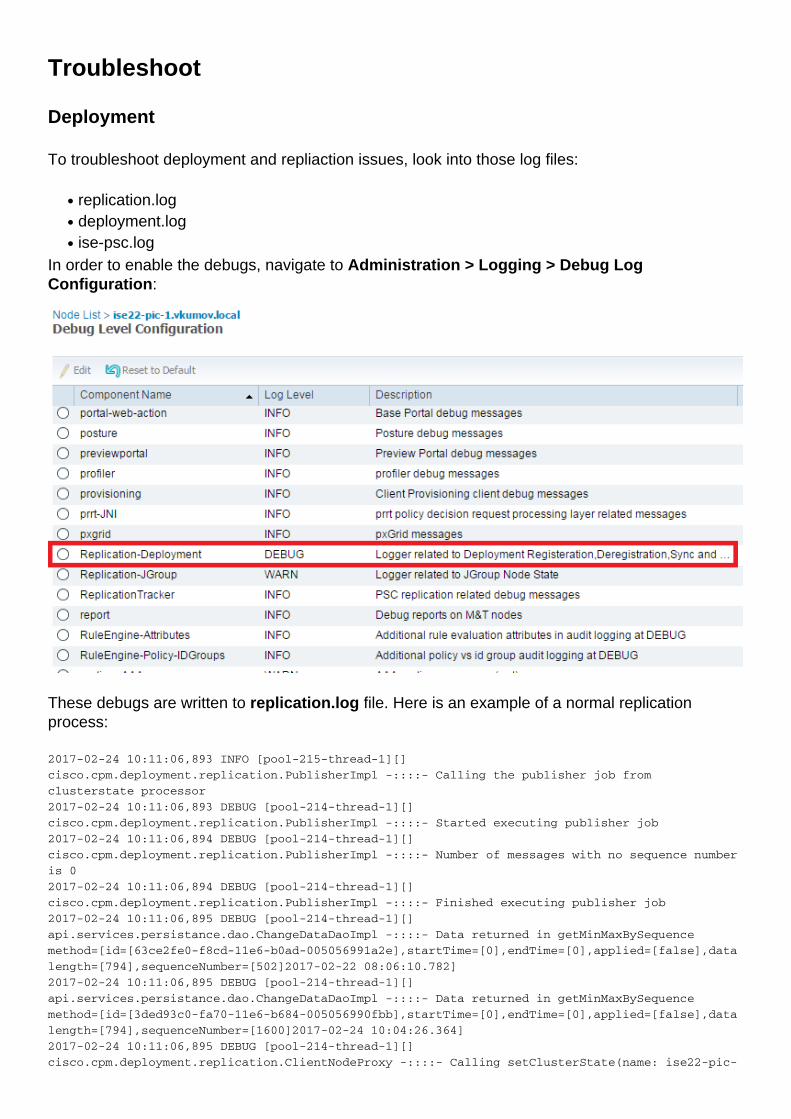
Troubleshoot
Deployment
To troubleshoot deployment and repliaction issues, look into those log files:
replication.log●
deployment.log●
ise-psc.log●
In order to enable the debugs, navigate to Administration > Logging > Debug LogConfiguration:
These debugs are written to replication.log file. Here is an example of a normal replicationprocess:
2017-02-24 10:11:06,893 INFO [pool-215-thread-1][]
cisco.cpm.deployment.replication.PublisherImpl -::::- Calling the publisher job from
clusterstate processor
2017-02-24 10:11:06,893 DEBUG [pool-214-thread-1][]
cisco.cpm.deployment.replication.PublisherImpl -::::- Started executing publisher job
2017-02-24 10:11:06,894 DEBUG [pool-214-thread-1][]
cisco.cpm.deployment.replication.PublisherImpl -::::- Number of messages with no sequence number
is 0
2017-02-24 10:11:06,894 DEBUG [pool-214-thread-1][]
cisco.cpm.deployment.replication.PublisherImpl -::::- Finished executing publisher job
2017-02-24 10:11:06,895 DEBUG [pool-214-thread-1][]
api.services.persistance.dao.ChangeDataDaoImpl -::::- Data returned in getMinMaxBySequence
method=[id=[63ce2fe0-f8cd-11e6-b0ad-005056991a2e],startTime=[0],endTime=[0],applied=[false],data
length=[794],sequenceNumber=[502]2017-02-22 08:06:10.782]
2017-02-24 10:11:06,895 DEBUG [pool-214-thread-1][]
api.services.persistance.dao.ChangeDataDaoImpl -::::- Data returned in getMinMaxBySequence
method=[id=[3ded93c0-fa70-11e6-b684-005056990fbb],startTime=[0],endTime=[0],applied=[false],data
length=[794],sequenceNumber=[1600]2017-02-24 10:04:26.364]
2017-02-24 10:11:06,895 DEBUG [pool-214-thread-1][]
cisco.cpm.deployment.replication.ClientNodeProxy -::::- Calling setClusterState(name: ise22-pic-

1, minSequence: 502, sequence: 1600, active: {ise22-pic-1-5015})
2017-02-24 10:11:06,896 INFO [pool-214-thread-1][]
cisco.cpm.deployment.replication.PublisherImpl -::::- Finished sending the clusterState !!!
2017-02-24 10:11:06,899 DEBUG [pool-216-thread-1][]
cisco.cpm.deployment.replication.NodeStateMonitorImpl -:::NodeStateMonitor:- MonitorJob starting
2017-02-24 10:11:06,901 DEBUG [pool-216-thread-1][]
cisco.cpm.deployment.replication.ClientNodeProxy -:::NodeStateMonitor:- Calling getNodeStates()
2017-02-24 10:11:06,904 INFO [pool-216-thread-1][]
cisco.cpm.deployment.replication.NodeStateMonitorImpl -:::NodeStateMonitor:- Nodes in
distrubution: {ise22-pic-2=nodeName: ise22-pic-2, status: SYNC COMPLETED, transientStatus: ,
lastStatusTime: 1487927436906, seqNumber: 1600, createTime: 2017-02-24 10:04:26.364} --- Nodes
in cluster: [name: ise22-pic-2, Address: ise22-pic-2-38077, sequence: 1600, createtime: 2017-02-
24 10:04:26.364]
2017-02-24 10:11:06,904 DEBUG [pool-216-thread-1][]
cisco.cpm.deployment.replication.NodeStateMonitorImpl -:::NodeStateMonitor:- Adding [ nodeName:
ise22-pic-2, status: SYNC COMPLETED, transientStatus: , lastStatusTime: 1487927436906,
seqNumber: 1600, createTime: 2017-02-24 10:04:26.364 ] to liveDeploymentMembers
2017-02-24 10:11:06,905 DEBUG [pool-216-thread-1][]
api.services.persistance.dao.ChangeDataDaoImpl -:::NodeStateMonitor:- Data returned in
getMinMaxBySequence method=[id=[63ce2fe0-f8cd-11e6-b0ad-
005056991a2e],startTime=[0],endTime=[0],applied=[false],data
length=[794],sequenceNumber=[502]2017-02-22 08:06:10.782]
2017-02-24 10:11:06,905 DEBUG [pool-216-thread-1][]
api.services.persistance.dao.ChangeDataDaoImpl -:::NodeStateMonitor:- Data returned in
getMinMaxBySequence method=[id=[3ded93c0-fa70-11e6-b684-
005056990fbb],startTime=[0],endTime=[0],applied=[false],data
length=[794],sequenceNumber=[1600]2017-02-24 10:04:26.364]
2017-02-24 10:11:06,905 INFO [pool-216-thread-1][]
cisco.cpm.deployment.replication.NodeStateMonitorImpl -:::NodeStateMonitor:- Primary node
current status minmum sequence[ 1600 ], cluster state: [ name: ise22-pic-1, minSequence: 502,
sequence: 1600, active: {ise22-pic-1-5015} ]
2017-02-24 10:11:06,905 DEBUG [pool-216-thread-1][]
cisco.cpm.deployment.replication.NodeStateMonitorImpl -:::NodeStateMonitor:- Processing node
state [ name: ise22-pic-2, Address: ise22-pic-2-38077, sequence: 1600, createtime:2017-02-24
10:04:26.364 ]
2017-02-24 10:11:06,905 DEBUG [pool-216-thread-1][]
cisco.cpm.deployment.replication.NodeStateMonitorImpl -:::NodeStateMonitor:- ise22-pic-2 - [
nodeName: ise22-pic-2, status: SYNC COMPLETED, transientStatus: , lastStatusTime: 1487927436906,
seqNumber: 1600, createTime: 2017-02-24 10:04:26.364 ]
2017-02-24 10:11:06,905 DEBUG [pool-216-thread-1][]
cisco.cpm.deployment.replication.NodeStateMonitorImpl -:::NodeStateMonitor:- Adding nodeName:
ise22-pic-2, status: SYNC COMPLETED, transientStatus: , lastStatusTime: 1487927436906,
seqNumber: 1600, createTime: 2017-02-24 10:04:26.364 to liveJGroupMembers
2017-02-24 10:11:06,905 INFO [pool-216-thread-1][]
cisco.cpm.deployment.replication.NodeStateMonitorImpl -:::NodeStateMonitor:- No Of
deployedNodes: [ 1 ], No Of liveJGroupNodes: [ 1 ], deadOrSyncInPrgMembersExist: [ false ],
latestMinSequence: [ 502 ]
2017-02-24 10:11:06,905 DEBUG [pool-216-thread-1][]
cisco.cpm.deployment.replication.NodeStateMonitorImpl -:::NodeStateMonitor:-
deadOrSyncInPrgMembersExist =[false], minSequence=[1598],clusterState=[502]
A message from ise-psc.log:
2017-02-24 10:19:36,902 INFO [pool-216-thread-1][]
api.services.persistance.dao.DistributionDAO -:::NodeStateMonitor:- Host Name: ise22-pic-2, DB
'SEC_REPLICATIONSTATUS' = SYNC COMPLETED, Node Persona: SECONDARY, ReplicationStatus obj status:
SYNC_COMPLETED
Common issue: secondary node is not reacheable
If the secondary node becomes unreacheable it would be displayed at Administration >Deployment page:
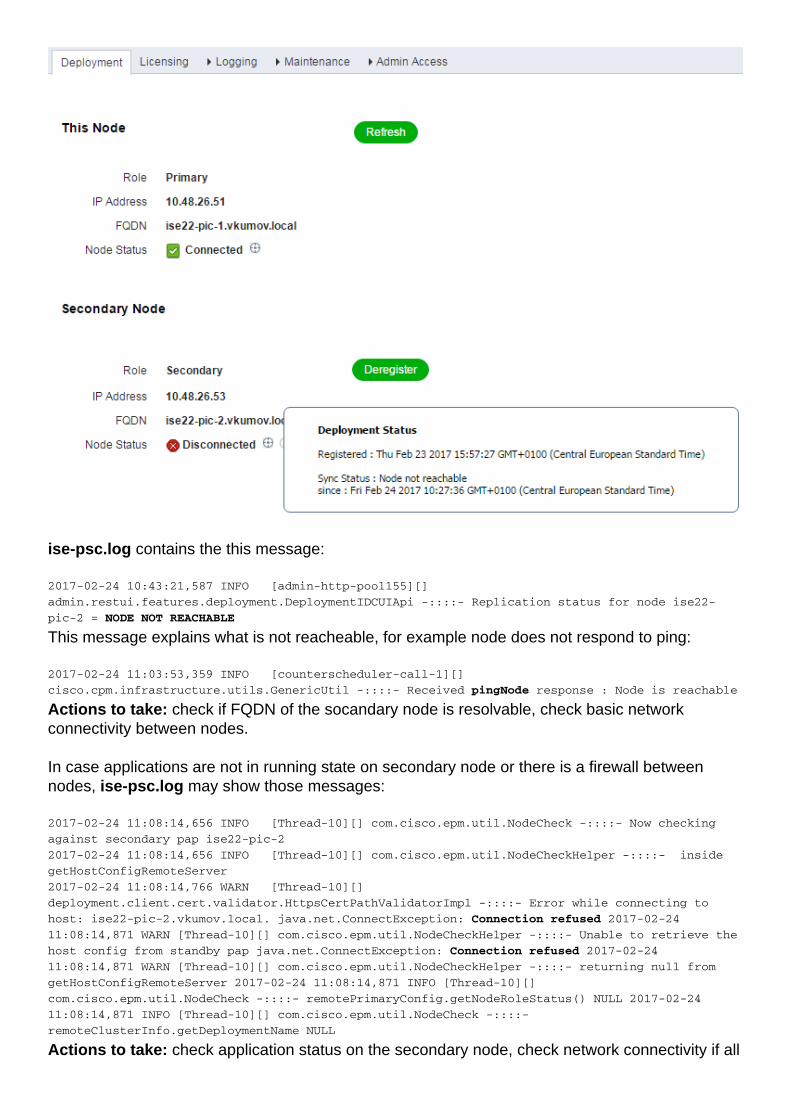
ise-psc.log contains the this message:
2017-02-24 10:43:21,587 INFO [admin-http-pool155][]
admin.restui.features.deployment.DeploymentIDCUIApi -::::- Replication status for node ise22-
pic-2 = NODE NOT REACHABLE
This message explains what is not reacheable, for example node does not respond to ping:
2017-02-24 11:03:53,359 INFO [counterscheduler-call-1][]
cisco.cpm.infrastructure.utils.GenericUtil -::::- Received pingNode response : Node is reachable
Actions to take: check if FQDN of the socandary node is resolvable, check basic networkconnectivity between nodes.
In case applications are not in running state on secondary node or there is a firewall betweennodes, ise-psc.log may show those messages:
2017-02-24 11:08:14,656 INFO [Thread-10][] com.cisco.epm.util.NodeCheck -::::- Now checking
against secondary pap ise22-pic-2
2017-02-24 11:08:14,656 INFO [Thread-10][] com.cisco.epm.util.NodeCheckHelper -::::- inside
getHostConfigRemoteServer
2017-02-24 11:08:14,766 WARN [Thread-10][]
deployment.client.cert.validator.HttpsCertPathValidatorImpl -::::- Error while connecting to
host: ise22-pic-2.vkumov.local. java.net.ConnectException: Connection refused 2017-02-24
11:08:14,871 WARN [Thread-10][] com.cisco.epm.util.NodeCheckHelper -::::- Unable to retrieve the
host config from standby pap java.net.ConnectException: Connection refused 2017-02-24
11:08:14,871 WARN [Thread-10][] com.cisco.epm.util.NodeCheckHelper -::::- returning null from
getHostConfigRemoteServer 2017-02-24 11:08:14,871 INFO [Thread-10][]
com.cisco.epm.util.NodeCheck -::::- remotePrimaryConfig.getNodeRoleStatus() NULL 2017-02-24
11:08:14,871 INFO [Thread-10][] com.cisco.epm.util.NodeCheck -::::-
remoteClusterInfo.getDeploymentName NULL
Actions to take: check application status on the secondary node, check network connectivity if all

connections are permitted between nodes.
Active Directory and WMI
To troubleshoot Active Directory WMI look into those files:
passive-wmi.log●
passive-endpoint.log●
ise-psc.log●
ad_agent.log●
And the useful debugs can enabled at Administration > Logging > Debug Log Configuration:
And:
Here is an example of a new learned session from passive-wmi.log with debugs enabled:
2017-02-24 11:36:22,584 DEBUG [Thread-11][] com.cisco.idc.dc-probe- New login event retrieved
from Domain Controller. Identity Mapping.ticket = instance of __InstanceCreationEvent {
SECURITY_DESCRIPTOR = {1, 0, 20, 128, 96, 0, 0, 0, 112, 0, 0, 0, 0, 0, 0, 0, 20, 0, 0, 0, 2, 0,
76, 0, 3, 0, 0, 0, 0, 0, 20, 0, 69, 0, 15, 0, 1, 1, 0, 0, 0, 0, 0, 5, 18, 0, 0, 0, 0, 0, 24, 0,
69, 0, 0, 0, 1, 2, 0, 0, 0, 0, 0, 5, 32, 0, 0, 0, 32, 2, 0, 0, 0, 0, 24, 0, 65, 0, 0, 0, 1, 2,
0, 0, 0, 0, 0, 5, 32, 0, 0, 0, 61, 2, 0, 0, 1, 2, 0, 0, 0, 0, 0, 5, 32, 0, 0, 0, 32, 2, 0, 0, 1,
1, 0, 0, 0, 0, 0, 5, 18, 0, 0, 0}; TargetInstance = instance of Win32_NTLogEvent { Category =
14339; CategoryString = "Kerberos Authentication Service"; ComputerName = "MainDC.vkumov.local";
EventCode = 4768; EventIdentifier = 4768; EventType = 4; InsertionStrings = {"Administrator",
"vkumov.local", "S-1-5-21-2952046201-2792970045-1866348404-500", "krbtgt", "S-1-5-21-2952046201-
2792970045-1866348404-502", "0x40810010", "0x0", "0x12", "2", "::1", "0", "", "", ""}; Logfile =
"Security"; Message = "A Kerberos authentication ticket (TGT) was requested. \n \nAccount
Information: \n\tAccount Name:\t\tAdministrator \n\tSupplied Realm Name:\tvkumov.local \n\tUser
ID:\t\t\tS-1-5-21-2952046201-2792970045-1866348404-500 \n \nService Information: \n\tService
Name:\t\tkrbtgt \n\tService ID:\t\tS-1-5-21-2952046201-2792970045-1866348404-502 \n \nNetwork
Information: \n\tClient Address:\t\t::1 \n\tClient Port:\t\t0 \n \nAdditional Information:
\n\tTicket Options:\t\t0x40810010 \n\tResult Code:\t\t0x0 \n\tTicket Encryption Type:\t0x12

\n\tPre-Authentication Type:\t2 \n \nCertificate Information: \n\tCertificate Issuer Name:\t\t
\n\tCertificate Serial Number:\t \n\tCertificate Thumbprint:\t\t \n \nCertificate information is
only provided if a certificate was used for pre-authentication. \n \nPre-authentication types,
ticket options, encryption types and result codes are defined in RFC 4120."; RecordNumber =
918032; SourceName = "Microsoft-Windows-Security-Auditing"; TimeGenerated =
"20170224103621.575178-000"; TimeWritten = "20170224103621.575178-000"; Type = "Audit Success";
}; TIME_CREATED = "131324061825752057"; }; , Identity Mapping.dc-domainname = vkumov.local ,
Identity Mapping.dc-connection-type = Current events , Identity Mapping.dc-name =
MainDC.vkumov.local , Identity Mapping.dc-host = MainDC.vkumov.local/10.48.26.52 , 2017-02-24
11:36:22,587 DEBUG [Thread-11][] com.cisco.idc.dc-probe- Replaced local IP. Identity
Mapping.ticket = instance of __InstanceCreationEvent { SECURITY_DESCRIPTOR = {1, 0, 20, 128, 96,
0, 0, 0, 112, 0, 0, 0, 0, 0, 0, 0, 20, 0, 0, 0, 2, 0, 76, 0, 3, 0, 0, 0, 0, 0, 20, 0, 69, 0, 15,
0, 1, 1, 0, 0, 0, 0, 0, 5, 18, 0, 0, 0, 0, 0, 24, 0, 69, 0, 0, 0, 1, 2, 0, 0, 0, 0, 0, 5, 32, 0,
0, 0, 32, 2, 0, 0, 0, 0, 24, 0, 65, 0, 0, 0, 1, 2, 0, 0, 0, 0, 0, 5, 32, 0, 0, 0, 61, 2, 0, 0,
1, 2, 0, 0, 0, 0, 0, 5, 32, 0, 0, 0, 32, 2, 0, 0, 1, 1, 0, 0, 0, 0, 0, 5, 18, 0, 0, 0};
TargetInstance = instance of Win32_NTLogEvent { Category = 14339; CategoryString = "Kerberos
Authentication Service"; ComputerName = "MainDC.vkumov.local"; EventCode = 4768; EventIdentifier
= 4768; EventType = 4; InsertionStrings = {"Administrator", "vkumov.local", "S-1-5-21-
2952046201-2792970045-1866348404-500", "krbtgt", "S-1-5-21-2952046201-2792970045-1866348404-
502", "0x40810010", "0x0", "0x12", "2", "::1", "0", "", "", ""}; Logfile = "Security"; Message =
"A Kerberos authentication ticket (TGT) was requested. \n \nAccount Information: \n\tAccount
Name:\t\tAdministrator \n\tSupplied Realm Name:\tvkumov.local \n\tUser ID:\t\t\tS-1-5-21-
2952046201-2792970045-1866348404-500 \n \nService Information: \n\tService Name:\t\tkrbtgt
\n\tService ID:\t\tS-1-5-21-2952046201-2792970045-1866348404-502 \n \nNetwork Information:
\n\tClient Address:\t\t::1 \n\tClient Port:\t\t0 \n \nAdditional Information: \n\tTicket
Options:\t\t0x40810010 \n\tResult Code:\t\t0x0 \n\tTicket Encryption Type:\t0x12 \n\tPre-
Authentication Type:\t2 \n \nCertificate Information: \n\tCertificate Issuer Name:\t\t
\n\tCertificate Serial Number:\t \n\tCertificate Thumbprint:\t\t \n \nCertificate information is
only provided if a certificate was used for pre-authentication. \n \nPre-authentication types,
ticket options, encryption types and result codes are defined in RFC 4120."; RecordNumber =
918032; SourceName = "Microsoft-Windows-Security-Auditing"; TimeGenerated =
"20170224103621.575178-000"; TimeWritten = "20170224103621.575178-000"; Type = "Audit Success";
}; TIME_CREATED = "131324061825752057"; }; , Identity Mapping.dc-domainname = vkumov.local ,
Identity Mapping.dc-connection-type = Current events , Identity Mapping.probe = WMI , Identity
Mapping.event-local-ip-address = ::1 , Identity Mapping.dc-name = MainDC.vkumov.local , Identity
Mapping.dc-host = MainDC.vkumov.local/10.48.26.52 , Identity Mapping.server = ise22-pic-2 ,
Identity Mapping.event-ip-address = 10.48.26.52 , 2017-02-24 11:36:22,589 DEBUG [Thread-11][]
com.cisco.idc.dc-probe- Received login event. Identity Mapping.ticket = instance of
__InstanceCreationEvent { SECURITY_DESCRIPTOR = {1, 0, 20, 128, 96, 0, 0, 0, 112, 0, 0, 0, 0, 0,
0, 0, 20, 0, 0, 0, 2, 0, 76, 0, 3, 0, 0, 0, 0, 0, 20, 0, 69, 0, 15, 0, 1, 1, 0, 0, 0, 0, 0, 5,
18, 0, 0, 0, 0, 0, 24, 0, 69, 0, 0, 0, 1, 2, 0, 0, 0, 0, 0, 5, 32, 0, 0, 0, 32, 2, 0, 0, 0, 0,
24, 0, 65, 0, 0, 0, 1, 2, 0, 0, 0, 0, 0, 5, 32, 0, 0, 0, 61, 2, 0, 0, 1, 2, 0, 0, 0, 0, 0, 5,
32, 0, 0, 0, 32, 2, 0, 0, 1, 1, 0, 0, 0, 0, 0, 5, 18, 0, 0, 0}; TargetInstance = instance of
Win32_NTLogEvent { Category = 14339; CategoryString = "Kerberos Authentication Service";
ComputerName = "MainDC.vkumov.local"; EventCode = 4768; EventIdentifier = 4768; EventType = 4;
InsertionStrings = {"Administrator", "vkumov.local", "S-1-5-21-2952046201-2792970045-1866348404-
500", "krbtgt", "S-1-5-21-2952046201-2792970045-1866348404-502", "0x40810010", "0x0", "0x12",
"2", "::1", "0", "", "", ""}; Logfile = "Security"; Message = "A Kerberos authentication ticket
(TGT) was requested. \n \nAccount Information: \n\tAccount Name:\t\tAdministrator \n\tSupplied
Realm Name:\tvkumov.local \n\tUser ID:\t\t\tS-1-5-21-2952046201-2792970045-1866348404-500 \n
\nService Information: \n\tService Name:\t\tkrbtgt \n\tService ID:\t\tS-1-5-21-2952046201-
2792970045-1866348404-502 \n \nNetwork Information: \n\tClient Address:\t\t::1 \n\tClient
Port:\t\t0 \n \nAdditional Information: \n\tTicket Options:\t\t0x40810010 \n\tResult
Code:\t\t0x0 \n\tTicket Encryption Type:\t0x12 \n\tPre-Authentication Type:\t2 \n \nCertificate
Information: \n\tCertificate Issuer Name:\t\t \n\tCertificate Serial Number:\t \n\tCertificate
Thumbprint:\t\t \n \nCertificate information is only provided if a certificate was used for pre-
authentication. \n \nPre-authentication types, ticket options, encryption types and result codes
are defined in RFC 4120."; RecordNumber = 918032; SourceName = "Microsoft-Windows-Security-
Auditing"; TimeGenerated = "20170224103621.575178-000"; TimeWritten = "20170224103621.575178-
000"; Type = "Audit Success"; }; TIME_CREATED = "131324061825752057"; }; , Identity Mapping.dc-
domainname = vkumov.local , Identity Mapping.dc-connection-type = Current events , Identity
Mapping.probe = WMI , Identity Mapping.event-local-ip-address = ::1 , Identity Mapping.dc-name =
MainDC.vkumov.local , Identity Mapping.event-user-name = Administrator , Identity Mapping.dc-
host = MainDC.vkumov.local/10.48.26.52 , Identity Mapping.server = ise22-pic-2 , Identity

Mapping.event-ip-address = 10.48.26.52 ,
Example of endpoint check from passive-endpoint.log (in this case the endpoint wasunreacheable from ISE):
2017-02-23 13:48:29,298 INFO [EndPointProbe-Workers-Check-2][] com.cisco.idc.endpoint-probe-
[PsExec-10.48.26.51] is User=vkumov.local/Administrator Still There ? ...
2017-02-23 13:48:32,335 INFO [EndPointProbe-Workers-Check-2][] com.cisco.idc.endpoint-probe-
[PsExec-10.48.26.51] Identity check result is - > Endpoint UNREACHABLE
Common issue: ISE PIC throws "Unable to run executable on <DC name>..." error
If user which is used to join ISE PIC to the domain does not have enough permissions, ISE PICthrows a error during WMI configuration:
Appropriate debugs can be found at ad_agent.log file (Active Directory log level should be set toDEBUG):
26/02/2017 19:15:45,VERBOSE,139954093012736,SMBGSSContextNegotiate: state =
1,lwio/server/smbcommon/smbkrb5.c:460
26/02/2017 19:15:45,VERBOSE,139956055955200,Session 0x7f49bc001430 is eligible for
reaping,lwio/server/rdr/session2.c:290
26/02/2017 19:15:45,VERBOSE,139954101405440,Error at ../../lsass/server/auth-providers/ad-open-
provider/provider-main.c:7503 [code: C0000022],lsass/server/auth-providers/ad-open-
provider/provider-main.c:7503
26/02/2017 19:15:45,VERBOSE,139954101405440,Extended Error code: 60190 (symbol:
LW_ERROR_ISEEXEC_CP_OPEN_REMOTE_FILE),lsass/server/auth-providers/ad-open-provider/provider-
main.c:7627 26/02/2017 19:15:45,VERBOSE,139954101405440,Error at ../../lsass/server/auth-
providers/ad-open-provider/provider-main.c:7628 [code: C0000022],lsass/server/auth-providers/ad-
open-provider/provider-main.c:7628 26/02/2017 19:15:45,VERBOSE,139954101405440,Error code: 5
(symbol: ERROR_ACCESS_DENIED),lsass/server/auth-providers/ad-open-provider/provider-main.c:7782
26/02/2017 19:15:45,VERBOSE,139954101405440,Error code: 5 (symbol:
ERROR_ACCESS_DENIED),lsass/server/auth-providers/ad-open-provider/provider-main.c:7855
26/02/2017 19:15:45,VERBOSE,139954101405440,Error code: 5 (symbol:
ERROR_ACCESS_DENIED),lsass/server/api/api2.c:2713 26/02/2017
19:15:45,VERBOSE,139956064347904,(session:ee880a4e15e682f4-08401b84f371a140) Dropping:
LWMSG_STATUS_PEER_CLOSE,lwmsg/src/peer-task.c:625 26/02/2017
19:15:50,VERBOSE,139956055955200,RdrSocketRelease(0x7f496800b6e0, 38): socket is eligible for
reaping,lwio/server/rdr/socket.c:2239
Actions to take: Re-join ISE PIC nodes to the domain with Domain Administrator credentials oradd the user which is used for join operation to Domain Admins group in the AD.