configuring a cisco unified communications manager … · • cisco tcs 7.x with a content server...
TRANSCRIPT

C H A P T E R 3
Configuring a Cisco Unified Communications Manager SIP Trunk with a Cisco TelePresence Content ServerThis document includes instructions for configuring a Cisco Unified Communications Manager version 9.1.2,10.5,11.0 and 11.5 Session Initiation Protocol (SIP) trunk with Cisco TelePresence Content Server (Content Server) Release 7.x.
Before integrating Cisco Content Server 7.x with CUCM through a SIP trunk, confirm that the Cisco Content Server is ready for the integration completing the applicable tasks in the Content Server installation guide. See the
http://www.cisco.com/c/en/us/td/docs/telepresence/tcs/7_1/install/tcs-7-1-vm-install.html
CUCM Integration with Content Server 7.xAfter installing the CUCM software is installed, complete these procedures in the following order:
• CUCM Integration with Cisco Content Server Standalone
• Cisco TCS 7.x with a Content Server cluster configured
Cisco Content Server Standalone
To create a SIP Trunk between CUCM and Content Server.
1. Create the SIP Trunk Security Profile
2. To Create the SIP Profile
3. Create the SIP Trunk
Complete these steps in the order given:
Create the SIP Trunk Security Profile
Step 1 Login to the Cisco Unified Communication Manager Administration Interface.
Step 2 Choose Security > SIP Trunk Security Profile.
Step 3 On the Find and List SIP Trunk Security Profiles page, click Add New.
3-21
Chapter 3 Configuring a Cisco Unified Communications Manager SIP Trunk with a Cisco TelePresenceCUCM Integration with Content Server 7.x
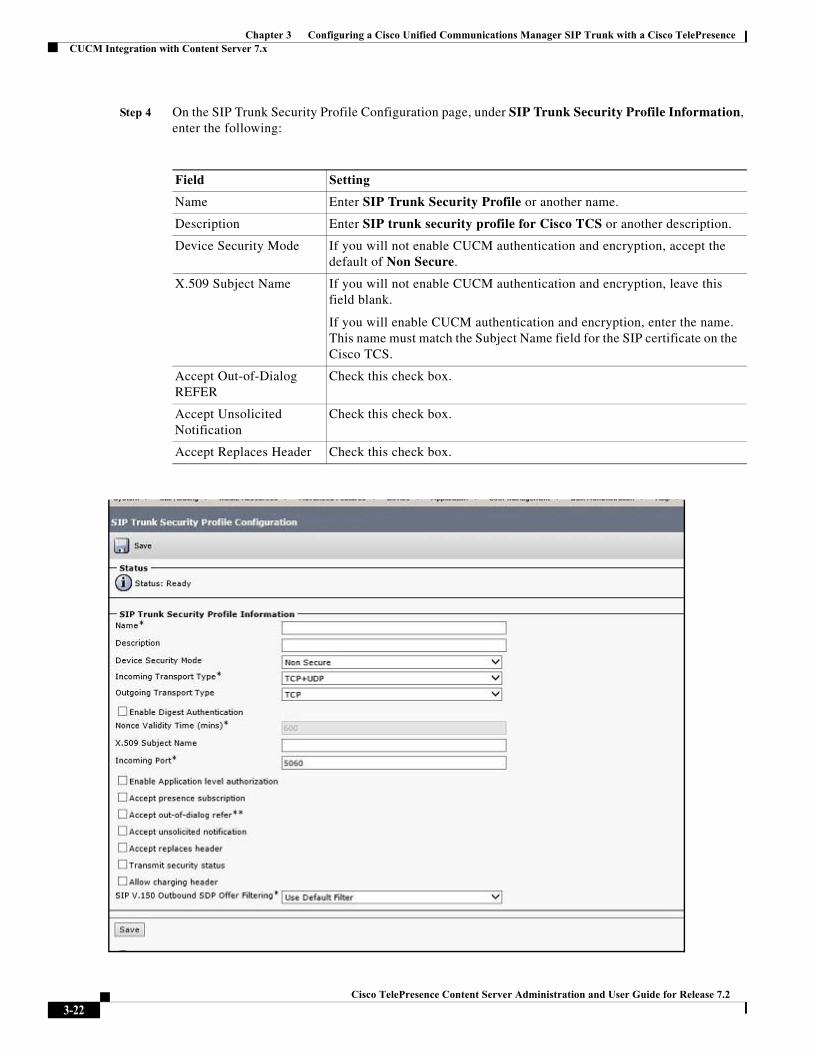
Step 4 On the SIP Trunk Security Profile Configuration page, under SIP Trunk Security Profile Information, enter the following:
Field Setting
Name Enter SIP Trunk Security Profile or another name.
Description Enter SIP trunk security profile for Cisco TCS or another description.
Device Security Mode If you will not enable CUCM authentication and encryption, accept the default of Non Secure.
X.509 Subject Name If you will not enable CUCM authentication and encryption, leave this field blank.
If you will enable CUCM authentication and encryption, enter the name. This name must match the Subject Name field for the SIP certificate on the Cisco TCS.
Accept Out-of-Dialog REFER
Check this check box.
Accept Unsolicited Notification
Check this check box.
Accept Replaces Header Check this check box.
3-22Cisco TelePresence Content Server Administration and User Guide for Release 7.2
Chapter 3 Configuring a Cisco Unified Communications Manager SIP Trunk with a Cisco TelePresence CUCM Integration with Content Server 7.x
Step 5 Click Save.
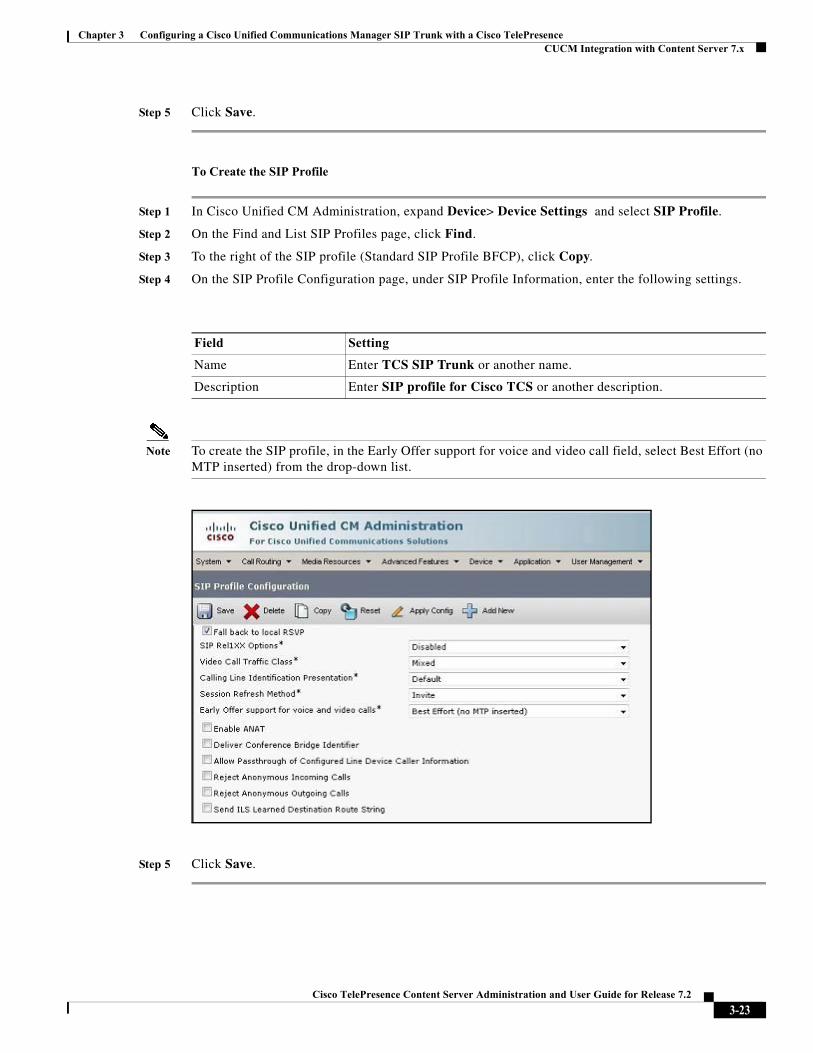
To Create the SIP Profile
Step 1 In Cisco Unified CM Administration, expand Device> Device Settings and select SIP Profile.
Step 2 On the Find and List SIP Profiles page, click Find.
Step 3 To the right of the SIP profile (Standard SIP Profile BFCP), click Copy.
Step 4 On the SIP Profile Configuration page, under SIP Profile Information, enter the following settings.
Note To create the SIP profile, in the Early Offer support for voice and video call field, select Best Effort (no MTP inserted) from the drop-down list.
Step 5 Click Save.
Field Setting
Name Enter TCS SIP Trunk or another name.
Description Enter SIP profile for Cisco TCS or another description.
3-23Cisco TelePresence Content Server Administration and User Guide for Release 7.2

Chapter 3 Configuring a Cisco Unified Communications Manager SIP Trunk with a Cisco TelePresenceCUCM Integration with Content Server 7.x
Create the SIP Trunk
Step 1 In Cisco Unified CM Administration, expand Device and click Trunk.
Step 2 On the Find and List Trunks page, click Add New.
Step 3 On the Trunk Configuration page, in the Trunk Type field, click SIP Trunk.
Step 4 In the Device Protocol field, click SIP and click Next.
Step 5 Under Device Information, enter the following:
Step 6 (Optional) If user phones are contained in a calling search space, under Inbound Calls, enter the following.
Field Setting
Device Name Enter TCS_SIP_Trunk or another name.
Description Enter SIP trunk for Cisco TCS or another description.
SRTP Allowed If you will enable CUCM authentication and encryption, check this check box.
Field Setting
Calling Search Space Select the name of the calling search space that contains the user phones.
Redirecting Diversion Header Delivery - Inbound Check this check box.
3-24Cisco TelePresence Content Server Administration and User Guide for Release 7.2
Chapter 3 Configuring a Cisco Unified Communications Manager SIP Trunk with a Cisco TelePresence CUCM Integration with Content Server 7.x
Step 7 Under SIP Information, enter the following
Step 8 Click Save.
SIP Trunk created successfully.
Step 9 Click Reset.
SIP Route pattern Configuration Setting:
There are two way to configure call Routing for a SIP Trunk:
1. Using Route pattern (For IP Address/ Domain based Routing).
• Recording Alias URI Suffix on TCS should match with suffix based SIP route pattern that configured on CUCM.
Eg: If SIP route pattern configured on CUCM is ‘@tcs-cisco.com’ then the recording alias URI configured on TCS must be ‘[email protected]’.
2. Using Number Based Routing.
• Recording Alias URI Suffix on TCS should match with IP or FQDN configured on CUCM SIP trunk created for TCS.
Eg: If number based route pattern configured on CUCM is 555X, then the recording alias URI configured on TCS must be ‘555X@<IP’ or ‘FQDN configured on CUCM Sip Trunk for TCS>’.
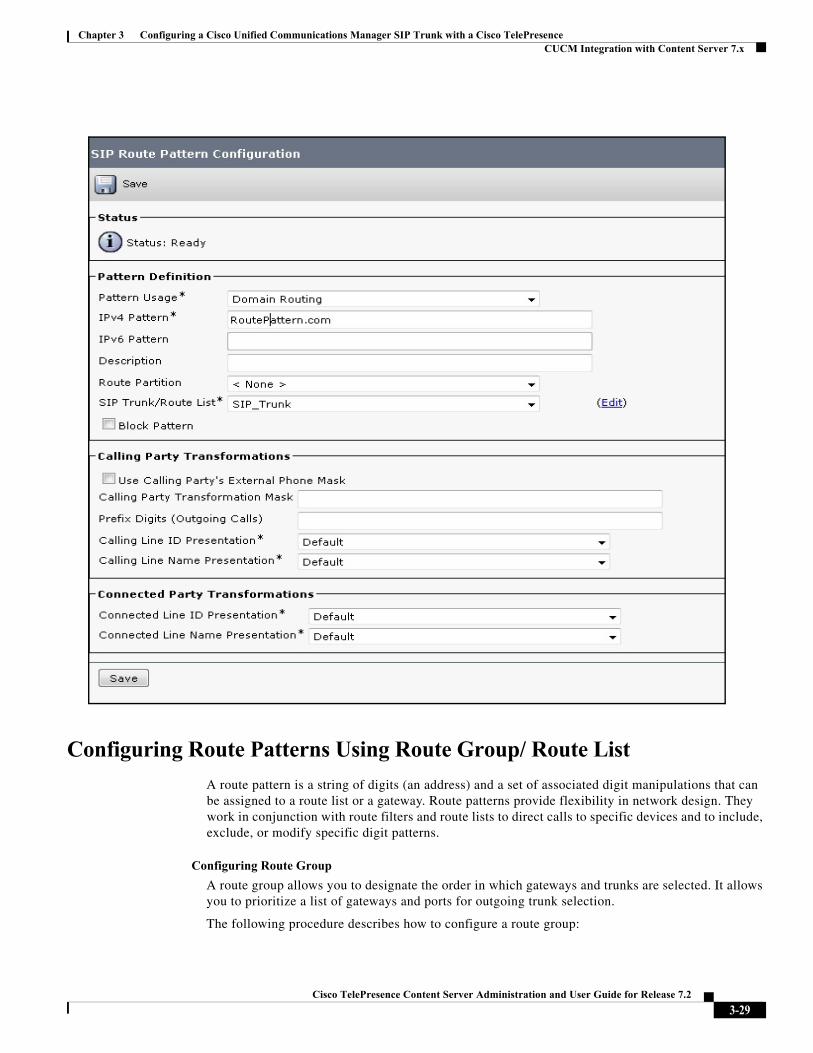
In Cisco Unified Communications Manager Administration, use the Call Routing > SIP Route Pattern menu path to configure SIP route patterns.
CUCM uses SIP route patterns to route or block both internal and external calls.
The domain name or IP address provides the basis for routing. The administrator can add domains, IP addresses, and IP network (subnet) addresses and associate them to SIP trunks (only). This method allows requests that are destined for these domains to be routed through particular SIP trunk interfaces.
Field Setting
Destination Address Enter the IP address of the Cisco TCS to which CUCM will connect.
Destination Port We recommend that you accept the default of 5060.
SIP Trunk Security Profile
Select the name of the SIP trunk security profile that you created in the “Create the SIP Trunk Security Profile” procedure on page 3-21. For example, click “Cisco TCS SIP Trunk Security Profile.”
Rerouting Calling Search Space
Select the name of the calling search space that is used by user phones.
Out-of-Dialog Refer Calling Search Space
Select the name of the calling search space that is used by user phones.
SIP Profile Select the name of the SIP profile that you created in the “To Create the SIP Profile” procedure on page 3-23. For example, select “Cisco TCS 7.x SIP Profile.”
3-25Cisco TelePresence Content Server Administration and User Guide for Release 7.2

Chapter 3 Configuring a Cisco Unified Communications Manager SIP Trunk with a Cisco TelePresenceCUCM Integration with Content Server 7.x
Note Because no default SIP route patterns exist in CUCM, the administrator must configure them. Domain name examples: cisco.com, my-pc.cisco.com, *.com, rtp-ccm[1-5].cisco.com Valid characters for domain names: [, -, ., 0-9, A-Z, a-z, *, and ]. IPv4 address examples: 172.18.201.119 or 172.18.201.119/32 (explicit IP host address); 172.18.0.0/16 (IP subnet); 172.18.201.18/21 (IP subnet). Valid characters for IP addresses: 0-9, ., and /
Field Description
Pattern Usage (Required) From the drop-down list, choose either Domain Routing or IP Address Routing.
IPv4 Pattern (Required) Enter the domain, sub-domain, IPv4 address, or IP subnetwork address.
If the SIP trunk supports IPv6 or both IPv4 and IPv6 (dual-stack mode), configure the IPv6 Pattern in addition to the IPv4 pattern.
Note For the IP subnetwork address, in Classless Inter-Domain Routing (CIDR) notation, X.X.X.X/Y; where Y is the network prefix that denotes the number of bits in the address that will be the network address.
IPv6 Pattern Cisco Unified Communications Manager uses SIP route patterns to route or block both internal and external calls. The IPv6 address in this field provides the basis for routing internal and external calls to SIP trunks that support IPv6.
If the SIP trunk supports IPv6 or both IPv4 and IPv6 (dual-stack mode), configure the IPv4 Pattern in addition to the IPv6 Pattern.
Description For this optional entry, enter a description of the SIP Route Pattern. The description can include up to 50 characters in any language, but it cannot include double-quotes ("), percentage sign (%), ampersand (&), or angle brackets (<>).
Route Partition If you want to use a partition to restrict access to the SIP route pattern, choose the desired partition from the drop-down list box. If you do not want to restrict access to the SIP route pattern, choose <None> for the partition.You can configure the number of partitions that display in this drop-down list box by using the Max List Box Items enterprise parameter. If more than 250 partitions are specified by using the Max List Box Items enterprise parameter, the Find button displays next to the drop-down list box. Click the Find button to display the Select Partition window. Enter a partial partition name in the List items where Name contains field. Click the desired partition name in the list of partitions that displays in the Select item to use box and click Add Selected.
SIP Trunk (Required) Use the drop-down list to choose the SIP trunk to which the SIP route pattern should be associated.
Block Pattern If you do not want this pattern to be used for routing calls, click the Block Pattern check box.
Calling Party Transformation
3-26Cisco TelePresence Content Server Administration and User Guide for Release 7.2
Chapter 3 Configuring a Cisco Unified Communications Manager SIP Trunk with a Cisco TelePresence CUCM Integration with Content Server 7.x
Use Calling Party's External Phone Mask
Check the check box if you want the full, external phone number to be used for calling line identification (CLID) on outgoing calls. You may also configure an External Phone Number Mask on all phone devices.
Calling Party Transformation Mask
Enter a transformation mask value. Valid entries include the digits 0 through 9 and the wildcard characters X, asterisk (*), and octothorpe (#). If this field is blank and the preceding field is not checked, no calling party transformation takes place.
Prefix Digits (Outgoing Calls)
Enter prefix digits in the Prefix Digits (Outgoing Calls) field. Valid entries include the digits 0 through 9 and the wildcard characters asterisk (*) and octothorpe (#).
Note The appended prefix digit does not affect which directory numbers route to the assigned device.
Calling Line ID Presentation
Cisco Unified Communications Manager uses calling line ID presentation (CLIP/CLIR) as a supplementary service to allow or restrict the originating caller phone number on a call-by-call basis.
Choose whether you want the Cisco Unified Communications Manager to allow or restrict the display of the calling party phone number on the called party phone display for this SIP route pattern.
Choose Default if you do not want to change calling line ID presentation. Choose Allowed if you want Cisco Unified Communications Manager to allow the display of the calling number. Choose Restricted if you want Cisco Unified Communications Manager to block the display of the calling number.
Calling Line Name Presentation
Cisco Unified Communications Manager uses calling name presentation (CNIP/CNIR) as a supplementary service to allow or restrict the originating caller name on a call-by-call basis.
Choose whether you want the Cisco Unified Communications Manager to allow or restrict the display of the calling party name on the called party phone display for this SIP route pattern.
Choose Default if you do not want to change calling name presentation. Choose Allowed if you want Cisco Unified Communications Manager to display the calling name information. Choose Restricted if you want Cisco Unified Communications Manager to block the display of the calling name information.
Connected Party Transformations
Field Description
3-27Cisco TelePresence Content Server Administration and User Guide for Release 7.2
Chapter 3 Configuring a Cisco Unified Communications Manager SIP Trunk with a Cisco TelePresenceCUCM Integration with Content Server 7.x
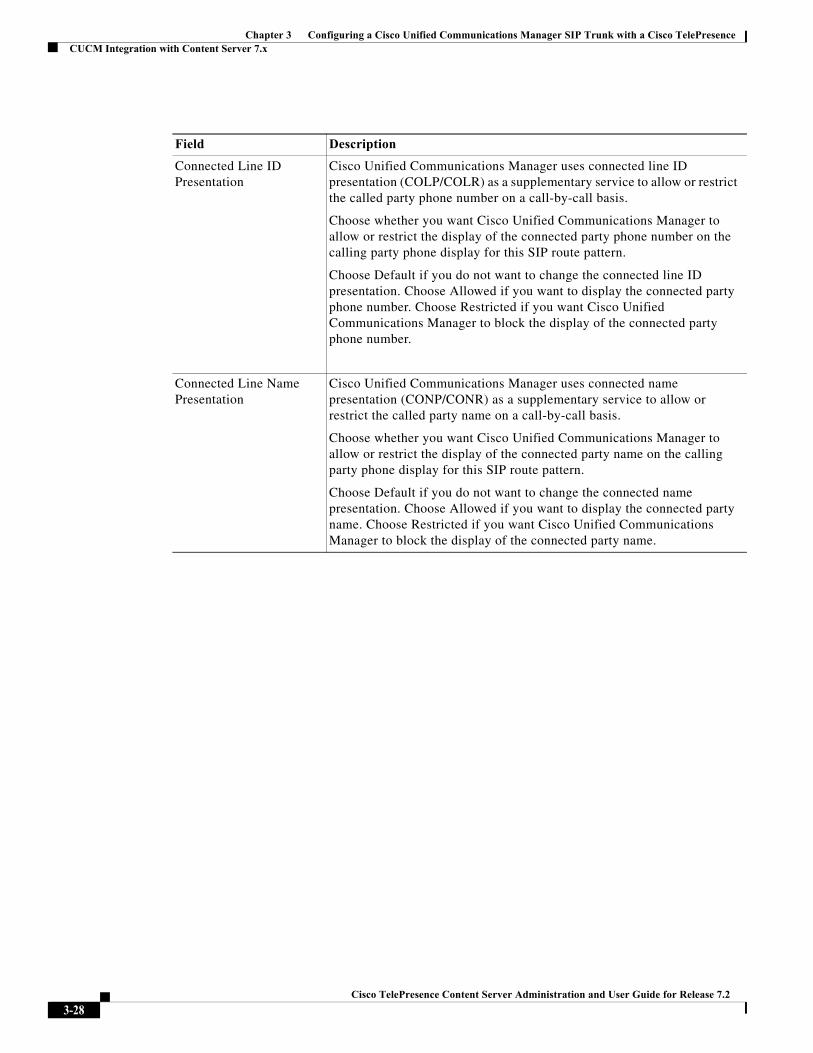
Connected Line ID Presentation
Cisco Unified Communications Manager uses connected line ID presentation (COLP/COLR) as a supplementary service to allow or restrict the called party phone number on a call-by-call basis.
Choose whether you want Cisco Unified Communications Manager to allow or restrict the display of the connected party phone number on the calling party phone display for this SIP route pattern.
Choose Default if you do not want to change the connected line ID presentation. Choose Allowed if you want to display the connected party phone number. Choose Restricted if you want Cisco Unified Communications Manager to block the display of the connected party phone number.
Connected Line Name Presentation
Cisco Unified Communications Manager uses connected name presentation (CONP/CONR) as a supplementary service to allow or restrict the called party name on a call-by-call basis.
Choose whether you want Cisco Unified Communications Manager to allow or restrict the display of the connected party name on the calling party phone display for this SIP route pattern.
Choose Default if you do not want to change the connected name presentation. Choose Allowed if you want to display the connected party name. Choose Restricted if you want Cisco Unified Communications Manager to block the display of the connected party name.
Field Description
3-28Cisco TelePresence Content Server Administration and User Guide for Release 7.2
Chapter 3 Configuring a Cisco Unified Communications Manager SIP Trunk with a Cisco TelePresence CUCM Integration with Content Server 7.x
Configuring Route Patterns Using Route Group/ Route List
A route pattern is a string of digits (an address) and a set of associated digit manipulations that can be assigned to a route list or a gateway. Route patterns provide flexibility in network design. They work in conjunction with route filters and route lists to direct calls to specific devices and to include, exclude, or modify specific digit patterns.
Configuring Route Group
A route group allows you to designate the order in which gateways and trunks are selected. It allows you to prioritize a list of gateways and ports for outgoing trunk selection.
The following procedure describes how to configure a route group:
3-29Cisco TelePresence Content Server Administration and User Guide for Release 7.2
Chapter 3 Configuring a Cisco Unified Communications Manager SIP Trunk with a Cisco TelePresenceCUCM Integration with Content Server 7.x
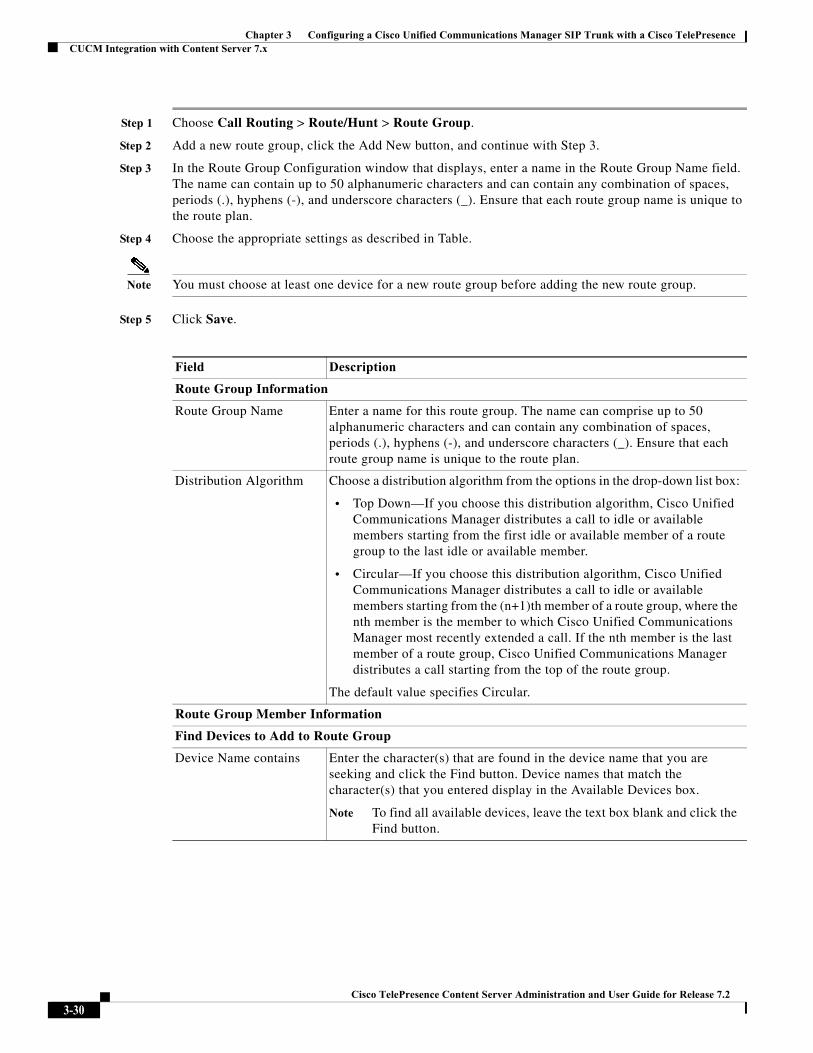
Step 1 Choose Call Routing > Route/Hunt > Route Group.
Step 2 Add a new route group, click the Add New button, and continue with Step 3.
Step 3 In the Route Group Configuration window that displays, enter a name in the Route Group Name field. The name can contain up to 50 alphanumeric characters and can contain any combination of spaces, periods (.), hyphens (-), and underscore characters (_). Ensure that each route group name is unique to the route plan.
Step 4 Choose the appropriate settings as described in Table.
Note You must choose at least one device for a new route group before adding the new route group.
Step 5 Click Save.
Field Description
Route Group Information
Route Group Name Enter a name for this route group. The name can comprise up to 50 alphanumeric characters and can contain any combination of spaces, periods (.), hyphens (-), and underscore characters (_). Ensure that each route group name is unique to the route plan.
Distribution Algorithm Choose a distribution algorithm from the options in the drop-down list box:
• Top Down—If you choose this distribution algorithm, Cisco Unified Communications Manager distributes a call to idle or available members starting from the first idle or available member of a route group to the last idle or available member.
• Circular—If you choose this distribution algorithm, Cisco Unified Communications Manager distributes a call to idle or available members starting from the (n+1)th member of a route group, where the nth member is the member to which Cisco Unified Communications Manager most recently extended a call. If the nth member is the last member of a route group, Cisco Unified Communications Manager distributes a call starting from the top of the route group.
The default value specifies Circular.
Route Group Member Information
Find Devices to Add to Route Group
Device Name contains Enter the character(s) that are found in the device name that you are seeking and click the Find button. Device names that match the character(s) that you entered display in the Available Devices box.
Note To find all available devices, leave the text box blank and click the Find button.
3-30Cisco TelePresence Content Server Administration and User Guide for Release 7.2
Chapter 3 Configuring a Cisco Unified Communications Manager SIP Trunk with a Cisco TelePresence CUCM Integration with Content Server 7.x
Available Devices Choose a device in the Available Devices list box and add it to the Selected Devices list box by clicking Add to Route Group.
If the route group contains a gateway that uses the QSIG protocol, only gateways that use the QSIG protocol display in the list. If the route group contains a gateway that uses the non-QSIG protocol, gateways that use the controlled intercluster trunks, which are QSIG protocol do not display in the list.
If you included the route group in a route list that contains QSIG gateways, the H.323 gateways do not display in the list.
Port(s) If this device supports individually configurable ports, choose the port. (Devices that allow you to choose individual ports include Cisco Access Analog and Cisco MGCP Analog gateways and T1 CAS.) Otherwise, choose the default value (Allor None Available, depending upon the device that is chosen). For a device that has no ports available (None Available), the device may be already added to the Route Group, or cannot be added to the route group.
Current Route Group Members
Selected Devices To change the priority of a device, choose a device name in the Selected Devices list box. Move the device up or down in the list by clicking the arrows on the right side of the list box.
To reverse the priority order of the devices in the Selected Devices list box, click Reverse Order of Selected Devices.
For more information about the order of devices in a route group, see “Route Plan Overview” in the Cisco Unified Communications Manager System Guide.
Removed Device Choose a device in the Selected Devices list box and add it to the Removed Devices list box by clicking the down arrow button between the two list boxes.
Note You must leave at least one device in a route group.
Route Group Members
List of Device This pane displays links to the devices that have been added to this route group. Click one of the device names to go to the configuration window for that particular device.
Note When you are adding a new route group, this list does not display until you save the route group.
Field Description
3-31Cisco TelePresence Content Server Administration and User Guide for Release 7.2

Chapter 3 Configuring a Cisco Unified Communications Manager SIP Trunk with a Cisco TelePresenceCUCM Integration with Content Server 7.x
Route List Configuration
A route list associates a set of route groups in a specified priority order. A route list then associates with one or more route patterns and determines the order in which those route groups are accessed. The order controls the progress of the search for available devices for outgoing calls.
A route list can contain only route groups.
Each route list should have at least one route group. Each route group includes at least one device, such as a gateway, that is available. Based on device type, Cisco Unified Communications Manager can choose some, or all, ports as resources in each route group. Some devices, such as digital access, only allow you to choose all ports.
A Route Group can be added to any number of Route Lists.
The following procedure describes how to configure a route list:
Step 1 Choose Call Routing > Route/Hunt > Route List.
Step 2 Click Add New.
Step 3 In the Route List Name field, enter a name. The name can comprise up to 50 alphanumeric characters and can contain any combination of spaces, periods (.), hyphens (-), and underscore characters (_). Ensure that each route list name is unique to the route plan.
Step 4 From the drop-down list box, choose a Cisco Unified Communications Manager group.
Note The Route List registers with the first Cisco Unified Communications Manager in the group which is its primary Cisco Unified Communications Manager.
Note If you choose a Cisco Unified Communications Manager group that has only one Cisco Unified Communications Manager configured, you receive the following warning:
Warning The selected Cisco Unified Communications Manager Group has only one Cisco Unified Communications Manager configured. For the control process to have redundancy protection, please select a Cisco Unified Communications Manager Group with more than one Cisco Unified Communications Manager
Step 5 Click Save.
Note A popup message reminds you that you must add at least one route group to this route list for it to accept calls.
The Route List Configuration window displays the newly added route list.
Step 6 By default, the system checks the Enable this Route List check box for the new route list.
Note If you want to disable this route list, uncheck this check box. A popup window explains that calls in progress are not affected, but this route list will not accept additional calls.
Step 7 Add at least one route group to the new route list.
3-32Cisco TelePresence Content Server Administration and User Guide for Release 7.2
Chapter 3 Configuring a Cisco Unified Communications Manager SIP Trunk with a Cisco TelePresence CUCM Integration with Content Server 7.x
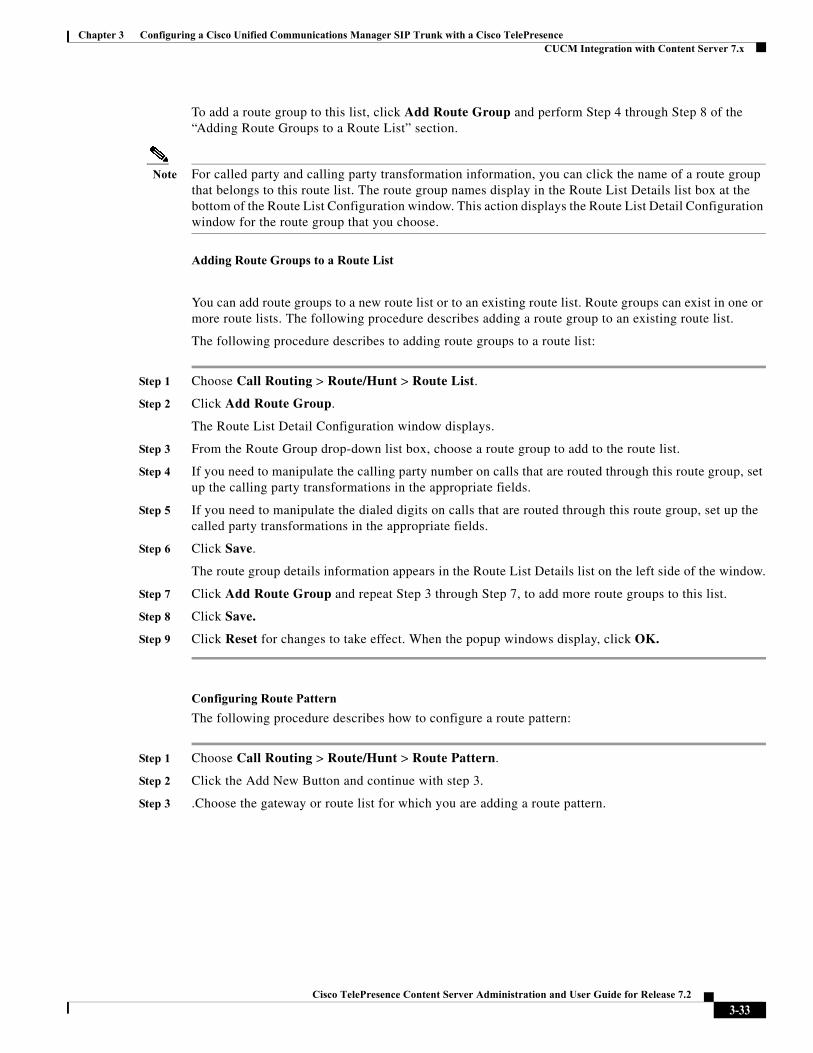
To add a route group to this list, click Add Route Group and perform Step 4 through Step 8 of the “Adding Route Groups to a Route List” section.
Note For called party and calling party transformation information, you can click the name of a route group that belongs to this route list. The route group names display in the Route List Details list box at the bottom of the Route List Configuration window. This action displays the Route List Detail Configuration window for the route group that you choose.
Adding Route Groups to a Route List
You can add route groups to a new route list or to an existing route list. Route groups can exist in one or more route lists. The following procedure describes adding a route group to an existing route list.
The following procedure describes to adding route groups to a route list:
Step 1 Choose Call Routing > Route/Hunt > Route List.
Step 2 Click Add Route Group.
The Route List Detail Configuration window displays.
Step 3 From the Route Group drop-down list box, choose a route group to add to the route list.
Step 4 If you need to manipulate the calling party number on calls that are routed through this route group, set up the calling party transformations in the appropriate fields.
Step 5 If you need to manipulate the dialed digits on calls that are routed through this route group, set up the called party transformations in the appropriate fields.
Step 6 Click Save.
The route group details information appears in the Route List Details list on the left side of the window.
Step 7 Click Add Route Group and repeat Step 3 through Step 7, to add more route groups to this list.
Step 8 Click Save.
Step 9 Click Reset for changes to take effect. When the popup windows display, click OK.
Configuring Route Pattern
The following procedure describes how to configure a route pattern:
Step 1 Choose Call Routing > Route/Hunt > Route Pattern.
Step 2 Click the Add New Button and continue with step 3.
Step 3 .Choose the gateway or route list for which you are adding a route pattern.
3-33Cisco TelePresence Content Server Administration and User Guide for Release 7.2
Chapter 3 Configuring a Cisco Unified Communications Manager SIP Trunk with a Cisco TelePresenceCUCM Integration with Content Server 7.x
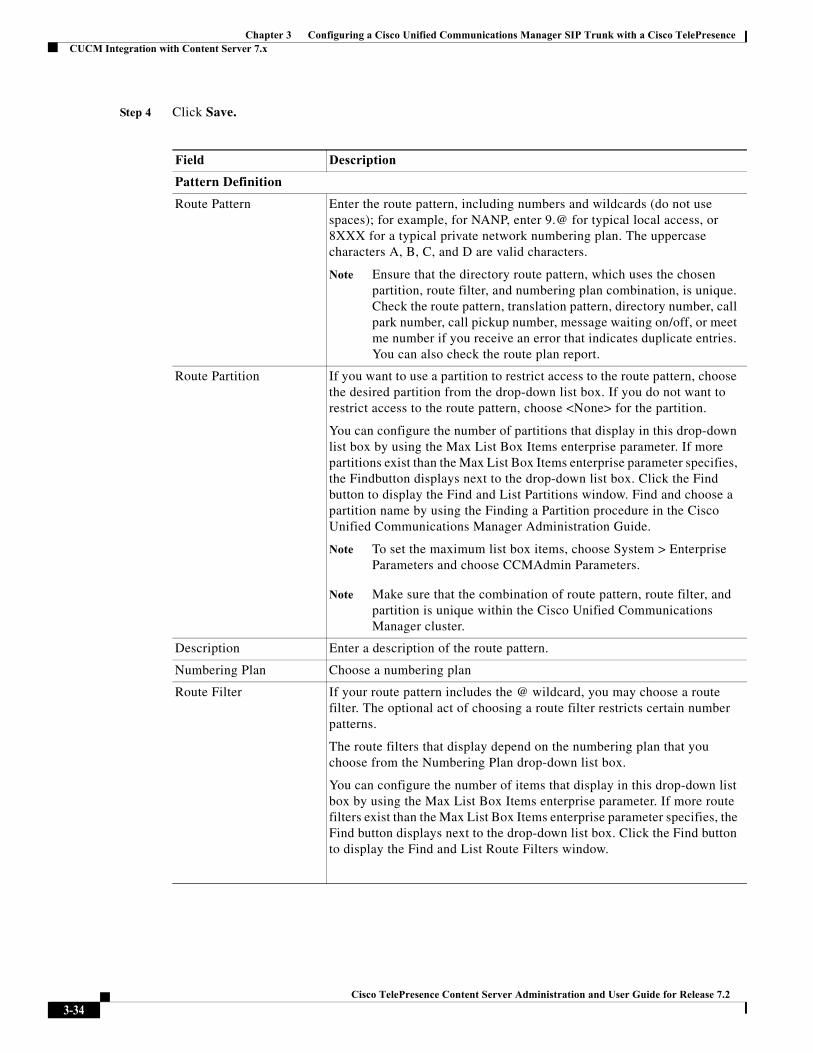
Step 4 Click Save.
Field Description
Pattern Definition
Route Pattern Enter the route pattern, including numbers and wildcards (do not use spaces); for example, for NANP, enter 9.@ for typical local access, or 8XXX for a typical private network numbering plan. The uppercase characters A, B, C, and D are valid characters.
Note Ensure that the directory route pattern, which uses the chosen partition, route filter, and numbering plan combination, is unique. Check the route pattern, translation pattern, directory number, call park number, call pickup number, message waiting on/off, or meet me number if you receive an error that indicates duplicate entries. You can also check the route plan report.
Route Partition If you want to use a partition to restrict access to the route pattern, choose the desired partition from the drop-down list box. If you do not want to restrict access to the route pattern, choose <None> for the partition.
You can configure the number of partitions that display in this drop-down list box by using the Max List Box Items enterprise parameter. If more partitions exist than the Max List Box Items enterprise parameter specifies, the Findbutton displays next to the drop-down list box. Click the Find button to display the Find and List Partitions window. Find and choose a partition name by using the Finding a Partition procedure in the Cisco Unified Communications Manager Administration Guide.
Note To set the maximum list box items, choose System > Enterprise Parameters and choose CCMAdmin Parameters.
Note Make sure that the combination of route pattern, route filter, and partition is unique within the Cisco Unified Communications Manager cluster.
Description Enter a description of the route pattern.
Numbering Plan Choose a numbering plan
Route Filter If your route pattern includes the @ wildcard, you may choose a route filter. The optional act of choosing a route filter restricts certain number patterns.
The route filters that display depend on the numbering plan that you choose from the Numbering Plan drop-down list box.
You can configure the number of items that display in this drop-down list box by using the Max List Box Items enterprise parameter. If more route filters exist than the Max List Box Items enterprise parameter specifies, the Find button displays next to the drop-down list box. Click the Find button to display the Find and List Route Filters window.
3-34Cisco TelePresence Content Server Administration and User Guide for Release 7.2
Chapter 3 Configuring a Cisco Unified Communications Manager SIP Trunk with a Cisco TelePresence CUCM Integration with Content Server 7.x
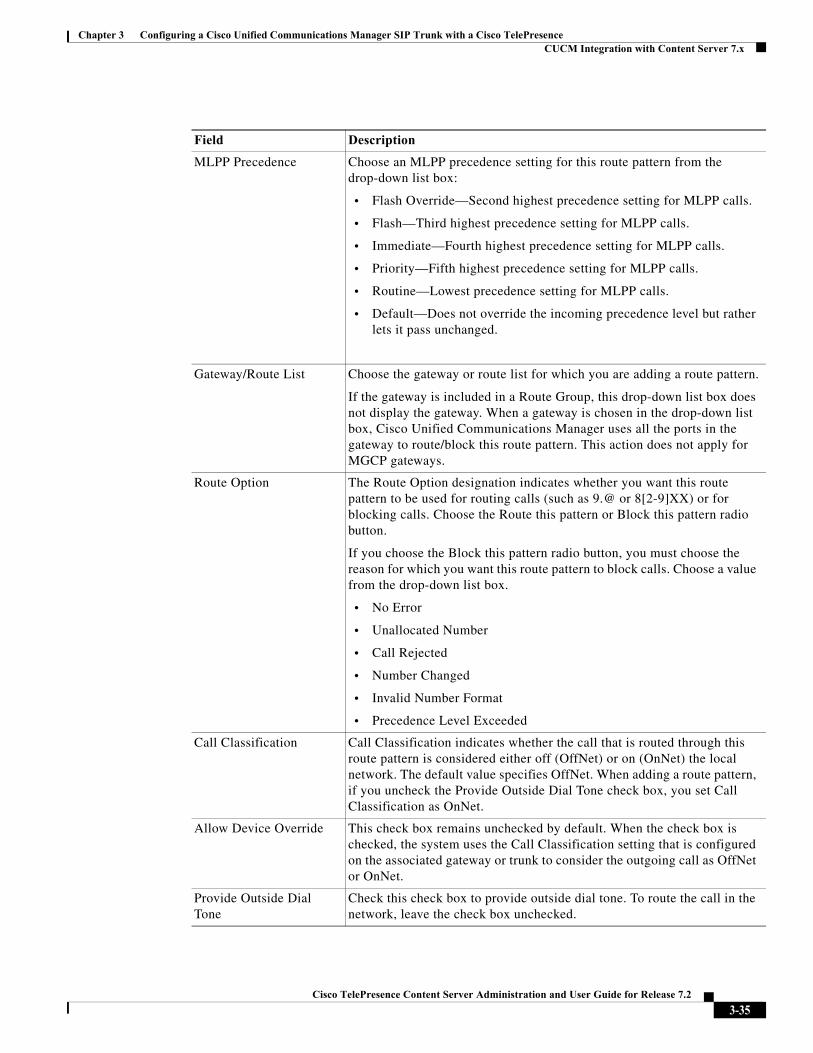
MLPP Precedence Choose an MLPP precedence setting for this route pattern from the drop-down list box:
• Flash Override—Second highest precedence setting for MLPP calls.
• Flash—Third highest precedence setting for MLPP calls.
• Immediate—Fourth highest precedence setting for MLPP calls.
• Priority—Fifth highest precedence setting for MLPP calls.
• Routine—Lowest precedence setting for MLPP calls.
• Default—Does not override the incoming precedence level but rather lets it pass unchanged.
Gateway/Route List Choose the gateway or route list for which you are adding a route pattern.
If the gateway is included in a Route Group, this drop-down list box does not display the gateway. When a gateway is chosen in the drop-down list box, Cisco Unified Communications Manager uses all the ports in the gateway to route/block this route pattern. This action does not apply for MGCP gateways.
Route Option The Route Option designation indicates whether you want this route pattern to be used for routing calls (such as 9.@ or 8[2-9]XX) or for blocking calls. Choose the Route this pattern or Block this pattern radio button.
If you choose the Block this pattern radio button, you must choose the reason for which you want this route pattern to block calls. Choose a value from the drop-down list box.
• No Error
• Unallocated Number
• Call Rejected
• Number Changed
• Invalid Number Format
• Precedence Level Exceeded
Call Classification Call Classification indicates whether the call that is routed through this route pattern is considered either off (OffNet) or on (OnNet) the local network. The default value specifies OffNet. When adding a route pattern, if you uncheck the Provide Outside Dial Tone check box, you set Call Classification as OnNet.
Allow Device Override This check box remains unchecked by default. When the check box is checked, the system uses the Call Classification setting that is configured on the associated gateway or trunk to consider the outgoing call as OffNet or OnNet.
Provide Outside Dial Tone
Check this check box to provide outside dial tone. To route the call in the network, leave the check box unchecked.
Field Description
3-35Cisco TelePresence Content Server Administration and User Guide for Release 7.2

Chapter 3 Configuring a Cisco Unified Communications Manager SIP Trunk with a Cisco TelePresenceCUCM Integration with Content Server 7.x
Allow Overlap Sending With overlap sending enabled, when Cisco Unified Communications Manager passes a call to the PSTN, it relies on overlap sending in the PSTN to determine how many digits to collect and where to route the call. Check this check box for each route pattern that you consider to be assigned to a gateway or route list that routes the calls to a PSTN that supports overlap sending.
The CMC and FAC features do not support overlap sending because the Cisco Unified Communications Manager cannot determine when to prompt the user for the code. If you check the Require Forced Authorization Code or the Require Client Matter Code check box, the Allow Overlap Sending check box becomes disabled.
Urgent Priority If the dial plan contains overlapping route patterns, Cisco Unified Communications Manager would not route the call until the interdigit timer expires (even if it is possible to dial a sequence of digits to choose a current match). Check this check box to interrupt interdigit timing when Cisco Unified Communications Manager must route a call immediately.
Require Forced Authorization Code
If you want to use forced authorization codes with this route pattern, check this check box.
The FAC feature does not support overlap sending because the Cisco Unified Communications Manager cannot determine when to prompt the user for the code. If you check the Allow Overlap Sending check box, the Require Forced Authorization Code check box becomes disabled.
Authorization Level Enter the authorization level for the route pattern. The number that you specify in this field determines the minimum authorization level that is needed to successfully route a call through this route pattern.
To activate the authorization code, you must check the Require Forced Authorization Code. If you do not check the check box, a message displays when you insert the route pattern that indicates that the authorization code cannot be activated. To activate the code, click Cancel, check the Require Forced Authorization Code check box, and click Insert. To activate the code at a later time, click OK.
Require Client Matter Code
If you want to use client matter codes with this route pattern, check this check box.
The CMC feature does not support overlap sending because the Cisco Unified Communications Manager cannot determine when to prompt the user for the code. If you check the Allow Overlap Sending check box, the Require Client Matter Code check box become disabled.
Calling Party Transformations
Field Description
3-36Cisco TelePresence Content Server Administration and User Guide for Release 7.2

Chapter 3 Configuring a Cisco Unified Communications Manager SIP Trunk with a Cisco TelePresence CUCM Integration with Content Server 7.x
Use Calling Party's External Phone Number Mask
Check the check box if you want the full, external phone number to be used for calling line identification (CLID) on outgoing calls. You may also configure an External Phone Number Mask on all phone devices.
Note The calling party transformation settings that are assigned to the route groups in a route list override any calling party transformation settings that are assigned to a route pattern that is associated with that route list.
Calling Party Transform Mask
Enter a transformation mask value. Valid entries for the NANP include the digits 0 through 9; the wildcard characters X, asterisk (*), and octothorpe (#); the uppercase characters A, B, C, and D; and blank. If this field is blank and the preceding field is not checked, no calling party transformation takes place.
Prefix Digits (Outgoing Calls)
Enter prefix digits in the Prefix Digits (Outgoing Calls) field. Valid entries for the NANP include the digits 0 through 9; the wildcard characters asterisk (*) and octothorpe (#); the uppercase characters A, B, C, and D; and blank.
Note The appended prefix digit does not affect which directory numbers route to the assigned device.
Calling Line ID Presentation
Cisco Unified Communications Manager uses calling line ID presentation (CLIP/CLIR) as a supplementary service to allow or restrict the originating caller phone number on a call-by-call basis.
Choose whether you want the Cisco Unified Communications Manager to allow or restrict the display of the calling party phone number on the called party phone display for this route pattern.
Choose Default if you do not want to change calling line ID presentation. Choose Allowed if you want Cisco Unified Communications Manager to allow the display of the calling number. Choose Restricted if you want Cisco Unified Communications Manager to block the display of the calling number.
Calling Name Presentation
Cisco Unified Communications Manager uses calling name presentation (CNIP/CNIR) as a supplementary service to allow or restrict the originating caller name on a call-by-call basis.
Choose whether you want the Cisco Unified Communications Manager to allow or restrict the display of the calling party name on the called party phone display for this route pattern.
Choose Default if you do not want to change calling name presentation. Choose Allowed if you want Cisco Unified Communications Manager to display the calling name information. Choose Restricted if you want Cisco Unified Communications Manager to block the display of the calling name information.
Connected Party Transformations
Field Description
3-37Cisco TelePresence Content Server Administration and User Guide for Release 7.2
Chapter 3 Configuring a Cisco Unified Communications Manager SIP Trunk with a Cisco TelePresenceCUCM Integration with Content Server 7.x
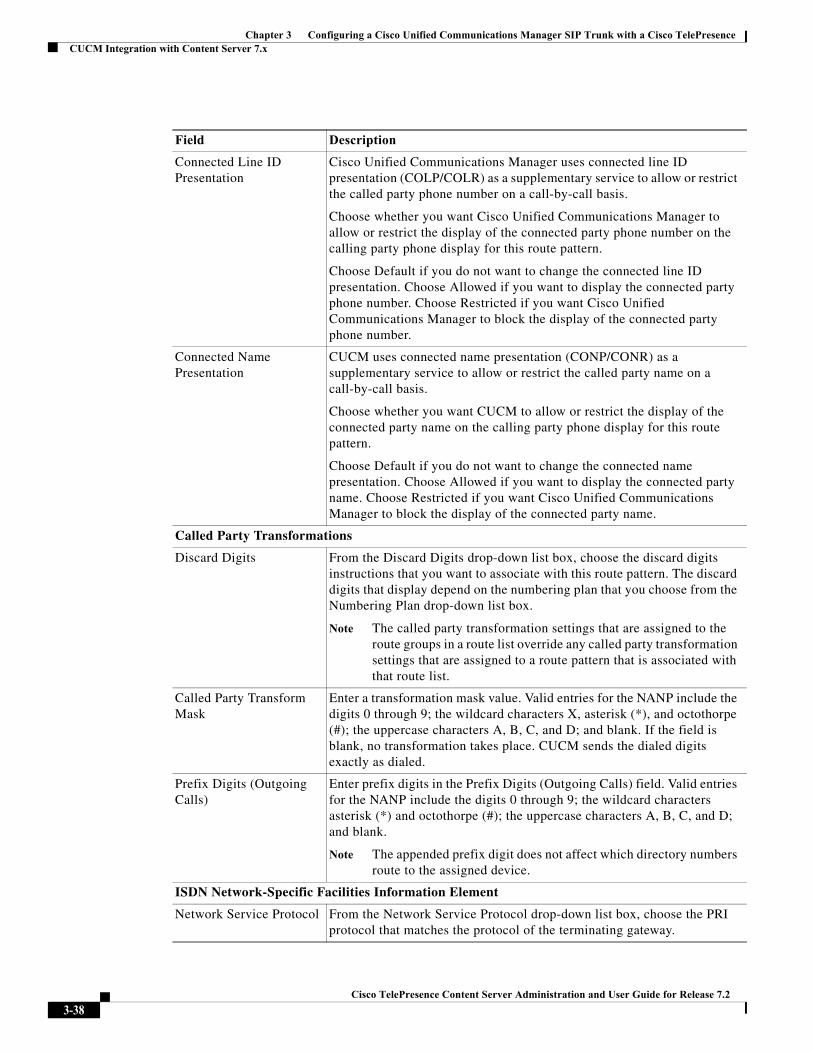
Connected Line ID Presentation
Cisco Unified Communications Manager uses connected line ID presentation (COLP/COLR) as a supplementary service to allow or restrict the called party phone number on a call-by-call basis.
Choose whether you want Cisco Unified Communications Manager to allow or restrict the display of the connected party phone number on the calling party phone display for this route pattern.
Choose Default if you do not want to change the connected line ID presentation. Choose Allowed if you want to display the connected party phone number. Choose Restricted if you want Cisco Unified Communications Manager to block the display of the connected party phone number.
Connected Name Presentation
CUCM uses connected name presentation (CONP/CONR) as a supplementary service to allow or restrict the called party name on a call-by-call basis.
Choose whether you want CUCM to allow or restrict the display of the connected party name on the calling party phone display for this route pattern.
Choose Default if you do not want to change the connected name presentation. Choose Allowed if you want to display the connected party name. Choose Restricted if you want Cisco Unified Communications Manager to block the display of the connected party name.
Called Party Transformations
Discard Digits From the Discard Digits drop-down list box, choose the discard digits instructions that you want to associate with this route pattern. The discard digits that display depend on the numbering plan that you choose from the Numbering Plan drop-down list box.
Note The called party transformation settings that are assigned to the route groups in a route list override any called party transformation settings that are assigned to a route pattern that is associated with that route list.
Called Party Transform Mask
Enter a transformation mask value. Valid entries for the NANP include the digits 0 through 9; the wildcard characters X, asterisk (*), and octothorpe (#); the uppercase characters A, B, C, and D; and blank. If the field is blank, no transformation takes place. CUCM sends the dialed digits exactly as dialed.
Prefix Digits (Outgoing Calls)
Enter prefix digits in the Prefix Digits (Outgoing Calls) field. Valid entries for the NANP include the digits 0 through 9; the wildcard characters asterisk (*) and octothorpe (#); the uppercase characters A, B, C, and D; and blank.
Note The appended prefix digit does not affect which directory numbers route to the assigned device.
ISDN Network-Specific Facilities Information Element
Network Service Protocol From the Network Service Protocol drop-down list box, choose the PRI protocol that matches the protocol of the terminating gateway.
Field Description
3-38Cisco TelePresence Content Server Administration and User Guide for Release 7.2
Chapter 3 Configuring a Cisco Unified Communications Manager SIP Trunk with a Cisco TelePresence CUCM Integration with Content Server 7.x
Cisco Content Server Cluster Configuration
To Content Server cluster configuration:
• Create the SIP Trunk Security Profile
• To Create the SIP Profile
• Create the SIP Trunk
Complete these steps in the order given:
Create a Route Group (for a TCS Cluster)
Step 1 On the Call Routing menu, click Route/Hunt > Route Group.
Step 2 On the Find and List Route Groups page, click Add New.
Step 3 On the Route Group Configuration page, enter the following settings.
Step 4 Confirm that both SIP trunks appear in the Available Devices field. Otherwise, click Find.
Carrier Identification Code
Enter the appropriate carrier identification code (0, 3, or 4 digits) in the Carrier Identification Code field. Carrier identification codes allow customers to reach the services of interexchange carriers.
The following list shows examples of commonly used carrier identification codes:
• ATT—0288
• Sprint—0333
• WorldCom/MCI—0222
For a complete list of NANP carrier identification codes, go to http://www.nanpa.com/.
Network Service Choose the appropriate network service. The values vary depending on the network service protocol that you choose from the Network Service Protocol field.
Service Parameter Name This field displays the service parameter name that is associated with the chosen network service. If no service parameter exists for the network service, the field displays <Not Exist>.
Service Parameter Value Enter the appropriate service parameter value. Valid entries include the digits 0 through 9. If a service parameter does not exist for the network service, Cisco Unified CM Administration disables this field.
Field Description
Field Setting
Route Group Name Enter Route Group name.
Distribution Algorithm Click Top Down.
3-39Cisco TelePresence Content Server Administration and User Guide for Release 7.2
Chapter 3 Configuring a Cisco Unified Communications Manager SIP Trunk with a Cisco TelePresenceCUCM Integration with Content Server 7.x
Step 5 Click Add to Route Group.
Step 6 Under Current Route Group Members, confirm that the SIP trunk that connects to the subscriber TCS 7.x appears first in the list. You can select the up or down arrows to change the order of the SIP trunks.
Step 7 Click Save.
Create a Route List (for a TCS Cluster)
Step 1 On the Call Routing menu, click Route/Hunt > Route List.
Step 2 On the Find and List Route Lists page, click Add New.
Step 3 On the Route List Configuration page, enter the following settings.
Step 4 Click Save.
Step 5 Confirm that the Enable This Route List check box is checked.
Step 6 Under Route List Member Information, click Add Route Group.
Step 7 On the Route List Detail Configuration page, in the Route Group field, select the Route Group that you created in the Create a Route Group (for a TCS Cluster) and click Save.
Step 8 When prompted that the route list settings will be saved, click OK.
Step 9 On the Route List Configuration page, click Reset.
Step 10 When prompted to confirm resetting the route list, click Reset.
Step 11 Click Close.
Create a Route Pattern (for a TCS Cluster)
Step 1 On the Call Routing menu, click Route/Hunt > Route Pattern.
Step 2 On the Find and List Route Patterns page, click Add New.
Step 3 On the Route Pattern Configuration page, enter the following settings.
Step 4 Click Save and then click Close.
Field Setting
Name Enter SIP_Trunk_Route_List or another name.
Description Enter SIP Trunk Route List or another description.
Cisco Unified Communications Manager Group
Click Default.
3-40Cisco TelePresence Content Server Administration and User Guide for Release 7.2

Chapter 3 Configuring a Cisco Unified Communications Manager SIP Trunk with a Cisco TelePresence CUCM Integration with Content Server 7.x
Region configuration on CUCM
Step 1 Login to the Cisco Unified Communication Manager Administration Interface.
Step 2 Select System > Region Information > Region.
Step 3 Click Find.
Step 4 Select Default.
Step 5 Under the Maximum Session Bit rate for Video Calls section, select the last radio button and enter 32000 kbps as highlighted in the snapshot.
CUCM Configuration Setting on Content Server
After ensuring that CUCM and Content Server are ready for the integration, do the following procedure to set up the integration and to enter the port settings.
Field Setting
Route Pattern Enter the route pattern for TCS trunk.
Gateway/Route List Select the name of the route list that you created in the Create a Route List (for a TCS Cluster). For example, click “SIP_Trunk_Route_List.”
3-41Cisco TelePresence Content Server Administration and User Guide for Release 7.2
Chapter 3 Configuring a Cisco Unified Communications Manager SIP Trunk with a Cisco TelePresenceCUCM Integration with Content Server 7.x
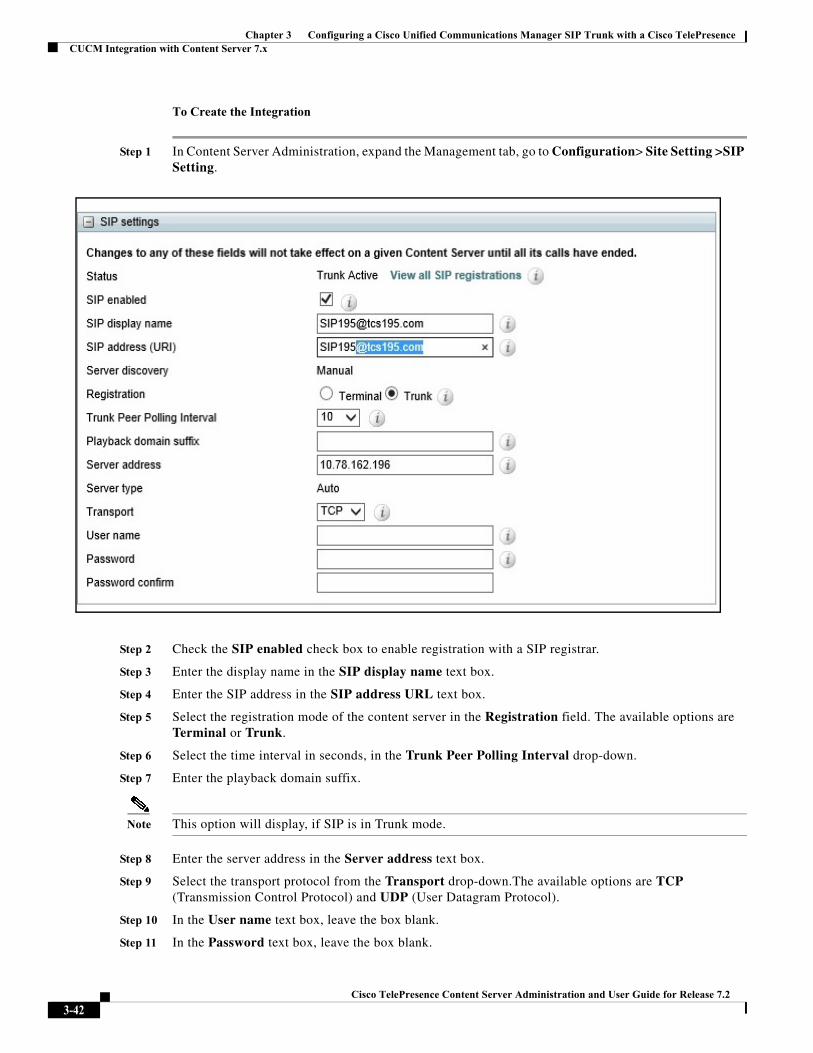
To Create the Integration
Step 1 In Content Server Administration, expand the Management tab, go to Configuration> Site Setting >SIP Setting.
Step 2 Check the SIP enabled check box to enable registration with a SIP registrar.
Step 3 Enter the display name in the SIP display name text box.
Step 4 Enter the SIP address in the SIP address URL text box.
Step 5 Select the registration mode of the content server in the Registration field. The available options are Terminal or Trunk.
Step 6 Select the time interval in seconds, in the Trunk Peer Polling Interval drop-down.
Step 7 Enter the playback domain suffix.
Note This option will display, if SIP is in Trunk mode.
Step 8 Enter the server address in the Server address text box.
Step 9 Select the transport protocol from the Transport drop-down.The available options are TCP (Transmission Control Protocol) and UDP (User Datagram Protocol).
Step 10 In the User name text box, leave the box blank.
Step 11 In the Password text box, leave the box blank.
3-42Cisco TelePresence Content Server Administration and User Guide for Release 7.2

Chapter 3 Configuring a Cisco Unified Communications Manager SIP Trunk with a Cisco TelePresence CUCM Integration with Content Server 7.x
Note The User name and the Password is not required as authentication is not enabled in CUCM SIP Trunk profile.
3-43Cisco TelePresence Content Server Administration and User Guide for Release 7.2

Chapter 3 Configuring a Cisco Unified Communications Manager SIP Trunk with a Cisco TelePresenceCUCM Integration with Content Server 7.x
3-44Cisco TelePresence Content Server Administration and User Guide for Release 7.2