configuring a sql server reporting services scale-out ... · pdf fileconfiguring a sql server...
TRANSCRIPT

Microsoft Dynamics®
AX
Configuring a SQL Server
Reporting Services scale-out
deployment to run on a
Network Load Balancing
cluster
White Paper
A SQL Server Reporting Services (SSRS) scale-out deployment includes two or more report server instances that share a single
report server database. By using a scale-out deployment, you can increase the number of users who can access reports at the
same time, and improve the availability of the report server.
Date: April 2012
www.microsoft.com/dynamics/ax

2 CONFIGURING A REPORTING SERVICES SCALE-OUT DEPLOYMENT
Table of Contents
Introduction ................................................................................................ 3 Prerequisites ........................................................................................................................ 4
Create a virtual host for the NLB cluster ..................................................... 4
Install and configure NLB............................................................................ 5 Install NLB ........................................................................................................................... 5 Create the NLB cluster ........................................................................................................... 6 Add the second report server to the NLB cluster ......................................................................10
Install and configure Reporting Services .................................................. 11 Install Reporting Services .....................................................................................................11 Configure the first instance of Reporting Services ....................................................................12 Configure the second instance of Reporting Services ................................................................13 Join the second instance of Reporting Services to the scale-out deployment ................................14 Configure view state validation ..............................................................................................15 Add the host name and URL of the virtual host ........................................................................16
Install the Reporting Services extensions ................................................. 17
Connect Microsoft Dynamics AX to the report servers ............................... 17 Connect Microsoft Dynamics AX to the NLB virtual host ............................................................17 Connect Microsoft Dynamics AX to each report server instance ..................................................18

3
CONFIGURING A REPORTING SERVICES SCALE-OUT DEPLOYMENT
Introduction
A SQL Server Reporting Services (SSRS) scale-out deployment includes two or more report server instances that share a single report server database. By using a scale-out deployment, you can increase the number of users who can access reports at the same time, and improve the availability of the report server.
Microsoft Dynamics® AX supports scale-out deployments of Reporting Services in an environment that has the following configuration:
The Reporting Services instances are installed on separate computers.
The Reporting Services instances share a single database.
A Network Load Balancing (NLB) cluster is used.
The Reporting Services extensions (provided by Microsoft Dynamics AX) are installed on each computer where Reporting Services is installed.
This white paper will help you configure a scale-out deployment that resembles the following environment.

4 CONFIGURING A REPORTING SERVICES SCALE-OUT DEPLOYMENT
Prerequisites
This white paper identifies the computers in the scale-out environment (shown in the previous diagram) by using the names listed in the following table. The table also lists the prerequisite software that is installed on each computer.
Computer name Description Prerequisites
CLIENT01 The Microsoft Dynamics AX client computer
Microsoft® Windows® 7
Microsoft .NET Framework 3.5 SP1
Microsoft .NET Framework 4
Microsoft Dynamics AX 2012 client
AOS01 The Microsoft Dynamics AX Application Object Server (AOS) computer
Microsoft Windows Server® 2008 R2 SP1 (64-bit)
Microsoft .NET Framework 3.5 SP1
Microsoft .NET Framework 4
Hotfix for Microsoft .NET Framework 4 (KB23390372)
Microsoft Dynamics AX 2012 AOS
SSRSNLB The NLB virtual host, which provides a single point of entry to all the report servers in the NLB cluster
Make sure that the NLB cluster is accessible through a virtual server name that maps to a virtual server IP address.
SSRS01 The computer that hosts the first Reporting Services instance
Windows Server 2008 R2 SP1 (64-bit)
Microsoft .NET Framework 3.5 SP1
Microsoft .NET Framework 4
SSRS02 The computer that hosts the second Reporting Services instance
Windows Server 2008 R2 SP1 (64-bit)
Microsoft .NET Framework 3.5 SP1
Microsoft .NET Framework 4
SQL01 The computer that hosts both the Reporting Services database and the Microsoft Dynamics AX database
Windows Server 2008 R2 SP1 (64-bit)
Microsoft .NET Framework 3.5 SP1
Microsoft .NET Framework 4
Microsoft SQL Server® 2008 R2 (including the Database Engine Services and Full-Text Search)
Microsoft Dynamics AX 2012 database
Create a virtual host for the NLB cluster
Complete the following procedure to create a virtual host for the NLB cluster. The virtual host provides a single point of entry to all the report servers in the NLB cluster. Complete this procedure on the domain controller.
1. Click Start > Administrative Tools > DNS.
2. In the left pane, expand the Forward Lookup Zones node.

5
CONFIGURING A REPORTING SERVICES SCALE-OUT DEPLOYMENT
3. Right-click the name of your domain, and then click New Host (A or AAAA).
4. Enter the name and IP address of the NLB virtual host. In this example, the virtual host name is
SSRSNLB.
5. Click Add Host.
Install and configure NLB
Complete the following procedures to configure the NLB cluster.
Install NLB
Complete the following procedure to install the NLB feature of Windows Server. Complete this procedure on the servers that run or will run Reporting Services.
1. Click Start > Administrative Tools > Server Manager.
2. In the Features Summary area, click Add Features.

6 CONFIGURING A REPORTING SERVICES SCALE-OUT DEPLOYMENT
3. Select the Network Load Balancing check box.
4. Click Next.
5. Click Install.
6. Repeat this procedure on each server that runs or will run Reporting Services.
Create the NLB cluster
Complete the following procedure to create the NLB cluster. Complete this procedure on the server that hosts or will host the first Reporting Services instance.
1. Click Start > Administrative Tools > Network Load Balancing Manager.
2. In the left pane, right-click Network Load Balancing Clusters, and then click New Cluster.

7
CONFIGURING A REPORTING SERVICES SCALE-OUT DEPLOYMENT
3. The New Cluster: Connect page is displayed. Complete the following steps:
a. Enter the name of the server that hosts or will host the first Reporting Services instance (that is, the computer that you are using to complete this procedure).
b. Click Connect, and then select the network adapter that is connected to the domain.
c. Click Next.
4. The New Cluster: Host Parameters page is displayed. Accept the default settings, and then click Next.
5. The New Cluster: Cluster IP Addresses page is displayed. Click Add.
8 CONFIGURING A REPORTING SERVICES SCALE-OUT DEPLOYMENT
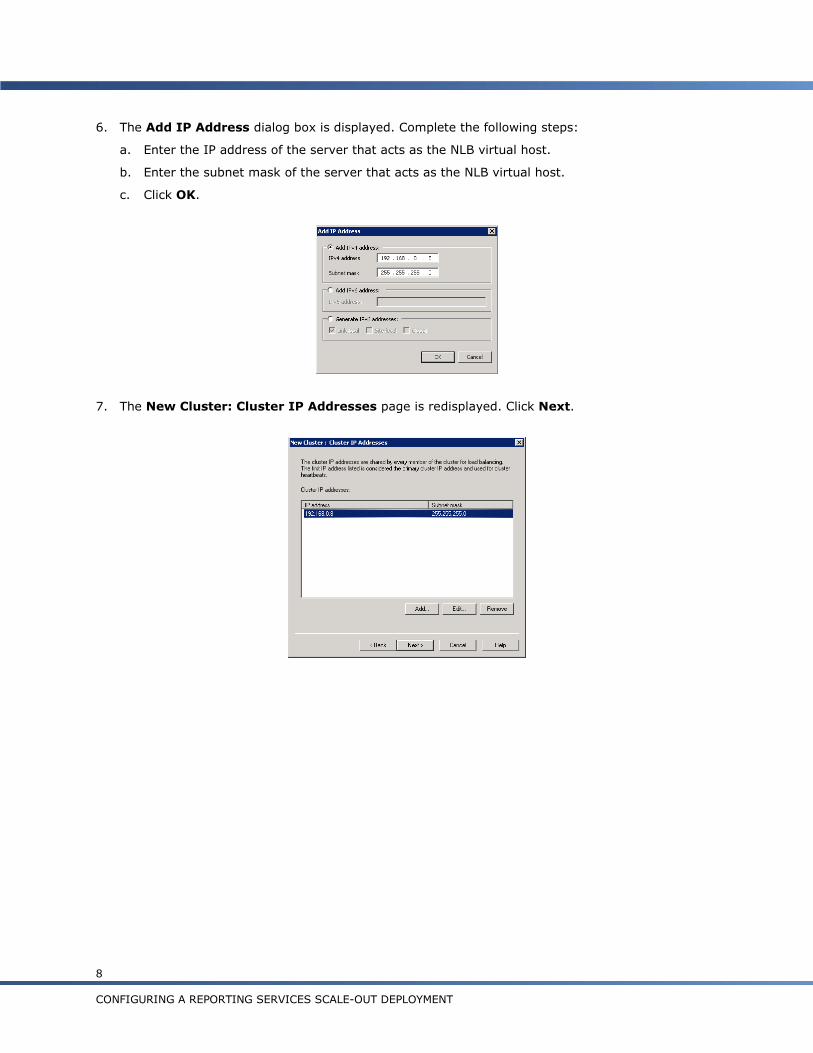
6. The Add IP Address dialog box is displayed. Complete the following steps:
a. Enter the IP address of the server that acts as the NLB virtual host.
b. Enter the subnet mask of the server that acts as the NLB virtual host.
c. Click OK.
7. The New Cluster: Cluster IP Addresses page is redisplayed. Click Next.

9
CONFIGURING A REPORTING SERVICES SCALE-OUT DEPLOYMENT
8. The New Cluster: Cluster Parameters page is displayed. Complete the following steps:
a. Enter the fully qualified domain name of the server that acts as the NLB virtual host.
b. Select the cluster operation mode that best suits your needs.
c. Click Next.
9. The New Cluster: Port Rules page is displayed. Complete the following steps:
a. Click Remove.
b. Click Add.
10. The Add/Edit Port Rule dialog box is displayed. Change the settings based on your needs, and
then click OK.
11. The New Cluster: Port Rules page is redisplayed. Click Finish.

10 CONFIGURING A REPORTING SERVICES SCALE-OUT DEPLOYMENT
Add the second report server to the NLB cluster
Complete the following procedure to add the second server that runs or will run Reporting Services to the NLB cluster. Complete this procedure on the server that hosts or will host the second Reporting Services instance.
1. Click Start > Administrative Tools > Network Load Balancing Manager.
2. In the left pane, right-click the cluster name, and then click Add Host To Cluster.
3. The Add Host to Cluster: Connect page is displayed. Complete the following steps:
a. Enter the name of the server that hosts or will host the second Reporting Services instance.
b. Click Connect, and then select the network adapter that is connected to the domain.
c. Click Next.

11
CONFIGURING A REPORTING SERVICES SCALE-OUT DEPLOYMENT
4. The Add Host to Cluster: Host Parameters page is displayed. Accept the default settings, and then click Next.
5. The Add Host to Cluster: Port Rules page is displayed. Click Finish.
6. Repeat this procedure for each report server that you want to add to the cluster.
Install and configure Reporting Services
Complete the following procedures to install and configure SQL Server Reporting Services.
Install Reporting Services
On each server that will act as a report server, run the SQL Server Setup wizard to install Reporting Services.
Note: When you install Reporting Services, select the Install but do not configure server option.
For more information about the versions of Reporting Services that are supported with Microsoft Dynamics AX, see the Microsoft Dynamics AX system requirements. For more information about how
to install Reporting Services, see the SQL Server documentation on TechNet.
12 CONFIGURING A REPORTING SERVICES SCALE-OUT DEPLOYMENT
Configure the first instance of Reporting Services
Complete the following procedure to configure the first instance of Reporting Services.
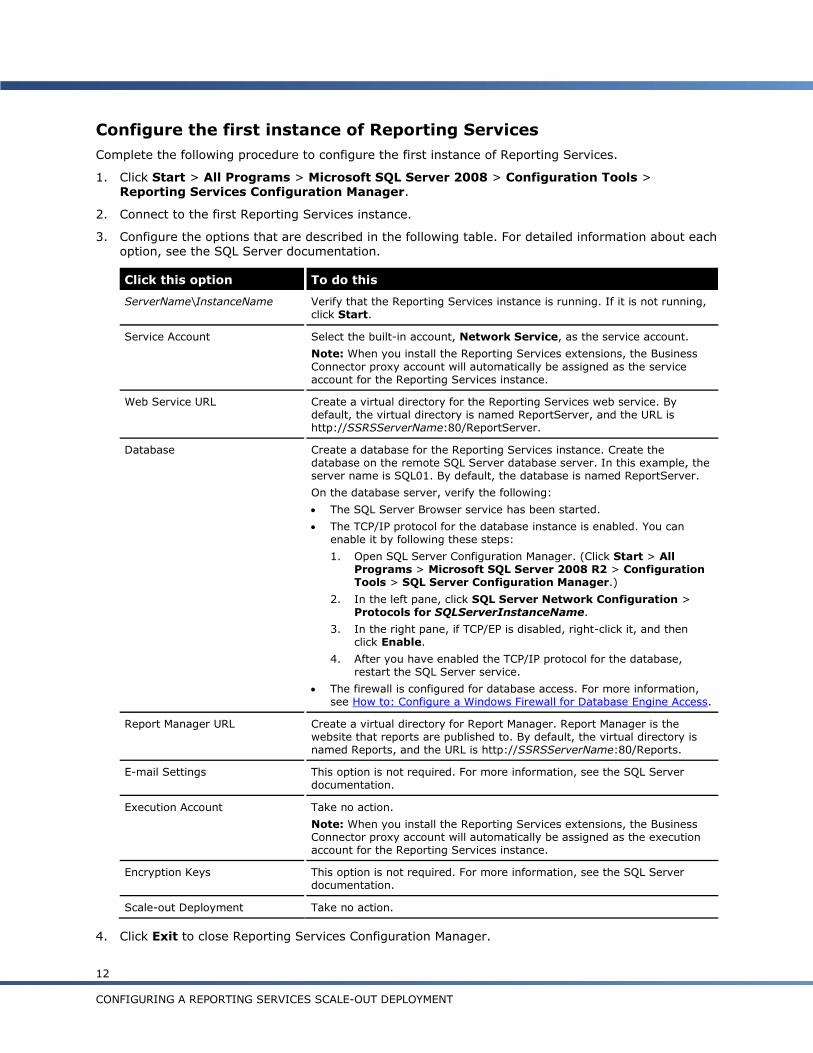
1. Click Start > All Programs > Microsoft SQL Server 2008 > Configuration Tools > Reporting Services Configuration Manager.
2. Connect to the first Reporting Services instance.
3. Configure the options that are described in the following table. For detailed information about each option, see the SQL Server documentation.
Click this option To do this
ServerName\InstanceName Verify that the Reporting Services instance is running. If it is not running, click Start.
Service Account Select the built-in account, Network Service, as the service account.
Note: When you install the Reporting Services extensions, the Business
Connector proxy account will automatically be assigned as the service account for the Reporting Services instance.
Web Service URL Create a virtual directory for the Reporting Services web service. By default, the virtual directory is named ReportServer, and the URL is http://SSRSServerName:80/ReportServer.
Database Create a database for the Reporting Services instance. Create the database on the remote SQL Server database server. In this example, the server name is SQL01. By default, the database is named ReportServer.
On the database server, verify the following:
The SQL Server Browser service has been started.
The TCP/IP protocol for the database instance is enabled. You can enable it by following these steps:
1. Open SQL Server Configuration Manager. (Click Start > All Programs > Microsoft SQL Server 2008 R2 > Configuration Tools > SQL Server Configuration Manager.)
2. In the left pane, click SQL Server Network Configuration > Protocols for SQLServerInstanceName.
3. In the right pane, if TCP/EP is disabled, right-click it, and then click Enable.
4. After you have enabled the TCP/IP protocol for the database, restart the SQL Server service.
The firewall is configured for database access. For more information, see How to: Configure a Windows Firewall for Database Engine Access.
Report Manager URL Create a virtual directory for Report Manager. Report Manager is the website that reports are published to. By default, the virtual directory is named Reports, and the URL is http://SSRSServerName:80/Reports.
E-mail Settings This option is not required. For more information, see the SQL Server documentation.
Execution Account Take no action.
Note: When you install the Reporting Services extensions, the Business Connector proxy account will automatically be assigned as the execution account for the Reporting Services instance.
Encryption Keys This option is not required. For more information, see the SQL Server documentation.
Scale-out Deployment Take no action.
4. Click Exit to close Reporting Services Configuration Manager.

13
CONFIGURING A REPORTING SERVICES SCALE-OUT DEPLOYMENT
5. Configure the Reporting Services instance for local administration. For instructions, see How to: Configure a Report Server for Local Administration on Windows Vista and Windows Server 2008 on TechNet.
6. After you have configured the Reporting Services instance for local administration, verify that you
can access the sites that are listed in the following table.
Website URL
Reporting Services web service http://SSRSServerName:80/ReportServer
Report Manager http://SSRSServerName:80/Reports
Configure the second instance of Reporting Services
Complete the following procedure to configure the second instance of Reporting Services.
1. Click Start > All Programs > Microsoft SQL Server 2008 > Configuration Tools > Reporting Services Configuration Manager.
2. Connect to the second Reporting Services instance.
3. Configure the options that are described in the following table. For detailed information about each option, see the SQL Server documentation.
Click this option To do this
ServerName\InstanceName Verify that the Reporting Services instance is running. If it is not running, click Start.
Service Account Select the built-in account, Network Service, as the service account.
Note: When you install the Reporting Services extensions, the Business Connector proxy account will automatically be assigned as the service account for the Reporting Services instance.
Web Service URL Create a virtual directory for the Reporting Services web service. By default, the virtual directory is named ReportServer, and the URL is http://SSRSServerName:80/ReportServer.
Database Click Change Database. A wizard appears. Complete the following steps:
1. Click Choose an existing report server database. Click Next.
2. Enter the name of the SQL Server database server. In this example, the server name is SQL01. Click Next.
3. Select the report server database that is used by the first instance of Reporting Services. Click Next, and then complete the wizard.
Report Manager URL Create a virtual directory for Report Manager. Report Manager is the website that reports are published to. By default, the virtual directory is named Reports, and the URL is http://SSRSServerName:80/Reports.
E-mail Settings This option is not required. For more information, see the SQL Server documentation.
Execution Account Take no action.
Note: When you install the Reporting Services extensions, the Business Connector proxy account will automatically be assigned as the execution account for the Reporting Services instance.
Encryption Keys This option is not required. For more information, see the SQL Server documentation.
Scale-out Deployment Take no action.
4. Click Exit to close Reporting Services Configuration Manager.

14 CONFIGURING A REPORTING SERVICES SCALE-OUT DEPLOYMENT
5. Configure the Reporting Services instance for local administration. For instructions, see How to: Configure a Report Server for Local Administration on Windows Vista and Windows Server 2008 on TechNet.
6. After you have configured the Reporting Services instance for local administration, verify that you
can access the sites that are listed in the following table.
Website URL
Reporting Services web service http://SSRSServerName:80/ReportServer
Report Manager http://SSRSServerName:80/Reports
7. Repeat this procedure for any other instances of Reporting Services in the scale-out deployment.
Join the second instance of Reporting Services to the scale-out
deployment
Complete the following procedure to join the second instance of Reporting Services to the scale-out deployment. Complete this procedure on the server that hosts the first Reporting Services instance.
1. Click Start > All Programs > Microsoft SQL Server 2008 > Configuration Tools >
Reporting Services Configuration Manager.
2. Connect to the first Reporting Services instance.
3. In the left pane, click Scale-out Deployment.
4. For each report server instance that has Waiting to Join status, click Add Server.
15
CONFIGURING A REPORTING SERVICES SCALE-OUT DEPLOYMENT
Configure view state validation
To run a scale-out deployment, you must configure view state validation, so that users can view interactive HTML reports. To do this, you must modify the Reporting Services configuration files. Complete the following procedure on each report server.
Note: We recommend that you make a backup of each configuration file before you modify it.
1. Generate a validation key and decryption key. For more information, see the following articles:
How to create keys by using Visual C# .NET for use in Forms authentication
machineKey Element (ASP.NET Settings Schema)
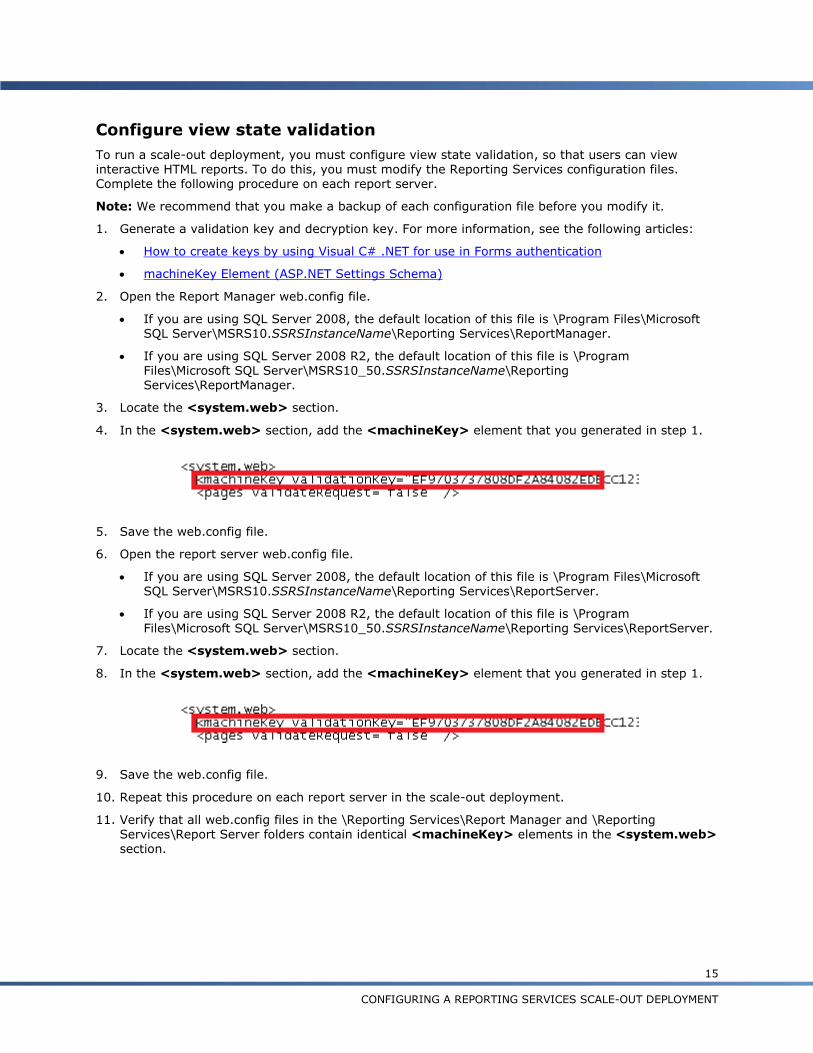
2. Open the Report Manager web.config file.
If you are using SQL Server 2008, the default location of this file is \Program Files\Microsoft
SQL Server\MSRS10.SSRSInstanceName\Reporting Services\ReportManager.
If you are using SQL Server 2008 R2, the default location of this file is \Program Files\Microsoft SQL Server\MSRS10_50.SSRSInstanceName\Reporting Services\ReportManager.
3. Locate the <system.web> section.
4. In the <system.web> section, add the <machineKey> element that you generated in step 1.
5. Save the web.config file.
6. Open the report server web.config file.
If you are using SQL Server 2008, the default location of this file is \Program Files\Microsoft SQL Server\MSRS10.SSRSInstanceName\Reporting Services\ReportServer.
If you are using SQL Server 2008 R2, the default location of this file is \Program Files\Microsoft SQL Server\MSRS10_50.SSRSInstanceName\Reporting Services\ReportServer.
7. Locate the <system.web> section.
8. In the <system.web> section, add the <machineKey> element that you generated in step 1.
9. Save the web.config file.
10. Repeat this procedure on each report server in the scale-out deployment.
11. Verify that all web.config files in the \Reporting Services\Report Manager and \Reporting Services\Report Server folders contain identical <machineKey> elements in the <system.web> section.

16 CONFIGURING A REPORTING SERVICES SCALE-OUT DEPLOYMENT
Add the host name and URL of the virtual host
To run a scale-out deployment, you must add the name and URL of the NLB virtual host to the RsReportServer.config file. Complete the following procedure on each report server.
Note: We recommend that you make a backup of the RsReportServer.config file before you modify it.
1. Open the RsReportServer.config file.
If you are using SQL Server 2008, the default location of this file is \Program Files\Microsoft SQL Server\MSRS10.SSRSInstanceName\Reporting Services\ReportServer.
If you are using SQL Server 2008 R2, the default location of this file is \Program
Files\Microsoft SQL Server\MSRS10_50.SSRSInstanceName\Reporting Services\ReportServer.
2. Locate the <Service> section.
3. In the <Service> section, add the <Hostname> element, as follows.
<Hostname>VirtualHostServerName</Hostname>
In this example, the <Hostname> element is as follows.
4. Locate the <UrlRoot> element.
Note: By default, this element is unspecified in the configuration file.
5. In the <UrlRoot> element, enter the URL of the Reporting Services web service on the NLB virtual host.
http://VirtualHostServerName/ReportServer
In this example, the <UrlRoot> element is as follows.
6. Save the RsReportServer.config file.
7. Repeat this procedure on each report server in the scale-out deployment.
Note: You may want to test access to the Reporting Services instance via a virtual server name. However, when you do that, you may see an error page. According to Microsoft KB article 896861, this behavior is by design. For information about how to work around the issue, see the KB article. You must then restart your server, because you do not have Microsoft Internet Information Services (IIS) on the NLB cluster nodes.

17
CONFIGURING A REPORTING SERVICES SCALE-OUT DEPLOYMENT
Install the Reporting Services extensions
On each report server, run the Microsoft Dynamics AX 2012 Setup wizard to complete the following tasks:
Install the Reporting Services extensions.
Deploy the reports that are included with Microsoft Dynamics AX.
For step-by-step instructions, see Install Reporting Services extensions on TechNet.
Connect Microsoft Dynamics AX to the report servers
Complete the following procedures to connect Microsoft Dynamics AX to the report servers. You first connect Microsoft Dynamics AX to the NLB virtual host. Then you connect Microsoft Dynamics AX to
each report server in the NLB cluster.
Connect Microsoft Dynamics AX to the NLB virtual host
Complete the following procedure to connect Microsoft Dynamics AX to the NLB cluster. Complete this procedure by using your Microsoft Dynamics AX client.
1. Open Microsoft Dynamics AX.
2. Click System administration > Setup > Business intelligence > Reporting Services > Report servers.
3. In the Configuration ID field, enter a name that identifies the Reporting Services instance and AOS instance that you are connecting.
4. In the Description field, enter a brief description to help you identify the Reporting Services
instance and AOS instance that you are connecting.
5. Select the Default configuration check box.
6. On the Reporting Server information FastTab, enter the following information about the Reporting Services instance:
a. The name of the server that is the NLB virtual host.
b. The name of the Reporting Services instance.
c. The URL of Report Manager. By default, the URL is http://VirtualHostServerName:80/Reports.
d. The URL of the Reporting Services web service. By default, the URL is http://VirtualHostServerName:80/ReportServer.
e. A name for the report folder that will be created for you on the Report Manager website.
7. On the Application Object Server information FastTab, select the name of the AOS instance.
8. Click Create report folder to create the report folder.

18 CONFIGURING A REPORTING SERVICES SCALE-OUT DEPLOYMENT
9. Click Validate settings to verify that the information that you entered in this form is correct, and that the report folder has been created.
Connect Microsoft Dynamics AX to each report server instance
Complete the following procedure to connect Microsoft Dynamics AX to each report server in the NLB cluster. Complete this procedure by using your Microsoft Dynamics AX client.
1. Open Microsoft Dynamics AX.
2. Click System administration > Setup > Business intelligence > Reporting Services > Report servers.
3. In the Configuration ID field, enter a name that identifies the Reporting Services instance and
AOS instance that you are connecting.
4. In the Description field, enter a brief description to help you identify the Reporting Services instance and AOS instance that you are connecting.
5. Do not select the Default configuration check box.
6. On the Reporting Server information FastTab, enter the following information about the Reporting Services instance:
a. The name of the report server.
b. The name of the Reporting Services instance.
c. The URL of Report Manager. By default, the URL is http://SSRSServerName:80/Reports.
d. The URL of the Reporting Services web service. By default, the URL is http://SSRSServerName:80/ReportServer.
e. A name for the report folder that will be created for you on the Report Manager website.
7. On the Application Object Server information FastTab, select the name of the AOS instance.

19
CONFIGURING A REPORTING SERVICES SCALE-OUT DEPLOYMENT
8. Click Create report folder to create the report folder.
9. Click Validate settings to verify that the information that you entered in this form is correct, and that the report folder has been created.
10. Repeat this procedure for each report server in the scale-out deployment.

20 CONFIGURING A REPORTING SERVICES SCALE-OUT DEPLOYMENT
Microsoft Dynamics is a line of integrated, adaptable business management solutions that enables you and your people to make
business decisions with greater confidence. Microsoft Dynamics works like and with familiar Microsoft software, automating and
streamlining financial, customer relationship and supply chain processes in a way that helps you drive business success.
U.S. and Canada Toll Free 1-888-477-7989
Worldwide +1-701-281-6500
www.microsoft.com/dynamics
This document is provided “as-is.” Information and views expressed in this document, including URL and other Internet Web site
references, may change without notice. You bear the risk of using it.
Some examples depicted herein are provided for illustration only and are fictitious. No real association or connection is intended or
should be inferred.
This document does not provide you with any legal rights to any intellectual property in any Microsoft product. You may copy and
use this document for your internal, reference purposes. You may modify this document for your internal, reference purposes.
© 2012 Microsoft Corporation. All rights reserved.
Microsoft, Microsoft Dynamics, the Microsoft Dynamics logo, SQL Server, Windows, and Windows Server are trademarks of the
Microsoft group of companies.
All other trademarks are property of their respective owners.