configuring health checker for z/os hands-on lab...configuring health checker for z/os hands-on lab...
TRANSCRIPT

Configuring Health Checker for z/OSHands-on Lab
Gordon DanielNewEra Software, Inc.
August 9, 2011Session 9680

Introduction
Hopefully you have some knowledge of the Health Checker and what it does. If not, then you will learn quickly. Basically, the Health Check is a Started Task and you are going to configure it, start it, and direct some operator commands to it, just like any other Started Task.
Have fun here and go back and try it on your own system!
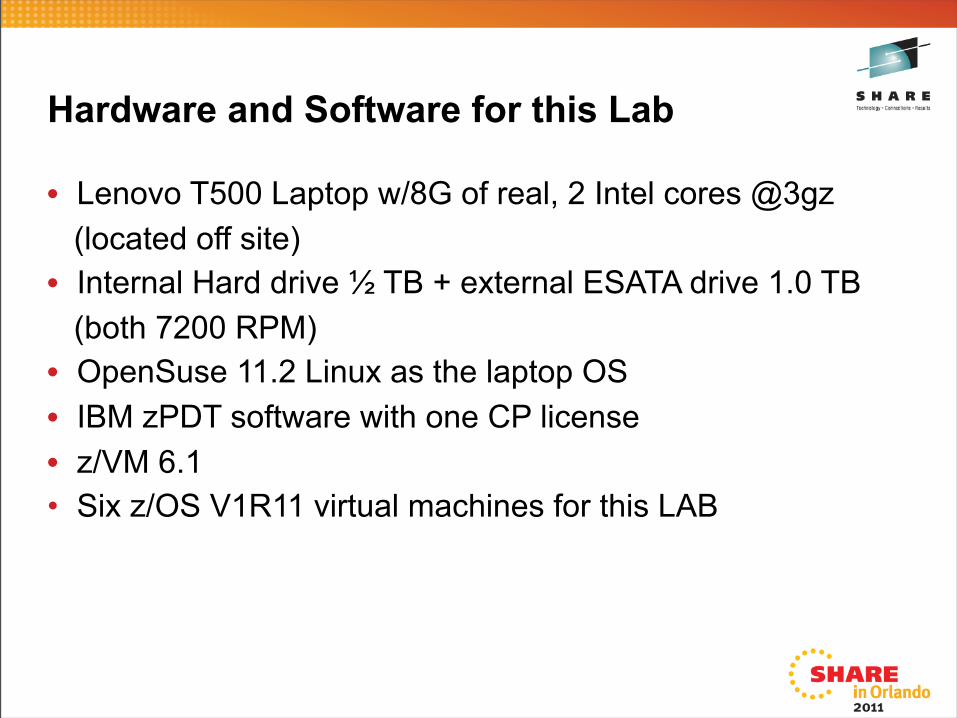
Hardware and Software for this Lab
• Lenovo T500 Laptop w/8G of real, 2 Intel cores @3gz (located off site)• Internal Hard drive ½ TB + external ESATA drive 1.0 TB (both 7200 RPM)• OpenSuse 11.2 Linux as the laptop OS• IBM zPDT software with one CP license• z/VM 6.1• Six z/OS V1R11 virtual machines for this LAB
Agenda
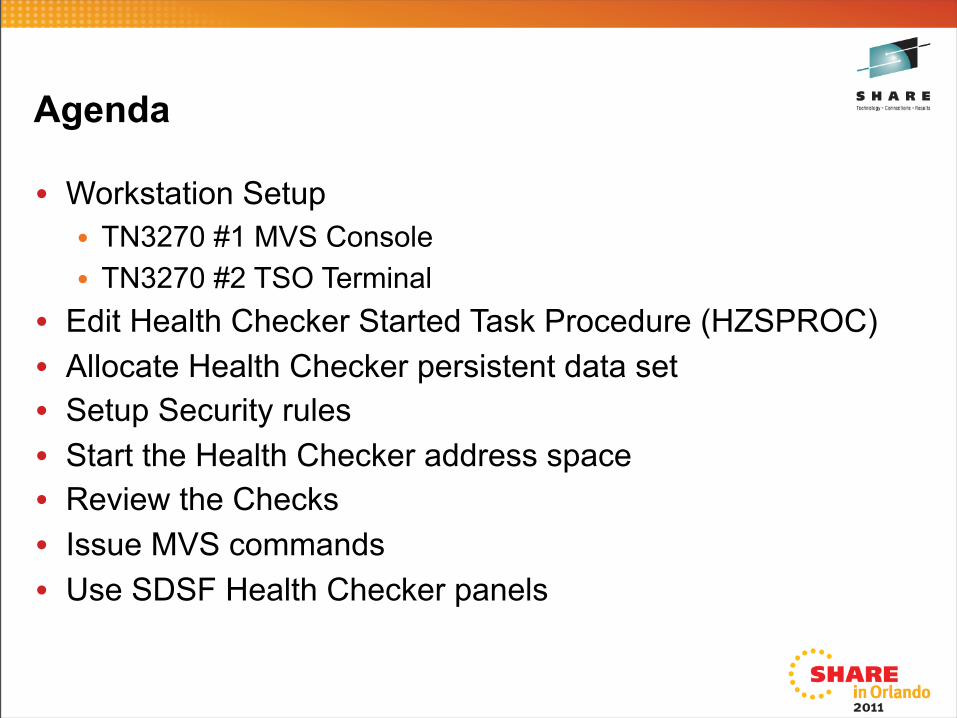
• Workstation Setup• TN3270 #1 MVS Console• TN3270 #2 TSO Terminal
• Edit Health Checker Started Task Procedure (HZSPROC)• Allocate Health Checker persistent data set• Setup Security rules• Start the Health Checker address space• Review the Checks• Issue MVS commands• Use SDSF Health Checker panels

Agenda
• Health Checker Log• Temporarily altering a specific Health Check• Permanently altering a specific Health Check• Review the details of a specific Health Check • Stopping the Health Checker address space• References• Questions for the author
Workstation Setup
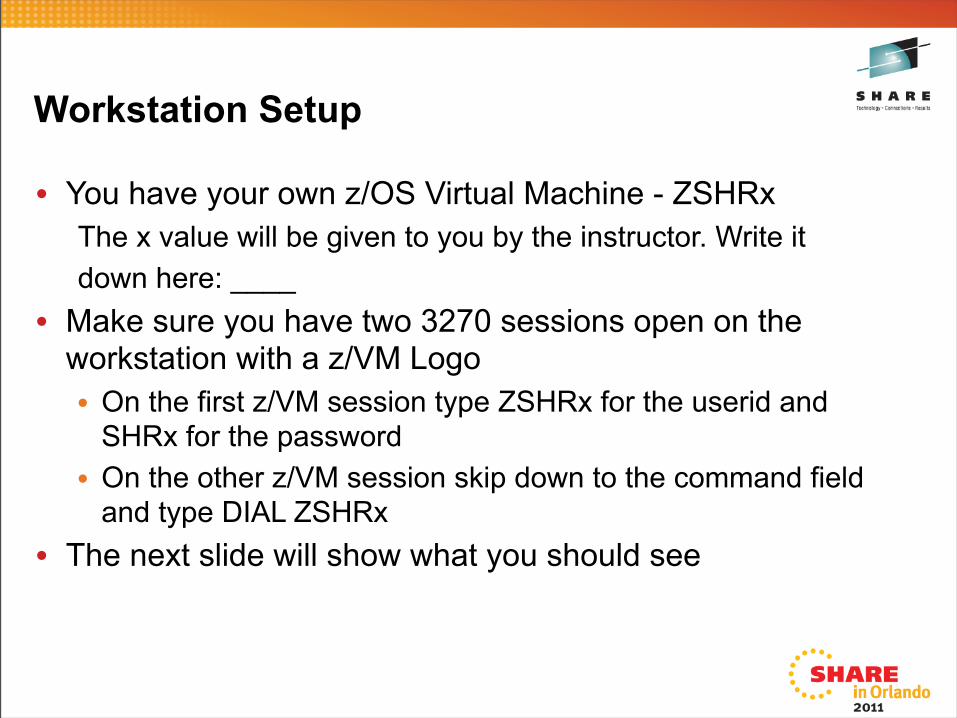
• You have your own z/OS Virtual Machine - ZSHRxThe x value will be given to you by the instructor. Write itdown here: ____
• Make sure you have two 3270 sessions open on the workstation with a z/VM Logo • On the first z/VM session type ZSHRx for the userid and
SHRx for the password • On the other z/VM session skip down to the command field
and type DIAL ZSHRx• The next slide will show what you should see

Workstation Setup
MVS Console TSO Terminal
Health Checker Configuration
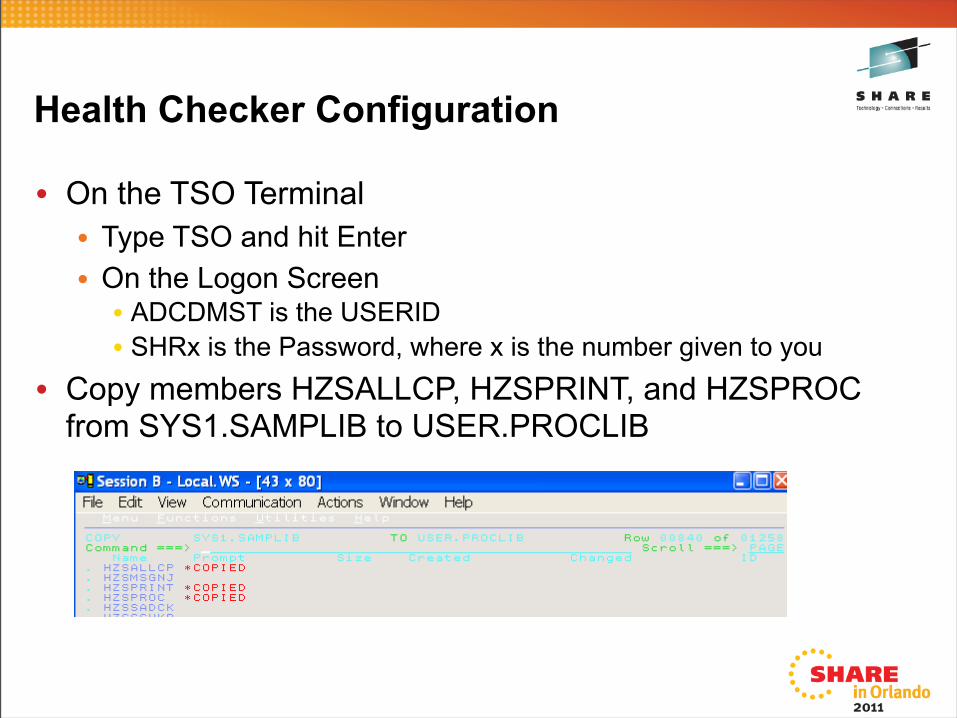
• On the TSO Terminal• Type TSO and hit Enter• On the Logon Screen• ADCDMST is the USERID• SHRx is the Password, where x is the number given to you
• Copy members HZSALLCP, HZSPRINT, and HZSPROC from SYS1.SAMPLIB to USER.PROCLIB
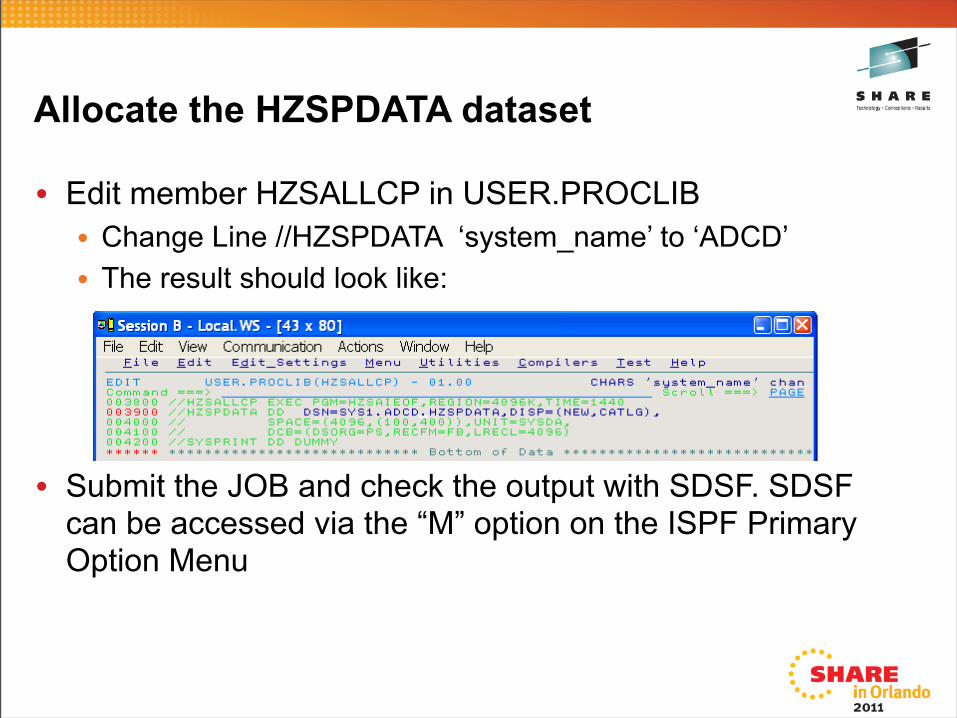
Allocate the HZSPDATA dataset
• Edit member HZSALLCP in USER.PROCLIB• Change Line //HZSPDATA ‘system_name’ to ‘ADCD’• The result should look like:
• Submit the JOB and check the output with SDSF. SDSF can be accessed via the “M” option on the ISPF Primary Option Menu
Security Setup
• The RACF definitions for the Health Checker and SDSF have been built for you for this lab. Since the lab system is your own sandbox we are going to let the user ADCDMST do just about everything. For your systems back home you really need to review the security definitions carefully. • Submit member BATHCK in USER.PROCLIB to do the
RACF definitions for the Health Checker• Review the output from BATHCK for success• Submit member BATSDSF in USER.PROCLIB to do the
RACF definitions for SDSF. The EXEC issued by this job is based on member ISFRAC which can be found in ISF.SISFEXEC
• Review the output from BATSDSF for success
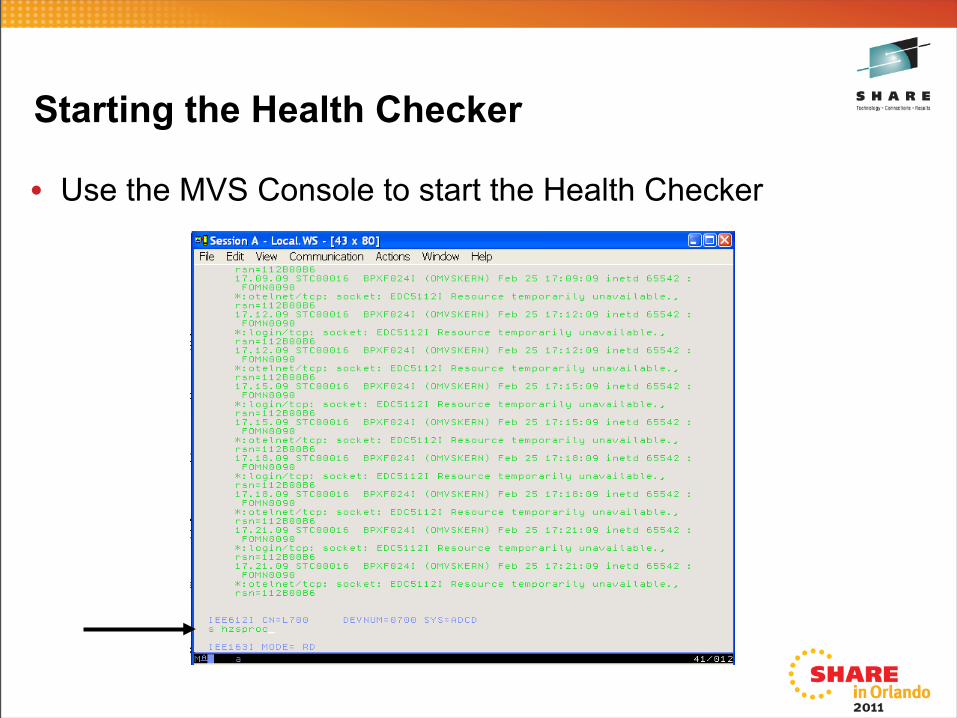
Starting the Health Checker
• Use the MVS Console to start the Health Checker

Health Checker Messages on the Console
• Note the critical Health Checks are show in red. These indicate that these messages will remain on the console until deleted.
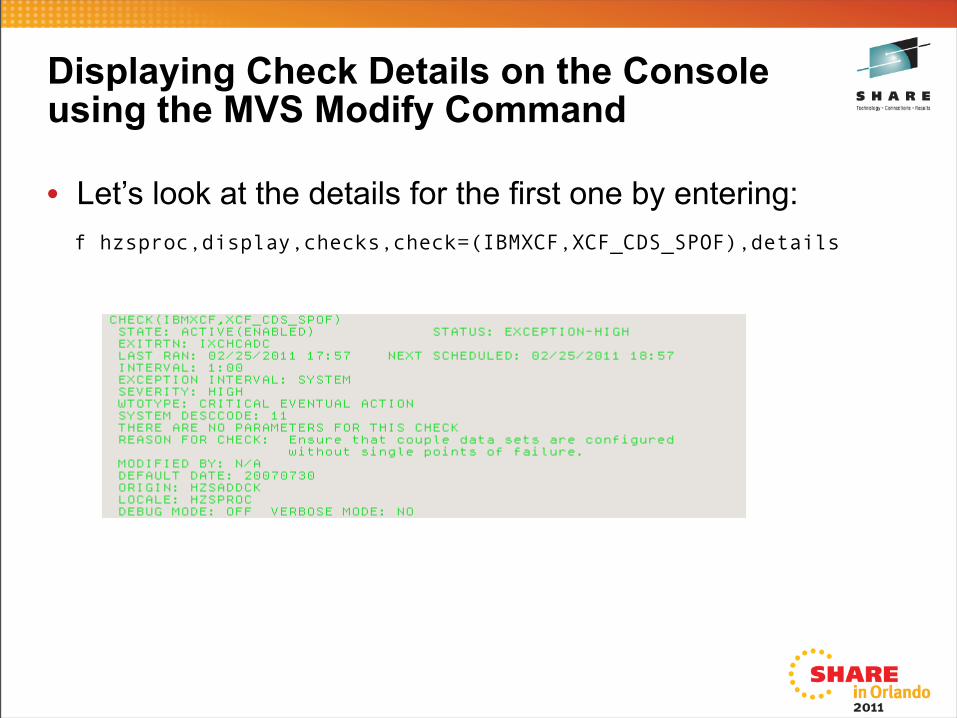
Displaying Check Details on the Console using the MVS Modify Command
• Let’s look at the details for the first one by entering: f hzsproc,display,checks,check=(IBMXCF,XCF_CDS_SPOF),details
More Modify Commands
• The reason for the check is that your Couple Datasets are all on the same volume. You may issue a D XCF,COUPLE command on the MVS console and see that the datasets are all on SBRES2
• Separation of the Couple Datasets is critical for a production system, but this is your sandbox with a limited number of dasd volumes available. Let’s say you want to keep the check as a reminder, but don’t want it to clutter up your console. You can change the check’s WTO options so the message will not remain in red on the console
• Issue the command: f hzsproc,update,check=(IBMXCF,XCF_CDS_SPOF),wtotype=informational
This won’t take effect until the check runs again, but we can run it now by this command:
f hzsproc,run,check=(IBMXCF,XCF_CDS_SPOF)
• Take a look at the MVS Console now and you will see the check is no longer red

Using SDSF to control Health Checker
• SDSF is the spool output processor on this system. You may use a different software product on your system back home. If you do, then check the documentation for that software to see how it supports the Health Checker.
• To access SDSF select the “M” option on the ISPF Primary Option Menu and then select “5” to enter SDSF.
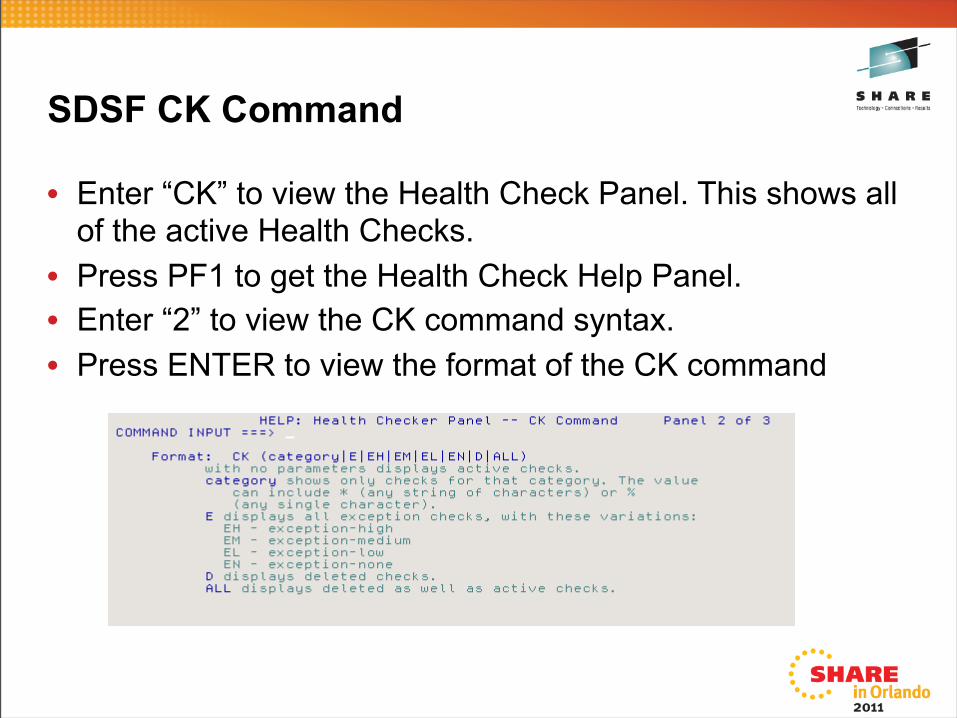
SDSF CK Command
• Enter “CK” to view the Health Check Panel. This shows all of the active Health Checks.
• Press PF1 to get the Health Check Help Panel.• Enter “2” to view the CK command syntax.• Press ENTER to view the format of the CK command

Display only Checks with Exceptions using SDSF “CK E” Command
• Press PF3 to return to the previous panel.• Enter “CK E” on the command line. This will list just the
Health Checks with Exception Status
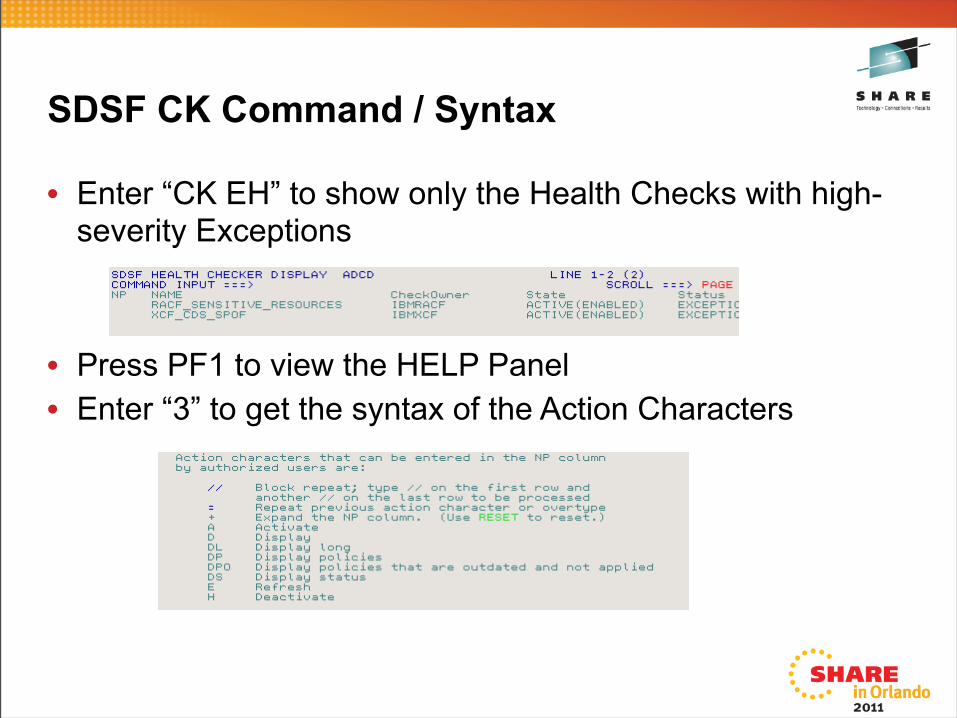
SDSF CK Command / Syntax
• Enter “CK EH” to show only the Health Checks with high-severity Exceptions
• Press PF1 to view the HELP Panel• Enter “3” to get the syntax of the Action Characters
SDSF Health Check Line Commands
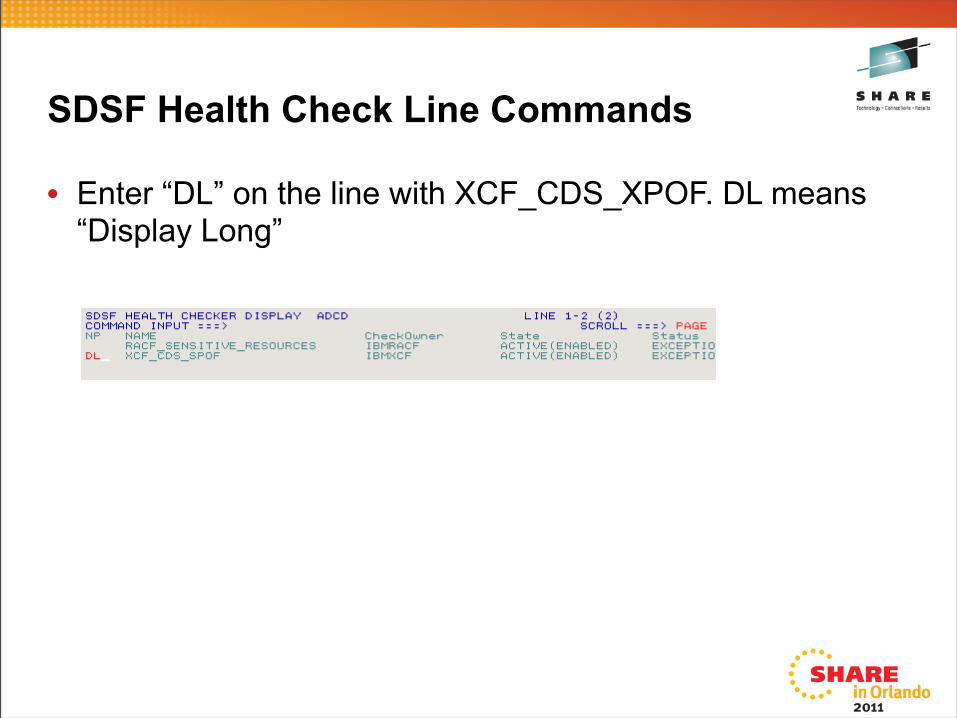
• Enter “DL” on the line with XCF_CDS_XPOF. DL means “Display Long”
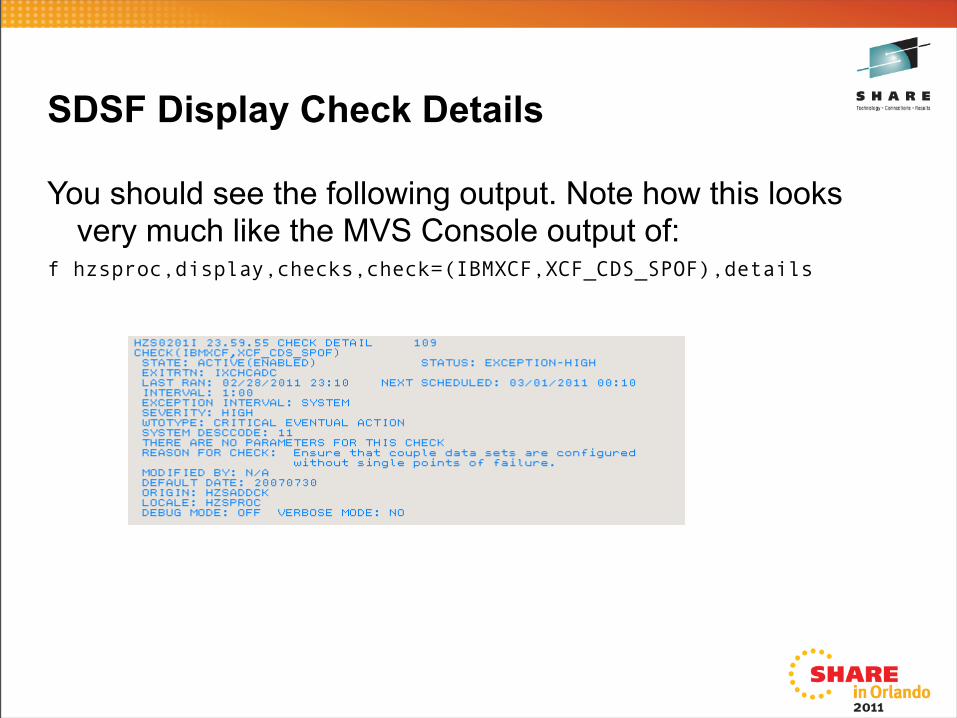
SDSF Display Check Details
You should see the following output. Note how this looks very much like the MVS Console output of:
f hzsproc,display,checks,check=(IBMXCF,XCF_CDS_SPOF),details

SDSF CK Command Scrolling
• On the command line Enter “CK EH” again to view those checks
• You can scroll to the right using to view more information about the checks. Press PF11 three times and you will see “TOType” on the header line. Type “1” in the Command Input and press PF10 to scroll back one column and you should see this:
• Note the indication that our earlier MVS console Modify Command changed the WTOType
Temporary Check Alteration and Running using SDSF
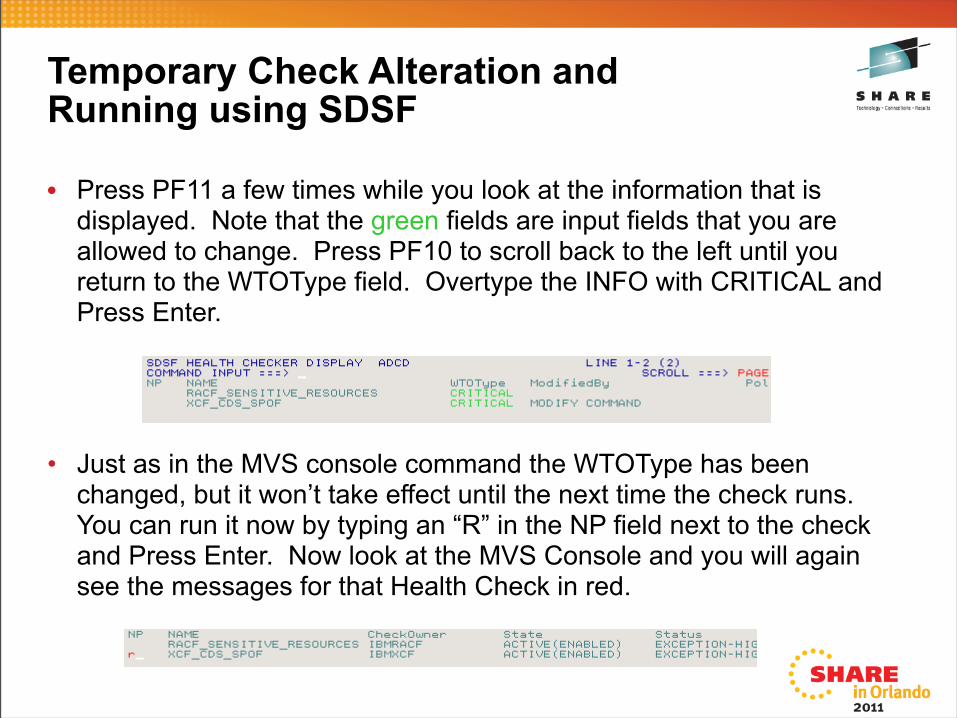
• Press PF11 a few times while you look at the information that is displayed. Note that the green fields are input fields that you are allowed to change. Press PF10 to scroll back to the left until you return to the WTOType field. Overtype the INFO with CRITICAL and Press Enter.
• Just as in the MVS console command the WTOType has been
changed, but it won’t take effect until the next time the check runs. You can run it now by typing an “R” in the NP field next to the check and Press Enter. Now look at the MVS Console and you will again see the messages for that Health Check in red.
Printing Health Check Results via a Batch JOB
• The HZSPRNT utility may be used to print the results of Health Checks with a batch job
• Go back and Edit USER.PROCLIB again• Select member HZSPRINT• Scroll down to the //HZSPRINT EXEC PGM=HZSPRNT line• You will several options to use; most are commented out• Let’s print all of the Health Checks that have Exceptions• Change the data to look like this: //HZSPRINT EXEC PGM=HZSPRNT,TIME=1440,REGION=0M,
// PARM=('CHECK(*,*)’,’EXCEPTIONS’) • Submit the job• Review the output with SDSF

Making Permanent Modifications to Checks
• We are going to make the temporary change to the WTOTYPE that we make earlier a permanent change
• Create a new member, HZSPRM01, in USER.PARMLIB with the following contents:
Making Changes to Checks Permanent:Adding new Parmlib Member
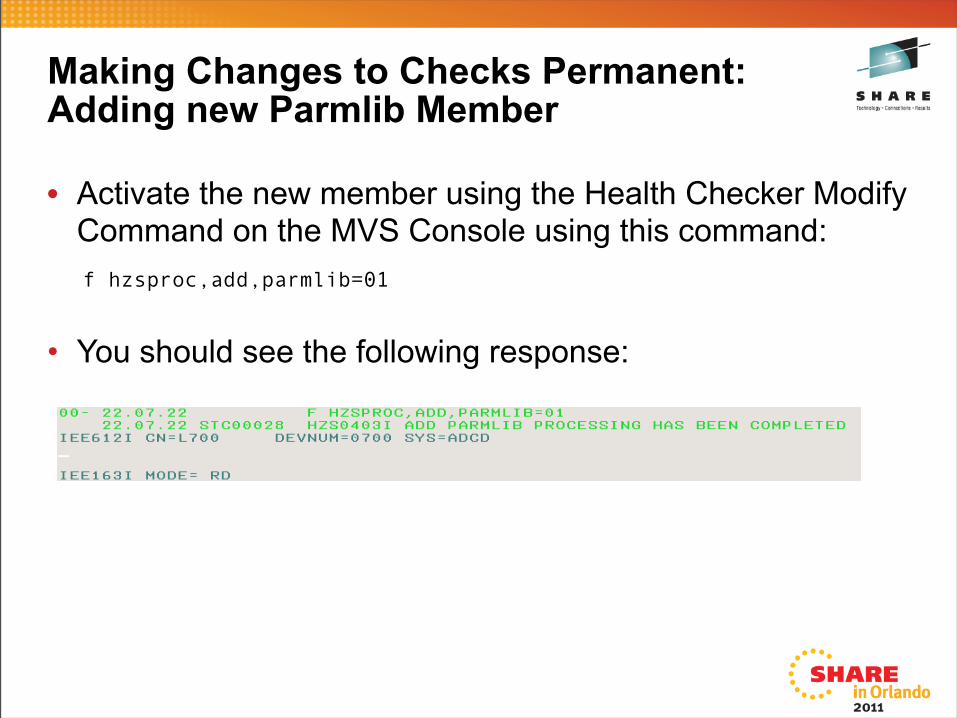
• Activate the new member using the Health Checker Modify Command on the MVS Console using this command:
f hzsproc,add,parmlib=01
• You should see the following response:
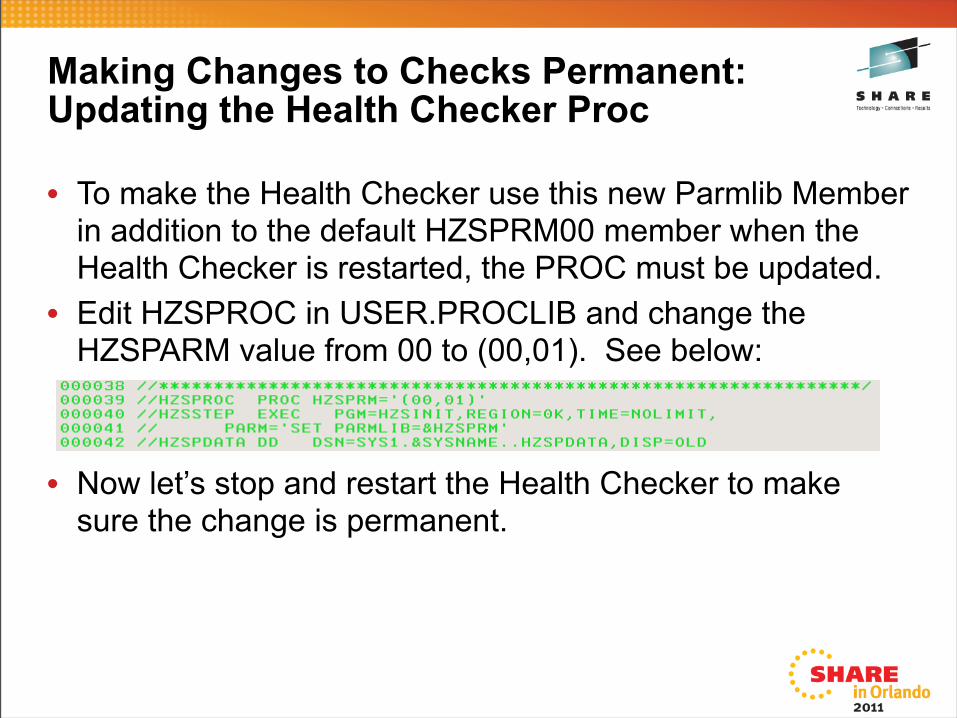
Making Changes to Checks Permanent:Updating the Health Checker Proc
• To make the Health Checker use this new Parmlib Member in addition to the default HZSPRM00 member when the Health Checker is restarted, the PROC must be updated.
• Edit HZSPROC in USER.PROCLIB and change the HZSPARM value from 00 to (00,01). See below:
• Now let’s stop and restart the Health Checker to make sure the change is permanent.

Stopping the Health Checker
• On the MVS Console Enter “P HZSPROC”• Watch the Health Checker wait for all the Checks to
terminate prior to ending
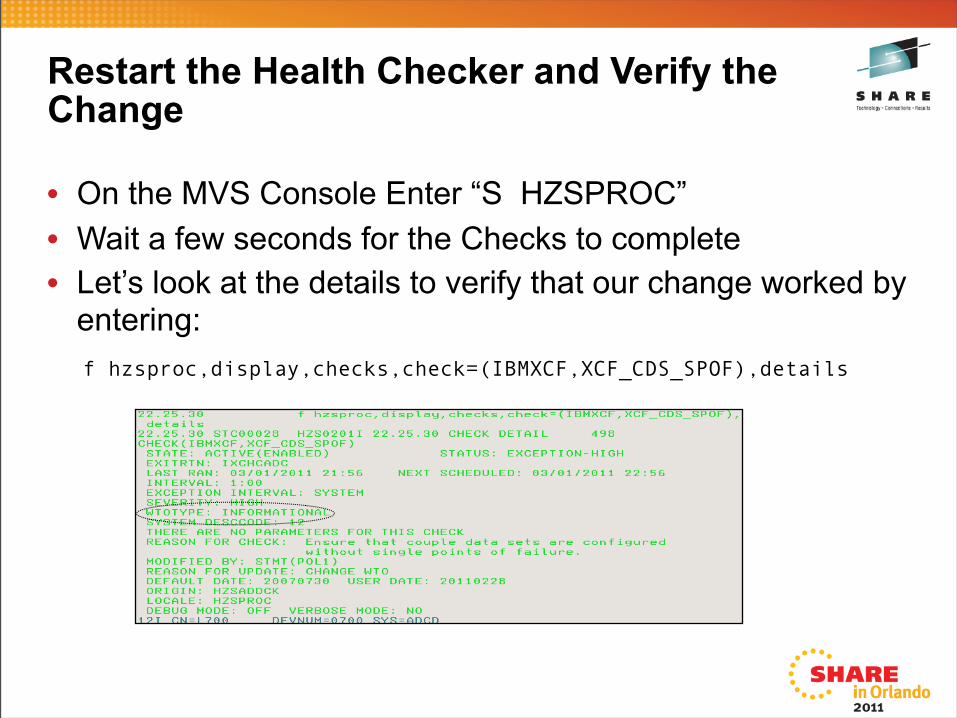
Restart the Health Checker and Verify the Change
• On the MVS Console Enter “S HZSPROC”• Wait a few seconds for the Checks to complete• Let’s look at the details to verify that our change worked by
entering: f hzsproc,display,checks,check=(IBMXCF,XCF_CDS_SPOF),details
Free Time
• If you have time go back to the HZSPRINT output and look at the RACF Sensitive Resource Check. This type of check contains reports in addition to the normal check output. These are important checks that show potential integrity exposures
• Feel free to look at some of the other Health Checks
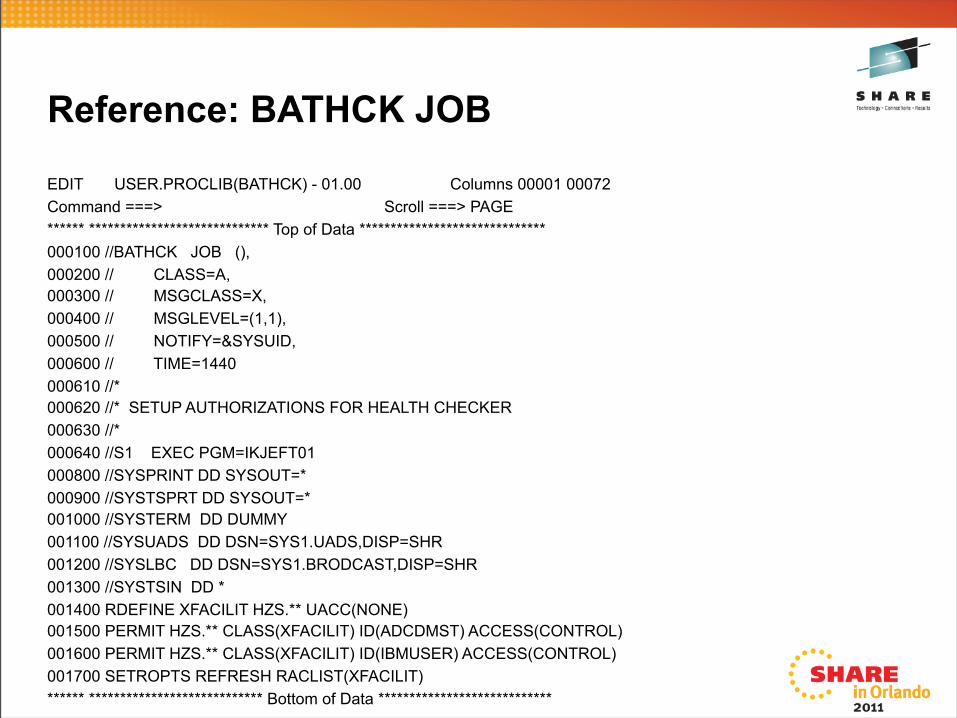
Reference: BATHCK JOB
EDIT USER.PROCLIB(BATHCK) - 01.00 Columns 00001 00072Command ===> Scroll ===> PAGE****** ***************************** Top of Data ******************************000100 //BATHCK JOB (),000200 // CLASS=A,000300 // MSGCLASS=X,000400 // MSGLEVEL=(1,1),000500 // NOTIFY=&SYSUID,000600 // TIME=1440000610 //*000620 //* SETUP AUTHORIZATIONS FOR HEALTH CHECKER000630 //*000640 //S1 EXEC PGM=IKJEFT01000800 //SYSPRINT DD SYSOUT=*000900 //SYSTSPRT DD SYSOUT=*001000 //SYSTERM DD DUMMY001100 //SYSUADS DD DSN=SYS1.UADS,DISP=SHR001200 //SYSLBC DD DSN=SYS1.BRODCAST,DISP=SHR001300 //SYSTSIN DD *001400 RDEFINE XFACILIT HZS.** UACC(NONE)001500 PERMIT HZS.** CLASS(XFACILIT) ID(ADCDMST) ACCESS(CONTROL)001600 PERMIT HZS.** CLASS(XFACILIT) ID(IBMUSER) ACCESS(CONTROL)001700 SETROPTS REFRESH RACLIST(XFACILIT)****** **************************** Bottom of Data ****************************
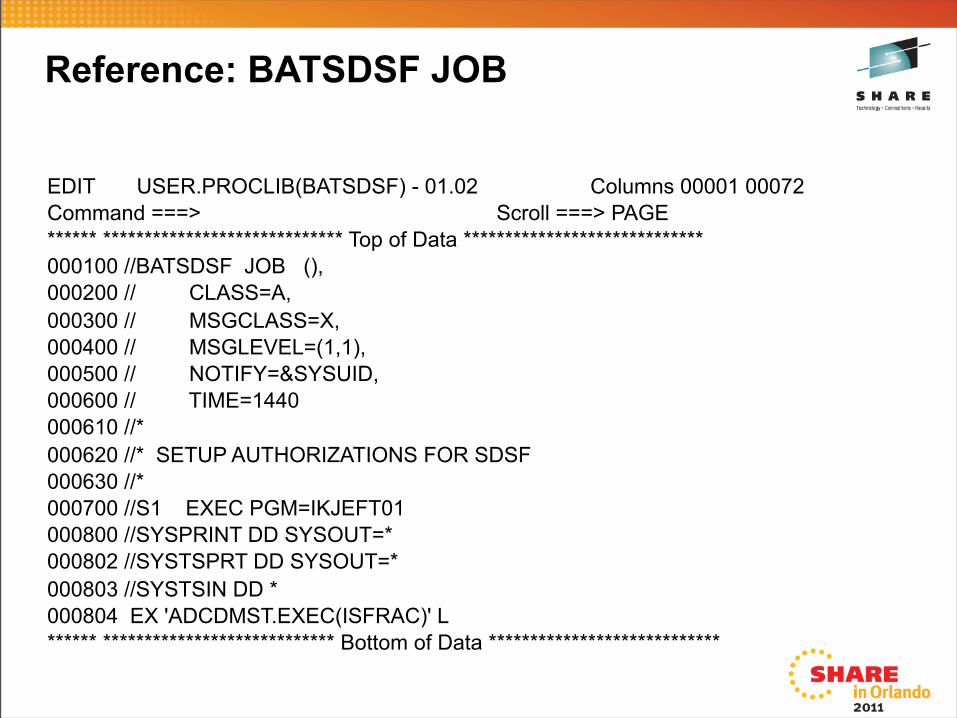
Reference: BATSDSF JOB
EDIT USER.PROCLIB(BATSDSF) - 01.02 Columns 00001 00072Command ===> Scroll ===> PAGE****** ***************************** Top of Data *****************************000100 //BATSDSF JOB (),000200 // CLASS=A,000300 // MSGCLASS=X,000400 // MSGLEVEL=(1,1),000500 // NOTIFY=&SYSUID,000600 // TIME=1440000610 //*000620 //* SETUP AUTHORIZATIONS FOR SDSF000630 //*000700 //S1 EXEC PGM=IKJEFT01000800 //SYSPRINT DD SYSOUT=*000802 //SYSTSPRT DD SYSOUT=*000803 //SYSTSIN DD *000804 EX 'ADCDMST.EXEC(ISFRAC)' L****** **************************** Bottom of Data ****************************
Reference List
• IBM Health Checker for z/OS User’s Guide• Exploiting the IBM Health Checker for z/OS Infrastructure (IBM Red paper – see www.redbooks.ibm.com)• Configuring the z/OS UNIX Health Checks and Exploiting
UNIX REXX Functions (a very good introduction to the Health Checker in general – see Share proceedings from 2008 San Jose)
• Lots more on Google

Follow Up
If you have any questions and you wish to contact me:
NewEra SoftwareGordon Daniel [email protected]
I will be happy to try to answer any questions!