configuring oracle minicluster for sap · configuring oracle minicluster for sap oracle white paper...
TRANSCRIPT

Configuring Oracle MiniCluster for SAP O R A C L E W H I T E P A P E R | A U G U S T 2 0 1 7
CONFIGURING SAP ON ORACLE MINICLUSTER
Disclaimer
The following is intended to outline our general product direction. It is intended for information
purposes only, and may not be incorporated into any contract. It is not a commitment to deliver any
material, code, or functionality, and should not be relied upon in making purchasing decisions. The
development, release, and timing of any features or functionality described for Oracle’s products
remains at the sole discretion of Oracle.
The functionality of non-Oracle products, including development, release, and timing of any features or
functionality described, is solely at the discretion of the non-Oracle vendors.

CONFIGURING SAP ON ORACLE MINICLUSTER
Table of Contents
Introduction 1
Part 1: Configuring Oracle MiniCluster for SAP 1
Install the Hardware 2
Collect Network Information 3
Perform Initial Configuration Steps 4
Create Database VM Profiles for the SAP Environment 25
Create Application VM Profiles for the SAP Environment 32
Complete the Installation 36
Part 2: Installing Highly Available SAP on Oracle MiniCluster 39
SAP Installation Considerations 39
Overview of the SAP Installation Process 39
Download SAP and Oracle Database Software 40
Install the Latest SAP Bundle Patch for Oracle Grid Infrastructure 41
Configure Logical Hosts and Shared Storage on Database VMs 41
Configuring Shared SAP File Systems 43
Configuring Users and Groups 44
Prepare Database Instances on Database Nodes 45
Install the ASCS Instance 63
Install the ERS instance 75
Install the Oracle Database 12c Instance 84
Post-Installation Steps on Database VMs 114
Install the Primary Application Server 115
Post-Installation Steps 139

CONFIGURING SAP ON ORACLE MINICLUSTER
HA Configuration Using SAPCTL 142
SAPCTL Installation 142
Final Thoughts 145
References 145

1 | CONFIGURING SAP ON ORACLE MINICLUSTER
Introduction
This multipart whitepaper provides best practices and recommendations for setting up highly available
SAP applications on Oracle MiniCluster. To compile and test the step-by-step procedures and
recommendations provided in this paper, a team of Oracle engineers and SAP experts constructed a
sample deployment using an Oracle MiniCluster S7-2 system. Figure 1 depicts the resulting solution.
Figure 1. A sample SAP ERP installation on Oracle MiniCluster with Oracle Real Application Clusters (Oracle RAC).
This paper is organized into two large sections: » Part 1, “Configuring Oracle MiniCluster for SAP”, outlines the steps necessary to set up the Oracle
MiniCluster. » Part 2, “Installing Highly Available SAP on Oracle MiniCluster”, describes how to install and
configure SAP ERP 6.0 EHP8 on two Oracle Database 12c nodes in a clustered environment.
Part 1: Configuring Oracle MiniCluster for SAP Part 1 describes steps for setting up a highly available configuration to run SAP applications on Oracle MiniCluster. It focuses on procedures to prepare the infrastructure on Oracle MiniCluster prior to the installation of the SAP software components.
About Oracle MiniCluster
For organizations that use SAP solutions to run their business, the infrastructure that supports SAP applications must offer outstanding agility, data protection mechanisms, and excellent reliability. To this end, Oracle MiniCluster is ideal for SAP deployments, especially for SAP applications that process security-sensitive data such as applications managing patient medical records, processing financial transactions, performing mission-critical enterprise resource planning, or handling secure communications and other security-related services.

2 | CONFIGURING SAP ON ORACLE MINICLUSTER
Oracle MiniCluster S7-2 is a preintegrated system that includes compute, storage, virtualization, operating system, and management components. Its simplicity, out-of-the-box performance, proven reliability, and small form factor make it an excellent choice for deployments in remote offices and small business locations or for agile software development (DevOps) environments.
Tools provided with Oracle MiniCluster automate the deployment of Oracle Database and Oracle RAC software components, setting up virtual machines (VMs), making it easier to manage security and compliance, and deploying system patches. Numerous security controls are built in, which helps to simplify secure configurations to meet DISA-STIG, PCI-DSS, and other security benchmarks.
This paper summarizes the steps necessary to set up Oracle MiniCluster S7-2 and how to use its configuration tools to prepare the system prior to installing SAP components. For more detailed setup and configuration instructions, refer to the Oracle MiniCluster documentation, specifically the Oracle MiniCluster S7-2 Getting Started Guide and the Oracle MiniCluster S7-2 Installation Guide.
Install the Hardware Unpack the two nodes and the storage array and connect them based on the instructions provided. In the sample deployment, Oracle MiniCluster includes a single storage array, which is connected to the two compute nodes as shown in Figure 2.
Figure 2: Oracle MiniCluster compute and storage connection topology.

3 | CONFIGURING SAP ON ORACLE MINICLUSTER
Collect Network Information Before configuring Oracle MiniCluster using subsequent procedures in this paper, gather system-specific networking information. The tables below show networking information used in the sample deployment. TABLE 1: MANAGEMENT NETWORK SETTINGS
Parameter Value
Management IP Node 1 Address 10.133.82.96
Management IP Node 2 Address 10.133.82.97
Default Gateway Address 10.133.80.1
Subnet CIDR Prefix /22
DNS Server 1 Address 10.209.76.197
DNS Server 2 Address 10.209.76.198
DNS Server 3 Address 192.135.82.132
NTP Server 1 Address 10.132.0.121
NTP Server 2 Address 10.132.0.122
TABLE 2: CLIENT NETWORK IP POOL
Parameter Value
Pool Starting IP Address 10.133.82.98
Pool Size 27
Gateway Address 10.133.80.1
Subnet CIDR Prefix /22
DNS Server 1 Address 10.209.76.197
DNS Server 2 Address 10.209.76.198
DNS Server 3 Address 192.135.82.132
NTP Server 1 Address 10.132.0.121
NTP Server 2 Address 10.132.0.122
The host names in Table 3 should be configured and resolved by the DNS servers listed in Table 1 and Table 2.
TABLE 3: HOST NAMES AND IP ADDRESSES
Host Name IP Address
oosmc1-n1-ilom 10.133.82.96
oosmc1-n2-ilom 10.133.82.97

4 | CONFIGURING SAP ON ORACLE MINICLUSTER
oosmc1-n1 10.133.82.98
oosmc1-n2 10.133.82.99
oosmc1ss01 10.133.82.100
oosmc1ss02 10.133.82.101
oosmc1ss01-vip 10.133.82.102
oosmc1ss02-vip 10.133.82.103
oosmc1ss-nfsvip 10.133.82.104
oosmc1ss-scan 10.133.82.105
oosmc1ss-scan 10.133.82.106
oosmc1ss-scan 10.133.82.107
Perform Initial Configuration Steps These software components are used in subsequent setup procedures for Oracle MiniCluster:
» Oracle MiniCluster Initial Configuration Tool. This tool generates initial configuration files based on collected parameters.
» Oracle MiniCluster Component Bundle. This bundle, which is contained within a patch set, includes updated software components (Oracle Database and Oracle Grid Infrastructure binaries, software for creating Oracle Solaris 10 and Oracle Solaris 11 VMs, and disk calibration software). It is used during the initial Oracle MiniCluster installation or whenever there are updates needed prior to configuring VMs.
» Oracle MiniCluster Core Software. This software supplies required Oracle Solaris repository files and the Oracle MiniCluster Configuration Utility (this tool is also called the MiniCluster Management Utility or MCMU). Download this software only if Oracle MiniCluster needs to be upgraded.
Locate the software to download.
Sign in to My Oracle Support (support.oracle.com) and click the Patches & Updates tab on top of the screen. Refine your search as follows:
• In the Patch Search section, click Product or Family (Advanced). • In the Product field, enter MiniCluster and select MiniCluster S7-2 Hardware. • In the Release field, select the latest release (in this case, Oracle MiniCluster S7-2 1.x), and click the Search
button (Figure 3). • In the search results, click the Sort Descending down arrow in the Updated column header to sort the patches
starting with the latest version.

5 | CONFIGURING SAP ON ORACLE MINICLUSTER
Figure 3: Search for Oracle MiniCluster patches and updates on My Oracle Support.
Download the Oracle MiniCluster Initial Configuration Tool.
From the list of software choices (Figure 4), select the latest release of the Oracle MiniCluster Initial Configuration Tool. Click the filename to download the tool (Figure 5).
Figure 4: Select the Oracle MiniCluster Initial Configuration Tool.

6 | CONFIGURING SAP ON ORACLE MINICLUSTER
Figure 5: Download the Oracle MiniCluster Initial Configuration Tool.
Download the Oracle MiniCluster Component Bundle and other required software, if needed.
Next, select MiniCluster Component Bundle from the list of software (Figure 6), and download the bundle. If Oracle MiniCluster also needs to be upgraded, select MiniCluster Core Software to download the archive and then follow the upgrade instructions.

7 | CONFIGURING SAP ON ORACLE MINICLUSTER
Figure 6: Download the Oracle MiniCluster Component Bundle.
Unpack the Oracle MiniCluster Initial Configuration Tool.
Unzip and unpack the Java archive file for the Oracle MiniCluster Initial Configuration Tool (Listing 1). Follow the instructions in the README.txt document.
user$ java -jar /Users/user/Downloads/MiniCluster/1.1.25.4/p25801095_100_SOLARIS64/UserInput/UserInput.jar
Listing 1: Unpacking the Java archive file for the Oracle MiniCluster Initial Configuration Tool.
Run the Oracle MiniCluster Initial Configuration Tool to configure parameter settings.
Start the tool. When it opens, configure the General and Management Network sections in the main window (Figure 7).

8 | CONFIGURING SAP ON ORACLE MINICLUSTER
Figure 7: Specify initial configuration parameters for Oracle MiniCluster.
Click the Client Network tab and configure the client network settings (Figure 8).
Figure 8: Specify client network settings.
Click Configure IP Allocation and enter the IP address ranges to be used by Oracle MiniCluster (Figure 9).

9 | CONFIGURING SAP ON ORACLE MINICLUSTER
Figure 9: Configure the allocated IP address ranges.
Click the Review button and review the configuration summary.
Figure 10: Review the configuration settings.
Click the Check IP button. This step allows you to verify that host names match the names resolved by the DNS servers (Figure 11).

10 | CONFIGURING SAP ON ORACLE MINICLUSTER
Figure 11: Verify that Oracle MiniCluster host names match DNS host names.
If the configuration is correct, click Save to generate the Oracle MiniCluster configuration files (Figure 12). Click Finish.
Figure 12: The tool creates required configuration files.

11 | CONFIGURING SAP ON ORACLE MINICLUSTER
Prepare to install Oracle MiniCluster.
Connect with SSH to the Oracle Lights Out Manager (Oracle ILOM) service processor on node 1.
Joebar:UserInput user$ ssh [email protected] The authenticity of host '10.133.82.96 (10.133.82.96)' can't be established. RSA key fingerprint is SHA256:AZT/TdJNNfzBv4emtEXUS3DRK6Jl9nZbWr5394jwPWI. Are you sure you want to continue connecting (yes/no)? yes Warning: Permanently added '10.133.82.96' (RSA) to the list of known hosts. Password: Oracle(R) Integrated Lights Out Manager Version 3.2.6.3.b r110516 Copyright (c) 2016, Oracle and/or its affiliates. All rights reserved. Warning: HTTPS certificate is set to factory default. Hostname: oosmc1-n1-ilom ->
Listing 2: Connect to the Oracle ILOM service processor on node 1.
Open a console on the main system from the Oracle ILOM service processor.
-> start sp/console Are you sure you want to start /SP/console (y/n)? y Serial console started. To stop, type #. oosmc1-n1 console login: mcinstall Password: Last login: Tue Oct 25 17:13:07 2016 on console Oracle Corporation SunOS 5.11 11.3 August 2016 mcinstall@oosmc1-n1:/var/home/mcinstall %
Listing 3: Start a console.
Launch the mcinstall script on node 1 using the --init parameter. This captures initial configuration information for Oracle MiniCluster into two files that are later used in the deployment process.
mcinstall@oosmc1-n1:/var/home/mcinstall % installmc --init [INFO ] Log file path : /var/opt/oracle.minicluster/setup/logs/installmc_102816_140555.log [INFO ] Configuring Firstnet.. Enter Temporary IP addresses : 10.133.82.98 Enter Netmask in CIDR form (valid range: 8-28) : 22 Enter Default Gateway Address : 10.133.80.1 VLAN ID is optional. Do you want to input this value? Enter Y/N (N): Type of Cable Used to Connect Network Ports with the 10 GbE Switch: Copper/Fiber : Copper ---------- Input Summary ---------- PUBLIC_IP = 10.133.82.98 GATEWAY = 10.133.80.1 NETMASK_CIDR = 22 CAN_CABLE_TYPE = COPPER Do you want to change the inputs? Enter Y/N (N): ----------------------------------------------------------------------------------- Initialization of Temporary IP Complete. Please copy over omcips.txt,userinputs.txt to /var/opt/oracle.minicluster/store if you have generated them using the MiniCluster Initial Configuration tool. Then, run installmc --deploy to continue with Firstnet setup ----------------------------------------------------------------------------------- mcinstall@oosmc1-n1:/var/home/mcinstall %
Listing 4: Run the mcinstall script on node 1.

12 | CONFIGURING SAP ON ORACLE MINICLUSTER
Copy the two generated configuration files to /var/opt/oracle.minicluster/store as instructed in Listing 4, and then launch installmc using the --deploy parameter.
mcinstall@oosmc1-n1:/var/home/mcinstall % installmc --deploy [INFO ] Log file path : /var/opt/oracle.minicluster/setup/logs/installmc_102816_141732.log [INFO ] Configuring Firstnet.. +---------------------------------------------------+ | Oracle MiniCluster v1.0 :: Initial System Install | +---------------------------------------------------+ Oct 28 14:17:32 mccn su: 'su root' succeeded for mcinstall on /dev/pts/1 Ready to setup MiniCluster? (Y/N)(Y): Initial system install in progress. Please do not interrupt. Wait for further on-screen instructions. Start Time: 10-28-2016 14:18:51 Oct 28 14:18:51 mccn su: 'su root' succeeded for mcinstall on /dev/pts/2 [INFO ] Log file path : oosmc1-n1:/var/opt/oracle.minicluster/setup/logs/mcmu_102816_141851.log [INFO ] No MCMUACTION table found in the table . ARGS list not updated this time [INFO ] ---------- Starting Oracle MiniCluster Management Utility [INFO ] STEP 1: Check Package Version and Gather User Input STARTED [INFO ] Invoked by OS user: mcinstall [INFO ] Find log at: oosmc1-n1:/var/opt/oracle.minicluster/setup/logs/omc_checkpkg_102816_141854.log [INFO ] ---------- Starting Checking System Package Version [INFO ] Checking System Package Version started. [INFO ] Checking System Package Version succeeded. [INFO ] Checking System Package Version Completed File /var/opt/oracle.minicluster/store/userinputs.txt already exists. ---------- Input Summary ---------- MACHINE_TYPE = S7-2 OMC_UPREFIX = oosmc1 FIRST_PUBLIC_IP = 10.133.82.98 IPCOUNT = 27 GATEWAY = 10.133.80.1 NETMASK_CIDR = 22 DOMAIN_NAME = us.oracle.com DNS_SERVER_LIST = 10.209.76.197,10.209.76.198,192.135.82.132 NTP_SERVER_LIST = 10.132.0.121,10.132.0.122 CAN_CABLE_TYPE = Copper FIRST_ILOM_IP = 10.133.82.96 SECOND_ILOM_IP = 10.133.82.97 ILOM_GATEWAY = 10.133.80.1 ILOM_NETMASK_CIDR = 22 ILOM_DNS_SERVER_LIST = 10.209.76.197,10.209.76.198,192.135.82.132 ILOM_NTP_SERVER_LIST = 10.132.0.121,10.132.0.122 CAN_HA = YES CAN_HA_TYPE = IPMP STORAGE_ARRAY_COUNT = 1 SS_DISK_COUNT = 6 TZ = America/Los_Angeles SECURITY_PROFILE = CIS KEYSTORE_TYPE = pkcs11 OMCTOOLKIT_VERSION = 1.1.17 You can either use the values provided in this file or you can manually overwrite it. Do you wish to use the existing /var/opt/oracle.minicluster/store/userinputs.txt file? Enter Y/N (Y):

13 | CONFIGURING SAP ON ORACLE MINICLUSTER
User Inputs Validation for File /var/opt/oracle.minicluster/store/userinputs.txt Succeeded. [INFO ] STEP 1: Check Package Version and Gather User Input COMPLETED [INFO ] STEP 2: Prepare for System Install STARTED [INFO ] Invoked by OS user: mcinstall [INFO ] Find log at: oosmc1-n1:/var/opt/oracle.minicluster/setup/logs/omc_crdb_102816_141943.log [INFO ] ---------- Starting Creating SQLite Database and Populating USER_INPUT Table [INFO ] Populate USER_INPUT table in SQLite Database started. [INFO ] Populate USER_INPUT table in SQLite Database succeeded. [INFO ] Populate IPADDRESS table in SQLite Database started. [INFO ] Populate IPADDRESS table in SQLite Database succeeded. [INFO ] Set description for IPADDRESS table entries succeeded. [INFO ] ---------- Starting Creating SQLite Database and Populating USER_INPUT Table Verification [INFO ] Check existance of entries in USER_INPUT table started. [INFO ] Check existance of entries in USER_INPUT table succeeded. [INFO ] Populating USER_INPUT Table Completed [INFO ] Invoked by OS user: mcinstall [INFO ] Find log at: oosmc1-n1:/var/opt/oracle.minicluster/setup/logs/omc_gentmpenvvar_102816_141945.log [INFO ] ---------- Starting Generating Environment Variables [INFO ] Generating Environment Variables started. [INFO ] Generating Environment Variables succeeded. [INFO ] ---------- Starting Temporary Environment Variable File Verification [INFO ] Check existence of $OMC_SETUP_DIR/tmp/setenv2.sh file started. [INFO ] Check existence of $OMC_SETUP_DIR/tmp/setenv2.sh file succeeded. [INFO ] Generating Environment Variables Completed [INFO ] STEP 2: Prepare for System Install COMPLETED [INFO ] STEP 3: Interconnect Setup STARTED [INFO ] Log file path : oosmc1-n1:/var/opt/oracle.minicluster/setup/logs/omc_fn_changepvtip_v2_102816_141946.log [INFO ] Reconfiguring Interconnect IP address.. [INFO ] Verifying reconfiguration of Interconnect IP address.. [INFO ] Reconfiguring Interconnect IP address.. Verified Successfully [INFO ] Reconfiguring Interconnect IP address.. Completed [INFO ] STEP 3: Interconnect Setup COMPLETED [INFO ] STEP 4: Configure Explorer STARTED [INFO ] Log file path : oosmc1-n1:/var/opt/oracle.minicluster/setup/logs/omc_explorer_102816_141950.log [INFO ] Configuring explorer... [INFO ] Enter the information to configure Oracle Explorer. [INFO ] Please do not schedule any cron job to run the Explorer, as cron entries will be removed and not run on the MiniCluster. [INFO ] Setting up explorer Absolute path of the Explorer output top location? [/var/explorer/output]: [y]: Retrieving serial number ... (can take time) Company name []: Oracle Contract Identifier []: SAP OOS System (oosmc1-n1, 86bb68e6) serial number [unknown]: 86bb68e6 Contact name []: My Name Contact email address []: [email protected] Phone number []: 16505067000

14 | CONFIGURING SAP ON ORACLE MINICLUSTER
Address (line 1) []: Address (line 2) []: City []: Santa Clara State []: CA Zip []: 95054 Select your geography from this list: 1) AMERICAS 2) EMEA 3) APAC [AMERICAS] 1 AMERICAS Two-character country code or '?' for a list of countries []: US Select the Explorer default transport upload method from this list: 1) Using Diagnostic Assistant (DA) 2) Other transport 3) None [Using Diagnostic Assistant (DA)] Selected: Using Diagnostic Assistant (DA) Do you want to configure Diagnostic Assistant to save credentials (y/n)? [y]: Configuring Diagnostic Assistant to save credentials ... (can take time) If you would like to be notified by email when your explorer output is uploaded into the repository, enter the email address here. When notification is not needed, enter a single '-'. []: [email protected] Solaris zones: By default, Explorer collects data from all running local zones when the option -w localzones is specified. If you wish to limit data collection to only some of the local zones, enter the names of those zones below. Separate multiple zone names with a comma ','. Comma-separated list of zone names or '-' for all zones []: - You have answered: Company name: Oracle Contract ID: SAP OOS System serial number: 86bb68e6 Contact name: My Name Contact email address: [email protected] Phone number: 16505067000 Address (line 1): Address (line 2): City: Santa Clara State: CA Zip: 95054 Country: United States Country Code: US Geography: AMERICAS Default result upload: Using Diagnostic Assistant (DA) Mail output from: [email protected] Mail on data load: [email protected] Solaris zone names: Are these values okay (y/n)? []: y

15 | CONFIGURING SAP ON ORACLE MINICLUSTER
Do you wish to schedule explorer in cron (y/n)? []: y Run explorer weekly or monthly (with w=weekly and m=monthly) []: w At which hour would you like this to run (0 to 23)? 23 At which minute would you like this to run (0 to 59)? 0 On which day would you like this to run (0-6 with 0=Sunday)? 0 Oct 28 14:25:24 oosmc1-n1[21075] explorer: Explorer defaults file updated. Oct 28 14:25:24 oosmc1-n1[21075] explorer: Run /usr/sbin/explorer with options to collect data. [INFO ] To run the Oracle Explorer, please login to the Oracle Engineered Systems Hardware Manager and go to the Support File Bundle tab. [INFO ] Select Compute Server 1 (Node 1) or Compute Server 2 (Node 2) and click create. Explorer will be gathered as a part of the new Support File Bundle. [INFO ] Configuring explorer... Completed [INFO ] Invoked by OS user: mcinstall [INFO ] Find log at: oosmc1-n1:/var/opt/oracle.minicluster/setup/logs/omc_scptonode1_102816_142525.log [INFO ] ---------- Starting Copying Files from 1st Node to 2nd Node [INFO ] Copy file started. [INFO ] Copy file succeeded. [INFO ] All Files have been Copied to 2nd Node successfully [INFO ] Invoked by OS user: mcinstall [INFO ] Find log at: oosmc1-n1:/var/opt/oracle.minicluster/setup/logs/omc_node1exec_102816_142525.log [INFO ] ---------- Starting Executing Script on the 2nd Node [INFO ] Executing Script on the 2nd Node started. [INFO ] Check the existence of the script on the 2nd node [INFO ] Execute the script on the 2nd node [INFO ] Log file path : oosmc1-n2:/var/opt/oracle.minicluster/setup/logs/omc_explorer_102816_142532.log [INFO ] Configuring explorer... [INFO ] Configuring explorer... Completed [INFO ] Executing Script on the 2nd Node succeeded. [INFO ] Executing Script on the 2nd Node Completed [INFO ] STEP 4: Configure Explorer COMPLETED [INFO ] STEP 5: Check System Readiness STARTED [INFO ] Log file path : oosmc1-n1:/var/opt/oracle.minicluster/setup/logs/omc_sysready_combined_v2_102816_142529.log [INFO ] Checking for System Readiness.. Oct 28 14:19:50 mccn last message repeated 2 times Oct 28 14:25:31 mccn su: 'su root' succeeded for mcinstall on /dev/pts/3 [INFO ] Checking for System Readiness.. Completed [INFO ] STEP 5: Check System Readiness COMPLETED [INFO ] STEP 6: Verify Topology STARTED Oct 28 14:27:22 mccn su: 'su root' succeeded for mcinstall on /dev/pts/2 [INFO ] Invoked by OS user: root [INFO ] Find log at: oosmc1-n1:/var/opt/oracle.minicluster/setup/logs/omc_verifytopology_102816_142723.log [INFO ] ---------- Starting Verify Topology [INFO ] Check PCI Layout of Network Cards started. [INFO ] Check PCI Layout of Network Cards succeeded. [INFO ] Check PCI Layout of Estes Cards started. [INFO ] Check PCI Layout of Estes Cards succeeded. [INFO ] Check JBOD Disk Arrays started. [INFO ] Check JBOD Disk Arrays succeeded. [INFO ] Check Interconnectivity between two Compute Nodes started. [INFO ] Check Interconnectivity between two Compute Nodes succeeded. [INFO ] Check Interconnect interface status started.

16 | CONFIGURING SAP ON ORACLE MINICLUSTER
[INFO ] Check Interconnect interface status finished. [INFO ] Check interface status of client access network started. [INFO ] Check interface status of client access network finished. [INFO ] Check SAS cabling started. [INFO ] Check SAS cabling finished. [INFO ] Verifying JBOD(s) Topology Oct 31 11:26:54 mccn last message repeated 2 times Oct 31 11:26:58 mccn su: 'su root' succeeded for root on /dev/pts/4 INFO su to user root successfully. INFO:MCMU.controllers.common.pexpect_util:su to user root successfully. INFO SSH login to 192.168.10.51 successfully. INFO:MCMU.controllers.common.pexpect_util:SSH login to 192.168.10.51 successfully. INFO su to user root successfully. INFO:MCMU.controllers.common.pexpect_util:su to user root successfully. [INFO ] The current connections are - [INFO ] Compute_Node1 PCIE2 SAS_Port0 <--> Storage_Array1 IOM1 Port0 Correct [INFO ] Compute_Node1 PCIE3 SAS_Port1 <--> Storage_Array1 IOM0 Port0 Correct [INFO ] Compute_Node2 PCIE2 SAS_Port1 <--> Storage_Array1 IOM1 Port1 Correct [INFO ] Compute_Node2 PCIE3 SAS_Port0 <--> Storage_Array1 IOM0 Port1 Correct [INFO ] Verifying JBOD(s) Topology finished. [INFO ] Executing omc_verifytopology on the other Compute Node started. : [INFO ] Invoked by OS user: root [INFO ] Find log at: oosmc1-n2:/var/opt/oracle.minicluster/setup/logs/omc_verifytopology_103116_112743.log [INFO ] ---------- Starting Verify Topology [INFO ] Check PCI Layout of Network Cards started. [INFO ] Check PCI Layout of Network Cards succeeded. [INFO ] Check PCI Layout of Estes Cards started. [INFO ] Check PCI Layout of Estes Cards succeeded. [INFO ] Check JBOD Disk Arrays started. [INFO ] Check JBOD Disk Arrays succeeded. [INFO ] Check Interconnectivity between two Compute Nodes started. [INFO ] System setup was not initiated yet. Cannot check interconnectivity between two compute nodes at this time. Try again after initiating system setup. [INFO ] Verify Topology Completed [INFO ] Executing omc_verifytopology on the other Compute Node succeeded. [INFO ] Verify Topology Completed [INFO ] STEP 6: Verify Topology COMPLETED [INFO ] STEP 7: Prepare Network Interfaces STARTED Oct 31 11:27:37 mccn su: 'su root' succeeded for mcinstall on /dev/pts/2 [INFO ] Log file path : oosmc1-n1:/var/opt/oracle.minicluster/setup/logs/omc_fn_netdiscovery_v3_103116_112737.log [INFO ] Network Interface Discovery.. [INFO ] Identifying network interfaces for public network [INFO ] Identifying network interfaces for private network [INFO ] Verifying Network Interface Discovery.. [INFO ] Network Interface Discovery.. Verified Successfully [INFO ] Network Interface Discovery.. Completed [INFO ] Log file path : oosmc1-n1:/var/opt/oracle.minicluster/setup/logs/omc_fn_preppubnet_v2_103116_112742.log [INFO ] Preparing public network for Client Access.. [INFO ] Verifying public network for Client Access.. [INFO ] Preparing public network for Client Access.. Verified Successfully [INFO ] Preparing public network for Client Access.. Completed [INFO ] Invoked by OS user: mcinstall [INFO ] Find log at: oosmc1-n1:/var/opt/oracle.minicluster/setup/logs/omc_scptonode1_103116_112748.log [INFO ] ---------- Starting Copying Files from 1st Node to 2nd Node [INFO ] Copy file started. [INFO ] Copy file succeeded. [INFO ] Copy file started. [INFO ] Copy file succeeded. [INFO ] All Files have been Copied to 2nd Node successfully

17 | CONFIGURING SAP ON ORACLE MINICLUSTER
[INFO ] Invoked by OS user: mcinstall [INFO ] Find log at: oosmc1-n1:/var/opt/oracle.minicluster/setup/logs/omc_node1exec_103116_112749.log [INFO ] ---------- Starting Executing Script on the 2nd Node [INFO ] Executing Script on the 2nd Node started. [INFO ] Check the existence of the script on the 2nd node [INFO ] Execute the script on the 2nd node [INFO ] Log file path : oosmc1-n2:/var/opt/oracle.minicluster/setup/logs/omc_fn_preppubnet_v2_103116_112756.log [INFO ] Preparing public network for Client Access.. [INFO ] Verifying public network for Client Access.. [INFO ] Preparing public network for Client Access.. Verified Successfully [INFO ] Preparing public network for Client Access.. Completed [INFO ] Executing Script on the 2nd Node succeeded. [INFO ] Executing Script on the 2nd Node Completed [INFO ] STEP 7: Prepare Network Interfaces COMPLETED [INFO ] STEP 8: Configure Client Access Network on Node 1 STARTED [INFO ] Log file path : oosmc1-n1:/var/opt/oracle.minicluster/setup/logs/omc_fn_initialpubip_v2_103116_112756.log [INFO ] Performing public IP configuration .. Oct 31 11:27:56 mccn last message repeated 2 times Oct 31 11:28:08 mccn in.mpathd[70]: All IP interfaces in group ipmppub0 are now unusable [INFO ] Verification of public IP configuration .. [INFO ] Performing public IP configuration .. Verified Successfully [INFO ] Performing public IP configuration .. Completed Oct 31 11:28:22 mccn su: 'su root' succeeded for mcinstall on /dev/pts/2 [INFO ] Log file path : oosmc1-n1:/var/opt/oracle.minicluster/setup/logs/omc_fn_routerconfig_v2_103116_112822.log [INFO ] Configuring default router .. [INFO ] Check if gateway(10.133.80.1) is reachable [INFO ] Trial:0 [INFO ] Gateway is reachable. Continuing with configuration [INFO ] Verifying Configuration of default router .. [INFO ] Configuring default router .. Verified Successfully [INFO ] Configuring default router .. Completed [INFO ] Log file path : oosmc1-n1:/var/opt/oracle.minicluster/setup/logs/omc_fn_dnsconfig_v2_103116_112829.log [INFO ] Setting up DNS Client .. [INFO ] Check if any of DNS Server 10.209.76.197,10.209.76.198,192.135.82.132 is un-reachable. [INFO ] Configuring name service switch to use DNS .. [INFO ] Verification of Setting DNS Client .. [INFO ] Setting up DNS Client .. Verified Successfully [INFO ] Setting up DNS Client .. Completed [INFO ] STEP 8: Configure Client Access Network on Node 1 COMPLETED [INFO ] STEP 9: Configure Client Access Network on Node 2 STARTED [INFO ] Invoked by OS user: mcinstall [INFO ] Find log at: oosmc1-n1:/var/opt/oracle.minicluster/setup/logs/omc_scptonode1_103116_112848.log [INFO ] ---------- Starting Copying Files from 1st Node to 2nd Node [INFO ] Copy file started. [INFO ] Copy file succeeded. [INFO ] Copy file started. [INFO ] Copy file succeeded. [INFO ] All Files have been Copied to 2nd Node successfully [INFO ] Invoked by OS user: mcinstall [INFO ] Find log at: oosmc1-n1:/var/opt/oracle.minicluster/setup/logs/omc_node1exec_103116_112849.log [INFO ] ---------- Starting Executing Script on the 2nd Node [INFO ] Executing Script on the 2nd Node started. [INFO ] Check the existence of the script on the 2nd node [INFO ] Execute the script on the 2nd node

18 | CONFIGURING SAP ON ORACLE MINICLUSTER
[INFO ] Log file path : oosmc1-n2:/var/opt/oracle.minicluster/setup/logs/omc_fn_initialpubip_v2_103116_112856.log [INFO ] Performing public IP configuration .. [INFO ] Verification of public IP configuration .. [INFO ] Performing public IP configuration .. Verified Successfully [INFO ] Performing public IP configuration .. Completed [INFO ] Executing Script on the 2nd Node succeeded. [INFO ] Executing Script on the 2nd Node Completed [INFO ] Invoked by OS user: mcinstall [INFO ] Find log at: oosmc1-n1:/var/opt/oracle.minicluster/setup/logs/omc_node1exec_103116_112915.log [INFO ] ---------- Starting Executing Script on the 2nd Node [INFO ] Executing Script on the 2nd Node started. [INFO ] Check the existence of the script on the 2nd node [INFO ] Execute the script on the 2nd node [INFO ] Log file path : oosmc1-n2:/var/opt/oracle.minicluster/setup/logs/omc_fn_routerconfig_v2_103116_112923.log [INFO ] Configuring default router .. [INFO ] Check if gateway(10.133.80.1) is reachable [INFO ] Trial:0 [INFO ] Gateway is reachable. Continuing with configuration [INFO ] Verifying Configuration of default router .. [INFO ] Configuring default router .. Verified Successfully [INFO ] Configuring default router .. Completed [INFO ] Executing Script on the 2nd Node succeeded. [INFO ] Executing Script on the 2nd Node Completed [INFO ] Invoked by OS user: mcinstall [INFO ] Find log at: oosmc1-n1:/var/opt/oracle.minicluster/setup/logs/omc_node1exec_103116_112953.log [INFO ] ---------- Starting Executing Script on the 2nd Node [INFO ] Executing Script on the 2nd Node started. [INFO ] Check the existence of the script on the 2nd nod [INFO ] Execute the script on the 2nd node [INFO ] Log file path : oosmc1-n2:/var/opt/oracle.minicluster/setup/logs/omc_fn_dnsconfig_v2_103116_113001.log [INFO ] Setting up DNS Client .. [INFO ] Check if any of DNS Server 10.209.76.197,10.209.76.198,192.135.82.132 is un-reachable. [INFO ] Configuring name service switch to use DNS .. [INFO ] Verification of Setting DNS Client .. [INFO ] Setting up DNS Client .. Verified Successfully [INFO ] Setting up DNS Client .. Completed [INFO ] Executing Script on the 2nd Node succeeded. [INFO ] Executing Script on the 2nd Node Completed [INFO ] STEP 9: Configure Client Access Network on Node 2 COMPLETED [INFO ] STEP 10: Configure NTP Client, Set Password Policy and Setup Apache Web Server STARTED [INFO ] Log file path : oosmc1-n1:/var/opt/oracle.minicluster/setup/logs/omc_ntpconfig_v2_103116_113013.log [INFO ] Setting up NTP Client .. [INFO ] Check if any of NTP Server 10.132.0.121,10.132.0.122 is reachable. [INFO ] Verifying NTP Client .. [INFO ] Setting up NTP Client .. Verified Successfully [INFO ] Setting up NTP Client .. Completed [INFO ] Invoked by OS user: mcinstall [INFO ] Find log at: oosmc1-n1:/var/opt/oracle.minicluster/setup/logs/omc_node1exec_103116_113141.log [INFO ] ---------- Starting Executing Script on the 2nd Node [INFO ] Executing Script on the 2nd Node started. [INFO ] Check the existence of the script on the 2nd node [INFO ] Execute the script on the 2nd node

19 | CONFIGURING SAP ON ORACLE MINICLUSTER
[INFO ] Log file path : oosmc1-n2:/var/opt/oracle.minicluster/setup/logs/omc_ntpconfig_v2_103116_113140.log [INFO ] Setting up NTP Client .. [INFO ] Check if any of NTP Server 10.132.0.121,10.132.0.122 is reachable. [INFO ] Verifying NTP Client .. [INFO ] Setting up NTP Client .. Verified Successfully [INFO ] Setting up NTP Client .. Completed [INFO ] Executing Script on the 2nd Node succeeded. [INFO ] Executing Script on the 2nd Node Completed [INFO ] Log file path : oosmc1-n1:/var/opt/oracle.minicluster/setup/logs/omc_passwdpolicy_103116_113301.log [INFO ] Starting Configuring Password Policy.. [INFO ] Configuring Password Policy.. Verified Successfully [INFO ] Configuring Password Policy.. Completed [INFO ] Invoked by OS user: mcinstall [INFO ] Find log at: oosmc1-n1:/var/opt/oracle.minicluster/setup/logs/omc_node1exec_103116_113302.log [INFO ] ---------- Starting Executing Script on the 2nd Node [INFO ] Executing Script on the 2nd Node started. [INFO ] Check the existence of the script on the 2nd node [INFO ] Execute the script on the 2nd node [INFO ] Log file path : oosmc1-n2:/var/opt/oracle.minicluster/setup/logs/omc_passwdpolicy_103116_113303.log [INFO ] Starting Configuring Password Policy.. [INFO ] Configuring Password Policy.. Verified Successfully [INFO ] Configuring Password Policy.. Completed [INFO ] Executing Script on the 2nd Node succeeded. [INFO ] Executing Script on the 2nd Node Completed [INFO ] Log file path : oosmc1-n1:/var/opt/oracle.minicluster/setup/logs/omc_fn_apachesslcfg_103116_113304.log [INFO ] Configuring Apache SSL security and Synchronizing the DB.. Oct 31 11:33:01 mccn last message repeated 3 times Oct 31 11:33:07 mccn su: 'su root' succeeded for mcinstall on /dev/pts/3 Oct 31 11:33:08 mccn last message repeated 3 times Oct 31 11:33:08 mccn su: 'su root' succeeded for mcinstall on /dev/pts/3 [INFO ] Verifying Apache SSL setup.. [INFO ] Configuring Apache SSL security and Synchronizing the DB.. Verified Successfully [INFO ] Configuring Apache SSL security and Synchronizing the DB.. Completed ---------------------------------------------------------------------------------------------------------------------------------------------------------- Please download the MiniCluster Component Bundle from Oracle MiniCluster S7-2 Software Download Center (My Oracle Support Doc ID: 2153282.1) and follow the instructions if not done already - If you download the Bundle on your local host, transfer files to both MiniCluster nodes by executing step 1 on both nodes 1.scp <path-on-local-host>/mc-*-sfw.tar.a* mcinstall@<ip-or-host-of-node>:/var/tmp If you downloaded the Bundle directly on MiniCluster nodes, then make sure both nodes have the Bundle under /var/tmp directory. Then run these steps - 2.cd /var/tmp on both the nodes and extract the files using 3.cat mc-*-sfw.tar.a? | gtar -x -C /var/opt/oracle.minicluster/ -f - Please use browser user interface (BUI) to complete the system and tenant setup URL: https://oosmc1-n1.us.oracle.com/MCMU -OR- https://10.133.82.98/MCMU Administrator login ID: mcinstall. Default password: welcome1 If you want to continue using Command Line Interface(CLI) and are currently connected via ILOM, login back to the host as mcinstall user, using public hostname or IP Address, then follow these steps -
20 | CONFIGURING SAP ON ORACLE MINICLUSTER
1.Register mcinstall user using 'mcmu user --create -u mcinstall -e <email> -n <fullname> -p <phone>' command 2.Supervisor must check email and register 'mcinstall' user to activate account 3.Change mcinstall user password using 'mcmu user --changepswd -u mcinstall' command 4.Continue with setup using 'mcmu setupmc -s all' command ---------------------------------------------------------------------------------------------------------------------------------------------------------- [INFO ] STEP 10: Configure NTP Client, Set Password Policy and Setup Apache Web Server COMPLETED [INFO ] Step execution completed successfully installmc completed successfully [INFO ] Configuring Firstnet.. Completed mcinstall@oosmc1-n1:/var/home/mcinstall %
Listing 5: Output from running the mcinstall script on node 1.
Make sure that the script output ends with the message installmc completed successfully. If it does not, fix the error and rerun the script until you achieve successful execution.
Prepare to install the Oracle MiniCluster Component Bundle.
Follow the steps listed at the end of the output (Listing 5). If you have not downloaded the Oracle MiniCluster Component Bundle files previously, go back to My Oracle Support, download the files, and follow the instructions in the file.readme file.
Copy the downloaded component bundle files over to node 1 of Oracle MiniCluster (Listing 6).
Joebar:UserInput user$ scp /Users/user/Downloads/MiniCluster/1.1.18.2/Component\ Bundle/*.zip [email protected]:/var/tmp The authenticity of host 'oosmc1-n1.us.oracle.com (10.133.82.98)' can't be established. RSA key fingerprint is SHA256:qUSQ7Z2JrTGdz26XxzrRiKnxs3X0MORWjpPWoF5Sg3c. Are you sure you want to continue connecting (yes/no)? yes Warning: Permanently added 'oosmc1-n1.us.oracle.com' (RSA) to the list of known hosts. Password: p24844733_100_SOLARIS64_10of12.zip 100% 710MB 11.3MB/s 01:03 p24844733_100_SOLARIS64_11of12.zip 100% 1561MB 11.2MB/s 02:19 p24844733_100_SOLARIS64_12of12.zip 100% 1335MB 11.2MB/s 01:59 p24844733_100_SOLARIS64_1of12.zip 100% 1773MB 11.2MB/s 02:38 p24844733_100_SOLARIS64_2of12.zip 100% 1147MB 11.2MB/s 01:42 p24844733_100_SOLARIS64_3of12.zip 100% 389MB 11.1MB/s 00:35 p24844733_100_SOLARIS64_4of12.zip 100% 1160MB 11.3MB/s 01:43 p24844733_100_SOLARIS64_5of12.zip 100% 1969MB 11.3MB/s 02:55 p24844733_100_SOLARIS64_6of12.zip 100% 1962MB 11.2MB/s 02:55 p24844733_100_SOLARIS64_7of12.zip 100% 1655MB 11.3MB/s 02:27 p24844733_100_SOLARIS64_8of12.zip 100% 1432MB 11.3MB/s 02:07 p24844733_100_SOLARIS64_9of12.zip 100% 258MB 11.7MB/s 00:22 Joebar:UserInput user$
Listing 6: Copy the Oracle MiniCluster Component Bundle to node 1.

21 | CONFIGURING SAP ON ORACLE MINICLUSTER
Copy the bundle files from node 1 over to node 2.
Joebar:UserInput user$ ssh mcinstall@oosmc1-n1 The authenticity of host 'oosmc1-n1 (10.133.82.98)' can't be established. RSA key fingerprint is SHA256:qUSQ7Z2JrTGdz26XxzrRiKnxs3X0MORWjpPWoF5Sg3c. Are you sure you want to continue connecting (yes/no)? yes Warning: Permanently added 'oosmc1-n1' (RSA) to the list of known hosts. Password: Last login: Mon Oct 31 13:42:08 2016 from Joebar Oracle Corporation SunOS 5.11 11.3 August 2016 mcinstall@oosmc1-n1:/var/home/mcinstall % scp /var/tmp/*.zip [email protected]:/var/tmp The authenticity of host 'oosmc1-n2.us.oracle.com (10.133.82.99)' can't be established. RSA key fingerprint is 02:38:61:d5:4f:33:4c:dd:d9:ad:93:20:19:89:28:1b. Are you sure you want to continue connecting (yes/no)? yes Warning: Permanently added 'oosmc1-n2.us.oracle.com,10.133.82.99' (RSA) to the list of known hosts. Password: p24844733_100_SOLARI 100% |*********************************| 709 MB 00:06 p24844733_100_SOLARI 100% |*********************************| 1561 MB 00:13 p24844733_100_SOLARI 100% |*********************************| 1334 MB 00:11 p24844733_100_SOLARI 100% |*********************************| 1772 MB 00:15 p24844733_100_SOLARI 100% |*********************************| 1146 MB 00:10 p24844733_100_SOLARI 100% |*********************************| 388 MB 00:03 p24844733_100_SOLARI 100% |*********************************| 1160 MB 00:10 p24844733_100_SOLARI 100% |*********************************| 1968 MB 00:17 p24844733_100_SOLARI 100% |*********************************| 1962 MB 00:17 p24844733_100_SOLARI 100% |*********************************| 1655 MB 00:14 p24844733_100_SOLARI 100% |*********************************| 1432 MB 00:12 p24844733_100_SOLARI 100% |*********************************| 258 MB 00:02 mcinstall@oosmc1-n1:/var/home/mcinstall %
Listing 7: Copy the Oracle MiniCluster Component Bundle files to node 2.
On both nodes, unzip the downloaded files, assemble the image files into a full tar image, and uncompress the final images into the path /var/opt/oracle.minicluster/. Listings 8 and 9 show the steps to unpack the bundle on node 1 and node 2, respectively.
mcinstall@oosmc1-n1:/var/home/mcinstall % cd /var/tmp mcinstall@oosmc1-n1:/var/tmp % /bin/unzip '*.zip' Archive: p24844733_100_SOLARIS64_1of12.zip inflating: mc-1.1.18.2-sfw.tar.aa inflating: MC-README.txt Archive: p24844733_100_SOLARIS64_5of12.zip inflating: mc-1.1.18.2-sfw.tar.ae Archive: p24844733_100_SOLARIS64_9of12.zip inflating: mc-1.1.18.2-sfw.tar.ai Archive: p24844733_100_SOLARIS64_12of12.zip inflating: mc-1.1.18.2-sfw.tar.al Archive: p24844733_100_SOLARIS64_8of12.zip inflating: mc-1.1.18.2-sfw.tar.ah Archive: p24844733_100_SOLARIS64_4of12.zip inflating: mc-1.1.18.2-sfw.tar.ad
Listing 8: Unpacking the archive files on node 1.

22 | CONFIGURING SAP ON ORACLE MINICLUSTER
Joebar:UserInput user$ ssh mcinstall@oosmc1-n2 The authenticity of host 'oosmc1-n2 (10.133.82.99)' can't be established. RSA key fingerprint is SHA256:qZbF3BjP+i9TGZSp81JELn0Muk6fG+VNmG5yDqt8g7M. Are you sure you want to continue connecting (yes/no)? yes Warning: Permanently added 'oosmc1-n2,10.133.82.99' (RSA) to the list of known hosts. Password: Last login: Mon Oct 31 14:15:57 2016 from oosmc1-n1.us.or Oracle Corporation SunOS 5.11 11.3 August 2016 mcinstall@oosmc1-n2:/var/home/mcinstall % cd /var/tmp mcinstall@oosmc1-n2:/var/tmp % /bin/unzip '*.zip' Archive: p24844733_100_SOLARIS64_3of12.zip inflating: mc-1.1.18.2-sfw.tar.ac Archive: p24844733_100_SOLARIS64_7of12.zip inflating: mc-1.1.18.2-sfw.tar.ag Archive: p24844733_100_SOLARIS64_12of12.zip inflating: mc-1.1.18.2-sfw.tar.al Archive: p24844733_100_SOLARIS64_2of12.zip inflating: mc-1.1.18.2-sfw.tar.ab Archive: p24844733_100_SOLARIS64_6of12.zip inflating: mc-1.1.18.2-sfw.tar.af Archive: p24844733_100_SOLARIS64_8of12.zip inflating: mc-1.1.18.2-sfw.tar.ah Archive: p24844733_100_SOLARIS64_4of12.zip inflating: mc-1.1.18.2-sfw.tar.ad Archive: p24844733_100_SOLARIS64_11of12.zip inflating: mc-1.1.18.2-sfw.tar.ak Archive: p24844733_100_SOLARIS64_1of12.zip inflating: mc-1.1.18.2-sfw.tar.aa inflating: MC-README.txt Archive: p24844733_100_SOLARIS64_5of12.zip inflating: mc-1.1.18.2-sfw.tar.ae Archive: p24844733_100_SOLARIS64_9of12.zip inflating: mc-1.1.18.2-sfw.tar.ai Archive: p24844733_100_SOLARIS64_10of12.zip inflating: mc-1.1.18.2-sfw.tar.aj 12 archives were successfully processed. mcinstall@oosmc1-n2:/var/tmp % cat mc-*-sfw.tar.a? | gtar -x -C /var/opt/oracle.minicluster/ -f - mcinstall@oosmc1-n2:/var/tmp %
Listing 9: Unpacking the archive files on node 2.
Complete the setup using the Oracle MiniCluster Configuration Utility.
Complete the setup using the Oracle MiniCluster Configuration Utility (MCMU), which is a browser-based user interface (BUI) for performing management tasks. Open the utility by pointing a browser to the address https://oosmc1-n1.us.oracle.com/MCMU (Figure 13). If you are logging into MCMU for the first time, the utility requires you to sign in using default credentials (username mcinstall and password welcome1) and then define a new password.

23 | CONFIGURING SAP ON ORACLE MINICLUSTER
Figure 13: Open the Oracle MiniCluster Configuration Utility.
Register and approve the installation administrator account (Figure 14). An email should be sent to you with an approval link.
Figure 14: Register the new administrator account.
Figure 15 lists the configuration steps. Click Next to proceed with the configuration.

24 | CONFIGURING SAP ON ORACLE MINICLUSTER
Figure 15: Oracle MiniCluster configuration steps.
On the System Setup screen, click Run all steps to complete the system setup (Figure 16). Steps 1 to 10 should already be completed.
Figure 16: Run the system setup steps.
Figure 17 reflects system setup progress. Once all the system setup steps are complete (Figure 18), click Continue.

25 | CONFIGURING SAP ON ORACLE MINICLUSTER
Figure 17: System setup is in progress.
Figure 18: System setup is complete.
Create Database VM Profiles for the SAP Environment After the system setup process is complete, it is necessary to configure database (DB) and application (App) VM group profiles according to SAP environment requirements. VM groups are collections of VMs that share the same profile characteristics, such as the number of VMs per compute node, the number of cores assigned to each VM, and management network host names and IP addresses for VMs. You will use the Oracle MiniCluster Configuration Utility interface to define (or later modify) the database and application VM group profiles.

26 | CONFIGURING SAP ON ORACLE MINICLUSTER
Create host name entries for database VMs in the DNS configuration.
First, add the necessary host names with their corresponding IP addresses to the DNS configuration. Table 4 lists the entries for database VMs in the sample deployment.
TABLE 4: HOST NAMES AND IP ADDRESSES FOR DATABASE VMS
Host Name IP Address
sapdb1-vm1-n1 10.133.82.108
sapdb1-vm1-n1-vip 10.133.82.109
sapdb1-vm1-n2 10.133.82.110
sapdb1-vm1-n2-vip 10.133.82.111
sapdb1scan 10.133.82.112
sapdb1scan 10.133.82.113
sapdb1scan 10.133.82.114
Use the Oracle MiniCluster Configuration Utility to configure the database VM group profile.
Figure 19 shows the main screen of the Oracle MiniCluster Configuration Utility. Under Database, click Virtual Machine Group Profile.
Figure 19: Oracle MiniCluster Configuration Utility main screen.

27 | CONFIGURING SAP ON ORACLE MINICLUSTER
Click Create New Profile (Figure 20).
Figure 20: Creating a new database VM group profile.
Enter a name in the Virtual Machine Group Name field. For Role Separated, select Yes. As shown in Figure 21, the utility will create profile with single VM on node 1 and a single VM on node 2. Click Next.
Figure 21: Enter information for the database VM group.

28 | CONFIGURING SAP ON ORACLE MINICLUSTER
Enter public host names for the VMs (Figure 22). It is an SAP requirement that you limit the number of characters in host names to 13 characters or less. According to "SAP Note 611361,” a host name must be an alphanumerical string up to 13 characters; it can contain alpha characters [A–Z] and [a–z], digits [0–9], and a hyphen or minus character (-); and it must begin with an alpha character. (Access to SAP Notes requires logon and authentication to the SAP Support Portal.) After entering the host names, click Next.
Figure 22: Enter host names for the database VMs.
As shown in Figure 23, enter a database Single Client Access Name (SCAN). Click Next.
Figure 23: Enter a SCAN name for the database cluster.

29 | CONFIGURING SAP ON ORACLE MINICLUSTER
On the Review screen (Figure 24), verify the parameters and click Generate.
Figure 24: Review the database profile parameters.
Figure 25 shows status for the database VM group profile.
Figure 25: Status of the database VM group profile.
30 | CONFIGURING SAP ON ORACLE MINICLUSTER
After profile configuration is complete (Figure 26), click Done.
Figure 26: Profile configuration is complete.
Click Deploy to confirm and create the VMs based on the profile (Figure 27).
Figure 27: Deploying the profile.
31 | CONFIGURING SAP ON ORACLE MINICLUSTER
Figure 28 shows profile deployment status. Click Finish once the process completed. Do not close the pop-up window until the Finish button appears.
Figure 28: Status of deploying the database VM group profile.
As Figure 29 shows, the database VM group (with one VM on each node) is now active.
Figure 29: The database VM group is active.

32 | CONFIGURING SAP ON ORACLE MINICLUSTER
Create Application VM Profiles for the SAP Environment Using a similar process and the Oracle MiniCluster Configuration Utility, create a VM group profile for the application VMs.
Create host name entries for application VMs in DNS.
Add the necessary host names with their corresponding IP addresses to the DNS configuration. Table 5 lists the entries for the application VMs in the sample deployment.
TABLE 5: HOST NAMES AND IP ADDRESSES FOR APPLICATION VMS
Host Name IP Address
oos1-app1 10.133.82.115
oos1-app2 10.133.82.116
Use the Oracle MiniCluster Configuration Utility to configure the application VM group profile.
Under Application, click Virtual Machine Group Profile. On that screen, click Create New Profile. Enter a name for the profile group (Figure 30) and click Next.
Figure 30: Creating a new application VM group profile.
Enter the public host names (Figure 31) and then click Next.

33 | CONFIGURING SAP ON ORACLE MINICLUSTER
Figure 31: Enter public host names for the application VMs.
Review the settings, and then click Generate (Figure 32).
Figure 32: Review profile parameters.
After the application VM group profile is configured, click Done (Figure 33).

34 | CONFIGURING SAP ON ORACLE MINICLUSTER
Figure 33: Profile configuration is complete.
Review the settings and then click Deploy (Figure 34).
Figure 34: Deploying the profile.

35 | CONFIGURING SAP ON ORACLE MINICLUSTER
Click Finish once the process has been completed.
Figure 35: Status of deploying the application VM group profile.
As Figure 36 shows, the application VM group (with a single VM on each node) is now active.
Figure 36: The application VM group is active.

36 | CONFIGURING SAP ON ORACLE MINICLUSTER
Complete the Installation To complete the rest of the SAP installation steps, it is necessary to perform two additional steps: creating the user sapadmin as a Tenant Admin user and setting up an Oracle Database home.
Create the sapadmin user.
From the MCMU initial screen, click Register and complete the user registration screen, selecting Tenant Admin for Type of User (Figure 37).
Figure 37: Creating a Tenant Admin user.
An email with the subject “New User Approval Request: MiniCluster Administration” will be sent to the Oracle MiniCluster Approval Board. The link in the email must be used to approve the new user account. After the new user approval request is approved, the sapadmin account appears in the listing of user accounts (Figure 38).

37 | CONFIGURING SAP ON ORACLE MINICLUSTER
Figure 38: The sapadmin account now appears on the User Accounts page.
An email will be sent directly to the sapadmin user to activate the account and create a new password.
Create the Oracle Database home.
Create a database home for the SAP installation in both database VMs. Under Database, select Instances and click Create DB Home (Figure 39).
Figure 39: Select Create Database Home to create the database home.

38 | CONFIGURING SAP ON ORACLE MINICLUSTER
On the Create Database Home page, specify the appropriate settings for the database version, the Oracle Database home path, and the patch level (Figure 40). Click Create.
Figure 40: Specify settings for the database home.
A status page appears, estimating the remaining time needed to create the database home (Figure 41).
Figure 41: The status page estimates the time remaining to create the database home.

39 | CONFIGURING SAP ON ORACLE MINICLUSTER
Part 2: Installing Highly Available SAP on Oracle MiniCluster Part 2 describes how to set up a highly available configuration to run SAP applications on Oracle
MiniCluster. This supplies step-by-step procedures to install the SAP software components and
configure SAPCTL to manage clustered resources.
SAP Installation Considerations These steps describe how to install and configure SAP ERP 6.0 EHP8 using Oracle Database 12c and Oracle Real Application Clusters (Oracle RAC) on two nodes in an HA environment Before deploying SAP on Oracle MiniCluster, it is important to review the following software support information:
» Supported SAP products on Oracle MiniCluster. All SAP products that are supported on Oracle Solaris 11 for SPARC are supported on Oracle MiniCluster. SAP products must be delivered with SAP Kernel Release 7.21 EXT and higher, or with SAP NetWeaver 7.0 and higher. Additional related information can be found in SAP Notes 2384855 and 2136441 (access to SAP Notes requires logon and authentication to the SAP Support Portal). The SAP Product Availability Matrix (PAM) is the recommended source for product support information.
» Supported Oracle Database software on Oracle MiniCluster. Oracle RAC and single-instance Oracle Database 12c environments are supported with SAP applications on Oracle MiniCluster. (Note that Oracle RAC One Node is not supported with SAP.) SAP Note 2384855, “Oracle MiniCluster for SAP,” is updated on a regular basis to reflect any changes with respect to running SAP applications on Oracle MiniCluster.
» Clustering solution for SAP HA on Oracle MiniCluster. SAPCTL is the recommended tool to deploy highly available SAP systems on Oracle MiniCluster. SAPCTL is developed for the Oracle Clusterware framework, and it can take care of the (A)SCS and ERS of the SAP system in an HA environment. SAPCTL provides an easy-to-use user interface, scripts, and dependencies for Oracle Clusterware and SAP HA components. It consolidates the functionality of the Oracle command-line tools by enabling you to easily manage the SAP ASCS for ABAP and Java, the SAP ERS for ABAP and Java, and the additional virtual IP addresses used by the SAP Instances.
Once SAP is installed, you can use SAPCTL to construct an HA configuration that uses Oracle Clusterware. In an Oracle RAC environment, Oracle Clusterware monitors Oracle RAC components (such as instances and services). If a failure occurs, Oracle Clusterware automatically attempts to fail over the failed component to another cluster node and/or redirects operations to a surviving component. Consult SAP Note 1496927 for additional guidance on downloading and using SAPCTL to implement ASCS and ERS as highly available services.
Overview of the SAP Installation Process An SAP ERP ABAP deployment requires the following installation and configuration procedures on the Oracle MiniCluster:
1. Download SAP and Oracle Database software. 2. Install the latest SAP bundle patch for Oracle Grid Infrastructure 12c. 3. Configure logical hosts and shared storage. 4. Prepare database instances on the database nodes. 5. Install the ABAP ASCS instance. 6. Install the ERS instance. 7. Create the SAP database instance. 8. Install the Primary Application Server (PAS). 9. Perform post-installation steps.

40 | CONFIGURING SAP ON ORACLE MINICLUSTER
10. Perform final HA configuration steps.
The rest of this article describes these procedures, providing step-by-step instructions and recommendations.
Download SAP and Oracle Database Software Download the SAP Software Provisioning Manager.
Download the SAP Software Provisioning Manager (sapinst) by logging in to the SAP Support Portal and navigating to the SAP Software Downloads site (https://support.sap.com/swdc). In the section “Types of Software,” click Access downloads under Installations & Upgrades. Navigate to the software as follows:
Select By Alphabetical Index (A-Z) N SAP NetWeaver SAP NetWeaver 7.5 Software Provisioning Mgr 1.0 from the drop-down menu, select Solaris on SPARC 64bit SWPM<release>.SAR
Download the SAP ERP software.
Download the SAP ERP software by clicking Access downloads under Installations & Upgrades. Search for the software as follows:
Select By Alphabetical Index (A-Z) E SAP ERP SAP ERP ENHANCE PACKAGE EHP8 FOR SAP ERP 6.0 INSTALLATION AND UPGRADE
From the drop-down menu, set the filter to “ORACLE DATABASE” and download files SAP ERP 6.0 EHP8 Installation Export (1-4), in four separate files.
Download the SAP Kernel.
Download the SAP NetWeaver software by clicking Access downloads under Installations & Upgrades. Navigate to the software as follows:
Select By Alphabetical Index (A-Z) E SAP ERP SAP ERP ENHANCE PACKAGE EHP8 FOR SAP ERP 6.0 SAP NetWeaver 7.5 SAP KERNEL 7.45 64-BIT UNICODE INSTALLATION
From the drop-down menu, set the filter to “SOLARIS” and download the file named “SAP Kernel 7.45 Solaris on SPARC 64bit - NW 7.5.”
Note: Advanced (expert) users may also download the up-to-date SAP kernel patch level from Support Packages and Patches. Make sure to download all the required packages including: SAPEXE.SAR, SAPEXEDB.SAR, DBATOOLS.SAR, SAPHOSTAGENT.SAR, igsexe.sar, and igshelper.sar, and for a Java system, also download SAPJVM.SAR. Do not mix EXT and non-EXT packages! Download all these files to a new folder, and provide the folder name when the installer asks for the location of these packages.
Download the Oracle Database software.
Download the Oracle Database software by clicking Access downloads under Databases. Navigate to the software as follows:
Select Database and Database Patches Oracle Oracle 12.1 Software (64-bit) INSTALLATION
From the drop-down lists, set the filter to “SOLARIS” and “ORACLE DATABASE”, and download files for “Oracle 12.1 RDBMS Solaris on SPARC 64bit (1-2)” in two separate files, and download the file named “Oracle Client 12.1.0.2.”

41 | CONFIGURING SAP ON ORACLE MINICLUSTER
Install the Latest SAP Bundle Patch for Oracle Grid Infrastructure Download the SAP bundle patch.
At the time that this document was written, the latest SAP bundle patch was release 12.1.0.2.170418. Because Oracle MiniCluster is in the Oracle engineered systems family, it is necessary to apply the SAP bundle patch for Oracle Exadata and Oracle SuperCluster. To download the patch, visit https://support.sap.com/swdc and click Access downloads under Databases. Navigate to the bundle patch as follows:
Select Database and Database Patches Oracle Oracle Patch and Software Downloads (12.1.0.2.0) …for Exadata & SuperCluster
From the drop-down list, set the filter to “SOLARIS ON SPARC 64BIT” and download all available files. Set the filter to “# OS INDEPENDENT” and download the latest OPATCH and MOPATCH packages.
Apply the SAP bundle patch.
Open the readme file (README12102P_1702-20012309.HTM) and follow the instructions to patch the Oracle Grid Infrastructure software. With the advent of Oracle MiniCluster software release 1.1.25.4, it is no longer necessary to roll back the standard Database Patch Set Update (PSU); the Oracle MiniCluster software release includes the Oracle Proactive Bundle Patch.
Set the environment variables as shown in Listing 10.
export ORACLE_HOME=/u01/app/12.1.0.2/grid export PATH=/u01/app/12.1.0.2/grid/bin:/u01/app/12.1.0.2/grid/OPatch:$PATH export OHGRID=/u01/app/12.1.0.2/grid export OHRDBMS=/oracle/MCL/121 export IHRDBMS=/u01/app/oracle/product/12.1.0/dbhome_1 export SBPFUSER=/usr/sbin/fuser
Listing 10: Environment variables.
Execute steps 1 to 14 of the readme file (under section 2.2, “Installing the SAP Bundle Patch”).
Note: Step 15 and onwards will be executed later in section “Post-Installation Steps” after the SAP software installation is completed.
Configure Logical Hosts and Shared Storage on Database VMs Edit the /etc/hosts files on both nodes.
Oracle Clusterware implements the concept of logical (or virtual) host names, which monitor network access availability and, if necessary, can move an IP address, managed as a resource, between nodes. To create an HA SAP configuration, you must define additional IP addresses and host names for logical hosts for the ASCS and ERS instances. In the example installation, we used logical host names vm1-lh1 and vm1-lh2, adding entries to /etc/hosts on both nodes. Make sure to add both the simple host names and the fully qualified domain names.
::1 localhost 127.0.0.1 localhost loghost 10.133.82.108 sapdb1-vm1-n1.us.oracle.com sapdb1-vm1-n1 10.133.82.110 sapdb1-vm1-n2.us.oracle.com sapdb1-vm1-n2 10.133.82.109 vm1-n1-vip.us.oracle.com vm1-n1-vip 192.168.10.60 sapdb1-vm1-n1-priv 10.133.82.111 vm1-n2-vip.us.oracle.com vm1-n2-vip 192.168.10.61 sapdb1-vm1-n2-priv 10.133.82.130 vm1-lh1.us.oracle.com vm1-lh1

42 | CONFIGURING SAP ON ORACLE MINICLUSTER
10.133.82.131 vm1-lh2.us.oracle.com vm1-lh2 10.133.82.115 oos1-app1.us.oracle.com oos1-app1 10.133.82.116 oos1-app2.us.oracle.com oos1-app2
Listing 11: Adding entries for logical hosts to the /etc/hosts files.
Create logical hosts for SAP ASCS and ERS.
Create logical hosts for SAP ASCS and ERS in the global zones on both nodes. The IP configuration for these logical hosts will be deleted after the SAP installation because SAPCTL will eventually manage the logical hosts. In the global zone of the first node, enter the following commands:
root@oosmc1-n1:~# zoneadm list -iv ID NAME STATUS PATH BRAND IP 0 global running / solaris shared 2 acfskz running - solaris-kz excl 21 appvm1-vm1-oosmc1-n1 running /mcpool/appvm1-vm1-oosmc1-n1zroot solaris excl 24 sapdb1-vm1-oosmc1-n1 running /mcpool/sapdb1-vm1-oosmc1-n1zroot solaris excl - appzonetemplate installed /mcpool/appzonetemplate solaris excl - dbzonetemplate installed /mcpool/dbzonetemplate solaris excl root@oosmc1-n1:~# zonecfg -z sapdb1-vm1-oosmc1-n1 zonecfg:sapdb1-vm1-oosmc1-n1> add anet zonecfg:sapdb1-vm1-oosmc1-n1:anet> set linkname=sap_net2 zonecfg:sapdb1-vm1-oosmc1-n1:anet> set lower-link=net2 zonecfg:sapdb1-vm1-oosmc1-n1:anet> end zonecfg:sapdb1-vm1-oosmc1-n1> verify zonecfg:sapdb1-vm1-oosmc1-n1> commit zonecfg:sapdb1-vm1-oosmc1-n1> exit
Listing 12: Configuring a logical host on node 1.
In the global zone of the second node, repeat the commands in Listing 12 to configure logical hosts.
Shut down cluster services and reboot the database VMs.
root@oosmc1-n1:~# zlogin sapdb1-vm1-oosmc1-n1 root@sapdb1-vm1-n1:~# /u01/app/12.1.0.2/grid/bin/crsctl stop cluster –n sapdb1-vm1-n1 root@sapdb1-vm1-n1:~# reboot
Listing 13: Rebooting database VMs on node 1.
Repeat the commands in Listing 13 on the second node.
Configure virtual interfaces in the database VMs.
root@sapdb1-vm1-n1:~# dladm show-link LINK CLASS MTU STATE OVER sap_net2 vnic 1500 up ? aggrpvt0 vnic 1500 up ? net0 vnic 1500 up ? net2 vnic 1500 up ? root@sapdb1-vm1-n1:~# ipadm create-ip sap_net2 root@sapdb1-vm1-n1:~# ipadm create-addr -a 10.133.82.130/22 sap_net2 root@sapdb1-vm1-n1:~# ipadm show-addr ADDROBJ TYPE STATE ADDR lo0/v4 static ok 127.0.0.1/8 aggrpvt0/v4 static ok 192.168.10.60/24 aggrpvt0/v4a static ok 169.254.26.62/16 ipmppub0/v4 static ok 10.133.82.108/22 ipmppub0/v4a static ok 10.133.82.109/22 ipmppub0/v4b static ok 10.133.82.114/22 sap_net2/v4 static ok 10.133.82.130/22 lo0/v6 static ok ::1/128 aggrpvt0/v6 addrconf ok fe80::8:20ff:fe25:78e9/10

43 | CONFIGURING SAP ON ORACLE MINICLUSTER
Listing 14: Configuring the virtual network.
Use ipadm commands like those in Listing 14 to configure a virtual interface on the second node.
Disable IP filtering in both database VM nodes.
After the installation and setup is completed, IP filtering must be enabled again.
root@sapdb1-vm1-n1:~# svcadm disable svc:/network/ipfilter:default
Listing 15: Disable IP filtering on node 1.
Repeat the command in Listing 15 on the second node.
Configuring Shared SAP File Systems
Shared file systems are created as subfolders under /sharedstore, as shown in Table 6.
TABLE 6: SHARED FILE SYSTEMS
Subfolder under /sharedstore Local mountpoint
/software /software
/MCL/oracle /oracle/MCL
/MCL/sapmnt /sapmnt/MCL
/MCL/trans /usr/sap/trans
/MCL/usrsap /usr/sap/MCL
Create subfolders in /sharedstore.
root@sapdb1-vm1-n2:~# cd /sharedstore/ root@sapdb1-vm1-n2:/sharedstore# mkdir -p MCL/oracle root@sapdb1-vm1-n2:/sharedstore# mkdir -p MCL/sapmnt root@sapdb1-vm1-n2:/sharedstore# mkdir -p MCL/trans root@sapdb1-vm1-n2:/sharedstore# mkdir -p MCL/usrsap root@sapdb1-vm1-n2:/sharedstore# mkdir software
Listing 16: Creating subfolders.
Create local folders.
root@sapdb1-vm1-n2:/~# mkdir -p /sapmnt/MCL root@sapdb1-vm1-n2:/~# mkdir -p /oracle/MCL root@sapdb1-vm1-n2:/~# mkdir -p /usr/sap/MCL root@sapdb1-vm1-n2:/~# mkdir /software
Listing 17: Creating local folders.
Add entries in /etc/vfstab specifying file systems and mount points.
10.133.82.104:/sharedstore/sharedstore/MCL/sapmnt - /sapmnt/MCL nfs - yes rw,bg,hard,rsize=1048576,wsize=1048576,proto=tcp 10.133.82.104:/sharedstore/sharedstore/software - /software nfs - yes rw,bg,hard,rsize=1048576,wsize=1048576,proto=tcp 10.133.82.104:/sharedstore/sharedstore/MCL/oracle - /oracle/MCL nfs - yes rw,bg,hard,rsize=1048576,wsize=1048576,proto=tcp 10.133.82.104:/sharedstore/sharedstore/MCL/usrsap - /usr/sap/MCL nfs - yes rw,bg,hard,rsize=1048576,wsize=1048576,proto=tcp
Listing 18: Adding entries to /etc/vfstab files.

44 | CONFIGURING SAP ON ORACLE MINICLUSTER
Mount the shared file systems.
Unmount /sharedstore and delete its entry in /etc/vfstab. Mount the shared file systems and set permissions, as shown in Listing 19.
root@sapdb1-vm1-n2:/~# mountall root@sapdb1-vm1-n2:/~# chown -R oracle:oinstall /oracle root@sapdb1-vm1-n2:/~# chmod 755 /oracle root@sapdb1-vm1-n2:~# df -F nfs -h Filesystem Size Used Available Capacity Mounted on 10.133.82.104:/commonfs/commonfs/sfw 100G 24G 76G 25% /oracleBits 10.133.82.104:/sharedstore/sharedstore/software 18T 70G 18T 1% /software 10.133.82.104:/sharedstore/sharedstore/MCL/oracle 18T 70G 18T 1% /oracle/MCL 10.133.82.104:/sharedstore/sharedstore/MCL/sapmnt 18T 70G 18T 1% /sapmnt/MCL 10.133.82.104:/sharedstore/sharedstore/MCL/usrsap 18T 70G 18T 1% /usr/sap/MCL
Listing 19: Mounting shared file systems.
Create a link for ORACLE_HOME with the user oracle.
oracle@sapdb1-vm1-n2:~$ ln -s /u01/app/oracle/product/12.1.0/dbhome_1 /oracle/MCL/121
Listing 20: Linking ORACLE_HOME.
Configuring Users and Groups
Oracle MiniCluster uses NFSv4 as the default network file sharing protocol. Users and groups that are used system-wide must exist on the NFS file server (in the storage VM) with identical IDs.
Create groups sapinst and sapsys in all storage and database VMs.
root@<instance>:~# groupadd -g 700 sapinst root@<instance>:~# groupadd -g 701 sapsys
Listing 21: Creating groups.
Create user mcladm in both storage VMs.
root@oosmc1ss01:~# useradd -c "SAP System Admin" -u 2001 -g sapsys mcladm
Listing 22: Creating mcladm user.
Create SAP OS users in both database VMs.
root@sapdb1-vm1-n1:~# useradd -c "SAP System Admin" -u 2001 -s "/bin/tcsh" -g sapsys -G dba,oper,oinstall -m mcladm 80 blocks root@sapdb1-vm1-n1:~# useradd -c "SAP System" -u 2002 -s "/bin/false" -g sapsys -m sapadm 80 blocks root@sapdb1-vm1-n1:~# useradd -c "SAP System" -u 2003 -s "/bin/tcsh" -g sapsys -m daaadm 80 blocks root@sapdb1-vm1-n1:~# useradd -c "SAP Database Admin" -u 2004 -s "/bin/tcsh" -g dba -G oper -m oramcl 80 blocks
Listing 23: Creating SAP OS users.

45 | CONFIGURING SAP ON ORACLE MINICLUSTER
Prepare Database Instances on Database Nodes To prepare and install the database instances on the database (DB) nodes, choose the sapinst menu option RAC/ASM/Exadata Database Instance Preparation ABAP – Kernel 7.4x. Database instance preparation steps include:
» Installing SAP kernel-independent and database-dependent parts of the SAP kernel » Installing BR*Tools as a portion of the database-dependent part » Installing Oracle Database Instant Client » Creating SAP users and groups (which was done previously in Listing 21 through Listing 23) » Preparing the environment for running the SAP database on Oracle Automatic Storage Management (Oracle
ASM) with Oracle RAC
At the time of the installation of the sample deployment documented in this article, there were two ways to run the SAP Software Provisioning Manager (sapinst), the GUI for installing SAP software components:
» Running sapinst locally on the database node. For this option, X11Forwarding must be enabled in the file /etc/ssh/sshd_config. After installation, X11Forwarding must be disabled to meet basic security requirements.
» Starting sapinst with the parameter –nogui on a remote system, and then starting sapinstgui to connect to the session.
A more recent release of the SAP Software Provisioning Manager introduces a browser-based interface to perform software installation steps. For more information, see the SAP NetWeaver on UNIX and Oracle Database installation guide.
For the sample deployment, we used the method of running sapinst locally after creating a local installation directory (Listing 24).
root@sapdb1-vm1-n1:~# mkdir -p /sapinstlog/prep root@sapdb1-vm1-n1:~# cd /sapinstlog/prep root@sapdb1-vm1-n1:/sapinstlog/prep# /software/SWPM/sapinst
Listing 24: Creating local installation directory and starting sapinst.

46 | CONFIGURING SAP ON ORACLE MINICLUSTER
The sapinst GUI displays an initial screen (Figure 42).
Under Generic Options, navigate to the installation option, as follows:
Select Oracle Database Tools RAC/ASM/Exadata Database Instance Preparation ABAP-Kernel 7.4x
The SAP kernel version and stack should match the subsequent SAP NetWeaver product selection.
Figure 42. Using the sapinst GUI to navigate to the installation option.

47 | CONFIGURING SAP ON ORACLE MINICLUSTER
If the default parameter settings are suitable for your requirements, select Typical as the installation parameter mode (Figure 43) and click Next.
Figure 43. Typical mode uses default parameter settings for installation.

48 | CONFIGURING SAP ON ORACLE MINICLUSTER
Messages indicate whether ownership and permission changes are necessary for the installation directory. Click OK to confirm permission changes.
Figure 44. Messages indicate if directory changes are necessary.
Deselect Profiles Available because we are performing a fresh installation that does not use existing parameters from a profile.
Figure 45. Deselecting “Profiles Available.”

49 | CONFIGURING SAP ON ORACLE MINICLUSTER
Set SAP System ID (SAPSID) to MCL and the mount directory as /sapmnt/MCL (Figure 46).
Figure 46. Specifying SAP parameters.

50 | CONFIGURING SAP ON ORACLE MINICLUSTER
Select the checkbox so that the SAP system will generate the FQDN, and enter the DNS domain name (Figure 47).
Figure 47. Specifying the DNS domain name.

51 | CONFIGURING SAP ON ORACLE MINICLUSTER
Set the master password (Figure 48).
Figure 48. Specifying the master password.
52 | CONFIGURING SAP ON ORACLE MINICLUSTER
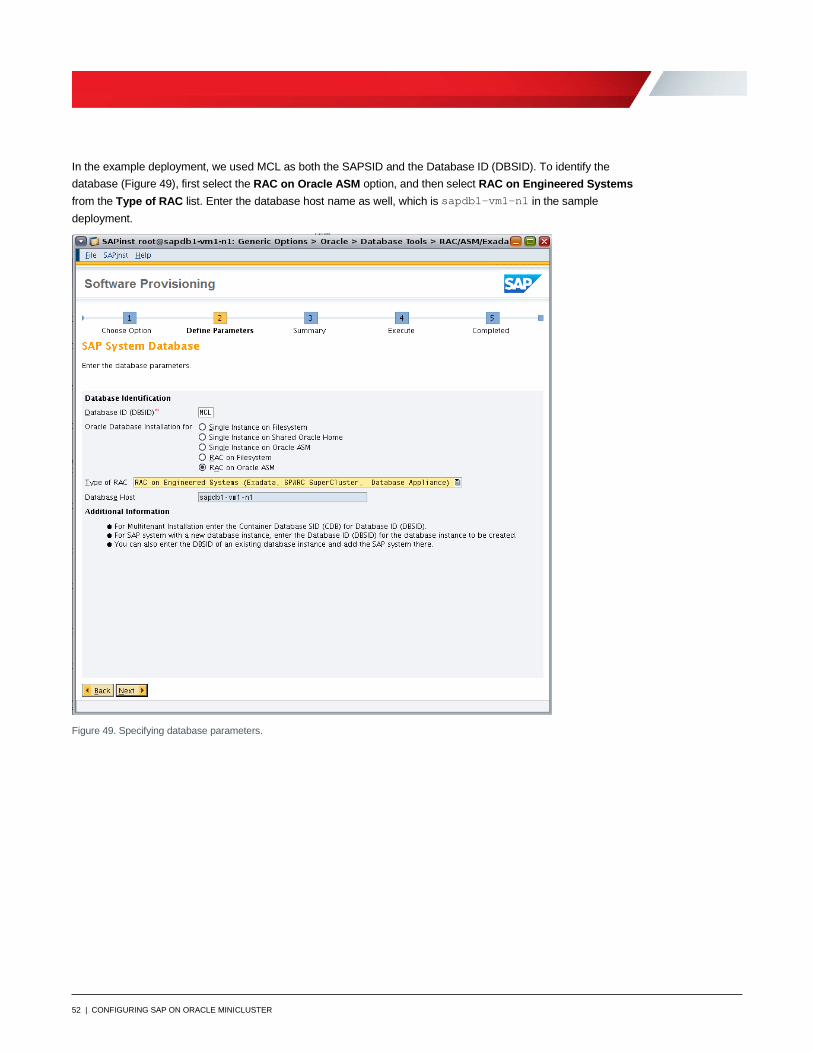
In the example deployment, we used MCL as both the SAPSID and the Database ID (DBSID). To identify the database (Figure 49), first select the RAC on Oracle ASM option, and then select RAC on Engineered Systems from the Type of RAC list. Enter the database host name as well, which is sapdb1-vm1-n1 in the sample deployment.
Figure 49. Specifying database parameters.
53 | CONFIGURING SAP ON ORACLE MINICLUSTER
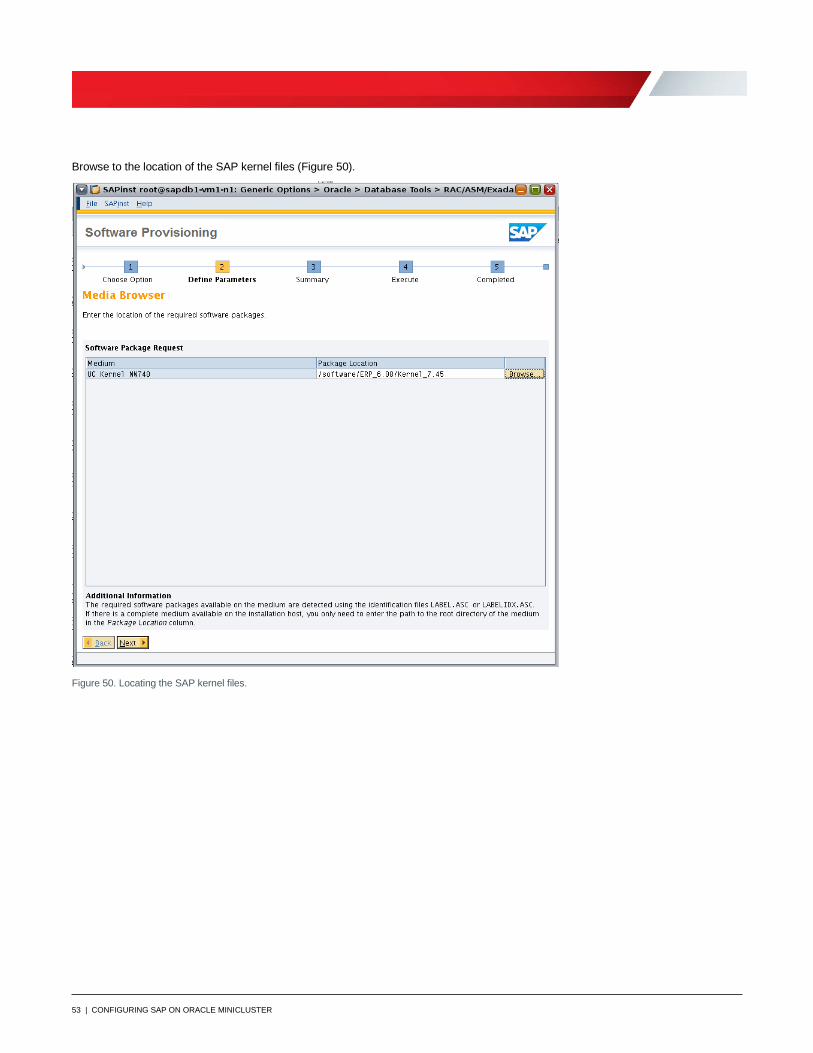
Browse to the location of the SAP kernel files (Figure 50).
Figure 50. Locating the SAP kernel files.

54 | CONFIGURING SAP ON ORACLE MINICLUSTER
Confirm that Database Server Version and Database Client Version are set to 121 (Figure 51).
Figure 51. Specifying database parameters for the ABAP system.

55 | CONFIGURING SAP ON ORACLE MINICLUSTER
On the Oracle Multitenant Database page, set Connect to Pluggable DB to No (Figure 52).
Figure 52. Specifying parameters for Oracle Multitenant.

56 | CONFIGURING SAP ON ORACLE MINICLUSTER
Accept the defaults for the Oracle Listener Configuration page (Figure 53).
Figure 53. Configuring the Oracle Database listener.

57 | CONFIGURING SAP ON ORACLE MINICLUSTER
Browse to the location of the Oracle Database Instant Client software packages (Figure 54).
Figure 54. Locating the Oracle Database Instant Client software.

58 | CONFIGURING SAP ON ORACLE MINICLUSTER
Set the appropriate path for ORACLE_HOME for GRID, and set ORACLE_SID for GRID to +ASM1 (Figure 55).
Figure 55. Specifying parameters for the database grid environment.

59 | CONFIGURING SAP ON ORACLE MINICLUSTER
Enter parameters for Oracle RAC, and set the number of Oracle RAC database instances to 2 (Figure 56).
Figure 56. Specifying parameters for Oracle RAC.

60 | CONFIGURING SAP ON ORACLE MINICLUSTER
Set the host names for the Oracle RAC instances, matching the database VM host names previously set in /etc/hosts (Figure 57).
Figure 57. Specifying host names for Oracle RAC nodes.

61 | CONFIGURING SAP ON ORACLE MINICLUSTER
Review the parameter summary, as shown in Figure 58. (If changes are needed, select Revise.) Check all defined parameters and then click Next to start the installation.
Figure 58. Reviewing the parameter summary.

62 | CONFIGURING SAP ON ORACLE MINICLUSTER
The SAP Software Provisioning Manager (sapinst) updates the installation status and then displays a message indicating that the installation was successful (Error! Reference source not found.).
Figure 59. A message indicates if the installation is completed successfully.
Before you continue, repeat the database instance preparation steps for the second database VM, sapdb1-vm1-n2.

63 | CONFIGURING SAP ON ORACLE MINICLUSTER
Install the ASCS Instance This procedure installs the ASCS instance on the first database VM using the logical host name. Create a local installation directory and start sapinst, specifying the logical host name using parameter SAPINST_USE_HOSTNAME.
root@sapdb1-vm1-n1:~# cd /sapinstlog/ascs/ root@sapdb1-vm1-n1:/sapinstlog/ascs# /software/SWPM/sapinst SAPINST_USE_HOSTNAME=vm1-lh1
Listing 25: Creating a local installation directory and starting sapinst.
As shown in Figure 60, under SAP Business Suite 7i 2016 and EHP8 for SAP ERP 6.0 ABAP, navigate to the following installation option:
Select Oracle SAP Systems Application Server ABAP High-Availability System ASCS Instance
Figure 60. Using the sapinst GUI to navigate to the installation option.

64 | CONFIGURING SAP ON ORACLE MINICLUSTER
Enter information for SAP System ID (SAPSID) and SAP Mount Directory (Figure 61).
Figure 61. Specifying SAP system parameters.

65 | CONFIGURING SAP ON ORACLE MINICLUSTER
Select the Set FQDN for SAP system checkbox so that the SAP system will generate the FQDN, and then enter the DNS domain name (Figure 62).
Figure 62. Specifying the DNS domain name.

66 | CONFIGURING SAP ON ORACLE MINICLUSTER
Set the master password (Figure 63).
Figure 63. Specifying the master password.

67 | CONFIGURING SAP ON ORACLE MINICLUSTER
Browse to the location of the software (Figure 64).
Figure 64. Specifying the software location.

68 | CONFIGURING SAP ON ORACLE MINICLUSTER
After you specify a path in the Package Path field, click Next to instruct the installer to check the availability of the packages at that location. The status column will be updated with “Available” if the required packages are found, as shown in Figure 65.
Figure 65. Based on the specified package path, the installer checks package availability.
Once the installer finds all archive packages, continue to the next screen by clicking Next again, leaving the Package Path field empty.

69 | CONFIGURING SAP ON ORACLE MINICLUSTER
Set ASCS Instance Host Name to the logical host name, in this case vm1-lh1 (Figure 66).
Figure 66. Specifying ASCS instance parameters.

70 | CONFIGURING SAP ON ORACLE MINICLUSTER
Enter the port numbers to be used by the message servers. We used the default ports (Figure 67).
Figure 67. Specifying message server port numbers.

71 | CONFIGURING SAP ON ORACLE MINICLUSTER
Select the checkbox to install the SAP Web Dispatcher (Figure 68).
Figure 68. Specifying additional components.

72 | CONFIGURING SAP ON ORACLE MINICLUSTER
Enter parameters for the SAP Web Dispatcher (Figure 69).
Figure 69. Specifying parameters for the SAP Web Dispatcher.

73 | CONFIGURING SAP ON ORACLE MINICLUSTER
Specify the password used by the SAP Web Dispatcher (Figure 70).
Figure 70. Specifying the password used by the SAP Web Dispatcher.

74 | CONFIGURING SAP ON ORACLE MINICLUSTER
Review the parameter summary (Figure 71). (If changes are needed, select Revise.) Check all defined parameters and then click Next to start the installation.
Figure 71. Reviewing the parameter summary.

75 | CONFIGURING SAP ON ORACLE MINICLUSTER
Install the ERS instance The following procedure installs the ERS instance on the second database VM using its logical host name, vm1-lh2. To begin, create a local installation directory and start sapinst, specifying the logical host name with SAPINST_USE_HOSTNAME.
root@sapdb1-vm1-n2:/sapmnt/MCL# cd /sapinstlog/ root@sapdb1-vm1-n2:/sapinstlog# mkdir ers root@sapdb1-vm1-n2:/sapinstlog# cd ers/ root@sapdb1-vm1-n2:/sapinstlog/ers# /software/SWPM/sapinst -nogui SAPINST_USE_HOSTNAME=vm1-lh2
Listing 26: Creating a local installation directory and starting sapinst.
As shown in Figure 72, under SAP Business Suite 7i 2016 and EHP8 for SAP ERP 6.0 ABAP, navigate to the following installation option:
Select Oracle SAP Systems Application Server ABAP High-Availability System Enqueue Replication Server Instance
Figure 72. Using the sapinst GUI to install the ERS instance.

76 | CONFIGURING SAP ON ORACLE MINICLUSTER
A message indicates whether permission changes are necessary for the installation directory (Figure 73). Click OK to confirm the change.
Figure 73. A message indicates if a permission change is necessary.

77 | CONFIGURING SAP ON ORACLE MINICLUSTER
A message indicates whether an ownership change is necessary for the installation directory (Figure 74). Click OK to confirm the change.
Figure 74. A message indicates whether an ownership change is necessary.

78 | CONFIGURING SAP ON ORACLE MINICLUSTER
Specify the profile directory for the SAP system (Figure 75).
Figure 75. Specifying the SAP profile directory.

79 | CONFIGURING SAP ON ORACLE MINICLUSTER
Browse to the location of the software archive (Figure 76).
Figure 76. Specifying the software location.

80 | CONFIGURING SAP ON ORACLE MINICLUSTER
Specify the ASCS instance for which you want to install an ERS instance (Figure 77).
Figure 77. Specifying the ASCS instance for the corresponding ERS instance.

81 | CONFIGURING SAP ON ORACLE MINICLUSTER
Specify parameters for the ERS instance (Figure 78).
Figure 78. Specifying parameters for the ERS instance.

82 | CONFIGURING SAP ON ORACLE MINICLUSTER
Restart the ASCS instance to activate the changes (Figure 79).
Figure 79. Restarting the ASCS instance to activate changes.

83 | CONFIGURING SAP ON ORACLE MINICLUSTER
Review the parameter summary, as shown in Figure 80. (If changes are needed, select Revise.) Check all defined parameters and then click Next to start the installation.
Figure 80. Reviewing the parameter summary.

84 | CONFIGURING SAP ON ORACLE MINICLUSTER
Install the Oracle Database 12c Instance Create an installation directory on the first database node and start sapinst (Listing 27).
root@sapdb1-vm1-n1:~# mkdir -p /sapinstlog/db root@sapdb1-vm1-n1:~# cd /sapinstlog/db root@sapdb1-vm1-n1:/sapinstlog/db# /software/SWPM/sapinst
Listing 27: Creating a local installation directory and starting sapinst.
As shown in Figure 81, under SAP Business Suite 7i 2016 and EHP8 for SAP ERP 6.0 ABAP, navigate to the following installation option:
Select Oracle SAP Systems Application Server ABAP High-Availability System Database Instance
Figure 81. Using the sapinst GUI to install the Oracle Database 12c instance.

85 | CONFIGURING SAP ON ORACLE MINICLUSTER
A message indicates whether ownership changes are necessary for the installation directory (Figure 82). Click OK to confirm the change.
Figure 82. A message indicates if an ownership change is necessary.

86 | CONFIGURING SAP ON ORACLE MINICLUSTER
A message indicates whether permission changes are necessary for the installation directory (Figure 83). Click OK to confirm the change.
Figure 83. A message indicates if a permission change is necessary.

87 | CONFIGURING SAP ON ORACLE MINICLUSTER
Specify the SAP profile directory (Figure 84).
Figure 84. Specifying the SAP profile directory.

88 | CONFIGURING SAP ON ORACLE MINICLUSTER
Specify the database parameters (Figure 85). Enter MCL in the Database System ID (DBSID) field and select the option RAC on Oracle ASM. Select RAC on Engineered Systems as the type of Oracle RAC implementation.
Figure 85. Specifying database parameters.

89 | CONFIGURING SAP ON ORACLE MINICLUSTER
Specify the path to the software archive (Figure 86).
Figure 86. Specifying the software location.

90 | CONFIGURING SAP ON ORACLE MINICLUSTER
Browse to the location of the software archive for the ECC export files (Figure 87).
Figure 87. Specifying the software location.

91 | CONFIGURING SAP ON ORACLE MINICLUSTER
Confirm that Database Server Version and Database Client Version are set to 121 and select Advanced DB Configuration (Figure 88).
Figure 88. Specifying the database version.

92 | CONFIGURING SAP ON ORACLE MINICLUSTER
Specify the database parameters (Figure 89). Adjust the values in the Database Instance RAM fields to meet your requirements.
Figure 89. Specifying database parameters.

93 | CONFIGURING SAP ON ORACLE MINICLUSTER
On the Oracle Multitenant Database page, set Install Multitenant DB to No (Figure 90).
Figure 90. Specifying parameters for Oracle Multitenant.

94 | CONFIGURING SAP ON ORACLE MINICLUSTER
Accept the defaults for the Oracle Listener Configuration page (Figure 91).
Figure 91. Configuring the Oracle Database listener.

95 | CONFIGURING SAP ON ORACLE MINICLUSTER
Set the passwords for the Oracle Database sys and system users (Figure 92).
Figure 92. Setting database system passwords.

96 | CONFIGURING SAP ON ORACLE MINICLUSTER
Set the parameters for the database grid environment (Figure 93).
Figure 93. Setting database grid parameters.

97 | CONFIGURING SAP ON ORACLE MINICLUSTER
Configure parameters on the Oracle ASM Disk Group page (Figure 94).
Figure 94. Configuring Oracle ASM disk group parameters.

98 | CONFIGURING SAP ON ORACLE MINICLUSTER
Specify Oracle RAC parameters, setting Number of Instances to 2 (Figure 95).
Figure 95. Configuring Oracle RAC parameters.

99 | CONFIGURING SAP ON ORACLE MINICLUSTER
Confirm the parameters for Oracle RAC and set parameters for the file init.ora accordingly (Figure 96).
Figure 96. Specifying Oracle RAC parameters.

100 | CONFIGURING SAP ON ORACLE MINICLUSTER
In the Advanced Oracle Configuration screen (Figure 97), configure Oracle Database parameters as needed.
Figure 97. Configuring advanced Oracle Database parameters.

101 | CONFIGURING SAP ON ORACLE MINICLUSTER
Specify database instance directories (Figure 98).
Figure 98. Specifying database instance directories.

102 | CONFIGURING SAP ON ORACLE MINICLUSTER
Specify the parameters for the sapdata directory distribution (Figure 99).
Figure 99. Specifying sapdata directory parameters.
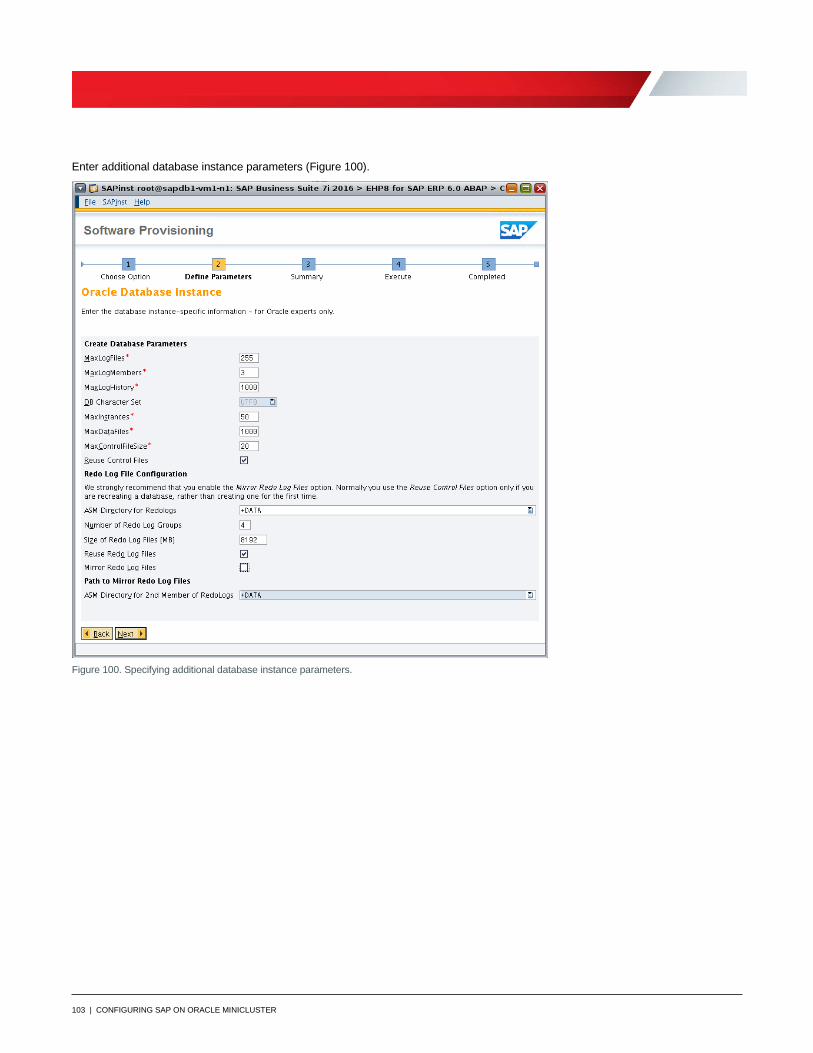
103 | CONFIGURING SAP ON ORACLE MINICLUSTER
Enter additional database instance parameters (Figure 100).
Figure 100. Specifying additional database instance parameters.

104 | CONFIGURING SAP ON ORACLE MINICLUSTER
Specify the control file location (Figure 101).
Figure 101. Specifying the control file location.
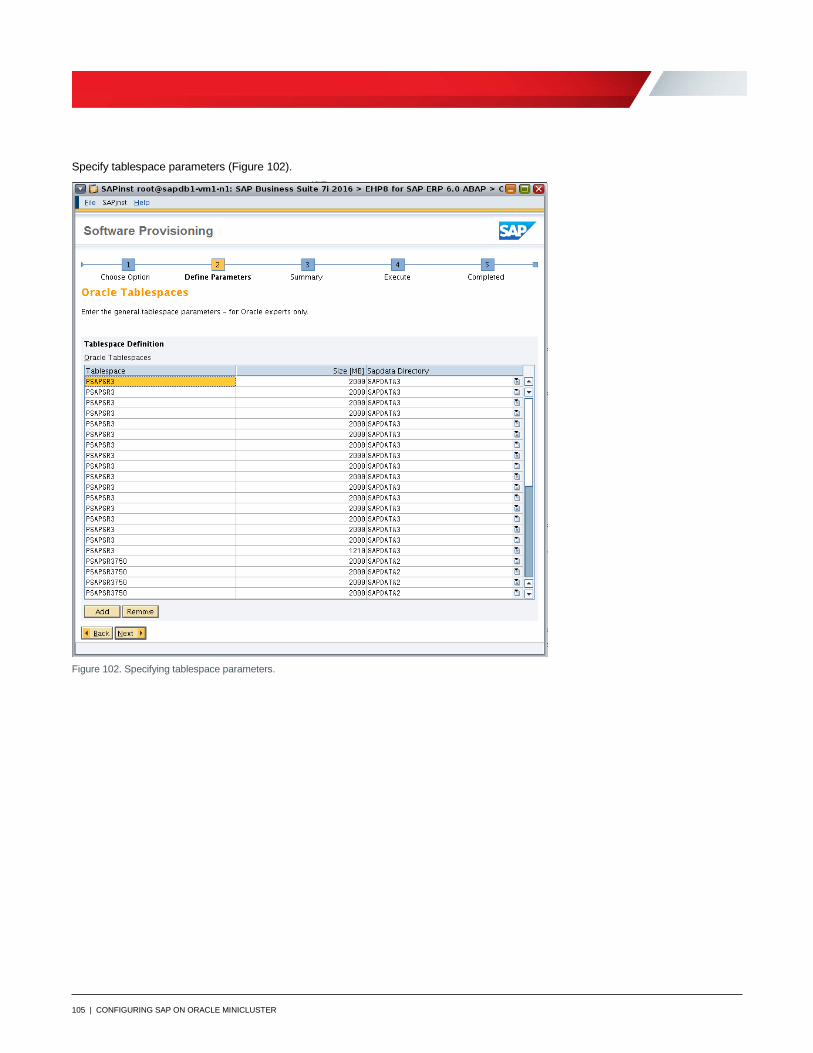
105 | CONFIGURING SAP ON ORACLE MINICLUSTER
Specify tablespace parameters (Figure 102).
Figure 102. Specifying tablespace parameters.

106 | CONFIGURING SAP ON ORACLE MINICLUSTER
Specify the autoextent configuration for tablespaces (Figure 103).
Figure 103. Specifying tablespace extensions.

107 | CONFIGURING SAP ON ORACLE MINICLUSTER
Specify general storage parameters for tablespaces (Figure 104).
Figure 104. Defining general storage parameters for tablespaces.

108 | CONFIGURING SAP ON ORACLE MINICLUSTER
Specify default storage parameters for tablespaces (Figure 105).
Figure 105. Defining default storage parameters for tablespaces.

109 | CONFIGURING SAP ON ORACLE MINICLUSTER
Review and, if necessary, configure parameters for init.ora (Figure 106).
Figure 106. Configuring parameters in init.ora.
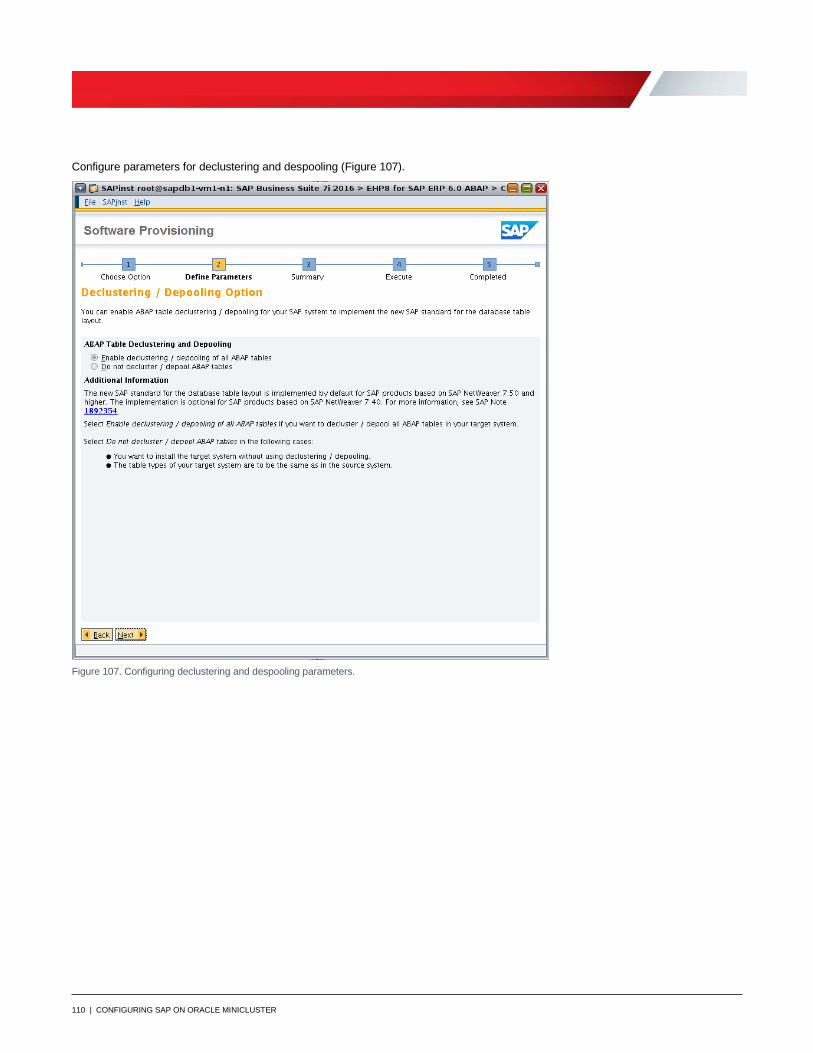
110 | CONFIGURING SAP ON ORACLE MINICLUSTER
Configure parameters for declustering and despooling (Figure 107).
Figure 107. Configuring declustering and despooling parameters.
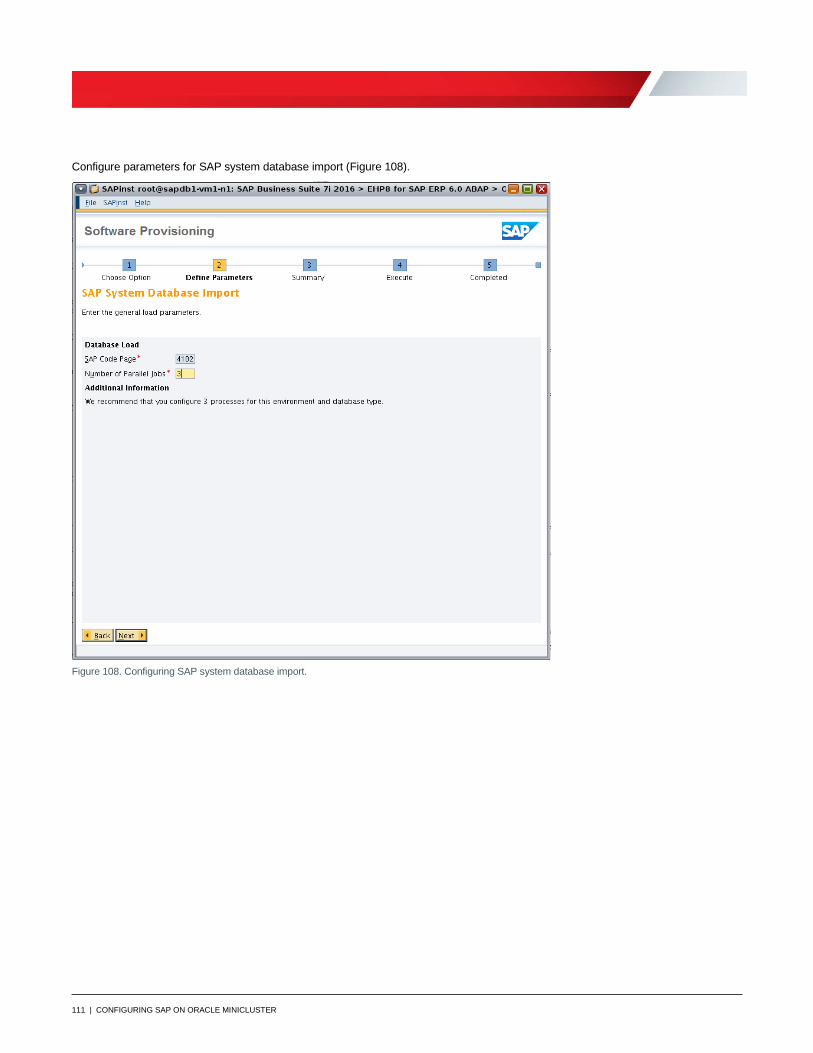
111 | CONFIGURING SAP ON ORACLE MINICLUSTER
Configure parameters for SAP system database import (Figure 108).
Figure 108. Configuring SAP system database import.

112 | CONFIGURING SAP ON ORACLE MINICLUSTER
Specify parameters for creating statistics about SAP system database import (Figure 109).
Figure 109. Configuring SAP system database import statistics.

113 | CONFIGURING SAP ON ORACLE MINICLUSTER
Browse to the location of the Oracle Database Instant Client software (Figure 110).
Figure 110. Locating the Oracle Database Instant Client software.

114 | CONFIGURING SAP ON ORACLE MINICLUSTER
Review the parameter summary, as shown in Figure 111. (If changes are needed, select Revise.) Check all defined parameters and then click Next to start the installation.
Figure 111. Reviewing the parameter summary.
Post-Installation Steps on Database VMs
During the installation process, SQL*Plus starts the database instance MCL001 only on the first node. To start the database on both nodes (and take advantage of Oracle RAC), it is first necessary to shut down the single instance of the database. On the first database VM, identify the database processes, as shown in Listing 28.
oracle@sapdb1-vm1-n1:~$ ps -efa | grep pmon oracle 8075 5851 0 12:29:38 ? 0:06 asm_pmon_+ASM1 oracle 8681 5851 0 12:30:00 ? 0:05 mdb_pmon_-MGMTDB oracle 4668 5851 0 06:14:07 ? 0:01 ora_pmon_MCL001
Listing 28: Identifying the database processes on node 1.
Listing 29 shows the same command executed on node 2.
oracle@sapdb1-vm1-n2:~$ ps -efa | grep pmon oracle 14187 11553 0 12:01:32 ? 0:07 asm_pmon_+ASM2
Listing 29: Identifying the database processes on node 2.

115 | CONFIGURING SAP ON ORACLE MINICLUSTER
Use SQL*Plus to shut down the database instance on node 1 (Listing 30).
oracle@sapdb1-vm1-n1:~$ export ORACLE_HOME=/oracle/MCL/121 oracle@sapdb1-vm1-n1:~$ export PATH=/u01/app/oracle/product/12.1.0/dbhome_1/bin:$PATH oracle@sapdb1-vm1-n1:~$ export ORACLE_SID=MCL001 oracle@sapdb1-vm1-n1:~$ sqlplus / as sysdba SQL*Plus: Release 12.1.0.2.0 Production on Tue Nov 22 08:42:40 2016 Copyright (c) 1982, 2014, Oracle. All rights reserved. Connected to: Oracle Database 12c Enterprise Edition Release 12.1.0.2.0 - 64bit Production With the Partitioning, Real Application Clusters, Automatic Storage Management, OLAP, Advanced Analytics and Real Application Testing options SQL> shutdown immediate Database closed. Database dismounted. ORACLE instance shut down.
Listing 30: Shutting down the database processes on node 1.
Use srvctl to start the Oracle RAC database instances on both nodes.
oracle@sapdb1-vm1-n1:~$ export ORACLE_HOME=/oracle/MCL/121 oracle@sapdb1-vm1-n1:~$ export PATH=/u01/app/oracle/product/12.1.0/dbhome_1/bin:$PATH oracle@sapdb1-vm1-n1:~$ export ORACLE_SID=MCL oracle@sapdb1-vm1-n1:~$ srvctl start database -d MCL oracle@sapdb1-vm1-n1:~$ srvctl status database -d MCL Instance MCL001 is running on node sapdb1-vm1-n1 Instance MCL002 is running on node sapdb1-vm1-n2
Listing 31: Starting database processes on both nodes.
Install the Primary Application Server Before running the SAP software provisioning tool sapinst to install the Primary Application Server (PAS), prepare the application VM for SAP deployment.
In the application VM, add the required group entries.
root@oos1-app1:~# groupadd -g 700 sapinst root@oos1-app1:~# groupadd -g 701 sapsys root@oos1-app1:~# groupadd -g 200 oinstall root@oos1-app1:~# groupadd -g 201 dba root@oos1-app1:~# groupadd -g 1032 oper
Listing 32: Creating groups.
Limit the physical memory allocated for the application server in the VM. Set system resources in the global zone according to application needs and then reboot the application VM.
root@oosmc1-n2:~# zonecfg -z appvm1-vm1-oosmc1-n2 zonecfg:appvm1-vm1-oosmc1-n2> remove capped-memory zonecfg:appvm1-vm1-oosmc1-n2> add capped-memory zonecfg:appvm1-vm1-oosmc1-n2:capped-memory> set physical=48G zonecfg:appvm1-vm1-oosmc1-n2:capped-memory> end zonecfg:appvm1-vm1-oosmc1-n2> verify zonecfg:appvm1-vm1-oosmc1-n2> commit zonecfg:appvm1-vm1-oosmc1-n2> exit root@oosmc1-n2:~# zoneadm -z appvm1-vm1-oosmc1-n2 reboot
Listing 33: Configuring the memory allocation for the application VM.
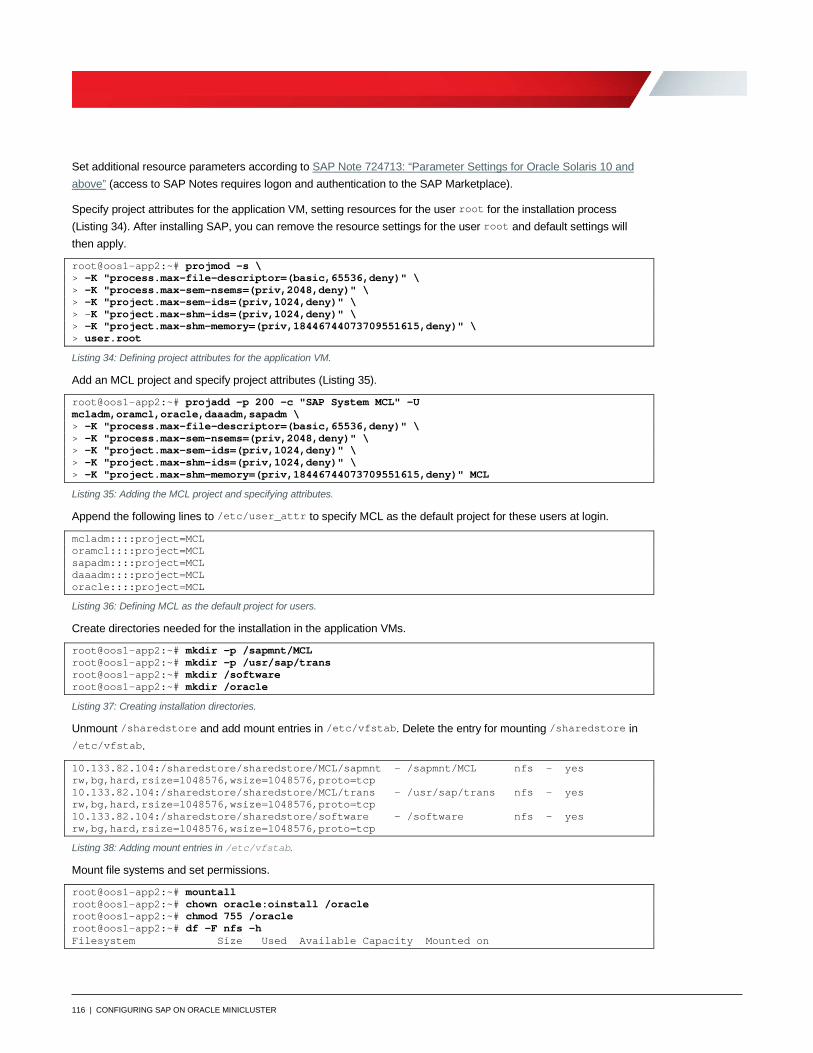
116 | CONFIGURING SAP ON ORACLE MINICLUSTER
Set additional resource parameters according to SAP Note 724713: “Parameter Settings for Oracle Solaris 10 and above” (access to SAP Notes requires logon and authentication to the SAP Marketplace).
Specify project attributes for the application VM, setting resources for the user root for the installation process (Listing 34). After installing SAP, you can remove the resource settings for the user root and default settings will then apply.
root@oos1-app2:~# projmod -s \ > -K "process.max-file-descriptor=(basic,65536,deny)" \ > -K "process.max-sem-nsems=(priv,2048,deny)" \ > -K "project.max-sem-ids=(priv,1024,deny)" \ > -K "project.max-shm-ids=(priv,1024,deny)" \ > -K "project.max-shm-memory=(priv,18446744073709551615,deny)" \ > user.root
Listing 34: Defining project attributes for the application VM.
Add an MCL project and specify project attributes (Listing 35).
root@oos1-app2:~# projadd -p 200 -c "SAP System MCL" -U mcladm,oramcl,oracle,daaadm,sapadm \ > -K "process.max-file-descriptor=(basic,65536,deny)" \ > -K "process.max-sem-nsems=(priv,2048,deny)" \ > -K "project.max-sem-ids=(priv,1024,deny)" \ > -K "project.max-shm-ids=(priv,1024,deny)" \ > -K "project.max-shm-memory=(priv,18446744073709551615,deny)" MCL
Listing 35: Adding the MCL project and specifying attributes.
Append the following lines to /etc/user_attr to specify MCL as the default project for these users at login.
mcladm::::project=MCL oramcl::::project=MCL sapadm::::project=MCL daaadm::::project=MCL oracle::::project=MCL
Listing 36: Defining MCL as the default project for users.
Create directories needed for the installation in the application VMs.
root@oos1-app2:~# mkdir -p /sapmnt/MCL root@oos1-app2:~# mkdir -p /usr/sap/trans root@oos1-app2:~# mkdir /software root@oos1-app2:~# mkdir /oracle
Listing 37: Creating installation directories.
Unmount /sharedstore and add mount entries in /etc/vfstab. Delete the entry for mounting /sharedstore in /etc/vfstab.
10.133.82.104:/sharedstore/sharedstore/MCL/sapmnt - /sapmnt/MCL nfs - yes rw,bg,hard,rsize=1048576,wsize=1048576,proto=tcp 10.133.82.104:/sharedstore/sharedstore/MCL/trans - /usr/sap/trans nfs - yes rw,bg,hard,rsize=1048576,wsize=1048576,proto=tcp 10.133.82.104:/sharedstore/sharedstore/software - /software nfs - yes rw,bg,hard,rsize=1048576,wsize=1048576,proto=tcp
Listing 38: Adding mount entries in /etc/vfstab.
Mount file systems and set permissions.
root@oos1-app2:~# mountall root@oos1-app2:~# chown oracle:oinstall /oracle root@oos1-app2:~# chmod 755 /oracle root@oos1-app2:~# df -F nfs -h Filesystem Size Used Available Capacity Mounted on

117 | CONFIGURING SAP ON ORACLE MINICLUSTER
10.133.82.104:/commonfs/commonfs/sfw 100G 25G 75G 25% /oracleBits 10.133.82.104:/sharedstore/sharedstore/software 18T 157G 17T 1% /software 10.133.82.104:/sharedstore/sharedstore/MCL/sapmnt 18T 157G 17T 1% /sapmnt/MCL 10.133.82.104:/sharedstore/sharedstore/MCL/trans 18T 157G 17T 1% /usr/sap/trans
Listing 39: Mounting file systems and setting permissions.
Install missing packages to run the SAP installation GUI.
root@oos1-app2:~# pkg install pkg:/x11/library/libxtst root@oos1-app2:~# pkg install pkg:/system/picl
Listing 40: Installing packages.
Create the PAS installation directory, and start sapinst to install the PAS software.
root@oos1-app2:~# mkdir -p /sapinstlog/pas root@oos1-app2:~# cd /sapinstlog/pas root@oos1-app2:/sapinstlog/pas# /software/SWPM/sapinst
Listing 41: Creating a local installation directory and starting sapinst.
The sapinst GUI displays the initial screen (Figure 112). Under SAP Business Suite 7i 2016 and EHP8 for SAP ERP 6.0 ABAP, navigate to the following location:
Select Oracle SAP Systems Application Server ABAP High-Availability System Primary Application Server Instance
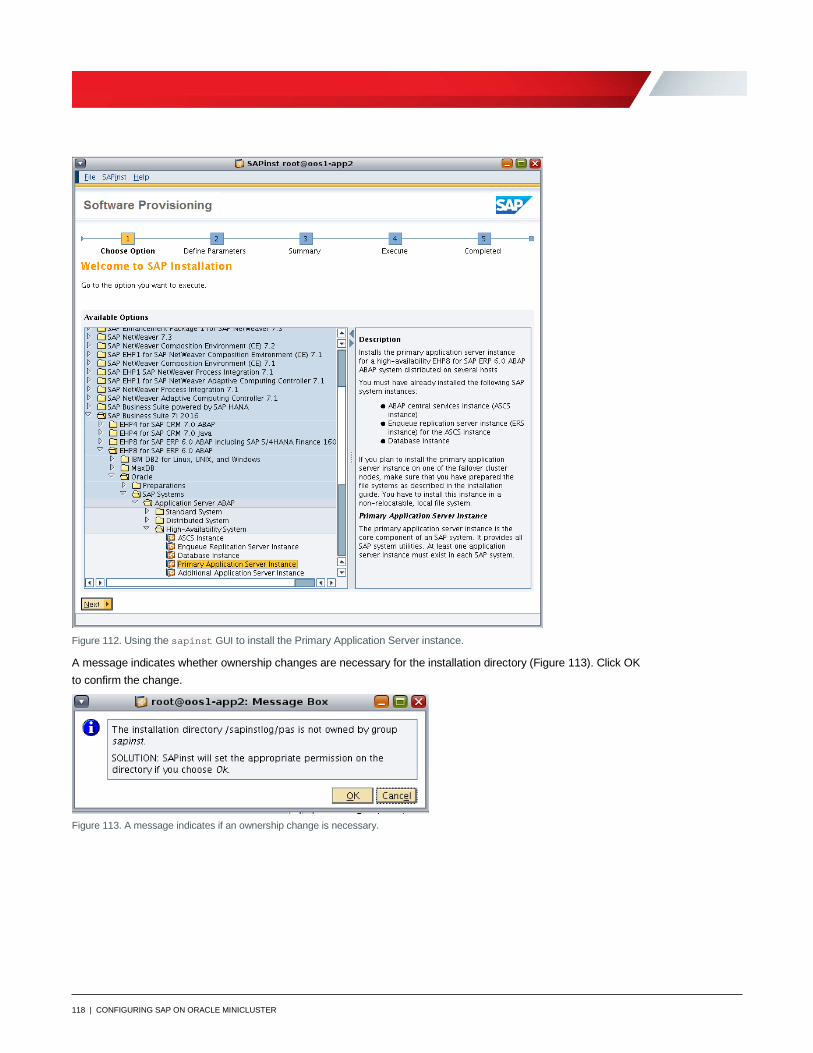
118 | CONFIGURING SAP ON ORACLE MINICLUSTER
Figure 112. Using the sapinst GUI to install the Primary Application Server instance.
A message indicates whether ownership changes are necessary for the installation directory (Figure 113). Click OK to confirm the change.
Figure 113. A message indicates if an ownership change is necessary.

119 | CONFIGURING SAP ON ORACLE MINICLUSTER
A message indicates whether permission changes are necessary for the installation directory (Figure 114). Click OK to confirm the change.
Figure 114. A message indicates whether permission changes are necessary.

120 | CONFIGURING SAP ON ORACLE MINICLUSTER
Specify the SAP profile directory (Figure 115).
Figure 115. Specifying the SAP profile directory.

121 | CONFIGURING SAP ON ORACLE MINICLUSTER
Specify the SAP master password (Figure 116).
Figure 116. Specifying the master password.

122 | CONFIGURING SAP ON ORACLE MINICLUSTER
Specify the database parameters (Figure 117). Enter values for the Database System ID (DBSID) and Database Host fields. Select the option Database on RAC.
Figure 117. Specifying database parameters.
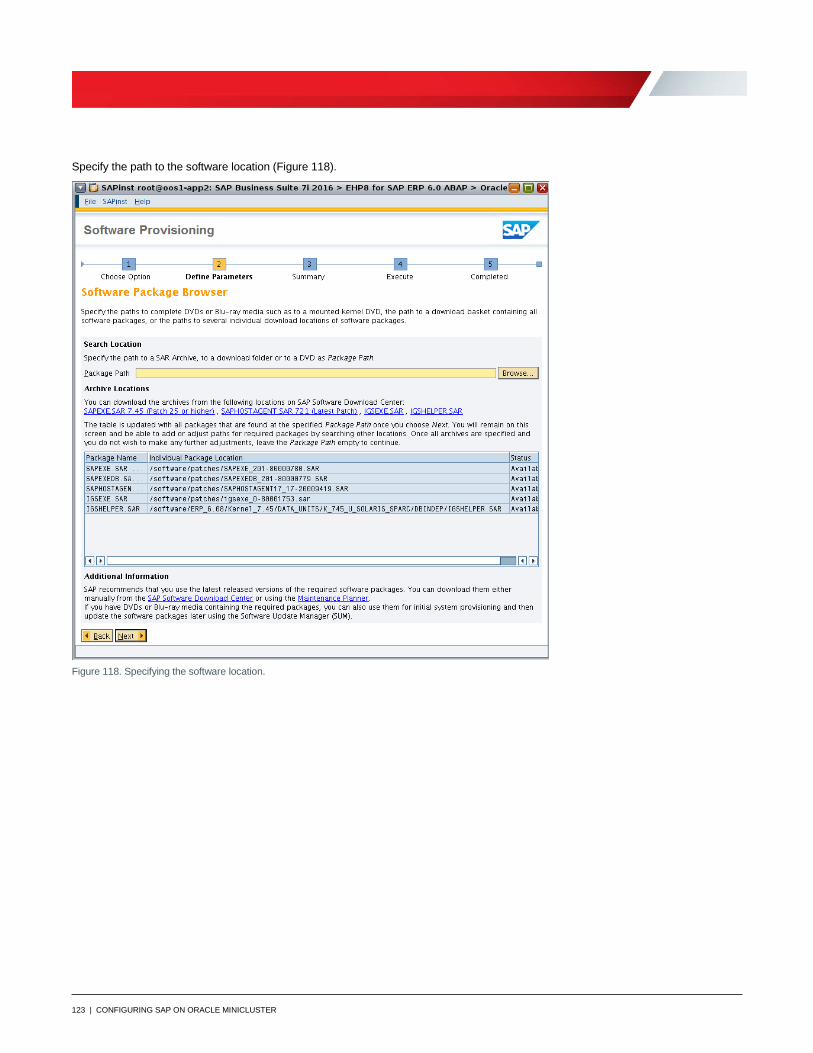
123 | CONFIGURING SAP ON ORACLE MINICLUSTER
Specify the path to the software location (Figure 118).
Figure 118. Specifying the software location.

124 | CONFIGURING SAP ON ORACLE MINICLUSTER
On the Oracle Multitenant Database page, set Connect to Pluggable DB to No (Figure 119).
Figure 119. Specifying parameters for Oracle Multitenant.

125 | CONFIGURING SAP ON ORACLE MINICLUSTER
Enter database system parameters. Confirm that Database Server Version and Database Client Version are set to 121 (Figure 120).
Figure 120. Specifying database system parameters.

126 | CONFIGURING SAP ON ORACLE MINICLUSTER
Specify Oracle RAC parameters, setting Number of Instances to 2 (Figure 121).
Figure 121. Specifying parameters for Oracle RAC.

127 | CONFIGURING SAP ON ORACLE MINICLUSTER
Confirm the parameters for Oracle RAC (Figure 122), setting the host names for the instances.
Figure 122. Specifying host names for Oracle RAC nodes.

128 | CONFIGURING SAP ON ORACLE MINICLUSTER
Specify the PAS instance parameters, including the host name (Figure 123).
Figure 123. Specifying PAS instance parameters.

129 | CONFIGURING SAP ON ORACLE MINICLUSTER
Enter port numbers for the message servers (Figure 124).
Figure 124. Specifying message server port numbers.

130 | CONFIGURING SAP ON ORACLE MINICLUSTER
Enter the password used by the administrative user webadm for the SAP Web Dispatcher (Figure 125).
Figure 125. Specifying the password used by the SAP Web Dispatcher.

131 | CONFIGURING SAP ON ORACLE MINICLUSTER
For the SAP System Landscape Directory (SLD), select the option No SLD destination (Figure 126).
Figure 126. Specifying no SLD destination.

132 | CONFIGURING SAP ON ORACLE MINICLUSTER
Select the option Do not create Message Server Access Control List (Figure 127).
Figure 127. Specifying no message server access control list.

133 | CONFIGURING SAP ON ORACLE MINICLUSTER
Browse to the location of the required software packages (Figure 128).
Figure 128. Locating the required software.

134 | CONFIGURING SAP ON ORACLE MINICLUSTER
If necessary, enter the password for the Data Dictionary (DDIC) user (Figure 129).
Figure 129. Specifying a DDIC password.

135 | CONFIGURING SAP ON ORACLE MINICLUSTER
Select the option to use the default key for the secure storage of the SAP system. Or, you may enter an individual key according to your needs.
Figure 130. Specifying the secure storage key.

136 | CONFIGURING SAP ON ORACLE MINICLUSTER
Enter the parameters for the Oracle RAC service and select the Create Shell Script checkbox (Figure 131).
Figure 131. Specifying Oracle RAC service parameters.

137 | CONFIGURING SAP ON ORACLE MINICLUSTER
Browse to the location of the Oracle Database Install Client software packages (Figure 132).
Figure 132. Locating the Oracle Database Install Client software.

138 | CONFIGURING SAP ON ORACLE MINICLUSTER
Review the parameter summary, as shown in Figure 133. (If changes are needed, select Revise.) Check all defined parameters and then click Next to start the installation.
Figure 133. Reviewing the parameter summary.
The installer stops in the phase “Update service parameter in RAC environment” to create and start the database service. Execute the script MCL_D00.sh as the user oracle on the first database VM, as shown in Listing 42.
oracle@sapdb1-vm1-n1:/software/ERP_6.08$ cat MCL_D00.sh #!/bin/sh #Generated shell script to create oracle RAC services on database host. #Login as the owner of the oracle database software (typically os user 'oracle') on the database host. #Set the $ORACLE_HOME variable to the home location of the database. # $ORACLE_HOME/bin/srvctl add service -db MCL -service MCL_D00 -preferred MCL001 -available MCL002 -tafpolicy BASIC -policy AUTOMATIC -notification TRUE -failovertype SELECT -failovermethod BASIC -failoverretry 3 -failoverdelay 5 $ORACLE_HOME/bin/srvctl start service -db MCL -service MCL_D00 oracle@sapdb1-vm1-n1:/software/ERP_6.08$ export ORACLE_HOME=/oracle/MCL/121 oracle@sapdb1-vm1-n1:/software/ERP_6.08$ ./MCL_D00.sh
Listing 42: Executing the script to add and start the database service.

139 | CONFIGURING SAP ON ORACLE MINICLUSTER
Once the script has been executed, verify that the database service is running.
oracle@sapdb1-vm1-n1:~$ srvctl status service -d MCL Service MCL_D00 is running on instance(s) MCL001
Listing 43: Checking service status.
After the installation resumes, the SAP Software Provisioning Manager (sapinst) displays a message to confirm that the installation process has been completed (Figure 134).
Figure 134. Confirmation that the PAS installation was successful.
Post-Installation Steps After the SAP software installation is complete, it is necessary to complete the unfinished steps for the SAP bundle patch installation process. Resume this process starting with Step 24 (under section 2.2, “Installing the SAP Bundle Patch”) in the readme file that comes with the SAP bundle patch distribution. Step 10 through Step 23 were previously performed in this article under the section “Install the Latest SAP Bundle Patch for Oracle Grid Infrastructure.”

140 | CONFIGURING SAP ON ORACLE MINICLUSTER
As user mcladm, stop the SAP system and stop the application server D00.
oos1-app2:mcladm 1% /usr/sap/MCL/D00/exe/sapcontrol -prot NI_HTTP -nr 00 -function Stop
Listing 44: Stopping the SAP application server.
Stop the ASCS and ERS instances.
sapdb1-vm1-n1:mcladm 1% /usr/sap/MCL/ASCS00/exe/sapcontrol -prot NI_HTTP -nr 00 -function Stop sapdb1-vm1-n2:mcladm 1% /usr/sap/MCL/ERS10/exe/sapcontrol -prot NI_HTTP -nr 10 -function Stop
Listing 45: Stopping the ASCS and ERS instances.
As user oracle, set the environment variables.
oracle@sapdb1-vm1-n1:~$ export PATH=/oracle/MCL/121/bin:$PATH oracle@sapdb1-vm1-n1:~$ export OHRDBMS=/oracle/MCL/121 oracle@sapdb1-vm1-n1:~$ export ORACLE_SID=MCL001
Listing 46: Setting environment variables.
As user oracle, run catsbp as in the readme file to perform the required post-process installation steps for the bundle patch. When script execution ends, confirm that the overall status is complete, as shown in Listing 47.
oracle@sapdb1-vm1-n1:~$ env ORACLE_HOME=$OHRDBMS $OHRDBMS/sapbundle/catsbp catsbp - Post-process Installation of SBP 12.1.0.2.170117 201702 for Exadata. Copyright (c) 2015, 2017, Oracle and/or its affiliates. All rights reserved. … … catsbp completed successfully. Overall Status: COMPLETE
Listing 47: Running catsbp.
Set the database parameters by following the instructions in the readme file (under the section “Recommended parameter settings for ‘_FIX_CONTROL’ and ‘EVENT’").
oracle@sapdb1-vm1-n1:~$ sqlplus / as sysdba SQL*Plus: Release 12.1.0.2.0 Production on Thu May 18 07:59:36 2017 Copyright (c) 1982, 2014, Oracle. All rights reserved. Connected to: Oracle Database 12c Enterprise Edition Release 12.1.0.2.0 - 64bit Production With the Partitioning, Real Application Clusters, Automatic Storage Management, OLAP, Advanced Analytics and Real Application Testing options SQL> ALTER SYSTEM SET "_FIX_CONTROL"= '5099019:ON','5705630:ON','6055658:OFF','6120483:OFF','6399597:ON','6430500:ON', '6440977:ON','6626018:ON','6972291:ON','7168184:OFF','7658097:ON','8937971:ON', '9196440:ON','9495669:ON','13077335:ON','13627489:ON','14255600:ON','14595273:ON', '18405517:2','20355502:8','14846352:OFF','22540411:ON','20107874:OFF','10038517:OFF' COMMENT='SAP_12102161018_201611 RECOMMENDED SETTINGS' SCOPE=SPFILE; System altered. SQL> ALTER SYSTEM SET EVENT= '10027', '10028', '10142', '10183', '10191', '10995 level 2', '38068 level 100', '38085', '38087', '44951 level 1024' COMMENT='SAP_121022_201503 RECOMMENDED SETTINGS' SCOPE=SPFILE; System altered.

141 | CONFIGURING SAP ON ORACLE MINICLUSTER
Listing 48: Setting database parameters.
Stop the database.
oracle@sapdb1-vm1-n1:~$ export ORACLE_HOME=/u01/app/12.1.0.2/grid oracle@sapdb1-vm1-n1:~$ srvctl stop database -d MCL
Listing 49: Stopping the database.
Remove the project resource settings for user root in the application VM.
root@appvm2-n1:~# projmod -r \ > -K "process.max-file-descriptor=(basic,65536,deny)" \ > -K "process.max-sem-nsems=(priv,2048,deny)" \ > -K "project.max-sem-ids=(priv,1024,deny)" \ > -K "project.max-shm-ids=(priv,1024,deny)" \ > -K "project.max-shm-memory=(priv,18446744073709551615,deny)" \ > user.root
Listing 50: Modifying the project resource settings.
On both database VMs, enter the commands shown in Listing 51 to delete the interfaces for the virtual hosts.
root@sapdb1-vm1-n2:~# ipadm delete-addr sap_net2/v4 root@sapdb1-vm1-n2:~# ipadm delete-ip sap_net2
Listing 51: Deleting interfaces for the virtual hosts.
In the global zone of each Oracle MiniCluster node, delete the sap_net2 virtual network definition from the database VM. Shut down the clustering service and reboot the database VM (Listing 52). Repeat the steps for both database VMs.
root@oosmc1-n2:~# zonecfg -z sapdb1-vm1-oosmc1-n2 zonecfg:sapdb1-vm1-oosmc1-n2> info zonename: sapdb1-vm1-oosmc1-n2 zonepath: /mcpool/sapdb1-vm1-oosmc1-n2zroot brand: solaris autoboot: true global-time: true autoshutdown: shutdown bootargs: file-mac-profile: pool: limitpriv: default,proc_priocntl,proc_clock_highres scheduling-class: ip-type: exclusive hostid: tenant: fs-allowed: [max-shm-memory: 510G] anet 0: linkname: aggrpvt0 lower-link: aggrpvt0 …. …. anet 3: linkname: sap_net2 lower-link: net2 … … zonecfg:sapdb1-vm1-oosmc1-n2> remove anet 3 zonecfg:sapdb1-vm1-oosmc1-n2> verify zonecfg:sapdb1-vm1-oosmc1-n2> commit zonecfg:sapdb1-vm1-oosmc1-n2> exit root@oosmc1-n2:~# zoneadm -z sapdb1-vm1-oosmc1-n2 reboot root@oosmc1-n1:~# zlogin sapdb1-vm1-oosmc1-n1 root@sapdb1-vm1-n1:~# /u01/app/12.1.0.2/grid/bin/crsctl stop cluster –n sapdb1-vm1-n1

142 | CONFIGURING SAP ON ORACLE MINICLUSTER
root@sapdb1-vm1-n1:~# reboot
Listing 52: Deactivating the virtual network used during the installation of the database nodes.
Edit the file /etc/ssh/sshd_config on every node where it was modified, setting the parameter X11Forwarding=no. This is an important step to maintain system security.
Enable IP filtering in both nodes of the database VM. Repeat this step for both database VMs.
root@sapdb1-vm1-n1:~# svcadm enable svc:/network/ipfilter:default
Listing 53: Enabling IP filtering.
HA Configuration Using SAPCTL This section describes the installation and configuration of SAPCTL. SAPCTL is bundled with Oracle RAC and enables management of the SAP Enqueue Service for ABAP and Java, the SAP Replication Service for ABAP and Java, and the additional virtual IP addresses used by the SAP Enqueue Service for ABAP and/or Java. Detailed information can be found in “SAP Note 1496927: Protection of SAP instances through Oracle Clusterware” (access to SAP Notes requires logon and authentication to the SAP Support Portal). Download the latest version of SAPCTL from the attachments, unpack it, and open the file sapctl_vx.x.pdf in the subfolder doc. Change the parameter “Restart_Program_xx” to “Start_Program_xx” in the start and instance profiles. Edit files MCL_ASCS00_vm1-lh1 and MCL_ERS10_vm1-lh2 according to SAP Note 1496927.
SAPCTL Installation
It is necessary to install the SAPCTL software on both database nodes as user root. First, create the required directories (Listing 54).
root@sapdb1-vm1-n1:~# mkdir –p /usr/sap/sapctl/bin root@sapdb1-vm1-n1:~# mkdir /usr/sap/sapctl/log root@sapdb1-vm1-n1:~# mkdir /usr/sap/sapctl/perl
Listing 54: Creating directories for SAPCTL installation.
Extract the SAPCTL files in the directory /usr/sap/sapctl.
root@sapdb1-vm1-n1:~# cd /usr/sap/sapctl root@sapdb1-vm1-n1:/usr/sap/sapctl# cp /software/sapctl/sapctl_v8.2.tgz root@sapdb1-vm1-n1:/usr/sap/sapctl# tar xvf sapctl_v8.2.tgz
Listing 55: Extracting the SAPCTL files.
Create symbolic links to the Oracle Clusterware executables in the directory /usr/sap/sapctl/bin.
root@sapdb1-vm1-n1:~# ln -s /u01/app/12.1.0.2/grid/bin/crsctl /usr/sap/sapctl/bin/crsctl root@sapdb1-vm1-n1:~# ln -s /u01/app/12.1.0.2/grid/bin/crsctl.bin \ /usr/sap/sapctl/bin/crsctl.bin
Listing 56: Creating symbolic links to Oracle Clusterware executables.
Recursively copy the files in the perl subdirectory to the directory /usr/sap/sapctl/perl.
root@sapdb1-vm1-n1:~# cp -r /u01/app/12.1.0.2/grid/perl/* /usr/sap/sapctl/perl
Listing 57: Copying files in the perl subdirectory.
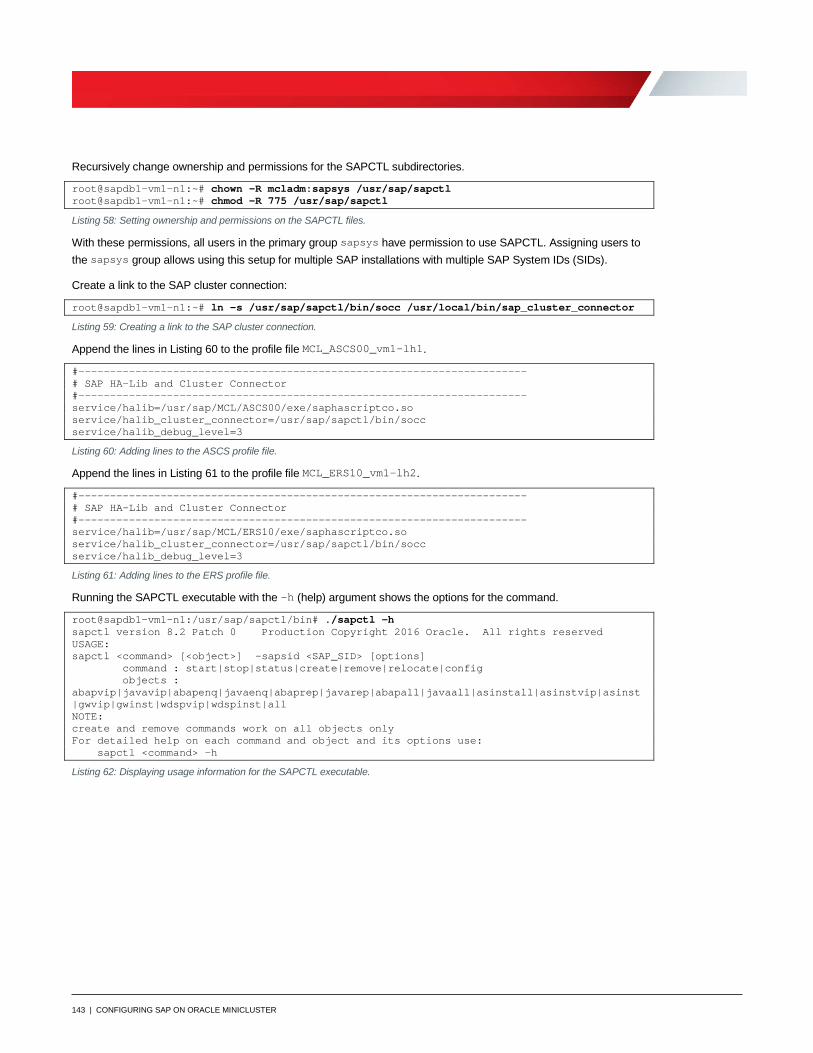
143 | CONFIGURING SAP ON ORACLE MINICLUSTER
Recursively change ownership and permissions for the SAPCTL subdirectories.
root@sapdb1-vm1-n1:~# chown -R mcladm:sapsys /usr/sap/sapctl root@sapdb1-vm1-n1:~# chmod -R 775 /usr/sap/sapctl
Listing 58: Setting ownership and permissions on the SAPCTL files.
With these permissions, all users in the primary group sapsys have permission to use SAPCTL. Assigning users to the sapsys group allows using this setup for multiple SAP installations with multiple SAP System IDs (SIDs).
Create a link to the SAP cluster connection:
root@sapdb1-vm1-n1:~# ln -s /usr/sap/sapctl/bin/socc /usr/local/bin/sap_cluster_connector
Listing 59: Creating a link to the SAP cluster connection.
Append the lines in Listing 60 to the profile file MCL_ASCS00_vm1-lh1.
#----------------------------------------------------------------------- # SAP HA-Lib and Cluster Connector #----------------------------------------------------------------------- service/halib=/usr/sap/MCL/ASCS00/exe/saphascriptco.so service/halib_cluster_connector=/usr/sap/sapctl/bin/socc service/halib_debug_level=3
Listing 60: Adding lines to the ASCS profile file.
Append the lines in Listing 61 to the profile file MCL_ERS10_vm1-lh2.
#----------------------------------------------------------------------- # SAP HA-Lib and Cluster Connector #----------------------------------------------------------------------- service/halib=/usr/sap/MCL/ERS10/exe/saphascriptco.so service/halib_cluster_connector=/usr/sap/sapctl/bin/socc service/halib_debug_level=3
Listing 61: Adding lines to the ERS profile file.
Running the SAPCTL executable with the -h (help) argument shows the options for the command.
root@sapdb1-vm1-n1:/usr/sap/sapctl/bin# ./sapctl -h sapctl version 8.2 Patch 0 Production Copyright 2016 Oracle. All rights reserved USAGE: sapctl <command> [<object>] -sapsid <SAP_SID> [options] command : start|stop|status|create|remove|relocate|config objects : abapvip|javavip|abapenq|javaenq|abaprep|javarep|abapall|javaall|asinstall|asinstvip|asinst|gwvip|gwinst|wdspvip|wdspinst|all NOTE: create and remove commands work on all objects only For detailed help on each command and object and its options use: sapctl <command> -h
Listing 62: Displaying usage information for the SAPCTL executable.

144 | CONFIGURING SAP ON ORACLE MINICLUSTER
Enter the sapctl command shown in Listing 63 to create resources.
root@sapdb1-vm1-n1:/usr/sap/sapctl# /usr/sap/sapctl/bin/sapctl create -sapsid MCL -if ipmppub0 -nm 255.255.252.0 -net 10.133.80.0 \ > -nodes sapdb1-vm1-n1,sapdb1-vm1-n2 \ > -abapvip 10.133.82.130 \ > -aersvip 10.133.82.131 \ > -abapmsport 3600 \ > -abapenq ASCS00 \ > -abaprep ERS10 sapctl version 8.2 Patch 0 Production Copyright 2016 Oracle. All rights reserved Creating SAP ABAP VIP Creating SAP ABAP ERS VIP Creating SAP ABAP Enqueue resource Creating SAP ABAP Replication resource Done
Listing 63: Creating resources using SAPCTL.
Listing 64 shows the SID managed by SAPCTL.
root@sapdb1-vm1-n1:/usr/sap/sapctl/bin# ./sapctl config sapctl version 8.2 Patch 0 Production Copyright 2016 Oracle. All rights reserved SAP_SIDs protected by the Oracle Clusterware are : MCL
Listing 64: Displaying the SID managed by SAPCTL.
Display the status of the resources managed by SAPCTL.
root@sapdb1-vm1-n1:/usr/sap/sapctl/bin# ./sapctl status all -sapsid MCL sapctl version 8.2 Patch 0 Production Copyright 2016 Oracle. All rights reserved SAP ABAP Enqueue service is OFFLINE SAP ABAP Replication service is OFFLINE
Listing 65: Displaying status of the resources managed by SAPCTL.
Start the Enqueue and Replication services using SAPCTL, and recheck service status. For additional information about troubleshooting SAPCTL, see the PDF document in the directory /usr/sap/sapctl/doc.
root@sapdb1-vm1-n1:/usr/sap/sapctl/bin# ./sapctl start all -sapsid MCL sapctl version 8.2 Patch 0 Production Copyright 2016 Oracle. All rights reserved Starting SAP ABAP Enqueue service Starting SAP ABAP Replication service SAP ABAP Enqueue service is ONLINE on sapdb1-vm1-n1 SAP ABAP Replication service is ONLINE on sapdb1-vm1-n2 Done root@sapdb1-vm1-n1:/usr/sap/sapctl/bin# ./sapctl status all -sapsid MCL sapctl version 8.2 Patch 0 Production Copyright 2016 Oracle. All rights reserved SAP ABAP Enqueue service is ONLINE on sapdb1-vm1-n1 SAP ABAP Replication service is ONLINE on sapdb1-vm1-n2
Listing 66: Checking service status.
Start the SAP application server in the application VM as the user mcladm:
oos1-app2:mcladm 1% /usr/sap/MCL/D00/exe/sapcontrol -prot NI_HTTP -nr 00 -function Start
Listing 67: Checking service status.
Connect to the SAP system with the SAPGUI and check the availability of all instances.

145 | CONFIGURING SAP ON ORACLE MINICLUSTER
Final Thoughts Business-critical SAP applications require database and application servers implemented on a resilient infrastructure. Oracle MiniCluster S7-2 features fully redundant, high-performance, shared flash storage and active/active independent compute nodes with redundant network connectivity, enabling a highly available architecture for strategic, performance-sensitive SAP applications. As shown in this paper, installing SAP software components using Oracle RAC and configuring clustered resources using SAPCTL allows creating a highly available SAP implementation on Oracle MiniCluster.
References Online Resources » Oracle Optimized Solution for SAP » Oracle MiniCluster S7-2 Supported with SAP
“SAP Note 2384855: “Running SAP Software on Oracle MiniCluster”; access to SAP Notes requires logon and authentication to the SAP Support Portal
» Oracle Database and IT Infrastructure for SAP » Oracle Services for SAP » SAP on Oracle Community » SAP on Oracle Solaris Community
White Papers
» "Best Practices for Migrating SAP Environments" » "Setting Up Highly Available SAP Systems on Oracle SuperCluster: Part 1: Configuring Virtualization for SAP on
Oracle SuperCluster” » "How to Improve the Efficiency and Performance of an SAP Environment with Oracle Optimized Solution for SAP"
Documentation
» Oracle MiniCluster S7-2 Getting Started Guide » Oracle MiniCluster S7-2 Installation Guide

Oracle Corporation, World Headquarters Worldwide Inquiries 500 Oracle Parkway Phone: +1.650.506.7000 Redwood Shores, CA 94065, USA Fax: +1.650.506.7200
Copyright © 2017, Oracle and/or its affiliates. All rights reserved. This document is provided for information purposes only, and the contents hereof are subject to change without notice. This document is not warranted to be error-free, nor subject to any other warranties or conditions, whether expressed orally or implied in law, including implied warranties and conditions of merchantability or fitness for a particular purpose. We specifically disclaim any liability with respect to this document, and no contractual obligations are formed either directly or indirectly by this document. This document may not be reproduced or transmitted in any form or by any means, electronic or mechanical, for any purpose, without our prior written permission. Oracle and Java are registered trademarks of Oracle and/or its affiliates. Other names may be trademarks of their respective owners. Intel and Intel Xeon are trademarks or registered trademarks of Intel Corporation. All SPARC trademarks are used under license and are trademarks or registered trademarks of SPARC International, Inc. AMD, Opteron, the AMD logo, and the AMD Opteron logo are trademarks or registered trademarks of Advanced Micro Devices. UNIX is a registered trademark of The Open Group. 0615 Configuring SAP on Oracle MiniCluster August 2017 Authors: Hans-Juergen Denecke, Pierre Reynes, Xirui Yang
C O N N E C T W I T H U S
blogs.oracle.com/oracle
facebook.com/oracle
twitter.com/oracle
oracle.com/sap