configuring snmp - cisco.com · group names to apply the access/role policy that is locally...
TRANSCRIPT
Send document comments to nexus7k -doc feedback@c i sco .com.
Cisco Nexus 7000 Series NX-OS SysOL-20086-01
C H A P T E R 10
Configuring SNMPThis chapter describes how to configure the SNMP feature on Cisco NX-OS devices.
This chapter includes the following sections:
• Information About SNMP, page 10-1
• Licensing Requirements for SNMP, page 10-7
• Prerequisites for SNMP, page 10-7
• Guidelines and Limitations, page 10-8
• Configuring SNMP, page 10-8
• Verifying SNMP Configuration, page 10-24
• SNMP Example Configurations, page 10-24
• Default Settings, page 10-25
• Additional References, page 10-25
• Feature History for SNMP, page 10-26
Information About SNMPThe Simple Network Management Protocol (SNMP) is an application-layer protocol that provides a message format for communication between SNMP managers and agents. SNMP provides a standardized framework and a common language used for the monitoring and management of devices in a network.
This section includes the following topics:
• SNMP Functional Overview, page 10-2
• SNMP Notifications, page 10-2
• SNMPv3, page 10-3
• SNMP and Embedded Event Manager, page 10-6
• Multiple Instance Support, page 10-6
• High Availability, page 10-7
• Virtualization Support, page 10-7
10-1tem Management Configuration Guide, Release 4.x
Send document comments to nexus7k -doc feedback@c i sco .com.
Chapter 10 Configuring SNMPInformation About SNMP
SNMP Functional OverviewThe SNMP framework consists of three parts:
• An SNMP manager—The system used to control and monitor the activities of network devices using SNMP.
• An SNMP agent—The software component within the managed device that maintains the data for the device and reports these data, as needed, to managing systems. Cisco NX-OS supports the agent and MIB. To enable the SNMP agent, you must define the relationship between the manager and the agent.
• A managed information base (MIB)—The collection of managed objects on the SNMP agent.
SNMP is defined in RFCs 3411 to 3418.
Cisco NX-OS supports SNMPv1, SNMPv2c, and SNMPv3. Both SNMPv1 and SNMPv2c use a community-based form of security.
Cisco NX-OS supports SNMP over IPv6.
SNMP NotificationsA key feature of SNMP is the ability to generate notifications from an SNMP agent. These notifications do not require that requests be sent from the SNMP manager. Notifications can indicate improper user authentication, restarts, the closing of a connection, loss of a connection to a neighbor router, or other significant events.
Cisco NX-OS generates SNMP notifications as either traps or informs. A trap is an asynchronous, unacknowledged message sent from the agent to the SNMP managers listed in the host receiver table (see the “Configuring SNMP Notification Receivers with VRFs” section on page 10-14). Informs are asynchronous messages sent from the SNMP agent to the SNMP manager which the manager must acknowledge receipt of.
Traps are less reliable than informs because the SNMP manager does not send any acknowledgment when it receives a trap. Cisco NX-OS cannot determine if the trap was received. An SNMP manager that receives an inform request acknowledges the message with an SNMP response protocol data unit (PDU). If Cisco NX-OS never receives a response, it can send the inform request again.
You can configure Cisco NX-OS to send notifications to multiple host receivers. See the “Configuring SNMP Notification Receivers” section on page 10-11 for more information about host receivers.
Table 10-1 lists the SNMP traps that are enabled by default.
Table 10-1 SNMP Traps Enabled By Default
Trap Type Description
generic : coldStart
generic : warmStart
entity : entity_mib_change
entity : entity_module_status_change
entity : entity_power_status_change
entity : entity_module_inserted
entity : entity_module_removed
entity : entity_unrecognised_module
10-2Cisco Nexus 7000 Series NX-OS System Management Configuration Guide, Release 4.x
OL-20086-01

Send document comments to nexus7k -doc feedback@c i sco .com.
Chapter 10 Configuring SNMPInformation About SNMP
SNMPv3SNMPv3 provides secure access to devices by a combination of authenticating and encrypting frames over the network. The security features provided in SNMPv3 are as follows:
• Message integrity—Ensures that a packet has not been tampered with while it was in-transit.
• Authentication—Determines that the message is from a valid source.
• Encryption—Scrambles the packet contents to prevent it from being seen by unauthorized sources.
SNMPv3 provides for both security models and security levels. A security model is an authentication strategy that is set up for a user and the role in which the user resides. A security level is the permitted level of security within a security model. A combination of a security model and a security level determines which security mechanism is employed when handling an SNMP packet.
This section includes the following topics:
• Security Models and Levels for SNMPv1, v2, v3, page 10-4
• User-Based Security Model, page 10-4
• CLI and SNMP User Synchronization, page 10-5
entity : entity_fan_status_change
entity : entity_power_out_change
link : linkDown
link : linkUp
link : extended-linkDown
link : extended-linkUp
link : cieLinkDown
link : cieLinkUp
link : delayed-link-state-change
rf : redundancy_framework
license : notify-license-expiry
license : notify-no-license-for-feature
license : notify-licensefile-missing
license : notify-license-expiry-warning
upgrade : UpgradeOpNotifyOnCompletion
upgrade : UpgradeJobStatusNotify
rmon : risingAlarm
rmon : fallingAlarm
rmon : hcRisingAlarm
rmon : hcFallingAlarm
entity : entity_sensor
Table 10-1 SNMP Traps Enabled By Default (continued)
Trap Type Description
10-3Cisco Nexus 7000 Series NX-OS System Management Configuration Guide, Release 4.x
OL-20086-01
Send document comments to nexus7k -doc feedback@c i sco .com.
Chapter 10 Configuring SNMPInformation About SNMP
• Group-Based SNMP Access, page 10-6
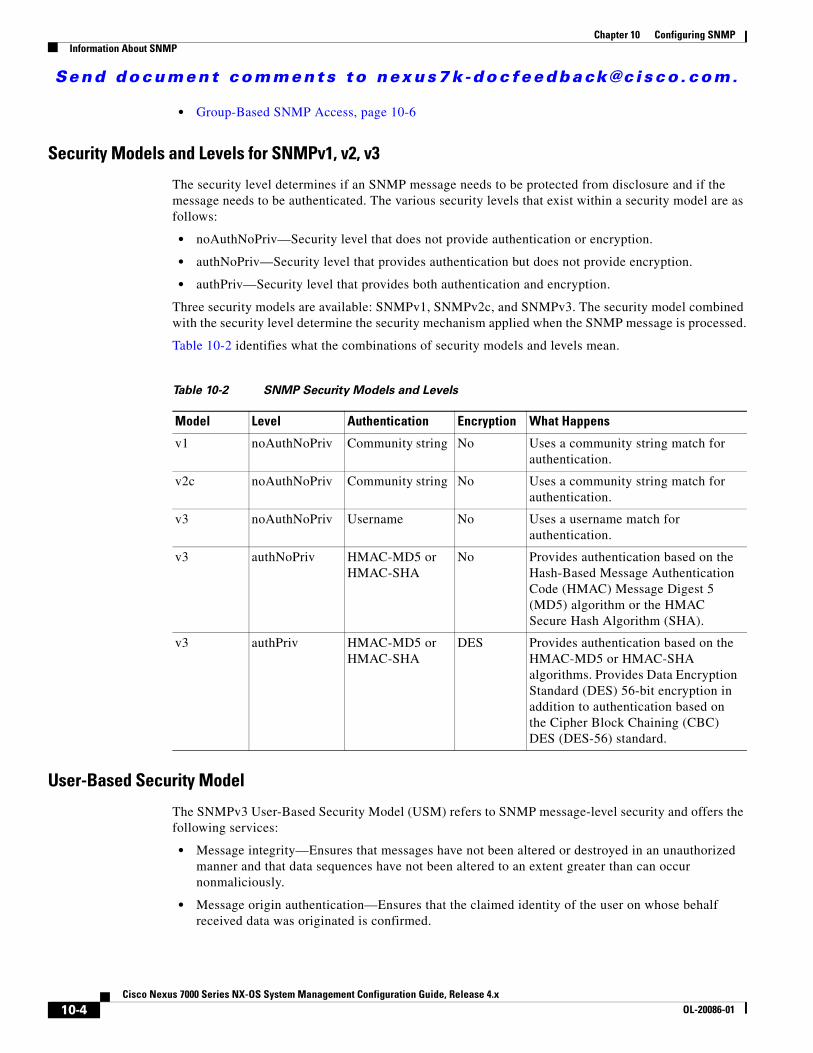
Security Models and Levels for SNMPv1, v2, v3
The security level determines if an SNMP message needs to be protected from disclosure and if the message needs to be authenticated. The various security levels that exist within a security model are as follows:
• noAuthNoPriv—Security level that does not provide authentication or encryption.
• authNoPriv—Security level that provides authentication but does not provide encryption.
• authPriv—Security level that provides both authentication and encryption.
Three security models are available: SNMPv1, SNMPv2c, and SNMPv3. The security model combined with the security level determine the security mechanism applied when the SNMP message is processed.
Table 10-2 identifies what the combinations of security models and levels mean.
User-Based Security Model
The SNMPv3 User-Based Security Model (USM) refers to SNMP message-level security and offers the following services:
• Message integrity—Ensures that messages have not been altered or destroyed in an unauthorized manner and that data sequences have not been altered to an extent greater than can occur nonmaliciously.
• Message origin authentication—Ensures that the claimed identity of the user on whose behalf received data was originated is confirmed.
Table 10-2 SNMP Security Models and Levels
Model Level Authentication Encryption What Happens
v1 noAuthNoPriv Community string No Uses a community string match for authentication.
v2c noAuthNoPriv Community string No Uses a community string match for authentication.
v3 noAuthNoPriv Username No Uses a username match for authentication.
v3 authNoPriv HMAC-MD5 or HMAC-SHA
No Provides authentication based on the Hash-Based Message Authentication Code (HMAC) Message Digest 5 (MD5) algorithm or the HMAC Secure Hash Algorithm (SHA).
v3 authPriv HMAC-MD5 or HMAC-SHA
DES Provides authentication based on the HMAC-MD5 or HMAC-SHA algorithms. Provides Data Encryption Standard (DES) 56-bit encryption in addition to authentication based on the Cipher Block Chaining (CBC) DES (DES-56) standard.
10-4Cisco Nexus 7000 Series NX-OS System Management Configuration Guide, Release 4.x
OL-20086-01
Send document comments to nexus7k -doc feedback@c i sco .com.
Chapter 10 Configuring SNMPInformation About SNMP
• Message confidentiality—Ensures that information is not made available or disclosed to unauthorized individuals, entities, or processes.
SNMPv3 authorizes management operations only by configured users and encrypts SNMP messages.
Cisco NX-OS uses two authentication protocols for SNMPv3:
• HMAC-MD5-96 authentication protocol
• HMAC-SHA-96 authentication protocol
Cisco NX-OS uses Advanced Encryption Standard (AES) as one of the privacy protocols for SNMPv3 message encryption and conforms with RFC 3826.
The priv option offers a choice of DES or 128-bit AES encryption for SNMP security encryption. The priv option and the aes-128 token indicate that this privacy password is for generating a 128-bit AES key.The AES priv password can have a minimum of eight characters. If the passphrases are specified in clear text, you can specify a maximum of 64 case-sensitive alphanumeric characters. If you use the localized key, you can specify a maximum of 130 characters.
Note For an SNMPv3 operation that uses the external AAA server, you must use AES for the privacy protocol in the user configuration on the external AAA server.
CLI and SNMP User Synchronization
SNMPv3 user management can be centralized at the Access Authentication and Accounting (AAA) server level. This centralized user management allows the SNMP agent in Cisco NX-OS to leverage the user authentication service of the AAA server. Once user authentication is verified, the SNMP PDUs are processed further. Additionally, the AAA server is also used to store user group names. SNMP uses the group names to apply the access/role policy that is locally available in the switch.
Any configuration changes made to the user group, role, or password results in database synchronization for both SNMP and AAA.
Cisco NX-OS synchronizes user configuration in the following ways:
• The authentication passphrase specified in the snmp-server user command becomes the password for the CLI user.
• The password specified in the username command becomes the authentication and privacy passphrases for the SNMP user.
• If you create or delete a user using either SNMP or the CLI, the user is created or deleted for both SNMP and the CLI.
• User-role mapping changes are synchronized in SNMP and the CLI.
• Role changes (deletions or modifications) from the CLI are synchronized to SNMP.
Note When you configure a passphrase/password in localized key/encrypted format, Cisco NX-OS does not synchronize the user information (password, roles, and so on).
Cisco NX-OS holds the synchronized user configuration for 60 minutes by default. See the “Modifying the AAA Synchronization Time” section on page 10-23 for information on how to modify this default value.
10-5Cisco Nexus 7000 Series NX-OS System Management Configuration Guide, Release 4.x
OL-20086-01
Send document comments to nexus7k -doc feedback@c i sco .com.
Chapter 10 Configuring SNMPInformation About SNMP
Group-Based SNMP Access
Note Because group is a standard SNMP term used industry-wide, we refer to role(s) as group(s) in this SNMP section.
SNMP access rights are organized by groups. Each group in SNMP is similar to a role through the CLI. Each group is defined with read access or read-write access.
You can begin communicating with the agent once your username is created, your roles are set up by your administrator, and you are added to the roles.
SNMP and Embedded Event ManagerThe Embedded Event Manager (EEM) feature monitors events, including SNMP MIB objects, and triggers an action based on these events. One of the actions could be to send an SNMP notification. EEM sends the cEventMgrPolicyEvent of CISCO-EMBEDDED-EVENT-MGR-MIB as the SNMP notification.
See Chapter 13, “Configuring the Embedded Event Manager” for more information about EEM.
Multiple Instance SupportA device can support multiple instances of a logical network entity, such as protocol instances or VRFs. Most existing MIBs cannot distinguish between these multiple logical network entities. For example, the original OSPF-MIB assumes a single protocol instance on a device, but you can now configure multiple OSPF instances on a device.
SNMPv3 uses contexts to distinguish between these multiple instances. An SNMP context is a collection of management information you can access through the SNMP agent. A device can support multiple contexts for different logical network entities. An SNMP context allows the SNMP manager to access one of the multiple instances of a MIB module supported on the device for the different logical network entities.
Cisco NX-OS supports the CISCO-CONTEXT-MAPPING-MIB to map between SNMP contexts and logical network entities. You can associate an SNMP context to a VRF, protocol instance, or topology.
SNMPv3 supports contexts with the contextName field of the SNMPv3 PDU. You can map this contextName field to a particular protocol instance or VRF.
For SNMPv2c, you can map the SNMP community to a context using the snmpCommunityContextName MIB object in the SNMP-COMMUNITY-MIB (RFC 3584). You can then map this snmpCommunityContextName to a particular protocol instance or VRF using the CISCO-CONTEXT-MAPPING-MIB or the CLI.
To map an SNMP context to a logical network entity, follow these steps:
Step 1 Create the SNMPv3 context.
Step 2 Determine the logical network entity instance.
Step 3 Map the SNMPv3 context to a logical network entity.
10-6Cisco Nexus 7000 Series NX-OS System Management Configuration Guide, Release 4.x
OL-20086-01
Send document comments to nexus7k -doc feedback@c i sco .com.
Chapter 10 Configuring SNMPLicensing Requirements for SNMP
Step 4 Optionally, map the SNMPv3 context to an SNMPv2c community.
For more information, see the “Configuring the Context to Network Entity Mapping” section on page 10-21.
High AvailabilityCisco NX-OS supports stateless restarts for SNMP. After a reboot or supervisor switchover, Cisco NX-OS applies the running configuration.
Virtualization SupportCisco NX-OS supports one instance of the SNMP per virtual device context (VDC). By default, Cisco NX-OS places you in the default VDC. For more information, see the Cisco Nexus 7000 Series NX-OS Virtual Device Context Configuration Guide, Release 4.x
SNMP supports multiple MIB module instances and maps them to logical network entities. For more information, see the “Multiple Instance Support” section on page 10-6.
SNMP is also VRF aware. You can configure SNMP to use a particular VRF to reach the SNMP notification host receiver. You can also configure SNMP to filter notifications to an SNMP host receiver based on the VRF where the notification occurred. For more information, see the “Configuring SNMP Notification Receivers with VRFs” section on page 10-14).
Licensing Requirements for SNMP
Prerequisites for SNMPSNMP has the following prerequisites:
• If you configure VDCs, install the Advanced Services license and enter the desired VDC. For more information, see the Cisco Nexus 7000 Series NX-OS Virtual Device Context Configuration Guide, Release 4.x.
Product License Requirement
NX-OS SNMP requires no license. Any feature not included in a license package is bundled with the Cisco NX-OS system images and is provided at no extra charge to you. For a complete explanation of the NX-OS licensing scheme, see the Cisco NX-OS Licensing Guide.
10-7Cisco Nexus 7000 Series NX-OS System Management Configuration Guide, Release 4.x
OL-20086-01
Send document comments to nexus7k -doc feedback@c i sco .com.
Chapter 10 Configuring SNMPGuidelines and Limitations
Guidelines and LimitationsSNMP has the following configuration guidelines and limitations:
• Cisco NX-OS supports read-only access to some SNMP MIBs. See the Cisco NX-OS MIB support list at the following URL for more information:
http://www.cisco.com/public/sw-center/netmgmt/cmtk/mibs.shtml
Configuring SNMPThis section includes the following topics:
• Configuring SNMP Users, page 10-8
• Enforcing SNMP Message Encryption, page 10-9
• Assigning SNMPv3 Users to Multiple Roles, page 10-10
• Creating SNMP Communities, page 10-10
• Filtering SNMP Requests, page 10-11
• Configuring SNMP Notification Receivers, page 10-11
• Configuring a Source Interface for SNMP Notifications, page 10-12
• Configuring the Notification Target User, page 10-13
• Configuring SNMP Notification Receivers with VRFs, page 10-14
• Configuring SNMP to Send Traps Using an Inband Port, page 10-15
• Enabling SNMP Notifications, page 10-17
• Displaying SNMP ifIndex for an Interface, page 10-19
• Disabling LinkUp/LinkDown Notifications on an Interface, page 10-19
• Enabling a One-time Authentication for SNMP over TCP, page 10-19
• Assigning the SNMP Device Contact and Location Information, page 10-20
• Configuring the Context to Network Entity Mapping, page 10-21
• Disabling SNMP, page 10-23
• Modifying the AAA Synchronization Time, page 10-23
Note Be aware that the Cisco NX-OS commands for this feature may differ from those commands used in Cisco IOS.
Configuring SNMP UsersYou can configure a user for SNMP.
BEFORE YOU BEGIN
Make sure that you are in the correct VDC. To change the VDC, use the switchto vdc command.
10-8Cisco Nexus 7000 Series NX-OS System Management Configuration Guide, Release 4.x
OL-20086-01

Send document comments to nexus7k -doc feedback@c i sco .com.
Chapter 10 Configuring SNMPConfiguring SNMP
SUMMARY STEPS
1. config t
2. snmp-server user name [auth {md5 | sha} passphrase [auto] [priv [aes-128] passphrase] [engineID id] [localizedkey]]
3. show snmp user
4. copy running-config startup-config
DETAILED STEPS
This example shows how to configure the SNMP contact and location information:
switch# config tEnter configuration commands, one per line. End with CNTL/Z.switch(config)# snmp-server user Admin auth sha abcd1234 priv abcdefgh
Enforcing SNMP Message EncryptionYou can configure SNMP to require authentication or encryption for incoming requests. By default, the SNMP agent accepts SNMPv3 messages without authentication and encryption. When you enforce privacy, Cisco NX-OS responds with an authorizationError for any SNMPv3 PDU request using securityLevel parameter of either noAuthNoPriv or authNoPriv.
Command Purpose
Step 1 config t
Example:switch# config tEnter configuration commands, one per line. End with CNTL/Z.switch(config)#
Places you in global configuration mode.
Step 2 snmp-server user name [auth {md5 | sha} passphrase [auto] [priv [aes-128] passphrase] [engineID id] [localizedkey]]
Example:switch(config)# snmp-server user Admin auth sha abcd1234 priv abcdefgh
Configures an SNMP user with authentication and privacy parameters. The passphrase can be any case-sensitive alphanumeric string up to 64 characters. If you use the localizedkey keyword, the passphrase can be any case-sensitive alphanumeric string up to 130 characters.
The engineID format is a 12-digit colon-separated decimal number.
Step 3 show snmp user
Example:switch(config-callhome)# show snmp user
(Optional) Displays information about one or more SNMP users.
Step 4 copy running-config startup-config
Example:switch(config)# copy running-config startup-config
(Optional) Saves this configuration change.
10-9Cisco Nexus 7000 Series NX-OS System Management Configuration Guide, Release 4.x
OL-20086-01
Send document comments to nexus7k -doc feedback@c i sco .com.
Chapter 10 Configuring SNMPConfiguring SNMP
Use the following command in global configuration mode to enforce SNMP message encryption for a user:
Use the following command in global configuration mode to enforce SNMP message encryption for all users:
Assigning SNMPv3 Users to Multiple Roles After you configure an SNMP user, you can assign multiple roles for the user.
Note Only users belonging to a network-admin role can assign roles to other users.
Use the following command in global configuration mode to assign a role to an SNMP user:
Creating SNMP CommunitiesYou can create SNMP communities for SNMPv1 or SNMPv2c.
Use the following command in global configuration mode to create an SNMP community string:
Command Purposesnmp-server user name enforcePriv
Example:switch(config)# snmp-server user Admin enforcePriv
Enforces SNMP message encryption for this user.
Command Purpose
snmp-server globalEnforcePriv
Example:switch(config)# snmp-server globalEnforcePriv
Enforces SNMP message encryption for all users.
Command Purpose
snmp-server user name group
Example:switch(config)# snmp-server user Admin superuser
Associates this SNMP user with the configured user role.
Command Purpose
snmp-server community name group {ro | rw}
Example:switch(config)# snmp-server community public ro
Creates an SNMP community string.
10-10Cisco Nexus 7000 Series NX-OS System Management Configuration Guide, Release 4.x
OL-20086-01
Send document comments to nexus7k -doc feedback@c i sco .com.
Chapter 10 Configuring SNMPConfiguring SNMP
Filtering SNMP RequestsYou can assign an access list (ACL) to a community to filter incoming SNMP requests. If the assigned ACL allows the incoming request packet, SNMP processes the request. If the ACL denies the request, SNMP drops the request and sends a system message.
Create the ACL with the following parameters:
• Source IP address
• Destination IP address
• Source port
• Destination port
• Protocol (UDP or TCP)
See the Cisco Nexus 7000 Series NX-OS Security Configuration Guide, Release 4.x for more information on creating ACLs. The ACL applies to both IPv4 and IPv6 over UDP and TCP.
Use the following command in global configuration mode to assign an ACL to a community to filter SNMP requests:
Configuring SNMP Notification ReceiversYou can configure Cisco NX-OS to generate SNMP notifications to multiple host receivers.
Use the following command in global configuration mode to configure a host receiver for SNMPv1 traps:
Command Purpose
snmp-server community community-name use-acl acl-name
Example:switch(config)# snmp-server community public use-acl my_acl_for_public
Assigns an ACL to an SNMP community to filter SNMP requests.
Command Purpose
snmp-server host ip-address traps version 1 community [udp_port number]
Example:switch(config)# snmp-server host 192.0.2.1 traps version 1 public
Configures a host receiver for SNMPv1 traps. The ip-address can be an IPv4 or IPv6 address. The community can be any alphanumeric string up to 255 characters. The UDP port number range is from 0 to 65535.
10-11Cisco Nexus 7000 Series NX-OS System Management Configuration Guide, Release 4.x
OL-20086-01
Send document comments to nexus7k -doc feedback@c i sco .com.
Chapter 10 Configuring SNMPConfiguring SNMP
Use the following command in global configuration mode to configure a host receiver for SNMPv2c traps or informs:
Use the following command in global configuration mode to configure a host receiver for SNMPv3 traps or informs:
Note The SNMP manager must know the user credentials (authKey/PrivKey) based on the SNMP engine ID of the Cisco NX-OS device to authenticate and decrypt the SNMPv3 messages.
Configuring a Source Interface for SNMP NotificationsYou can configure SNMP to use the IP address of an interface as the source IP address for notifications. When a notification is generated, its source IP address is based on the IP address of this configured interface. You can configure this as follows:
• All notifications sent to all SNMP notification receivers.
• All notifications sent to a specific SNMP notification receiver. This configuration overrides the global source interface configuration.
Note Configuring the source interface IP address for outgoing trap packets does not guarantee that the device will use the same interface to send the trap. The source interface IP address defines the source address inside of the SNMP trap, and the connection is opened with the address of the egress interface as source.
Command Purposesnmp-server host ip-address {traps | informs} version 2c community [udp_port number]
Example:switch(config)# snmp-server host 192.0.2.1 informs version 2c public
Configures a host receiver for SNMPv2c traps or informs. The ip-address can be an IPv4 or IPv6 address. The community can be any alphanumeric string up to 255 characters. The UDP port number range is from 0 to 65535.
Command Purpose
snmp-server host ip-address {traps | informs} version 3 {auth | noauth | priv} username [udp_port number]
Example:switch(config)# snmp-server host 192.0.2.1 informs version 3 auth NMS
Configures a host receiver for SNMPv3 traps or informs. The ip-address can be an IPv4 or IPv6 address. The username can be any alphanumeric string up to 255 characters. The UDP port number range is from 0 to 65535.
10-12Cisco Nexus 7000 Series NX-OS System Management Configuration Guide, Release 4.x
OL-20086-01
Send document comments to nexus7k -doc feedback@c i sco .com.
Chapter 10 Configuring SNMPConfiguring SNMP
Use the following command in global configuration mode to configure a host receiver on a source interface:
Use the following command in global configuration mode to configure a source interface for sending out all SNMP notifications:
Use the show snmp source-interface command to display information about configured source interfaces.
Configuring the Notification Target UserYou must configure a notification target user on the device to send SNMPv3 inform notifications to a notification host receiver.
Cisco NX-OS uses the credentials of the notification target user to encrypt the SNMPv3 inform notification messages to the configured notification host receiver.
Note For authenticating and decrypting the received inform PDU, the notification host receiver should have the same user credentials as configured in Cisco NX-OS to authenticate and decrypt the informs.
Use the following command in global configuration mode to configure the notification target user:
Command Purposesnmp-server host ip-address source-interface if-type if-number [udp_port number]
Example:switch(config)# snmp-server host 192.0.2.1 source-interface ethernet 2/1
Configures a host receiver for SNMPv2c traps or informs. The ip-address can be an IPv4 or IPv6 address. Use ? to determine the supported interface types. The UDP port number range is from 0 to 65535.
This configuration overrides the global source interface configuration.
Command Purposesnmp-server source-interface {traps | informs} if-type if-number
Example:switch(config)# snmp-server source-interface traps ethernet 2/1
Configures a source interface for sending out SNMPv2c traps or informs. Use ? to determine the supported interface types.
Command Purpose
snmp-server user name [auth {md5 | sha} passphrase [auto] [priv [aes-128] passphrase] [engineID id]
Example:switch(config)# snmp-server user NMS auth sha abcd1234 priv abcdefgh engineID 00:00:00:63:00:01:00:10:20:15:10:03
Configures the notification target user with the specified engine ID for the notification host receiver. The engineID format is a 12-digit colon-separated decimal number.
10-13Cisco Nexus 7000 Series NX-OS System Management Configuration Guide, Release 4.x
OL-20086-01
Send document comments to nexus7k -doc feedback@c i sco .com.
Chapter 10 Configuring SNMPConfiguring SNMP
Configuring SNMP Notification Receivers with VRFsSNMP adds entries into the cExtSnmpTargetVrfTable of the CISCO-SNMP-TARGET-EXT-MIB when you configure the VRF reachability and filtering options for an SNMP notification receiver.
Note You must configure the host before configuring the VRF reachability or filtering options.
You can configure Cisco NX-OS to use a configured VRF to reach the host receiver.
Use the following command in global configuration mode to configure a VRF to use for sending notifications to the host receiver:
You can configure Cisco NX-OS filter notifications based on the VRF in which the notification occurred.
Use the following command in global configuration mode to filter notifications based on a configured VRF:
Command Purpose
snmp-server host ip-address use-vrf vrf_name [udp_port number]
Example:switch(config)# snmp-server host 192.0.2.1 use-vrf Blue
Configures SNMP to use the selected VRF to communicate with the host receiver. The ip-address can be an IPv4 or IPv6 address. The VRF name can be any alphanumeric string up to 255 characters. The UDP port number range is from 0 to 65535. This command adds an entry into thc ExtSnmpTargetVrfTable of the CISCO-SNMP-TARGET-EXT-MB.
no snmp-server host ip-address use-vrf vrf_name [udp_port number]
Example:switch(config)# no snmp-server host 192.0.2.1 use-vrf Blue
Removes the VRF reachability information for the configured host, and removes the entry from thc ExtSnmpTargetVrfTable of the CISCO-SNMP-TARGET-EXT-MB.
The ip-address can be an IPv4 or IPv6 address.
Does not remove the host configuration.
Command Purpose
snmp-server host ip-address filter-vrf vrf_name [udp_port number]
Example:switch(config)# snmp-server host 192.0.2.1 filter-vrf Red
Filters notifications to the notification host receiver based on the configured VRF. The ip-address can be an IPv4 or IPv6 address. The VRF name can be any alphanumeric string up to 255 characters. The UDP port number range is from 0 to 65535.
This command adds an entry into thc ExtSnmpTargetVrfTable of the CISCO-SNMP-TARGET-EXT-MB.
10-14Cisco Nexus 7000 Series NX-OS System Management Configuration Guide, Release 4.x
OL-20086-01
Send document comments to nexus7k -doc feedback@c i sco .com.
Chapter 10 Configuring SNMPConfiguring SNMP
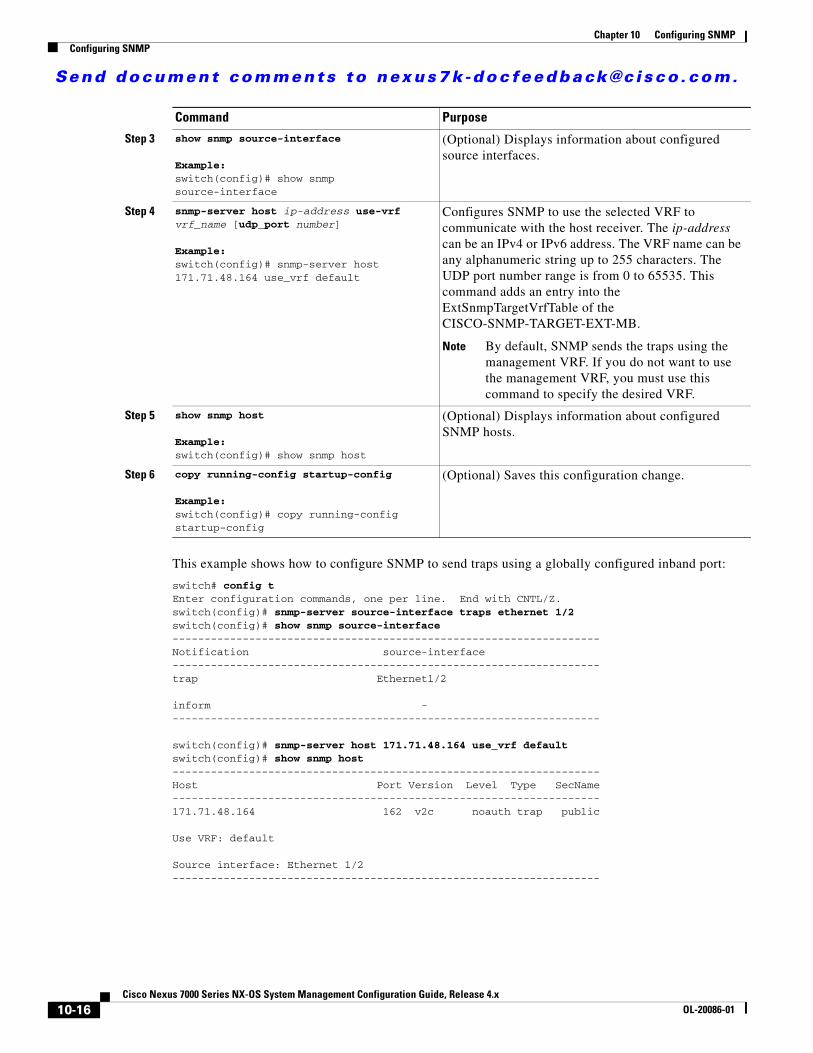
Configuring SNMP to Send Traps Using an Inband PortYou can configure SNMP to send traps using an inband port. To do so, you must configure the source interface (at the global or host level) and the VRF used to send the traps.
SUMMARY STEPS
1. config t
2. snmp-server source-interface traps if-type if-number
3. show snmp source-interface
4. snmp-server host ip-address use-vrf vrf_name [udp_port number]
5. show snmp host
6. copy running-config startup-config
DETAILED STEPS
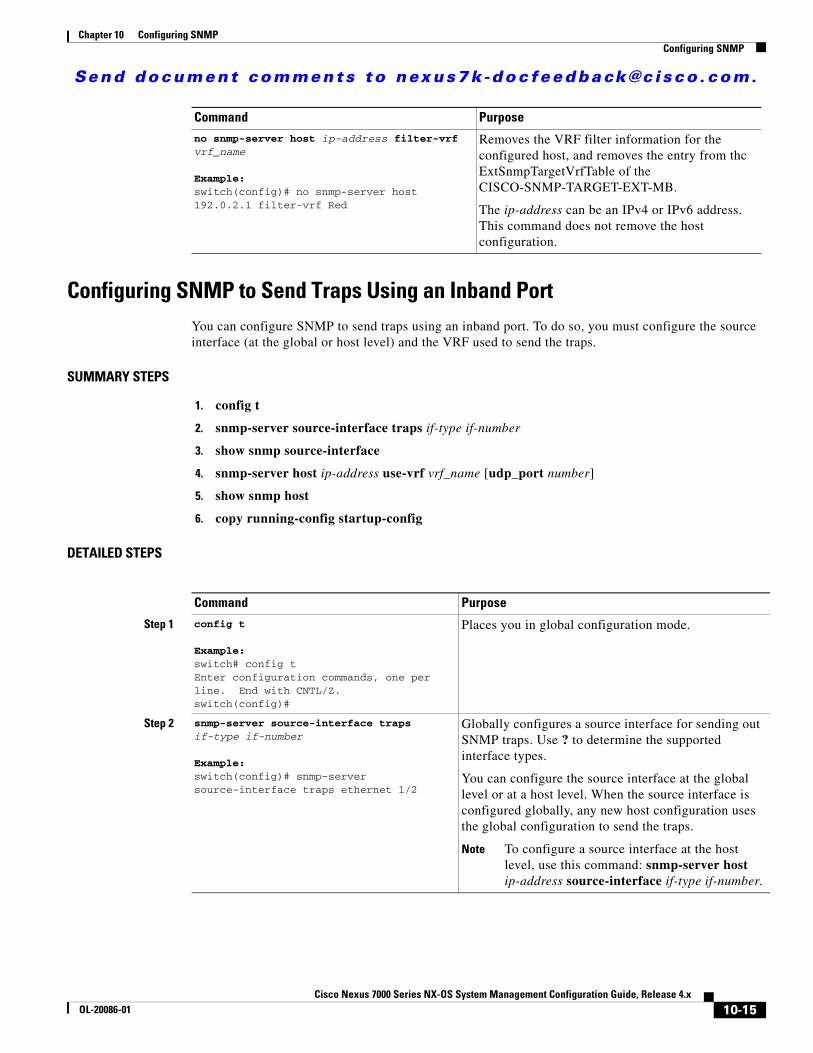
no snmp-server host ip-address filter-vrf vrf_name
Example:switch(config)# no snmp-server host 192.0.2.1 filter-vrf Red
Removes the VRF filter information for the configured host, and removes the entry from thc ExtSnmpTargetVrfTable of the CISCO-SNMP-TARGET-EXT-MB.
The ip-address can be an IPv4 or IPv6 address. This command does not remove the host configuration.
Command Purpose
Command Purpose
Step 1 config t
Example:switch# config tEnter configuration commands, one per line. End with CNTL/Z.switch(config)#
Places you in global configuration mode.
Step 2 snmp-server source-interface traps if-type if-number
Example:switch(config)# snmp-server source-interface traps ethernet 1/2
Globally configures a source interface for sending out SNMP traps. Use ? to determine the supported interface types.
You can configure the source interface at the global level or at a host level. When the source interface is configured globally, any new host configuration uses the global configuration to send the traps.
Note To configure a source interface at the host level, use this command: snmp-server host ip-address source-interface if-type if-number.
10-15Cisco Nexus 7000 Series NX-OS System Management Configuration Guide, Release 4.x
OL-20086-01
Send document comments to nexus7k -doc feedback@c i sco .com.
Chapter 10 Configuring SNMPConfiguring SNMP
This example shows how to configure SNMP to send traps using a globally configured inband port:
switch# config tEnter configuration commands, one per line. End with CNTL/Z.switch(config)# snmp-server source-interface traps ethernet 1/2switch(config)# show snmp source-interface-------------------------------------------------------------------Notification source-interface-------------------------------------------------------------------trap Ethernet1/2
inform --------------------------------------------------------------------
switch(config)# snmp-server host 171.71.48.164 use_vrf defaultswitch(config)# show snmp host-------------------------------------------------------------------Host Port Version Level Type SecName-------------------------------------------------------------------171.71.48.164 162 v2c noauth trap public
Use VRF: default
Source interface: Ethernet 1/2-------------------------------------------------------------------
Step 3 show snmp source-interface
Example:switch(config)# show snmp source-interface
(Optional) Displays information about configured source interfaces.
Step 4 snmp-server host ip-address use-vrf vrf_name [udp_port number]
Example:switch(config)# snmp-server host 171.71.48.164 use_vrf default
Configures SNMP to use the selected VRF to communicate with the host receiver. The ip-address can be an IPv4 or IPv6 address. The VRF name can be any alphanumeric string up to 255 characters. The UDP port number range is from 0 to 65535. This command adds an entry into the ExtSnmpTargetVrfTable of the CISCO-SNMP-TARGET-EXT-MB.
Note By default, SNMP sends the traps using the management VRF. If you do not want to use the management VRF, you must use this command to specify the desired VRF.
Step 5 show snmp host
Example:switch(config)# show snmp host
(Optional) Displays information about configured SNMP hosts.
Step 6 copy running-config startup-config
Example:switch(config)# copy running-config startup-config
(Optional) Saves this configuration change.
Command Purpose
10-16Cisco Nexus 7000 Series NX-OS System Management Configuration Guide, Release 4.x
OL-20086-01
Send document comments to nexus7k -doc feedback@c i sco .com.
Chapter 10 Configuring SNMPConfiguring SNMP
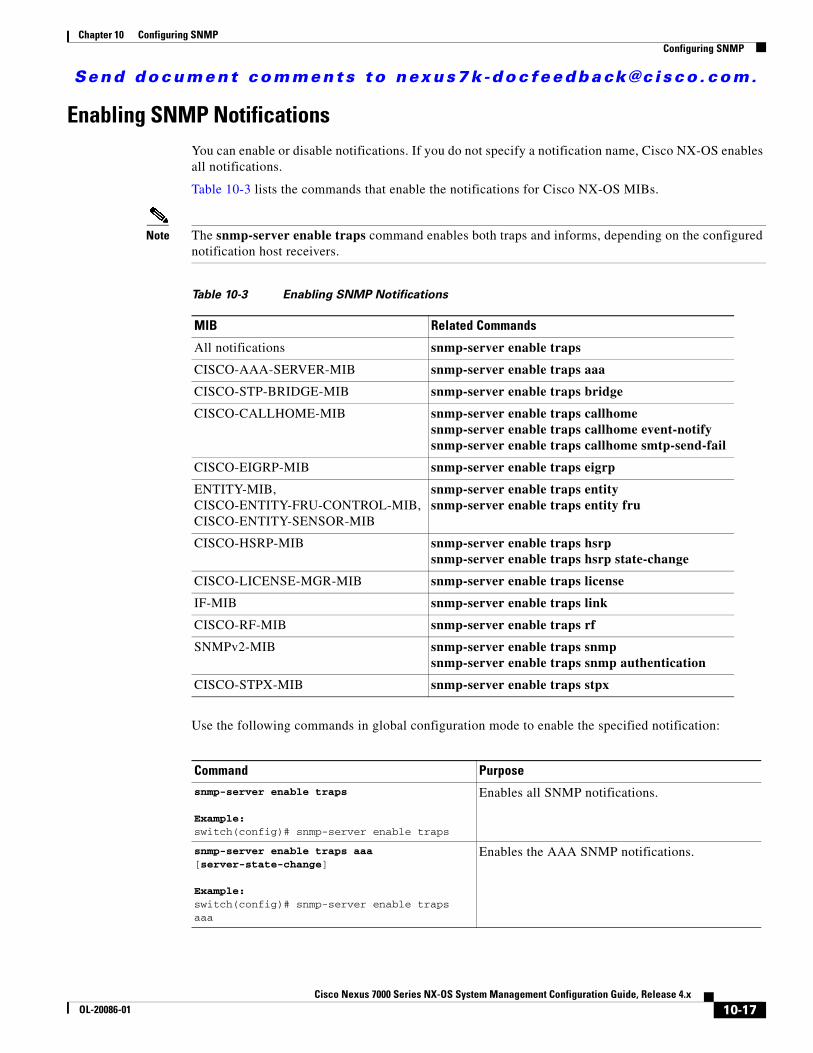
Enabling SNMP NotificationsYou can enable or disable notifications. If you do not specify a notification name, Cisco NX-OS enables all notifications.
Table 10-3 lists the commands that enable the notifications for Cisco NX-OS MIBs.
Note The snmp-server enable traps command enables both traps and informs, depending on the configured notification host receivers.
Use the following commands in global configuration mode to enable the specified notification:
Table 10-3 Enabling SNMP Notifications
MIB Related Commands
All notifications snmp-server enable traps
CISCO-AAA-SERVER-MIB snmp-server enable traps aaa
CISCO-STP-BRIDGE-MIB snmp-server enable traps bridge
CISCO-CALLHOME-MIB snmp-server enable traps callhomesnmp-server enable traps callhome event-notifysnmp-server enable traps callhome smtp-send-fail
CISCO-EIGRP-MIB snmp-server enable traps eigrp
ENTITY-MIB, CISCO-ENTITY-FRU-CONTROL-MIB, CISCO-ENTITY-SENSOR-MIB
snmp-server enable traps entitysnmp-server enable traps entity fru
CISCO-HSRP-MIB snmp-server enable traps hsrpsnmp-server enable traps hsrp state-change
CISCO-LICENSE-MGR-MIB snmp-server enable traps license
IF-MIB snmp-server enable traps link
CISCO-RF-MIB snmp-server enable traps rf
SNMPv2-MIB snmp-server enable traps snmpsnmp-server enable traps snmp authentication
CISCO-STPX-MIB snmp-server enable traps stpx
Command Purposesnmp-server enable traps
Example:switch(config)# snmp-server enable traps
Enables all SNMP notifications.
snmp-server enable traps aaa [server-state-change]
Example:switch(config)# snmp-server enable traps aaa
Enables the AAA SNMP notifications.
10-17Cisco Nexus 7000 Series NX-OS System Management Configuration Guide, Release 4.x
OL-20086-01
Send document comments to nexus7k -doc feedback@c i sco .com.
Chapter 10 Configuring SNMPConfiguring SNMP
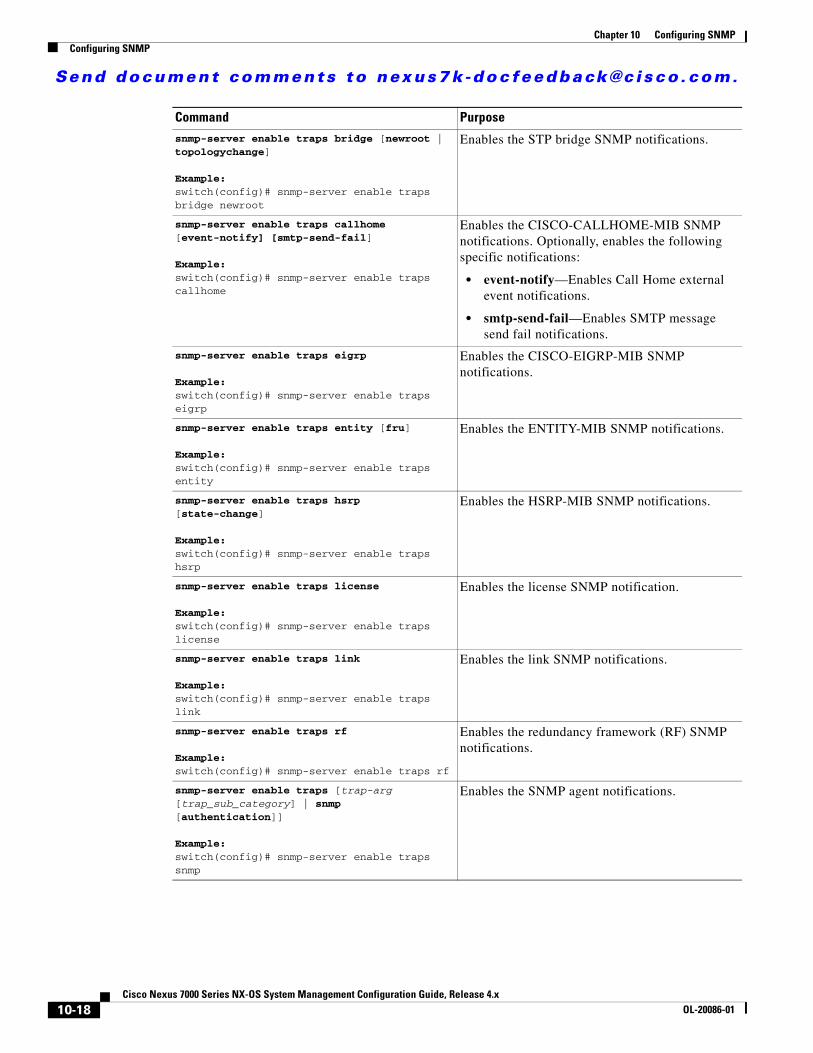
snmp-server enable traps bridge [newroot | topologychange]
Example:switch(config)# snmp-server enable traps bridge newroot
Enables the STP bridge SNMP notifications.
snmp-server enable traps callhome [event-notify] [smtp-send-fail]
Example:switch(config)# snmp-server enable traps callhome
Enables the CISCO-CALLHOME-MIB SNMP notifications. Optionally, enables the following specific notifications:
• event-notify—Enables Call Home external event notifications.
• smtp-send-fail—Enables SMTP message send fail notifications.
snmp-server enable traps eigrp
Example:switch(config)# snmp-server enable traps eigrp
Enables the CISCO-EIGRP-MIB SNMP notifications.
snmp-server enable traps entity [fru]
Example:switch(config)# snmp-server enable traps entity
Enables the ENTITY-MIB SNMP notifications.
snmp-server enable traps hsrp [state-change]
Example:switch(config)# snmp-server enable traps hsrp
Enables the HSRP-MIB SNMP notifications.
snmp-server enable traps license
Example:switch(config)# snmp-server enable traps license
Enables the license SNMP notification.
snmp-server enable traps link
Example:switch(config)# snmp-server enable traps link
Enables the link SNMP notifications.
snmp-server enable traps rf
Example:switch(config)# snmp-server enable traps rf
Enables the redundancy framework (RF) SNMP notifications.
snmp-server enable traps [trap-arg [trap_sub_category] | snmp [authentication]]
Example:switch(config)# snmp-server enable traps snmp
Enables the SNMP agent notifications.
Command Purpose
10-18Cisco Nexus 7000 Series NX-OS System Management Configuration Guide, Release 4.x
OL-20086-01
Send document comments to nexus7k -doc feedback@c i sco .com.
Chapter 10 Configuring SNMPConfiguring SNMP
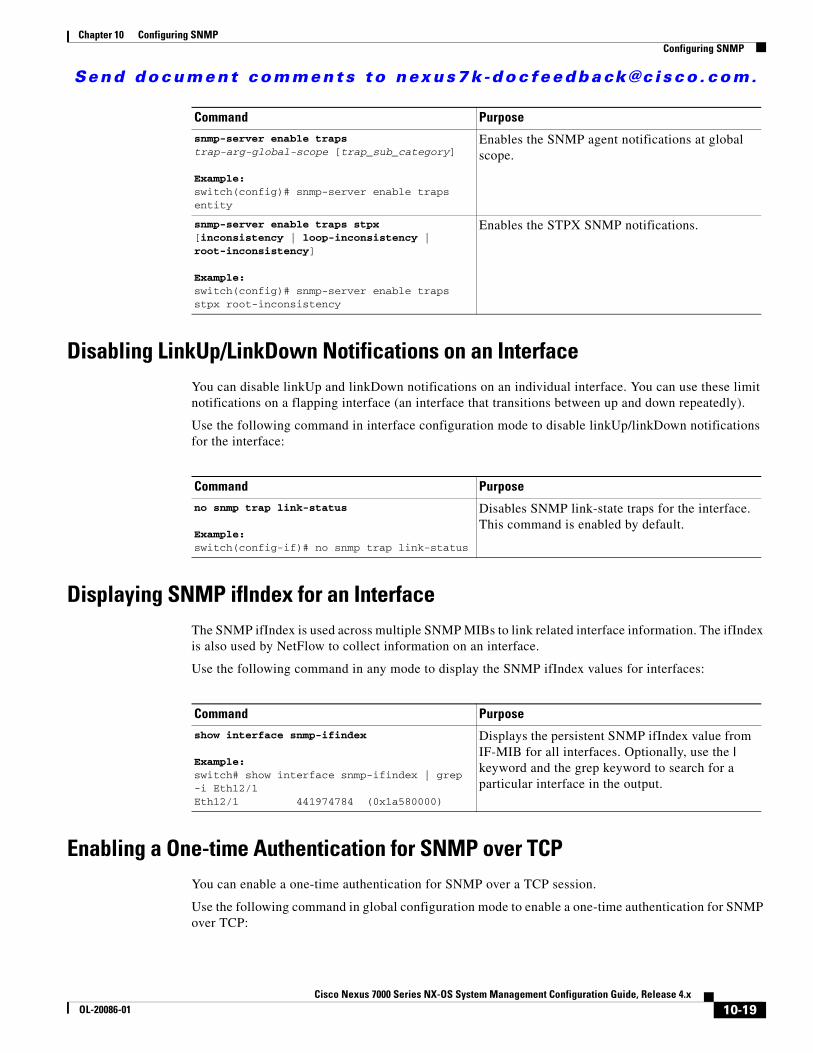
Disabling LinkUp/LinkDown Notifications on an InterfaceYou can disable linkUp and linkDown notifications on an individual interface. You can use these limit notifications on a flapping interface (an interface that transitions between up and down repeatedly).
Use the following command in interface configuration mode to disable linkUp/linkDown notifications for the interface:
Displaying SNMP ifIndex for an InterfaceThe SNMP ifIndex is used across multiple SNMP MIBs to link related interface information. The ifIndex is also used by NetFlow to collect information on an interface.
Use the following command in any mode to display the SNMP ifIndex values for interfaces:
Enabling a One-time Authentication for SNMP over TCPYou can enable a one-time authentication for SNMP over a TCP session.
Use the following command in global configuration mode to enable a one-time authentication for SNMP over TCP:
snmp-server enable traps trap-arg-global-scope [trap_sub_category]
Example:switch(config)# snmp-server enable traps entity
Enables the SNMP agent notifications at global scope.
snmp-server enable traps stpx [inconsistency | loop-inconsistency | root-inconsistency]
Example:switch(config)# snmp-server enable traps stpx root-inconsistency
Enables the STPX SNMP notifications.
Command Purpose
Command Purpose
no snmp trap link-status
Example:switch(config-if)# no snmp trap link-status
Disables SNMP link-state traps for the interface. This command is enabled by default.
Command Purpose
show interface snmp-ifindex
Example:switch# show interface snmp-ifindex | grep -i Eth12/1Eth12/1 441974784 (0x1a580000)
Displays the persistent SNMP ifIndex value from IF-MIB for all interfaces. Optionally, use the | keyword and the grep keyword to search for a particular interface in the output.
10-19Cisco Nexus 7000 Series NX-OS System Management Configuration Guide, Release 4.x
OL-20086-01
Send document comments to nexus7k -doc feedback@c i sco .com.
Chapter 10 Configuring SNMPConfiguring SNMP
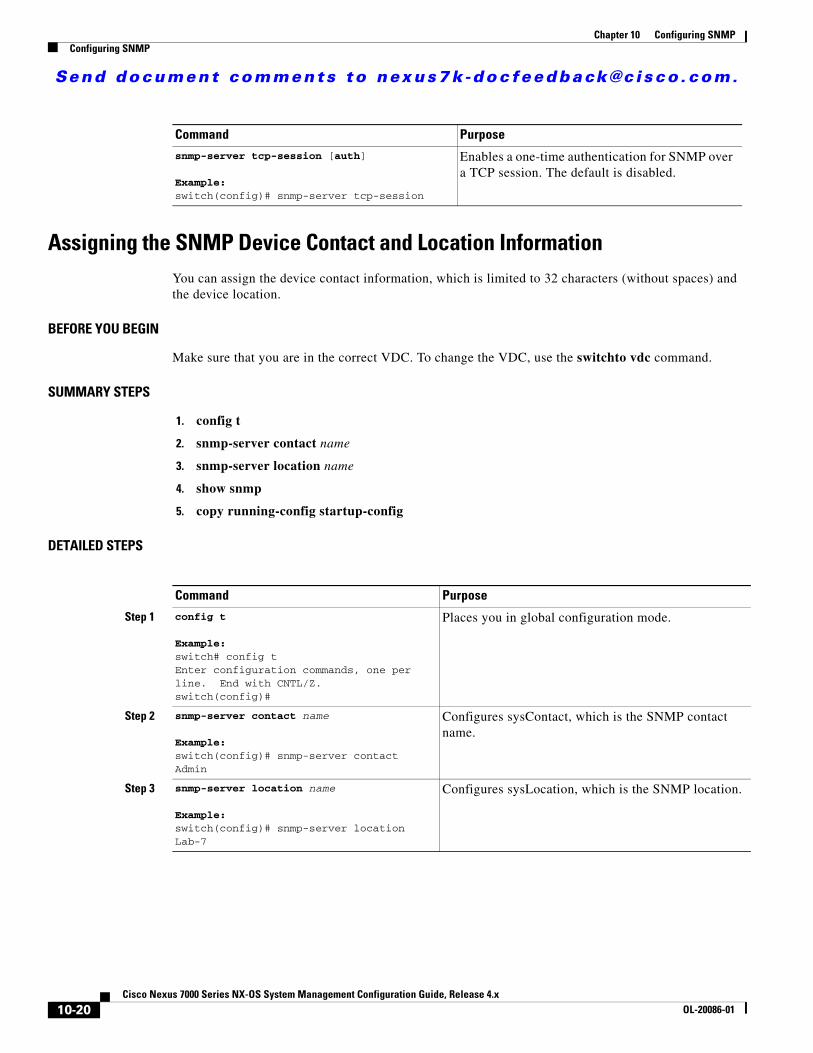
Assigning the SNMP Device Contact and Location InformationYou can assign the device contact information, which is limited to 32 characters (without spaces) and the device location.
BEFORE YOU BEGIN
Make sure that you are in the correct VDC. To change the VDC, use the switchto vdc command.
SUMMARY STEPS
1. config t
2. snmp-server contact name
3. snmp-server location name
4. show snmp
5. copy running-config startup-config
DETAILED STEPS
Command Purpose
snmp-server tcp-session [auth]
Example:switch(config)# snmp-server tcp-session
Enables a one-time authentication for SNMP over a TCP session. The default is disabled.
Command Purpose
Step 1 config t
Example:switch# config tEnter configuration commands, one per line. End with CNTL/Z.switch(config)#
Places you in global configuration mode.
Step 2 snmp-server contact name
Example:switch(config)# snmp-server contact Admin
Configures sysContact, which is the SNMP contact name.
Step 3 snmp-server location name
Example:switch(config)# snmp-server location Lab-7
Configures sysLocation, which is the SNMP location.
10-20Cisco Nexus 7000 Series NX-OS System Management Configuration Guide, Release 4.x
OL-20086-01
Send document comments to nexus7k -doc feedback@c i sco .com.
Chapter 10 Configuring SNMPConfiguring SNMP
This example shows how to configure the SNMP contact and location information:
switch# config tEnter configuration commands, one per line. End with CNTL/Z.switch(config)# snmp contact Adminswitch(config)# snmp location Lab-7
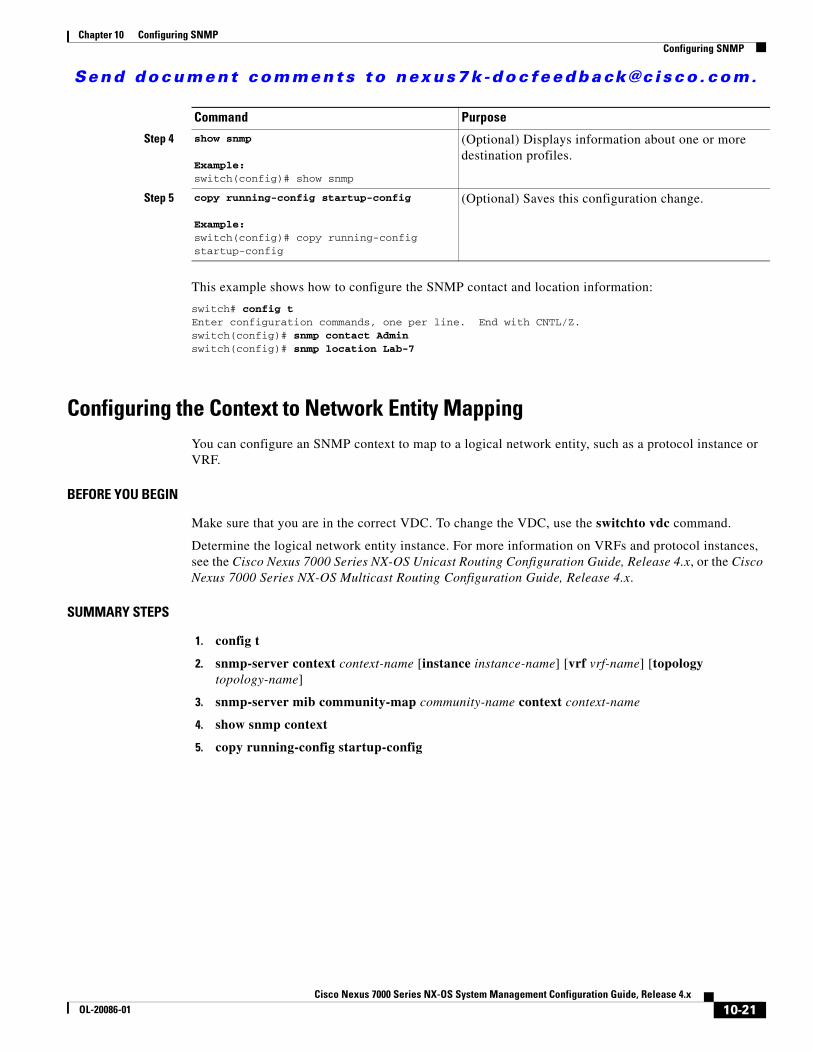
Configuring the Context to Network Entity MappingYou can configure an SNMP context to map to a logical network entity, such as a protocol instance or VRF.
BEFORE YOU BEGIN
Make sure that you are in the correct VDC. To change the VDC, use the switchto vdc command.
Determine the logical network entity instance. For more information on VRFs and protocol instances, see the Cisco Nexus 7000 Series NX-OS Unicast Routing Configuration Guide, Release 4.x, or the Cisco Nexus 7000 Series NX-OS Multicast Routing Configuration Guide, Release 4.x.
SUMMARY STEPS
1. config t
2. snmp-server context context-name [instance instance-name] [vrf vrf-name] [topology topology-name]
3. snmp-server mib community-map community-name context context-name
4. show snmp context
5. copy running-config startup-config
Step 4 show snmp
Example:switch(config)# show snmp
(Optional) Displays information about one or more destination profiles.
Step 5 copy running-config startup-config
Example:switch(config)# copy running-config startup-config
(Optional) Saves this configuration change.
Command Purpose
10-21Cisco Nexus 7000 Series NX-OS System Management Configuration Guide, Release 4.x
OL-20086-01
Send document comments to nexus7k -doc feedback@c i sco .com.
Chapter 10 Configuring SNMPConfiguring SNMP
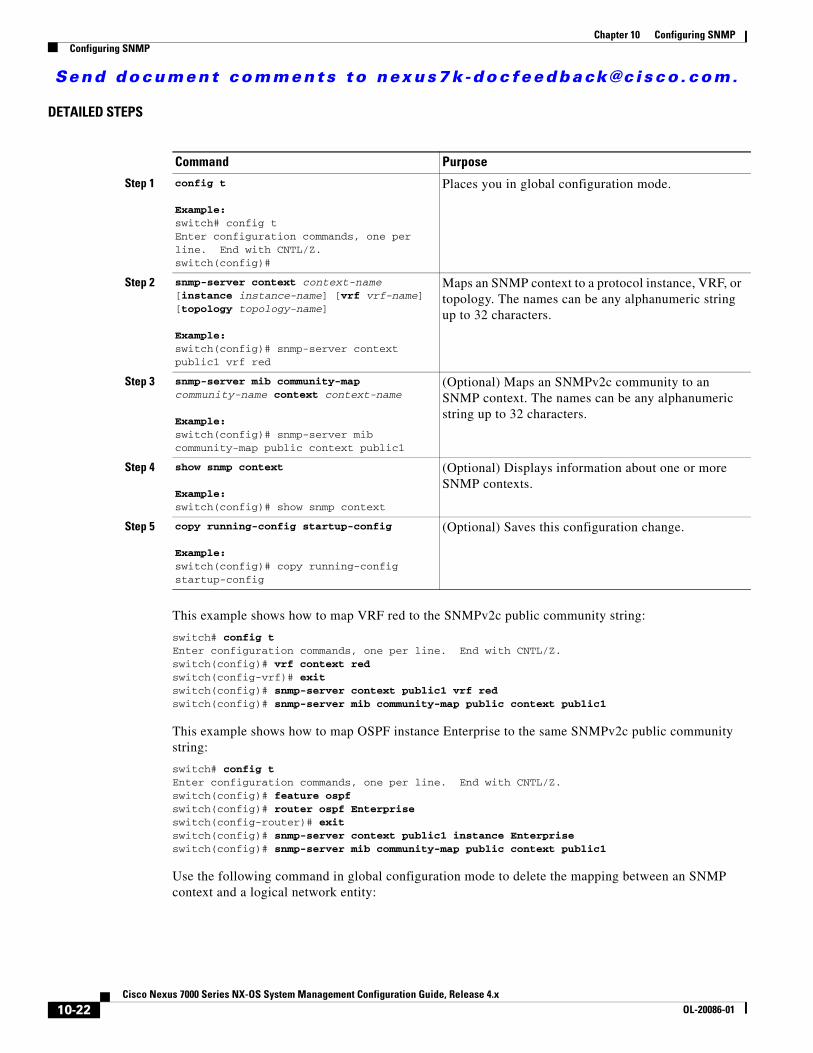
DETAILED STEPS
This example shows how to map VRF red to the SNMPv2c public community string:
switch# config tEnter configuration commands, one per line. End with CNTL/Z.switch(config)# vrf context redswitch(config-vrf)# exitswitch(config)# snmp-server context public1 vrf redswitch(config)# snmp-server mib community-map public context public1
This example shows how to map OSPF instance Enterprise to the same SNMPv2c public community string:
switch# config tEnter configuration commands, one per line. End with CNTL/Z.switch(config)# feature ospfswitch(config)# router ospf Enterpriseswitch(config-router)# exitswitch(config)# snmp-server context public1 instance Enterpriseswitch(config)# snmp-server mib community-map public context public1
Use the following command in global configuration mode to delete the mapping between an SNMP context and a logical network entity:
Command Purpose
Step 1 config t
Example:switch# config tEnter configuration commands, one per line. End with CNTL/Z.switch(config)#
Places you in global configuration mode.
Step 2 snmp-server context context-name [instance instance-name] [vrf vrf-name] [topology topology-name]
Example:switch(config)# snmp-server context public1 vrf red
Maps an SNMP context to a protocol instance, VRF, or topology. The names can be any alphanumeric string up to 32 characters.
Step 3 snmp-server mib community-map community-name context context-name
Example:switch(config)# snmp-server mib community-map public context public1
(Optional) Maps an SNMPv2c community to an SNMP context. The names can be any alphanumeric string up to 32 characters.
Step 4 show snmp context
Example:switch(config)# show snmp context
(Optional) Displays information about one or more SNMP contexts.
Step 5 copy running-config startup-config
Example:switch(config)# copy running-config startup-config
(Optional) Saves this configuration change.
10-22Cisco Nexus 7000 Series NX-OS System Management Configuration Guide, Release 4.x
OL-20086-01
Send document comments to nexus7k -doc feedback@c i sco .com.
Chapter 10 Configuring SNMPConfiguring SNMP
Disabling SNMPYou can disable SNMP on a device.
Use the following command in global configuration mode to disable SNMP:
Modifying the AAA Synchronization TimeYou can modify how long Cisco NX-OS holds the synchronized user configuration.
Use the following command in global configuration mode to modify the AAA synchronization time:
Command Purpose
no snmp-server context context-name [instance instance-name] [vrf vrf-name] [topology topology-name]
Example:switch(config)# no snmp-server context public1
Deletes the mapping between an SNMP context and a protocol instance, VRF, or topology. The names can be any alphanumeric string up to 32 characters.
Note Do not enter an instance, VRF, or topology to delete a context mapping. If you use the instance, vrf, or topology keywords, you configure a mapping between the context and a zero-length string.
Command Purpose
no snmp-server protocol enable
Example:switch(config)# no snmp-server protocol enable
Disables SNMP. This command is enabled by default.
Command Purpose
snmp-server aaa-user cache-timeout seconds
Example:switch(config)# snmp-server aaa-user cache-timeout 1200.
Configures how long the AAA synchronized user configuration stays in the local cache. The range is from 1 to 86400 seconds. The default is 3600.
10-23Cisco Nexus 7000 Series NX-OS System Management Configuration Guide, Release 4.x
OL-20086-01
Send document comments to nexus7k -doc feedback@c i sco .com.
Chapter 10 Configuring SNMPVerifying SNMP Configuration
Verifying SNMP ConfigurationTo display the SNMP configuration information, perform one of the following tasks:
SNMP Example ConfigurationsThis example shows how to configure Cisco NX-OS to send the Cisco linkUp or Down notifications to one notification host receiver using the Blue VRF and defines two SNMP users, Admin and NMS:
config tsnmp-server contact [email protected] snmp-server user Admin auth sha abcd1234 priv abcdefghsnmp-server user NMS auth sha abcd1234 priv abcdefgh engineID
00:00:00:63:00:01:00:22:32:15:10:03snmp-server host 192.0.2.1 informs version 3 auth NMSsnmp-server host 192.0.2.1 use-vrf Bluesnmp-server enable traps link cisco
This example shows how to configure SNMP to send traps using an inband port configured at the host level:
switch# config tEnter configuration commands, one per line. End with CNTL/Z.switch(config)# snmp-server host 171.71.48.164 version 2c publicswitch(config)# snmp-server host 171.71.48.164 source-interface ethernet 1/2switch(config)# show snmp host-------------------------------------------------------------------Host Port Version Level Type SecName-------------------------------------------------------------------171.71.48.164 162 v2c noauth trap public
Command Purpose
show interface snmp-ifidex Displays the SNMP ifIndex value for all interfaces (from IF-MIB).
show running-config snmp [all] Displays the SNMP running configuration.
show snmp Displays the SNMP status.
show snmp community Displays the SNMP community strings.
show snmp context Displays the SNMP context mapping.
show snmp engineID Displays the SNMP engineID.
show snmp group Displays SNMP roles.
show snmp host Displays information about configured SNMP hosts.
show snmp session Displays SNMP sessions.
show snmp source-interface Displays information about configured source interfaces.
show snmp trap Displays the SNMP notifications enabled or disabled.
show snmp user Displays SNMPv3 users.
10-24Cisco Nexus 7000 Series NX-OS System Management Configuration Guide, Release 4.x
OL-20086-01
Send document comments to nexus7k -doc feedback@c i sco .com.
Chapter 10 Configuring SNMPDefault Settings
Source interface: Ethernet 1/2-------------------------------------------------------------------
switch(config)# snmp-server host 171.71.48.164 use_vrf defaultswitch(config)# show snmp host-------------------------------------------------------------------Host Port Version Level Type SecName-------------------------------------------------------------------171.71.48.164 162 v2c noauth trap public
Use VRF: default
Source interface: Ethernet 1/2-------------------------------------------------------------------
Default SettingsTable 10-4 lists the default settings for SNMP parameters.
Additional ReferencesFor additional information related to implementing SNMP, see the following sections:
• Related Documents, page 10-25
• Standards, page 10-26
• MIBs, page 10-26
Related Documents
Table 10-4 Default SNMP Parameters
Parameters Default
license notifications Enabled.
Related Topic Document Title
SNMP CLI commands Cisco Nexus 7000 Series NX-OS System Management Configuration Guide, Release 4.x
VDCs and VRFs Cisco Nexus 7000 Series NX-OS Virtual Device Context Configuration Guide, Release 4.x
MIBs http://www.cisco.com/public/sw-center/netmgmt/cmtk/mibs.shtml
10-25Cisco Nexus 7000 Series NX-OS System Management Configuration Guide, Release 4.x
OL-20086-01
Send document comments to nexus7k -doc feedback@c i sco .com.
Chapter 10 Configuring SNMPFeature History for SNMP
Standards
MIBs
Feature History for SNMP Table 10-5 lists the release history for this feature.
Standards Title
No new or modified standards are supported by this feature, and support for existing standards has not been modified by this feature.
—
MIBs MIBs Link
• SNMP-COMMUNITY-MIB
• SNMP-FRAMEWORK-MIB
• SNMP-NOTIFICATION-MIB
• SNMP-TARGET-MIB
• SNMPv2-MIB
To locate and download MIBs, go to the following URL:
http://www.cisco.com/public/sw-center/netmgmt/cmtk/mibs.shtml
Table 10-5 Feature History for SNMP
Feature Name Releases Feature Information
IPv6 support 4.2(1) Supports configuring IPv6 SNMP hosts.
Filter SNMP requests by community using an ACL
4.2(1) Assigns an ACL to an SNMP community to filter SNMP requests. See the “Filtering SNMP Requests” section on page 10-11
Use interfaces for SNMP notification receivers 4.2(1) Adds support to designate an interface to act as the source interface for SNMP notifications. See the “Configuring SNMP Notification Receivers” section on page 10-11
SNMP AAA synchronization 4.0(3) Adds ability to modify the synchronized user configuration timeout.
See the “Modifying the AAA Synchronization Time” section on page 10-23.
SNMP protocol 4.0(3) Added ability to disable the SNMP protocol.
See the “Disabling SNMP” section on page 10-23.
10-26Cisco Nexus 7000 Series NX-OS System Management Configuration Guide, Release 4.x
OL-20086-01