configuring ssh and telnet nexus 5000 series nx-os security configuration guide, release 5.1(3)n1(1)...
TRANSCRIPT

Configuring SSH and Telnet
This chapter contains the following sections:
• Configuring SSH and Telnet, page 1
Configuring SSH and Telnet
Information About SSH and Telnet
SSH ServerThe Secure Shell Protocol (SSH) server feature enables a SSH client to make a secure, encrypted connectionto a Cisco Nexus device. SSH uses strong encryption for authentication. The SSH server in the Cisco Nexusdevice switch interoperates with publicly and commercially available SSH clients.
The user authentication mechanisms supported for SSH are RADIUS, TACACS+, and the use of locallystored user names and passwords.
SSH ClientThe SSH client feature is an application running over the SSH protocol to provide device authentication andencryption. The SSH client enables a switch to make a secure, encrypted connection to another Cisco Nexusdevice or to any other device running an SSH server. This connection provides an outbound connection thatis encrypted. With authentication and encryption, the SSH client allows for a secure communication over aninsecure network.
The SSH client in the Cisco Nexus device works with publicly and commercially available SSH servers.
SSH Server KeysSSH requires server keys for secure communications to the Cisco Nexus device. You can use SSH keys forthe following SSH options:
• SSH version 2 using Rivest, Shamir, and Adelman (RSA) public-key cryptography
Cisco Nexus 5000 Series NX-OS Security Configuration Guide, Release 5.1(3)N1(1) OL-25845-01 1

• SSH version 2 using the Digital System Algrorithm (DSA)
Be sure to have an SSH server key-pair with the appropriate version before enabling the SSH service. Youcan generate the SSH server key-pair according to the SSH client version used. The SSH service accepts threetypes of key-pairs for use by SSH version 2:
• The dsa option generates the DSA key-pair for the SSH version 2 protocol.
• The rsa option generates the RSA key-pair for the SSH version 2 protocol.
By default, the Cisco Nexus device generates an RSA key using 1024 bits.
SSH supports the following public key formats:
• OpenSSH
• IETF Secure Shell (SECSH)
If you delete all of the SSH keys, you cannot start the SSH services.Caution
Telnet ServerThe Telnet protocol enables TCP/IP connections to a host. Telnet allows a user at one site to establish a TCPconnection to a login server at another site, and then passes the keystrokes from one system to the other. Telnetcan accept either an IP address or a domain name as the remote system address.
The Telnet server is enabled by default on the Cisco Nexus device.
Guidelines and Limitations for SSHSSH has the following configuration guidelines and limitations:
• The Cisco Nexus device supports only SSH version 2 (SSHv2).
Configuring SSH
Generating SSH Server KeysYou can generate an SSH server key based on your security requirements. The default SSH server key is anRSA key that is generated using 1024 bits.
Cisco Nexus 5000 Series NX-OS Security Configuration Guide, Release 5.1(3)N1(1)2 OL-25845-01
Configuring SSH and TelnetGuidelines and Limitations for SSH
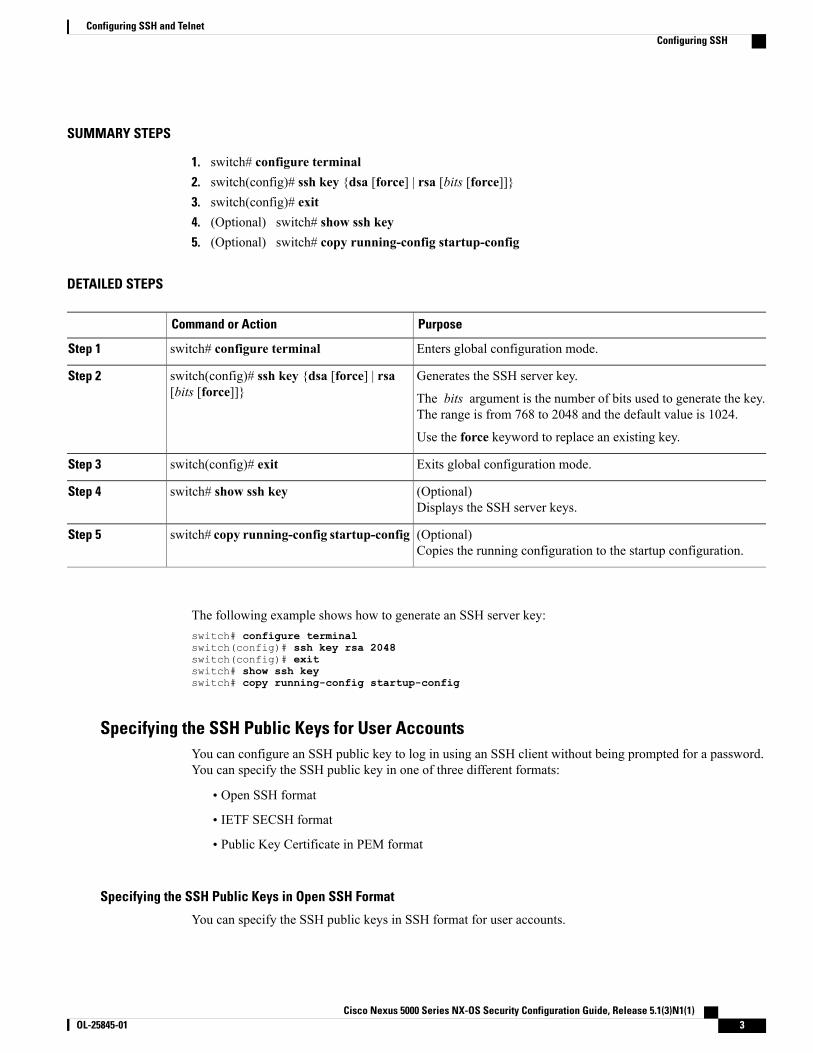
SUMMARY STEPS
1. switch# configure terminal2. switch(config)# ssh key {dsa [force] | rsa [bits [force]]}3. switch(config)# exit4. (Optional) switch# show ssh key5. (Optional) switch# copy running-config startup-config
DETAILED STEPS
PurposeCommand or Action
Enters global configuration mode.switch# configure terminalStep 1
Generates the SSH server key.switch(config)# ssh key {dsa [force] | rsa[bits [force]]}
Step 2
The bits argument is the number of bits used to generate the key.The range is from 768 to 2048 and the default value is 1024.
Use the force keyword to replace an existing key.
Exits global configuration mode.switch(config)# exitStep 3
(Optional)Displays the SSH server keys.
switch# show ssh keyStep 4
(Optional)Copies the running configuration to the startup configuration.
switch# copy running-config startup-configStep 5
The following example shows how to generate an SSH server key:switch# configure terminalswitch(config)# ssh key rsa 2048switch(config)# exitswitch# show ssh keyswitch# copy running-config startup-config
Specifying the SSH Public Keys for User AccountsYou can configure an SSH public key to log in using an SSH client without being prompted for a password.You can specify the SSH public key in one of three different formats:
• Open SSH format
• IETF SECSH format
• Public Key Certificate in PEM format
Specifying the SSH Public Keys in Open SSH Format
You can specify the SSH public keys in SSH format for user accounts.
Cisco Nexus 5000 Series NX-OS Security Configuration Guide, Release 5.1(3)N1(1) OL-25845-01 3
Configuring SSH and TelnetConfiguring SSH

SUMMARY STEPS
1. switch# configure terminal2. switch(config)# username username sshkey ssh-key3. switch(config)# exit4. (Optional) switch# show user-account5. (Optional) switch# copy running-config startup-config
DETAILED STEPS
PurposeCommand or Action
Enters global configuration mode.switch# configure terminalStep 1
Configures the SSH public key in SSH format.switch(config)#username username sshkey ssh-keyStep 2
Exits global configuration mode.switch(config)# exitStep 3
(Optional)Displays the user account configuration.
switch# show user-accountStep 4
(Optional)Copies the running configuration to the startupconfiguration.
switch# copy running-config startup-configStep 5
The following example shows how to specify an SSH public key in open SSH format:switch# configure terminalswitch(config)# username User1 sshkey ssh-rsaAAAAB3NzaC1yc2EAAAABIwAAAIEAri3mQy4W1AV9Y2t2hrEWgbUEYzCfTPO5B8LRkedn56BEy2N9ZcdpqE6aqJLZwfZcTFEzaAAZp9AS86dgBAjsKGs7UxnhGySr8ZELv+DQBsDQH6rZt0KR+2Da8hJD4ZXIeccWk0gS1DQUNZ300xstQsYZUtqnx1bvm5Ninn0McNinn0Mc=switch(config)# exitswitch# show user-accountswitch# copy running-config startup-config
The username command in the example above is a single line that has been broken for legibility.Note
Specifying the SSH Public Keys in IETF SECSH Format
You can specify the SSH public keys in IETF SECSH format for user accounts.
Cisco Nexus 5000 Series NX-OS Security Configuration Guide, Release 5.1(3)N1(1)4 OL-25845-01
Configuring SSH and TelnetConfiguring SSH
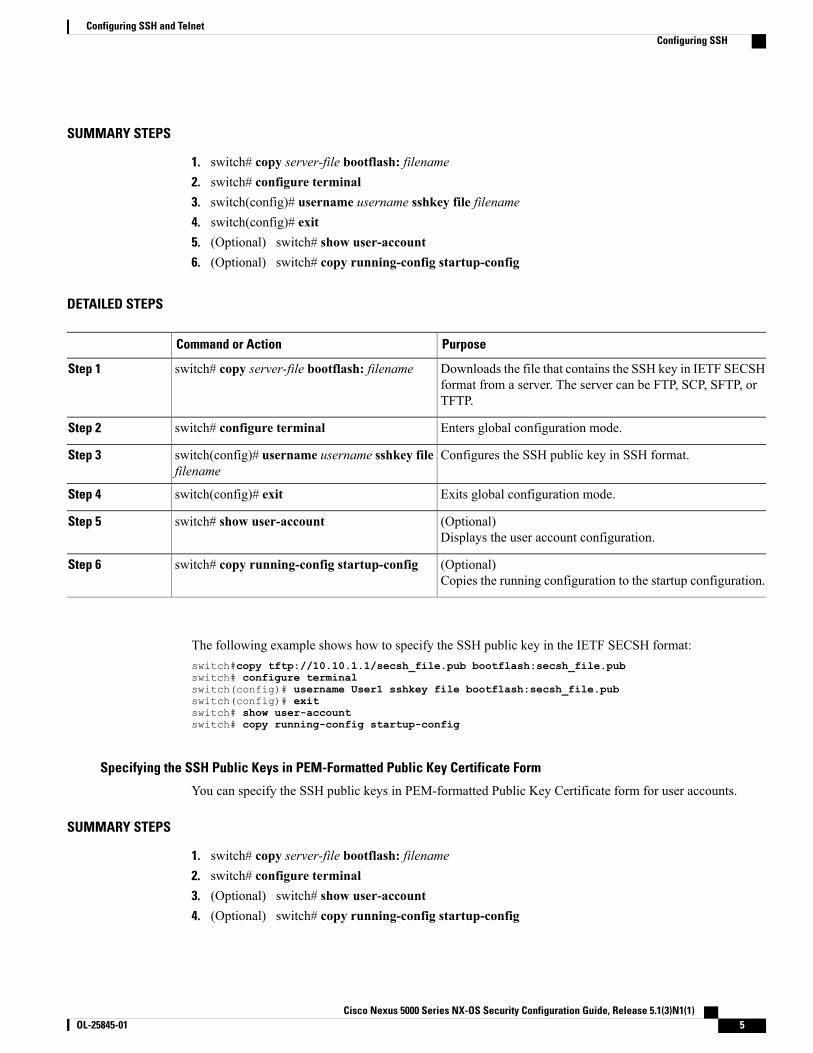
SUMMARY STEPS
1. switch# copy server-file bootflash: filename2. switch# configure terminal3. switch(config)# username username sshkey file filename4. switch(config)# exit5. (Optional) switch# show user-account6. (Optional) switch# copy running-config startup-config
DETAILED STEPS
PurposeCommand or Action
Downloads the file that contains the SSH key in IETF SECSHformat from a server. The server can be FTP, SCP, SFTP, orTFTP.
switch# copy server-file bootflash: filenameStep 1
Enters global configuration mode.switch# configure terminalStep 2
Configures the SSH public key in SSH format.switch(config)# username username sshkey filefilename
Step 3
Exits global configuration mode.switch(config)# exitStep 4
(Optional)Displays the user account configuration.
switch# show user-accountStep 5
(Optional)Copies the running configuration to the startup configuration.
switch# copy running-config startup-configStep 6
The following example shows how to specify the SSH public key in the IETF SECSH format:switch#copy tftp://10.10.1.1/secsh_file.pub bootflash:secsh_file.pubswitch# configure terminalswitch(config)# username User1 sshkey file bootflash:secsh_file.pubswitch(config)# exitswitch# show user-accountswitch# copy running-config startup-config
Specifying the SSH Public Keys in PEM-Formatted Public Key Certificate Form
You can specify the SSH public keys in PEM-formatted Public Key Certificate form for user accounts.
SUMMARY STEPS
1. switch# copy server-file bootflash: filename2. switch# configure terminal3. (Optional) switch# show user-account4. (Optional) switch# copy running-config startup-config
Cisco Nexus 5000 Series NX-OS Security Configuration Guide, Release 5.1(3)N1(1) OL-25845-01 5
Configuring SSH and TelnetConfiguring SSH

DETAILED STEPS
PurposeCommand or Action
Downloads the file that contains the SSH key in PEM-formattedPublic Key Certificate form from a server. The server can be FTP,SCP, SFTP, or TFTP
switch# copy server-file bootflash: filenameStep 1
Enters global configuration mode.switch# configure terminalStep 2
(Optional)Displays the user account configuration.
switch# show user-accountStep 3
(Optional)Copies the running configuration to the startup configuration.
switch# copy running-config startup-configStep 4
The following example shows how to specify the SSH public keys in PEM-formatted public key certificateform:switch# copy tftp://10.10.1.1/cert.pem bootflash:cert.pemswitch# configure terminalswitch# show user-accountswitch# copy running-config startup-config
Starting SSH Sessions to Remote DevicesYou can start SSH sessions to connect to remote devices from your Cisco Nexus device.
SUMMARY STEPS
1. switch# ssh {hostname | username@hostname} [vrf vrf-name]
DETAILED STEPS
PurposeCommand or Action
Creates an SSH session to a remote device. The hostnameargument can be an IPv4 address, an IPv6 address, or a hostname.
switch# ssh {hostname | username@hostname} [vrfvrf-name]
Step 1
Clearing SSH HostsWhen you download a file from a server using SCP or SFTP, you establish a trusted SSH relationship withthat server.
SUMMARY STEPS
1. switch# clear ssh hosts
Cisco Nexus 5000 Series NX-OS Security Configuration Guide, Release 5.1(3)N1(1)6 OL-25845-01
Configuring SSH and TelnetConfiguring SSH
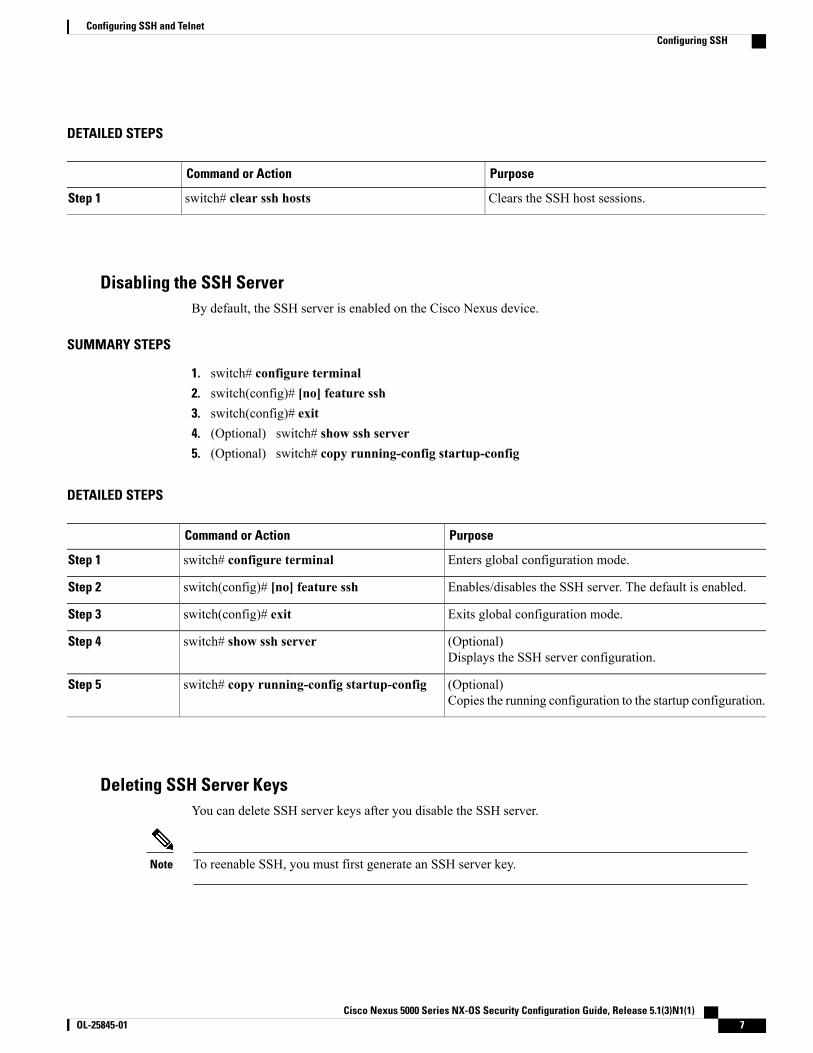
DETAILED STEPS
PurposeCommand or Action
Clears the SSH host sessions.switch# clear ssh hostsStep 1
Disabling the SSH ServerBy default, the SSH server is enabled on the Cisco Nexus device.
SUMMARY STEPS
1. switch# configure terminal2. switch(config)# [no] feature ssh3. switch(config)# exit4. (Optional) switch# show ssh server5. (Optional) switch# copy running-config startup-config
DETAILED STEPS
PurposeCommand or Action
Enters global configuration mode.switch# configure terminalStep 1
Enables/disables the SSH server. The default is enabled.switch(config)# [no] feature sshStep 2
Exits global configuration mode.switch(config)# exitStep 3
(Optional)Displays the SSH server configuration.
switch# show ssh serverStep 4
(Optional)Copies the running configuration to the startup configuration.
switch# copy running-config startup-configStep 5
Deleting SSH Server KeysYou can delete SSH server keys after you disable the SSH server.
To reenable SSH, you must first generate an SSH server key.Note
Cisco Nexus 5000 Series NX-OS Security Configuration Guide, Release 5.1(3)N1(1) OL-25845-01 7
Configuring SSH and TelnetConfiguring SSH

SUMMARY STEPS
1. switch# configure terminal2. switch(config)# no feature ssh3. switch(config)# no ssh key [dsa | rsa]4. switch(config)# exit5. (Optional) switch# show ssh key6. (Optional) switch# copy running-config startup-config
DETAILED STEPS
PurposeCommand or Action
Enters global configuration mode.switch# configure terminalStep 1
Disables the SSH server.switch(config)# no feature sshStep 2
Deletes the SSH server key.switch(config)# no ssh key [dsa | rsa]Step 3
The default is to delete all the SSH keys.
Exits global configuration mode.switch(config)# exitStep 4
(Optional)Displays the SSH server configuration.
switch# show ssh keyStep 5
(Optional)Copies the running configuration to the startup configuration.
switch# copy running-config startup-configStep 6
Clearing SSH SessionsYou can clear SSH sessions from the Cisco Nexus device.
SUMMARY STEPS
1. switch# show users2. switch# clear line vty-line
DETAILED STEPS
PurposeCommand or Action
Displays user session information.switch# show usersStep 1
Clears a user SSH session.switch# clear line vty-lineStep 2
Cisco Nexus 5000 Series NX-OS Security Configuration Guide, Release 5.1(3)N1(1)8 OL-25845-01
Configuring SSH and TelnetConfiguring SSH

Configuration Examples for SSHThe following example shows how to configure SSH:
SUMMARY STEPS
1. Generate an SSH server key.2. Enable the SSH server.3. Display the SSH server key.4. Specify the SSH public key in Open SSH format.5. Save the configuration.
DETAILED STEPS
Step 1 Generate an SSH server key.switch(config)# ssh key rsagenerating rsa key(1024 bits)......generated rsa key
Step 2 Enable the SSH server.switch# configure terminalswitch(config)# feature ssh
This step should not be required because the SSH server is enabled by default.Note
Step 3 Display the SSH server key.switch(config)# show ssh keyrsa Keys generated:Fri May 8 22:09:47 2009
ssh-rsa AAAAB3NzaC1yc2EAAAABIwAAAIEAri3mQy4W1AV9Y2t2hrEWgbUEYzCfTPO5B8LRkedn56BEy2N9ZcdpqE6aqJLZwfZ/cTFEzaAAZp9AS86dgBAjsKGs7UxnhGySr8ZELv+DQBsDQH6rZt0KR+2Da8hJD4ZXIeccWk0gS1DQUNZ300xstQsYZUtqnx1bvm5/Ninn0Mc=
bitcount:1024
fingerprint:4b:4d:f6:b9:42:e9:d9:71:3c:bd:09:94:4a:93:ac:ca**************************************could not retrieve dsa key information**************************************
Step 4 Specify the SSH public key in Open SSH format.switch(config)# username User1 sshkey ssh-rsa AAAAB3NzaC1yc2EAAAABIwAAAIEAri3mQy4W1AV9Y2t2hrEWgbUEYzCfTPO5B8LRkedn56BEy2N9ZcdpqE6aqJLZwfZcTFEzaAAZp9AS86dgBAjsKGs7UxnhGySr8ZELv+DQBsDQH6rZt0KR+2Da8hJD4ZXIeccWk0gS1DQUNZ300xstQsYZUtqnx1bvm5Ninn0McNinn0Mc=
Cisco Nexus 5000 Series NX-OS Security Configuration Guide, Release 5.1(3)N1(1) OL-25845-01 9
Configuring SSH and TelnetConfiguration Examples for SSH
Step 5 Save the configuration.switch(config)# copy running-config startup-config
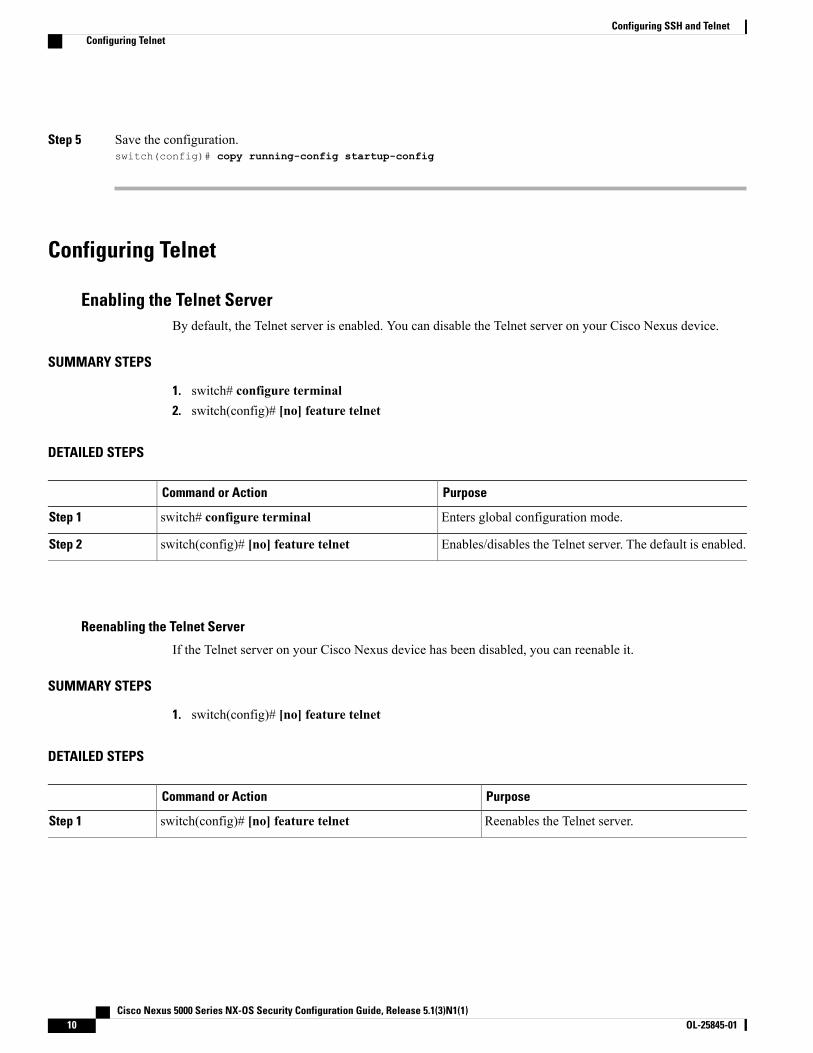
Configuring Telnet
Enabling the Telnet ServerBy default, the Telnet server is enabled. You can disable the Telnet server on your Cisco Nexus device.
SUMMARY STEPS
1. switch# configure terminal2. switch(config)# [no] feature telnet
DETAILED STEPS
PurposeCommand or Action
Enters global configuration mode.switch# configure terminalStep 1
Enables/disables the Telnet server. The default is enabled.switch(config)# [no] feature telnetStep 2
Reenabling the Telnet Server
If the Telnet server on your Cisco Nexus device has been disabled, you can reenable it.
SUMMARY STEPS
1. switch(config)# [no] feature telnet
DETAILED STEPS
PurposeCommand or Action
Reenables the Telnet server.switch(config)# [no] feature telnetStep 1
Cisco Nexus 5000 Series NX-OS Security Configuration Guide, Release 5.1(3)N1(1)10 OL-25845-01
Configuring SSH and TelnetConfiguring Telnet
Starting Telnet Sessions to Remote DevicesBefore you start a Telnet session to connect to remote devices, you should do the following:
• Obtain the hostname for the remote device and, if needed, obtain the username on the remote device.
• Enable the Telnet server on the Cisco Nexus device.
• Enable the Telnet server on the remote device.
SUMMARY STEPS
1. switch# telnet hostname
DETAILED STEPS
PurposeCommand or Action
Creates a Telnet session to a remote device. The hostname argument canbe an IPv4 address, an IPv6 address, or a device name.
switch# telnet hostnameStep 1
The following example shows how to start a Telnet session to connect to a remote device:
switch# telnet 10.10.1.1Trying 10.10.1.1...Connected to 10.10.1.1.Escape character is '^]'.switch login:
Clearing Telnet SessionsYou can clear Telnet sessions from the Cisco Nexus device.
SUMMARY STEPS
1. switch# show users2. switch# clear line vty-line
DETAILED STEPS
PurposeCommand or Action
Displays user session information.switch# show usersStep 1
Clears a user Telnet session.switch# clear line vty-lineStep 2
Cisco Nexus 5000 Series NX-OS Security Configuration Guide, Release 5.1(3)N1(1) OL-25845-01 11
Configuring SSH and TelnetConfiguring Telnet

Verifying the SSH and Telnet ConfigurationTo display the SSH configuration information, perform one of the following tasks:
• switch# show ssh key [dsa | rsa]PurposeCommand or Action
Displays the SSH and user account configurationin the running configuration. The allkeyworddisplays the default values for the SSH and useraccounts.
switch# show running-config security[all]
Displays the SSH server configuration.switch# show ssh server
Displays user account informationswitch# show user-account
Default Settings for SSHThe following table lists the default settings for SSH parameters.
Table 1: Default SSH Parameters
DefaultParameters
EnabledSSH server
RSA key generated with 1024 bitsSSH server key
1024RSA key bits for generation
EnabledTelnet server
Cisco Nexus 5000 Series NX-OS Security Configuration Guide, Release 5.1(3)N1(1)12 OL-25845-01
Configuring SSH and TelnetVerifying the SSH and Telnet Configuration