configuring tools for your loan team
TRANSCRIPT

Revision date: October 19, 2018
For an updated copy of this booklet, check out the Reference Materials page of our website: https://www.cuanswers.com/resources/doc/cubase-reference
CU*BASE® is a registered trademark of CU*Answers, Inc.
Configuring Tools for Your Loan Team
Using CU*BASE Tools to Standardize and Streamline Your Lending Department
INTRODUCTION
CU*BASE Loan Processing tools are
designed to increase the productivity, accuracy, and efficiency of your credit
union’s lending efforts.
With CU*BASE, loan applications can
easily be worked by more than one credit
union employee. Whether you have one
branch or many, CU*BASE tools help make sure everyone can access the
information they need to answer a
member question and keep the ball rolling.
These tools are designed to give your loan interviewers and underwriters more
time to do what they do best...take care of your members’ borrowing needs.
Included in this booklet:
• Loan Product Configuration (including risk-based pricing)
• Delivery Channel Configuration
• Rate Maintenance
• Rate Inquiry - Your Online “Quote Sheet”
• Underwriting Codes and Controls and setting Underwriting limits
• Loan Deal Filters for collateral-based lending
• Automated Collateral Valuation (NADA)
• Application Status Inquiry and the Lending Team “Dashboard”
• Loan Application File Verification
• Permanent Underwriting Comments
• Non-Member Notes
• App Check
• Business Unit

2 Configuring Tools for Your Loan Team
• Loan Application Checklists
• Loan App Workflow Styles
All of these tools apply to normal member lending as well as the CU*BASE
Pre-Membership Lending for non-member loan application processing.
ABOUT THIS BOOKLET
This book is designed to provide an overview of some CU*BASE features and
tools that will help you streamline and organize your lending department.
It is not an exhaustive list of all loan-related features in CU*BASE, of course,
but does explain some of the key configuration options you can use to make
your team more efficient.
CONTENTS
COMPANION BOOKLETS 4
LOAN PRODUCT CODES: WHAT DO YOU SELL TO YOUR MEMBERS? 5
SETTING UP LOAN CATEGORY CODES 6 DISBURSING FUNDS 8 BUSINESS UNIT 9 LOAN PRODUCT CODES 9
CONFIGURING LOAN DELIVERY CHANNELS 19
CONFIGURING COLLATERAL 21
MANAGING LOAN RATES AND YOUR ONLINE “QUOTE SHEET” 23
RATE MAINTENANCE 23 RATE INQUIRY 24
LOAN APPLICATION WORKFLOW CONTROLS 25
UNDERWRITING CODES AND CONTROLS 27
OVERVIEW 27 ABOUT UNDERWRITING CODES 28 CONFIGURING UNDERWRITING CODES 28 MARKING LOANS WITH UNDERWRITING CODES 30 SETTING UNDERWRITER / INTERVIEWER SECURITY 32 UNDERWRITER AUDITING 33 ACTIVATION AND USE OF “UNDERWRITING CONTROLS” 36 SAMPLE UNDERWRITING CODES AND SCENARIOS 36
LOAN DEAL FILTERS FOR COLLATERAL-BASED LENDING 40
LOAN DEAL FILTERS AND YOUR DECISION MODEL 40 HOW TO CONFIGURE LOAN DEAL FILTERS 41 RUNNING AND VIEWING DEAL FILTERS ON A LOAN REQUEST 42
LOAN UNDERWRITER APPROVAL LIMITS 45
ACTIVATION 45 A WORD OF CAUTION: ONCE ACTIVATED LIMITS ARE REQUIRED 45 HOW CAN LIMITS BE DELETED? 45 HOW TO ADD UNDERWRITER APPROVAL LIMITS TO AN EMPLOYEE ID 46
Configuring Tools for Your Loan Team 3
AUTOMATED COLLATERAL VALUATION (NADA) 48
ACTIVATION IN CU*BASE 48 ADDING THE NADA VALUE TO THE COLLATERAL RECORD IN CU*BASE 50
APPLICATION STATUS INQUIRY: A “DASHBOARD” APPROACH 54
LOAN APPLICATION STATUS INQUIRY 54 STATISTICAL ANALYSIS: THE “DASHBOARD” 56
LOAN FILE VERIFICATION: KEEPING UP WITH THE PAPERWORK 59
RECORDING VERIFICATION DATES FOR NEW LOANS 59 USING THE ELECTRONIC CHECK LIST FOR FILE VERIFICATION 60 PRINTING THE FILE VERIFICATION REPORT 61 ACTIVATION AND CONTROLS FOR LOAN FILE VERIFICATION 62
PERMANENT UNDERWRITING COMMENTS 64
CONFIGURING MEMO CODE FOR PERMANENT UNDERWRITING COMMENTS 64 REVIEWING PERMANENT UNDERWRITING COMMENTS 65
NON-MEMBER NOTES 66
LOAN APP WORKFLOW STYLES 68
ACTIVATION AND CONFIGURATION 69 CONFIGURATION AT THE LOAN PRODUCT LEVEL 72
APP CHECK 75
ACTIVATION 75 ACTIVATE AT THE EMPLOYEE LEVEL 76 USING APP CHECK 77

4 Configuring Tools for Your Loan Team
COMPANION BOOKLETS
Be sure to check out these companion booklets:
• Big-Picture Planning for Your Loan Configurations: What to
Consider When Setting Up Your Lending Codes and Configurations
• Collateral: Tools for Tracking Property Security Loans
• Configuring Tools for Collectors: Developing a Collections Strategy
• Escrow Processing with CU*BASE
• Lease Loan Tools
• Loan Interest Calculation: 360/365 Daily Interest
• Mortgage Products: 360-Day Interest Calculation
• Mortgage Products: Data Capture for Mortgage Closing Forms
• Mortgage Products: Interest Payment Only Loans
• Packaging Loans for Sale: Managing Your Concentration Risk
• Participation Lending: Fannie Mae Secondary Market Loan Servicing
• Participation Lending: FHLB Secondary Market Loan Servicing
• Participation Lending: Freddie Mac Secondary Market Loan Servicing
• Participation Lending: Standard 365 Loans and Other Loans
• Variable Rate Loan Products
All of these booklets can be found posted on the CU*Answers Reference
Page: http://www.cuanswers.com/resources/doc/cubase-reference/

Configuring Tools for Your Loan Team 5
LOAN PRODUCT CODES: WHAT DO
YOU SELL TO YOUR MEMBERS?
There are two key codes that are configured in CU*BASE to allow your credit
union to lend to your members: Loan Category Codes and Loan Product
Codes. In addition to myriad other codes that record the purpose of the
loan, collateral, payment protection, and other loan features, these two codes are the key codes that control the lending experience from initial application
to loan payoff.
• The Loan Category is the CU*BASE configuration that governs how the
loan is serviced (payment and interest calculations, payment spread,
G/L accounts, etc.).
• A Loan Product is a template for how a specific type of loan is sold to
your members.
Multiple loan products can be tied to individual loan categories. Examples of loan products include your credit union’s used car loan offering, new car
loan, RV loan, etc.—these products could all be tied to the same generic
"closed-end installment loan" or "vehicle loan" category.
You can create, delete, relabel, and reorganize loan product templates any
time you like, without affecting apps in the queue or booked loans...so get creative! Create promos, introduce products...maybe just give things a new
name once in a while!
Up to 999 loan products can be configured per corporation. Up to 50 of
those products can be flagged to appear in the Loan Rate Board in
It’s Me 247 or from any external website, similar to share and certificate
products, complete with "sales information" describing the loan and how to apply, and an online loan application that is integrated directly into
CU*BASE.
01
Closed-End
Installment
Loan
02
360 Calc.
Mortgage
Loan
03
Open Line
of Credit
04
HELOC
001 New Auto Loan
002 Used Auto Loan
003 Classic Car Loan
004 Boat/RV Loan
005 Computer Loan
006 Motorcycle Loan
Loan Categories:
Loan Products:
• 99 maximum
• Controls for
servicing loans:
interest calc, GL
interface, payment
change calcs, etc.
• Tied to loan for life
• 999 maximum
• Defaults for selling
loans: pricing,
term, marketing
tips, task
checklist, etc.
• Not tied to loan;
used for app/setup
process only

6 Configuring Tools for Your Loan Team
SETTING UP LOAN CATEGORY CODES
Loan Category Codes are set up using Tool #458 Loan Category
Configuration.
Setting up loan categories requires that you spend time evaluating how loan
accounts are disclosed to members and determining how the accounts
should be handled on a day-to-day basis, including interest accruals, daily G/L interface for loan income, payment matrix settings to control the spread,
etc.
To ensure that your loan categories behave the way you expect and disclose to your members, a CU*BASE Client Service Representative can work with you as you set up the various control parameters. Also refer to the “Big-Picture Planning for Your Loan Configurations” booklet for tips on what to consider when setting up your lending codes and configurations.
For complete details, refer to CU*BASE GOLD Online Help.
Click the link in the lower right hand corner of this screen.
Loan Category Configuration (Tool #458) - Screen 1
Business Unit allows you to group similar loans to assist with daily work and filtering. Refer to the Business Unit
explanation below.
Check Allow Teller Disbursements if you want your tellers to be able to
disburse loan funds from within the Main Teller Posting screen.
Check this box to require that
different people approve the loan and disburse the
loan funds.
Use this button to allow disbursements through
Audio Banking or Online Banking.
Save money by using targeted notices – unique text and date
ranges for 4 different types.

Configuring Tools for Your Loan Team 7
Screen 2 (Sample A: Closed-end loan)
Screen 2 (Sample B: Interest-only LOC)
Prevent fat-finger errors and loan amounts
outside of your policy limits.
Loans can be written off to more than one category
(secured, unsecured, mortgage, etc.).
Post a portion of every payment to a G/L (auto leases, forced savings).
Remember escrows aren’t just for 360s.
In addition to credit cards, Add overline to payment can also be used for stepdown
interest-only LOCs.
8 Configuring Tools for Your Loan Team
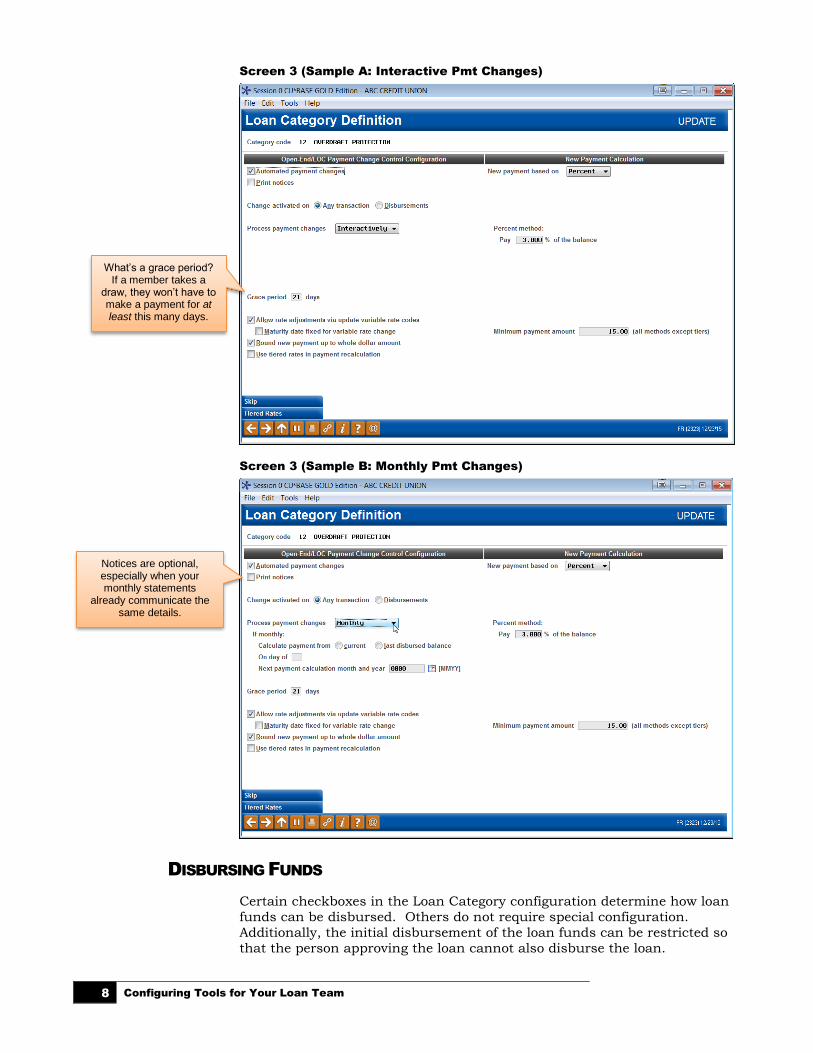
Screen 3 (Sample A: Interactive Pmt Changes)
Screen 3 (Sample B: Monthly Pmt Changes)
DISBURSING FUNDS
Certain checkboxes in the Loan Category configuration determine how loan
funds can be disbursed. Others do not require special configuration.
Additionally, the initial disbursement of the loan funds can be restricted so
that the person approving the loan cannot also disburse the loan.
What’s a grace period? If a member takes a
draw, they won’t have to make a payment for at least this many days.
Notices are optional, especially when your monthly statements
already communicate the same details.

Configuring Tools for Your Loan Team 9
Following is a listing of ways that loan funds can be disbursed:
1. The loan funds can be disbursed directly when the loan is created.
2. Loan funds can be disbursed through Tool #50 Disburse Member Loan
Funds.
By pressing Enter on this screen, you are able to post all the loan funds or individual loan fund amounts at separate times. The Total Disbursed records the entire amount disbursed.
3. Via Phone Operator and regular funds transfer
Tellers can transfer money from Tool #516 Member
Transfers and from Phone Inquiry. Additionally this screen is accessed via F13-Transfer from the Teller Processing screen.
4. Via Online and Audio Banking if the correct configuration is set in the
Loan Category configuration. Just select Audio/Online Banking (F23) from within the Category configuration and check to “Allow payments via
audio online banking”. (See following image.)
5. Funds can also be disbursed via teller processing (a withdrawal field will
be available) if the configuration in the Loan Category configuration
allows for it. (See following image.)
Additionally, the Loan Category configuration can restrict who can disburse
the loan funds. Check “Restrict approving loan officer from disbursing same
loan” to require that two different people approve the loan and disburse the
funds. (See the image on Page 6.)
BUSINESS UNIT
Credit unions can group loans with a specific purpose, such as mortgage
loans, via use of the new Business Unit codes. Credit unions first configure
their Business Unit code(s) via Tool #177 Business Unit Configuration,
then enter that code in the Business Unit field in the first Loan Category
configuration screen of the related loan categories.
Using this feature simplifies analysis and day-to-day work since Business
Unit has been added to several reports and filtering tools, such as the Loan
Queue and Activity Tracking dashboards.
LOAN PRODUCT CODES
Loan Product Codes are set up using Tool #470 Loan Product
Configuration.
Setting up loan product codes first requires a thorough understanding of the
categories you have configured, as well as a plan for the types of loans you
will be offering to your members. Since loan product codes also control what appears on the electronic rate sheet in CU*BASE Rate Inquiry, your current
loan rate sheet is a good place to start.
Following are samples of the screens used to configure loan product codes.

10 Configuring Tools for Your Loan Team
For complete details on all fields and options, refer to online help while working in the screens.
Loan Product Configuration (Tool #470) - Screen 1
Use the Display Options at the top of the screen to narrow down the list of
products.
The Prod # represents the order in which your loan officers will see the product when they start new loan request, so give
some thought as to what products you want to keep front
and center!
The Sequence represents the order in which products will be
display to members in online/mobile banking.
Use Add New Product (F6) to
create a new code.
Use Reassign to rearrange the product code numbers so the products appear in a logical order for your loan
officers in their day-to-day work.
Use Copy to take an existing product and use it as a template for creating a new one.
Show only those products that have been tied to a
particular loan category – helpful for making sure all of your categories have at least
one product configured. Use this to display products
according to delivery channel. This groups products according
to where they are listed:
• Loan Processing
• Loan Quoter
• It’s Me 247 online/mobile
• Other external channels

Configuring Tools for Your Loan Team 11
Loan Product Configuration Options
(Appears only when editing an existing product.)
General Product Information
Notice that only one rate is entered for the product; all other rates,
including risk-based pricing and the online banking offered rate, will be
entered as a variant (plus or minus xx.xxx) based on that rate.
You must check this if you want to be able to offer misc. coverages
for this product, such as gap insurance.
These flags control where this loan product can be sold,
including external loan delivery channels (SEG web site, Dealer
Track, etc.). Online banking access is controlled on the Online
Banking screen.
The middle section of the screen contains defaults used
when creating new loan requests. These save efforts
more time and make your consistent. (More defaults will
also be available on a subsequent screen.)
To quote up to 81 payments in Loan Quoter, check this flag and fill in fields in this
bottom section.
If this is checked, the risk-based pricing screen will display after you use Enter on this screen.
If editing a product, check the boxes for only the
configuration feature(s) you need to access. (When
adding a new product, all screens are displayed
automatically in order so this window is not needed.)
Simplify and speed things up for your loan officers with workflow styles (see Page 68).

12 Configuring Tools for Your Loan Team
Loan Product Defaults
Unless a field has been hidden, loan officers will be able to modify any
default values you specify. If protected, the “Unlock” button will need to be used first before the field will allow changes to be made, preventing
accidental alterations.
If you want to display the item but keep it from
being changed accidentally, the Protect flag will prevent changes until a special “unlock”
button is used.
Items that will never be needed for this
product can be hidden altogether.
Set default values for more consistency and to save
time for your loan officers.

Configuring Tools for Your Loan Team 13
Miscellaneous Coverage (1)
Miscellaneous Coverage (2)
This screen appears automatically when the Miscellaneous coverage on loan checkbox is
checked on the general product information screen. You must configure all products you potentially want to offer to members on this type of loan. The choice
to actually add them to the loan or not is made at the time the loan request is set up.
14 Configuring Tools for Your Loan Team
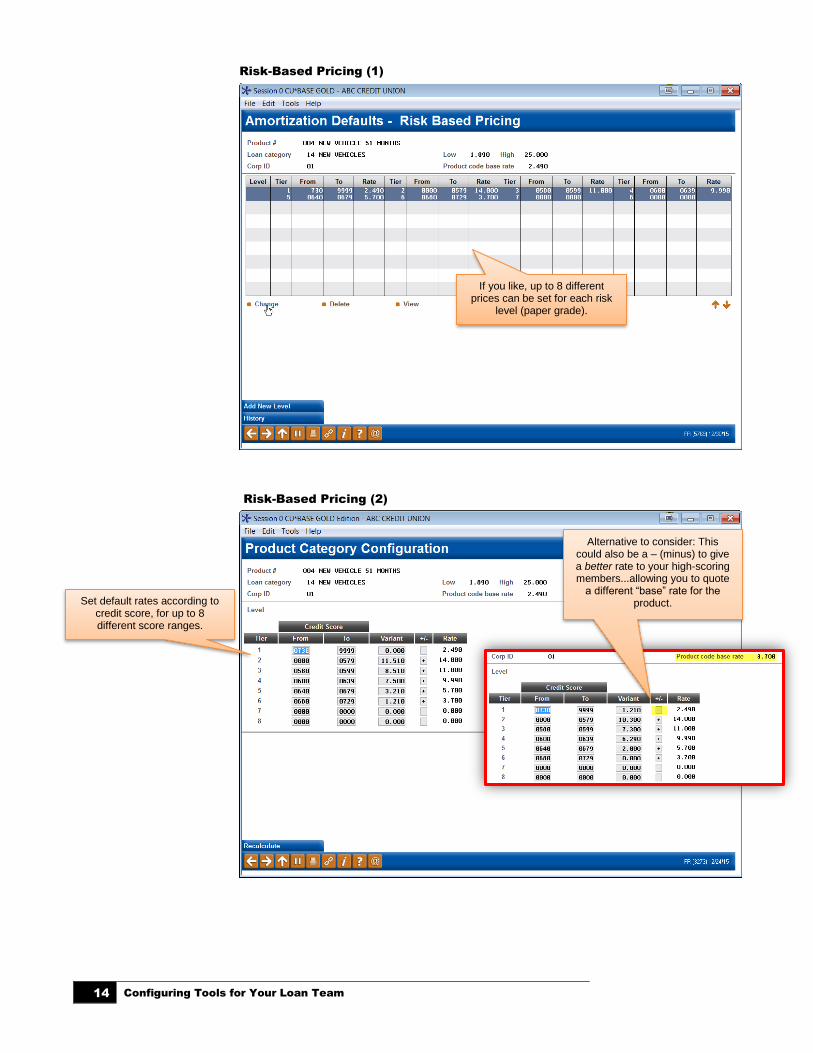
Risk-Based Pricing (1)
Risk-Based Pricing (2)
If you like, up to 8 different prices can be set for each risk
level (paper grade).
Alternative to consider: This could also be a – (minus) to give a better rate to your high-scoring members...allowing you to quote
a different “base” rate for the product. Set default rates according to
credit score, for up to 8 different score ranges.

Configuring Tools for Your Loan Team 15
Insurance or Debt Protection Configuration (1)
Insurance or Debt Protection Configuration (2)
This lets you choose which coverage type will be quoted on new loan
requests.
Filling in defaults here means these premiums will always
be quoted on new loan requests for this product.
When debt protection is selected.
When Insurance is selected on the
initial window.

16 Configuring Tools for Your Loan Team
Online Banking Configuration
Member Sales Information
This screen appears automatically for loans that are being included in the It’s Me
247 Rate Board.
A URL and/or free-form text should be configured to sell the
loan to the online banking member.
A sequence number here (1-50) means this product will be shown to members on the It’s
Me 247 Loan Rate Board.
These settings are used to control the loan application
process for members through online banking.
IMPORTANT: If you set up any products to be offered via online banking, also be
sure to review your Delivery Channel configuration to control how those
incoming applications will be coded by the system. See Page 19 for details.
IDEA: Link to your disclosures, then add “By clicking Submit you agree to the terms & conditions
outlined on...” language to your comments.
Configuring Tools for Your Loan Team 17
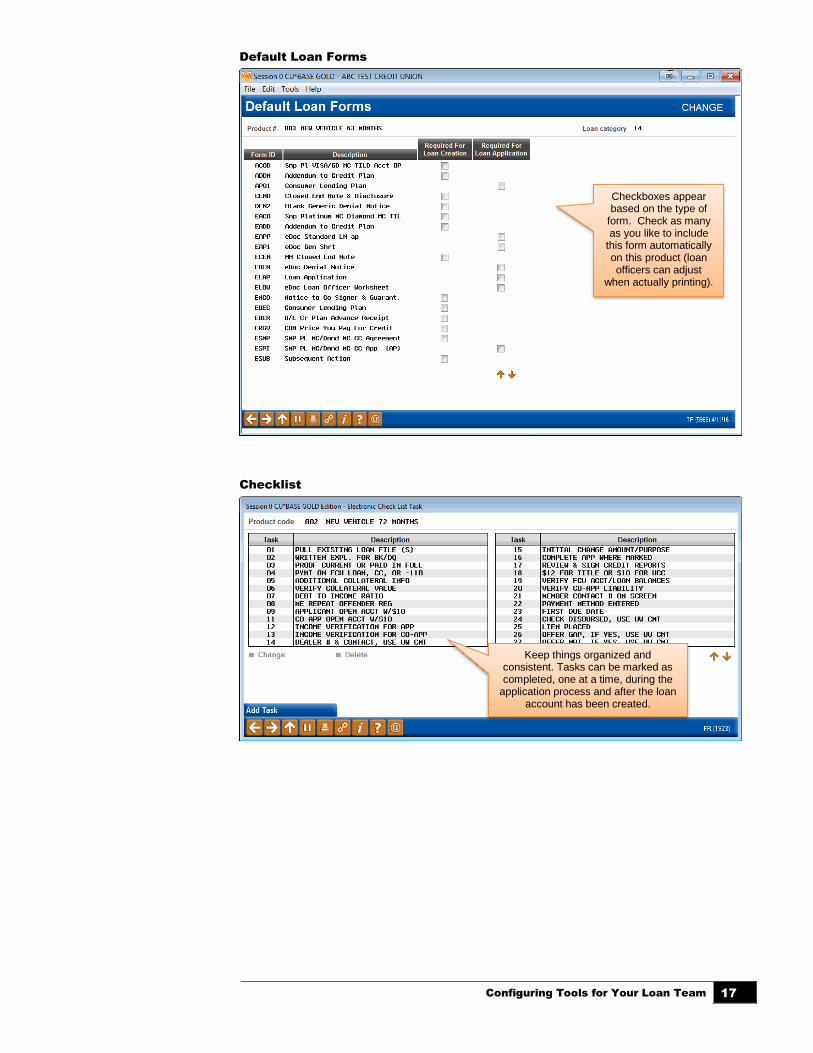
Default Loan Forms
Checklist
Checkboxes appear based on the type of
form. Check as many as you like to include
this form automatically on this product (loan officers can adjust
when actually printing).
Keep things organized and consistent. Tasks can be marked as completed, one at a time, during the
application process and after the loan account has been created.

18 Configuring Tools for Your Loan Team
Product Procedures
Product Marketing Tips
A URL and/or free-form text can be configured to help staff sell the loan to
members, and to document the steps
required to process it.
These tips should help your staff sell the loan to members. You can link to a page on your website that contains member-
friendly content your staff should also be using.

Configuring Tools for Your Loan Team 19
CONFIGURING LOAN DELIVERY
CHANNELS
One of the unique features of the CU*BASE loan application processing
system is that it can handle applications that come from many different
sources. An application that comes directly from a member using online
banking is handled using the same tools as one keyed by a credit union employee at a loan officer desk—without time-consuming re-keying of
application data.
Likewise, CU*BASE can also receive, process, and respond to any type of
Internet loan application through its XML Lending Gateway, which allows
applications from external sources to be funneled through CU*BASE loan
processing tools.
Even if your credit union will not be using an external source for
applications (such as Dealer Track or a web site), you must use the Loan
Delivery Channel Configuration to control how loan applications entered in
It’s Me 247 online banking will be coded for handling by CU*BASE.
Loan Delivery Channel Configuration (Tool #462)
This is the first screen used to configure default settings used by loan
delivery channels. In this context, a Delivery Channel is simply a source of
loan applications funneled from any source into the CU*BASE loan
application database. Currently there are four main sources, and more will
be added over time:
CU*BASE (CU) This channel represents loan applications entered directly into CU*BASE using loan processing.
There are no configuration options for this channel; it is listed here for information only.

20 Configuring Tools for Your Loan Team
Dealer Track (DT) This channel is our first link to a third-party source of loan applications. If your credit union has been set up to use this channel, you may access various configuration screens here that will allow you to define which CU*BASE loan products correspond to incoming Dealer Track loan applications, including free-form text for stipulations to be communicated back to an automotive dealer via the Dealer Track software.
Contact a CU*BASE Client Service Representative for assistance planning for and setting up an integration
with Dealer Track.
Online Banking (HB)
This channel represents loan requests that come to CU*BASE from a It’s Me 247 online banking loan application.
Prime Alliance (PA) This channel represents loan applications originating from third-party service Prime Alliance.
Contact a CU*BASE Client Service Representative for assistance planning for and setting up an integration with Prime Alliance.
Currently this configuration is used primarily to set default settings used by
online banking loan applications. Select the HB channel and use Enter or
click the Change option to proceed to the second screen:
Screen 2
Use these fields to designate which branch, employee ID and underwriting
codes should be used on applications that come in from It’s Me 247. When
done, use Enter to save and return to the previous screen.
For complete details, refer to CU*BASE GOLD Online Help.
Click the link in the lower right hand corner of this screen.
Configuring Tools for Your Loan Team 21
CONFIGURING COLLATERAL
The primary purpose of a Collateral Type code is to define what the screen
will look like (which fields and field labels will appear) when detailed
information about the collateral is recorded in CU*BASE. Each collateral
type, such as vehicles, mortgages, bonds, durable goods, and stock, has a corresponding definition type which controls the data fields that are relevant
for that type of collateral.
It is not unusual to use Collateral Type for the purposes of aggregating data
for the 5300 and risk concentration, but it would typically not be used for
any of the other areas such financial reports, ALM, etc., and cannot be used
to control credit bureau reporting on CU*BASE. Most credit unions typically
configure fewer than 20 collateral type codes.
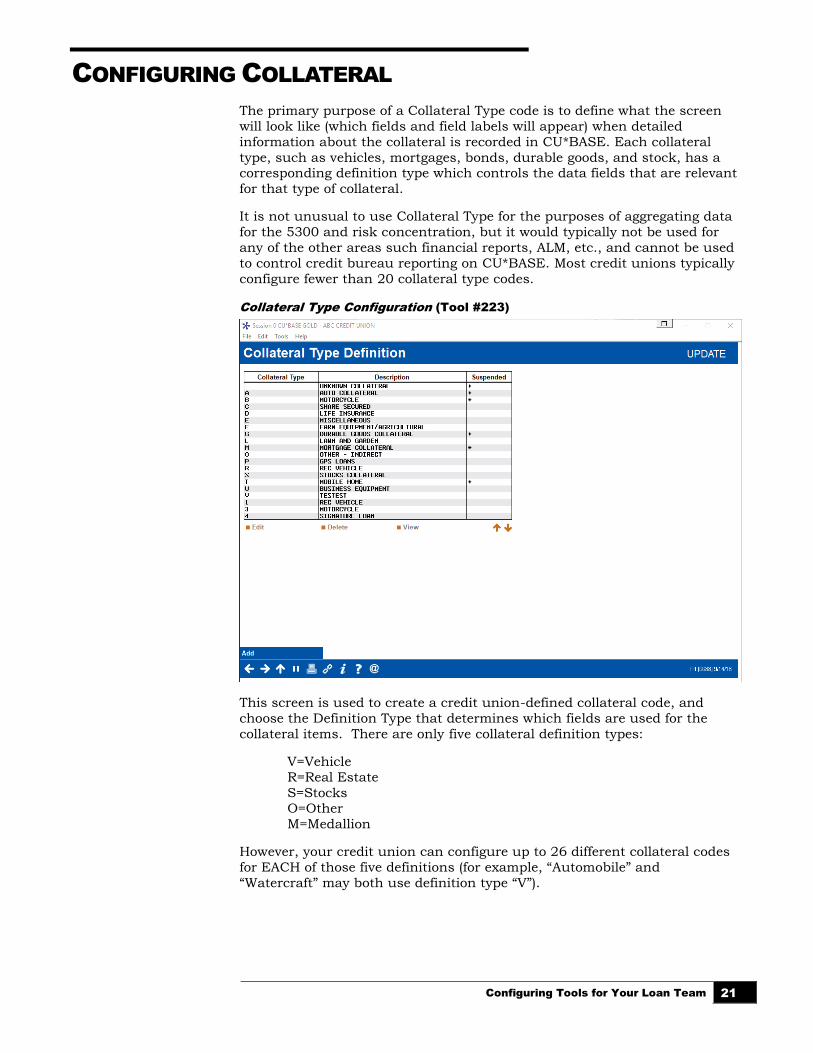
Collateral Type Configuration (Tool #223)
This screen is used to create a credit union-defined collateral code, and
choose the Definition Type that determines which fields are used for the
collateral items. There are only five collateral definition types:
V=Vehicle
R=Real Estate
S=Stocks O=Other
M=Medallion
However, your credit union can configure up to 26 different collateral codes
for EACH of those five definitions (for example, “Automobile” and
“Watercraft” may both use definition type “V”).
22 Configuring Tools for Your Loan Team
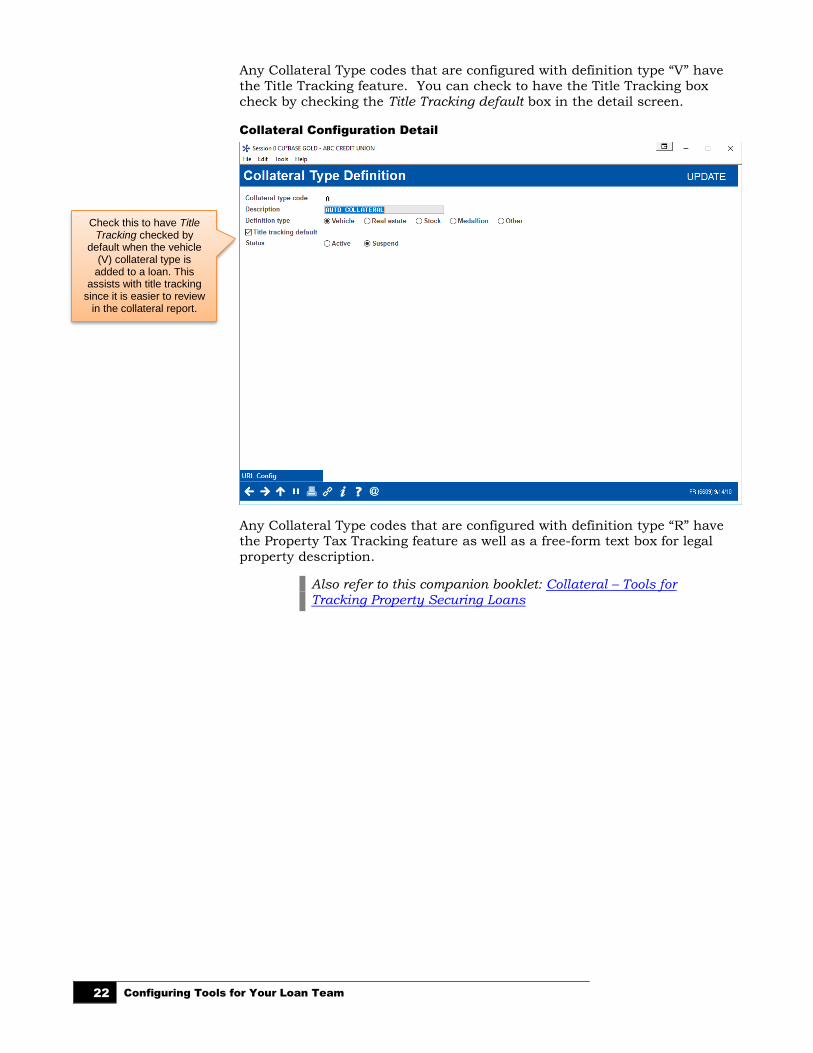
Any Collateral Type codes that are configured with definition type “V” have
the Title Tracking feature. You can check to have the Title Tracking box
check by checking the Title Tracking default box in the detail screen.
Collateral Configuration Detail
Any Collateral Type codes that are configured with definition type “R” have the Property Tax Tracking feature as well as a free-form text box for legal
property description.
Also refer to this companion booklet: Collateral – Tools for Tracking Property Securing Loans
Check this to have Title Tracking checked by
default when the vehicle (V) collateral type is
added to a loan. This assists with title tracking
since it is easier to review in the collateral report.

Configuring Tools for Your Loan Team 23
MANAGING LOAN RATES AND YOUR
ONLINE “QUOTE SHEET”
RATE MAINTENANCE
After your loan products are set up, you should not need to access the Loan
Product configuration again except to make changes to default settings. For rate changes, a much easier and more efficient method is to use the same
Rate Maintenance feature you use to update savings and certificate rates.
Member Rate Maintenance (Tool #506)
On this screen you can update the base rate for all your loan products in the
same place. Simply enter the desired rate (use three places past the decimal point) into the Base Rate column for each item. At any time, press Enter to
save the changes and recalculate the rates shown in the Offered Rate
column.
Use these buttons to update the
Procedures and Marketing Tips for
each product.
Click the lookup to modify the rate that is initially quoted to members in online
banking.
Use these buttons to limit which products are
displayed, making it easier to verify rates.

24 Configuring Tools for Your Loan Team
RATE INQUIRY
Similar to rate maintenance, the Rate Inquiry screen provides “one stop
shopping” for rates on any of your credit union’s loan products. Because
these rates are updated immediately after any rate maintenance, this online
inquiry can provide an excellent alternative to the traditional paper quote
sheets that often clutter up your employees’ desks.
As shown below, the Rate Inquiry screen is simply a view-only version of the
same screen used for rate maintenance. Click the Rate Inquiry button to
access this screen.
F7 (or the button shown above)

Configuring Tools for Your Loan Team 25
LOAN APPLICATION WORKFLOW
CONTROLS
The Loan Processing Workflow controls screen houses several different types
of configurable controls that will allow your credit union to further define the
experience for a loan officer working member applications, even according to
the type of loan being worked in the queue.
There are several configuration settings your loan team can use to control
how loan applications work for your teams. These can be found on Tool
#475 Loan Workflow/App Check Configuration, so online credit unions
can make adjustments without having to contact a CSR.
• Changes made to loan underwriter control, underwriter approval
limits, collateral valuation and loan application file verification are
recorded in CUFMNT. Search for program name ULNCL.
Loan Workflow/App Check Configuration (Tool #475) (all features activated)
Controls that credit unions have on this screen include:
• Underwriting controls. Activate this feature to prevent a user from creating or denying a loan application without the proper
Underwriting Code entered on the Loan Recap screen. See page 36
for more details.
• Underwriter approval limits. Underwriter approval limits are used
to control the dollar amount for loan a loan officer can approve for underwriting. Underwriting controls must also be activated to use
this feature. See page 45 for more details.

26 Configuring Tools for Your Loan Team
• Loan application verification – Activate this feature to require a
verification date to be recorded for all new loan accounts. This feature
is used to track the paperwork associated with loan processing. When activating this feature you must enter the number of days that
should be used to calculate the verification date. The calculated date
will be entered into the File verification date field on the Loan
Creation screen when the loan account is created. See page 59 for
more details.
• App check – Activate this feature to give the application a “final
check” so you can be sure your loan officer doesn't forget to get everything needed to complete the application. This can be activated
at the employee level and can be used as a training tool. See page
75 for more details.
• App workflow styles – A standard CU*BASE loan application has 10
different screens, but not all of them are critical for every type of loan. “Loan App Workflow Styles” controls the automatic forward
momentum through the CU*BASE loan application screens,
bypassing pages that are not required by the particular loan product
(such as skipping over the employment, income, and assets screens
for a CD-secured loan). See page 68 for more details.
• NADA valuation of collateral - Your credit union can implement a tight integration between CU*BASE and the NADA (National
Automobile Dealer Association) to populate the automobile’s current
value directly into the collateral record. See page 48 for more
information.
Refer to the CU*BASE Online help for more field level descriptions and
additional information about the features beyond what is included in this booklet. Click the “I” button on any screen to open help. Then enter the
feature name in quotes in the Search field and use Enter. The results will
supply topics on the subject.
You can also find help by clicking on the “I” button while on the Loan
Workflow/App Check Controls screen shown on the previous page. Links
from the topic will take you to topics on the different features.

Configuring Tools for Your Loan Team 27
UNDERWRITING CODES AND
CONTROLS
OVERVIEW
In the past, if a credit union decision maker wished either to deny or to
approve a member’s loan on the CU*BASE system, it meant that either the account had to be created or the actual loan request be processed as a
denial. An interim step was needed to allow a “memo” posting of the
decision, pending action.
With CU*BASE, a loan application can be worked by more than one credit
union employee, and the status can be communicated to the member or any other credit union employee through an Application Status inquiry, report,
or even WMail. This is often used by multiple-office credit unions where
approvals on loan requests/applications must be obtained from a second
party before the actual account is created.
In most cases, member loan requests are granted some form of action
(whether approval or denial) immediately, but certain situations may require some delay. In these cases, either a reply to the loan interviewer or a
member’s inquiry into the status of the request comes into play.
Following are some examples of situations where Underwriting Codes,
Application Status inquiry, and WCalendar are used to communicate and
process loan request information:
Example 1
ABC Credit Union has three satellite offices with only small service staffs.
The branch staff conducts loan interviews, processes paperwork, and
distributes loans, but does not approve loans.
Using the Application Status inquiry, the underwriter would review
pending requests submitted by branch personnel, and then approve or
deny the loans using Underwriting Codes.
The branch employee then processes the request based upon the
underwriter’s decision using the same Application Status software.
Example 2
Bill Smith comes into ABC Credit Union’s main office and drops off a loan application on his lunch hour for a loan officer’s review. The loan
receptionist tells Bill that the loan application will be processed and a
decision made within an hour. Bill arranges to call later from work for
an update and to schedule an appointment.
When Bill calls, his loan application status is brought up on the CU*BASE terminal through the Application Status inquiry. The loan
application is still pending. The loan receptionist checks the application
checklist to see what portion of the application is still outstanding.
She tells Bill that his loan is only waiting for proof of insurance, and that
if he would like to bring it in with him she would be happy to schedule a
loan closing. The employee schedules the appointment using the
CU*BASE WCalendar software.

28 Configuring Tools for Your Loan Team
Example 3
Jill Jones, a new loan officer at ABC Credit Union, has an approval limit of $5,000 on signature loans. A long-time participating member, Jack
Miller, comes in to apply for a line of credit with a disbursement limit of
$15,000. Jill is the only loan officer available, so after entering the
information into CU*BASE she sends a WMail message to her loan
supervisor at the main branch requesting an immediate approval on Jack’s application. The loan supervisor reviews the loan request on
CU*BASE, records her approval, and sends a return WMail message to
Jill indicating that the loan is ready for processing.
In addition, to ensure that Underwriting Codes are used consistently
according to your credit union’s policies, a special Underwriting Control
feature is available. This control ensures that a loan is not created or denied
without a specific Underwriting Code being in place. See Page 36.
ABOUT UNDERWRITING CODES
Underwriting Codes are credit union-defined codes that are used to flag a
loan with an underwriter’s approval, denial, or even “memo” notes regarding tasks to be completed in order for a determination to be made. Key features
include:
Comprehensive security attached to Underwriting Codes, to prevent
unauthorized users from marking a loan or changing the loan
information after underwriter review.
Workflow automation options to prompt underwriters to fill in
comments or complete appropriate notices.
A credit union can control the actual creation and denial processing
on a loan account, so that a loan account cannot be created without proper underwriting approval.
Underwriting Auditing lets you review daily all underwriting activity
on loan requests.
Notify your underwriters and loan processors when the status is
updated on a pending application, by flagging an underwriting code
to trigger an email alert.
Even if you decide not to use underwriting codes, CU*BASE has Special
Employee Security settings to control who can create loans and process
denial notices. (See Page 32.)
CONFIGURING UNDERWRITING CODES
The Underwriting Codes feature does more than just mark a loan approved
or denied. It allows the credit union to create up to 99 codes, each indicating a different pending status. In addition, each code can be set up
with special security and automation features, depending on the credit
union’s underwriting policies.

Configuring Tools for Your Loan Team 29
Underwriting Code Configuration (Tool #880)
This is the first of two screens used to configure an Underwriting Code. Enter a two-character code (both numbers and letters are allowed) and use
Enter to proceed to the second screen.
Screen 2
This is the second screen used to specify the description, parameters and
security for this Underwriting Code. When done, use Enter to record all
changes and return to the previous screen.
For complete details, refer to CU*BASE GOLD Online Help.
Click the button on this screen.
The first two options relate to settings in Employee Special
Security (see Page 32). Refer to the following section on page 45
for more information on underwriter approval limits. NOTE: The text “& approval limits” is conditional on the
“Underwriter Approval Limits” feature being activated.
Underwriter audit records lets you track changes made to loans once a final determination is made, and are
typically used on Approval and Denial type codes only. See Page 33
for more details.
Check this flag and enter an email address to receive a notification
email whenever this code is entered onto a pending loan application. Only one email
address can be specified per underwriting code, so use a group email address that you can adjust separately as your team changes.
(If you configure this feature for your HB (online banking)
underwriting code only, an email will be sent when an online loan
application is received in the lending queue in CU*BASE.)
NOTE: You’ll also need to specify a “from” address for these emails and any bounce-backs. Use Tool # 233
Config CU FROM Email Addresses.
Use this to display counts for this code on the Application Status screen (see Page 55). Great for “submitted for approval” memo-type codes to
make sure they are handled promptly.
The “Prompt” options are workflow controls that streamline
the process and minimize keystrokes.
30 Configuring Tools for Your Loan Team
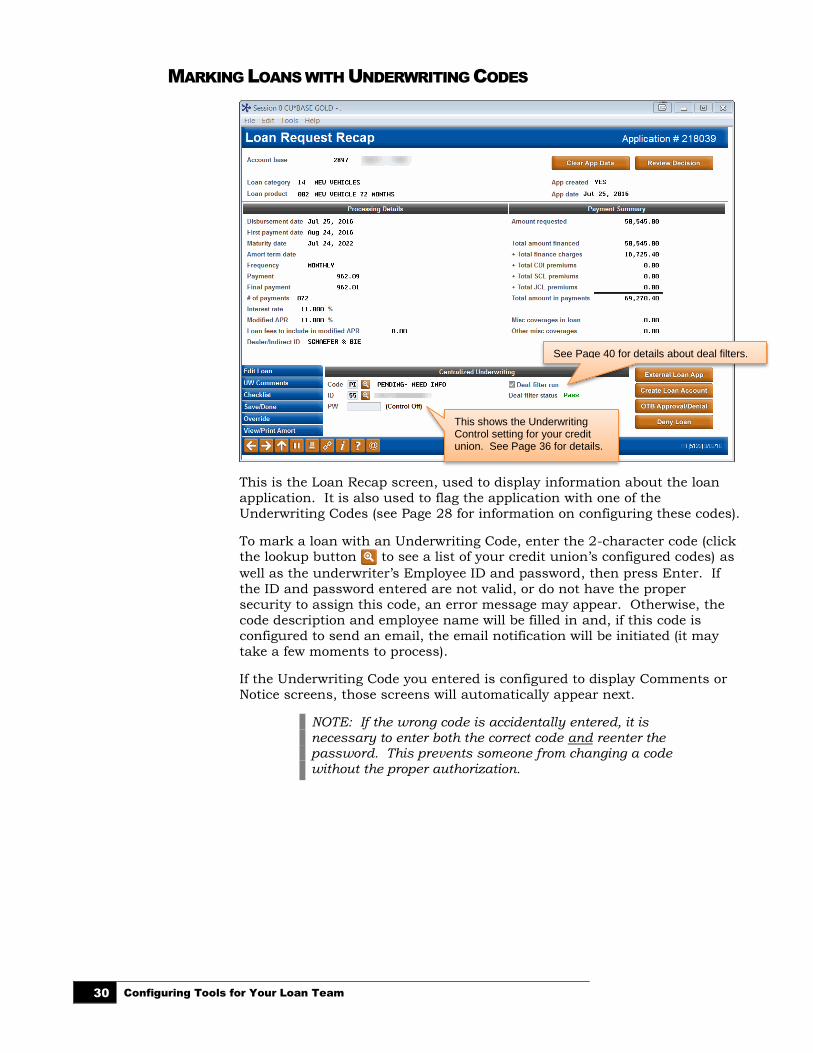
MARKING LOANS WITH UNDERWRITING CODES
This is the Loan Recap screen, used to display information about the loan
application. It is also used to flag the application with one of the
Underwriting Codes (see Page 28 for information on configuring these codes).
To mark a loan with an Underwriting Code, enter the 2-character code (click the lookup button to see a list of your credit union’s configured codes) as
well as the underwriter’s Employee ID and password, then press Enter. If
the ID and password entered are not valid, or do not have the proper
security to assign this code, an error message may appear. Otherwise, the
code description and employee name will be filled in and, if this code is
configured to send an email, the email notification will be initiated (it may
take a few moments to process).
If the Underwriting Code you entered is configured to display Comments or
Notice screens, those screens will automatically appear next.
NOTE: If the wrong code is accidentally entered, it is necessary to enter both the correct code and reenter the password. This prevents someone from changing a code without the proper authorization.
This shows the Underwriting Control setting for your credit union. See Page 36 for details.
See Page 40 for details about deal filters.

Configuring Tools for Your Loan Team 31
Changing or Overriding an Existing Loan Request
Once an Underwriting Code has been entered on the Recap screen, the
system will assess that code whenever an attempt is made to edit the original
loan request using Edit Loan (F2) or Override (F13).
If an Underwriting Code with a type “D” (denial) or “A” (approval) is already
assigned to the loan, both Edit Loan (F2) and Override (F13) will be disabled.
In order to modify the loan request or override loan terms, it is
necessary to clear all Underwriting Code fields (Code, ID and Password).
If the code was originally configured to record an Underwriter Audit record, the process of clearing the code will cause a record to be written to the Audit
Report, and a warning message will appear:
2460-Audit record will be written: Enter to continue, F7 to Cancel
Using Enter at this time will add a record to the Underwriter Audit Report
(see Page 35 for details about this report), giving underwriters and lending
managers a written record that changes were attempted on the loan request. It will be important to monitor this report to ensure that these requests are
followed up. For information on tracking all underwriting activity on
outstanding loan requests, see “Underwriter Auditing” on Page 33.
After the original code has been cleared, use Edit Loan (F2) or Override (F13)
and make changes to the loan request as needed. Once the changes have
been made, one way to ensure that the Underwriter is made aware of the changes is to add a special Underwriting Code such as “CHANGE &
RESUBMIT” or something similar. This code would also be configured with
Record underwriter audit feature turned on so that another audit record,
showing the change made to the loan request, will be added to the audit
report.
Although the use of a “CHANGE” type Underwriting Code is optional, if your credit union uses this type of code to record
an audit record and alert your Underwriters of the change, it is best to add the code after the change has been made. If you assign the code before editing the loan, the audit record will not include the changes made to the loan request.
IMPORTANT: The only way to ensure that changes made to loan requests
after initial underwriter approval or denial are carefully controlled and
tracked is through the Underwriter Audit system. Therefore, it is important that these codes be configured with the Record underwriter audit flag turned
on in the Underwriting Code configuration (see Page 29).
Who Can Create or Deny a Loan?
The system will NOT allow a user to use the Create Loan Account or Deny Loan buttons on the Loan Recap screen unless that employee (the one who
originally accessed the loan recap screen) is set up as a loan interviewer in
employee security (Loan interviewer/processor flag is checked).
In addition, if your credit union uses Underwriting Control (see Page 62), the
system will check the same employee security, but will also check to make
sure there is an appropriate “A” type code in the Underwriting Code field,
with an ID that is set up as an underwriter, before allowing Create Loan Account or a “D” type code before allowing Deny Loan. Therefore, the

32 Configuring Tools for Your Loan Team
employee must be an interviewer, and the loan must also have been coded
by an authorized underwriter.
IMPORTANT: If you want your underwriters to also be able to actually create a loan account or process a denial notice, you must also make them interviewers/processors in their employee security. See Page 32 for details on setting up employee security.
CU*TIP: Underwriting Security does not apply to the Process OTB Approval/Denial feature - no special security or underwriting codes are
required in order to approve or deny an application when processed as an
OTB credit card application with this feature.
SETTING UNDERWRITER / INTERVIEWER SECURITY
CU*BASE Employee Security (Tool #327) > Update Spcl Security
By default, the Loan underwriting and Loan interviewer/processor flags are
checked for all existing employees, meaning that the employee can add any Underwriting Code, and can create loan accounts and process denial notices.
You must manually remove the checkmark from these flags if you wish to
revoke Underwriter or Interviewer privileges for an individual employee.
Following is a synopsis of the privileges for each:
An Underwriter:
• CAN enter any Underwriting Code marked with Use underwriter security turned on (see Page 29)
• CANNOT enter any Underwriting Code marked with Use interviewer security turned on
• CANNOT create a loan account
• CANNOT process a denial notice
An Interviewer:
• CAN enter any Underwriting Code marked with Use interviewer security turned on (see Page 29)
• CANNOT enter any Underwriting Code marked with Use underwriter security turned on
• CAN create a loan account*
• CAN process a denial notice*
*Remember that if your credit union uses Underwriting Control (see Page
36), the system will still require that the proper code has been entered by an
underwriter before the Interviewer/Processor can create the loan account or
process a denial notice.

Configuring Tools for Your Loan Team 33
IMPORTANT: If you want your Underwriters to also be able to process denial notices and create loan accounts, it is best to check both flags for those employees. However, to keep loan Interviewers from marking loans as approved or
denied, uncheck “Loan underwriter” for those employees and make sure to turn on “Use underwriting security” for all of the Underwriting Codes that you do not want interviewers to use (see Page 29).
CU*TIP: For credit unions which use a special employee ID to represent a
loan committee that performs underwriting tasks, that ID would be set up as
follows:
UNDERWRITER AUDITING
One of the most important features of CU*BASE Underwriting Codes is their
ability to track an audit trail showing underwriting activity on a loan
application. This auditing feature is flexible in that your credit union can configure the types of activities that should be included in the written audit
records.
For example, you may configure several Underwriting Codes that are just
“memo” type codes for notifying other staff of the status of the request, such
as “submitted to underwriting,” “pending income verification” or other similar codes. With these, it is not important to audit the loan information
at each stage, since it may be changed often while handling the request.
However, once a loan request has been reviewed by an underwriter and
marked either “approved” or “denied” as it was submitted, any changes made
after that must be carefully monitored, so that a change is not made without
additional underwriter review. After all, if your underwriter approves a $5,000 loan, you don’t want the loan to be bumped up to $25,000 without
the underwriter reviewing it again!
To assist you in monitoring and controlling these requests, two security
features are in place:
• First, any Underwriting Code can be configured to record an audit record
showing all loan information (amount, term, rate, etc.) at the time the
code is attached to the loan request. This flag, called Record underwriter audit (see Page 29), should be turned on for any codes that indicate a
final decision by an underwriter, such as “Approved” or “Denied.”

34 Configuring Tools for Your Loan Team
• Second, once an Underwriting Code type “A” (approved) or type “D”
(denied) has been entered on a loan request, no changes will be allowed
on that request. If the code is removed, an audit record will be written
(assuming the Record underwriter audit flag is on), with an initial warning message to keep employees from changing the request without
proper authority.
NOTE: Once you add an Underwriting Code type of “A” (approved) or type “D” (denied) to a loan request, that request is then removed from the “Wait Times this Week” that appear on the left of the Work/View Application Status screen (shown to the left in the orange area). This
does not mean that the request is
removed from the listing, just from the
wait times. (These wait times indicate that paperwork is still in process for these
applications.)
In addition, if you wish to track requests that have been changed
intentionally and need to be reviewed again by an underwriter, a special
“CHANGE & RESUBMIT” code can be helpful, and this code would also be set up to record an audit record. As you will see in the following scenario,
this provides a complete picture of the key underwriting activity on a loan
request for an accurate and safe audit trail:
ABC Credit Union has a central underwriting department that reviews all loan requests submitted by branch locations. On Tuesday, underwriter John Smith reviews application # 372 for a $5,000 home equity loan. Based on the member’s application, he marks the loan as “Approved” using Underwriting Code “AA.” (This code has been configured as type
“A,” and is set up to record an audit record.)
When John presses Enter on the Recap screen after entering the Code and his ID and password, the system automatically adds a record to the Underwriter Audit Report showing the loan amount and other terms and conditions:
Applic. Loan Pmt # of Payment --UNDERWRITER INFO--
App # Date Acct # Member Name Type Amount Freq Pmts Amount Rate Code Emp ID Date
----- -------- --------- ------------------------------ ---- ------------ ---- ---- ---------- ------ ---- ------ --------
372 04/01/05 56789 EDWARD ANYBODY 02 5,000.00 M 60 327.38 8.725 AA 32 04/13/05
Later that day, the member calls and asks if he could increase the loan amount to $7,500. In order to be able to change the loan information, the branch loan officer clears the original underwriting codes, causing a second audit record to be written:
Applic. Loan Pmt # of Payment --UNDERWRITER INFO--
App # Date Acct # Member Name Type Amount Freq Pmts Amount Rate Code Emp ID Date
----- -------- --------- ------------------------------ ---- ------------ ---- ---- ---------- ------ ---- ------ --------
372 04/01/05 56789 EDWARD ANYBODY 02 5,000.00 M 60 327.38 8.725 AA 32 04/13/05
372 04/01/05 56789 EDWARD ANYBODY 02 5,000.00 M 60 327.38 8.725
The loan officer makes the changes to the loan account, then enters Underwriting Code “CH,” which the credit union has configured to indicate “change and resubmit to underwriting.” Because this code is also configured to write an audit record, a third record is added to the report:

Configuring Tools for Your Loan Team 35
Applic. Loan Pmt # of Payment --UNDERWRITER INFO--
App # Date Acct # Member Name Type Amount Freq Pmts Amount Rate Code Emp ID Date
----- -------- --------- ------------------------------ ---- ------------ ---- ---- ---------- ------ ---- ------ --------
372 04/01/05 56789 EDWARD ANYBODY 02 5,000.00 M 60 327.38 8.725 AA 32 04/13/05
372 04/01/05 56789 EDWARD ANYBODY 02 5,000.00 M 60 327.38 8.725
372 04/01/05 56789 EDWARD ANYBODY 02 7,500.00 M 60 450.97 8.725 CH 47 04/13/05
IMPORTANT NOTE: If the credit union had not configured the “CH” code,
the audit report would not include the third item showing the change that
was made. However, the second record (with no Underwriting Code) would
be a warning flag that this loan requires further follow-up.
Underwriter Audit Report
Underwriter Audit Report (Tool #879)
Remember that this report is designed to show an audit trail of key
underwriter action on loan requests, using Underwriting Codes that have been configured to record an audit record (see Page 29). Therefore, not every
loan request that is currently pending will be included on this report. Its
main purpose is to monitor discrepancies between what is approved and
what actually gets processed.
For complete details, refer to CU*BASE GOLD Online Help.
Click the link in the lower right hand corner of this screen.
Records will be sorted by member account number, then by loan application number (for members with more than one loan request), making it easy to
see the chain of events that affect each loan request, even if more than one
employee was involved.

36 Configuring Tools for Your Loan Team
Remember that for both reports, records are written only when a code is
either added or cleared, if that code was configured with Record underwriter audit turned on. Therefore, not every loan request that is currently pending
will be included.
ACTIVATION AND USE OF “UNDERWRITING CONTROLS”
To ensure that Underwriting Codes are used consistently according to your
credit union’s policies, be sure to activate the feature in the Loan
Processing Workflow Controls. See page 25.
• If Use Underwriter Control is turned on, the system will not allow Create Loan Account or Deny Loan on the Loan Recap screen to be
used without the proper Underwriting Code being entered.
• If Use Underwriter Approval Limits is turned on, the system will
review the approval limits for the Emp ID to see if the user can
approve a loan at that dollar amount. (See page 45 for more
information on this separate feature.)
As discussed earlier, Underwriting Codes also have their own security system to prevent an unauthorized user from marking a loan with an
underwriting code. This control flag adds another layer to that security, by
preventing a loan from being created or denied unless an underwriter has
marked the loan request. In other words, to create a loan, there must be an
“A” (approved) type Underwriting Code on the loan request (with an ID authorized as an underwriter). To deny a loan, there must be a “D” (denied)
type code in place. Without this control, a loan that has been marked
“denied” by an underwriter could actually be created.
This control is only necessary if your credit union wishes to make the
use of underwriting codes mandatory in order to allow the creation or
denial of a loan. You may still use the full functionality of the underwriting codes system, including employee security for entering the codes themselves
and making changes to existing loan requests, regardless of the setting in
this control.
In addition, the system will always check to see if a person has proper
security clearance to create a loan account or process a denial notice. The
main difference with this control is whether or not an Underwriting Code must be assigned in order to process the loan account. Turning this control
on provides the highest level of control and security.
Remember, this employee security only applies when a user tries to actually
create a loan or process a denial notice from the Loan Recap screen. All
employees that have access to those Lending Functions tools can create a
loan request, fill out an application, and check loan details at any time.
SAMPLE UNDERWRITING CODES AND SCENARIOS
Test Cases
Because setting up a comprehensive underwriting security system can be
complex, here are two common scenarios to give you ideas for setting up
your own system:

Configuring Tools for Your Loan Team 37
Test Case 1: ABC Credit Union
ABC Credit Union is a small credit union with two loan officers who share the responsibilities of processing and approving all loan requests.
Because of their size and configuration, they do not have a need for an
entire system of underwriting codes. However, to make sure that
approvals and denials are handled correctly according to all credit union
policies, they want to ensure that only the two loan officers are able to
create loan accounts and process denial notices.
Because they are not going to require the use of Underwriting Codes,
ABC Credit Union leaves the Underwriting Control flag turned off. All
they need to do, then, is edit the Special Security for all their employees,
and ensure that only the two loan officers are set up as Underwriters and
Interviewers. They may choose to use some memo-type Underwriting Codes for their own tracking purposes, but the system will not require
them for the purpose of creating or denying a loan account.
Test Case 2: XYZ Credit Union
XYZ Credit Union is a large credit union with a central headquarters and
several branches. Each branch has at least one loan officer that interviews members and submits loan requests. Underwriters are
located at the main headquarters and are responsible for evaluating all
loan requests before the branch officer can process the paperwork.
XYZ Credit Union wants to ensure that no branch officer can create or
deny a loan request without the proper authorization from an
underwriter. Therefore, they set the Underwriting Control system flag to Yes to ensure that loans cannot be created or denied without the proper
Underwriting Code type being assigned. They set up their “Approved”
and “Denied” Underwriting Codes to use Underwriter employee security,
so that only Underwriters can assign these approval and denial codes.
In addition, XYZ Credit Union also wants to divide the responsibilities so that the actual creation or denial processing on a loan account is not
handled by the Underwriters, but rather by the branch loan officers
(interviewers). Therefore, employee security is set up to grant only
underwriter authority to the underwriters, and only
interviewer/processor authority to the branch loan officers.
Because Underwriting Control is turned on for this credit union, loan officers can create a loan only after code “AA” has been assigned by the
underwriter, and can deny a loan only after code “DD” has been assigned
by the underwriter. If Underwriting Control was turned off, the loan
officers would still be the only ones who could handle the actual creation
and denial process, but it would be possible to create a loan that an
underwriter had denied.
38 Configuring Tools for Your Loan Team
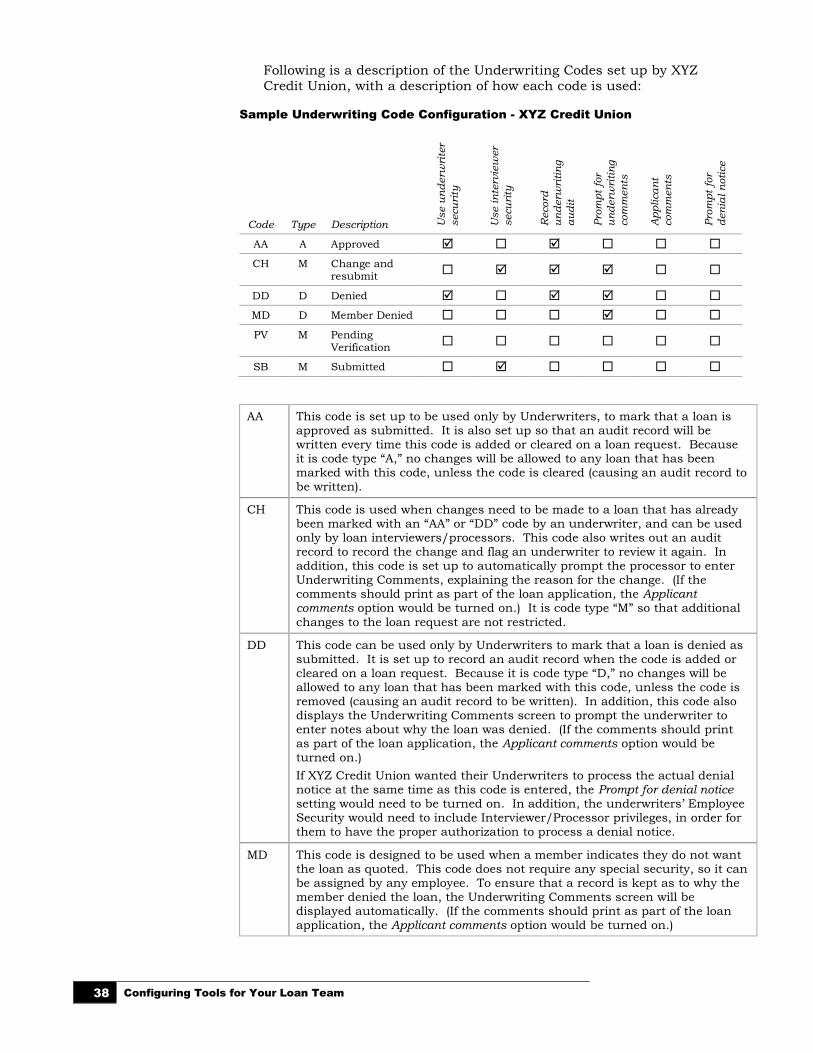
Following is a description of the Underwriting Codes set up by XYZ
Credit Union, with a description of how each code is used:
Sample Underwriting Code Configuration - XYZ Credit Union
Code Type Description U
se u
nd
erw
rite
r
secu
rity
Use in
terv
iew
er
secu
rity
Record
un
derw
riti
ng
au
dit
Pro
mpt
for
un
derw
riti
ng
com
men
ts
Applica
nt
com
men
ts
Pro
mpt
for
den
ial n
oti
ce
AA A Approved
CH M Change and resubmit
DD D Denied
MD D Member Denied
PV M Pending Verification
SB M Submitted
AA This code is set up to be used only by Underwriters, to mark that a loan is approved as submitted. It is also set up so that an audit record will be written every time this code is added or cleared on a loan request. Because it is code type “A,” no changes will be allowed to any loan that has been marked with this code, unless the code is cleared (causing an audit record to be written).
CH This code is used when changes need to be made to a loan that has already been marked with an “AA” or “DD” code by an underwriter, and can be used only by loan interviewers/processors. This code also writes out an audit record to record the change and flag an underwriter to review it again. In addition, this code is set up to automatically prompt the processor to enter Underwriting Comments, explaining the reason for the change. (If the comments should print as part of the loan application, the Applicant comments option would be turned on.) It is code type “M” so that additional
changes to the loan request are not restricted.
DD This code can be used only by Underwriters to mark that a loan is denied as submitted. It is set up to record an audit record when the code is added or cleared on a loan request. Because it is code type “D,” no changes will be allowed to any loan that has been marked with this code, unless the code is removed (causing an audit record to be written). In addition, this code also displays the Underwriting Comments screen to prompt the underwriter to enter notes about why the loan was denied. (If the comments should print as part of the loan application, the Applicant comments option would be turned on.)
If XYZ Credit Union wanted their Underwriters to process the actual denial notice at the same time as this code is entered, the Prompt for denial notice setting would need to be turned on. In addition, the underwriters’ Employee Security would need to include Interviewer/Processor privileges, in order for them to have the proper authorization to process a denial notice.
MD This code is designed to be used when a member indicates they do not want the loan as quoted. This code does not require any special security, so it can be assigned by any employee. To ensure that a record is kept as to why the member denied the loan, the Underwriting Comments screen will be displayed automatically. (If the comments should print as part of the loan application, the Applicant comments option would be turned on.)

Configuring Tools for Your Loan Team 39
PV This code is a general-purpose code to be attached to any loan that is awaiting further verification, paperwork, or tasks that must be completed, before an underwriter reviews the request. This code would be helpful for keeping track of outstanding loan requests to keep them moving quickly and make sure things don’t fall through the cracks. The code can be assigned by any employee.
SB This code is designed to be assigned only by an Interviewer/Processor, to indicate that everything is in order and the loan is ready for underwriter review. These items could easily be tracked to ensure prompt underwriter action. If these items need to appear on the Underwriting Audit Report, the Record underwriter audit flag would be turned on.

40 Configuring Tools for Your Loan Team
LOAN DEAL FILTERS FOR COLLATERAL-
BASED LENDING
For many types of loans, an underwriting decision is dependent not only on
an applicant’s creditworthiness but also on the quality of the collateral. A
member might be approved to borrow money but your credit union might
still be concerned about LTV or the value of the collateral item in securing the loan. The most common scenario is for used-car loans, where the age of
the vehicle can be important in deciding whether or not the loan is a “good
deal” for the credit union. Each product has its own set of filter settings.
CU*BASE Loan Deal Filters compare the member’s loan request and
collateral against a series of tests you configure for:
Maximum LTV Maximum age of collateral vehicle
Maximum mileage on the collateral vehicle
Minimum monthly income for the applicant
Minimum monthly income for the co-applicant
Minimum combined monthly income for both applicants
While working a loan request a loan officer can make adjustments to the
loan terms and collateral, then re-run the request through the deal filters as
many times as desired.
Since deal filters are completely independent of the credit report or any
decision model tools your credit union may use, deals filters are a FREE
tool that will help your credit union make faster, more consistent decisions
on your collateral-based loan products.
IMPORTANT: Deal Filters are not tied in any way to the
CU*BASE Underwriting Controls you may have activated to control whether loans can be created or not. You will need to establish appropriate procedures for loans that fail your deal filters but are still approved for underwriting.
LOAN DEAL FILTERS AND YOUR DECISION MODEL
247 Lender Requirement Filters* Loan Deal Filters
Used in determining a member’s overall creditworthiness
Used in evaluating the specific loan request and collateral quality, for an otherwise creditworthy member
Some of the filters control whether or
not a decision model is run, while others evaluate key ratios to control whether the member is pre-approved for your configured products and services
These filters simply present the results
of an evaluation, to assist the loan team in setting up the loan terms and making an underwriting decision
A failure here might prompt the underwriter to investigate the member’s
credit history or other factors
A failure here might prompt the loan officer to adjust the terms of the loan
request and collateral
Configuring Tools for Your Loan Team 41
247 Lender filters are independent of loan deal filters
Loan deal filters are independent of the automated decision altogether
*To learn more about 247 Lender requirement filters, refer
to the following booklet: Online Credit Bureau Access and 247 Lender (2): Configuring 247 Lender and the Approval Matrix
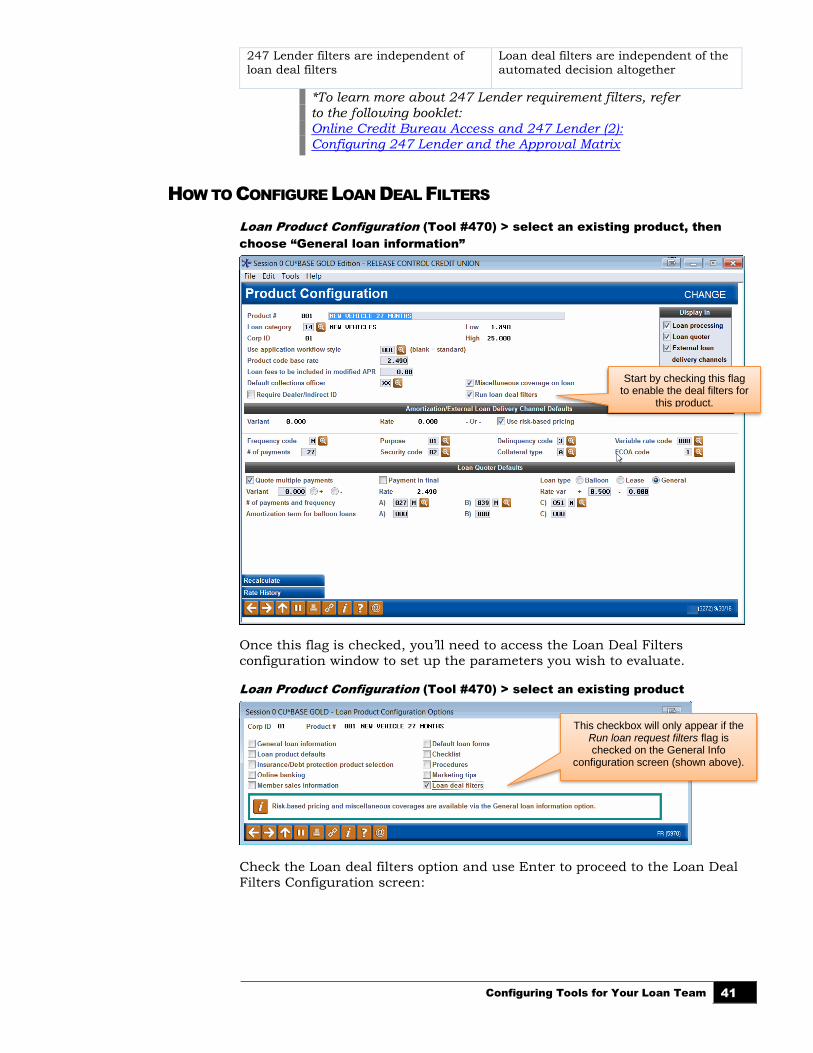
HOW TO CONFIGURE LOAN DEAL FILTERS
Loan Product Configuration (Tool #470) > select an existing product, then
choose “General loan information”
Once this flag is checked, you’ll need to access the Loan Deal Filters
configuration window to set up the parameters you wish to evaluate.
Loan Product Configuration (Tool #470) > select an existing product
Check the Loan deal filters option and use Enter to proceed to the Loan Deal
Filters Configuration screen:
Start by checking this flag to enable the deal filters for
this product.
This checkbox will only appear if the Run loan request filters flag is checked on the General Info
configuration screen (shown above).

42 Configuring Tools for Your Loan Team
Loan Product Configuration (Tool #470) > choose “Loan deal filters”
For each of the settings you want to use, be sure to check the Requirement enabled flag then specify the value for each. For complete details on how
each of these filters works, refer to CU*BASE GOLD Online Help (click
the button while working on this screen).
RUNNING AND VIEWING DEAL FILTERS ON A LOAN REQUEST
Deal filters are run automatically the first time the Loan Application
Summary screen is accessed during a session, and the results will appear
on that screen, as shown on the next page.
You can also initiate a re-evaluation of the loan request against your filters
at any time, such as if you’ve modified the collateral or adjusted the
member’s income information, by using the Deal Filters button on that
screen.
IMPORTANT: If you check the flag on the General Info screen but do not access this
screen to enable any of the filters, the system will still run the evaluation on loan
requests but will show all as “passed.”

Configuring Tools for Your Loan Team 43
Viewing Filter Results on the Loan Application Summary
Deal Filter Results Window
This window shows deal filter results in situations where the filters either
failed, or if they could not be run due to incomplete or invalid information on the loan request or collateral. You will see this window automatically when
you access the Loan Application Summary screen for the first time during a
particular session, or when you click the Deal Filters button on that screen
to re-run the deal filters evaluation.
This shows the results of the deal filters evaluation. If the filters did not pass, you may click the Deal Filters
button to run the evaluation again and display the results window shown
below.

44 Configuring Tools for Your Loan Team
Viewing Filter Results on the Loan Request Recap
Results of the deal filters evaluation will
also appear on the Loan Request Recap
screen (shown on Page 30).
A notation will appear near the
Underwriting Codes area for any loan
products with deal filters activated.
Shown to the right are the four possible
statuses you might see on the Recap.
If the Deal filter run checkbox is not
checked, then use the Complete Loan
Application (or External Loan App)
button, then click the Summary button
to run the filters again and see the most
up-to-date status.
IMPORTANT: These statuses are part of the loan application record only and will not be saved with the loan account should the loan be approved/booked (or denied).

Configuring Tools for Your Loan Team 45
LOAN UNDERWRITER APPROVAL
LIMITS
Credit unions can restrict the dollar amount that a loan officer (configured
with loan underwriting privileges) can approve. These limits are configured
through the use of Loan Underwriter Approval Limits. (See page 36 for more
information on Underwriter Controls, which also must be activated to use
this feature.)
ACTIVATION
To ensure that Underwriting Codes are used consistently according to your
credit union’s policies, Use Underwriting Control and Use Underwriter Approval Limits must both be activated in the Loan Processing Workflow
Controls. See page 25. If “Use underwriter approval limits” is checked in
this configuration, CU*BASE refers to the loan officer’s configured limits
before allowing him or her to approve a loan.
Underwriter Approval Limits are set through employee Update Special
Security (only when the loan underwriter approval limits feature is activated). Underwriter approval limits are set by employee ID and by loan
category. You can for example, limit the size of loan an underwriter can
approve for your mortgage categories.
A WORD OF CAUTION: ONCE ACTIVATED LIMITS ARE REQUIRED
One word of caution for credit unions considering using underwriting
approval limits. Once this feature is activated in the Loan Processing
Workflow Controls (see page 25), underwriter approval limits are required for
all loan officers approving loans using codes with underwriter security. The
absence of a limit (configured by loan category) will be viewed by the system as a limit of zero. Since the underwriter limit feature has a Copy option, it is
recommended that credit unions create a “Loan Officer” Employee ID, add
limits to this ID. Then the Copy feature can be used to copy these limits to
all loan officers’ Emp IDs, with individual adjustments made to each Emp ID
as needed.
HOW CAN LIMITS BE DELETED?
Approval Limits are deleted from the system in the following instances:
• All existing limits are removed, if the flag in the Loan Processing
Workflow Controls (see page 25) is unchecked after being checked.
(See above.)
• All limits for a Emp ID are removed if the Emp ID is deleted or if
“Loan Underwriter” is unchecked in Special Security for that Emp ID.

46 Configuring Tools for Your Loan Team
HOW TO ADD UNDERWRITER APPROVAL LIMITS TO AN EMPLOYEE ID
Underwriter approval limits are added by Employee ID and by category by
using the Update Special Security screen. Once the feature is activated,
Approval Limits (F10) will appear allowing you to set limits for the employee
ID by category.
CU*BASE Employee Security (Tool #327)> select an Emp ID, then Update
Special Security
Use Approval Limits (F10) from this screen to reveal the listing of limits for
the Emp ID and to add new limits.
NOTE: The function key Approval Limits (F10) is not available until the Underwriter Approval Limits feature is activated in the Loan Processing Workflow Controls (see page 25).
“Approval Limits” (F10)
From the Underwriter Approval Limits screen, you can add new limits by
using Add Category (F6). On the next screen, enter a limit and an expiration
date for this category for this Emp ID (shown below).
Approval Limits (F10) only is shown if
Underwriter Approval Limits are activated.

Configuring Tools for Your Loan Team 47
“Add Category” (F6)
NOTE: All 9s in the Approval limit field indicates the Emp ID can approve any amount (unlimited). All 9’s in the Expiration date field means the limits never expire.
Use Copy Limits (F9) to copy the limits from one Emp ID to another. It is
recommended that you set up baseline limits for a “Loan Officer” Emp ID,
then copy these limits to each Loan Officer’s Emp ID, making adjustments as
needed.
“Copy Limits” (F9)
Approving a Loan with Loan Underwriter Approval Limits
Every time a loan officer enters an underwriter code (such as AA) that requires a limit check, CU*BASE checks the Emp ID of the loan officer to
review the configured limits (after first confirming the password).
If the loan is greater than the limit, the following messaging will appear.
Do Automated Channels Use Approval Limits?
Automated approval systems such as approvals per Decision Modeling do
not check underwriter approval limits. When a loan underwriter adds a
second approval, however, the underwriter approval limits are used.

48 Configuring Tools for Your Loan Team
AUTOMATED COLLATERAL VALUATION
(NADA)
Your credit union can implement a tight integration between CU*BASE and
the NADA (National Automobile Dealer Association) to populate the
automobile’s current value directly into the collateral record.
• IMPORTANT: Prior to activation, you will need to
work with Lender*VP to set up the connection to
collect the NADA data. Contact them at [email protected] for more information on how
to get started.
• NOTE: This feature cannot be used with commercial
vehicles at this time. Only automobile valuation can
be populated.
ACTIVATION IN CU*BASE
Activation of this NADA flood feature and selection of the applicable
collateral types is done via Tool #475 Loan Workflow/App Check
Configuration.
• Self Processor credit unions: To use this new feature you will need
to add new subsystem.
To activate the NADA flood valuation, you must activate the feature in
CU*BASE, select the type of value you would like to populate, and select the
collateral types that will use this feature.
Loan Workflow/App Check Configuration (Tool #475)

Configuring Tools for Your Loan Team 49
First check Activate automated collateral valuation. This will reveal the
collateral valuation types and the multiple Select button to select the
collateral types this feature applies to.
The screen will default to Retail; however Trade In and Loan can also be
used. These are the values that can be provided by NADA.
Then use the Select button to reveal a screen listing your collateral types
with collateral definition V (vehicle). Select the collateral types to apply.
• NOTE: Automated collateral valuation can only be used for
automobiles at this time.

50 Configuring Tools for Your Loan Team
ADDING THE NADA VALUE TO THE COLLATERAL RECORD IN CU*BASE
Once the feature is activated and the collateral types are selected, lending
officers can get current NADA values entered in the CU*BASE collateral
screen. The Collateral Identification screen is used to add collateral to a loan
request or when updating collateral on an existing loan via Tool #51
Miscellaneous Loan Maintenance.
The loan officer enters the vehicle make, model, identification number (VIN) and mileage. (Other fields are optional. In fact mileage is optional; however,
omitting it will result in a less accurate value.) You may leave the Value Type as Other as shown in the example below.

Configuring Tools for Your Loan Team 51
To get the NADA value, use the Get Value button to update the collateral
record with the vehicle’s current value. This button is only available on
collateral types selected in the configuration mentioned in the previous
section.
One the button is clicked, a window will appear informing the loan officer
that the collateral is in the process of being updated. This protects you from
inadvertently not completing the collateral value update. At this point the
collateral value record is locked.
A browser window is launched showing you the features associated with the
vehicle. NOTE: If you close this window, the collateral record will NOT
be updated.

52 Configuring Tools for Your Loan Team
The browser window allows you to identify additional features about the
vehicle such as leather seats and mileage to ensure the value used is valid.
In this example, we have added a bed liner. The TOTAL is updated.
At this point, you click Submit to CU*BASE.
Items that are crossed out are not available. (For example, if you
select a soft top convertible, a moon
roof will not be an available feature.)

Configuring Tools for Your Loan Team 53
The screen message then alerts you that the value was successfully updated.
The button text changes to Print or Archive. If you click this button, you can
print a copy for your records.
In CU*BASE the following changes will be made:
• The Estimated value will be updated to the NADA value
• The Value Type field will be updated to NADA
• The back arrow will be disabled.
• NOTE: The NADA value that is used is based on the state of the
credit union.
To advance you must save these changes by using Save/Update (F5). If you
do not wish to save the changes, use Delete and the collateral record will be
deleted.

54 Configuring Tools for Your Loan Team
APPLICATION STATUS INQUIRY: A
“DASHBOARD” APPROACH
With the CU*BASE Application Status feature, any credit union employee at
any CU*BASE workstation can view the status of all loan requests, including
those that have been recently booked or denied. Instead of a member having
to call and get shuffled from one employee to another in an effort to locate the original loan officer, any employee who answers the phone can give the
member an update right over the phone.
In addition, this feature provides a centralized place where underwriters and
loan processors can review applications and mark approvals or denials
quickly and efficiently. Direct access is available to process a new loan
request, update or review underwriting comments.
Up to six underwriting codes can be configured to display right on the
Application Status screen, with a button to display all additional codes.
Each code shows a record count of applications currently sitting at each
status. This was designed especially for central underwriting teams to show
a quick count of all newly submitted applications awaiting underwriter
action.
The Activity Tracking statistics provide a status “dashboard” for your loan
team’s daily efforts, so lending managers can tell at a glance where to “step
on the gas” to make sure the department meets its goals.
LOAN APPLICATION STATUS INQUIRY
The Work/View Application Status system consists of three screens that can
be used to view pending, booked (loan accounts created) and denied loan
requests. The Application Status system is great for:
• Checking on the status of a loan request to answer a member inquiry.
• Reviewing the progress of various tasks on the Electronic Checklist.
• Updating Underwriting Comments for a member.
• “Working” a loan request, including assigning Underwriting Codes,
printing or viewing amortization data, updating Household information—
even creating the loan account or processing a denial notice.
In addition, you can access the WMail electronic mail or WCalendar
scheduler programs directly from the status screens, to allow for quick
communication between loan officers, underwriters, and member service
personnel.
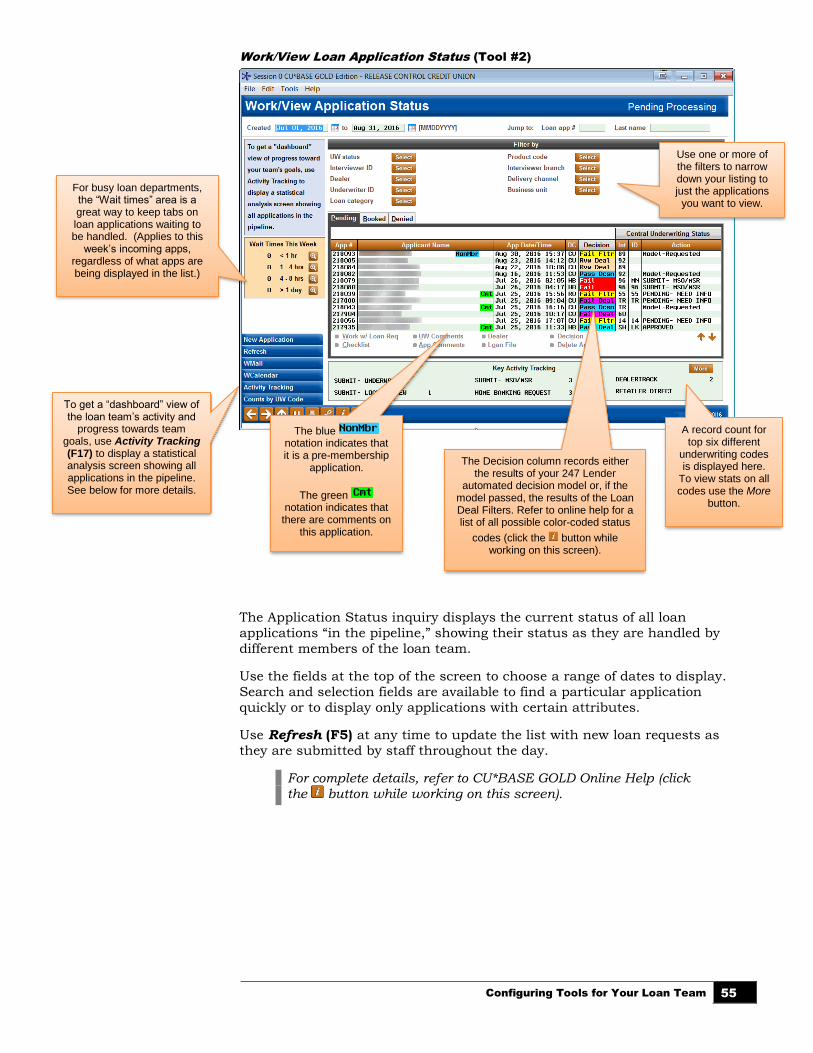
Configuring Tools for Your Loan Team 55
Work/View Loan Application Status (Tool #2)
The Application Status inquiry displays the current status of all loan
applications “in the pipeline,” showing their status as they are handled by
different members of the loan team.
Use the fields at the top of the screen to choose a range of dates to display.
Search and selection fields are available to find a particular application
quickly or to display only applications with certain attributes.
Use Refresh (F5) at any time to update the list with new loan requests as
they are submitted by staff throughout the day.
For complete details, refer to CU*BASE GOLD Online Help (click the button while working on this screen).
The blue notation indicates that it is a pre-membership
application.
The green notation indicates that
there are comments on this application.
To get a “dashboard” view of the loan team’s activity and
progress towards team goals, use Activity Tracking (F17) to display a statistical analysis screen showing all applications in the pipeline. See below for more details.
For busy loan departments, the “Wait times” area is a great way to keep tabs on loan applications waiting to be handled. (Applies to this
week’s incoming apps, regardless of what apps are being displayed in the list.)
A record count for top six different
underwriting codes is displayed here.
To view stats on all codes use the More
button.
The Decision column records either the results of your 247 Lender
automated decision model or, if the model passed, the results of the Loan Deal Filters. Refer to online help for a list of all possible color-coded status
codes (click the button while working on this screen).
Use one or more of the filters to narrow down your listing to just the applications
you want to view.

56 Configuring Tools for Your Loan Team
STATISTICAL ANALYSIS: THE “DASHBOARD”
Introducing a "Statistical Dashboard" for Loan Department Activity: An instant
view of the lending team’s output at any time during the month.
Today’s credit unions want an instant look at where they are throughout the
month in relationship to their goals and where they hope to end up. In the
past, you simply ran a report after the fact to see how you did. Today, we need to stay aware of how many days we have left to meet our goals, in order
to affect how fast we’re moving toward those goals. We need to make sure
we inspire the right people in order to stay on track.
That’s what this Loan "Statistical Dashboard" is all about. This feature
should help you get a team-wide awareness of where you are and where you
are going.
Now leadership can pop in on the loan department any time they want. Data
can be displayed for any time period and grouped by employee, loan
category, branch, or delivery channel. At a glance the stats can point to the
need to encourage an employee on an individual goal, counsel a branch
leader on the team’s goals, touch base with an indirect lender, or even work with the web team to try and increase the number of applications coming in
through the Internet.
Work/View Loan Application Status (Tool #2) > Activity Tracking
The idea with this screen is to show how many applications were added to
the pipeline during the chosen period. In this context the date range relates to the date on which the application record was created. So if an application
was created during the time period specified at the top of the screen, it will
be included in the analysis.
To group applications according to status (Pending, Denied, Booked), the
system looks at the current status of the app as it sits in the pipeline now.
For the range of dates selected, Week 1 is always the last (most recent) week in that range. Week 2 would be the next most recent, and so on.
(Basically the system starts at the end of the range (the "To" date) and works backwards.)
Use the buttons to filter the list and show
statistics for only certain applications.

Configuring Tools for Your Loan Team 57
Among other things, the analysis answers the question, "How many of the
applications that came in during the week of ________ are sitting at a
pending (or denied, or booked) status today?
For complete details, including an explanation of the calculations used to define these statistics refer to
CU*BASE GOLD Online Help. Click the link in the lower right hand corner of this screen.
To view a summary of these statistics, click Summary by Month (F17). Use
the tabs across the top to see graphical images of the data:
Use the Counts by UW Code button (F20) to see a summary of activity which
can be sorted by status (booked, pending, denied) or for all loans in the
specified period:

58 Configuring Tools for Your Loan Team
Click on any orange column heading to sort the list by that column. By
default only booked loans for the specified period will be shown; click the
tabs along the top of the list to reveal other summary lists.

Configuring Tools for Your Loan Team 59
LOAN FILE VERIFICATION: KEEPING UP
WITH THE PAPERWORK
Few processes in the day-to-day life of a credit union produce more
paperwork than a loan application file. From start to finish, the file can
contain multiple forms, copies and notes, all of which must be filed and
maintained as part of your normal record-keeping process. Who makes sure this paperwork actually gets to its final destination? How can you know if all
the forms have been filled out and everything has been done according to
credit union procedures?
The CU*BASE Loan Application File Verification feature lets you record a
date on which loan application records are to be verified, after the loan has
been finally approved (created). A report can be produced showing files due for verification, with special features that allow you to “mark” a file as
verified.
In addition, this feature combines with the Electronic Check List feature to
let you track all necessary tasks that should be completed, both before and
after the loan is approved.
RECORDING VERIFICATION DATES FOR NEW LOANS
Loan Creation Screen
This is the screen used to create a loan account. When a loan is being
created, the File verification date field is available to record the date on which the paperwork from this loan application needs to be verified for accuracy
and completeness.

60 Configuring Tools for Your Loan Team
NOTE: Depending on the Loan Configuration, the same person may not be able approve a loan and disburse its funds. If this setting is set, separate people will need to
authorize these actions.
If you wish this date to be mandatory for all loans being created, use the File Verification system control feature described on Page 62. If this control has been turned on, the system will automatically fill in a date using the default number of days configured.
USING THE ELECTRONIC CHECK LIST FOR FILE VERIFICATION
As shown on Page 17, an Electronic Checklist is a great way to make sure all the i’s are dotted and t’s are crossed in completing a member’s loan request.
Before the loan is approved and the loan account created, you can work the
checklist from the Loan Recap screen.
After the loan has been created, you can still access the checklist by using
Tool #454 Loan App File Verification. Enter the member’s account base
and loan suffix and use Enter to proceed to the screen shown below:
To mark a task as completed, select the item in the list (use Ctrl and click on
additional items if desired) then use the Maintenance option (or press F6).
The following window will appear:

Configuring Tools for Your Loan Team 61
Enter the date on which the tasks were completed, and the Employee ID of
the person completing the tasks. The system will automatically calculate the
number of days between the initial loan request date and the completion
date for the task. Use Enter to mark the task(s) and return to the check list.
Once all of the tasks are completed and all necessary paperwork has been verified, use File Verified (F10). Because the system will automatically
insert your ID and the current date, and these fields cannot be changed, a
warning message will appear. Use Enter to confirm and a notation will
appear near the top of the screen showing the verification date and employee
ID.
PRINTING THE FILE VERIFICATION REPORT
This report, also called the “Pipeline” report, is traditionally used to show the
status of tasks for all pending loan requests. It can also be used to show the status of tasks after a loan has been created, as well as a summary of File
Verification information for your records department.

62 Configuring Tools for Your Loan Team
Loan Pipeline Analysis (Tool #469)
There are two reports available: The normal Detail report showing the status of all tasks for each individual loan request, and a Summary report that lists
basic details about loans with the file verification dates included.
For complete details, refer to CU*BASE GOLD Online Help.
Click the link in the lower right hand corner of this screen.
ACTIVATION AND CONTROLS FOR LOAN FILE VERIFICATION
To ensure that File Verification features are used consistently according to
your credit union’s policy, you will need to check Loan application file verification in the Loan Processing Workflow Controls. This screen will
also require the entry of the number of days from loan creation date. See
page 25.
If this control setting is turned on, the system will require a file verification date to be entered into the Loan Creation screen when a loan account is
being created. You may also enter a default number of days, and the system
will automatically calculate the verification date by adding that number of
days to the date on which the loan was created.
For example, if you wish to allow 15 days from when a loan is created to when the final paperwork is verified by your records department, this setting would automatically calculate a verification date 15 days from the loan creation date. Therefore, a loan created on April 1 would have a verification date of April 16.

Configuring Tools for Your Loan Team 63
The verification date will appear on reports and the Electronic Check List
screen for use by record-keeping personnel in tracking the status of loan
application file paperwork.
If this control setting is turned off, a verification date can still be entered and
the reports can still be pulled, but will not be required or calculated
automatically by the system.

64 Configuring Tools for Your Loan Team
PERMANENT UNDERWRITING
COMMENTS
Lending officers use underwriting comments to record information that they
use for approvals and denials of a loan. These comments are not permanent
and can be changed, allowing loan officers to edit and adjust their comments. Credit unions wanted to protect certain underwriting comments
from being changed (either accidentally or purposely), for example
maximum-approval limit or other special instructions about a particular
member. For this purpose, we have developed the permanent underwriting
comments feature which uses the Tracker system to record comments that
cannot be altered or edited.
To use this feature, first configure a Memo Type to support underwriting
comments (see Page 64). This option is only available for Memo Types
associated with Collection Tracker (XX) Types. Then when recording a permanent underwriting comment, simply add a Tracker conversation and
use this configured Memo Type. To review permanent underwriting
comments at a later time, access the Underwriting Comments screen for the
member (see Page 65).
• Remember that Trackers are only available for members. If you are
assisting a non-member, simply use the comment feature that is
currently available to enter your underwriting comments.
CONFIGURING MEMO CODE FOR PERMANENT UNDERWRITING COMMENTS
To record permanent underwriting comments, use the Tracker
feature. First create a Memo Type to support underwriting comments by
checking “Used for permanent underwriting comments” box in the Memo
Type configuration.
Configure Memo Type Codes for Trackers (Tool #260)
This feature is only available for Memo Types associated with Collection
Tracker (XX) Types.
Then when you want to record a permanent underwriting comment, simply
use the Tracker feature. One access points is Tracker Review (F21) on the
Underwriting Comments screen (see Page 65), but there are many other
access points to adding Tracker conversations to a member. When adding a conversation that is a permanent underwriting comment, use the configured
Memo Type.
Check this box if you want to use this Memo Code for permanent
underwriter comments.

Configuring Tools for Your Loan Team 65
REVIEWING PERMANENT UNDERWRITING COMMENTS
The top right-hand corner of the screen indicates if permanent comments
have been entered. To view them, select the View Underwriting Trackers
button on the Underwriting Comments screen for the member (shown
below). This will take you to the Tracker Conversation screen, filtered to
show only the permanent underwriting comments (Tracker conversations
with the specified Memo Type for underwriting comments).
(The Underwriting Comments screen is accessed from many loan application
screens including via Tool #2 Work/View Loan Application Status.
Underwriting Comments Screen
Permanent Underwriting Comment Entry
NOTE: The number next to Conversations" at the top of this screen indicates the total number of conversation on that Tracker. It does not indicate the number of permanent underwriting comments.
This note indicates that a permanent underwriter
comment has been recorded for this member.
Select this button to view the permanent underwriting
comments as shown below.

66 Configuring Tools for Your Loan Team
NON-MEMBER NOTES
No matter which avenue your credit union uses to find new members (loans,
membership applications, and online applications), your staff can now all
follow the same process to add notes to non-members that are permanently
saved for later review. With the “Non-Member Notes” feature, employees can record notes about non-members (co-borrowers, new applicants and joint
owners) via the Non-Member Information screen, the Underwriter Comments
screen (for pre-membership loan applications), and the New Member
Application screen. Just use Add (F6) on the new Non-Member Notes screen
to add a note or view the chronological record of notes on the member. As a
nice extra you can also access OFAC scans run for the non-member from the
Non-Member Notes screen by selecting OFAC Notes (F12).
Non-Member Notes Screen (Accessed from Three Locations Noted Above)
You can make these notes part of permanent record on a membership once the non-member becomes a member! Then they can be easily accessed and
viewed by all employees.

Configuring Tools for Your Loan Team 67
To make these notes part of the permanent record once the non-member is
converted to a member, configure a Tracker and Memo Type in Tool #1004
Workflow Controls: Open Mbrships/Accts.
• NOTE: You may want to configure a Tracker and Memo Type
specifically for use with this feature.
Workflow Controls: Open Mbrships/Accts (Tool 1004)
Once the membership is created, the non-member notes will be converted
into Tracker conversation on the membership base share (000) account. If no Tracker and Memo Types are configured, the non-member notes
automatically purge if the non-member converts to a member. (In either
case the OFAC records run while the member was a non-member can still be
found via Tool 559 OFAC Non-Member Scan History.)
Additionally, if a membership application is denied, the system-generated “Other Information/More Info” notes from the online membership screens
(including the indicator that it was a MAP/MOP application) are saved to a
Non-Member Note.
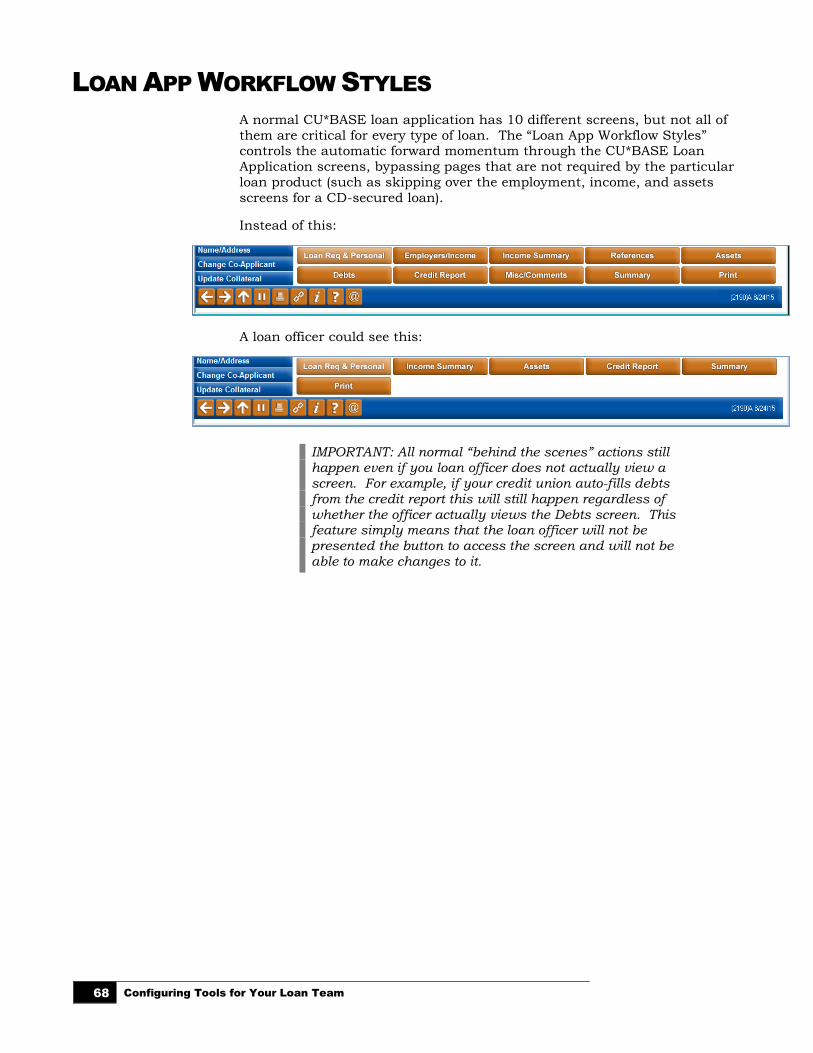
68 Configuring Tools for Your Loan Team
LOAN APP WORKFLOW STYLES
A normal CU*BASE loan application has 10 different screens, but not all of
them are critical for every type of loan. The “Loan App Workflow Styles” controls the automatic forward momentum through the CU*BASE Loan
Application screens, bypassing pages that are not required by the particular
loan product (such as skipping over the employment, income, and assets
screens for a CD-secured loan).
Instead of this:
A loan officer could see this:
IMPORTANT: All normal “behind the scenes” actions still happen even if you loan officer does not actually view a screen. For example, if your credit union auto-fills debts from the credit report this will still happen regardless of whether the officer actually views the Debts screen. This feature simply means that the loan officer will not be presented the button to access the screen and will not be able to make changes to it.

Configuring Tools for Your Loan Team 69
ACTIVATION AND CONFIGURATION
Start by configuring workflow styles in the Loan Workflow Controls (see
below and page 25), and then attach the appropriate style to your loan
products via Tool #470 Loan Product Configuration.
Loan Workflow/App Check Configuration (Tool #475) (feature not turned on)
To activate the feature, first check Use App Workflow Styles to control which application pages to show/bypass and press Enter.
NOTE: It will not affect your loan officers until these styles are attached to a loan product. This step simply allows you to create and edit the styles you will use.

70 Configuring Tools for Your Loan Team
Loan Workflow/App Check Configuration (Tool #475) (App Workflow Styles
activated)
Once the feature is activated, the system-generated styles will appear. Above
you can see these styles. Each styles is giving a Style # and the columns
indicate which screens (and corresponding buttons) are shown on the loan
application. You may choose to use these default styles. You may also edit
them to fit your credit union needs. Or you may create a new style using the
Add New button.
The styles and the Add New button will not appear until you activate the feature by checking the box at the top of the screen and pressing Enter.
To edit an existing style, select the style and use Edit. Then you can edit the
selections. To add a new style use Add New.

Configuring Tools for Your Loan Team 71
Both actions will take you to the following screen. (When selecting Edit, the
Description line will be filled in.)
On this subsequent screen you will enter a description (if adding a new style)
and select/de-select the screens you want/do not want to have shown to a
loan officer when filling out a loan app for loans of the loan product you assign this Loan Workflow Style to. Press Enter to save the style/style
changes.
Next you will need to associate the Loan App Workflow style to a loan
product. Indicate the style on the first loan product screen.

72 Configuring Tools for Your Loan Team
CONFIGURATION AT THE LOAN PRODUCT LEVEL
Loan Product Configuration (Tool #470)
Use the lookup next to Use application workflow style to attach a style to the
product. A window will appear with the available styles to select from. This
screen lists the style numbers, description and the number of screens that
the loan officer will see.
To view more details about the screens, select a style and the Detail option.
This field is used to attach a loan application workflow
style to the loan product.
This style displays 5 of the 9 possible app
screens.

Configuring Tools for Your Loan Team 73
To attach a style, use the Select option. (See image on last page.) The style
will then be attached to the product.
Press Enter to save the changes made to the Loan Product screen.
A loan application workflow style is now attached to the to
the loan product.

74 Configuring Tools for Your Loan Team
When an loan is created for the loan product used in this example, the loan
officer will see the following screen when entering the loan application
screens.
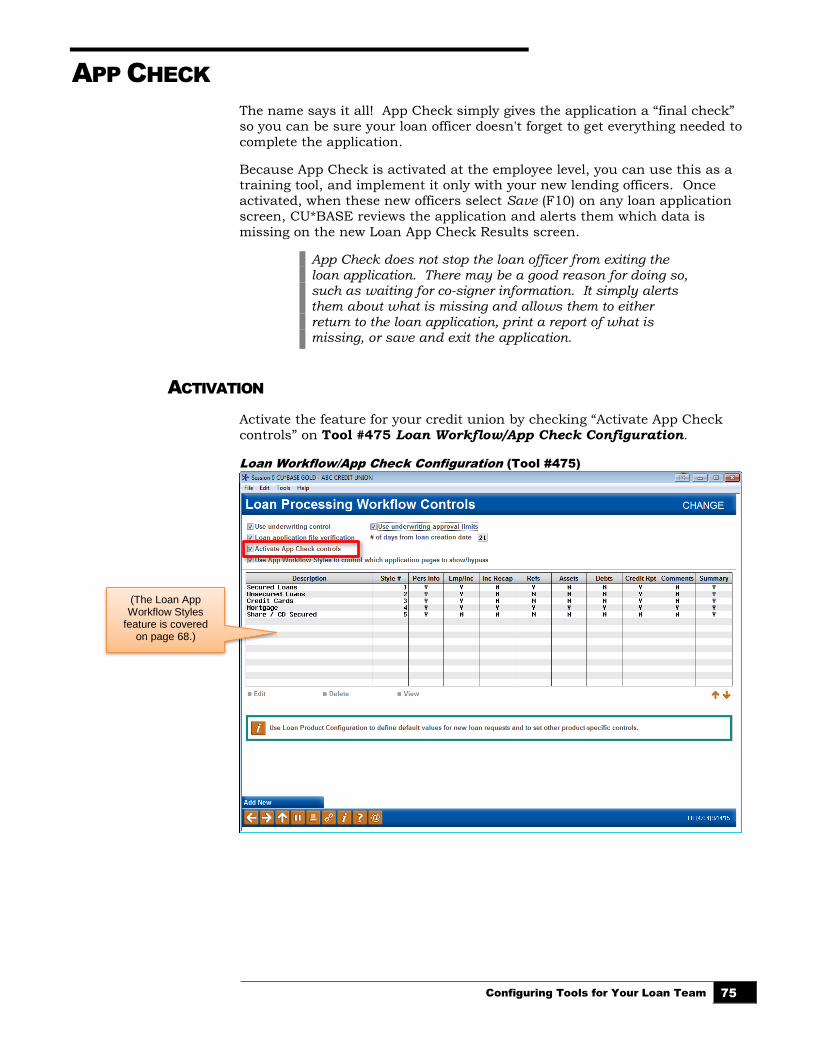
Configuring Tools for Your Loan Team 75
APP CHECK
The name says it all! App Check simply gives the application a “final check”
so you can be sure your loan officer doesn't forget to get everything needed to
complete the application.
Because App Check is activated at the employee level, you can use this as a training tool, and implement it only with your new lending officers. Once
activated, when these new officers select Save (F10) on any loan application
screen, CU*BASE reviews the application and alerts them which data is
missing on the new Loan App Check Results screen.
App Check does not stop the loan officer from exiting the loan application. There may be a good reason for doing so, such as waiting for co-signer information. It simply alerts them about what is missing and allows them to either return to the loan application, print a report of what is missing, or save and exit the application.
ACTIVATION
Activate the feature for your credit union by checking “Activate App Check
controls” on Tool #475 Loan Workflow/App Check Configuration.
Loan Workflow/App Check Configuration (Tool #475)
(The Loan App Workflow Styles
feature is covered on page 68.)

76 Configuring Tools for Your Loan Team
Press Enter to move to the next screen. Check the Warn if empty box for
each piece of data you want to be required for an application.
ACTIVATE AT THE EMPLOYEE LEVEL
As mentioned earlier, this feature can be activated by employee, so you can
use it for new lending officers as a training tool.
Activate the feature by Employee ID by checking Use app check in the special
security of CU*BASE Employee Security.
CU*BASE Employee Security (Tool #327) > Update Spcl Security”

Configuring Tools for Your Loan Team 77
USING APP CHECK
Once activated, when loan officers (configured to use App Check) select F10-
Save on any loan application screen, CU*BASE reviews the application and
alerts them to which data is missing on the new Loan App Check Results
screen.
As mentioned earlier, the lending officer can then select to exit the
application (Confirm (F10)), print the results of the screen (Print (F14)), or re-
enter the application to add the missing information.
If the employee chooses to print the report, he or she will first need to select
a printer. Then the following report will print:
Loan App Check Results Report
10/28/12 8:59:09 ABC CREDIT UNION PAPPCHK PAGE
RUN ON 10/30/12 LOAN APP CHECK RESULTS USER
APPLICANT MARY L MEMBER APP # 117284
THE FOLLOWING DATA IS MISSING FROM THE LOAN APPLICATION:
LOAN APPLICATION DATA SECTION APPLICANT
MARRIED STATUS 01 Name/Address Info Primary
REFERENCE #1 CITY 04 Reference Info Primary
REFERENCE #1 NAME 04 Reference Info Primary
REFERENCE #1 STATE 04 Reference Info Primary
REFERENCE #1 STREET ADDRESS 04 Reference Info Primary
REFERENCE #1 ZIP CODE 04 Reference Info Primary
***END OF REPORT***