console guide version 9 - cyberoam · 2.4 set cyberoam administrator email id_____ 12 2.5...
TRANSCRIPT

Console Guide Version 9
Document version 9412-1.0-01/03/2007
IMPORTANT NOTICE Elitecore has supplied this Information believing it to be accurate and reliable at the time of printing, but is presented without warranty of any kind, expressed or implied. Users must take full responsibility for their application of any products. Elitecore assumes no responsibility for any errors that may appear in this document. Elitecore reserves the right, without notice to make changes in product design or specifications. Information is subject to change without notice. USER’S LICENSE The Appliance described in this document is furnished under the terms of Elitecore’s End User license agreement. Please read these terms and conditions carefully before using the Appliance. By using this Appliance, you agree to be bound by the terms and conditions of this license. If you do not agree with the terms of this license, promptly return the unused Appliance and manual (with proof of payment) to the place of purchase for a full refund. LIMITED WARRANTY Software: Elitecore warrants for a period of ninety (90) days from the date of shipment from Elitecore: (1) the media on which the Software is furnished will be free of defects in materials and workmanship under normal use; and (2) the Software substantially conforms to its published specifications except for the foregoing, the software is provided AS IS. This limited warranty extends only to the customer as the original licenses. Customers exclusive remedy and the entire liability of Elitecore and its suppliers under this warranty will be, at Elitecore or its service center’s option, repair, replacement, or refund of the software if reported (or, upon, request, returned) to the party supplying the software to the customer. In no event does Elitecore warrant that the Software is error free, or that the customer will be able to operate the software without problems or interruptions. Elitecore hereby declares that the anti virus and anti spam modules are powered by Kaspersky Labs and the performance thereof is under warranty provided by Kaspersky Labs. It is specified that Kaspersky Lab does not warrant that the Software identifies all known viruses, nor that the Software will not occasionally erroneously report a virus in a title not infected by that virus. Hardware: Elitecore warrants that the Hardware portion of the Elitecore Products excluding power supplies, fans and electrical components will be free from material defects in workmanship and materials for a period of One (1) year. Elitecore's sole obligation shall be to repair or replace the defective Hardware at no charge to the original owner. The replacement Hardware need not be new or of an identical make, model or part; Elitecore may, in its discretion, replace the defective Hardware (or any part thereof) with any reconditioned product that Elitecore reasonably determines is substantially equivalent (or superior) in all material respects to the defective Hardware. DISCLAIMER OF WARRANTY Except as specified in this warranty, all expressed or implied conditions, representations, and warranties including, without limitation, any implied warranty or merchantability, fitness for a particular purpose, non-infringement or arising from a course of dealing, usage, or trade practice, and hereby excluded to the extent allowed by applicable law. In no event will Elitecore or its supplier be liable for any lost revenue, profit, or data, or for special, indirect, consequential, incidental, or punitive damages however caused and regardless of the theory of liability arising out of the use of or inability to use the product even if Elitecore or its suppliers have been advised of the possibility of such damages. In the event shall Elitecore’s or its supplier’s liability to the customer, whether in contract, tort (including negligence) or otherwise, exceed the price paid by the customer. The foregoing limitations shall apply even if the above stated warranty fails of its essential purpose. In no event shall Elitecore or its supplier be liable for any indirect, special, consequential, or incidental damages, including, without limitation, lost profits or loss or damage to data arising out of the use or inability to use this manual, even if Elitecore or its suppliers have been advised of the possibility of such damages.
RESTRICTED RIGHTS Copyright 2000 Elitecore Technologies Ltd. All rights reserved. Cyberoam, Cyberoam logo are trademark of Elitecore Technologies Ltd. Information supplies by Elitecore Technologies Ltd. Is believed to be accurate and reliable at the time of printing, but Elitecore Technologies assumes no responsibility for any errors that may appear in this documents. Elitecore Technologies reserves the right, without notice, to make changes in product design or specifications. Information is subject to change without notice
CORPORATE HEADQUARTERS Elitecore Technologies Ltd. 904 Silicon Tower, Off. C.G. Road, Ahmedabad – 380015, INDIA Phone: +91-79-66065600 Fax: +91-79-26407640 Web site: www.elitecore.com , www.cyberoam.com

Cyberoam Console Guide
1
Contents
Annexure I - Contents__________________________________________________________________ 3
Preface _______________________________________________________________________ 1 Guide Audience ______________________________________________________________________ 1 Guide Sets___________________________________________________________________________ 2 Technical Support_____________________________________________________________________ 3 Typographic Conventions_______________________________________________________________ 4
Introduction ___________________________________________________________________ 4 Notation conventions __________________________________________________________________ 4
Introduction ___________________________________________________________________ 5 Accessing Cyberoam Console_____________________________________________________ 5
Accessing Console via TELNET _________________________________________________________ 5 R. Restart Management Services __________________________________________________ 7
Set IP Address and Alias _______________________________________________________________ 8 2.1 Set Console Password______________________________________________________________ 10 2.2 Set System Date __________________________________________________________________ 10 2.3 View Access logs _________________________________________________________________ 11 2.4 Set Cyberoam Administrator Email ID_________________________________________________ 12 2.5 Traceroute Utility _________________________________________________________________ 13 2.6 Set Module Info __________________________________________________________________ 13 2.7 Bandwidth Graph Setting ___________________________________________________________ 13 2.8 Enable/Disable LAN Bypass ________________________________________________________ 14 2.0 Exit ____________________________________________________________________________ 14 3.1 Add Route_______________________________________________________________________ 15 3.2 Delete Route _____________________________________________________________________ 16 3.3 Show Route______________________________________________________________________ 16 3.0 Exit ____________________________________________________________________________ 17 5.1 Restart Management Services________________________________________________________ 19 5.2 Remove Firewall Rules_____________________________________________________________ 19 5.3 Reset Management Password ________________________________________________________ 20 5.4 Database Utilities _________________________________________________________________ 20 5.5 Download Backup ________________________________________________________________ 22 5.6 Restore Backup___________________________________________________________________ 22 5.7 DHCP Client Settings______________________________________________________________ 22 5.8 View Audit Logs__________________________________________________________________ 22 5.9 Check and Upgrade New version _____________________________________________________ 22 5.10 Auto Upgrade status ______________________________________________________________ 23 5.11 Check and Update Webcat Latest Database ____________________________________________ 23 5.12 Webcat Auto Upgrade Status _______________________________________________________ 23 5.13 Reset to Factory Defaults __________________________________________________________ 23 5.14 Custom Menu ___________________________________________________________________ 23 5.15 Logging Management_____________________________________________________________ 24 5.16 Restore Backup of Version 7.4.2.x ___________________________________________________ 24 5.17 ReBuild New Firewall State ________________________________________________________ 25 5.0 Exit ____________________________________________________________________________ 25 8.1 Regenerate RSA Key ______________________________________________________________ 28 8.2 Restart VPN service _______________________________________________________________ 28 8.3 View VPN Logs __________________________________________________________________ 29 8.3 View Connection wise VPN Logs ____________________________________________________ 29 8.4 View Connection wise VPN Logs ____________________________________________________ 29 8.5 Advance VPN Logs _______________________________________________________________ 30 8.6 PPTP VPN Logs __________________________________________________________________ 30 8.0 Exit ____________________________________________________________________________ 31
0. Exit _______________________________________________________________________ 32
Cyberoam Console Guide
2
Annexure A __________________________________________________________________ 33

Cyberoam Console Guide
3
Annexure I - Contents
arp ............................................................................................................................................33
cacheclient...............................................................................................................................33
clear .........................................................................................................................................33
cyberoam..................................................................................................................................33
disableremote...........................................................................................................................34
dnslookup ................................................................................................................................34
enableremote ...........................................................................................................................35
ip ..............................................................................................................................................35
message....................................................................................................................................46
ping ..........................................................................................................................................46
route.........................................................................................................................................47
set .............................................................................................................................................48
show .........................................................................................................................................49
tcpdump ...................................................................................................................................51
telnet ........................................................................................................................................52
traceroute.................................................................................................................................52

Cyberoam Console Guide
1
Preface Welcome to Cyberoam’s – Console guide. Cyberoam is an Identity-based UTM Appliance. Cyberoam’s solution is purpose-built to meet the security needs of corporate, government organizations, and educational institutions. Cyberoam’s perfect blend of best-of-breed solutions includes user based Firewall, Content filtering, Anti Virus, Anti Spam, Intrusion Detection and Prevention (IDP), and VPN. Cyberoam provides increased LAN security by providing separate port for connecting to the publicly accessible servers like Web server, Mail server, FTP server etc. hosted in DMZ which are visible the external world and still have firewall protection. Cyberoam Console guide helps you administer, monitor and manage Cyberoam with the help of Console. Note that by default, Cyberoam Console password is ‘admin’. It is recommended to change the default password immediately after Installation.
Guide Audience
Cyberoam Console Guide provides functional and technical information of the Cyberoam Software. This Guide is written to serve as a technical reference and describes features that are specific to the Console. Guide also provides the brief summary on using the Console commands. This guide is intended for the Network Administrators and Support personnel who perform the following tasks: • Configure System & Network • Manage and maintain Network • Manage various services • Troubleshooting This guide is intended for reference purpose and readers are expected to possess basic-to-advanced knowledge of systems networking.
Note The Corporate and individual names, data and images in this guide are for demonstration purposes only and does not reflect the real data.
If you are new to Cyberoam, use this guide along with the ‘Cyberoam User Guide’

Cyberoam Console Guide
2
Guide Sets
Guide Describes
User Guide Console Guide Console Management Windows Client Guide Installation & configuration of Cyberoam
Windows Client Linux Client Guide Installation & configuration of Cyberoam Linux
Client HTTP Client Guide Installation & configuration of Cyberoam HTTP
Client Analytical Tool Guide Using the Analytical tool for diagnosing and
troubleshooting common problems LDAP Integration Guide Configuration for integrating LDAP with
Cyberoam for external authentication ADS Integration Guide Configuration for integrating ADS with
Cyberoam for external authentication PDC Integration Guide Configuration for integrating PDC with
Cyberoam for authentication RADIUS Integration Guide Configuration for integrating RADIUS with
Cyberoam for external authentication High Availability Configuration Guide
Configuration of High Availability (HA)
Data transfer Management Guide Configuration and Management of user based data transfer policy
Multi Link Manager User Guide Configuration of Multiple Gateways, load balancing and failover
VPN Management Implementing and managing VPN Cyberoam IDP Implementation Guide
Configuring, implementing and managing Intrusion Detection and Prevention
Cyberoam Anti Virus Implementation Guide
Configuring and implementing anti virus solution
Cyberoam Anti Spam Implementation Guide
Configuring and implementing anti spam solution
Cyberoam Console Guide
3
Technical Support
You may direct all questions, comments, or requests concerning the software you purchased, your registration status, or similar issues to Customer care/service department at the following address: Corporate Office eLitecore Technologies Ltd. 904, Silicon Tower Off C.G. Road Ahmedabad 380015 Gujarat, India. Phone: +91-79-66065606 Fax: +91-79-26407640 Web site: www.elitecore.com Cyberoam contact: Technical support (Corporate Office): +91-79- 26400707 Email: [email protected] Web site: www.cyberoam.com Visit www.cyberoam.com for the regional and latest contact information.

Cyberoam Console Guide
4
Typographic Conventions
Material in this manual is presented in text, screen displays, or command-line notation.
Item Convention Example
Server Machine where Cyberoam Software - Server component is installed Client Machine where Cyberoam Software - Client component is installed User The end user Username Username uniquely identifies the user of the system Topic titles Shaded font
typefaces Introduction
Subtitles Bold and Black typefaces
Notation conventions
Navigation link
Bold typeface
Group Management → Groups → Create it means, to open the required page click on Group management then on Groups and finally click Create tab
Notes & points to remember
Bold typeface between the black borders
Note

Cyberoam Console Guide
5
IP address of Cyberoam server
Introduction Cyberoam console provides a collection of tools to administer, monitor and control certain Cyberoam system components.
Accessing Cyberoam Console There are two ways to access Cyberoam Console as explained below 1. Direct Console connection - attaching a keyboard and monitor directly to the Cyberoam
server 2. Remote connection - Using remote login utility TELNET - Telnet provides user support for the
Telnet protocol, a remote access protocol you can use to log on to a remote computer, network device, or private TCP/IP network.
Accessing Console via TELNET
To use TELNET, IP Address of the Cyberoam server is required. To start the TELNET utility: Click Start from Windows Taskbar followed by Run
In Open, type TELNET xxx.xxx.x.xxx Click OK, opens new window and prompts to enter Password Default password for Cyberoam console is “admin”.

Cyberoam Console Guide
6
On successful login, following Main menu screen will be shown.
To access any of the menu items, type the number corresponding to the menu item in the ‘Select Menu Number’ field and press <Enter> key. Example To access Type System Configuration 2 DNS services 8 Exit 0 or Ctrl -C
Cyberoam Console Guide
7
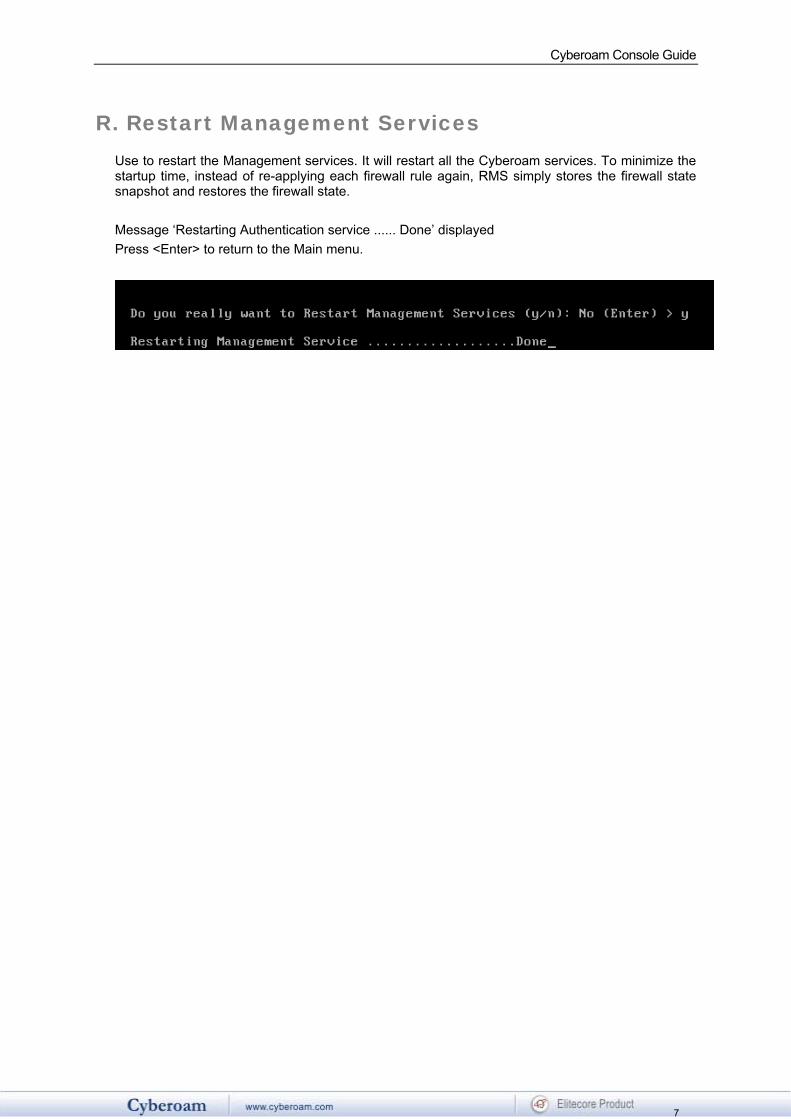
R. Restart Management Services Use to restart the Management services. It will restart all the Cyberoam services. To minimize the startup time, instead of re-applying each firewall rule again, RMS simply stores the firewall state snapshot and restores the firewall state. Message ‘Restarting Authentication service ...... Done’ displayed Press <Enter> to return to the Main menu.
Cyberoam Console Guide
8
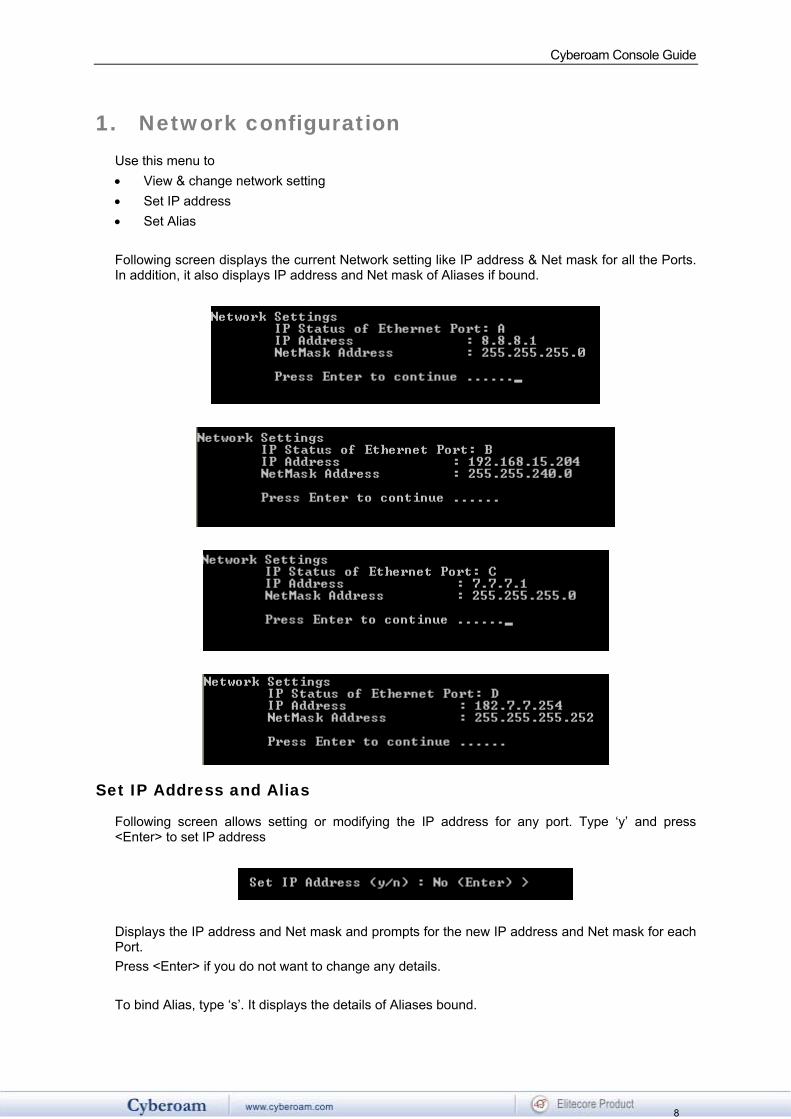
1. Network configuration Use this menu to • View & change network setting • Set IP address • Set Alias Following screen displays the current Network setting like IP address & Net mask for all the Ports. In addition, it also displays IP address and Net mask of Aliases if bound.
Set IP Address and Alias
Following screen allows setting or modifying the IP address for any port. Type ‘y’ and press <Enter> to set IP address
Displays the IP address and Net mask and prompts for the new IP address and Net mask for each Port. Press <Enter> if you do not want to change any details. To bind Alias, type ‘s’. It displays the details of Aliases bound.
Cyberoam Console Guide
9
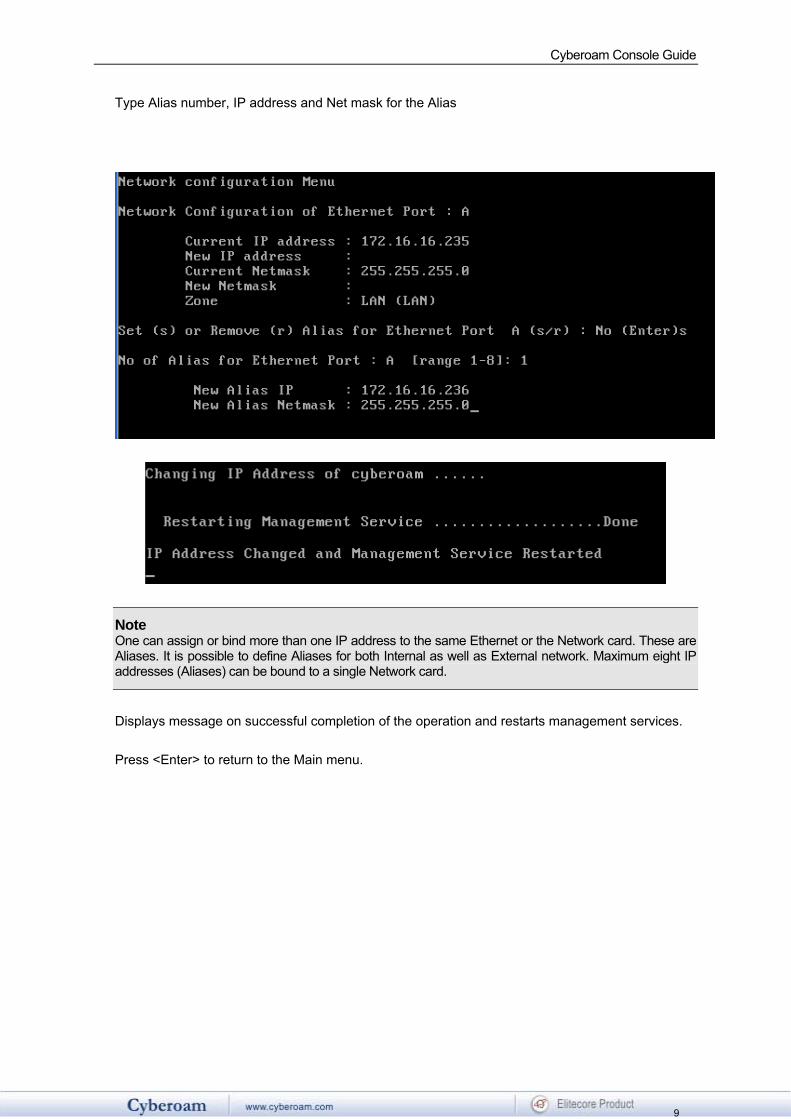
Type Alias number, IP address and Net mask for the Alias
Note One can assign or bind more than one IP address to the same Ethernet or the Network card. These are Aliases. It is possible to define Aliases for both Internal as well as External network. Maximum eight IP addresses (Aliases) can be bound to a single Network card.
Displays message on successful completion of the operation and restarts management services. Press <Enter> to return to the Main menu.

Cyberoam Console Guide
10
2. System configuration Use this menu to • View & change various system properties
2.1 Set Console Password
Use to change the Console password Type new password, retype for confirmation, and press <Enter>
Displays message on successful completion of the operation. Press <Enter> to return to the System Setting Menu.
2.2 Set System Date
Use to change time zone and system date Type ‘y’ to set new time and press <Enter>
Select the appropriate zone by using ‘Tab’ key and press ‘OK’ followed by <Enter>

Cyberoam Console Guide
11
Type ‘y’ to reset Date and press <Enter> Type Month, Day, Year, Hour, Minutes
Press <Enter> to return to the System Menu
2.3 View Access logs
Use to view Access log Displays list of IP addresses from where the Console was accessed along with Date & time

Cyberoam Console Guide
12
2.4 Set Cyberoam Administrator Email ID
Use to change the Email ID of Cyberoam Administrator. Cyberoam sends system alert mails on the specified Email ID. Type Email ID and press <Enter>. It displays the new Email ID.
Press <Enter> to return to the System Setting Menu
Cyberoam Console Guide
13
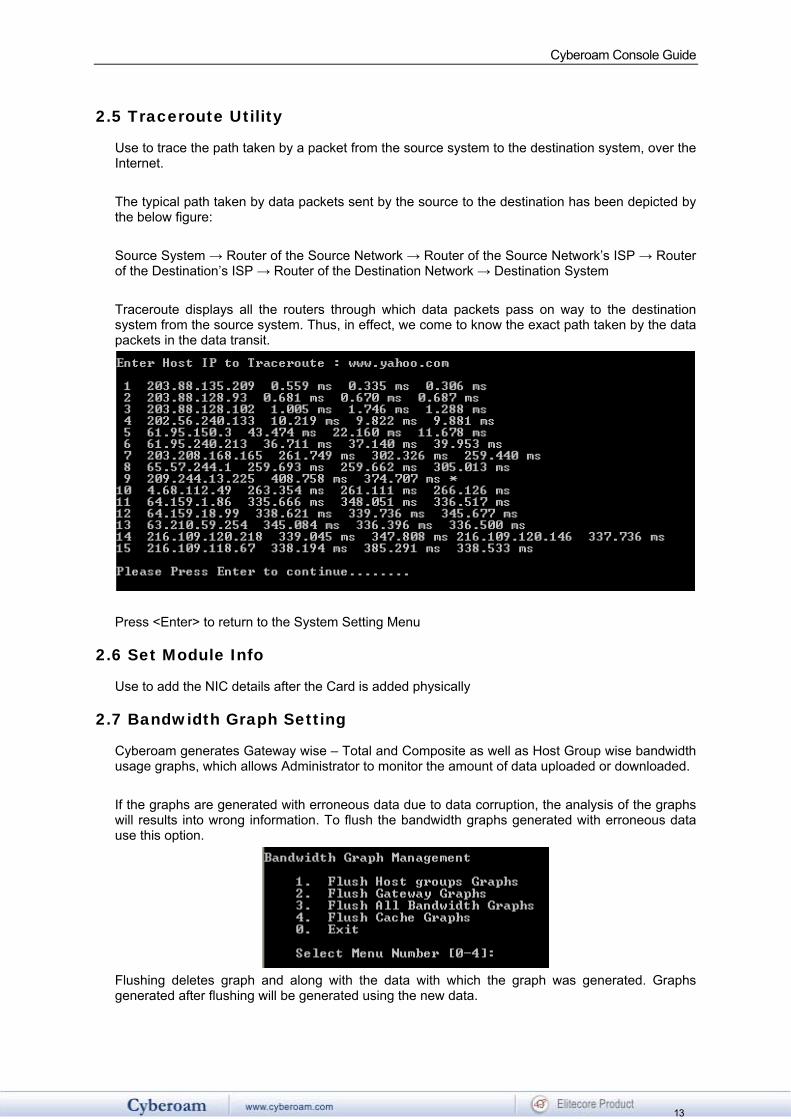
2.5 Traceroute Utility
Use to trace the path taken by a packet from the source system to the destination system, over the Internet. The typical path taken by data packets sent by the source to the destination has been depicted by the below figure: Source System → Router of the Source Network → Router of the Source Network’s ISP → Router of the Destination’s ISP → Router of the Destination Network → Destination System Traceroute displays all the routers through which data packets pass on way to the destination system from the source system. Thus, in effect, we come to know the exact path taken by the data packets in the data transit.
Press <Enter> to return to the System Setting Menu
2.6 Set Module Info
Use to add the NIC details after the Card is added physically
2.7 Bandwidth Graph Setting
Cyberoam generates Gateway wise – Total and Composite as well as Host Group wise bandwidth usage graphs, which allows Administrator to monitor the amount of data uploaded or downloaded. If the graphs are generated with erroneous data due to data corruption, the analysis of the graphs will results into wrong information. To flush the bandwidth graphs generated with erroneous data use this option.
Flushing deletes graph and along with the data with which the graph was generated. Graphs generated after flushing will be generated using the new data.

Cyberoam Console Guide
14
2.7.1 Flush Host group Graphs
Use to flush the graph generated for different Host groups defined in the Cyberoam
2.7.2 Flush Gateway Graphs
Use to flush the graph generated for different Gateways defined in the Cyberoam
2.7.3 Flush All Bandwidth Graphs
Use to flush all the Bandwidth graphs generated
2.7.4 Flush Cache Graphs
Use to flush the Cache graphs generated
2.7.0 Exit
Type ‘0’ to exit from the Bandwidth Graph Menu and return to the System Settings Menu
2.8 Enable/Disable LAN Bypass
Use to enable/disable LAN Bypass Option available only if Cyberoam is in Bridge mode
2.0 Exit
Type ‘0’ to exit from System Setting menu and return to the Main Menu.

Cyberoam Console Guide
15
3. Route configuration Use to configure and view permanent Route details Cyberoam supports two types of Routes: 1. Permanent – These routes once created, are saved permanently until you explicitly delete
them. In this section, we are talking about permanent routes. 2. Temporary – Flushed when the system is rebooted. Use option 4 – Cyberoam Console in
Cyberoam Main menu to define them.
3.1 Add Route
Use to add 1) Network route 2) Host route
3.1.1 Add Network Route
Use to add route for the Network Type Network, Net mask and Gateway Address and press <Enter>
Cyberoam Console Guide
16
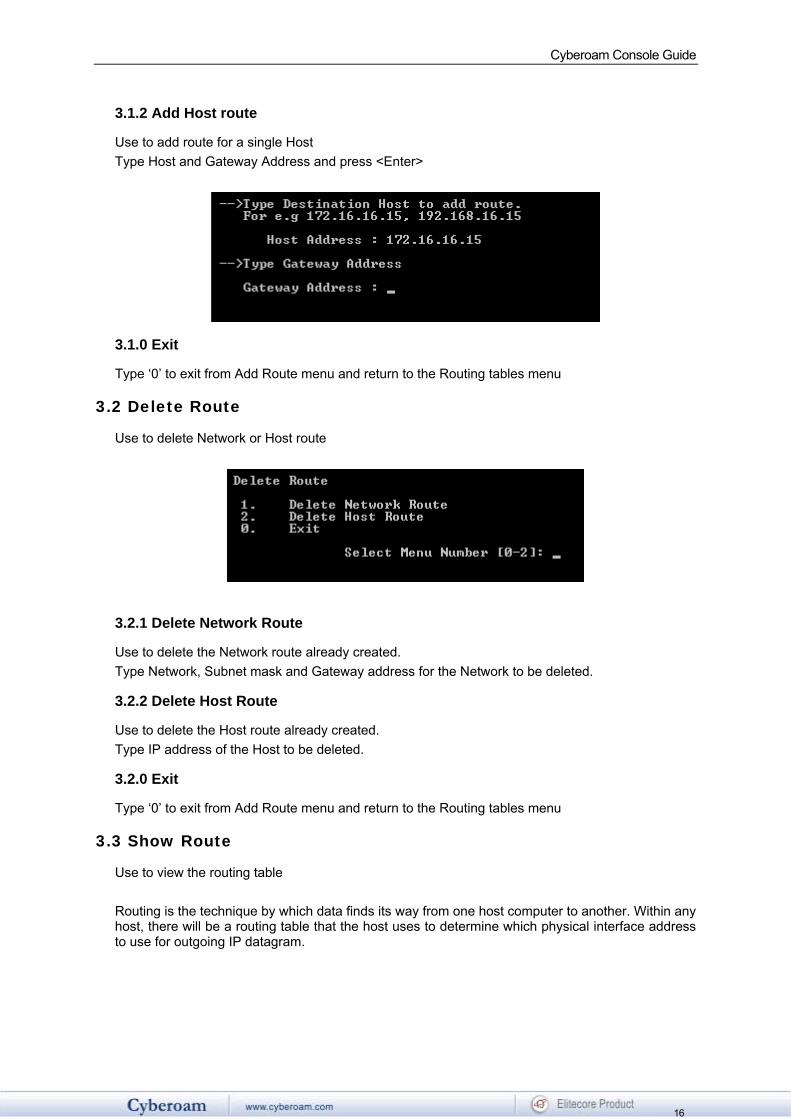
3.1.2 Add Host route
Use to add route for a single Host Type Host and Gateway Address and press <Enter>
3.1.0 Exit
Type ‘0’ to exit from Add Route menu and return to the Routing tables menu
3.2 Delete Route
Use to delete Network or Host route
3.2.1 Delete Network Route
Use to delete the Network route already created. Type Network, Subnet mask and Gateway address for the Network to be deleted.
3.2.2 Delete Host Route
Use to delete the Host route already created. Type IP address of the Host to be deleted.
3.2.0 Exit
Type ‘0’ to exit from Add Route menu and return to the Routing tables menu
3.3 Show Route
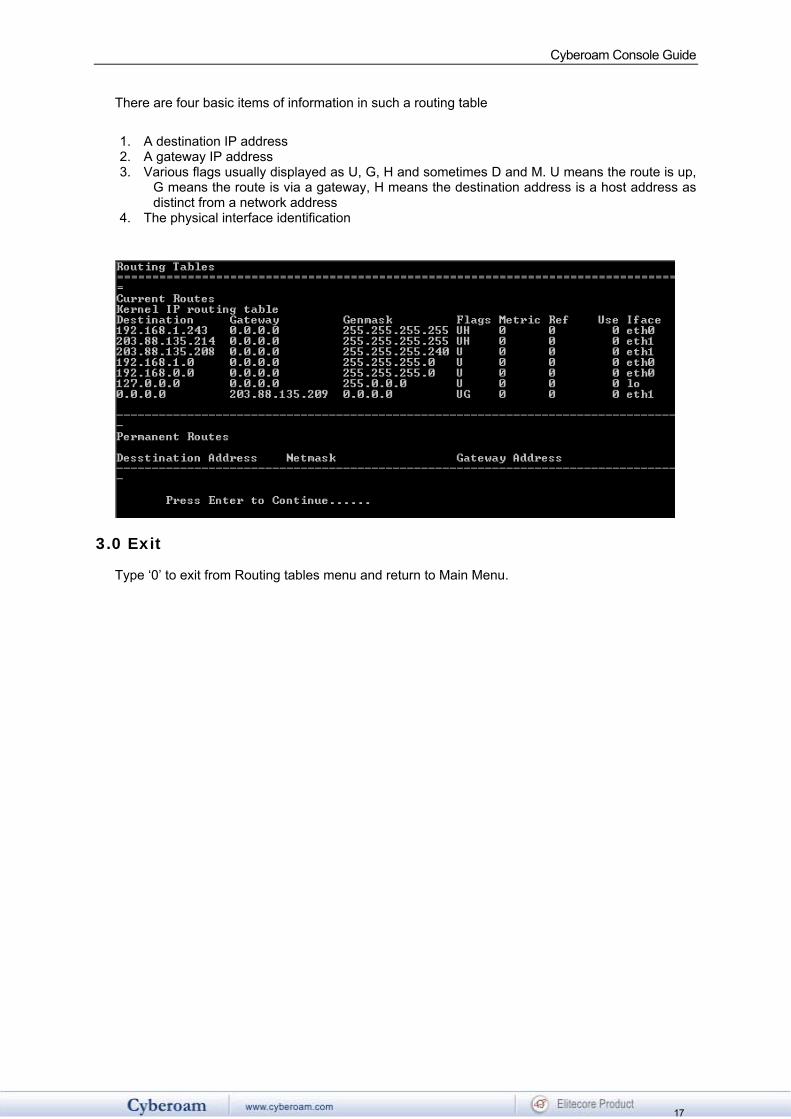
Use to view the routing table Routing is the technique by which data finds its way from one host computer to another. Within any host, there will be a routing table that the host uses to determine which physical interface address to use for outgoing IP datagram.
Cyberoam Console Guide
17
There are four basic items of information in such a routing table 1. A destination IP address 2. A gateway IP address 3. Various flags usually displayed as U, G, H and sometimes D and M. U means the route is up,
G means the route is via a gateway, H means the destination address is a host address as distinct from a network address
4. The physical interface identification
3.0 Exit
Type ‘0’ to exit from Routing tables menu and return to Main Menu.
Cyberoam Console Guide
18
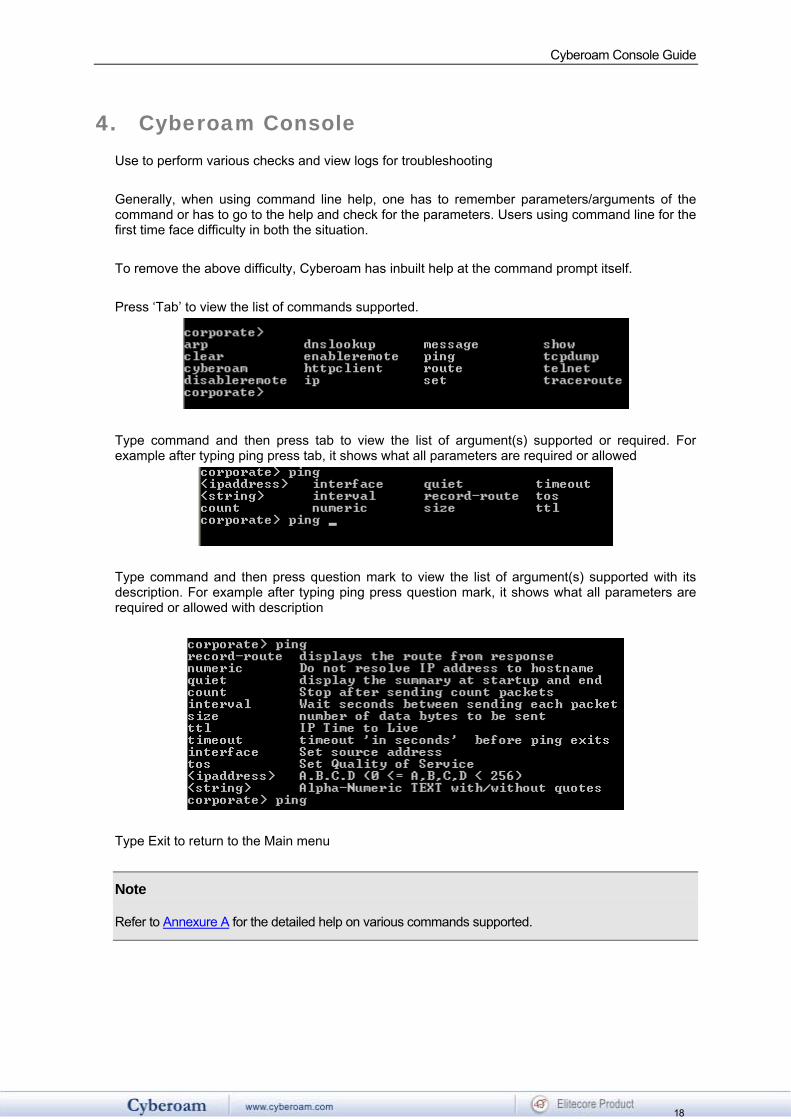
4. Cyberoam Console Use to perform various checks and view logs for troubleshooting Generally, when using command line help, one has to remember parameters/arguments of the command or has to go to the help and check for the parameters. Users using command line for the first time face difficulty in both the situation. To remove the above difficulty, Cyberoam has inbuilt help at the command prompt itself. Press ‘Tab’ to view the list of commands supported.
Type command and then press tab to view the list of argument(s) supported or required. For example after typing ping press tab, it shows what all parameters are required or allowed
Type command and then press question mark to view the list of argument(s) supported with its description. For example after typing ping press question mark, it shows what all parameters are required or allowed with description
Type Exit to return to the Main menu
Note Refer to Annexure A for the detailed help on various commands supported.
Cyberoam Console Guide
19
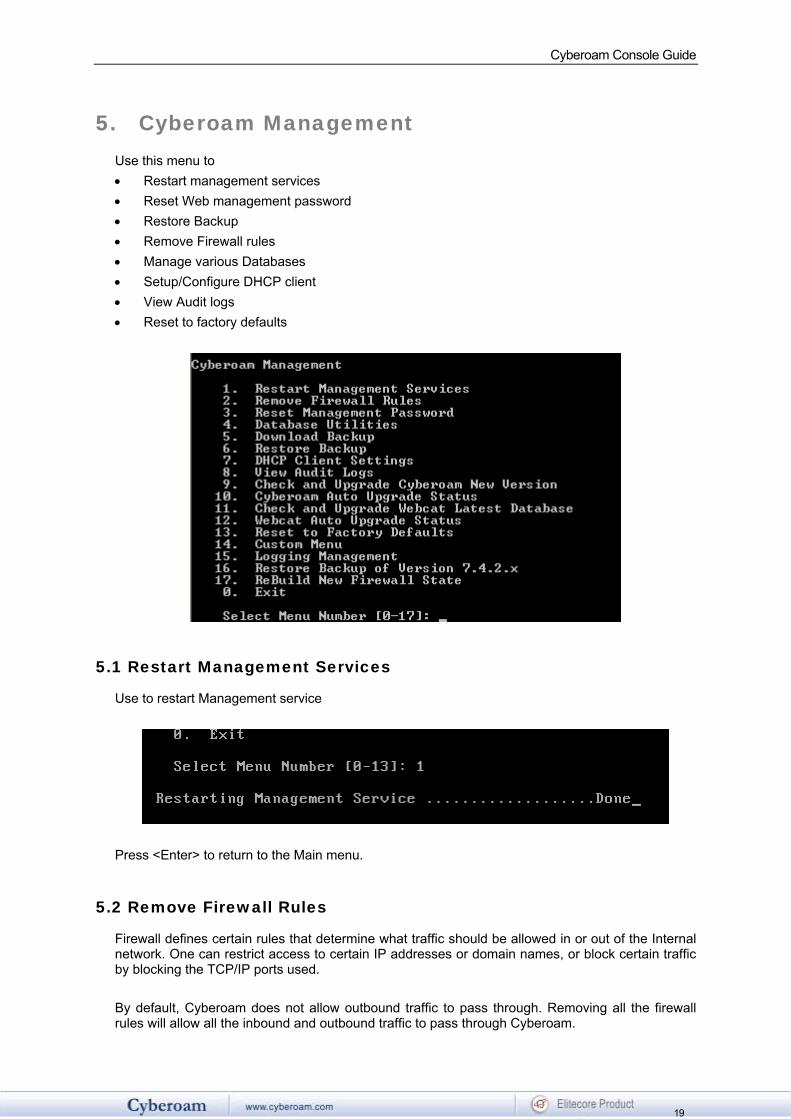
5. Cyberoam Management Use this menu to • Restart management services • Reset Web management password • Restore Backup • Remove Firewall rules • Manage various Databases • Setup/Configure DHCP client • View Audit logs • Reset to factory defaults
5.1 Restart Management Services
Use to restart Management service
Press <Enter> to return to the Main menu.
5.2 Remove Firewall Rules
Firewall defines certain rules that determine what traffic should be allowed in or out of the Internal network. One can restrict access to certain IP addresses or domain names, or block certain traffic by blocking the TCP/IP ports used. By default, Cyberoam does not allow outbound traffic to pass through. Removing all the firewall rules will allow all the inbound and outbound traffic to pass through Cyberoam.
Cyberoam Console Guide
20
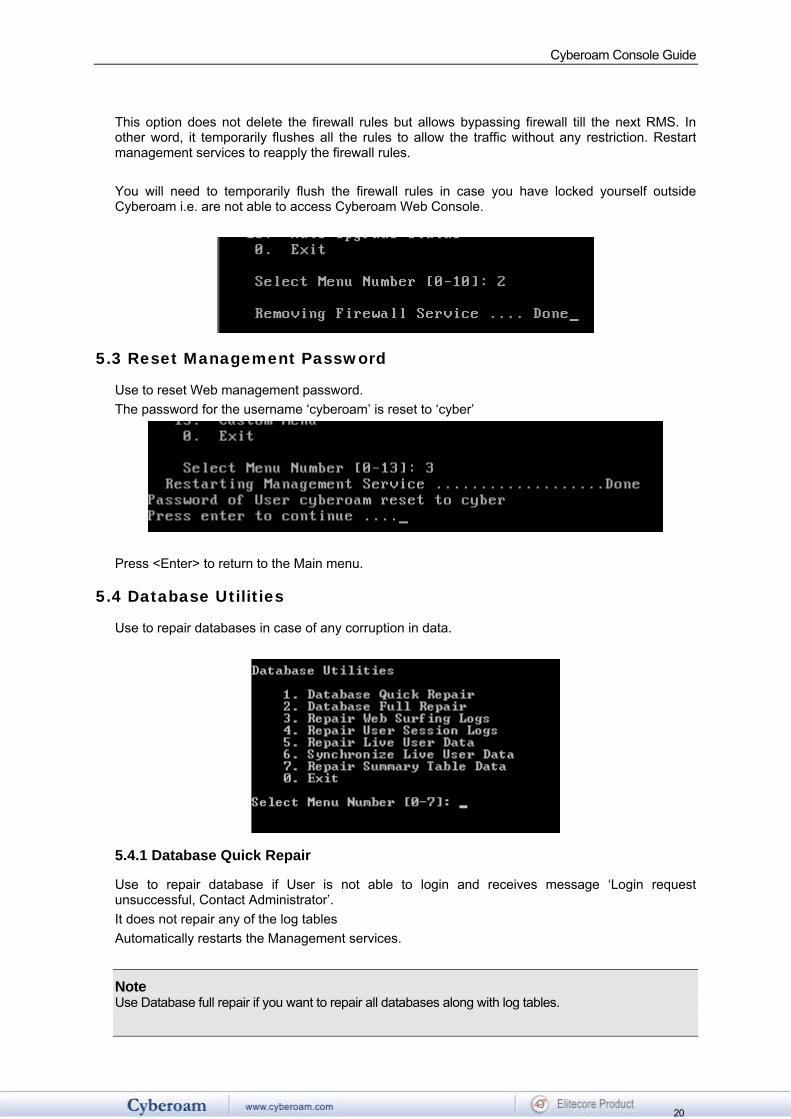
This option does not delete the firewall rules but allows bypassing firewall till the next RMS. In other word, it temporarily flushes all the rules to allow the traffic without any restriction. Restart management services to reapply the firewall rules. You will need to temporarily flush the firewall rules in case you have locked yourself outside Cyberoam i.e. are not able to access Cyberoam Web Console.
5.3 Reset Management Password
Use to reset Web management password. The password for the username ‘cyberoam’ is reset to ‘cyber’
Press <Enter> to return to the Main menu.
5.4 Database Utilities
Use to repair databases in case of any corruption in data.
5.4.1 Database Quick Repair
Use to repair database if User is not able to login and receives message ‘Login request unsuccessful, Contact Administrator’. It does not repair any of the log tables Automatically restarts the Management services.
Note Use Database full repair if you want to repair all databases along with log tables.

Cyberoam Console Guide
21
To repair only the log tables, use the respective repair log options
5.4.2 Database Full Repair
Use this repair if any inconsistency found in any of the log data tables or user database. Automatically restarts the Management services. Use this option rarely as the time taken to repair the full database is directly proportional to the size of log tables. Use the full repair option if the system was shut down abnormally and is giving some unexpected results. Database quick repair is a more preferred option.
5.4.3 Repair Web Surfing logs
Use to repair Web surfing log tables if any inconsistency found in the log data tables. Web surfing log stores the information of all the websites visited by all the users.
5.4.4 Repair User Session logs
Use to repair User Session log tables. Use this option when user accounting reports are not coming or are mismatched. Also, use this option if there is some problem in user logout. This might be because the user accounting record is not being put into the user session table. Every time the user logs in, session is created. User session log stores the session entries of all the users and specifies the login and logout time.
5.4.5 Repair Live User Data
Use to repair Live User data table if user login/logout is being affected. This table stores the current/live user data
5.4.6 Synchronize Live User Data
Use this option if a certain user is not able to logon into Cyberoam. This happens if the user has not logged out cleanly from his last Cyberoam session due to network errors. This option synchronizes the current/live user data with the current scenario.
5.4.7 Repair Summary table Data
Use this option if you are not getting web surfing or internet usage reports. This option repairs the summary tables.
5.4.0 Exit
Type ‘0’ to exit from the Database Utilities Menu and return to Cyberoam Management Menu
Cyberoam Console Guide
22
5.5 Download Backup
Use to download backup taken
5.6 Restore Backup
Use to restore backup taken from Web Interface
5.7 DHCP Client Settings
Use to enable DHCP for a particular interface. The configured interface will obtain an IP address automatically from a DHCP server running on the network connected to that interface.
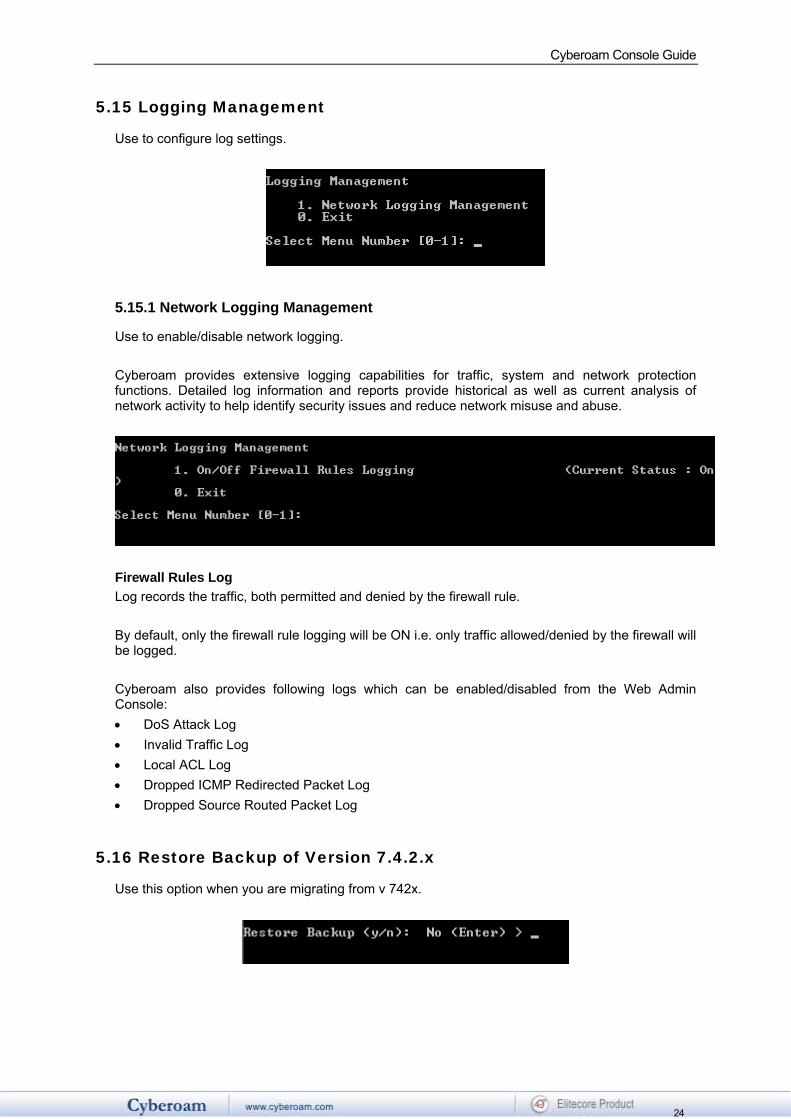
5.8 View Audit Logs
Use to view Audit log This log stores the details of all the actions performed the User administrating Cyberoam. Displays operation performed, IP address of the User and result of the operation
5.9 Check and Upgrade New version
Use to check and upgrade to new version

Cyberoam Console Guide
23
5.10 Auto Upgrade status
Use to check the auto upgrade status.
5.11 Check and Update Webcat Latest Database
Use to check and upgrade latest webcat database
5.12 Webcat Auto Upgrade Status
Use to check the auto upgrade status
5.13 Reset to Factory Defaults
This option resets all the customized configurations to their original state and un-registers Cyberoam. All customization done after the initial installation will be deleted including network configuration, HTTP proxy cache, passwords, groups, users and policies.
5.14 Custom Menu
Any customized menu option provided especially for the client.
Cyberoam Console Guide
24
5.15 Logging Management
Use to configure log settings.
5.15.1 Network Logging Management
Use to enable/disable network logging. Cyberoam provides extensive logging capabilities for traffic, system and network protection functions. Detailed log information and reports provide historical as well as current analysis of network activity to help identify security issues and reduce network misuse and abuse.
Firewall Rules Log Log records the traffic, both permitted and denied by the firewall rule. By default, only the firewall rule logging will be ON i.e. only traffic allowed/denied by the firewall will be logged. Cyberoam also provides following logs which can be enabled/disabled from the Web Admin Console: • DoS Attack Log • Invalid Traffic Log • Local ACL Log • Dropped ICMP Redirected Packet Log • Dropped Source Routed Packet Log
5.16 Restore Backup of Version 7.4.2.x
Use this option when you are migrating from v 742x.

Cyberoam Console Guide
25
5.17 ReBuild New Firewall State
This option will re-apply all the firewall rules one-by-one instead of just restoring the previous state. Take note that this operation would take time to execute as each firewall rule re-applied. Use this option only when firewall state has to be rebuilt in case of unexpected behavior.
5.0 Exit
Type ‘0’ to exit from Cyberoam Management menu and return to Main menu

Cyberoam Console Guide
26
6. Upgrade version Use to upgrade Cyberoam version Before using this option, please check upgrade file is uploaded properly.
You can upgrade from CD-ROM or if you have uploaded the upgraded version. Follow the on-screen instructions to upgrade the version. Some of the common errors:
Error message: “Upgrade File not found. Please upload version File Properly” Reason/Solution: This error may occur if the upgrade file is not uploaded from Cyberoam Web Console. Go to Cyberoam Web Console and upload the file again
Error message: “System requires Restart of Cyberoam, Please reboot System before doing
upgrade” Reason/Solution: This error may occur if system is in inconsistent state, reboot the system from Cyberoam Telnet Console and try again. If still not able to upgrade contact Cyberoam Support
Error message/Solution: “Could not extract upgrade file, Please upload upgrade file properly” Reason/Solution: This error may occur if upgrade file is corrupted, download Upgrade file again and repeat the above steps to upgrade
Error message: “Could not find upgrade file, Please upload upgrade file properly” Reason/Solution: This error may occur if upgrade file is corrupted, download Upgrade file again and repeat the above steps to upgrade
Error message: “Cyberoam already Upgraded to Version” Reason/Solution: This error may occur if you try to upgrade to the same version that is running currently
Error message: “Cyberoam can not be upgraded from Current Version to Newer Version” Reason/Solution: This error may occur if you are trying to upgrade the version, which is lower than the current version i.e. from Version 5.0.6.2 to Version 5.0.6.0 or from Version 5.0.6.2 to Version 4.0.0
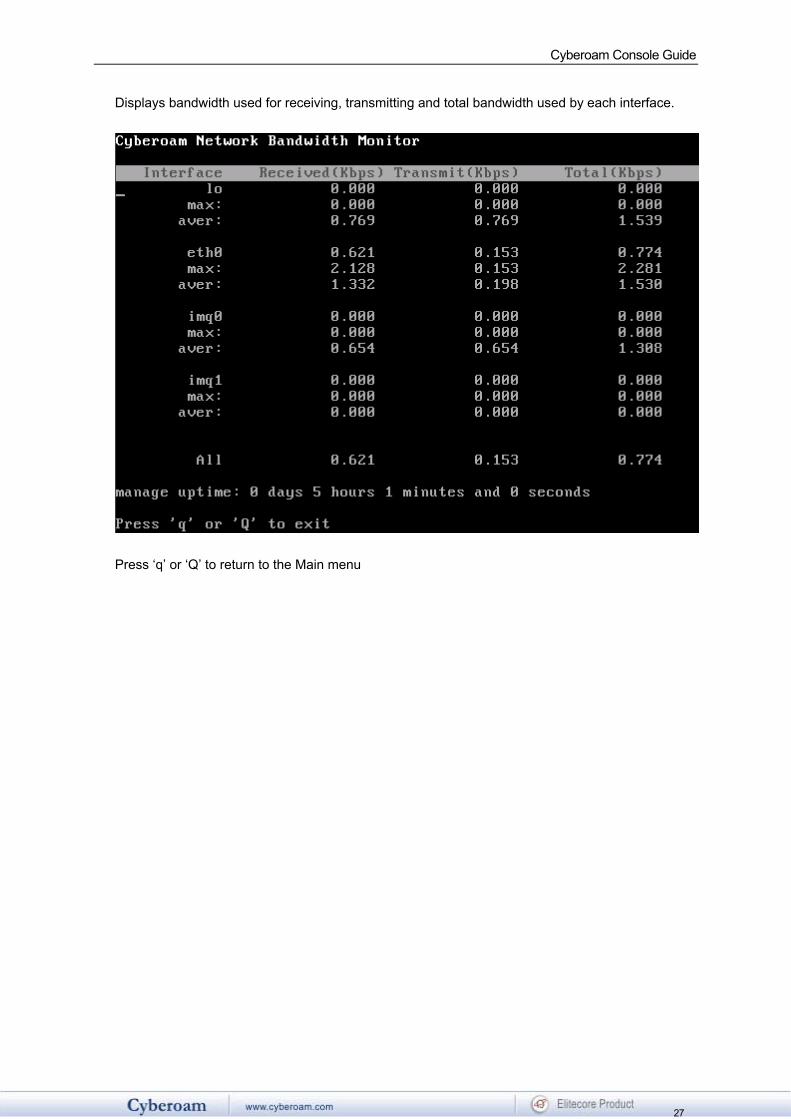
7. Bandwidth Monitor Use to monitor the bandwidth used by each Interface.
Cyberoam Console Guide
27
Displays bandwidth used for receiving, transmitting and total bandwidth used by each interface.
Press ‘q’ or ‘Q’ to return to the Main menu

Cyberoam Console Guide
28
8. VPN Management VPN Management is an add-on module which needs to be registered before use.
8.1 Regenerate RSA Key
Use to regenerates the local public key used for authenticating users. Public key authentication uses two keys – public key available to anyone and a private key held by only one individual. The sender encrypts the data with the recipient’s public key. Only the recipient can decrypt the data, being the only one who possesses the corresponding private key. RSA key is used for authenticating user, when authentication type is defined as ‘Public key’ for Net to Net connection. Connection type and Authentication type are defined from Web based Administration Console. Public key available to all is termed as Local Public/RSA key while private key known to only one individual is termed as Remote Public key. Longer the key life, larger the risk as it becomes easier to intercept the ciphered text, hence it is better to regenerate the RSA key after certain time interval.
Once the key is generated it is to be send to all the users.
8.2 Restart VPN service
Use to restart VPN Service

Cyberoam Console Guide
29
8.3 View VPN Logs
Use to view VPN logs for troubleshooting
8.3 View Connection wise VPN Logs
Use to view VPN logs for troubleshooting
8.4 View Connection wise VPN Logs
Use to view VPN logs. Specify the connection name to view specific connection log or press <Enter> to view logs of all the connections.

Cyberoam Console Guide
30
8.5 Advance VPN Logs
Use to view date wise connection VPN logs. Specify date and connection name to view specific connection’s date wise log.
8.6 PPTP VPN Logs
Use to view date wise connection VPN logs. Specify date and connection name to view specific connection’s date wise log.

Cyberoam Console Guide
31
8.0 Exit
Type ‘0’ to exit from VPN menu and return to the Main menu

Cyberoam Console Guide
32
9. Shutdown/Reboot Cyberoam Use to shutdown or reboot Cyberoam server.
0. Exit Type ‘0’ to exit from Cyberoam Console Management

Cyberoam Console Guide
33
Annexure A arp Used for debugging purposes, to get a complete dump of the ARP cache Syntax arp [ping] [show] Parameter list & description ping Sends ICMP ECHO_REQUEST packets to network hosts. Refer to Ping command
for details. Show Show / manipulate arp cache. Refer to Show command for details. cacheclient Client to query cache server using URL as argument Syntax cacheclient <string> clear Clears the screen Syntax clear cyberoam Cyberoam Management Syntax cyberoam [autoupgrade] [bandwidth] [check_disk] [cpu_burn_test] [dialup-menu] [dns-menu]
[repair_disk] [restart] [shutdown] [system_monitor] [view] Parameter list & description autoupgrade [show | on | off]
Cyberoam Console Guide
34
show Displays current status of Autoupgrade mode on Enables autoupgrade mode. Cyberoam will be automatically upgarded incase
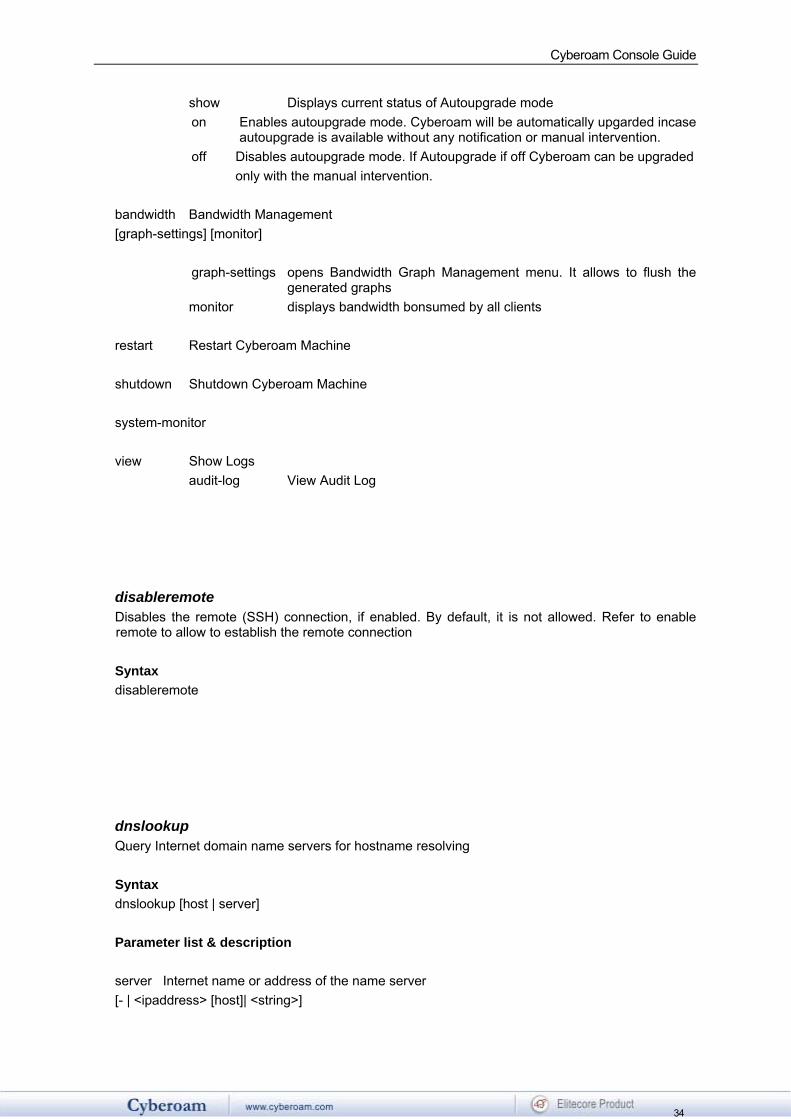
autoupgrade is available without any notification or manual intervention. off Disables autoupgrade mode. If Autoupgrade if off Cyberoam can be upgraded only with the manual intervention. bandwidth Bandwidth Management [graph-settings] [monitor] graph-settings opens Bandwidth Graph Management menu. It allows to flush the
generated graphs monitor displays bandwidth bonsumed by all clients restart Restart Cyberoam Machine shutdown Shutdown Cyberoam Machine system-monitor view Show Logs audit-log View Audit Log disableremote Disables the remote (SSH) connection, if enabled. By default, it is not allowed. Refer to enable remote to allow to establish the remote connection Syntax disableremote dnslookup Query Internet domain name servers for hostname resolving Syntax dnslookup [host | server] Parameter list & description server Internet name or address of the name server [- | <ipaddress> [host]| <string>]
Cyberoam Console Guide
35
host Host to find [<ipaddress> [dot_notation_address | queryclass <string> | querytype <string> | time <number>]|
<string> | [queryclass <string> | time <number>]] enableremote Allows to connect to the Cyberoam remotely i.e. allows to establish remote (SSH) connection. By default remote connection is not allowed Syntax enableremote [port <number> | serverip <ipaddress>] Parameter list & description port Port through which the remote SSH connection can be established serverip IP address of the Cyberoam to which the remote connection can be established ip IP Utility from iproute2 package Syntax ip [ -family | addr | dnet | inet | inet6 | ipx | link | maddr | monitor | mroute | neigh | no_protocol |
route | rule | tunnel ] Parameter list & description -family Protocol family identifier: inet, inet6, ipx, dnet or link [ dnet | inet | inet6 | ipx | no_protocol ]
Specifies the address family which affects interpretation of the remaining parameters. Since an interface can receive transmissions in differing protocols with different naming schemes, specifying the address family is recommended.
addr Protocol Address Management [add | del | flush | show] add Add a new Protocol address [ <ipaddress> | dev | peer ] del Delete a Protocol address [ <ipaddress> | dev | peer ] dev Device name
Cyberoam Console Guide
36
[ eth0 | lo ] peer For PointToPoint Interfaces [<ipaddress> | anycast | broadcast | dev | label | scope] anycast - Destinations are anycast addresses [<ipaddress> | broadcast | dev | label | scope] broadcast Broadcast address on the interface [<ipaddress> | anycast | dev | label | scope] scope The scope of the area where this address is valid [<number> | anycast | broadcast | dev | global | host | label | link] label Each address may be tagged with a label string [<string> | anycast | broadcast | dev | scope] global [anycast | broadcast | dev | label] host [anycast | broadcast | dev | label] link [anycast | broadcast | dev | label] flush Flush Protocol addresses
[deprecated | dev | dynamic | label | permanent | primary | scope | secondary | tentative | to ]
show Display Protocol addresses
[deprecated | dev | dynamic | label | permanent | primary | scope | secondary | tentative | to]
deprecated (IPv6 only) list deprecated addresses [dev | label | scope | to] dev Device name [ eth0 | lo ]
dynamic List addresses installed due to stateless address configuration
[dev | label | scope | to] label Each address may be tagged with a label string
[<string> | deprecated | dev | dynamic | permanent | primary | scope | secondary | tentative | to ]

Cyberoam Console Guide
37
permanent Permanent addresses only [dev | label | scope | to] primary Primary addresses only [dev | label | scope | to] scope Scope of the area where this address is valid
[<number> | deprecated | dev | dynamic | global | host | label | | link | permanent | primary | secondary | tentative | to ]
secondary Secondary addresses only [dev | label | scope | to]
tentative (IPv6 only) Addresses which did not pass duplicate address detection
[dev | label | scope | to] to List addresses matching this prefix
[<string> | deprecated | dev | dynamic | label | permanent | primary | secondary | tentative]
global
[deprecated | dev | dynamic | label | permanent | primary | secondary | tentative | to]
host
[deprecated | dev | dynamic | label | permanent | primary | secondary | tentative | to]
link
[deprecated | dev | dynamic | label | permanent | primary | secondary | tentative | to]
dnet [addr | link | maddr | monitor | mroute | neigh | route | rule | tunnel] inet [addr | link | maddr | monitor | mroute | neigh | route | rule | tunnel] inet6 [addr | link | maddr | monitor | mroute | neigh | route | rule | tunnel] ipx [addr | link | maddr | monitor | mroute | neigh | route | rule | tunnel] link Network Device Configuration [set | show [eth0 | lo]] set
Cyberoam Console Guide
38
[eth0 | lo] [address | allmulti | arp | broadcast | down | dynamic | mtu | multicat | name | promisc | txqueuelen | up]
address Change the Station address of the Interface [<string>] allmulti Device receives all Multicast Packets on the link [off | on] arp Change the NOARP flag on the Device. [off | on] broadcast Change the link layer Broadcast Address. [<string>] down Change the State of Device to DOWN
dynamic Flag indicating that Interface is dynamically created/destroyed
[off | on] mtu Change the MTU of the Device. [<number>] name Change the Name of the Device [<text>]
multicast Flag indicating that the Interface is aware of Multicasting [off | on]
promisc Device listens to and feeds to the kernel all traffic on the link [off | on] txqueuelen Transmit Queue Length [<number>] up Change the State of Device to UP maddr Link Layer Multicast Address Management [add | del | show] add Add a Multicast Address [<string> | dev] del Delete a Multicast Address [<string> | dev] dev Device to join/leave this Multicast Address [eth0 | lo]
Cyberoam Console Guide
39
show List Multicast Addresses [dev] monitor State Monitoring [<string> | all] mroute Multicast Routing Cache Management [show [from <string>| interface [eth0 | lo]| to <string>]] no_protocol [addr | link | maddr | monitor | mroute | neigh | route | rule | tunnel] neigh Neighbour/Arp Tables Management [add | change | del | flush | replace | show] add Add a new Neighbour entry [<ipaddress> [dev | lladdr | nud] | proxy [dev]] lladdr lladdr Link Layer Address of neighbour [<text> | dev | nud] nud Neighbour Unreachability Detection [noarp | permanent | reachable | stale] [dev | lladdr] change Change an Existing entry [<ipaddress> [dev | lladdr | nud] | proxy [dev]] del Delete a Neighbour entry [<ipaddress> [dev | lladdr | nud] | proxy [dev]] flush Flush Neighbour Entries [dev | nud | to <text>] replace Add a new entry or Change an existing one [<ipaddress> [dev | lladdr | nud] | proxy [dev]] show List Neighbour Entries [dev | nud | to <text>] route Routing Table Management [add | append | change | del | flush | get | list | replace] add Add a new route
[<string> | blackhole | broadcast | local | multicast | nat | prohibit | throw | unicast | unreachable]
append Adds route to the end of list

Cyberoam Console Guide
40
[<string> | blackhole | broadcast | local | multicast | nat | prohibit | throw | unicast | unreachable]
change Change a route
[<string> | blackhole | broadcast | local | multicast | nat | prohibit | throw | unicast | unreachable]
del Delete a route
[<string> | blackhole | broadcast | local | multicast | nat | prohibit | throw | unicast | unreachable]
flush Flush routing tables [exact <string> | match <string> | proto | root | scope | table | type] exact [<string> | match <string> | proto | root | scope | table | type] match [<string> | exact | proto | root | scope | table | type] proto
[<number> | boot | exact | kernel | match | root | scope | static | table | type]
boot [exact <string> | match <string> | root | scope | table | type] kernal [exact <string> | match <string> | root | scope | table | type] static [exact <string> | match <string> | root | scope | table | type] root [<string> | exact | match | proto | scope | table | type] scope
[<number> | exact | global | host | link | match | proto | root | table | type]
global [exact | match | proto | root | table | type] host [exact | match | proto | root | table | type] link [exact | match | proto | root | table | type] table

Cyberoam Console Guide
41
[<number> | all | default | exact | local | main | match | protoc | root | scope | type]
type
[blackhole | broadcast | exact | local | match | multicast | nat | prohibit | proto | root | scope | table | throw | unicast | unreachable]
get Get a single route [<ipaddress> | from | output_iface | tos] from from
[<ipaddress> | input_iface [eth0 | lo] | output_iface [eth0 | lo]| tos <number>]
output_iface [eth0 | lo | from | tos] tos [<number> | from | output_iface] list List routes
[<string> | blackhole | broadcast | local | multicast | nat | prohibit | throw | unicast | unreachable]
replace Replace
[<string> | blackhole | broadcast | local | multicast | nat | prohibit | throw | unicast | unreachable]
blackhole Unreachable destinations [<string> | advmss | cwnd | dev | equalize | metric | mtu | nexthop | onlink | pervasive |
proto | realms | rtt | rttvar | scope | ssthresh | table | tos | via | weight | window] broadcast Destinations are broacast addresses [<string> | advmss | cwnd | dev | equalize | metric | mtu | nexthop | onlink | pervasive |
realms | rtt | rttvar | scope | ssthresh | table | tos | via | weight | window] local Destinations are assigned to this host [<string> | advmss | cwnd | dev | equalize | metric | mtu | nexthop | onlink | pervasive |
realms | rtt | rttvar | scope | ssthresh | table | tos | via | weight | window] multicast Used for mutlicasting routing [<string> | advmss | cwnd | dev | equalize | metric | mtu | nexthop | onlink | pervasive |
realms | rtt | rttvar | scope | ssthresh | table | tos | via | weight | window] nat NAT route [<string> | advmss | cwnd | dev | equalize | metric | mtu | nexthop | onlink | pervasive |
realms | rtt | rttvar | scope | ssthresh | table | tos | via | weight | window] prohibit Unreachable destinations [<string> | advmss | cwnd | dev | equalize | metric | mtu | nexthop | onlink | pervasive |
realms | rtt | rttvar | scope | ssthresh | table | tos | via | weight | window]

Cyberoam Console Guide
42
throw Route used with policy rules [<string> | advmss | cwnd | dev | equalize | metric | mtu | nexthop | onlink | pervasive |
realms | rtt | rttvar | scope | ssthresh | table | tos | via | weight | window] unicast Route entry describes real paths to the destinations [<string> | advmss | cwnd | dev | equalize | metric | mtu | nexthop | onlink | pervasive |
realms | rtt | rttvar | scope | ssthresh | table | tos | via | weight | window] unreachable Unreachable destinations [<string> | advmss | cwnd | dev | equalize | metric | mtu | nexthop | onlink | pervasive |
realms | rtt | rttvar | scope | ssthresh | table | tos | via | weight | window] advmss Advertise Maximal Segment Size. [<number> | cwnd | equalize | mtu | nexthop | realms | rtt | rttvar | ssthresh | window] cwnd Clamp for congestion window. [<number> | advmss | equalize | mtu | nexthop | realms | rtt | rttvar | ssthresh |
window] dev The Output Device name. [etho | lo] [ advmss | cwnd | equalize | mtu | nexthop | online | pervasive| realms | rtt |
rttvar | ssthresh | via | weight | window] equalize Allow packet by packet randomization on multipath routes. [nexthop | dev | online | pervasive | via] metric Preference value of the Route [<number> | advmss | cwnd | dev | equalize | mtu | nexthop | onlink | pervasive | proto
| realms | rtt | rttvar | scope | ssthresh | table | tos | via | weight | window] mtu Maximal Transfer Unit [<number> | advmss | cwnd | equalize | nexthop | realms | rtt | rttvar | ssthresh |
window] nexthop The nexthop of a multipath route [dev | onlink | pervasive | via | weigth] onlink Pretend that nexthop is directly attached to this link. [<number> | advmss | cwnd | equalize | nexthop | realms | rtt | rttvar | ssthresh |
window] pervasive Pervasive hop [advmss | cwnd | equalize | mtu | nexthop | realms | rtt | rttvar | ssthresh | window] realms Route with this realm [<string> | advmss | cwnd | equalize | mtu | nexthop | rtt | rttvar | ssthresh | window] rtt Round Trip Time

Cyberoam Console Guide
43
[<number> | advmss | cwnd | equalize | mtu | nexthop | realms | rttvar | ssthresh | window]
rttvar Initial RTT variance estimate [<number> | advmss | cwnd | equalize | mtu | nexthop | realms | rtt | ssthresh |
window] ssthresh Estimate for the initial slow start threshold. [<tesx> | advmss | cwnd | equalize | mtu | nexthop | realms | rtt | rttvar | window] via Address of the nexthop router. [<ipaddress> | advmss | cwnd | dev | equalize | mtu | nexthop | onlink | pervasive |
realms | rtt | rttvar | ssthresh | weight | window] weight Weight for this element of a multipath route reflecting its quality. [<number> | advmss | cwnd | dev | equalize | mtu | nexthop | onlink | pervasive |
realms | rtt | rttvar | ssthresh | weight | window] window Maximal window for TCP to advertise [<number> | advmss | cwnd | equalize | mtu | nexthop | realms | rtt | rttvar | ssthresh]
rule Routing policy database management [add | del | dev | from | fwmark | list | nat | pref | prohibit | realms | reject | table | to | tos | unreacheable] add Insert new rule
[dev | from | fwmark | nat | pref | prohibit | realms | reject | table | to | tos | unreacheable]
del Delete rule
[dev | from | fwmark | nat | pref | prohibit | realms | reject | table | to | tos | unreacheable]
dev Network device
[eth0 | lo] [from | fwmark | nat | pref | prohibit | realms | reject | table | to | tos | unreacheable]
from Source prefix
[<string>] [dev | fwmark | nat | pref | prohibit | realms | reject | table | to | tos | unreacheable]
fwmark fwmark value
[<string>] [dev | from | nat | pref | prohibit | realms | reject | table | to | tos | unreacheable]
list List rules
[dev | from | fwmark | nat | pref | prohibit | realms | reject | table | to | tos | unreacheable]

Cyberoam Console Guide
44
nat Base of the IP address block to translate [<ipaddress>] [prohibit | realms | reject | table | unreacheable] pref Rule priority
[<number>] [dev | from | fwmark | nat | pref | prohibit | realms | reject | table | to | tos | unreacheable]
prohibit Prohibit Communication administratively [nat | realms | table] realms Select realm(s) [<text>] [nat | prohibit | reject | table | unreacheable] reject Bad Path [nat | realms | table] table Rules for this table [<number>] [default | local | main | nat | prohibit | realms | reject | unreacheable] to Destination prefix
[<string>] [dev | from | fwmark | nat | pref | prohibit | realms | reject | table | tos | unreacheable]
tos TOS value
[<number>] [dev | from | fwmark | nat | pref | prohibit | realms | reject | table | to | tos | unreacheable]
tunnel (IP tunnel devices only.) Configure the physical source and destination address for IP
tunnel interfaces [add | change | del | show] add Add a new tunnel
[<interface> | csum | dev | icsum | ikey | iseq | key | local | mode | nopmtudisc | ocsum | okey | oseq | pmtudisc | remote | seq | tos | ttl]
change Change existing tunnel
[<interface> | csum | dev | icsum | ikey | iseq | key | local | mode | nopmtudisc | ocsum | okey | oseq | pmtudisc | remote | seq | tos | ttl]
del Delete a tunnel
[<interface> | csum | dev | icsum | ikey | iseq | key | local | mode | nopmtudisc | ocsum | okey | oseq | pmtudisc | remote | seq | tos | ttl]
show List tunnels
[<interface> | csum | dev | icsum | ikey | iseq | key | local | mode | nopmtudisc | ocsum | okey | oseq | pmtudisc | remote | seq | tos | ttl]
csum (only GRE tunnels) generate/require checksums for tunneled
packets [<interface> | dev | ikey | iseq | key | local | mode | nopmtudisc | okey
| oseq | pmtudisc | remote | seq | tos | ttl]

Cyberoam Console Guide
45
dev Network device
[eth0 | lo ] [<interface> | csum | icsum | ikey | iseq | key | local | mode | nopmtudisc | ocsum | okey | oseq | pmtudisc | remote | seq | tos | ttl]
icsum Generate/require checksums for tunneled packets
[<interface> | dev | ikey | iseq | key | local | mode | nopmtudisc | okey | oseq | pmtudisc | remote | seq | tos | ttl]
ikey Use keyed GRE with this Input key
[<ipaddress> | <number> ] [<interface> | csum | dev | icsum | iseq | local | mode | nopmtudisc | ocsum | oseq | pmtudisc | remote | seq | tos | ttl]
iseq Flag enables sequencing of incoming packets
[<interface> | csum | dev | icsum | ikey | key | local | mode | nopmtudisc | ocsum | okey | pmtudisc | remote | tos | ttl]
key (only GRE tunnels) use keyed GRE with key K
[<ipaddress> | <number> ] [<interface> | csum | dev | icsum | iseq | local | mode | nopmtudisc | ocsum | oseq | pmtudisc | remote | seq | tos | ttl]
local Set the fixed local address for tunneled packets
[<ipaddress>] [<interface> | csum | dev | icsum | ikey | iseq | key | mode | nopmtudisc | ocsum | okey | oseq | pmtudisc | remote | seq | tos | ttl]
mode Set the tunnel mode
[gre | ipip | sit] [<interface> | csum | dev | icsum | ikey | iseq | key | local | nopmtudisc | ocsum | okey | oseq | pmtudisc | remote | seq | tos | ttl]
nopmtudisc Disable Path MTU Discovery on this tunnel
[<interface> | csum | dev | icsum | ikey | iseq | key | local | mode | ocsum | okey | oseq | remote | seq | tos | ttl]
ocsum Generate/require checksums for tunneled packets
[<interface> | dev | ikey | iseq | key | local | mode | nopmtudisc | okey | oseq | pmtudisc | remote | seq | tos | ttl]
okey Use keyed GRE with this output key
[<ipaddress> <number>] [<interface> | csum | dev | icsum | iseq | local | mode | nopmtudisc | ocsum | oseq | pmtudisc | remote | seq | tos | ttl]
oseq Flag enables sequencing of outgoing packets
[<interface> | csum | dev | icsum | ikey | key | local | mode | nopmtudisc | ocsum | okey | pmtudisc | remote | tos | ttl]
pmtudisc Enable Path MTU Discovery on this tunnel

Cyberoam Console Guide
46
[<interface> | csum | dev | icsum | ikey | iseq | key | local | mode | ocsum | okey | oseq | remote | seq | tos | ttl]
remote Set the remote endpoint of the tunnel
[<ipaddress>] [<interface> | csum | dev | icsum | ikey | iseq | key | local | mode | nopmtudisc | ocsum | okey | oseq | pmtudisc | seq | tos | ttl]
seq Flag is equivalent to the combination `iseq oseq'
[<interface> | csum | dev | icsum | ikey | key | local | mode | nopmtudisc | ocsum | okey | pmtudisc | remote | tos | ttl]
tos Type of Service
[<number>] [<interface> | csum | dev | icsum | ikey | iseq | key | local | mode | nopmtudisc | ocsum | okey | oseq | pmtudisc | remote | seq | ttl]
ttl Time to Live
[<number>] [<interface> | csum | dev | icsum | ikey | iseq | key | local | mode | nopmtudisc | ocsum | okey | oseq | pmtudisc | remote | seq | tos | ttl]
message Send Message to all the users Syntax Message all-users <text> ping Sends ICMP ECHO_REQUEST packets to network hosts Syntax ping [count | duplicate | interface | silent | source | timeout] Parameter list & description count Amount of times to send the ping request [ <number> | duplicate | interface | silent | source | timeout] duplicate duplicate address detection mode [interface | silent | source | timeout] interface outgoing interface address to use for multicast packets
Cyberoam Console Guide
47
[eth0 | lo <ipaddress>] silent does not print any message(s) [duplicate | interface | source | timeout] source source address [count | duplicate | interface | silent | timeout] timeout stop after this time [ <number> | count | duplicate | interface | silent | source] route Use to view / manipulate the IP routing table. Route manipulates the kernel’s IP routing tables. Its
primary use is to set up static routes to specific hosts or networks via an interface. When the add or del options are used, route modifies the routing tables. Without these options,
route displays the current contents of the routing tables Syntax route [add | del | show] Parameter list & description add add a new route [<ipaddress> | default | host | mss | net | window] del delete route [<ipaddress> | default | host | mss | net] show displays the routing table in the following format Output Destination The destination network or destination host Gateway The gateway address or '*' if none set Genmask The netmask for the destination net; '255.255.255.255' for a host destination and
'0.0.0.0' for the default route Flags Possible flags include U (route is up) H (target is a host)

Cyberoam Console Guide
48
G (use gateway) R (reinstate route for dynamic routing) D (dynamically installed by daemon or redirect) M (modified from routing daemon or redirect) A (installed by addrconf) C (cache entry) ! (reject route) Metric The ‘distance’ to the target (usually counted in hops). It is not used by recent kernels,
but may be needed by routing daemons. Ref Number of references to this route. (Not used in the Linux kernel.) Use Count of lookups for the route. Depending on the use of -F and -C this will be either
route cache misses (-F) or hits (-C). Iface Interface to which packets for this route will be sent set Set entities Syntax set [ advanced-firewall | arp-flux | bandwidth | cache | date ] Parameter list & description advanced-firewall Displays current advanced firewall setting [ftpbounce-prevention | strict-policy | tcp_est_idle_timeout]
ftpbounce-prevention [control | data]
control Prevent ftp-bounce attack on FTP control connection data Prevent ftp-bounce attack on FTP data connection
strict-policy [on | off ]
on Applies strict firewall policy. It drops UDP Dst Port 0, TCP Src Port 0 and/or Dst Port 0, Land Attack, Winnuke Attack, Data On TCP Sync, Zero IP Protocol, TTL Value 0 traffic
off Disbales strict firewall policy
tcp_est_idle_timeout Set Idle Timeout between 2700-432000 seconds for tcp connections in the established state
Cyberoam Console Guide
49
arp-flux ARP flux occurs when multiple ethernet adaptors often on a single machine respond to an ARP query. Due to this, problem with the link layer address to IP address mapping can occur. Cyberoam may respond to ARP requests from both Ethernet interfaces. On the machine creating the ARP request, these multiple answers can cause confusion. ARP flux affects only when Cyberoam has multiple physical connections to the same medium or broadcast domain.
on Cyberoam may respond to ARP requests from both Ethernet interfaces when
Cyberoam has multiple physical connections to the same medium or broadcast domain.
off Cyberoam responds to ARP requests from respective Ethernet interface
when Cyberoam has multiple physical connections to the same medium or broadcast domain.
bandwidth Bandwidth Settings [ graph ]
graph Opens the Bandwidth Graph Management menu and allows to flush the generated graphs
cache Set Cache Properties clean Removes all Cached files date Set Timezone, Date and Time show Shows various system modules information Syntax show [ access-log | advanced-firewall | antispam | antivirus | cache | date | login | mail | monitor |
network | pppoe connection | reboot | system | vpn ] Parameter list & description access-log View IP addresses of machines from where Cyberoam was (attempt-)accessed cache Show cache Information [ log [access | all | error] | space ] date System Time & Date login Show who is/was logged on
Cyberoam Console Guide
50
mail Information about mail subsystem [ livelog | log | queue] network Show network connections from system [ bandwidth | connections | interfaces [all] ] PPPoE Displays PPPoE connection status reboot Show system reboot history system Information about system hardware, resources, and softwares [ cpu | devices | disk | dma | filesystems | interrupts | iomem | ioports | logs | memory | messages | modules | partitions | pci | processes | statistics | uptime ]
cpu Displays cpu information like processor, vendor, model, model name, speed, cache size
devices Displays list of System Devices
disk Displays the records of disk space used. Also displays distribution of disk space, used and unused disk space by the various file systems on a volume.
dma Displays DMA information filesystems Displasy dilesystems supported by System interrupts Displays System Interrupts information iomem Displays I/O and Memory information ioports Displays I/O Ports information logs Displays PPPoE logs memory Display system memory status
messages Use to examine or control the kernel ring buffer. Helps to print bootup messages used for debug
modules Displays list of loaded modules partitions Displays Partition information pci Displays Peripherals information processes Displays Process Tree
statistics Displays reports about processes, memory, paging, block IO, traps, and cpu activity
Cyberoam Console Guide
51
uptime Tell how long the system has been running tcpdump tcpdump prints out the headers of packets on a network interface that match the boolean
expression. Only packets that match expression will be processed by tcpdump. Syntax tcpdump [<text> | count | hex | interface | llh | no_time | dump line | quite | verbose ] Parameter list & description <text> Packet filter expression [ count | hex | interface | llh | no_time | dump line | quite | verbose ]
selects which packets will be dumped. If no expression is given, all packets on the net will be dumped. Otherwise, only packets for which expression is `true' will be dumped.
The expression consists of one or more primitives. Primitives usually consist of an id
(name or number) proceeded by one or more qualifiers. count Exit after receiving count packets [<count> | <text> | hex | interface | llh | no_time | dump line | quite | verbose ] hex Print each packet (minus its link level header) in hex [<text> | count | interface | len <number>| llh | no_time | dump line | quite | verbose ] interface Listen on <interface> [[eth0 | lo] | <text> | <count> | hex | llh | no_time | promisc | quite | verbose ] promisc Do not put the interface into promiscuous mode [<count> | hex | interface | llh | no_time | quite | verbose ] llh Print the link-level header on each dump line [<text> | count | hex | interface | no_time | quite | verbose ] no_time Do not print a timestamp on each dump line [<text> | count | hex | interface | llh | quite | verbose ] quite Print less protocol information so output lines are shorter. [<text> | count | hex | interface | llh | no_time | verbose ] verbose Verbose output. For example, the time to live, identification, total
length and options in an IP packet are printed. Also enables
Cyberoam Console Guide
52
additional packet integrity checks such as verifying the IP and ICMP header checksum.
[<text> | count | hex | interface | llh | no_time | quite ] telnet Uses the telnet protocol to connect to another remote computer. Syntax telnet [<ipaddress> <port> | source | tos] Parameter list & description ipaddress official name, an alias, or the Internet address of a remote host port Indicates a port number (address of an application). If a number is not specified, the
default telnet port is used. source Use given IP address as source address [<ipaddress> <port> | tos] tos IP type-of-service option for the connection [<number> | <ipaddress> <port>| tos] traceroute Use to print the route packets take to network host
The Internet is a large and complex aggregation of network hardware, connected together by gateways. Tracking the route one's packets follow (or finding the miscreant gateway that is discarding your packets) can be difficult. Traceroute utilizes the IP protocol `time to live' field and attempts to elicit an ICMP TIME_EXCEEDED response from each gateway along the path to some host. Syntax traceroute [[<ipaddress> | <string> | size ] [base-port <port> | first-ttl | icmp | max-ttl | no-frag | probes | source | timeout | tos] Parameter list & description base Set the base UDP port number used in probes -default 33434 [ <port> | <ipaddress> | first-ttl | icmp | no-frag | probes | source | timeout | tos] first-ttl Set the initial time-to-live used in the first outgoing probe packet [<number>|<ipaddress> <string>|base-port|icmp | max-ttl | no-frag | probes | source | timeout | tos]
Cyberoam Console Guide
53
icmp Use ICMP ECHO instead of UDP datagrams [<ipaddress> <string> | base-port | first-ttl | max-ttl | no-frag | probes | source | timeout | tos] max-ttl Set the max time-to-live [<number> | <ipaddress> <string>| base-port|first-ttl| icmp | no-frag | probes | source | timeout | tos] no-frag Set the 'don't fragment' bit [<ipaddress> <string> | base-port | first-ttl | icmp | max-ttl | probes | source | timeout | tos] probes Probes are sent at each ttl -default 3 [<count> | <ipaddress> <string> | base-port| first-ttl | icmp | max-ttl | no-frag | source | timeout | tos] source Use given IP address as source address [<ipaddress> <string> | base-port | first-ttl | icmp | max-ttl | no-frag | probes | timeout | tos] timeout Set the timeout -in seconds for a response to a probe -default 5 [<count> | <ipaddress> <string> | base-port | first-ttl | icmp | max-ttl | no-frag | probes | source | tos] tos Set the type-of-service [<number> | <ipaddress> <string> | base-port | first-ttl | icmp | max-ttl | no-frag | probes | source | timeout]