content · © sontheim industrie elektronik gmbh page 4 of 16 07/2016 | installation instructions...
TRANSCRIPT


© Sontheim Industrie Elektronik GmbH Page 2 of 16
07/2016 | Installation instructions Version 1.2
Content Content ...................................................................................................................................................... 2
1. Preliminary note ................................................................................................................................ 3 1.1. Symbols used ............................................................................................................................... 3 1.2. Warning signs used...................................................................................................................... 3
2. Safety instructions ............................................................................................................................ 4 2.1. General ........................................................................................................................................ 4 2.2. Target group ................................................................................................................................. 4 2.3. Electrical connection .................................................................................................................... 4 2.4. Tampering with the device ........................................................................................................... 4
3. Functions and features ..................................................................................................................... 5 3.1. Features at a glance .................................................................................................................... 5 3.2. Application example ..................................................................................................................... 5
4. Installation ......................................................................................................................................... 6
5. Electrical connection ........................................................................................................................ 6 5.1. General electrical connection ....................................................................................................... 6 5.2. More cables .................................................................................................................................. 6
6. Display elements ............................................................................................................................... 6
7. Set-up ................................................................................................................................................. 7 7.1. General notes ............................................................................................................................... 7 7.2. Install CANUSBlight MT/-API driver ............................................................................................. 7 7.3. Function ..................................................................................................................................... 12
8. Technical data ................................................................................................................................. 13
9. Maintenance, repair and disposal ................................................................................................. 15 9.1. Maintenance ............................................................................................................................... 15 9.2. Cleaning the housing surface .................................................................................................... 15 9.3. Repair ......................................................................................................................................... 15 9.4. Disposal ..................................................................................................................................... 15
10. Approvals/standards ................................................................................................................... 15

© Sontheim Industrie Elektronik GmbH Page 3 of 16
07/2016 | Installation instructions Version 1.2
1. Preliminary note
This document applies to devices of the type „CANUSBlight“ (art. no. V93030x000)
This document is intended for specialists. These specialists are people who are qualified by their
appropriate training and their experience to see risks and to avoid possible hazards that may
be caused during operation or maintenance of the device. The document contains information
about the correct handling of the device.
Read this document before use to familiarize yourself with operating conditions, installation
and operation. Keep this document during the entire duration of use of the device.
Adhere to the safety instructions.
1.1. Symbols used
Instructions
Reaction, result
[…] Designation of pushbuttons, buttons or indications
Cross-reference
Important note Non-compliance can result in malfunction or interference Information
Information Supplementary note
1.2. Warning signs used
WARNING Warning of serious personal injury.
Death or serious irreversible injuries may result.
CAUTION Warning of personal injury. Slight reversible injuries may result.
NOTE Warning of damage to property.

© Sontheim Industrie Elektronik GmbH Page 4 of 16
07/2016 | Installation instructions Version 1.2
2. Safety instructions
2.1. General
These instructions contain texts and figures concerning the correct handling of the device and
must be read before installation or use. Observe the operating instructions. Non-observance
of the instructions, operation which is not in accordance with use as prescribed below, wrong
installation or incorrect handling can seriously affect the safety of operators and machinery.
2.2. Target group
These instructions are intended for authorized persons according to the EMC and low-voltage
directives. The device must only be installed, connected and put into operation by a qualified
electrician.
2.3. Electrical connection
The connections may only be supplied with the signals indicated in the technical data and/or on the device label.
2.4. Tampering with the device
In case of malfunctions or uncertainties please contact the manufacturer. Tampering with the
device can seriously affect the safety of operators and machinery. It is not permitted and leads
to the exclusion of any liability and warranty claims.

© Sontheim Industrie Elektronik GmbH Page 5 of 16
07/2016 | Installation instructions Version 1.2
3. Functions and features
CANUSB is a CAN interface for the connection of a CAN fieldbus system to a USB interface. The main applications for the device are to enable the user to do program downloads, online diagnostics and system performance monitoring from the user PC interface via the CAN network.
3.1. Features at a glance
Operating voltage via USB (5 V DC)
Interfaces electrically isolated
CAN baud rate freely selectable
11 and 29-bit identifiers
Can be used for example with CANexplorer, MDT or CLCM
3.2. Application example
CAN System CANUSBlight PC or Notebook

© Sontheim Industrie Elektronik GmbH Page 6 of 16
07/2016 | Installation instructions Version 1.2
4. Installation
The device is operated without installation.
5. Electrical connection
5.1. General electrical connection
Wiring 8 technical data The connection of the device to the CAN system is made over a
SubD9 plug compliant to CiA, CAN ISO 11898.
5.2. More cables
Information about available CAN cables at:
Phone: +498315759000 | mail: [email protected]
6. Display elements Status LED Operating states 8 technical data

© Sontheim Industrie Elektronik GmbH Page 7 of 16
07/2016 | Installation instructions Version 1.2
7. Set-up
7.1. General notes
The software required for set-up and use of the device is on the SiE-System-DVD. As an
alternative, the software is also available on the internet.
https://www.sontheim-industrie-elektronik.de/en/support/downloads/mt-api-drivers/
Adhere to the following sequence for the installation of the software.
1. Install the SiE MT-API driver. 2. Then connect the USB plug of the device to the PC or notebook
7.2. Install CANUSBlight MT/-API driver
It is necessary that the USB plug of the device is not connected to the PC or notebook when the CANUSBlight MT-API driver is installed. Make sure that you log in with administrator privileges Put the System CD into the computer drive The navigation window opens
Select API folder → All interfaces → Start Setup.exe The installation wizard opens A detailed Help File of the MT/-API is also included on the System-CD
© Sontheim Industrie Elektronik GmbH Page 8 of 16
07/2016 | Installation instructions Version 1.2
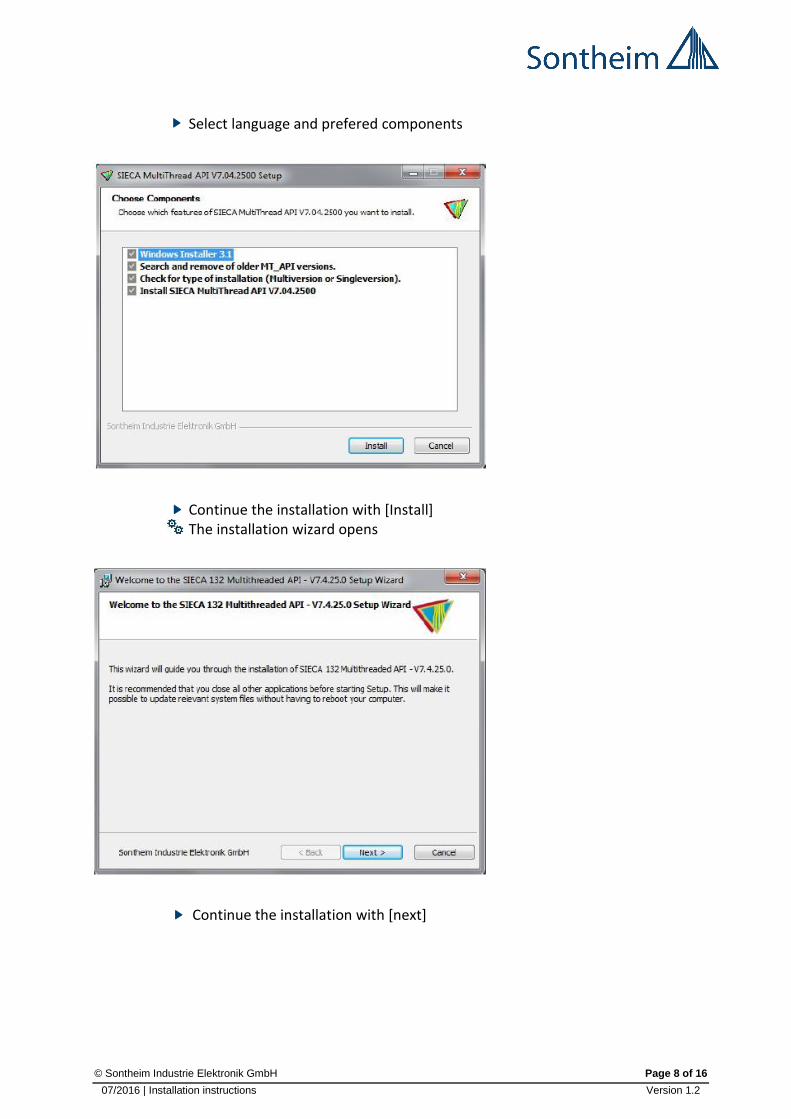
Select language and prefered components
Continue the installation with [Install] The installation wizard opens
Continue the installation with [next]

© Sontheim Industrie Elektronik GmbH Page 9 of 16
07/2016 | Installation instructions Version 1.2
Accept the license agreement and continue the installation with
[Next]
Select the components to install
Continue the installation with [Next]

© Sontheim Industrie Elektronik GmbH Page 10 of 16
07/2016 | Installation instructions Version 1.2
A system check will be executed and check all requirements for the
Installation
Old MT/ -API versions are replaced by newer versions!
Continue the installation with [install]
The SiE MT/-API will be installed
Continue the installation with [next]
© Sontheim Industrie Elektronik GmbH Page 11 of 16
07/2016 | Installation instructions Version 1.2
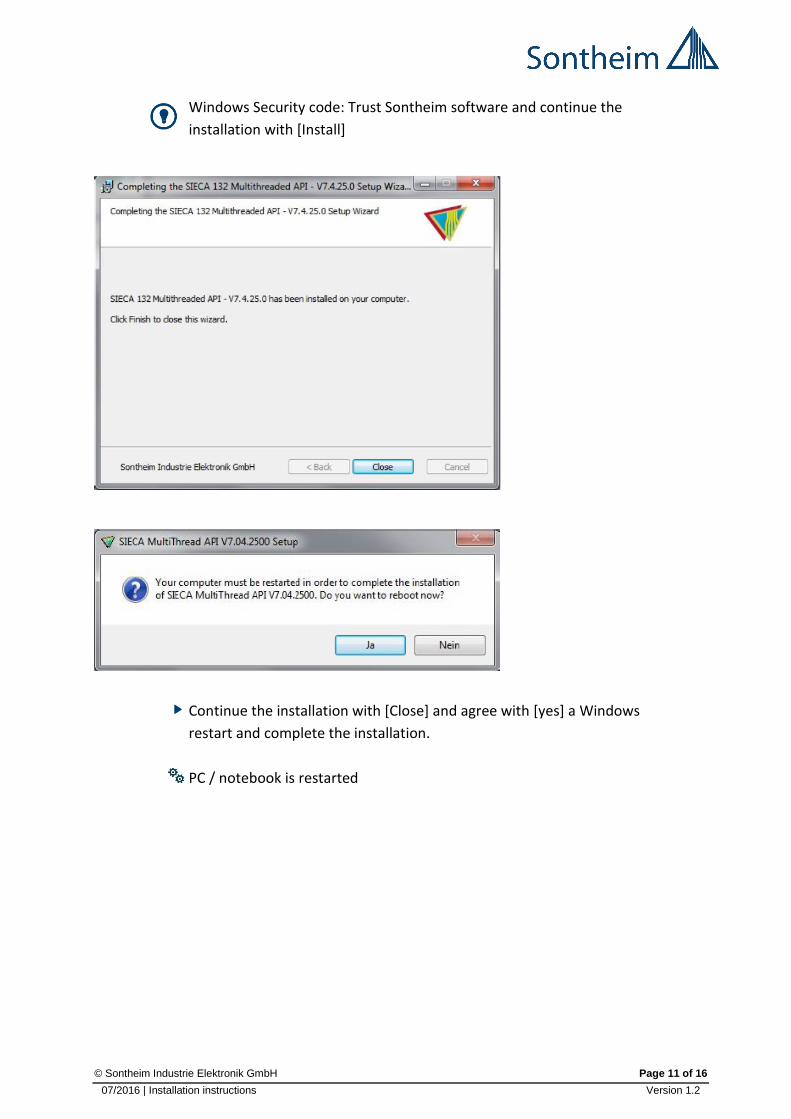
Windows Security code: Trust Sontheim software and continue the
installation with [Install]
Continue the installation with [Close] and agree with [yes] a Windows
restart and complete the installation.
PC / notebook is restarted

© Sontheim Industrie Elektronik GmbH Page 12 of 16
07/2016 | Installation instructions Version 1.2
7.3. Function
Click with the right mouse button on the yellow symbol in the task
bar and select [About].
The info window for the CANUSBlight driver opens.
If the serial number of the interface appears, the installation was successful and the device is registrated.
Click on the entry and select [Blink LED On]
The status LEDs are flashing
The unit is ready for operation
End the function test with [Blink LED Off] and [OK]
If the status LEDs do not flash, make a Windows restart

© Sontheim Industrie Elektronik GmbH Page 13 of 16
07/2016 | Installation instructions Version 1.2
8. Technical data
CANUSBlight V93030X000
CAN-USB interface for programming and
diagnosing CAN systems Operating voltage
5 V DC (via USB)
CANUSBlight Technical Data
Housing compact plastic
Dimensions (W x H x D) 52 x 36 x 21 mm
Protection rating IP50
CAN interface 1x gal. isolated acc. to CiA, CAN ISO 11898-2, 1m cable
USB interface 1 × USB type A, USB 1.1 with up to 12 Mbit/sec, 2m cable
Maximum data transfer rate 1 Mbit / 90 % Buslast
Power supply 5 V DC via USB
Power consumption max. 200 mA
LEDs 3 × 3 mm LED
microcontroller 32Bit NXP Microcontroller LPC2458
microcontroller CAN Motorola Star12, 16 Bit
microcontroller USB Philips PDUSB12
Operating temperature 0 °C up to +70 °C
Storage temperature -40 °C up to +85 °C
humidity 20 % – 90 % (non-condensing)
System requirements Microsoft Windows ® 2000, XP, Vista or Windows 7, 8
CE marking EN 61000-6-2 electromagnetic compliance (EMC) interference immunity (10 V/m)
EN 61000-6-4 electromagnetic compliance
(EMC) electromagnetic interference
EN 61000-4-2 electrostatic discharge (ESD)
CAN cable Equipment

© Sontheim Industrie Elektronik GmbH Page 14 of 16
07/2016 | Installation instructions Version 1.2
Operating status
LED LED-colour Status Description
USB green flashing CANUSBlight initialized
CAN-Status yellow flashing Baud rate, initialization or reset is running
CAN-Data yellow flashing CAN data transfer running
Pin assignments
CAN
1 -
2 CAN-Low
3 GND (Ground)
4 -
5 -
6 -
7 CAN-High
8 -
9 -
USB
1 VCC (VBUS)
2 - Data
3 +Data
4 GND (Ground)
Items delivered
1x CANUSBlight
1x
System-CD with drivers SiECA132 MT-CANapi, Hard- and software description (4 Handles)
Versions
V930220000 CANUSBlight 1xCAN
V930220100 CANUSBlight 1xCAN, low speed

© Sontheim Industrie Elektronik GmbH Page 15 of 16
07/2016 | Installation instructions Version 1.2
9. Maintenance, repair and disposal
9.1. Maintenance
The device does not contain any components that need to be maintained by the user.
9.2. Cleaning the housing surface
Disconnect the device.
Clean the device from dust and light dirt using a soft, chemically untreated, dry
cloth.
In case of heavy dirt use a damp soft clean cloth.
The following agents are not suited for cleaning the device:
chemicals dissolving plastics such as methylated spirit,
benzine, thinner, alcohol, acetone or ammonia.
Micro-fibre cloths without chemical additives are recommended.
9.3. Repair
The device must only be repaired by the manufacturer.
Observe the safety instructions ( 2.4 Tampering with the device)
9.4. Disposal
Dispose of the device in accordance with the national environmental regulations.
10. Approvals/standards
Test standards and regulations ( 8 Technical data)