contents - massgeneral.org · oraquick advance rapid hiv-1/2 antibody test lit controls are...
TRANSCRIPT

POCT ProgramMassachusetts General Hospital - Pathology Service
55 Fruit Street, Boston, MA 02114Title: Rapid HIV ProcedureCross References: Rapid HIV Certified Testing PersonnelRapid HIV Testing Post - Training AssessmentRapid HIV Training and Competency AssessmentRapid HIV Kit Control Log SheetRapid HIV Room Temperature LogRapid HIV State Lab Confirmatory Testing Log SheetMGH POCT QC Storage Ordering and Documentation GuidePOCT Proficiency Testing ProcedurePOCT Proficiency Testing Evaluation Worksheet
Title (with LTR): Rapid HIV Procedure (LTR15639)Last Approved: Gregory, Kimberly (Electronic Signature Timestamp: 1/3/2014 2:49:36 PM)
1
Contents Purpose .......................................................................................................................................................2Scope ..........................................................................................................................................................2Policy and Procedure Statement.................................................................................................................2Test Principle...............................................................................................................................................2Proficiency Testing ......................................................................................................................................2Regulatory Requirements............................................................................................................................3Competency Assessment ...........................................................................................................................4Limitations/ Interferences ............................................................................................................................4Test Kit/Supplies .........................................................................................................................................4Quality Control Monitoring...........................................................................................................................5Materials Provided in the OraQuick ADVANCE Rapid HIV-1/2 Antibody Test Kit ......................................6Materials Required But Not Provided by the Test Kit ..................................................................................6Materials Provided in Kit Control Box..........................................................................................................6Preparation for Running Controls................................................................................................................6Kit Control Testing Procedure ..................................................................................................................... 7Control Interpretation...................................................................................................................................8Specimen collection ....................................................................................................................................9Test Procedure............................................................................................................................................ 9Test Interpretation .....................................................................................................................................10Reference Range ......................................................................................................................................11Documentation ..........................................................................................................................................11State Lab Confirmation of Reactive and Indeterminate Results ...............................................................11Transcription review ..................................................................................................................................11References ................................................................................................................................................ 11Cross - References ...................................................................................................................................12Ordering and Resulting HIV Tests - WebMRE..........................................................................................12
Written by: Kim Gregory MT(ASCP), NCA, CLS Date: 11/8/2011

Title (with LTR): Rapid HIV Procedure (LTR15639)Last Approved: Gregory, Kimberly (Electronic Signature Timestamp: 1/3/2014 2:49:36 PM)
2
Purpose
This document outlines policies and procedures that deal with Rapid HIV testing. In an effort to be concise, some information may be excluded from the manufacturer’s recommended procedure. It is recommended that operators familiarize themselves with the manufacturer’s product information that accompanies each package and their manual if one exists.
Scope
Level of Personnel: MD’s, RN’s, NP’s and MA’s who have successfully completed initial training and maintained annual competency.
Testing Site: All sites approved and on file with the Pathology Service’s POCT Division.
Policy and Procedure Statement
The OraQuick ADVANCE Rapid HIV-1, 2 Antibody Test Kit is a single-use, qualitative immunoassay to detect antibodies to Human Immunodeficiency Virus Type 1 (HIV-1) and Type 2 (HIV-2). This test is a screening assay for point-of-care testing to aid in the diagnosis of infection with HIV-1 and HIV-2 and requires confirmation by western blot when results are presumptive positive or indeterminate.
Test Principle
The OraQuick Advance rapid test utilizes a proprietary lateral flow immunoassay procedure. The device plastic housing holds an assay strip comprised of several materials that provide the matrix for the immunochromatography of the specimen and the platform for the indication of the test results.
The assay test strip, which can be viewed through the test device result window, contains synthetic peptides representing the HIV envelope region and a goat anti-human IgG procedural control immobilized onto a nitrocellulose membrane in the Test (T) zone and the Control (C) zone, respectively.
As the specimen flows through the test device, the developer solution facilitates the flow of the specimen into the device and onto the test strip device. As the diluted specimen flows through the device, it rehydrates the protein-A gold colorimetric reagent contained in the device. As the specimen continues to migrate up the strip, it encounters the T zone. If the specimen contains antibodies that react with the antigens immobilized on the nitrocellulose membrane, a reddish-purple line will appear, qualitatively indicating the presence of antibodies to HIV-1 and/or HIV-2 in the specimen. The intensity of the line color is not directly proportional to the amount of antibody present in the specimen.
Further, up the assay strip, the sample will encounter the C zone. This built-in procedural control serves to demonstrate that a specimen was added to the vial and that the fluid has migrated adequately through the test device. A reddish-purple line will appear in the C zone during the performance of all valid tests, whether or not the sample is positive or negative for antibodies to HIV-1 and/or HIV-2.
The results are interpreted after 20 minutes but not more than 40 minutes after the introduction of the test device into the developer solution containing the specimen. No precision pipeting, predilutions or specialized instrumentation are required to perform the OraQuick ADVANCE Rapid HIV-1/2 Antibody test.
Proficiency Testing
The College of American Pathologists (CAP) and the WSLH sends unknown samples to the laboratory for analysis several times per year. Results are submitted to the PT agency within 10 days of survey receipt. If a site fails 2 out of 3 events or two consecutive events according to federal law, it may be required to discontinue testing.
All Survey results are to be handled and reported in the same manner as clinical results following the directions on the survey package insert. The samples are not to be analyzed in duplicate unless clinical specimens are analyzed in duplicate. Actions or decisions must be documented.
Participation must be random and not assigned to specific individuals. Successful participation may be used as demonstrating successful competency for that year.
Upon receiving the survey:

Title (with LTR): Rapid HIV Procedure (LTR15639)Last Approved: Gregory, Kimberly (Electronic Signature Timestamp: 1/3/2014 2:49:36 PM)
3
The POCT program will contact the participating departments regarding the survey and the timeline of the survey to be performed.
The departments must be available within the period identified by POCT.
The Key operators must make sure of the following:
o Instruments are in good working order.o Randomly select staff to participate, but ensure that subsequent surveys are rotated
among different staff (e.g. document in a log)o Maintain original PT survey form with the results documented.o Maintain the signed Attestation form.o In addition, retain copies of above in the files of testing personnel.
Once results are obtained, they should be given to the POCT Coordinators who will send them to the PT provider via mail, fax or electronic entry on the PT provider’s website.
Site Director and CLIA certificate Director or designees shall review survey results to assess performance and ensure compliance with the standard and comment.
Scores of 100% minimally requires documentation of review by the Director or designee.
Scores between 100% and 80% requires a comprehensive investigation and remedial action documented of unsuccessful challenges.
Scores less than 80% requires a comprehensive investigation and documentation of remedial action of unsuccessful challenges. Scores of less than 80 percent may jeopardize a sites ability to continue to perform testing.
Should a site fail proficiency, they will be required to immediately perform a comprehensive investigation and document remedial action. Operator re-training may be required.
In order to avoid cessation of testing, a site failing a challenge will be expected to develop and implement a more aggressive plan for performance improvement
Each site is responsible for completing survey challenges when they arrive.
Anticipated Survey Periods:
Anti-HIV (HVW) - Waived methods
Product Receipt Evaluation receiptFebruary MarchAugust September
Regulatory Requirements
I. Each testing site must have a documented quality control program, which is developed in collaboration with or has been approved by the MGH Pathology Service.
II. All test results must be maintained in patient records with all required information for four years
Required information:1. Patient’s name2. Medical Record Number3. Patient’s gender4. Patient’s age or date of birth5. Date & time test collected, performed and reported6. Ordering Physician7. Responsible physician (if not 6)8. Reference or Target Range9. Test Performed10. Test units11. Lab name12. Consent
III. Additional information that must be retained for four years:
1. Testing personnel records2. Quality control results

Title (with LTR): Rapid HIV Procedure (LTR15639)Last Approved: Gregory, Kimberly (Electronic Signature Timestamp: 1/3/2014 2:49:36 PM)
4
3. Product information (i.e. serial number, lot numbers, expiration dates, etc.), information on quality control and any remedial action
4. QC charts, maintenance sheets, reference and critical ranges
IV. Other
1. Universal precautions must be observed when handling any patient specimen.2. A physician’s order or standing order is required prior to performing test.3. The Hospital Hand Hygiene policy must be adhered to at all times.
Competency Assessment
All operators must read the procedure manual, complete the “HIV Rapid Testing Post-Training Assessment” and run quality controls for initial training. Competency is assessed annually using at least two of the following methods:
1. Performing a test on a blind specimen/proficiency testing results*2. Supervisor observes performance of routine work.3. Each user’s quality control performance is monitored4. Written testing specific to the method.
* Proficiency testing is required by the DPH for each operator as a form of competency.
A complete list of operators and certification dates must be kept for each test site with the back up documentation. An updated list must be provided each year of testing.
Limitations/ Interferences
1. Reading test results earlier than 20 minutes or later than 40 minutes may yield erroneous results.
2. Individuals infected with HIV-1 or HIV-2 who are receiving highly active antiretroviral therapy (HAART) may produce false negative results.
3. A reactive result using the OraQuick Advance Rapid HIV-1/2 Antibody Test suggests the presence of HIV-1 and/or HIV-2 antibodies in the specimen. The OraQuick ADVANCE Rapid HIV-1/2 Antibody Test is intended as an aid in the diagnosis of infection with HIV-1 and/or HIV-2. A follow-up serum sample must be obtained to confirm Reactive status through Western Blot testing.
4. A non-reactive result does not preclude the possibility of exposure to HIV or infection with HIV. An antibody response to recent exposure may take several months to reach detectable levels
5. A person who has antibodies to HIV-1 or HIV-2 is presumed to be infected with the virus, except that a person who has participated in an HIV vaccine study may develop antibodies to the vaccine and may or may not be infected with HIV.
6. Clinical data has not been collected to demonstrate the performance of the OraQuick ADVANCE test kit for persons less than 12 years of age.
7. For a reactive result, the intensity of the line does not necessarily correlate with the titer of the antibody in the specimen.
Test Kit/Supplies

Title (with LTR): Rapid HIV Procedure (LTR15639)Last Approved: Gregory, Kimberly (Electronic Signature Timestamp: 1/3/2014 2:49:36 PM)
5
Quality Control Monitoring
A. Internal Quality Control:
The OraQuick ADVANCE Rapid HIV-1/2 Antibody Test has a built-in procedural control that demonstrates assay validity. A reddish-purple line in the Control (“C”) area of the Result Window indicates that a specimen was added and that the fluid migrated appropriately through the Test Device. The Control line will appear on all valid tests, whether or not the sample is reactive or non-reactive.
B. External Quality Control:
OraQuick ADVANCE Rapid HIV-1/2 Antibody Test Lit Controls are available separately for use only with the OraQuick ADVANCE Rapid HIV- 1/2 Antibody Test. The kit controls are specifically formulated and manufactured to ensure performance of the Test, to verify your ability to perform the test and interpret the results. The HIV-1 and HIV-2 Positive controls will produce a reactive test result and have been manufactured to produce a very faint Test (“T”) line. The Negative Control will produce a non-reactive test result.
1. External controls are run daily for the HIV negative control and weekly for HIV-1 and HIV-2 positive controls.
2. Each new operator must first successfully run OraQuick ADVANCE using the External controls before they are allowed to test patient specimens.
3. External controls must be run each time a new lot number is opened.
4. External controls must be run on all new shipments that are received, even if it is the same lot number that is currently in use. If the shipment contains more than one lot number, the external controls must be run on each lot number.
5. External controls must be run when the temperature of the test kit storage area falls below 2°C (35°F) or rises above 27°C (80°F).
6. External controls must be run when the temperature of the testing area falls below 15°C (59°F) or rises above 37°C (99°F).
7. If operator tests at more than one site, external controls must be successfully run at the additional site before the operator can begin testing at that site.
8. External controls must be run if you receive two consecutive invalid test results on a patient.
If the controls produce the expected result (the HIV-1 positive control is positive, the HIV-2 positive control is positive, and the negative control is negative) continue with patient testing.
If they do not produce the expected result, repeat the external controls. If they still do not produce the expected results DO NOT proceed with patient testing and
contact the POCT program at 3-5392, 6-1462, or 63858. The POCT program will facilitate troubleshooting with OraSure Technologies Customer Service (800-869-3538).
Products Manufacturer # People soft # StorageOraQuick Advance 100
Test KitAbbott 1L74-20 128120 – GID obtains kits
from DPH program2º- 27ºC (35º-80ºF) Do not open pouch until ready to test.
Storage and testing temperature records
are required. Controls OraQuick
Advance Rapid HIV-1/2 Antibody
Abbott 1L74-10 120628 2- 8C (35- 46F) Date with 8 week expiration upon
opening. Do not use past date printed on
outer carton.Disposable gloves Owens or Fisher
Timer Fisher

Title (with LTR): Rapid HIV Procedure (LTR15639)Last Approved: Gregory, Kimberly (Electronic Signature Timestamp: 1/3/2014 2:49:36 PM)
6
Refer to the OraQuick Test Controls package insert for instructions on the use of these reagents.
Materials Provided in the OraQuick ADVANCE Rapid HIV-1/2 Antibody Test Kit
1. Divided Pouch containing a Test Device, Absorbent Packet, and a Developer Solution Vial
2. Reusable Test Stands3. Specimen Collection Loops4. OraQuick ADVANCE Rapid HIV-1/2 Antibody Test Package Insert 5. Customer Letter
Materials Required But Not Provided by the Test Kit
1. Timer or watch capable of timing 20 to 40 minutes2. Antiseptic wipe3. Sterile disposable lancet4. Disposable gloves5. Clean, disposable, absorbent workspace cover. (i.e. a chuck or blue
pad)6. Biohazard waste container7. Biohazard sharps container8. Splashguard or safety glasses 9. Thermometers for each testing and storage area10. OraQuick ADVANCE Kit Control Log Sheet
Materials Provided in Kit Control Box
Each Kit Control box contains a package insert and three vials (one HIV-1 positive control, one HIV-2 positive control and one negative control) as described below:
1. HIV-1 Positive ControlOne black-capped vial containing 0.2 mL of photo chemically inactivated human plasma positive for antibodies to HIV-1, diluted in a defibrinated pool of normal human plasma. Preservative: ProClin 5000. Negative for Hepatitis B surface antigen and Hepatitis C antibody.
2. HIV-2 Positive ControlOne red-capped vial containing 0.2 mL of photo chemically inactivated human plasma positive for antibodies to HIV-2, diluted in a defibrinated pool of normal human plasma. Preservative: ProClin 5000. Negative for Hepatitis B surface antigen and Hepatitis C antibody.
3. Negative ControlOne white-capped vial containing 0.2 mL of defibrinated pool of normal human plasma negative for antibodies to HIV-1 and HIV-2. Preservative: ProClin 5000. Negative for Hepatitis B surface antigen and Hepatitis C antibody.
Preparation for Running Controls
Run Negative and HIV-1 and HIV-2 Positive controls separately.
Set-up one test at a time.
Always run the Negative control first to prevent contamination.
1. Remove the Kit Controls from the refrigerator. About one hour before use.
2. When opening a new set of Kit Controls write the date opened on the box.
3. If using an already opened box of Kit Controls check to make sure that it has not been 8 weeks or more since the box was opened. If it has been 8 weeks or more since the box was opened discard the remaining unused portion in a Biohazard Waste Container. Remove a new set of controls from the refrigerator and write the current date on the box as the date opened.
4. Check the expiration date on the Kit Controls. If the Kit Controls are expired, discard them in a Biohazard Trash Container. Check the refrigerator for additional expired Kit Controls and discard them in a Biohazard Trash Container. If all of your Kit Controls are expired then the Controls cannot be run and patient samples cannot be tested until the Kit Controls have been successfully run using unexpired Kit Controls.
5. Gather all required materials.

Title (with LTR): Rapid HIV Procedure (LTR15639)Last Approved: Gregory, Kimberly (Electronic Signature Timestamp: 1/3/2014 2:49:36 PM)
7
6. Follow hand hygiene protocol and put on gloves.
7. Cover your workspace with a clean, disposable, absorbent workspace cover. (i.e. a chuck or blue pad)
8. If a splashguard is not available, put on safety glasses.
9. Set an OraQuick ADVANCE Reusable Test “Stand” up on your workspace cover. Use only the stand provided. If not wearing safety glasses put the Test "Stand" behind the splashguard.
10. Open only one Pouch at a time.
11. Check the expiration date on the Pouch. If the Pouch is expired, discard and use a new Pouch that has a valid expiration date.
12. Write down required lot numbers, expiration dates and room temperature on Kit Control Log Sheet.
13. Open both chambers of the OraQuick ADVANCE Divided “Pouch” by tearing at the notches on the top of each side of the Pouch. To prevent contamination, leave the Test Device in the Pouch until you are ready to use it.
14. Remove the Developer Solution “Vial” from the Pouch. Label the Vial either Negative or Positive Control depending on which one you are working with. Hold the Vial firmly in your hand. Carefully remove the cap from the Developer Solution Vial by gently rocking the cap back and forth while pulling it off. Set the cap on your workspace cover.
15. If using a splashguard instead of safety glasses the Stand should be behind the splashguard. Slide the Vial into the top of one of the slots in the Stand. DO NOT force the Vial into the Stand from the front of the slot as splashing may occur. Make sure the Vial is pushed all the way to the bottom of the slot in the Stand. If any portion of the developer is spilled discard all elements of the opened Pouch and start the test from the beginning using a new, complete, unused Pouch containing a Vial, Device, and Absorbent Package.
Kit Control Testing Procedure
1. Open the Negative or HIV-1 Positive or HIV-2 Positive Kit Control Vial.
2. Insert the round end of an unused Specimen Collection Loop into the vial of control reagent. Visually inspect the loop to make sure that it is completely filled with the control reagent. Use separate unused Specimen Collection Loops for each control reagent.
3. Note: The Kit Control reagents are clear to straw yellow in color.
4. DO NOT USE IF THE REAGENT APPEARS VISUALLY CLOUDY OR DISCOLORED.
5. Immediately immerse the control-reagent-filled Specimen Collection Loop in the developer solution inside the Developer Solution Vial. Use the specimen loop to stir the specimen in the developer solution. Remove the Specimen Collection Loop from the Developer Solution Vial and discard the used loop in a biohazard waste container.
6. Remove the Test Device from the Divided Pouch without touching the flat pad. Insert the Test Device, flat pad first, into the Developer Solution Vial containing the specimen. Be sure that the result window faces forward and the flat pad touches the bottom of the Developer Solution Vial.
7. Leave the Test Device in the Developer Solution Vial and start a timer. Do not remove the Test Device from the Vial until you have read the results. Read the results after 20 minutes but not more than 40 minutes in a fully lighted area. Read the results as described in the Test Result and Interpretation of Test Result sections of the OraQuick ADVANCE HIV-1/2 Antibody Test Kit product insert.
8. Dispose of the used Developer Solution Vial and Test Device in a biohazard waste container.
9. Repeat starting at step 5 of Preparation using next Kit Control (Negative or HIV-1 Positive or HIV-2 Positive) and a new, complete, unused Pouch containing a Developer Solution Vial, Device, and Absorbent Package.
10. When completely done reseal the Kit Control Reagent Vials back in their original container and store at 2- 8 C (35- 46F).

Title (with LTR): Rapid HIV Procedure (LTR15639)Last Approved: Gregory, Kimberly (Electronic Signature Timestamp: 1/3/2014 2:49:36 PM)
8
Control Interpretation
1. Negative Control:The Negative Control will produce a Non-Reactive test result.A reddish –purple line should be present in the Result Window in the area adjacent to only the triangle labeled “C” and NO line appears next to the triangle labeled “T”. This indicates a Non-Reactive test result.
2. HIV-1 Positive Control: The HIV-1 Positive Control will produce a Reactive test result and has been manufactured toproduce a very faint Test (“T”) line. A reddish-purple line should be present in the Result Window in the area adjacent to the
triangle labeled “C” and a reddish-purple line should appear in the area adjacent to the triangle labeled “T”. This indicates a Reactive test result. The lines will not necessarily be the same intensity.
3. HIV-2 Positive Control:The HIV-2 Positive Control will produce a Reactive test result and has been manufactured to produce a very faint Test (“T”) line. A reddish-purple line should be present in the Result Window in the area adjacent to the
triangle labeled “C” and a reddish-purple line should appear in the area adjacent to the triangle labeled “T”. This indicates a Reactive test result. The lines will not necessarily be the same intensity.
Negative Control Positive Control HIV1 or 2
Note: If the test results for either the Negative Control, HIV-1 Positive Control or the HIV-2 Positive controls are not as expected, the test must be repeated using a new Test Device, Developer Solution Vial and control specimen. If they still do not produce the expected results DO NOT proceed with patient testing and contact the POCT program at 3-5392, 6-1462, or 63858. The POCT program will facilitate troubleshooting with OraSure Technologies Customer Service (800-869-3538).
4. Invalid Test: All tests must be read after 20 minutes, but not more than 40 minutes after the Device has
been inserted into the Vial containing the patient specimen. Any test result that is read before 20 minutes or after 40 minutes is invalid.
No reddish purple line appears next to the triangle labeled “C’” (See picture a or b) or If a red background in the Result Window makes it difficult to read after 20 minutes the test
is invalid (See picture “c”) or If any of the lines present are not inside the “C” or “T” triangle areas the test is invalid (See
pictures d1 and d2).

Title (with LTR): Rapid HIV Procedure (LTR15639)Last Approved: Gregory, Kimberly (Electronic Signature Timestamp: 1/3/2014 2:49:36 PM)
9
All invalid tests cannot be interpreted and must be repeated using a new Pouch and a new sample collected from the Negative, HIV-1 Positive, or HIV-2 Positive Kit Control.
Specimen collection
Finger stick whole blood:1. Using an antiseptic wipe, clean the finger of the person being tested. Allow the finger to dry
thoroughly or wipe dry with a sterile gauze pad.
2. Using a sterile lancet, puncture the skin just off center of the finger pad. Discard the lancet in a Biohazard Sharps Container.
3. Hold the finger downward and apply gentle pressure beside the point of the puncture. Avoid squeezing the finger to bleed. Wipe away the first drop of blood with a new sterile gauze pad. Allow a new drop of blood to form.
4. Pick up an unused Specimen Collection “Loop” by the thick “handle” end. Put the “rounded” end of the loop on the drop of blood. Make sure that the Loop is completely filled with blood. ***If the Loop is dropped or comes in contact with any other surface, discard the loop in a Biohazard Sharps Container. Get a new unused loop to collect the blood sample.
Venipuncture whole blood:
Venous whole blood collected according to hospital policy in a collection tube with EDTA. Fill tube to capacity. Label tube with two patient identifiers per hospital policy.
Criteria for Specimen Rejection: Evidence of clotting Specimens collected in vacuum tubes with anticoagulant other than lithium or sodium
heparin Other sample types such as urine, CSF and pleural fluid
NOTE: Avoid the Following Circumstances Drawing a specimen from an arm with an I.V Stasis (tourniquet left on longer than one minute before venipuncture) Extra muscle activity (fist pumping) Hemolysis (alcohol left over puncture site or a traumatic draw)
Oral fluid is not used at MGH for patient testing.
Test ProcedureTest must be performed at the same time the sample is collected.
1. Remove the Device from the Pouch. DO NOT touch the Flat Pad. If you touch the Flat Pad discard the Device and all elements of the opened Pouch (including the Developer Vial containing the blood sample) in a Biohazard Waste Container and start the test from the beginning using a new complete unused Pouch containing a Vial, Device, and Absorbent Package. A new blood
Title (with LTR): Rapid HIV Procedure (LTR15639)Last Approved: Gregory, Kimberly (Electronic Signature Timestamp: 1/3/2014 2:49:36 PM)
10
sample must be collected. If the original puncture site has begun to clot, the new blood sample must be collected from a new puncture site.
2. Check to make sure that an Absorbent Packet is included with the Device. If no Absorbent Packet is present, discard the Device and all elements of the opened Pouch (including the Developer Vial containing the blood sample) in a Biohazard Waste Container and start the test from the beginning using a new complete unused Pouch containing a Vial, Device, and Absorbent Package. A new blood sample must be collected. If the original puncture site has begun to clot, the new blood sample must be collected from a new puncture site.
3. Label the Device with the appropriate Barcode Label. DO NOT touch the Flat Pad of the Device. DO NOT cover the two holes on the back of the device with the Barcode Label.
4. Make sure that the Pace Label on the Patient Log Sheet, Developer Solution Vial, and Device all match.
5. Mix the whole blood EDTA tube and then open using a protective cover to prevent splashing.
6. Using a clean collection loop, dip the loop into the sample and ensure the loop is completely filled.
7. Put the loop into the appropriately labeled developer solution and use the loop to stir. Discard the loop into the sharp container.
8. The developer solution should turn a pink color. If it does not, the entire test kit should be discarded and a new one opened.
9. Open the test device pouch. With the Result Window facing you, insert the flat pad of the device all the way into the developer solution vial containing the blood sample. Make sure that the Flat Pad touches the bottom of the Vial. DO NOT remove the Device from the Vial while the test isrunning. DO NOT move the Stand containing the Vial and the Device during testing.
10. Write down the start time of the test and the temperature of the test area on the Patient Log Sheet. Start timing the test. Pink fluid will appear and travel up the Result Window. The pink fluid will gradually disappear as the test develops.
11. Read the results after 20 minutes, but not more than 40 minutes, in a fully lighted area while the Device is still in the Developer Vial. Confirm that a line appears within the "C" triangle of the result window and document its presence on the Patient Log Sheet. Write down the time the test was read on the Patient Log Sheet
12. Refer to the Test Interpretation section and fill in the appropriate data on the Patient Log Sheet.
Test Interpretation
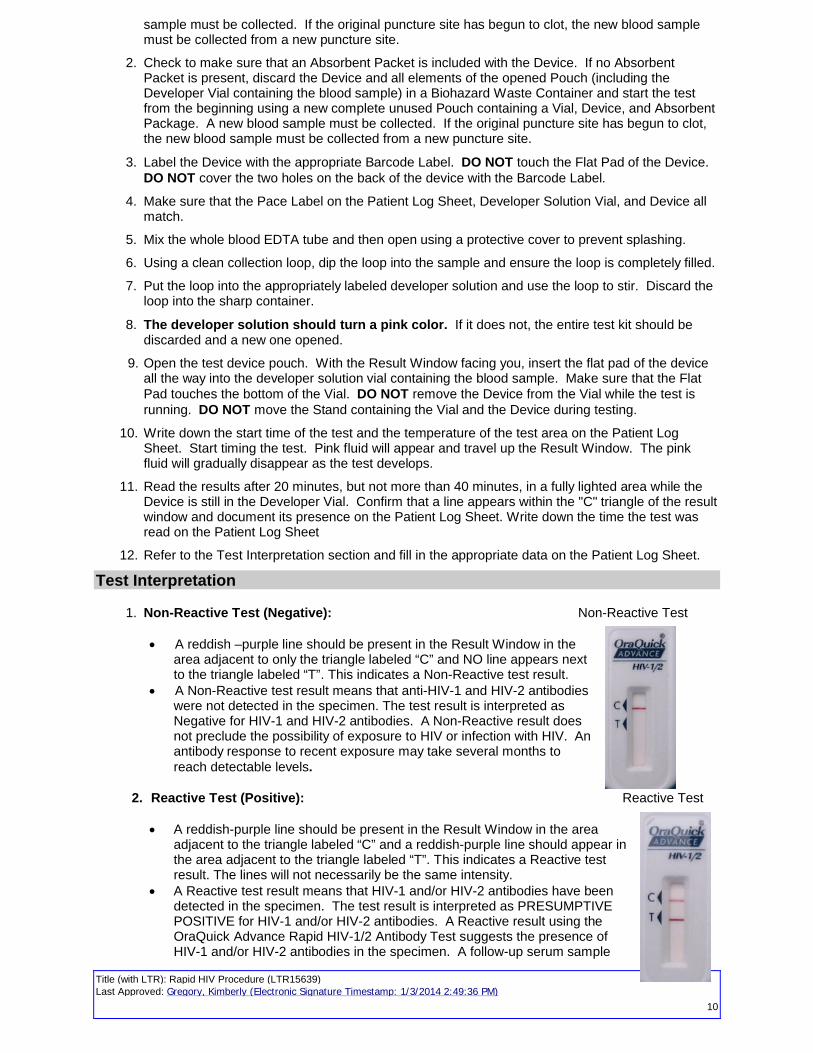
1. Non-Reactive Test (Negative): Non-Reactive Test
A reddish –purple line should be present in the Result Window in the area adjacent to only the triangle labeled “C” and NO line appears next to the triangle labeled “T”. This indicates a Non-Reactive test result.
A Non-Reactive test result means that anti-HIV-1 and HIV-2 antibodies were not detected in the specimen. The test result is interpreted as Negative for HIV-1 and HIV-2 antibodies. A Non-Reactive result does not preclude the possibility of exposure to HIV or infection with HIV. An antibody response to recent exposure may take several months to reach detectable levels.
2. Reactive Test (Positive): Reactive Test
A reddish-purple line should be present in the Result Window in the area adjacent to the triangle labeled “C” and a reddish-purple line should appear in the area adjacent to the triangle labeled “T”. This indicates a Reactive test result. The lines will not necessarily be the same intensity.
A Reactive test result means that HIV-1 and/or HIV-2 antibodies have been detected in the specimen. The test result is interpreted as PRESUMPTIVEPOSITIVE for HIV-1 and/or HIV-2 antibodies. A Reactive result using the OraQuick Advance Rapid HIV-1/2 Antibody Test suggests the presence of HIV-1 and/or HIV-2 antibodies in the specimen. A follow-up serum sample
Title (with LTR): Rapid HIV Procedure (LTR15639)Last Approved: Gregory, Kimberly (Electronic Signature Timestamp: 1/3/2014 2:49:36 PM)
11
must be obtained to confirm Reactive status through Western Blot testing. Document all sera drawn for confirmation in the Patient Log Sheet.
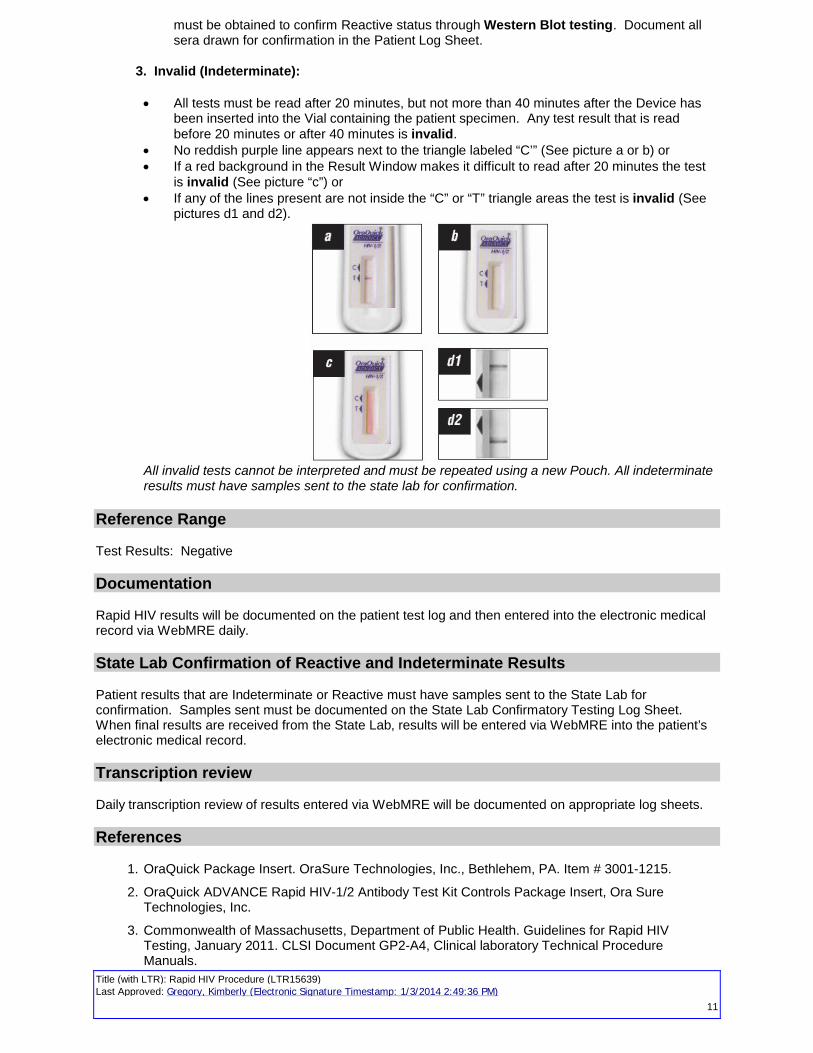
3. Invalid (Indeterminate):
All tests must be read after 20 minutes, but not more than 40 minutes after the Device has been inserted into the Vial containing the patient specimen. Any test result that is read before 20 minutes or after 40 minutes is invalid.
No reddish purple line appears next to the triangle labeled “C’” (See picture a or b) or If a red background in the Result Window makes it difficult to read after 20 minutes the test
is invalid (See picture “c”) or If any of the lines present are not inside the “C” or “T” triangle areas the test is invalid (See
pictures d1 and d2).
All invalid tests cannot be interpreted and must be repeated using a new Pouch. All indeterminate results must have samples sent to the state lab for confirmation.
Reference Range
Test Results: Negative
Documentation
Rapid HIV results will be documented on the patient test log and then entered into the electronic medical record via WebMRE daily.
State Lab Confirmation of Reactive and Indeterminate Results
Patient results that are Indeterminate or Reactive must have samples sent to the State Lab for confirmation. Samples sent must be documented on the State Lab Confirmatory Testing Log Sheet. When final results are received from the State Lab, results will be entered via WebMRE into the patient’s electronic medical record.
Transcription review
Daily transcription review of results entered via WebMRE will be documented on appropriate log sheets.
References
1. OraQuick Package Insert. OraSure Technologies, Inc., Bethlehem, PA. Item # 3001-1215.
2. OraQuick ADVANCE Rapid HIV-1/2 Antibody Test Kit Controls Package Insert, Ora Sure Technologies, Inc.
3. Commonwealth of Massachusetts, Department of Public Health. Guidelines for Rapid HIV Testing, January 2011. CLSI Document GP2-A4, Clinical laboratory Technical Procedure Manuals.

Title (with LTR): Rapid HIV Procedure (LTR15639)Last Approved: Gregory, Kimberly (Electronic Signature Timestamp: 1/3/2014 2:49:36 PM)
12
Cross - References
Rapid HIV Training and Competency AssessmentRapid HIV Procedure Rapid HIV Certified Testing PersonnelRapid HIV Kit Control Log SheetRapid HIV Test Patient Log SheetRapid HIV Room Temperature LogHIV State Lab Confirmatory Testing Log SheetHIV Rapid Testing Post - Training Assessment
Ordering and Resulting HIV Tests - WebMRE
Table of ContentsOrdering and Resulting HIV Tests using WebMRE......................................................... 23
Opening WebMRE........................................................................................................ 24Entering Data ................................................................................................................ 26Resulting the Rapid HIV Test....................................................................................... 28Resulting the State Lab Confirmatory Test................................................................... 29Result Display in CAS .................................................................................................. 30Manual Entry Transcription Review............................................................................. 31Sample Log use in WebMRE........................................................................................ 32References..................................................................................................................... 32
Opening WebMRE
Step Action1 From the Desktop open the WebMRE application icon.
http://webmre.partners.org/WebMRE/login.aspx2 Enter the Username and Password then click on the
button. Note: User will be required to change password the first time they log in.
Users and Passwords are set up in Telcor by Kim Gregory or her designee.
Title (with LTR): Rapid HIV Procedure (LTR15639)Last Approved: Gregory, Kimberly (Electronic Signature Timestamp: 1/3/2014 2:49:36 PM)
13
Opening WebMRE(continued)
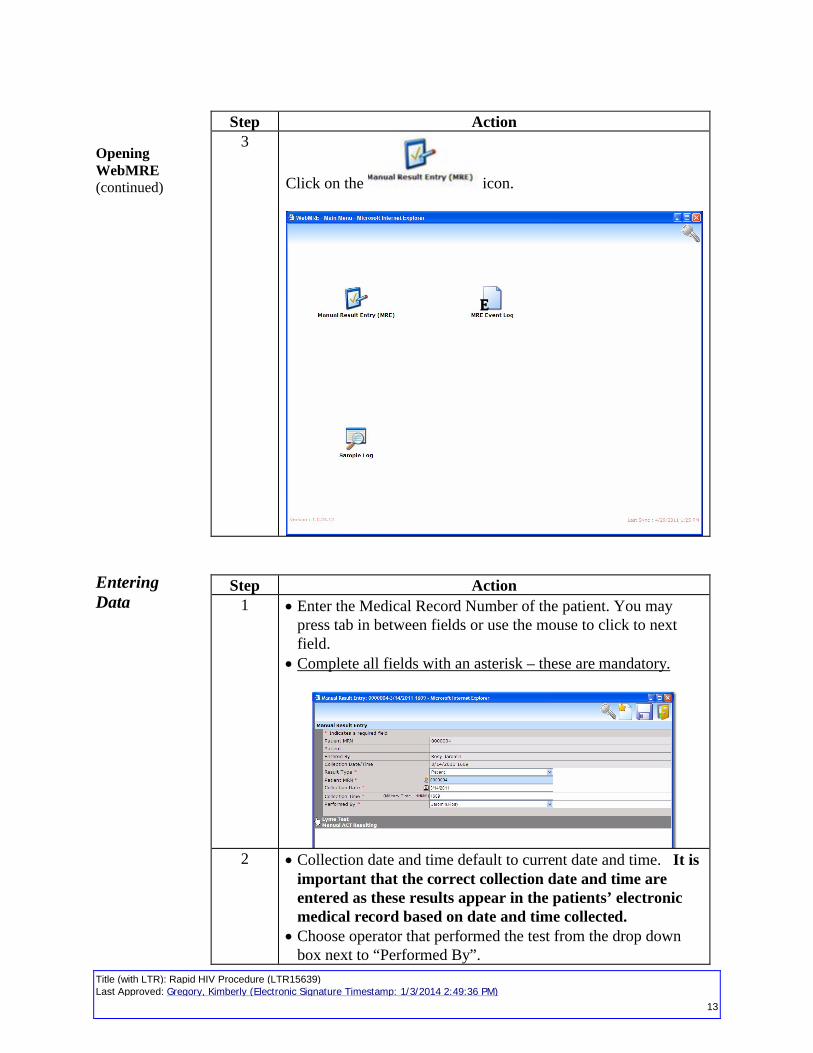
Step Action3
Click on the icon.
Entering Data
Step Action1 Enter the Medical Record Number of the patient. You may
press tab in between fields or use the mouse to click to next field.
Complete all fields with an asterisk – these are mandatory.
2 Collection date and time default to current date and time. It is important that the correct collection date and time are entered as these results appear in the patients’ electronic medical record based on date and time collected.
Choose operator that performed the test from the drop down box next to “Performed By”.

Title (with LTR): Rapid HIV Procedure (LTR15639)Last Approved: Gregory, Kimberly (Electronic Signature Timestamp: 1/3/2014 2:49:36 PM)
14
Entering Data (continued) Step Action
3 Once the data is entered, click on the link.4 The Rapid HIV test fields display.
Click on the menu box icon to access the drop down for lot numbers. This function will not be used by your lab for the purpose of tracking reagent lot numbers. To bypass this function, you will choose “Not Required” from the drop down. This will fill in a default statement to the lot number and expiration date fields which are mandatory for resulting.
Device code is automatically filled in. Sample type field is not required and will remain "Blank” as
the choice. Performed Date and Time will auto fill with “Collection Date
and Time”. DO NOT CHANGE!
Resulting the Rapid HIV Test
Reporting of Rapid HIV TestStep Action
1 Result the Rapid HIV Test using the codes listed in the drop down.
2
Note: Results entered in Web MRE will translate to: NEG = Negative INDSL = Indeterminate. Sample sent to state lab for
confirmation. Result to follow on separate accession number POSL = Presumptive Positive. Sample sent to state lab for
confirmation. Results to follow on separate accession number.

Title (with LTR): Rapid HIV Procedure (LTR15639)Last Approved: Gregory, Kimberly (Electronic Signature Timestamp: 1/3/2014 2:49:36 PM)
15
3Once result is entered, click (Save).
4 A message box will appear to accept and file your result. Click OK and file the result. Once you click OK - the result is sent to Sunquest. (The drop down boxes present on the message box should be ignored. They are due to an internet explorer conflict.)
Note: You cannot correct sample results using WebMRE. They will need to be corrected in Sunquest. Refer to manual entry transcription review section of procedure.
Resulting the State Lab Confirmation Test
Reporting of State Lab Confirmatory TestStep Action
1 Western blot testing for is performed on all indeterminate and presumptive positive results at the MA State Lab. Confirmatory test results are entered via WebMRE.
2 Enter the Medical Record Number of the patient. You may press tab in between fields or use the mouse to click to next field.
Complete all fields with an asterisk – these are mandatory.
3 Collection date and time default to current date and time. Edit date to the correct collection date and enter the collection time as 5 minutes after the original collection time. This will ensure the results are not looked at by Telcor as duplicate

Title (with LTR): Rapid HIV Procedure (LTR15639)Last Approved: Gregory, Kimberly (Electronic Signature Timestamp: 1/3/2014 2:49:36 PM)
16
results. Choose operator that performed the test from the drop down box
next to “Performed By”.4 Once the data is entered, click on the link.5 The State HIV test fields display.
Click on the menu box icon to access the drop down for lot numbers. This function will not be used by your lab for the purpose of tracking reagent lot numbers. To bypass this function, you will choose “Not Required” from the drop down. This will fill in a default statement to the lot number and expiration date fields which are mandatory for resulting.
Device code is automatically filled in. Sample type field is not required and will remain "Blank” as the
choice.Performed Date and Time will auto fill with “Collection Date and Time”. DO NOT CHANGE!
6 Result the State Lab Confirmatory Test using the codes listed in the drop down.
CHIV7N = Negative. No antibody to HIV-1 or HIV-2 detected. CHIV7I = Indeterminate. Presence or absence of antibody to
HIV-1 cannot be confirmed in this sample. Please submit a follow-up sample in 3-4 weeks.
CHIV7P = Positive. Presence of antibody to HIV-1 confirmed.
7Once all results are entered, click (Save).
8 A message box will appear to accept and file your result. Click OK

Title (with LTR): Rapid HIV Procedure (LTR15639)Last Approved: Gregory, Kimberly (Electronic Signature Timestamp: 1/3/2014 2:49:36 PM)
17
and file the result. Once you click OK - the result is sent to Sunquest. (The drop down boxes present on the message box should be ignored. They are due to an internet explorer conflict.)
Note: You cannot correct sample results using WebMRE. They will need to be corrected in Sunquest. Refer to manual entry transcription review section of procedure.
Result Display in CAS

Title (with LTR): Rapid HIV Procedure (LTR15639)Last Approved: Gregory, Kimberly (Electronic Signature Timestamp: 1/3/2014 2:49:36 PM)
18
Manual Entry Transcription Review
Step Action1 Reports from Sunquest are emailed daily to the performing
laboratory. Results reported in Sunquest must be compared against results listed for patients on the worksheet to identify transcription errors and verify all results are reported to medical record.
2 Result entry errors discovered during review must immediately be reported to the LIS team at 617-724-4585 or the POCT Associate Director (6-3858) for correction in Sunquest.
3 Sign and date reports and retain documentation of review for 4 years as required by regulatory agencies.

Title (with LTR): Rapid HIV Procedure (LTR15639)Last Approved: Gregory, Kimberly (Electronic Signature Timestamp: 1/3/2014 2:49:36 PM)
19
Sample Log use in WebMRE
Step Action1
Click on the icon.
2 The sample log can be used to confirm results sent to Sunquest. This is useful when multiple results are entered and the operator is interrupted during result entry.
References Telcor Point of Care Products Operator’s Manual, version 2.2.6.2, 2009