contents page - rotimatic · 7. never place your rotimatic on or beside hot surfaces such as...
TRANSCRIPT

Contents Page
9
23
10
31
14
17
45
In the box
Rotimatic at a glance
Before f irst use
Connect to Wi-Fi
1. Prepare ingredients
1. Regular cleaning
2 . Make rotis
2 . Advanced cleaning
3. Power off
4. Clean after use
Let ’s make rotis
Cleaning
Troubleshooting
A
B
C
D
E
F
G
46WarrantyH

We hope you enjoy more time with your family while Rotimatic takes care of fresh, healthy meals!
Setup and maintenance
This Manual has everything you need to know about set-up, maintenance and troubleshooting. For tutorial videos visit: rotimatic.com/tutorials or access them through Rotimatic mobile App.
For instant support, Chat with our customer support team via the App.
For improved performance
Do connect Rotimatic to WiFi to receive exciting features and updates. It also enables remote troubleshooting and advanced support almost instantly.
Connect with community
To make the most of your Rotimatic, exchange videos, tips, healthy recipes and hacks with other Rotimatic owners, join the Facebook group: rotimatic.com/fbgroup
Here's to sharing homemade happiness <3
Warm Regards,Rotimatic Team
Welcome to #RotimaticLife
- 2 -

Before You Begin
- 3 -
Unpacking Instructions
Carefully unpack the product immediately and check the container to make sure all the parts are in the package and are in good condition.
Claims
For issues, such as missing components or parts, damage not related to shipping, or concealed damage, email us at [email protected] within 7 days of delivery. In addition, keep the box and contents for inspection.
Disclaimer
The information and specifications contained in this User Manual are subject to changewithout notice. Zimplistic reserves the right to revise or recreate this manual at any time. Download the latest version from rotimatic.com

Symbols
Symbol Meaning Critical installation, configuration, or operation information. Not following these instructions may make the product not work, cause damage to the product, or cause harm to the operator.
Important installation or configuration information. The product may not function correctly if this information is not used.
Useful information.
- 4 -
Note
The information, knowledge, and graphic material contained in this documentation is the sole property of Zimplistic Private Limited, Singapore and may not be reproduced or otherwise distributed without the prior written consent of Zimplistic Private Limited, Singapore.Zimplistic Private Limited, Singapore reserves the right to enforce all rights in this connection, especially in the event that patents are granted.
Trademarks
Rotimatic® is a registered trademark of Zimplistic Private Limited, Singapore in Singapore and other countries.Product names, company names, and descriptions in this manual may be registered trademarks of other companies. Such terms in this manual are used for explanatory purposes only and no infringement on rights is intended.Google Play® from Google Corporation and App Store (iOS)® from Apple Corporation are registered trademarks.
© 2017 Zimplistic Private Limited, Singapore. All rights reserved.Printed for Zimplistic Private Limited, Singapore.

YOUR SAFETY IS IMPORTANT TO US
THESE SAFETY PRECAUTIONS ARE A PART OF YOUR ROTIMATIC, READ THEM CAREFULLY BEFORE USING ROTIMATIC.
Basic Precautions
1. Rotimatic is designed to prepare rotis in accordance with the instructions and Important Safeguards included in this User Manual. Do not use your Rotimatic for any purpose other than its intended use.
2. Rotimatic is designed for indoor use, in non-extreme temperatures and humidity conditions. Do not use it outdoors and protect the Rotimatic from direct sunlight and water.
3. Rotimatic is intended for household use only. Do not use it for commercial purposes. 4. Rotimatic is not intended for use by children. Please make sure that Rotimatic and its electrical
cords are kept out of reach of children. Close supervision is necessary when Rotimatic is used near children.
5. Rotimatic is not intended for use by people with reduced physical, sensory or mental capabilities, or lack of experience and knowledge, unless they use it under supervision or are given instructions concerning the use of the Rotimatic by a person responsible for their safety.
Important Safeguards Impo
rtan
tsa
fegu
ards
- 5 -
Installation
1. Always place your Rotimatic on a flat, horizontal, stable and even surface. The surface must be heat resistant and should be impermeable to fluids in case of spill, and strong enough to bear the weight of the Rotimatic (44lbs/ 20 kgs).
2. Keep your Rotimatic at least 10cm/ 4 inches away from walls or any object on the same countertop.
3. Do not block the cooling fans located at the side and back of the Rotimatic. 4. Do not use accessories or attachments other than recommended by the manufacturer.

- 6 -
Avoid Risk of Electric Shock and Fire
1. Keep the power cord away from heat, dampness and sharp edges. Contact [email protected] for replacement or repair of damaged cord or plug.
2. Plug your Rotimatic into suitable and grounded electrical sockets only.3. Ensure that the voltage of the power source corresponds to the voltage indicated on the
rating plate on the back of your Rotimatic.4. Do not operate another high wattage appliance on the same circuit along with your
Rotimatic. 5. Always attach the Rotimatic power cord to the Rotimatic first, then connect the electrical
plug into the power outlet. To disconnect, power off your Rotimatic, then remove the plug from the power outlet.
6. In case of emergency, immediately switch off the power and disconnect the Rotimatic.7. Never place your Rotimatic on or beside hot surfaces such as radiators, stoves, ovens, gas
burners, open flame or similar conditions to avoid hazardous damage.
Safe Operation of Rotimatic
1. Do not close the front door while the Rotimatic is in use to avoid over-heating.2. Ensure that there are no liquid spills on any surface, especially on the top, inside the flour
container, inside the flour slot, inside the flour dispensing tunnel and inside the machine.3. Do not open the side door during the roti-making process to avoid danger of injury
from moving parts inside. Open only when prompted by the Rotimatic or for cleaning after rotimaking is complete.
4. Do not remove the flour container or its lid during the roti-making process to avoid danger of injury from moving parts inside. Open only for refilling flour when prompted by the Rotimatic or after roti-making is complete.
5. Do not operate the Rotimatic after malfunction or has been damaged in any manner. Contact [email protected] for examination, adjustment, repair or replacement.
6. Regularly clean the Rotimatic in accordance with instructions to avoid risk of fire or food contamination.
7. Power off your Rotimatic when not in use and before cleaning. Allow the heating pans to cool for 25 minutes before cleaning, removing or reattaching parts.
- 7 -
8. Do not touch hot pans during operation and until at least 25 minutes after use.9. Use tongs or similar utensil to remove completed rotis to avoid risk of burn injury.10. Do not insert or place any part of hand underneath or near the press while Rotimatic is in use or powered on to avoid risk of burn injury.
Heating Surface
1. Do not touch the hot pans during operation under any circumstances! To prevent burn injury allow 25 minutes for the heating parts to cool after use.
2. Do not place your hands or any foreign object on the hot pans.3. Do not insert a roti that has been pushed out on to the front door back on the pans.4. Allow the Rotimatic to cool down for at least 25 mins. Clean the pans with the accessories
provided only after the Rotimatic has completely cooled down.
Food Safety
1. Fill the water container with fresh, potable and room-temperature water.2. Always clean the dough cup and dough tray thoroughly before and after every use to
avoid any food contamination. 3. Ensure that the flour is fresh and not past expiration.4. In high humidity environment, store the filled flour container in a cool, dry place when not
in use.5. Empty and clean the flour and water container when not in use for more than 3 days.6. Clean the flour tunnel daily with the Magic Brush to ensure that there are no traces of
flour left.7. Always remove the water and oil container to refill them to avoid the risk of water spilling
into the flour tunnel as that might result in flour spoilage.8. Change the water in water container on alternative days.

- 8 -
Dimensions40 cm x 40 cm x 45 cm16 x 16 x 18 inches
Product specifications
Voltage and power ratingRated Input Voltage: 110 - 120V AC (ZMA0111A model) 220 - 240V AC (ZMA0111 model)
Rated Input Power: 1600 - 1800 WattsWeight 20 kgs44 lbs
Industry Canada (IC) Compliance Statement
This device complies with Industry Canada licence-exempt RSS standard(s). Operation is subject to the following two conditions:(1) this device may not cause interference, and(2) this device must accept any interference, including interference that may causeundesired operation of the device.
This device complies with IC radiation exposure limits.
Industrie Canada (IC) Déclaration de conformité
Le présent appareil est conforme aux CNR d’Industrie Canada applicables aux appareils radio exempts de licence. L’exploitation est autorisée aux deux conditions suivantes : 1) l’appareil ne doit pas produire de brouillage; et2) l’utilisateur de l’appareil doit accepter tout brouillage radioélectrique subi, même si le brouillage est susceptible d’en compromettre le fonctionnement.

- 9 -
SECTION A
In the box21
4
6
4. Magic Brush
3. Quick Start Guide
2. User Manual
1. Rotimatic
5. Magic Stick
6. Power Cord
In th
e bo
x
3
5

Rotimatic at a glance
SECTION B

Oil container
Containers
Storage Containers
- 11 -
Front door
Cooking section
Kneading section
Side door
Control screen
Water container
Flour container
Rotimatic sections
Rotim
atic
at a
gla
nce

-12 -
Kneading section
Cooking section
Dough cup
Stirrer
Sweeper Dough tray
Kicker
Kicker
Pans
Front door

Control screen
- 13 -
1. Power button
5. Roast level
6. Oil level
2. Number of rotis made
3. Thickness level
10. Input buttons
9. Increase/ decrease roti quantity
7. Start/ Stop button
4. Menu (choose flour options)
8. Number of rotis to be made
1
6
2345
7
8
9
10

Before first use
SECTION C

- 15 -
Open the front door.
After un-boxing Rotimatic, place it on a flat, stable and heat-resistant surface.
Rotimatic has two fans located at rear and left side. Keep it at least 10 cm/ 4 inches away from any wall, cabinet or heated oven to prevent overheating.
2
1
10 cm/ 4 inches
Wall Rotimatic
Befo
re fi
rst u
se
Remove the protection foam from the pan slot.
3

Follow the instructions in Section D, Connect to Wi-Fi (page 17) to update the Rotimatic software, before first use.
Install the Rotimatic App - page 18
Connect Mobile Phone to Rotimatic - page 19
Connect Rotimatic to Home Wi-Fi - page 21
- 16 -
4

Connect to Wi-Fi
SECTION D
Con
nect
to W
i-Fi
SECTION D1
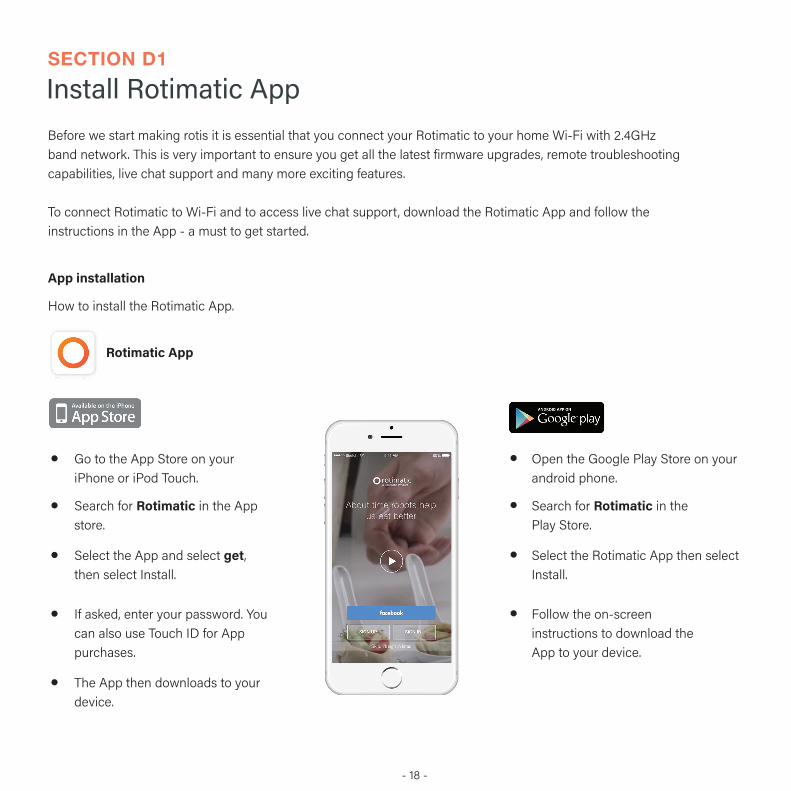
How to install the Rotimatic App.
Rotimatic App
Go to the App Store on your iPhone or iPod Touch.
Open the Google Play Store on your android phone.
Search for Rotimatic in the App store.
Search for Rotimatic in the Play Store.
Select the App and select get, then select Install.
Select the Rotimatic App then select Install.
If asked, enter your password. You can also use Touch ID for App purchases.
Follow the on-screen instructions to download the App to your device.
The App then downloads to your device.
Before we start making rotis it is essential that you connect your Rotimatic to your home Wi-Fi with 2.4GHz band network. This is very important to ensure you get all the latest firmware upgrades, remote troubleshooting capabilities, live chat support and many more exciting features.
To connect Rotimatic to Wi-Fi and to access live chat support, download the Rotimatic App and follow the instructions in the App - a must to get started.
App installation
Install Rotimatic App
- 18 -

Connect Mobile Phone to RotimaticSECTION D2
To reconfigure Wi-Fi, tap the power button and then select the WiFi option. This step is also applicable, if you skipped the Hello screen for the first time.
Power on your Rotimatic. Wait for Rotimatic to complete the Starting up and Final check process.
Once you see the Hello screen, tap the Next button. This screen appears only, when you power on Rotimtaic for the first time.
3
1
4
2
- 19 -
Once you download and install the Rotimatic App on your mobile device, tap the Next button. (Page 18, App installation)

Open the Rotimatic App on your mobile device and sign up. Please ensure that your mobile data is turned off and your mobile is connected to the home Wi-Fi with 2.4GHz band to avoid any problems in connecting.
5 6
- 20 -
After signing up successfully, connect your phone to the Rotimatic Wi-Fi.
Your mobile phone is now synced to Rotimatic.
7

In the Rotimatic App, enter the name and password of your home Wi-Fi and click Connect.
1 2
- 21 -
3
Connect Rotimatic to Home Wi-FiSECTION D3
The Rotimatic screen displays the Connecting Rotimatic to internet message.
Your Rotimatic is now connected to Wi-Fi..

If the connection is successful, your Rotimatic screen will display the Connected message. Whereas the Rotimatic App on your mobile device may take a little longer to show the connected message.
In case you see an error message, refer to the troubleshooting section (Section G - page 45)
4
- 22 -

Let's make rotis
SECTION E
Let's
mak
e ro
tis

- 24 -
Important notesAlways use Rotimatic Approved Power Cord to reduce the risk of electric shock.1.
Use the power cord provided along with Rotimatic and avoid using long extensions to reduce the chances ofentanglement or tripping over a longer cord.
2.
If extension cord is used, it must be the Earthed type (3-pin) and compatible with Rotimatic's electrical rating.3.
Always check if the flour container is completely dry before filling up flour. Any water or dampness inside the flour container can affect the flow of flour during roti-making.
5.
Only use the recommended flour types.6.
No estimation of ingredient quantity is required. Simply fill up the containers and Rotimatic will automatically measure the amount required.
7.
Always keep the front door open during operation to prevent overheating.8.
To ensure safety, plug your Rotimatic into an earthed electrical socket only. Verify that the voltage indicated on the rating plate on the back of the unit corresponds with your electrical power source.
4.
Rotimatic buttons are designed with capacitive touch sensing. Just tap gently with your finger tips. Do not press. Use your thumb tip for a wider touch surface if needed.
9.
Expect some noise at times in the beginning of the roti-making cycle, as Rotimatic is trying to detect the placement of the stirrer.
10.
As the dispensing system and heating pans need time to warm up, the first few rotis might not be perfect.11.
Rotimatic is a smart machine with built-in AI technology that takes into account the flour and water properties. It learns and improves the dough quality over time. Rotimatic uses the information from the first few dough balls to adjust following dough formations.
12.
The steam inside a freshly-puffed roti will continue cooking the roti even after it leaves Rotimatic. To keep rotis fresh, please cover them with soft, absorbent cloth or tissue and store in a casserole for a few minutes before consumption.
13.
Wait for at least 25 minutes before closing the front door and unplugging from the main power source as the cooling fans run to cool down the Rotimatic.
14.
The ingredient containers of Rotimatic are also storage containers. It is not necessary to clean the containers after every use.
15.

- 25 -
Prepareingredients
To reinstall the flour container, insert the flour container by aligning the ridges on the flour container with the groove in the flour slot.
1 2
3
Ensure the flour container is completely dry. Fill up flour to the MAX marking for the best flour flow.
DO NOT overfill or compress flour while filling to ensure a steady dispensing flow.
SECTION E1
To add ingredients, remove the lid of all three storage containers.

- 26 -
Make rotis
Fill the water container with fresh, portable and room-temperature water. Place it in the water container slot and press it down. Fill the oil container. Place it in the oil container slot press it all the way down firmly until you hear a clicking sound.
Open the front door.
Open side door. Ensure that the Dough cup, Stirrer and Dough Tray are properly inserted (Page 35). Close the side door.
4
1
SECTION E2
Slide the dough cup in the slot fully using guiding taps on top.
Gently lift the dough cup upwards while rotating it to the right into locked position.
DO NOT spill water or oil into the flour slot or flour container.

- 27 -
Connect the Rotimatic approved Power Cord to your Rotimatic.
Plug in the cord to Rotimatic before connecting the plug to a wall socket.
DO NOT use any cord other than the Rotimatic Approved Power Cord.
2
3
5
Power on Rotimatic by tapping the Power button using your finger tip.
Select the number of rotis by tapping the increase/decrease buttons
Rotimatic buttons are designed with capacitive touch sensing, tap gently to perfrom an action.
4
Wait for Rotimatic to complete the final checking process.
Select the flour configuration for the flour loaded inside the flour container.
To do so, tap Menu >> tap Flour, select the respective flour option and tap OK.

- 28 -
6
8
7
9
Adjust the thickness, roast and oil level by tapping the input buttons below the screen.
Rotimatic will ask you to confirm the start of operation. Select Yes to confirm.
After about 6 minutes of warming up, your Rotimatic will start dispensing ingredients and making rotis.
Tap Start/ Stop button to start making rotis.

- 29 -
10Remove each roti with a tong as it slides onto the front door.
DO NOT use your hands to pick rotis as freshly-made rotis are hot. Use tongs or similar utensil to remove completed rotis to avoid risk of burn injury.
While the Rotimatic is operating, you can adjust the quantity and preferences. New settings will be activated for the next dough ball.
Power offSECTION E3
Once you have finished roti-making, you will be prompted to power off the Rotimatic. Tap 'Yes' to confirm.Or Tap power button, then tap Yes to confirm powering off Rotimatic.
Wait for at least 25 minutes, before disconnecting from the power source so that the cooling fans can continue to cool the Rotimatic down.
The ingredient containers of Rotimatic are also storage containers. You may leave them in Rotimatic for the next use.
In high humidity environment, store the filled flour container in the fridge or any cool, dry place to avoid flour spoilage. Clean the flour slot and the dispensing tunnel (page 36), then cover the flour slot with a cover.
1 2
3

Clean after useSECTION E4
Follow the instructions in
Section F Cleaning (page 31) to clean
various parts after use.
Kneading parts - page 33
Pans - page 40 Front door - page 40
- 30 -

CleaningSECTION F
Cle
anin
g

- 32 -
Important notes1. Rotimatic is designed for easy cleaning. It will take less than 10 minutes to complete the regular/ advanced cleaning steps for the kneading parts and pans after every use.
2. It is not necessary to clean the ingredient containers after every use. In low to medium humidity environment, simply store the ingredients in Rotimatic for the next use.
In high humidity environment, store the filled flour container in the fridge to avoid flour spoilage. Clean the flour tunnel to avoid leaving any traces of flour in the Rotimatic.
3. Only use the provided accessories to clean Rotimatic.
4. To prevent irreversible damage, do not clean any parts with metal scouring pads, scouring powder, steel wool pads or any other abrasive materials.
5. Only use Magic stick to clean the pans. Do not use any other materials or objects.
The pans could be hot. Do not touch the pans directly. Allow the pans to cool down.
6. Do not immerse the Rotimatic in water or other liquids.
7. Ensure all the parts are dry before you place them inside Rotimatic.
8. Do not spill water or any liquid into the flour container or flour slot during cleaning, filling up or removing the ingredient containers.
9. Do not spill flour into the water or oil slot during cleaning, filling up or removing ingredient containers.
10. It is recommended to perform advanced cleaning at least once every 2 weeks.
11. Advanced cleaning process includes cleaning storage (flour, water and oil) containers, flour dispensing tunnel, front door, pan area, behind Kicker and Sweeper.
12. Rotimatic is designed with a special cleaning modes to help you clean less accessible areas including areas under the VT (Vertical Tray - the plastic part under the Dough Tray), areas behind the Kicker and behind the Sweeper.

Regular cleaningSECTION F1 SECTION F1.1
Open the side door.
Hold the Dough Cup handle and rotate to the left out of locked position.
Rotimatic should be powered off for at least 25 mins to cool down after use before starting the cleaning process, to prevent burn injury.
Gently slide the Dough Cup out of the slot.
Use the Magic Brush to clear any residue around the kneading section and on the Sweeper.
1
2
CLEAN & REINSERT KNEADING PARTS
- 33 -
The regular cleaning includes: cleaning of Dough Tray, Dough Cup, Stirrer and area under VT and flour tunnel.The advanced cleaning includes: cleaning of oil/ water tunnel, front door, pan area, behind Kicker and Sweeper.

- 34-
Press the two tabs at the top of the stirrer. Push the Stirrer inwards to remove it from the Dough Cup.
Put aside for washing.
Squeeze the black rubber band and pull it out from the Dough Tray to clean.Pull the Dough Tray towards you to remove it.
To insert the Dough Tray, slide it into its slot on the VT (Vertical Tray - the plastic part at the base of the knead-ing section).
3
54
6
Handwash all parts with mild detergent or use upper basket in dishwasher. Wipe each part and let dry before inserting them inside Rotimatic.
VT
Vertical tray is the plastic part at the base of the kneading section.
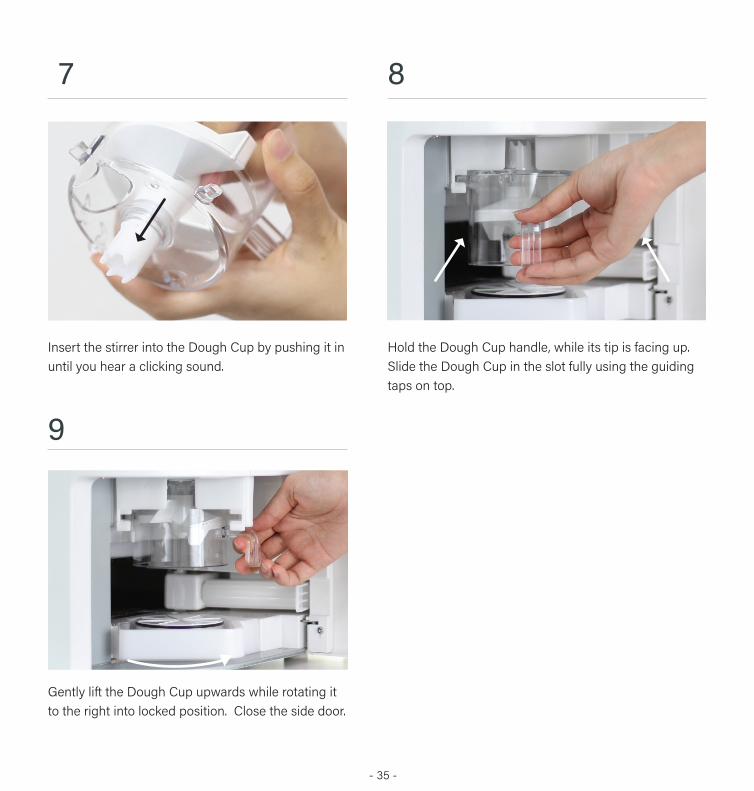
Insert the stirrer into the Dough Cup by pushing it in until you hear a clicking sound.
Hold the Dough Cup handle, while its tip is facing up. Slide the Dough Cup in the slot fully using the guiding taps on top.
Gently lift the Dough Cup upwards while rotating it to the right into locked position. Close the side door.
7 8
9
- 35 -

- 36 -
SECTION F1.2CLEAN FLOUR TUNNEL
Use Magic Brush to brush off any flour residue down to the kneading area through the flour dispensing tunnel.
1
2Use a dry cloth or tissue to remove any flour clog. Ensure the flour slot and flour dispensing tunnel are completely dry before re-inserting the flour container.
3Clean any flour residue which may have dropped down to the kneading area.
Flour dispensing tunnel

- 37 -
CLEAN UNDER VT (VERTICAL TRAY)
1 32
Ensure the Rotimatic is on. Tap the power button.
Select VT. VT (under dough tray) will automatically move up. For slur-ry/ imperfect dough, clean under VT.
Tap the button below Cleaning to enter cleaning mode.
SECTION F1.3
4 5 6
Open the side door, use Magic Brush to clear flour from under the VT. Once cleaning is done, shut the side door.
Re-select VT. VT will automatically move down.
Select Back to return to the normal roti setting screen.

- 38 -
Pull the 3 ingredient containers up and out of the slots. Empty and put aside for washing.
Hold the top in one hand and the bottom in the other hand. Turn the Flour Container counter-clockwise to separate the top and bottom parts. Remove the white ring from the bottom. Hold the top of the container in your one hand, pinch the 3 tabs of the white flour dispensing blade, push them inside to remove the flour dispensing blade from the container.
1
2
Advanced cleaningSECTION F2 SECTION F2.1
CLEAN INGREDIENT CONTAINERS
DISASSEMBLE FLOUR CONTAINER
Wait for at least 25 minutes to allow the pans to cool down and ensure the power is off prior to cleaning.
1 2 3 4
1. Remove the white flour dispensing blade.2. Twist in opposite direction.3. Match and push down.4. Pull out.

1. Place the white ring into the bottom part with the toothed center facing up. 2. To assemble flour dispensing blade, twist and lock the two parts.3. Insert the white flour dispensing blade into the top part of the container until you hear a clicking sound. 4. Align the notches on the top part of the container with the slots on the bottom part.5. Twist the top clock-wise until you hear a clicking sound.
- 39 -
Handwash all the three containers and their parts with a mild detergent or wash in the top rack of a dishwasher.Wipe and let dry completely before filling up the ingredients and inserting them back in your Rotimatic.
DO NOT fill up flour in a wet container. Any water or dampness inside flour container can affect flour flow during operation. Empty and clean the flour and water container, when not in use for more than three days.
3
1. Use the sponge to clean and soak up leftover liquid in the water/oil slot. 2. Sponges are high quality absorbents , so they can be washed and
reused. DO NOT throw them away, sponges are not covered under warranty.
3. Wash sponges under running water or with dishwashing liquid.
2
1. Put sponge on the rear end of the magic brush to clean Water/Oil slot.2. Keep separate sponges for Water & Oil slots.
1SECTION F2.2CLEAN WATER/OIL SLOT
ASSEMBLE FLOUR CONTAINER41 2 3 4 5

-40 -
SECTION F2.3
SECTION F2.4CLEAN FRONT DOOR
CLEAN PANS
Check if Rotimatic is powered off. Before cleaning, ensure Rotimatic is powered off for at least 25 minutes to allow for sufficient cooling.
Use Magic Stick to dry wipe both the top & bottom pans.
For thorough cleaning, detach the front door by holding it with both hands, pulling it up, then towards you from one side. Make sure the door is in partial open condition before it can be pulled out.
Brush any residue off the front door and door slot. Wash the front door and wipe dry if necessary.
1 2
1After use, wait for 25 minutes to allow the pans to cool down, before you start cleaning the pans.
Outer cloth of the Magic Stick can only be removed for washing. Please ensure the cloth is always present on the Magic Stick while cleaning the pans.

- 41 -
SECTION F2.5
3
Select SWEEPER. The Sweeper will automatically move out.
CLEAN BEHIND SWEEPER
1 2
Ensure the Rotimatic is on. Tap the power button.
Tap the button below Cleaning to enter cleaning mode.
2 3
Reinsert the front door by aligning the left tab of the door, then insert the right side tab and let it slide down into locked position. The door can't be inserted at fully opened condition, it can be inserted in almost closed condition.
Close the front door when your Rotimatic is not in use

- 42 -
987
Re-select SWEEPER. Sweeper will automatically move back.
Once cleaning is finished, close the side door.Pull the flap back to insert the roller
back into the Sweeper.
Wash roller. Let dry.
Roller
4 5 6
Open the side door. Use Magic Brush to clear any flour around the Sweeper.
Press the tab on the Sweeper flap down, pull the flap out, remove the roller to clean.
Clean any residue sticking on theSweeper arm. To clean behind Sweeper, use the Magic Stick's rear sharper end.
Sweeper Flap

SECTION F2.6CLEAN BEHIND KICKER
• The Kicker is the robotic arm of Rotimatic that moves each roti from the back pans to the front pans.
• For your safety, Kicker should only be cleaned when pans have completely cooled down.
• Rotimatic will display an error message if the pans are not cool enough. As a caution, do not touch hot pans.
• The best time to clean the Kicker is before you start making rotis.
Select KICKER.
If pans are hot, Rotimatic will ask you to wait for the pans to cool down before cleaning.
If pans are cool enough, the kicker will automatically move to the front.
1 2
3
Ensure the Rotimatic is on. Tap the Power button.
Tap the button below Cleaning to enter cleaning mode.
- 43 -
Kicker

- 44 -
Ensure that the pans are cool. Remove the Kicker by pulling the Kicker tab to the right. Pull the Kicker out from one side.
Use the Magic Stick to clean the front pan, back pan, top pan and bottom pan.
Once the Kicker is dry, place it on the pan. Hold the Kicker on the left. Push it inwards until you hear a soft clicking sound.
Re-select KICKER. The kicker will automatically move to the back.
Select Back to return to the roti setting screen.
Wash Kicker and let dry.
7
8
4
5
6

TroubleshootingSECTION GIf you encounter any error message during roti-making:
1. Follow the instructions on the screen. 2. Tap OK to proceed.
If the issue persists: 1. Check the kneading section and the cooking section for any unfinished roti, dough or residue. 2. Remove the unfinished roti, dough or residue using the Magic Stick (cleaning brush provided with the Rotimatic). 3. Make sure dough cup, dough tray and pans are free from excessive flour residues. 4. Resume roti-making.
If the issue persists, check if any flour has clogged inside the flour slot, flour container or the flour dispensing tunnel. If so: 1. Clean the flour dispensing tunnel, wipe dry completely. 2. Clean the flour container. Let it dry completely. Fill up the flour container to the 'MAX' marking on the container. 3. Resume roti-making.
In case Rotimatic hangs or the power button is not responsive: 1. Unplug Rotimatic from the power source. 2. Wait for two minutes, then reconnect Rotimatic to the power source and switch on the power. 3. Tap the Rotimatic power button to restart Rotimatic.
In case you are not able to connect Rotimatic to the Wi-Fi: 1. Please ensure that your mobile phone's data mode is turned off and your mobile phone is connected to the home Wi-Fi. 2. There might be an installation problem with the Rotimatic App. Uninstall and try installing the App again. 3. Please make sure you have enabled 2.4Ghz frequency for your Wi-Fi router.
Rotimatic does not support 5.0Ghz frequency with Wi-Fi.
4. If the issue persists, contact [email protected].
For more detailed troubleshooting instructions and video guides, visit: https://rotimatic.com/
- 45 - Trou
bles
hoot
ing

Zimplistic’s warranty obligations for all products sold by Zimplistic on this site are limited to the terms set forth below:
Zimplistic will provide the repair and replacement services described in further detail below for the Rotimatic (excluding software) and associated Zimplistic hardware products against defects in materials design and workmanship under normal use for a period of one year from the date of delivery to the original end-user purchaser (“Warranty Period”). Zimplistic’s repair and replacement services under this Exclusive Limited Warranty described herein do not serve, and shall not be interpreted as making any representation concerning the Rotimatic or Zimplistic. Zimplistic does not represent or claim through its Exclusive Limited Warranty that all products will be completely free of defects and this Exclusive Limited Warranty shall not serve as an express or implied warranty about the Rotimatic in any manner whatsoever.
If a product defect arises and a valid claim is received within the Warranty period, at Zimplistic's sole option and to the extent permitted by law, Zimplistic will either (1) repair the product defect at no charge, using new or refurbished replacement parts, or (2) exchange the product with a product that is new or refurbished by Zimplistic or that has been manufactured from new or serviceable used parts and is at least functionally equivalent to the original product. If Zimplistic is unable to repair or replace such products within a timeframe determined by Zimplistic, acting reasonably, Zimplistic will refund you the amounts paid for such defective or non-conforming Products.
Zimplistic may request that you replace defective parts with new or refurbished user-installable parts that Zimplistic provides in fulfillment of its warranty obligation.
A replacement product or part, including a user-installable part that has been installed in accordance with instructions provided by Zimplistic, assumes the remaining warranty of the original product or ninety (90) days from the date of replacement or repair, whichever provides longer coverage for you.
When a Product or part is exchanged, any replacement item becomes your property and the replaced item becomes Zimplistic’s property. Parts provided by Zimplistic in fulfillment of its warranty obligation must be used in products for which warranty service is claimed. When a refund is given, the product for which the refund is provided must be returned to Zimplistic unless specified otherwise. In order to be eligible for refund, the returned products must not be damaged by misuse, abuse, or disassembly.
Exclusive Limited Warranty
- 46-
SECTION H

Exclusions from and Limitation to Warranty
This Limited Warranty applies only to the hardware Products manufactured by or for Zimplistic. The Limited Warranty does not apply to any non-Zimplistic products or any software, even if packaged or sold with the Rotimatic. ZIMPLISTIC, IN SO FAR AS IS PERMITTED BY LAW, PROVIDES ITS PRODUCTS “AS IS”. Software distributed by Zimplistic with or without the Zimplistic brand name (including, but not limited to system software) is not covered under this Limited Warranty. Refer to the Terms of Use for the software for details of your rights with respect to its use.
Zimplistic does not warrant that the operation of the product will be uninterrupted or error-free. Zimplistic is not responsible for damage arising from failure to follow instructions relating to the product's use.
This warranty does not apply to (a) any damage caused by use of the product in a manner not in accordance with, the documentation, guidelines or instructions provided by Zimplistic (b) any damage caused by accident, abuse, misuse, flood, fire, earthquake, electrical surges, power failure or other external causes; (c) any damage caused by operating the product outside the permitted or intended uses described by Zimplistic; (d) any damage caused by service (including upgrades and expansions) performed by anyone who is not a representative of Zimplistic or its authorized representative; (e) any product or part that has been modified to alter functionality or capability without the written permission of Zimplistic ; (f ) any consumable parts; (g) any cosmetic damage, including but not limit-ed to scratches, dents; (h) if any Zimplistic serial number has been removed or defaced or (i) your breach of these Terms of Sale.
Except as explicitly provided in the Terms of Sale, no representations have been made, and no warranties have been given to you by Zimplistic, its agents or employees, concerning the product and none shall be implied from this transaction. We do not guarantee, represent or warrant that your use of our service or any Zimplistic product will be uninterrupted, timely, secure or error-free. We do not warrant that the results obtained from the use of the service or the product will be accurate or reliable. You agree that from time to time we may remove the service for indefinite periods of time or cancel the service at any time, without notice to you.
Zimplistic believes its products work as intended, but you should not use any Zimplistic product in any situation where health or safety might be at risk. In addition, Zimplistic products should not be used by underage users un-less supervised. Zimplistic disclaims any express or implied warranty of fitness for such usage.
ALL EXPRESS AND IMPLIED WARRANTIES, INCLUDING BUT NOT LIMITED TO ANY IMPLIED WARRANTIES AND CONDITIONS OF MERCHANTABILITY AND FITNESS FOR A PARTICULAR PURPOSE, ARE EXPRESSLY DISCLAIMED. NO WARRANTY OBLIGATIONS WILL APPLY AFTER THE EXPIRATION OF THE LIMITED WAR-RANTY PERIOD.
No Zimplistic reseller, agent, or employee is authorized to make any modification, extension, or addition to this war-ranty. If any term is held to be illegal or unenforceable, the legality or enforceability of the remaining terms shall not be affected or impaired.
- 47- Trou
bles
hoot
ing
EXCEPT AS PROVIDED IN THIS WARRANTY AND TO THE EXTENT PERMITTED BY LAW, ZIMPLISTIC SHALL NOT BE RESPONSIBLE NOR LIABLE FOR ANY LOSS, DAMAGE, OR INJURY (INCLUDING DEATH) TO ANY PARTY, INDIVIDUAL, OR ENTITY NOR BE RESPONSIBLE FOR OTHER CASUALTY OF ANY KIND, INCLUDING BUT NOT LIMITED TO DIRECT, INDIRECT, SPECIAL, INCIDENTAL OR CONSEQUENTIAL DAMAGES RESULTING FROM ANY BREACH OF WARRANTY OR CONDITION OR ANY OTHER REASON, OR UNDER ANY OTHER LEGAL THEORY, INCLUDING BUT NOT LIMITED TO LOSS OF USE; LOSS OF REVENUE; LOSS OF ACTUAL OR ANTICIPATED PROFITS (INCLUDING LOSS OF PROFITS ON CONTRACTS); LOSS OF THE USE OF MONEY; LOSS OF ANTICIPATED SAVINGS; LOSS OF BUSINESS; LOSS OF OPPORTUNITY; LOSS OF GOODWILL; LOSS OF REPUTATION; LOSS OF, DAMAGE TO OR CORRUPTION OF DATA; OR ANY INDIRECT OR CONSEQUENTIAL LOSS OR DAMAGE HOWSOEVER CAUSED, INCLUDING THE REPLACEMENT OF EQUIPMENT AND PROPERTY, ANY COSTS OF RECOVERING, PROGRAMMING, OR REPRODUCING ANY PROGRAM OR DATA STORED OR USED WITH ZIMPLISTIC PRODUCTS AND ANY FAILURE TO MAINTAIN THE CONFIDENTIALITY OF DATA STORED ON THE PRODUCT. SOME STATES OR COUNTRIES DO NOT ALLOW THE EXCLUSION OR LIMITATION OF INCIDENTAL OR CONSEQUENTIAL DAMAGES, IN WHICH INSTANCE, THIS PARAGRAPH WILL BE GIVEN THE GREATEST EFFECT ALLOWABLE BY LAW.
- 48 -
Obtaining Warranty Service
Please refer to https://rotimatic.com/ for the basic troubleshooting guide before requesting warranty service. If the product is still not functioning properly after making use of these resources, please contact Zimplistic Customer Care team at [email protected]. You must assist in diagnosing issues with your product and follow Zimplistic’s warranty processes.
Zimplistic may restrict warranty service outside of Singapore and the United States. Zimplistic may provide warranty service by (i) servicing your product at one of our repair service locations or (ii) by sending you a new or refurbished replacement product or parts, at our sole option and to the extent permitted by law.
Service options, parts availability, and response times may vary. Service options are subject to change at any time. In accordance with Applicable law, Zimplistic may require that you furnish proof of purchase details and/or comply with registration requirements before receiving warranty service. Please refer to the accompanying documentation for more details on this and other matters on obtaining warranty service.
All shipment of any Products is at your expense, unless Zimplistic otherwise agrees in writing. Zimplistic will maintain and use customer information in accordance with the Zimplistic Privacy Policy. Your product will be returned to you configured as originally purchased, subject to applicable updates.
To purchase extended warranty, visit https://rotimatic.com/.

Thank you for choosing Rotimatic,a technologically advanced automatic flatbread making robot.
The manufacturer's warranty period for your new Rotimatic product can be found in the warranty information on our website.
This limited warranty does not apply to the following:
(a) Customer-induced damages such asmishandling or misuse resulting to physical, mechanical or functional defect; (b) Damage resulting from causes beyondcontrol such as power surges, water damage or lightning strike, or any other calamity etc.;
(c) Unauthorized repair, alteration, modification or disassembly; and
(d) Removed or erased discernable identifying serial numbers.
Warranty period is one (1) year start-ing from the date of delivery. Within which Zimplistic, at its own discre-tion, will either:
(a) Repair the defect at no charge, using new or refurbished replace-ment parts,
(b) Exchange the product with a product that is new or refurbished by Zimplistic.
Return/Refund Policy
You can return the purchased items to Zimplistic for a refund within thirty (30) days from the date of purchase mentioned in your invoice.
Before you install your Rotimatic product, read the FCC notice and other regulatory material, including Important Safeguards section in the User Manual.
Safety Information
Warranty Information
Limited Warranty Policy Restrictions
- 49 -
Zimplistic does its best to ensure an uninterrupted and error-free availability of the services. Nevertheless, this cannot be always guaranteed by the nature of internet system, because of technical suspensions or restrictions that may take place, related or not to repairs, maintenance, or new services being carried out. Our company shall do its best to limit the number and the duration of such suspensions or restrictions

Contact our friendly Customer Care Representatives at [email protected], with this information ready:
• Registeration details.
• Your receipt/ invoice as proof of purchase.
• Detailed description of the problem.
• Diagnostic error messages, if any.
• Details about recent configuration changes or changes to your device or network.
Return Authorizations: If your unit cannot be restored remotely and you are asked to return it under the terms of your warranty, it will be processed as a Return, subject to the terms of this policy. You must assist the Customer Support staff by providing all necessary documentation and authorizations so that the factory can ensure proper tracking and handling of returned material.
3.
- 50 -
Customer Support
If (a) your hardware fails during the warranty period; (b) your hardware fails after the warranty period; (c) you have agreed to enroll in an extended warranty program or special request service; (d) you have other queries, please contact our friendly Customer Care Representatives by following these steps:
Read the information in this Exclusive Limited Warranty section carefully to determine your warranty period and understand all the Terms.
1.
2.