contents search index - sony hd snap camera mhs-ts10/ts20/ts20k table of contents operation search...
TRANSCRIPT

© 2010 Sony Corporation 4-261-655-11(1)GB
HandbookMobile HD Snap CameraMHS-TS10/TS20/TS20K
Table of
contentsO
peration S
earchS
ettings S
earchIndex

Table of
contentsO
peration S
earchS
ettings S
earchIndex
2GB
How to use this handbookClick on a button on the right to jump to the corresponding page.This is convenient when searching for a function you want to view.
Search for information by function.
Search for information by operation.
Search for information in a listing of Settings items.
Search for information by keyword.
Marks and notations used in this handbook
Table of
contents
Operation S
earchS
ettings S
earchInd
ex
In this handbook, the sequence of operations is shown by arrows (t). Operate the camera in the order indicated. Marks are shown as they appear in the camera’s default setting.
The default setting is indicated by .
Indicates cautions and limitations relevant to the correct operation of the camera.
z Indicates information that is useful to know.
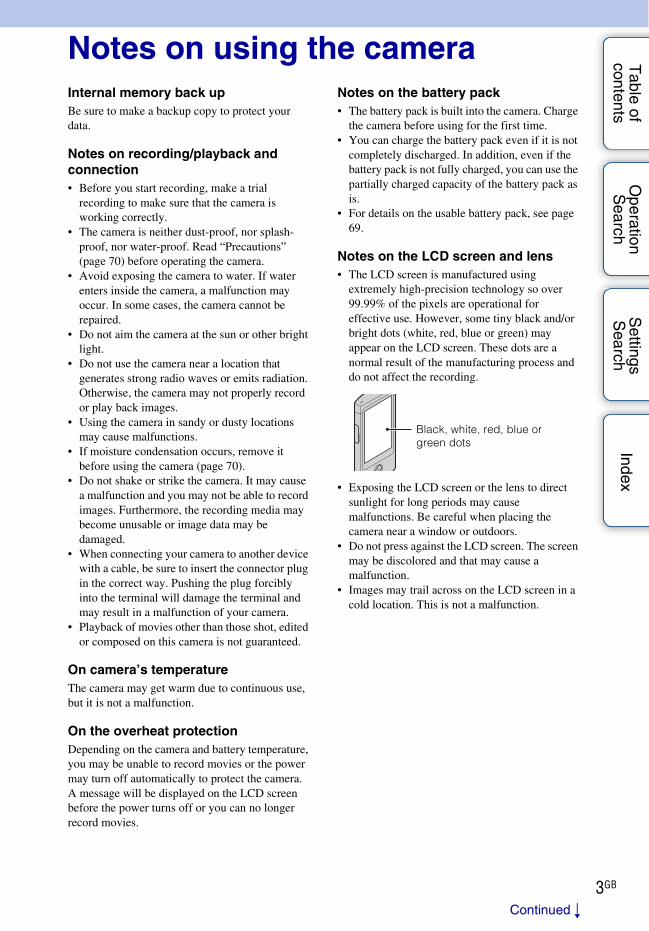
Table of
contentsO
peration S
earchS
ettings S
earchIndex
3GB
Notes on using the cameraInternal memory back upBe sure to make a backup copy to protect your data.
Notes on recording/playback and connection• Before you start recording, make a trial
recording to make sure that the camera is working correctly.
• The camera is neither dust-proof, nor splash-proof, nor water-proof. Read “Precautions” (page 70) before operating the camera.
• Avoid exposing the camera to water. If water enters inside the camera, a malfunction may occur. In some cases, the camera cannot be repaired.
• Do not aim the camera at the sun or other bright light.
• Do not use the camera near a location that generates strong radio waves or emits radiation. Otherwise, the camera may not properly record or play back images.
• Using the camera in sandy or dusty locations may cause malfunctions.
• If moisture condensation occurs, remove it before using the camera (page 70).
• Do not shake or strike the camera. It may cause a malfunction and you may not be able to record images. Furthermore, the recording media may become unusable or image data may be damaged.
• When connecting your camera to another device with a cable, be sure to insert the connector plug in the correct way. Pushing the plug forcibly into the terminal will damage the terminal and may result in a malfunction of your camera.
• Playback of movies other than those shot, edited or composed on this camera is not guaranteed.
On camera’s temperatureThe camera may get warm due to continuous use, but it is not a malfunction.
On the overheat protectionDepending on the camera and battery temperature, you may be unable to record movies or the power may turn off automatically to protect the camera. A message will be displayed on the LCD screen before the power turns off or you can no longer record movies.
Notes on the battery pack• The battery pack is built into the camera. Charge
the camera before using for the first time.• You can charge the battery pack even if it is not
completely discharged. In addition, even if the battery pack is not fully charged, you can use the partially charged capacity of the battery pack as is.
• For details on the usable battery pack, see page 69.
Notes on the LCD screen and lens• The LCD screen is manufactured using
extremely high-precision technology so over 99.99% of the pixels are operational for effective use. However, some tiny black and/or bright dots (white, red, blue or green) may appear on the LCD screen. These dots are a normal result of the manufacturing process and do not affect the recording.
• Exposing the LCD screen or the lens to direct sunlight for long periods may cause malfunctions. Be careful when placing the camera near a window or outdoors.
• Do not press against the LCD screen. The screen may be discolored and that may cause a malfunction.
• Images may trail across on the LCD screen in a cold location. This is not a malfunction.
Black, white, red, blue or green dots
Continued r

Table of
contentsO
peration S
earchS
ettings S
earchIndex
4GB
On image data compatibility• This camera supports “MP4 format” as movie
file format. Therefore, movies recorded by this camera cannot be played on devices that do not support “MP4 format”.
• This camera does not support “AVCHD format” and therefore is not compatible with the playback and recording of movies in “AVCHD format” like a Digital HD Video camera recorder.
• Still images recorded by this camera are compressed/recorded in JPEG format. The file extension is “.JPG”.
• The camera conforms with DCF (Design rule for Camera File system) universal standard established by JEITA (Japan Electronics and Information Technology Industries Association).
• Sony does not guarantee that the camera will play back images recorded or edited with other equipment, or that other equipment will play back images recorded with the camera.
Warning on copyrightTelevision programs, films, videotapes, and other materials may be copyrighted. Unauthorized recording of such materials may be contrary to the provisions of the copyright laws.
No compensation for damaged content or recording failureSony cannot compensate for failure to record or loss or damage of recorded content due to a malfunction of the camera or recording media, etc.
The images used in this handbook• The images used as examples in this handbook
are reproduced images, and are not actual images shot using the camera.
• Design and specifications are subject to change without notice.
Notes on playing back movies on other devicesThe camera is compatible with MPEG-4 AVC/H.264 Main Profile for HD (high definition) image quality recording. Therefore, you cannot play back images recorded with HD (high definition) image quality on the camera with the devices which are not compatible with the MPEG-4 AVC/H.264.

Table of
contentsO
peration S
earchS
ettings S
earchIndex
5GB
Life with “Bloggie”
Capture your life
At a partyRecord still images at maximum 12M (4128 × 3096) and movies at maximum 1920 × 1080 30p full high-vision (page 36, 37). Also, you can record still images during movie recording (page 31).
During a walkTake compact “Bloggie” with you anywhere, anytime. Take it out, and record casually.
On a tripAttach the 360 Video Lens to “Bloggie” and shoot exciting 360-degree panoramic images of the world around you. Enjoy 360-degree panoramic images by playing back with the Bloggie Software pre-loaded on the internal memory (page 34). (MHS-TS20K only)
Continued r

Table of
contentsO
peration S
earchS
ettings S
earchIndex
6GB
Share your life
Connect to TVConnect your “Bloggie” to a TV with an HDMI cable (sold separately), and enjoy images on the big screen (page 60).
Import and upload captured momentsYou can upload images easily and intuitively, using the Bloggie Software pre-loaded on the internal memory (page 24, 50).You can also choose the images and the sharing site to upload in advance (Share it Later) (page 43).

Table of
contentsO
peration S
earchS
ettings S
earchIndex
7GB
Table of contents
Notes on using the cameraHow to use this handbook····································· 2Notes on using the camera ··································· 3Life with “Bloggie”·················································· 5Operation Search ················································ 10Settings Search··················································· 11Identifying parts··················································· 13List of buttons/icons displayed on the screen ····· 14How to hold the camera ······································ 16How to use the touch panel································· 18
Getting startedChecking the accessories supplied····················· 20Charging the camera··········································· 21Installing the software (Windows) ······················· 24Setting the language and clock ··························· 26
ShootingShooting (Still images) ········································ 28Shooting (Movies) ··············································· 30Zoom··································································· 32Self-Timer···························································· 33Shooting 360 Video images (MHS-TS20K only) ···································································· 34Photo Size··························································· 36Movie Size··························································· 38
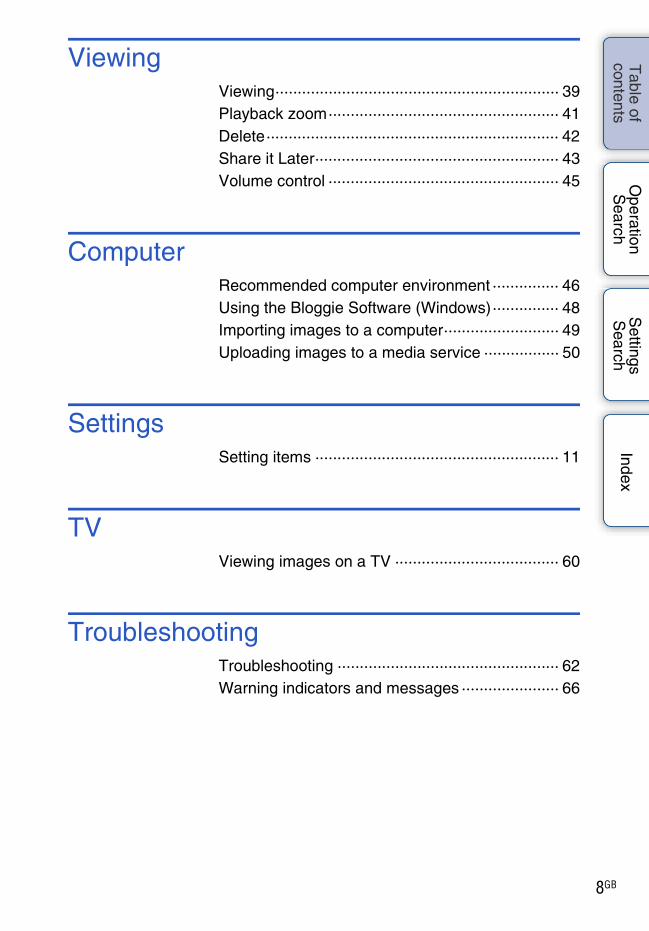
Table of
contentsO
peration S
earchS
ettings S
earchIndex
8GB
ViewingViewing································································ 39Playback zoom···················································· 41Delete·································································· 42Share it Later······················································· 43Volume control ···················································· 45
ComputerRecommended computer environment ··············· 46Using the Bloggie Software (Windows)··············· 48Importing images to a computer·························· 49Uploading images to a media service ················· 50
SettingsSetting items ······················································· 11
TVViewing images on a TV ····································· 60
TroubleshootingTroubleshooting ·················································· 62Warning indicators and messages ······················ 66

Table of
contentsO
peration S
earchS
ettings S
earchIndex
9GB
OthersNumber of still images and recordable time of movies································································· 68Built-in battery pack············································· 69Precautions ························································· 70Specifications ······················································ 71
IndexIndex ··································································· 73

Table of
contentsO
peration S
earchS
ettings S
earchIndex
10GB
Operation Search
Shooting sill images Shooting (Still images)······································· 28
Shooting movies Shooting (Movies) ··············································· 30
Changing image size Photo Size ····························································· 36
Movie Size ····························································· 38
Deleting images Delete······································································ 42
Format ···································································· 58
Displaying enlarged images
Playback zoom····················································· 41
Changing clock settings
Date & Time Setting············································ 59
Initializing settings Initialize··································································· 55
Viewing on TVs Connecting with an HDMI cable (sold separately) ·················································· 60
Mark the images to upload
Share it Later ························································ 43
Shooting a 360-degree view (MHS-TS20K only)
360 Video Lens ···················································· 34

Table of
contentsO
peration S
earchS
ettings S
earchIndex
11GB
Settings Search
In the table below, indicates settings that can be changed, while – indicates settings that cannot be changed.
1 Press the ON/OFF (Power) button.
2 Tap (Settings).
Setting items
Items Shooting mode Playback mode
Protect –
Beep
Language Setting
Demo Mode
Initialize
HDMI Output
LUN Settings
Format
Date & Time Setting
How to set items
ON/OFF (Power) button
Continued r

Table of
contentsO
peration S
earchS
ettings S
earchIndex
12GB
3 Tap the items.The displayed items scroll by dragging the LCD screen up and down with your finger.
4 Tap the desired mode.
5 Tap [Back].

Table of
contentsO
peration S
earchS
ettings S
earchIndex
13GB
Identifying partsA Speaker
B Lens
C Hook for wrist strap
D LCD screen/Touch panel
E Movie button
F Microphone
G ON/OFF (Power) button• Press and hold the ON/OFF (Power) button
for at least 7 seconds to force-quit the camera.
H Charge lamp
I (Shutter) button
J Tripod receptacle
K (USB) jack
L Jack cover
M HDMI OUT jack (60)
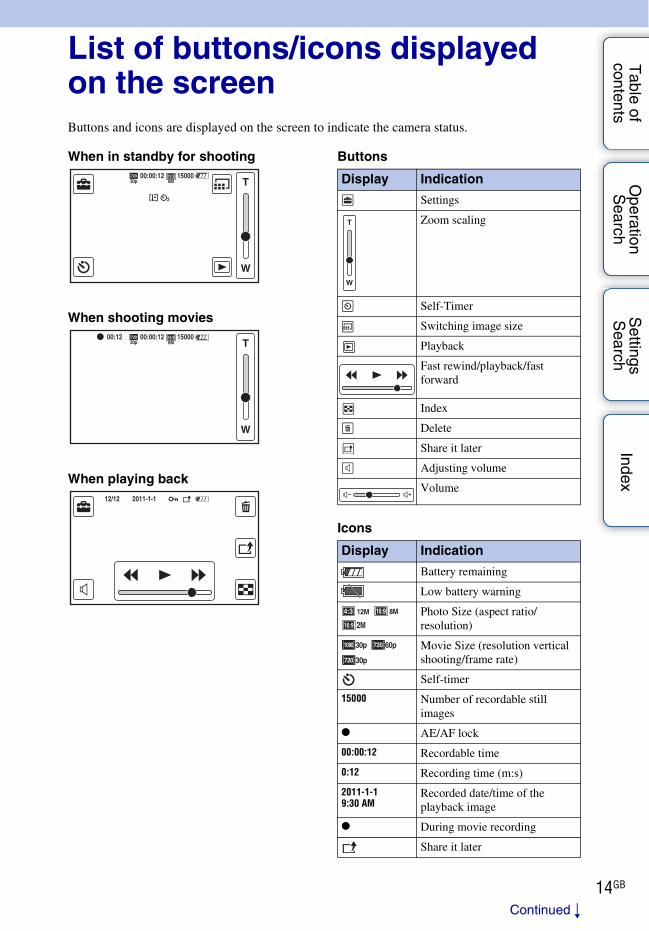
Table of
contentsO
peration S
earchS
ettings S
earchIndex
14GB
List of buttons/icons displayed on the screenButtons and icons are displayed on the screen to indicate the camera status.
When in standby for shooting
When shooting movies
When playing back
Buttons
Icons
Display Indication
Settings
Zoom scaling
Self-Timer
Switching image size
Playback
Fast rewind/playback/fast forward
Index
Delete
Share it later
Adjusting volume
Volume
Display Indication
Battery remaining
Low battery warning
Photo Size (aspect ratio/resolution)
Movie Size (resolution vertical shooting/frame rate)
Self-timer
15000 Number of recordable still images
z AE/AF lock
00:00:12 Recordable time
0:12 Recording time (m:s)
2011-1-19:30 AM
Recorded date/time of the playback image
z During movie recording
Share it later
Continued r

Table of
contentsO
peration S
earchS
ettings S
earchIndex
15GB
• Indicators and their positions are approximate and differ from what you actually see.
• The screen display shifts both horizontally and vertically depending on the camera aspect.
• The screen display disappears automatically after about 4 seconds. You can change display/nondisplay by tapping the LCD screen.
Protect
Overheating warning
00:00:12 Counter
Notes
Display Indication

Table of
contentsO
peration S
earchS
ettings S
earchIndex
16GB
How to hold the camera• Be careful not to block the lens or microphone with your finger when shooting.
• Do not hold the USB jack.
• Attach the strap and place your hand through its loop to prevent the camera from damage by being dropped.
Hook
Continued r

Table of
contentsO
peration S
earchS
ettings S
earchIndex
17GB
zWhen you shoot movies holding the camera vertically
Portrait images are recorded. Black bands appear on the left and right of the screen during playback on TV or computer. This is useful when shooting portrait objects.

Table of
contentsO
peration S
earchS
ettings S
earchIndex
18GB
How to use the touch panelYou can operate the camera by tapping the buttons on the LCD screen or dragging the screen.
• Do not operate with a sharp-pointed object, such as pen or finger nail.
Lightly touch the buttons or items on the screen with your finger.
Touch and slide the screen with your finger.
Note
Select the items (Tap)
Scroll the screen (Drag)
Drag upwards Release your finger

Table of
contentsO
peration S
earchS
ettings S
earchIndex
19GB
Drag the screen quickly. To stop the screen, tap with your finger.
Display the next screen quickly (Flick)

Table of
contentsO
peration S
earchS
ettings S
earchIndex
20GB
Checking the accessories supplied• USB connection support cable (1)
• 360 Video Lens VCL-BPP2 (1)/360 Video Lens case (1) (MHS-TS20K only)
• Wrist strap (1)• Software (page 24, 48)
The following contents are included in the internal memory of this camera.– Bloggie Software (application software)– Bloggie Handbook (this manual)
• Instruction Manual (1)• Important Notice (1)

Table of
contentsO
peration S
earchS
ettings S
earchIndex
21GB
Charging the cameraThe camera’s battery is continuously recharged whenever the camera is connected to a running computer.
1 Press the ON/OFF (Power) button to turn off the camera.
2 Push the “PUSH” part at the bottom of the camera.The USB jack comes out as shown in the illustration.
3 Connect the camera to the computer that is turned on with the USB connection support cable (supplied).The charge lamp lights up in orange, and charging starts.When the charge lamp turns off, charging is finished.• The charge lamp may turn off when the temperature is outside
of the recommended operating temperature (10°C to 30°C (50°F to 86°F)).
ON/OFF (Power) button
USB jackPUSH
USB connection support cable (supplied)
Charge lamp
Insert until fully seated
Continued r

Table of
contentsO
peration S
earchS
ettings S
earchIndex
22GB
4 When charging is finished, delete the USB connection between the camera and computer.• Install Bloggie Software (pre-loaded on the internal memory) after completing the procedure above.
• While the camera is connected to a computer, you cannot operate the camera. Be sure to disconnect the camera before operation.
• Do not apply force to the camera, when you connect the camera to a computer. This may cause damage to the camera or the computer.
• When you connect the camera to a notebook computer that is not connected to an AC power source, the battery of the notebook computer may be depleted rapidly. Do not leave the camera connected to the computer for a long time.
• Charging the battery or the connection with customized or hand-built computers is not guaranteed. Depending on the type of USB device used, charging may not function properly.
• If you do not intend to use the camera for an extended period, charge the camera once every 6 to 12 months to maintain battery performance.
Perform the procedures from step 1 to 3 below before:• Disconnecting the USB connection support cable.• Turning off the camera.
1 Double-click the disconnect icon on the tasktray.
2 Click (USB Mass Storage Device) t [Stop].
3 Confirm the device on the confirmation window, then click [OK].
• Drag and drop the drive icon to the “Trash” icon beforehand when you use a Macintosh computer, and the camera is disconnected from the computer.
Notes
Deleting the USB connection
Note
Windows Vista
Disconnect icon
Windows XP
zTo retract the USB jackPush the USB jack back in the direction of the arrow until it clicks.
Continued r

Table of
contentsO
peration S
earchS
ettings S
earchIndex
23GB
zHow long does it take to charge the camera?
Charging time
• Time required to charge a fully depleted battery at a temperature of 25°C (77°F). Charging may take longer under certain circumstances or conditions.
Full charge time
Approx. 200 min.
zHow long can I record or play back images?
Standard battery life
*1 Recording time is the time when you set image size to [1280×720 30p].*2 Continuous recording time shows the approximate time available of a fully charged battery pack.
Continuous recording of movies is possible for approximately 29 minutes. Also, recording stops automatically to prevent the file size from exceeding 2 GB.
*3 Typical recording time shows the approximate time available of a fully charged battery pack when you repeat recording start/stop, turning the power on/off and zooming.
Recording time*1
Continuous recording time*2 Approx. 120 min.
Typical recording time*3 Approx. 70 min.
Playback time
Approx. 150 min.
zChecking the remaining battery chargeA remaining charge indicator appears on the upper right of the LCD screen.
• The displayed battery remaining indicator may not be correct under certain circumstances.• If the camera is running on battery power and you do not operate the camera for about 5 minutes,
the camera turns off automatically to prevent wearing down the battery (Auto power off function).• The Language/Clock Setting screen appears when the camera is turned on for the first time
(page 26).• It takes about one minute until the correct battery remaining indicator appears.
High Low

Table of
contentsO
peration S
earchS
ettings S
earchIndex
24GB
Installing the software (Windows)You can do the following using the Bloggie Software (pre-loaded on the internal memory).– Import images shot with the camera to a computer, and play back.– Upload images to a network service.
1 Press the ON/OFF (Power) button to turn on the camera.
2 Push the “PUSH” part at the bottom of the camera.The USB jack comes out as shown in the illustration.
3 Connect the camera to the computer that is turned on with the USB connection support cable (supplied).When the USB connection is completed, [Mass Storage] appears on the LCD screen of the camera.
ON/OFF (Power) button
PUSH USB jack
USB connection support cable (supplied)
Charge lamp
Insert until fully seated
Continued r

Table of
contentsO
peration S
earchS
ettings S
earchIndex
25GB
4 Activate the installer.Windows 71 Click [Open folder to view files] on the AutoPlay
screen.
2 Double-click “Setup_Bloggie.exe” in the folder.
Windows Vista/Windows XP1 Click [Setup Bloggie Software] on the AutoPlay
screen.
• If the AutoPlay screen does not appear, click [Start] t [Computer] (in Windows XP, [My Computer]), then double-click [Bloggie Software] t “Setup_Bloggie.exe”.
5 Click [Install], and follow the instructions on the screen to complete the installation.
6 Delete the USB connection between the camera and computer after the installation is completed (page 22).• For details on the Bloggie Software, see page 48.
• If you turn on or restart the computer while the camera is connected to the computer, the camera may malfunction. In this case, press and hold the ON/OFF (Power) button for at least 7 seconds, and force-quit the camera. Disconnect the camera from the computer before turn on or restart the computer.
• Even if you delete files such as “Setup_Bloggie.exe” in the [Bloggie Software] folder, the recording capacity of the camera does not increase.
Notes

Table of
contentsO
peration S
earchS
ettings S
earchIndex
26GB
Setting the language and clock1 Press the ON/OFF (Power) button.
The camera is turned on.The demonstration movie plays back when you turn on the camera for the first time.
2 Select the desired language, then tap [Next].
3 Select the desired date display format, then tap [Next].
4 Select Daylight Savings [On]/[Off], then tap [Next].
5 Scroll each item up or down to set the desired date and time, and tap [OK].Midnight is indicated as 12:00 AM, and noon as 12:00 PM.
ON/OFF (Power) button
Continued r
Table of
contentsO
peration S
earchS
ettings S
earchIndex
27GB
zTo set the date and time againTap (Settings) and select [Date & Time Setting] (page 59).
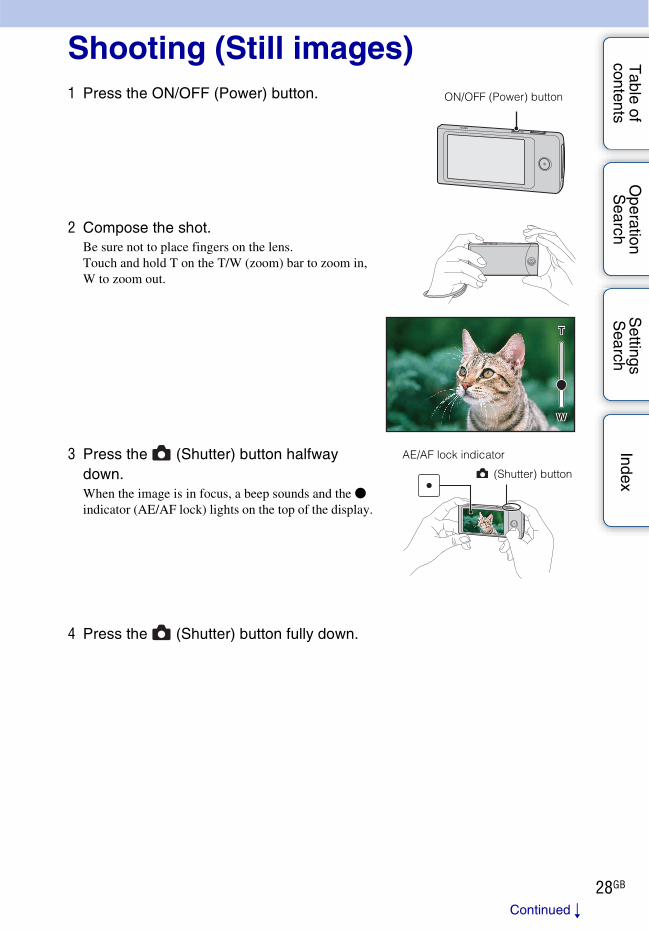
Table of
contentsO
peration S
earchS
ettings S
earchIndex
28GB
Shooting (Still images)1 Press the ON/OFF (Power) button.
2 Compose the shot.Be sure not to place fingers on the lens.Touch and hold T on the T/W (zoom) bar to zoom in, W to zoom out.
3 Press the (Shutter) button halfway down.When the image is in focus, a beep sounds and the z indicator (AE/AF lock) lights on the top of the display.
4 Press the (Shutter) button fully down.
ON/OFF (Power) button
AE/AF lock indicator
(Shutter) button
Continued r
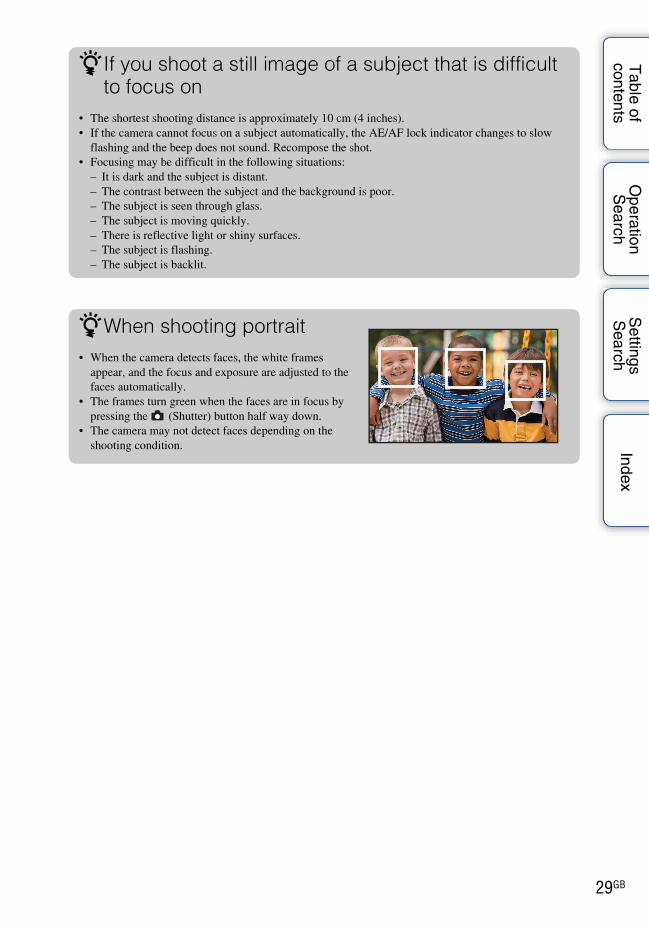
Table of
contentsO
peration S
earchS
ettings S
earchIndex
29GB
zIf you shoot a still image of a subject that is difficult to focus on
• The shortest shooting distance is approximately 10 cm (4 inches).• If the camera cannot focus on a subject automatically, the AE/AF lock indicator changes to slow
flashing and the beep does not sound. Recompose the shot.• Focusing may be difficult in the following situations:
– It is dark and the subject is distant.– The contrast between the subject and the background is poor.– The subject is seen through glass.– The subject is moving quickly.– There is reflective light or shiny surfaces.– The subject is flashing.– The subject is backlit.
zWhen shooting portrait• When the camera detects faces, the white frames
appear, and the focus and exposure are adjusted to the faces automatically.
• The frames turn green when the faces are in focus by pressing the (Shutter) button half way down.
• The camera may not detect faces depending on the shooting condition.

Table of
contentsO
peration S
earchS
ettings S
earchIndex
30GB
Shooting (Movies)1 Press the ON/OFF (Power) button.
2 Compose the shot.Be sure not to place fingers on the lens.Touch and hold T on the T/W (zoom) bar to zoom in, W to zoom out.
3 Press the movie button.To finish shooting the movie, press the movie button again.
• Continuous recording is possible for approximately 29 minutes.• The maximum size of a single movie file is approximately 2 GB. Recording stops before 29 minutes if
the file size reaches approximately 2 GB during movie recording.
Notes
ON/OFF (Power) button
Movie button
Continued r
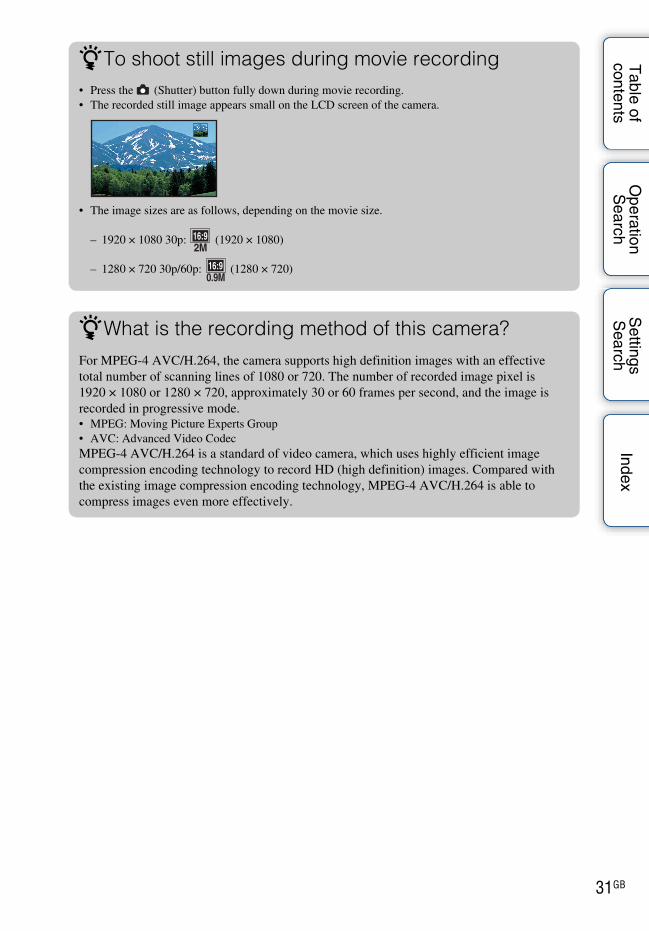
Table of
contentsO
peration S
earchS
ettings S
earchIndex
31GB
zTo shoot still images during movie recording• Press the (Shutter) button fully down during movie recording.• The recorded still image appears small on the LCD screen of the camera.
• The image sizes are as follows, depending on the movie size.
– 1920 × 1080 30p: (1920 × 1080)
– 1280 × 720 30p/60p: (1280 × 720)
zWhat is the recording method of this camera?For MPEG-4 AVC/H.264, the camera supports high definition images with an effective total number of scanning lines of 1080 or 720. The number of recorded image pixel is 1920 × 1080 or 1280 × 720, approximately 30 or 60 frames per second, and the image is recorded in progressive mode.• MPEG: Moving Picture Experts Group• AVC: Advanced Video CodecMPEG-4 AVC/H.264 is a standard of video camera, which uses highly efficient image compression encoding technology to record HD (high definition) images. Compared with the existing image compression encoding technology, MPEG-4 AVC/H.264 is able to compress images even more effectively.

Table of
contentsO
peration S
earchS
ettings S
earchIndex
32GB
ZoomYou can enlarge the image when shooting. The camera’s zoom function can enlarge images up to 4×.
1 Touch and hold T or W.Touch and hold T to zoom in, W to zoom out.
• Only Digital zoom is available with this camera.• You may not be able to zoom in or out images smoothly when using zoom function.• Image quality decreases as the images are digitally processed.
Notes
T side
W side

Table of
contentsO
peration S
earchS
ettings S
earchIndex
33GB
Self-Timer1 Tap (Self-Timer) on the shooting
standby screen.Tap the LCD screen when the screen display is not shown.
2 Tap the desired mode.
(Off) Does not use the self-timer.
(2sec) Sets the 2-second delay self-timer.When you press the (Shutter) button or movie button, a self-timer icon flashes, and after rapid beep sounds are heard, the camera will shoot.
(10sec) Sets the 10-second delay self-timer.

Table of
contentsO
peration S
earchS
ettings S
earchIndex
34GB
Shooting 360 Video images (MHS-TS20K only)By attaching the supplied 360 Video Lens to the camera, you can shoot 360-degree images of the area around the camera.
1 Take out the 360 Video Lens from its case.
2 Press the ON/OFF (Power) button.
3 Attach the 360 Video Lens to the camera in the direction shown in the illustration.• The camera shifts to the “360 Video” mode automatically, and the
ring-shaped image appears on the LCD screen.
4 Start shooting (page 28, 30).
• Do not attach or remove the 360 Video Lens during shooting.• The still image size is fixed to 8M (16:9), and the movie size is fixed to 1920 × 1080 30p.• When you attach the 360 Video Lens to the camera, you cannot operate zooming or settings.• Do not hold the camera by the 360 Video Lens only.
Notes
ON/OFF (Power) button
Continued r

Table of
contentsO
peration S
earchS
ettings S
earchIndex
35GB
You can play back 360 Video images on the computer using the Bloggie Software. For details on the installation of the Bloggie Software, see page 24.
• You cannot view converted 360 Video images using only the camera.• When playing back converted 360 Video images, the resolution of the played back images is lower than
that of normal images.
Viewing 360 Video images
Notes
zTo place the camera verticallyAttach the bottom part of the 360 Video Lens case to the bottom of the camera.
zTo remove the 360 Video LensPull the 360 Video Lens in the opposite direction of when attaching.
Image played back on this camera
Ring-shaped image
Image played back on the computer using the Bloggie Software
360 Video image

Table of
contentsO
peration S
earchS
ettings S
earchIndex
36GB
Photo SizeThe photo size determines the size of the image file that is recorded when you take an image.The larger the photo size, the more detail will be reproduced when the image is printed on large-format paper. The smaller the photo size, the more images can be recorded.
1 Tap (Switching image size) on the shooting standby screen.Tap the LCD screen when the screen display is not shown.
2 Tap the desired size from [Photo Size].
• When you print still images recorded with 16:9 aspect ratio, both edges may be cut off.
Photo Size Usage guidelines No. of images
Printing
(4128×3096) For prints up to A3+ size
(3840×2160) For viewing on a high-definition TV, and for prints up to A4 size
(1920×1080) For viewing on a high-definition TV
Note
Less
More
Fine
Rough
zWhen you select (4128 × 3096)The aspect ratio switches to 4:3 when shooting images.
Continued r

Table of
contentsO
peration S
earchS
ettings S
earchIndex
37GB
zOn “image quality” and “image size”A digital image is made up of a collection of small dots called pixels.If it contains a large number of pixels, the image becomes large, it takes up more memory, and the image is displayed in fine detail. “Image size” is shown by the number of pixels. Although you cannot see the differences on the screen of the camera, the fine detail and data processing time differ when the image is printed or displayed on a computer screen.
Description of the pixels and the image size
1 Image size: 12M4128 pixels × 3096 pixels = 12,780,288 pixels
2 Image size: 2M1920 pixels × 1080 pixels = 2,073,600 pixels
Many pixels(Fine image quality and large file size)
Few pixels(Rough image quality but small file size)
Pixels
Pixel

Table of
contentsO
peration S
earchS
ettings S
earchIndex
38GB
Movie SizeThe larger the movie size, the higher the movie quality.The movies shot with the camera will be recorded in MPEG-4 AVC/H.264 Main Profile, approximately 30 or 60 frames per second, Progressive, AAC LC, “MP4 format”.
1 Tap (Switching image size) on the shooting standby screen.Tap the LCD screen when the screen display is not shown.
2 Tap the desired size from [Movie Size].
Movie Size Usage guidelines
(1920×1080 30p) Shoots HD (high definition) quality movies in sizes suited for display on computer or high definition TV
(1280×720 60p) Shoots the rapidly moving action scenes such as sports smoothly with HD (high definition) quality
(1280×720 30p) Shoots HD (high definition) quality movies in sizes suited for display on computer
zProgressive playbackThe camera supports progressive mode*, which is used in computers, and therefore is suited for playing back images on computers.* The progressive mode is a type of movie recording method, which reads out all image pixels at
once.

Table of
contentsO
peration S
earchS
ettings S
earchIndex
39GB
Viewing1 Tap (Playback) to switch to playback
mode.The index screen appears.
2 Select an image and tap.A single movie plays back when an image is selected.
Movie
Still image
zTo show previous/next imagesDrag your finger in the direction of the arrows.You can send multiple images at one time by flicking.
Previous Next
zFast forward/Fast rewind the movieTap / / .
Playback bar
Fast rewind/Play/Fast forward
Continued r

Table of
contentsO
peration S
earchS
ettings S
earchIndex
40GB
zTo go back to shooting modeDo one of the following:
– Tap on the index screen.
– Press the (Shutter) button or movie button. (Shutter) button
Movie button
zTo go back to the index screenTap .
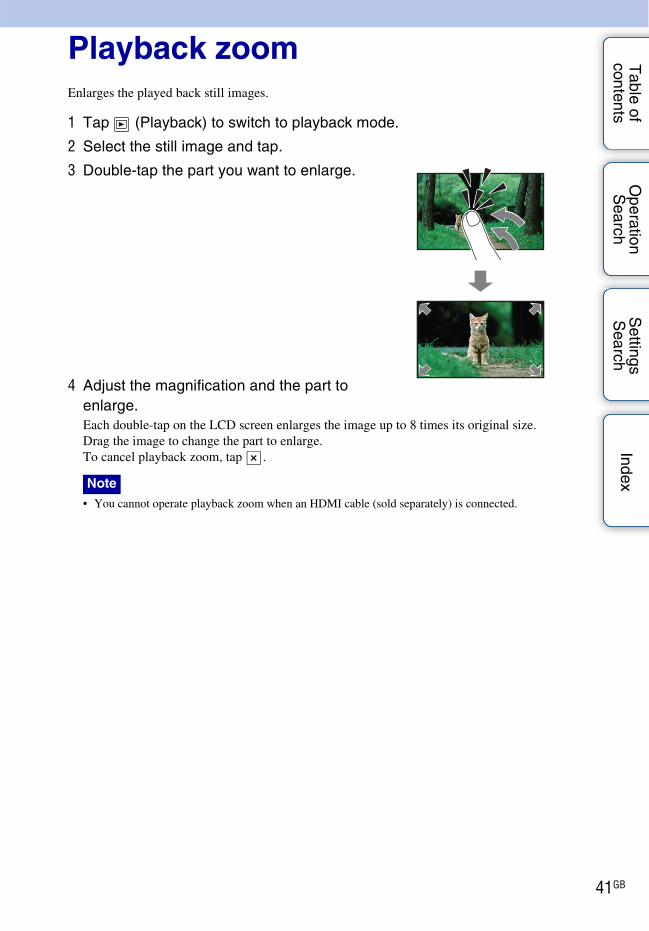
Table of
contentsO
peration S
earchS
ettings S
earchIndex
41GB
Playback zoomEnlarges the played back still images.
1 Tap (Playback) to switch to playback mode.
2 Select the still image and tap.
3 Double-tap the part you want to enlarge.
4 Adjust the magnification and the part to enlarge.Each double-tap on the LCD screen enlarges the image up to 8 times its original size.Drag the image to change the part to enlarge.To cancel playback zoom, tap .
• You cannot operate playback zoom when an HDMI cable (sold separately) is connected.
Note

Table of
contentsO
peration S
earchS
ettings S
earchIndex
42GB
DeleteAllows you to select unwanted images for deletion.
1 Tap (Playback) to switch to playback mode.
2 Tap (Delete) on the index screen.
3 Tap images you want to delete.Repeat the above step until there are no more images to be deleted. Select an image with a mark again to release the mark.
4 Tap [OK] t [OK].
zTo delete images during playbackTap (Delete) t [OK] in single-image mode.

Table of
contentsO
peration S
earchS
ettings S
earchIndex
43GB
Share it LaterYou can choose images and the sharing site to upload in advance.
1 Tap (Playback) to switch to playback mode.
2 Tap (Share it Later) on the index screen.
3 Tap images you want to upload.Repeat the above step until there are no more images to be uploaded.
4 Tap [Next].
5 Select and tap the sharing site to upload from the share list, and tap [OK].For information on how to upload images, see page 50.
• You cannot create the share list with the camera. Use Bloggie Software to create.• The maximum number of share lists the camera can display is 14.
Notes
Continued r

Table of
contentsO
peration S
earchS
ettings S
earchIndex
44GB
zTo share images during playbackTap (Share it Later) t The sharing site you upload images t [OK] in single-image mode.
zTo cancel sharingTap (Share it Later) t Release the mark on the sharing site t [OK] during playback of the image you want to cancel sharing.

Table of
contentsO
peration S
earchS
ettings S
earchIndex
45GB
Volume controlYou can adjust the volume for playback movies.
1 Tap (Playback) to switch to playback mode.
2 Select a movie and tap.
3 Tap (Volume control).Tap the LCD screen when the screen display is not shown.
4 Touch and hold to increase, to decrease the volume. Lower Louder

Table of
contentsO
peration S
earchS
ettings S
earchIndex
46GB
Recommended computer environment
The following computer environment is recommended when using the Bloggie Software, and importing images via a USB connection.
*1 64-bit editions and Starter (Edition) are not supported.*2 Starter (Edition) is not supported.
Macintosh is not supported by the Bloggie Software (pre-loaded on the internal memory).The following computer environment is recommended when importing images via a USB connection.
• Operation is not assured in an environment based on an upgrade of the operating systems described above or in a multi-boot environment.
• If you connect two or more USB devices to a single computer at the same time, some devices, including the camera, may not operate, depending on the types of USB devices you are using.
• Connecting the camera using a USB interface that is compatible with Hi-Speed USB (USB 2.0 compliant) allows advanced transfer (high speed transfer), as the camera is compatible with Hi-Speed USB (USB 2.0 compliant).
• When your computer resumes activity from suspend or sleep mode, communication between the camera and your computer may not recover at the same time.
Windows
OS (pre-installed) Microsoft Windows XP*1 SP3/Windows Vista*2 SP1/Windows 7
Others CPU: Intel Core Duo 1.66 GHz or faster, Intel Core 2 Duo 1.20 GHz or fasterMemory: 1 GB or moreHard Disk: Disk space required for installation: approximately 200 MBDisplay: 1,024 × 768 dots or more
Macintosh
OS (pre-installed) USB Connection: Mac OS X (v10.3 to v10.6)
Notes

Table of
contentsO
peration S
earchS
ettings S
earchIndex
47GB
To play back and edit movie files (MPEG-4 AVC/H.264) recorded by the camera on your computer, you need to install the software compatible with MPEG-4 AVC/H.264 or the Bloggie Software.• Even in a PC environment where operations are guaranteed, images may not play back smoothly due to
dropped frames, etc. Note that the imported image itself is not affected.• If you are using a notebook PC, be sure to use the PC with the AC adaptor plugged in. Sometimes normal
operations are not possible due to the power savings function of the PC.
• Operations are not guaranteed, even on computers fulfilling the above system requirements. For example, other open or background applications currently running may limit product performance.
Note on playback of movie files (MPEG-4 AVC/H.264)
Note

Table of
contentsO
peration S
earchS
ettings S
earchIndex
48GB
Using the Bloggie Software (Windows)
1 Double-click the Bloggie Software (pre-loaded on the internal memory) shortcut icon on the desktop.
Activating
zConnecting the camera to a computerIf the Bloggie Software is already installed to a computer, Bloggie Software starts automatically.

Table of
contentsO
peration S
earchS
ettings S
earchIndex
49GB
Importing images to a computerTo connect the camera to your computer, see page 46.
When using the Bloggie SoftwareSee page 48.
When not using the Bloggie SoftwareWhen the AutoPlay Wizard appears after making a USB connection between the camera and a computer, click [Open folder to view files] t [OK] t [DCIM] or [MP_ROOT] t copy the desired images to the computer.
1 Connect the camera to your Macintosh computer first. Double-click the newly recognized [BLOGGIE] icon t [DCIM] or [MP_ROOT] t the folder where the images you want to import are stored.
2 Drag and drop the image files to the hard disk icon.The image files are copied to the hard disk.
3 Double-click the hard disk icon t the desired image file in the folder containing the copied files.The image is displayed.
Windows
Macintosh

Table of
contentsO
peration S
earchS
ettings S
earchIndex
50GB
Uploading images to a media service
1 Choose images and the sharing site to upload with the camera in advance (page 43).
2 Connect the camera to a computer in which the Bloggie Software (pre-loaded on the internal memory) is already installed.Bloggie Software starts automatically and the confirmation screen for uploading images appears.
Upload images by following the uploading procedure of the network service.
• Set [LUN Settings] to [Multi].• When uploading images over the Internet, the cache may remain in the computer being used depending
on the service provider. This is also true when the camera is used for this purpose.
In order to use Bloggie Software to enjoy the benefits of the image uploading service or other services (the “services”) provided by these and other websites, you must consent to the following.• Some websites require registration procedures and/or fees to use their services. In using such services,
you must comply with the terms and conditions established by the websites concerned.• Services may be terminated or changed in accordance with the convenience of the website operators.
Sony will not be held responsible for any trouble occurring between the users and third parties or any inconvenience caused to users relating to the utilization of the services inclusive of the termination of or changes to such services.
• To view a website, you will be redirected to it by the Sony server. There may be times when you cannot access the website because of server maintenance or for other reasons.
• If the operation of the Sony server is to be terminated, you will be notified of the termination ahead of time on Sony’s website, etc.
• The URLs to which you are redirected by the Sony server and other information may be recorded for the purposes of improving Sony’s future products and services. However, no personal data will be recorded on such occasions.
Windows
Macintosh
Notes
Notes on Bloggie Software (pre-loaded on the internal memory)

Table of
contentsO
peration S
earchS
ettings S
earchIndex
51GB
ProtectProtects recorded images against accidental erasure.The mark is displayed when playing back registered images.
1 Tap (Playback) to switch to playback mode.
2 Tap (Settings) t [Protect] on the index screen.In single-image mode, protect is completed in step 2.
3 Tap images you want to protect.Select an image with a mark to release the mark.
4 Tap [OK].
zTo cancel the protectionTap (Settings) t [Protect] during image playback as the same procedure to protect it. The indicator disappears, and the protection is released.

Table of
contentsO
peration S
earchS
ettings S
earchIndex
52GB
BeepSets the sound for when you operate the camera.
1 Tap (Settings) t [Beep] t desired mode.
On Turns on the beep sound when you press the (Shutter) button or movie button.
Off Turns off the beep sound.

Table of
contentsO
peration S
earchS
ettings S
earchIndex
53GB
Language SettingSelects the language to be used in the menu items, warnings and messages.
1 Tap (Settings) t [Language Setting] t desired language.
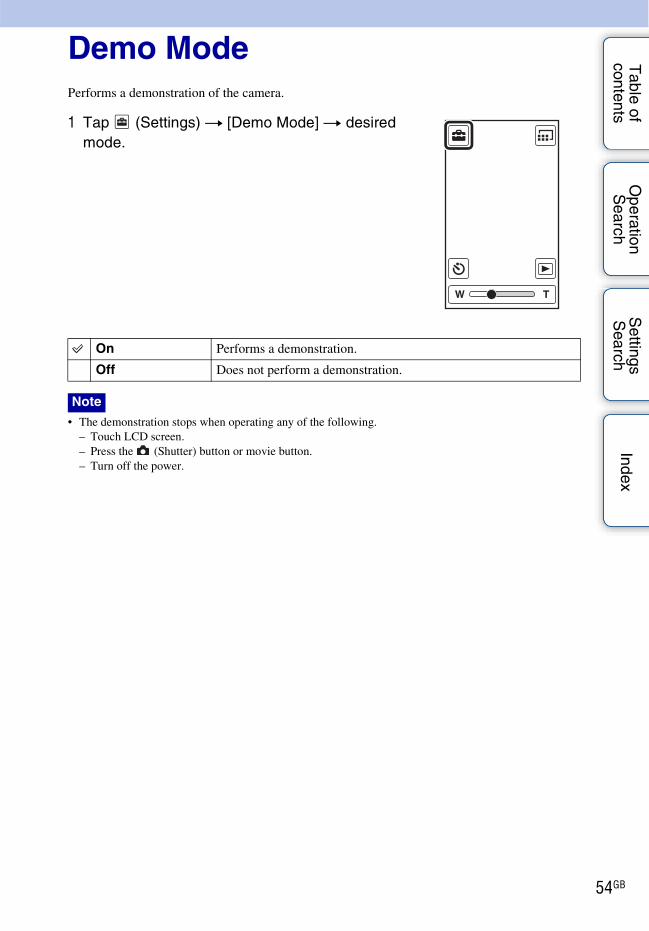
Table of
contentsO
peration S
earchS
ettings S
earchIndex
54GB
Demo ModePerforms a demonstration of the camera.
1 Tap (Settings) t [Demo Mode] t desired mode.
• The demonstration stops when operating any of the following.– Touch LCD screen.– Press the (Shutter) button or movie button.– Turn off the power.
On Performs a demonstration.
Off Does not perform a demonstration.
Note

Table of
contentsO
peration S
earchS
ettings S
earchIndex
55GB
InitializeInitializes the setting to the default setting.Even if you execute this function, the images are retained.
1 Tap (Settings) t [Initialize] t [OK].
• Perform initialization after charging the camera to prevent the camera from turning off during the process.
Note
zWhen the camera does not work properlyPress and hold the ON/OFF (Power) button for at least 7 seconds, and force-quit the camera (page 13). Then turn the camera on again.

Table of
contentsO
peration S
earchS
ettings S
earchIndex
56GB
HDMI OutputSelects the type of signal to be output to a TV from the HDMI OUT jack. If images are not displayed on the TV clearly, changing the setting may improve the display.
1 Tap (Settings) t [HDMI Output] t desired mode.
60Hz Outputs with 60Hz.
50Hz Outputs with 50Hz.

Table of
contentsO
peration S
earchS
ettings S
earchIndex
57GB
LUN SettingsSets the display method for the recording media displayed on a computer screen or other monitor when the camera is connected with a computer or AV component using a USB connection.
1 Tap (Settings) t [LUN Settings] t desired mode.
Multi Select this setting when you connect the camera to a computer.
Single Select this setting in cases where the images are not displayed when the camera is connected to a device other than a computer.

Table of
contentsO
peration S
earchS
ettings S
earchIndex
58GB
FormatFormats the internal memory.
1 Tap (Settings) t [Format] t [OK].
• Note that formatting permanently erases all data including even protected images.
Note

Table of
contentsO
peration S
earchS
ettings S
earchIndex
59GB
Date & Time SettingSets the date and time again.
1 Tap (Settings) t [Date & Time Setting].
2 Tap the items you want to set.
Date & Time Format Selects the date and time display format.
Daylight Savings Pushes forward an hour.
Date & Time Sets the date and time (page 26).

Table of
contentsO
peration S
earchS
ettings S
earchIndex
60GB
Viewing images on a TVConnect the camera to a TV which has an HDMI terminal with an HDMI cable (sold separately).Refer also to the instruction manuals of the TV.
1 Turn off both the camera and the TV.
2 Open the jack cover and connect the camera to the TV with the HDMI cable (sold separately).
3 Turn on the camera.
4 Turn on the TV and set the input.Images shot with the camera appear on the TV.
5 Tap images to play back.
• Do not connect the output terminal of the camera to that of other devices. This may result in malfunction.• Some devices may not work properly. Image and sound may not be output. • Use an HDMI cable with the HDMI logo.
Notes
1 To HDMI jackHDMI cable
2 To HDMI OUT jack
HDMI jack

Table of
contentsO
peration S
earchS
ettings S
earchIndex
61GB
If you want to view images on a TV screen, you need a TV with an HDMI terminal and an HDMI cable (sold separately). The color system of the TV must match that of the camera. Check the following lists for the TV color system of the country or region where the camera is used, and set [HDMI Output] (page 56).
NTSC systemBahama Islands, Bolivia, Canada, Central America, Chile, Colombia, Ecuador, Jamaica, Japan, Korea, Mexico, Peru, Surinam, Taiwan, the Philippines, the U.S.A., Venezuela, etc.
PAL systemAustralia, Austria, Belgium, China, Croatia, Czech Republic, Denmark, Finland, Germany, Holland, Hong Kong, Hungary, Indonesia, Italy, Kuwait, Malaysia, New Zealand, Norway, Poland, Portugal, Rumania, Singapore, Slovak Republic, Spain, Sweden, Switzerland, Thailand, Turkey, United Kingdom, Viet Nam, etc.
PAL-M systemBrazil
PAL-N systemArgentina, Paraguay, Uruguay
SECAM systemBulgaria, France, Greece, Guiana, Iran, Iraq, Monaco, Russia, Ukraine, etc.
On TV color systems

Table of
contentsO
peration S
earchS
ettings S
earchIndex
62GB
TroubleshootingIf you experience trouble with the camera, try the following solutions.
Be aware that by sending the camera for repair, you give consent that the contents of the internal memory, music files may be checked.
Cannot turn on the camera.• The battery pack is discharged. Charge the camera.
The power turns off suddenly.• Depending on the camera and battery temperature, the power may turn off automatically to protect
the camera. In this case, a message is displayed on the LCD screen before the power turns off.• If you do not operate the camera for a certain period of time while the power is on, the camera turns
off automatically to prevent wearing down the battery pack. Turn the camera on again.
Battery life is short.• Charge the battery until the charge lamp disappears.• You are using the camera in an extremely hot or cold location, or the charging is insufficient. This is
not a malfunction.• If you have not used the camera for a prolonged period, the efficiency of the battery will be improved
by repeatedly charging and discharging it.• When usable battery life becomes half the usual time, even after charging the battery fully, the battery
may need to be replaced. Consult your nearest Sony dealer.
1 Check the items on pages 62 to 67.
2 Turn the power off and then on again.
3 Press and hold the ON/OFF (Power) button for at least 7 seconds, and force-quit the camera. Then turn the camera on again (page 13).
4 Consult your Sony dealer or local authorized Sony service facility.
Additional information on this product and answers to frequently asked questions can be found at our Customer Support Website.http://www.sony.net/
Battery pack and power

Table of
contentsO
peration S
earchS
ettings S
earchIndex
63GB
Cannot charge the camera.• Turn off the camera and make the USB connection.• Disconnect the USB connection support cable, and then reconnect it.• Use the USB connection support cable (supplied).• Charge the battery in an ambient temperature of 10°C to 30°C (50°F to 86°F).• Turn on the computer and connect the camera.• Release the computer from sleep or hibernation status.• Connect the camera directly to a computer using the supplied USB connection support cable.• Connect the camera to a computer with the operating system that is supported by the camera.• After trying the remedies above, if the problem still persists, press and hold the ON/OFF (Power)
button for at least 7 seconds, and force-quit the camera. Then reconnect it to the computer using the supplied USB connection support cable.
The remaining charge indicator is incorrect.• This phenomenon occurs when you use the camera in an extremely hot or cold location.• A discrepancy arose between the remaining charge indicator and the actual remaining battery charge.
Fully discharge the battery pack once, then charge it to correct the indication.• The battery pack is dead (page 69). Consult your nearest Sony dealer.
Cannot record images.• Check the free capacity of the internal memory. If it is full, delete unnecessary images (page 42).
The date and time are not displayed on the LCD screen.• While shooting, the date and time are not displayed. They are displayed only during playback.
Cannot insert dates on images.• The camera does not have a feature for superimposing dates on images.
Dots appear and remain on the screen.• This is not a malfunction. These dots are not recorded.
Cannot play back images.• The folder/file name has been changed on your computer.• Playback on the camera cannot be guaranteed if files contain images processed on a computer, or
images shot by another camera.• The camera is in USB mode. Delete the USB connection (page 22).
The image appears rough right after playback starts.• This may happen due to image processing. This is not a malfunction.
The image does not appear on the TV.• Set [HDMI Output] to [60Hz] in NTSC region, [50Hz] in PAL region (page 56).• Check whether the connection is correct (page 60).
Shooting still images/movies
Viewing images

Table of
contentsO
peration S
earchS
ettings S
earchIndex
64GB
The top and bottom edges of images are trimmed slightly on a connected TV.• The LCD screen of the camera can display recording images across the entire screen (full pixel
display). However, this may cause slight trimming of the top, bottom, right, and left edges of images when played back on a TV that is not compatible with full pixel display.
Black bands appear on the left and right of the screen.• Black bands appear on the left and right of the screen when viewing movies recorded with the camera
held in the vertical position on a TV or a computer. This is not a malfunction.
Cannot delete an image.• Cancel the protection (page 51).
Your computer does not recognize the camera.• When the battery level is low, charge the camera.• Turn on the camera and connect to a computer.• Use the USB connection support cable (supplied).• Disconnect the USB connection support cable from both the computer and the camera, and connect it
again firmly.• Disconnect all equipment other than the camera, the keyboard and the mouse from the USB
connectors of your computer.• Connect the camera directly to your computer without passing through a USB hub or other device.• Set [LUN Settings] to [Multi] (page 57).
Cannot import images.• Connect the camera and your computer correctly making a USB connection (page 46).• When you format the internal memory with a computer, you may not be able to import the images to
a computer. Format the internal memory with the camera, and shoot (page 58).
After making a USB connection, Bloggie Software does not start automatically.• Install the Bloggie Software to a computer, and make the USB connection after both the camera and a
computer are turned on.
Cannot play back images on your computer.• Consult the computer or software manufacturer.
The image and sound are interrupted by noise when you view a movie on a computer.
• You are playing back the movie directly from the internal memory. Import the movie to your computer using the Bloggie Software and play it back (page 49).
Deleting
Computers

Table of
contentsO
peration S
earchS
ettings S
earchIndex
65GB
The camera does not work properly.• Press and hold the ON/OFF (Power) button for at least 7 seconds, and force-quit the camera. Then
turn the camera on again.
The lens gets fogged.• Moisture condensation has occurred. Turn off the camera and wait about an hour for the moisture to
evaporate.
The camera becomes warm when you use it for a long time.• This is not a malfunction.
The Clock Set screen appears when you turn on the camera.• Set the date and time again (page 26).
The date or time is incorrect.• Set the date and time again (page 59).
Others

Table of
contentsO
peration S
earchS
ettings S
earchIndex
66GB
Warning indicators and messagesIf the following messages appear, follow the instructions.
• The battery level is low. Charge the battery pack immediately. Depending on the conditions of use, the indicator may flash even though there are still 5 to 10 minutes of remaining battery time left.
System error• Turn the power off and then on again.
• If you record movies for an extended period, the camera temperature rises. In this case, stop recording movies.
Camera overheatingAllow it to cool
• The camera temperature has risen. The power may turn off automatically, or you may be unable to record movies. Leave the camera in a cool location until the temperature goes down.
Internal memory error• Turn the power off and then on again.
Error formatting internal memory• Format the media again (page 58).
No images• No images that can be played back have been recorded in the internal memory.
Folder error• A folder with the same first three digit number already exists on the internal memory (for example:
123MSDCF and 123ABCDE). Format the camera (page 58).
Cannot create more folders• The folder with a name beginning with “999” exists on the internal memory. Format the camera
(page 58).
File error• An error occurred while the image was playing back.
Playback on the camera cannot be guaranteed if files contain images processed on a computer, or images shot by another camera.
File protected• Release the protection (page 51).

Table of
contentsO
peration S
earchS
ettings S
earchIndex
67GB
Image size over limit• You are playing back an image with size that cannot be played back on the camera.
Maximum number of images already selected• Up to 100 files can be selected when using [Delete], [Share it Later] and [Protect].
Operation cannot be executed in unsupported files• Playback zoom cannot be performed on movies.
Invalid operation• This message appears if you perform an invalid operation.
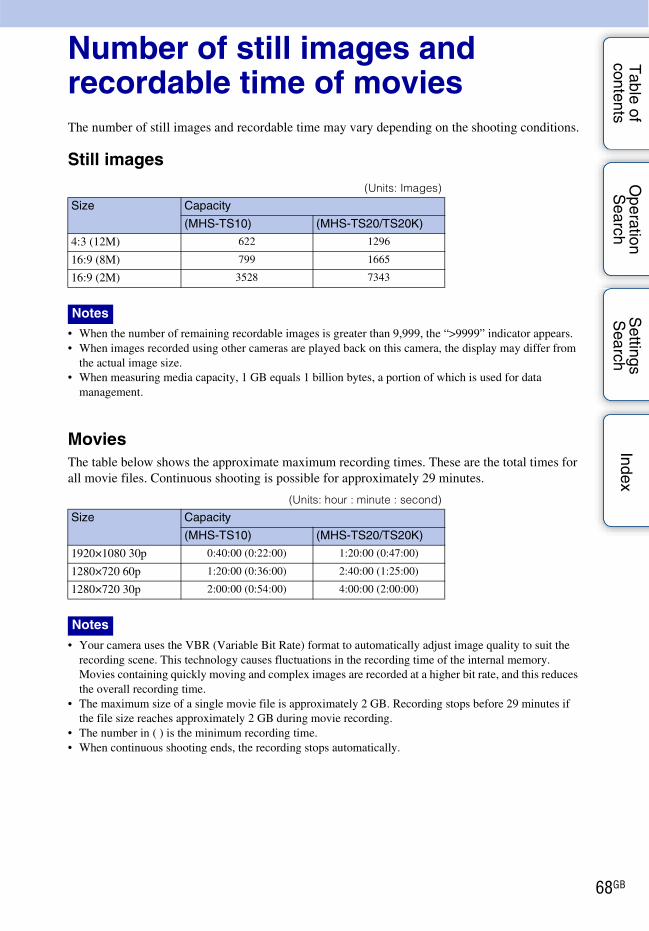
Table of
contentsO
peration S
earchS
ettings S
earchIndex
68GB
Number of still images and recordable time of moviesThe number of still images and recordable time may vary depending on the shooting conditions.
Still images
• When the number of remaining recordable images is greater than 9,999, the “>9999” indicator appears.• When images recorded using other cameras are played back on this camera, the display may differ from
the actual image size.• When measuring media capacity, 1 GB equals 1 billion bytes, a portion of which is used for data
management.
MoviesThe table below shows the approximate maximum recording times. These are the total times for all movie files. Continuous shooting is possible for approximately 29 minutes.
• Your camera uses the VBR (Variable Bit Rate) format to automatically adjust image quality to suit the recording scene. This technology causes fluctuations in the recording time of the internal memory.Movies containing quickly moving and complex images are recorded at a higher bit rate, and this reduces the overall recording time.
• The maximum size of a single movie file is approximately 2 GB. Recording stops before 29 minutes if the file size reaches approximately 2 GB during movie recording.
• The number in ( ) is the minimum recording time.• When continuous shooting ends, the recording stops automatically.
(Units: Images)
Size Capacity
(MHS-TS10) (MHS-TS20/TS20K)
4:3 (12M) 622 1296
16:9 (8M) 799 1665
16:9 (2M) 3528 7343
Notes
(Units: hour : minute : second)
Size Capacity
(MHS-TS10) (MHS-TS20/TS20K)
1920×1080 30p 0:40:00 (0:22:00) 1:20:00 (0:47:00)
1280×720 60p 1:20:00 (0:36:00) 2:40:00 (1:25:00)
1280×720 30p 2:00:00 (0:54:00) 4:00:00 (2:00:00)
Notes

Table of
contentsO
peration S
earchS
ettings S
earchIndex
69GB
Built-in battery packOn charging the battery pack• We recommend charging the battery pack in an ambient temperature of between 10°C to 30°C (50°F to
86°F). The battery pack may not be effectively charged in temperatures outside this range.• When usable battery life becomes half the usual time, even after charging the battery fully, the battery
should be replaced. Consult your nearest Sony dealer.
Effective use of the battery pack• Battery performance decreases in low temperature surroundings. So in cold places, the operational time
of the battery pack is shorter.• The battery pack will run out quickly if you use the zoom frequently.• Do not expose the camera to water. The camera is not water-resistant.• Do not leave the camera in an extremely hot place, such as in a car or under direct sunlight.
How to store the camera• Even if you do not use the camera for an extended period, fully charge the camera every 6 to 12 months
to maintain the camera’s function. Also, store the camera in a cool, dry place.
On battery life• The battery life is limited. Battery capacity decreases over time and through repeated use. If decreased
usage time between charges becomes significant, consult your nearest Sony dealer.• The battery life varies according to how it is stored and the operating conditions and environment in
which each battery pack is used.

Table of
contentsO
peration S
earchS
ettings S
earchIndex
70GB
PrecautionsDo not use/store the camera in the following places• In an extremely hot, cold or humid place
In places such as in a car parked in the sun, the camera body may become deformed and this may cause a malfunction.
• Under direct sunlight or near a heaterThe camera body may become discolored or deformed, and this may cause a malfunction.
• In a location subject to rocking vibration• Near strong magnetic fields• In sandy or dusty places
Be careful not to let sand or dust get into the camera. This may cause the camera to malfunction, and in some cases may be irreparable.
On carryingDo not sit down in a chair or other place with the camera in the back pocket of your trousers or skirt, as this may cause malfunction or damage the camera.
On cleaning
Cleaning the LCD screenWipe the screen surface with an LCD cleaning kit (sold separately) to remove fingerprints, dust, etc.
Cleaning the lensWipe the lens with a soft cloth to remove fingerprints, dust, etc.
Cleaning the camera surfaceClean the camera surface with a soft cloth slightly moistened with water, then wipe the surface with a dry cloth. Do not use any of the following as they may damage the finish or the casing.– Chemical products such as thinner, benzine, alcohol, disposable cloths, insect repellent, sunscreen or
insecticide, etc.– Do not touch the camera with any of the above on your hand.– Do not leave the camera in contact with rubber or vinyl for a long time.
On operating temperaturesYour camera is designed for use under the temperatures between 0°C and 40°C (32°F and 104°F). Shooting in extremely cold or hot places that exceed this range is not recommended.
On moisture condensationIf the camera is brought directly from a cold to a warm location, moisture may condense inside or outside the camera. This moisture condensation may cause a malfunction of the camera.
If moisture condensation occursTurn off the camera and wait about an hour for the moisture to evaporate.
Note on disposal/transfer• When using the software pre-loaded on the internal memory, personal information such as IDs and mail
addresses may be saved on the internal memory of the camera. Before changing ownership of the camera, or before disposal, delete any personal information.
• Even if you delete data in the internal memory or format the camera, you may not delete data from the internal memory completely. When you dispose of the camera, it is recommended that you destroy the actual body of the camera.

Table of
contentsO
peration S
earchS
ettings S
earchIndex
71GB
SpecificationsCamera
[System]Image device: 7.35 mm (1/2.5 type) CMOS sensorTotal pixel number of camera:
Approx. 13 011 000 pixelsEffective pixel number of camera:
Approx. 8 294 000 pixels (still image, 16:9), Approx. 12 780 000 pixels (still image, 4:3), Approx. 2 073 000 pixels ([1920×1080 30p] movie)
Lens: F2.8f = 5.3 mm (7/32 inches)When converted to a 35 mm still cameraFor movies: 37 mm (1 1/2 inches) (16:9)For still images: 32 mm (1 5/16 inches) (4:3)
Exposure control: Automatic exposureFile format:
Still images: JPEG (DCF Ver. 2.0, Exif Ver. 2.3, MPF Baseline) compliantMovies: MPEG-4 AVC/H.264 (MP4)Audio: MPEG AAC
Recording media: Internal Memory (MHS-TS10: Approx. 4 GB, MHS-TS20/TS20K: Approx. 8 GB)
• When measuring media capacity, 1 GB equals 1 billion bytes, a portion of which is used for system management and/or application files. Available user capacity is as below.MHS-TS10: Approx. 3.7 GBMHS-TS20/TS20K: Approx. 7.7 GB
[Input and Output connectors]HDMI jack: HDMI mini connectorUSB jack: type A (built-in)USB communication: Hi-Speed USB (USB 2.0
compliant)
[LCD screen]LCD screen: 7.6 cm 3.0 type (16:9) TFT driveTotal number of dots: 288 000 (720 × 400) dots
[Power, general]Power:
Built-in rechargeable battery packUSB charging (supplied from the computer by connecting with the supplied USB connection support cable)
Charging time: Approx. 200 mins. (full charge) (when charging from the USB connector of the computer)
Power consumption (during shooting): 1.7 W (when the movie image size is [1280×720 30p])
Operating temperature: 0°C to 40°C (32°F to 104°F)
Storage temperature: –20°C to +60°C (–4°F to +140°F)
Dimensions: Approx. 52.0 mm × 107.0 mm × 15.2 mm (2 1/8 inches × 4 1/4 inches × 5/8 inches) (W/H/D, excluding protrusions)
Mass: Approx. 125 g (4.4 oz)Microphone: MonauralSpeaker: Monaural
Design and specifications are subject to change without notice.

Table of
contentsO
peration S
earchS
ettings S
earchIndex
72GB
Trademarks• “Bloggie” is a trademark of Sony Corporation.• 360 Video is a trademark of Sony Corporation.• HDMI, the HDMI logo and High-Definition Multimedia Interface are trademarks or registered
trademarks of HDMI Licensing LLC.
• Microsoft, Windows, Windows Vista and DirectX are either registered trademarks or trademarks of Microsoft Corporation in the United States and/or other countries.
• Macintosh, Mac OS, iMac, iBook, PowerBook, Power Mac and eMac are trademarks or registered trademarks of Apple Inc..
• Intel and Pentium are trademarks or registered trademarks of Intel Corporation.In addition, system and product names used in this manual are, in general, trademarks or registered trademarks of their respective developers or manufacturers. However, the ™ or ® marks are not used in all cases in this manual.
Notes on the LicenseTHIS PRODUCT IS LICENSED UNDER THE AVC PATENT PORTFOLIO LICENSE FOR THE PERSONAL AND NON-COMMERCIAL USE OF A CONSUMER TO (i) ENCODE VIDEO IN COMPLIANCE WITH THE AVC STANDARD (“AVC VIDEO”) AND /OR (ii) DECODE AVC VIDEO THAT WAS ENCODED BY A CONSUMER ENGAGED IN A PERSONAL AND NON-COMMERCIAL ACTIVITY AND/OR WAS OBTAINED FROM A VIDEO PROVIDER LICENSED TO PROVIDE AVC VIDEO. NO LICENSE IS GRANTED OR SHALL BE IMPLIED FOR ANY OTHER USE. ADDITIONAL INFORMATION MAY BE OBTAINED FROM MPEG LA, L.L.C.SEE <HTTP://WWW.MPEGLA.COM>
Table of
contentsO
peration S
earchS
ettings S
earchIndex
73GB
IndexNumerics360 Video images.............................................................34
BBattery pack ........................................................................69
Beep........................................................................................52
Bloggie Software ........................................................24, 48
CCharging ...............................................................................21
Clock Settings ....................................................................26
Computer
Importing images.......................................................49
Recommended environment.................................46
Uploading images .....................................................50
Connecting
Computer ......................................................................49
DDate & Time Setting .......................................................59
Daylight Savings.........................................................26, 59
Delete.....................................................................................42
Demo Mode ........................................................................54
FFormat ...................................................................................58
HHDMI OUT jack...............................................................60
HDMI Output .....................................................................56
IIdentifying parts ................................................................13
Initialize ................................................................................55
Install .....................................................................................24
LLanguage Setting ..............................................................53
LUN Settings......................................................................57
MMacintosh computer........................................................46
Movie Size...........................................................................38
NNumber of still images ...................................................68
OOS............................................................................................46
PPhoto Size ............................................................................36
Pixel........................................................................................37
Playback zoom...................................................................41
Protect....................................................................................51
RRecordable time of movies...........................................68
SSelf-Timer............................................................................33
Settings..................................................................................11
Share it Later ......................................................................43
Shooting
Movies............................................................................30
Still images...................................................................28
Software..........................................................................24, 48
TTouch panel.........................................................................18
Troubleshooting ................................................................62
UUSB ..................................................................................21, 24
VView
Movies............................................................................39
Still images...................................................................39
Volume control..................................................................45
WWarning messages............................................................66
Windows computer..........................................................46
ZZoom......................................................................................32