contents...silver, for instance, practice it twice using silver-plated copper, and then move to...
TRANSCRIPT
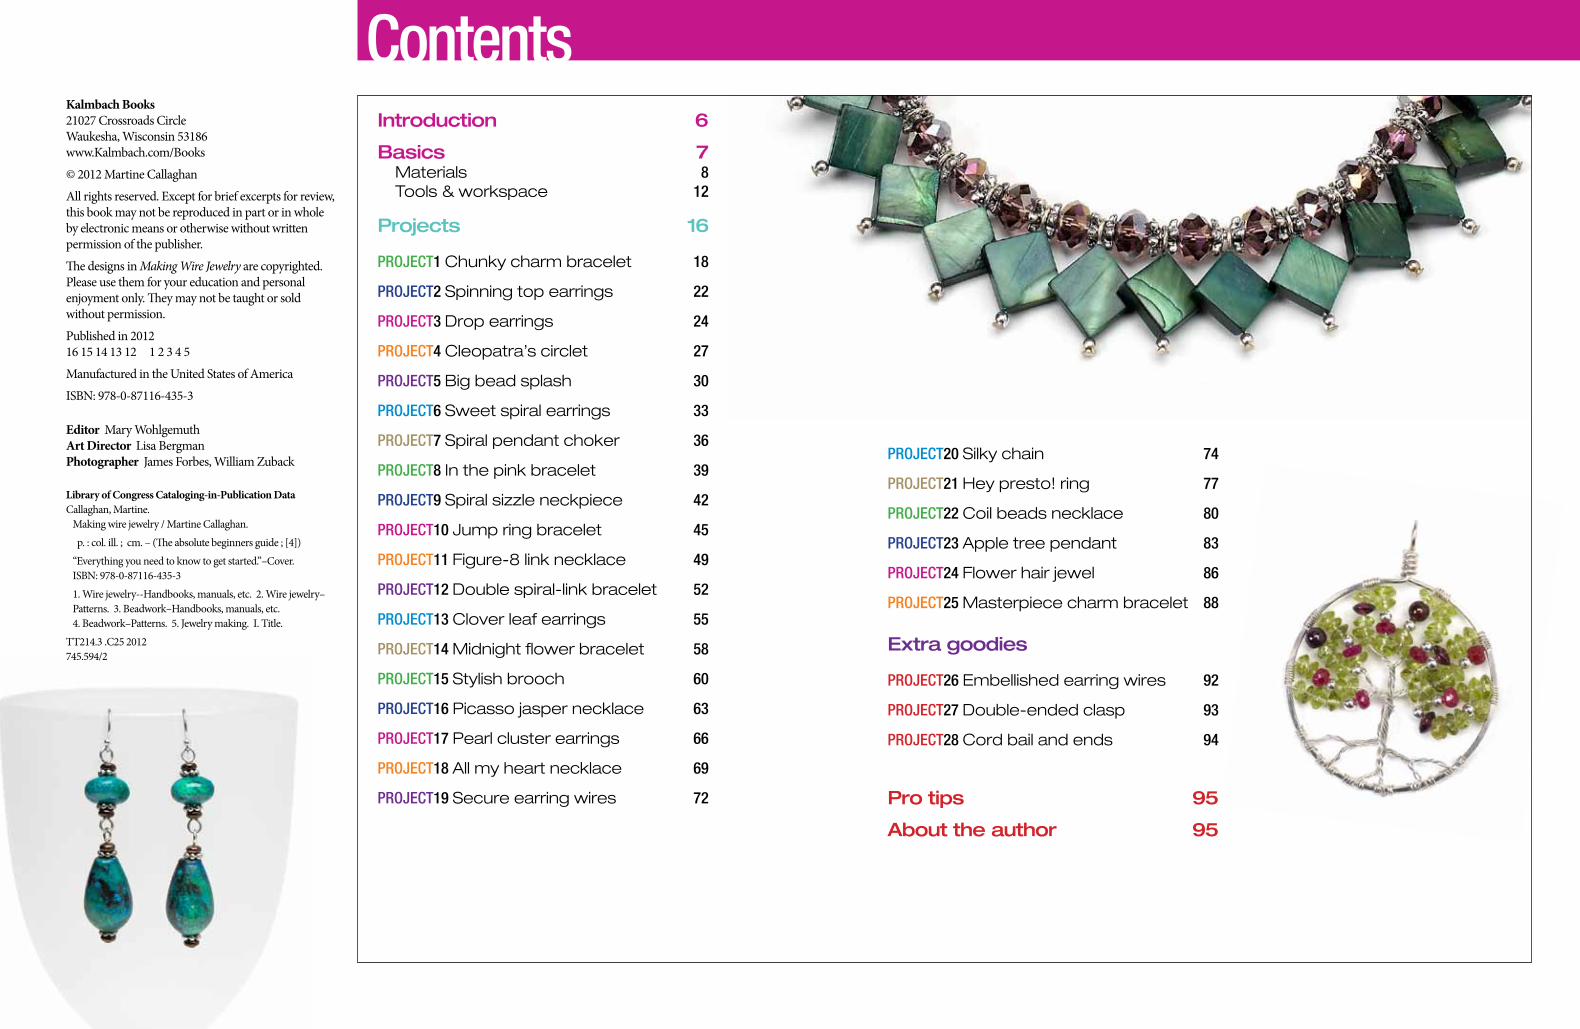
ContentsKalmbach Books21027 Crossroads Circle Waukesha, Wisconsin 53186 www.Kalmbach.com/Books
© 2012 Martine Callaghan
All rights reserved. Except for brief excerpts for review, this book may not be reproduced in part or in whole by electronic means or otherwise without written permission of the publisher.
The designs in Making Wire Jewelry are copyrighted. Please use them for your education and personal enjoyment only. They may not be taught or sold without permission.
Published in 2012 16 15 14 13 12 1 2 3 4 5
Manufactured in the United States of America
ISBN: 978-0-87116-435-3
Editor Mary WohlgemuthArt Director Lisa BergmanPhotographer James Forbes, William Zuback
Library of Congress Cataloging-in-Publication Data Callaghan, Martine. Making wire jewelry / Martine Callaghan.
p. : col. ill. ; cm. – (The absolute beginners guide ; [4])
“Everything you need to know to get started.”–Cover. ISBN: 978-0-87116-435-3
1. Wire jewelry--Handbooks, manuals, etc. 2. Wire jewelry–Patterns. 3. Beadwork–Handbooks, manuals, etc. 4. Beadwork–Patterns. 5. Jewelry making. I. Title.
TT214.3 .C25 2012 745.594/2
Introduction 6
Basics 7 Materials 8 Tools & workspace 12
Projects 16
PROJECT1 Chunky charm bracelet 18
PROJECT2 Spinning top earrings 22
PROJECT3 Drop earrings 24
PROJECT4 Cleopatra’s circlet 27
PROJECT5 Big bead splash 30
PROJECT6 Sweet spiral earrings 33
PROJECT7 Spiral pendant choker 36
PROJECT8 In the pink bracelet 39
PROJECT9 Spiral sizzle neckpiece 42
PROJECT10 Jump ring bracelet 45
PROJECT11 Figure-8 link necklace 49
PROJECT12 Double spiral-link bracelet 52
PROJECT13 Clover leaf earrings 55
PROJECT14 Midnight flower bracelet 58
PROJECT15 Stylish brooch 60
PROJECT16 Picasso jasper necklace 63
PROJECT17 Pearl cluster earrings 66
PROJECT18 All my heart necklace 69
PROJECT19 Secure earring wires 72
PROJECT20 Silky chain 74
PROJECT21 Hey presto! ring 77
PROJECT22 Coil beads necklace 80
PROJECT23 Apple tree pendant 83
PROJECT24 Flower hair jewel 86
PROJECT25 Masterpiece charm bracelet 88
Extragoodies
PROJECT26 Embellished earring wires 92
PROJECT27 Double-ended clasp 93
PROJECT28 Cord bail and ends 94
Protips 95
Abouttheauthor 95

6 The Absolute Beginners Guide 7Making Wire Jewelry
Introduction BasicsWire is a truly amazing material for making jewelry. With a few simple tools and techniques and a few lengths of inexpensive metal, you can be on your way to making fabulous jewelry that is not only unique and attractive, but also extremely strong and durable. and wireworking doesn’t require a huge investment in time: many of the projects in this book can be made in less than an hour. making the projects is a guaranteed way to build the skills that will turn you into a talented wireworker: accuracy, patience, and attention to detail. you’ll also get quite friendly with your materials and tools along the way.
your main material is naturally going to be wire. as i’ll explain later, many different types of wire can be used in jewelry, but to minimize the cost, i suggest you work mostly with copper or plated copper to practice your technique. The rule of thumb is to make two pieces for practice and one “for real.” so, if you want to make a project using sterling silver, for instance, practice it twice using silver-plated copper, and then move to sterling. you will find that, by the third time, you will have ironed out all the problems. Of course, you don’t have to use sterling silver at all; copper is a pure material in its own right, and good-quality silver-plated or silver-filled wire will also stand the test of time.
take your time and work your wire slowly, calmly, unhurriedly, and lovingly, and you will be amply rewarded. you are about to give a humble piece of wire life, beauty, and function!
as a trained teacher, i am constantly driven by the thought that there is always a better, simpler way of passing on knowledge. in this book, you will find many simple and innovative ways
of learning the basics, including quite a few tricks to make some of the techniques easier to understand.
This book aims to get you started making gorgeous wire jewelry right from the start: each project teaches several basic techniques. The projects are organized in order of difficulty from the simplest to the most challenging, and each new piece builds on and expands the skills learned in the previous one.
i suggest that if you are an absolute beginner, you work your way through the projects in the order they are presented to increase your skill levels gradually and thoroughly. as you progress through the projects, you will become more at ease with your tools and wire.
Be sure to take advantage of “another idea”—a variation on the featured project—to practice and develop your design skills.
Whether you have never picked up a pair of pliers or you already have some experience in wirework, you will find this book a useful reference to take you step by step through all the basic techniques needed to produce beautiful, professional-looking wirework. Wirework is not only an ancient and intricate art form, it’s also an exciting, challenging, and—i have to warn you!—totally engrossing hobby.
i hope this book will give you the solid foundation needed to be a skillful wireworker and, in the process, inspire you to develop your very own style. above all, i hope you will have good fun.
totally engrossing hobby.
it’s an exciting, challenging, and
i can already hear you say, “But i want beads in my wirework!” sure you do! Those gorgeous, sparkly things are just impossible to resist. Fortunately (or is it unfortunately?) for wirework, we don’t need a huge stash, as the wire is the main event. What beads you choose to decorate your wirework will be entirely up to you.
We all have different tastes, so there is no right or wrong choice and there are so many hard-to-resist beauties available. However, keep in mind that some of the projects have precise measurements adapted to a particular size of bead, and delicate beads can be damaged by wire.
now it’s time to make friends with your wire. Cut off a piece and bend it with your fingers, make some shapes, play with it, see what it can do. How does it feel? springy? soft? stiff? let’s talk more about our favorite material.
Colored craft wire and copper wire are excellent practice materials for beginners.
22 The Absolute Beginners Guide 23Making Wire Jewelry
TECHNIQUES REVIEWHOWTO
PROJECT2
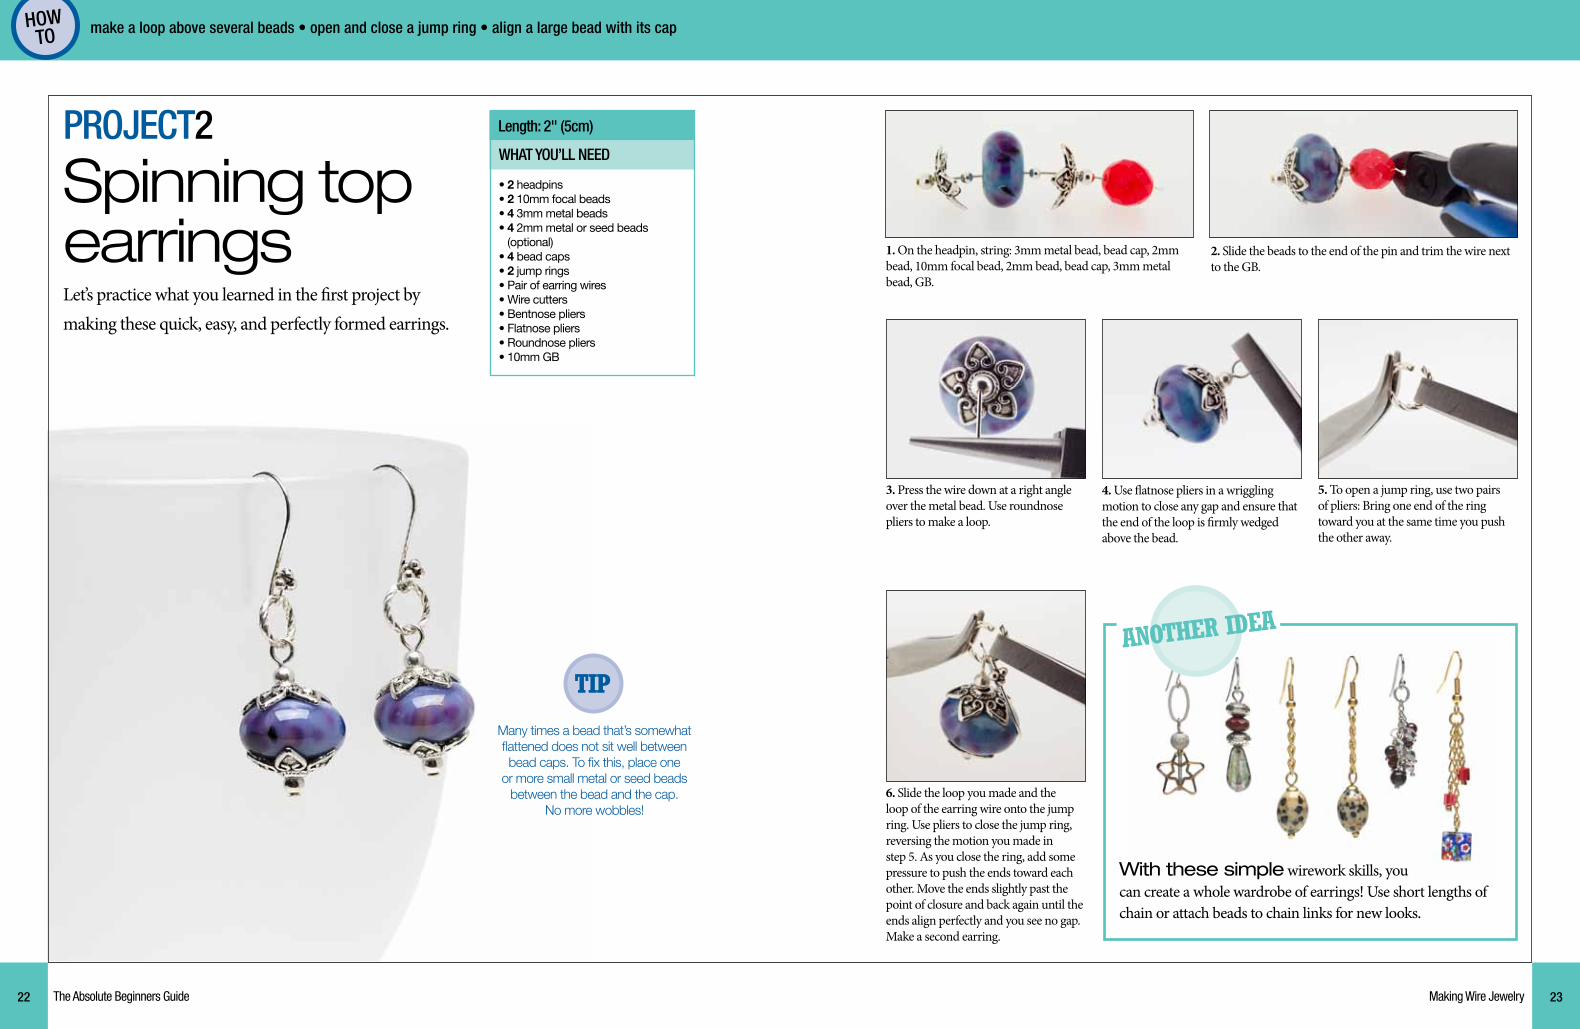
Spinning top earringsLet’s practice what you learned in the first project by making these quick, easy, and perfectly formed earrings.
Length: 2" (5cm)
make a loop above several beads • open and close a jump ring • align a large bead with its cap
WHAT YOU’LL NEED
• 2 headpins• 2 10mm focal beads• 4 3mm metal beads• 4 2mm metal or seed beads
(optional)• 4 bead caps• 2 jump rings• Pair of earring wires• Wire cutters• Bentnose pliers• Flatnose pliers• Roundnose pliers• 10mm GB
1. On the headpin, string: 3mm metal bead, bead cap, 2mm bead, 10mm focal bead, 2mm bead, bead cap, 3mm metal bead, GB.
Many times a bead that’s somewhat flattened does not sit well between bead caps. To fix this, place one
or more small metal or seed beads between the bead and the cap.
No more wobbles!
TIP
2. Slide the beads to the end of the pin and trim the wire next to the GB.
3. Press the wire down at a right angle over the metal bead. Use roundnose pliers to make a loop.
4. Use flatnose pliers in a wriggling motion to close any gap and ensure that the end of the loop is firmly wedged above the bead.
5. To open a jump ring, use two pairs of pliers: Bring one end of the ring toward you at the same time you push the other away.
6. Slide the loop you made and the loop of the earring wire onto the jump ring. Use pliers to close the jump ring, reversing the motion you made in step 5. As you close the ring, add some pressure to push the ends toward each other. Move the ends slightly past the point of closure and back again until the ends align perfectly and you see no gap. Make a second earring.
ANOTHER IdEA
With these simple wirework skills, you can create a whole wardrobe of earrings! Use short lengths of chain or attach beads to chain links for new looks.
42 The Absolute Beginners Guide 43Making Wire Jewelry
TECHNIQUES REVIEWHOWTO
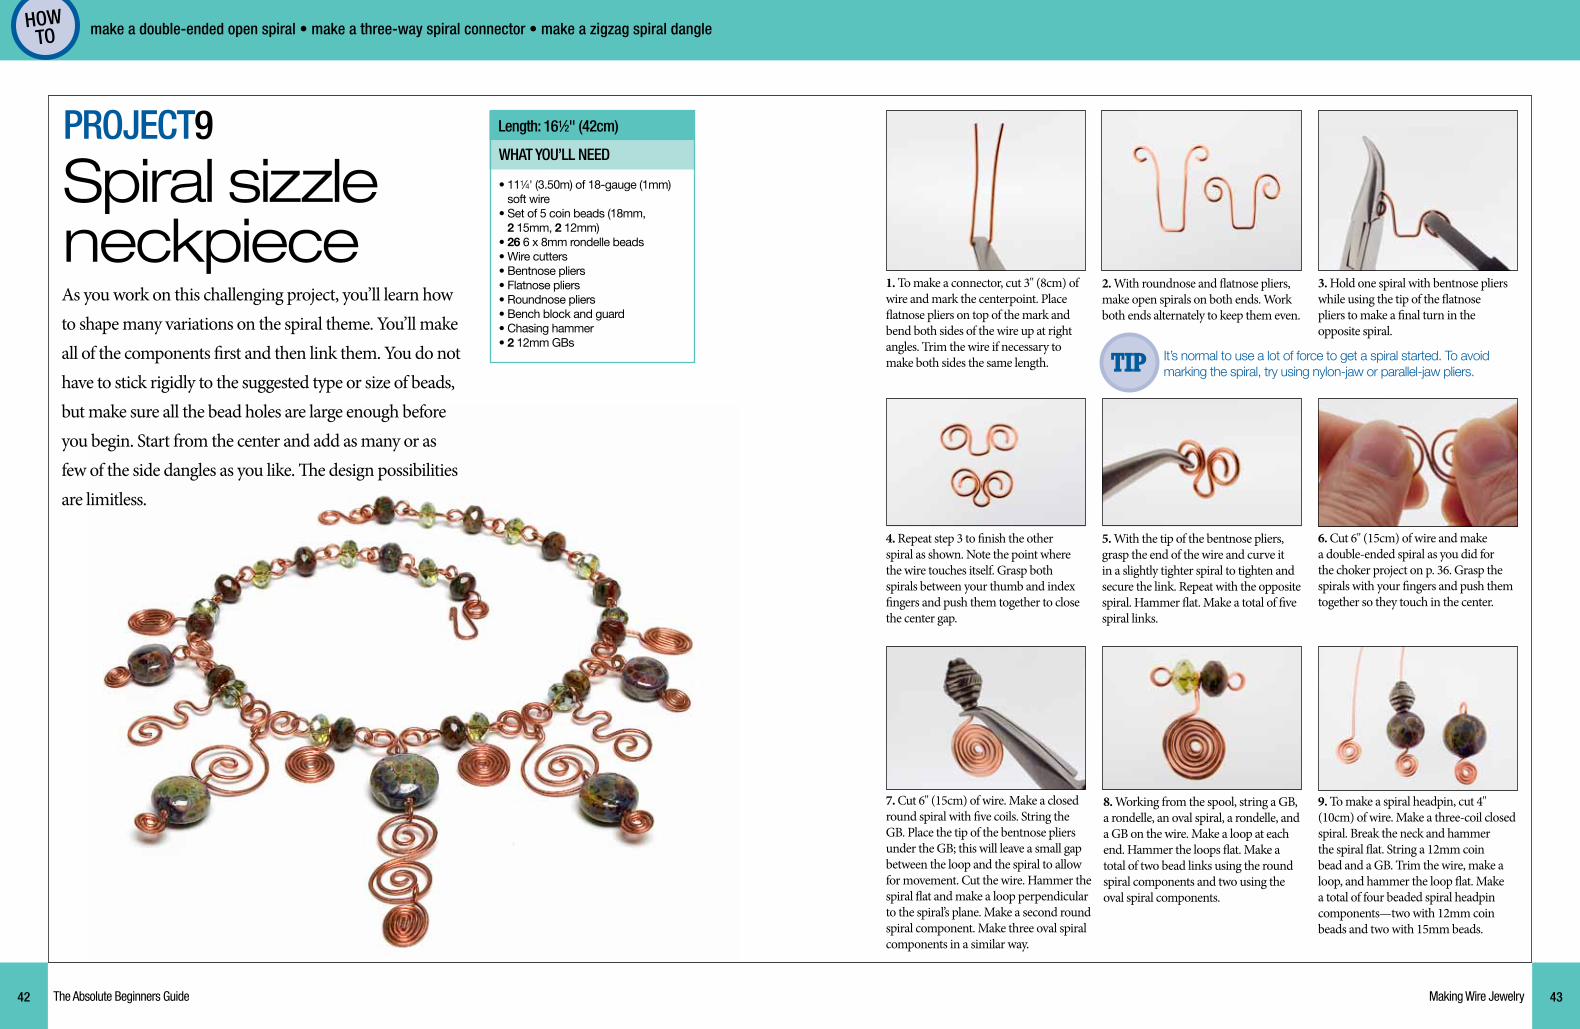
PROJECT9
Spiral sizzle neckpieceAs you work on this challenging project, you’ll learn how to shape many variations on the spiral theme. You’ll make all of the components first and then link them. You do not have to stick rigidly to the suggested type or size of beads, but make sure all the bead holes are large enough before you begin. Start from the center and add as many or as few of the side dangles as you like. The design possibilities are limitless.
Length: 161⁄2" (42cm)
make a double-ended open spiral • make a three-way spiral connector • make a zigzag spiral dangle
WHAT YOU’LL NEED
• 111⁄4' (3.50m) of 18-gauge (1mm) soft wire
• Set of 5 coin beads (18mm, 2 15mm, 2 12mm)
• 26 6 x 8mm rondelle beads• Wire cutters• Bentnose pliers• Flatnose pliers• Roundnose pliers• Bench block and guard• Chasing hammer• 2 12mm GBs
1. To make a connector, cut 3" (8cm) of wire and mark the centerpoint. Place flatnose pliers on top of the mark and bend both sides of the wire up at right angles. Trim the wire if necessary to make both sides the same length.
2. With roundnose and flatnose pliers, make open spirals on both ends. Work both ends alternately to keep them even.
3. Hold one spiral with bentnose pliers while using the tip of the flatnose pliers to make a final turn in the opposite spiral.
4. Repeat step 3 to finish the other spiral as shown. Note the point where the wire touches itself. Grasp both spirals between your thumb and index fingers and push them together to close the center gap.
5. With the tip of the bentnose pliers, grasp the end of the wire and curve it in a slightly tighter spiral to tighten and secure the link. Repeat with the opposite spiral. Hammer flat. Make a total of five spiral links.
6. Cut 6" (15cm) of wire and make a double-ended spiral as you did for the choker project on p. 36. Grasp the spirals with your fingers and push them together so they touch in the center.
7. Cut 6" (15cm) of wire. Make a closed round spiral with five coils. String the GB. Place the tip of the bentnose pliers under the GB; this will leave a small gap between the loop and the spiral to allow for movement. Cut the wire. Hammer the spiral flat and make a loop perpendicular to the spiral’s plane. Make a second round spiral component. Make three oval spiral components in a similar way.
8. Working from the spool, string a GB, a rondelle, an oval spiral, a rondelle, and a GB on the wire. Make a loop at each end. Hammer the loops flat. Make a total of two bead links using the round spiral components and two using the oval spiral components.
9. To make a spiral headpin, cut 4" (10cm) of wire. Make a three-coil closed spiral. Break the neck and hammer the spiral flat. String a 12mm coin bead and a GB. Trim the wire, make a loop, and hammer the loop flat. Make a total of four beaded spiral headpin components—two with 12mm coin beads and two with 15mm beads.
TIP It’s normal to use a lot of force to get a spiral started. To avoid marking the spiral, try using nylon-jaw or parallel-jaw pliers.

88 The Absolute Beginners Guide 89Making Wire Jewelry
TECHNIQUES REVIEW
PROJECT25
MasterpiececharmbraceletLike a filmmaker’s most spectacular work that caps a brilliant career, this final project incorporates nearly all the techniques of the craft you have learned and expands on them. This can truly be your masterpiece. I purposefully left the specifics of the beads and wire colors up to you—let your imagination run free to invent and add other dangles and use other gauges, shapes, or materials to make it your own.
Length: 71⁄2" (19cm)
make wire-wrapped links • make a double coiled bead • assemble a charm bracelet
WHAT YOU’LL NEED
• 7' (2m) 18-gauge (1mm) wire• 4' (1.2m) 20-gauge (0.8mm) wire• 40" (1m) 22-gauge (0.6mm) wire• 53' (16m) 26-gauge (0.4mm) wire• 14' (4m) 28-gauge (0.3mm) wire• Various sizes of beads• 3⁄8" (9.5mm) mandrel• Wire cutters• Bentnose pliers• Chainnose pliers• Flatnose pliers• Roundnose pliers• Bench block and guard• Chasing hammer• Nylon-head mallet• 12mm GB
HOWTO
The charmsMy Fair Lady String a large bead on 3" (7.5cm) of 18-gauge (1mm) wire. Using 26-gauge (0.4mm) wire, make several wraps at one end of the bead, string several metal beads, wrap it around the 18-gauge wire at the other end of the large bead, and trim. Make a spiral at one end of the 18-gauge wire. Slide the bead against it and make a loop using the 12mm GB at the other end.
La Dolce Vita Cut 6" (15cm) of 18-gauge (1mm) wire. Make a small loop at one end. Cut a comfortable length of 26-gauge (0.4mm) wire. About 2" (5cm) from one end, wrap several times around the 18-gauge wire close to the loop. String a small bead, make 10 close wraps with the wire tail, push the bead and the coil close to the loop, and trim. Continue adding beads in this way, wrapping tightly 10 times between beads. After the sixth bead, wrap for about 3" (8cm). Starting with the small lopp, make a spiral with the entire beaded and wrapped wire, placing roundnose pliers through the loop to start the spiral and continuing the shape using your fingers. Make a loop for attaching the charm to the bracelet.
Funny Girl Make a P loop on one end of 5" (12.5cm) of 20-gauge (0.8mm) wire. Wrap 26-gauge (0.4mm) wire for 3" (8cm). Push the coil close to the loop. Start a spiral with roundnose pliers and then use flatnose pliers very gently to continue the shape. Straighten the neck. String your chosen beads and make a loop.
Back to the Future Using a piece of 18-gauge (1mm) wire as a mandrel, make a 2½" (6.5cm) coil with 26-gauge (0.4mm) wire. Remove the coil from the mandrel and cut it into seven pieces, each ¼" (6mm) long. Cut 6" (15cm) of 22-gauge (0.6mm) wire. String on a pattern of a coil and a 4mm bead six times, and string a coil. Secure the wire tail on 3" (8cm) of 18-gauge (1mm) wire. Wrap the coils and the beads around the wire, aligning the beads. Wrap the other end of the 22-gauge (0.6mm) wire to secure. String a bead on the 18-gauge wire and make a headpin ending (such as this figure 8). Make a loop at the other end.
Mamma Mia! For this charm, choose a bead with a very large hole. Cut 4" (10cm) of 18-gauge (1mm) wire. Slide the bead onto the wire. Make a P loop at each end, facing the loops in opposite directions. Coil 26-gauge (0.4mm) wire starting near one loop, pass the wire through the bead hole, and coil to the other end. Mark the center. Make a double spiral as in Project 7, p. 36. Add a jump ring to attach.