controller's manual for feelthere's tower!se air traffic
TRANSCRIPT

CONTROLLER'S MANUAL
FOR feelThere's Tower!SE
Air Traffic Control Simulator
Tower!SE not to be used for real world training! Page 1

Table of Contents Welcome to Tower ................................................................................................................................................................... 3 Installing Tower ........................................................................................................................................................................ 4
For the virtual pilots to speak .............................................................................................................................................. 5 Voice recognition system .................................................................................................................................................... 5
How Tower recognizes vocal commands ................................................................................................................................. 6 The Airports.............................................................................................................................................................................. 7
Cyril E. King Airport .......................................................................................................................................................... 8 Los Angeles International Airport ...................................................................................................................................... 8
Miami International Airport ............................................................................................................................................... 11 Getting Started ........................................................................................................................................................................ 13
Tower Configuration .............................................................................................................................................................. 22 Tower/Select Simulation ................................................................................................................................................... 22
Settings.............................................................................................................................................................................. 23 Information ....................................................................................................................................................................... 24
Exit .................................................................................................................................................................................... 26 Loading ............................................................................................................................................................................. 26
In-Game Screens .................................................................................................................................................................... 26 The Ground Radar (ADIRS) ............................................................................................................................................. 27
Air Radar (DBRITE) ......................................................................................................................................................... 28 Command Screen .............................................................................................................................................................. 29
Strip Screen ....................................................................................................................................................................... 30 Airport View ..................................................................................................................................................................... 32
Commands and Syntax ........................................................................................................................................................... 32 Command Reference Sheets ............................................................................................................................................. 35
Airborne commands .................................................................................................................................................... 36 Ground commands ...................................................................................................................................................... 37
Descriptions of Aircraft Reactions to Commands ............................................................................................................. 38 Ground Commands ...................................................................................................................................................... 38
Airborne Commands ................................................................................................................................................... 41 DELETE command ..................................................................................................................................................... 45
The Theory Behind Air Traffic Control: Putting It Together and Getting It Done ................................................................ 46 Controlling Departures ...................................................................................................................................................... 46
Controlling Arrivals .......................................................................................................................................................... 48 Controlling Ground Traffic ............................................................................................................................................... 49
Controlling Local Traffic .................................................................................................................................................. 50 Things to Remember When Controlling ................................................................................................................................. 50
Multiplayer ............................................................................................................................................................................. 51 Setup ................................................................................................................................................................................. 51
Play ................................................................................................................................................................................... 53 Obtaining Support for this Software ....................................................................................................................................... 54
Real World Air Traffic Control Resources ............................................................................................................................. 55 Aircraft Identification Codes .................................................................................................................................................. 56
Airline Identification Codes ................................................................................................................................................... 57 Tower Editors ......................................................................................................................................................................... 58
Creating Airplanes ............................................................................................................................................................ 58 Creating Airports .............................................................................................................................................................. 62
Schedule Editing ............................................................................................................................................................... 82 Definitions .............................................................................................................................................................................. 84
Airport, Schedule, Airline and Aircraft Expansion Packs ...................................................................................................... 86 CREDITS AND COPYRIGHT .............................................................................................................................................. 87
Tower!SE not to be used for real world training! Page 2

Tower!SE by feelThere
Welcome to Tower!SE by feelThere.
In Tower your assignment is to guide aircraft of various sizes and capabilities to and from the active
runway for landing and takeoff. As Tower Controller you must assure that it safe for a plane to enter or
cross a runway, assign taxiway routes, when to stop and start movement, and clear aircraft for take off.
Tower!SE by feelThere provides you with flight strips, ground and air radar screens and top down view
photorealistic background for the airport. Tower 2011 is no arcade game. With a complex command
structure, advanced AI and Speech Recognition technology Tower!SE will allow you to experience of
the thrill of being a real air traffic controller.
Tower!SE not to be used for real world training! Page 3

Installing Tower! by feelThere
Supported Operating Systems:
• Windows 7 Ultimate 64 bits
Windows 8 64 bits
Windows 10 64 bits
Minimum Computer Specifications:
• 1.2 GHz Processor
• 1.0 GB memory for Windows XP and 1.5 GB memory for Windows VISTA and Windows 7
• 256 MB video card memory
• 700 MB hard disk space
• Sound card
• Mouse or pointer control device
Recommended Hardware and Peripherals:
• 3.0 GHz Processor
• 3 GB memory Windows XP and 4 GB memory for VISTA and Windows 7
• video card 512 MB video card memory
• Two button mouse with a middle button scroll wheel
• Two or three monitors
Tower!SE requires you to have hardware that supports a stable connection to the Internet. Hardware
and firewall(s) must be correctly configured to allow Tower! host and client computers to
communicate. feelThere recommends that you have an Internet connection that provides uninterrupted
connections faster than 800 Mbps. An unstable and/or slow Internet connection may result in poor
multiplayer game performance because of latency, lag or disconnects. Internet service charges may
apply.
Tower!SE not to be used for real world training! Page 4

INTENTIONALLY LEFT BLANK
Tower!SE not to be used for real world training! Page 5

Setting your computer to use voice recognition will take about one-half-hour to complete.
IMPORTANT:
Tower only recognizes typed or spoken English, the international language of airtraffic control. Toweronlyrecognizes voice commands whenSpeechis set toEnglish US. The PTT button on theCommand screenmust be pushed and held when
speakingcommands. When you have completed a command release the PTT button. The use ofSpeechis not required.Tower! by feelTherecan be played using
onlykeyboard commands.
A high quality microphone improvesSpeech'sability to interpret your
voice.Speak at a steady pace without to short a pause between words and
numbers.Speaking too quickly or with long pauses will confuse Speech.
Keeping background noises to a minimum improvesSpeech'sability to
interpretyour voice.
Because of differences between individual's speech diction feelThere does not guarantee that voice
recognition will work flawlessly for all users.
How Tower!SE recognizes vocal commands
For Tower to 'listen' to your voiced commands the PTT button on the Command screen must be
pressed and held using the left-mouse-button. The keyboard <TAB> key can also be used to control
the PTT button. Once the command has been stated release the PTT botton, or <TAB> key, to 'send'
the command to the AI pilot.
Commands must be stated as outlined in the Commands section of this manual. The commands listed
are the only word sequencing that Tower!SE will recognize.
When speaking commands Tower will display the command the voice recognition believes you are
stating in the Command screen window. The entire commend phrase must be stated for the instruction
to be accepted by Tower. As the software recognizes each word/letter/number the text will change from
shadow to bold printing. If Tower does not recognize your instruction and clears the Command screen line, it is best to
release the PTT button before speaking again.
If the instruction recognized by Tower! by feelThere is incorrect, continue to hold the PTT button
until the command clears.
VIA is recognized as "vahy-uh".
Tower!SE not to be used for real world training! Page 6

Taxiways and general aviation callsigns are identified using these ICAO phonic pronunciation codes -
Letter - Code Letter - Code Letter - Code
A - Alfa J - Juliett S - Sierra
B - Bravo K - Kilo T - Tango
C - Charlie L - Lima U - Uniform
D - Delta M - Mike V - Victor
E - Echo N - November W - Whiskey
F - Foxtrot O - Oscar X - X-ray
G - Golf P - Papa Y - Yankee
H - Hotel Q - Quebec Z - Zulu
I - India R - Romeo
Numbers used in callsigns, taxiways and runways are identified using these ICAO
phonic pronunciation codes -
Number - Code Number - Code Number - Code
0 - Zero 4 - Four 7 - Seven
1 - One 5 - Five 8 - Eight
2 - Two 6 - Six 9 - Niner
3 - Three
The Airports
ICAO (IATA) - Cyril E. King Airport, St. Thomas Island, United States
TIST (STT)
Virgin Islands
KLAX (LAX) - Los Angeles International Airport , Los Angeles,
California, United States of America
KMIA (MIA) - Miami International Airport, Miami, Florida, United States
of America
In the Tower 2011! root directory, in a folder named 'Charts', are the full-sized charts for the
simulated airports.
Tower!SE not to be used for real world training! Page 7

TIST (STT):
Cyril E. King Airport, St. Thomas Island, United States Virgin Islands
The Cyril E. King Airport is named for the second elected governor of the
U.S. Virgin Islands. In 1990 the terminal and runway were rebuilt and
upgraded. Located on the southwestern side of island of St. Thomas, U.S.
Virgin Islands, the airfield covers 280 acres and contains a single runway.
Until 1984 the field was known as Harry S Truman Airport, the 33rd
President of the United States. Local time is -4 hours to UTC.
There is little overnight traffic as the Air Traffic Control Tower
operates from 1100 to 0230 UTC. An average day at TIST sees only
200 aircraft movements.
Runway Designations -
• 10: 7000 ft (2134 m) long by 150ft (46 m) wide; heading 100 magnetic, 87 true
• 28: 7000 ft (2134 m) long by 150ft (46 m) wide; heading 280 magnetic, 267 true.
Aircraft Terminal, Apron, and Ramp Assignments -
All private aircraft and small props are assigned to ramp parking north of the runway.
All jetliners and commuter turboprop aircraft are assigned to the main terminal.
KLAX (LAX):
Los Angeles International Airport, Los Angeles, California, United
States of America
Located on the Pacific ocean cost in southwestern Los Angeles in the
neighborhood of Westchester, Los Angeles International Airport is most
often referred to by its IATA airport code of LAX. The airfield covers
3,500 acres (5 sq mi; 14 sq km) and operates four parallel runways. Local
time is -8 hours to UTC.
LAX is a major hub for the world's airlines making it the sixth busiest
airport in the world. Always open, the airport handles over 1100 aircraft
movements each day.
After doing little more than smoothing over 640 acres (1 sq mi; 2.6 sq
km) of farmland, the airport Opened in 1928 without a terminal. The
airfield was named after William W. Mines, the organizing real estate
Tower!SE not to be used for real world training! Page 8

agent. Official dedication occurred in 1930. In 1941 the name was changed to Los Angeles Airport,
followed with a renaming to Los Angeles International in 1949.
The 'X' in the identifier code was added in the early 1930s as increased airline traffic resulted in
the construction of more airports. United States ID codes were changed from two to three letter
designators.
Los Angeles International has nine terminals. Terminals 1-3 make up the north side of the complex
(south of runway 6R/24L). Terminals 4-8 are the south side of the complex (north of runway 7L/25R).
the Tom Bradley International Terminal (TBIT) is on the western side of the terminal complex (east of
taxiway S).
In the center of the terminal complex is the distinctive building designed by Paul R. Williams,
Pereira & Luckman, and Robert Herrick Carter. Constructed in 1961, the 135 foot arches of this
'Theme Building' resemble a flying saucer that has landed on its four legs. The building was
designated a cultural and historical monument in 1992.
Runway Designations -
• 6L: 8925 ft (2720 m) long by 150 ft (46 m) wide; heading 69 magnetic, 83 true.
• 6R: 10285 ft (3135 m) long by 150 ft (46 m) wide; heading 69 magnetic, 83 true.
• 7L: 12091 ft (3686 m) long by 150 ft (46 m) wide, heading 69 magnetic, 83 true.
• 7R: 11095 ft (3382 m) long by 200 ft (61 m) wide; heading 69 magnetic, 83 true.
• 24L: 10285 ft (3135 m) long by 150 ft (46 m) wide; heading 249 magnetic, 263 true.
• 24R: 8925 ft (2720 m) long by 150 ft (46 m) wide; heading 249 magnetic, 263 true.
• 25L: 11095 ft (3382 m) long by 200 ft (61 m) wide; heading 249 magnetic, 263 true.
• 25R: 12091 ft (3686 m) long by 150 ft (46 m) wide, heading 249 magnetic, 263 true.
Runways 7R/25L and connecting taxiways were updated in 2006 & 2008 for the introduction
into services of the Airbus A380s. 7R/25L also have enhanced lighting not available on
LAX's other runways.
Aircraft Terminal, Apron, and Ramp Assignments -
All private aircraft and small props are assigned to the ramps south of runway 7R/25L.
The terminals at Los Angeles International are numbered counter-clockwise beginning in the
upper right corner of main complex. The Tom Bradley International Terminal is on the far left and
is not numbered.
Airline Terminal Assignments:
Terminal One
• Value • Denali Airlines
Tower!SE not to be used for real world training! Page 9 Terminal Two
• Trans American • Silent Valley Airline

• Gold Sun Air • Latitude Airways
• Magic Express • Value
• Big Lakes
Terminal Three
• Denali • Trans American
• Feelthere International Airlines
Terminal Four
• Magic Express • Uluru
• FeelThere International Airlines Terminal Five
• Magic Express • Trans American
Terminal Six
• Trans American • Value
Terminal Seven
• Trans American
• Trans Global • Denali Airlines
• Be There Vacation
• Uluru
• Denali Airlines

Terminal Eight
• Trans American • Magic Express • Value
Tom Bradley International Terminal • Open assignment for international flights
NOTE: Tower, like the real-world, uses the code/callsign used by the registered owner of the aircraft. This
means that flights by those airlines sub-contracting their regional and express networks to smaller airlines will
be correctly identified by the aircraft operator.
Tower!SE not to be used for real world training! Page 10

KMIA (MIA):
Miami International Airport, Miami, Florida, United States of
America
Miami International is also known as Wilcox Field and MIA. Located in
Southern Florida, the 3,230 acre (5 sq mi; 13 sq km) airport is northwest
of downtown Miami, in unincorporated Miami. MIA operates four
runway: three parallel and one crossing. Local time is -5 hours to UTC.
Called the gateway between the United States and Latin America and the
Caribbean. Ranked the 25th busiest airport in the world, MIA is ranked
first in the United States by percentage of international passenger and
cargo flights. Miami International is one of the few airports in the United
States were you find regular flights to and from Cuba. Always open, the
airport handles over 1000 aircraft movements each day.
Miami International started operations in 1928 as Pan American Field, the operating base of Pan
American Airways Corporation. After opening the airfield went mostly unused and was renamed 36th
Street Airport until 1934 when Eastern Air Lines began regular service. The City of Miami then
purchase the airport , and expanded the facility though a merger with an adjoining Army airfield in
1949. The port authority expanded the airfield again in 1951. In 1959 the main terminal building, still
in use after many renovations, was opened.
Runway Designations -
• 8L: 8600 ft (2621 m) long by by 150 ft (46 m) wide; heading 92 magnetic, 87 true.
• 8R: 10506 ft (3202 m) long by 200 ft (61 m) wide; heading 92 magnetic, 87 true.
• 9: 13000 ft (3962 m) long by 150 ft (46 m) wide; heading 92 magnetic, 87 true.
• 12: 9354 ft (2851 m) long by 150 ft (46 m) wide; heading 124 magnetic, 119 true.
• 26L: 10506 ft (3202 m) long by 200 ft (61 m) wide; heading 272 magnetic, 267 true.
• 26R: 8600 ft (2621 m) long by by 150 ft (46 m) wide; heading 272 magnetic, 267 true.
• 27: 13000 ft (3962 m) long by 150 ft (46 m) wide; heading 272 magnetic, 267 true.
• 30: 9354 ft (2851 m) long by 150 ft (46 m) wide; heading 304 magnetic, 299 true.
Operations Restrictions -
• Runways 8L, 12. 26R, and 30 are closed 0200 - 1100 UTC.
• Runways 8R and 26L are closed when 9 and 27 are in use.
Aircraft Terminal, Apron, and Ramp Assignments -
All private aircraft and small props are assigned to the apron north of runway 8L/26R. Specifically the
apron area east of the FED EX building and north of the CUSTOMS & GAC building (see KMIA
chart included with Tower!).
Tower!SE not to be used for real world training! Page 11

Cargo flights by Express Mail Freight are assigned to the ramp areas west of runway 12/30 and north
of runway 9/27.
The terminal complex is semicircular in shape and contains three terminals containing six concourses.
The long linear concourse D, also known as the North Terminal, is the dominant feature. The Central
Terminal is made up of concourses E, F, and G. Concourses H and J are the South Terminal.
Where are concourses A, B, C and I? A was closed in 2007 and then reopened in 2010 as part of D. B
& C were demolished so that Concourse D gates could be added. Concourse I was skipped to avoid
confusion with the number 1.
Airline Terminal Assignments:
Terminal D
• Magic Express • Feelthere International Airlines
Terminal E
• Trans American • Denali Airlines • Be There Vacation
• Big Lakes
Terminal F
• Trans Global • Cheshire Blue
• Feelthere International Airlines
Terminal G
• Cheshire Blue • Trans American • Denali Airlines
• Value • Magic Express • Latitude Airways
• Trans Global
Terminal H
• Trans Global • Latitude Airways • Be There Vacation
• Denali Airlines • Value • Trans American
• Feelthere International Airlines
Terminal J
• Be There Vacation • Rainier Air • Trans American
• Silent Valley Airline • Magic Express • Latitude Airways
• Trans Global • Value
NOTE: Tower, like the real-world, uses the code/callsign used by the registered owner of the aircraft.
This means that flights by those airlines sub-contracting their regional and express networks to
smaller airlines will be correctly identified by the aircraft operator.
Tower!SE not to be used for real world training! Page 12

Getting Started
TIST is perfect for the new controller because of the single runway and light to moderate traffic. This
short orientation session will provide only an outline of how control aircraft using Tower!SE by
feelThere. Details on commands, control screens and proper procedures are covered later in the
manual.
Print the St. Thomas PDF airport and departure charts for St. Thomas located in the Tower
root directory in the folder named 'charts'.
Launch the simulator though the OS Start Menu → feelThere → Tower!SE.
For this introduction configure Tower! by feelThere as outlined below -
• On the Settings page set the arrival and departure density just to the right of the third (middle) hash mark (see picture to the right).
• On the Opening page set:
◦ St. Thomas as the active airport.
◦ 10 as the active landing runway.
◦ weather as clear.
◦ game time to 19:00 UTC.
• Once you have set the simulation Start the game.
Tower!SE will show the loading screen as the airport and traffic are compiled for the session. Once
the game is loaded you will have the radar screens set to the left of your monitor's screen. On the right
will be the Strip and Command screens. You can move the screens anywhere on your computer
monitor, or monitors, according to your preference by left-mouse-click and hold the title bar. To
resized the radar screens left-mouse-click and hold on lower right corner of their windows. The Strip
Screen can be made longer, not wider, with a left-mouse-click and hold on lower right corner of the
window. You cannot resize the Command screen.
For details on the use of and reading the four screens see their individual manual sections.
You can adjust the St. Thomas (TIST) Airport top-down view using the center-mouse scroll wheel.
You can change the view's center-point with a lef-mouse-button and drag. Look around and familiarize
yourself the with airport. Be sure to compare the chart to the airport so you know the taxiway and
runway designations.
At any time during the training session you can pause the game by pressing the PAUSE button on the
Command screen.
Tower!SE not to be used for real world training! Page 13

The first plane to call for control will be Field Air 212. The pilot will state, “Field Air 212 with you
runway 10.”
'Field Air 212 cleared to land.'
You have multiple methods for entering the permission to land instruction into the Command screen:
• left-mouse-click on FRT212'S flight strip on the Strip Screen, typing CLEARED TO LAND and pressing the send button, or the <Enter> keyboard key.
• left-mouse-click on FRT212's icon on the DBRITE air radar screen, typing CLEARED TO LAND and pressing the send button, or the <Enter> keyboard key.
• typing the entire command: FRT212 CLEARED TO LAND, and pressing the send button, or the <Enter> keyboard key.
NOTE: as commands are entered into the Command screen TOWER! will guess
which instruction you are sending. If the correct command is shown accept the guess
by pressing the keyboard right arrow key.
• left-mouse-click on FRT212's flight strip on the Strip Screen, using keyboard shortcut <CTRL><C> and pressing the send button, or the <Enter> keyboard key.
• left-mouse-click on FRT212's icon on the DBRITE air radar screen, using keyboard shortcut <CTRL><C> and pressing the send button, or the <Enter> keyboard key.
• To use voice command left-mouse-click and hold the PTT button on the Command screen (or press and hold the keyboard <TAB> key), say, “Field Air two one two cleared to land;” and release the PTT button (or <TAB> key).
REMINDER: what stating an aircraft's ID you must state the airline callsign.
If the command is not in the correct syntax the artificial intelligence (AI) pilot will state, “Say
again.” When you receive this 'syntax error' callback restate the instruction.
When a valid command is sent FRT212's AI pilot will read back the command and continue his approach. On FRT212's strip on the Strip screen you will see a check mark in the note field indicating you have cleared the plane for landing.
You have about eight minutes until another plane asks for control, so increase the simulation
rate until the game time is 19:09 UTC.
At about 19:10 UTC VAL1174 pilot will state, “Value 1174 ready for taxi.”
'Value 1174 taxi to runway 10.'
You have multiple methods for entering the taxi instructions into the Command screen:
• left-mouse-click on VAL1174's flight strip on the Strip Screen, typing TAXI TO RUNWAY 10
Tower!SE not to be used for real world training! Page 14

and pressing the send button, or the <Enter> keyboard key.
• left-mouse-click on VAL1174's icon on the ADIRS ground radar screen, typing TAXI TO RUNWAY 10, and pressing the send button, or the <Enter> keyboard key.
• typing the entire command: VAL1174 TAXI TO RUNWAY 10, and pressing the send button, or the <Enter> keyboard key.
NOTE: as commands are entered into the Command screen TOWER! will guess
which instruction you are sending. If the correct command is shown accept the guess
by pressing the keyboard right arrow key.
• left-mouse-click on VAL1174's flight strip on the Strip Screen, using keyboard shortcut <ALT><R> following by typing 10, and pressing the send button, or the <Enter> keyboard key.
• left-mouse-click on VAL1174's icon on the ADIRS ground radar screen, using keyboard shortcut <ALT><R> followed by typing 10, and pressing the send button, or the <Enter> keyboard key.
• To use voice command left-mouse-click and hold the PTT button on the Command screen (or press and hold the keyboard <TAB> key), say, “Value eight one two taxi to runway one zero;” and release the PTT button (or <TAB> key).
REMINDER: what stating an aircraft's ID you must state the airline callsign.
If the command is not in the correct syntax the artificial intelligence (AI) pilot will state, “Say
again.” When you receive this 'syntax error' callback restate the instruction.
When a valid command is sent VAL1174's AI pilot will read back the command and
commence pushback, taxi to and hold short of runway 10.
As VAL1174 is heading for runway 10, FRT212 will be landing.
Once FRT212 has landed and exited the runway instruct the flight to taxi to the terminal:
'Field Air two one two taxi to terminal.'
HINTS:
• Type the command, or use keyboard shortcuts, to enter the instructions into the Command screen.
◦ <ALT><3> = taxi to terminal.
• Aircraft ID's can be entered into the Command screen by typing, mouse clicking on the plane's icon on the radar screen, mouse clicking on the flight strip.
• To issue a keyboard entered commend click the SEND key on the Command screen.
• To use issue voice commands click-and-hold the Command screen PTT button, speak,
Tower!SE not to be used for real world training! Page 15

“<callsign> <flight number> taxi to terminal.” When done speaking the command
release the PTT button.
◦ 'Field Air' is the callsign for Feelthere International Airlines
◦ flight numbers are stated number by number: 212 is ''two one two'
When Field Air 212 reaches the terminal the flight's strip will be removed from the Strip screen.
Now we will clear Value 1174 for takeoff.
As the controller you can closely duplicate real-world departures. The PALCO SIX DEPARTURE
chart instructs that planes taking off from runway 10 are to make a right-hand turn to a heading of 250
degrees. We will simulate this departure. Issue the following command:
'Value 1174 after departure fly heading 250 cleared for takeoff.'
Hints:
• When using keyboard entry Value's three-digit ICAO code, VAL is used.
• When using voice commands Value's callsign, Value, must be used.
• When using voice commands Value's flight number must be stated as digits. In this case say 1174 as, “one one seven four.”
• The keyboard shortcut for AFTER DEPARTURE FLY HEADING is <ALT><U>.
• When using voice commands headings are stated as digits. In this case say 250 as, “two five zero.” Be sure to enter a space after typing the heading.
• The keyboard shortcut for CLEARED FOR TAKEOFF is <ALT><C>.
Value1174's AI pilot will confirm the command, enter the runway and then takeoff. On VAL1174's flight strip on the Strip screen you will see a check mark in the note field indicating you have cleared the plane for takeoff.
Once the aircraft has left the runway the plane icon will clear from the ADIRS ground radar and
appear on the DBRITE air radar screen. (If you typed or used keyboard shortcuts to give the takeoff
command and the pilot does not begin to taxi and takeoff, check that you correctly entered a space
after typing the heading.)
After takeoff and reaching 500' the VAL1174 will make a right-hand turn to heading 250 degrees.
FRT1632 and N842FT will call for permission to taxi. In general you will want to instruct planes in the
order received. In some instances this may not work because of taxiway crowding, space to safely
maneuver planes at the terminal, and to avoid airspace conflicts. Check the positions of each aircraft to
confirm that none are in conflict.
Note on the flight strip for FRT1632 and N842FT that both planes are small prop aircraft. Aircraft this
size do not require the full runway length for takeoff. You can send these planes to a runway
intersection closer to the terminal to shorten taxi time, saving the airlines' fuel, and allowing you to
control the aircraft more quickly.
Tower!SE not to be used for real world training! Page 16

Instruct Field Air 1632 to taxi to runway 10 and hold short at taxiway C. The command you will give
is:
'Field Air 1632 taxi to runway one zero at charlie.'
'Charlie' is the ICAO phonic pronunciation code for C.
HINTS:
• Type the command, or use keyboard shortcuts, to enter the instructions into the Command screen.
◦ <ALT><R> = taxi to runway.
◦ <ALT><A> = at
◦ as commands are entered into the Command screen TOWER! will guess which instruction you are sending. If the correct command is shown accept the guess by pressing the keyboard right arrow key.
• Aircraft ID's can be entered into the Command screen by typing, mouse clicking on the plane's icon on the radar screen, mouse clicking on the flight strip.
• To issue a keyboard entered commend click the SEND key on the Command screen.
• To use issue voice commands click-and-hold the Command screen PTT button, speak, “<callsign> <flight number> taxi to runway one zero at charlie.” When done speaking the command release the PTT button.
◦ 'Field Air' is the callsign for Feelthere International Airlines
◦ flight numbers are stated number by number: 1632 is 'one six three two'
◦ runways are said as digits: 10 is 'one zero'
◦ Taxiways are said in ICAO phonic pronunciation code: C is 'charlie'
On Field Air 1632's flight strip on the Strip screen you will see a notation of 'xC' in the note
field indicating you have instructed the pilot to hold at runway 10's taxiway C.
Now instruct N842FT to taxi to runway. This plane is no the north side of the runway. You can give a
specific taxi route to better control the flow of traffic at the airport:
'842FT taxi to runway 10 at charlie via foxtrot alpha.'
Hints: You do not need to state the leading letter of a general aviation (GA) aircraft ID. When using voice commands you must state the GA identification letters using the phonic
pronunciation code/ In this case F is 'foxtrot' and T is 'tango' When using voice commands the GA identification numbers must be stated as digits. When using voice commands runways are said as digits: 10 is 'one zero' The keyboard short for TAXI TO RUNWAY is <ALT><R>. The keyboard shortcut for AT is <ALT><A>. The keyboard shortcut for VIA is <ALT><V>.
Tower!SE not to be used for real world training! Page 17

• Taxiways are said in ICAO phonic pronunciation code: C is 'charlie', F is 'foxtrot' and A is 'alpha'. • If using voice command it may help to have printed for reference the ICAO phonic pronunciation codes on page 7.
N842FT will read back the taxi permission and head for the runway using the routing F and then
after crossing runway 10 follow A to taxiway C. As with Field Air 1632's flight strip, you will see on
N842FT's strip a notation of xC in the note field indicating you have instructed the pilot to hold at
runway 10's taxiway C for takeoff clearance.
When Field Air 1632 has arrived at taxiway C at runway 10 you can prepare this flight for takeoff
by moving the plane into position:
'Field Air 1612 line up and wait'
Hints:
• 'Field Air' is the callsign for Feelthere International Airlines
• Flight numbers are stated number by number: 1632 is 'one six three two'
• The keyboard shortcut for LINE UP AND WAIT is <ALT><L>
The AI pilot will taxi onto the runway and line-up for departure. FRT1612 will not depart because you
have not yet issued takeoff clearance. LINE UP AND WAIT is a good way to cue a plane for a quick
departure during busy airport operations.
For safety reasons you cannot immediately clear the next flight to following Value 1174. FRT 1632
and VAL1174 are classified as Category I aircraft. Prior to giving the clearance to takeoff you must
satisfy the following separation distance category criteria:
• When the aircraft wanting to takeoff is CAT I and the aircraft taking off prior is CAT I the departing aircraft is past the departure end of the runway; OR the prior aircraft has left the runway surface and is at least 3000’ ahead of the aircraft wishing to take-off.
Now, if you are reading this while playing Tower!SE VAL1174 is far enough away that you can clear
the next plane for takeoff. If not, you must wait until VAL1174 has flown far enough from the airport
for the next plane to safely depart. You can check the distance on the Air radar DBRITE screen, or
as the AI pilot to report her position:
'Value 1174 report position.'
Hints:
• When using keyboard entry Value's three-digit ICAO code, VAL is used.
• When using voice commands Value's callsign, Value, must be used.
Tower!SE not to be used for real world training! Page 18

• When using voice commands Value's flight number must be stated as digits. In this case say 1174 as, “one one seven four.”
• The keyboard shortcut for REPORT POSITION is <CTRL><R>.
Once it is safe the the next plane to depart, Field Air 1632, is issued the same instruction as issued
for Value's takeoff:
'Field Air 1632 after departure fly heading 250 cleared for takeoff.'
Hints:
• When using keyboard entry the callsign three-digit ICAO code is used (FRT).
• When using voice commands an airline's callsign must be used (Field Air).
• When using voice commands the flight number must be stated as digits.
• The keyboard shortcut for AFTER DEPARTURE FLY HEADING is <ALT><U>.
• When using voice commands headings are stated as digits. In this case say 250 as, “two five zero.” Be sure to enter a space after typing the heading.
• The keyboard shortcut for CLEARED FOR TAKEOFF is <ALT><C>.
Remember, if you need to take a moment to re-read any of the controlling session instruction, or
want to take a few minutes to look a the control screens more closely, you can pause the game by
pressing the PAUSE button on the Command screen.
Now check how Value 1174's departure progressing. If VAL1174 is between five to ten miles from the
airport you can instruct the pilot to make a right turn to heading 293, to intercept the PALCO
waypoint. There are two ways to instruct the pilot to the new heading:
'Value 1174 turn right 43
degrees' - or -
'Value 1174 turn right heading 293 degrees'
Hints:
• the keyboard shortcuts for TURN RIGHT XX DEGREES are <CTRL><K> type 43 <CTRL><2>
• the keyboard shortcuts for TURN RIGHT HEADING XX DEGREES are <CTRL><K><CTRL 1> type 293 <CTRL><2>
• vocal commands to turn XX degrees are stated as digits. In this example the correct statement is, “four three degrees.”
• vocal commands to turn to heading XXX are stated as digits. In this example the syntax is, “heading two niner three.”
Tower!SE not to be used for real world training! Page 19

After the AI pilot confirms the command and begins the turn you can transfer control of Value
to departure:
'Value 1174 contact departure.'
Hint: the keyboard shortcut for CONTACT DEPARTURE is <CTRL><D>
The pilot will respond 'good bye', the flight will be removed from the Strip Screen and the
VAL1174 details will be removed from the DBRITE Radar Screen (the aircraft's 'T' icon will
remain until the plane leaves the TIST radar coverage area).
While you were handing VAL1174 over to departure N842FT will have held short of runway 10 on
taxiway A. AI pilots will not cross their active runway without permission. After checking that there
are no aircraft taking off from or landing on runway 10 you clear N842FT to cross the runway:
'842FT continue taxi.'
Hints:
• The keyboard shortcut for CONTINUE TAXI is <ALT><T>.
• You do not need to state the leading letter of a general aviation (GA) aircraft ID.
• When using voice commands you must state the GA identification letters using the phonic pronunciation code/ In this case F is 'foxtrot' and T is 'tango'.
• When using voice commands the GA identification numbers must be stated as digits.
Once N842FT has crossed runway 10 the pilot will hold again and must be cleared to continue on
to taxiway A and then hold at taxiway C:
'842FT continue taxi.'
Once N842FT has held short of runway 10 at taxiway C you confirm there is a safe takeoff distance
between the plane and FRT1632. You can check the distance on the Air radar DBRITE screen, or
as the AI pilot to report her position:
'Field Air 1632 report position.'
Hint: • The keyboard shortcut for REPORT POSITION is <CTRL><R>.
Once it is safe the the next plane to depart, N842FT, is issued the same instruction as issued for
Value's and Field Air's takeoffs:
'842 foxtrot tango after departure fly heading 250 cleared for takeoff.'
Tower!SE not to be used for real world training! Page 20

Hints:
• The keyboard shortcut for AFTER DEPARTURE FLY HEADING is <ALT><U>.
• When using voice commands headings are stated as digits. In this case say 250 as, “two five zero.” Be sure to enter a space after typing the heading.
• The keyboard shortcut for CLEARED FOR TAKEOFF is <ALT><C>.
When Field Air 1632 is between five to ten miles from the airport instruct the pilot to make a right
turn to heading 293 -
'Field Air 1632 turn right 43
degrees' - or -
'Field Air 1632 turn right heading 293 degrees'
Then instruct the pilot to contact departure -
'Field Air 1632 contact departure.'
It is a busy afternoon. Field Air 4806 has called for landing clearance.
'Field Air 4806 cleared to land.'
Hints: • The keyboard shortcut for CLEARED TO LAND is <CTRL><C>
Congratulations! You have successfully controlled aircraft departures and arrivals at TIST for just
over 30 minutes while learning the basics of air traffic control and Tower!SE's controls. Extensive
details on Tower and ATC are outlined in the later manual sections.
You can continue controlling at St. Thomas, or end the game. To end the simulation press the keyboard
<ESC> key and choose 'YES' to open Towers! Main Menu. From the main menu you can set up
another controlling situation or shut down Tower!.
Continuous Tower!SE controlling time is limited to four hours. This limitation is similar to real-
world mandatory break restrictions for air traffic controllers, and the game's scheduler logic
limitation for airport traffic. If you wish to control for longer than four hours just restart play by
pressing the START button on the Tower/Select Simulation page; you do not need to close the
program.
Tower!SE not to be used for real world training! Page 21

Tower Configuration
There are three pages used to configure Tower!SE: Tower/Select, Settings and Information. The
configuration pages are viewed by pressing the selection button along the left boarder of the page.
The fourth button, Exit, is used to close the game.
After launching the simulation you are presented with the Tower/Select Simulation page.
Tower/Select Simulation
From this page you select the airport to control,
active runway(s), weather, simulation time, and
user profile to be played. Along the bottom of the
page are the multiplayer configuration buttons and
the Start buttons to begin game play.
Airport Selection - Left-mouse-click and hold to choose the
airport you wish to control.
Once the airport is selected an overhead view is shown. Click the activation button to set the runway(s)
TRACON/Approach will assign arriving planes. Each airport presents its own unique set of challenges,
with perhaps TIST being the most sedate.
Take care in selecting the active runways. Tower! by feelThere will not allow you to select opposing
ends of a runway to be active, but you can chose runways that cross or conflict in other ways. At least
one runway must be activated for the game to start.
Below the overhead airport view is a brief description of the airfield.
Environment - Select the time of day and weather theme you wish to have at the controlled airport.
• Weather: Left-mouse-click and hold to choose the weather theme at the selected airport. • Time: To change the airport time click on the up or down arrow. The time is Coordinated
Universal Time (UTC).
Profile Selection - Left-mouse-click and hold to chose which control profile will be used during the game. New profiles
are created on the Settings page.
Tower!SE not to be used for real world training! Page 22
Multiplayer configuration - At the bottom of the page are three buttons and one window. The left two buttons and window are used
to configure multiplayer sessions.
• Join: starts a multiplayer session only if the correct IP address is entered in the IP address window. (see Multiplayer section of this manual).
• IP address window: enter the IP address of the host's computer if you are joining another's Tower session. See Multiplayer section of this manual for details on setting and locating a computer's IP address.
• Start server: click this button to start Tower! as the host computer. In order to host you must have set your router, modem and/or firewall to allow the game to communicate across the Internet. See Multiplayer section of this manual for details on configuring your computer to host multiplayer sessions.
Single player Start - At the bottom right of the page is the Start button. Clicking the button begins a single player
controlling session.
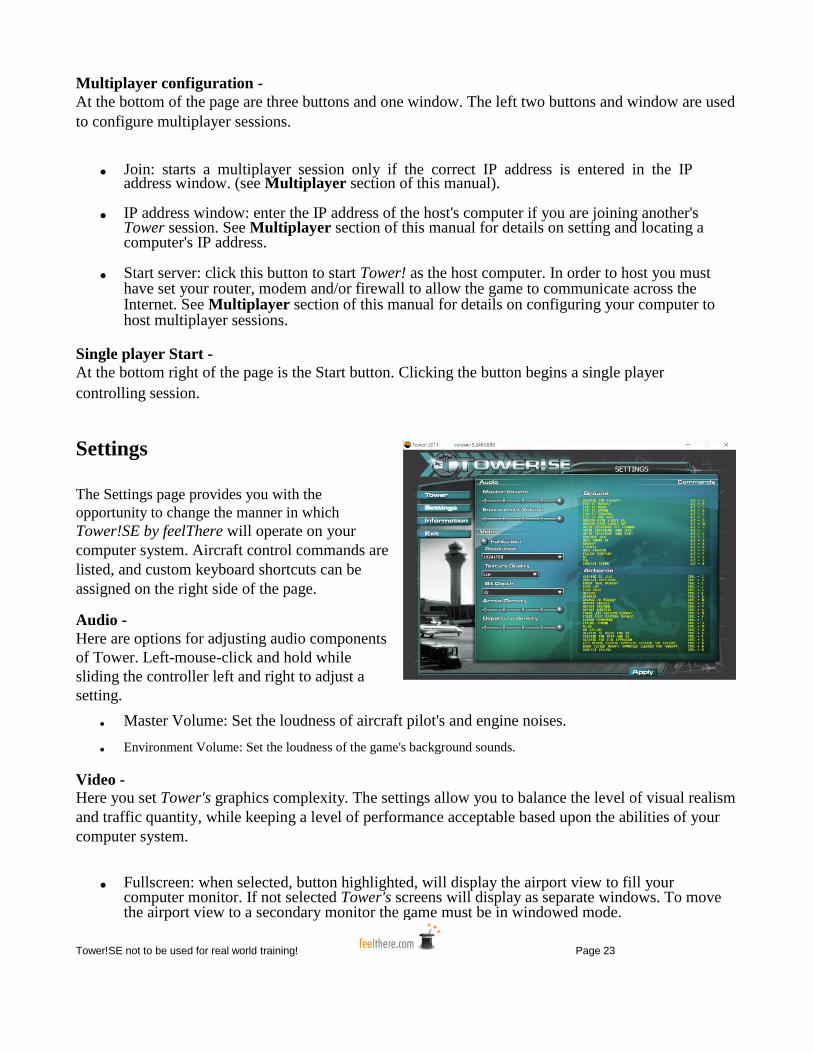
Settings
The Settings page provides you with the
opportunity to change the manner in which Tower!SE by feelThere will operate on your
computer system. Aircraft control commands are
listed, and custom keyboard shortcuts can be
assigned on the right side of the page.
Audio - Here are options for adjusting audio components
of Tower. Left-mouse-click and hold while
sliding the controller left and right to adjust a
setting.
• Master Volume: Set the loudness of aircraft pilot's and engine noises. • Environment Volume: Set the loudness of the game's background sounds.
Video - Here you set Tower's graphics complexity. The settings allow you to balance the level of visual realism
and traffic quantity, while keeping a level of performance acceptable based upon the abilities of your
computer system.
• Fullscreen: when selected, button highlighted, will display the airport view to fill your computer monitor. If not selected Tower's screens will display as separate windows. To move the airport view to a secondary monitor the game must be in windowed mode.
Tower!SE not to be used for real world training! Page 23

• Resolution: Left-mouse-click and hold to set vertical and horizontal resolution of the game. IMPORTANT: should you happen to select a screen resolution that is higher than the maximum of your monitor, you will greatly reduce your frame rates! If you find your rates suffering, check this first! Either run the game in full screen mode, or use only the maximum resolution that is supported by your monitor.
• Texture Quality: Left-mouse-click and hold to set the relative texture quality of the airport display.
• Bit Depth: Left-mouse-click and hold to set the color (bit) quality of the airport display.
• Arrival Density: Left-mouse-click and hold the slider button to set the volume of aircraft arrival traffic. By altering the density you can increase or decrease the complexity of the game. When the slider is set full-left Tower will load no arrival traffic.
• Departure Density: Left-mouse-click and hold the slider button to set the volume of aircraft departure traffic. By altering the density you can increase or decrease the complexity of the game. When the slider is set full-left Tower!SE will load no departure traffic.
• Commands: Listed are all the ground and air traffic control commands used by Tower. Each command may be typed into the Command screen, entered using the listed shortcut keystrokes, or stated vocally if you have connected a hight quality microphone to your computer and correctly trained Windows Speech. How to use the commands is outlined in the Commands/Syntax section of this manual.
The shortcut key commands are all customizable to your preference. Click on a command will
permit modification. The selected command will be red-highlighted. All shortcut commands
must begin with either ALT, CTRL, or SHIFT. You will receive a warning if attempting to
map a previously assigned key sequence.
The commands and shortcuts can be viewed, not modified, in-game by pressing and holding
the <TAB> key or the HOTKEY button on the Command screen. You can enter an instruction
into the Command screen command line from this in-game screen with a left-mouse-click. To save changes made on the Settings page click to Apply button in the lower right corner of
the window.
Information
The Information page provides details on a
players controlling history, and a summary of
the game End User License Agreement (EULA).
ATC Suite by feelThere : TOWER! Page 24

Profile
• Profile Information:
✔ Time Spent Controlling – the time the selected profile has spend controlling.
✔ Number of successful Landings and Takeoffs – these numbers start at zero when a player personality is created.
✔ Number of incidents, accidents – this is a tabulation of those incidents when safe controlling policies and procedures were violated (see types of controller errors below).
✔ Score – the total points the controller profile has accumulated. Points are awarded by the following scale:
• 1 hours without accident/incident = + 500 points
• 2 hours without accident/incident = + 1000 points
• 5 hours without accident/incident = +3000 points
• 10 hours without accident/incident = +5000 points
• Safe aircraft takeoff = + 10 points
• Safe aircraft landing = + 10 points
You receive negative points when there is a controller error:
RUNWAY INTRUSION! You've allowed an airplane to cross an active runway while another was taking off or landing. - 500 points ◦
SEPARATION ERROR! Two airplanes under your control came closer than 5 miles horizontal separation and/or their vertical separation was less than 1000 feet. - 500 points ◦ COLLISION! Two airplanes under your control have collided. - 1000 points
GROUND COLLISION! Two taxiing planes have collided. - -500 points
FORGET TO SEND TO DEPARTURE! You have failed to send a plane to Departure. -100 points ◦
UNHANDLED! An aircraft has gone around as you never gave it permission land. -500 points
• About: You can review Tower!SE by feelThere’s version, development team and copyright information.
Tower!SE not to be used for real world training! Page 25

Exit
To close the simulation click the exit button. Tower will confirm you wish to end the game by
displaying a YES/NO window.
Loading
Once you have configured a simulation session
Tower will compile the airport and traffic after
you press the Start button, for single player,
Start Server (if hosting) or Join (if client) for
multiplayer. The time required to load the game
is dependent on the airport complexity and the
traffic density selected. The loading status bar
will move left to right as the simulation is
compiled. Large airports with dense traffic may
take one to two minutes to load.
The In-Game Screens
In order to adequately get the planes to and from parking and jetways, you need to review, better yet
memorize, the airport environment. With this in mind, in the 'Charts' folder in the Tower!SE root
directory, are PDF charts showing labeled runways and taxiways. It is a good idea to print these and
have them available at all times for those instances in which you lose your orientation while looking at
the simulation screens.
For real time information you are provided with two radar screens: ground and air. Each may be
manipulated to increase your level of situational awareness. The Radar and Arrivals/Departures
screens interact with the Command screen for quick entry of flight callsigns. Double clicking on a
specific Arrival or Departure aircraft tag listed will cause that aircraft’s calsign to appear on the
command line, thus avoiding the need to type in the sign manually. Likewise, double clicking on an
aircraft icon visible on your radar screens will place their call sign on the Command line, giving you a
nice shortcut that greatly speeds your ability to communicate with your aircraft. The third way to enter
an ID is to press the PTT button and vocally identify the flight (as stated before to use Tower 2011's
voice recognition abilities you must have a high quality microphone and trained Microsoft Speech).
Tower!SE not to be used for real world training! Page 26

The Ground Radar, ADIRS,
Screen:
This screen is invaluable as it gives you
an overhead view of your entire ground
controlling area. The controlled aircraft
locations are updated in real time.
The aircraft icon is pointing in the
direction the plane is moving. Each
aircraft icon has the flight's ID number
attached. Only aircraft under your
control are shown on the ground radar
screen. The ID number can be rotated
around the aircraft icon by left-mouse-
click and hold on the plane followed by
a looping motion with the mouse. Once
the ID is in the location you prefer
release the mouse button.
Clicking on an aircraft icon will enter that plane's ID into the Command screen. To clear an unwanted
ID from the Command screen repeatedly press the keyboard <backspace> key.
When a plane lands and stops after exiting the runway you can see the assigned parking location by
right- mouse-clicking on the aircraft. A yellow aircraft icon will appear at the flight's assigned gate.
After noting the gate you can create detailed taxi directions.
The ADIRS screen size and location are adjustable. Adjust the window size with a left-mouse-button
click and hold in the lower right corner of the screen. Left-mouse-click and hold the window ID bar to
move the screen's location on your computer monitor(s). In the upper left corner of the screen are the
click-boxes to maximize and minimize the window.
ADIRS screen components -
• Move: ON/OFF button allows you to manipulate the view shown on the screen. Once enabled, simply center-mouse-click and hold to set a new display center for the radar screen.
• Zoom: the + and - buttons will zoom in and out the radar display.
• Font size: the + and - buttons will increase and decrease the aircraft flight number ID size.
Tower!SE not to be used for real world training! Page 27

The Air Radar, DBRITE, Screen:
Air radar gives you a visual display of the
incoming and outgoing airport traffic.
The 'T' icon indicates a aircraft's
location within the airport's
airspace. Only planes under your
control have Aircraft IDs.
The aircraft data block tag shows
the following details -
Aircraft ID
Altitude Airspeed
• Altitude: in 100’s of feet (ex., 011 = 1100 feet)
• Airspeed: in knots (ex., 225 = 225 knots)
The data block can rotated around the aircraft icon by left- mouse-click and hold on the plane
followed by a looping motion with the mouse. Once the data block is in the location you prefer
release the mouse button.
Clicking on an aircraft icon will enter that plane's ID into the Command screen. To clear an unwanted
ID from the Command screen repeatedly press the keyboard <backspace> key.
The DBRITE screen size and location are adjustable. Adjust the window size with a left-mouse-button
click and hold in the lower right corner of the screen. Left- mouse-click and hold the window ID bar to
move the screen's location on your computer monitor(s). In the upper left corner of the screen are the
click-boxes to maximize and minimize the window.
DBRITE screen components -
• VIS HDG: ON/OFF button toggles the representation of aircraft movement on the radar screen. • Zoom: the + and - buttons will zoom in and out the radar display.
• Font size: the + and - buttons will increase and decrease the aircraft flight number IDs size.
Tower!SE not to be used for real world training! Page 28

The Command Screen:
On the Command screen you send
control commands to the aircraft in your
airspace. A record of the
communications sent to planes is stored,
along with all communication received
from the AI pilots.
Left-mouse-click and hold the window
ID bar to move the screen's location on your computer monitor(s).
screen are the click-boxes to maximize and minimize the window.
cannot be re-sized.
Command Screen components -
In the upper left corner of the
The Command screen window
• Command window: The first line of this window, the command line, displays your control instructions prior to transmission. A log of sent commands are recorded below the command line. The scroll bar on the right edge of the command window can be used to review your controlling history.
• SEND: pressing the button will transmit typed commands to the AI pilots. Pressing the keyboard <Enter> key will also send typed commands.
• PAUSE: pressing the button will pause the game. Press the button again to restart the simulation.
• Game Speed: Press the + and – buttons to increase or decrease the simulation rate.
• Score: The controller points awarded during this game session. Points are updates live with details listed in the History window. (see the Settings page section of this manual for how controllers gain and loose points.)
• Time (UTC): Coordinated Universal Time (UTC) for the current game session is reported.
• History: a record of communication received from aircraft and controller points awards. The scroll bar on the right edge of the history window can be used to review the AI pilot's communications and your controller point awards history.
• PTT: activates Tower's voice recognition feature when left-mouse-clicked and held. When the PTT button is held voice commands will be entered into the command line. The keyboard <TAB> key may also be used instead of the mouse. Send the command to the AI pilot's by releasing the PTT button (or the <TAB> key). Microsoft's SpeechSDK51 must be installed and trained before using voice commands (see Installing Tower).
• HOTKEY: press to display the list of Tower!SE's control commands and keyboard shortcuts.
Tower!SE not to be used for real world training! Page 29

The Strip Screen:
This is a visual representation of your “to do” list. The
screen is divided into arrivals and departures sections.
As aircraft come under your control their strip is
displayed at the top of the appropriate list. When
aircraft are no longer under your control, meaning you
have transferred departing flight to departure and
arriving planes have arrived safety at their parking
location, the strip is cleared from the screen
Left-mouse-click and hold the window ID bar to move
the screen's location on your computer monitor(s). In
the upper left corner of the screen are the click- boxes
to maximize and minimize the window. Adjust the
window length with a left-mouse-button click and
hold in the lower right corner of the screen. The Strip
screen cannot be made wider.
Deciphering an ARRIVAL slip - Column 1:
Line one - aircraft call sign and flight number (see Airline identification codes)
Line two – equipment type (Aircraft identification codes ). Heavy aircraft will have their equipment type followed by /H (See The Theory Behind Air Traffic Control for discussion on aircraft separation rules.) Line three – an arbitrary number assigned by the program that generates the strips
Column 2: Line 1 – a computer generated arbitrary number Line 2 – expected arrival time reported in UTC. Line 3 – flight level of aircraft when transferred to you by arrival control
Column 3: Line 1– destination airport Line 2 – departure airport Column 4:
• When the aircraft has been cleared to land a check mark will be shown in this datafield.. Column 5:
• Lines 1 up to 3 – assigned runway. Will have a cross through when new runway is assigned.
Deciphering a DEPARTURE slip - Column 1:
• Line 1 – aircraft call sign (see Airline identification codes)
• Line 2 – equipment type (see Aircraft Identification Codes for more information.
Tower!SE not to be used for real world training! Page 30

Heavy aircraft will have their equipment type followed by /H (See The Theory
Behind Air Traffic Control for discussion on aircraft separation rules.)
• Line 3 – An arbitrary number assigned by the program that generates the strips Column 2:
Line 1 – a computer generated arbitrary number Line 2 – time of departure, reported as UTC Line 3 – flight level of aircraft when transferred to you by arrival control
Column 3: Line 1 – departure airport Line 2 – destination airport Column 4:
• Tower will display controller notes under these circumstances -
✔ For local flights the number of go-arounds, low approaches and touch and goes the plane will conduct.
✔ Display the assigned runway intersection for takeoff (see Ground commands, AT command).
✔ When you clear an aircraft for takeoff a check mark will be shown. Column 5:
• Lines 1 up to 3 – assigned runway. Will have a cross through when new runway is assigned.
(pictured: Cyril E. King Airport)
Tower!SE not to be used for real world training! Page 31

Airport View
Represented is an aerial view of the airport you are controlling. Moving about the airport are on-
ground and in-air aircraft, and ground vehicle traffic. The view may be zoomed in and out using the
center mouse wheel. A center-mouse-click and hold allows you to drag the view on the screen to
review all the airport runways and taxiways.
The Airport view is always behind the Radar, Strip and Command screens (see above on how to
move the screens). When not in full-screen mode the Airport view may be moved to another computer
monitor by a left-mouse-click and hold of the window ID bar.
(pictured: Los Angeles International)
Commands and Syntax
Traffic control commands are divided into ground and airborne types. You can only send air
commands to planes under your control and in-flight; or ground commands to planes at the airport and
under your control.
As you enter commands Tower! by feelThere will give hints on how to complete your instructions. Tower
bases this 'guess' on the commanded aircraft's flight status and the callsigns of flights currently
Tower!SE not to be used for real world training! Page 32

under your control. When typing commands you can accept Tower!SE's suggestion by pressing the
keyboard right arrow key. The entire command syntax must be stated if controlling by voice.
If you enter a command Tower! by feelThere does not understand the pilot will respond, “Say again.”
In the event that you get this 'syntax error' message confirm that you are using the correct word
sequence. To see a listing of commands press the keyboard <TAB> key or the Command screen's
HOTKEY button.
When a pilot responds, “unable;” he/she is stating the command is inappropriate or cannot be
completed. Examples are instructing an in-flight aircraft to taxi to the terminal, and clearing a 777 to
land on, or takeoff from, a 5000-foot runway.
Common causes of syntax errors when typing commands: Not typing an aircraft’s full ID (ie, Leslie 289 is TAA289) Placing a space between a flight's ICAO code and number. Failing to type a space between all command words. Typing ‘V’ instead of VIA When more than one runway exists be sure to enter the exact runway designation (ie.
runway 18 left is typed 18L).
If controlling by voice the following syntax must be following -
Airlines must be identified by their callsign:
✔ Correct: “Leslie one two three taxi to runway seven left.”
✗ INCORRECT: “TAA one two three taxi to runway seven left.”
✔ Correct: “Ozzy six cleared to land.”
✗ INCORRECT: “Uluru six cleared to land.”
Flight numbers must be stated digit by digit:
✔ Correct: “Cheshire one two three taxi to runway seven left.”
✗ INCORRECT: “Cheshire one hundred and twenty three taxi to runway seven left.”
Runways must be stated digit by digit, as follows:
✔ Correct: “Goldsun one two three taxi to runway seven.”
✗ INCORRECT: “Goldsun one two three taxi to runway zero seven.”
✔ Correct: “Value one two three taxi to two five.”
✗ INCORRECT: “Value one two three taxi to runway twenty five.”
Tower!SE not to be used for real world training! Page 33

When more than one runway exists be sure to state the exact runway designation as left, right
or center:
✔ Correct: “Goldsun one two three taxi to runway six left.”
✗ INCORRECT: “Goldsun one two three taxi to runway six L.”
✔ Correct: “Value one two three taxi to runway two four right.”
✗ INCORRECT: “Value one two three taxi to two four R.”
Headings must be stated as three digits, as follows:
✔ Correct: “Lakes six seven turn left zero zero six degrees.”
✗ INCORRECT: “Lakes six seven turn left six degrees.”
✗ INCORRECT: “Lakes six seven turn left zero six degrees.”
✔ Correct: “White Sand six seven turn left zero two one degrees.”
✗ INCORRECT: “White Sand six seven turn left twenty one degrees.”
✗ INCORRECT: “White Sand six seven turn left two one degrees.”
✔ Correct: “Denali six seven turn left one five six degrees”
✗ INCORRECT: “Denali six seven turn left one hundred fifty six degrees”
Remember:
• To transmit your instructions to a pilot you must either press the ENTER key on the keyboard, or click SEND button on the Command screen.
• When controlling by voice you must first press the Command screen PTT button, speak, and then release the PTT button to 'send' the command.
NOTE: If you do not quickly release the PTT button after speaking a command
Tower! by feelThere will clear the instruction.
REMINDERS:
You cannot control an aircraft’s airborne movement until the pilot states, “with you.”
You cannot control an aircraft’s ground movement until the pilot states, “ready to taxi.”You cannot control an aircraft's airborne movement after they are told to “contact
departure”.You cannot control an Aircraft's ground movement when they have turned into
their parking space.
Tower!SE not to be used for real world training! Page 34
Tower! Command Reference Sheets
Below are all available commands for controlling aircraft in Tower! by feelThere. Each command as a
default keystroke shortcut. Keystrokes can be customized on the Settings page. Should you find it
more convenient, you may always type in your commands instead of using the shortcuts, as long as
you follow the proper syntax.
Airborne commands:
On page 36 are the commands to control aircraft when they are in flight and under your control. You
are encouraged to print the page for reference. Most commands have been pre-assigned a keystroke
shortcut (see Settings page on changing and adding a keystroke shortcut). The shortcuts shown are the
default settings. Unless noted, a ll commands must be prefaced with the aircraft's flight ID .
Ground commands:
On page 37 are the commands to control aircraft when they are on the ground and under your control.
You are encouraged to print the page for reference. All commands can be assigned a keystroke shortcut
(see Settings page on changing and adding a keystroke shortcut). The shortcuts shown below are the
default settings. Unless noted, a ll commands must be prefaced with the aircraft's flight ID .
REMINDER – aircraft ID may be entered by typing, a mouse click on the aircraft icon on a radar
screen or the flight's strip. Voice control requires you to enter the entire command verbally.
Tower!SE not to be used for real world training! Page 35

TOWER! by feelThere AIRBORNE CONTROL COMMANDS CLEARED TO LAND.......................CTRL C
may be followed by RUNWAY XX
CONTACT DEPARTURE.................CTRL D
ENTER FINAL RUNWAY XX.........CTRL E
for airports with a multiple runways
the L, R or C designation must be used
TURN LEFT......................................CTRL L
must be followed by one of: HEADING
XXX or XX DEGREES
TURN RIGHT....................................CTRL K
must be followed by one of: HEADING
XXX or XX DEGREES
HEADING.........................................CTRL 1
must be prefaced by TURN LEFT or
TURN RIGHT
DEGREES..........................................CTRL 2
must be prefaced by TURN LEFT or
TURN RIGHT
CHANGE TO RUNWAY XX............CTRL W
must be followed by CLEARED TO LAND
REPORT HEADING.........................CTRL R
REPORT POSITION.........................CTRL P
REPORT AIRSPEED.........................CTRL A
ENTER LEFT PATTERN
RUNWAY XX....................................CTRL N for airports with a multiple runways the
L, R or C designation must be used
ENTER RIGHT PATTERN RUNWAY XX....................................CTRL M
for airports with a multiple runways the
L, R or C designation must be used
EXTEND DOWNWIND...................CTRL I
must be followed by XX MILES
EXTEND UPWIND...........................CTRL U
must be followed by XX MILES
MILES................................................CTRL M
must be prefaced by EXTEND UPWIND
XX
GO AROUND....................................CTRL G
CLEARED TO TOUCH AND GO............................................CTRL O
may be followed by RUNWAY XX (for
airports with a multiple runways the L,
R or C designation must be used)
CLEARED FOR STOP AND GO............................................CTRL T
may be followed by RUNWAY XX (for
airports with a multiple runways the L,
R or C designation must be used)
CLEARED FOR LOW APPROACH......................................CTRL S
may be followed by RUNWAY XX (for
airports with a multiple runways the L,
R or C designation must be used)
Tower!SE not to be used for real world training! Page 36

TOWER! by feelThere GROUND CONTROL COMMANDS CLEARED FOR TAKEOFF.............. ALT C
TAXI TO RUNWAY ......................... ALT R
may be followed by VIA X X X ... (taxiways
separated by spaces)
and may be followed by AT XX (runway
intersection)
TAXI TO RAMP................................ ALT 1
may be followed by VIA X X X ... (taxiways
separated by spaces)
TAXI TO APRON.............................. ALT 2
may be followed by VIA X X X ... (taxiways
separated by spaces)
TAXI TO TERMINAL...................... ALT 3
may be followed by VIA X X X ... (taxiways
separated by spaces)
LINE UP AND WAIT........................ ALT L
GROUND PATH VISIBLE ON......... ALT Q
GROUND PATH VISIBLE OFF....... ALT W
AFTER DEPARTURE FLY
HEADING XXX................................ ALT U
may be followed by CLEARED FOR
TAKEOFF
AFTER DEPARTURE TURN
LEFT XX DEGREES........................ ALT I
must be followed by DEGREES.
may be followed by CLEARED FOR
TAKEOFF
AFTER DEPARTURE TURN
RIGHT XX DEGREES...................... ALT O
must be followed by DEGREES. may
be followed by CLEARED FOR TAKEOFF
CONTINUE TAXI.............................ALT T
HOLD SHORT OF............................ALT S
must be followed by one of: TAXIWAY XX
or RUNWAY XX (for airports with a
multiple runways the L, R or C
designation must be used)
RUNWAY..........................................ALT 8
must be prefaced by HOLD SHORT OF
and follow by runway number(for airports
with a multiple runways the L, R or C
designation must be used)
TAXIWAY..........................................ALT 9
must be prefaced by HOLD SHORT OF
and follow by taxiway letter/number
HOLD POSITION`............................ALT H
FOLLOW COMPANY......................ALT F
AT.......................................................ALT A
VIA....................................................ALT V
CONTACT TOWER..........................ALT B
CONTACT GROUND.......................CTRL B
LEFT CLOSED TRAFFIC
APPROVED CLEARED
FOR TAKEOFF.................................CTRL 8
RIGHT CLOSED TRAFFIC
APPROVED CLEARED
FOR TAKEOFF.................................CTRL 9

Descriptions of Aircraft Reactions to Commands
Ground Commands - GROUND PATH VISIBLE ON
A green line will be drawn on the Top-down View showing the plane's taxi path. The aircraft's
behavior is not changed.
GROUND PATH VISIBLE OFF
The green taxi path line will be removed from the Top-down View. The aircraft's behavior is
not changed.
AFTER DEPARTURE FLY HEADING XXX
may be followed by CLEARED FOR TAKEOFF
After climbing 500 feet above the runway the AI pilot will turn the plane to the assigned
heading. When followed by CLEARED FOR TAKEOFF the AI pilot will begin the takeoff roll.
Syntax notes:
• When controlling by voice the heading is stated digit by digit (ex., 216 is stated, “two one six”.).
Examples:
Typed commands - Vocal commands -
• RAA795 AFTER DEPARTURE FLY • “Rainier seven niner five after departure fly
HEADING 113 heading one one three.”
• RAA795 AFTER DEPARTURE FLY • “Rainier seven niner five after departure fly
HEADING 215 CLEARED FOR heading two one five cleared for takeoff.”
TAKEOFF
AFTER DEPARTURE TURN LEFT/RIGHT XX DEGREES
may be followed by CLEARED FOR TAKEOFF
Once the aircraft is 500 feet above the runway the AI pilot will run LEFT/RIGHT from the
runway heading the instructed degrees. When followed by CLEARED FOR TAKEOFF the pilot
will immediately begin to accelerate plane for takeoff.
Syntax notes:
• When controlling by voice the degrees are stated as digit by digit (ex., 15 is stated, “one five”.).
Tower!SE not to be used for real world training! Page 38

Examples:
Typed commands - Vocal commands -
• TGA567 AFTER DEPARTURE TURN • “Globe five six seven after departure turn
LEFT 20 DEGREES left two zero degrees.”
• TGA567 AFTER DEPARTURE TURN • “Globe five six seven after departure turn
RIGHT 62 DEGREES CLEARED FOR right six two degrees cleared for takeoff.”
TAKEOFF
CLEARED FOR TAKEOFF
Aircraft will accelerate and takeoff. If holding short aircraft will enter runway and then takeoff.
CONTINUE TAXI
Will resume taxi after being told to HOLD POSITION or having stopped as instructed with the
HOLD SHORT OF XX command.
Syntax notes: • the command cannot be given until the aircraft has stopped moving.
CONTACT GROUND
AI pilot will respond 'good bye' and contract ground. The aircraft is no longer under your control.
CONTACT TOWER
AI pilot will respond 'good bye' and contract tower. The aircraft is no longer under your control.
HOLD SHORT OF
must be followed by one of: TAXIWAY XX or RUNWAY XX
Aircraft will stop at hold short line of indicated runway. A hold for a taxiway will be done just prior to
the indicated intersection. The plane will not move again until after CONTINUE TAXI command is
given.
Syntax notes: • AI pilots will taxi across all runways accept the one they are assigned. If the route to their
runway, or terminal, includes a runway(s) you must use the HOLD SHORT OF command.
Tower!SE not to be used for real world training! Page 39

HOLD POSITION
Aircraft will immediately stop and hold it's current position. The plane will not move again until after
CONTINUE TAXI command is given.
TAXI TO RUNWAY XX
may be followed by AT XX (runway intersection)
may be followed by VIA XX XX XX (taxiways and runways with spaces between)
The instructed aircraft will taxi to the end of the assigned runway and hold short. When followed by
AT the plane will taxi to the the assigned runway intersection and hold short. Adding VIA XX XX
XX defines the route to be used in going from the terminal/apron/ramp to the assigned runway.
Syntax notes: • For airports with multiple runways (L, R, C) the full identification must be used.
Examples:
Typed commands - Vocal commands -
• LAW123 TAXI TO RUNWAY 8R • “Latitude one two three taxi to runway eight
right.”
• LAW123 TAXI TO RUNWAY 25L • “Latitude one two three taxi to runway
two five left.”
• LAW123 TAXI TO RUNWAY 9 AT T1 • “Latitude one two three taxi to runway
niner at tango-one.”
• LAW123 TAXI TO RUNWAY 25R AT F • “Latitude one two three taxi to runway
VIA C C6 B two five right at foxtrot via charlie
charlie-six bravo.”
TAXI TO TERMINAL/APRON/RAMP
may be followed by: VIA XX XX ... (each taxiway separated by a space)
Command can only be given after the aircraft has landed. If no route is given the AI pilot will choose
the most direct path to the terminal/apron/ramp. You cannot designate a specific terminal, gate, ramp
or apron. As the controller you must be learn the correct terminal for arriving airlines (see The
airports for terminal/ramp assignments).
Aircraft will follow an assigned route when the VIA command is used. The parking location is pre-
assigned in the airline and airport databases. As a controller you must know the airport terminal, apron
and ramp assignments in order correctly direct the planes. If no route is given the aircraft will choose
the most direct path.
Once the AI pilot begins taxi only the HOLD POSITION and CONTINUE TAXI commands may
be used on the aircraft.
Tower!SE not to be used for real world training! Page 40

Syntax notes
• The controller cannot assign a specific terminal, gate, apron or ramp. These locations are set by the airport designer. See The airports for details on the terminal, apron and ramp locations.
Examples:
Typed commands - Vocal commands -
• ANG526 TAXI TO TERMINAL • “Goldsun five two six taxi to terminal.”
• ANG526 TAXI TO RAMP VIA E D9 D • “Goldsun five two six taxi to ramp via echo
delta niner delta.”
LINE UP AND WAIT
AI pilot will taxi aircraft onto runway and wait for takeoff clearance.
LEFT/RIGHT CLOSED TRAFFIC APPROVED CLEARED FOR TAKEOFF
Aircraft will accelerate and takeoff. If holding short aircraft will enter runway and then takeoff. The
pilot will fly a the closed pattern as assigned.
Syntax notes: • The command can only be given to local traffic.
FOLLOW COMPANY
AI pilot will follow the same taxi route to the same runway as the most recent instructed company
aircraft.
Syntax notes:
• FOLLOW COMPANY is not followed by the runway assignment.
• The command can only be given to departing aircraft (ie., taxi from terminal to runway).
Airborne Commands -
CLEARED TO LAND may optionally add RUNWAY XXX
Aircraft will land on the cleared runway. The runway assigned by approach control is noted on the
STRIP. After the landing roll the aircraft will exit the runway, stop and await clearance to taxi to
terminal, apron or ramp.
Tower!SE not to be used for real world training! Page 41

CONTACT DEPARTURE
AI pilot will respond 'good bye' and contract departure. The flight's strip will be removed from the
Strip screen. The aircraft is no longer under your control.
CHANGE TO RUNWAY XX
must be followed by CLEARED TO LAND
Aircraft will change approach and land on the assigned runway. The runway change will be noted on
the flight's strip on the Strip screen.
Syntax notes:
• The runway change can only be a parallel runway with a centerline no greater than 1000 feet from the runway assigned by the approach controller. For example: aircraft assigned by approach control to runway 7L at KLAX can only have their landing runway changed to runway 7R. Aircraft assigned to KLAX runway 7L cannot be assigned to runways 6L or 6R.
Example:
Typed commands - Vocal commands -
• BLA6732 CHANGE TO RUNWAY 7L • “Lakes six seven three two change to
CLEARED TO LAND runway seven left cleared to land.”
REPORT HEADING
AI pilot will report back the aircraft's current heading.
REPORT POSITION
AI pilot will report back the aircraft's current distance from the airport.
REPORT AIRSPEED
AI pilot will report back the aircraft's current airspeed (KIAS).
TURN LEFT/RIGHT HEADING XXX
AI pilot will turn left, or right, to the stated heading.
Syntax notes:
• When controlling by voice the headings are stated as three digits, digit by digit (ex., a heading of 15 is stated, “zero one five”.).
Tower!SE not to be used for real world training! Page 42

Examples:
Typed commands - Vocal commands -
• CBA82 TURN LEFT HEADING 20 • “Cheshire eight two turn left heading zero
DEGREES two zero.”
• CBA82 TURN RIGHT HEADING 120 • “Cheshire eight two turn right heading one
two zero.”
TURN LEFT/RIGHT XX DEGREES
The aircraft will turn left, or right, by XX degrees.
Syntax notes:
• When controlling by voice the degrees are stated as digit by digit (ex., 90 is stated, “niner zero”.).
Examples:
Typed commands - Vocal commands -
• BTV2 TURN LEFT 20 DEGREES • “White Sand two turn left two zero
degrees.”
• BTV2 TURN RIGHT 105 DEGREES • “White Sand two turn right one zero five
degrees.”
ENTER LEFT PATTERN RUNWAY XX (for airports with a multiple runways the L, R or
C designation must be used).
Aircraft will maneuver into a left racetrack pattern for the designated runway. The AI pilot will fly
directly from the aircraft's current location into the pattern. The point that the pilot enters the pattern
cannot be defined.
ENTER RIGHT PATTERN RUNWAY XX
Aircraft will maneuver into a right racetrack pattern for the designated runway. The AI pilot will fly
directly from the aircraft's current location into the pattern. The point that the pilot enters the pattern
cannot be defined.
Syntax notes: • for airports with a multiple runways the L, R or C designation must be used.
Tower!SE not to be used for real world training! Page 43

EXTEND DOWNWIND XX MILES
Aircraft will extend the downwind leg of the racetrack pattern by XX miles.
EXTEND UPWIND XX MILES
Aircraft will extend the upwind leg of the racetrack pattern by XX miles.
ENTER FINAL RUNWAY XX
Aircraft will turn to the assigned runway and align itself for landing. The aircraft is not cleared to land.
This command can be used to change the runway assigned by the approach controller.
Syntax notes: • for airports with a multiple runways the L, R or C designation must be used.
GO AROUND
The AI pilot will abort the landing. The aircraft will fly the runway heading.
Syntax notes: • After the GO AROUND command is given the controller must direct the aircraft away from
the airport and hand off to departure for the re-sequencing.
Local Traffic Commands The following commands will be used for aircraft flying circuits or patterns and conducting runway
touch-and-goes, stop-and-goes, and low approaches. The number of landing patterns is noted on the
flight's stip on the Strip screen.
CLEARED FOR LOW APPROACH may
be followed by RUNWAY XX
Aircraft will fly as it was going to land, but will not actually touch wheels on the runway. The AI pilot
will depart the airport on the runway heading.
Syntax notes:
• Command may only be issued to local traffic.
• For airports with a multiple runways the L, R or C designation must be used.
• After completing maneuver aircraft must be instructed away from the airport and hand off to departure for the re-sequencing. OR the aircraft can be instructed to fly a left or right pattern or vectored around for another landing attempt (see 'TURN RIGHT/LEFT' and 'ENTER FINAL RUNWAY' commands).
Tower!SE not to be used for real world training! Page 44

CLEARED TO TOUCH AND GO
may be followed by RUNWAY XX
Aircraft will only touch landing gear on runway, not stop, and immediately takeoff. The AI pilot will
depart the airport on the runway heading.
Syntax notes:
• Command may only be issued to local traffic.
• For airports with a multiple runways the L, R or C designation must be used.
• After completing maneuver aircraft must be instructed away from the airport and hand off to departure for the re-sequencing. OR the aircraft can be instructed to fly a left or right pattern or vectored around for another landing attempt (see 'TURN RIGHT/LEFT' and 'ENTER FINAL RUNWAY' commands).
CLEARED FOR STOP AND GO may be followed by RUNWAY XX
Aircraft will land, come to a stop on the runway, and then takeoff. The AI pilot will depart the airport
on the runway heading.
Syntax notes:
• Command may only be issued to local traffic.
• For airports with a multiple runways the L, R or C designation must be used.
• After completing maneuver aircraft must be instructed away from the airport and hand off to departure for the re-sequencing. OR the aircraft can be instructed to fly a left or right pattern or vectored around for another landing attempt (see 'TURN RIGHT/LEFT' and 'ENTER FINAL RUNWAY' commands).
The DELETE command: DELETE XXX
Sometimes accidents happen and an aircraft incident blocks a taxiway or runway. Any unwanted
aircraft may be removed from game play using the DELETE XXX command. Using the DELETE
command will result in a score penalty, -200 points, and the plane being removed from the game.
Example: DELETE EMF694
NOTE: the DELETE command must be typed into the Command screen's command line to work.
The DELETE command cannot be issued by voice or assigned a shortcut key sequence.
Tower!SE not to be used for real world training! Page 45

The Theory Behind Air Traffic Control: Putting It Together and
Getting It Done As the Tower Controller your task is to provide safe passage to all aircraft within your control
space. This is accomplished through issuing commands to your charges that assure adequate aircraft
separation both in-air and on-ground.
Tower!SE by feelThere is programmed to follow, more or less, United States of America Federal
Aviation Administration (FAA) and European (EUROCONTROL) guidelines for traffic control.
While the command structure simulation is not completely accurate to “real world” procedures,
instructions sent to aircraft are designed to apply to a broad set of applicable global procedures.
Tower! by feelThere is programmed so that all aircraft fly IFR and all airports have ground radar
capability. As such, all aircraft maintain a radio for two-way communication and carry equipment to
correctly report their position on the tower radars when on ground and when airborne: altitude and
airspeed. When in single-player mode Tower places you simultaneously in two controller positions:
Tower and Ground Controller. Multiplayer mode allows you to define whom is the Ground and Tower
controller.
Air traffic control towers are operated for the purpose of providing separation to aircraft using the
airport. The primary responsibility of the tower controller is to ensure sufficient runway separation
exists between landing and departing aircraft. Other responsibilities include relaying Instrument Flight
Rule (IFR) clearances, providing taxi instructions and directing airborne aircraft within the vicinity of
the airport.
The Ground Controller is responsible for the safety of aircraft that are taxiing on taxiways or inactive
runways. To ensure the ground controller is always communicating with the correct pilot, the aircraft’s
position must be positively determined before issuing instructions. This may be done through the use
of visual observation, a pilot report or ground radar. Once this determination has been made,
communication should include the aircraft identification, the route to be used while taxiing and any
restrictions applicable to the pilot.
We’ll now take a close look at how all of the smaller details of Tower!SE work.
Controlling Departures
Telling aircraft it is OK to takeoff as soon as they arrive at the runway isn’t all there is to being a
controller. Your role is to assure adequate aircraft separation, and provide a reasonable and safe flow of
traffic away from the airport to avoid conflicts with arriving aircraft. This is done by properly spacing
inbound aircraft (discussed later) AND sequencing departures into the traffic flow.
Aircraft separation is generally defined by the phase of flight the aircraft is currently in (takeoff, climb,
cruise, descent, and landing) and the size of the aircraft. Aircraft are categorized according to weight:
• Cat I = under 41,000 pounds gross weight (small)
• Cat II = between 41,000 and 255,000 pounds gross weight (large)
• Cat III = over 255,000 pounds gross weight (heavy)
Tower!SE not to be used for real world training! Page 46

As you are the Tower controller you are responsible for assuring safe separation distances. As such you
must know the category of each aircraft is assigned. With this knowledge the distance between takeoffs
can be figured.
Prior to giving the clearance to takeoff you must satisfy the following aircraft category criteria:
When the aircraft wanting to takeoff is CAT I and the aircraft taking off prior is CAT I the departing aircraft is past the departure end of the runway; OR the prior aircraft has left the runway surface and is at least 3000’ ahead of the aircraft wishing to take-off.
When the aircraft wanting to takeoff is CAT I and the aircraft taking off prior is CAT II the prior aircraft has left the runway surface and is at least 3000’ ahead of the aircraft wishing to take-off.
When the aircraft wanting to takeoff is CAT II and the aircraft taking off prior is CAT I or CAT II the prior aircraft has left the runway surface and is at least 4500’ ahead of the aircraft wishing to take-off.
When the aircraft wanting to takeoff is CAT III and the aircraft taking off prior is CAT I or CAT II the prior aircraft has left the runway surface and is at least 6000’ ahead of the aircraft wishing to take-off.
When reviewing an aircraft's size you must also keep in mind the plane's in-flight performance. A
heavy, CAT III, aircraft doesn't have much concern with the wake turbulence created by a small CAT I
propeller plane (it is best to avoided all wake turbulence), but the climb rate and airspeed are both
items to consider. Once airplanes are away from the runway the flights under your control came must
have 5 miles horizontal separation and their vertical separation must be greater than 1000 feet. Be
aware of each plane's performance abilities as you are responsible for clearing planes and assigning
flight headings to avoid in-air conflicts.
You cannot allow an aircraft to take-off until landing aircraft are clear of the runway.
You must also keep the following in mind when controlling airports with parallel runways: simultaneous takeoffs are only allowed if the runways are separated by more than 2500’. parallel runways less the 2500' apart require the aircraft to be separated by one mile
and flying a diverging course greater than fifteen degrees.
If a landing aircraft is told to GO AROUND, while another is taking off from the same runway, the
departing aircraft must instructed to fly a course that diverges the lead plane's heading by more than
30 degrees.
Adding to the fun, if you are controlling an airport with runways that intersect another active runway
or taxiway, the controller must ensure the pilot does not begin the takeoff roll until at least one of the
following conditions exist:
• A preceding landing aircraft has -
◦ taxied off the landing runway
◦ completed the landing roll
◦ passed the intersection
Tower!SE not to be used for real world training! Page 47

• A preceding departing aircraft is airborne and has passed the intersection, or is turning prior to the intersection to avoid a conflict.
You are also allowed to use anticipated separation. Where you are reasonably assured that correct
separation will exist air traffic controllers are permitted to issue both anticipated takeoff and
landing clearances.
Normal practice is to transfer control to departure as soon as possible to reduce workload. It is your
responsibility not to clear the next aircraft for takeoff until the departing aircraft is safely away. Once
you are certain the flight is clear, you can instruct the pilot to contact Departure.
When leaving your control the AI pilot will acknowledge the command by saying, “Good bye;” and the
aircraft’s data block on the radar screen is cleared with only a “T” remaining. Planes without a data block are not under your control. At the same time the data block clears from the radar screen the strip
for the departing flight will clear from the Strip screen.
To send a command to a plane you may information into the Command screen's CMD line by:
• typing full commands
• using the available shortcut key combinations
• double left-click on the radar screens to enter the aircraft ID
• left-click on the aircraft’s arrival strip to enter the aircraft ID
• using voice control (when correctly configured)
The information just covered is a primer of the many types of commands you may use when
controlling in Tower!SE by feelThere. As your basic control skills improve you are encouraged to read
the real world resources about air traffic control and incorporate these in your controlling. A short list
of real-world resources are listed in the Real World Air Traffic Control Resources section of this
manual.
Controlling Arrivals
Tower!SE's AI TRACON controller will direct the aircraft to final approach (you will not see or hear
these commands). You cannot control arriving aircraft until the pilot contacts you stating, “With you.”
Even if you see her strip on your board, or see his radar return on your radar screen you must wait until
the pilot calls for your control. Only after being contacted by arriving aircraft can you grant the aircraft
clearance to land; change the runway assignment, or direct the pilot appropriately to avoid collisions or
“near misses”.
Approach control is responsible for instructing aircraft to keep adequate aircraft separation; and
providing a reasonable and safe flow of the airport’s landing traffic that avoids departing and arriving
traffic. Your role is to assure that it is safe for aircraft to land. There is a Golden Rule: No aircraft may
land when another aircraft is on the runway.
As with departure control you can enter control information into the Command screen's CMD line by: • typing full commands
Tower!SE not to be used for real world training! Page 48

• using the available shortcut key combinations • double left-click on the radar screens to enter the aircraft ID
• left-click on the aircraft’s arrival strip to enter the aircraft ID
• using voice control (when correctly configured)
You are allowed to use anticipated separation. Where you are reasonably assured that correct
separation will exist air traffic controllers are permitted to issue both anticipated arrival and
departure clearances.
As aircraft approach their landing runway keep in mind the plane's in-flight performance. A heavy,
CAT III, jet doesn't have much concern with the wake turbulence created by a small, CAT I, propeller
plane, but the slower airspeed of the propeller driven plane is something to consider. Be aware of each
plane's performance abilities as you are responsible for assuring that aircraft keep safe separation
distances. In the case of a heavy, CAT III, following a small, CAT I, you may need to issue GO
AROUND command to keep a faster aircraft from overtaking a slower plane.
The information just covered is a primer of the many types of commands you may use when
controlling in Tower!SE. As your basic control skills improve you are encouraged to read the real
world resources about air traffic control and incorporate these in your game controlling. A short list of
real-world resources are listed in the Real World Air Traffic Control Resources section of this
manual.
Controlling Ground Traffic
One of the primary responsibilities of the ground controller is to prevent a runway incursion. If an
aircraft must cross or enter an active runway, the ground controller must first give permission for the
pilot to do so. In similar fashion, pilots must not be permitted to cross/enter taxiways when doing so
could interfere with traffic already on the taxiway. You responsibility is to use the ‘HOLD SHORT OF
RUNWAY”, “HOLD SHORT OF TAXIWAY” and “HOLD POSITION” commands to keep aircraft
off of the active runways and to keep planes from getting into situations where there can be a collision.
All aircraft that display on the ADIRS Ground Radar screen are under your control. These aircraft
also have a strip on the Strip screen. You cannot issue taxi commands to aircraft that are not under
your control.
Gate and parking locations are not under your control. After a landing plane exits the runway and
comes to a stop you can see the assigned parking location by right-mouse-clicking on the aircraft's
ADIRS screen icon. A yellow aircraft icon will appear at the flight's assigned gate.. Once you know
where the aircraft needs to go you can issue an appropriate taxi route. Tower!SE does not require you
to issue specific taxiway instruction to arriving flights. When you do not assign a taxi route the AI
pilot will select the most direct route between the plane's current location and the parking location.
AI pilots will choose a route on their own that avoids conflicts or collisions. It is recommended that
you assign specific taxi routing using the VIA command to avoid collisions between aircraft. When
setting taxi routes be aware that AI pilots will not stop their taxi to avoid a collision or conflict. The
only situation where an AI pilot will stop to avoid a collision is when following another plane, or if
Tower!SE not to be used for real world training! Page 49

there is about to be a head-on collision. With experience you can create taxi routing that avoid conflicts
between aircraft going to their parking location and those heading for their assigned runway.
The information just covered is a primer of the many types of commands you may use when
controlling in Tower!SE. As your basic control skills improve you are encouraged to read the real
world resources about air traffic control and incorporate these in your game controlling. A short list of
real-world resources are listed in the Real World Air Traffic Control Resources section of this
manual.
Controlling Local Traffic
Aircraft designated as local traffic will remain in the local area of their departure airport. Local traffic are
not to be transferred to departure control, and have some specific control commands. Arriving and
departing traffic cannot be 'changed' to local traffic and cannot be issued local traffic commands. The local
traffic AI pilots will follow all Ground commands when going to and from an assigned runway.
The special local traffic commands are:
• CLEARED TO TOUCH AND GO
• CLEARED FOR STOP AND GO
• CLEARED FOR LOW APPROACH
• LEFT CLOSED TRAFFIC APPROVED CLEARED FOR TAKEOFF
• RIGHT CLOSED TRAFFIC APPROVED CLEARED FOR TAKEOFF
Instruction on how to issue, and how aircraft respond to, the above commands
are detailed in the Commands and syntax section of this manual.
As local traffic is flying the runway pattern you must appropriately direct the pilot to enter the landing
traffic sequence. Keep in mind the plane's in-flight performance and abilities as you are responsible for
assuring that aircraft keep safe separation distances. A heavy, CAT III, jet doesn't have much concern
with the wake turbulence created by a small, CAT I, propeller plane (it is best to avoid wake
turbulence at all times), but the slower airspeed of the small, CAT I, is something to consider. The
EXTEND UPWIND and EXTEND DOWNWIND commands are helpful when sequencing local
traffic into the arrival pattern.
Local traffic's flight strips will remain in the departure section of the Strip screen. In the notes section
of a flight's strip the number and type of landing maneuvers to be flown are outlined.
Things to Remember When Controlling
You may always enter commands using either the shortcut keys or entirely by keyboard input. Depending upon your keyboard skill, you will find yourself entering your commands at an ever faster and accurate rate with practice. When you computer system is correctly configured you can control using voice commands. Of course, issuing the right command at the right time is the real challenge.
You must type in “VIA” on the keyboard.
Tower!SE not to be used for real world training! Page 50

Place a space between commands on the Command Line.
You cannot control aircraft movement until the pilot has contacted you. Aircraft approaching the airport will call, “with you;” aircraft on-ground will call, “ready to taxi.”
You may always alter the shortcut keys to suit your taste, choosing a key sequence that is logical to your thinking.
You, as controller, will be responsible for determining the arrival/departure patterns to be used. There is a wealth of charts available on the web to assist you in this regard.
Due to programming limitations, precise gate assignments is impossible. As above, you must refer to your airport maps in order to determine optimum pathways to/from the gates, parking and runways. These will change depending on which runways are active.
In Tower!SE by feelThere you are controlling ground operations, landings and takeoffs. You are not responsible directing aircraft through airport SID and STAR procedures. Tower will control aircraft until they are on final approach. After aircraft takeoff you to transfer control to departure so Tower can direct the pilots away from the airport’s airspace.
Please remember this is a game, and as such not meant to duplicate actual procedures in the airport towers around the world! It is not meant as a training vehicle for aspiring controllers.
Practice, practice, practice! Controllers do not develop overnight, nor should you expect your skills to do so. Start small and slow, and as you gain confidence and an understanding of appropriate traffic flow, move to the more challenging scenarios. The syntax used in “Real World” controlling is very specific and standardized for a reason. Before long, you will be issuing commands without hesitation.
If you give yourself the opportunity, this simulation will become one of the most anxiety inducing, hair raising and perspiration inspiring “games” that you have ever enjoyed!
Multiplayer Only owners of the Tower!SE Multiplayer Edition can connect through the Internet to control an
airport. Tower!SE Multiplayer is designed for the host player to be the Tower controller, and the
client player controlling Ground traffic.
Setup Multiplayer setup is configured on the Tower/Select simulation page. feelThere recommends that you
have an Internet connection that provides uninterrupted connections faster than 800 Mbps. An unstable
and/or slow Internet connection may result in poor multiplayer game performance because of latency,
lag or disconnects. Internet service charges may apply.
Host computer configuration -
First configure your Internet connection device to allow communication through port 22224 (see Router, Modem and/or Internet connection device configuration below for details).
Select the airport, active runways, time and weather conditions on the Tower/Select simulation page. Be sure to share these conditions with the player joining the controlling session.
Provide the hosting computer's IP address to the client player. If your ISP and/or router dynamically assigns an IP address you will need to confirm the address before each multiplayer session. An Internet search for 'MY IP' will list on-line resources for identifying your home/office IP address.

Tower!SE not to be used for real world training! Page 51

• After sharing your IP address with your client, press the Start server button on the Tower/Select simulation page to open Tower's Internet connection.
• Allow Tower!SE to connect to the Internet if your firewall displays a security warning.
Client computer configuration -
• Enter the host computer's address into the IP address window on the Tower/Select simulation page.
• Press the Join button to connect to the host computer.
• Allow Tower!SE to connect to the Internet if your firewall displays a security warning.
NOTE: when the host loads a session the game will be paused and no play will be begin until the
client connects.
Router, Modem, and/or Internet connection device configuration -
You must instruct your router, modem and/or Internet connection device(s) permission for Tower!
to host a multiplayer session. In your Internet connection device(s) configuration utility and create a
custom service:
• Go to port forwarding/triggering select port forwarding.
• Select TCP/UDP and create a name, such as TOWER
• Set starting and ending ports as 22224.
• Set the host computer's IP address (if the IP address is set dynamically each time you turn on your computer you will need to check the IP address each time you create a multiplayer session).
• Save the custom service.
NOTE: the above instructions are generic. You will need to review your Internet connection
device(s) owner's manual for the specific sequence of steps to configure a custom service.
Common connection problems -
• The host must have his/her session running before the client can press the Join button.
• If unable to connect confirm that all firewalls are configured to allow Tower! to access the Internet.
• If unable to connect confirm that your router and Internet connection devices are configured to allow communication through port 22224.
• If you experience latency, lag and/or disconnects consider resetting your Internet connection device(s).
Tower!SE not to be used for real world training! Page 52

Play
The controllers can communicate through text by entering a asterisk, *, into the Command screen command line and then typing a message. The message is sent by pressing the SEND button. You
will hear a 'bing' sound when you receive a message from your co-controller.
The tower controller can only issue commands to planes under her control. Aircraft transferred from
ground will call their new controller. As in single player mode airborne planes being transferred from
the AI TRACON will call, “With you.”
The ground controller can only issue commands to aircraft under his control. Flights transferred from
tower will call to the ground controller. As in single player mode AI pilots ready to taxi to the runway
will call, “Ready to taxi.”
Only the tower controller can issue runway and airborne commands. Only the ground controller can
issue taxi commands.
Runway commands that may be used only by the tower controller:
• LINE UP AND WAIT • AFTER DEPARTURE FLY HEADING XXX
• AFTER DEPARTURE TURN LEFT/RIGHT XX DEGREES
• CLEARED FOR TAKEOFF
• LEFT CLOSED TRAFFIC APPROVED CLEARED FOR TAKEOFF
• RIGHT CLOSED TRAFFIC APPROVED CLEARED FOR TAKEOFF
The aircraft are transferred between controllers using the the following commands:
XXX CONTACT GROUND
The AI pilot will acknowledge the command and contact the ground controller. The flight's
strip will clear from tower's Strip screen and appear on ground's.
Examples:
Typed commands - Vocal commands -
• EMF389 CONTACT GROUND • “Package three eight niner contact
ground.”
Tower!SE not to be used for real world training! Page 53

XXX CONTACT TOWER
The AI pilot will acknowledge the command and contact the tower controller. The flight's strip
will clear from grounds' Strip screen and appear on tower's.
Examples:
Typed commands - Vocal commands -
• FRT3164 CONTACT TOWER • “Field Air three one six four contact
tower.”
Players receive points together for all successful landing, takeoffs, and controlling time without
errors. Ground errors are assigned to the Ground controller and airborne errors to Tower.
To end a multiplayer session exit the game by pressing the <ESC> key and choose 'YES' to
open Towers! Main Menu
Obtaining Support for this Software Answers to frequently asked questions (FAQs), updates and on-line support from feelThere is
located at:
http://forum.simflight.com/forum/170-atc-simulators/
In order to access and post messages on the ‘Tower!SE by feelThere’ forum you must create a user
account by clicking on ‘register’.
Be sure to visit Tower! by feelThere’s official world-wide-web site:
http://www.atcsuite.com
Tower!SE not to be used for real world training! Page 54

Real World Air Traffic Control Resources
Airport Internet Home Pages (at time of publication) –
Cyril E. King Airport http://www.viport.com/airports.html
Los Angeles International Airport http://www.lawa.org/welcomeLAX.aspx
Miami International Airport http://www.miami-airport.com
Listings of Aircraft and Airline Identification Codes –
ICAO - Aircraft Type Designators: http://www.icao.int/anb/ais/8643/index.cfm
Airline Codes: http://www.airlinecodes.co.uk/
The European Organization for the Safety of Air
Navigation (EUROCONTROL) –
General Information: http://www.eurocontrol.be
ATC: http://www.eurocontrol.be/corporate/public/
standard_page/cb_airtraffic_controller.html
Library: http://www.eurocontrol.int/eatm/public/
standard_page/Library.html
United States of America Federal Aviation
Administration (FAA) –
General Information: http://www.faa.gov
ATC: http://www.faa.gov/air_traffic/publications/
ATpubs/AIM/
Library: http://www.faa.gov/library
Books –
Any edition of Michael S. Nolan’s Fundamentals of air traffic control published by
Brooks/Cole Publishing Company.
Brenlove, M.S. (1983). Vectors to spare: The life of an air traffic controller. Ames, Iowa:
Iowa State University Press.
Tower!SE not to be used for real world training! Page 55

Aircraft Identification Codes All aircraft modeled in Tower! by feelThere are identified by codes on the Strip Screen and when using
the editors. The list below is organized by the aircraft identification you will see on each flight’s strip.
It is important that you become familiar with which aircraft are represented by the code shorthand. The
second column is the aircraft common name. Airframe body designations listed in the final column are
used by Tower!SE to implement the on-ground behaviors, airborne separation rules and the sounds
made the by plane..
CODE COMMON AIRCRAFT NAME SIZE BODY DESIGNATION
JTO Wide-body default jet H WIDE BODY JET
JT1 Narrow-body default jet L NARROW BODY JET
RJ1 Regional jet S REGIONAL JET
TRP Turboprop S TURBOPROP
PRP Propeller airplane S PROP
The aircraft used in Tower! by feelThere are fictional. Real-world plane packs are available for purchase
from feelThere's development partners on the ATC Suite web-site – http://www.atcsuite.com
(pictured: Los Angeles International)
Tower!SE not to be used for real world training! Page 56

Airline Identification Codes All airlines modeled in Tower!SE are identified by codes on the Strip Screen and when using the
editors. The list below is organized by the airline identification you will see on each flight’s strip
(which happens to be the ICAO code). It is important that you become familiar with which airlines are
represented by the code shorthand. Column two is the IATA code, and is used when creating airports
and flight schedules. Column three is the airline's callsign. Column four is the full airline name.
NOTE: Tower, like the real-world, uses the code/callsign used by the registered owner of the aircraft.
This means that flights by those airlines sub-contracting their regional and express networks to
smaller airlines will be correctly identified by the aircraft operator.
Example: Magic Express (code: MAX, call sign: Magic) provides the Express services at the
stock Tower!SE airports. Magic Express flights operate under the MAX code and call sign,
not the mainline carrier (ie, Trans American).
ICAO CODE IATA CODE CALL SIGN NAME
TAB TA LESLIE Trans American
FRT FT FIELD AIR Feelthere International Airlines
TGB TG GLOBE Trans Global
VAL VL VALUE Value
BLA BL LAKES Big Lakes
CBA CB CHESHIRE Cheshire Blue
BTV BV WHITE SAND Be There Vacation
DEN DN DENALI Denali Airlines
RAA RN RAINIER Rainier Air
ANG AN GOLDSUN Gold Sun Air
LAW LW LATITUDE Latitude Airways
UAX UU OZZY Uluru
EMF EF PACKAGE Express Mail Freight
PAV PV PATIENCE Silent Valley Airline
MAX MR MAGIC Magic Express
The airlines used in Tower! by feelThere are fictional. Real-world airline callsign packs and airport
schedules are available for purchase from feelThere's development partners on the ATC Suite
web-site – http://www.atcsuite.com
Tower!SE not to be used for real world training! Page 57

Tower!SE Editors
As you gain experience using Tower you can create, and share, more challenging airport environments by
modifying the types of aircraft, airline schedules and airline gate assignments. The editors can also be used
to create new airports. The editors provided are identical to those used to create Tower 2011 and are fully
supported. Support will only be provided for airports, aircraft and schedules released by feelThere. For
Tower addons please contact the airport, aircraft and/or schedule developer.
Copyright Notice -
Freeware airports, aircraft and schedules may be created and distributed with the following
restrictions and understandings:
• Tower!SE is the property of feelThere.
• Only the airport, aircraft and schedule files that result from using the editors may be shared. No portion of the game or editors may be distributed.
• FeelThere reserves the right to update Tower!SE in any way and without notice, even if the update results in the incorrect function of an addon airport, aircraft and/or schedule.
• Freeware means FREE. No fees or the requirement of an exchange of service or property can be asked to collect or use a freeware airport, aircraft or schedule. There can be no charge to download a freeware airport, aircraft or schedule from a file sharing site, or on-line library. No charge can be accessed for bandwidth or the cost to mail physical media (CD, DVD, flash/thumb-drive, etc.). There can be no fee to cover the cost of physical media.
• Airports, aircraft and schedules created and distributed as freeware must contain a 'readme file' that includes the following statement:
Tower!SE is the property of feelThere. No portion of the game may be distributed
except templates included with the editors. feelThere is in no way responsible for errors
or inconsistencies that may result in the Tower!SE function or visual model by the use
of an addon airport, aircraft or schedule.
• feelThere reserves the right limit distribution of any airport, aircraft and/or schedule in violation of the EULA, copyright, or the above freeware restrictions.
Persons interested in creating airports, airplanes and/or schedules for Tower!SE that will be released
as shareware or payware must first contact feelThere, Inc., at [email protected], to receive
creative, licensing and distribution permission. feelThere reserves the right to refuse permission,
license, or release of any shareware or payware addition to Tower!SE.
Creating Airplanes Tower will only recognize the aircraft types listed in the Aircraft Identification Codes section of
this manual. Not all the aircraft listed are simulated, nor are the many airline, manufacturer or private
liveries. The Airplane editor allow you to create unstimulated planes and add repaints.
The Airplane editor is located in the Tower!SE root directory in the 'Airplanes' folder.
Tower!SE not to be used for real world training! Page 58

When a plane is loaded the large screen on the left side of the application window will display the
airplane graphic and be your workbench screen for adding the aircraft lights. Below the workbench
screen you can choose to show the aircraft lights in a 'night scene' (ie, dark) view or if the aircraft
graphic will 'show airplane lights' (ie, are visible for editing). The zoom slider adjusts the
magnification of the airplane graphic. 'Show gizmo' represents how Tower is going to see the plane. If
the gizmo icon is not centered on the aircraft fuselage at the wing root the plane may turn oddly in the
game's Top down view.
To the right of the workbench screen are the primary editing controls: Load plane: select the plane to be created, or a current plane to be edited. Save plane: save the newly created or edited aircraft.
Type: this is both a descriptor of the aircraft and will be the filename created when you save the plane. Maximum characters allowed are 32.
Code: aircraft ICAO code. The code used must be one of those listed in the Aircraft Identification Codes section of this manual.
Class: aircraft type and is the reference for the sound the plane will use in the game. Category: aircraft's class for ATC control. See Controlling Arrivals and Controlling
Departures section of the manual for more information. Length: aircraft total length. Cruising speed: speed, in percent of Mach, the aircraft travels when at cruise altitude. Ex: a
Tower!SE not to be used for real world training! Page 59

modern medium range transport jets usually fly at M0.80, and the value entered in the data
field will be 80. Take-off length: distance required for the aircraft to takeoff off.
Landing speed: landing speed for the aircraft (Vapp) Rate of climb: aircraft's initial climb rate after takeoff
Take-off speed: take-off speed for the aircraft (V2) Rate of descent: aircraft's common rate of descent.
Landing length: distance required for airplane to safely stop after landing.
Association details box: this box will detail the file associations, liveries/repaints, for the selected aircraft type.
Add TGA: the airplane/livery file used as source data for planes in Tower is in TGA graphic file format. TGA, a raster graphics file format. Only TGA files can be used, and the file must be in 32 bit (24 bit of RGB and an extra 8-bit alpha channel) and not larger than 1024 x 1024 pixels. The image of the aircraft must have the nose facing up. You can use any graphic editor you wish to design aircraft and repaints, but the final graphic format you import into Tower 2011 using the Airplane editor must be TGA. Add APT: loads an AirPlane Texture file has already been imported by the Airplane editor.
Delete: a highlighted file in the Association details box will be removed.
Airline (ICAO): this is the airline reference code that added liveries will be reference on the Strip screen, used by Tower to state an airline name and by the voice recognition software. The Airlines that Tower recognizes are listed Airline identification code section of this manual.
NOTE: if you have an airline expansion pack installed those installed ICAO codes may be
used. Position settings: aircraft light locations are set onto the plane TGA file -
➢ Autofit lights tells Airplane editor, based on the aircraft shape, to automatically place the lights on the airframe.
➢ The buttons to the left of the light locations/types allow you to select which light you yourself, wish to place. Only one button may be selected at a time.
➢ The ON click-boxes allow you see the light type on the plane. NOTE: all planes must use all the light types.
➢ To place a light by hand use the mouse pointer to click the location on the fuselage. Runway turn, wing, colored navigation and strobe lights are paired, so the Airplane editor will place the second light equal-distance from the centerline of the plane (ex., click on the right wingtip for the colored navigation lights the editor will automatically place the green light on the right wingtip, and the red light on the left wingtip.)
Importing a plane's grapic - 1. Using a graphic editor output a TGA graphic that is 32 bit (24 bit of RGB and an extra 8-bit
alpha channel) and not larger than 1024 x 1024 pixels. The image of the aircraft must have the
nose facing up.
2. Import the plane graphic by pressing the Add TGA button to the right of the association
details box. The Airplane editor will list this new plane in the association details box as
SETME= = = >><filename>.tga.
Tower!SE not to be used for real world training! Page 60

3. IMPORTANT, set the ICAO of this first added graphic as DEFAULT. This must be done as
this creates an airplane for Tower to display. If an aircraft type does not include a
DEFAULT plane graphic no planes of the type will appear in the game. After setting the
ICAO as DEFAULT the Airplane editor will change the SETME to DEFAULT.
4. Enter data in ALL REMAINING DATA FIELDS and set the aircraft light locations. If any
field is left blank the plane will not be created.
5. To save your work press the Save plane button. This creates the APT and APX files that
Tower!SE uses to represent aircraft.
You have now created an aircraft.
Adding a livery - 1. Using a graphic editor output a TGA graphic that is 32 bit (24 bit of RGB and an extra 8-bit
alpha channel) and not larger than 1024 x 1024 pixels. The image of the aircraft must have the
nose facing up.
2. Import the livery by pressing the Add TGA button to the right of the association details box. The editor will list this new plane in the association details box as SETME= = = >>xxx.tga.
3. Set the ICAO to the correct three letter/digit code. Airplane editor will change the xxx.tga to
include ICAO three-digit code.tga.
4. Save your work press the Save plane button. This updates the plane's APT and APX files.
You have added a livery to an aircraft type. When a schedule file listed an ICAO code that
matches the livery ICAO code your creation will be displayed instead of the DEFAULT
aircraft model.
Sharing airplanes and liveries - There are multiple ways to share planes and repaints you create for Tower. How you share depends
on what file you wish to distribute. APT files are graphics Tower 2011 uses to display airplanes. APX
files are aircraft types and performance data.
Sharing a plane:
If you just share a TGA graphic of an aircraft type the users of your creation will need to use the
Airplane editor to create the plane in their Tower installation. It is recommended that you include a
readme file that outlines the airframe performance information and outline the correct locations for
the plane's lighting. Using your instructions the user can then compile the APT and APX files.
Sharing a livery:
To share just a livery TGA graphic for an aircraft type the users of your creation will need to use the
Airplane editor to add the livery to their Tower installation. It is recommended you include a readme
file that outlines the correct ICAO code for the airline. By sharing the TGA livery graphic the user
only needs to add the repaint to an existing aircraft APT file. NOTE: if the user of your creation must
have a voice pack that includes the ICAO code that matches your livery.
Sharing a plane and livery package:
If you distribute paired APT and APX files you are providing a complete aircraft with all the repaints
you have created for that plane type. An APT file is named by the airline editor according to aircraft
code you enter in the Code data location. Tower 2011 will not understand any other code except those
Tower!SE not to be used for real world training! Page 61

listed in the Aircraft Identification Codes section of this manual. An aircraft and livery APX/APT
package will replace a preexisting airframe type and all liveries. If your package does not include an
airline livery (ie, ICAO code) that is defined in the traffic schedule Tower will use the DEFAULT
graphic. If you distribute a common aircraft type that does not include all liveries ever released users
can loose repaints. Either gaining permissions from all authors of liveries to distribute a full package,
or only distribute TGA files.
Only if you are adding a plane that does not already exist in Tower 2011, feelThere recommends
you share only TGA files. Distribution of graphic source files avoids the disappointment users may
experience if your APT/APX files (ie, a new representation of a plane) removes his/her favorite
airline livery.
Creating Airports Using the Tower!SE Airfield editor you can create the world's airports. The Airfield editor is not a
graphic editor. You must create the necessary airport graphic files using an image editor (see below for
specific file format requirements. The Airfield editor is only used to position the Tower!SE code the
defines aircraft taxiways, runways, and parking locations.
Airport Images:
Tower!SE uses graphic files to represent the gaming
environment. To build an airport you must use a graphic editor
to create each image. Once the images are created you use the
Airfield editor to insert the field lights, taxiways, runways,
and parking locations.
Seven images are required to build an airport:
• <airportname>_Airport_final_noshadow.tga
• <airportname>_Airport_shadow.raw
• <airportname>_Airport_night_lights.tga
• <airportname>_Airport_night_lights2.tga
• <airportname>_Airport_forest_raw
• <airportname>_Airport_ADIRS.tga
• <airportname>_Airport_DBRITE.tga
The naming of files must be done carefully and consistently.
Tower identifies the airport data and graphics necessary to
display the game by the airport name used to save related files.
For example: all of the KMIA files begin with 'Miami'. In the
graphic to the right are listed AFX and ATB files. See Editor
controls below on how these filetypes are created and used.
Tower!SE not to be used for real world training! Page 62

Airport daylight top-down image Before using the Airfield editor you must create the airport daylight top-down view using a graphic
editor. You can use a satellite image, freehand draw the airport, or a combination of methods. Any editor
and source format will work as long as you can save the airport as a 24 bit TGA file 8 to 10,000 pixels
wide by 8 to 10,000 pixels tall. Save the file as: <airportname>_Airport_final_noshadow.tga
When creating the daylight image do not include shadows. The shadows cast by the airport buildings and
topography are set in the Airport height map.
When creating the Airport top-down image you must assure you create the graphic with the appropriate
runway alignment for correct representation in Tower!SE.. For example, Los Angeles airport runway 6R
has a magnetic heading of 249 and a true heading of 263. The image that represents the airport is encoded
using the Airfield editor so the runways magnetic heading is correctly designated in-game.
When selecting your source picture be aware of how the image is aligned to true north. In the graphic
below you see that the image shows the runways in an '270 degrees' orientation:
Airport orientation is a design choice based on a airport's layout needing to be displayed on the computer,
or to match real-world radar screen. By using the Airfield editor you will set the actual runway heading as
263 degrees true.
Most persons assume that up is true north. In the picture below the runways are aligned at 263 degrees:
The concern with the above image image is that the runways show at an angle on the computer monitor.
Tower!SE not to be used for real world training! Page 63

If you do a simple rotation of the above image you end up with the following:
The above image will not display correctly in Tower. For this reason create your source image to create
a graphic that is horizontally and vertically square:
Now you must appropriately set the airports pixel-per-foot scale. For Tower to correctly simulate
aircraft ground and air movements you need to create an image that represents 2.6 feet for each pixel.
Example:
• Select a runway of known length. In this example the runway is 8600 feet long
• Count the number of pixels that the airport image uses to display the runway's length. In this hypothetical case the runway is 5035 pixels long.
• Divide the real-world runway length (feet) by the image's runway pixel length. Using
Tower!SE not to be used for real world training! Page 64
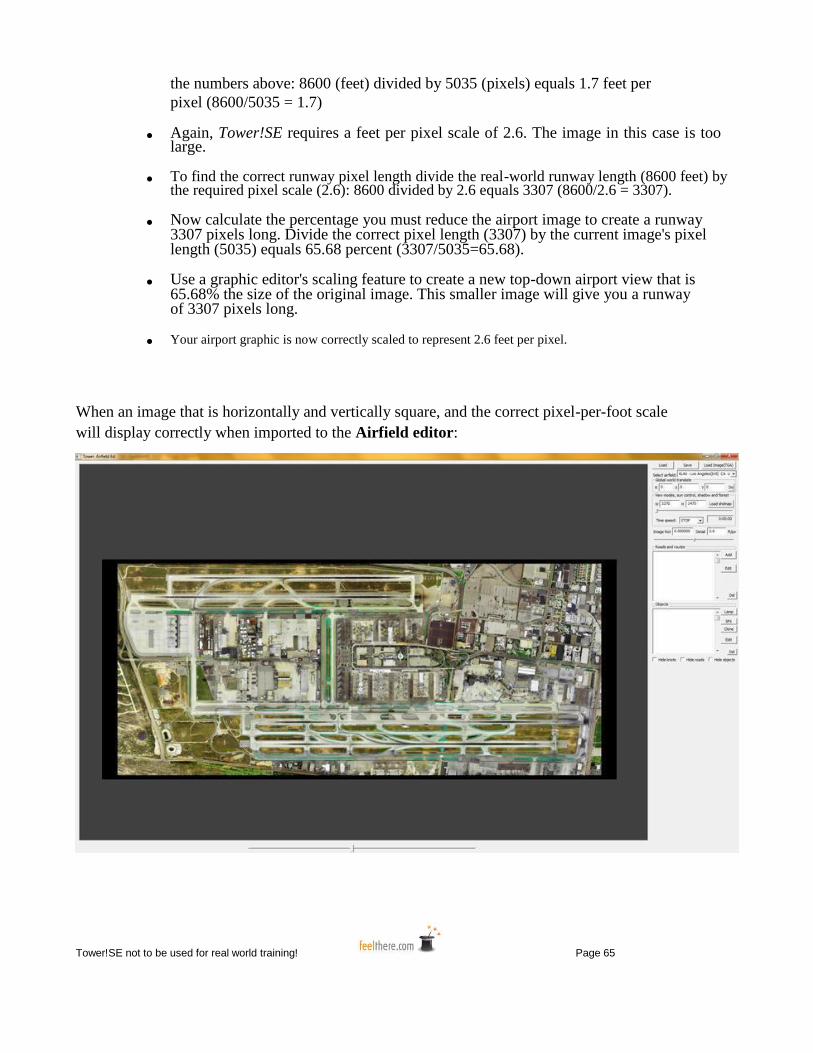
the numbers above: 8600 (feet) divided by 5035 (pixels) equals 1.7 feet per
pixel (8600/5035 = 1.7)
• Again, Tower!SE requires a feet per pixel scale of 2.6. The image in this case is too large.
• To find the correct runway pixel length divide the real-world runway length (8600 feet) by the required pixel scale (2.6): 8600 divided by 2.6 equals 3307 (8600/2.6 = 3307).
• Now calculate the percentage you must reduce the airport image to create a runway 3307 pixels long. Divide the correct pixel length (3307) by the current image's pixel length (5035) equals 65.68 percent (3307/5035=65.68).
• Use a graphic editor's scaling feature to create a new top-down airport view that is 65.68% the size of the original image. This smaller image will give you a runway of 3307 pixels long.
• Your airport graphic is now correctly scaled to represent 2.6 feet per pixel.
When an image that is horizontally and vertically square, and the correct pixel-per-foot scale
will display correctly when imported to the Airfield editor:
Tower!SE not to be used for real world training! Page 65

Airport Height Map Tower uses a height
map to display
shadows cast by the
airport's buildings and
terrain. To create the altitude
data resize the Daylight top-down
image to 50%. Draw
height map data to this
smaller sized image.
The altitude data is
grayscaled: 0,0,0 is the ground level and 255, 255, 255 is the highest point at the airport. The grasycaling gradient from 0-255
instructs Tower to display shadows inside the game. Save the height map as 16 bit RAW format with
1 channel. Save the file as: <airportname>_Airport_shadow.raw
IMPORTANT: do not attempt to edit the Height map using the Airfield editor.
Trees, Ground and Water Map Tower uses color to
define the on-screen
location where wind
causes water waves
and trees to sway. As with the Height
map, for the tree and
water map resize the
Daylight top-down
image to 50%. Define
the terrain using 0,0,0
as ground; water
129,129,129; and the
treed areas
as193,193,193. Save the
map as 8 bit RAW format with 1 channel. Save the file as: <airportname>_Airport_forest_raw
IMPORTANT: do not attempt to edit the Trees, ground and water map using the Airfield editor.
Tower!SE not to be used for real world training! Page 66

Night Lighting map During simulation times when the sun has set Tower!SE uses a night map to represent the airport.
Use the Daylight top-down image at 100%. add a 82% Multiply blending mode and set the color to
#17253c HEX.
Make a new layer and use this to create appropriate nighttime shades, light splashes, and colors
for night lighting. Set the blend mode to 'Color Dodge' to create a Nighttime image similar what
is pictured below:
Create a new layer between the Daylight top-down image and the Nighttime image and set the
color to 181818 HEX. You now have a Gray image.
Copy the Gray image and combine it with the Nighttime image layer. Set the combined Gray and
Nighttime image to the top layer and set the blending mode to 'Difference'. Setting the blending mode
to 'Difference' creates the Spotlights image:
The above image will light the airplanes and the cars. Save the Spotlights image as a 24 bit TGA
named: <airportname>_Airport_night_lights2.tga
Tower!SE not to be used for real world training! Page 67

Return to the work before you placed a layer set to color 181818 HEX between the Daylight top-down
image and the Nighttime image.. Copy the Daylight top-down image and combine with the
Spotlights image. Set the blending mode to 'difference' to create a graphic that has texture and details
visible under the lights:
The above image is the Night lighting map that will show in-game during nighttime play. Save Night
lighting map as a 24 btt TGA named: <airportname>_Airport_night_lights.tga
IMPORTANT: do not attempt to edit the Night lighting map using the Airfield editor.
Ground Radar image To represent the airport's ADIRS screen create an outline of the airport's primary features (ie, ruways,
taxiways, ramp space, terminals) using the 100% sized Daylight top-down image. When done editing
resize the ground radar graphic to 1024x1024 pixels and save as a 24 bit TGA. Name the ground radar
file <airport_name>_ADIRS.tga
Tower!SE not to be used for real world training! Page 68

Air Radar image To represent the airport's DBRITE create runway centerline extension using the Daylight top-down
image at 100% sized. When done editing resize the air radar screen to 512x512 pixels and save as a 24
bit TGA. Name the air radar file <airport_name>_DBRITE.tga.
Radar screen creation tips:
The radar screens' background color is black.
feelThere used the green color definition below for the Ground radar screen: HEX: 0x00EB4D RGB: (77,235,0)
HTML: #4DEB00 CMYK: (62,0,92,8)
HSV (100,100,92)
feelThere used the green color definition below for the Air radar screen: HEX: 0x085722 RGB: (34,87,8)
HTML: #225708 CMYK: (21,0,31,66)
HSV (100,91,34)
IMPORTANT: do not attempt to edit the Radar graphic files using the Airfield editor.
REMINDER: all of an airport's image and reference files must be saved using the exact same airport
name for Tower to correctly display each image.
When you have completed the Airport top-down view, Maps, and Radars place the seven files
in the Tower root folder named 'Airfields'.
Tower!SE not to be used for real world training! Page 69

Airfield Editor:
The Airfield editor is located in the root Tower!SE folder.
The Airfield editor window is divided into to areas: A) Airfield workbench screen: here you will manipulate the airport elements required to add
runways, taxiways, parking locations and vehicle traffic routes. The grid represents one mile.
Below the workbench screen is the zoom slider adjusts the magnification, not the scale, of the
screen. The mouse scroll-wheel also adjusts the zoom setting. To move the centerpoint of the
workbench screen center-mouse-button click and hold.
B) Editor controls: all elements used to create a functioning airport are along the right side of the
editor window.
The Airfield editor does not have an 'undo' function. It is recommended that you save your work
often so if a mistake is made you can re-load the project from a prior point of development.
Tower!SE not to be used for real world training! Page 70

Editor controls
1. Load: open an existing airport
- <airportname>_Airport.afx
2. Save: saves your work. The airport file
needs to be named -
<airportname>_Airport.afx
3. Load image (TGA): select the image
that will be used to represent the airport.
This should be your airport TGA
named: <airportname>_Airport_
final_noshadow.tga
4. Select airfield: using the pull-down
menu choose the airport you are
creating. (See Airport database if the
airport not shown.)
5. Global world translate:
• R - rotate in degrees
• X- move horizontal
• Y – move vertical
• Do – the editor will move all of the objects and elements set using the Road/route, Lamp and SFX editors (see below) according the values entered for R, X, and Y. The Airport image is not moved. NOTE: each time the Do button is clicked the editor will move the objects and elements.
6. View Modes, sun control, shadow and forest:
W – enter half the airport daylight image's pixel width. For example if the image is 8805 pixels wide you must enter 4403. ◦
H - enter half the airport daylight image's pixel height. For example the image is 6410 pixels high then you must enter 3205. ◦
Load shdmap – click to load the Height or Trees, ground and water maps to review their display properties. Loading a Map is CPU intensive so load an image only when necessary. ◦
See the Airport image section of the manual for details on creating airfield images
for Tower.
Slider – set the time for a test of how the airport's Maps will display in-game. ◦ Time speed – set the speed for a test of how the airport's Maps will display in-game. ◦
Time window – UTC being simulated during the Time speed test.
6. Image rotation and detail:
• Image rotation – you are moving the Airport image as needed for magnetic heading alignment with the airport objects and elements. A value of +/- 360 degrees is allowed.
Tower!SE not to be used for real world training! Page 71

• Detail – the number of feet Tower! believes that each pixel represents. The target value is 2.6 feet/pixel.
• Slider - set the magnetic declination, image rotation, for the airport image. A value of +/- 360 is allowed.
8. GMT and Altitude
• GMT offset – set airport local time +/- GMT (UTC). • Alt – set the airport's altitude above sea level.
9. Roads and routes screen: roads,
taxiways and runways that have been
added to the airport are displayed.
10. Roads and routes editors: • Add - click to add a
runway, taxiway, taxicar, traffic, airway/incoming or airway/outgoing using the Road/routes setting editor.
• Edit – click to open the Road/routes setting eidtor after
highlight an existing item in in
the Roads and routes screen.
• Del - highlight an existing item in the Roads and routes screen and click to delete from the airport. NOTE: you cannot undo a delete.
11. Objects screen: lights and sound
effects that have been added to the
airport are displayed.
12. Objects editors: • Lamp – click to add a light using the Lights object settings editor • SFX – click to add an environment sound to the airport. • Clone - highlight an existing object and click to copy. • Edit – highlight an existing object and click to open the object's editor. • Del – highlight an existing object and click to delete from the airport. NOTE: you
cannot undo a delete. 13. Hide Objects:
• Hide knots – hide runway, taxiway, taxicar, traffic, airway/incoming or airway/outgoing control points, called knots.
• Hide roads - hide the runway, taxiway, taxicar, traffic, airway/incoming or airway/outgoing control points travel lines, called roads.
• Hide objects – hide the objects added to the airport.
Tower!SE not to be used for real world training! Page 72

When you fist save a new airport project the editor will create two files: <airportname>_Airport.afx
and <airportname>_final_noshadow.atb. The file you name when pressing the SAVE button the first
time is the AFX type. This file contains the data generated using the Roads/routes settings and Lamp
objects editors (see below). Automatically saved is the ATB file. This file contains a converted
version of the Airport daylight top-down image so that Tower!SE can display the airport in-game.
IMPORTANT:
The naming of files must be done carefully and consistently.
Tower identifies the airport data and graphics necessary to
display the game by the airport name used to save related files.
For example: all of the KLAX files begin with 'Los_Angeles'.
Roads / Routes Settings Editor Open the editor by clicking the ADD or EDIT
buttons. All work is saved automatically as you
enter data.
1. Name – type the name of the element
you are adding. Set the name of the
taxiways and runways correctly as this
is the designation Tower!SE will be used
in the game.
2. Type – the the road/route type
(see below).
3. Direction – designate which direction(s)
aircraft may move along the element. 4. Width – set the width of the element.
5. Terminal company filter – when
creating a 'Taxiway terminal' you can
designate a terminal name. The terminal
name is used to assign assigning parking
spaces for airlines. (See Assigning
parking locations.)
6. RW heading – magnetic heading of a runway
7. Knot properties –
alt: used only when creating Airways in. This sets the altitude that planes use for aligning to their assigned landing runway. ◦
gate type: at the selected knot create a taxi hold line. Using the pull-down menu you can designate the hold (gate) to stop planes moving in any all, or a specific direction. ◦ Gate trg: set if the hold (gate) is for a specific taxiway(s) or runway(s).
Tower!SE not to be used for real world training! Page 73

When you create a airport element a knot icon is show on the Workbench screen. A knot is a point
that defines the location of airport taxiways, runways, airways, traffic, and taxicar control points.
Knots can be single points, or connected to form a line or curve. Use the minimum number of knots
that allows for realistic simulation of the airport. Excessive airport detail will result in AI pilot taxi and
control errors. 90-degree turns are acceptable as the planes will always make an arc turn.
The following roads and routes are used in creating an airport. Select the type of road or route you
wish to crate in the Road/route settings editor type pull-down menu:
• Runway • Taxicar
• Taxiway - simple • Traffic
• Taxiway – terminal in/out • Airway - incoming
• Taxiway - parking • Airway - outgoing
As you lay out the airport be sure that terminal, taxiway, runway, traffic and airway segments are
connected. Look closely at the point where a taxiway-to-taxiway, or taxiway-to-runway, or taxiway-
to-terminal intersection exists for a black knot. The black knot shows that aircraft are able to transition
from one route to another. If the taxiways/runways/terminal routes are connected planes will be come
stuck.
Runway are only one-way and aircraft only travel them in the magnetic heading shown in the RW
heading window. Don't worry about the actually heading shown as you initially set the runway road.
The runway magnetic headings used during game play will be set once you have completed set all the
control components over the Airfield image (see Magnetic alignment). Most runways can be used
from both directions. For example: first create runway 15; then place opposite heading runway 33 as a
layer over 15.
For planes to land on the airport runways you must attach an Airways-incoming route. Extend the
airways 20 miles from the runway. Set the far end altitude in the Knot properties alt window to be
3000 feet. To allow airplanes to depart from the runway create an Airways-outgoing route that extends
20 miles.
Taxiways can be set for a specific direction of travel. Be careful is setting on-way roads unless the
restriction is clearly noted on the airport chart.
There are two types of routes for airport ground traffic: TRAFFIC and TAXICAR. Traffic are for the
roads around the airport, such as the highways and side streets near the airport and driveways going to
and from the parking garage and terminal. A traffic road must begin with a knot set to gate type SHOW
and end with gate type HIDE. For the traffic knots 'along the street' set the gate type as N/A. The roads
cannot cross each other, so careful placement of the road segments is required to correctly animate
traffic.
The second road type, taxicar, is for the service vehicles that run next to the terminal building on the
airport apron and ramp. Taxicar segments do not required a SHOW or HIDE beginning and end knot.
Like traffic roads, taxicar routes cannot cross.
Tower!SE not to be used for real world training! Page 74

In order to manipulate an item on the Workbench screen you must have the Roads and routes
editor or Lamp Objects editor window open. With the Editor window open the following mouse
commands are used on airport items: Delete a knot - <SHIFT> and right-mouse-click Insert a knot on a connecting line - <CTRL> and right-mouse-click Move connected knots together - <SHIFT> and left-mouse-click Move a single knot - left-mouse-click and hold Place a knot or light – right-mouse-click Select a connected line of knots (such as a taxiway) - <CTRL> and left-mouse-click Select a single knot or light - left-mouse-click
NOTE: if you are unable to select, move or adjust an item on the Workbench screen you have
not opened the correct Editor window.
Lamp Object Settings Editor The Lamp object editor is opened by clicking the
LAMP or EDIT button. All work is saved
automatically as you enter data.
1. Name - name the light
2. Blend mode - select the blending mode
3. Spline settings -
• Mode: you select between placing a single light or a line (spline) of lights.
• Distance between objs: select the separation between the each light on a spline.
• Time off set: set a flashing delay between each light
4. Blink settings -
• Type: select the timing of the blink
• Length: set how long a light is on (seconds)
• Delay: set how long a light is off (seconds)
5. Load TGA - you select a TGA graphic to represent a light. The standard Tower!SE light TGA
are located in the Tower root folder named 'Icons'. 6. Size - you can select the size of the light
In order to manipulate an item on the Workbench screen you must have the Roads and routes
editor or Lamp Objects editor window open. With the Editor window open the following mouse
Tower!SE not to be used for real world training! Page 75

commands are used on airport items: Delete a knot - <SHIFT> and right-mouse-click Insert a knot on a connecting line - <CTRL> and right-mouse-click Move connected knots together - <SHIFT> and left-mouse-click Move a single knot - left-mouse-click and hold Place a knot or light – right-mouse-click Select a connected line of knots (such as a taxiway) - <CTRL> and left-mouse-click Select a single knot or light - left-mouse-click
NOTE: if you are unable to select, move or adjust an item on the Workbench screen you have
not opened the correct Editor window.
SFX Object Settings Editor The sound object editor is opened by click the SFX button.
1. Name – set the name of the sound
2. Load OGG – select the sound to be used
in the location. The standard Tower!SE
sounds are located in the Tower root
folder named 'Sound \ Environment'.
3. Distance
• Near: at this distance or closer the sound source is at it's maximum volume and will get no louder.
• Far: when beyond this distance from the sound source the volume will be zero.
4. Slider – sets the relative volume of the heard in-game sounds.
Tower!SE uses sound files in the OGG format. To create new sounds
for the game you must use a sound editor. The SFX object editor is not a sound editor.
To edit the properties or location of a current sound you must highlight that sound in the
Objects screen and press the EDIT button.
Use a left-mouse-button click on the Workbench screen to place a FSX object. When the SFX object
editor is open you can move the selected SFX by placing the mouse pointer in a new location on the
Workbench screen and again doing a left-mouse-button click.
To remove a SFX select the sound in the Objects screen, press the DEL button. Click carefully as you
cannot undo a delete.
feelThere recommends that sound object placements are the last items you add to an airport.
Once sounds are placed on the airfield they cannot be silenced.
Tower!SE not to be used for real world training! Page 76

NOTE: you cannot select and move SFX objects on the Workbench screen in the same way as
done for lamps, roads, routes and knots. The only way move a SFX object is by selecting the sound
you wish to move in the Objects screen, press the EDIT button, and left-mouse-click on the
Workbench screen to select a new location.
Magnetic Alignment After you have placed all roads, routes, lamps and sounds you align the airport for correct magnetic
alignment in the game. First align the airport objects. In this example we will use the real-world
orientation of Los Angeles International's runway 6R. We will set the airport objects for real-world
magnetic heading of 249 degrees. Select runway 6R in the Road/route screen and click the EDIT
button. Check the RW heading window to see the current alignment Tower has for 6R. If the heading
is not 249 degree, enter the appropriate rotation needed to align the runway in the Airfield editor
controls Global world translate R window (red box below, also see page 71 above). Press to Do
button to implement the change. What you will see, pictured below, is all the airport elements have
been rotated to the correct magnetic heading:
Confirm that the runway magnetic heading is now correct in the Road/route editor in the RW
heading window.
Now that the airport elements are aligned to magnetic north, you need to tell Tower!SE how to orient
the picture. In the Airfield editor controls Image rotate window (red box below, and see page 71
above) set the necessary rotation degrees, or use the Slider. After rotating the image confirm that the
the roads, routes, objects and sounds are in their correct location on the airport..
Tower!SE not to be used for real world training! Page 77

Airport Database: Tower comes with an extensive world airport database. If you find that an airport is not listed it is a
simple matter to update the airports.txt file.
The airport database is located in Tower root folder named 'Databases'. Use a text editor, such
as Microsoft Notepad, to open and edit the file.
IMPORTANT: Make a backup of airports.txt before making any changes.
The file is a fixed columned list with each airport defined on a single line reading left to right:
AAA Anaa French Polynesia 17.25 S 145.30 W NTGA AAE Annaba Rabah Bitat UK 36.50 N 8.00 E DABB LHR London(Heathrow) England 51.28 N 0.27 W EGLL NGO Nagoya(Intl) Japan WA USA 34.51 N 136.49 E RJNN SEA Seattle/Tacoma(Intl) 47.27 N 122.18 W KSEA SVO Moscow(Sheremetyevo) Russian Fed. 55.58 N 37.25 E UUEE SYD Sydney(Intl) NS Australia 33.56 S 151.10 E YSSY
• IATA code – three digits
• Airport name – common name(detail) state and/or country
Tower!SE not to be used for real world training! Page 78

• Latitude – DD.MM (degrees and decimal minutes) N or S • Longitude – DDD.MM (degrees and minutes/decimal minutes) E or W • ICAO code – four digits
The airports.txt file is saved in the Tower root folder named 'Databases'. Follow the date format in
the existing file when making additions.
Tower/Select Simulation Menu Page Graphics: For any airport you design you must create three graphics for Tower!SE to display on the main
airport selection page. Templates, in PSD format, for these files are provided the folder named
'templates' located in Tower's root folder. After creating the graphics for your airport the files must be
the same pixel size as the templates and saved as 32 bit TGA
menu_text_template.psd
In this file you enter the airport name you wish to show in the upper left tab of the Select simulation
page. The text must be aligned to the right. You can only create an airport specific graphic the same
size as the template. Save the image as as 32 bit TGA with the filename of:
menu_text_airport_<airportICAO>.tga
menu_map_name_template.psd This is the top-down view of the airport where the player selects the active runways. You can only
create an airport specific graphic the same size as the template. Save the image as as 32 bit TGA with
the filename of: menu_map_<airportname>.tga.
See Button mapping for how to place the active runway clickspots.
On the layer named 'Tower' in the menu_map_name_template.psd file is the red-button tower icon.
menu_map_name_template.psd Provide the player a short description of the airport's characteristics in this graphic. You can only
create an airport specific graphic the same size as the template. Save the image as as 32 bit TGA with
the filename of: menu_new_game_info_<airportICAO>.tga
REMINDER: save the three Tower/select simulation menu page images as TGA grahics.
Tower!SE cannot display .PSD files.
Active runway selection buttons The location of the the click-spots for players to selection an airport's active runway is a simple
text file. This text file also defines for Tower!SE the filenames of the three Select Simulation page
graphics and the airport name displayed in the Airport selection pull-down menu.
Tower!SE not to be used for real world training! Page 79

Using a text editor, such as Microsoft Notepad, create a file as shown below:
• name=<airport name to show in Airport selection pull-down menu>
• MapName=<airport name used to save the airport with the Airfield editor>
• NameTexture=MenuData/ menu_text_airport_<airportICAO>.tga
• MapTexture=MenuData/ menu_new_game_info_<airportICAO>.tga
• InfoTexture=MenuData/ menu_new_game_info_<airportICAO>.tga
• Runway=<rwy number> <X-coordinate>
<Y-coordinate> <closed runway>
You may only enter spaces in the 'Name=' line,
and between the number in 'Runway='.
Click-button coordinates -
The X and Y coordinates in the 'Runway=' line are the number of pixels from the upper left corner
of the menu_new_game_info_<airportICAO>.tga graphic. The X and Y values place the center of
the click-button.
Active and non-active runways -
In general you will close the opposite end of an active runway. You specify for Tower which runway
will be closed when anther is active. In the example picture above, for St. Thomas Airport, when
runway 10 is active, runway 28 is closed (Runway=10 256 156 28). The second 'Runway=' line states
that when 28 is open 10 is closed.
Saving the menu_map file -
menu_map_<airportname> is a simple text file saved with a .map extension. The Airport name must
match exactly the airport name used when saving the menu_text_airport_, menu_map_, and
menu_new_game_info_ TGA files. Tower!SE associates an airport's files based upon this common
airport name.
NOTE: when saving the menu_map_<airportname>.map file confirm that the filename isn't saved as
menu_map_<airportname>.map.txt
After creating the four files required for the Tower/Select Simulation Menu Page, place them in
the Tower root folder named 'MenuData'.
Tower!SE not to be used for real world training! Page 80

Assigning Parking Locations Airlines are assigned parking locations using a text file named <airport_name>-terminal.txt.
The code for assigning airlines is:
Terminal_X:AAA,BBB,CCC.DDD, . . .
• No spaces are entered in the data line.
• X is the terminal number.
• The terminal_X must match the terminal names entered into the 'terminal filter' window when creating the airport (see Road/route settings editor).
• AAA,BBB are the airlines' ICAO codes.
General aviation parking locations are also assigned in the <airport_name>-terminal.txt file. Use the
code GA as the 'airline' code.
Example: Terminal_GA:GA
• No spaces are entered in the data line.
• GA is entered into the 'terminal filter' window when creating the airport (see Road/route settings editor).
NOTE: the same airport name used to save the airport must be used for the terminal assignments file.
Example: Los_Angeles_Airport_terminal.txt is the parking assignment file for
Los_Angeles_Airport.afx
The completed airport parking assignments file is place in the Tower root folder named 'Airfields'.
Airport design recommendations:
Before releasing an airport first obtain permission to use all source images.
Double check your scaling settings. Failure to correctly set an airport's scale will result
incompiling errors and your work being lost.
Images length and heights should be 8 to 10,000 pixels by 8 to 10,000 pixels.
Use the minimum number of taxiways and control points that allow for realistic simulation
ofthe airport. Excessive airport detail will result in AI pilot taxi and control errors.
90-degree turns are acceptable as the planes will always make an arc turn.
Use real-world designations when naming runways, taxiways, terminals and
parkinglocations. In order to re-create the airfield it is recommended you collect the
appropriate real-world charts and reference material.
Tower!SE not to be used for real world training! Page 81

Schedule Editing Tower 2011 reads airline schedules, planes going from one airport to a different destination airport,
from a single text file named schedule.txt. Local traffic is read from a single text file named
gaandlocaltraffic.txt. You can modify, add or remove flights from these files using a text editor, such as
Microsoft's Notepad. The schedule files are in the Tower root folder named 'Databases'.
IMPORTANT: Make a backup of the schedule file before making any changes.
Airline schedules ( schedule.txt) - Each flight is defined on a single line reading left to right:
AAB, AAA, JT1, FT, 2995, 09:00, 21:30, 450, FT
• departure airport: enter the three-digit IATA code. The airport codes recognized by Tower are outlined in the airport.txt file located in the \databases folder. Additional information is also in the Airfield editor section of this manual.
• arrival airport: enter the three-digit IATA airport code.
• aircraft type: Tower only recognize the aircraft type codes listed in the Aircraft Identification Codes section of this manual.
• airline ID: enter the two-digit IATA airline code.
• flight number: must be a number no greater than four digits.
• arrival time = entry as HH:MM (hour:minute, 24 hour clock) in local time.
• departure time = entry as HH:MM (hour:minute, 24 hour clock) in local time.
• flight duration = minutes required to fly from departure to destination.
• codeshare airline ID = when a flight is being flown by a codeshare airline here is where you enter the mainline airline's IATA identifier. Codeshare flights use the callsign of the airline owning the plane, not the airline booking the flight. If the flight is serviced by the mainline carrier insert the same ID as was entered for 'airline ID'.
The IATA code listed at the end of the description is where the aircraft be parked at
the departure and arrival airports. See Airfield editor for information on how airline
parking is assigned.
NOTE: The airline codes recognized by Tower are listed in the Airline Identification Codes
section of this manual. Additional information is also in the Airplane editor section of this manual. NOTE: if you have an airline expansion pack installed the expanded ICAO codes may be used.
Tower!SE not to be used for real world training! Page 82

Local traffic schedule (gaandlocaltraffic.txt) - Each flight is defined on a single line reading left to right:
TIST, 23:00, JT1, TAB523, 0, 3, 0
• airport = enter the three-digit IATA code. The airport codes recognized by Tower are outlined in the airport.txt file located in the \databases folder. Additional information is also in the Airfield editor section of this manual.
• departure time = airport local time. Data entry must be XX:XX (hour:minute, 24 hour clock).
• aircraft type = Tower2011 only recognizes the aircraft types listed in the Aircraft Identification Codes section of this manual
• callsign = combination of letters and number being no greater than six digits.
• number of stop and goes to be conducted = number 0 to 9.
• number of touch and goes to be conducted = number 0 to 9.
• number of low approaches to be conducted = number 0 to 9.
When saving your modified airline or local traffic file be sure to save as a text (.txt) document
with ANSI encoding.
Schedule files are placed in the Tower root folder named 'Databases'.
Sharing a airline or local traffic package - You may only distribute a schedule or localtraffic file that contains traffic you have created.
Please review the beginning of the Tower editors section of this manual for details on how you
can share, or sell, traffic files.. You cannot re-distribute the schedule file contents included with
Tower 2011 (ie, default traffic). You can instruct others to either add your traffic to their
current files (ie, cut from your file and paste into the default Tower file).
IMPORTANT: Make a backup of the schedule or localtraffic files before making any changes.
Tower!SE not to be used for real world training! Page 83
Definitions
• Adequate Separation: Separation between two or more aircraft that presents each with operating space sufficient for safe navigation, commonly defined by the FAA or controlling authority.
• Air Traffic Control Handbook (FAAH 7110.65): The FAA publication that delineates the procedures to be used by FAA air traffic controllers when performing their duties.
• Anticipated Separation: A procedure whereby the controller issues instructions to two or more aircraft based on the presumption that they will remain separated.
• Apron: Airport parking for planes that are not loading or unloading passengers and cargo. Many airports refer to aprons as where aircraft are parked to undergo maintenance. At some locations aprons may also be called ramps.
• Data Block: An alphanumeric display on a radar presentation that normally includes the aircraft’s identity and altitude and may also include its ground speed and destination airport.
• Departure Control: A function of an approach control facility that provides air traffic control service to departing aircraft.
• Gate (airport): Location where aircraft load and unload passengers. Usually located at a terminal building.
• Gate (airfield editor): A point on a taxiway where aircraft must stop and wait for clearance before continuing to taxi (see hold short line). Location where aircraft load and unload passengers. Usually located at a terminal building.
• GMT: Greenwich Mean Time is also known as Coordinated Universal Time (UTC). GMT is the local time in Greenwich, England; the location of the Prime Meridian.
• Hold Short Line: a line drawn on an airport taxiway that a pilot will not cross without being given permission to taxi by the airport controller.
• Inactive Runways: Runways not declared active by the local controller. The responsibility of the ground controller.
• Initial Approach Fix (IAF): The fixes depicted on navigation charts that identify the beginning of the initial approach segment of an instrument approach procedure.
• Instrument Flight Rules (IFR): The rules that govern the conduct of aircraft during instrument flight.
• Instrument Landing System (ILS): A precision approach and landing aid that normally consists of a localizer, a glide slope, marker beacons and an approach light system.
• International Air Transportation Association (IATA): this organization of airlines works with national airspace governing groups to define safe airspace utilization. Airports working with IATA are given a three digit identification code.
• International Civil Aviation Organization (ICAO): a United States of America government agency responsible for developing and systems for safe navigation and air traffic control. Airports working with ICAO are given a four digit identification code.
Tower!SE not to be used for real world training! Page 84

• Knot (airfield editor): on-screen icon that defines the location of airport taxiways, runways, and control points.
• Knot (speed): the velocity that an aircraft is traveling. One knot equals 1.15 miles per hour or 1.85 kilometers per hour.
• Local Traffic: In Tower!SE these are planes that remain under the control of the tower controller and are not passed to Departure.
• Marker Beacon: An electronic navigation facility that transmits a low intensity coded signal, typically used as part of an instrument landing system.
• Minimum Descent Altitude (MDA): The lowest altitude to which descent is authorized during a non precision (ie. not an ILS approach) instrument approach procedure.
• Minimum En Route Altitude (MEA): The lowest published altitude between navigational fixes that provides both obstacle clearance and adequate navigation radio reception.
• Missed Approach Point (MAP): The point where the missed approach procedure will be flown by the pilot if the required visual references for landing do not exist.
• Non-Precision Approach: A standard instrument approach procedure in which no electronic glide path is provided.
• Ramp: The area of an airport where aircraft stop for fueling and passenger/cargo loading and unloading. Sometimes called an apron.
• Taxicar: A route type used to define a pathway/road for airport apron traffic to follow on the game's airport top-down view.
• Terminal Radar Approach Control (TRACON): the radar air traffic control facility associated with the control tower to provide aircraft with safe arrival and departure routings in the airport vicinity.
• Traffic (editor): A route type used to define a pathway/road for cars to follow on the city roads and driveways around the airport. Cars will be seen to 'drive' along the roads in the game's airport top-down view.
• UTC: Coordinated Universal Time is also known as Greenwich Mean Time (GMT). UTC is the local time in Greenwich, England; the location of the Prime Meridian.
• Visual Flight Rules (VFR): Rules that govern the procedures for conduction flight under visual conditions.
• Visual Separation: A means employed by controllers to separate aircraft in terminal areas. To utilize visual separation, either the controller or one of the pilots visually separates the involved aircraft.
Tower!SE not to be used for real world training! Page 85

Airport, Schedule, Airline and Aircraft Expansion Packs
Expansion packages for Tower!SE are available through the feelThere's ATC Suite and marketplace:
• http://www.atcsuite.com • http://www.feelThere.com
Tower!SE is fully expandable. Airlines change their schedules seasonly, combine, and new
companies provide new airport services. There are over 20,000 airports in the world, each has their
own controlling challenges.
The airline and aircraft packs will increase the realism of your controlling by adding real-world
callsigns and aircraft types.
Schedule packages provide new controlling traffic based on different times of year. Fictional packages
can challenge controllers with heavy traffic loads.
Airport expansions add new challenges based upon the each location's, runway alignments and terminal
locations. Fictional airports are fun because of their runway configurations and terminal locations.
Tower!SE not to be used for real world training! Page 86

CREDITS AND COPYRIGHT
Developed by:........................................................................feelThere – www.feelthere.com
Producer:................................................................................Victor Racz
Programing:............................................................................Marton Szucs
Manual:..................................................................................W. David Scobie
Aerial Airport Imagery:..........................................................Data available from U.S. Geological
Survey, EROS Data Center, Sioux
Falls, SD.
Published by:..........................................................................feelThere - www.feelthere.com
Airport history, descriptions and statistics use information collected from on-line sources
(including wikipedia.org. airport homepages, airnav.com, airwise.com, worldairportawards.com
and www.airports.org) and the development team’s personal experiences.
The descriptions of real-world air traffic control procedures and definitions come from: EUROCONTROL procedure documents, Federal Aviation Administration (USA) procedure documents.
Tower! by feelThere development team’s personal experiences.
Nolan, M.S. (2004). Fundamentals of air traffic control. (4th ed.). Belmont, CA : Brooks/Cole – Thomson Learning, Inc. Real-world experience of the design team.
All trademarks and brand names are trademarks or registered trademarks of the respective owners.
feelThere associated logos are registered trademarks.
Disclaimer: at the time of publication all information in this manual and links to external resources are
correct to the best of the development team’s knowledge.
This product is neither produced nor endorsed by another third party.
All photographs and graphics are owned by feelThere except as noted.
Tower!SE not to be used for real world training! Page 87

The airport charts included with this software are out-of-date and not to be used for real world
aviation. The TIST, KLAX and KMIA charts provided with this software are for entertainment
purposes only. The charts were published by the United State Federal Aviation Administration (FAA)
and are in the public domain and not copyright protected. The FAA does not endorse or recommend a
private industry product.
The use of this product is restricted to the private domain and for entertainment purposes only.. Usage
of this product for any professional or commercial activity is strictly forbidden. For professional use of
the product contact feelThere, Inc. at [email protected]
The code used in feelThere's products may under no circumstances be decompiled or used for any other
purposes without the expressed written permission of feelThere, Inc.
Additional responsibilities, restrictions and copyrights are outlined in the End User License
Agreement (EULA) provided when the software is installed.
2017 - ALL RIGHTS RESERVED
JSON PARSER:

/* * File JSON.cpp part of the SimpleJSON Library - http://mjpa.in/json * * Copyright (C) 2010 Mike Anchor * * Permission is hereby granted, free of charge, to any person obtaining a copy * of this software and associated documentation files (the "Software"), to deal * in the Software without restriction, including without limitation the rights * to use, copy, modify, merge, publish, distribute, sublicense, and/or sell * copies of the Software, and to permit persons to whom the Software is * furnished to do so, subject to the following conditions: * * The above copyright notice and this permission notice shall be included in * all copies or substantial portions of the Software. * * THE SOFTWARE IS PROVIDED "AS IS", WITHOUT WARRANTY OF ANY KIND, EXPRESS OR * IMPLIED, INCLUDING BUT NOT LIMITED TO THE WARRANTIES OF MERCHANTABILITY, * FITNESS FOR A PARTICULAR PURPOSE AND NONINFRINGEMENT. IN NO EVENT SHALL THE * AUTHORS OR COPYRIGHT HOLDERS BE LIABLE FOR ANY CLAIM, DAMAGES OR OTHER * LIABILITY, WHETHER IN AN ACTION OF CONTRACT, TORT OR OTHERWISE, ARISING FROM, * OUT OF OR IN CONNECTION WITH THE SOFTWARE OR THE USE OR OTHER DEALINGS IN * THE SOFTWARE. */ NanoJpeg // NanoJPEG -- KeyJ's Tiny Baseline JPEG Decoder // version 1.3.5 (2016-11-14) // Copyright (c) 2009-2016 Martin J. Fiedler <[email protected]> // published under the terms of the MIT license // // Permission is hereby granted, free of charge, to any person obtaining a copy // of this software and associated documentation files (the "Software"), to // deal in the Software without restriction, including without limitation the // rights to use, copy, modify, merge, publish, distribute, sublicense, and/or // sell copies of the Software, and to permit persons to whom the Software is // furnished to do so, subject to the following conditions: // // The above copyright notice and this permission notice shall be included in // all copies or substantial portions of the Software. // // THE SOFTWARE IS PROVIDED "AS IS", WITHOUT WARRANTY OF ANY KIND, EXPRESS OR // IMPLIED, INCLUDING BUT NOT LIMITED TO THE WARRANTIES OF MERCHANTABILITY, // FITNESS FOR A PARTICULAR PURPOSE AND NONINFRINGEMENT. IN NO EVENT SHALL THE // AUTHORS OR COPYRIGHT HOLDERS BE LIABLE FOR ANY CLAIM, DAMAGES OR OTHER // LIABILITY, WHETHER IN AN ACTION OF CONTRACT, TORT OR OTHERWISE, ARISING // FROM, OUT OF OR IN CONNECTION WITH THE SOFTWARE OR THE USE OR OTHER // DEALINGS IN THE SOFTWARE.
