controlling the bbc micro:bit using another bbc micro:bit … · click on ‘item’ and rename it...
TRANSCRIPT

First, head over to the BBC micro:bit website: http://microbit.org/ and click on the ‘Let’s Code’ button
Find the ‘JavaScript Blocks Editor (PXT)’ section and click on the ‘Let’s Code’ button
Click on ‘projects’ ‘new project…’
Controlling the BBC micro:bit using another BBC micro:bit as a remote control via PXT Radio activity

Next you will need to rename the project so it is easier to locate later in the activity
Get rid of all the blocks on the page, this can be done by dragging them to the left, over the tabs
First we need to create a bit of code for the buttons to work, Click on the ‘input’ tab, select the ‘on button A pressed’ block and drag it onto the blank page

Click on the ‘Variables’ tab, select the ‘set item to 0’ block and drag it in-between the ‘on button A pressed’ block
Click on ‘item’ and rename it to ‘Mode’, then change the ‘0’ to a ‘1’ – This is creating the variable and value for the micro:bit controller, this will be used later on.
Next, click on the ‘Input’ tab, select the ‘on button A pressed’ block and drag it onto the blank page, then change the ‘A’ to ‘B’
Click on the ‘Variables’ tab, select the ‘set item to 0’ block and drag it in-between the ‘on button B pressed’ block

Click on ‘item’ and change it to ‘Mode’, then change the ‘0’ to a ‘2’ - This is creating the variable and value for the micro:bit car , this will be used later on.
Next we need to create a failsafe, this is for when you don’t want the Robotic car to move when you put the other micro:bit down
Click on the ‘input’ tab, select the ‘on button A pressed’ block and drag it onto the blank page, then change the ‘A’ to ‘A+B’
Click on the ‘Variables’ tab, select the ‘set item to 0’ block and drag it in-between the ‘on button A+B pressed’ block
Click on ‘item’ and change it to ‘Mode’

Click on the ‘Radio’ tab, select the ‘radio send number 0’ block and drag it below the ‘set Mode to 0’ block, then change the ‘0’ to ‘5’
Next we will need to change to JavaScript to create a ‘radio on data received’ block, this is done by clicking on the JavaScript button at the top of the page
Next click on the ‘Radio’ tab, select the ‘onDataReceived(() => {})’ block
We now need to define two more variables, ‘LastDriveDirection’ and ‘DriveDirection’. To do this, click at the end of line 1, ‘let Mode = 0’, and press enter, then type ‘let LastDriveDirection = 0’, then press enter and type ‘let DriveDirection = 0’. (See lines 2 and 3 below)

Next click on line 15 and input ‘LastDriveDirection = DriveDirection’, this create a ‘set LastDriveDirection to DriveDirection’ block
Next, press enter and type ‘DriveDirection = radio.receiveNumber()’
Next we need to go back to the ‘blocks’ section, to do this, click on the ‘Blocks’ button at the top of the page
Click on the ‘Logic’ tab, select the ‘if’ statement and drag it underneath the ‘set DriveDirection to radio receive number’ block
Click on the ‘logic’ tab again, select the ‘ 0=0’ block and drag it to the right of the ‘if’ statement, replacing ‘true’

Click on the ‘Variables’ tab, select the ‘DriveDirection’ block, drag and snap it onto the first ‘0’
Click on the ‘Advanced’ tab and select the ‘pins’ tab. Select the ‘digital write pin’ block and drag it into the ‘then’ section of the if statement. Repeat three more times until you have four ‘digital write pins’ blocks
Now we need to change the pins so the program corresponds with our pin layout, to do this we need to change the ‘P0’ on all the blocks to ‘P13’ ‘P14’ ‘P15’ ‘P16’

Next we need to duplicate all the blocks in the ‘if’ statement, to do this right click on the ‘if’ statement and duplicate, then place the newly duplicated blocks underneath the first ‘if’ statement. Repeat this five more times to have a total of six ‘if’ statements – This gives you the base of the code needed.

Next we need to change the values of the previously duplicated blocks.
On the second ‘if’ statement change the ‘DriveDirection = 0’ to ‘DriveDirection = 1’ – this is creating an if statement with the value of 1, this is the first out of five values we will be creating (not including the value 0 we created earlier)

Then, change the ‘0’s to ‘0’ ‘1’ ‘1’ ‘0’ (in that order), Later on this will make the robotic car drive forward – this is due to when the code reads a ‘1’ it turns a pin on, and if certain pins are turned on at the same time it will make the car drive in a certain direction
On the third ‘if’ statement change the ‘DriveDirection = 0’ to ‘DriveDirection = 2’
Then, on the third ‘if’ statement change the ‘0’s to ‘0’ ‘1’ ‘0’ ‘1’ (in that order), later on this will make the robotic car turn right
On the fourth ‘if’ statement change the ‘DriveDirection = 0’ to ‘DriveDirection = 3’

Then, on the fourth ‘if’ statement change the ‘0’s to ‘1’ ‘0’ ‘0’ ‘1’ (in that order), later on this will make the robotic car go back
On the fifth ‘if’ statement change the ‘DriveDirection = 0’ to ‘DriveDirection = 4’
Then, on the fifth ‘if’ statement change the ‘0’s to ‘1’ ‘0’ ‘1’ ‘0’ (in that order), later on this will make the robotic car turn left
On the sixth ‘if’ statement change the ‘DriveDirection = 0’ to ‘DriveDirection = 5’. We leave the ‘0’s as they are as this block doesn’t send commands to the car

Click on the ‘Logic’ tab, select the ‘if’ statement and drag it underneath the final ‘if’ statement
Click on the ‘Logic’ tab, select the ‘0 = 0’ block and drag it onto the right of the ‘if’ statement
Next change the symbol from ‘=’ to ‘≠’. Then click on the ‘Variables’ tab, select the ‘DriveDirection’ block and drag it over the first ‘0’ – the ‘≠’ symbol means not equal to.
Click on the ‘Variables’ tab, select the ‘LastDriveDirection’ block and drag it over the ‘0’ on the ‘DriveDirection ≠ 0’ – this is creating an if statement saying that if ‘DriveDirection’ is not equal to ‘LastDriveDirection’ then it will run the commands below in the ‘then’ section
Click on the ‘Variables’ tab, select the ‘set item to 0’ block and drag it into the ‘then’ section of the ‘if’ statement

Click on ‘item’ and rename to ‘UpdateScreen’. Then change the ‘0’ to ‘1’
Now we need to create the code for the micro:bit controller to control the car.
Click on the ‘Basic’ tab, select the ‘Forever’ block and drag it onto the blank page
Click no the ‘logic’ tab, select the ‘if’ statement and drag it in-between the ‘forever’ block
Click on the ‘Logic’ tab, select the ‘0 = 0’ block and drag it to the right of the ‘if’ statement
Click on the ‘Variables’ tab, select the ‘Mode’ variable and drag it over the first ‘0’. Then change the second ‘0’ to ‘1’

Click on the ‘Variable’ tab, select the ‘set item to’ block and drag it to the ‘then’ section of the ‘if’ statement. Repeat this twice to create three ‘set item to’ blocks, then place it underneath the first ‘set item to’ block.
Click on the first ’set item to 0’ block and rename ‘item’ to ‘xSpeed’
Click on the Second ’set item to 0’ block and rename ‘item’ to ‘ySpeed’
Click on the third ’set item to 0’ block and rename ‘item’ to ‘LastDirection’ – the above three stages create three variables that are used to determine the speed and direction of the Robotic car

Next click on the ‘Input’ tab, select the ‘acceleration (mg)’ block and drag it to the right of the ‘set xSpeed to’ block. Repeat this for the ‘set ySpeed to’ block but change the ‘x’ on the ‘acceleration (mg)’ block to ‘y’
Click on the ‘Variables’ tab, select the ‘item’ block and drag it to the right of the ‘set LastDirection to’ block. Then rename ‘item’ to ‘direction’
Click on the ‘Logic’ tab, select the second ‘if’ statement and drag it underneath the ‘set LastDirection to direction’ block, making sure that it is enclosed in the first ‘if’ statement

Click on the ‘Logic’ tab, select the ‘0 < 0’ block and drag it to the right of the second ‘if’ statement. Then change the ‘<’ symbol to ‘>’
Click on the ‘Variables’ tab, select the ‘xSpeed’ variable and drag it over the first ‘0’ on the ‘0 > 0’ block. Then change the second ‘0’ to ‘300’
Click on the ‘Variables’ tab, select the ‘set item to’ block and drag it into the ‘then’ section of the second ‘if’ statement
Click on ‘item’ and change it to ‘direction’. Then change ‘0’ to ‘2’

Click on the ‘Logic’ tab, select the second ‘if’ statement and place it in the ‘else’ section of the second ‘if’ statement
Right click on the ‘xSpeed > 300’ block, duplicate it and drag to the right of the third ‘if’ statement
On the previously duplicated blocks, change the ‘>’ symbol back to ‘<’ and change ‘300’ to ‘-300’
Click on the ‘Variables’ tab, select the ‘set item to’ block and drag it into the ‘then’ section of the third ‘if’ statement

Click on ‘item’ and change it to ‘direction’. Then change ‘0’ to ‘4’
Click on the ‘Logic’ tab, select the second ‘If’ statement and drag it into the ‘else’ section of the third ‘if’ statement
Right click on the ‘xSpeed < -300’ blocks from the third ‘If’ statement, then duplicate and place to the right of the fourth ‘if’ statement

Click on ‘xSpeed’, located in the fourth ‘if’ statement, and change it to ‘ySpeed’
Click on the ‘Variables’ tab, select the ‘set item to’ block and drag it into the ‘then’ section of the fourth ‘if’ statement
Click on ‘item’ and change it to ‘direction’. Then change ‘0’ to ‘1’

Click on the ‘Logic’ tab, select the second ‘If’ statement and drag it into the ‘else’ section of the fourth ‘if’ statement
Click on the ‘Logic’ tab, select the ‘0 < 0’ block and drag it onto the right of the fourth ‘if’ statement
Click on the ‘Variables’ tab, select the ‘ySpeed’ block and drag it over the first ‘0’ in the ‘0 < 0’ block
Replace the ‘<’ symbol click on the symbol and a selection of choices will appear, select the ‘>’ symbol. Then change the ‘0’ to ‘300’

Click on the ‘Variables’ tab, select the ‘set item to’ block and drag it into the ‘then’ section of the fifth ‘if’ statement
Click on ‘item’ and change it to ‘direction’. Then change ‘0’ to ‘3’
Duplicate the ‘set direction to 3’ block and place it in the else section, then replace the ‘3’ with a ‘0’
Click on the ‘Radio’ tab, select the ‘radio send number’ block and place it underneath the second ‘if’ statement

Click on the ‘Variables’ tab, select the ‘direction’ block and drag it over the ‘0’ in the ‘radio send number’ block
Click on the ‘Logic’ tab, select the ‘if’ statement and drag it underneath the ‘radio send number direction’ block
Click on the ‘Logic’ tab, select the ‘0 = 0’ block and drag it onto the right of the ‘if’ statement. Then change the ‘=’ symbol to ‘≠’
Click on the ‘Variables’ tab, select the ‘direction’ block and drag it over the first ‘0’ in the ‘0 ≠ 0’ block. Then click on the ‘Variables’ tab again, select the ‘LastDirection’ block and drag it over the second ‘0’

Click on the ‘Variables’ tab, select the ‘set item to’ block and drag it into the ‘then’ section of the ‘if’ statement
Click on ‘item’ from ‘set item to’ and rename to ‘updateScreen’. Then change the ‘0’ to ‘1’
Click on the ‘Basic’ tab, select the ‘pause’ block and drag it underneath the ‘if’ statement. Then change the ‘100’ to ‘10’ – this changes the delay in time (ms)
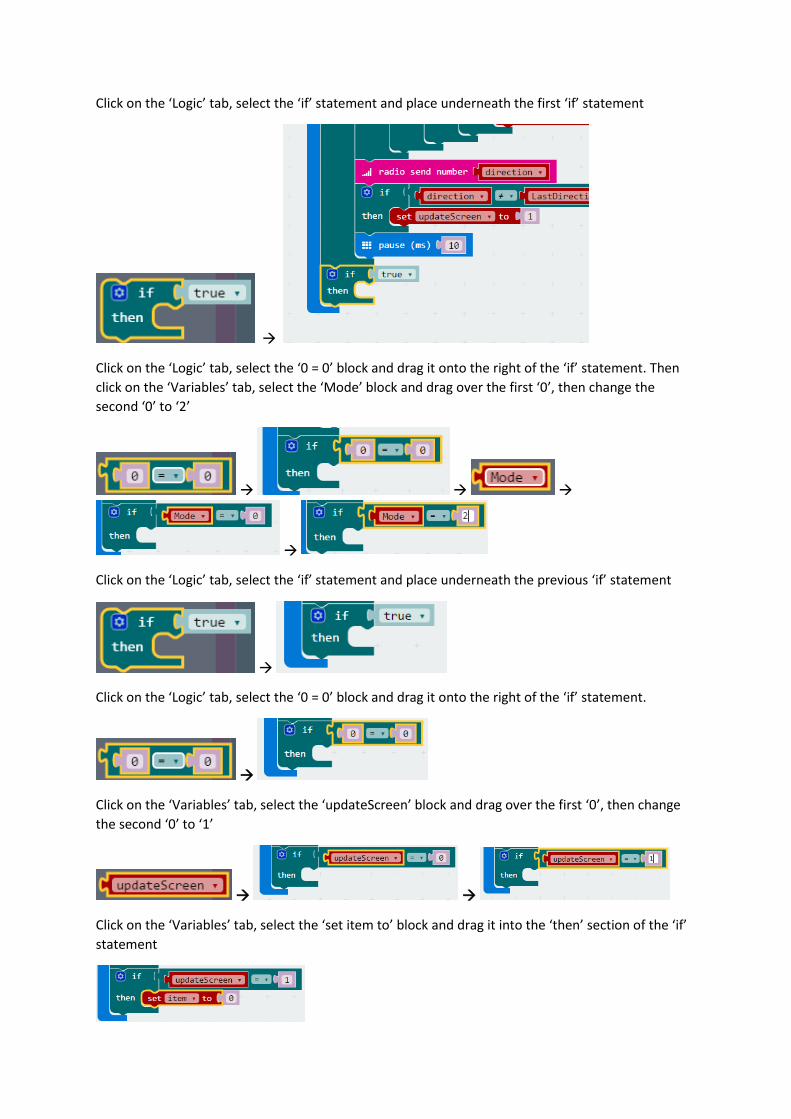
Click on the ‘Logic’ tab, select the ‘if’ statement and place underneath the first ‘if’ statement
Click on the ‘Logic’ tab, select the ‘0 = 0’ block and drag it onto the right of the ‘if’ statement. Then click on the ‘Variables’ tab, select the ‘Mode’ block and drag over the first ‘0’, then change the second ‘0’ to ‘2’
Click on the ‘Logic’ tab, select the ‘if’ statement and place underneath the previous ‘if’ statement
Click on the ‘Logic’ tab, select the ‘0 = 0’ block and drag it onto the right of the ‘if’ statement.
Click on the ‘Variables’ tab, select the ‘updateScreen’ block and drag over the first ‘0’, then change the second ‘0’ to ‘1’
Click on the ‘Variables’ tab, select the ‘set item to’ block and drag it into the ‘then’ section of the ‘if’ statement

Click on ‘item’ and change it to ‘updateScreen’
Click on the ‘Logic’ tab, select the ‘if’ statement and place underneath the ‘set updateScreen to 0’ block
Click on the ‘Logic’ tab, select the ‘0 = 0’ block and drag it onto the right of the ‘if’ statement. Then click on the ‘Variables’ tab, select the ‘Mode’ block and drag over the first ‘0’
Click on the ‘Basic’ tab, select the ‘show leds’ block and drag it into the ‘then’ section of the ‘if’ statement, repeat this again so you have a total of two ‘show leds’ blocks

Now create a pattern, using the tick boxes – each box represents one led light on the micro:bit
Click on the ‘Variables’ tab, select the ‘set item to’ block and drag it underneath the two ‘show leds’ blocks, then click on ‘item’ and change it to ‘updateScreen’ and change to ‘0’ to ‘1’
Click on the ‘Logic’ tab, select the ‘if’ statement and place underneath the previously placed ‘if’ statement

Click on the ‘Logic’ tab, select the ‘0 = 0’ block and drag it onto the right of the ‘if’ statement. Then click on the ‘Variables’ tab, select the ‘Mode’ block and drag over the first ‘0’ then change the ‘0’ to ‘1’
Click on the ‘Logic’ tab, select the ‘if’ statement and place it in the ‘then’ section of the previous ‘if’ statement
Click on the ‘Logic’ tab, select the ‘0 = 0’ block and drag it onto the right of the ‘if’ statement. Then click on the ‘Variables’ tab, select the ‘direction’ block and drag over the first ‘0’
Click on the ‘Basic’ tab, select the ‘show leds’ block and drag it into the ‘then’ section of the ‘if’ statement. Then make a pattern to show that the micro:bit is not sending commands to the robotic car

Duplicate the whole previous ‘if’ statement and place it underneath
Change the ‘0’ from the ‘direction = 0’ block to ‘1’, then change the ‘show leds’ block to display an arrow pointing up
Duplicate the whole previous ‘if’ statement and place it underneath
Change the ‘1’ from the ‘direction = 1’ block to ‘2‘, then change the ‘show leds’ block to display an arrow pointing right

Duplicate the whole previous ‘if’ statement and place it underneath
Change the ‘2’ from the ‘direction = 2’ block to ‘3‘, then change the ‘show leds’ block to display an arrow pointing down
Duplicate the whole previous ‘if’ statement and place it underneath

Change the ‘3’ from the ‘direction = 3’ block to ‘4‘, then change the ‘show leds’ block to display an arrow pointing left
Click on the ‘Logic’ tab, select the ‘if’ statement and drag it underneath the second ‘if’ statement
Click on the ‘Logic’ tab, select the ‘0 = 0’ block and drag it onto the right of the ‘if’ statement. Then click on the ‘Variables’ tab, select the ‘Mode’ block and drag over the first ‘0’, then change the second ‘0’ to ‘2’

Click on the ‘Logic’ tab, select the ‘if’ statement and drag it into the ‘then’ section of the pervious ‘if’ statement
Click on the ‘Logic’ tab, select the ‘0 = 0’ block and drag it onto the right of the ‘if’ statement. Then click on the ‘Variables’ tab, select the ‘DriveDirection’ block and drag over the first ‘0’
Click on the ‘Basic’ tab, select the ‘show leds’ block and drag it into the ‘then’ section of the ‘if’ statement. Then, using the individual tick boxes, create an unhappy face
Right click and duplicate the whole previous ‘if’ statement and place it underneath

Change the ‘0’ from the ‘DriveDirection = 0’ block to ‘1‘, then change the ‘show leds’ block to display an arrow pointing up
Right click and duplicate the whole previous ‘if’ statement and place it underneath
Change the ‘1’ from the ‘DriveDirection = 1’ block to ‘2‘, then change the ‘show leds’ block to display an arrow pointing right
Right click and duplicate the whole previous ‘if’ statement and place it underneath

Change the ‘2’ from the ‘DriveDirection = 2’ block to ‘3‘, then change the ‘show leds’ block to display an arrow pointing down
Right click and duplicate the whole previous ‘if’ statement and place it underneath
Change the ‘3’ from the ‘DriveDirection = 3’ block to ‘4‘, then change the ‘show leds’ block to display an arrow pointing left
Next we need to create a ‘on start’ block – this is needed so the programmed LEDS from the previously are shown on the screen when the micro:bit turns on
Click on the ‘Basic’ tab, select the ‘on start’ block and drag it onto a blank section of the page

Click on the ‘Variables’ tab, select the ‘set item to’ block and drag it inside the ‘on start’ block
Click on ‘item’, this will bring a dropdown menu up, select ‘updateScreen’
Change the ‘0’ from the ‘set updateScreen to 0’ block to ‘1’
You now will have all the code you need to control the 4WD robotic car kit with two micro:bits
NOTE:- the file needs to be flashed onto both micro:bits for the code to work, it doesn’t matter witch micro:bit is in the car or in the Binary holder.
1. If button A is pressed - Sets micro:bit in remote control mode (Press A one the micro:bit you use to control the car)
2. If button B is pressed - Sets micro:bit in car control mode (press B on the micro:bit placed in the breakout board on the robotic car)
3. If buttons A + B are pressed - Enter standby mode. (to avoid the car driving while waiving the controller around). After pressing A+B you have to press the buttons as described above on both micro:bits.