geomap.wa cookbook · cookbook . add various ingredients for . a mouth watering display . table of...
TRANSCRIPT
GeoMap.WA cookbook
Add various ingredients for
a mouth watering display

Table of Contents
Table of Contents ......................................................................................................... 2
Exercise 1: Download from the Data and Software Centre ........................................................ 1
Ingredients ............................................................................................................... 1
Method .................................................................................................................... 1
Exercise 2: Load Live and Pending Tenements ....................................................................... 3
Ingredients ............................................................................................................... 3
Method .................................................................................................................... 3
Exercise 3: Load 1:250 000 Topographic Image ...................................................................... 5
Ingredients ............................................................................................................... 5
Method .................................................................................................................... 5
Exercise 4: Load 1:250 000 Geology Mosaic Image .................................................................. 7
Ingredients ............................................................................................................... 7
Method .................................................................................................................... 7
Optional ..................................................................................................................... 8
Exercise 5: Search By Area ............................................................................................ 10
Ingredients ............................................................................................................. 10
Method .................................................................................................................. 10
Exercise 6: Search By Text Value ..................................................................................... 12
Ingredients ............................................................................................................. 12
Method 1: Search by Find Feature ................................................................................. 12
Method 2: Search by Data Query ................................................................................... 13
Exercise 7: Changing Layer Properties............................................................................... 16
Ingredients ............................................................................................................. 16
Method .................................................................................................................. 16
Exercise 8: Making a print ............................................................................................. 22
Ingredients ............................................................................................................. 22
Method .................................................................................................................. 22
Version 2.0
1
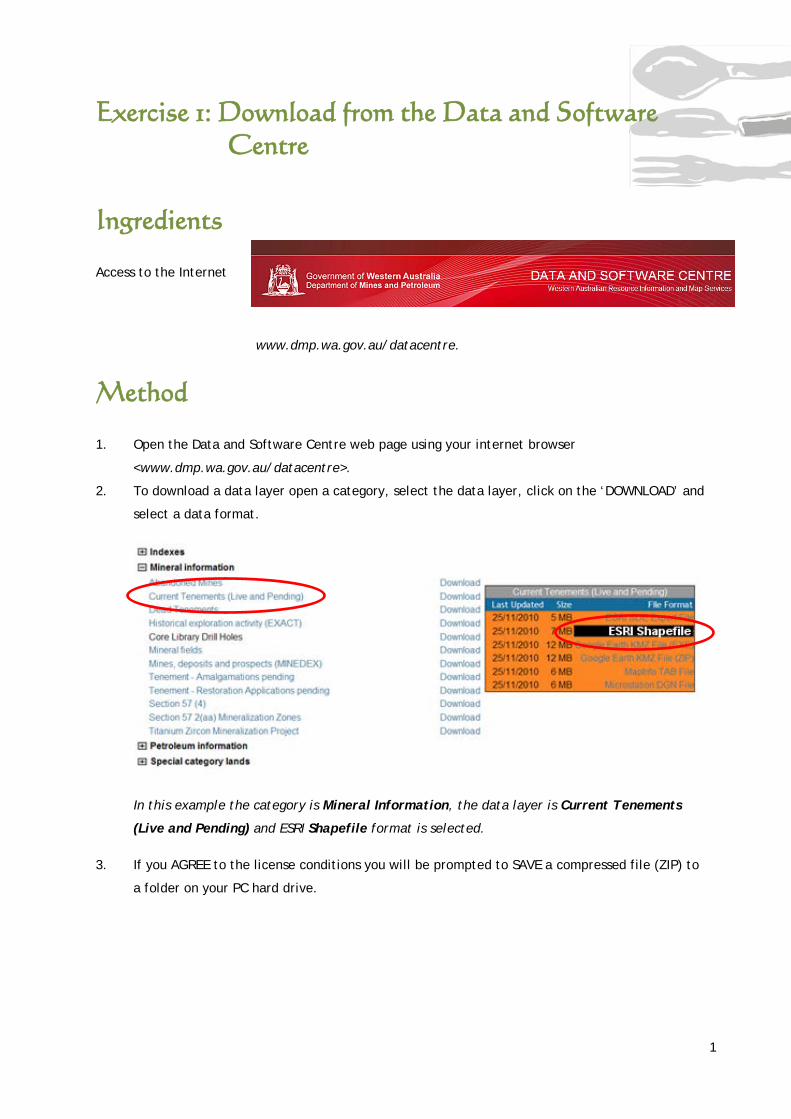
Exercise 1: Download from the Data and Software Centre
Ingredients
Access to the Internet
www.dmp.wa.gov.au/datacentre.
Method
1. Open the Data and Software Centre web page using your internet browser
<www.dmp.wa.gov.au/datacentre>.
2. To download a data layer open a category, select the data layer, click on the ‘DOWNLOAD’ and
select a data format.
In this example the category is Mineral Information, the data layer is Current Tenements
(Live and Pending) and ESRI Shapefile format is selected.
3. If you AGREE to the license conditions you will be prompted to SAVE a compressed file (ZIP) to
a folder on your PC hard drive.

2
In this example current tenements (tenements.zip) is to be saved to the hard drive.
4. The next step is to uncompress the ZIP file by copying the contents into a folder. First
double click on the ZIP file to open it to see the contents. Then copy the files into a
folder.
In this example tenements.ZIP has been opened to allow the contents to be copied into
a folder.
5. The data layer files are now in a folder and be loaded into GeoMap.WA (see Section 6.6
in the GeoMap.WA user guide).

3
Exercise 2: Load Live and Pending Tenements
Ingredients
GeoMap.WA
Live and pending tenements data
layer
An updated tenements file can be downloaded from Data and Software Centre. See page 1
Method
1. Open a new Project in GeoMap.WA
2. Click ADD DATA
If a vector dataset does not include coordinate system information
that GeoMap.WA can interpret you will be prompted with a
message. See Section 6.6 of the GeoMap.WA user guide for more
details.
3. Browse to the ‘tenement.shp’ spatial data file on your PC. See page 1 for Download from Data
and Software Centre recipe.
Click on the file name and click OPEN

4
4. The tenement data layer is now loaded into GeoMap.WA (for more details see Section 6.6
in the GeoMap.WA user guide).
5. To remove tenement data layer from a project right-click on the layer name in the Legend. Click
on Remove Layer from the menu that pops up

5
Exercise 3: Load 1:250 000 Topographic Image
Ingredients
GeoMap.WA
1:250 000 topographic image
An updated image can be downloaded from Data and Software Centre. See page 1
Method
6. Open a new Project in GeoMap.WA
7. Click ADD DATA
If a raster dataset does not include coordinate system information that GeoMap.WA can
interpret you will be prompted with a message. See Section 6.6 of the GeoMap.WA user
guide for more details.
8. Browse to the ‘250K_topographic.ecw’ image data file on your PC. See Exercise 1: Download
from Data and Software Centre on page 1.
Click on the file name and click OPEN
9. The 1:250 000 topographic image data layer is now loaded into GeoMap.WA (for more
details see Section 6.6 in the GeoMap.WA user guide).

6
10. To remove the 1:250 000 topographic image data layer from a project right-click on the layer
name in the [Legend]. Click on [Remove Layer] from the menu that pops up

7
Exercise 4: Load 1:250 000 Geology Mosaic Image
Ingredients
GeoMap.WA
1:250 000 geology mosaic image
Live and pending tenements data
layer
Updated versions of these can be downloaded from Data and Software Centre. See page 1
Method
1. Open a new Project in GeoMap.WA
2. Click ADD DATA
If a raster dataset does not include coordinate system information that GeoMap.WA can
interpret you will be prompted with a message. See Section 6.6 of the GeoMap.WA user guide
for more details.
3. Browse to the ‘gsdWA_lat250K_geology.ecw’ image data file on your PC. See page 1 for
Download from Data and Software Centre recipe.
Click on the file name and click OPEN
8
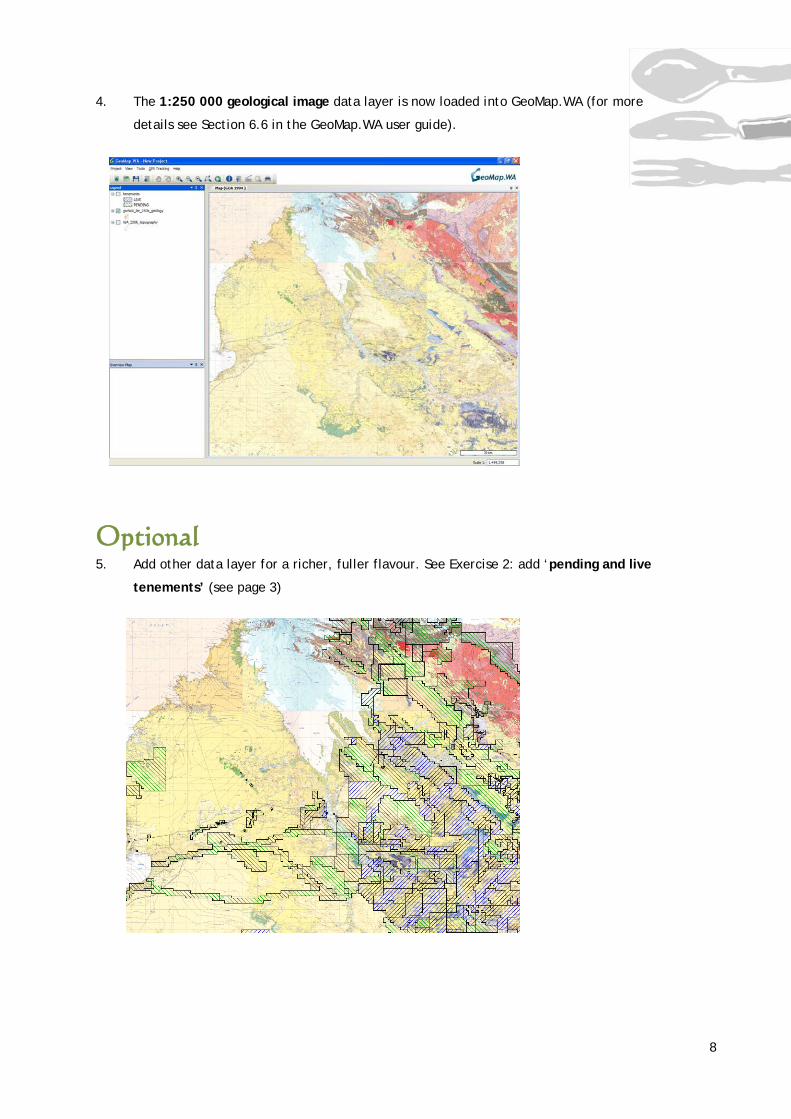
4. The 1:250 000 geological image data layer is now loaded into GeoMap.WA (for more
details see Section 6.6 in the GeoMap.WA user guide).
Optional 5. Add other data layer for a richer, fuller flavour. See Exercise 2: add ‘pending and live
tenements’ (see page 3)

9
11. To remove 1:250 000 geological image or pending and live tenements data layer from a
project right-click on the layer name in the Legend. Click on Remove Layer from the menu that
pops up

10
Exercise 5: Search By Area
Ingredients
GeoMap.WA
Live and pending tenements data
layer
An updated tenements file can be downloaded from Data and Software Centre. See page 1
Method
1. Load the tenement data layer into GeoMap.WA (for details see Exercise 2, page 3 or Section 6.6
in the GeoMap.WA user guide).
2. Click on IDENTIFY
IDENTIFY displays information about selected map features.
3. Draw the cursor over the specific map feature you want identified. By default the information
displayed will be about features from the active layer.

11
In this example, the area search will return
results from the Tenements, Live and
Pending that that overlap
4. Click on a record to display details in the table on the right. When you click on a new site in the
left-hand panel, its location will be highlighted briefly on the map in blue. Right click on the
record to zoom to its location in map panel.
5. Use the EXPORT To CSV to save the results of the search to a file.
For more details see Section 9.5 of the GeoMap.WA user guide

12
Exercise 6: Search By Text Value
Ingredients
GeoMap.WA
Live and pending tenements data layer
An updated tenements file can be downloaded from Data and Software Centre. See page 1
1. Load the tenement data layer into GeoMap.WA (for details see Exercise 2, page 3 or Section 6.6
in the GeoMap.WA user guide).
Method 1: Search by Find Feature
2 Click on FIND FEATURE

13
Find Feature button allows you to do a text search across a layer or multiple layers.
To find a feature add the text into Search For. In this example ‘pop’ is entered. Note: Anything
containing the text ‘pop’ will be selected even if it is only part of the text.
Then select the layer or layers to search. In this example the active layer is selected
The search results in two features. Note the text ‘pop’ is in the field ADDR1.
You can limit the search to a particular field by click on Search only this field
Method 2: Search by Data Query
Click on DATA QUERY
Data query button opens a dialogue that helps you create a query to find and display information
about features.

14
2. To set up a query
• To select the data Layer, click the arrow beside the Layer: field to display the available
layers and then choose a layer to query. In this example Tenements is selected
• To select a data source, click the arrow beside the Select a data source: to display a list
of available fields for the chosen layer will be displayed. In this example Main is
selected.
• Double-click on the field you want to query. The field name will be added to the [Select
* from Main (Attribute Table) Where]. The range of possible values for that field will be
displayed beside the function icons. In this example HOLDER1 is selected.
• Single-click the function icon to build the query. The function will be added to the
[Select * from Main (Attribute Table) Where]. In this example “=” is selected.
• Next double-click the value you are querying against. In this example Abbotts
Exploration PTY LTD is selected.
The complete query is now built and displayed in the [Select * from Main (Attribute Table) Where]. In
this example HOLDER1 = “ABBOTTS EXPLORATION PTY LTD” is selected
3. Click OK to execute the text query.

15
In this example four results are returned.
4. Click on a record to display details in the table on the right. When you click on a new site in the
left-hand panel, its location will be highlighted briefly on the map in blue. Right click on the
record to zoom to its location.in map panel.
6. Use the EXPORT To CSV to save the results of the search to a file.
For more details see Section 9.5 of the GeoMap.WA user guide

16
Exercise 7: Changing Layer Properties
Ingredients
GeoMap.WA
Live and pending tenements data
layer
An updated tenements file can be downloaded from Data and Software Centre. See page 1
Method
1. Load the tenement data layer into GeoMap.WA (for details see Exercise 2, page 3 or Section 6.6
in the GeoMap.WA user guide).
2. Double-click or right click a layer name and select Layer Properties to open the Layer
Properties dialogue box.
Layer property settings are different between vector and raster datasets (much more limited for raster
datasets).
17
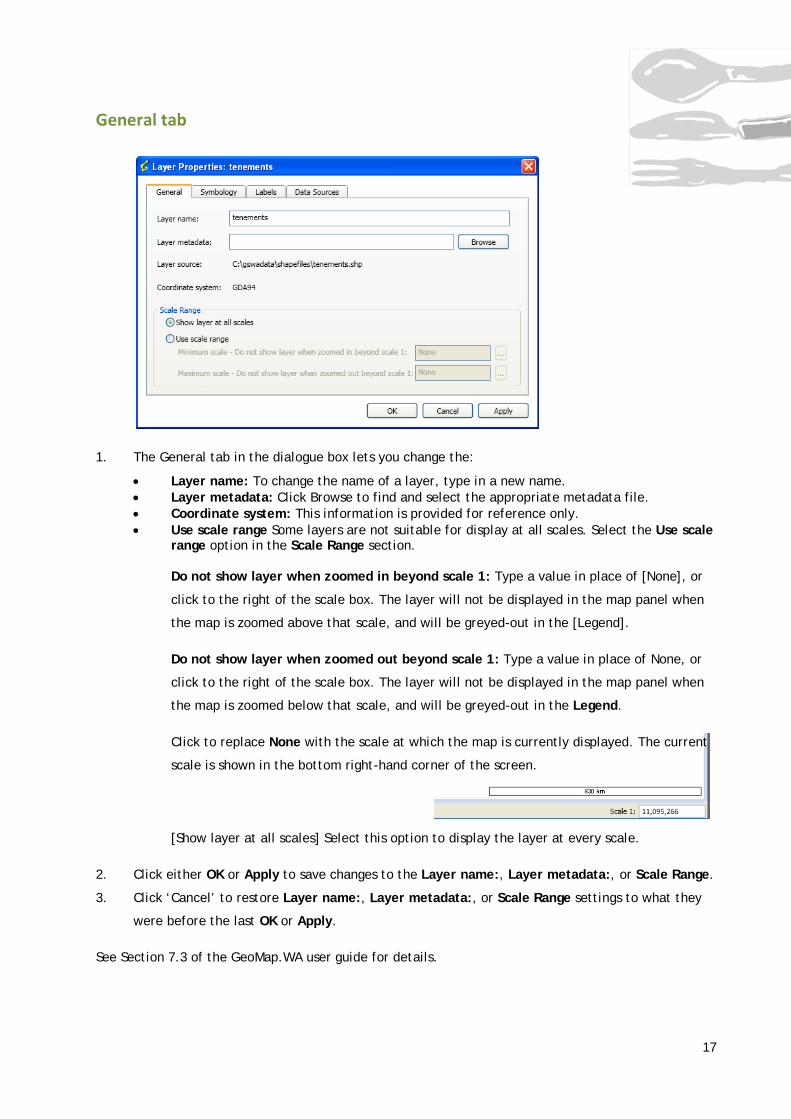
General tab
1. The General tab in the dialogue box lets you change the:
• Layer name: To change the name of a layer, type in a new name. • Layer metadata: Click Browse to find and select the appropriate metadata file. • Coordinate system: This information is provided for reference only. • Use scale range Some layers are not suitable for display at all scales. Select the Use scale
range option in the Scale Range section.
Do not show layer when zoomed in beyond scale 1: Type a value in place of [None], or
click to the right of the scale box. The layer will not be displayed in the map panel when
the map is zoomed above that scale, and will be greyed-out in the [Legend].
Do not show layer when zoomed out beyond scale 1: Type a value in place of None, or
click to the right of the scale box. The layer will not be displayed in the map panel when
the map is zoomed below that scale, and will be greyed-out in the Legend.
Click to replace None with the scale at which the map is currently displayed. The current
scale is shown in the bottom right-hand corner of the screen.
[Show layer at all scales] Select this option to display the layer at every scale.
2. Click either OK or Apply to save changes to the Layer name:, Layer metadata:, or Scale Range.
3. Click ‘Cancel’ to restore Layer name:, Layer metadata:, or Scale Range settings to what they
were before the last OK or Apply.
See Section 7.3 of the GeoMap.WA user guide for details.

18
Symbology tab
Single symbol
The Symbology tab lets you change the layers symbology. The default setting is Single symbol for
newly added datasets.
1. To change the symbology click on the colour square, in this case ‘blue’.
2. Change the colour fill by clicking on Colour: and selecting a colour

19
3. To change the outline colour click on the Outline: and select line symbol and colour
In this example the line style is ‘solid line’ and the colour is black
See Section 7.3 of the GeoMap.WA user guide for details.
Unique values
1. To display distinct values or features as different symbols, select the Unique values option. If
there are too many values for the available colour and symbol variations, you will receive a
message like the one below.
Message displayed when there are too many values to be symbolized
2. To display different symbols for features in a layer, select Unique values, and then select
Field:, Colour palette:, and Transparency.

20
In this example Unique values has been selected using the Field ‘TENSTATUS’. Values for this
are only ‘LIVE’ and ‘PENDING’. A diagonal line, blue left and green right, has been applied. No
transparency has been set.
3. Settings apply to the whole layer and all the symbols in the layer,
4. Click Apply or OK to save the new settings, or Cancel to return to the original settings.
See Section 7.3 of the GeoMap.WA user guide for details.
Labels tab
The Labels tab in the dialogue box lets you display a Label features in this layer
1. Click in the Labels field: to choose the field to be labelled. In this example FMT_TENID, the
formatted tenement identifier, has been selected.
2. The values in this field will be used to label features. This dialogue box also allows you to modify
the Labels font and Font colour, and choose whether to apply a Halo effect and Halo colour to
labels. In this example ARIAL, regular, 10 point has been selected.

21
See Section 7.3 of the GeoMap.WA user guide for details.
Data sources tab
The linking of external data sources is complex. See Section 7.3 page 23 of the GeoMap.WA user guide
for details.
Select this option to add labels to the map
Click arrow to display a list of features
that can be labelled
Use these options to control the appearance of the labels

22
Exercise 8: Making a print
Ingredients
GeoMap.WA
Live and pending tenements data
layer
Updated versions of these can be downloaded from Data and Software Centre. See page 1
Method
1. Load the tenement data layer into GeoMap.WA (for details see Exercise 2, page 3 or Section 6.6
in the GeoMap.WA user guide).
In this example the tenements have been symbolized on unique value ‘TenStatus’. See Exercise
6 for more details.
2. Click on the Print Button
The Print button prints the map as it is currently displayed in the main map panel.
3. Click the Print button to open the print window, which allows you to choose the Paper Size:,
Orientation:, and Header: and Footer: text. Tick Display date to show the date on the
printout.

23
In this example the page size is A4 and orientation is portrait.
4. Click OK to view a print preview with title, date, time, scale, and north arrow.

24
5. The preview has buttons for controlling the way the map is displayed.
Increase size of content
Display 100% Whole page
Two pages
Decrease size of content
Page width