cool pix camera manual aw100en_manual
TRANSCRIPT

7/28/2019 Cool Pix Camera Manual AW100EN_Manual
http://slidepdf.com/reader/full/cool-pix-camera-manual-aw100enmanual 1/242
En
Reerence Manual
DIGITAL CAMERA

7/28/2019 Cool Pix Camera Manual AW100EN_Manual
http://slidepdf.com/reader/full/cool-pix-camera-manual-aw100enmanual 2/242
Trademark Information
• Microsoft, Windows and Windows Vista are either registered trademarks or
trademarks of Microsoft Corporation in the United States and/or other countries.
• Macintosh, Mac OS, and QuickTime are trademarks of Apple Inc., registered in the
U.S. and other countries. The iFrame logo and the iFrame symbol are trademarks
of Apple Inc.• Adobe and Acrobat are registered trademarks of Adobe Systems Inc.
• SDXC, SDHC and SD Logos are trademarks of SD-3C, LLC.
• PictBridge is a trademark.
• HDMI, logo and High-Definition Multimedia Interface are
trademarks or registered trademarks of HDMI Licensing LLC.
• All other trade names mentioned in this manual or the other documentation
provided with your Nikon product are trademarks or registered trademarks of
their respective holders.
AVC Patent Portfolio License
This product is licensed under the AVC Patent Portfolio License for the personal and
non-commercial use of a consumer to (i) encode video in compliance with the AVC
standard (“AVC video”) and/or (ii) decode AVC video that was encoded by a
consumer engaged in a personal and non-commercial activity and/or was
obtained from a video provider licensed to provide AVC video. No license is granted
or shall be implied for any other use. Additional information may be obtained fromMPEG LA, L.L.C.
See http://www.mpegla.com.

7/28/2019 Cool Pix Camera Manual AW100EN_Manual
http://slidepdf.com/reader/full/cool-pix-camera-manual-aw100enmanual 3/242
i
Introduction
Parts of the Camera and Basic Operations
The Basics of Shooting and Playback
Shooting Features
Playback Features
Recording and Playing Back Movies
Using GPS/Displaying Maps
General Camera Setup
Reference Section
Technical Notes and Index

7/28/2019 Cool Pix Camera Manual AW100EN_Manual
http://slidepdf.com/reader/full/cool-pix-camera-manual-aw100enmanual 4/242
ii
I nt r od uc t i on
Introduction
Read This First
Thank you for purchasing the Nikon COOLPIX AW100 digital camera.
Before using the camera, please read the information in “For Your Safety” (Avi) and
“<Important> Shockproof, waterproof, dustproof, condensation, GPS/digital
compass“ (Axi), and familiarize yourself with the information provided in thismanual. After reading, please keep this manual handy and refer to it to enhance
your enjoyment of your new camera.
Confirming the Package ContentsIn the event that any items are missing, please contact the store where you
purchased the camera.
* Shape of power cable depends on country of use.
NOTES:
• Accessories are not waterproof.
• A memory card is not included with the camera.
COOLPIX AW100Digital Camera
Camera strap for land use Rechargeable Li-ion BatteryEN-EL12
(with terminal cover)
Battery Charger MH-65(with power cable)*
Filter Adapter UR-E23(with cord)
USB Cable UC-E6
Audio Video Cable EG-CP16 ViewNX 2 Installer CD Reference Manual CD
• Warranty

7/28/2019 Cool Pix Camera Manual AW100EN_Manual
http://slidepdf.com/reader/full/cool-pix-camera-manual-aw100enmanual 5/242
iii
Read This First
I n t r o d u c t i on
About This ManualIf you want to start using the camera right away, see “ The Basics of Shooting and
Playback ” (A15).
To learn about the parts of the camera and basic operations, see “Parts of theCamera and Basic Operations” (A1).
Other Information
• Symbols and Conventions To make it easier to find the information you need, the following symbols andconventions are used in this manual:
• SD, SDHC and SDXC memory cards are referred to as “memory cards” in this manual.• The setting at the time of purchase is referred to as the “default setting.”
• The names of menu items displayed in the camera monitor, and the names of buttons or messages displayed on a computer monitor appear in bold.
• In this manual, images are sometimes omitted from monitor display samples sothat monitor indicators can be more clearly shown.
• Illustrations and monitor content shown in this manual may differ from theactual product.
Icon Description
B This icon indicates cautions and information that should be read beforeusing the camera.
C This icon marks notes, information that should be read before using thecamera.
A / E / F These icons indicate other pages containing relevant information;E: “Reference Section”,F: “ Technical Notes and Index.”

7/28/2019 Cool Pix Camera Manual AW100EN_Manual
http://slidepdf.com/reader/full/cool-pix-camera-manual-aw100enmanual 6/242
iv
Read This First
I nt r od uc t i on
Information and Precautions
Life-Long Learning
As part of Nikon’s “Life-Long Learning” commitment to ongoing product support and education,
continually updated information is available online at the following sites:
• For users in the U.S.A.: http://www.nikonusa.com/
• For users in Europe and Africa: http://www.europe-nikon.com/support/
• For users in Asia, Oceania, and the Middle East: http://www.nikon-asia.com/
Visit these sites to keep up-to-date with the latest product information, tips, answers to frequently
asked questions (FAQs), and general advice on digital imaging and photography. Additional
information may be available from the Nikon representative in your area. Visit the site below for
contact information:
http://imaging.nikon.com/
Use Only Nikon Brand Electronic Accessories
Nikon COOLPIX cameras are designed to the highest standards and include complex electronic
circuitry. Only Nikon brand electronic accessories (including battery chargers, batteries, and AC
adapters) certified by Nikon specifically for use with this Nikon digital camera are engineered and
proven to operate within the operational and safety requirements of this electronic circuitry.
T HE USE OF NON-NIKON ELECTRONIC ACCESSORIES COULD DAMAGE THE CAMERA AND MAY
VOID YOUR NIKON WARRANTY.
The use of third-party rechargeable Li-ion batteries not bearing the Nikon holographic seal could
interfere with normal operation of the camera or result in the batteries overheating, igniting,
rupturing, or leaking.
For more information about Nikon brand accessories, contact a local authorized Nikon dealer.
Before Taking Important Pictures
Before taking pictures on important occasions (such as at weddings or before taking the camera on
a trip), take a test shot to ensure that the camera is functioning normally. Nikon will not be held liable
for damages or lost profits that may result from product malfunction.
About the Manuals
• No part of the documentation included with this product may be reproduced, transmitted,
transcribed, stored in a retrieval system, or translated into any language in any form, by any means,
without Nikon’s prior written permission.
• Nikon will not be held liable for any damages resulting from the use of this product.
• Nikon reserves the right to change the specifications of the hardware and software described in
the documentation at any time and without prior notice.
• While every effort was made to ensure that the information in the documentation is accurate andcomplete, we would appreciate it were you to bring any errors or omissions to the attention of the
Nikon representative in your area (address provided separately).
Holographic seal: Identifies this
device as an authentic Nikon product.

7/28/2019 Cool Pix Camera Manual AW100EN_Manual
http://slidepdf.com/reader/full/cool-pix-camera-manual-aw100enmanual 7/242
v
Read This First
I n t r o d u c t i on
Notice Concerning Prohibition of Copying or Reproduction
Note that simply being in possession of material that was digitally copied or reproduced by means
of a scanner, digital camera or other device may be punishable by law.
• Items prohibited by law from being copied or reproducedDo not copy or reproduce paper money, coins, securities, government bonds or local government
bonds, even if such copies or reproductions are stamped “Sample.” The copying or reproduction of
paper money, coins, or securities which are circulated in a foreign country is prohibited. Unless the
prior permission of the government was obtained, the copying or reproduction of unused postage
stamps or post cards issued by the government is prohibited.
The copying or reproduction of stamps issued by the government and of certified documents
stipulated by law is prohibited.
• Cautions on certain copies and reproductions
The government has issued cautions on copies or reproductions of securities issued by private
companies (shares, bills, checks, gift certificates, etc.), commuter passes, or coupon tickets, except
when a minimum of necessary copies are to be provided for business use by a company. Also, do
not copy or reproduce passports issued by the government, licenses issued by public agencies and
private groups, ID cards and tickets, such as passes and meal coupons.
• Comply with copyright notices
The copying or reproduction of copyrighted creative works such as books, music, paintings,
woodcut prints, maps, drawings, movies, and photographs is governed by national and international
copyright laws. Do not use this product for the purpose of making illegal copies or to infringe
copyright laws.
Disposing of Data Storage Devices
Please note that deleting images or formatting data storage devices such as memory cards or
built-in camera memory does not completely erase the original image data. Deleted files can
sometimes be recovered from discarded storage devices using commercially available software,
potentially resulting in the malicious use of personal image data. Ensuring the privacy of such data is
the user’s responsibility.
Before discarding a data storage device or transferring ownership to another person, erase all data
using commercial deletion software, or format the device and then completely refill it with images
containing no private information (for example, pictures of empty sky). Be sure to also replace any
pictures selected for the Select an image option in the Welcome screen setting (A94). Care
should be taken to avoid injury or damage to property when physically destroying data storage
devices.

7/28/2019 Cool Pix Camera Manual AW100EN_Manual
http://slidepdf.com/reader/full/cool-pix-camera-manual-aw100enmanual 8/242
vi
I nt r od uc t i on
For Your Safety
To prevent damage to your Nikon product or injury to yourself or to others, read
the following safety precautions in their entirety before using this equipment.
Keep these safety instructions where all those who use the product will read them.
WARNINGS
Turn off in the event of
malfunctionShould you notice smoke or an unusual
smell coming from the camera orBattery Charger, unplug the AC adapter
and remove the battery immediately,
taking care to avoid burns. Continued
operation could result in injury. After
removing or disconnecting the power
source, take the equipment to a Nikon-
authorized service representative for
inspection.
Do not disassemble Touching the internal parts of the
camera or Battery Charger could result
in injury. Repairs should be performed
only by qualified technicians. Should
the camera or Battery Charger break
open as the result of a fall or other
accident, take the product to a Nikon-authorized service representative for
inspection, after unplugging the
product and/or removing the battery.
Do not use the camera orBattery Charger in the
presence of flammable gas
Using the camera in the presence of
flammable gases such as propane andgasoline, as well as flammable sprays or
dust could result in explosion or fire.
Remove the strap when using
the camera underwater Twisting the camera strap around the
neck may cause suffocation.Handle the camera strap with
careNever place the strap around the neck
of an infant or child.
Keep out of reach of children
Do not keep the products within reach
of children. Doing so may cause injury.
Particular care should be taken to
prevent infants from putting the
battery or other small parts into their
mouths.
Do not remain in contact withthe camera, battery charger,
or AC adapter for extended
periods while the devices areon or in use.
Parts of the devices become hot.
Leaving the devices in direct contact
with the skin for extended periods may
result in low-temperature burns.
This icon marks warnings, information that should be read before using this Nikonproduct, to prevent possible injury.

7/28/2019 Cool Pix Camera Manual AW100EN_Manual
http://slidepdf.com/reader/full/cool-pix-camera-manual-aw100enmanual 9/242
vii
For Your Saety
I n t r o d u c t i on
Observe caution whenhandling the battery
The battery may leak, overheat, or
explode if improperly handled.Observe the following precautions
when handling the battery for use in
this product:
• Before replacing the battery, turn the
product off. If you are using theBattery Charger/AC adapter, be sure
it is unplugged.
• Use only a Rechargeable Li-ion
Battery EN-EL12 (included). Chargethe battery by inserting it in a Battery
Charger MH-65 (included).
• When inserting the battery, do notattempt to insert it upside down or
backwards.
• Do not short or disassemble thebattery or attempt to remove or
break the battery insulation or casing.• Do not expose the battery to flame
or to excessive heat.
• Do not immerse in or expose to water.
• Replace the terminal cover whentransporting the battery. Do not
transport or store with metal objects
such as necklaces or hairpins.
• The battery is prone to leakage whenfully discharged. To avoid damage tothe product, be sure to remove the
battery when no charge remains.
• Discontinue use immediately should
you notice any change in the battery,
such as discoloration or deformation.
• If liquid from the damaged battery
comes in contact with clothing orskin, rinse immediately with plenty
of water.
Observe the followingprecautions when handling
the Battery Charger
• Keep dry. Failure to observe thisprecaution could result in fire or
electric shock.
• Dust on or near the metal parts of
the plug should be removed with adry cloth. Continued use could result
in fire.
• Do not handle the power cable or go
near the Battery Charger during
lightning storms. Failure to observethis precaution could result in
electric shock.
• Do not damage, modify, forcibly tug
or bend the power cable, place it
under heavy objects, or expose it toheat or flames. Should the insulationbe damaged and the wires become
exposed, take it to a Nikon-authorized service representative forinspection. Failure to observe these
precautions could result in fire or
electric shock.
• Do not handle the plug or Battery
Charger with wet hands. Failure toobserve this precaution could resultin electric shock.
• Do not use with travel converters or
adapters designed to convert from
one voltage to another or with DC-to-AC inverters. Failure to observe
this precaution could damage the
product or cause overheating or fire.
7/28/2019 Cool Pix Camera Manual AW100EN_Manual
http://slidepdf.com/reader/full/cool-pix-camera-manual-aw100enmanual 10/242
viii
For Your Saety
I nt r od uc t i on
Use appropriate cablesWhen connecting cables to the input
and output jacks, use only the cables
provided or sold by Nikon for thepurpose, to maintain compliance with
product regulations.
Handle moving parts with care
Be careful that your fingers or other
objects are not pinched by the lens
cover or other moving parts.
CD-ROMs
The CD-ROMs included with this deviceshould not be played back on audio CD
equipment. Playing CD-ROMs on an
audio CD player could cause hearing
loss or damage the equipment.
Observe caution when using
the flashUsing the flash close to your subject’s
eyes could cause temporary visual
impairment. Particular care should be
observed if photographing infants,
when the flash should be no less than
1 m (3 ft 4 in.) from the subject.
Do not operate the flash with
the flash window touching a
person or objectFailure to observe this precaution could
result in burns or fire.
Avoid contact with liquidcrystal
Should the monitor break, care should
be taken to avoid injury caused by
broken glass and to prevent liquid
crystal from the monitor touching theskin or entering the eyes or mouth.
Turn the power off when usinginside an airplane or the
hospital
Turn the power off while inside an
airplane during takeoff and landing.
Also, before boarding an airplane, set
the GPS tracking information recording
function to OFF. If using in a hospital, be
sure to follow the instructions of the
hospital. The electromagnetic waves
emitted by this camera may disrupt the
electronic systems of the airplane or
the instruments of the hospital.
Do not touch the camera
directly for a long time in low
temperatures of 0°C (32°F) orlower
If the skin contacts metal parts etc., it
may result in injury to the skin. Wear
gloves etc.
Drivers should not operate the
camera while driving. This could cause a traffic accident.
Observe caution when using
the movie light
Do not look directly into the movie
light. This could damage the eyes or
result in visual impairment.

7/28/2019 Cool Pix Camera Manual AW100EN_Manual
http://slidepdf.com/reader/full/cool-pix-camera-manual-aw100enmanual 11/242
ix
I n t r o d u c t i on
Notices
Notices for Customers in the
U.S.A.
IMPORTANT SAFETYINSTRUCTIONS -
SAVE THESE INSTRUCTIONS.
DANGER - TO REDUCE THE RISK OF
FIRE OR ELECTRIC SHOCK,
CAREFULLY FOLLOW THESE
INSTRUCTIONS
For connection to a supply not in theU.S.A., use an attachment plug adapter
of the proper configuration for the
power outlet if needed.
The power supply unit is intended to
be correctly orientated in a vertical or
floor mount position.
Federal Communications
Commission (FCC) RadioFrequency Interference
Statement
This equipment has been tested and
found to comply with the limits for a
Class B digital device, pursuant to Part
15 of the FCC rules. These limits are
designed to provide reasonable
protection against harmful
interference in a residential installation.
This equipment generates, uses, and
can radiate radio frequency energy
and, if not installed and used in
accordance with the instructions, may
cause harmful interference to radio
communications. However, there is no
guarantee that interference will not
occur in a particular installation. If this
equipment does cause harmful
interference to radio or television
reception, which can be determined
by turning the equipment off and on,the user is encouraged to try to correct
the interference by one or more of the
following measures:
• Reorient or relocate the receivingantenna.
• Increase the separation between the
equipment and receiver.
• Connect the equipment into anoutlet on a circuit different from thatto which the receiver is connected.
• Consult the dealer or an
experienced radio/televisiontechnician for help.
CAUTIONS
Modifications
The FCC requires the user to be
notified that any changes or
modifications made to this device thatare not expressly approved by Nikon
Corporation may void the user’s
authority to operate the equipment.
Interface Cables
Use the interface cables sold or
provided by Nikon for your equipment.
Using other interface cables may
exceed the limits of Class B Part 15 of
the FCC rules.
COOLPIX AW100

7/28/2019 Cool Pix Camera Manual AW100EN_Manual
http://slidepdf.com/reader/full/cool-pix-camera-manual-aw100enmanual 12/242
x
Notices
I nt r od uc t i on
Notice for Customers in the State of California
WARNING
Handling the cord on this product willexpose you to lead, a chemical known
to the State of California to cause birth
defects or other reproductive harm.
Wash hands after handling.
Nikon Inc.,
1300 Walt Whitman Road,
Melville, New York 11747-3064
USA Tel: 631-547-4200
Notice for Customers in Canada
CAUTION
This Class B digital apparatus complies
with Canadian ICES-003.
ATTENTIONCet appareil numérique de la classe B
est conforme à la norme NMB-003 du
Canada.
Notices for Customers in Europe
CAUTIONS
RISK OF EXPLOSION IF BATTERY ISREPLACED BY AN INCORRECT
TYPE.
DISPOSE OF USED BATTERIES
ACCORDING TO THEINSTRUCTIONS.
This symbol indicates that
this product is to be collected
separately. The following apply only to
users in European countries:
• This product is designated forseparate collection at an appropriate
collection point. Do not dispose of as
household waste.
• For more information, contact the
retailer or the local authorities incharge of waste management.
This symbol on the battery
indicates that the battery is
to be collected separately.
The following apply only to
users in European countries:
• All batteries, whether marked with
this symbol or not, are designated forseparate collection at an appropriate
collection point. Do not dispose of as
household waste.
• For more information, contact the
retailer or the local authorities incharge of waste management.

7/28/2019 Cool Pix Camera Manual AW100EN_Manual
http://slidepdf.com/reader/full/cool-pix-camera-manual-aw100enmanual 13/242
xi
I n t r o d u c t i on
<Important> Shockproof, waterproof, dustproof, condensation, GPS/digital compass
• Make sure to read the following instructions as well as the instructions provided in“Caring for the Products” (F2).
Notes on shockproof performance This camera has passed Nikon’s in-house test (drop test from a height of 152 cm
(60 in.) on a 5 cm (2 in.) thick plywood panel) compliant with MIL-STD 810F Method
516.5-Shock*.
This test does not guarantee the waterproof performance of the camera or that the
camera will be free from damage or trouble under all conditions.
Changes in appearance, such as paint peeling off and deformation of the drop
shock portion are not subject to the Nikon’s in-house test.* U.S. Department of Defense test method standard.
This drop test drops 5 cameras in 26 directions (8 edges, 12 corners, and 6 faces) from a height of 122 cm
(48 in.) to make sure that one to five cameras pass the test (if any defect is detected during the test,
another five cameras are tested to make sure that the test criteria are satisfied for one to five cameras).
bDo not subject the camera to excessive shock, vibration or pressure by
dropping or hitting it.
Failure to observe this precaution could cause water to seep inside the camera and
result in camera malfunction.
• Do not use the camera deeper than 10 m (33 ft) underwater.• Do not subject the camera to water pressure by exposing it to running water.
• Do not sit down with the camera in the pocket of your trousers.Do not forcibly stuff the camera into a bag.
Notes on waterproof and dustproof performances The camera is equivalent to IEC/JIS waterproof grade 8 (IPX8) and IEC/JIS dustproof
grade 6 (IP6X) and enables shooting pictures underwater at a depth of 10 m (33 ft)
for up to 60 minutes.*
This rating does not guarantee the waterproof performance of the camera or that
the camera will be free from damage or trouble under all conditions.* This rating indicates that the camera has been designed to withstand the specified water pressure
for the specified period of time when the camera is used according to the methods defined by
Nikon.
b If the camera is subjected to excessive shock, vibration or pressure by
dropping or hitting it, the waterproof performance is not guaranteed.• If the camera is exposed to shocks, it is recommended to consult your retailer or Nikon-
authorized service representative to confirm the waterproof performance (chargedservice).- Do not use the camera deeper than 10 m (33 ft) underwater.
- Do not subject the camera to water pressure by exposing it to the running water.- Your Nikon warrantee may not cover troubles caused by water seeping inside thecamera due to improper handling of the camera.
7/28/2019 Cool Pix Camera Manual AW100EN_Manual
http://slidepdf.com/reader/full/cool-pix-camera-manual-aw100enmanual 14/242
xii
<Important> Shockproof, waterproof, dustproof, condensation, GPS/digital compass
I nt r od uc t i on
• The waterproof performance of this camera is designed to work for fresh water andseawater only.
• The inner portion of this camera is not waterproof. Water seeping inside the cameracould cause a malfunction.
• Accessories are not waterproof.• Do not handle the camera with wet hands.
Do not insert a wet memory card or battery in the camera.• If a liquid such as water droplets falls on the outside of the camera or inside of the
battery-chamber/memory card slot cover, immediately wipe it off with a soft dry cloth.If the battery-chamber/memory card slot cover is opened or closed under wetconditions near a waterfront or underwater, this could cause water to seep inside thecamera or result in camera malfunction.Do not open or close the cover with wet hands. This could cause water to seep inside
the camera or result in camera malfunction.• If a foreign substance adheres to the outside of the camera or inside of the battery-chamber/memory card slot cover (in locations such as yellow waterproof packing,hinges, memory card slot, or terminals), immediately remove it with a blower or brush.
• If a foreign substance such as suntan oil, sunscreen lotion, hot spring, bath mixpowder, detergent, soap, organic solvent, oil, or alcohol adheres to the camera,immediately wipe it off.
• Do not leave the camera in low temperature conditions in cold climate regions or inhigh-temperature conditions of 40°C (104°F) or more (in particular, a place exposed todirect sunlight, inside the cabin of a car, on a boat, on the beach, or near heating
apparatus) for a long period of time. This could cause deterioration of the waterproof performance.
Before using the camera underwaterRemove the strap for land use before using the camera underwater.
1. Make sure that there are no foreign substances inside the battery-
chamber/memory card slot cover.• Any foreign substances such as sand, dust or hair inside the battery-chamber/
memory card slot cover should be removed with a blower or brush.
• Any liquid such as water droplets inside the battery-chamber/memory card slotcover should be wiped off with a soft dry cloth.2. Make sure that the waterproof packing of the battery-chamber/memory
card slot cover is not cracked or deformed.• The waterproof performance of waterproof packing may start to deteriorate after
one year.It is recommended to consult your retailer or Nikon-authorized servicerepresentative once a year to replace the waterproof packing with a new one(charged service).
3. Make sure that the battery-chamber/memory card slot cover is firmly closed.• Rotate the battery-chamber/memory card slot cover latch until it clicks into place.
Make sure that the thin cord of the camera strap does not get caught.• Make sure that the latch indicator indicates the “Close” status.

7/28/2019 Cool Pix Camera Manual AW100EN_Manual
http://slidepdf.com/reader/full/cool-pix-camera-manual-aw100enmanual 15/242
xiii
<Important> Shockproof, waterproof, dustproof, condensation, GPS/digital compass
I n t r o d u c t i on
Notes on using the camera underwater
Observe the following precautions to prevent water from seeping insidethe camera.
• Do not dive into water deeper than 10 m (33 ft) with the camera.• Do not continuously use the camera underwater for 60 minutes or more.• Use the camera in the water temperature range from 0°C to 40°C (32°F to 104°F) when
using it underwater.Do not immerse the camera in hot water (such as bath or hot spring) that is higherthan 40°C (104°F).
• Do not open or close the battery-chamber/memory card slot cover underwater.• Do not subject the camera to shock when using it underwater.
Do not jump into water with the camera or subject it to high water pressure
conditions such as rapids or waterfalls.• This camera does not float in water. Make sure not to drop the camera underwater.
Cleaning after using the camera underwater
• After using the camera underwater, clean the camera within 60 minutes. If you leavethe camera in wet conditions where salt particles, hot spring particles, or other foreignsubstances are adhered to it, this could cause damage, discoloration, corrosion, a badsmell or deterioration of waterproof performance.
• Before cleaning the camera, thoroughly remove water droplets, sand, salt particles,
hot spring particles, or other foreign substances from your hands, body, and hair.• It is recommended to clean the camera indoors to avoid a place where it could be
exposed to water spray or sand.• Do not open the battery-chamber/memory card slot cover until all foreign substances
are washed off with water and all moisture is wiped off.

7/28/2019 Cool Pix Camera Manual AW100EN_Manual
http://slidepdf.com/reader/full/cool-pix-camera-manual-aw100enmanual 16/242
xiv
<Important> Shockproof, waterproof, dustproof, condensation, GPS/digital compass
I nt r od uc t i on
1. Keep the battery-chamber/memory card slot cover closed and wash off the camera with fresh water.
Immerse the camera in a shallow basin filled
with freshwater for 10 minutes.• If the buttons or switches do not operateproperly, foreign substances may have adhered.Since this could cause a malfunction, immersethe camera in fresh water and shake itsufficiently in the water to remove the anyforeign substances from the camera.
• When the camera is immersed in the water, a few air bubbles may come out fromthe water drain holes of the camera such as openings in the microphone orspeakers. This is not a malfunction.
2. Wipe off water droplets with a soft cloth and dry the camera in the well-ventilated and shady place.• Place the camera on a dry cloth to dry it.
Water will flow out from openings in the microphone or speakers.• Do not dry the camera with hot air from a hair dryer or clothes dryer.• Do not use chemicals (such as benzine, thinner, alcohol, or cleanser), soap, or neutral
detergents.If the waterproof packing or body of the camera becomes deformed, the waterproof performance will deteriorate.
3. After making sure that there are no water droplets on the camera, open
the battery-chamber/memory card slot cover and gently wipe off anywater or sand remaining inside the camera with a dry soft cloth.• If you open the cover before the camera is thoroughly dried, water droplets may fall
on a memory card or battery. The water droplets may also seep inside the battery-chamber/memory card slotcover (in locations such as waterproof packing, hinges, memory card slot, orterminals).
If that happens, wipe the water off with a dry soft cloth.• If the cover is closed when the inside is wet, this could cause condensation or
malfunction.• If the microphone or speaker openings are clogged with water droplets, the sound
may deteriorate or become distorted.- Wipe the water off with a dry soft cloth.- Do not puncture the microphone or speaker openings with a sharp implement. If
the inside of the camera is damaged, the waterproof performance willdeteriorate.

7/28/2019 Cool Pix Camera Manual AW100EN_Manual
http://slidepdf.com/reader/full/cool-pix-camera-manual-aw100enmanual 17/242
xv
<Important> Shockproof, waterproof, dustproof, condensation, GPS/digital compass
I n t r o d u c t i on
Notes on operating temperature and humidity and
condensation
The operation of this camera has been tested at temperatures from -10°C to +40°C
(14°F to 104°F).When you use the camera in cold climate regions, observe the following
precautions. Keep the camera and spare batteries in a warm place before use.
• The performance of the batteries (number of pictures shot and shooting time) willdrop temporarily.
• If the camera is in a very cold state, the performance may drop temporarily, forexample, the monitor may be darker than normal immediately after the camera isturned on or residual images may be produced.
• When snow or water droplets adhere to the exterior of the camera, immediately wipethem off.- If the buttons or switches are frozen, they may not operate smoothly.- If the microphone or speaker openings are clogged with water droplets, the sound
may deteriorate or become distorted.
bOperating environmental conditions such as
temperature and humidity may cause fogging
(condensation) on the inside of the monitor or lens.This is not the camera malfunction or defect.
b Environmental conditions that are likely to causecondensation inside of the camera
Fogging (condensation) may occur on the inside of the monitor or lens in the
following environmental conditions where there are sharp temperature changes or
high humidity.
• The camera is suddenly immersed in low temperature underwater from hightemperature on land.
• The camera is brought to a warm place such as inside a building from the cold climateoutside.
• The battery-chamber/memory card slot cover is opened or closed in a high-humidityenvironment.
b Clearing the fogging• Open the battery-chamber/memory card slot cover after turning off the camera in a
place where the ambient temperature is stable (avoid any place that has high-temperature/high-humidity, sand or dust). To clear the fogging, remove the battery and memory card, and leave the camera withthe battery-chamber/memory card slot cover open to allow the camera to adjust tothe ambient temperature.
• If the fogging does not clear, consult your retailer or Nikon-authorized servicerepresentative.
7/28/2019 Cool Pix Camera Manual AW100EN_Manual
http://slidepdf.com/reader/full/cool-pix-camera-manual-aw100enmanual 18/242
xvi
<Important> Shockproof, waterproof, dustproof, condensation, GPS/digital compass
I n t r o d u c t i on
Notes on GPS/digital compass
bMap/location name data of this camera
Before using the GPS function, make sure to read “USER LICENSE AGREEMENT FOR
MAP DATA AND LOCATION NAME DATA” (F9) and agree to the terms.• The maps and location name information (Point of Interest: POI) are as of December 2010.
The maps and location name information will not be updated.• The details of geological formations are displayed simplistically according to the scale
of a map. The scale of a map and level of detail of the location information varydepending on country and region.If the latitude becomes higher, the horizontal and vertical scales displayed on themonitor vary, therefore displayed geological formations differ from the actualformations. Use the maps and location name information only as a guide.
bNotes on GPS/digital compass• Do not operate the GPS/digital compass while you are driving a car.• Use information (such as direction and distance) measured by the camera as a guideline only.
This information cannot be used for navigation of an airplane, car, and person or landsurvey applications.
• When you use the camera for mountain climbing , trekking, or underwater, be sure totake a map, navigation device, or measuring instrument separately.
• When the camera lens is facing upward, the digital compass is not displayed.• An individual may be identified from still pictures or movies that have been recorded
with location information.Observe caution when you transfer still pictures or movies recorded with locationinformation, or GPS log files to a third party or upload them to a network such as theInternet where the public can view them.Be sure to read “Disposing of Data Storage Devices” (Av).
bWhen the Record GPS data of the GPS options menu is On, the GPS
function will continue to operate even when the camera is turned off.• The electromagnetic waves emitted from the camera may affect the measuring
instruments of an airplane or medical equipment.
When use of the camera is prohibited during airplane takeoffs and landings or insidea hospital, set the Record GPS data to Off and turn off the camera.• When the Record GPS data is set to On, the battery will be drained, even when the
camera is turned off.
bUsing the camera overseas• Before taking the camera with GPS function overseas for travel, consult your travel
agency or embassy of the country you are visiting to confirm whether there is anyrestriction on use.For example, you cannot record location information logs without permission fromthe government in China.Set the Record GPS data of the GPS options menu to Off .
• The GPS may not function properly in China and on the borders between China andneighbouring countries (as of December 2010).

7/28/2019 Cool Pix Camera Manual AW100EN_Manual
http://slidepdf.com/reader/full/cool-pix-camera-manual-aw100enmanual 19/242
xvii
I n t r o d u c t i on
Table of Contents
Introduction .......................................................................................................................................... iiRead This First......................................................................................................................................... ii
Confirming the Package Contents.............................................................................................................. ii
About This Manual............................................................................................................................................... iiiInformation and Precautions.......... ...................... ...................... ...................... ...................... ..................... . iv
For Your Saety ...................................................................................................................................... viWARNINGS ................. ...................... ..................... ...................... ..................... .................... ...................... .............. vi
Notices ..................................................................................................................................................... ix<Important> Shockproo, waterproo, dustproo, condensation,GPS/digital compass........................................................................................................................... xi
Notes on shockproof performance........................................................................................................... xi
Notes on waterproof and dustproof performances ....................... ...................... ........................ .. xi
Before using the camera underwater ..................... ...................... ...................... ......................... .......... xii
Notes on using the camera underwater............................................................................................. xiii
Cleaning after using the camera underwater.................................................................................. xiii
Notes on operating temperature and humidity and condensation ..................... ............. xv
Notes on GPS/digital compass.................................................................................................................. xvi
Parts o the Camera and Basic Operations................................................................................. 1Parts o the Camera.............................................................................................................................. 2
The Camera Body................. ...................... ...................... ..................... .................... ..................... ................... .... 2
Controls Used in Shooting Mode ...................... ..................... .................... ...................... ................... ....... 4
Controls Used in Playback Mode .................... ...................... ...................... ...................... ................. ......... 5 The Monitor.......... ..................... .................... ................... ..................... ...................... ................... ................... ....... 6
Basic Operations.................................................................................................................................... 9Switching Between Shooting Mode and Playback Mode .................. ...................... .................. 9
Using the Multi Selector................................................................................................................................. 10
Using Menus (thed Button) ................... ...................... ..................... .................... ...................... ......... 11
Using the Action Button................................................................................................................................. 13
Attaching the Camera Strap for Land Use ..................... ...................... ....................... ...................... .. 14
Use of the Filter Adapter and the Attachment Method............................................................. 14

7/28/2019 Cool Pix Camera Manual AW100EN_Manual
http://slidepdf.com/reader/full/cool-pix-camera-manual-aw100enmanual 20/242
xviii
Table o Contents
I nt r od uc t i on
The Basics o Shooting and Playback ........................................................................................ 15Preparation 1 Charge the Battery.................................................................................................. 16Preparation 2 Insert the Battery..................................................................................................... 18
Preparation 3 Insert a Memory Card ............................................................................................ 20Internal Memory and Memory Cards..................................................................................................... 21
Approved Memory Cards .................... .................... ...................... ..................... ...................... ................... .. 21
Step 1 Turn the Camera On ............................................................................................................. 22 Turning the Camera On and Off.... ...................... ..................... ...................... ..................... ...................... 23
Setting the Display Language, Date, and Time................................................................................ 24
Step 2 Select a Shooting Mode...................................................................................................... 26Available Shooting Modes............................................................................................................................ 27
Step 3 Frame a Picture....................................................................................................................... 28Using the Zoom................................................................................................................................................... 29
Step 4 Focus and Shoot .................................................................................................................... 30Step 5 Play Back Images ................................................................................................................... 32
Changing How Images Are Displayed................................................................................................... 33
Step 6 Delete Unwanted Images................................................................................................... 34
Shooting Features ............................................................................................................................ 37G (Easy Auto) Mode.......................................................................................................................... 38
Changing G (Easy Auto) Mode Settings ....................... ...................... ....................... ...................... .. 38
Scene Mode (Shooting Suited to Scenes) .................................................................................. 39Changing Scene Mode Settings................................................................................................................ 39
Characteristics of Each Scene ................... ...................... ..................... .................... ...................... ............. 40
Special Eects Mode (Applying Eects When Shooting) ..................................................... 47Characteristics of Each Special Effect..................................................................................................... 47
Changing Special Effects Mode Settings............................................................................................. 48
Smart Portrait Mode (Shooting Smiling Faces)........................................................................ 49Changing Smart Portrait Mode Settings.............................................................................................. 50
Options Available in the Smart Portrait Menu.................................................................................. 50
A (Auto) Mode.................................................................................................................................... 51Changing A (Auto) Mode Settings........................................................................................................ 51
Options Available in the Shooting Menu (A (Auto) Mode)................................................... 51Features That Can Be Set Using the Multi Selector................................................................. 53
Available Functions ................... ................... ...................... ..................... ................... ...................... ................. 53
Flash Modes (Using the Flash).................................................................................................................... 54
Using the Self-timer ..................... ....................... ...................... ...................... ................... ..................... .......... 56
Using Macro Mode ................... .................... ..................... ..................... .................... ...................... ................. 57
Exposure Compensation (Adjusting Brightness)............................................................................ 58
Default Settings ................... ................... ..................... ................... ................... ...................... ...................... ...... 59

7/28/2019 Cool Pix Camera Manual AW100EN_Manual
http://slidepdf.com/reader/full/cool-pix-camera-manual-aw100enmanual 21/242
xix
Table o Contents
I n t r o d u c t i on
Changing the Image Size (Image Mode).................................................................................... 61Image Mode Settings (Image Size and Quality).............................................................................. 61
Features That Cannot Be Used Simultaneously ....................................................................... 63Using Face Detection......................................................................................................................... 65
Using Skin Sotening ......................................................................................................................... 66Focus Lock ............................................................................................................................................. 67
Playback Features............................................................................................................................. 69Selecting Certain Types o Images or Playback ...................................................................... 70
Available Playback Modes............................................................................................................................. 70
Switching Between Playback Modes ..................... ...................... .................... ...................... ................ 70
Features Available in Playback Mode (Playback Menu) ........................................................ 71Connecting the Camera to a TV, Computer, or Printer.......................................................... 73Using ViewNX 2.................................................................................................................................... 74
Installing ViewNX 2............................................................................................................................................ 74
Transferring Images to the Computer................... ...................... ...................... ...................... .............. 76
Viewing Images ................... .................... ...................... ..................... ...................... ................... ...................... .. 77
Retouching Photographs .................. ..................... ..................... .................... ................... ......................... .. 78
Editing Movies...................................................................................................................................................... 78
Printing Images.................................................................................................................................................... 78
Recording and Playing Back Movies.......................................................................................... 79Recording Movies ............................................................................................................................... 80
Changing Movie Recording Settings (Movie Menu) ...................... ...................... ...................... .. 83Playing Back Movies........................................................................................................................... 84
Using GPS/Displaying Maps ......................................................................................................... 85Starting GPS Data Recording.......................................................................................................... 86Displaying Maps .................................................................................................................................. 88
When Using Shooting Mode....................................................................................................................... 88
When Using Playback Mode........................................................................................................................ 88
Changing the GPS or Electronic Compass Settings (Map Menu) ...................................... 90
General Camera Setup.................................................................................................................... 93The Setup Menu .................................................................................................................................. 94
7/28/2019 Cool Pix Camera Manual AW100EN_Manual
http://slidepdf.com/reader/full/cool-pix-camera-manual-aw100enmanual 22/242
xx
Table o Contents
I nt r od uc t i on
Reerence Section........................................................................................................................ E1Using Easy Panorama (Shooting and Playing back) ..........................................................E2
Taking Pictures with Easy Panorama................... ...................... ...................... ...................... ............E2
Viewing Easy Panorama (Scroll)...........................................................................................................E4Using Panorama Assist.................................................................................................................E5Playing and Deleting Images Captured Using Continuous Shooting Mode(Sequence)........................................................................................................................................E7
Playing Images in a Sequence..............................................................................................................E7
Deleting Images in a Sequence...........................................................................................................E8
Favorite Pictures Mode ................................................................................................................E9Adding Images to Albums......................................................................................................................E9
Playing Back Images in Albums........................................................................................................E10
Removing Images From Albums .................... ...................... ...................... ...................... ............... E10
Changing the Favorites Album Icon..............................................................................................E11Auto Sort Mode ........................................................................................................................... E12List by Date Mode....................................................................................................................... E14Editing Images (Still Pictures) ................................................................................................. E15
Editing Features..........................................................................................................................................E15
k Quick Retouch: Enhancing Contrast and Saturation................................................... E17
I D-Lighting: Enhancing Brightness and Contrast............................................................ E17
s Glamour Retouch: Making Facial Skin Tones Softer, Face Smaller, or
Eyes Larger.....................................................................................................................................................E18
p Filter Effects: Applying Digital Filter Effects ..................... .................... ...................... ........... E19g Small Picture: Reducing the Size of an Image.................................................................. E20
a Crop: Creating a Cropped Copy................................................................................................. E21
Connecting the Camera to a TV (Playback on a TV)....................................................... E22Connecting the Camera to a Printer (Direct Print) .......................................................... E24
Connecting the Camera to a Printer.............................................................................................. E25
Printing Individual Images...................................................................................................................E26
Printing Multiple Images.......................................................................................................................E27
Editing Movies.............................................................................................................................. E30Extracting Only the Desired Portions of the Movie.............................................................. E30
The Smart Portrait Menu.......................................................................................................... E32Image Mode (Image Size and Quality)......................................................................................... E32
Skin Softening..............................................................................................................................................E32
Smile Timer....................................................................................................................................................E32
Blink Proof.......................................................................................................................................................E33

7/28/2019 Cool Pix Camera Manual AW100EN_Manual
http://slidepdf.com/reader/full/cool-pix-camera-manual-aw100enmanual 23/242
xxi
Table o Contents
I n t r o d u c t i on
The Shooting Menu (A (Auto) Mode) ................................................................................ E34Image Mode (Image Size and Quality)......................................................................................... E34
White Balance (Adjusting Hue) ................. ...................... ...................... ...................... ..................... .E34
Continuous Shooting..............................................................................................................................E36
ISO Sensitivity...............................................................................................................................................E37AF Area Mode ................. ...................... ..................... ...................... ...................... ................ ..................... .E38
Subject Tracking Mode (Focusing on a Moving Subject)................................................. E40
Autofocus Mode.........................................................................................................................................E41
The Playback Menu .................................................................................................................... E42a Print Order (Creating a DPOF Print Order) ...................... ...................... ...................... ........ E42
b Slide Show..............................................................................................................................................E45
d Protect...................................................................................................................................................... E46
The Image Selection Screen .................. ...................... ................... ..................... .................... ........... E47
f Rotate Image.........................................................................................................................................E48E Voice Memo.............................................................................................................................................E49
h Copy (Copy Between Internal Memory and Memory Card)................................... E50
C Sequence Display Options...........................................................................................................E51
x Choose Key Picture............................................................................................................................E51
The Movie Menu.......................................................................................................................... E52Movie Options.............................................................................................................................................E52
Open with HS Footage...........................................................................................................................E53
Recording Movies in Slow Motion and Fast Motion (HS Movie).................................. E54
Autofocus Mode.........................................................................................................................................E56
Movie Light....................................................................................................................................................E56
Wind Noise Reduction............................................................................................................................E56
Map Menu...................................................................................................................................... E57GPS Settings..................................................................................................................................................E57
Distance Units..............................................................................................................................................E58
Calculate Distance.....................................................................................................................................E59
Points of interest (POI) (Recording and Displaying Location
Name Information) ................. ..................... ................... ...................... ................... ..................... ............ E60
Create Log (Record the log of moving information)........................................................... E61
View Log (View the log on a map).................................................................................................. E63Electronic Compass..................................................................................................................................E64

7/28/2019 Cool Pix Camera Manual AW100EN_Manual
http://slidepdf.com/reader/full/cool-pix-camera-manual-aw100enmanual 24/242
xxii
Table o Contents
I nt r od uc t i on
The Setup Menu .......................................................................................................................... E66Welcome Screen .................. ..................... .................... ..................... ..................... .................... ............... E66
Time Zone and Date................. ...................... ..................... .................... ...................... .................. ........ E67
Monitor Settings.........................................................................................................................................E70
Print Date (Imprinting Date and Time on Pictures).............................................................. E72Vibration Reduction ................... .................... ................... ................... ................... ......................... ........ E73
Motion Detection......................................................................................................................................E74
AF Assist...........................................................................................................................................................E75
Digital Zoom.................................................................................................................................................E75
Sound Settings............................................................................................................................................E76
Action Control Response......................................................................................................................E77
Auto Off ..................... .................... ..................... ................... ...................... ................... ..................... ............ E77
Format Memory/Format Card............................................................................................................E78
Language........................................................................................................................................................ E78 TV Settings .................... ..................... .................... ...................... ..................... ................... ..................... .....E79
Blink Warning ..................... ................... ...................... ..................... ................... ...................... ................... E80
Assign Action Button...............................................................................................................................E81
Reset All .................. ................... ..................... ................... ..................... ................... ...................... ................ E81
Firmware Version........................................................................................................................................E84
File and Folder Names............................................................................................................... E85Optional Accessories ................................................................................................................. E87Error Messages............................................................................................................................. E88
Technical Notes and Index.........................................................................................................F1Caring or the Products................................................................................................................. F2
The Camera ..................... ................... ..................... .................... ..................... ....................... ..................... ..... F2
The Battery................. ..................... ..................... .................... ..................... .................... ..................... ............ F4
The Battery Charger ................... ...................... ..................... ...................... ..................... ................... ......... F5
The Memory Cards........... .................... .................... .................... .................... ................... ...................... .... F6
Caring or the Camera ................................................................................................................... F7Cleaning ..................... ..................... .................... ...................... ...................... ................... ..................... ............ F7
Storage................................................................................................................................................................. F8
USER LICENSE AGREEMENT FOR MAP DATA AND LOCATION NAME DATA ................ F9Troubleshooting............................................................................................................................F13Speciications .................................................................................................................................F20
Supported Standards................................................................................................................................F23
Index..................................................................................................................................................F24

7/28/2019 Cool Pix Camera Manual AW100EN_Manual
http://slidepdf.com/reader/full/cool-pix-camera-manual-aw100enmanual 25/242
1
P a r t s of t h e C a m
er a a n d B a s i c O p er a t i on s
Parts of the Camera andBasic Operations
This chapter describes the parts of the camera and also explains the main
functions of each part and basic camera operations.
Parts of the Camera ................................................2
The Camera Body .......................................................................................... 2Controls Used in Shooting Mode ............................................................ 4Controls Used in Playback Mode............................................................. 5The Monitor ..................................................................................................... 6
Basic Operations.....................................................9Switching Between Shooting Mode and Playback Mode ..............9Using the Multi Selector........................................................................... 10Using Menus (thed Button) ............................................................. 11
Using the Action Button .......................................................................... 13Attaching the Camera Strap or Land Use......................................... 14Use o the Filter Adapter and the Attachment Method ............... 14
If you want to start using the camera right away, see “ The Basics of
Shooting and Playback ” (A15).

7/28/2019 Cool Pix Camera Manual AW100EN_Manual
http://slidepdf.com/reader/full/cool-pix-camera-manual-aw100enmanual 26/242
2
P a r t s of t h eC a m
er a a nd B a s i c Oper a t i ons
Parts of the Camera and Basic Operations
Parts of the Camera
The Camera Body
18
219 108 3 4 5 6 7
16 1713 1512 1411
1 Eyelet for camera strap ................... .......... 142 Shutter-release button........................4, 30
3 Power switch/power-on lamp .............. 23
4 Flash...................................................................... 54
5 GPS antenna ...................................................... 86
6Self-timer lamp ..................... ...................... ... 56AF-assist illuminator....................................95Movie illuminator ...........................................83
7 Lens
8 Memory card slot .........................................20
9 Battery latch............................................. 18, 19
10 Battery chamber............................................1811 HDMI mini connector (Type C) ............. 73
12 Hinge...................................................................... xii
13 Waterproofing packing..............................xiii
14 USB/Audio video connector .................. 73
15Battery-chamber/memory card slotcover latch release ..................... .......... 18, 20
16
Battery-chamber/memory card slot
cover latch.................................................18, 20
17Battery-chamber/ memory card slot cover ...................18, 20
18 Microphone (stereo)...............................71, 80
7/28/2019 Cool Pix Camera Manual AW100EN_Manual
http://slidepdf.com/reader/full/cool-pix-camera-manual-aw100enmanual 27/242
3
Parts o the Camera
P a r t s of t h e C a m
er a a n d B a s i c O p er a t i on s
12
321 4 5 6 7 8
1110
9
13 14
1 Eyelet for camera strap ................... .......... 14
2 Speaker ..................... ......................... . 71, 84, 95
3 Monitor.......................................................... 6, 26
4 Flash lamp......................................................... 54
5
Zoom buttons................................................29f : Wide...................................................29g : Tele......................................................29h : Thumbnail playback.................33
i : Playback zoom.............................33j : Help....................................................39
6 b (emovie-record) button...............80
7 c (playback) button............................9, 32
8 k (apply selection) button ...................109 Multi selector...................................................10
10Action buttonU : Display map...................................13V : Action control ..............................13
11 Tripod socket
12 A (shooting mode) button .............9, 26
13 d (menu) button............ 11, 50, 51, 83
14 l (delete) button.................................34, 84
7/28/2019 Cool Pix Camera Manual AW100EN_Manual
http://slidepdf.com/reader/full/cool-pix-camera-manual-aw100enmanual 28/242
4
Parts o the Camera
P a r t s of t h eC a m
er a a nd B a s i c Oper a t i ons
Controls Used in Shooting Mode
Control Name Main Function A
A (shootingmode) button
Change the shooting mode (displays theshooting-mode selection screen).
26
Zoom buttonsPressg (i) (telephoto zoom position) tozoom in, and f (h) (wide-angleposition) to zoom out.
29
Multi selectorSee “Using the Multi Selector” for moreinformation.
10
d (menu)button
Display and hides the menu. 11
Shutter-release button
When pressed halfway (i.e., if you stoppressing when you feel resistance slightly):Set focus and exposure.When pressed all the way (i.e., if you pressthe button all the way down): Release theshutter.
30
b (emovie-record) button
Start and stop movie recording. 80
Playback button
Play back images. 9, 32
Delete button Delete the last image that was saved. 34
Action button• Operate the function when the camera
is shaken.• Display the current location on a map.
13
13

7/28/2019 Cool Pix Camera Manual AW100EN_Manual
http://slidepdf.com/reader/full/cool-pix-camera-manual-aw100enmanual 29/242
5
Parts o the Camera
P a r t s of t h e C a m
er a a n d B a s i c O p er a t i on s
Controls Used in Playback Mode
Control Name Main Function A
Playback
button
• When the camera is turned off, pressand hold this button to turn the camera
on in playback mode.• Return to shooting mode.
23
9
Zoom buttons
• Magnify the image with g (i); displayimage thumbnails or the calendar withf (h).
• Adjust the volume for voice memo andmovie playback.
33
71, 84
Multi selector
See “Using the Multi Selector” for more
information. 10
Applyselectionbutton
• Display individual images of a sequencein full-frame.
• Scroll a picture recorded with easypanorama.
• Play back movies.• Switch from image thumbnail or
zoomed image display to full-frame
playback mode.
10
10
8410
d (menu)button
Display and hide the menu. 11
Delete button Delete images. 34
A (shootingmode) button
Return to shooting mode. –Shutter-
release button
b (emovie-record) button
Action button Display the location of a picture taken on amap.
13

7/28/2019 Cool Pix Camera Manual AW100EN_Manual
http://slidepdf.com/reader/full/cool-pix-camera-manual-aw100enmanual 30/242
6
Parts o the Camera
P a r t s of t h eC a m
er a a nd B a s i c Oper a t i ons
The Monitor• The information that is displayed on the monitor during shooting and playback
changes depending on the camera’s settings and state of use. Information is
displayed when the camera is first turned on and when you operate the camera,
and turns off after a few seconds (when Photo info in Monitor settings (A94) is set to Auto info).
Shooting Mode
1 / 2 5 0/250 99999999F3.93.9F3.9
29m 0s9m 0s29m 0s
1 / 2 5 0
9999 9999
99999 9 99999
28 20
26 25 24 23
27
29
2122
3
4
21 6
5
18
15
16
8 9
17
37
36
31
33
32
35
30
12
10
7
11
13
14
34
19
2 9 m 0 s
1 3 4 2
2 9m 0 s
13 4 2
40
38
39

7/28/2019 Cool Pix Camera Manual AW100EN_Manual
http://slidepdf.com/reader/full/cool-pix-camera-manual-aw100enmanual 31/242
7
Parts o the Camera
P a r t s of t h e C a m
er a a n d B a s i c O p er a t i on s
1 Shooting mode......................................26, 27
2 Macro mode ....................................................57
3 Zoom indicator ..................... ...................... ...29
4 AE/AF-L indicator....................................E6
5 Flash mode.......................................................54
6 Battery level indicator ..................... ...........22
7 Vibration reduction icon .................... ......94
8 GPS reception ..................... ...................... ......86
9 Log display........................................................91
10 Motion detection icon...............................95
11 Wind noise reduction.................................83
12“Date not set” indicator.....................25, 94
13 Travel destination indicator.................. ..94
14 Print date............................................................94
15 Movie options.................................................83
16 HS movie options.........................................83
17 Movie length ...........................................80, 82
18 Image mode ....................................................61
19 Easy panorama...............................................45
20 Number of exposures remaining(still pictures)............................................22, 62
21 Internal memory indicator......................22
22 Aperture value................................................30
23Focus area (for manual, center).......................................................................... 30, 52
24 Focus area (for auto).................................. 52
25Focus area (for face detection,pet detection) ..................... ............46, 52, 65
26 Focus area (for subject tracking) ........ 52
27 Shutter speed................................................. 30
28 ISO sensitivity...........................................28, 52
29 Exposure compensation value............ 58
30 Skin softening................................................. 50
31 White balance................................................ 52
32 Blink proof icon ...................... ...................... . 50
33 Backlighting (HDR)...................................... 4434 Continuous shooting mode ................. 52
35 Panorama shooting.................................... 45
36 Smile timer....................................................... 50
37 Self-timer........................................................... 56
38Compass display (Direction gauge)................................................................................. 91
39 Compass display (Compass)................. 91
40Location name information(POI information).......................................... 91
7/28/2019 Cool Pix Camera Manual AW100EN_Manual
http://slidepdf.com/reader/full/cool-pix-camera-manual-aw100enmanual 32/242
8
Parts o the Camera
P a r t s of t h eC a m
er a a nd B a s i c Oper a t i ons
Playback Mode
999/99999/999
9999.JPG999.JPG
2524
15/11 /2 0115/11/2011
9999.JPG
12:002:0012:00
999/999
15/11 /2 011
1m 0sm 0s9999/99999 9 9 / 9 9 9 9
999/9999 9 / 9 9 9
9999/9999
999/999 1m 0sm 0s1m 0s
1m 0s
22
19
23
26
1516
1 2 4
10
12
13
11
67
9
8
5
ba
3
14
20
21
17
18
1 Date of recording......................................... 24
2 Time of recording .................... .................... 24
3 Voice memo indicator ........................ ...... 71
4
Album icon in favorite pictures mode................................................................................. 70
Category icon in auto sort mode....... 70List by date mode........................................ 70
5 Battery level indicator................................ 22
6 Protect icon ................... ................... ............... 71
7 GPS reception................................................. 86
8 Log display....................................................... 91
9 Compass display (Compass) ................. 91
10 Print order icon.............................................. 71
11 Image mode.................................................... 61
12 Movie options................................................ 83
13 Easy panorama indicator......................... 45
14
(a) Current image number/totalnumber of images................................ 32
(b) Movie length........................................... 84
15 Internal memory indicator .....................32
16
Easy panorama playback guide........................................................................... E4Sequence playback guide ................E7Movie playback guide............................... 84
17 List by date guide ................................E1418 Volume indicator.................................. 71, 84
19Location name information(POI information).......................................... 91
20 D-Lighting icon ................... ...................... .... 71
21 Quick retouch icon...................................... 71
22 Filter effects icon ................... ...................... . 71
23 Small picture .................... ...............71,E2124 Glamour retouch icon............................... 71
25 Sequence display......................................... 72
26 File number and type........................E85

7/28/2019 Cool Pix Camera Manual AW100EN_Manual
http://slidepdf.com/reader/full/cool-pix-camera-manual-aw100enmanual 33/242
9
P a r t s of t h e C a m
er a a n d B a s i c O p er a t i on s
Basic Operations
Switching Between Shooting Mode and Playback Mode
The camera has two modes of operation: Shooting mode, which is used for taking
pictures, and playback mode, which is used for viewing pictures.
Press thec (playback) button to switch to playback mode.Press the A (shooting mode) button to switch to shooting mode.
• While using playback mode, you can also switch to shooting mode by pressing
the shutter-release button or theb (emovie-record) button.
• If you press the A (shooting mode) button while the shooting mode is
displayed, the shooting-mode selection menu is displayed, from which you canselect one of the available shooting modes (A26, 27).
• If you press thec (playback) button while the playback mode is displayed, the
playback-mode selection menu is displayed, from which you can select one of the available playback modes (A70).
• Use the multi selector to select a shooting mode or playback mode (A10).
Shooting mode
Shooting-mode selectionmenu
Playback-mode selectionmenu
Playback mode
5 0 s5 0 s
21121
Easy auto mode
44 44ޓ
0004.JPG004.JPG0004.JPG15:305:3015:3015/11 /20115/11 /201115/11 /2011
Play

7/28/2019 Cool Pix Camera Manual AW100EN_Manual
http://slidepdf.com/reader/full/cool-pix-camera-manual-aw100enmanual 34/242
10
Basic Operations
P a r t s of t h eC a m
er a a nd B a s i c Oper a t i ons
Using the Multi Selector
Operate by pressing up (H), down (I), left (J), right (K), or thek button.
When Using Shooting Mode
When Using Playback Mode
* When displaying image thumbnails or when the image is magnified, this button switches the
camera to full-frame playback mode.
When Displaying Menus
Displaym (lash mode)
menu (A54), select theitem above
Apply selection
DisplayD (macro mode) menu (A57), choose the item below
Displayn (sel-timer)menu (A56)
Flash mode
Display theo (exposurecompensation) guide(A58)
Select the previousimage, move thedisplayed area whenthe image ismagniied (A33)
44 44ޓ
0004.JPG004.JPG0004.JPG15:305:3015:3015/11 /20115/11/201115/11 /2011
Plays back images o a sequence (E7),plays back panorama pictures (E4),plays back movies (A84)*
Select the nextimage, move thedisplayed area whenthe image is
magniied (A33)
Apply selection
Shooting menu
Continuous
Autofocus modeAF area modeISO sensitivity
White balanceImage mode
Select the item below
Select the item on thelet, return display tothe previous screen
Select the item onthe right, displaysub-menu (applyselection)
Select the item above
7/28/2019 Cool Pix Camera Manual AW100EN_Manual
http://slidepdf.com/reader/full/cool-pix-camera-manual-aw100enmanual 35/242
11
Basic Operations
P a r t s of t h e C a m
er a a n d B a s i c O p er a t i on s
Using Menus (thed Button)
When thed button is pressed while the shooting screen or playback screen is
displayed, the menu for the current mode is displayed. Once the menu is
displayed, various settings can be changed.
21121
5 0 s5 0 s
Image mode
Easy auto mode
44 44ޓ
0004.JPG004.JPG0004.JPG15:305:3015:3015/11 /20115/11/201115/11 /2011
Playback menu
Protect
Slide showPrint orderFilter ef ectsGlamour retouchD-Lighting
Quick retouch
Shooting mode Playback mode
TabsTabs
c tab:Displays available settings in the currentplayback mode (A70). Depending onthe current playback mode, the tab iconthat is displayed will be different.
z tab:
Displays the setup menu (basic camerasetup) items.
A tab:Displays available settings in the currentshooting mode (A27). Depending onthe current shooting mode, the tab iconthat is displayed will be different.
D tab:
Displays the settings that deal withmovie recording.
z tab:
Displays the setup menu (basic camera
setup) items.
C If Tabs Are Not Displayed
If you press thed button and the screen that allows you to
change the image mode is displayed, pressJ to display the tabs.
1024×768
2048×1536
2592×19443264×2448
4000×3000
4608×3456
4608×3456
Image mode

7/28/2019 Cool Pix Camera Manual AW100EN_Manual
http://slidepdf.com/reader/full/cool-pix-camera-manual-aw100enmanual 36/242
12
Basic Operations
P a r t s of t h eC a m
er a a nd B a s i c Oper a t i ons
Switching Between Tabs
Selecting Menu Items
C Displayed When the Menu Contains Two or More Pages
The scroll bar is displayed to indicate the current page.
Shooting menu
Continuous
Autofocus modeAF area modeISO sensitivity
White balanceImage mode
Continuous
Autofocus modeAF area modeISO sensitivity
White balanceImage mode
Shooting menu Set up
Welcome screen
AF assistMotion detectionVibration reductionPrint date
Monitor settingsTime zone and date
Press the multi selectorJ to highlight the tab.
Press the multi selectorH orI to select a tab, andpress thek button orK.
The selected menu isdisplayed.
Shooting menu
Continuous
Autofocus modeAF area modeISO sensitivity
White balanceImage mode
Autofocus mode
Single AFFull-time AF
Press the multi selector
H orI to select an item,and then pressK or thek button.
PressHorI to select an
item and then press thek button.
When you inish
changing settings, pressthed (menu) buttonto exit the menu.
Set up
Welcome screen
AF assistMotion detectionVibration reductionPrint dateMonitor settingsTime zone and date

7/28/2019 Cool Pix Camera Manual AW100EN_Manual
http://slidepdf.com/reader/full/cool-pix-camera-manual-aw100enmanual 37/242
13
Basic Operations
P a r t s of t h e C a m
er a a n d B a s i c O p er a t i on s
Using the Action Button
When the action button is pressed, either of the
following operations set in Assign action button of
the setup menu (A94) can be performed.
• Display maps.• Perform the function by shaking the camera (action
control).
Display map
Display the current location on a map during shooting
(only when Record GPS data in GPS options of the
map menu (A86) is set to On).
Display the shooting location of an image on a map
during playback (only images on which positioninformation is recorded).
Action controlAs shown in the illustration, use your wrist and shake the camera for a single up/
down or forward/backward stroke to perform the functions.
In the action menu, you can select the following options by shaking the camera
up/down or forward/backward.
•Shooting mode: You can select the Easy auto mode, Auto mode, Beach,Snow, Landscape and Underwater modes.
• Start movie recording: Press the action button to begin shooting. Press thebutton again to exit shooting.
• Quick playback : Display images in full-frame playback mode.
• Current position: Display the current location on a map (only when Record
GPS data in GPS options of the map menu (A86) is set to On).
Press the action button to select the function.
In Quick playback or full-frame playback mode, shake the camera up/down to
display the next image or forward/backward to display the previous image.
500km
ConrmonfrmConrm
Easy auto mode
Action menu

7/28/2019 Cool Pix Camera Manual AW100EN_Manual
http://slidepdf.com/reader/full/cool-pix-camera-manual-aw100enmanual 38/242
14
Basic Operations
P a r t s of t h eC a m
er a a nd B a s i c Oper a t i ons
B Notes on Action Control
• When using the action control, be sure to hold the camera firmly by passing your hand through
the camera strap.
• In the action control, only the action button, shutter-release button and power switch can be used.
• Action control may not perform well depending on how the camera is shaken. Change the Action
control response (A95).
Attaching the Camera Strap for Land Use
Remove the strap for land use before using the camera underwater.
Use of the Filter Adapter and the Attachment Method
Use the included filter adapter to attach a commercially available φ 40.5 mm filter.
The filter adapter is used in cases such as when attaching the color filter or
polarizing filter.
Attach the filter adapter to the camera strap using a cord.
B Note on Using the Filter Adapter
Lights of AF-assist illuminator/movie illuminator (A2) are blocked out when the filter adapter isattached. Set AF illuminator (A95) and movie illuminator (A83) to Off when using the filter
adapter.
7/28/2019 Cool Pix Camera Manual AW100EN_Manual
http://slidepdf.com/reader/full/cool-pix-camera-manual-aw100enmanual 39/242
15
T h e
B a s i c s of S h o o t i n g a n d P l a
y b
a c k
The Basics of Shooting andPlayback
Preparation
Preparation 1 Charge the Battery .................................................................................. 16Preparation 2 Insert the Battery ..................................................................................... 18
Preparation 3 Insert a Memory Card............................................................................. 20
Shooting
Step 1 Turn the Camera On.............................................................................................. 22
Setting the Display Language, Date, and Time (First Use Only) ................. 24Step 2 Select a Shooting Mode....................................................................................... 26Step 3 Frame a Picture ....................................................................................................... 28Step 4 Focus and Shoot..................................................................................................... 30
Playback
Step 5 Play Back Images .................................................................................................... 32Step 6 Delete Unwanted Images ................................................................................... 34

7/28/2019 Cool Pix Camera Manual AW100EN_Manual
http://slidepdf.com/reader/full/cool-pix-camera-manual-aw100enmanual 40/242
16
T h e
B a s i c s of S h oot i nga nd P l a y b
a c k
The Basics of Shooting and Playback
Preparation 1 Charge the Battery
1 Connect the power cable in the order indicated below.
2 Insert the battery into the battery chargerby sliding the battery orward (1), andpress down until it locks into place (2).• CHARGE lamp starts blinking when charging starts.
• A fully-exhausted battery charges in about two
hours and 30 minutes.
• When charging is complete, the CHARGE lamp
stops blinking.
• See “Understanding CHARGE Lamp” (A17).
3 When charging is complete, remove the battery, and then unplug thecharger.
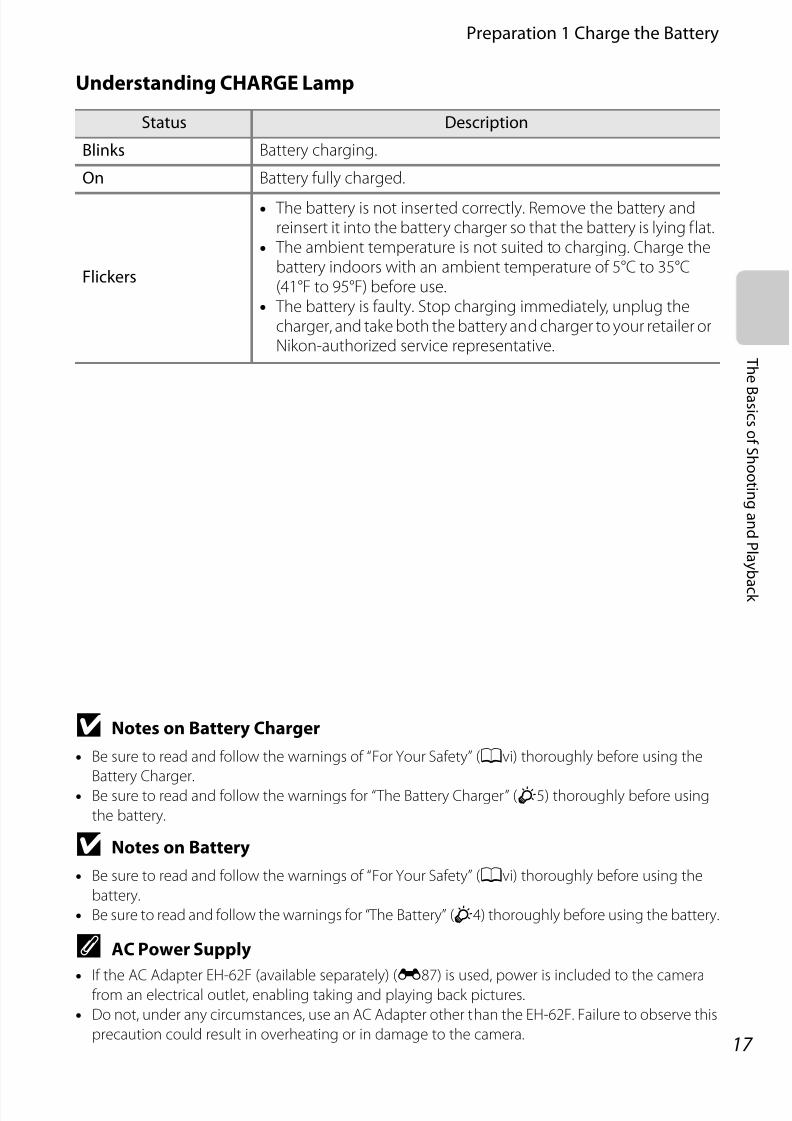
7/28/2019 Cool Pix Camera Manual AW100EN_Manual
http://slidepdf.com/reader/full/cool-pix-camera-manual-aw100enmanual 41/242
17
Preparation 1 Charge the Battery
T h e
B a s i c s of S h o o t i n g a n d P l a
y b
a c k
Understanding CHARGE Lamp
B Notes on Battery Charger
• Be sure to read and follow the warnings of “For Your Safety” (Avi) thoroughly before using the
Battery Charger.
• Be sure to read and follow the warnings for “ The Battery Charger” (F5) thoroughly before using
the battery.
B Notes on Battery
• Be sure to read and follow the warnings of “For Your Safety” (Avi) thoroughly before using the
battery.
• Be sure to read and follow the warnings for “ The Battery” (F4) thoroughly before using the battery.
C AC Power Supply
•If the AC Adapter EH-62F (available separately) (E87) is used, power is included to the camerafrom an electrical outlet, enabling taking and playing back pictures.
• Do not, under any circumstances, use an AC Adapter other than the EH-62F. Failure to observe this
precaution could result in overheating or in damage to the camera.
Status Description
Blinks Battery charging.
On Battery fully charged.
Flickers
• The battery is not inserted correctly. Remove the battery andreinsert it into the battery charger so that the battery is lying flat.
• The ambient temperature is not suited to charging. Charge thebattery indoors with an ambient temperature of 5°C to 35°C(41°F to 95°F) before use.
• The battery is faulty. Stop charging immediately, unplug thecharger, and take both the battery and charger to your retailer orNikon-authorized service representative.

7/28/2019 Cool Pix Camera Manual AW100EN_Manual
http://slidepdf.com/reader/full/cool-pix-camera-manual-aw100enmanual 42/242
18
T h e
B a s i c s of S h oot i nga nd P l a y b
a c k
Preparation 2 Insert the Battery
1 Press the battery-chamber/memory-cardslot cover latch release (1) and rotate thebattery-chamber/memory-card slot coverlatch (2) to open the cover (3).
2 Insert the battery.
• Use the battery to push the
orange battery latch in the
direction shown (1), and fully
insert the battery (2).
• When the battery is fully inserted,
the battery latch locks it in place.
B Inserting the Battery Correctly
Inserting the battery upside down or backwards could damage the camera. Be
sure to confirm that the battery is in the correct orientation.
3 Push the battery chamber/memory cardslot-cover to the camera (1) and rotatethe battery chamber/ memory card slot-cover latch until the cover is locked (2).
• Rotate the battery-chamber/memory-card slot
cover latch until it clicks into place.
B Note on Closing the Cover without Getting the Camera Strap or Cord
Caught
If the camera strap or filter adapter’s cord gets caught in the battery-chamber/memory card slot
cover when it is closed, the cover could be damaged. Before closing the battery-chamber/memory
card slot cover, make sure that the strap or cord does not get caught in it.
Battery latch

7/28/2019 Cool Pix Camera Manual AW100EN_Manual
http://slidepdf.com/reader/full/cool-pix-camera-manual-aw100enmanual 43/242
19
Preparation 2 Insert the Battery
T h e
B a s i c s of S h o o t i n g a n d P l a
y b
a c k
Removing the Battery
Before opening the battery-chamber/memory card
slot cover, turn the camera off (A23) and confirm that
the power-on lamp and the monitor are off.
To eject the battery, open the battery-chamber/
memory card slot cover and slide the orange battery
latch in the direction shown (1). Then, remove the
battery straight (2).
B High Temperature Caution
The camera, battery, and memory card may be hot immediately after using the camera. Observe
caution when removing the battery or memory card.
B Opening/Closing the Battery Chamber/Memory Card Slot-Cover
Do not open and close the battery chamber/memory card slot-cover in a sandy or dusty
environment or with wet hands. If the cover is closed without removing foreign particles, water may
seep inside the camera or the camera may become damaged.
• If foreign particles get inside the cover or camera, immediately remove them with a blower or
brush.
• If liquid such as water gets inside the cover or camera, immediately wipe it off with a soft and dry
cloth.

7/28/2019 Cool Pix Camera Manual AW100EN_Manual
http://slidepdf.com/reader/full/cool-pix-camera-manual-aw100enmanual 44/242
20
T h e
B a s i c s of S h oot i nga nd P l a y b
a c k
Preparation 3 Insert a Memory Card
1 Conirm that the power-on lamp and themonitor are turned o and open thebattery-chamber/memory card slot cover.
• Be sure to turn off the camera before opening the
cover.
2 Insert the memory card.
• Slide the memory card until it clicks
into place.
B Inserting the Memory CardCorrectlyInserting the memory card upside
down or backwards could damage the
camera or the memory card. Be sure to
confirm that the memory card is in the
correct orientation.
3 Close the battery-chamber/memory cardslot cover.
B Note on Closing the Cover without Getting the Camera Strap or Cord
Caught
If the camera strap or filter adapter’s cord gets caught in the battery-chamber/memory card slot
cover when it is closed, the cover could be damaged. Before closing the battery-chamber/memory
card slot cover, make sure that the strap or cord does not get caught in it.
B Formatting a Memory Card
• The first time you insert a memory card that has been used in another device into this camera, be
sure to format it with this camera.
• All data stored on a memory card is permanently deleted when the card is formatted. Be
sure to make copies of any data you wish to keep before formatting the memory card.
• To format a memory card, insert the memory card into the camera and press thed button, and
select Format card from the setup menu (A94).
B Note on Memory Cards
Refer to the documentation included with the memory card, as well as “ The Memory Cards” (F6) in
“Caring for the Products”.

7/28/2019 Cool Pix Camera Manual AW100EN_Manual
http://slidepdf.com/reader/full/cool-pix-camera-manual-aw100enmanual 45/242
21
Preparation 3 Insert a Memory Card
T h e
B a s i c s of S h o o t i n g a n d P l a
y b
a c k
Removing Memory Cards
Before opening the battery-chamber/memory card
slot cover, turn the camera off and confirm that the
power-on lamp and the monitor are off.
Press the memory card in lightly with your finger(1) to partially eject it, and then pull it out straight
(2).
B High Temperature Caution
The camera, battery, and memory card may be hot immediately after using the camera. Observe
caution when removing the battery or memory card.
Internal Memory and Memory Cards
Camera data, including images and movies, can be saved in either the camera’sinternal memory (approximately 83 MB) or on a memory card. To use the camera’s
internal memory for shooting or playback, first remove the memory card.
Approved Memory Cards
The following Secure Digital (SD) memory cards have been tested and approved
for use in this camera.
• When recording a movie onto a memory card, a memory card with an SD speed
class of Class 6 or higher is recommended. If the transfer speed of the card isslow, the movie recording may end unexpectedly.
1 Before using a card reader or similar device, check that the device supports 2 GB cards.2 SDHC-compliant. Before using a card reader or similar device, check that the
device supports SDHC.
3 SDXC-compliant. Before using a card reader or similar device, check that thedevice supports SDXC.
• Contact the manufacturer for details on the above cards.
SD memory cards1 SDHC memory cards2 SDXC memory cards3
SanDisk 2 GB 4 GB, 8 GB, 16 GB, 32 GB 64 GB
TOSHIBA 2 GB 4 GB, 8 GB, 16 GB, 32 GB 64 GB
Panasonic 2 GB4 GB, 8 GB, 12 GB,16 GB, 32 GB
48 GB, 64 GB
Lexar - 4 GB, 8 GB, 16 GB, 32 GB -

7/28/2019 Cool Pix Camera Manual AW100EN_Manual
http://slidepdf.com/reader/full/cool-pix-camera-manual-aw100enmanual 46/242
22
T h e
B a s i c s of S h oot i nga nd P l a y b
a c k
Step 1 Turn the Camera On
1 Press the power switch to turn on the camera.
• If you are turning the camera on for the first time,
see “Setting the Display Language, Date, and
Time” (A24).• The monitor is turned on.
2 Check the battery level and number o exposures remaining.
Battery Level
Number of Exposures Remaining
The number of exposures remaining is displayed.
• When a memory card is not inserted,C is displayed and images are recorded to theinternal memory (approx. 83 MB).
• The number of pictures that can be stored depends on the remaining capacity of the
internal memory or memory card, and the image quality and image size (image
mode) (A61).
• The number of exposures remaining shown in the illustration differs from the actual
value.
Display Description
b Battery level high.
B Battery level low. Prepare to charge or replace the battery.
NBattery exhausted.
Cannot take pictures. Charge or replace the battery.
2 112 1
5 0 s5 0 s
Battery level indicator
Number o exposuresremaining

7/28/2019 Cool Pix Camera Manual AW100EN_Manual
http://slidepdf.com/reader/full/cool-pix-camera-manual-aw100enmanual 47/242
23
Step 1 Turn the Camera On
T h e
B a s i c s of S h o o t i n g a n d P l a
y b
a c k
Turning the Camera On and Off • When the camera is turned on, the power-on lamp (green) lights, and the
monitor is turned on (the power-on lamp turns off when the monitor is turned
on).
• To turn off the camera, press the power switch. Both the monitor and the
power-on lamp are turned off.
• Hold down thec (playback) button to turn on the camera in playback mode.
C Power Saving Function (Auto Off)
If no operations are performed for a while, the monitor will be turned off, the camera will enter
standby mode, and the power-on lamp will blink. If no operations are performed for another three
minutes, the camera will turn off automatically.
While the camera is in standby mode, the monitor is turned on again when any of the following
buttons is pressed.
➝ Power switch, shutter-release button, A (shooting mode) button,c (playback) button, or
b (emovie-record) button
• The time that elapses before the camera enters standby mode can be changed using the Auto off
setting in the setup menu (A94).
• In the default setting, the camera enters standby mode in about five minutes when you are using
shooting mode or playback mode.
• If you are using the optional AC Adapter EH-62F, the camera enters standby mode after
30 minutes.
2 121
50 s50s
Blinks
No operationsperormed.
No operationsperormed.
3 min
Camera entersstandby mode.
Camera turns o.

7/28/2019 Cool Pix Camera Manual AW100EN_Manual
http://slidepdf.com/reader/full/cool-pix-camera-manual-aw100enmanual 48/242
24
Step 1 Turn the Camera On
T h e
B a s i c s of S h oot i nga nd P l a y b
a c k
Setting the Display Language, Date, and Time
Dialogs for language selection and camera clock setting are displayed the first time
the camera is turned on.
1Press the multi selectorH orI to choose the desired languageand press thek button.
2 PressH orI to choose Yes and press thek
button.• To cancel setting, select No.
3 PressJorK to select your hometime zone (Time zone), and press
thek
button.• See “Daylight Saving Time” (A25) for
more information about daylight
saving time.
4 PressHorI to choose the date display orderand press thek button orK.
ČeštinaDansk
DeutschEnglishEspañolΕλληνικά
Cancel
Language
Multi selector
Time zone and date
set date and time?
No
Yes
Cancel
Choose time zone and
Back
LondonCasablanca
Date format
Year/Month/DayMonth/Day/Year
Day/Month/Year
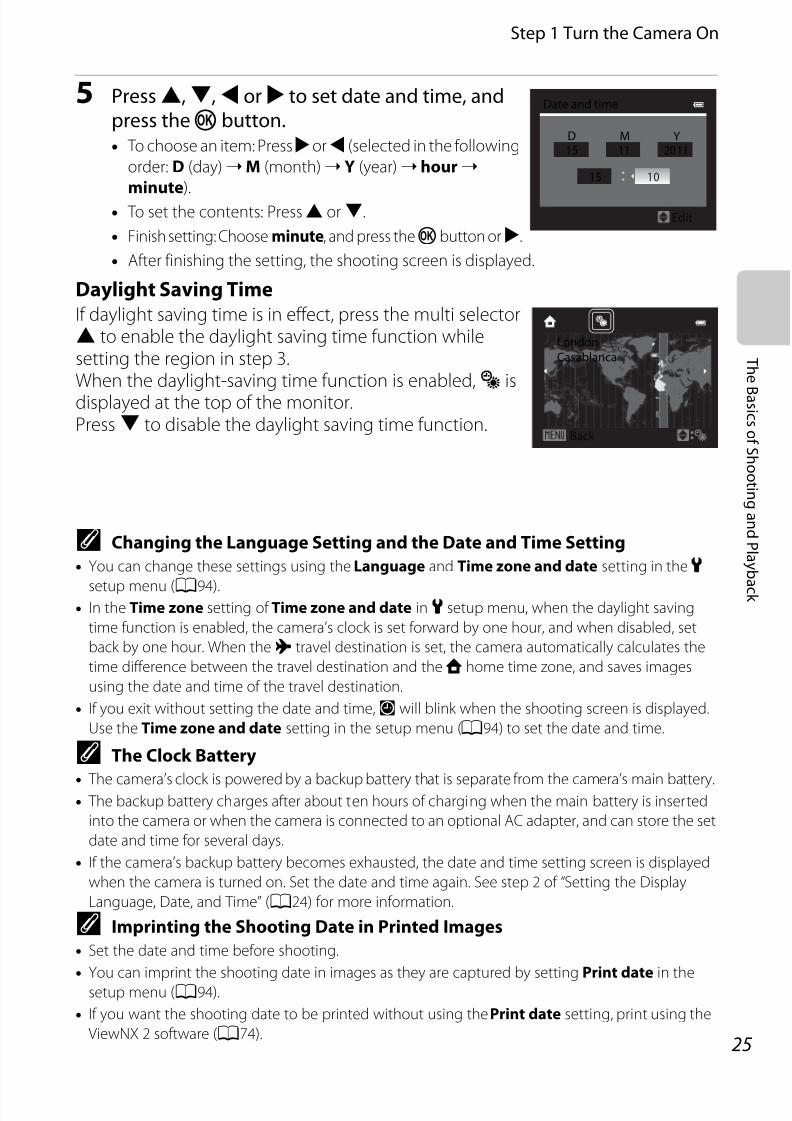
7/28/2019 Cool Pix Camera Manual AW100EN_Manual
http://slidepdf.com/reader/full/cool-pix-camera-manual-aw100enmanual 49/242
25
Step 1 Turn the Camera On
T h e
B a s i c s of S h o o t i n g a n d P l a
y b
a c k
5 PressH,I,J orK to set date and time, andpress thek button.• To choose an item: PressKorJ (selected in the following
order: D (day)➝ M (month)➝ Y (year)➝ hour ➝
minute).• To set the contents: PressH orI.
• Finish setting: Choose minute, and press thekbutton orK.
• After finishing the setting, the shooting screen is displayed.
Daylight Saving TimeIf daylight saving time is in effect, press the multi selectorH to enable the daylight saving time function whilesetting the region in step 3.When the daylight-saving time function is enabled,W isdisplayed at the top of the monitor.PressI to disable the daylight saving time function.
C Changing the Language Setting and the Date and Time Setting
• You can change these settings using the Language and Time zone and date setting in the z
setup menu (A94).• In the Time zone setting of Time zone and date in z setup menu, when the daylight saving
time function is enabled, the camera’s clock is set forward by one hour, and when disabled, set
back by one hour. When thex travel destination is set, the camera automatically calculates the
time difference between the travel destination and thew home time zone, and saves images
using the date and time of the travel destination.
• If you exit without setting the date and time,O will blink when the shooting screen is displayed.
Use the Time zone and date setting in the setup menu (A94) to set the date and time.
C The Clock Battery
• The camera’s clock is powered by a backup battery that is separate from the camera’s main battery.
• The backup battery charges after about ten hours of charging when the main battery is inserted
into the camera or when the camera is connected to an optional AC adapter, and can store the set
date and time for several days.
• If the camera’s backup battery becomes exhausted, the date and time setting screen is displayed
when the camera is turned on. Set the date and time again. See step 2 of “Setting the Display
Language, Date, and Time” (A24) for more information.
C Imprinting the Shooting Date in Printed Images
• Set the date and time before shooting.
• You can imprint the shooting date in images as they are captured by setting Print date in the
setup menu (A94).
• If you want the shooting date to be printed without using the Print date setting, print using the
ViewNX 2 software (A74).
15 10
Date and time
Edit
1115MD
2011Y
LondonCasablanca
Back

7/28/2019 Cool Pix Camera Manual AW100EN_Manual
http://slidepdf.com/reader/full/cool-pix-camera-manual-aw100enmanual 50/242
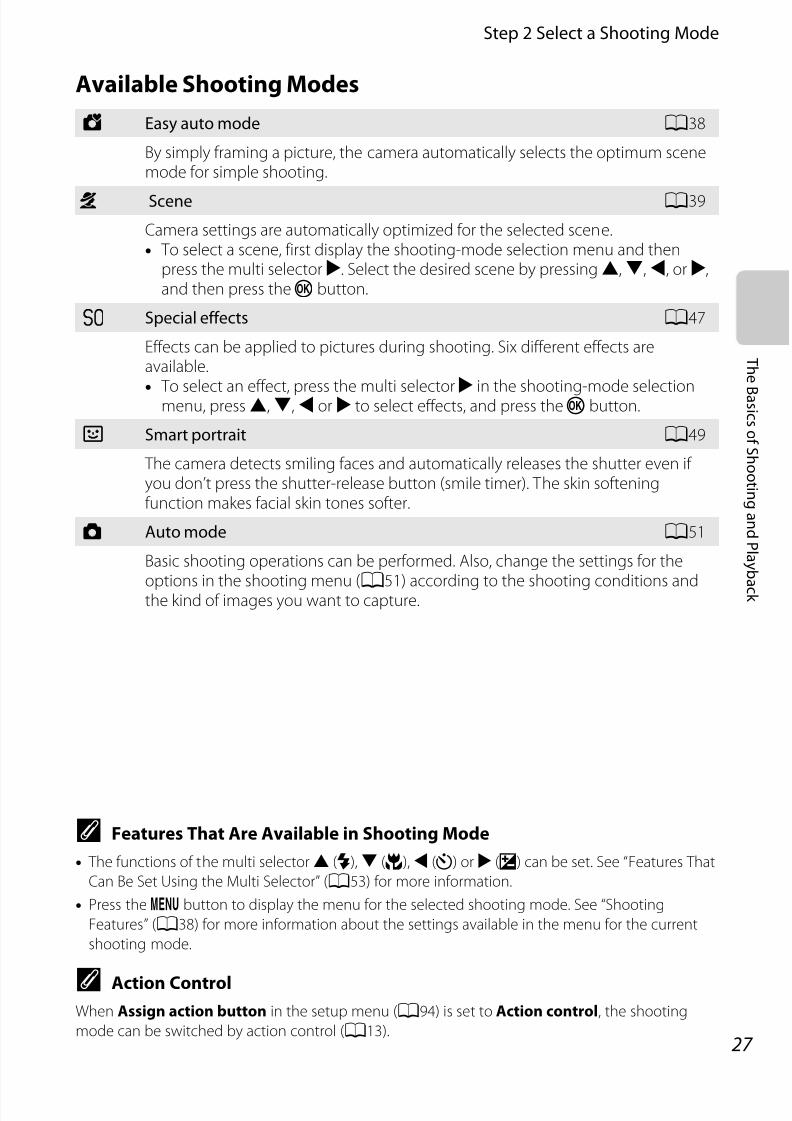
7/28/2019 Cool Pix Camera Manual AW100EN_Manual
http://slidepdf.com/reader/full/cool-pix-camera-manual-aw100enmanual 51/242
27
Step 2 Select a Shooting Mode
T h e
B a s i c s of S h o o t i n g a n d P l a
y b
a c k
Available Shooting Modes
C Features That Are Available in Shooting Mode
• The functions of the multi selectorH (m),I (p),J (n) orK (o) can be set. See “Features That
Can Be Set Using the Multi Selector” (A53) for more information.
• Press thed button to display the menu for the selected shooting mode. See “Shooting
Features” (A38) for more information about the settings available in the menu for the current
shooting mode.
C Action ControlWhen Assign action button in the setup menu (A94) is set to Action control, the shooting
mode can be switched by action control (A13).
G Easy auto mode A38
By simply framing a picture, the camera automatically selects the optimum scenemode for simple shooting.
b Scene A39
Camera settings are automatically optimized for the selected scene.• To select a scene, first display the shooting-mode selection menu and then
press the multi selectorK. Select the desired scene by pressingH,I,J, orK,and then press thek button.
D Special eects A47
Effects can be applied to pictures during shooting. Six different effects areavailable.•
To select an effect, press the multi selectorK in the shooting-mode selectionmenu, pressH,I,J orK to select effects, and press thek button.
F Smart portrait A49
The camera detects smiling faces and automatically releases the shutter even if you don’t press the shutter-release button (smile timer). The skin softeningfunction makes facial skin tones softer.
A Auto mode A51
Basic shooting operations can be performed. Also, change the settings for the
options in the shooting menu (A51) according to the shooting conditions andthe kind of images you want to capture.
7/28/2019 Cool Pix Camera Manual AW100EN_Manual
http://slidepdf.com/reader/full/cool-pix-camera-manual-aw100enmanual 52/242
28
T h e
B a s i c s of S h oot i nga nd P l a y b
a c k
Step 3 Frame a Picture
1 Ready the camera.• Keep your fingers, hair, camera strap and other objects away from the lens, flash, AF-
assist illuminator and microphone.
• To shoot in the “tall” orientation, hold the camera so that the flash is above the lens.
2 Frame the picture.• When the camera determines a scene mode, the
shooting mode icon changes (A26).
• When the camera detects a face, a yellow double
border (focus area) is displayed.
See “Using Face Detection” (A65) for more
information.• When non-human subjects are photographed, or a subject with which no face can be
detected is framed, the focus area is not displayed. Position the main subject near the
center of the monitor.
B Notes on G (Easy Auto) Mode
• When the digital zoom is in effect, the shooting mode is set toU.
• Depending upon shooting conditions, the camera may not select the desired scene mode. In this
case, select another shooting mode.
C ISO Sensitivity
E (ISO sensitivity,A7) may be displayed on the shooting screen. WhenE is displayed, the ISO
sensitivity is automatically raised.
C Using a Tripod
• In the following situations, use of a tripod is recommended to stabilize the camera during
shooting and to avoid the effects of camera shake.
– When shooting in dark surroundings or when flash mode (A54) is set to W (off)
– When shooting at the telephoto zoom position
• To take a picture with the camera attached to a tripod, set Vibration reduction in the setup
menu (A94) to Off .
21121
5 0 s5 0 s

7/28/2019 Cool Pix Camera Manual AW100EN_Manual
http://slidepdf.com/reader/full/cool-pix-camera-manual-aw100enmanual 53/242
29
Step 3 Frame a Picture
T h e
B a s i c s of S h o o t i n g a n d P l a
y b
a c k
Using the Zoom
Press the zoom buttons to activate the optical zoom.
• The subject fills a larger area of the frame: Press g (zoom in).
• The area visible increases in the frame: Pressf (zoom out).
• When the power is turned on, the zoom is at the
maximum wide-angle position.
• A zoom position is displayed at the top of themonitor when the zoom button is pressed.
Digital Zoom
If the zoom buttong is pressed continuously when optical zoom is set at themaximum telephoto zoom position (maximum optical zoom), digital zoom will be
activated.
Digital zoom can magnify the subject up to about 4× beyond the maximum
magnification of the optical zoom.
• The focus will be at the center of the frame and the focus area will not bedisplayed when the digital zoom is in effect.
C Digital Zoom and Interpolation
Unlike the optical zoom, the digital zoom uses a digital imaging process known as interpolation tomagnify images, resulting in slight deterioration of image quality depending on the image mode
(A61) and digital zoom magnification.
Interpolation is applied at zoom positions beyondV. When the zoom is increased beyond theV
position, interpolation is initiated and the zoom indicator also turns yellow.
Vmoves right as the image size becomes smaller, allowing you to confirm the zoom position that
can be used to capture still images without image degradation before shooting at the current image
mode setting.
• Using Digital zoom in the setup menu (A94), it is possible to set the digital zoom so that it does
not operate.
Zoom out Zoom in
Optical zoom Digital zoom
Maximum optical zoom Digital zoom enabled
When the image size is small

7/28/2019 Cool Pix Camera Manual AW100EN_Manual
http://slidepdf.com/reader/full/cool-pix-camera-manual-aw100enmanual 54/242
30
T h e
B a s i c s of S h oot i nga nd P l a y b
a c k
Step 4 Focus and Shoot
1 Press the shutter-release button halway, i.e.,press the button slightly until you eelresistance.
• When you press the shutter-release button halfway, the
camera sets the focus and exposure (shutter speed and
aperture value). Focus and exposure remain locked
while the shutter-release button is pressed halfway.
• When a face is detected:
Focuses on the face around which a double border
(focus area) is displayed (see “Using Face Detection”
(A65) for more information). When the camera has
focused on that face, the double border will turn green.
• When a face is not detected:
Focuses on the focus area selected by the camera
according to the shooting scene. When the subject is in
focus, the focus area (active focus area) lights in green
(maximum of nine areas).
• When the digital zoom is in effect, the camera focuses on the subject at the center of
the frame, and the focus area is not displayed. When the subject is in focus, the focus
indicator (A6) lights in green.
• When the shutter-release button is pressed halfway and the focus area or focus
indicator may blink red, the camera is unable to focus. Change the composition andpress the shutter-release button halfway again.
2 Press the shutter-release button all the way,i.e., press the button the rest o the way down.
• The shutter is released and the picture is recorded.
• If you press the shutter-release button with too much
force, the camera may shake, causing images to be
blurred. Press the button gently.
1 /2 50/2501 /2 50 F3.93. 9F3.9
Shutter speedAperture value
1 /2 50/2501 /2 50 F3.93. 9F3.9
Shutter speedAperture value
7/28/2019 Cool Pix Camera Manual AW100EN_Manual
http://slidepdf.com/reader/full/cool-pix-camera-manual-aw100enmanual 55/242
31
Step 4 Focus and Shoot
T h e
B a s i c s of S h o o t i n g a n d P l a
y b
a c k
B During Recording
• While the indicator showing the number of exposures remaining is blinking, images are being
recorded. Do not open the battery-chamber/memory card slot cover. Cutting the power or
removing the memory card in these circumstances could result in loss of data or in damage to the
camera or card.
• Depending on the settings or shooting conditions, the image recording time may take longerthan usual (F16).
B Autofocus
Autofocus may not perform as expected in the following situations. In some rare cases, the subject
may not be in focus despite the fact that the active focus area lights in green:
• Subject is very dark
• Objects of sharply differing brightness are included in the scene (e.g. the sun behind the subject
makes that subject appear very dark)
• No contrast between the subject and surroundings (e.g. a portrait subject, wearing a white shirt, is
standing in front of a white wall)• Several objects are at different distances from the camera (e.g., an animal inside a cage)
• Subjects that repeat the same pattern (e.g., as window blinds or buildings lined with windows of
the same shape)
• Subject is moving rapidly
In these situations, try pressing the shutter-release button halfway again to refocus, several times if
necessary. If the subject is still not in focus, select auto mode and use focus lock (A67) to take the
picture by first focusing on an object that is at the same distance from the camera as the desired
subject.
C AF-assist Illuminator and FlashIn dark places, the AF-assist illuminator (A95) may light when the shutter-release button is pressed
halfway, and the flash (A54) may fire when the shutter-release button is pressed all the way.
C To Make Sure You Do Not Miss a Shot
If you are concerned that you might miss a shot, press the shutter-release button all the way without
first pressing it halfway.

7/28/2019 Cool Pix Camera Manual AW100EN_Manual
http://slidepdf.com/reader/full/cool-pix-camera-manual-aw100enmanual 56/242
32
T h e
B a s i c s of S h oot i nga nd P l a y b
a c k
Step 5 Play Back Images
1 Press thec (playback) button.• When you switch from shooting mode
to playback mode, the last image saved
will be displayed in full-frame playback mode.
2 Use the multi selector to view the previous and next images.• To view previous images:H orJ
• To view next images:I orK
• The image can be also selected by using action control (A13) and shaking thecamera.
• To return to shooting mode, press the A button, the shutter-release button, or theb
(emovie-record) button.
• To play back images that are saved
in the internal memory, remove the
memory card.C is displayed
around “current image number/
total number of images“ on the
playback screen.
C Viewing Pictures• Pictures taken using face detection (A65) or pet detection (A46) will be rotated automatically
when displayed in full-frame playback mode according to the orientation of the face (except for
pictures taken when Continuous in the shooting menu (A51) was set).
• When pictures taken with the continuous shooting feature are displayed, each series of images is
treated as a group, and only the group’s “key picture” is displayed (see “Playing Images Captured
Using Continuous Shooting Mode (Sequence)” (A72) for more information).
• Images may be displayed at low resolution immediately after switching to the previous or next
image.
C More Information• See “Features Available in Playback Mode (Playback Menu)“ (A71) for more information.
• See “Selecting Certain Types of Images for Playback “ (A70) for more information.
Multi selector
c (playback)button
44 ޓ 44
0004.JPG004 .JPG0004.JPG15 :305 :3015 :3015/11 /2 0115/11 /201115/11 /2 011
Current imagenumber
Total number o images

7/28/2019 Cool Pix Camera Manual AW100EN_Manual
http://slidepdf.com/reader/full/cool-pix-camera-manual-aw100enmanual 57/242
33
Step 5 Play Back Images
T h e
B a s i c s of S h o o t i n g a n d P l a
y b
a c k
Changing How Images Are DisplayedWhen using playback mode, you can change howimages are displayed by pressing the zoom buttonf (h)/ g (i).
Playback Zoom
• To adjust the zoom ratio by pressing the zoom buttonf (h)/ g (i). Imagescan be zoomed up to 10×.
• To view a different area of the image, press the multi selectorH,I,J, orK.• Pictures taken using face detection (A65) or pet detection (A46) are
enlarged at the center of the face that was detected during shooting (except forpictures taken when Continuous in the shooting menu (A51) was set). If morethan one face is detected when the image was captured, useH,I,J, orK todisplay a different face. To zoom in on an area of the image where there are nofaces, first change the zoom ratio, and then pressH,I,J, orK.
• You can crop the displayed area of the image and save it as a separate image bypressing thed button (E21).
• Press thek button to return to full-frame playback mode.
Thumbnail Playback, Calendar Display
• You can view several images on one screen, making it easy to find the image you want.• You can change the number of images displayed by pressing the zoom buttonf (h)/ g (i).
• Press the multi selectorH,I,J, orK to select an image and then press thek button to display that image in full-frame playback mode.
•
When 16 images are displayed, press the zoom buttonf (h) to switch tocalendar display.• While using calendar display mode, press the multi selectorH,I,J, orK to select
a date and then press thek button to display the first picture taken on that day.
44 44ޓ
0004.JPG004.JPG0004.JPG
15:305:3015:3015/11 /20115/11/201115/11 /2011g
(i)
f (h)
Image is zoomed in.Image is displayed in ull-rame playback mode.
Display position guide
132321321
0004.JPG004.JPG0004.JPG15:305:3015:3015/11 /20115/11/201115/11 /2011 1 132 /
3
2011 11
8 9 10 11 1276
13 14 15 16 17 18 19
20 21 22 23 24 25 26
27 28 29
21 3 4 5
30
Image Thumbnail Display(4, 9 and 16 images per screen)
Full-rame Playback Mode
Calendar Display
g (i)
f (h)
g(i)
f (h)

7/28/2019 Cool Pix Camera Manual AW100EN_Manual
http://slidepdf.com/reader/full/cool-pix-camera-manual-aw100enmanual 58/242
34
T h e
B a s i c s of S h oot i nga nd P l a y b
a c k
Step 6 Delete Unwanted Images
1 Press thel button to delete theimage currently displayed on themonitor.
2 Press the multi selectorH orI to select thedesired deletion method and press thek button.• Current image: Only the current image is deleted.
• Erase selected images: Multiple images can be
selected and deleted. See “Operating the EraseSelected Images Screen” (A35) for more information.
• All images: All images are deleted.
• To exit without deleting, press thed button.
3 PressH orI to select Yes and press thek button.• Deleted images cannot be recovered.
• To cancel, pressH orI to select No and press thek
button.
B Notes on Deletion
• Deleted images cannot be recovered. Transfer important images to a computer before deleting
them.
• Protected images cannot be deleted (A71).
C Deleting Images in a Sequence
• When images are taken with continuous shooting, each series of images is treated as a group
(pictures in a sequence) and only the group’s “key picture“ is displayed in the default setting (E7).
• When thel button is pressed during displaying only the key picture, all images in the sequence,
including the key picture, are deleted.
• To delete each picture in a sequence, before pressing thel button, press thek button to display
each image in the sequence individually.
C Deleting the Last Image Captured While in Shooting Mode
When using shooting mode, press thel button to delete the last image that was saved.
All imagesErase selected images
Current image
Delete
Erase 1 image?
YesNo

7/28/2019 Cool Pix Camera Manual AW100EN_Manual
http://slidepdf.com/reader/full/cool-pix-camera-manual-aw100enmanual 59/242
35
Step 6 Delete Unwanted Images
T h e
B a s i c s of S h o o t i n g a n d P l a
y b
a c k
Operating the Erase Selected Images Screen
1 Press the multi selectorJ orK to select animage to be deleted, and then pressH todisplayy.• To cancel the selection, pressI to removey.
• Press the zoom button (A29)g (i) to switch back to
full-frame playback mode orf (h) to display
thumbnails.
2 Addy to all images that you want to delete and then press thek button to apply the selection.• A confirmation dialog is displayed. Follow the instructions displayed on the monitor.
C Selecting Certain Types of Images for DeletionWhen using favorite pictures mode, auto sort mode, or list by date mode (A70), images in the
same album or category, or pictures taken on the same date can be deleted.
ON/OFF
Erase selected images
Back

7/28/2019 Cool Pix Camera Manual AW100EN_Manual
http://slidepdf.com/reader/full/cool-pix-camera-manual-aw100enmanual 60/242
36
7/28/2019 Cool Pix Camera Manual AW100EN_Manual
http://slidepdf.com/reader/full/cool-pix-camera-manual-aw100enmanual 61/242
37
S h o o t i n gF e a t ur e s
Shooting Features
This chapter describes each of the camera’s shooting modes and the features that
are available when using shooting mode.
By referring to this information, you will learn how to select different shooting
modes and adjust settings according to the shooting conditions and the kind of
images you want to capture.
1 3 4 2134 2
2 9 m 0 s29 m 0s
Auto mode
2 9 m 0 s
1 3 4 2134 2
29 m 0s
Shooting menu
Continuous
Autofocus modeAF area modeISO sensitivity
White balanceImage mode
2 9 m 0 s
1 3 4 2134 2
29 m 0s
Flash mode
7/28/2019 Cool Pix Camera Manual AW100EN_Manual
http://slidepdf.com/reader/full/cool-pix-camera-manual-aw100enmanual 62/242
38
S h oot i ngF ea t ur es
Shooting Features
G (Easy Auto) Mode
When you frame a picture, the camera automatically selects the optimum scene
for simple shooting.
When the camera is pointed at the subject, the camera
automatically switches to the setting that is suited for
the following shooting mode.
• e: Portrait
• f: Landscape
• h: Night portrait
• g: Night landscape
• i: Close-up
• j: Backlighting
• a: Underwater*
• U: Other scenes* The camera is switched to underwater mode when it is lowered into water.
• The camera automatically selects the focus area for autofocus in accordancewith the composition. The camera detects and focuses on faces (see “Using
Face Detection” (A65) for more information).
B Notes on Easy Auto Mode
• When the digital zoom is in effect, the shooting mode is set toU.
• The desired scene mode may not be selected in certain conditions. In this case, select another
shooting mode.
B Note after Taking the Camera out of the Water
After taking the camera out of water, sometimes it may not automatically switch to another scene
from underwater mode.
Gently brush any water droplets with your hand from the camera or wipe it off with a soft and dry
cloth. See “Cleaning after using the camera underwater” (Axiii) for more information on caring forthe camera.
Changing G (Easy Auto) Mode Settings• See “Features That Can Be Set Using the Multi Selector” (A53) for more
information on flash mode (A54), self-timer (A56), and exposure
compensation (A58).
• Functions that can be set using thed button:
The combination of image size and image quality (image mode) can be set
using thed button (A61).C Features That Cannot Be Used Simultaneously
These features may not be used in combination with certain features (A63).
Display the shooting screenM A (shooting mode) buttonM G (Easy auto) mode
(A26, 27)
2 9 m 0 s
1 3 4 213 4 2
2 9m 0 s

7/28/2019 Cool Pix Camera Manual AW100EN_Manual
http://slidepdf.com/reader/full/cool-pix-camera-manual-aw100enmanual 63/242
39
S h o o t i n gF e a t ur e s
Scene Mode (Shooting Suited to Scenes)
When one of the following scenes is selected, pictures are captured using settings
that are optimized for the selected scene.
* The icon for the last scene mode selected is displayed. The default setting is b (portrait).
C View a Description of Each Scene (Help Information)
Select the desired scene from the scene selection screen and press
the zoom button (A29)g (j) to view a description of that scene
(help). To return to the original screen, press the zoom button g
(j) again.
Changing Scene Mode Settings• See “Features That Can Be Set Using the Multi Selector” (A53) for more
information. The setting varies with scene mode. See “Default Settings” (A59)for more information.
• Functions that can be set using thed button:
The combination of image size and image quality (image mode) can be set bypressing thed button in shooting mode (A61, except Easy panorama).
C Features That Cannot Be Used Simultaneously
These features may not be used in combination with certain features (A63).
Display the shooting screenM A (shooting mode) buttonM b (the second icon rom
the top*)M K M select a scene (A26, 27)
b Portrait (A40) k Close-up (A42)
c Landscape (A40) u Food (A43)
d Sports (A40) l Museum (A43)
e Night portrait (A41) m Fireworks show (A43)
f Party/indoor (A41) n Black and white copy (A43)
ZBeach (A41) o Backlighting (A44)
z Snow (A41) p Panorama (A45)
h Sunset (A41) OPet portrait (A46)
i Dusk/dawn (A42) C Underwater (A46)
j Night landscape (A42)
Portrait

7/28/2019 Cool Pix Camera Manual AW100EN_Manual
http://slidepdf.com/reader/full/cool-pix-camera-manual-aw100enmanual 64/242
40
Scene Mode (Shooting Suited to Scenes)
S h oot i ngF ea t ur es
Characteristics of Each Scene
Use of a tripod is recommended in scenes with whichO is indicated. Set
Vibration reduction in the setup menu (A94) to Off when using a tripod to
stabilize the camera.
b Portrait
Use this mode for portraits.• The camera detects and focuses on a face (see “Using Face
Detection” (A65) for more information).• After the skin softening feature makes the subject’s skin
appear smoother, the camera records the image (A66).• If no faces are detected, the camera focuses on the subject
at the center of the frame.• The digital zoom is not available.
c Landscape
Use this mode for vivid landscapes and cityscapes.• When the shutter-release button is pressed halfway, the
focus area or focus indicator (A6) always lights in green.
d Sports
Use this mode when shooting sporting events. The cameracaptures a series of still pictures that allow you to clearly seedetailed movements in a moving subject.• The camera focuses on the subject at the center area of the
frame.• To capture a series of images, hold down the shutter-
release button all the way. Up to 12 pictures are shot at a rate of about 1.4 frames persecond (fps) (when image mode is set toP 4608×3456).
• The camera focuses on the subject even when the shutter-release button is not pressed
halfway. You may hear the sound of the camera focusing.• Focus, exposure, and hue are fixed at the values determined with the first shot in each
series.• The frame rate with continuous shooting may decrease depending upon the current
image mode setting, the memory card used, or shooting condition.
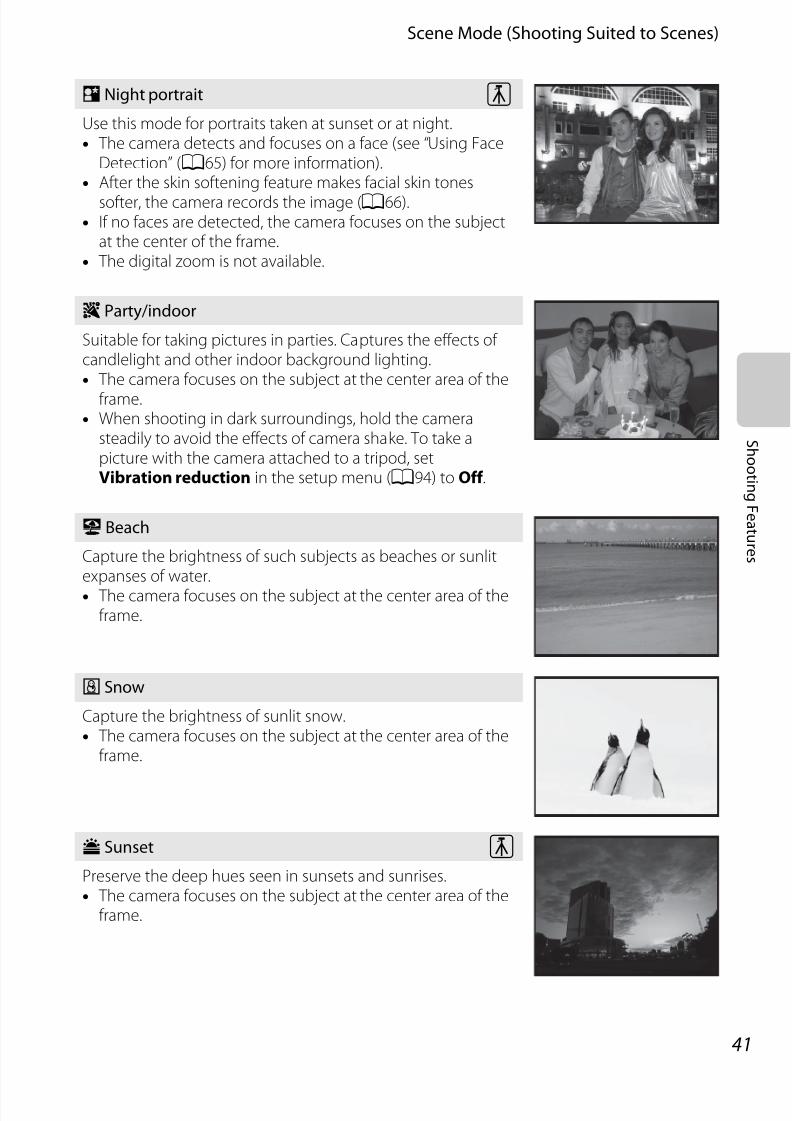
7/28/2019 Cool Pix Camera Manual AW100EN_Manual
http://slidepdf.com/reader/full/cool-pix-camera-manual-aw100enmanual 65/242
41
Scene Mode (Shooting Suited to Scenes)
S h o o t i n gF e a t ur e s
e Night portrait
Use this mode for portraits taken at sunset or at night.• The camera detects and focuses on a face (see “Using Face
Detection” (A65) for more information).• After the skin softening feature makes facial skin tones
softer, the camera records the image (A66).• If no faces are detected, the camera focuses on the subject
at the center of the frame.• The digital zoom is not available.
f Party/indoor
Suitable for taking pictures in parties. Captures the effects of candlelight and other indoor background lighting.• The camera focuses on the subject at the center area of the
frame.• When shooting in dark surroundings, hold the camera
steadily to avoid the effects of camera shake. To take apicture with the camera attached to a tripod, setVibration reduction in the setup menu (A94) to Off .
Z Beach
Capture the brightness of such subjects as beaches or sunlitexpanses of water.• The camera focuses on the subject at the center area of the
frame.
z Snow
Capture the brightness of sunlit snow.• The camera focuses on the subject at the center area of the
frame.
h Sunset
Preserve the deep hues seen in sunsets and sunrises.• The camera focuses on the subject at the center area of the
frame.
O
O

7/28/2019 Cool Pix Camera Manual AW100EN_Manual
http://slidepdf.com/reader/full/cool-pix-camera-manual-aw100enmanual 66/242
42
Scene Mode (Shooting Suited to Scenes)
S h oot i ngF ea t ur es
i Dusk/dawn
Preserve the colors seen in the weak natural light beforesunrise or after sunset.• When the shutter-release button is pressed halfway, the
focus area or focus indicator (A6) always lights in green.
j Night landscape
Slow shutter speeds are used to capture the atmosphere of anight landscape.• When the shutter-release button is pressed halfway, the
focus area or focus indicator (A6) always lights in green.
k Close-up
Use this mode to photograph flowers, insects, and other smallobjects at close range.• Macro mode (A57) is enabled and the camera
automatically zooms to the closest position to the subjectwhere the camera can shoot.
• You can move the focus area that the camera focuses on.Press thek button and then press the multi selector H,I,J, orK to move the focus
area. To adjust the following settings, press thek button to temporarily cancel focus areaselection, and then adjust each setting.- Flash mode, self-timer or exposure compensation
• The camera focuses on the subject even when the shutter-release button is not pressedhalfway. You may hear the sound of the camera focusing.
O
O

7/28/2019 Cool Pix Camera Manual AW100EN_Manual
http://slidepdf.com/reader/full/cool-pix-camera-manual-aw100enmanual 67/242
43
Scene Mode (Shooting Suited to Scenes)
S h o o t i n gF e a t ur e s
u Food
Use this mode when taking pictures of food.• Macro mode (A57) is enabled and the camera
automatically zooms to the closest position to the subjectwhere the camera can shoot.
• You can adjust the hue by pressing the multi selectorH orI. The hue adjustment setting is saved in the camera’smemory even after the camera is turned off.
• You can move the focus area that the camera focuses on.Press thek button and then press the multi selectorH,I,J, orK to move the focus area.
To adjust the following settings, press thek button totemporarily cancel focus area selection, and then adjust eachsetting.- Hue, self-timer or exposure compensation
• The camera focuses on the subject even when the shutter-release button is not pressed halfway. You may hear the sound of the camera focusing.
l Museum
Use indoors where flash photography is prohibited (forexample, in museums and art galleries) or in other settings inwhich you do not want to use the flash.• The camera focuses on the subject at the center area of the
frame.• The camera captures up to ten images while the shutter-
release button is pressed all the way, and the sharpest image in the series is automaticallyselected and saved (BSS (Best Shot Selector) (A52)).
m Fireworks show
Slow shutter speeds are used to capture the expanding burstof light from fireworks.• The camera focuses at infinity.• When the shutter-release button is pressed halfway, the
focus area or focus indicator (A6) always lights in green.
n Black and white copy
Provide clear images of text or drawings on a white board orin print.• The camera focuses on the subject at the center area of the
frame.• When shooting nearby object, shoot with macro mode
(A57).
134 2342134 2
2 9 m 0 s2 9m 0 s
O

7/28/2019 Cool Pix Camera Manual AW100EN_Manual
http://slidepdf.com/reader/full/cool-pix-camera-manual-aw100enmanual 68/242
44
Scene Mode (Shooting Suited to Scenes)
S h oot i ngF ea t ur es
o Backlighting
Use when light is coming from behind the subject, throwing features or details intoshadow.In the screen that is displayed when o Backlighting scene mode is selected, On or Off canbe selected in HDR (high dynamic range) composition.
• Off (default setting): The flash fires to prevent the backlitsubject from being hidden in shadow.- The camera focuses on the subject at the center area of
the frame.- Press the shutter-release button all the way to shoot a
single picture.
• On: Use when shooting scenes with high contrast.
- TheP icon is displayed on the shooting screen. If there are very bright areas and very dark areas in theframe, theP icon lights in green.
- The camera focuses on the subject at the center area of the frame.
- When the shutter-release button is pressed all the way,the camera shoots pictures continuously, and saves thefollowing two images.- An image processed by D-Lighting (A71) at the time of shooting- HDR composite image (loss of detail is reduced in highlights and shadows)
- The second image saved is an HDR composite image. If only one image can be saved,an image processed by D-Lighting is the only image saved.
- Once the shutter-release button is pressed all the way, hold the camera steady withoutmoving it until a still picture is displayed. After taking a picture, do not turn the cameraoff before the monitor switches to the shooting screen.
- Use of a tripod is recommended. Set Vibration reduction in the setup menu (A94)to Off when using a tripod to stabilize the camera.
- The digital zoom is not available.

7/28/2019 Cool Pix Camera Manual AW100EN_Manual
http://slidepdf.com/reader/full/cool-pix-camera-manual-aw100enmanual 69/242
45
Scene Mode (Shooting Suited to Scenes)
S h o o t i n gF e a t ur e s
B Note on Printing Panorama Pictures
When printing panorama pictures, a full view may not be printed depending on the printer settings.
Additionally, printing may not be available depending on the printer.
For more information, see your printer’s manual or contact a digital photo lab.
p Panorama
Use this mode for shooting panorama pictures.In the screen that is displayed when p Panorama scene mode is selected, Select Easypanorama or Panorama assist.
• Easy panorama (default setting): Shoots panorama pictures that can be played back onthe camera by moving the camera in the direction you want to create a panoramapicture.- Shooting range can be selected from Normal (180°) (default setting) or Wide (360°).- Press the shutter-release button all the way and release it, then move the camera
slowly in the horizontal or vertical direction.- When shooting starts, the camera focuses on the subject at the center area of the
frame.- The zoom is fixed at the wide-angle position.- Display the picture recorded with easy panorama in full-frame playback mode and
press thek button. The camera displays the short side of the picture filling the entirescreen and scrolls the picture automatically.See “Using Easy Panorama (Shooting and Playing back)” (E2).
• Panorama assist: Use this mode when shooting a series of pictures that can later be joined on a computer to form a single panorama.- Press the multi selectorH,I,J orK to select the direction in which pictures are to
be joined and press thek button.- After shooting the first picture, shoot the necessary number of pictures while
confirming the seams. To finish shooting, press thek button.- Transfer taken pictures to a computer and use the included Panorama Maker 5
software (A76, E6) to join them in a single panorama. See “Panorama Assist” (E5)for more information.

7/28/2019 Cool Pix Camera Manual AW100EN_Manual
http://slidepdf.com/reader/full/cool-pix-camera-manual-aw100enmanual 70/242
46
Scene Mode (Shooting Suited to Scenes)
S h oot i ngF ea t ur es
O Pet portrait
Use this mode for shooting pictures of dogs or cats.• Select Single or Continuous (three pictures are shot
continuously).- Single: One picture is captured at a time.
- Continuous (default setting): When the camera focuseson the detected face in Pet portrait auto release (default setting) mode, three pictures are shot continuously (frame rate withcontinuous shooting: approximately 1.4 frames per second when image mode is set toP 4608×3456). If pet portrait auto release is not used, up to 12 pictures are shot at arate of about 1.4 frames per second while the shutter-release button is fully held down(when image mode is set toP 4608×3456).
• The camera detects and focuses on the face of a dog or cat. In the default setting, whenthe subject is in focus, the shutter is released automatically (Pet portrait auto release).
• Up to five pet faces are detected simultaneously.• If a pet’s face is not detected, press the shutter-release button halfway to focus on the
subject at the center of the frame.• Press the multi selectorJ (n) to change the pet portrait auto release settings.
- Pet portrait auto release (default setting): When the camera focuses on thedetected face, the shutter is released automatically. When Pet portrait auto release is selected,d is displayed on the shooting screen.OFF: Press the shutter-release button to release the shutter.
• In the following situations, Pet portrait auto release is automatically switched to OFF.- When pet portrait auto release is repeated five times- When remaining capacity of the internal memory or memory card is low
To continue shooting with pet portrait auto release, press the multi selectorJ (n) to setagain.
• The digital zoom is not available.• Under some shooting conditions such as pet-to-camera distance, speed of moving pets,
direction in which the pets are facing, and brightness of the faces, the camera may beunable to detect a dog or cat, or a border is displayed around something other than adog or cat.
C Underwater
Use this mode for underwater shooting.• The camera focuses on the subject at the center area of the
frame.• The digital zoom is not available.• See “<Important> Shockproof, waterproof, dustproof,
condensation, GPS/digital compass” (Axi) for moreinformation on shooting underwater.

7/28/2019 Cool Pix Camera Manual AW100EN_Manual
http://slidepdf.com/reader/full/cool-pix-camera-manual-aw100enmanual 71/242
47
S h o o t i n g F e a t ur e s
Special Effects Mode (Applying Effects When Shooting)
Select one of the six special effects for shooting. The effect is applied to picturesduring shooting.
* The last icon you selected is displayed. The default setting isD (Soft).
• The camera focuses on the subject at the center areaof the frame.
Characteristics of Each Special Effect
• When Selective color is set, select a color that you
want to retain using the multi selectorH orI.
To adjust the following settings, press thek buttonto temporarily cancel color selection, and then adjust
each setting.
- Flash mode (A54)- Macro mode (A57) To return to the color selection screen, press thek button again.
Display the shooting screenM A (shooting mode) buttonM D (the third icon from the
top*)M K M Select the effect (A26, 27)
Option Description
D Soft Soften the image by adding a slight blur to the overall image.
E Nostalgic sepiaAdd a sepia tone and reduce the contrast to simulate the qualitiesof an old photograph.
F High-contrastmonochrome
Change the image to black and white and gives it sharp contrast.
G High key Give the overall image a bright tone.
H Low key Give the overall image a dark tone.
I Selective colorCreate a black and white image in which only the specified colorremains.
Soft
SaveaveSave
7/28/2019 Cool Pix Camera Manual AW100EN_Manual
http://slidepdf.com/reader/full/cool-pix-camera-manual-aw100enmanual 72/242
48
Special Eects Mode (Applying Eects When Shooting)
S h oot i ngF ea t ur es
Changing Special Effects Mode Settings• See “Features That Can Be Set Using the Multi Selector” (A53) for more
information on flash mode (A54), self-timer (A56), macro mode (A57), and
exposure compensation (A58).
• Functions that can be set using thed button: The combination of image sizeand image quality (image mode) can be set using thed button (A61).
C Features That Cannot Be Used Simultaneously
These features may not be used in combination with certain features (A63).

7/28/2019 Cool Pix Camera Manual AW100EN_Manual
http://slidepdf.com/reader/full/cool-pix-camera-manual-aw100enmanual 73/242
49
S h o o t i n gF e a t ur e s
Smart Portrait Mode (Shooting Smiling Faces)
If the camera detects smiling faces, the shutter is automatically released without
pressing the shutter-release button (Smile timer). The skin softening function
makes facial skin tones softer.
1 Frame the picture and wait or the subject tosmile.• When the camera detects a human face, a yellow
double border (focus area) is displayed around that
face. When the camera has focused on that face, the
double border will light in green for a moment andfocus is locked.
• Up to three faces can be detected. When more than one face is detected, the face
closest to the center of the frame is framed by a double border and the others by
single borders.
• If the camera detects that the face framed by the double border is smiling, the Smile
timer (A50) feature is activated and the shutter is automatically released.
• Each time the shutter is released, automatic shooting using face detection and smile
detection is repeated.
2 Shooting ends.• To finish automatic shooting of smile detection, press the A button to switch to
another shooting mode.
B Notes on Smart Portrait Mode
• The digital zoom is not available.
• Under some shooting conditions, faces and smiling faces may not be detected properly.
• See “Notes on Face Detection” (A65) for more information.
C Auto Power Off in Smile Timer Mode
When Smile timer is set to On, the auto off function (A95) is activated and the camera turns off
when any one of the situations indicated below persists and no other operations are performed.
• The camera does not detect any faces.
• The camera detected a face, but cannot detect a smile.
C When the Self-timer Lamp Blinks
When using smile timer, the self-timer lamp blinks when the camera detects a face and flickers
immediately after the shutter is released.
C Releasing the Shutter Manually
The shutter can also be released by pressing the shutter-release button. If no faces are detected, the
camera focuses on the subject at the center of the frame.
Display the shooting screenM A (shooting mode) buttonM F Smart portrait mode(A26, 27)
1 /2 50/2501 /2 50 F3.93. 9F3.9

7/28/2019 Cool Pix Camera Manual AW100EN_Manual
http://slidepdf.com/reader/full/cool-pix-camera-manual-aw100enmanual 74/242
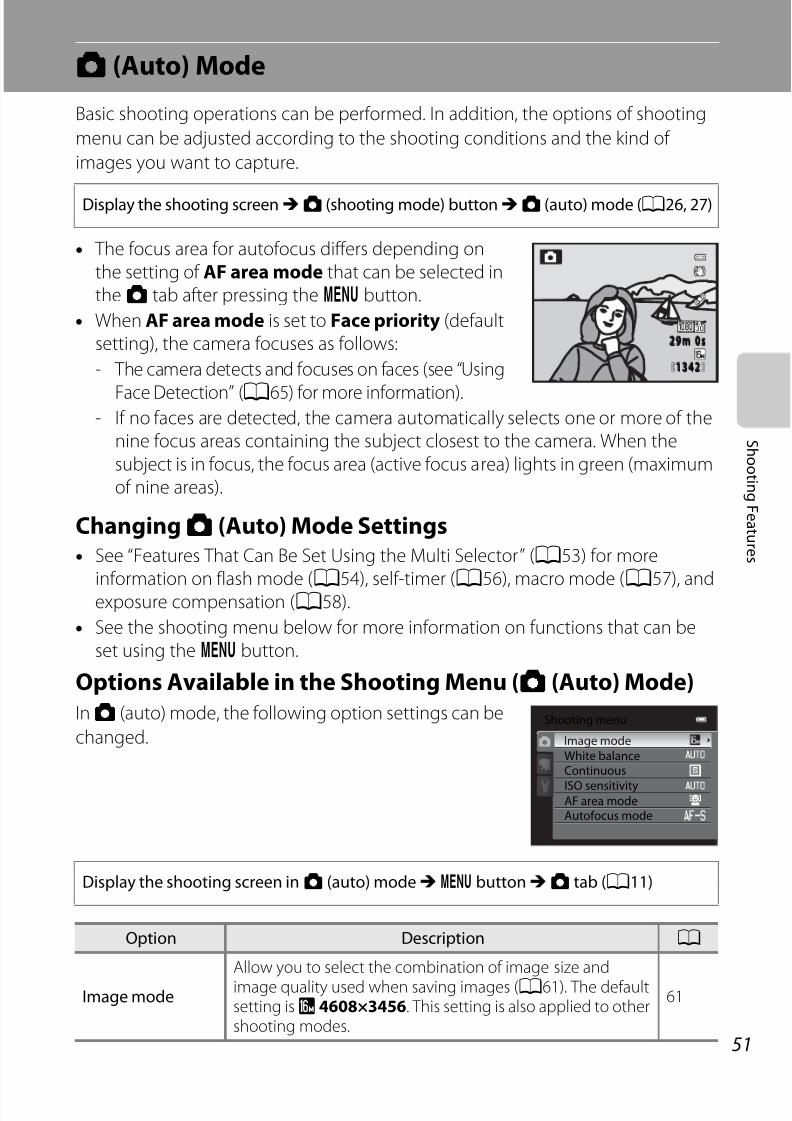
7/28/2019 Cool Pix Camera Manual AW100EN_Manual
http://slidepdf.com/reader/full/cool-pix-camera-manual-aw100enmanual 75/242
51
S h o o t i n gF e a t ur e s
A (Auto) Mode
Basic shooting operations can be performed. In addition, the options of shooting
menu can be adjusted according to the shooting conditions and the kind of
images you want to capture.
• The focus area for autofocus differs depending on
the setting of AF area mode that can be selected inthe A tab after pressing thed button.
• When AF area mode is set to Face priority (defaultsetting), the camera focuses as follows:
- The camera detects and focuses on faces (see “Using
Face Detection” (A65) for more information).- If no faces are detected, the camera automatically selects one or more of the
nine focus areas containing the subject closest to the camera. When the
subject is in focus, the focus area (active focus area) lights in green (maximumof nine areas).
Changing A (Auto) Mode Settings• See “Features That Can Be Set Using the Multi Selector” (A53) for more
information on flash mode (A54), self-timer (A56), macro mode (A57), and
exposure compensation (A58).
• See the shooting menu below for more information on functions that can be
set using thed button.
Options Available in the Shooting Menu (A (Auto) Mode)
In A (auto) mode, the following option settings can be
changed.
Display the shooting screenM A (shooting mode) buttonM A (auto) mode (A26, 27)
Display the shooting screen in A (auto) modeM d buttonM A tab (A11)
Option Description A
Image mode
Allow you to select the combination of image size and
image quality used when saving images (A61). The defaultsetting isP 4608×3456. This setting is also applied to othershooting modes.
61
2 9 m 0 s
1 3 4 213 4 2
2 9m 0 s
Shooting menu
Continuous
Autofocus modeAF area modeISO sensitivity
White balanceImage mode

7/28/2019 Cool Pix Camera Manual AW100EN_Manual
http://slidepdf.com/reader/full/cool-pix-camera-manual-aw100enmanual 76/242
52
A (Auto) Mode
S h oot i ngF ea t ur es
C Features That Cannot Be Used Simultaneously
These features may not be used in combination with certain features (A63).
White balance
Adjust colors in the image closer to the colors as they appearto the eye. Although Auto (default setting) can be usedunder most types of lighting, you can apply the whitebalance setting suited to the sky conditions or light source to
achieve better results if default setting results areunsatisfactory.• When the white balance setting is other than Auto or
Flash, set the flash mode (A54) to W (off).
E34
Continuous
Select the mode used for taking a series of pictures fromSingle, Continuous H, Continuous L, BSS (A43) andMulti-shot 16. The default setting is Single (i.e., only onepicture is captured at a time).When set to Continuous H, up to three pictures are shot at
a rate of about 7.1 frames per second while the shutter-release button is pressed all the way (when image mode isset toQ 4608×3456).
E36
ISO sensitivity
Higher ISO sensitivity allows you to take pictures of darkersubjects. Additionally, even with subjects of similarbrightness, pictures can be taken with faster shutter speeds,and blurring caused by camera shake and subjectmovement can be reduced. When set to Auto (defaultsetting), the camera sets the ISO sensitivity automatically.If ISO sensitivity has increased automatically when Auto is
selected,E (A28) is displayed on the shooting screen.
E37
AF area modeAllow you to determine how the camera selects the focusarea for autofocus to Face priority (default setting), Auto,Manual, Center or Subject tracking mode.
E38
Autoocus mode
Single AF (default setting) to adjust the focus only when theshutter-release button is pressed halfway or Full-time AF toadjust the focus even when the shutter-release button is notpressed halfway can be selected. You may hear the sound of the camera focusing.
E41
Option Description A

7/28/2019 Cool Pix Camera Manual AW100EN_Manual
http://slidepdf.com/reader/full/cool-pix-camera-manual-aw100enmanual 77/242
53
S h o o t i n gF e a t ur e s
Features That Can Be Set Using the Multi Selector
Press the multi selectorH (m),J (n),I (D), orK (o) while shooting to operate
the following functions.
Available FunctionsAvailable functions differ according to the shooting mode as follows.
• See “Default Settings” (A59) for more information on the default settings ineach shooting mode.
* The setting varies with scene mode or special effects. See “Default Settings” (A59) formore information.
FunctionEasy auto
modeScene
Specialeects
Smartportrait
A (Auto)
mFlash mode(A54)
w
*
w w w
n Sel-timer (A56) w w w w
DMacro mode(A57)
- w - w
oExposurecompensation(A58)
w w w w
n Sel-timer (A56)
DMacro mode (A57)
o Exposure compensation(A58)
m Flash mode (A54)
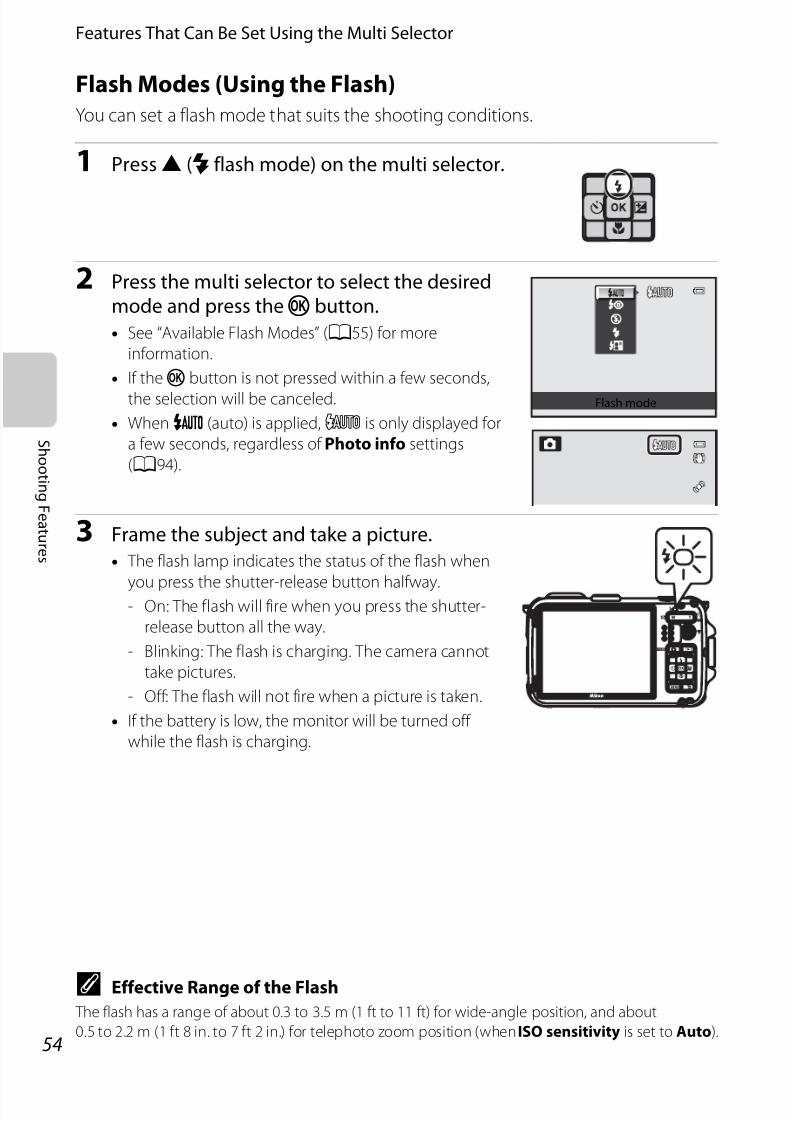
7/28/2019 Cool Pix Camera Manual AW100EN_Manual
http://slidepdf.com/reader/full/cool-pix-camera-manual-aw100enmanual 78/242
54
Features That Can Be Set Using the Multi Selector
S h oot i ngF ea t ur es
Flash Modes (Using the Flash)
You can set a flash mode that suits the shooting conditions.
1 PressH (m lash mode) on the multi selector.
2 Press the multi selector to select the desiredmode and press thek button.• See “Available Flash Modes” (A55) for more
information.
• If thek button is not pressed within a few seconds,
the selection will be canceled.
• When U (auto) is applied,D is only displayed for
a few seconds, regardless of Photo info settings
(A94).
3 Frame the subject and take a picture.• The flash lamp indicates the status of the flash when
you press the shutter-release button halfway.- On: The flash will fire when you press the shutter-
release button all the way.
- Blinking: The flash is charging. The camera cannot
take pictures.
- Off: The flash will not fire when a picture is taken.
• If the battery is low, the monitor will be turned off
while the flash is charging.
C Effective Range of the Flash The flash has a range of about 0.3 to 3.5 m (1 ft to 11 ft) for wide-angle position, and about
0.5 to 2.2 m (1 ft 8 in. to 7 ft 2 in.) for telephoto zoom position (when ISO sensitivity is set to Auto).
Flash mode
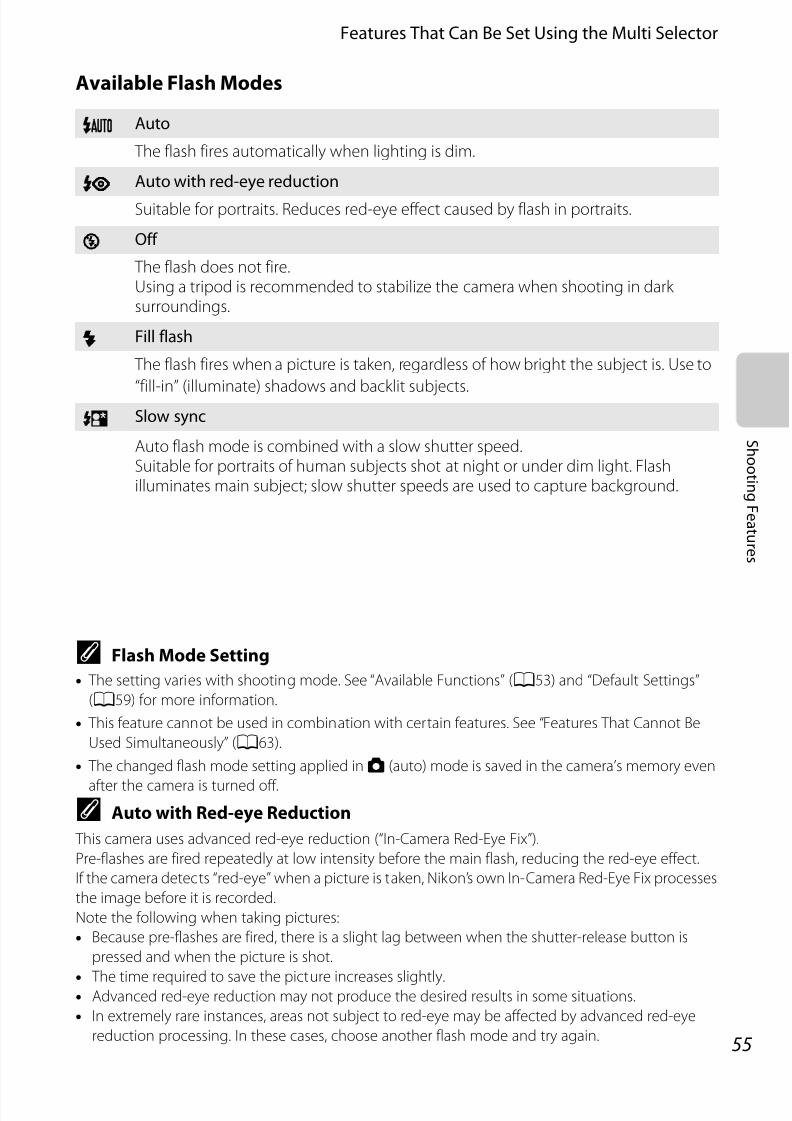
7/28/2019 Cool Pix Camera Manual AW100EN_Manual
http://slidepdf.com/reader/full/cool-pix-camera-manual-aw100enmanual 79/242
55
Features That Can Be Set Using the Multi Selector
S h o o t i n gF e a t ur e s
Available Flash Modes
C Flash Mode Setting
• The setting varies with shooting mode. See “Available Functions” (A53) and “Default Settings”
(A59) for more information.
• This feature cannot be used in combination with certain features. See “Features That Cannot Be
Used Simultaneously” (A63).
• The changed flash mode setting applied in A (auto) mode is saved in the camera’s memory even
after the camera is turned off.
C Auto with Red-eye Reduction
This camera uses advanced red-eye reduction (“In-Camera Red-Eye Fix”).
Pre-flashes are fired repeatedly at low intensity before the main flash, reducing the red-eye effect.
If the camera detects “red-eye” when a picture is taken, Nikon’s own In-Camera Red-Eye Fix processes
the image before it is recorded.
Note the following when taking pictures:
• Because pre-flashes are fired, there is a slight lag between when the shutter-release button is
pressed and when the picture is shot.
• The time required to save the picture increases slightly.
• Advanced red-eye reduction may not produce the desired results in some situations.
• In extremely rare instances, areas not subject to red-eye may be affected by advanced red-eye
reduction processing. In these cases, choose another flash mode and try again.
U Auto
The flash fires automatically when lighting is dim.
V Auto with red-eye reduction
Suitable for portraits. Reduces red-eye effect caused by flash in portraits.
W O
The flash does not fire.Using a tripod is recommended to stabilize the camera when shooting in dark surroundings.
X Fill lash
The flash fires when a picture is taken, regardless of how bright the subject is. Use to
“fill-in” (illuminate) shadows and backlit subjects.Y Slow sync
Auto flash mode is combined with a slow shutter speed.Suitable for portraits of human subjects shot at night or under dim light. Flashilluminates main subject; slow shutter speeds are used to capture background.

7/28/2019 Cool Pix Camera Manual AW100EN_Manual
http://slidepdf.com/reader/full/cool-pix-camera-manual-aw100enmanual 80/242
56
Features That Can Be Set Using the Multi Selector
S h oot i ngF ea t ur es
Using the Self-timer The self-timer is suitable for taking group pictures and reducing the vibration when
the shutter-release button is pressed.When using the self-timer, use of a tripod is recommended. Set Vibrationreduction in the setup menu (A94) to Off when using a tripod to stabilize the
camera.
1 PressJ (n sel-timer) on the multi selector.
2 Press the multi selectorH orI to select 10s
or 2s and press thek button.• 10s (ten seconds): suitable for group pictures.
• 2s (two seconds): suitable for preventing camera
shake.
• When the shooting mode is set to Pet portrait in
scene mode,Y (pet portrait auto release) is displayed
(A46). The self-timer 10s and 2s are not available.
• The mode selected for the self-timer is displayed.
• If thek button is not pressed within a few seconds, the selection will be canceled.
3 Frame the subject and press the shutter-release button halway.
• The focus and exposure are set.
4 Press the shutter-release button all theway.• The self-timer starts, and the number of
seconds remaining before the shutter is
released is displayed. The self-timer lampblinks while the timer is counting down.
About one second before the shutter is
released, the lamp stops blinking and
remains lit.
• When the shutter is released, the self-timer
turns OFF.
• To stop the timer before a picture is taken,
press the shutter-release button again.
Self-timer
1 /2 50/2501 /2 50 F3.93. 9F3.9
99

7/28/2019 Cool Pix Camera Manual AW100EN_Manual
http://slidepdf.com/reader/full/cool-pix-camera-manual-aw100enmanual 81/242
57
Features That Can Be Set Using the Multi Selector
S h o o t i n gF e a t ur e s
Using Macro Mode
When using macro mode, the camera can focus on subjects as close as 1 cm
(0.4 in.) from the front of the lens.
This feature is useful when taking close-up pictures of flowers and other small
subjects.
1 PressI (pmacro mode) on the multiselector.
2 Press the multi selectorH orI to select ON and press thek button.• The macro mode iconF is displayed.
• If thek button is not pressed within a few seconds,
the selection will be canceled.
3 Use the zoom buttons to set the zoom ratio toa position whereF and the zoom indicatorlight in green.
• How close you can be to the subject when shootingdepends on the zoom ratio.
When the zoom ratio is set to a position whereF and the zoom indicator light in
green, the camera can focus on subjects as close as 10 cm (4 in.) from the lens. At the
zoom position between the maximum wide-angle position andG icon, the camera
can focus on subjects as close as 1 cm (0.4 in.) from the lens.
B Note on Using the Flash
The flash may be unable to light the entire subject at distances of less than 50 cm (1 ft 8 in.).
C Autofocus
In the A (auto) mode, you can focus without pressing the shutter-release button halfway by settingAutofocus mode in the shooting menu (A51) to Full-time AF.When using other shooting modes, Full-time AF is turned on automatically when macro mode isturned on.You may hear the sound of the camera focusing.
C The Macro Mode Setting
• Macro mode cannot be used when using certain shooting modes. See “Available Functions”
(A53) and “Default Settings” (A59) for more information.
• The changed macro mode setting applied in A (auto) mode is saved in the camera’s memoryeven after the camera is turned off.
Macro mode

7/28/2019 Cool Pix Camera Manual AW100EN_Manual
http://slidepdf.com/reader/full/cool-pix-camera-manual-aw100enmanual 82/242
58
Features That Can Be Set Using the Multi Selector
S h oot i ngF ea t ur es
Exposure Compensation (Adjusting Brightness)
By adjusting exposure compensation when taking pictures, you can adjust overall
image brightness.
1 PressK (o exposure compensation) on themulti selector.
2 Press the multi selectorH orI to select acompensation value.• To make the image brighter, apply positive (+)
exposure compensation.
• To make the image darker, apply negative (–) exposure
compensation.
3 Press thek button.• If thek button is not pressed within a few seconds, the selection is set and the
setting menu disappears.
• Even when the shutter-release button is pressed without pressing thek button, a
picture can be shot using the selected compensation value.
• When an exposure compensation value other than 0.0 is applied, the value is
displayed with theH icon on the monitor.
4 Press the shutter-release button to take apicture.• To turn off exposure compensation, return to step 1,
change the value to 0.0.
C Exposure Compensation Value
• The changed exposure compensation value applied in A (auto) mode is saved in the camera’s
memory even after the camera is turned off.
• When the shooting mode is the Fireworks show scene mode (A43), the exposure
compensation cannot be used.
Exposure compensation
Exposurecompensation value
2 9 m 0 s
1 3 4 213 4 2
2 9m 0 s
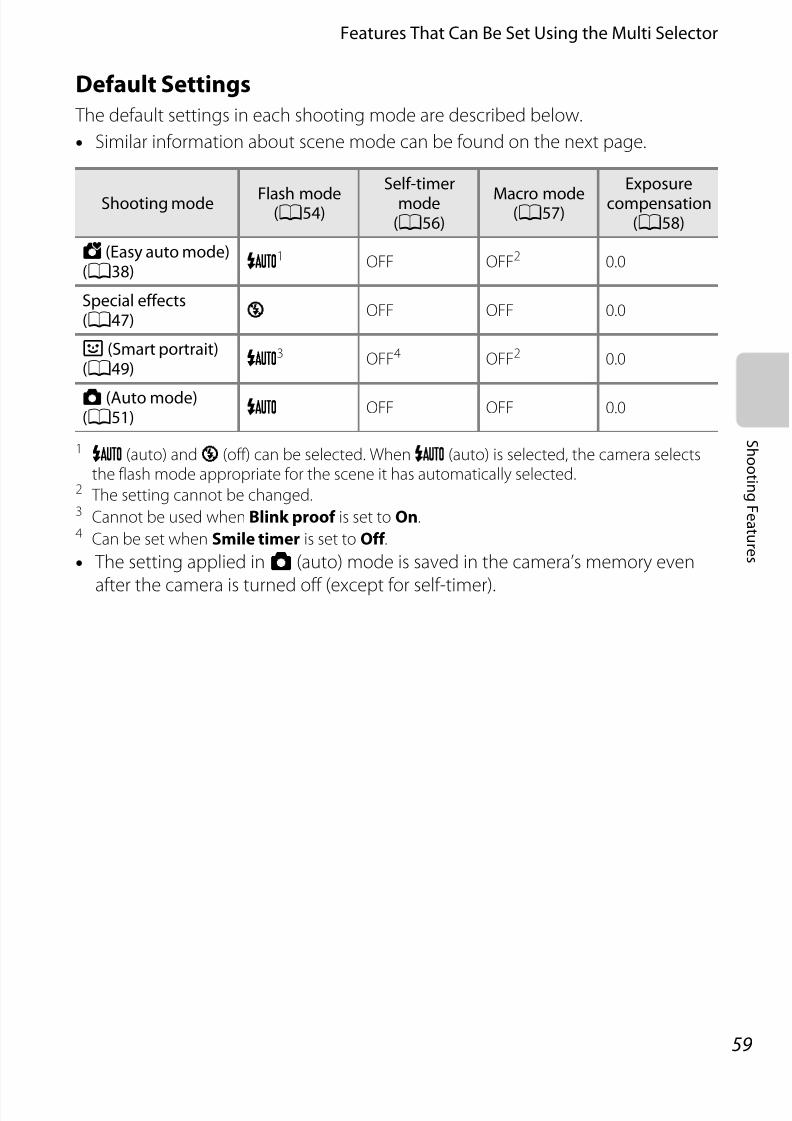
7/28/2019 Cool Pix Camera Manual AW100EN_Manual
http://slidepdf.com/reader/full/cool-pix-camera-manual-aw100enmanual 83/242
59
Features That Can Be Set Using the Multi Selector
S h o o t i n gF e a t ur e s
Default Settings
The default settings in each shooting mode are described below.
• Similar information about scene mode can be found on the next page.
1 U (auto) and W (off) can be selected. When U (auto) is selected, the camera selectsthe flash mode appropriate for the scene it has automatically selected.
2 The setting cannot be changed.3 Cannot be used when Blink proof is set to On.4 Can be set when Smile timer is set to Off .
• The setting applied in A (auto) mode is saved in the camera’s memory even
after the camera is turned off (except for self-timer).
Shooting mode Flash mode(A54)
Sel-timermode
(A56)Macro mode(A57)
Exposurecompensation
(A58)
G (Easy auto mode)(A38)
U1 OFF OFF2 0.0
Special eects(A47)
W OFF OFF 0.0
F (Smart portrait)(A49)
U3 OFF4 OFF2 0.0
A (Auto mode)(A51)
U OFF OFF 0.0

7/28/2019 Cool Pix Camera Manual AW100EN_Manual
http://slidepdf.com/reader/full/cool-pix-camera-manual-aw100enmanual 84/242
60
Features That Can Be Set Using the Multi Selector
S h oot i ngF ea t ur es
The default settings in each scene mode are described below.
1 The setting cannot be changed.2 The setting cannot be changed. The flash mode setting is fixed at fill flash with slow sync
and red-eye reduction.3
May switch to slow sync with red-eye reduction flash mode.4 When HDR is set to Off , the flash mode is fixed at X (fill flash).When HDR is set to On, the flash mode is fixed at W (off).
5 The setting cannot be changed when using Easy panorama.6 The self-timer is not available. Pet portrait auto release (A46) can be set to on or off.
C Features That Cannot Be Used Simultaneously
These features may not be used in combination with certain features (A63).
Flash mode(A54)
Sel-timer mode(A56)
Macro mode(A57)
Exposurecompensation
(A58)
b(A40)
VOFF OFF
1
0.0c (A40) W1 OFF OFF1 0.0
d (A40) W1 OFF1 OFF1 0.0
e (A41) V2 OFF OFF1 0.0
f (A41) V3 OFF OFF1 0.0
Z (A41) U OFF OFF1 0.0
z (A41) U OFF OFF1 0.0
h (A41) W1 OFF OFF1 0.0
i (A42) W1 OFF OFF1 0.0
j (A42) W1 OFF OFF1 0.0
k (A42) W OFF ON1 0.0
u (A43) W1 OFF ON1 0.0
l (A43) W1 OFF OFF 0.0
m (A43) W1 OFF1 OFF1 0.01
n (A43) W OFF OFF 0.0
o (A44) X / W4 OFF OFF1 0.0
p (A45) W5 OFF5 OFF5 0.0
O (A46) W1 Y6 OFF 0.0
C (A46) W OFF OFF 0.0

7/28/2019 Cool Pix Camera Manual AW100EN_Manual
http://slidepdf.com/reader/full/cool-pix-camera-manual-aw100enmanual 85/242
61
S h o o t i n gF e a t ur e s
Changing the Image Size (Image Mode)
Use the Image mode setting in the shooting menu to select the combination of
image size and image quality (compression rate) that is used when saving images.
Select the image mode best suited to the manner in which images will be used
and the capacity of the internal memory or memory card.
The higher the image mode setting, the larger the size at which it can be printed
or displayed without appearing noticeably grainy, but the number of images that
can be saved is reduced.
Image Mode Settings (Image Size and Quality)
* The total number of pixels recorded, and the number of pixels recorded horizontally andvertically.Example:Q 4608×3456 = 16 megapixels, 4608×3456 pixels
The icon for the current setting is displayed on the monitor in shooting and
playback modes (A6, 8).
C Image Mode Setting
• The setting is also applied to other shooting modes.
• This function cannot be used simultaneously with certain features. See “Features That Cannot Be
Used Simultaneously” (A63) for more information.
Display the shooting screenM d button (A11)M Shooting MenuM Image mode
Option* Description
Q 4608×3456PImages will be higher quality thanP. The compression ratio isapproximately 1:4.
P 4608×3456(deaultsetting)
Good balance between file size and image quality; suitable in mostsituations. The compression ratio is approximately 1:8.I 4000×3000
R 3264×2448L 2592×1944
M 2048×1536Smaller size thanP,I,R, orL and therefore allows more images tobe captured. The compression ratio is approximately 1:8.
N 1024×768Suited to display on a computer monitor. The compression ratio isapproximately 1:8.
O 640×480Suited to full-screen display on a television with an aspect ratio of 4:3, ore-mail attachments. The compression ratio is approximately 1:8.
g 4608×2592 Images with an aspect ratio of 16:9 can be shot. The compression ratiois approximately 1:8.
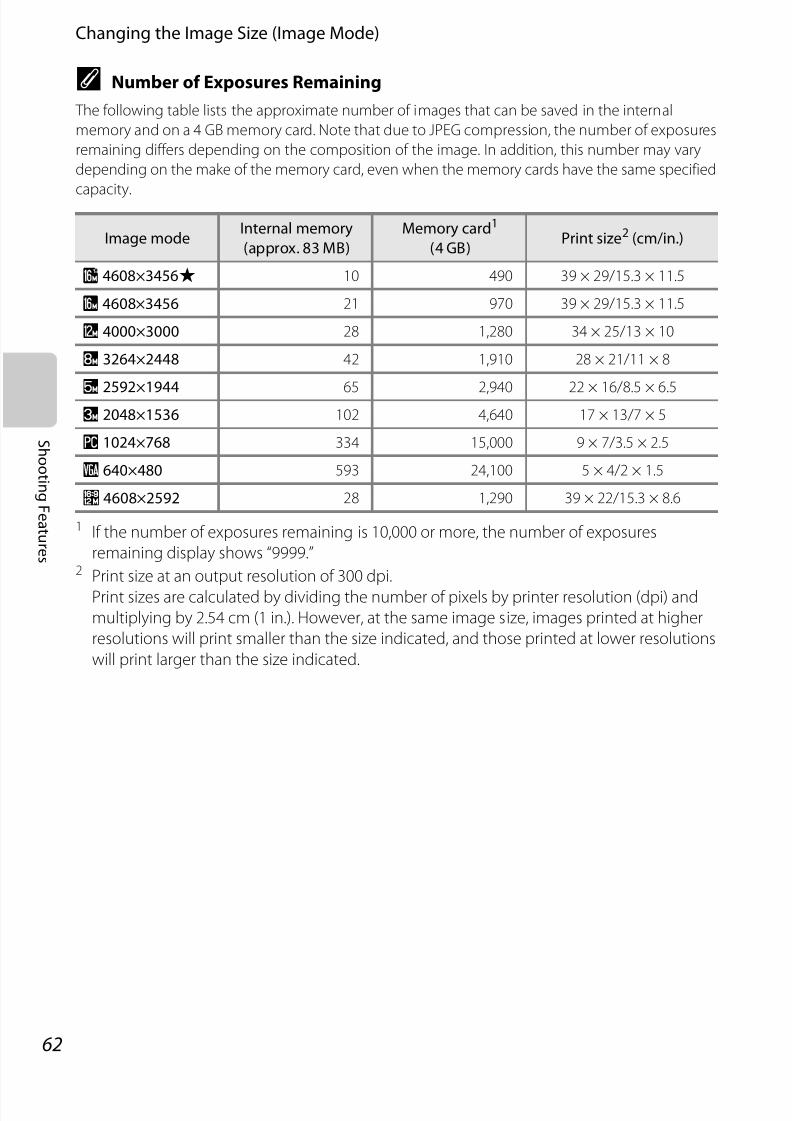
7/28/2019 Cool Pix Camera Manual AW100EN_Manual
http://slidepdf.com/reader/full/cool-pix-camera-manual-aw100enmanual 86/242
62
Changing the Image Size (Image Mode)
S h oot i ngF ea t ur es
C Number of Exposures Remaining
The following table lists the approximate number of images that can be saved in the internal
memory and on a 4 GB memory card. Note that due to JPEG compression, the number of exposures
remaining differs depending on the composition of the image. In addition, this number may vary
depending on the make of the memory card, even when the memory cards have the same specified
capacity.
1 If the number of exposures remaining is 10,000 or more, the number of exposures
remaining display shows “9999.”2 Print size at an output resolution of 300 dpi.
Print sizes are calculated by dividing the number of pixels by printer resolution (dpi) and
multiplying by 2.54 cm (1 in.). However, at the same image size, images printed at higher
resolutions will print smaller than the size indicated, and those printed at lower resolutions
will print larger than the size indicated.
Image modeInternal memory(approx. 83 MB)
Memory card1 (4 GB)
Print size2 (cm/in.)
Q 4608×3456P 10 490 39 × 29/15.3 × 11.5
P 4608×3456 21 970 39 × 29/15.3 × 11.5
I 4000×3000 28 1,280 34 × 25/13 × 10
R 3264×2448 42 1,910 28 × 21/11 × 8
L 2592×1944 65 2,940 22 × 16/8.5 × 6.5M 2048×1536 102 4,640 17 × 13/7 × 5
N 1024×768 334 15,000 9 × 7/3.5 × 2.5
O 640×480 593 24,100 5 × 4/2 × 1.5
g 4608×2592 28 1,290 39 × 22/15.3 × 8.6

7/28/2019 Cool Pix Camera Manual AW100EN_Manual
http://slidepdf.com/reader/full/cool-pix-camera-manual-aw100enmanual 87/242
63
S h o o t i n gF e a t ur e s
Features That Cannot Be Used Simultaneously
Some shooting settings cannot be used in combination with other functions.
Restrictedunction
Option Descriptions
Flash mode
Continuous (A52) When continuous is used for shooting, theflash cannot be used.
Blink proof (A50)When Blink proof is set to On, the flashcannot be used.
Sel-timer
Smile timer (A50)When Smile timer is used for shooting, theself-timer cannot be used.
AF area mode (A52)When Subject tracking is used forshooting, the self-timer cannot be used.
Macro mode AF area mode (A52) When Subject tracking is used forshooting, the macro mode cannot be used.
Image mode Continuous (A52)When Multi-shot 16 is used for shooting,the setting is fixed atL (image size:2560×1920 pixels).
Continuous Self-timer (A56)When using the self-timer, the setting isfixed at Single.
ISO sensitivity Continuous (A52)
• When Continuous L is used, 3200 of ISO sensitivity cannot be used. If Continuous L is selected when 3200 isset, the setting is changed to 1600.
• When Multi-shot 16 is used forshooting, the ISO sensitivity isautomatically specified according to thebrightness.
Autoocus mode AF area mode (A52)When Face priority is used for shooting,Autofocus mode is fixed at Single AF.
Print date
Continuous (A52)When Continuous H, Continuous L orBSS is used for shooting, the print datecannot be used.
Blink proof (A50)When Blink proof is set to On for shooting,the print date cannot be used.
Motion detection
Continuous (A52)When Multi-shot 16 is used for shooting,Motion detection is disabled.
ISO sensitivity (A52)When the ISO sensitivity is fixed to asetting other than Auto, Motion
detection is disabled.

7/28/2019 Cool Pix Camera Manual AW100EN_Manual
http://slidepdf.com/reader/full/cool-pix-camera-manual-aw100enmanual 88/242
64
Features That Cannot Be Used Simultaneously
S h oot i ng F ea t ur es
B Notes on Digital Zoom• The digital zoom is not available depending on the shooting mode.
• When the digital zoom is used, the camera focuses on the subject at the center of the frame.
Sound settings
Continuous (A52)When continuous is used for shooting,shutter sound is disabled.
Smile timer (A50) When Smile timer is set to On, shuttersound is disabled.
Blink warning Continuous (A52)When continuous is used for shooting, blink warning is disabled.
Digital zoom
AF area mode (A52)When Subject tracking is used forshooting, the digital zoom cannot be used.
Continuous (A52)When Multi-shot 16 is used for shooting,the digital zoom cannot be used.
Restrictedfunction
Option Descriptions

7/28/2019 Cool Pix Camera Manual AW100EN_Manual
http://slidepdf.com/reader/full/cool-pix-camera-manual-aw100enmanual 89/242
65
S h o o t i n gF e a t ur e s
Using Face Detection
In the following shooting modes, the camera uses face
detection to automatically focus on human faces. If
more than one face is detected, a double border is
displayed around the face that the camera will focuson, and single borders are displayed around the other
faces.
• When G (easy auto) mode is selected, the focus area changes depending on which scene thecamera automatically selects.
• When using Face priority, if you press the shutter-release button halfway while no faces aredetected, the camera automatically selects one or more of the nine focus areas containing thesubject closest to the camera.
• If no faces are detected when the shutter-release button is pressed halfway in Portrait or Night
portrait scene mode or smart portrait mode, the camera will focus on the subject at the center of the frame.
B Notes on Face Detection
• The camera’s ability to detect faces depends on a variety of factors, including whether or not thesubject is facing the camera. Additionally, the camera may be unable to detect faces in thefollowing situations:- When faces are partially hidden by sunglasses or otherwise obstructed- When faces take up too much or too little of the frame
• When the frame includes more than one face, the faces detected by the camera and the face on
which the camera focuses depend upon a variety of factors, including the direction in which thesubject is facing.
• In some rare cases, such as those described in “Autofocus” (A31), the subject may not be in focuseven though the double border turns green. If the camera does not focus, use “Focus Lock”(A67).
C Viewing Pictures Taken Using Face Detection
• During playback, the camera automatically rotates images according to the orientation of thefaces that were detected at the time of shooting. (Pictures taken when using Continuous (A52)are not rotated.)
• When zooming in on an image displayed in full-frame playback mode by pressing the zoombutton g (i), the image is enlarged at the center of the face that was detected during shooting(A33). (Pictures taken when using Continuous (A52) are not displayed.)
Shooting modeNumber o aces that
can be detectedFocus area (double border)
G (Easy auto mode) (A38)
Up to 12 The face closest to the cameraA (Auto mode) (AF area mode (A51) is Face priority)
Portrait, Night portrait scenemode (A39)
Smart portrait mode (A49) Up to 3 The face closest to the center of the frame
2 9 m 0 s2 9m 0 s
1 3 4 213 4 2

7/28/2019 Cool Pix Camera Manual AW100EN_Manual
http://slidepdf.com/reader/full/cool-pix-camera-manual-aw100enmanual 90/242
66
S h oot i ngF ea t ur es
Using Skin Softening
In the following mode, the camera detects up to three human faces when the
shutter is released, and processes the image to make facial skin tones softer before
saving the image.
•
G (easy auto) mode (A38)• Portrait (A40) or Night portrait (A41) in scene mode
• Smart portrait mode (A49)
Skin softening in Glamour retouch (A71) can also be applied to saved images,
even after shooting.
B Notes on Skin Softening
• It may take more time to save images.
• Under some shooting conditions, the desired skin softening results may not be achieved, and skin
softening may be applied to areas of the image where there are no faces. If the desired results are
not produced, select another shooting mode or set Skin softening to Off when using smart
portrait mode and shoot again.
• The skin softening level cannot be adjusted when shooting in G (easy auto) mode, or Portrait or
Night portrait scene mode.

7/28/2019 Cool Pix Camera Manual AW100EN_Manual
http://slidepdf.com/reader/full/cool-pix-camera-manual-aw100enmanual 91/242
67
S h o o t i n gF e a t ur e s
Focus Lock
Use focus lock to focus on off-center subjects when center is selected for AF area
mode.
To focus on off-center subjects when Center is selected for AF area mode for the
shooting menu (A51) in A (auto) mode, use focus lock as described below.
1 Position the subject at the center o therame.
2 Press the shutter-release buttonhalway.• Focus is locked and the focus area lights in
green.
• Exposure is also locked.
3Continue holding down the shutter-release button halway and recompose thepicture.• Be sure to maintain the same distance between the
camera and the subject.
4 Press the shutter-release button all the way totake the picture.
1 3 4 213 4 2
2 9 m 0 s2 9m 0 s
1 /2 50/2501 /2 50 F3.93. 9F3.9
1 /2 501 /2 50 F3.93. 9F3.9

7/28/2019 Cool Pix Camera Manual AW100EN_Manual
http://slidepdf.com/reader/full/cool-pix-camera-manual-aw100enmanual 92/242
68

7/28/2019 Cool Pix Camera Manual AW100EN_Manual
http://slidepdf.com/reader/full/cool-pix-camera-manual-aw100enmanual 93/242
69
P l a
y b a c k F e a t ur e s
Playback Features
This chapter describes how to select certain types of images for playback as well as
some of the features available when playing back images.
44 13232132
0004.JPG004.JPG0004.JPG15:305:3015:305/11/201115/11 /2011
44 13232132
0004.JPG004.JPG0004.JPG15:305:3015:305/11/201115/11 /2011
Auto sort
Playback menu
Protect
Slide showPrint orderFilter ef ectsGlamour retouchD-Lighting
Quick retouch

7/28/2019 Cool Pix Camera Manual AW100EN_Manual
http://slidepdf.com/reader/full/cool-pix-camera-manual-aw100enmanual 94/242
70
P l a y b a c k F ea t ur es
Playback Features
Selecting Certain Types of Images for Playback
Playback mode can be changed according to the type of images you want to
view.
Available Playback Modes
Switching Between Playback Modes
1 When viewing images, press thec button.
• The screen for selecting a playback mode(the playback-mode selection menu) is
displayed.
2 Press the multi selectorH orI to select amode and then press thek button.• If you select Play, the playback screen is displayed.
• If you select other than Play, the selection screen for
favorite pictures, auto sort, or list by date is displayed.
• To return to the current playback mode without
switching playback modes, press thec button.
3 Select an album, a category or shooting dateand then press thek button.• h See “Favorite Pictures Mode” (E9) for more
information.
• F See “Auto Sort Mode” (E12) for more information.
• C See “List by Date Mode” (E14) for more information.• To select favorite pictures, auto sort, or list by date again,
repeat the operation from step 1.
c Play A32
All images are played back without selecting types of images. When you switch fromshooting mode to playback mode, this mode is selected.
h Favorite pictures E9
Play back only the images added to an album. Before switching to this mode, imagesmust be added to the album folder (A72,E9).
F Auto sort E12
The pictures taken are automatically sorted into categories such as portrait, landscape,and movies. Only images of the same category are played back.
C List by date E14
Only images captured on the same date are played back.
Auto sort
Other scenes
Portraits
Auto sort mode

7/28/2019 Cool Pix Camera Manual AW100EN_Manual
http://slidepdf.com/reader/full/cool-pix-camera-manual-aw100enmanual 95/242
71
P l a
y b a c k F e a t ur e s
Features Available in Playback Mode (Playback Menu)
When viewing images in full-frame playback mode or
thumbnail playback mode, you can configure the
following functions by pressing thed button to
display the menu, and then selecting thec tab,h
tab,F tab orC tab (A11).
Option Description A
k Quick retouch1 Create retouched copies in which contrast and saturationhave been enhanced.
E17
I D-Lighting1 Create copies with enhanced brightness and contrast,brightening dark portions of an image.
E17
s Glamourretouch1
Make facial skin tones softer and make faces look smallerwith larger eyes.
E18
p Filter eects1Apply a variety of effects using digital filter. The availableeffects are Color options, Soft, Selective color, Crossscreen, Fisheye, Miniature effect and Fog removal.
E19
a Print order2
When using a printer to print images saved on the memorycard, the print order function can be used to select whichimages are printed, and how many copies of each imageare printed.
E42
b Slide show2 Images saved in the internal memory or on a memory cardare played back in an automatic slide show.
E45
d Protect2 Protect selected images from accidental deletion. E46
f Rotate imageSpecify the orientation in which saved images are displayedin playback mode.
E48
g Small picture1Create a small copy of the pictures taken. This feature isuseful for creating copies for display on Web pages or e-mail attachments.
E20
E Voice memoUse the camera’s microphone to record voice memos andattach them to the picture taken. Playback and deletion of voice memos can also be performed.
E49
h Copy3 Copy images between the internal memory and a memorycard.
E50
Playback menu
Protect
Slide showPrint orderFilter ef ectsGlamour retouchD-Lighting
Quick retouch

7/28/2019 Cool Pix Camera Manual AW100EN_Manual
http://slidepdf.com/reader/full/cool-pix-camera-manual-aw100enmanual 96/242
72
Features Available in Playback Mode (Playback Menu)
P l a y b a c k F ea t ur es
1 This function is applied to edit the image currently selected and store it as separate filesfrom the original files. Pictures shot with an Image mode (A61) of g 4608×2592,pictures shot with easy panorama and movies cannot be edited (E15,E16). Edited
images may not be retouched again in some cases (E16).2 When using list by date mode, press thed button from the list by date screen (E14) to
apply the same setting to all images captured on the selected date.3 This function is not selected when using favorite pictures mode, auto sort mode, or list by
date mode.4 When changing this setting, select the desired sequence before displaying the menu.5 This option is not displayed in favorite pictures mode.6 This option is displayed only in favorite pictures mode.
See “Editing Images (Still Pictures)” (E15) and “ The Playback Menu” (E42) inthe Reference Section for more information about each function.
C Sequencedisplay options
Display a sequence of images shot continuously asindividual images, or display only the key picture of asequence.
E51
xChoose keypicture4 Change the key picture for the series of pictures that wereshot continuously (Pictures in a sequenceE7). E51
h Favoritepictures5 Select and add pictures to an album. E9
h Remove romavorites6 Remove a picture from an album. E10
Option Description A

7/28/2019 Cool Pix Camera Manual AW100EN_Manual
http://slidepdf.com/reader/full/cool-pix-camera-manual-aw100enmanual 97/242
73
P l a
y b a c k F e a t ur e s
Connecting the Camera to a TV, Computer, or Printer
You can enhance your enjoyment of images and movies by connecting the
camera to a TV, computer, or printer.
• Before connecting the camera to an external device, make sure the remaining
battery level is sufficient and turn the camera off. For information about theconnection methods and subsequent operations, refer to the documentation
included with the device in addition to this document.
Viewing images on a TV E22
You can view the camera’s images and movies on a TV.Connection method: Connect the video and audio plugs of the includedAudio Video Cable EG-CP16 to the TV’s input jacks. Alternatively,connect a commercially available HDMI cable (Type C) to the TV’s HDMI
input jack.
Viewing and organizing images on a computer A74
If you transfer images to a computer, you can perform simpleretouching and manage image data in addition to playing back imagesand movies.Connection method: Connect the camera to the computer’s USB input
jack with the included USB Cable UC-E6.• Before connecting to a computer, install ViewNX 2 on the computer
using the included ViewNX 2 Installer CD. SeeA76 for more
information about using the ViewNX 2 Installer CD and transferringimages to a computer.
Printing images without using a computer E24
If you connect the camera to a PictBridge-compatible printer, you canprint images without using a computer.Connection method: Connect the camera directly to the printer’s USBinput jack with the included USB Cable UC-E6.
Insert the plug straight.How to open the battery/memory-card slot cover (A18)
HDMI mini connector (Type C)
USB/audio/video output connector

7/28/2019 Cool Pix Camera Manual AW100EN_Manual
http://slidepdf.com/reader/full/cool-pix-camera-manual-aw100enmanual 98/242
74
P l a y b a c k F ea t ur es
Using ViewNX 2
ViewNX 2 is an all-in-one software package which enables you to transfer, view,
edit and share images.
Install ViewNX 2 using the ViewNX 2 Installer CD.
Installing ViewNX 2• An Internet connection is required.
Compatible Operating Systems
Windows• Windows 7 Home Basic/Home Premium/Professional/Enterprise/Ultimate
• Windows Vista Home Basic/Home Premium/Business/Enterprise/Ultimate(Service Pack 2)
• Windows XP Home Edition/Professional (Service Pack 3)
Macintosh
• Mac OS X (version 10.5.8, 10.6.7)
Refer to the Nikon website for the latest information on operating system
compatibility.
1 Start the computer and insert the ViewNX 2 Installer CD into the CD-ROM drive.
• Mac OS: When the ViewNX 2 window is displayed, double-click the Welcome icon.
Your Imaging Toolbox ViewNX 2™
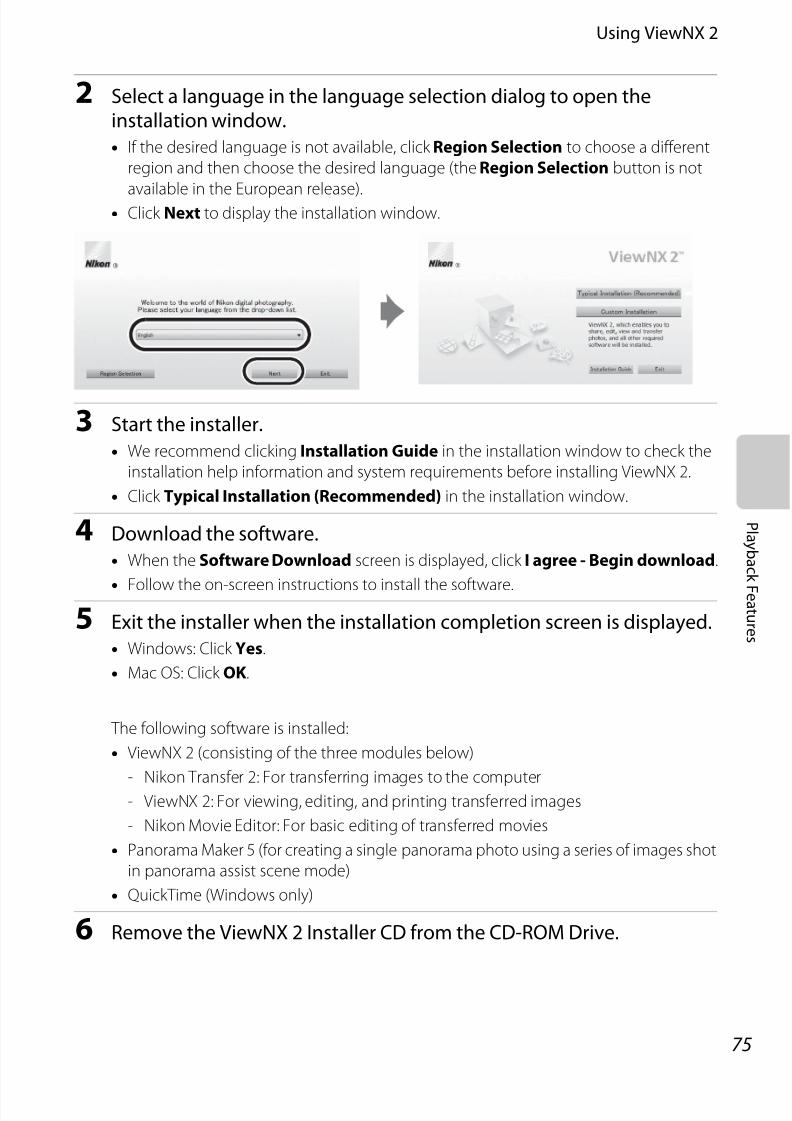
7/28/2019 Cool Pix Camera Manual AW100EN_Manual
http://slidepdf.com/reader/full/cool-pix-camera-manual-aw100enmanual 99/242
75
Using ViewNX 2
P l a y b a c k
F e a t ur e s
2 Select a language in the language selection dialog to open theinstallation window.
• If the desired language is not available, click Region Selection to choose a different
region and then choose the desired language (the Region Selection button is not
available in the European release).• Click Next to display the installation window.
3 Start the installer.
• We recommend clicking Installation Guide in the installation window to check the
installation help information and system requirements before installing ViewNX 2.
• Click Typical Installation (Recommended) in the installation window.
4 Download the software.
• When the Software Download screen is displayed, click I agree - Begin download.
•
Follow the on-screen instructions to install the software.
5 Exit the installer when the installation completion screen is displayed.
• Windows: Click Yes.
• Mac OS: Click OK.
The following software is installed:
• ViewNX 2 (consisting of the three modules below)
- Nikon Transfer 2: For transferring images to the computer- ViewNX 2: For viewing, editing, and printing transferred images
- Nikon Movie Editor: For basic editing of transferred movies
• Panorama Maker 5 (for creating a single panorama photo using a series of images shot
in panorama assist scene mode)
• QuickTime (Windows only)
6 Remove the ViewNX 2 Installer CD from the CD-ROM Drive.

7/28/2019 Cool Pix Camera Manual AW100EN_Manual
http://slidepdf.com/reader/full/cool-pix-camera-manual-aw100enmanual 100/242
76
Using ViewNX 2
P l a y b a c k F ea t ur es
Transferring Images to the Computer
1 Choose how images will be copied to the computer.
Choose one of the following methods:
• Direct USB connection: Turn the camera off and ensure that the memory card isinserted in the camera. Connect the camera to the computer using the included USB
Cable UC-E6 and then turn the camera on.
• SD card slot: If your computer is equipped with an SD card slot, the card can be
inserted directly in the slot.
• SD card reader: Connect a card reader (available separately from third-party
suppliers) to the computer and insert the memory card.
If a message is displayed prompting you to choose a program, select Nikon Transfer 2.
• When using Windows 7
If the dialog shown at right is displayed,
follow the steps below to select Nikon
Transfer 2.
1 A program selection dialog will be
displayed; select Import File using
Nikon Transfer 2 and click OK.
2 Double-click Import File.
If the memory card contains a large number of images, it may take a while for Nikon
Transfer 2 to start. Wait until Nikon Transfer 2 starts.
B Connecting the USB Cable
The connection may not be recognized if the camera is connected to the computer via a USB hub.

7/28/2019 Cool Pix Camera Manual AW100EN_Manual
http://slidepdf.com/reader/full/cool-pix-camera-manual-aw100enmanual 101/242
77
Using ViewNX 2
P l a
y b a c k F e a t ur e s
2 Transer images to the computer.• Confirm that the name of the connected camera or removable disk is displayed in the
“Source” panel in the Nikon Transfer 2 “Options” area (1).
• Click Start Transfer (2).
• At default settings, all the images on the memory card will be copied to the
computer.
3 Terminate the connection.• If the camera is connected to the computer, turn the camera off and disconnect the
USB cable. If you are using a card reader or card slot, choose the appropriate option in
the computer operating system to eject the removable disk corresponding to the
memory card and then remove the card from the card reader or card slot.
Viewing Images
Start ViewNX 2.• Images are displayed in ViewNX 2 when transfer
is complete.
• Consult online help for more information on
using ViewNX 2.
C Starting ViewNX 2 Manually• Windows: Double-click the ViewNX 2 shortcut on the desktop.
• Mac OS: Click the ViewNX 2 icon in the Dock.
1
2

7/28/2019 Cool Pix Camera Manual AW100EN_Manual
http://slidepdf.com/reader/full/cool-pix-camera-manual-aw100enmanual 102/242
78
Using ViewNX 2
P l a y b a c k F ea t ur es
Retouching Photographs
Click Edit in the ViewNX 2 toolbar.
Image editing functions include tone compensation, sharpness adjustment, and
trimming (cropping).
Editing Movies
Click Movie Editor in the ViewNX 2 toolbar.
Movie editing functions include the ability to delete unwanted scenes.
Printing Images
Click Print in the ViewNX 2 toolbar.
A dialog is displayed and images can be printed using a printer connected to the
computer.

7/28/2019 Cool Pix Camera Manual AW100EN_Manual
http://slidepdf.com/reader/full/cool-pix-camera-manual-aw100enmanual 103/242
79
R e c or d i n g a n d P l a
y i n g B a
c k M ovi e s
Recording and Playing Back Movies
You can record movies by simply pressing theb (D movie-record) button.
In playback mode, press thek button to play a movie.
99
2 9 m 9 s29 m 9s
7m23sm23s7m23s
10m16s0m16s10m16s
0004.MOV004.MOV
15:305:3015:300004.MOV15/11 /2011
7m42sm42s7m42s

7/28/2019 Cool Pix Camera Manual AW100EN_Manual
http://slidepdf.com/reader/full/cool-pix-camera-manual-aw100enmanual 104/242
80
R ec or d i nga nd P l a y i ngB a
c k Movi es
Recording and Playing Back Movies
Recording Movies
You can record movies by simply pressing theb (emovie-record) button.
Color tones, white balance, and other settings are the same when recording
movies as they are when taking still images.
1 Turn on the camera and display the shootingscreen.• The movie options icon indicates the type of movie
recorded. The default setting isd HD 1080pP
(1920×1080) (A83).
• When recording movies, the angle of view (i.e., the area
visible in the frame) is narrower than that of still
images. When Photo info (A94) is set to Movie
frame+auto info, you can confirm the area visible inthe frame before recording movies.
* The maximum movie length shown in theillustration differs from the actual value.
2 Press theb (emovie-record) buttonto start movie recording.• The camera focuses on the subject at the
center of the frame. Focus areas are not
displayed during recording.• When recording with the movie options of
the aspect ratio of 16:9 (i.e., Movie options isd HD
1080pP (1920×1080)), monitor display changes to
an aspect ratio of 16:9 (the movie is recorded in the
range shown in the screen on the right).
• The approximate remaining movie length is displayed
on the monitor.C is displayed while saving to the
internal memory.
• Recording stops automatically when the maximum movie length has been recorded.
3 Press theb (emovie-record) button again to end recording.
B Note on Saving Movies
After a movie has been recorded, it is not fully saved to the internal memory or memory card until
monitor display returns to the shooting screen. Do not open the battery-chamber/memory card
slot cover . Removing the memory card or the battery while a movie is being saved may result in loss
of the movie data or damage to the camera or to the memory card.
C Action ControlWhen Assign action button in the setup menu (A94) is set to Action control (A13), movies
can be recorded by using the action control.
2 9 m 0 s2 9m 0 s
1 3 4 21 3 4 2
Movie option
Maximum movie length*
7m23sm23s7m23s

7/28/2019 Cool Pix Camera Manual AW100EN_Manual
http://slidepdf.com/reader/full/cool-pix-camera-manual-aw100enmanual 105/242
81
Recording Movies
R e c or d i n g a n d P l a
y i n g B a
c k M ovi e s
B Notes on Movie Recording
• When saving a movie onto a memory card, a memory card with an SD speed class of Class 6 or
higher is recommended (A21). If the transfer speed of the card is slow, the movie recording may
end unexpectedly.
• Using the digital zoom causes image quality to deteriorate. If you start recording the movie
without using digital zoom, and you keep pressing the zoom button g, the zoom stops at themaximum optical zoom ratio. Release the zoom button and press again g to trigger digital zoom.
When recording ends, digital zoom turns off.
• The sound using the zoom, autofocus, vibration reduction or aperture control when the
brightness changes may be recorded.
• The following phenomena may be seen on the monitor while recording movies. These
phenomena are saved in the recorded movies.
- Banding may occur in images under fluorescent, mercury-vapor, or sodium-vapor lighting
- Subjects that move quickly from one side of the frame to the other, such as a moving train or
car, may appear skewed
- The entire movie image may be skewed when the camera is panned
- Lighting or other bright areas may leave residual images when the camera is moved
B Notes on Autofocus
• When Autofocus mode (A83) in the movie menu is set toA Single AF (default setting),
the focus is locked when theb (emovie-record) button is pressed to start movie recording.
• Autofocus may not perform as expected (A31). Should this occur, try the following:
1. Before recording, set Autofocus mode in the movie menu toA Single AF (default setting).
2. Position a different subject at the same distance in the middle of the screen. Press theb (emovie-record) button to start the movie recording, and change the composition.
B Notes on the Camera Temperature
• The camera may become warm when recording movies for an extended period of time or when
the camera is used in a hot area.
• When the temperature inside the camera becomes extremely
high while recording a movie, recording automatically stop after
30 seconds. The remaining amount of recording time (B30 s) is
displayed on the monitor. The camera turns off in 5 seconds after
movie recording automatically stops.
Leave the camera off until the inside of the camera has cooled
and then use it. 7m23sm23s7m23s
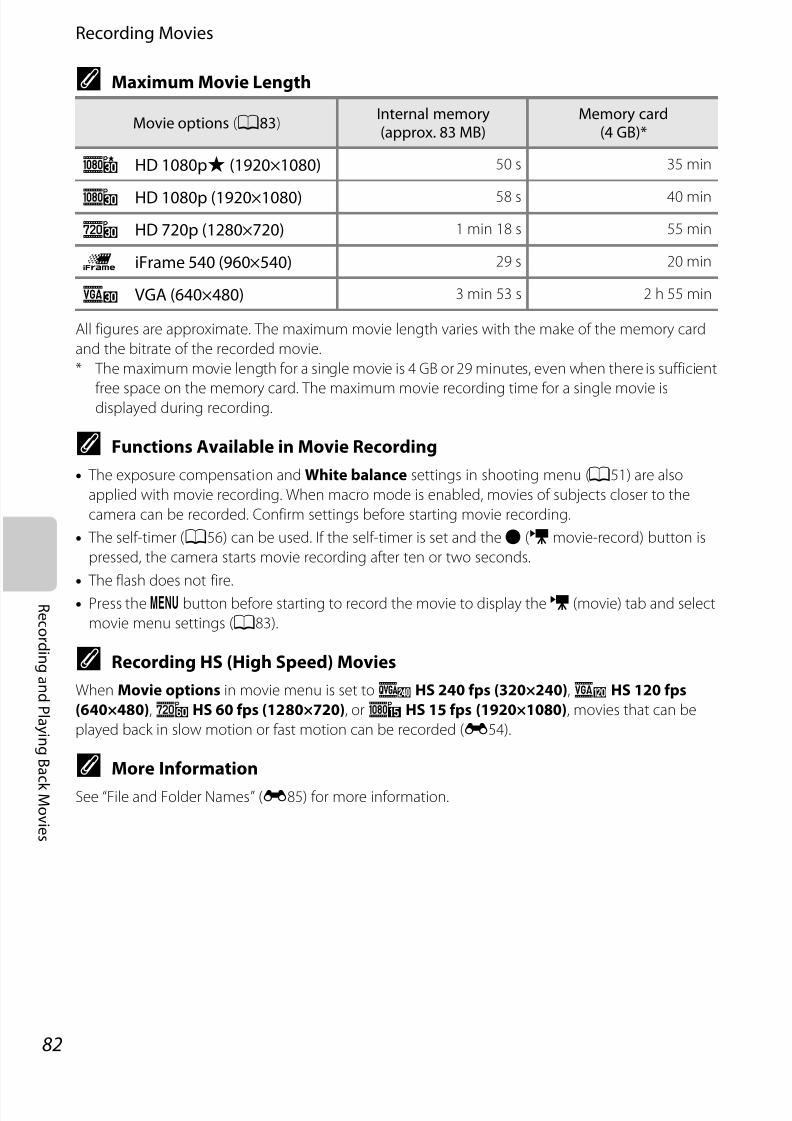
7/28/2019 Cool Pix Camera Manual AW100EN_Manual
http://slidepdf.com/reader/full/cool-pix-camera-manual-aw100enmanual 106/242
82
Recording Movies
R ec or d i nga nd P l a y i ngB a
c k Movi es
C Maximum Movie Length
All figures are approximate. The maximum movie length varies with the make of the memory card
and the bitrate of the recorded movie.
* The maximum movie length for a single movie is 4 GB or 29 minutes, even when there is sufficient
free space on the memory card. The maximum movie recording time for a single movie isdisplayed during recording.
C Functions Available in Movie Recording
• The exposure compensation and White balance settings in shooting menu (A51) are also
applied with movie recording. When macro mode is enabled, movies of subjects closer to the
camera can be recorded. Confirm settings before starting movie recording.
• The self-timer (A56) can be used. If the self-timer is set and theb (emovie-record) button is
pressed, the camera starts movie recording after ten or two seconds.
• The flash does not fire.
• Press thed button before starting to record the movie to display thee (movie) tab and select
movie menu settings (A83).
C Recording HS (High Speed) Movies
When Movie options in movie menu is set tok HS 240 fps (320×240),h HS 120 fps
(640×480),i HS 60 fps (1280×720), orj HS 15 fps (1920×1080), movies that can be
played back in slow motion or fast motion can be recorded (E54).
C More Information
See “File and Folder Names” (E85) for more information.
Movie options (A83)Internal memory(approx. 83 MB)
Memory card(4 GB)*
d HD 1080pP (1920×1080) 50 s 35 min
e HD 1080p (1920×1080) 58 s 40 min
f HD 720p (1280×720) 1 min 18 s 55 min
p iFrame 540 (960×540) 29 s 20 min
g VGA (640×480) 3 min 53 s 2 h 55 min

7/28/2019 Cool Pix Camera Manual AW100EN_Manual
http://slidepdf.com/reader/full/cool-pix-camera-manual-aw100enmanual 107/242
83
Recording Movies
R e c or d i n g a n d P l a
y i n g B a
c k M ovi e s
Changing Movie Recording Settings (Movie Menu)
The following option settings can be changed.
Display the shooting screenM d buttonM D tab (A11)
Option Description A
Movie options
Select the type of movie recorded. The default setting is
d HD 1080pP (1920×1080).• Normal speed movies: Whenp iFrame 540
(960×540) is selected, movies can be recorded in theformat supported by Apple Inc.
• HS movies: Whenk HS 240 fps (320×240),h HS120 fps (640×480), ori HS 60 fps (1280×720) isselected, movies played back in slow motion can berecorded. Whenj HS 15 fps (1920×1080) isselected, movies played back in fast motion can berecorded.
The camera switches between normal speed movierecording and HS movie recording each time thek button is pressed.
E52
Open with HSootage
When On (default setting) is selected, record slow motion orfast motion movies from the start of HS movie recording.
E53
Autoocus mode
Select how the camera focuses when recording normalspeed movies.Single AF (default setting) where the focus is locked whenmovie recording begins, or Full-time AF where the camera
focuses continuously during movie recording can be selected.When Full-time AF is selected, the sound of the camerafocusing may be heard in recorded movies. If you want toprevent the sound of the camera focusing from beingrecorded, select Single AF.
E56
Movie lightWhen On is selected, enable the movie light that assistsrecording in dark places during movie recording. The defaultsetting is Off .
E56
Wind noisereduction
Set whether or not to reduce wind noise during movie
recording. During playback, not only wind noise, but othersounds may also become difficult to hear. The default settingis Off .
E56
Movie options
Movie
Wind noise reductionMovie lightAutofocus modeOpen with HS footage
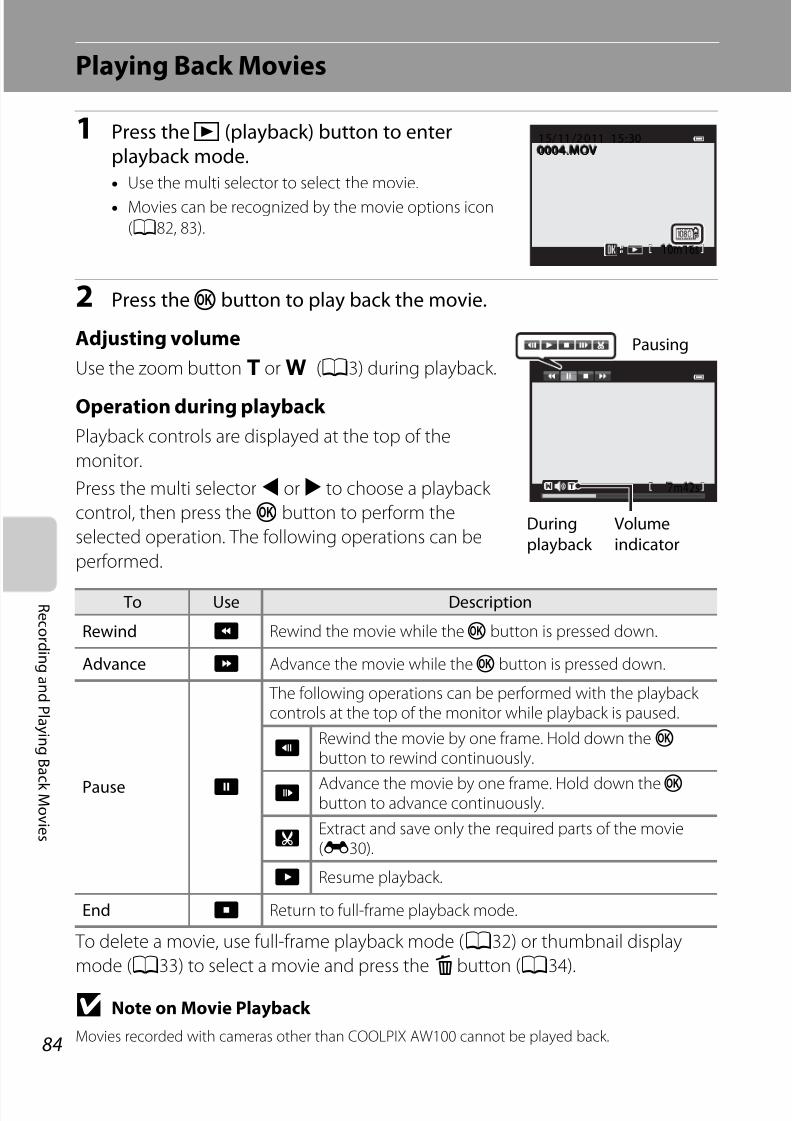
7/28/2019 Cool Pix Camera Manual AW100EN_Manual
http://slidepdf.com/reader/full/cool-pix-camera-manual-aw100enmanual 108/242
84
R ec or d i nga nd P l a y i ngB a
c k Movi es
Playing Back Movies
1 Press thec (playback) button to enterplayback mode.• Use the multi selector to select the movie.
• Movies can be recognized by the movie options icon
(A82, 83).
2 Press thek button to play back the movie.
Adjusting volume
Use the zoom buttong orf (A3) during playback.
Operation during playback
Playback controls are displayed at the top of the
monitor.
Press the multi selectorJ orK to choose a playback
control, then press thek button to perform the
selected operation. The following operations can be
performed.
To delete a movie, use full-frame playback mode (A32) or thumbnail display
mode (A33) to select a movie and press thel button (A34).
B Note on Movie Playback
Movies recorded with cameras other than COOLPIX AW100 cannot be played back.
To Use Description
Rewind A Rewind the movie while thek button is pressed down.
Advance B Advance the movie while thek button is pressed down.
Pause E
The following operations can be performed with the playback controls at the top of the monitor while playback is paused.
CRewind the movie by one frame. Hold down thek button to rewind continuously.
D Advance the movie by one frame. Hold down thek button to advance continuously.
IExtract and save only the required parts of the movie(E30).
F Resume playback.
End G Return to full-frame playback mode.
10m16s0m 16s10m16s
0004.MOV004.MOV
15:305:3015:300004.MOV15/11 /2011
7m42sm42s7m42s
Duringplayback
Volumeindicator
Pausing
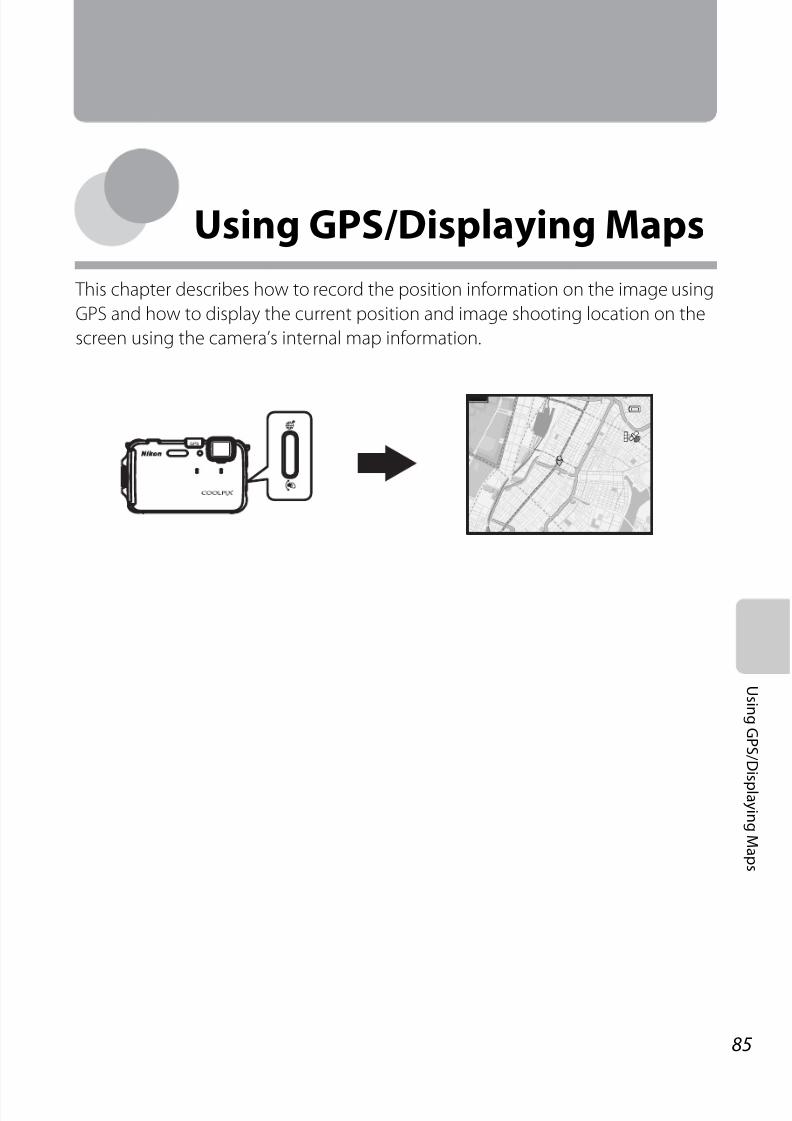
7/28/2019 Cool Pix Camera Manual AW100EN_Manual
http://slidepdf.com/reader/full/cool-pix-camera-manual-aw100enmanual 109/242
85
U s i n g G P S / D i s pl a y i n gM a p s
Using GPS/Displaying Maps
This chapter describes how to record the position information on the image using
GPS and how to display the current position and image shooting location on the
screen using the camera’s internal map information.
500km

7/28/2019 Cool Pix Camera Manual AW100EN_Manual
http://slidepdf.com/reader/full/cool-pix-camera-manual-aw100enmanual 110/242
86
U s i ngG P S / D i s pl a y i ngMa ps
Using GPS/Displaying Maps
Starting GPS Data Recording
The Global Positioning System (GPS) is a satellite-based navigation system using the
electro-magnetic waves of a network of GPS satellites placed into orbit. It allows
users to determine their locations anywhere on Earth. The camera’s internal GPS
receives signals from the GPS satellites and calculate its current time and position.Calculation of the position is known as positioning.
The position information (latitude and longitude) can be recorded on the pictures
to be shot.
To start recording of the position information, set GPS options to Record GPS data.
* To display the map by pressing the action button, set Assign action button in the setupmenu (A94) to Display map.
When set to On, signals are received from the GPS satellite and positioning starts.
• The default setting is Off .
• Operate in an open-air area when starting to receive signals from GPS satellites.
• Set the camera’s date/time if it has not been set before using the GPS function
(A24). Functions such as create log cannot be used if the date/time has notbeen set.
C GPS Reception Indicator and Point of Interest (POI) Information
• GPS reception can be checked on the shooting screen (A6).
- n: Signals are being received from four or more satellites and
determines position. Position information is recorded on the
image.
- o: Signals are being received from three satellites and
determines position. Position information is recorded on the
image.
- z: Signals are being received from the satellite, but
positioning is not possible. The position information is not
recorded on the image.
- y: Signals cannot be received from the satellite, and
positioning is not possible. The position information is not
recorded on the image.
• When Display POI in Points of interest (POI) of the map menu (A90) is set to On, the point of
interest (POI) information is displayed. The POI information displays the names of the nearest
landmarks (facilities) and other details.
• “----” may be displayed depending on the setting level in Level of detail of Points of interest
(POI). Also, certain landmark names may not be registered, or the landmark name may be different.
• To record the POI information on an image, set Embed POI in Points of interest (POI) to On.
Display the shooting screenM Press the action button to display a map* (A13)M d
button (A11)M GPS optionsM Record GPS data
2 9 m 0 s
1 3 4 213 4 2
2 9m 0 s
GPS reception
Point o interest (POI)inormation

7/28/2019 Cool Pix Camera Manual AW100EN_Manual
http://slidepdf.com/reader/full/cool-pix-camera-manual-aw100enmanual 111/242
87
Starting GPS Data Recording
U s i n g G P S / D i s pl a y i n gM a p s
B Notes on GPS
• When positioning for the first time, when positioning was unable to be performed for about two
hours, or after the battery was changed, it takes a few minutes to obtain the position information.
• Positions of the GPS satellites change constantly. You may not be able to determine the position
or it may take some time depending on your location and the time. To use the GPS feature, use the
camera as much as possible in an open-air area. Signal receiving will be smoother if the GPSantenna (A2) is facing the sky.
• If the camera needs to be turned off inside an airplane or hospital, set the Record GPS data to
Off .
• The following locations which block or reflect signals may result in failed or inaccurate positioning.
- Inside buildings or at the basement of buildings
- Between high-rise buildings
- Under overpasses
- Inside tunnels
- Near high-voltage electrical power lines
- Between clusters of trees
- Underwater
• Using a mobile phone of 1.5 GHz band near this camera may disrupt positioning.
• When carrying this camera around while positioning, do not place it in a metal bag. Positioning
cannot be performed if the camera is covered in metal materials.
• When there is a significant difference in the signals from the GPS satellite, there could be a
deviation of up to several hundred meters.
• Be aware of your surroundings when positioning.
• If Record GPS data is set to On and the camera is turned off, positioning will be done every
30 minutes for up to six hours. If positioning cannot be done, positioning will be done every
15 minutes for up to an hour. Positioning will cancel if positioning cannot be done after three
minutes.
• The date and time of the camera’s internal clock at the time of shooting is recorded at the date
and time of recording indicators displayed on the camera during playback. The time obtained by
the position information and recorded on images will not be displayed on the camera.
• Position information will be recorded on the first frame of pictures shot using continuous shooting
mode.
• The Geodetic system for this camera's GPS function uses the WGS 84 (World Geodetic System
1984).
C Pictures with Recorded Position Information
• Thez icon is displayed during playback for images which have the position information recorded
(A8).
• Position information recorded on a picture can be checked on a map with ViewNX2 after
transferring the image to a computer (A74).
• The actual place of shooting may differ from the GPS information recorded on the image files due
to the accuracy of the position information obtained and a difference in the Geodetic system used.

7/28/2019 Cool Pix Camera Manual AW100EN_Manual
http://slidepdf.com/reader/full/cool-pix-camera-manual-aw100enmanual 112/242
88
U s i ngG P S / D i s pl a y i ngMa ps
Displaying Maps
The current position or image shooting location can be
displayed on the screen using the camera’s internal
map information.
To display the map, press the action button in shootingmode or playback mode.
When Using Shooting Mode
To display the current position on the screen, press the
action button in shooting mode when Record GPS
data in GPS options of the map menu is set to On.
• To adjust the scale of the map, use the zoom button
(f (h)/ g (i)).
When Using Playback Mode
If an image displayingz in the full-frame display is
selected and the action button is pressed, the image
shooting location is displayed on the screen.
• To adjust the scale of the map, use the zoom button(f (h)/ g (i)).
• To move the map display, press the multi selectorH,I,J orK.
• When thek button is pressed, another image canbe selected. Only images with the recorded
position information are displayed in the thumbnaildisplay.
• The image shooting location and a rough directionare indicated byC (C indicates north), and the
selected image is highlighted in yellow.
• Press the multi selectorJ orK to select the image.
•
To enlarge the image, press the zoom buttong
(i
). To return to the map display, pressf (h).
Scale GPS reception
500km
Currentposition
Locationname (A86)
Scale
Locationname (A86)
500km
Image shooting locationand direction
Thumbnail display
500km

7/28/2019 Cool Pix Camera Manual AW100EN_Manual
http://slidepdf.com/reader/full/cool-pix-camera-manual-aw100enmanual 113/242
89
Displaying Maps
U s i n g G P S / D i s pl a y i n gM a p s
B Map Display
• The map display cannot be rotated. Only the north up display (the top of the screen indicates the
north) is available.
• The map display scale may vary depending on the country where the map is displayed.
• In shooting mode, when Record GPS data in GPS options of the map menu is set to Off or
when positioning could not be performed, a world map centered on the region that was set inTime zone of Time zone and date in the setup menu (A94) is displayed.
• If the position information is not recorded on the playback image, the map cannot be displayed.
C Action Control
If Assign action button in the setup menu (A94) is set to Action control, the map can be
displayed by the action control (A13).

7/28/2019 Cool Pix Camera Manual AW100EN_Manual
http://slidepdf.com/reader/full/cool-pix-camera-manual-aw100enmanual 114/242
90
U s i ngG P S / D i s pl a y i ngMa ps
Changing the GPS or Electronic Compass Settings (Map Menu)
In map display mode, the following option settings
can be changed.
Press the action button (display map,A13)M d buttonM U tab (A11)
Option Description A
GPS options
Record GPS data: When set to On, signals are being
received from the GPS satellite and positioning starts(A86). The default setting is Off .Synchronize: Signals from the GPS satellite are used toset the date and time of the camera’s internal clock (only when Record GPS data in GPS options of themap menu is set to On).Update A-GPS file: A memory card is used to updatethe A-GPS (assist GPS) file. Using the latest A-GPS filecan shorten the time needed for tracking the positioninformation.
E57
Distance units The distance units of the map display can be selectedfrom km (m) (kilometers (meters)) (default setting) ormi (yd) (miles (yards)).
E58
Calculate distance
Calculate the linear distance from the current locationto the shooting location on the image (only whenRecord GPS data of GPS options of the map menu isset to On) or between image shooting locations (onlywhen using playback mode).
E59
Electronic compassView logCreate logPoints of interest (POI)
Calculate distanceDistance unitsGPS options
Map menu

7/28/2019 Cool Pix Camera Manual AW100EN_Manual
http://slidepdf.com/reader/full/cool-pix-camera-manual-aw100enmanual 115/242
91
Changing the GPS or Electronic Compass Settings (Map Menu)
U s i n g G P S / D i s pl a y i n gM a p s
Points o interest (POI)
Make the settings for the POI (points of interest,location name information).Embed POI: When set to On, the location nameinformation is recorded on the pictures to be shot. The
default setting is Off .Display POI: When set to On, the location nameinformation is displayed on the shooting screen orplayback screen. The default setting is Off .Level of detail: Set the display level of the locationname information. A higher display level shows moredetailed regional information, and a lower display levelshows regional information for a wider area (such ascountry names).Edit POI: The level of the location name informationrecorded on the image can be changed, and theregional information can be deleted.
E60
Create log
When log recording starts, the measured trackinginformation for a certain duration is recorded until apreset time has elapsed (only when Record GPS data in GPS options of the map menu is set to On).• To display the log data, save it to a memory card.
E61
View logDisplay the recorded log data on the map for checking
your movement route.
E63
Electronic compass
Compass display: When set to On, the compass isdisplayed on the shooting screen. The default setting isOff .Compass correction: Corrects the compass when thecompass direction is not displayed correctly. Swing thecamera to draw a figure eight in the air while turningyour wrist to face the camera forward and backward,side to side, or up and down.
E64
Option Description A

7/28/2019 Cool Pix Camera Manual AW100EN_Manual
http://slidepdf.com/reader/full/cool-pix-camera-manual-aw100enmanual 116/242

7/28/2019 Cool Pix Camera Manual AW100EN_Manual
http://slidepdf.com/reader/full/cool-pix-camera-manual-aw100enmanual 117/242
93
G en er a l C a m er a S e t u p
General Camera Setup
This chapter describes the various settings that can be adjusted in the z setup
menu.
• See “Using Menus (thed Button)” (A11) for more information about using
the camera’s menus.
• For further details about each setting, refer to “ The Setup Menu” in the
Reference Section (E66).
Set up
Welcome screen
AF assistMotion detectionVibration reductionPrint dateMonitor settingsTime zone and date
1 3 4 23 4 2134 2
2 9 m 0 s29 m 0s

7/28/2019 Cool Pix Camera Manual AW100EN_Manual
http://slidepdf.com/reader/full/cool-pix-camera-manual-aw100enmanual 118/242
94
G ener a l C a mer a S et up
General Camera Setup
The Setup Menu
From the menu screen, select the z tab to display the
setup menu, and then you can change the following
settings.
Press thed buttonM z (setup) tab (A11)
Option Description A
Welcome screen
Select the image displayed as the welcome screenwhen the camera is turned on. Select COOLPIX todisplay the COOLPIX logo. Select Select an image touse a picture taken with the camera as the welcomescreen. The default setting is None.
E66
Time zone and date
Set settings related to the camera’s date and time. TheTime zone setting allows you to specify the time zonewhere the camera is mainly used and whether or notdaylight saving time is in effect. When thex traveldestination is selected, the camera automatically
calculates the time difference between the traveldestination and thew home time zone, and savesimages using the date and time of the traveldestination.
E67
Monitor settings
In Photo info, select the kind of information that isdisplayed on the monitor during shooting mode andplayback mode. If you select Framing grid+auto info,a framing grid is displayed when shooting to help youframe the picture. Also, set the image review display
after shooting and the screen brightness.
E70
Print date
Imprint the shooting date and time on pictures at thetime of shooting. The default setting is Off .• When the scene mode is set to Sports, Museum,
Backlighting with HDR set to On, Panorama, Petportrait with Continuous, or when recordingmovies, date cannot be imprinted.
E72
Vibration reduction
Reduce blurring caused by camera shake whenshooting. The default setting is On.
• When using a tripod to stabilize the camera, set thisfeature to Off to prevent this feature frommalfunctioning.
E73
Set upWelcome screen
AF assistMotion detectionVibration reductionPrint dateMonitor settingsTime zone and date

7/28/2019 Cool Pix Camera Manual AW100EN_Manual
http://slidepdf.com/reader/full/cool-pix-camera-manual-aw100enmanual 119/242
95
The Setup Menu
G en er a l C a m er a S e t u p
Motion detection
When the camera detects camera shake or subjectmovement at the time of shooting, it automaticallyincreases ISO sensitivity and shutter speed to reduceblurring. The default setting is Auto.
Ther icon lights in green when the camera detectscamera shake and increases shutter speed.• When using certain shooting modes or settings,
motion is not detected. In this case ther icon is notdisplayed.
E74
AF assist
When set to Auto (default setting), the AF-assistilluminator (A31) lights when shooting in dark surroundings to help the camera focus.• The illuminator has a range of about 3.5 m (11 ft) at
the maximum wide-angle position and about 2.0 m(6 ft 6 in.) at the maximum telephoto position.
• Even if Auto is selected, the AF-assist illuminator maynot light depending on the position of the focus areaor the scene mode that is selected.
E75
Digital zoom
When set to On (default setting), the digital zoom isenabled if the zoom button g (i) is pressed whenoptical zoom is set at the maximum telephoto zoomposition (A29).•
When using certain shooting modes or settings, thedigital zoom cannot be used simultaneously.
E75
Sound settings
Turn various camera sounds on and off. A beep willsound in the default setting.• When using certain shooting modes or settings, the
operation sound is disabled.
E76
Action controlresponse
Set the operation sensitivity of the action button. Whenthis option is set to High (default setting), the operationis performed even if the camera shake movement is
small. When this option is set to Low, the operation isperformed if the camera shake movement is large.• When viewing images with Quick playback of
action control or in full-frame playback mode,operation response of selecting images is fixed.
E77
Auto o Set the amount of time that passes before the monitoris turned off to save power. The default setting is 5 min.
E77
Option Description A

7/28/2019 Cool Pix Camera Manual AW100EN_Manual
http://slidepdf.com/reader/full/cool-pix-camera-manual-aw100enmanual 120/242
96
The Setup Menu
G ener a l C a mer a S et up
Format memory/Format card
Format the internal memory (only when a memory cardis not inserted) or the memory card (when a memorycard is inserted).• All data stored in the internal memory or on the
memory card is deleted during formatting andcannot be restored. Be sure to transfer importantimages to a computer and save them beforeformatting.
E78
Language Change the camera’s display language. E78
TV settings
Select this option if no image is displayed on a TV evenwhen the audio/video or HDMI cable is connected tothe TV. HDMI device control is used for setting
whether or not the camera receives signals from a TV when the TV that conforms to the HDMI-CEC standardis connected with an HDMI cable.
E79
Blink warning
When the camera detects that a human subject mayhave closed the eyes immediately after recognizing theface while shooting with modes other than the smartportrait mode (A65), the Did someone blink? screenis displayed on the monitor to check the picture taken.
The default setting is Off .
E80
Assign action buttonSwitch the operation of the action button.In the default setting, the camera displays a map whenthe action button is pressed.
E81
Reset allReset the camera’s settings to their default values.• Some of the settings such as Time zone and date
and Language are not reset.
E81
Firmware version View the current camera firmware version. E84
Option Description A

7/28/2019 Cool Pix Camera Manual AW100EN_Manual
http://slidepdf.com/reader/full/cool-pix-camera-manual-aw100enmanual 121/242
E1
R ef er en c e S e c t i on
E Reference Section
The Reference Section provides detailed information and hints for using the
camera.
Shooting
Using Easy Panorama (Shooting and Playing back) ......................................E2Using Panorama Assist ............................................................................................. E5
Playback
Playing and Deleting Images Captured Using Continuous Shooting Mode(Sequence) ..................................................................................................................... E7Favorite Pictures Mode ............................................................................................... E9Auto Sort Mode........................................................................................................... E12List by Date Mode ...................................................................................................... E14Editing Images (Still Pictures)............................................................................... E15Connecting the Camera to a TV (Playback on a TV) .....................................E22Connecting the Camera to a Printer (Direct Print) .......................................E24
Editing Movies ........................................................................................................... E30
Menu
The Smart Portrait Menu........................................................................................ E32The Shooting Menu (A (Auto) Mode) .............................................................E34The Playback Menu.................................................................................................. E42The Movie Menu ....................................................................................................... E52
Map Menu ................................................................................................................... E57The Setup Menu........................................................................................................ E66
Additional Information
File and Folder Names ............................................................................................ E85Optional Accessories............................................................................................... E87Error Messages .......................................................................................................... E88
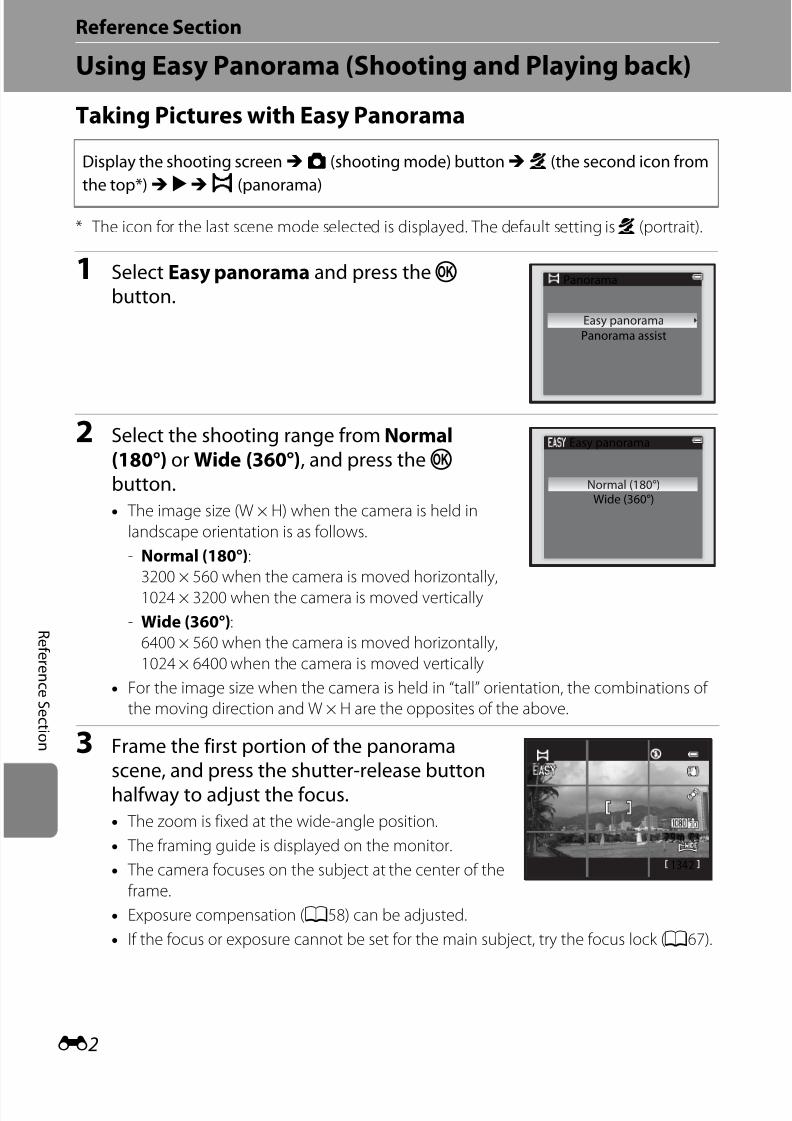
7/28/2019 Cool Pix Camera Manual AW100EN_Manual
http://slidepdf.com/reader/full/cool-pix-camera-manual-aw100enmanual 122/242
E2
R ef er enc eS ec t i on
Reference Section
Using Easy Panorama (Shooting and Playing back)
Taking Pictures with Easy Panorama
* The icon for the last scene mode selected is displayed. The default setting is b (portrait).
1 Select Easy panorama and press thek button.
2 Select the shooting range rom Normal(180°) or Wide (360°), and press thek button.• The image size (W × H) when the camera is held in
landscape orientation is as follows.
- Normal (180°):
3200 × 560 when the camera is moved horizontally,
1024 × 3200 when the camera is moved vertically
- Wide (360°):
6400 × 560 when the camera is moved horizontally,
1024 × 6400 when the camera is moved vertically
• For the image size when the camera is held in “tall” orientation, the combinations of
the moving direction and W × H are the opposites of the above.
3 Frame the irst portion o the panoramascene, and press the shutter-release buttonhalway to adjust the ocus.• The zoom is fixed at the wide-angle position.
• The framing guide is displayed on the monitor.
• The camera focuses on the subject at the center of the
frame.
• Exposure compensation (A58) can be adjusted.
• If the focus or exposure cannot be set for the main subject, try the focus lock (A67).
Display the shooting screenM A (shooting mode) buttonM b (the second icon rom
the top*)M K M p (panorama)
Panorama assist
Panorama
Easy panorama
Easy panorama
Wide (360°)Normal (180°)
134 234 2134 2
2 9 m 0 s2 9m 0 s
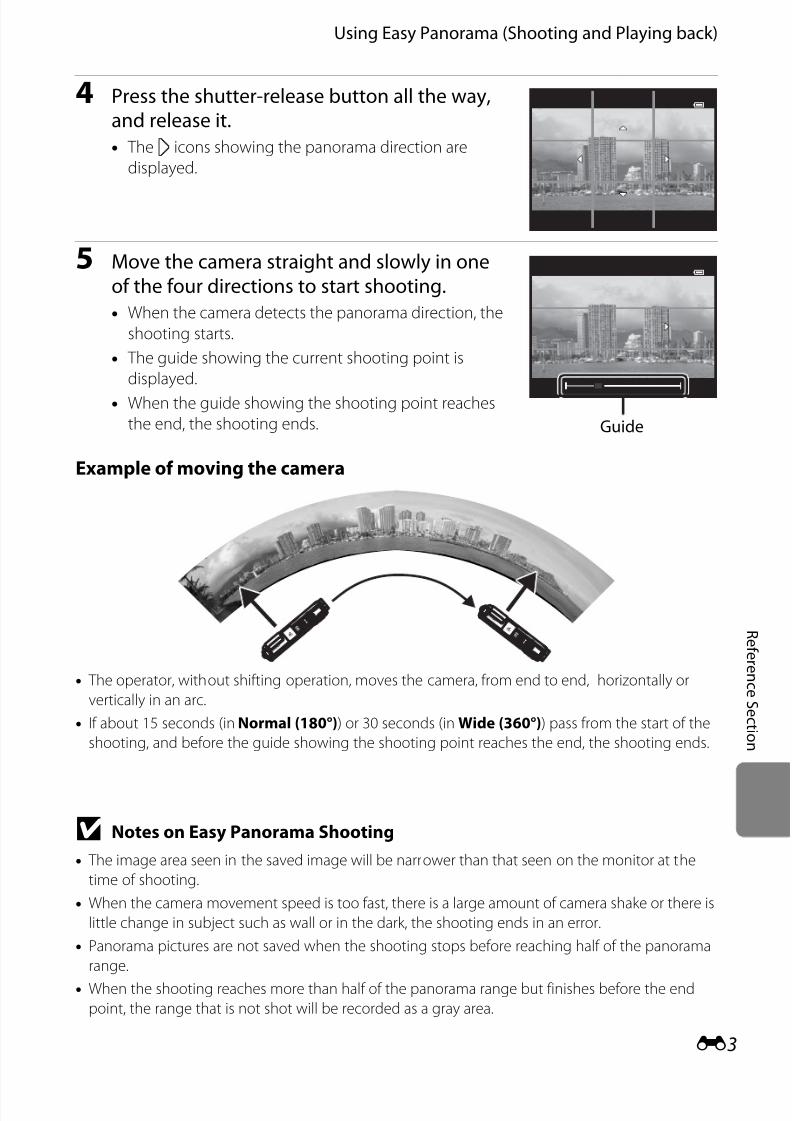
7/28/2019 Cool Pix Camera Manual AW100EN_Manual
http://slidepdf.com/reader/full/cool-pix-camera-manual-aw100enmanual 123/242
E3
Using Easy Panorama (Shooting and Playing back)
R ef er en c e S e c t i on
4 Press the shutter-release button all the way,and release it.• The I icons showing the panorama direction are
displayed.
5 Move the camera straight and slowly in oneo the our directions to start shooting.• When the camera detects the panorama direction, the
shooting starts.
• The guide showing the current shooting point is
displayed.
• When the guide showing the shooting point reaches
the end, the shooting ends.
Example of moving the camera
• The operator, without shifting operation, moves the camera, from end to end, horizontally or
vertically in an arc.
• If about 15 seconds (in Normal (180°)) or 30 seconds (in Wide (360°)) pass from the start of the
shooting, and before the guide showing the shooting point reaches the end, the shooting ends.
B Notes on Easy Panorama Shooting
• The image area seen in the saved image will be narrower than that seen on the monitor at the
time of shooting.
• When the camera movement speed is too fast, there is a large amount of camera shake or there is
little change in subject such as wall or in the dark, the shooting ends in an error.
• Panorama pictures are not saved when the shooting stops before reaching half of the panorama
range.
• When the shooting reaches more than half of the panorama range but finishes before the end
point, the range that is not shot will be recorded as a gray area.
Guide

7/28/2019 Cool Pix Camera Manual AW100EN_Manual
http://slidepdf.com/reader/full/cool-pix-camera-manual-aw100enmanual 124/242
E4
Using Easy Panorama (Shooting and Playing back)
R ef er enc eS ec t i on
Viewing Easy Panorama (Scroll)
Switch to playback mode (A32), display the picture
recorded with easy panorama in full-frame playback
mode and press thek button. The camera displays the
short side of the picture filling the entire screen andscrolls the displayed area automatically.
• The picture is scrolled in the direction of the
panorama shooting.
Playback controls are displayed at the top of the
monitor during playback. When you choose a playback
control with the multi selectorJ orK and press thek
button, the following operations can be performed.
B Note on Viewing Pictures Recorded with Easy Panorama
Panorama pictures recorded with functions other than easy panorama of the COOLPIX AW100 may
not be scrolled or zoomed on this camera.
To Use Description
Rewind A Scroll quickly back while thek button is pressed.
Advance B Scroll quickly forward while thek button is pressed.
Pause E
The following operations can be performed with the playback controls at the top of the monitor while playback is paused.
C Rewind while thek button is pressed.
D Scroll while thek button is pressed.
F Restart the automatic scroll.
End G Return to full-frame playback mode.
44 13232132
0004.JPG004.JPG0004.JPG15:305:3015:3015/11 /2 011

7/28/2019 Cool Pix Camera Manual AW100EN_Manual
http://slidepdf.com/reader/full/cool-pix-camera-manual-aw100enmanual 125/242
E5
R ef er en c e S e c t i on
Using Panorama Assist
Using a tripod makes the composition easier. When using a tripod to stabilize the
camera, set Vibration reduction (E73) to Off in the setup menu.
* The icon for the last scene mode selected is displayed. The default setting is b (portrait).
1 Choose Panorama assist and press thek button.• The I icons are displayed to show the direction in
which pictures are joined.
2 Use the multi selector to choose the directionand press thek button.• Select the direction in which pictures are joined in the
completed panorama: right (I), left (J), up (K) or
down (L).
• The yellow panorama direction icon (II) is displayed
for the current direction and the direction is fixed whenthek button is pressed. A white icon (I) is displayed in the selected direction.
• Apply flash mode (A54), self-timer (A56), macro mode (A57) and exposure
compensation (A58) settings with this step, if necessary.
• Press thek button again to reselect the direction.
3 Frame the irst portion o thepanorama scene and take the irstpicture.• The camera focuses on the subject at the
center of the frame.
• 1/3 of the image will be displayed as
translucent.
Display the shooting screenM A (shooting mode) buttonM b (the second icon rom
the top*)M K M p (panorama)
Panorama assist
Panorama
Easy panorama
134 234 2134 2
2 9 m 0 s2 9m 0 s
13423421342
2 9 m 0 s2 9m 0 s

7/28/2019 Cool Pix Camera Manual AW100EN_Manual
http://slidepdf.com/reader/full/cool-pix-camera-manual-aw100enmanual 126/242
E6
Using Panorama Assist
R ef er enc eS ec t i on
4 Shoot the next picture.• Match the outline of the next picture so that
1/3 of the frame overlaps the previous
picture, and press the shutter-release button.
•Repeat until you have taken the necessarynumber of pictures to complete the image.
5 Press thek button when shooting is completed.• The camera returns to step 2.
B Notes on Panorama Assist
• Set the flash mode, self-timer, macro mode and exposure compensation before releasing the
shutter for the first picture. The settings cannot be changed after shooting the first picture.
Pictures cannot be deleted, nor can zoom, or Image mode (A61) be adjusted after shooting the
first picture.
• The panorama series is terminated if the auto off function (E77) triggers the standby mode
during shooting. To prevent this, setting a longer time for the auto off function is recommended.
CR (exposure lock) Indicator
When using panorama assist mode, all pictures in the panorama
have the same exposure, white balance, and focus as the first
picture of the panorama.
When the first picture is shot,R is displayed on the monitor
to indicate that exposure, white balance, and focus are locked.
C Panorama Creation
Transfer pictures taken to a computer (A76) and use Panorama Maker 5 to join them in a single
panorama.
Install Panorama Maker 5 on a computer using the included ViewNX 2 Installer CD.
C More Information
See “File and Folder Names” (E85) for more information.
134134 11341EndndEnd
29 m 0s9m 0s29 m 0s
134134 11341EndndEnd
29 m 0s9m 0s29 m 0s

7/28/2019 Cool Pix Camera Manual AW100EN_Manual
http://slidepdf.com/reader/full/cool-pix-camera-manual-aw100enmanual 127/242
E7
R ef er en c e
S e c t i on
Playing and Deleting Images Captured Using Continuous Shooting Mode (Sequence)
The images shot in the following continuous shooting mode are saved as a group
(called a “sequence”) each time you shoot.
• Continuous H, Continuous L in Continuous (E36) in the shooting menu
•
Sports (A40) or Continuous in the Pet portrait (A46) scene mode
Playing Images in a Sequence
In full-frame playback mode or thumbnail playback mode (A33), the first image
of a sequence is used as the “key picture”, i.e., it is displayed to represent the
images in the sequence.
While the key picture of a sequence is displayed in full-frame playback mode, press thek button to display
each image in the sequence individually. To return to key
picture only display, press the multi selectorH.
The following operations can be performed when each image in a sequence is
displayed individually.
• Choose an image: Press the multi selectorJ orK.
• Zoom in: Press the zoom button g (i) (A33).
B Note on Sequence
Pictures captured continuously with cameras other than COOLPIX AW100 cannot be displayed as a
sequence.
C Sequence Display Options
Select Sequence display options (E51) in the playback menu to set all sequences to be
displayed using their key pictures or to display them as individual images.
If an image in the sequence is selected when Sequence display options is set to Individual
pictures,F icon is displayed on the screen.
C Changing Key Picture in SequenceA sequence’s key picture can be changed using Choose key picture (E51) in the playback menu.
44 55ޓ
0004.JPG004.JPG0004.JPG
15:305:3015:3015/11/20115/11/201115/11/2011
Back ackBack

7/28/2019 Cool Pix Camera Manual AW100EN_Manual
http://slidepdf.com/reader/full/cool-pix-camera-manual-aw100enmanual 128/242
E8
Playing and Deleting Images Captured Using Continuous Shooting Mode (Sequence)
R ef er enc eS ec t i on
C Playback Menu Options Available When Using Sequence
When thed button is pressed during an image sequence playback, the following menu
operations are available.
1 Press thed button after displaying individual images. Settings can be applied to individual
images.2 When thed button is pressed during displaying only the key picture, the same settings can be
applied to all images in that sequence. Press thed button after displaying individual images to
apply settings to individual images.
Deleting Images in a Sequence
When Sequence display options (E51) is set to Key picture only in the
playback menu, if thel button is pressed and the deletion method is selected,
the following images are deleted.
• When a sequence is displayed by its key picture only:- Current image: When the sequence is selected, all images in the sequence
are deleted.- Erase selected images: When the key picture is selected in the erase
selected images screen (A35), all images in the sequence are deleted.- All images: All images including the sequence that is displayed are deleted.
• If the key picture is selected and thek button is pressed to display each
individual image in the sequence before pressing thel button:
The deletion methods change to the following.- Erase current picture: Delete the image that is
displayed.
- Erase selected images: Select multiple images inthe sequence to delete in the erase selected
images screen (A35).- Erase entire sequence: All images in the
sequence, including the image that is displayed,are deleted.
• Quick retouch1➝ E17 • D-Lighting1
➝ E17
• Glamour retouch1➝ E18 • Filter effects1
➝ E19
• Print order2
➝ E42 • Slide show
➝ E45
• Protect2➝ E46 • Rotate image1
➝ E48
• Small picture1➝ E20 • Voice memo1
➝ E49
• Copy2➝ E50 • Sequence display options ➝ E51
• Choose key picture ➝ E51 • Favorite pictures2➝ E9
Erase entire sequenceErase selected imagesErase current picture
Delete

7/28/2019 Cool Pix Camera Manual AW100EN_Manual
http://slidepdf.com/reader/full/cool-pix-camera-manual-aw100enmanual 129/242

7/28/2019 Cool Pix Camera Manual AW100EN_Manual
http://slidepdf.com/reader/full/cool-pix-camera-manual-aw100enmanual 130/242
E10
Favorite Pictures Mode
R ef er enc eS ec t i on
Playing Back Images in Albums
Use the multi selector to select an album and press the
k button to play back only images added to the same
album.
• The following operations can be performed on thealbum list screen.
- l (delete) button: Delete all images in thecurrently selected album.
- d button: Change album icon (color and design) (E11).
• When viewing images in full-frame playback mode or thumbnail playback
mode, if you press thed button to display the menu and then select theh tab (favorite pictures menu), you can then select a feature from the playback
menu (A71).
Removing Images From Albums
1 Press the multi selectorJ orK, and thenchoose an image and pressH to displayy.• To remove more images from the same album, repeat
this step as necessary.
• To cancel the selection, pressI to removey.
• Press the zoom button (A29)g (i) to switch back to
full-frame playback mode orf (h) to display
thumbnails.
2 Displayy or all images to be removed and press thek button to setthe chosen images.
3 Choose Yes and press thek button.• To cancel removal, select No.
B Note on Deletion
If an image is deleted while using favorite pictures mode, the image will be removed from the album
and it will be permanently deleted from the internal memory or the memory card.
Select playback modeM c button (A70)M h Favorite pictures
Select avorite pictures modeM Select an album rom which images are removed
(E10)M k buttonM d buttonM h tab (A11)M h Remove rom avorites
Choose icon
Favorite pictures
ON/OFF
Remove from favorites
Back

7/28/2019 Cool Pix Camera Manual AW100EN_Manual
http://slidepdf.com/reader/full/cool-pix-camera-manual-aw100enmanual 131/242
E11
Favorite Pictures Mode
R ef er en c e S e c t i on
Changing the Favorites Album Icon
1 Press the multi selectorJ orK to choose anicon color and press thek button.
2 PressH,I,J orK to choose an icon andpress thek button.• The icon changes and the monitor display returns to
the list of albums screen.
B Notes on Album Icons
Set the album icons separately for the internal memory and for the memory card.
• To change the album icons for the internal memory, first remove the memory card from the
camera.
• The default setting for the icon is the number icon (black).
Select avorite pictures modeM Select an album to change its icon (E10)M d
button
Choose icon
Back
Choose icon
Back
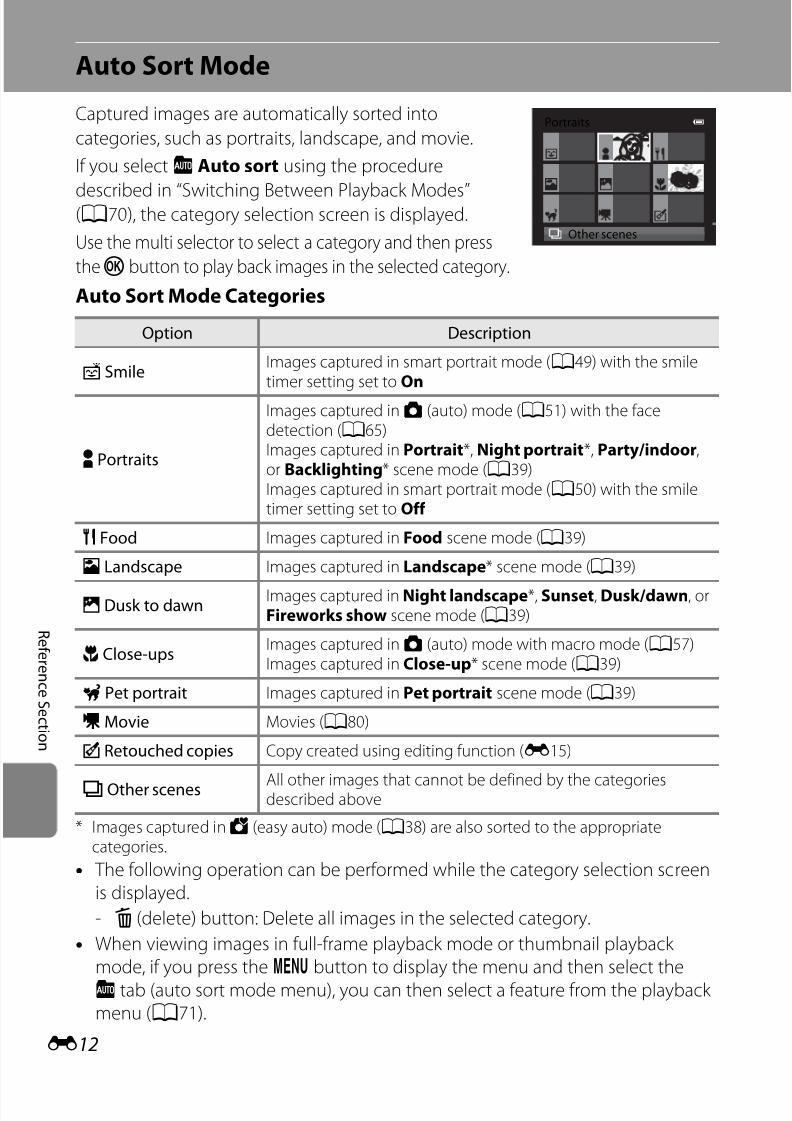
7/28/2019 Cool Pix Camera Manual AW100EN_Manual
http://slidepdf.com/reader/full/cool-pix-camera-manual-aw100enmanual 132/242
E12
R ef er enc e
S ec t i on
Auto Sort Mode
Captured images are automatically sorted into
categories, such as portraits, landscape, and movie.
If you selectF Auto sort using the procedure
described in “Switching Between Playback Modes”(A70), the category selection screen is displayed.
Use the multi selector to select a category and then press
thek button to play back images in the selected category.
Auto Sort Mode Categories
* Images captured inG (easy auto) mode (A38) are also sorted to the appropriatecategories.
• The following operation can be performed while the category selection screenis displayed.
- l (delete) button: Delete all images in the selected category.
• When viewing images in full-frame playback mode or thumbnail playback mode, if you press thed button to display the menu and then select the
F tab (auto sort mode menu), you can then select a feature from the playback menu (A71).
Option Description
a SmileImages captured in smart portrait mode (A49) with the smiletimer setting set to On
D Portraits
Images captured inA (auto) mode (A51) with the facedetection (A65)Images captured in Portrait*, Night portrait*, Party/indoor,or Backlighting* scene mode (A39)Images captured in smart portrait mode (A50) with the smiletimer setting set to Off
u Food Images captured in Food scene mode (A39)
U Landscape Images captured in Landscape* scene mode (A39)
V Dusk to dawnImages captured in Night landscape*, Sunset, Dusk/dawn, orFireworks show scene mode (A39)
D Close-upsImages captured inA (auto) mode with macro mode (A57)Images captured in Close-up* scene mode (A39)
O Pet portrait Images captured in Pet portrait scene mode (A39)
DMovie Movies (A80)
X Retouched copies Copy created using editing function (E15)
W Other scenes All other images that cannot be defined by the categoriesdescribed above
Other scenes
Portraits

7/28/2019 Cool Pix Camera Manual AW100EN_Manual
http://slidepdf.com/reader/full/cool-pix-camera-manual-aw100enmanual 133/242

7/28/2019 Cool Pix Camera Manual AW100EN_Manual
http://slidepdf.com/reader/full/cool-pix-camera-manual-aw100enmanual 134/242
E14
R ef er enc eS ec t i on
List by Date Mode
If you selectC List by date using the procedure
described in “Switching Between Playback Modes”
(A70), the shooting date selection screen is displayed.
Use the multi selector to select a date and then pressthek button to play back images captured on the
selected date.
• The first picture taken on the selected date isdisplayed.
• The following operations can be performed while the shooting date list screen
is displayed.
- l (delete) button: Delete all images captured on the selected date.
- d button: If you select theC tab (list by date menu) from the menuscreen to display the playback menu (A71), you can select one of the
following features and apply that feature to images captured on the selected
date.
➝ Print order, slide show, protect and favorite pictures
• When viewing images in full-frame playback mode or thumbnail playback mode, if you press thed button to display the menu and then select theC
tab (list by date menu), you can then select a feature from the playback menu
(A71).
• Calendar display mode (A33) cannot be used in list by date mode.
B Notes on List by Date Mode
• Up to 29 dates can be selected. If images exist for more than 29 dates, all images saved earlier than
most recent 29 dates will be combined under Others.
• The 9,000 most recent images can be displayed in list by date mode.
• Pictures taken when the camera’s date is not set are treated as images captured on January 1,
2011.
4
11
8
4
List by date
26/11 /2011
20/11 /2011
18/11 /2011
15/11 /2011
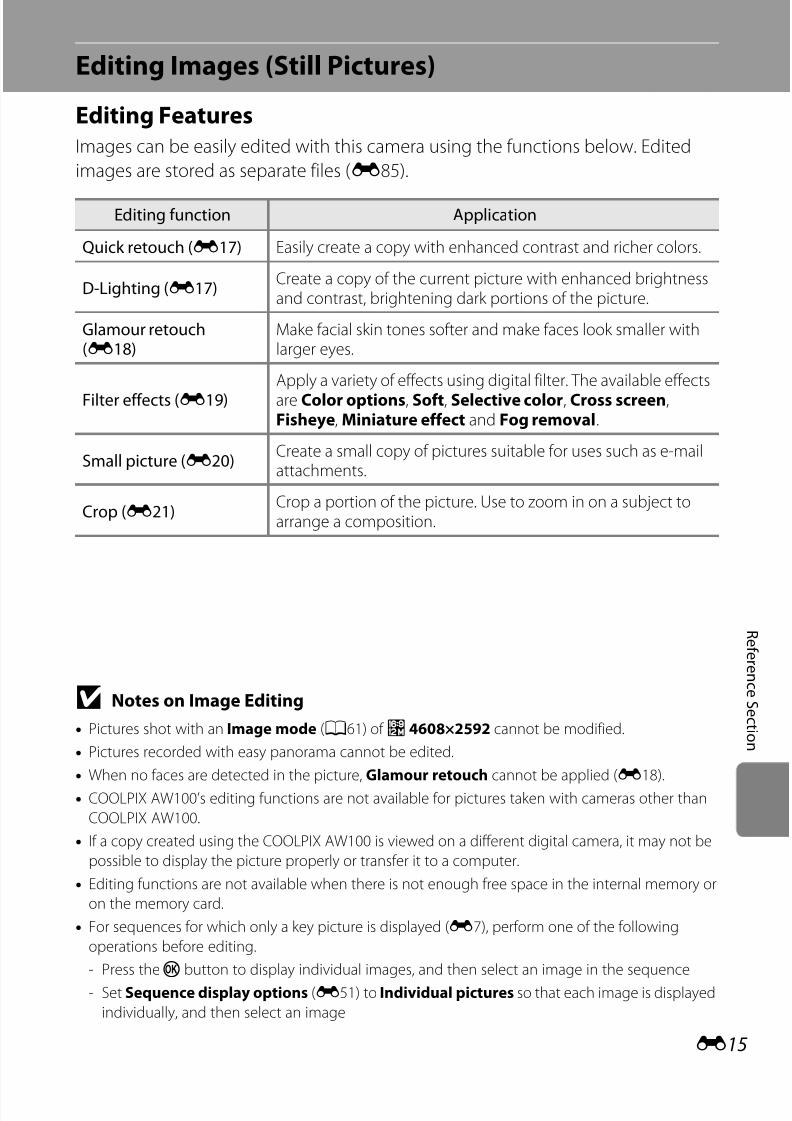
7/28/2019 Cool Pix Camera Manual AW100EN_Manual
http://slidepdf.com/reader/full/cool-pix-camera-manual-aw100enmanual 135/242
E15
R ef er en c e S e c t i on
Editing Images (Still Pictures)
Editing Features
Images can be easily edited with this camera using the functions below. Edited
images are stored as separate files (E85).
B Notes on Image Editing
• Pictures shot with an Image mode (A61) of g 4608×2592 cannot be modified.
• Pictures recorded with easy panorama cannot be edited.
• When no faces are detected in the picture, Glamour retouch cannot be applied (E18).
• COOLPIX AW100’s editing functions are not available for pictures taken with cameras other than
COOLPIX AW100.
• If a copy created using the COOLPIX AW100 is viewed on a different digital camera, it may not be
possible to display the picture properly or transfer it to a computer.
• Editing functions are not available when there is not enough free space in the internal memory or
on the memory card.
• For sequences for which only a key picture is displayed (E7), perform one of the following
operations before editing.
- Press thek button to display individual images, and then select an image in the sequence
- Set Sequence display options (E51) to Individual pictures so that each image is displayed
individually, and then select an image
Editing unction Application
Quick retouch (E17) Easily create a copy with enhanced contrast and richer colors.
D-Lighting (E17)Create a copy of the current picture with enhanced brightnessand contrast, brightening dark portions of the picture.
Glamour retouch(E18)
Make facial skin tones softer and make faces look smaller withlarger eyes.
Filter eects (E19)Apply a variety of effects using digital filter. The available effectsare Color options, Soft, Selective color, Cross screen,Fisheye, Miniature effect and Fog removal.
Small picture (E20)Create a small copy of pictures suitable for uses such as e-mailattachments.
Crop (E21)Crop a portion of the picture. Use to zoom in on a subject toarrange a composition.

7/28/2019 Cool Pix Camera Manual AW100EN_Manual
http://slidepdf.com/reader/full/cool-pix-camera-manual-aw100enmanual 136/242
E16
Editing Images (Still Pictures)
R ef er enc eS ec t i on
C Restrictions on Image Editing
The following restrictions apply when editing pictures that were created by editing.
• Copies created by editing cannot be edited again using the same editing function.
• When combining the small picture or crop function and another editing function, use the small
picture or crop functions after other editing functions have been applied.
• Retouch effects such as the glamour retouch function’s skin softening effect can be applied to
pictures taken with the skin softening function during shooting.
C Original Pictures and Edited Copies
• Copies created with editing functions are not deleted if the original pictures are deleted. The
original pictures are not deleted if copies created with editing functions are deleted.
• Edited copies are stored with the same shooting date and time as the original.
• Even if the pictures that are marked for Print order (E42) or Protect (E46) are used for
editing, these settings are not reflected on the edited copies.
Editing unctions used Editing unctions to add
Quick retouchD-LightingFilter eects
Glamour retouch, Small picture or Crop can be used.Quick retouch, D-Lighting or Filter effects cannot be used incombination with each other.
Glamour retouchQuick retouch, D-Lighting, Filter effects, Small picture or Cropcan be used.
Small pictureCrop
No additional editing functions can be used.
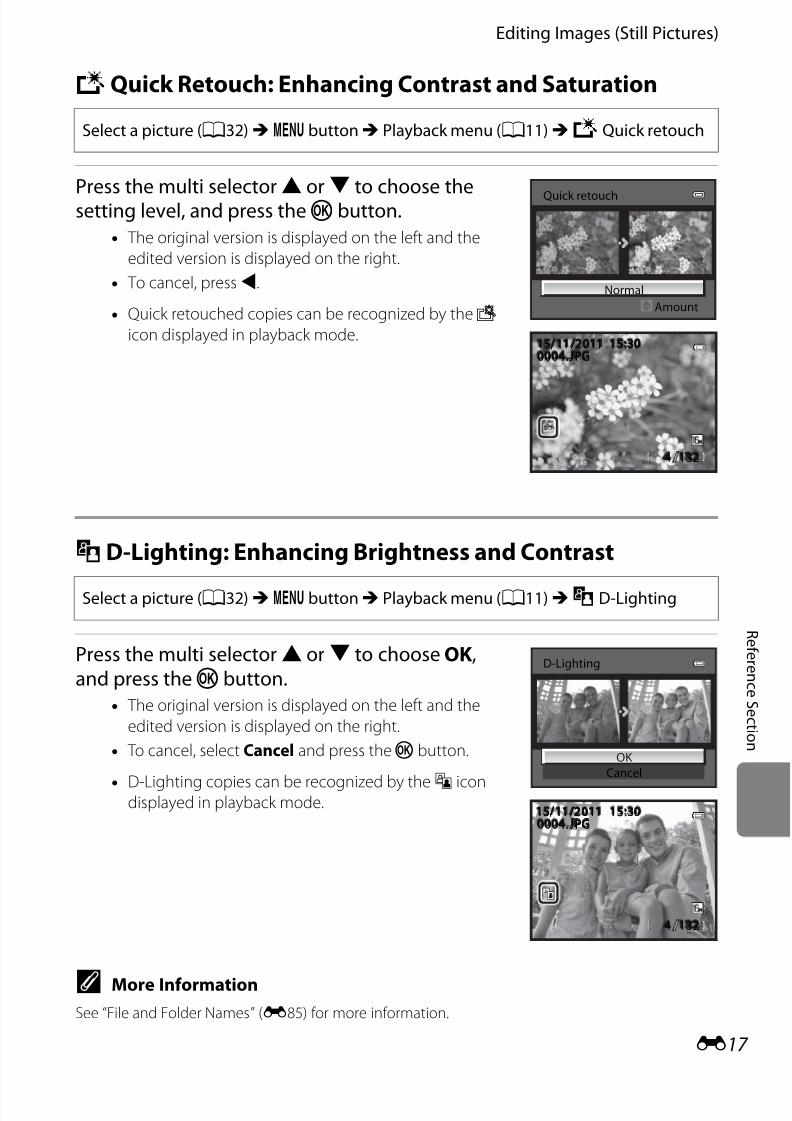
7/28/2019 Cool Pix Camera Manual AW100EN_Manual
http://slidepdf.com/reader/full/cool-pix-camera-manual-aw100enmanual 137/242

7/28/2019 Cool Pix Camera Manual AW100EN_Manual
http://slidepdf.com/reader/full/cool-pix-camera-manual-aw100enmanual 138/242
E18
Editing Images (Still Pictures)
R ef er enc eS ec t i on
sGlamour Retouch: Making Facial Skin Tones Softer, Face
Smaller, or Eyes Larger
1 Press the multi selectorH orI to select theeect type, and press thek button.• All: Soften facial skin tones, make faces look smaller, and
make eyes look larger.
• Skin softening: Make facial skin tones softer.
• A confirmation screen is displayed, and the image is
displayed zoomed in on the edited face.
• To cancel, pressJ.
2 Conirm the results.• Up to 12 faces, in order of proximity to the center of the
frame, can be enhanced.
• When multiple faces are edited, press the multi
selectorJ andK to switch the face that is displayed.
• To change the effect type of glamour retouch, press
thed button and return to step 1.• To create a copy edited with glamour retouch, press
thek button.
• Copies created using the glamour retouch function
can be recognized by theu icon displayed in
playback mode.
B Notes on Glamour Retouch
• Depending on conditions such as the direction the subject is facing or the brightness of the face,
the face may not be detected properly, or the desired effect may not be achieved.
• If no faces are detected in the image, a warning is displayed and the screen returns to the playback
menu.
C More Information
See “File and Folder Names” (E85) for more information.
Select a picture (A32)M d buttonM Playback menu (A11)M s Glamour
retouch
Glamour retouch
Select
All
Preview
Saveack SaveBack
132321324
0004.JPG004.JPG0004.JPG15:305:3015:3015/11 /20115/11 /201115/11 /2011

7/28/2019 Cool Pix Camera Manual AW100EN_Manual
http://slidepdf.com/reader/full/cool-pix-camera-manual-aw100enmanual 139/242
E19
Editing Images (Still Pictures)
R ef er en c e S e c t i on
p Filter Effects: Applying Digital Filter Effects
1 Press the multi selectorH orI to choose theilter eect type and press thek button.• When Cross screen, Fisheye, Miniature effect or
Fog removal is selected, proceed to step 3.
2 Adjust the eect and press thek button.• Color options: PressH orI to select a color tone.
• Soft: PressH orI to select the extent of the effect.
• Selective color: PressH orI to select the color to
keep.
Select a picture (A32)M d buttonM Playback menu (A11)M p Filter eects
Option Description
Color optionsModify color tones.• Select the option from Vivid color, Black-and-white, Sepia,or Cyanotype.
SotGently soften the focus of the image from the center to theedge. In pictures taken with face detection (A65) or petdetection (A46) selected, areas around faces will be blurred.
Selective colorKeep only selected image colors and makes other colors black-and-white.
Cross screenProduce star-like rays of light that radiate outward from brightobjects such as sunlight reflections and city lights. Suitable fornight scenes.
FisheyeCreate images that look like they were shot with a fisheye lens.Suitable for pictures shot in macro mode.
Miniature eectCreate images that look like close-up photos of a diorama.Suitable for pictures shot while looking down from a highlocation, with the main subject near the center of the frame.
Fog removal Reduce blurring of images caused by underwater shooting.
Filter ef ects
Color optionsSoft
Selective colorCross screenFisheye
Miniature ef ectFog removal
Extent
Normal
Soft
Soft

7/28/2019 Cool Pix Camera Manual AW100EN_Manual
http://slidepdf.com/reader/full/cool-pix-camera-manual-aw100enmanual 140/242
E20
Editing Images (Still Pictures)
R ef er enc eS ec t i on
3 Check the eect and press thek button.• A new, edited copy is created.
• To cancel, pressJ.
• Copies created by editing with filter effect can be
recognized by thec icon displayed in playback mode.
g Small Picture: Reducing the Size of an Image
1 Press the multi selectorH orI to choose thedesired copy size and press thek button.• The available size is 640×480, 320×240 or 160×120.
2 Select Yes and press thek button.• A new, smaller copy is created.
• The compression ratio of the created image is 1:16.
• To cancel, choose No and press thek button.
• The copy is displayed with a black frame.
C More Information
See “File and Folder Names” (E85) for more information.
Select a picture (A32)M d buttonM Playback menu (A11)M g Small picture
Preview
Saveack SaveBack
132321324
0004.JPG004.JPG0004.JPG15:305:3015:3015/11 /20115/11/201115/11 /2011
160×120
320×240
640×480Small picture
Create small picture le?
Yes
No
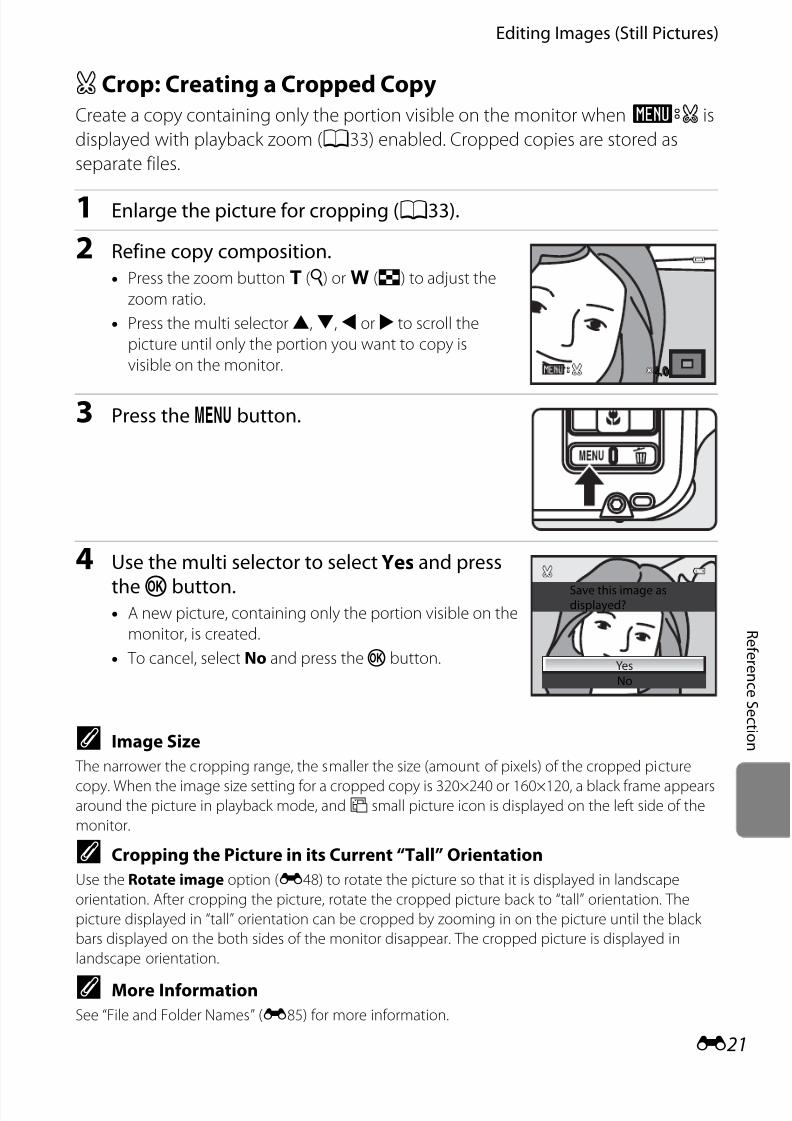
7/28/2019 Cool Pix Camera Manual AW100EN_Manual
http://slidepdf.com/reader/full/cool-pix-camera-manual-aw100enmanual 141/242

7/28/2019 Cool Pix Camera Manual AW100EN_Manual
http://slidepdf.com/reader/full/cool-pix-camera-manual-aw100enmanual 142/242
E22
R ef er enc eS ec t i on
Connecting the Camera to a TV (Playback on a TV)
Connect the camera to a television to play back pictures on the television.
If your television is equipped with an HDMI connector, you can connect it to the
camera with a commercially available HDMI cable to play back movies.
1 Turn o the camera.
2 Connect the camera to the TV.When connecting using the included audio/video cable
• Connect the yellow plug to the video-in jack on the TV, and the red and white plugs
to the audio-in jacks.
When connecting using a commercially available HDMI cable
• Connect the plug to the HDMI jack on the TV.
WhiteYellow Red
HDMI mini
connector (Type C)
To the HDMI jack

7/28/2019 Cool Pix Camera Manual AW100EN_Manual
http://slidepdf.com/reader/full/cool-pix-camera-manual-aw100enmanual 143/242
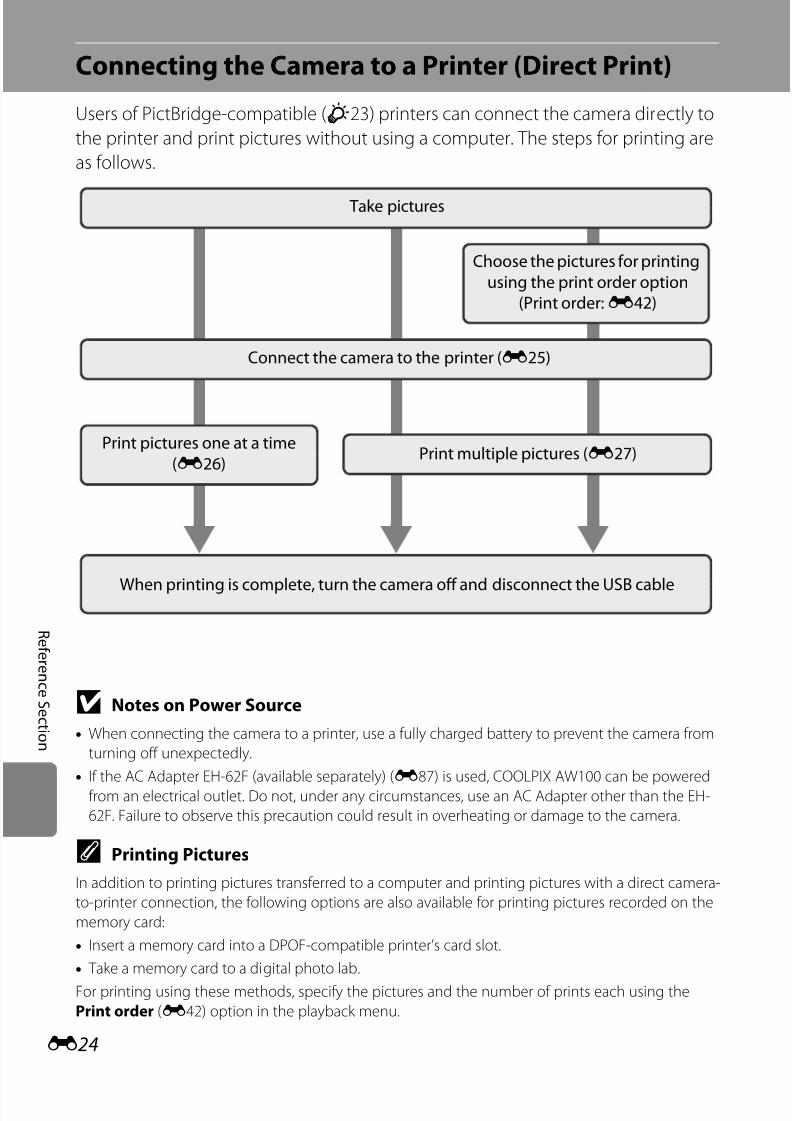
7/28/2019 Cool Pix Camera Manual AW100EN_Manual
http://slidepdf.com/reader/full/cool-pix-camera-manual-aw100enmanual 144/242
E24
R ef er enc eS ec t i on
Connecting the Camera to a Printer (Direct Print)
Users of PictBridge-compatible (F23) printers can connect the camera directly to
the printer and print pictures without using a computer. The steps for printing are
as follows.
B Notes on Power Source
• When connecting the camera to a printer, use a fully charged battery to prevent the camera from
turning off unexpectedly.
• If the AC Adapter EH-62F (available separately) (E87) is used, COOLPIX AW100 can be powered
from an electrical outlet. Do not, under any circumstances, use an AC Adapter other than the EH-
62F. Failure to observe this precaution could result in overheating or damage to the camera.
C Printing Pictures
In addition to printing pictures transferred to a computer and printing pictures with a direct camera-
to-printer connection, the following options are also available for printing pictures recorded on the
memory card:
• Insert a memory card into a DPOF-compatible printer’s card slot.
• Take a memory card to a digital photo lab.
For printing using these methods, specify the pictures and the number of prints each using the
Print order (E42) option in the playback menu.
Take pictures
Connect the camera to the printer (E25)
Print pictures one at a time(E26)
Print multiple pictures (E27)
When printing is complete, turn the camera o and disconnect the USB cable
Choose the pictures or printingusing the print order option
(Print order: E42)
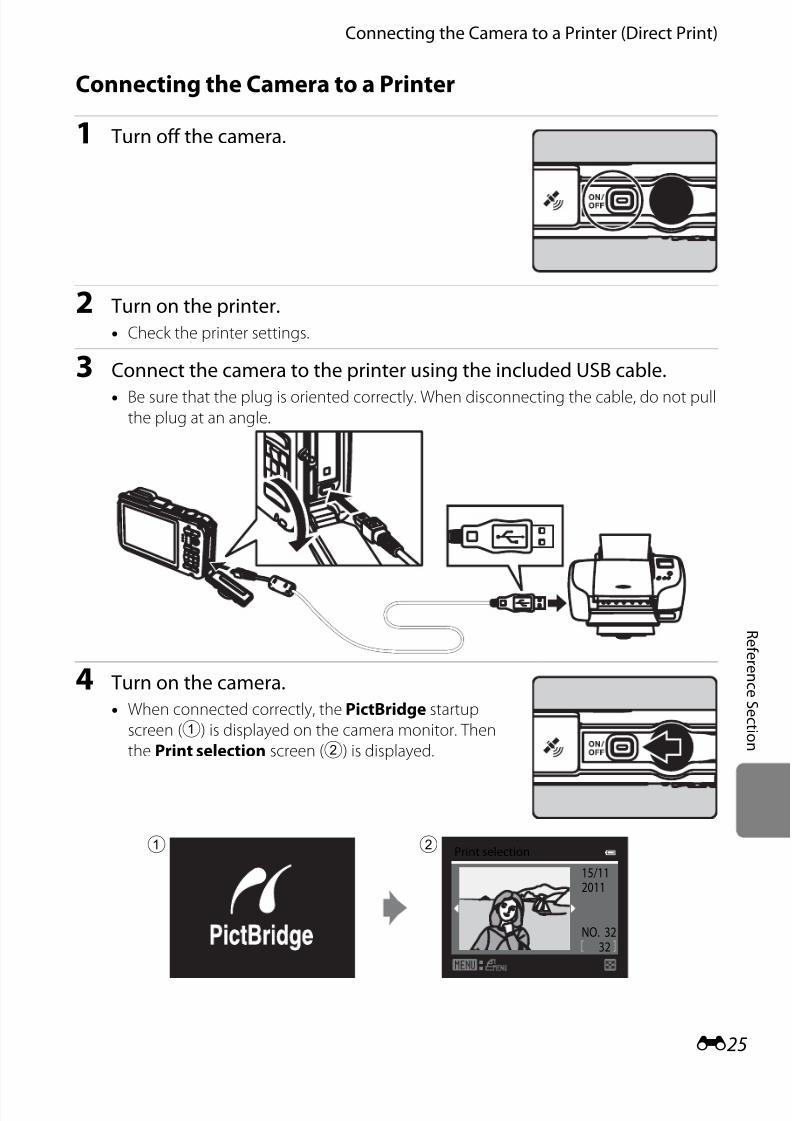
7/28/2019 Cool Pix Camera Manual AW100EN_Manual
http://slidepdf.com/reader/full/cool-pix-camera-manual-aw100enmanual 145/242
E25
Connecting the Camera to a Printer (Direct Print)
R ef er en c e S e c t i on
Connecting the Camera to a Printer
1 Turn o the camera.
2 Turn on the printer.• Check the printer settings.
3 Connect the camera to the printer using the included USB cable.
• Be sure that the plug is oriented correctly. When disconnecting the cable, do not pullthe plug at an angle.
4 Turn on the camera.• When connected correctly, the PictBridge startup
screen (1) is displayed on the camera monitor. Then
the Print selection screen (2) is displayed.
32
32
NO.
Print selection
2011
15/11
1 2

7/28/2019 Cool Pix Camera Manual AW100EN_Manual
http://slidepdf.com/reader/full/cool-pix-camera-manual-aw100enmanual 146/242
E26
Connecting the Camera to a Printer (Direct Print)
R ef er enc eS ec t i on
Printing Individual Images
After connecting the camera to the printer correctly (E25), print pictures by
following the procedure below.
1 Use the multi selector to choose the picture tobe printed and press thek button.• Press the zoom buttonf (h) to display
12 thumbnails, or g (i) to switch back to full-frame
playback mode.
2 Choose Copies and press thek button.
3 Choose the number o copies (up to nine) andpress thek button.
4 Choose Paper size and press thek button.
32
32
NO.
Print selection
2011
15/11
PictBridge
001 prints
Start printCopies
Paper size
4
Copies
PictBridge
004 prints
Start print
CopiesPaper size

7/28/2019 Cool Pix Camera Manual AW100EN_Manual
http://slidepdf.com/reader/full/cool-pix-camera-manual-aw100enmanual 147/242
E27
Connecting the Camera to a Printer (Direct Print)
R ef er en c e S e c t i on
5 Choose the desired paper size and press thek button.• To specify the paper size using the printer settings,
choose Default in the paper size menu.
6 Choose Start print and press thek button.
7 Printing starts.• The monitor display returns to that shown in step 1
when printing is complete.
• To cancel before all copies have been printed, press the
k button.
Printing Multiple Images
After connecting the camera to the printer correctly (E25), print pictures by
following the procedure below.
1 When the Print selection screen is displayed,press thed button.• The Print menu screen is displayed.
2 Use the multi selector to choose Paper size and press thek button.• To exit the print menu, press thed button.
Paper size
Default3.5×5 in.
5×7 in.
100×150 mm
4×6 in.
8×10 in.
Letter
PictBridge
004 prints
Start printCopies
Paper size
002 / 004
Printing
Cancel
Current print/total
number o prints
Print menu
Print selectionPrint all images
DPOF printingPaper size
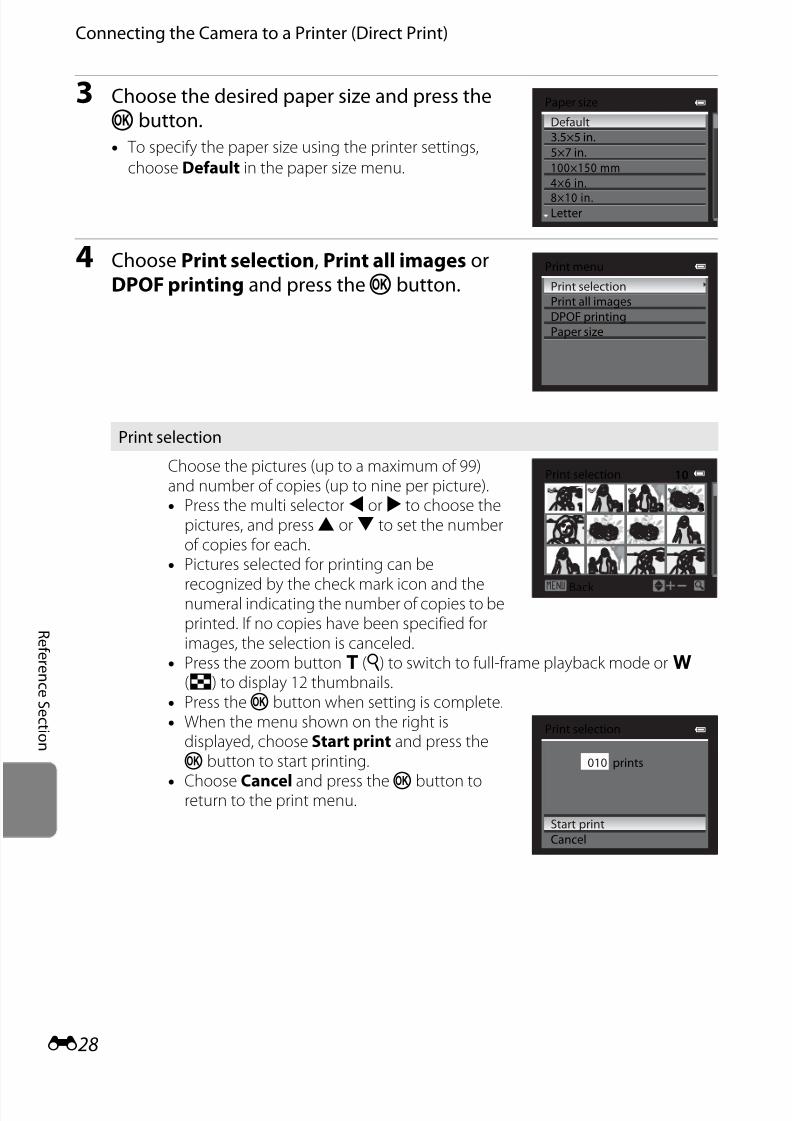
7/28/2019 Cool Pix Camera Manual AW100EN_Manual
http://slidepdf.com/reader/full/cool-pix-camera-manual-aw100enmanual 148/242
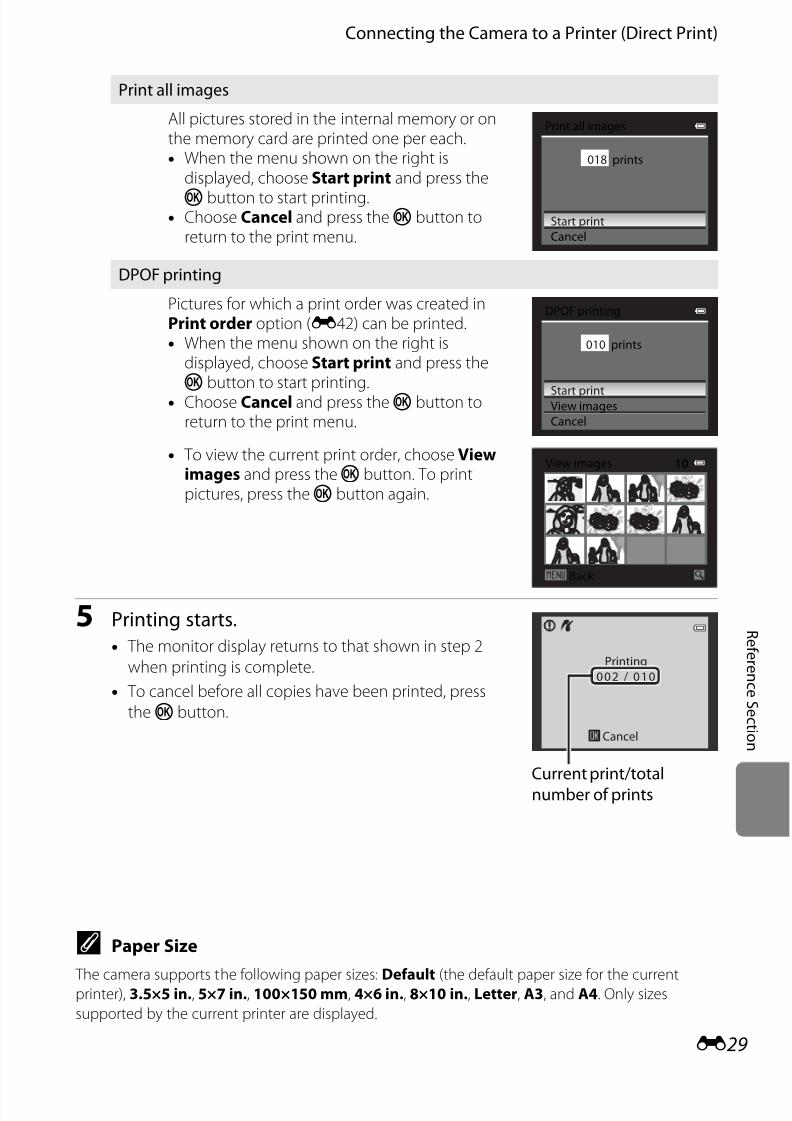
7/28/2019 Cool Pix Camera Manual AW100EN_Manual
http://slidepdf.com/reader/full/cool-pix-camera-manual-aw100enmanual 149/242
E29
Connecting the Camera to a Printer (Direct Print)
R ef er en c e S e c t i on
5 Printing starts.• The monitor display returns to that shown in step 2
when printing is complete.
• To cancel before all copies have been printed, press
thek button.
C Paper Size
The camera supports the following paper sizes: Default (the default paper size for the currentprinter), 3.5×5 in., 5×7 in., 100×150 mm, 4×6 in., 8×10 in., Letter, A3, and A4. Only sizes
supported by the current printer are displayed.
Print all images
All pictures stored in the internal memory or onthe memory card are printed one per each.• When the menu shown on the right is
displayed, choose Start print and press the
k button to start printing.• Choose Cancel and press thek button to
return to the print menu.
DPOF printing
Pictures for which a print order was created inPrint order option (E42) can be printed.• When the menu shown on the right is
displayed, choose Start print and press thek button to start printing.
• Choose Cancel and press thek button toreturn to the print menu.
• To view the current print order, choose Viewimages and press thek button. To printpictures, press thek button again.
Print all images
018 prints
Start print
Cancel
DPOF printing
010 prints
Start printView images
Cancel
Back
View images 10
Printing
002 / 010
Cancel
Current print/totalnumber o prints
7/28/2019 Cool Pix Camera Manual AW100EN_Manual
http://slidepdf.com/reader/full/cool-pix-camera-manual-aw100enmanual 150/242
E30
R ef er enc eS ec t i on
Editing Movies
Extracting Only the Desired Portions of the Movie The desired portions of a recorded movie can be saved as a separate file (exceptfor movies recorded withp iFrame 540 (960×540)).
1 Play back the movie to be edited and pause at the start point o theportion that is to be extracted (A84).
2 Use the multi selectorJ orK to chooseI on the playback control and press thek button.• The movie editing screen is displayed.
3 PressH orI to chooseJ (Choose startpoint) on the editing playback control.• PressJ orK to adjust the start position.
• To cancel, pressH orI to chooseL (Back) and press
thek button.
4 PressH orI to chooseK (Choose endpoint).• PressJ orK to move the end point at the right end to
the end position of the desired portion.
• To check the playback of the movie in the specified
range before saving it, choosec (Preview) and press
thek button. During preview playback, the volume
can be adjusted with the zoom buttong / f. To stop the preview playback, press the
k button again.
5 Ater inishing the settings, pressH orI to choosem (Save) and pressthek button.
6 Choose Yes and press thek button.• The edited movie is saved.
• To cancel the saving, choose No.
7m42sm42s7m42s
8m48sm48s8m48s
Choose start point
5m52sm52s5m52s
Choose end point
Save OK?
YesNo

7/28/2019 Cool Pix Camera Manual AW100EN_Manual
http://slidepdf.com/reader/full/cool-pix-camera-manual-aw100enmanual 151/242
E31
Editing Movies
R ef er en c e S e c t i on
B Notes on Editing Movies
• Once a movie is created through editing, it cannot be used again for extracting a movie. To extract
another range, select and edit the original movie.
• Because the edited movies are extracted in 1-second units, they may vary slightly from the set start
point and end point. Sections shorter than two seconds cannot be extracted.
• Editing functions are not available when there is not enough free space in the internal memory oron the memory card.
C More Information
See “File and Folder Names” (E85) for more information.
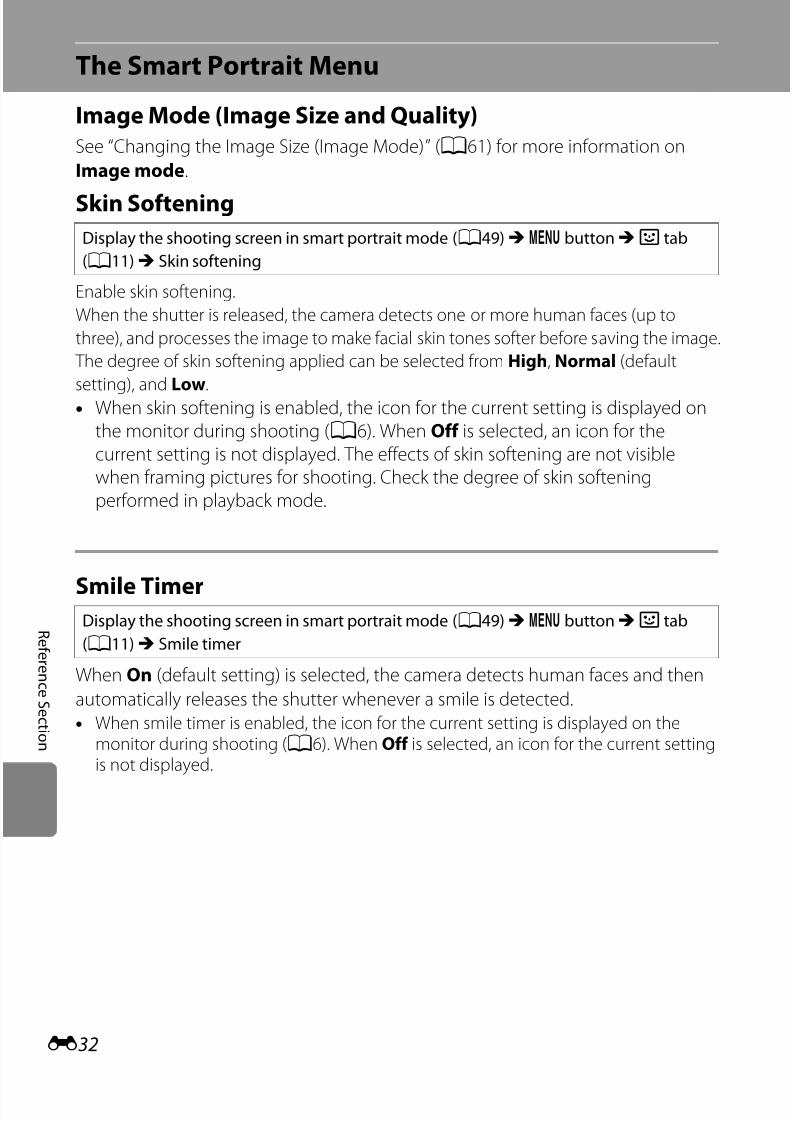
7/28/2019 Cool Pix Camera Manual AW100EN_Manual
http://slidepdf.com/reader/full/cool-pix-camera-manual-aw100enmanual 152/242
E32
R ef er enc eS ec t i on
The Smart Portrait Menu
Image Mode (Image Size and Quality)
See “Changing the Image Size (Image Mode)” (A61) for more information on
Image mode.
Skin Softening
Enable skin softening.
When the shutter is released, the camera detects one or more human faces (up to
three), and processes the image to make facial skin tones softer before saving the image.
The degree of skin softening applied can be selected from High, Normal (default
setting), and Low.• When skin softening is enabled, the icon for the current setting is displayed on
the monitor during shooting (A6). When Off is selected, an icon for the
current setting is not displayed. The effects of skin softening are not visiblewhen framing pictures for shooting. Check the degree of skin softening
performed in playback mode.
Smile Timer
When On (default setting) is selected, the camera detects human faces and then
automatically releases the shutter whenever a smile is detected.
• When smile timer is enabled, the icon for the current setting is displayed on themonitor during shooting (A6). When Off is selected, an icon for the current settingis not displayed.
Display the shooting screen in smart portrait mode (A49)M d buttonM F tab
(A11)M Skin sotening
Display the shooting screen in smart portrait mode (A49)M d buttonM F tab
(A11)M Smile timer

7/28/2019 Cool Pix Camera Manual AW100EN_Manual
http://slidepdf.com/reader/full/cool-pix-camera-manual-aw100enmanual 153/242
E33
The Smart Portrait Menu
R ef er en c e S e c t i on
Blink Proof
When On is selected, the camera automatically releases the shutter twice each time
a picture is taken. Of the two shots, one in which the subject’s eyes are open is saved.• If the camera saved an image in which the subject’s
eyes may have been closed, the dialog shown on theright is displayed for a few seconds.
• Flash cannot be used when On is selected.• The default setting is Off .• When blink proof is enabled, the icon for the current
setting is displayed on the monitor during shooting(A6). When Off is selected, an icon for the current
setting is not displayed.
Display the shooting screen in smart portrait mode (A49)M d buttonM F tab
(A11)M Blink proo
A blink was detected in thepicture just taken.
7/28/2019 Cool Pix Camera Manual AW100EN_Manual
http://slidepdf.com/reader/full/cool-pix-camera-manual-aw100enmanual 154/242
E34
R ef er enc eS ec t i on
The Shooting Menu (A (Auto) Mode)
Image Mode (Image Size and Quality)
See “Changing the Image Size (Image Mode)” (A61) for more information on
Image mode.
White Balance (Adjusting Hue)
The color of light reflected from an object varies with the color of the light source.
The human brain is able to adapt to changes in the color of the light source, with
the result that white objects appear white whether seen in the shade, direct
sunlight, or under incandescent lighting. Digital cameras can mimic thisadjustment of the human eye by processing images according to the color of the
light source. This is known as “white balance.” For natural colors, select a white
balance setting that matches the light source before shooting.
Although the default setting, Auto, can be used under most types of lighting, you
can apply the white balance setting suited to a particular light source to achieve
more accurate results.
The icon for the current setting other than Auto is displayed on the monitor
(A6).
B Notes on White Balance
•
At white-balance settings other than Auto or Flash, set the flash mode toW
(off) (A
54).• This feature may not be used in combination with certain features. See “Features That Cannot Be
Used Simultaneously” (A63) for more information.
Display the shooting screen in A (Auto) mode (A51)M d buttonM A tab (A11)
MWhite balance
Option Descriptiona Auto(deault setting)
White balance is automatically adjusted to suit lightingconditions. Best choice in most situations.
b Preset manualUseful when shooting under unusual lighting. See “Using PresetManual” for more information (E35).
c Daylight White balance adjusted for direct sunlight.
d Incandescent Use under incandescent lighting.
e Fluorescent Use under fluorescent lighting.
f Cloudy Use when taking pictures under overcast skies.
g Flash Use with the flash.

7/28/2019 Cool Pix Camera Manual AW100EN_Manual
http://slidepdf.com/reader/full/cool-pix-camera-manual-aw100enmanual 155/242
E35
The Shooting Menu (A (Auto) Mode)
R ef er en c e S e c t i on
Using Preset ManualUse when white balance setting (Auto, Incandescent, etc.) may not produce the
desired results, such as when shooting under unusual lighting conditions (e.g.,when you want to make pictures taken under lamps with reddish-light look as
though they were shot in normal light).
Use the procedure below to measure the white balance value under the lightingused during shooting.
1 Place a white or gray reerence object under the lighting that will beused during shooting.
2 Display the shooting menu (A51), use themulti selector to set White balance tob Preset manual, then press thek button.
• The lens extends to the zoom position for
measurement.
3 Choose Measure.• To apply the most recently measured white balance
value, select Cancel and press thek button. The most
recently measured white balance value will be set.
4 Frame a white or gray reerence object in thereerence object rame.
5 Press thek button to measure the white balance value.• The shutter is released and the new white balance preset value is set (no picture is
recorded).
B Note on Preset Manual
The camera cannot measure a white balance value for when the flash fires. When shooting with the
flash, set White balance to Auto or Flash.
White balance
Flash
CloudyFluorescent
IncandescentDaylight
Auto
Flash
CloudyFluorescent
IncandescentDaylight
AutoPreset manual
Preset manual
MeasureCancel
Preset manual
Measure
Cancel
Reerence object rame
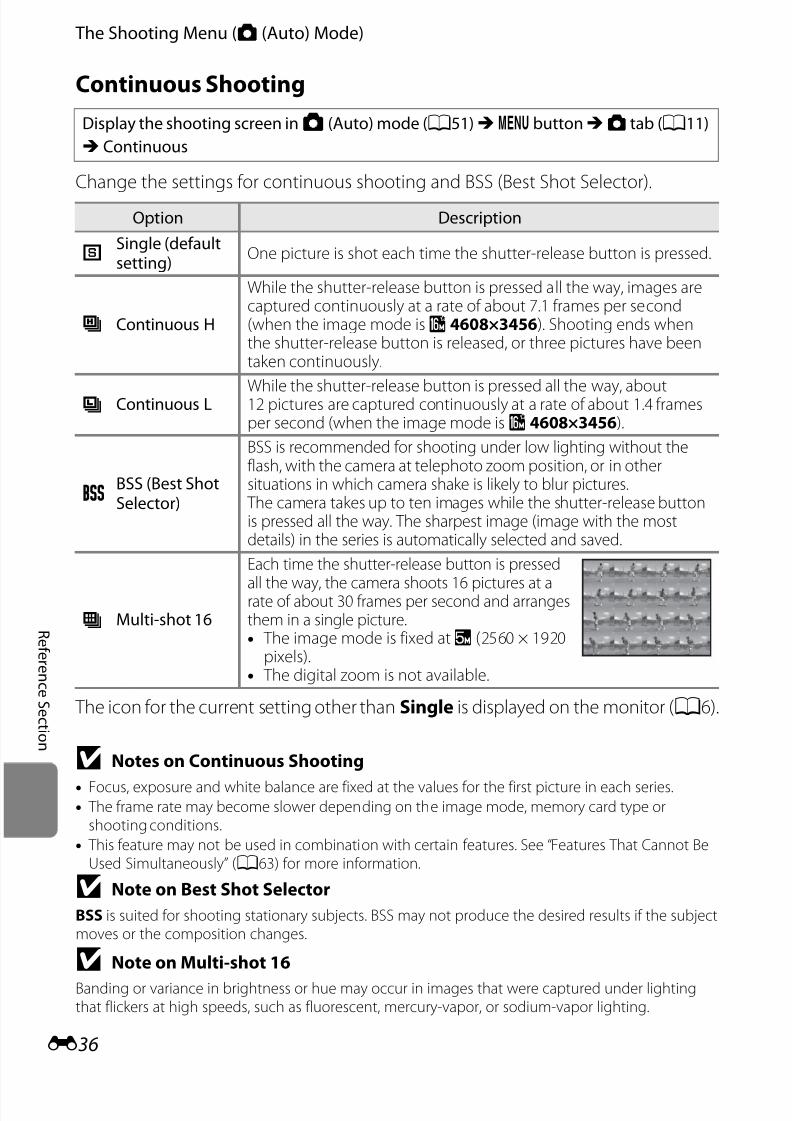
7/28/2019 Cool Pix Camera Manual AW100EN_Manual
http://slidepdf.com/reader/full/cool-pix-camera-manual-aw100enmanual 156/242
E36
The Shooting Menu (A (Auto) Mode)
R ef er enc eS ec t i on
Continuous Shooting
Change the settings for continuous shooting and BSS (Best Shot Selector).
The icon for the current setting other than Single is displayed on the monitor (A6).
B Notes on Continuous Shooting
• Focus, exposure and white balance are fixed at the values for the first picture in each series.• The frame rate may become slower depending on the image mode, memory card type or
shooting conditions.
• This feature may not be used in combination with certain features. See “Features That Cannot BeUsed Simultaneously” (A63) for more information.
B Note on Best Shot Selector
BSS is suited for shooting stationary subjects. BSS may not produce the desired results if the subjectmoves or the composition changes.
B Note on Multi-shot 16
Banding or variance in brightness or hue may occur in images that were captured under lightingthat flickers at high speeds, such as fluorescent, mercury-vapor, or sodium-vapor lighting.
Display the shooting screen in A (Auto) mode (A51)M d buttonM A tab (A11)
M Continuous
Option Description
USingle (deaultsetting)
One picture is shot each time the shutter-release button is pressed.
k Continuous H
While the shutter-release button is pressed all the way, images arecaptured continuously at a rate of about 7.1 frames per second(when the image mode isQ 4608×3456). Shooting ends whenthe shutter-release button is released, or three pictures have beentaken continuously.
m Continuous L While the shutter-release button is pressed all the way, about12 pictures are captured continuously at a rate of about 1.4 framesper second (when the image mode isQ 4608×3456).
DBSS (Best ShotSelector)
BSS is recommended for shooting under low lighting without theflash, with the camera at telephoto zoom position, or in othersituations in which camera shake is likely to blur pictures.
The camera takes up to ten images while the shutter-release buttonis pressed all the way. The sharpest image (image with the mostdetails) in the series is automatically selected and saved.
W Multi-shot 16
Each time the shutter-release button is pressed
all the way, the camera shoots 16 pictures at arate of about 30 frames per second and arrangesthem in a single picture.• The image mode is fixed atL (2560 × 1920
pixels).• The digital zoom is not available.

7/28/2019 Cool Pix Camera Manual AW100EN_Manual
http://slidepdf.com/reader/full/cool-pix-camera-manual-aw100enmanual 157/242
E37
The Shooting Menu (A (Auto) Mode)
R ef er en c e S e c t i on
ISO Sensitivity
The higher the ISO sensitivity, the less light needed for taking pictures. The higher the ISO sensitivity, the darker the subject that can be shot. Additionally,
even with subjects of similar brightness, pictures can be taken at faster shutter
speeds, and blurring caused by camera shake and subject movement can be
reduced.
• Setting the ISO sensitivity to a high level is effective when shooting dark subjects, not using the flash, shooting at the telephoto zoom position and
similar situations, but the pictures taken may be slightly grainy.
The icon for the ISO sensitivity setting is displayed on the monitor (A6).
• When Auto is selected, theE icon is not displayed at ISO 125, but is displayedif the ISO sensitivity automatically increases to more than 125 (A28).
• When Fixed range auto is selected,U icon and the maximum value for ISOsensitivity are displayed.
B Note on ISO Sensitivity Settings
This feature may not be used in combination with certain features. See “Features That Cannot Be
Used Simultaneously” (A63) for more information.
Display the shooting screen in A (Auto) mode (A51)M d buttonM A tab (A11)
M ISO sensitivity
Option Description
Auto (deault setting)Sensitivity is ISO 125 when there is sufficient lighting; the cameracompensates by raising sensitivity to a maximum of ISO 800when lighting is dim.
Fixed range auto
Sensitivity is ISO 125–400 when the camera automatically adjustsISO sensitivity. ISO sensitivity does not exceed the maximumvalue.Set the maximum value for ISO sensitivity for effective control
over the amount of “grain” that appears in images.
125, 200, 400, 800,1600, 3200
ISO sensitivity is locked at the specified value.

7/28/2019 Cool Pix Camera Manual AW100EN_Manual
http://slidepdf.com/reader/full/cool-pix-camera-manual-aw100enmanual 158/242
E38
The Shooting Menu (A (Auto) Mode)
R ef er enc eS ec t i on
AF Area Mode
You can set how the camera selects the focus area for autofocus.
Display the shooting screen in A (Auto) mode (A51)M d buttonM A tab (A11)
M AF area mode
Option Description
aFace priority(deault
setting)
The camera detects and focuses ona face (see “Using Face Detection”(A65) for more information).If more than one face is detected,the camera focuses on the faceclosest to the camera.When non-human subjects arephotographed, or a subject withwhich no face can be detected isframed, AF area mode is set toAuto. The camera automatically selects the focus area (up to nineareas) containing the subject closest to the camera.
w Auto
The camera automatically selectsthe focus area (up to nine areas)containing the subject closest tothe camera.
Press the shutter-release buttonhalfway to activate the focus area.When the shutter-release button ispressed halfway, the focus areaselected by the camera isdisplayed on the monitor (up tonine areas).
134234 21342
29m 9s9m 0s29m 0s
Focus area
134234 21342
29m 9s9m 0s29m 0s
Focus areas

7/28/2019 Cool Pix Camera Manual AW100EN_Manual
http://slidepdf.com/reader/full/cool-pix-camera-manual-aw100enmanual 159/242
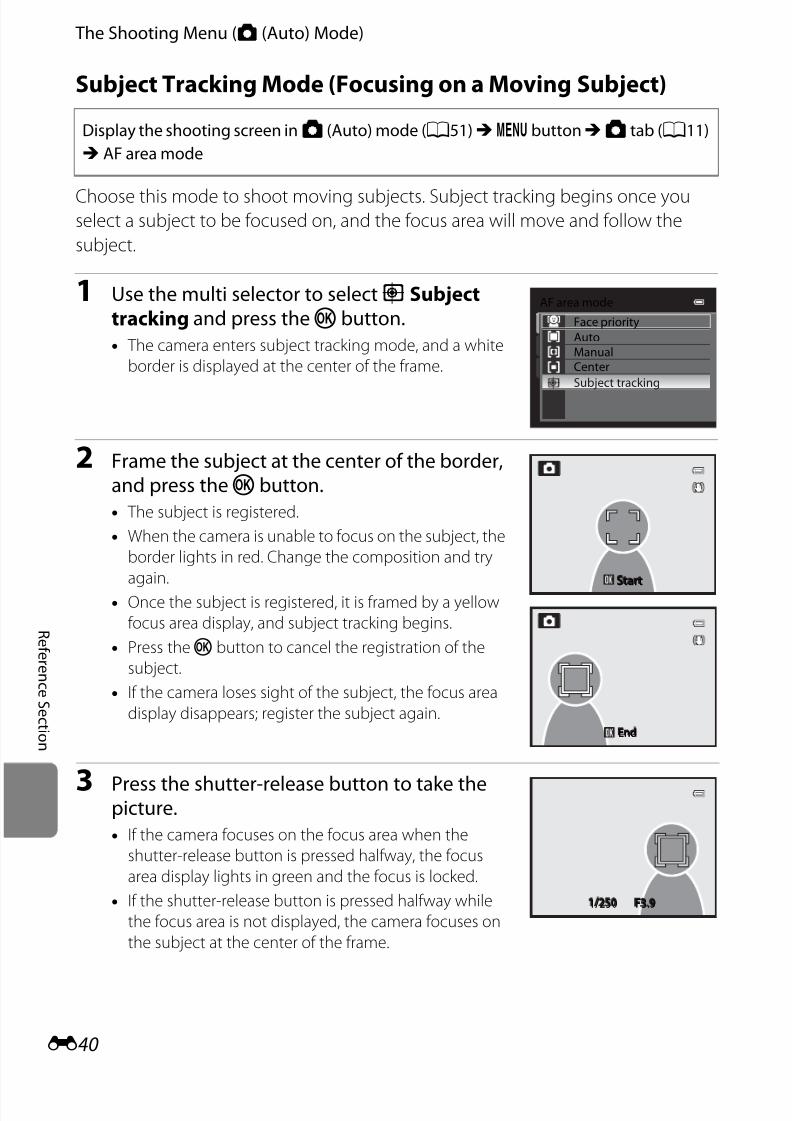
7/28/2019 Cool Pix Camera Manual AW100EN_Manual
http://slidepdf.com/reader/full/cool-pix-camera-manual-aw100enmanual 160/242
E40
The Shooting Menu (A (Auto) Mode)
R ef er enc eS ec t i on
Subject Tracking Mode (Focusing on a Moving Subject)
Choose this mode to shoot moving subjects. Subject tracking begins once youselect a subject to be focused on, and the focus area will move and follow the
subject.
1 Use the multi selector to select s Subjecttracking and press thek button.• The camera enters subject tracking mode, and a white
border is displayed at the center of the frame.
2 Frame the subject at the center o the border,and press thek button.• The subject is registered.
• When the camera is unable to focus on the subject, the
border lights in red. Change the composition and try
again.
• Once the subject is registered, it is framed by a yellow
focus area display, and subject tracking begins.
• Press thek button to cancel the registration of the
subject.
• If the camera loses sight of the subject, the focus area
display disappears; register the subject again.
3 Press the shutter-release button to take thepicture.• If the camera focuses on the focus area when the
shutter-release button is pressed halfway, the focus
area display lights in green and the focus is locked.
• If the shutter-release button is pressed halfway while
the focus area is not displayed, the camera focuses on
the subject at the center of the frame.
Display the shooting screen in A (Auto) mode (A51)M d buttonM A tab (A11)
M AF area mode
AF area mode
Face priority
AutoManualCenter
Subject tracking
StarttartStart
EndndEnd
1/25/2501/250 F3.93. 9F3.9

7/28/2019 Cool Pix Camera Manual AW100EN_Manual
http://slidepdf.com/reader/full/cool-pix-camera-manual-aw100enmanual 161/242
E41
The Shooting Menu (A (Auto) Mode)
R ef er en c e S e c t i on
B Notes on Subject Tracking
• The digital zoom is not available.
• Set the zoom position, flash mode, or menu settings before registering a subject. If any of these are
changed after a subject is registered, the subject will be canceled.
• During certain conditions, such as when the subject is moving quickly, when there is a large
amount of camera shake, or when there are multiple subjects that look alike, the camera may notbe able to register or track a subject, or the camera may track a different subject. Additionally, the
subject may not be tracked properly depending on factors such as the subject’s size and
brightness.
• In some rare cases of shooting subjects for which autofocus does not perform as expected (A31),
the subject may not be in focus despite the fact that the focus area lights in green. If you cannot
focus, change the AF area mode setting to Manual or Center, or try shooting with focus lock
(A67) by refocusing on another subject at the same distance.
• This feature may not be used in combination with certain features. See “Features That Cannot Be
Used Simultaneously” (A63) for more information.
Autofocus Mode
Choose how the camera focuses.
B Note on AF mode
This feature may not be used in combination with certain features. See “Features That Cannot Be
Used Simultaneously” (A63) for more information.
C Autofocus Mode for Movie Recording
Autofocus mode for movie recording can be set with Autofocus mode (E56) in the movie menu.
Display the shooting screen in A (Auto) mode (A51)M d buttonM A tab (A11)
M Autoocus mode
Option Description
ASingle AF(deaultsetting)
The camera focuses only when the shutter-release button ispressed halfway.
B Full-time AF The camera focuses continuously until the shutter-release buttonis pressed down halfway. Use with moving subjects. A sound willbe heard while the camera focuses.

7/28/2019 Cool Pix Camera Manual AW100EN_Manual
http://slidepdf.com/reader/full/cool-pix-camera-manual-aw100enmanual 162/242
E42
R ef er enc eS ec t i on
The Playback Menu
See “Editing Images (Still Pictures)” (E15) for the function of editing features
(Quick retouch, D-Lighting, Glamour retouch, Filter effects, Small picture).
a Print Order (Creating a DPOF Print Order)
If you choose to use one of the following methods to print pictures that are stored
on a memory card, the pictures to print and the number of copies can be set in
advance on the memory card.
• Printing with a DPOF-compatible (F23) printer that is equipped with a card
slot.
• Ordering the prints from a digital photo lab that has a DPOF service.• Printing by connecting the camera to a PictBridge-compatible (F23) printer
(E24). (When the memory card is removed from the camera, the print orders
can also be performed for the pictures stored on the internal memory.)
1 Use the multi selector to choose Selectimages and press thek button.
• When favorite pictures mode (E9), auto sort mode
(E12) or list by date mode (E14) is selected, the
menu shown on the right is not displayed.
Proceed to the step 2.
2 Choose the pictures (up to a maximum o 99)and number o copies (up to nine per picture).• Press the multi selectorJ orK to choose the pictures,
and pressH orI to set the number of copies for each.• Pictures selected for printing can be recognized by the
check mark icon and the numeral indicating thenumber of copies to be printed. If no copies have beenspecified for images, the selection is canceled.
• Press the zoom button g (i) to switch to full-frame playback mode orf (h) todisplay 12 thumbnails.
• Press thek button when setting is complete.
Press thec button (Playback mode)M d button (A11)M a Print order
Print order
Select imagesDelete print set
Print selection
Back
11 31 3

7/28/2019 Cool Pix Camera Manual AW100EN_Manual
http://slidepdf.com/reader/full/cool-pix-camera-manual-aw100enmanual 163/242
E43
The Playback Menu
R ef er en c e S e c t i on
3 Choose whether or not to also print shootingdate and shooting inormation.• Choose Date and press thek button to print the
shooting date on all pictures in the print order.
• Choose Info and press thek button to print shooting
information (shutter speed and aperture value) on all
pictures in the print order.
• Choose Done and press thekbutton to complete the
print order.
Pictures selected for printing are recognized by thew
icon displayed in playback mode.
B Notes on Printing Shooting Date and Shooting Information
When the Date and Info options are enabled in the print order menu, shooting date and shooting
information are printed on pictures when a DPOF-compatible (F23) printer which supports printingof shooting date and shooting information is used.
• Shooting information cannot be printed when the camera is connected directly to a printer, via the
included USB cable, for DPOF printing (E29).
• Date and Info are reset each time the Print order menu is displayed.
• The date and time printed on the picture is the date and time
recorded on the camera when the picture was taken. The date and
time printed using this option are not affected if the camera’s Time
zone and date setting is changed from the setup menu after the
pictures are taken.
Print order
Done
DateInfo
44 13232132
0004.JPG004.JPG0004.JPG15:305:3015:3015/11/20115/11/201115/11/2011
15/11/201115/11/2011

7/28/2019 Cool Pix Camera Manual AW100EN_Manual
http://slidepdf.com/reader/full/cool-pix-camera-manual-aw100enmanual 164/242
E44
The Playback Menu
R ef er enc eS ec t i on
B Notes on Print order
When a print order is created in favorite pictures mode, auto sort mode, or list by date mode, the
screen shown below is displayed if pictures other than those in the selected album, category, or
shooting date have been marked for printing.
• Select Yes to add the print order setting to the existing print order.
• Select No to remove the existing print order and restrict the print order setting.
Additionally, if there are more than 99 pictures as a result of adding the current print order settings,
the screen shown below will be displayed.
• Select Yes to remove the existing print order and restrict the print order setting.
• Select Cancel to retain the existing print order and remove the print order setting.
C Deleting All Print Orders
In step 1 of the print order procedure (E42), choose Delete print order and press thek button
to delete the print orders for all pictures.
C Print Date
The shooting date and time can be imprinted in pictures at the time of shooting by using Print
date (E72) in the setup menu. This information can be printed even from printers that do not
support printing of the date and time. Only the date and time of print date on the pictures are
printed, even if Print order is enabled with the date selected in the print order screen.
List by date modeFavorite pictures mode
or auto sort mode
Print order
Save print marking for otherimages?
Yes
No
Print order
Yes
Save print marking for other
dates?
No
List by date modeFavorite pictures modeor auto sort mode
Print order
Yes
Cancel
Remove print marking from
other images?
Too many images selected.
Print order
Too many images selected.
Remove print marking for
other dates?
Yes
Cancel
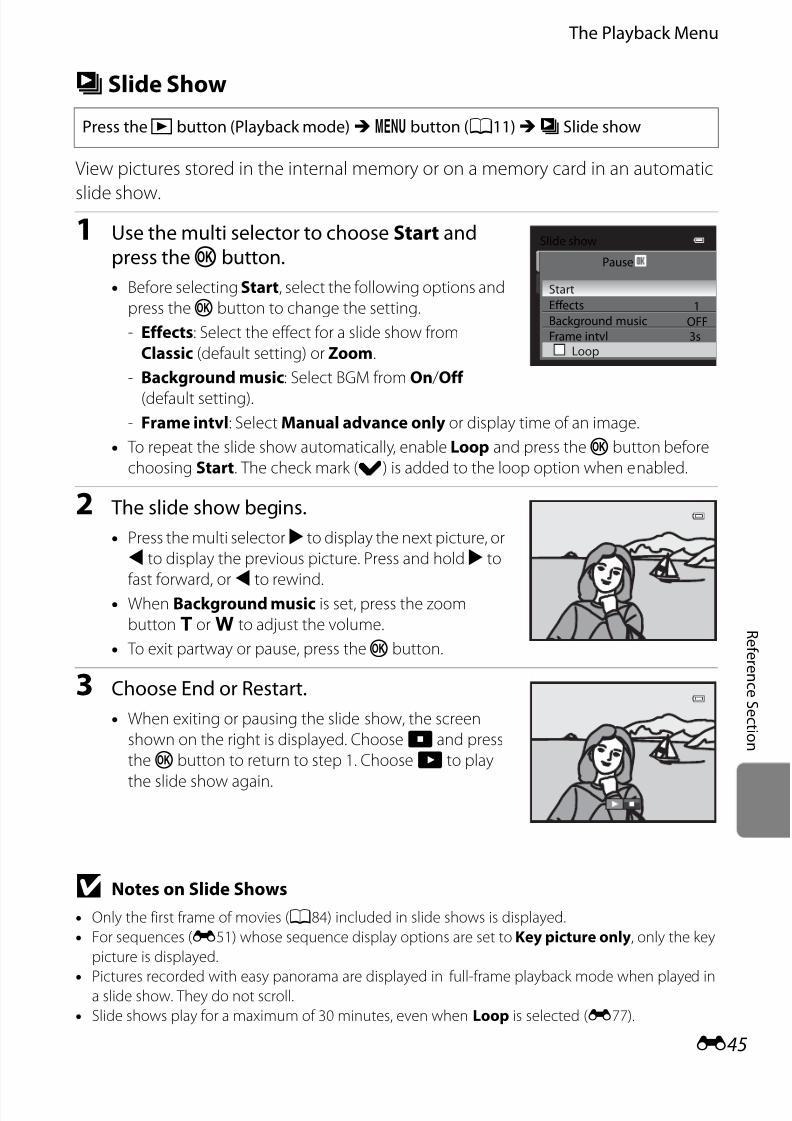
7/28/2019 Cool Pix Camera Manual AW100EN_Manual
http://slidepdf.com/reader/full/cool-pix-camera-manual-aw100enmanual 165/242
E45
The Playback Menu
R ef er en c e
S e c t i on
b Slide Show
View pictures stored in the internal memory or on a memory card in an automatic
slide show.
1 Use the multi selector to choose Start andpress thek button.
• Before selecting Start, select the following options and
press thek button to change the setting.
- Effects: Select the effect for a slide show from
Classic (default setting) or Zoom.
- Background music: Select BGM from On / Off
(default setting).
- Frame intvl: Select Manual advance only or display time of an image.
• To repeat the slide show automatically, enable Loop and press thek button before
choosing Start. The check mark (w) is added to the loop option when enabled.
2 The slide show begins.
• Press the multi selectorK to display the next picture, or
J to display the previous picture. Press and holdK to
fast forward, orJ to rewind.
• When Background music is set, press the zoom
buttong orf to adjust the volume.
• To exit partway or pause, press thek button.
3 Choose End or Restart.
• When exiting or pausing the slide show, the screen
shown on the right is displayed. ChooseG and press
thek button to return to step 1. ChooseF to play
the slide show again.
B Notes on Slide Shows
• Only the first frame of movies (A84) included in slide shows is displayed.
• For sequences (E51) whose sequence display options are set to Key picture only, only the key
picture is displayed.
•
Pictures recorded with easy panorama are displayed in full-frame playback mode when played ina slide show. They do not scroll.
• Slide shows play for a maximum of 30 minutes, even when Loop is selected (E77).
Press thec button (Playback mode)M d button (A11)M b Slide show
3s
1
OFF
Slide show
Pause
Start
Ef ects
Background music
Frame intvlLoop

7/28/2019 Cool Pix Camera Manual AW100EN_Manual
http://slidepdf.com/reader/full/cool-pix-camera-manual-aw100enmanual 166/242
E46
The Playback Menu
R ef er enc eS ec t i on
d Protect
Protect selected pictures from accidental deletion.
In the picture selection screen, choose a picture and set or cancel protection. See“ The Image Selection Screen” (E47) for more information.
Note, however, that formatting the camera’s internal memory or the memory card
permanently erases the protected files (E78).
Protected pictures are recognized by thes icon in playback mode (A8).
Press thec button (Playback mode)M d button (A11)M d Protect

7/28/2019 Cool Pix Camera Manual AW100EN_Manual
http://slidepdf.com/reader/full/cool-pix-camera-manual-aw100enmanual 167/242
E47
The Playback Menu
R ef er en c e S e c t i on
The Image Selection Screen The image selection screen is displayed in the following menus.
Only one image can be selected for some menu items, while for other menu items,multiple images can be selected.
Follow the procedure described below to select images.
1 Press the multi selectorJ orK to choose thedesired image.• Press the zoom button g (i) to switch to full-frame
playback mode orf (h) to switch to 12 thumbnails.
• For functions for which only one image is selected,proceed to step 3.
2 PressH orI to select or deselect (or thenumber o copies).• When an image is selected, a check mark (y) is
displayed with the image. Repeat steps 1 and 2 to select
additional images.
3Press thek button to apply the image selection.• With selections such as Selected images, the confirmation dialog is displayed. Follow
the instructions on the screen.
Functions or which only one image can beselected Functions or which multiple images can beselected
• Playback menu:Rotate image (E48),Choose key picture (E51)
• Setup menu:Select an image in Welcome screen(E66)
• Playback menu:Select images in Print order (E42),Protect (E46),Selected images in Copy (E50),Favorite pictures (E9),Remove from favorites (E10)
• Erase selected images in Deletingunnecessary images (A34)
ON/OFFBack
Protect
ON/OFFBack
Protect

7/28/2019 Cool Pix Camera Manual AW100EN_Manual
http://slidepdf.com/reader/full/cool-pix-camera-manual-aw100enmanual 168/242
E48
The Playback Menu
R ef er enc eS ec t i on
f Rotate Image
Change the orientation of pictures played back in the camera’s monitor after
shooting. Still pictures can be rotated 90° clockwise or counterclockwise.Pictures that were recorded in the “tall” orientation can be rotated up to 180° in
either direction.
Select a picture in the picture selection screen (E47) to display the rotate image
screen. Press the multi selectorJ orK to rotate the picture 90°.
Press thek button to set the orientation displayed and save the orientation data
with the picture.
B Rotating Images in a Sequence
While the key picture of a sequence is displayed, images cannot be rotated. Apply the setting after
displaying individual images (E7,E51).
Press thec button (Playback mode)M d button (A11)M f Rotate image

7/28/2019 Cool Pix Camera Manual AW100EN_Manual
http://slidepdf.com/reader/full/cool-pix-camera-manual-aw100enmanual 169/242
E49
The Playback Menu
R ef er en c e S e c t i on
E Voice Memo
Use the camera’s microphone to record voice memos for pictures.
• The recording screen is displayed for a picture without voice memo, while the voice memoplayback screen is displayed for a picture with voice memo (a picture marked with p infull-frame playback mode).
Recording Voice Memos• Recording ends after about 20 seconds or when thek
button is released.• Do not touch the microphone during recording.• During recording,o andp blink on the monitor.• When recording ends, the voice memo playback screen is
displayed.
Playing Voice Memos
Pictures for which voice memos have been recorded are
indicated byp in full-frame playback mode.• Press thek button to play back a voice memo. To end
playback, press thek button again.• Press the zoom button g orf during playback to adjust
playback volume.• Press the multi selectorJ before or after playing a voice
memo to return to the playback menu. Press thed button to exit the playback menu.
Deleting Voice Memos
Press thelbutton on the voice memo playback screen.
Press the multi selectorH orI to select Yes and press
thek button to delete only the voice memo.
B Notes on Voice Memos
• When a picture with a voice memo attached is deleted, both the picture and its voice memo are deleted.• Voice memos cannot be recorded for a picture that already has a voice memo attached on it. The
current voice memo must be deleted before a new voice memo can be recorded.• COOLPIX AW100 is not able to record a voice memo for a picture taken with cameras other than
COOLPIX AW100.• Voice memos cannot be deleted for a picture in Protect (E46).
C More InformationSee “File and Folder Names” (E85) for more information.
Press thec button (Playback mode)M d button (A11)M E Voice memo
17s7s17s
12s2s12s
File will be deleted. OK?
Yes
No
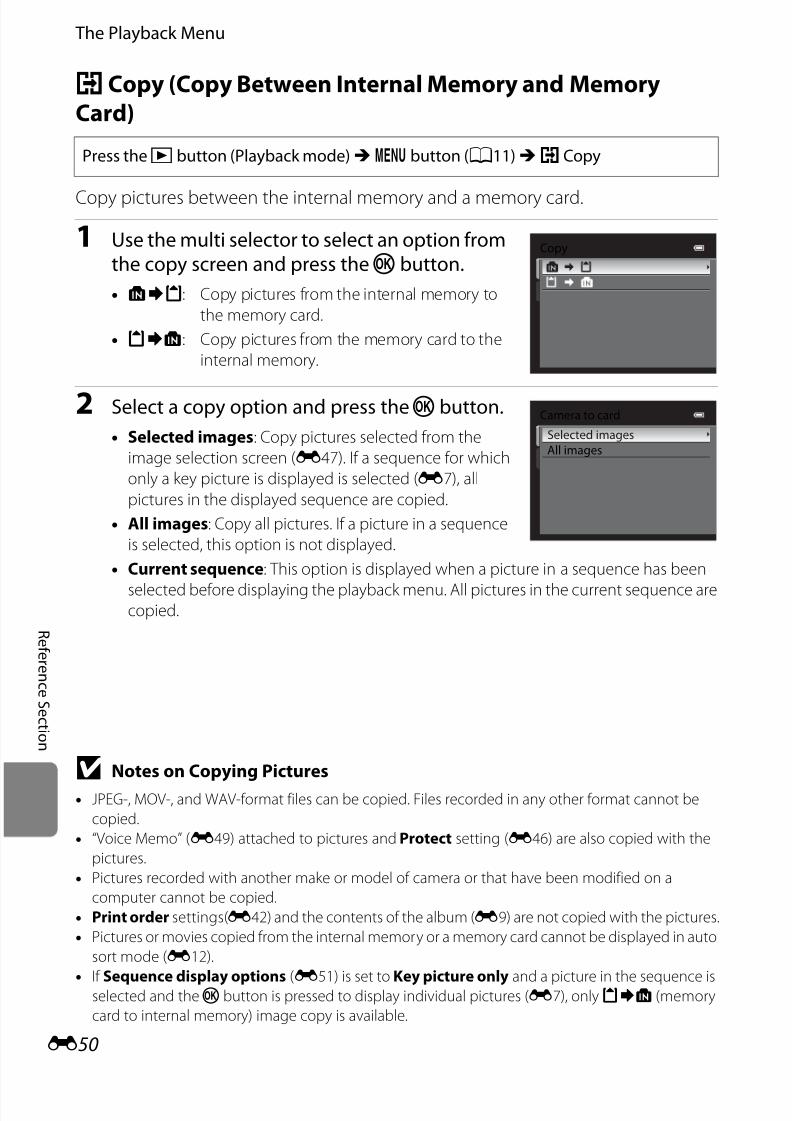
7/28/2019 Cool Pix Camera Manual AW100EN_Manual
http://slidepdf.com/reader/full/cool-pix-camera-manual-aw100enmanual 170/242
E50
The Playback Menu
R ef er enc eS ec t i on
h Copy (Copy Between Internal Memory and Memory
Card)
Copy pictures between the internal memory and a memory card.
1 Use the multi selector to select an option romthe copy screen and press thek button.
• q: Copy pictures from the internal memory to
the memory card.
• r: Copy pictures from the memory card to the
internal memory.
2 Select a copy option and press thek button.
• Selected images: Copy pictures selected from the
image selection screen (E47). If a sequence for which
only a key picture is displayed is selected (E7), all
pictures in the displayed sequence are copied.
• All images: Copy all pictures. If a picture in a sequence
is selected, this option is not displayed.
• Current sequence: This option is displayed when a picture in a sequence has been
selected before displaying the playback menu. All pictures in the current sequence arecopied.
B Notes on Copying Pictures
• JPEG-, MOV-, and WAV-format files can be copied. Files recorded in any other format cannot be
copied.
• “Voice Memo” (E49) attached to pictures and Protect setting (E46) are also copied with the
pictures.
• Pictures recorded with another make or model of camera or that have been modified on a
computer cannot be copied.
• Print order settings(E42) and the contents of the album (E9) are not copied with the pictures.
• Pictures or movies copied from the internal memory or a memory card cannot be displayed in auto
sort mode (E12).
•If Sequence display options (E51) is set to Key picture only and a picture in the sequence isselected and thek button is pressed to display individual pictures (E7), onlyr (memory
card to internal memory) image copy is available.
Press thec button (Playback mode)M d button (A11)M h Copy
Copy
Camera to card
Selected images
All images

7/28/2019 Cool Pix Camera Manual AW100EN_Manual
http://slidepdf.com/reader/full/cool-pix-camera-manual-aw100enmanual 171/242

7/28/2019 Cool Pix Camera Manual AW100EN_Manual
http://slidepdf.com/reader/full/cool-pix-camera-manual-aw100enmanual 172/242
E52
R ef er enc eS ec t i on
The Movie Menu
Movie Options
You can choose the type of movie to shoot.
The camera can record normal speed movies and HS (high speed) movies (E54),
which can be played back in slow motion or fast motion.
The larger the image size and bit rate, the higher the image quality; however, the
file size also becomes larger.
Normal Speed Movies
B Note onp iFrame 540 (960×540)
The movie editing functions cannot be used.
C More InformationSee “Maximum Movie Length” (A82) for more information.
Display the shooting screen M d buttonM e (Movie) tab (A11)MMovie options
Option Description
d HD 1080pP (1920×1080)(deault setting)
Movies with an aspect ratio of 16:9 are recorded.• Movie bitrate: 14 Mbps• Frame rate: 30 frames per second
e HD 1080p (1920×1080)Movies with an aspect ratio of 16:9 are recorded.• Movie bitrate: 12 Mbps• Frame rate: 30 frames per second
f HD 720p (1280×720)Movies with an aspect ratio of 16:9 are recorded.• Movie bitrate: 9 Mbps
• Frame rate: 30 frames per second
p iFrame 540 (960×540)
Movies with an aspect ratio of 16:9 are recorded.It is one of the formats supported by Apple Inc.• Movie bitrate: 24 Mbps• Frame rate: 30 frames per secondWhen using the camera's internal memory for recording,the movie recording may end unexpectedly depending onthe composition of the image. Using a memory card (Class6 or higher) is recommended when taking importantmovies.
g VGA (640×480)Movies with an aspect ratio of 4:3 are recorded.• Movie bitrate: 3 Mbps• Frame rate: 30 frames per second
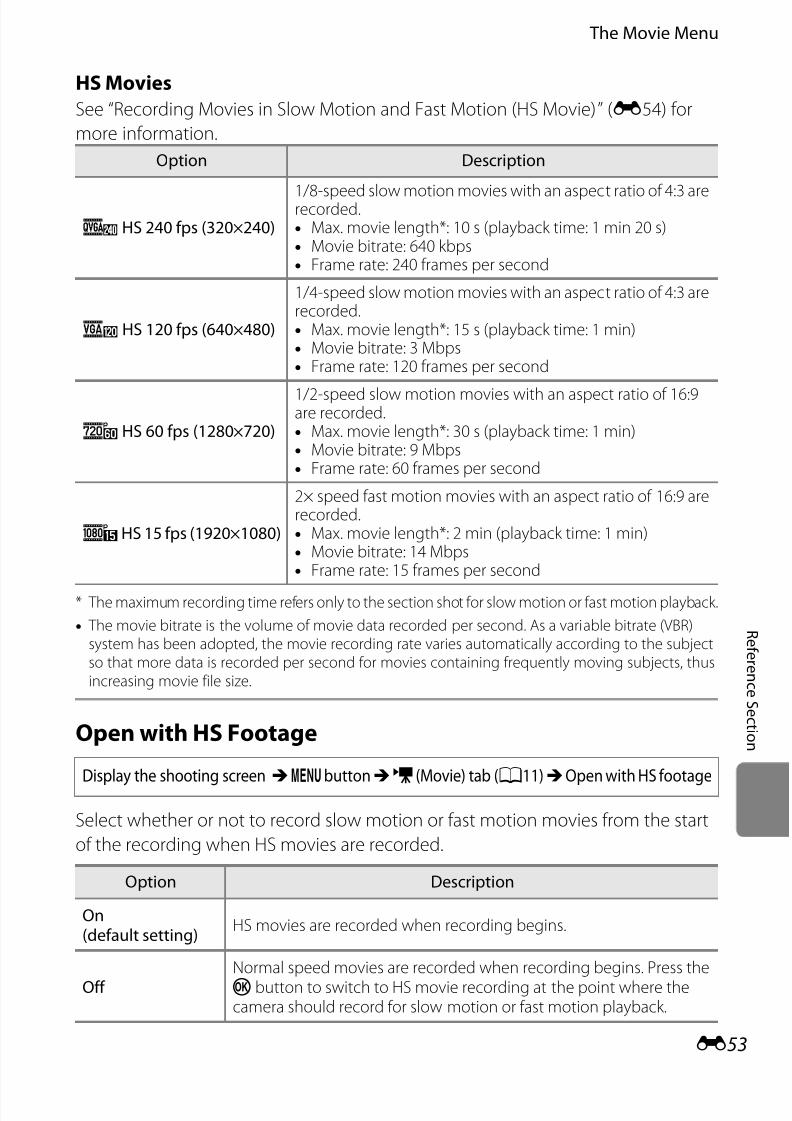
7/28/2019 Cool Pix Camera Manual AW100EN_Manual
http://slidepdf.com/reader/full/cool-pix-camera-manual-aw100enmanual 173/242
E53
The Movie Menu
R ef er en c e S e c t i on
HS Movies
See “Recording Movies in Slow Motion and Fast Motion (HS Movie)” (E54) for
more information.
* The maximum recording time refers only to the section shot for slow motion or fast motion playback.
• The movie bitrate is the volume of movie data recorded per second. As a variable bitrate (VBR)system has been adopted, the movie recording rate varies automatically according to the subjectso that more data is recorded per second for movies containing frequently moving subjects, thusincreasing movie file size.
Open with HS Footage
Select whether or not to record slow motion or fast motion movies from the start
of the recording when HS movies are recorded.
Option Description
k HS 240 ps (320×240)
1/8-speed slow motion movies with an aspect ratio of 4:3 arerecorded.• Max. movie length*: 10 s (playback time: 1 min 20 s)• Movie bitrate: 640 kbps• Frame rate: 240 frames per second
h HS 120 ps (640×480)
1/4-speed slow motion movies with an aspect ratio of 4:3 arerecorded.• Max. movie length*: 15 s (playback time: 1 min)• Movie bitrate: 3 Mbps• Frame rate: 120 frames per second
i HS 60 ps (1280×720)
1/2-speed slow motion movies with an aspect ratio of 16:9are recorded.• Max. movie length*: 30 s (playback time: 1 min)• Movie bitrate: 9 Mbps• Frame rate: 60 frames per second
jHS 15 ps (1920×1080)
2× speed fast motion movies with an aspect ratio of 16:9 arerecorded.• Max. movie length*: 2 min (playback time: 1 min)• Movie bitrate: 14 Mbps• Frame rate: 15 frames per second
Display the shooting screen M dbuttonM e (Movie) tab (A11)MOpen with HS footage
Option Description
On(deault setting)
HS movies are recorded when recording begins.
O
Normal speed movies are recorded when recording begins. Press the
k button to switch to HS movie recording at the point where thecamera should record for slow motion or fast motion playback.
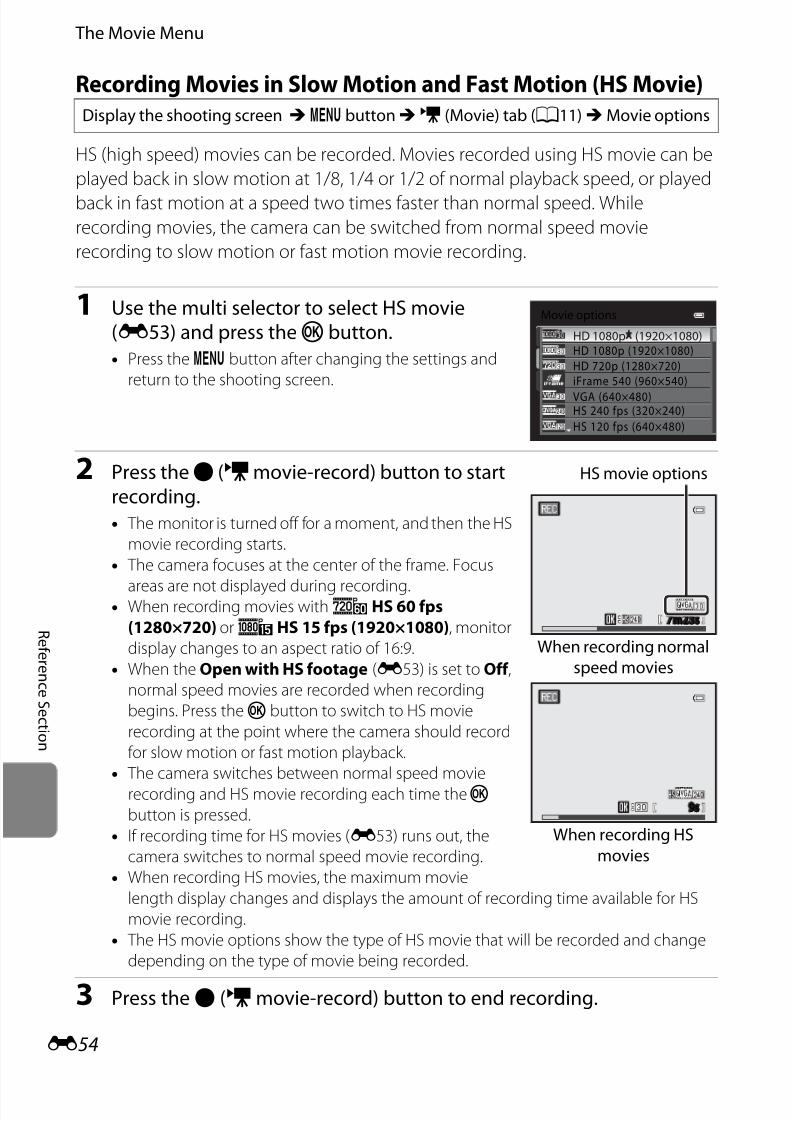
7/28/2019 Cool Pix Camera Manual AW100EN_Manual
http://slidepdf.com/reader/full/cool-pix-camera-manual-aw100enmanual 174/242
E54
The Movie Menu
R ef er enc eS ec t i on
Recording Movies in Slow Motion and Fast Motion (HS Movie)
HS (high speed) movies can be recorded. Movies recorded using HS movie can be
played back in slow motion at 1/8, 1/4 or 1/2 of normal playback speed, or played
back in fast motion at a speed two times faster than normal speed. While
recording movies, the camera can be switched from normal speed movie
recording to slow motion or fast motion movie recording.
1 Use the multi selector to select HS movie(E53) and press thek button.• Press thed button after changing the settings and
return to the shooting screen.
2 Press theb (emovie-record) button to startrecording.• The monitor is turned off for a moment, and then the HS
movie recording starts.
• The camera focuses at the center of the frame. Focus
areas are not displayed during recording.• When recording movies withi HS 60 fps
(1280×720) orj HS 15 fps (1920×1080), monitor
display changes to an aspect ratio of 16:9.
• When the Open with HS footage (E53) is set to Off ,
normal speed movies are recorded when recording
begins. Press thek button to switch to HS movie
recording at the point where the camera should record
for slow motion or fast motion playback.
• The camera switches between normal speed movie
recording and HS movie recording each time thek
button is pressed.
• If recording time for HS movies (E53) runs out, the
camera switches to normal speed movie recording.
• When recording HS movies, the maximum movie
length display changes and displays the amount of recording time available for HS
movie recording.
• The HS movie options show the type of HS movie that will be recorded and change
depending on the type of movie being recorded.
3 Press theb (emovie-record) button to end recording.
Display the shooting screen M d buttonM e (Movie) tab (A11)MMovie options
Movie options
HS 120 fps (640×480)
HS 240 fps (320×240)VGA (640×480)
iFrame 540 (960×540)
HD 720p (1280×720)
HD 1080p (1920×1080)HD 1080p (1920×1080)
7m23s7m23s
When recording normalspeed movies
When recording HSmovies
HS movie options
9s9s
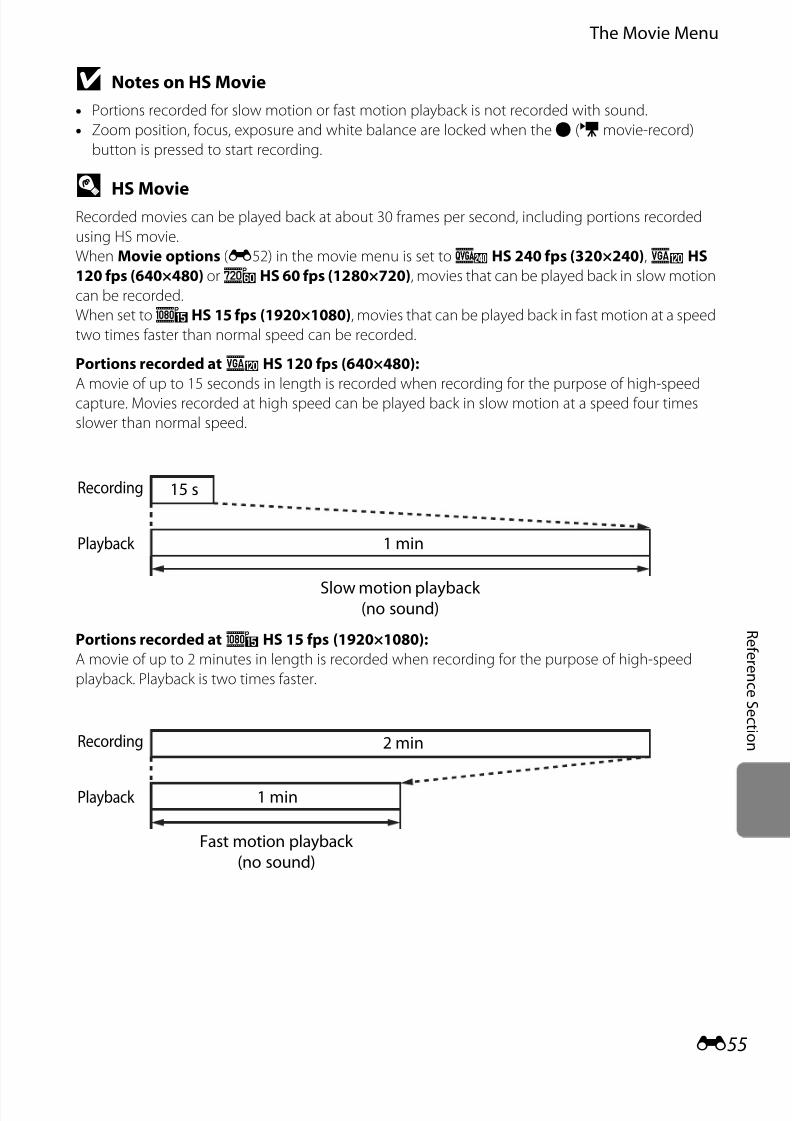
7/28/2019 Cool Pix Camera Manual AW100EN_Manual
http://slidepdf.com/reader/full/cool-pix-camera-manual-aw100enmanual 175/242
E55
The Movie Menu
R ef er en c e S e c t i on
B Notes on HS Movie
• Portions recorded for slow motion or fast motion playback is not recorded with sound.
• Zoom position, focus, exposure and white balance are locked when theb (emovie-record)
button is pressed to start recording.
D HS MovieRecorded movies can be played back at about 30 frames per second, including portions recorded
using HS movie.
When Movie options (E52) in the movie menu is set tok HS 240 fps (320×240),h HS
120 fps (640×480) ori HS 60 fps (1280×720), movies that can be played back in slow motion
can be recorded.
When set toj HS 15 fps (1920×1080), movies that can be played back in fast motion at a speed
two times faster than normal speed can be recorded.
Portions recorded ath HS 120 fps (640×480):
A movie of up to 15 seconds in length is recorded when recording for the purpose of high-speed
capture. Movies recorded at high speed can be played back in slow motion at a speed four times
slower than normal speed.
Portions recorded atj HS 15 fps (1920×1080):
A movie of up to 2 minutes in length is recorded when recording for the purpose of high-speed
playback. Playback is two times faster.
Recording 15 s
Slow motion playback (no sound)
Playback 1 min
Recording 2 min
Fast motion playback (no sound)
Playback 1 min

7/28/2019 Cool Pix Camera Manual AW100EN_Manual
http://slidepdf.com/reader/full/cool-pix-camera-manual-aw100enmanual 176/242
E56
The Movie Menu
R ef er enc eS ec t i on
Autofocus Mode
Choose how the camera focuses when recording normal speed movies (E52).
Movie Light
Enable or disable the movie light that assists recording in dark places during movie
recording.
Wind Noise Reduction
Set whether or not to reduce wind noise during normal-speed movie recording (E52).
When On is selected, an icon for this setting is displayed on the monitor duringmovie recording (A6).
Display the shooting screen M dbuttonM e (Movie) tab (A11)MAutofocus mode
Option DescriptionA Single AF
(deaultsetting)
Lock on the focus when theb (emovie-record) button is pressedto start recording. Select this option when the distance between thecamera and the subject remains fairly consistent.
B Full-time AF
The camera focuses continuously during movie recording.Suitable for shooting when the distance between the camera andsubject changes. The operation sound when the camera focuses maybe recorded. Setting to Single AF is recommended if the sound isnoticeable.
Display the shooting screen M d buttonM e (Movie) tab (A11)MMovie light
Option Description
On The movie light is turned on for lighting when movies are recorded.
O (deault setting)
The movie light is turned off.
Display the shooting screenM dbuttonM D (Movie) tab (A11)MWind noise reduction
Option Description
Y On The noise of wind blowing on the camera’s built-in microphone isminimized during recording. This setting is suitable for recording in strongwinds. Other sounds may become difficult to hear in playback mode.
k O (deaultsetting)
Wind noise is not reduced.
7/28/2019 Cool Pix Camera Manual AW100EN_Manual
http://slidepdf.com/reader/full/cool-pix-camera-manual-aw100enmanual 177/242
E57
R ef er en c e S e c t i on
Map Menu
GPS Settings
Updating the A-GPS File
Download the latest A-GPS file from the website below, and use it to update the
file.
http://nikonimglib.com/agps/index.html
• The A-GPS file for COOLPIX AW100 is only available from the website above.
1 Download the latest A-GPS ile to the computer rom the website.
2 Use a card reader or other device to copy the downloaded ile to the“NCFL” older o the memory card.• The “NCFL” folder is located directly under the memory card root directory. If the
memory card does not have “NCFL” folder, create a new folder.
3 Insert the memory card containing the copied ile into the camera.
4 Turn on the camera, and press the action button to display a map.
5 Press thed button to display the map menu, and use the multiselector to select GPS options.
6 Select Update A-GPS file, and update the ile.
Display a map (A88)M d buttonM U tab (A11)M GPS options
Option Description
Record GPS dataWhen set to On, signals are being received from the GPS satellite, andpositioning starts (A86).• The default setting is Off .
Synchronize
Signals from the GPS satellite are used to set the date and time of thecamera’s internal clock (only when Record GPS data in GPSoptions of the map menu is set to On). Check the positioning status
before starting Synchronize.
Update A-GPS ileA memory card is used to update the A-GPS (assist GPS) file. Using thelatest A-GPS file can shorten the time needed for tracking of theposition information.

7/28/2019 Cool Pix Camera Manual AW100EN_Manual
http://slidepdf.com/reader/full/cool-pix-camera-manual-aw100enmanual 178/242
E58
Map Menu
R ef er enc eS ec t i on
B Notes on Synchronize
• Date/time adjustment by Synchronize is set according to the time zone set in Time zone and
date (A24,E67) of the setup menu. Check the time zone before setting Synchronize.
• The date/time set using Synchronize is not as accurate as radio clocks. Use Time zone and date
in the setup menu to set the time if it is not accurate in Synchronize.
B Notes on Updating A-GPS File
• The validity period of the A-GPS file is seven days. The validity period can be checked on the
update screen.
• Once the validity period of the A-GPS file has expired, tracking of the position information will not
become faster. Updating of the A-GPS file before using the GPS feature is recommended.
Distance Units
The distance units of the map display can be selected from km (m) (kilometers,
meters) (default setting) or mi (yd) (miles, yards).
Display a map (A88)M d buttonM U tab (A11)M Distance units

7/28/2019 Cool Pix Camera Manual AW100EN_Manual
http://slidepdf.com/reader/full/cool-pix-camera-manual-aw100enmanual 179/242
E59
Map Menu
R ef er en c e S e c t i on
Calculate Distance
This calculates the linear distance from the current location to the shootinglocation on the image or between the shooting locations of two images.
1 Use the multi selector to select the target orcalculating the distance, and press thek button.• Position now<–>image: Calculates the distance from
the current location to the image shooting location
(only when Record GPS data in GPS options of themap menu is set to On). Confirmation of the current
position starts. Proceed to step 3.
• Image<–>image: Calculates the distance between the shooting locations of two
images.
2 PressJ orK to select the image that is thestart point, and press thek button.• To adjust the scale of the map, use the zoom button
(f (h)/ g (i)).
3 PressJ orK to select the image that is theend point.• Each time an image is selected, the distance is
displayed on the screen.
• Press thek button to end the distance calculation.
B Note on Distance CalculationIf the position information is not recorded on the image, the distance cannot be calculated.
Press thec button (Playback mode)M Display a map (A88)M d buttonM U tab
(A11)M Calculate distance
Calculate distance
Position now<–>imageImage<–>image
Choose start point
Select imageBack
500km
Select imageBack
100m
500km
Choose end point
Distance

7/28/2019 Cool Pix Camera Manual AW100EN_Manual
http://slidepdf.com/reader/full/cool-pix-camera-manual-aw100enmanual 180/242
E60
Map Menu
R ef er enc eS ec t i on
Points of interest (POI) (Recording and Displaying Location
Name Information)
This shows how to set the POI (point of interest, location name information).
C POI DisplayIf there is no location name information in the display level that was set, “---” is displayed.
Display a map (A88)M d buttonM U tab (A11)M Points o interest (POI)
Option Description
Embed POI
When set to On, the location name information is recorded on thepictures to be shot.• The default setting is Off .• The location name information can be recorded on a still image or
video.
Display POI When set to On, the location name information is displayed on theshooting screen or playback screen (A6, 8).• The default setting is Off .
Level o detail
Set the display level of the location name information. A higherdisplay level shows more detailed regional information, and a lowerdisplay level shows regional information for a wider area (such ascountry names).When set to level 1, country names are displayed. When set to level 6,landmark names (facilities) are displayed. The information displayedfor levels 2 to 5 vary depending on the country where the map isdisplayed.
Edit POI
If Update POI is selected during playback mode, the location nameinformation recorded on the image can be changed.• When level 6 is selected, press the multi selectorJ orK to change the
landmark name.
• To change the map information level, press the multi selectorH orI.
If Remove POI is selected, the location name information recordedon the image is deleted.
7/28/2019 Cool Pix Camera Manual AW100EN_Manual
http://slidepdf.com/reader/full/cool-pix-camera-manual-aw100enmanual 181/242
E61
Map Menu
R ef er en c e S e c t i on
Create Log (Record the log of moving information)
When log recording starts, the measured tracking information for a certain
duration is recorded until a preset time has elapsed. To display the log data(E63), save it to a memory card.
1 Use the multi selector to select Start log, andpress thek button.
2 Select the duration that the log will berecorded, and press thek button.• Log recording starts.
• The log data is recorded every minute until the preset
time is reached.
• D is displayed on the screen during log recording.
3 When log recording is completed, select End
log in Create log in the map menu, and pressthek button.
Display a map (A88)M d buttonM U tab (A11)M Create log
Create log
Start logEnd log
Log data for next 72 hoursLog data for next 24 hours
Log data or next 6 hours
Start log
Log data for next 12 hours
500km
Create log
Start logEnd log

7/28/2019 Cool Pix Camera Manual AW100EN_Manual
http://slidepdf.com/reader/full/cool-pix-camera-manual-aw100enmanual 182/242
E62
Map Menu
R ef er enc eS ec t i on
4 Select Save log, and press thek button.• The log data is saved to a memory card.
B Notes on Log Recording
• If the date and time are not set, the log cannot be recorded.
• If the date and time is changed in Time zone and date (A24,E67) in the setup menu or
Synchronize in GPS options (E57) of the map menu during log recording, log recording is
canceled.
• Log recording is paused during the operations below. Log recording resumes once these
operations are canceled.
- During continuous shooting
- During movie recording
- When connected with a USB cable
• Although the log recording time elapses based on the internal clock even if the camera battery is
removed, the log is not recorded.
• The log data is temporarily stored in the camera. New logs cannot be recorded if the log data
remains in the camera. After recording log data, save it to a memory card.
• A maximum of 36 log data events can be recorded in one day.
• A maximum of 100 log data events can be saved to a single memory card.
C To Erase Log Data
• To erase the log data that is temporarily stored in the camera, select Erase log in step 4.
• To erase the log data that is stored in the memory card, press thel button in View log (E63).
Erase log
Save log
End log
7/28/2019 Cool Pix Camera Manual AW100EN_Manual
http://slidepdf.com/reader/full/cool-pix-camera-manual-aw100enmanual 183/242
E63
Map Menu
R ef er en c e S e c t i on
View Log (View the log on a map)
Display on the map the log data saved in the memory card using Create log
(E61) to check your movement route.
1 Use the multi selector to select the log data tobe displayed, and press thek button.• The movement route is indicated by a blue line.
2 Check the movement route.• To adjust the scale of the map, use the zoom button
(f (h)/ g (i)).
• To move the map display, use the multi selectorH,I,
J, orK.
• To erase the displayed log data, press thel button.
To Erase Log Data
To erase the log data, press thel button in step 1.
• Selected log: The selected log data is erased.
• All logs: All log data stored on the memory card is erased.
C Log Data
Log data is NMEA format-compliant. However, display in any software or on any camera is not
guaranteed.
Display a map (A88)M d buttonM U tab (A11)M View log
20/11/2011
26/11/201126/11/2011
15/11/2011
18/11/2011
View log
[1]
[2]
500km
7/28/2019 Cool Pix Camera Manual AW100EN_Manual
http://slidepdf.com/reader/full/cool-pix-camera-manual-aw100enmanual 184/242
E64
Map Menu
R ef er enc eS ec t i on
Electronic Compass
Display a map (A88)M d buttonM U tab (A11)M Electronic compass
Option Description
Compass display
When set to On, a compass is displayed on the shooting screen.
• The default setting is Off .
• The compass indicator changes based on the direction that the
camera is held (A6).
• Compass display gives indication of direction for the destination
from the actual location on the basis of measured direction
information.
- Display style: north, east, south and west
- Display range: 16 cardinal points
- The red arrow of the circle compass display points north.
Compass correction
Correct the compass when the compass direction is not displayed
correctly.
When the screen shown on the
right is displayed, swing the
camera to draw a figure eight in
the air while turning your wrist to
face the camera forward and
backward, side to side, or up and
down.
Move camera in a fgure eight
Compass correction

7/28/2019 Cool Pix Camera Manual AW100EN_Manual
http://slidepdf.com/reader/full/cool-pix-camera-manual-aw100enmanual 185/242
E65
Map Menu
R ef er en c e S e c t i on
B Notes on Using the Digital Compass
• The digital compass is not displayed when the camera lens is facing upwards.
• Do not use the digital compass in this camera for mountain climbing and other specialized
applications. The displayed information is intended as a general guide only.
• Direction may not be measured correctly near the following objects: magnet, metal, electrical
motor, electrical home appliance or electrical power cable• Direction may not be measured correctly in the following places: in automobiles, trains, ships,
airplanes, inside buildings or in underground malls
• Direction may not be measured correctly if the position information is not recorded.

7/28/2019 Cool Pix Camera Manual AW100EN_Manual
http://slidepdf.com/reader/full/cool-pix-camera-manual-aw100enmanual 186/242
E66
R ef er enc eS ec t i on
The Setup Menu
Welcome Screen
Choose whether or not to display the welcome screen on the monitor when thecamera is turned on.
Press thed buttonM z tab (A11)MWelcome screen
Option Description
None(deault setting)
Display the shooting or playback screen without displaying thewelcome screen.
COOLPIXDisplay the welcome screen before displaying the shooting orplayback screen.
Select an image
Select an image taken to display as the welcome screen. Display the
image selection screen, choose an image (E47), and press thek button to register it.• Because the selected image is stored in the camera, the image
appears in the welcome screen even if the original image is deleted.• Pictures taken with Image mode (A61) of g 4608×2592,
pictures recorded with easy panorama (E2), and pictures createdwith small picture (E20) or crop function (E21) that are 320×240or smaller cannot be registered.

7/28/2019 Cool Pix Camera Manual AW100EN_Manual
http://slidepdf.com/reader/full/cool-pix-camera-manual-aw100enmanual 187/242
E67
The Setup Menu
R ef er en c e S e c t i on
Time Zone and Date
Press thed buttonM z tab (A11)M Time zone and date
Option Description
Date and time
Set the camera clock to the current date and time.Use the multi selector to set the dateand time.• Choose an item: PressK orJ
(selected in the following order: D (day)➝ M (month)➝ Y (year)➝ hour ➝ minute).
• Set the contents: PressH orI.• Finish setting: Choose minute and
press thek button orK.
Date ormat Choose the order in which the day, month, and year are displayed(Year/Month/Day, Month/Day/Year or Day/Month/Year).
Time zone
w Home time zone can be specified and daylight saving can beenabled or disabled.Whenx travel destination is registered, the time difference (E69)from thew home time zone is automatically calculated and the localdate and time are recorded. Useful when traveling.
201111
15 10
Date and time
YM
Edit
15
D

7/28/2019 Cool Pix Camera Manual AW100EN_Manual
http://slidepdf.com/reader/full/cool-pix-camera-manual-aw100enmanual 188/242
E68
The Setup Menu
R ef er enc eS ec t i on
Setting the Travel Destination Time Zone
1 Use the multi selector to choose Time zone and press thek button.• The Time zone screen is displayed.
2 Choosex Travel destination and press thek button.• The date and time displayed on the monitor change
according to the region currently selected.
3 PressK.• The time zone selection screen is displayed.
4 PressJ orK to choose the travel destination(Time zone).• The time difference between home and the travel
destination is displayed.
• When using the camera in an area where daylight saving
time is in effect, turn on the daylight saving setting with
H. When set to on, theW icon is displayed on the top of
the monitor and the clock advances by one hour. To turn
off, pressI.
• Press thek button to register the travel destination
time zone.
• While the travel destination time zone is selected, theZ
icon is displayed on the monitor when the camera is in
shooting mode.
C wHome Time Zone
• To switch to the home time zone, choosew Home time zone in step 2 and press thek button.
• To change the home time zone, choosew Home time zone in step 2 and perform the same
procedure as forx Travel destination to set the home time zone.
15:30
London, Casablanca
15/11/2011
Time zone and date
Time zoneDate format
Date and time
15:3015/11/2011
Time zone
Home time zone
Travel destination
London, Casablanca
0:3016/11/2011
Tokyo, Seoul
Time zone
Travel destination
Home time zone
EDT:New York Toronto, Lima
10:3015/11/2011
Time zone
Travel destinationHome time zone
10:30 -5:00
EDT:
New York
Toronto
Lima
Back
Time dierence

7/28/2019 Cool Pix Camera Manual AW100EN_Manual
http://slidepdf.com/reader/full/cool-pix-camera-manual-aw100enmanual 189/242
E69
The Setup Menu
R ef er en c e S e c t i on
C Time Zones
The camera supports the time zones listed below.
For time differences not listed below, set the camera clock using Time zone and date.
UTC +/- Location UTC +/- Location
-11 Midway, Samoa +1 Madrid, Paris, Berlin-10 Hawaii, Tahiti +2 Athens, Helsinki, Ankara
-9 Alaska, Anchorage +3Moscow, Nairobi, Riyadh,Kuwait, Manama
-8PST (PDT): Los Angeles,Seattle, Vancouver
+4 Abu Dhabi, Dubai
-7 MST (MDT): Denver, Phoenix +5 Islamabad, Karachi
-6
CST (CDT): Chicago,
Houston, Mexico City +5.5 New Delhi
-5EST (EDT): New York,
Toronto, Lima+6 Colombo, Dhaka
-4.5 Caracas +7 Bangkok, Jakarta
-4 Manaus +8Beijing, Hong Kong,Singapore
-3 Buenos Aires, Sao Paulo +9 Tokyo, Seoul
-2 Fernando de Noronha +10 Sydney, Guam
-1 Azores +11 New Caledonia
±0 London, Casablanca +12 Auckland, Fiji
7/28/2019 Cool Pix Camera Manual AW100EN_Manual
http://slidepdf.com/reader/full/cool-pix-camera-manual-aw100enmanual 190/242
E70
The Setup Menu
R ef er enc eS ec t i on
Monitor Settings
Photo infoSelect whether or not the photo information is displayed on the monitor.See “ The Monitor” (A6) for more information on indicators displayed on the
monitor.
Press thed buttonM z tab (A11)MMonitor settings
Option Description
Photo inoSelect information displayed on the monitor during shooting andplayback mode.
Image reviewOn (default setting): Picture is displayed on the monitor immediatelyafter shooting and the monitor display returns to shooting screen.Off : Picture is not displayed immediately after shooting.
BrightnessChoose from five settings to select the monitor brightness. Thedefault setting is 3.
Shooting mode Playback mode
Show ino
Auto ino(deaultsetting)
The same information as in Show info is displayed. If no operations areperformed after a few seconds, the display will be the same as Hide info. Theinformation is displayed again when an operation is performed.
Hide ino
2 9 m 0 s
1 3 4 21 3 4 2
2 9 m 0 s
0004.JPG004.JPG0004.JPG15:305:3015:3015/11/20115/11/201115/11/2011
13232132ޓ44

7/28/2019 Cool Pix Camera Manual AW100EN_Manual
http://slidepdf.com/reader/full/cool-pix-camera-manual-aw100enmanual 191/242
E71
The Setup Menu
R ef er en c e S e c t i on
Framinggrid+autoino
In addition to information shown withAuto info above, a framing grid isdisplayed to help frame pictures.It is not displayed while recordingmovies.
The same information as in Auto info is displayed.
Movierame+autoino
In addition to information shown withAuto info above, the movie frame isdisplayed before recording movies.
The same information as in Auto info is displayed.
Shooting mode Playback mode
2 9 m 0 s
1 3 4 21 3 4 2
2 9 m 0 s
13232132ޓ44
0004.JPG004.JPG0004.JPG15:305:3015:3015/11/20115/11/201115/11/2011
2 9 m 0 s
1 3 4 21 3 4 2
2 9 m 0 s
0004.JPG004.JPG0004.JPG15:305:3015:3015/11/20115/11/201115/11/2011
13232132ޓ44

7/28/2019 Cool Pix Camera Manual AW100EN_Manual
http://slidepdf.com/reader/full/cool-pix-camera-manual-aw100enmanual 192/242

7/28/2019 Cool Pix Camera Manual AW100EN_Manual
http://slidepdf.com/reader/full/cool-pix-camera-manual-aw100enmanual 193/242
E73
The Setup Menu
R ef er en c e S e c t i on
Vibration Reduction
Specify the vibration reduction setting for shooting still pictures or movies. Correct
blur, caused by slight hand movement known as camera shake, that commonlyoccurs when shooting with zoom applied or at slow shutter speeds.
When using a tripod to stabilize the camera, set vibration reduction to Off .
The icon for the current setting other than Off is displayed on the monitor (A6).
B Notes on Vibration Reduction
• It may take a few seconds to activate vibration reduction after the power is turned on or the camera
enters shooting mode from playback mode. Wait until the display stabilizes before shooting.
• Due to characteristics of the vibration reduction function, images displayed on the camera’s
monitor immediately after shooting may appear blurry.
• Vibration reduction may be unable to completely eliminate the effects of camera shake in some
situations.
• When the camera shake is extremely high or low, picture compensation with electronic VR may not
be possible even when On (hybrid) is set.
• When the shutter speed is fast or extremely slow, electronic VR may not operate even when On
(hybrid) is set.
• When electronic VR in On (hybrid) operates, saving the picture takes longer than normal, because
when the picture is shot, the shutter is released twice automatically to perform picture
compensation. Shutter sound (E76) is heard only once. One frame is recorded.
Press thed buttonM z tab (A11)M Vibration reduction
Option Description
V On (hybrid)
Record with optical compensation for camera shake during stillpicture shooting using the lens shift method, and under thefollowing conditions, also performs electronic VR using imageenhancement.• When the flash does not fire• When the shutter speed is slower than 1/60 second• When the self-timer is off • When Single is selected for the Continuous setting
gOn (deaultsetting)
Compensate for camera shake using the lens shift method. Thecamera automatically detects the panning direction and onlycorrects for vibration caused by camera shake.When the camera is panned horizontally, for example, vibrationreduction only reduces vertical shake. If the camera is pannedvertically, vibration reduction only compensates for horizontal
shake.
k O Vibration reduction is not enabled.
7/28/2019 Cool Pix Camera Manual AW100EN_Manual
http://slidepdf.com/reader/full/cool-pix-camera-manual-aw100enmanual 194/242
E74
The Setup Menu
R ef er enc eS ec t i on
Motion Detection
Enable motion detection to reduce the effects of camera shake and subject
movement when shooting still pictures.
When Auto is selected, an icon for this setting is displayed on the monitor (A6).
The motion detection icon lights in green when the camera detects any vibration
and increases the shutter speed.
B Notes on Motion Detection
• Motion detection may be unable to completely reduce effects of camera shake and subject
movement in some situations.
• Motion detection may not function if the subject exhibits significant movement or is too dark.
• The pictures taken may become grainy.
• This feature may not be used in combination with certain features. See “Features That Cannot BeUsed Simultaneously” (A63) for more information.
Press thed buttonM z tab (A11)MMotion detection
Option Description
UAuto (deaultsetting)
If the camera detects the movement of the subject or camerashake, the ISO sensitivity is raised and the shutter speed isincreased to reduce their effects.However, motion detection does not function in the followingsituations.• When the flash fires• In the following scene modes: Sports, Night portrait, Dusk/
dawn, Night landscape, Museum, Fireworks show,Backlighting and Pet portrait
• When Continuous (E36) is set to Multi-shot 16• When ISO sensitivity (E37) is set to other than Auto• When AF area mode is set to Subject tracking
k O Motion detection does not function.

7/28/2019 Cool Pix Camera Manual AW100EN_Manual
http://slidepdf.com/reader/full/cool-pix-camera-manual-aw100enmanual 195/242
E75
The Setup Menu
R ef er en c e S e c t i on
AF Assist
Enable or disable the AF-assist illuminator that assists the autofocus when the
lighting is dim.
Digital Zoom
Enable or disable the digital zoom.
B Notes on Digital Zoom
• When the digital zoom is used, the camera focuses at the center of the frame.
• The digital zoom cannot be used when Portrait, Night portrait, Backlighting with HDR set to
On, Pet portrait, Underwater, or smart portrait mode is selected in scene mode.
• This feature may not be used in combination with certain features. See “Features That Cannot Be
Used Simultaneously” (A63) for more information.
Press thed buttonM z tab (A11)M AF assist
Option Description
Auto(deault setting)
AF-assist illuminator lights automatically if the lighting is dim. Theilluminator has a range of about 3.5 m (11 ft) at the maximum wide-angle position and about 2.0 m (6 ft 6 in.) at the maximum telephotoposition.• For some focus areas and scene modes such as Museum (A43)
and Pet portrait (A46), AF-assist illuminator does not turn oneven if Auto is set.
O AF-assist illuminator does not light. The camera may be unable tofocus if lighting is dim.
Press thed buttonM z tab (A11)M Digital zoom
Option Description
On(deault setting)
If the zoom button g (i) is pressed when optical zoom is set at themaximum telephoto zoom position, digital zoom (A29) will beactivated.
O Digital zoom is not activated.

7/28/2019 Cool Pix Camera Manual AW100EN_Manual
http://slidepdf.com/reader/full/cool-pix-camera-manual-aw100enmanual 196/242
E76
The Setup Menu
R ef er enc eS ec t i on
Sound Settings
Adjust the following sound settings.
B Notes on Sound Settings
• In Pet portrait scene mode, even when On is set, the button sound and shutter sound are
disabled.
• Even when On is set, the shutter sound is disabled during movie recording.
• This feature may not be used in combination with certain features. See “Features That Cannot Be
Used Simultaneously” (A63) for more information.
Press thed buttonM z tab (A11)M Sound settings
Option Description
Button sound
Set the following all sound settings to On (default setting) or Off .• Setting beep (beep sounds once when the settings are
completed)• Focus beep (beep sounds twice when the camera focuses on
the subject)• Error beep (beep sounds three times when an error is
detected)• Start-up sounds
Shutter sound Choose whether to set the shutter sound to On (default setting)or Off .

7/28/2019 Cool Pix Camera Manual AW100EN_Manual
http://slidepdf.com/reader/full/cool-pix-camera-manual-aw100enmanual 197/242
E77
The Setup Menu
R ef er en c e S e c t i on
Action Control Response
Set the sensitivity of the operation performed when shaking the camera (action
control) (A13). When this option is set to High (default setting), the operation isperformed even if the camera shake movement is small. When this option is set to
Low, the operation is performed if the camera shake movement is large.
B Note on Action Control Response
When viewing images with Quick playback of action control or in full-frame playback mode,
operation response of selecting images is fixed.
Auto Off
If no operations are performed for a certain period while the camera is on, the
monitor is turned off to save power and the camera enters standby mode (A23).
This option sets the amount of time allowed to elapse before the camera enters
standby mode.
Choose from 30 s, 1 min, 5 min (default setting) and 30 min.
C Auto Off Setting
In the following situations, the time taken for the camera to enter standby mode is fixed.
• When menus are displayed: three minutes
• During slideshow playback: maximum of 30 minutes
• When the AC Adapter EH-62F is connected: 30 minutes
Press thed buttonM z tab (A11)M Action control response
Press thed buttonM z tab (A11)M Auto o

7/28/2019 Cool Pix Camera Manual AW100EN_Manual
http://slidepdf.com/reader/full/cool-pix-camera-manual-aw100enmanual 198/242
E78
The Setup Menu
R ef er enc eS ec t i on
Format Memory/Format Card
Format the internal memory or a memory card.
Formatting permanently deletes all data in the internal memory ormemory card. The deleted data cannot be recovered. Be sure to transfer
important pictures to a computer before formatting.
Formatting the Internal Memory
To format the internal memory, remove the memory card from the camera. The
Format memory option is displayed in the setup menu.
Formatting Memory Cards
When a memory card is inserted in the camera, the memory card can be formatted. The Format card option is displayed on the setup menu.
B Formatting Internal Memory and Memory card
• When formatting the camera’s internal memory or the memory card, album icons (E11) are
reset to their default icons (number icon).
• Do not turn off the camera or open the battery-chamber/memory card slot cover during
formatting.
• The first time you insert a memory card that has been used in another device into this camera, be
sure to format it with this camera.
Language
Choose one of 29 languages for displaying the camera menus and messages.
Press thed buttonM z tab (A11)M Format memory/Format card
Press thed buttonM z tab (A11)M Language
Czech Dutch Turkish
Danish Norwegian Ukrainian
German Polish Arabic
(defaultsetting)
BrazilianPortuguese
SimplifiedChinese
Spanish Portuguese TraditionalChinese
Greek Russian Japanese
French Romanian Korean
Indonesian Finnish Thai
Italian Swedish Hindi
Hungarian Vietnamese

7/28/2019 Cool Pix Camera Manual AW100EN_Manual
http://slidepdf.com/reader/full/cool-pix-camera-manual-aw100enmanual 199/242
E79
The Setup Menu
R ef er en c e S e c t i on
TV Settings
Adjust the settings for connecting to a TV.
C HDMI and HDMI-CEC
“HDMI” is an abbreviation of High-Definition Multimedia Interface, which is one type of multimedia
interface.
“HDMI-CEC” is an abbreviation of HDMI-Consumer Electronics Control, which enables operations to
be linked between compatible devices.
Press thed buttonM z tab (A11)M TV settings
Option Description
Video modeSelect the analog video output system from NTSC and PAL inaccordance with your TV.
HDMI
Choose a picture resolution for HDMI output from Auto (defaultsetting), 480p, 720p, or 1080i. When Auto is set, the outputresolution that is best suited to the connected TV is selectedautomatically from 480p, 720p or 1080i.
HDMI device control
Choose whether or not the camera receives signals from a TV when a TV that conforms to the HDMI-CEC standard isconnected with an HDMI cable. When set to On (default setting),the television remote control can be used to operate the cameraduring playback.See “Using the TV’s Remote Control (HDMI Device Control)”(E23) for more information.

7/28/2019 Cool Pix Camera Manual AW100EN_Manual
http://slidepdf.com/reader/full/cool-pix-camera-manual-aw100enmanual 200/242
E80
The Setup Menu
R ef er enc eS ec t i on
Blink Warning
Choose whether or not blinking eyes are detected when using face detection
(A65) in the following shooting modes.• G (Easy auto) mode
• In the following scene modes: Portrait (A40) or Night portrait (A41)
• A (Auto) mode (when Face priority (E38) is selected for AF area mode)
The Did someone blink? Screen
If no operations are performed for a few seconds, the
screen automatically returns to the shooting screen.
• To zoom in to the face for which blinking wasdetected, press the zoom button g (i). To return tofull-frame playback mode, press the zoom button
f (h).
• When the camera detects that one or more humansubjects have closed their eyes, pressH,I,J orK during playback zoom to
display other faces.
• Press thel button to delete the picture taken.
• Press thek button to return to shooting screen.
B Note on Blink Warning
This feature may not be used in combination with certain features. See “Features That Cannot Be Used
Simultaneously” (A63) for more information.
Press thed buttonM z tab (A11)M Blink warning
Option Description
On
The Did someone blink? screen is displayed on the monitor if the camera detects that a human subject may have closed theeyes immediately after recognizing the face. The face of the
human subject that may have closed his/her eyes is framed by ayellow border. You can check the picture taken and determine if you need to take the picture again.
O (deault setting)
The camera does not detect blinks.
Did someone blink?
ExitExit
7/28/2019 Cool Pix Camera Manual AW100EN_Manual
http://slidepdf.com/reader/full/cool-pix-camera-manual-aw100enmanual 201/242
E81
The Setup Menu
R ef er en c e S e c t i on
Assign Action Button
Set the function to be performed when the action button (A13) is pressed.
Reset All
When Reset is selected, the camera settings are restored to the default values.
Pop-up Menu
Scene Mode
Special Effects Mode
Press thed buttonM z tab (A11)M Assign action button
Option DescriptionDisplay map (deault setting) Display a map (A13).
Action controlOperate the function by shaking the camera (actioncontrol).
Press thed buttonM z tab (A11)M Reset all
Option Deault value
Flash mode (A54) Auto
Sel-timer (A56) OFF
Macro mode (A57) OFFExposure compensation (A58) 0.0
Option Deault value
Scene (A39) Portrait
Hue adjustment in Food mode (A43) Center
HDR in Backlighting (A44) Off
Panorama (A45) Normal (180°) in Easy panorama
Pet portrait (A46)Pet portrait auto release: ONContinuous: Continuous
Option Deault value
Special eects (A47) Soft

7/28/2019 Cool Pix Camera Manual AW100EN_Manual
http://slidepdf.com/reader/full/cool-pix-camera-manual-aw100enmanual 202/242
E82
The Setup Menu
R ef er enc e
S ec t i on
Smart Portrait Menu
Shooting Menu
Movie Menu
Map Menu
Setup Menu
Option Default value
Skin softening (E32) Normal
Smile timer (E32) On
Blink proof (E33) Off
Option Default value
Image mode (A61) P 4608×3456
White balance (E34) Auto
Continuous (E36) Single
ISO sensitivity (E37) Auto
AF area mode (E38) Face priority
Autofocus mode (E41) Single AF
Option Default value
Movie options (E52) d HD 1080pP (1920×1080)
Open with HS footage (E53) On
Autofocus mode (E56) Single AF
Movie light (E56) Off
Wind noise reduction (E56) Off
Option Default value
Record GPS data (E57) Off
Distance units (E58) km (m)
Embed POI (E60) Off
Display POI (E60) Off
Level of detail (E60) Level 6 (detailed)
Compass display (E64) Off
Option Default value
Welcome screen (E66) None
Photo info (E70) Auto info
Image review (E70) On
7/28/2019 Cool Pix Camera Manual AW100EN_Manual
http://slidepdf.com/reader/full/cool-pix-camera-manual-aw100enmanual 203/242
E83
The Setup Menu
R ef er en c e
S e c t i on
Others
• Choosing Reset all also clears the current file number (E85) in the memory.After resetting, numbering continues from the lowest number available in the
internal memory or the memory card. If Reset all is performed after all pictures
are deleted from the internal memory or memory card (A34), the file numbers
for the next pictures taken start from 0001.• The following settings remain unaffected even if Reset all is performed.
Shooting menu: Preset manual data for White balance (E34)
Playback menu: Sequence display options (E51) and Choose key
picture (E51)
Setup menu: Time zone and date (E67), Language (E78) and Video
mode (E79) in TV settings
Brightness (E70) 3
Print date (E72) Off
Vibration reduction (E73) On
Motion detection (E74) AutoAF assist (E75) Auto
Digital zoom (E75) On
Button sound (E76) On
Shutter sound (E76) On
Action control response (E77) High
Auto off (E77) 5 min
HDMI (E79) Auto
HDMI device control (E79) On
Blink warning (E80) Off
Assign action button (E81) Display map
Option Default value
Paper size (E26,E27) Default
Slide show (E
45) Effects: ClassicBackground music: Off Frame intvl: 3 s
Album icons and color (E11) Number icon (black)
Option Default value

7/28/2019 Cool Pix Camera Manual AW100EN_Manual
http://slidepdf.com/reader/full/cool-pix-camera-manual-aw100enmanual 204/242
E84
The Setup Menu
R ef er enc eS ec t i on
Firmware Version
Displays the current camera firmware version.
Press thed buttonM z tab (A11)M Firmware version
COOLPIX AW100Ver.X.X
Back

7/28/2019 Cool Pix Camera Manual AW100EN_Manual
http://slidepdf.com/reader/full/cool-pix-camera-manual-aw100enmanual 205/242

7/28/2019 Cool Pix Camera Manual AW100EN_Manual
http://slidepdf.com/reader/full/cool-pix-camera-manual-aw100enmanual 206/242
E86
File and Folder Names
R ef er enc eS ec t i on
• When image files or voice files are copied to or from the internal memory or
memory card (E50), the file naming conventions are as follows:
- Files copied usingSelected images are copied to the current folder (or to thefolder used for subsequent pictures), where they are assigned file numbers in
ascending order following the largest file number in memory.
- Files copied using All images, along with their folder, are copied together.Folder numbers are assigned in ascending order, following the largest folder
number on the destination medium.File names are not changed.
• When the current folder is numbered 999, if there are 200 files in the folder or if a file is numbered 9999, no further pictures can be shot until the internalmemory or memory card is formatted (E78), or a new memory card is
inserted.

7/28/2019 Cool Pix Camera Manual AW100EN_Manual
http://slidepdf.com/reader/full/cool-pix-camera-manual-aw100enmanual 207/242
E87
R ef er en c e S e c t i on
Optional Accessories
* Included with the camera at the time of purchase (see “Confirming the Package Contents”(Aii) for more information).
See our websites or product catalogs for up-to-date information on accessories for
the COOLPIX AW100.
Accessories are not waterproof.
Rechargeablebattery
Rechargeable Li-ion Battery EN-EL12*
Battery charger Battery Charger MH-65*
AC adapter
AC Adapter EH-62F (connect as shown)
Fully insert the cord of the AC Adapter into the slot in the AC Adapter,then insert the AC Adapter in the battery chamber.• While using the AC adapter, the battery-chamber/memory card slot
cover cannot be closed. Do not pull the cord of the AC adapter.If the cord is pulled, the connection between the camera and powersource is interrupted, and the camera turns off.
USB cable USB Cable UC-E6*
Audio/Videocable
Audio Video Cable EG-CP16*
Filter adapter Filter Adapter UR-E23*

7/28/2019 Cool Pix Camera Manual AW100EN_Manual
http://slidepdf.com/reader/full/cool-pix-camera-manual-aw100enmanual 208/242
E88
R ef er enc eS ec t i on
Error Messages
The following table lists the error messages and other warnings displayed on the
monitor, as well as the solutions for dealing with them.
Display Description Solution A
O(blinks)
Clock not set. Set date and time. E67
NBattery exhausted.
Battery exhausted. Charge or replace the battery. 16, 18
PBattery temperature
high
Battery temperature is
high.
Turn off camera, and allow battery tocool down before resuming use. Fiveseconds after this message appears,the monitor is turned off, and thepower-on lamp, the AF lamp and the
flash lamp flicker. After the lampsblink for three minutes, the cameraturns off automatically, but you canalso press the power switch to turn itoff manually.
23
P The camera will turn off to prevent overheating.
Inside of the camerahas become hot. Thecamera turns off automatically.
Leave the camera off until the insideof the camera has cooled and thenturn it on again.
–
Q
(blinks red)Camera cannot focus.
• Refocus.
• Use focus lock.
30, 31
67
PPlease wait for thecamera to finishrecording.
Camera cannotperform otheroperations untilrecording is complete.
Wait until message clears fromdisplay automatically whenrecording is complete.
–
NMemory card is writeprotected.
Write-protect switch isin “lock” position.
Slide the write-protect switch to“write” position.
–
P
This card cannot beused. Error accessing
memory card.
•Use an approved card.• Check that connectors are clean.
• Confirm that memory card iscorrectly inserted.
212020
P This card cannot be read.

7/28/2019 Cool Pix Camera Manual AW100EN_Manual
http://slidepdf.com/reader/full/cool-pix-camera-manual-aw100enmanual 209/242
E89
Error Messages
R ef er en c e S e c t i on
PCard is not formatted.Format card?
YesNo
Memory card has notbeen formatted for
use in this camera.
All data stored on the memorycard is deleted when formatted. If there is any data on the card that youwant to keep, select No, and backup
the data to a computer beforeformatting the memory card. Toformat the memory card, selectYes and press thek button.
20
NOut of memory.
Memory card is full.
• Choose smaller image mode.• Delete pictures and movies.• Replace memory card.• Remove memory card and use
internal memory.
6134, 842021
PImage cannot be saved.
Error occurred while
recording picture.
Format the internal memory or
memory card. E78
Camera has run out of file numbers.
Replace the memory card, or formatthe internal memory/memory card.
20,E78
Picture cannot beused for welcomescreen.
The following pictures cannot beused.• Pictures taken with Image mode
of g 4608×2592• Pictures created with small picture
or crop function that are 320 × 240
or smaller• Pictures recorded with easypanorama
61
E20, E21
E2
There is insufficientspace to save a copy.
Delete images from destination. 34
NAlbum is full. No furtherpictures can be added.
200 pictures havealready been recordedon the album.
• Remove pictures from the album.• Save pictures on the another
album.
E10E9
Display Description Solution A

7/28/2019 Cool Pix Camera Manual AW100EN_Manual
http://slidepdf.com/reader/full/cool-pix-camera-manual-aw100enmanual 210/242
E90
Error Messages
R ef er enc eS ec t i on
NUnable to createpanorama.
Cannot perform easypanorama shooting.
Easy panorama shooting may not beavailable in the following situations.
• When shooting has not finishedafter a certain period of time
• When the camera movementspeed is too fast
• When the camera is not straightrelative to the panorama direction
E2
N
Unable to createpanorama. Pan thecamera in one directiononly.
NUnable to createpanorama. Pan thecamera more slowly.
P
Sound file cannot besaved.
A voice memo cannotbe attached to this file.
• Voice memos cannot be attached
to movies.• Select a picture taken with thiscamera.
–
E49
NA blink was detected inthe picture just taken.
Someone may havehad their eyes closedwhen the picture wastaken.
Check results in playback mode. E33
NImage cannot be
modified.
Cannot edit selectedpicture.
• Confirm the conditions that arerequired for editing.
• These options cannot be used
with movies.
E15
–
NCannot record movie.
Time out error whilerecording movie.
Choose memory card with fasterwrite speed.
21
NMemory contains noimages.
No pictures in theinternal memory ormemory card.
• Pictures stored in the internalmemory can only be viewed if nomemory card is inserted.
• To copy files from internal memoryto memory card, press thed button to display the copy screen,
then copy the files from internalmemory to memory card.
20
E50
Display Description Solution A

7/28/2019 Cool Pix Camera Manual AW100EN_Manual
http://slidepdf.com/reader/full/cool-pix-camera-manual-aw100enmanual 211/242
E91
Error Messages
R ef er en c e S e c t i on
NFile contains no imagedata. File not created with
COOLPIX AW100.
File cannot be viewed on thiscamera.View file using the computer or anyother devices which was used tocreate or edit this file.
–P
This file cannot beplayed back.
NAll images are hidden.
The picture cannot beplayed back in a slideshow.
– E45
N This image cannot bedeleted.
Picture is protected. Disable protection. E46
N
Travel destination is inthe current time zone.
Destination in sametime zone as home. – E69
Lens errorQ
Lens is not operatingproperly.
Turn camera off and then on again. If error persists, contact retailer orNikon-authorized servicerepresentative.
23
PCommunications error
Error occurred duringcommunication withprinter.
Turn off camera and reconnect cable. E25
System errorQ
Error has occurred incamera’s internalcircuitry.
Turn off camera , remove and reinsertbattery, and turn on camera. If theerror persists, contact retailer orNikon-authorized servicerepresentative.
23
QInitializing lens. Cannotfocus.
The camera cannotfocus.
Wait until the camera recoversautomatically.
–
NCould not obtain GPS
data.
The camera clock isnot set correctly.
Change the location or time anddetermine the location again.
–
Display Description Solution A

7/28/2019 Cool Pix Camera Manual AW100EN_Manual
http://slidepdf.com/reader/full/cool-pix-camera-manual-aw100enmanual 212/242
E92
Error Messages
R ef er enc eS ec t i on
N
No A-GPS file found oncard
An A-GPS file that canbe updated is not
found in the memorycard.
Check the following items.• Whether the memory card is
inserted• Whether the A-GPS file is stored in
the memory card• Whether the A-GPS file saved in a
memory card is more recent thanthe A-GPS file saved in the camera
• Whether the A-GPS file is still valid
–
NUpdate failed
Unable to update A-GPS file.
The A-GPS file may be corrupted.Download the file from the websiteonce more.
E57
NUnable to determinecurrent position
Unable to determinethe current position
when distance iscalculated.
Change the location or time and
determine the location again.–
NCannot save to card
A memory card is notinserted.
Insert a memory card. 20
36 log data eventshave been alreadysaved in one day.
– –
100 log data eventshave been already
saved.
Delete log data that is no longerrequired from a memory card or
replace the memory card with a newone.
E63
NUnable to correctcompass
Unable to correct thedigital compasscorrectly.
Swing the camera to draw a figureeight in the air outdoors whileturning your wrist to face the cameraforward and backward, side to side,or up and down.
E64
Display Description Solution A

7/28/2019 Cool Pix Camera Manual AW100EN_Manual
http://slidepdf.com/reader/full/cool-pix-camera-manual-aw100enmanual 213/242
E93
Error Messages
R ef er en c e S e c t i on
* See the instruction manual provided with your printer for further guidance and information.
PRPrinter error: check printer status.
Printer errorCheck printer. After solving theproblem, select Resume and pressthek button to resume printing.*
–
PRPrinter error: check paper Specified size of paperis not loaded.
Load the specified size of paper,
select Resume and press thek button to resume printing.*
–
PRPrinter error: paper jam
Paper has jammed inthe printer.
Remove the jammed paper, selectResume and press thek button toresume printing.*
–
PRPrinter error: out of paper
No paper is loaded inthe printer.
Load the specified size of paper,select Resume and press thek button to resume printing.*
–
PR
Printer error: check ink Ink error
Check ink, select Resume and press
thek button to resume printing.* –
PRPrinter error: out of ink
Ink cartridge is empty.Replace ink cartridge, select Resume and press thek button to resumeprinting.*
–
PRPrinter error: file corrupt
An error caused by theimage file hasoccurred.
Select Cancel and press thek button to cancel printing.
–
Display Description Solution A

7/28/2019 Cool Pix Camera Manual AW100EN_Manual
http://slidepdf.com/reader/full/cool-pix-camera-manual-aw100enmanual 214/242
E94

7/28/2019 Cool Pix Camera Manual AW100EN_Manual
http://slidepdf.com/reader/full/cool-pix-camera-manual-aw100enmanual 215/242
T e c h ni c a l N o t e s a
n d I n d ex
F1
Technical Notes and Index
Caring for the Products .............................................F2The Camera............................................................................................................. F2The Battery.............................................................................................................. F4The Battery Charger............................................................................................. F5
The Memory Cards............................................................................................... F6Caring for the Camera ...............................................F7
Cleaning................................................................................................................... F7Storage..................................................................................................................... F8
USER LICENSE AGREEMENT FOR MAP DATA AND
LOCATION NAME DATA.............................................F9Troubleshooting......................................................F13
Specifications...........................................................F20Supported Standards....................................................................................... F23
Index .........................................................................F24
7/28/2019 Cool Pix Camera Manual AW100EN_Manual
http://slidepdf.com/reader/full/cool-pix-camera-manual-aw100enmanual 216/242
T ec h ni c a l N ot es a
nd I nd ex
F2
Technical Notes and Index
Caring for the Products
The Camera To ensure continued enjoyment of this Nikon product, observe the following
precautions when using or storing the device.
Be sure to read and follow the warnings of “For Your Safety” (Avi to viii) and“<Important> Shockproof, waterproof, dustproof, condensation, GPS/digital
compass“ (Axi to xvi) thoroughly before using the products.
B Do Not Allow Damp to Enter Inside the Camera
COOLPIX AW100 is provided with JIS/IEC protection class 8 (IPX8) equivalent waterproofing. If water
seeps inside the camera, however, this could cause the components to rust and result in a high
repair charge or the camera may not be repairable. After using the camera at the beach or
underwater, make sure that the battery-chamber/memory card slot cover is firmly closed, and then
immerse the camera in a shallow container filled with freshwater for ten minutes. After using the
camera underwater, do not leave the camera wet for 60 minutes or more. This could causedeterioration of the waterproofing performance.
B Prevent Water From Seeping Inside the Camera
If the inside of the camera becomes wet, this could result in camera malfunction and the camera
may not be repairable. To prevent water seeping (water submersion) accidents, be sure to observe
the following cautions when using the camera.
• When the battery-chamber/memory card slot cover is closed, make sure that the camera strap,
hair, lint, dust, sand grains, other foreign substances, or dirt are not attached on the waterproofing
packing and portions that make a contact with the waterproofing packing.
• Do not open and close the battery-chamber/memory card slot cover in areas exposed to waterspray, high winds, dust or sand.
• When an external force is applied on the camera, it could become deformed or the airtight seals
may become damaged and cause water to seep inside the camera. Do not place a heavy object
on the camera, drop the camera, or apply excessive force on the camera.
• If water seeps inside the camera, immediately stop using the camera. Wipe off moisture from the
camera, and at once take the camera to your Nikon-authorized service representative.
B Shock and Vibration
Do not drop the camera, strike it against a hard object such as a rock, or throw it at a water surface.
Do not leave the camera in an area subject to vibration. If the camera is subjected to excessive shock,this could result in camera malfunction or damage.
B Maximum Depth
COOLPIX AW100 is designed to withstand water pressure up to a depth of 10 m (33 ft) for
approximately 60 minutes. At greater depth, water could seep inside the camera, resulting in camera
malfunction.
B Precautions on Handling the Camera in Cold Locations
• The operation of this camera has been confirmed at temperatures of –10°C (14°F). If the camera is
left with snow or water droplets adhered to the exterior, snow or water droplets between the gapsmay become frozen and it may be difficult to operate parts of the camera.

7/28/2019 Cool Pix Camera Manual AW100EN_Manual
http://slidepdf.com/reader/full/cool-pix-camera-manual-aw100enmanual 217/242
F3
Caring or the Products
T e c h ni c a l N o t e s a
n d I n d ex
• At temperatures from –10°C to 0°C (14°F to 32°F), the performance of the batteries (number of
pictures shot and shooting time) will drop temporarily.
• If the camera becomes extremely cold in cold locations, the monitor performance may drop
temporarily immediately after the power is turned on (i.e., the monitor appears darker than usual
or a residual image occurs).
• When using the camera in cold locations or at high altitudes, keep the camera warm inside a
protection against cold or clothing.
B Do Not Drop
The product may malfunction if subjected to strong shock or vibration.
B Handle the Lens and All Moving Parts with Care
Do not apply force to the lens, lens cover, monitor, memory card slot, or battery chamber. These
parts are easily damaged. Applying force to the lens cover could result in camera malfunction or
damage to the lens. Should the monitor break, care should be taken to avoid injury caused by
broken glass and to prevent the liquid crystal from the display touching the skin or entering the eyes
or mouth.B Do Not Point the Lens at Strong Light Sources for Extended Periods
Avoid pointing the lens at the sun or other strong light sources for extended periods when using or
storing the camera. Intense light may cause deterioration of the image sensor, producing a white
blur effect in photographs.
B Keep away from Strong Magnetic Fields
Do not use or store this device in the vicinity of equipment that generates strong electromagnetic
radiation or magnetic fields. Strong static charge or the magnetic fields produced by equipment
such as radio transmitters could interfere with the monitor, damage data saved on the memory card,
or affect the product’s internal circuitry.
B Avoid Sudden Changes in Temperature
Sudden changes in temperature, such as when entering or leaving a heated building on a cold day,
can cause condensation to form inside the device. To prevent condensation, place the device in a
carrying case or a plastic bag before exposing it to sudden changes in temperature.
Do not expose the camera to high temperatures by leaving it on the beach or in direct sunlight
before entering the water.
B Turn the Product off Before Removing or Disconnecting the Power Source
or the Memory Card
Do not remove the battery while the product is on, or while images are being saved or deleted.
Forcibly cutting power in these circumstances could result in loss of data or in damage to product
memory or internal circuitry.
B The Monitor
• The monitor may contain a few pixels that are always lit or that do not light. This is a characteristic
common to all TFT LCD displays, and does not indicate a malfunction. Images saved using the
product will not be affected.
• Images on the monitor may be difficult to see under bright lighting.
• The monitor is lit by an LED backlight. Should the monitor begin to dim or flicker, contact your
Nikon-authorized service representative.

7/28/2019 Cool Pix Camera Manual AW100EN_Manual
http://slidepdf.com/reader/full/cool-pix-camera-manual-aw100enmanual 218/242
F4
Caring or the Products
T ec h ni c a l N ot es a
nd I nd ex
The Battery• Be sure to read and follow the warnings of “For Your Safety” (Avi to viii)
thoroughly before using the battery.
• Check the battery level before using the camera and replace or charge thebattery if necessary. Do not continue charging once the battery is fully charged
as this will result in reduced battery performance. Whenever possible, carry a
fully charged spare battery when taking pictures on important occasions.
• Do not use the battery at ambient temperatures below -10°C (14°F) or above
40°C (104°F).
• Charge the battery indoors with an ambient temperature of 5°C to 35°C (41°F to
95°F) before use.
• When the battery temperature is between 0°C and 10°C (32°F to 50°F) or 45°C to
60°C (113°F to 140°F), the chargeable capacity may decrease.
• The battery is not charged at ambient temperatures below 0°C (32°F) or above
60°C (140°F).
• Note that the battery may become hot during use; wait for the battery to cool
before charging. Failure to observe these precautions could damage thebattery, impair its performance, or prevent it from charging normally.
• On cold days, the capacity of batteries tends to decrease. Be sure that thebattery is fully charged before heading outside to take pictures in cold weather.
Keep spare batteries in a warm place and exchange as necessary. Once warmed,
a cold battery may recover some of its charge.• Dirt on the battery terminals can prevent the camera from functioning. Should
the battery terminals become dirty, wipe them off with a clean, dry cloth beforeuse.
• If the battery will not be used for some time, insert it in the camera and run it flatbefore removing it for storage. The battery should be stored in a cool location
with an ambient temperature of 15°C to 25°C (59°F to 77°F). Do not store thebattery in hot or extremely cold locations.
• Always remove the battery from the camera or battery charger when it is notbeing used. When inserted, minute amounts of current are drawn from thebattery even when not in use. This may result in excessive draining of the
battery and complete loss of function. Turning the camera on or off while the
battery is exhausted can result in reduced battery life. When the battery level islow, be sure to charge the battery before using it.
• Recharge the battery at least once every six months and completely exhaust itbefore returning it to storage.
•After removing the battery from the camera or battery charger, attach theincluded terminal cover to the battery and store it in a cool place.

7/28/2019 Cool Pix Camera Manual AW100EN_Manual
http://slidepdf.com/reader/full/cool-pix-camera-manual-aw100enmanual 219/242
F5
Caring or the Products
T e c h ni c a l N o t e s a
n d I n d ex
• A marked drop in the time a fully-charged battery retains its charge, when used
at room temperature, indicates that the battery needs to be replaced. Purchase
a new EN-EL12 battery.
• Replace the battery when it no longer holds a charge. Used batteries are a
valuable resource. Please recycle used batteries in accordance with local
regulations.
The Battery Charger• Be sure to read and follow the warnings of “For Your Safety” (Avi to viii)
thoroughly before using the battery charger.
• The included Battery Charger is for use only with a Rechargeable Li-ion Battery
EN-EL12.

7/28/2019 Cool Pix Camera Manual AW100EN_Manual
http://slidepdf.com/reader/full/cool-pix-camera-manual-aw100enmanual 220/242
F6
Caring or the Products
T ec h ni c a l N ot es a
nd I nd ex
The Memory Cards• Use only Secure Digital memory cards. See “Approved Memory Cards” (A 21).
• Be sure to observe the precautions in the memory card documentation when
you use the memory card.
•Do not affix labels or stickers to the memory card.
• Do not format the memory card using a computer.
• When a memory card is used for the first time, it is recommended to format it
with this camera. In particular, the first time you insert a memory card that hasbeen used in another device into this camera, be sure to format it with this
camera.
• Formatting permanently deletes all data in the memory card. Be sure to transfer
important pictures to a computer before formatting.
•
If the error message “Card is not formatted. Format card?“ is displayed when youinsert a memory card into this camera, the memory card must be formatted. If the memory card contains images you wish to keep, select No and save those
images on your computer before formatting the memory card. To format the
card, select Yes and press thek button.
• Do not perform the following during formatting, while data is being written to
or deleted from the memory card, or during data transfer to a computer. Failureto observe this precaution could result in loss of data or damage to the memory
card:
- Open the battery-chamber/memory card slot cover to remove the battery ormemory card.
- Turn off the camera
- Disconnect the AC adapter

7/28/2019 Cool Pix Camera Manual AW100EN_Manual
http://slidepdf.com/reader/full/cool-pix-camera-manual-aw100enmanual 221/242
T e c h ni c a l N o t e s a
n d I n d ex
F7
Caring for the Camera
Cleaning
Do not use volatile organic solvents such as alcohol or thinner, chemicaldetergents, anticorrosive agents, or anti-fogging agents.
Lens
Avoid touching glass parts with your fingers. Remove dust or lint with a blower(typically a small device with a rubber bulb attached to one end that is
pumped to produce a stream of air out the other end). To remove fingerprints,oily substances, or other stains that cannot be removed with a blower, carefullywipe the lens with a dry soft cloth or eyewear cleaning cloth, using a spiralmotion that starts at the center of the lens and working toward the edges. Donot wipe the lens forcibly or with a hard material. Failure to observe thisprecaution could result in damage or trouble. If this fails, clean the lens using acloth lightly dampened with commercial lens cleaner.
Monitor
Remove dust or lint with a blower. To remove fingerprints, oily substances orother stains, carefully wipe the monitor with a dry soft cloth or eyewearcleaning cloth. Do not wipe the monitor forcibly or with a hard material. Failureto observe this precaution could result in damage or trouble.
Body
Use a blower to remove dust, dirt, or sand, then wipe gently with a soft, drycloth. After using the camera underwater or at the beach, gently wipe off anysand or salt with a soft cloth lightly dampened with fresh water and drythoroughly. If you handle the camera using hands where sunscreen lotion isapplied, this could cause deterioration of the camera exterior. Note that foreign matter inside the camera could cause damage not covered by thewarranty.

7/28/2019 Cool Pix Camera Manual AW100EN_Manual
http://slidepdf.com/reader/full/cool-pix-camera-manual-aw100enmanual 222/242
F8
Caring or the Camera
T ec h ni c a l N ot es a
nd I nd ex
Storage
Remove the battery if the camera will not be used for an extended period. Do not
store the camera with naphtha or camphor moth balls, or in any of the following
locations:
• Next to equipment that produces strong electromagnetic fields, such astelevisions or radios
• Exposed to temperatures below –10°C (14°F) or above 50°C (122°F)
• Places that are poorly ventilated or subject to humidity of over 60%
To prevent mold or mildew, take the camera out of storage at least once a month.
Turn the camera on and release the shutter a few times before putting the camera
away again.
Be sure to read and follow the warnings given in “ The Battery” (F4) of ”Caring for
the Products” to store the battery.

7/28/2019 Cool Pix Camera Manual AW100EN_Manual
http://slidepdf.com/reader/full/cool-pix-camera-manual-aw100enmanual 223/242
T e c h ni c a l N o t e s a
n d I n d ex
F9
USER LICENSE AGREEMENT FOR MAP DATA AND LOCATION NAME DATA
The map data and location name data that arestored in this digital camera (“Data”) is providedfor your personal, internal use only and not forresale. It is protected by copyright, and issubject to the following terms and conditions
which are agreed to by you, on the one hand,and Nikon Corporation (“Nikon”) and itslicensors (including their licensors andsuppliers) on the other hand.
For information on copyrights and licensors,refer to “Notices related to licensed softwarecopyright holders.” (F11).
Terms and Conditions
Personal Use Only. You agree to use this Datatogether with this digital camera and the imagedata taken by the digital camera for the solelypersonal, non-commercial purposes for whichyou were licensed, and not for service bureau,time-sharing or other similar purposes.Accordingly, but subject to the restrictions setforth in the following paragraphs, you agree notto otherwise reproduce, copy, modify,decompile, disassemble or reverse engineer anyportion of this Data, and may not transfer or
distribute it in any form, for any purpose, exceptto the extent permitted by mandatory laws.Restrictions. Except where you have beenspecifically licensed to do so by Nikon, andwithout limiting the preceding paragraph, youmay not (a) use this Data with any products,systems, or applications installed or otherwiseconnected to or in communication withvehicles, capable of vehicle navigation,positioning, dispatch, real time route guidance,fleet management or similar applications; or (b)with or in communication with any positioningdevices or any mobile or wireless-connectedelectronic or computer devices, includingwithout limitation cellular phones, palmtop andhandheld computers, pagers, and personaldigital assistants or PDAs.Warning. The Data may contain inaccurate orincomplete information due to the passage of time, changing circumstances, sources usedand the nature of collecting comprehensivegeographic data, any of which may lead toincorrect results.
No Warranty. This Data is provided to you “as is,”and you agree to use it at your own risk. Nikonand its licensors (and their licensors andsuppliers) make no guarantees, representationsor warranties of any kind, express or implied,
arising by law or otherwise, including but notlimited to, content, quality, accuracy,completeness, effectiveness, reliability, fitnessfor a particular purpose, usefulness, use orresults to be obtained from this Data, or that theData or server will be uninterrupted or error-free.Disclaimer of Warranty: NIKON AND ITSLICENSORS (INCLUDING THEIR LICENSORS ANDSUPPLIERS) DISCLAIM ANY WARRANTIES,EXPRESS OR IMPLIED, OF QUALITY,
PERFORMANCE, MERCHANTABILITY, FITNESSFOR A PARTICULAR PURPOSE OR NON-INFRINGEMENT. Some States, Territories andCountries do not allow certain warrantyexclusions, so to that extent the aboveexclusion may not apply to you.Disclaimer of Liability: NIKON AND ITSLICENSORS (INCLUDING THEIR LICENSORS ANDSUPPLIERS) SHALL NOT BE LIABLE TO YOU: INRESPECT OF ANY CLAIM, DEMAND OR ACTION,IRRESPECTIVE OF THE NATURE OF THE CAUSE
OF THE CLAIM, DEMAND OR ACTION ALLEGINGANY LOSS, INJURY OR DAMAGES, DIRECT ORINDIRECT, WHICH MAY RESULT FROM THE USEOR POSSESSION OF THE INFORMATION; OR FORANY LOSS OF PROFIT, REVENUE, CONTRACTS ORSAVINGS, OR ANY OTHER DIRECT, INDIRECT,INCIDENTAL, SPECIAL OR CONSEQUENTIALDAMAGES ARISING OUT OF YOUR USE OF ORINABILITY TO USE THIS INFORMATION, ANYDEFECT IN THE INFORMATION, OR THE BREACHOF THESE TERMS OR CONDITIONS, WHETHER INAN ACTION IN CONTRACT OR TORT OR BASED
ON A WARRANTY, EVEN IF NIKON OR ITSLICENSORS HAVE BEEN ADVISED OF THEPOSSIBILITY OF SUCH DAMAGES. Some States, Territories and Countries do not allow certainliability exclusions or damages limitations, so tothat extent the above may not apply to you.

7/28/2019 Cool Pix Camera Manual AW100EN_Manual
http://slidepdf.com/reader/full/cool-pix-camera-manual-aw100enmanual 224/242
F10
USER LICENSE AGREEMENT FOR MAP DATA AND LOCATION NAME DATA
T ec h ni c a l N ot es a
nd I nd ex
Export Control. You agree not to export fromanywhere any part of the Data or any directproduct thereof except in compliance with, andwith all licenses and approvals required under,applicable export laws, rules and regulations,including but not limited to the laws, rules andregulations administered by the Office of Foreign Assets Control of the U.S. Departmentof Commerce and the Bureau of Industry andSecurity of the U.S. Department of Commerce. To the extent that any such export laws, rules orregulations prohibit Nikon and its licensors fromcomplying with any of its obligations hereunderto deliver or distribute Data, such failure shall beexcused and shall not constitute a breach of thisAgreement.Entire Agreement. These terms and conditionsconstitute the entire agreement between Nikon
(and its licensors, including their licensors andsuppliers) and you pertaining to the subjectmatter hereof, and supersedes in their entiretyany and all written or oral agreementspreviously existing between us with respect tosuch subject matter.Governing Law. The above terms andconditions shall be governed by the laws of theJapan, without giving effect to (i) its conflict of laws provisions, or (ii) the United NationsConvention for Contracts for the International
Sale of Goods, which is explicitly excluded;provided that in the event that the laws of theJapan is not deemed applicable to thisAgreement for any reason in the country whereyou obtained the Data, this Agreement shall begoverned with the laws of the country whereyou obtained the Data. You agree to submit tothe jurisdiction of Japan for any and all disputes,claims and actions arising from or in connectionwith the Data provided to you hereunder.
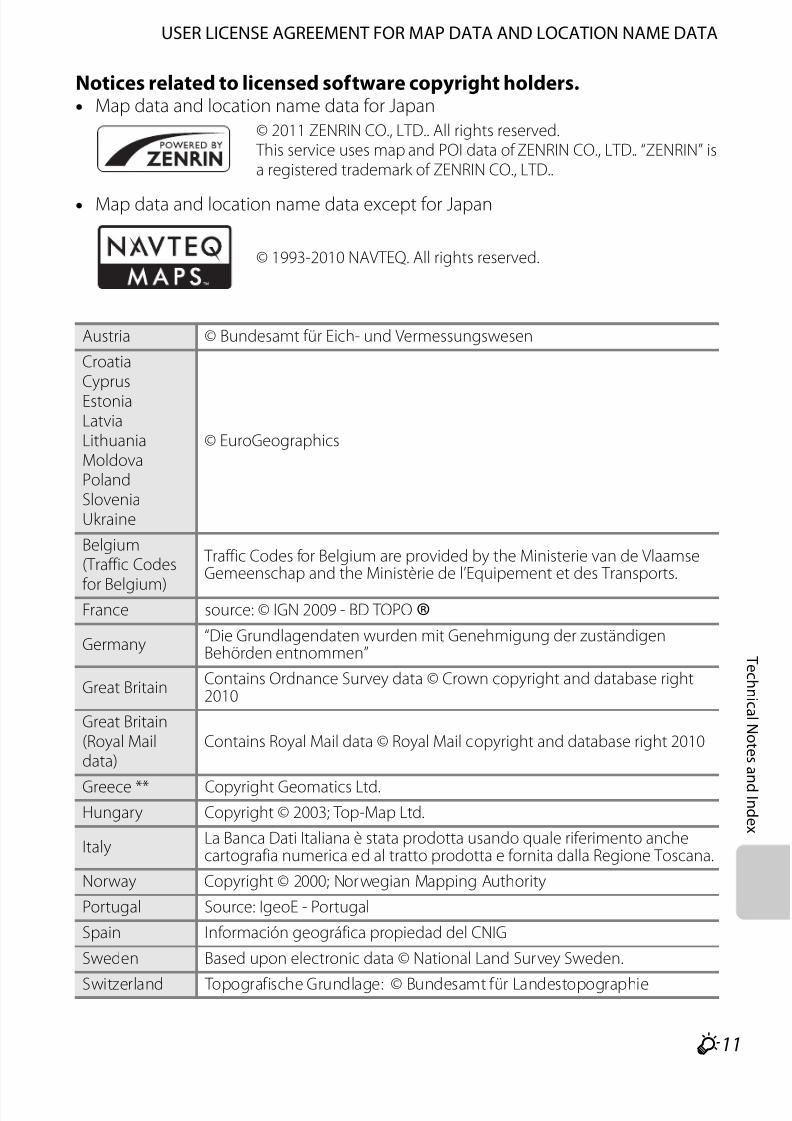
7/28/2019 Cool Pix Camera Manual AW100EN_Manual
http://slidepdf.com/reader/full/cool-pix-camera-manual-aw100enmanual 225/242
F11
USER LICENSE AGREEMENT FOR MAP DATA AND LOCATION NAME DATA
T e c h ni c a l N o t e s a
n d I n d ex
Notices related to licensed software copyright holders.• Map data and location name data for Japan
• Map data and location name data except for Japan
© 2011 ZENRIN CO., LTD.. All rights reserved. This service uses map and POI data of ZENRIN CO., LTD.. “ZENRIN” isa registered trademark of ZENRIN CO., LTD..
© 1993-2010 NAVTEQ. All rights reserved.
Austria © Bundesamt für Eich- und Vermessungswesen
CroatiaCyprusEstoniaLatviaLithuaniaMoldovaPolandSloveniaUkraine
© EuroGeographics
Belgium(Traffic Codes
for Belgium)
Traffic Codes for Belgium are provided by the Ministerie van de VlaamseGemeenschap and the Ministèrie de l’Equipement et des Transports.
France source: © IGN 2009 - BD TOPO ®Germany
“Die Grundlagendaten wurden mit Genehmigung der zuständigenBehörden entnommen”
Great BritainContains Ordnance Survey data © Crown copyright and database right2010
Great Britain(Royal Maildata)
Contains Royal Mail data © Royal Mail copyright and database right 2010
Greece ** Copyright Geomatics Ltd.Hungary Copyright © 2003; Top-Map Ltd.
ItalyLa Banca Dati Italiana è stata prodotta usando quale riferimento anchecartografia numerica ed al tratto prodotta e fornita dalla Regione Toscana.
Norway Copyright © 2000; Norwegian Mapping Authority
Portugal Source: IgeoE - Portugal
Spain Información geográfica propiedad del CNIG
Sweden Based upon electronic data © National Land Survey Sweden.
Switzerland Topografische Grundlage: © Bundesamt für Landestopographie

7/28/2019 Cool Pix Camera Manual AW100EN_Manual
http://slidepdf.com/reader/full/cool-pix-camera-manual-aw100enmanual 226/242
F12
USER LICENSE AGREEMENT FOR MAP DATA AND LOCATION NAME DATA
T ec h ni c a l N ot es a
nd I nd ex
Canada
This data includes information taken with permission from Canadianauthorities, including © Her Majesty the Queen in Right of Canada,© Queen’s Printer for Ontario, © Canada Post Corporation, GeoBase ®,© The Department of Natural Resources Canada. All rights reserved.
Mexico Fuente: INEGI (Instituto Nacional de Estadística y Geografía.)
United States© United States Postal Service ® 2010. Prices are not established,controlled or approved by the United States Postal Service ®. Thefollowing trademarks and registrations are owned by the USPS: UnitedStates Postal Service, USPS, and ZIP+4.
Australia
© Hema Maps Pty. Ltd, 2010.Copyright. Based on data provided under license from PSMA AustraliaLimited (www.psma.com.au).Product incorporates data which is © 2010 Telstra Corporation Limited, GMHolden Limited, Intelematics Australia Pty Ltd, NAVTEQ International LLC,Sentinel Content Pty Limited and Continental Pty Ltd.
Israel © Survey of Israel data source
Jordan © Royal Jordanian Geographic Centre
Mozambique Certain Data for Mozambique provided by Cenacarta © 2010 by Cenacarta
Réunion source: © IGN 2009 - BD TOPO ®Ecuador
INSTITUTO GEOGRAFICO MILITAR DEL ECUADRO AUTORIZACION N° IGM-2011-01- PCO-01 DEL 25 DE ENERO DE 2011
Guadeloupe source: © IGN 2009 - BD TOPO ®Guatemala
Aprobado por el INSTITUTO GEOGRAFICO NACIONAL - Resolución del IGNN° 186-2011
French Guiana source: © IGN 2009 - BD TOPO ®Martinique source: © IGN 2009 - BD TOPO ®Mexico Fuente: INEGI (Instituto Nacional de Estadística y Geografía)

7/28/2019 Cool Pix Camera Manual AW100EN_Manual
http://slidepdf.com/reader/full/cool-pix-camera-manual-aw100enmanual 227/242
T e c h ni c a l N o t e s a
n d I n d ex
F13
Troubleshooting
If the camera fails to function as expected, check the list of common problems
below before consulting your retailer or Nikon-authorized service representative.
Refer to the page numbers in the right-most column for more information.
•See “Error Messages” (E88) for more information.
Power, Display and Settings Issues
Problem Cause/Solution A
Camera turns off without warning.
• Battery is exhausted.• Camera has turned off automatically by auto off to save
power.• Inside of the camera has become hot. Leave the camera
off until the inside of the camera has cooled.• At low temperatures, the camera and the battery may not
function normally.
2223
–
F4
Monitor is blank.
• Camera is off.• Battery is exhausted.• Standby mode for saving power: press the power switch,
the shutter-release button, A button,c button, orb (emovie-record) button.
• Camera and computer are connected via USB cable.• Camera and TV are connected via A/V cable or HDMI
cable.
232223
7373
Monitor is hard tosee.
• Adjust monitor brightness.• Monitor is dirty. Clean monitor.
94F2
Date and time of recording are notcorrect.
• If the camera clock has not been set (“Date not set”indicator blinks during shooting), still pictures have a timestamp of “00/00/0000 00:00”; and movies are dated “01/ 01/2011 00:00.” Set the correct date and time using Timezone and date in the setup menu.
• The camera clock is not as accurate as a normal clock,such as watches. Check camera clock regularly againstmore accurate timepieces and reset as required.
24, 94
94
No informationdisplayed inmonitor.
Hide info is selected for Photo info under Monitorsettings in the setup menu.
94
Print date notavailable.
Time zone and date in the setup menu has not been set. 24, 94
Date notappearing onpictures evenwhen Print date isenabled.
• A shooting mode that does not support print date isselected.
• Another function that is set now is restricting the printdate.
• The date cannot be imprinted onto a movie.
94
63
–
Camera settingsreset.
Clock battery is exhausted; all settings were restored to theirdefault values.
25
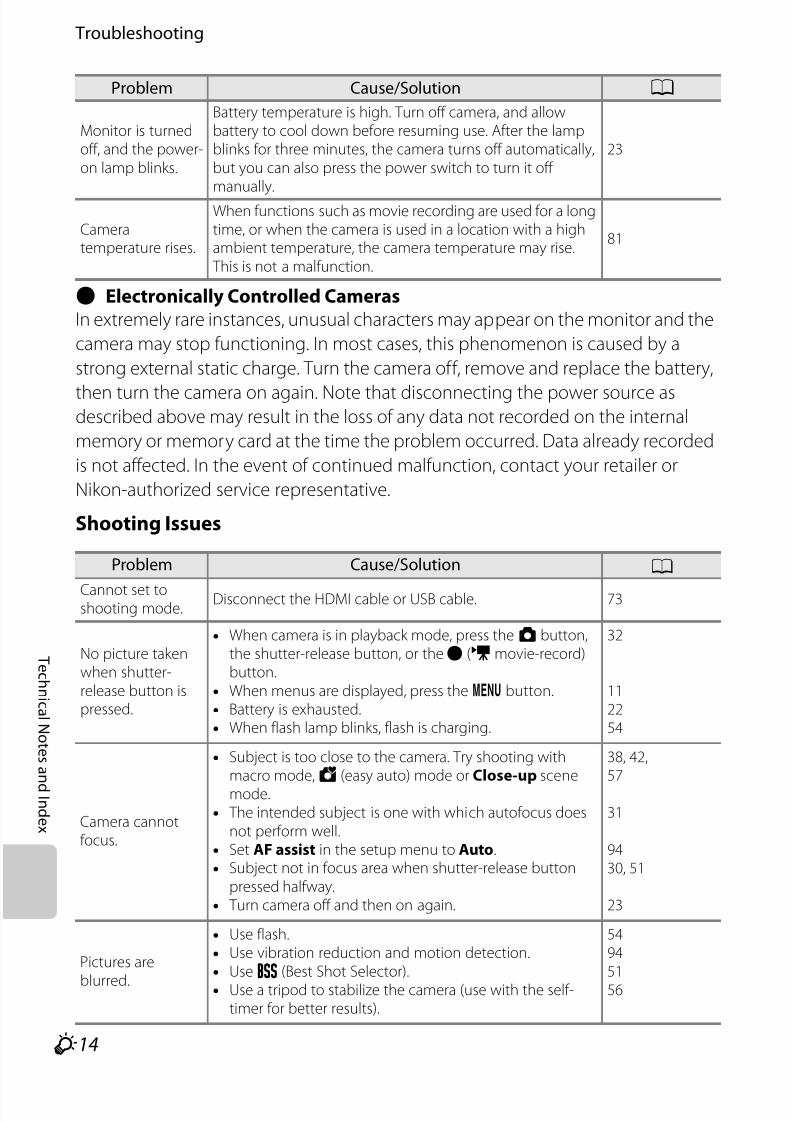
7/28/2019 Cool Pix Camera Manual AW100EN_Manual
http://slidepdf.com/reader/full/cool-pix-camera-manual-aw100enmanual 228/242
F14
Troubleshooting
T ec h ni c a l N ot es a
nd I nd ex
b Electronically Controlled Cameras
In extremely rare instances, unusual characters may appear on the monitor and the
camera may stop functioning. In most cases, this phenomenon is caused by a
strong external static charge. Turn the camera off, remove and replace the battery,
then turn the camera on again. Note that disconnecting the power source asdescribed above may result in the loss of any data not recorded on the internal
memory or memory card at the time the problem occurred. Data already recorded
is not affected. In the event of continued malfunction, contact your retailer or
Nikon-authorized service representative.
Shooting Issues
Monitor is turnedoff, and the power-on lamp blinks.
Battery temperature is high. Turn off camera, and allowbattery to cool down before resuming use. After the lampblinks for three minutes, the camera turns off automatically,but you can also press the power switch to turn it off manually.
23
Cameratemperature rises.
When functions such as movie recording are used for a longtime, or when the camera is used in a location with a highambient temperature, the camera temperature may rise. This is not a malfunction.
81
Problem Cause/Solution A
Cannot set toshooting mode.
Disconnect the HDMI cable or USB cable. 73
No picture takenwhen shutter-release button ispressed.
• When camera is in playback mode, press the A button,the shutter-release button, or theb (emovie-record)button.
• When menus are displayed, press thed button.• Battery is exhausted.• When flash lamp blinks, flash is charging.
32
112254
Camera cannotfocus.
• Subject is too close to the camera. Try shooting withmacro mode, G (easy auto) mode or Close-up scenemode.
• The intended subject is one with which autofocus doesnot perform well.
• Set AF assist in the setup menu to Auto.• Subject not in focus area when shutter-release button
pressed halfway.• Turn camera off and then on again.
38, 42, 57
31
9430, 51
23
Pictures are
blurred.
• Use flash.• Use vibration reduction and motion detection.• UseD (Best Shot Selector).• Use a tripod to stabilize the camera (use with the self-
timer for better results).
54945156
Problem Cause/Solution A

7/28/2019 Cool Pix Camera Manual AW100EN_Manual
http://slidepdf.com/reader/full/cool-pix-camera-manual-aw100enmanual 229/242

7/28/2019 Cool Pix Camera Manual AW100EN_Manual
http://slidepdf.com/reader/full/cool-pix-camera-manual-aw100enmanual 230/242
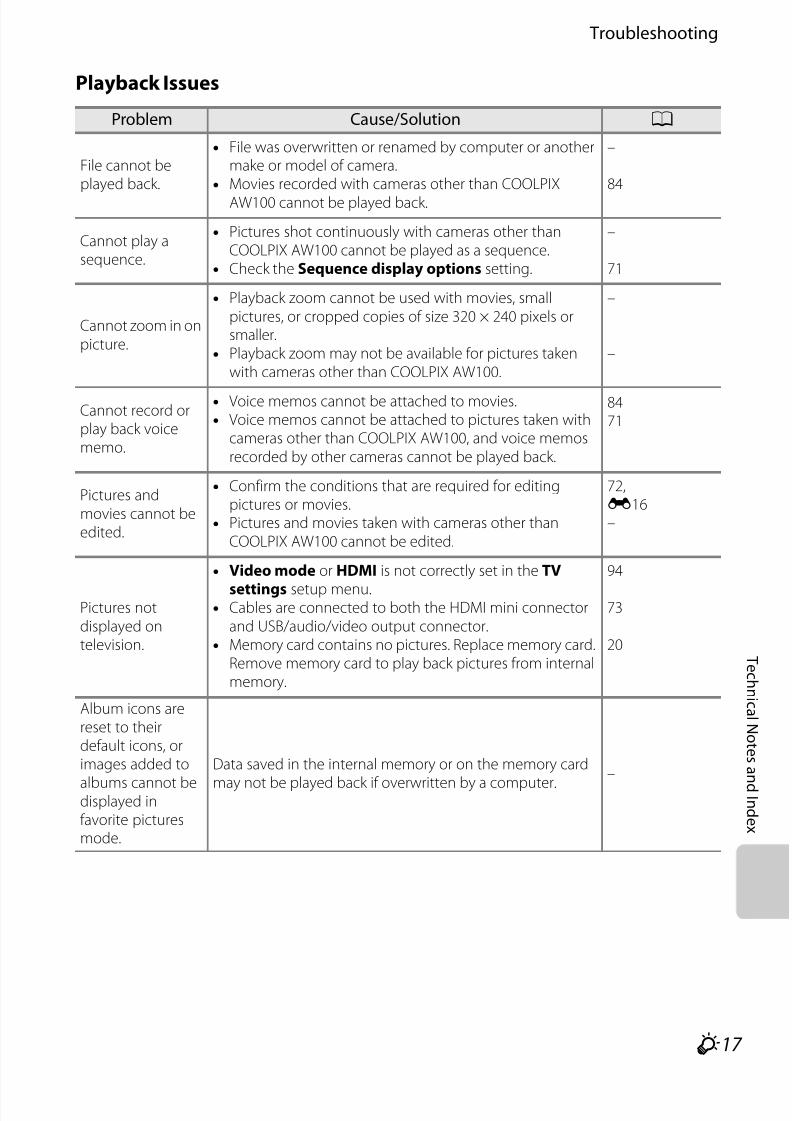
7/28/2019 Cool Pix Camera Manual AW100EN_Manual
http://slidepdf.com/reader/full/cool-pix-camera-manual-aw100enmanual 231/242
F17
Troubleshooting
T e c h ni c a l N o t e s a
n d I n d ex
Playback Issues
Problem Cause/Solution A
File cannot beplayed back.
• File was overwritten or renamed by computer or anothermake or model of camera.
• Movies recorded with cameras other than COOLPIXAW100 cannot be played back.
–
84
Cannot play asequence.
• Pictures shot continuously with cameras other thanCOOLPIX AW100 cannot be played as a sequence.
• Check the Sequence display options setting.
–
71
Cannot zoom in onpicture.
• Playback zoom cannot be used with movies, smallpictures, or cropped copies of size 320 × 240 pixels orsmaller.
• Playback zoom may not be available for pictures takenwith cameras other than COOLPIX AW100.
–
–
Cannot record orplay back voicememo.
• Voice memos cannot be attached to movies.• Voice memos cannot be attached to pictures taken with
cameras other than COOLPIX AW100, and voice memosrecorded by other cameras cannot be played back.
8471
Pictures andmovies cannot beedited.
• Confirm the conditions that are required for editingpictures or movies.
• Pictures and movies taken with cameras other thanCOOLPIX AW100 cannot be edited.
72,E16–
Pictures notdisplayed ontelevision.
• Video mode or HDMI is not correctly set in the TV
settings setup menu.• Cables are connected to both the HDMI mini connector
and USB/audio/video output connector.• Memory card contains no pictures. Replace memory card.
Remove memory card to play back pictures from internalmemory.
94
73
20
Album icons arereset to theirdefault icons, orimages added to
albums cannot bedisplayed infavorite picturesmode.
Data saved in the internal memory or on the memory card
may not be played back if overwritten by a computer.–

7/28/2019 Cool Pix Camera Manual AW100EN_Manual
http://slidepdf.com/reader/full/cool-pix-camera-manual-aw100enmanual 232/242
F18
Troubleshooting
T ec h ni c a l N ot es a
nd I nd ex
The saved imagesare not displayedin auto sort mode.
• The desired image was sorted to a category other thanthe category currently displayed.
• Images saved by cameras other than COOLPIX AW100and images copied using the Copy option cannot be
displayed in auto sort mode.• Images saved in the internal memory or on the memorycard may not be played back correctly if overwritten by acomputer.
• Up to 999 images and movies in total can be added toeach category. If the desired category already contains999 images or movies in total, new images or moviescannot be added.
70,E12E13
–
E13
Nikon Transfer 2does not startwhen camera isconnected to acomputer.
• Camera is off.• Battery is exhausted.•
USB cable is not correctly connected.• Camera is not recognized by the computer.• Confirm that the operating system used is compatible
with the camera.• Computer is not set to launch Nikon Transfer 2
automatically.For more information on Nikon Transfer 2, refer to helpinformation contained in ViewNX 2.
2322
73–74
77
Pictures to beprinted are notdisplayed.
• Memory card contains no pictures. Replace memory card.• Remove memory card to print pictures from internal
memory.
2021
Cannot selectpaper size withcamera.
Paper size cannot be selected from the camera in thefollowing situations, even for PictBridge compatible printers.Use the printer to select paper size.• The paper size selected using the camera is not
compatible with the printer.• A printer that automatically sets the paper size is being
used.
E26, E27–
Problem Cause/Solution A

7/28/2019 Cool Pix Camera Manual AW100EN_Manual
http://slidepdf.com/reader/full/cool-pix-camera-manual-aw100enmanual 233/242
F19
Troubleshooting
T e c h ni c a l N o t e s a
n d I n d ex
GPS
Problem Cause/Solution A
Unable to identifythe location or ittakes time toidentify thelocation.
• The camera may not be able to identify the location insome shooting environments. To use the GPS feature, usethe camera as much as possible in an open-air area.
• When positioning for the first time, when positioning wasunable to be performed for about two hours, or after thebattery was changed, it takes a few minutes to obtain thepositioning information.
87
87
Unable to recordpositioninformation onshot images.
Whenz ory is displayed on the shooting screen, theposition information is not recorded. Before shootingpictures, make sure that the camera is receiving a GPS signalat sufficient strength.
86
Difference
between theactual shootinglocation andrecorded positioninformation.
The acquired position information may deviate in some
shooting environments. When there is a significantdifference in the signals from the GPS satellite, there couldbe a deviation of up to several hundred meters.
87
An incorrectlocation name isrecorded or thecorrect locationname is notdisplayed.
The desired landmark name is not registered or an incorrectlandmark name is displayed.
–
Unable to updatethe A-GPS file.
• Check the following items.- Whether the memory card is inserted- Whether the A-GPS file is stored in the memory card- Whether the A-GPS file saved in a memory card is more
recent than the A-GPS file saved in the camera- Whether the A-GPS file is still valid
• The A-GPS file may be corrupted. Download the file fromthe website once more.
–
E57
Unable to save logdata.
• Be sure that a memory card is inserted in the camera.
• Up to 36 log data events can be recorded in a day.• Up to 100 log data events can be stored on a single
memory card. Delete log data that is no longer requiredfrom a memory card or replace the memory card with anew one.
–
–E63

7/28/2019 Cool Pix Camera Manual AW100EN_Manual
http://slidepdf.com/reader/full/cool-pix-camera-manual-aw100enmanual 234/242
T ec h ni c a l N ot es a nd I nd ex
F20
Specifications
Nikon COOLPIX AW100 Digital Camera
Type Compact digital camera
Effective pixels 16.0 million
Image sensor 1/2.3-in. type CMOS; approx. 16.79 million total pixels
Lens 5× optical zoom, NIKKOR lens
Focal length5.0-25.0mm (angle of view equivalent to that of 28-140 mmlens in 35mm [135] format)
f/-number f/3.9-4.8
Construction 12 elements in 10 groups (including 2 ED lens elements)
Digital zoomUp to 4× (angle of view equivalent to that of approx. 560 mm lensin 35mm [135] format)
Vibration reductionLens shift and electronic VR methods (still pictures)Lens shift method (movies)
Autofocus (AF) Contrast-detect AF
Focus range (fromlens)
• Approx. 50 cm (1 ft 8 in.) to ∞ (f); approx. 1 m (3 ft 4 in.) to∞ (g)
• Macro mode: 1 cm (0.4 in.) (at a wide-angle zoom positionbeyondG) to∞
Focus-area selectionFace priority, auto (9-area automatic selection), center, manualwith 99 focus areas, subject tracking
Monitor7.5 cm (3-in.), approx. 460k-dot, wide viewing angle TFT LCDmonitor with anti-reflection coating and 5-level brightness
adjustmentFrame coverage(shooting mode)
Approx. 98% horizontal and 98% vertical (compared to actualpicture)
Frame coverage(playback mode)
Approx. 100% horizontal and 100% vertical (compared toactual picture)
Storage
MediaInternal memory (approx. 83 MB),SD/SDHC/SDXC memory card
File system DCF, Exif 2.3, and DPOF compliant
File formatsStill pictures: JPEGSound files (voice memo): WAV Movies: MOV (Video: H.264/MPEG-4 AVC, Audio: AAC stereo)
Image size(pixels)
• 16 M (High) 4608×3456P
• 16 M 4608×3456
• 12 M 4000×3000
• 8 M 3264×2448
• 5 M 2592×1944
• 3 M 2048×1536
• PC 1024×768
• VGA 640×480
• 16:9 4608×2592
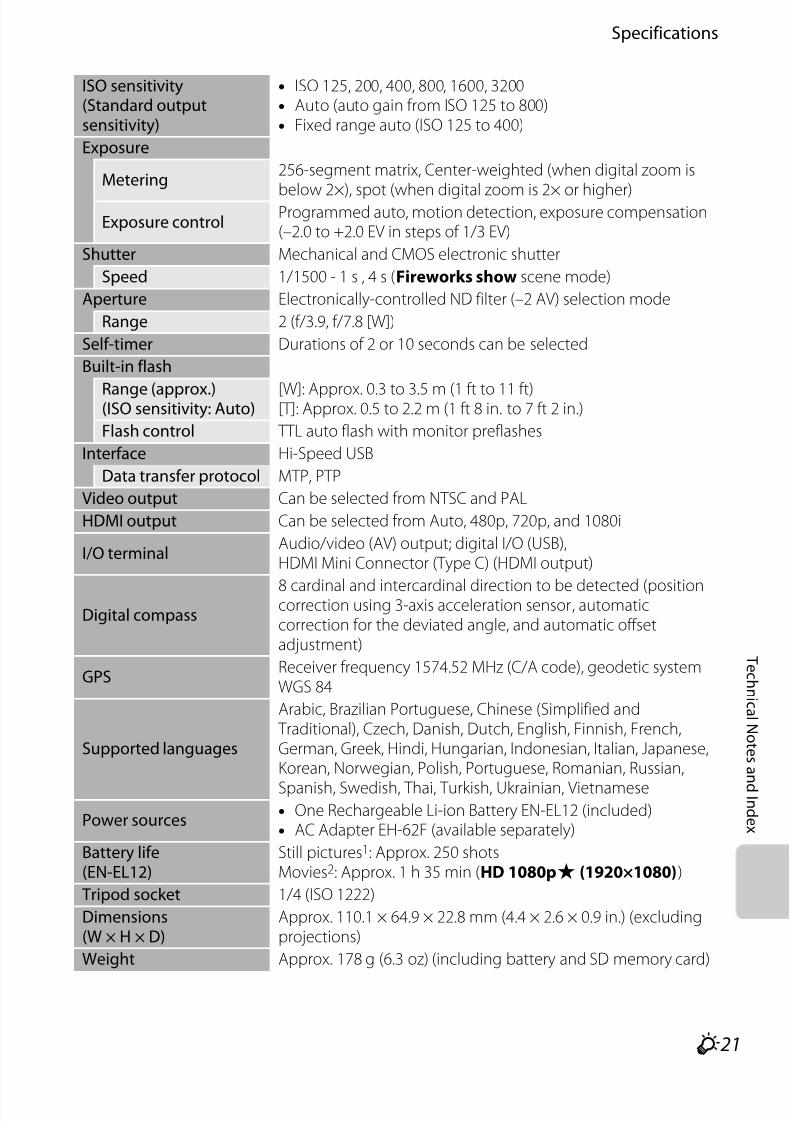
7/28/2019 Cool Pix Camera Manual AW100EN_Manual
http://slidepdf.com/reader/full/cool-pix-camera-manual-aw100enmanual 235/242
F21
Specifications
T e c h ni c a l N o t e s a n d I n d ex
ISO sensitivity(Standard outputsensitivity)
• ISO 125, 200, 400, 800, 1600, 3200• Auto (auto gain from ISO 125 to 800)• Fixed range auto (ISO 125 to 400)
Exposure
Metering256-segment matrix, Center-weighted (when digital zoom is
below 2×), spot (when digital zoom is 2× or higher)Exposure control
Programmed auto, motion detection, exposure compensation(–2.0 to +2.0 EV in steps of 1/3 EV)
Shutter Mechanical and CMOS electronic shutter
Speed 1/1500 - 1 s , 4 s (Fireworks show scene mode)
Aperture Electronically-controlled ND filter (–2 AV) selection mode
Range 2 (f/3.9, f/7.8 [W])
Self-timer Durations of 2 or 10 seconds can be selected
Built-in flash
Range (approx.)(ISO sensitivity: Auto)
[W]: Approx. 0.3 to 3.5 m (1 ft to 11 ft)[T]: Approx. 0.5 to 2.2 m (1 ft 8 in. to 7 ft 2 in.)
Flash control TTL auto flash with monitor preflashes
Interface Hi-Speed USB
Data transfer protocol MTP, PTP
Video output Can be selected from NTSC and PAL
HDMI output Can be selected from Auto, 480p, 720p, and 1080i
I/O terminalAudio/video (AV) output; digital I/O (USB),HDMI Mini Connector (Type C) (HDMI output)
Digital compass8 cardinal and intercardinal direction to be detected (positioncorrection using 3-axis acceleration sensor, automaticcorrection for the deviated angle, and automatic offsetadjustment)
GPSReceiver frequency 1574.52 MHz (C/A code), geodetic systemWGS 84
Supported languages
Arabic, Brazilian Portuguese, Chinese (Simplified and Traditional), Czech, Danish, Dutch, English, Finnish, French,German, Greek, Hindi, Hungarian, Indonesian, Italian, Japanese,Korean, Norwegian, Polish, Portuguese, Romanian, Russian,
Spanish, Swedish, Thai, Turkish, Ukrainian, Vietnamese
Power sources• One Rechargeable Li-ion Battery EN-EL12 (included)• AC Adapter EH-62F (available separately)
Battery life(EN-EL12)
Still pictures1: Approx. 250 shotsMovies2: Approx. 1 h 35 min (HD 1080pP (1920×1080))
Tripod socket 1/4 (ISO 1222)
Dimensions(W × H × D)
Approx. 110.1 × 64.9 × 22.8 mm (4.4 × 2.6 × 0.9 in.) (excludingprojections)
Weight Approx. 178 g (6.3 oz) (including battery and SD memory card)
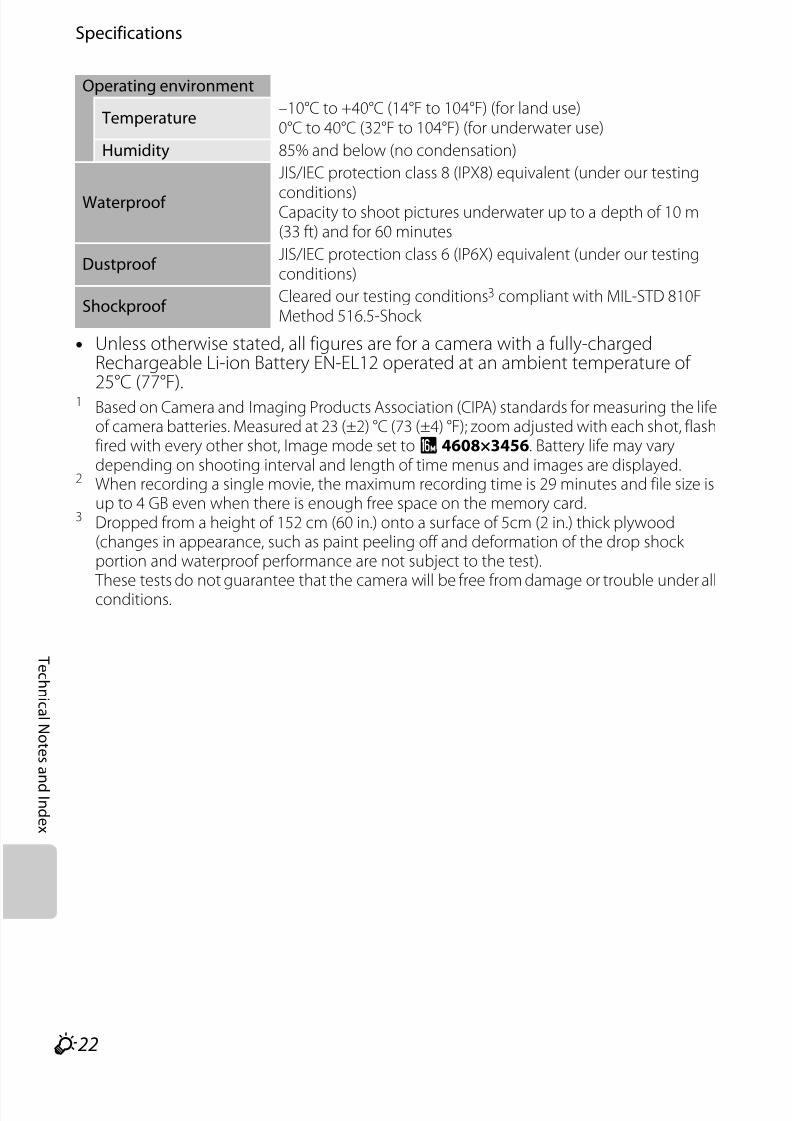
7/28/2019 Cool Pix Camera Manual AW100EN_Manual
http://slidepdf.com/reader/full/cool-pix-camera-manual-aw100enmanual 236/242
F22
Specifications
T ec h ni c a l N ot es a nd I nd ex
• Unless otherwise stated, all figures are for a camera with a fully-chargedRechargeable Li-ion Battery EN-EL12 operated at an ambient temperature of 25°C (77°F).
1 Based on Camera and Imaging Products Association (CIPA) standards for measuring the lifeof camera batteries. Measured at 23 (±2) °C (73 (±4) °F); zoom adjusted with each shot, flashfired with every other shot, Image mode set toP, 4608×3456. Battery life may varydepending on shooting interval and length of time menus and images are displayed.
2 When recording a single movie, the maximum recording time is 29 minutes and file size isup to 4 GB even when there is enough free space on the memory card.
3 Dropped from a height of 152 cm (60 in.) onto a surface of 5cm (2 in.) thick plywood(changes in appearance, such as paint peeling off and deformation of the drop shock portion and waterproof performance are not subject to the test).
These tests do not guarantee that the camera will be free from damage or trouble under allconditions.
Operating environment
Temperature–10°C to +40°C (14°F to 104°F) (for land use)0°C to 40°C (32°F to 104°F) (for underwater use)
Humidity 85% and below (no condensation)
Waterproof
JIS/IEC protection class 8 (IPX8) equivalent (under our testing
conditions)Capacity to shoot pictures underwater up to a depth of 10 m(33 ft) and for 60 minutes
Dustproof JIS/IEC protection class 6 (IP6X) equivalent (under our testingconditions)
Shockproof Cleared our testing conditions3 compliant with MIL-STD 810FMethod 516.5-Shock

7/28/2019 Cool Pix Camera Manual AW100EN_Manual
http://slidepdf.com/reader/full/cool-pix-camera-manual-aw100enmanual 237/242
F23
Specifications
T e c h ni c a l N o t e s a n d I n d ex
Rechargeable Li-ion Battery EN-EL12
Battery Charger MH-65
B Specifications
• Nikon will not be held liable for any errors this manual may contain.
• The appearance of this product and its specifications are subject to change without notice.
Supported Standards• DCF: Design Rule for Camera File System is a standard widely used in the digital
camera industry to ensure compatibility among different makes of camera.
• DPOF: Digital Print Order Format is an industry-wide standard that allows
pictures to be printed at a digital photo lab or with a household printer fromprint orders stored on the memory card.
• Exif version 2.3: This camera supports Exif (Exchangeable Image File Formatfor Digital Still Cameras) version 2.3, a standard that allows information stored
with photographs to be used for optimal color reproduction when images areoutput from Exif-compliant printers.
See the instruction manual of the printer for further details.
• PictBridge: A standard developed cooperatively by the digital camera and
printer industries, allowing photographs to be output directly to a printer
without connecting the camera to a computer.
Type Rechargeable lithium-ion battery
Rated capacity DC 3.7 V, 1050 mAh
Operating temperature –10°C to +40°C (14°F to 104°F)
Dimensions(W × H × D) Approx. 32 × 43.8 × 7.9 mm (1.3 × 1.7 × 0.3 in.) (excludingprojections)
Weight Approx. 22.5 g (0.8 oz) (excluding terminal cover)
Rated input AC 100 to 240 V, 50/60 Hz, 0.08 to 0.05 A
Rated output DC 4.2 V, 0.7 A
Supported rechargeablebattery
Rechargeable Li-ion Battery EN-EL12
Charging time Approx. 2 hours and 30 minutes when no charge remainsOperating temperature 0°C to 40°C (32°F to 104°F)
Dimensions(W × H × D)
Approx. 58 × 27.5 × 80 mm (2.3 × 1.1 × 3.1 in.) (excludingpower cable)
Length of power cable Approx. 1.8 m (6 ft)
Weight Approx. 70 g (2.5 oz) (excluding power cable)
7/28/2019 Cool Pix Camera Manual AW100EN_Manual
http://slidepdf.com/reader/full/cool-pix-camera-manual-aw100enmanual 238/242
F24
T ec h ni c a l N ot es a
nd I nd ex
Index
SymbolsR E6k Apply selection button 5, 10A Auto mode 51
F Auto sort mode 70,E12l Delete button 4, 5, 34,E49G Easy auto mode 38o Exposure compensation 58h Favorite pictures mode 70,E9m Flash mode 54h Image thumbnail display 33C List by Date Mode 70,E14pMacro mode 57
dMenu button 4, 5, 11b (emovie-record) button 80c Playback button 4, 5, 32i Playback zoom 33C Scene mode 39n Self-timer 56A Shooting mode button 9, 26F Smart portrait mode 49g Tele 29fWide 29.JPGE85.MOV E85.WAV E85
AA/V cableE87AC adapter 17,E87Action button 13Action control 13Action control response 95,E77AF area mode 52,E38AF assist 95,E75AlbumE9,E11Assign action button 96,E81Attaching the camera strap 14Audio/video cable 73,E22Audio/video-in jack 73,E22Auto 55Auto mode 51
Auto off 95,E77Auto sort mode 70,E12Autofocus 52, 57,E41,E56Autofocus mode 52, 83,E41,E56
AV cable 73,E22
BBacklightingR 44Battery 16, 18,E87Battery charger 16,E87Battery level indicator 22Battery-chamber/memory card slot cover18, 20BeachZ 41
Best shot selector 52,E36Black and white copy n 43Blink proof 50,E33Blink warning 96,E80BSS 52,E36Button soundE76
CCalendar Display 33Camera strap for land use 14
Charger 16,E87Choose key picture 72, E51Close-up k 42Compression ratio 61Computer 73Continuous 52,E36CropE21,E30
DDate and time 24,E67
Date imprint 94,E72Daylight saving time 25Delete 34, 84,E49Digital zoom 29, 95,E75Direct PrintE24Displaying map 13D-Lighting 71,E17DPOF printingE29DSCNE85

7/28/2019 Cool Pix Camera Manual AW100EN_Manual
http://slidepdf.com/reader/full/cool-pix-camera-manual-aw100enmanual 239/242
Index
F25
T e c h ni c a l N o t e s a
n d I n d ex
Dusk/dawn i 42
EEasy auto shooting menu 38Easy panorama 45,E2Editing ImagesE15
Editing moviesE30Exposure compensation 58ExtensionE85Extracting parts of the movie 84Eyelet for camera strap 14
FFace detection 65Face priority 52,E38Favorite pictures 72,E9
Favorite pictures mode 70,E9Features that cannot be usedsimultaneously 63File nameE85Fill flash 55Filter adapter 14Filter effects 71,E19Fireworks show m 43Firmware version 96,E84Flash 54Flash mode 54Focus 30, 52,E38,E41Focus area 52,E38Focus lock 67Folder nameE85Food u 43Format 20, 96,E78Format the internal memory 96,E78Format the memory card 20,E78
FSCNE85Full-time AF 52,E41,E56
GGlamour retouch 71,E18
HHDMI 96, E22, E79HDMI device control 96,E79HDMI mini connector 73,E22
HS movie 83,E53,E54
IIdentifierE85Image copy 71,E50Image mode 61, 62
ISO sensitivity 52,E37LLandscape c 40Language 96,E78Lens 28,F20Li-ion rechargeable battery 16, E87List by date mode 70,E14Lithium-ion type batteryE87
MMacro mode 57Memory capacity 22Memory card 20, 21Memory card slot 20Microphone 71, 83,E49Monitor 6, 8,F7Monitor brightness 94,E70Monitor settings 94,E70Motion detection 95,E74
Movie length 82Movie light 83,E56Movie options 83,E52Movie recording 80Multi selector 4, 5, 10, 53Multi-shot 16 52,E36Museum l 43
NNight landscape j 42
Night portraite
41Number of exposures remaining 22, 62
OOff 55Open with HS footage 83, E53Operation sound 95,E76Optical zoom 29Optional accessoriesE87

7/28/2019 Cool Pix Camera Manual AW100EN_Manual
http://slidepdf.com/reader/full/cool-pix-camera-manual-aw100enmanual 240/242
F26
Index
T ec h ni c a l N ot es a
nd I nd ex
PPanorama assist 45,E5Panorama p 45Paper sizeE26,E27Party/indoor f 41
Pet portraitO 46Photo info 94,E70PictBridgeE24,F23Playback 32, 70, 84,E49Playback menu 71Playback modes 70Playback zoom 33Playing back movies 84Portrait b 40Power 22, 23, 24
Power switch/Power-on lamp 23Preset manualE35PrintE24,E26,E27Print order 71,E42Print Order Date OptionE43Printer 73, E24Protect 71,E46
QQuick retouch 71, E17
RRechargeable battery 16, E87Recording slow motion moviesE54Red-eye reduction 55Remove from favorites 72,E10Reset all 96, E81Rotate image 71,E48RSCNE85
SScene mode 39, 40Selecting picturesE47Self-timer 56Self-timer lamp 56SequenceE7Sequence display options 72,E51Setup menu 94Shooting 26Shooting menu 51
Shutter sound 95,E76Shutter-release button 4, 5, 30Single 52,E36Single AF 52,E41,E56Skin softening 50, 66, E32
Slide show 71,E
45Slow sync 55Small picture 71,E20Smart portrait menu 50Smart portrait mode 49Smile timer 50,E32Snowz 41Sound settings 95,E76Special effects menu 48Special effects mode 47
Sports d 40SSCNE85Subject tracking 52,E39,E40Sunset h 41
T Tele 29 Thumbnail Playback 33 Time differenceE69 Time zone 24,E69
Time zone and date 24, 94,E67 TV settings 96,E79
UUnderwaterC 46USB cable 73,E25,E87USB/audio/video output connector 73,E22,E25
VVibration reduction 94,E73
Video mode 96Video outputE79ViewNX 2 74Voice memo 71,E49Volume 84
WWelcome screen 94, E66White balance 52,E34

7/28/2019 Cool Pix Camera Manual AW100EN_Manual
http://slidepdf.com/reader/full/cool-pix-camera-manual-aw100enmanual 241/242
Index
F27
T e c h ni c a l N o t e s a
n d I n d ex
Wide 29Wind noise reduction 83,E56
ZZoom 29Zoom buttons 4, 5, 29

7/28/2019 Cool Pix Camera Manual AW100EN_Manual
http://slidepdf.com/reader/full/cool-pix-camera-manual-aw100enmanual 242/242