copyright © 2005 by elsevier inc. all rights reserved. general dentistry chapter 48
TRANSCRIPT
Copyright © 2005 by Elsevier Inc. All rights reserved.
General Dentistry
Chapter 48
Copyright © 2005 by Elsevier Inc. All rights reserved.
Introduction
Restorative and esthetic dentistry
focuses on the general dental
needs of the patient.

Copyright © 2005 by Elsevier Inc. All rights reserved.
Restorative Dentistry
• Specific conditions that initiate a need for restorative dental treatment are:
– Initial or recurring decay
– Replacement of failed restorations
– Abrasion or the wearing away of tooth structure
– Erosion of tooth structure
Copyright © 2005 by Elsevier Inc. All rights reserved.
Esthetic Dentistry
• Specific conditions that initiate a need for esthetic dental treatment are:
– Discoloration due to extrinsic or intrinsic staining
– Anomalies due to developmental disturbances
– Abnormal spacing between teeth
– Trauma

Copyright © 2005 by Elsevier Inc. All rights reserved.
Terminology in Cavity Preparation

Copyright © 2005 by Elsevier Inc. All rights reserved.
Initial Cavity Preparation
• Outline Form
– Design and initial depth of sound tooth structure
• Resistance Form
– Shape and placement of cavity walls
• Retention Form
– To resist displacement or removal
• Convenience Form
– Provides accessibility in preparing restoring tooth
Copyright © 2005 by Elsevier Inc. All rights reserved.
Final Cavity Preparation
• Removal of decayed dentin, or old restorative material
• Insert resistance and retention with the use of hand cutting instruments and burs
• Placement of protective materials (liners, bases, desensitizing or bonding)

Copyright © 2005 by Elsevier Inc. All rights reserved.
Patient Preparation for Restorative Procedures
• Inform the patient what to expect throughout the procedure.
• Position the patient correctly for the dentist and the type of procedure.
• Explain each step to the patient as the procedure progresses.
Copyright © 2005 by Elsevier Inc. All rights reserved.
Responsibilities of the Chairside Assistant
• Prepare the setup for the procedures.
• Know and anticipate the dentist's needs.
• Provide moisture control.
• Transfer dental instruments and accessories.
• Mix and transfer dental materials.
• Maintain patient comfort.

Copyright © 2005 by Elsevier Inc. All rights reserved.
Steps in the Restorative Procedure • Dentist evaluates the tooth to be restored.
• Dentist obtains local anesthesia.
• Assistant readies the type of moisture control.
• Dentist prepares the tooth.
• Dentist determines the type of dental materials.
• Assistant mixes and transfers the dental materials.
• Dentist burnishes, carves, or finishes the dental material.
• Dentist checks the occlusion of the restoration.
• Dentist finishes and polishes the restoration.

Copyright © 2005 by Elsevier Inc. All rights reserved.
Class I Restorations
• Class I lesion affecting the pit and fissures of the teeth
• Surfaces involved are:
– Occlusal pits and fissures of premolars and molars
– Buccal pits and fissures of mandibular molars
– Lingual pits and fissures of the maxillary molars
– Lingual pits of maxillary incisors, most frequently in the pit near the cingulum

Copyright © 2005 by Elsevier Inc. All rights reserved.
Fig. 48-5 Class I restoration

Copyright © 2005 by Elsevier Inc. All rights reserved.
Class II Restorations
• Class II lesion is the extension of the Class I lesion into the proximal surfaces of premolars and molars.
• Surfaces involved:
– Two-surface restoration of posterior teeth
– Three-surface restoration of posterior teeth
– Four- or more surface restoration of posterior teeth

Copyright © 2005 by Elsevier Inc. All rights reserved.
Fig. 48-6 Class II restorations (From Baum L et al: Textbook of operative dentistry, ed 3, Philadelphia, 1995, Saunders.)

Copyright © 2005 by Elsevier Inc. All rights reserved.
Class III and IV Restorations
• Class III Lesion
– Affects the interproximal surface of incisors and canines
• Class IV Lesion
– Involves a larger surface area, which includes the incisal edge and interproximal surface of incisors and canines

Copyright © 2005 by Elsevier Inc. All rights reserved.
Fig. 48-7 Class III restoration (From Baum L et al: Textbook of operative dentistry, ed 3, Philadelphia, 1995, Saunders.)

Copyright © 2005 by Elsevier Inc. All rights reserved.
Fig. 48-8 Class IV restoration (From Baum L et al: Textbook of operative dentistry, ed 3, Philadelphia, 1995, Saunders.)

Copyright © 2005 by Elsevier Inc. All rights reserved.
Class V Restorations
• Class V Restoration
– Classified as a smooth surface restoration
• These decayed lesions occur at:
– Gingival third of the facial or lingual surfaces of any tooth
– Root of a tooth, near the cementoenamel junction

Copyright © 2005 by Elsevier Inc. All rights reserved.
Fig. 48-9 Class V restoration (From Baum L et al: Textbook of operative dentistry, ed 3, Philadelphia, 1995, Saunders.)

Copyright © 2005 by Elsevier Inc. All rights reserved.
Complex Restorations
• Decay has extended beyond normal size or shape
• Retention Pins
– Decay has extended into the cusp of a tooth and undermined the enamel and dentin
– General understanding when using retention pins
• One pin is placed for each missing cusp

Copyright © 2005 by Elsevier Inc. All rights reserved.
Fig. 48-10 Retention pins placed for added retention

Copyright © 2005 by Elsevier Inc. All rights reserved.
Intermediate Restorations
• Restoration placed for a short term
• Primary Factors for Placement
– The health of the tooth
– Waiting to receive a permanent restoration
– Financial reasons

Copyright © 2005 by Elsevier Inc. All rights reserved.
Procedure Fig. 48-5-3 Placement of IRM

Copyright © 2005 by Elsevier Inc. All rights reserved.
Direct Bonded Veneers
• Veneer
– Thin layer of tooth-colored material applied to the facial surface of a prepared tooth
• Used to improve the appearance of teeth that are:
– Abraded
– Eroded
– Discolored with intrinsic stains
– Darkened after endodontic treatment

Copyright © 2005 by Elsevier Inc. All rights reserved.
Fig. 48-11 Veneers placed to reduce brightness and cover stain (From Roberson T et al: Sturdevant’s art and science of operative dentistry,
ed 4, St. Louis, 2002, Mosby.)

Copyright © 2005 by Elsevier Inc. All rights reserved.
Fig. 48-12 Veneers placed to close a diastema (From Roberson T et al: Sturdevant’s art and science of operative dentistry,
ed 4, St. Louis, 2002, Mosby.)

Copyright © 2005 by Elsevier Inc. All rights reserved.
Tooth Whitening
Known as vital bleaching, tooth
whitening is a noninvasive method of
lightening dark or discolored teeth.

Copyright © 2005 by Elsevier Inc. All rights reserved.
Indications for Using a Tooth Whitener
• Indications for Procedure
– Extrinsic stains from foods, cigarette smoking, coffee, or tea
– Aged discolored teeth
– Intrinsic stains, such as mild tetracycline stains and mild fluorosis

Copyright © 2005 by Elsevier Inc. All rights reserved.
Fig. 48-13 Before and after picture of tooth whitening used for extrinsic stains
Copyright © 2005 by Elsevier Inc. All rights reserved.
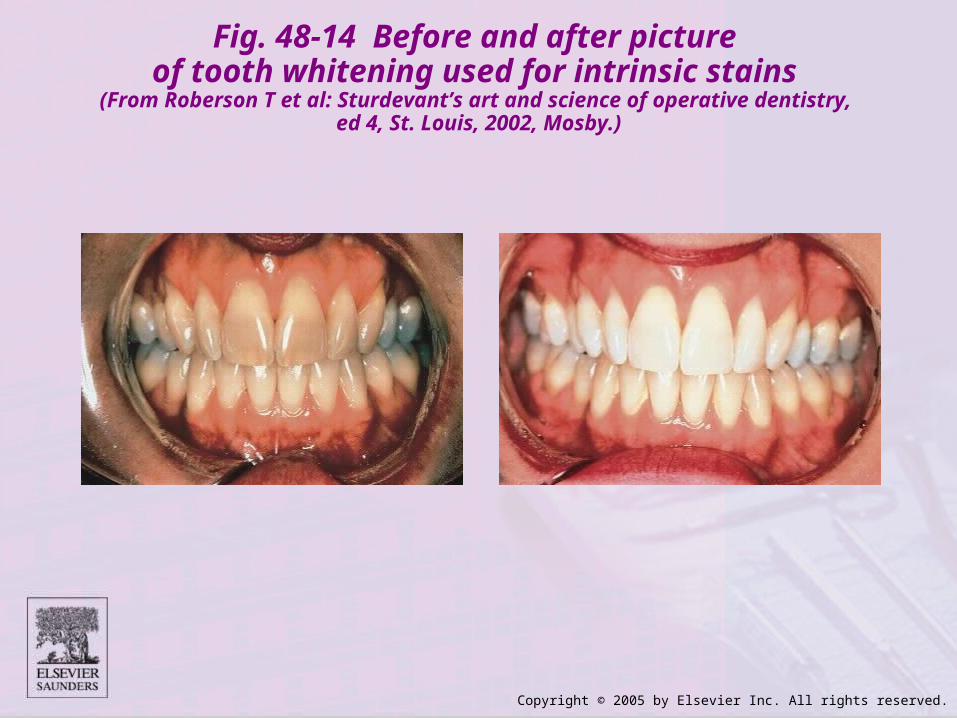
Fig. 48-14 Before and after picture of tooth whitening used for intrinsic stains
(From Roberson T et al: Sturdevant’s art and science of operative dentistry, ed 4, St. Louis, 2002, Mosby.)

Copyright © 2005 by Elsevier Inc. All rights reserved.
Whitening Products
• Chemical Makeup
– Active ingredient
• Either carbamide peroxide or hydrogen peroxide
– Gel base
• With one or a mixture of propylene glycol, glycerin, and water
– Thickener
• Carbopol

Copyright © 2005 by Elsevier Inc. All rights reserved.
At-Home Tooth-Whitening Procedure
• Material placed in a thermoplastic custom tray that the patient wears for a designated period.
– For the 10% to 16% carbamide peroxide gels, the wear schedule would be 1 hour, twice a day for the first week and once a day for the second week
– For the 20% to 22% mixture, 1 hour a day for a 2-week period
– For the hydrogen peroxide 15 to 30 minutes, 2 or 3 times a day for a 2-week period

Copyright © 2005 by Elsevier Inc. All rights reserved.
Tooth-Whitening Strips
• Thin, flexible strips coated with an adhesive hydrogen peroxide whitening gel.
• Application
– Patient peels off the backing like a Band-Aid and presses the strip to the facial anterior teeth.
– The remaining portion of the strip is folded onto the lingual surface.

Copyright © 2005 by Elsevier Inc. All rights reserved.
Possible Complications to Tooth Whitening
• Thermal Hypersensitivity
– Patient may experience sensitivity to heat and cold after removal of tray and material. The use of sensitive-type toothpaste is recommended
• Tissue Irritation
– Gingival tissue exposed to excess gel caused by improper tray fit. Recommend to patient not to overfill tray with material and remove any excess after seating the tray

Copyright © 2005 by Elsevier Inc. All rights reserved.
Dental Assistant's Role in Tooth-Whitening Procedure
• Aid in recording the medical and dental history
• Assist in making shade selection
• Take intraoral photographs before and after
• Take and pour up preliminary impressions for tray
• Fabricate and trim tray
• Provide postoperative instructions
• Assist in weekly or biweekly clinical visits

Copyright © 2005 by Elsevier Inc. All rights reserved.
Patient Instructions for Tooth-Whitening Procedure
• Brush and floss before tray placement.
• Place equal amounts of gel in tray.
• Seat tray.
• Do not eat or drink when wearing the tray.
• Wear tray for the recommended time.
• If the patient experiences any problems, discontinue use and discuss with the dentist.