copyright 2006 les fabrications tjd · this owner’s manual was carefully prepared to allow you to...
TRANSCRIPT

Les Fabrications TJD.
© All rights reserved Les Fabrications TJD, Rivière-du-Loup, G5R 5X9. No copy or reproduction of this manual, in whole or in part is permitted without the explicit consent of Les Fabrications TJD.
Copyright © 2006 Les Fabrications TJD

2
2
TABLE OF CONTENTS Introduction.……………………………………………………....…………………………….….. 2 Advice to Buyer.……………………………………………………....…………………………… 3 Safety Precautions ………………………………………………………………………….…….. 4 Installation...…………………………………………………..…………………………...……….. 6 Use...……………………………………………………………………………....………………... 7 Maintenance, Disassembly………………..…………………………………………..………….. 8 Stabilisation Bar Installation Procedure………………………………………………………… 9 Hub Adaptor Installation Procedure……………………………………………………………… 10 Part List and Exploded view………………………………………………….……………...…… 11 Stabilisation Rod Installation Procedure ……………………………………..….....…… 15 ANNEX – Typical installation according to model of ATV……………………………………...
TECHNICAL SUPPORT
In case of problem covered by your warranty that your local dealer cannot resolve, please contact our customer services at (418) 863-5885.
INTRODUCTION
Les Fabrications TJD thank you for choosing TJD XGEN STS4 tracks, carefully designed to give you complete satisfaction. Designed exclusively for 4-wheel-drive (4X4) ATVs, they are easily installed in about 45 minutes with no modifications to your ATV. The TJD XGEN STS4 tracks are the most advanced tracks in the world. With its unique suspension and its unparalleled maneuverability you get a smooth ride, as well as on tire. You will be able to push back your limit at unequalled levels safely. ATVs equipped with TJD XGEN STS4 tracks can operate over a wider range of terrain and for a longer period of the year. TJD XGEN STS4 tracks are designed to operate on all types of snowy and swampy terrain, sand, slush, mud and hard surfaces.

3
3
ADVICE TO BUYER
This owner’s manual was carefully prepared to allow you to easily mount TJD XGEN STS4 tracks on your ATV and to manipulate them properly and safely, during their installation and while in use.
Read this entire owner’s manual. It will allow you to familiarize yourself with the safety recommendations and the
procedures for mounting and correct use of the tracks; you are also advised to provide this information in its totality to all users of your ATV.
Read the safety and operation recommendations in your ATV owner’s manual. This safety information also
applies to your ATV when equipped with tracks. Consult your local, provincial and national authorities about highway safety code regulations on the use of tracks. Also check with ATV clubs on the use of tracks on local trails.
NOTE: Verify whether your ATV manufacturer authorizes the installation of products other than their own on their
ATVs.
When tracks are transferred (sold), give this manual to the new owner.
NOTE: All illustrations in this manual are provided for reference purposes and are based on the latest available information at the time of publication.
NOTE: The illustrations, specifications, and information contained in this manual are subject to change without
notice. In this owner’s manual this symbol indicates important safety information. When you see this symbol,
carefully read all that follows to avoid the possibility of serious or fatal injury.
In this owner’s manual, this symbol indicates that improper use can cause damage to the vehicle.
In this manual, the right and left sides of the tracks refer to their position in relation to the driver
sitting at the handlebar of the ATV.
4
4
SAFETY PRECAUTIONS
The following safety precautions are important to help you avoid accidents. Most accidents can be avoided
by taking basic precautions. To prevent accidents, carefully read the safety instructions before installing and using your tracks. Tracks must only be used by individuals who have read this owner’s manual as well as the safety instructions.
The most effective safety and preventative measures are based on common sense. Remain calm, alert and on the lookout for potential hazards.
Do not remove warning stickers and replace them if they become illegible.
The safety information in your ATV owner’s manual and highway safety code regulations also apply to the use of tracks (check the regulations for your province or country).
Even when equipped with tracks, only the operator is permitted on the ATV (see ATV owner’s manual and highway safety code regulations).
Never allow children to operate an ATV (see ATV owner’s manual and highway safety code regulations for your province or country), and do not allow an adult to operate an ATV without proper instruction.
Provide all the information on safety, use of the tracks and use of the ATV to all individuals who will be using them.
Make sure that there are no people or domestic animals in the areas you are operating the ATV.
Do not use an ATV while under the influence of alcohol, drugs or other medication. This impairs your faculties, reduces your reaction time and above all increases the risk of potentially serious frostbite in winter.
Users must wear an approved helmet and visor as well as clothing appropriate for the season at all times. Wear them even for very short rides so you will be prepared for the unexpected at all times.
Never place your hands or feet near the tracks when they are in motion in order to avoid serious injury.
Make sure that shirtsleeves, coats, scarves, laces and other articles of clothing or objects cannot get caught in the moving parts of the tracks.
Always carry an emergency first aid kit, a cell phone, a hatchet, a tool kit, safety matches and dry paper, as well as a cable to be prepared under any circumstances.

5
5
Preventive Maintenance
If, for any reason, you must suddenly get off
your ATV, disengage the clutch, apply the hand brake, turn off the engine and remove the key from the ignition.
Be careful when crossing public and private roads. Do not cross private roads without permission. It is illegal to cross railroad tracks.
On unfamiliar terrain, be extra careful and reduce your speed.
When operating your ATV off well-used trails and on isolated terrain watch out for obstacles hidden by the snow: tree stumps, large rocks, fallen trees, fences, ditches and other hazards.
Before leaving on a long ride, familiarize yourself with the operation of the tracks near your home on a level surface. Operating an ATV with tracks is different than with tires.
If your ATV becomes unstable while in use, stop, turn off the engine and determine the cause.
Do not adjust the tracks unless the ATV engine is off and the hand brake applied.
Do not follow the ATV too closely to avoid being hit by debris kicked up by the tracks.
Regularly check all bolts and tighten them if necessary to avoid costly repairs. Make sure that your equipment is in safe operating condition.
To remove ice and snow from the track components, you must first turn off the ATV engine, apply the hand brake and remove the key from the ignition. For safety reasons, do not use your hands or feet to remove snow and ice. Use a piece of wood or any other rigid non-metallic object to dislodge ice or snow.
THIS SYMBOL INDICATES
DANGER TO YOURSELF
OR TO OTHERS
LES FABRICATIONS TJD is not responsible for any changes in the operation of the ATV that could be due to tracks traction.
Respect the towing capacity specified by the ATV manufacturer, even when equipped with tracks. Do not drive over stumps, branches, or rocky terrain as this could damage the tracks or their components.
When you venture off well-used trails or into isolated areas, respect the environment, do not damage vegetation or disturb wildlife.

6
INSTALLATION
Turn off the engine and remove the key from the ignition before installing tracks on your ATV to avoid asphyxiation from exhaust fumes. These fumes are odourless, colourless and can be fatal.
Wear appropriate work clothes while you are installing tracks: safety glasses, steel-toed boots, and gloves.
Make sure that shirtsleeves, coats, scarves, laces and other articles of clothing or objects cannot get caught in the moving parts.
During installation, do not turn the tracks with engine power until they are positioned on the ground and you are in the driver’s seat.
Do not make any adjustments to the tracks unless the engine is off and the hand brake is applied.
Always adjust the ATV’s suspension to its maximum stiffness.
Apply threadlocker (Loctite) to all nuts and bolts.
Correctly adjust the tension so the tracks stay in their proper position on the rollers. When installing tracks on an ATV, choose a clean level surface with good lighting and good ventilation. Put the ATV in neutral (N), turn off the motor, remove the key from the ignition, apply the hand brake and position chocks in front and in back of the wheels that are in contact with the ground, to immobilize the vehicle. You do not need to modify your ATV to install tracks. First identify the front and back tracks, as well as the left and right tracks. If the edges of the fenders are in contact with the tracks, the fenders must be cut back slightly. THE ATV’S SUSPENSION MUST ALWAYS BE AT MAXIMUM STIFNESS WHEN USING THE TRACKS.

7
USE Tracks are designed for use on all types of snow as well as on swampy terrain, sand, slush, mud and hard surfaces. Before each outing, remove snow and ice from the tracks components with a piece of wood or other rigid, non-metallic object, but never hit the components directly. For your security the maximum speed recommended is 25 km/h. Consult your ATV owner’s manual for load weight.
Carefully read the owner’s manual to familiarize yourself with all the safety information in order to get the best service from your equipment.
You are advised to drive at a reduced speed for better traction and control of the ATV.
To remove ice and snow from the track components, the ATV engine must be turned off, the hand brake must be applied and the key must be removed from the ignition. It is not safe to use your hands or feet to remove ice and snow. Use a piece of wood or a rigid, non-metallic object to dislodge ice and snow.
Do not drive over stumps, branches, or rocky terrain as this could cause damage to the cat tracks or their components.
When you venture off well-used trails or into isolated areas, respect the environment, do not damage vegetation or disturb wildlife.

8
MAINTENANCE Before doing any maintenance on the tracks or on the ATV (see ATV manual), turn off the ATV engine and remove the key from the ignition. This also applies before making any inspection.
Automatic Track tension The adjustment of the track is automatic but should be checked regularly for best operation of the components. Checking the condition of the hardware To maintain your equipment in optimal working condition, replace damaged bolts as well as nylon nuts and any other part subject to normal wear and tear such as the bearings and the tube covers on the frame. Replace them with original manufacturer parts; see your authorized dealer for further information.
Regularly check all bolts and tighten them if necessary to avoid costly repairs. Make sure that your equipment is in safe operating condition.
The lock nuts are designed for one-time use only and must never be reused once they have been removed. Cleaning
To ensure long life, clean the rubber tracks with soapy water only.
REMOVAL
Before removing the track system from the ATV, turn off the engine and remove the key from the ignition When removing the tracks system, take the same safety precautions you employed when assembling it (see installation). To remove the track system, follow the steps in the INSTALLATION section in roughly reverse order. They are easy to remove and only the track system itself has to be removed. Once removed, release the tension on the four tracks. Store the track system under cover until you are ready to reinstall it for the next season; this is the time to inspect and check the condition of the hardware. Have your local dealer to check and grease the hub bearings to stay out of problems every season.
9
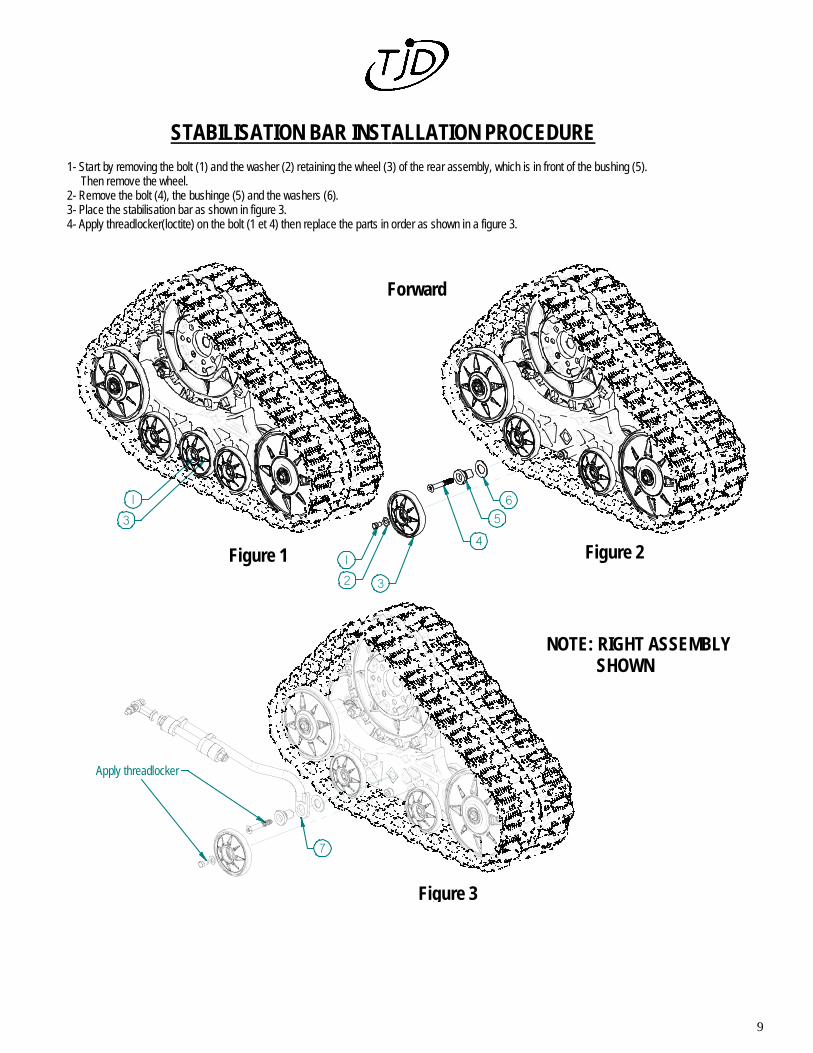
1- Start by removing the bolt (1) and the washer (2) retaining the wheel (3) of the rear assembly, which is in front of the bushing (5). Then remove the wheel.2- Remove the bolt (4), the bushinge (5) and the washers (6).3- Place the stabilisation bar as shown in figure 3.4- Apply threadlocker(loctite) on the bolt (1 et 4) then replace the parts in order as shown in a figure 3.
1
3
1
2
4
5
6
3
Figure 1 Figure 2
7
Figure 3
Apply threadlocker
Forward
STABILISATION BAR INSTALLATION PROCEDURE
NOTE: RIGHT ASSEMBLY SHOWN
10
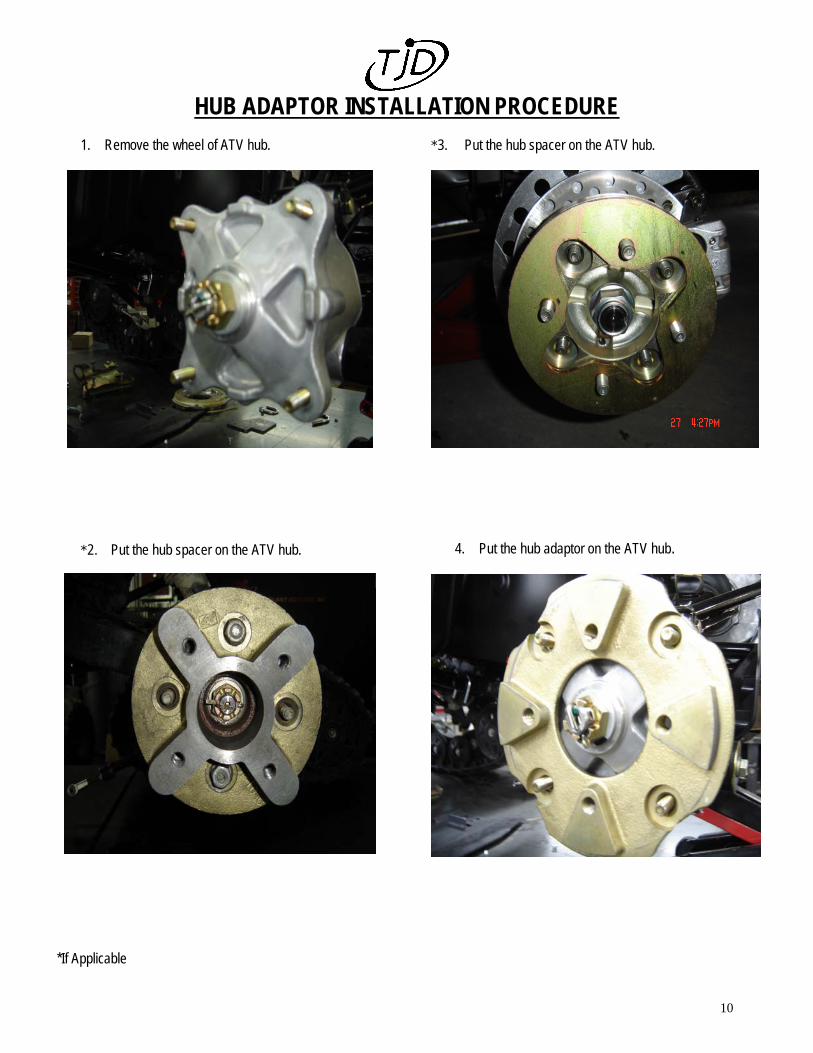
HUB ADAPTOR INSTALLATION PROCEDURE1. Remove the wheel of ATV hub.
*2. Put the hub spacer on the ATV hub.
*If Applicable
*3. Put the hub spacer on the ATV hub.
4. Put the hub adaptor on the ATV hub.

11
5. Tighten de 4 wheel nuts provided with the adaptor. (60lbsxfoot).
6. Position the sprocket of the XGEN assembly to allow the sprocket to fully engage into the hub adaptor.
7. Once the XGEN assembly is fully engaged, position the sprocket to match the holes on the front side of the suspension arm.
8. Bolt the XGEN assembly by the front side to the hub adaptor with the bolts provided with the hub adaptor. Apply threadlocker (Loctite) on the bolts.
TABLE 1
MAKE TORQUE IN POUND-FOOT
ARCTIC CAT 30 BOMBARDIER 45 HONDA 47 KAWASAKI 58 POLARIS 30 SUZUKI 60 YAMAHA 40

FORWARD
PART LIST: FRONT XGEN ASSEMBLY
1513
46
4
41 7
8
48
47
43
5
45
42
21
23253
44
19222026
40
831
37
36
21
33
3228
27
11
6
1817
12
9
50
39
14
38
49
10
29
30
34
35
16
24REF

PART LIST: FRONT XGEN ASSEMBLYRÉF #PART Description (A) QTY
1 FHCS-1I2x2 Flat Head Cap Screw 1/2-13 NC x 2" 12 04CA-007 Internal Cover 13 HLN-5I16-18NC Nylon Insert Locknut 5/16-18 NC 84 HN-7I16-14NC Hex Nut 7/16-14 NC 25 HB-5I16-18NCx2-3I4 Hex Bolt 5/16-18 NC x 2-3/4" 56 04HE-004 Modified Bolt 27 04CA-006 External Cover 18 FHCS-5I16x3I4 Nylon Insert Locknut 5/16-18 NC x 3/4" 39 HB-5I16-18NCx3 Hex Bolt 5/16-18 NC x 3" 310 02SO-002 Front Track Shoe 111 04AR-035 Simple Axle 412 02RO-006 Wheel 6" 413 FW-7I16-USS Flat Washer 7/16" USS Zinc Plated 914 HB-7I16-14NCx3I4 Hex Bolt 7/16-14 NC x 3/4" 815 02RO-005 Wheel 9" 216 02RO-004 Wheel 11" 217 04AR-038 Support Bushing For Spring 28mm 118 04RC-001 Spring 119 04TF-014 Threaded Rod 120 HN-5I8-11NC Hex Nut 5/8-11 NC 221 FW-5I8 Flat Washer 5/8" Zinc Plated 222 02RU-001 Rubber 1" Duro 60 123 02RU-002 Rubber 1/4" Duro 70 124 HLN-5I8-11NC Nylon Insert Locknut 5/8-11 NC 125 04TU-081 Stabilisation Rod Tube 126 04DO-014 Taper Bushing 227 04AR-039 Suppport Bushing For Spring 30mm 128 04RC-002 Spring 129 04DO-011 Bushing 130 BB6007-RSR Bearing 331 02JE-002 Seal 132 02JE-001 Gasket 133 HB-1I2-13NCx1-1I4 Hex Bolt 1/2-13 NC x 1-1/4" 134 04MO-210 Hub 135 02BA-001 Sprocket 136 04RS-001 Special Washer 137 04TU-006 Bushing Spacer 138 02CH-002 Track 139 03TF-001 Tensioner Rod 140 02RT-001 Rod End 1/2" with 5/8-11 NC Thread 141 FHWS10x1 Flat Head Wood Screw 10 x 1po 242 03RT-001 Tensioner Cover Assembly 143 03RT-002 Tensioner Cover Assembly 144 04PL-023D Stabilisation Rod Support 145 03TE-005 Tensioner Tube Assembly 146 03TE-006 Tensioner Tube Assembly 147 03TF-002 Tensioner Rod 148 FHCS-5I16x1_1I2_v7.00 Flat Head Cap Screw 5/16-18 NC x 1-1/2" 449 04LI-003 Slide 150 03BC-002 Structural Arm Vulcanised Assembly 1
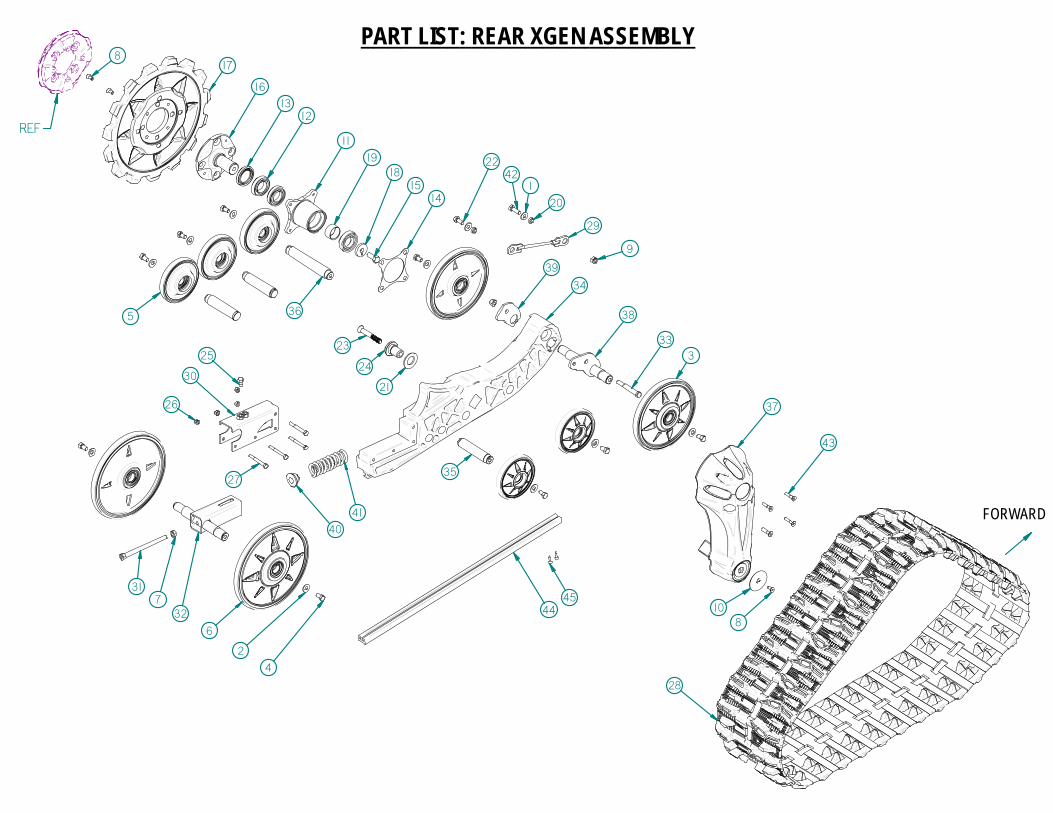
PART LIST: REAR XGEN ASSEMBLY
FORWARD
REF
2
3
4
5
6
7
8
9
10
20
24
11
12
14
13
15
16
17
1819
21
2325
26
27
30
8
28
29
31
32
33
34
35
36
37
38
39
4041
1
22
4445
42
43

RÉF # PART Description (A) QTY.1 FW-3I8-USS Flat Washer 3/8" USS 22 FW-7I16-USS Flat Washer 7/16" USS Zinc Plated 93 02RO-005 Wheel 9" 24 HB-7I16-14NCx3I4 Hex Bolt 7/16-14 NC x 3/4" 95 02RO-006 Wheel 6" 56 02RO-004 Wheel 11" 27 HN-7I16-14NC Hex Nut 7/16-14 NC 18 FHCS-5I16x3I4 Nylon Insert Locknut 5/16-18 NC x 3/4" 39 HLN-7I16-14NC Nylon Insert Locknut 7/16-14 NC 210 04CA-006 External Cover 111 04DO-011 Bushing 112 BB6007-RSR Bearing 313 02JE-002 Seal 114 02JE-001 Gasket 115 HB-1I2-13NCx1-1I4 Hex Bolt 1/2-13 NC x 1-1/4" 116 04MO-210 Hub 117 02BA-001 Sprocket 118 04RS-001 Special Washer 119 04TU-006 Bushing Spacer 120 04DO-013 Cable Bushing 221 FW-1-SAE Flat Washer 1" SAE Zinc Plated 122 HB-7I16-14NCx1 Hex Bolt 7/16-14 NC x 1" 123 FHCS-1I2x3_1I2 Flat Head Cap Screw 1/2-13 NC x 3-1/2" 124 04DO-012 Stabilisation Bar Bushing 125 04HE-004 Modified Bolt 126 HLN-5I16-18NC Nylon Insert Locknut 5/16-18 NC 427 HB-5I16-18NCx2-3I4 Hex Bolt 5/16-18 NC x 2-3/4" 428 02CH-002 Track 129 03CR-001 Cable Assembly 130 03RT-003 Tensioner Cover Assembly 131 03TF-002 Tensioner Rod 132 03TE-005 Tensioner Tube Assembly 133 HB-7I16-14NCx3-1I2 Hexagonal bolt 134 02SO-001 Rear Track Shoe 135 04AR-035 Simple Axle 336 04AR-036 Axle 137 03BC-002 Structural Arm Vulcanised Assembly 138 03AR-001D Welded Axle 139 04CA-008 Cover 140 04AR-038 Support Bushing For Spring 28mm 141 04RC-001 Spring 142 HB-7I16-14NCx1-1I4 Hex Bolt 7/16-14NC x 1-1/4" 143 FHCS-5I16x1_1I2_v7.00 Flat Head Cap Screw 5/16-18 NC x 1-1/2" 444 04LI-003 Slide 145 FHWS10x1 Flat Head Wood Screw 10 x 1po 2
PART LIST: REAR XGEN ASSEMBLY
16
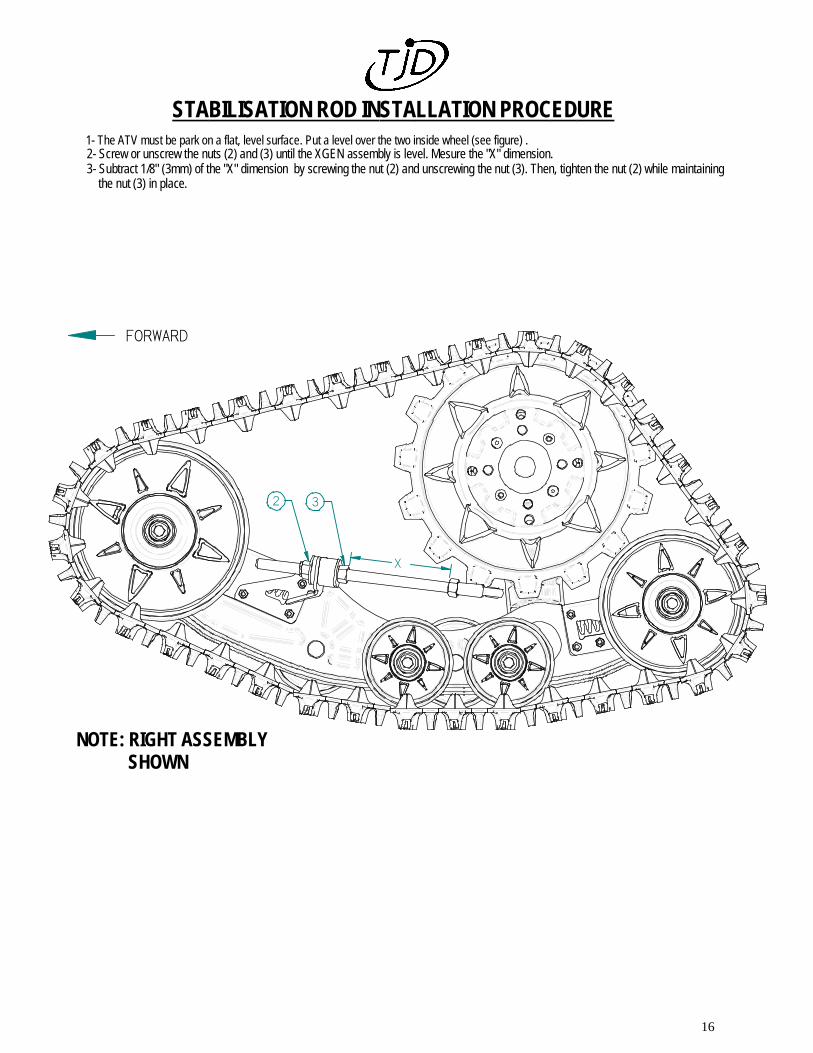
NOTE: RIGHT ASSEMBLY SHOWN
FORWARD
STABILISATION ROD INSTALLATION PROCEDURE
X
2 3
2- Screw or unscrew the nuts (2) and (3) until the XGEN assembly is level. Mesure the "X" dimension. 3- Subtract 1/8" (3mm) of the "X" dimension by screwing the nut (2) and unscrewing the nut (3). Then, tighten the nut (2) while maintaining the nut (3) in place.
1- The ATV must be park on a flat, level surface. Put a level over the two inside wheel (see figure) .