copyright boian … · the advantage of the win32 api components is that hey will work on any...
TRANSCRIPT

www.openwire.orgwww.mitov.com
Copyright Boian Mitov 2004 - 2014

IndexInstallation...................................................................................................................................................3Where is “Basic Video”?............................................................................................................................3Why some of the examples don’t work?.....................................................................................................3Creating a simple video player using Win32API Components..................................................................4Creating a simple video player using DirectShow components.................................................................6Creating a simple video capture application using DirectShow.................................................................9Creating a simple video capture application using Win32API.................................................................15Capturing a frame into a TBitmap............................................................................................................21Creating your own filter............................................................................................................................24Using the TSLCRealBuffer in C++ Builder and Visual C++...................................................................31Deploying your 32 bit application with the IPP DLLs.............................................................................34Deploying your 64 bit application............................................................................................................34
November 13, 2014 Basic Video 7.5-2-

Installation“Basic Video” comes with an installation program. Just start the installation by double-clicking on the Setup.exe file and follow the installation instructions.
Where is “Basic Video”?After the installation, start your Delphi or C++ Builder.Scroll the “Component Palette”, until you see the last three tabs:
If the installation was successful, they should be named “VideoLab”, “SignalLab” and “AudioLab”. On the SignalLab palette you will have only a subset of the SignalLab components necessary for processing histogram data. SignalLab is a separated product, and will not be shipped as full with VideoLab. On the AudioLab palette you will have only a subset of the AudioLab components necessary for basic processing audio data. AudioLab is a separated product, and will not be shipped as full with VideoLab.Only the following two components of SignalLab will be available:
Only the following components of AudioLab will be available:
The following two PlotLab components will be available.
Why some of the examples don’t work?Video lab is a unique library that supports both the Win32 API’s AVIFile ( VFW ) functions (ACM) and DirectShow. You as a developer have the ultimate choice to use either the Win32 API or DirectShow components or both at the same time.
November 13, 2014 Basic Video 7.5-3-

The advantage of the Win32 API components is that hey will work on any Windows 95 and up system out of the box, however they are much less capable than the DirectShow components, and should be avoided if not necessary.The advantage of the DirectShow components is that they will use the latest and greatest capability of DirectShow, the latest video camera devices, and TV Tuners, but they require DirectShow 9.0 or higher to be installed in order to work.If you don’t have DirectX 9.0 or higher installed on your system, you will not be able to use see the DirectShow examples working.
Creating a simple video player using Win32API Components
From the Delphi/C++Builder menu select | File | New | Application |.
An empty form will appear on the screen.From the “Component Palette” select the “Video Lab” tab:
select and drop on the form the following two components:
- TVLAVIPlayer
- TVLImageDisplay
November 13, 2014 Basic Video 7.5-4-

Select the VLImageDisplay1 component on the form.
In the Object Inspector set the Align property to alClient:
Make the form relatively small.Select the VLAVIPlayer1.The form will look similar to this one:
In the Object Inspector select the FileName property and click the button.
November 13, 2014 Basic Video 7.5-5-

A File selection dialog will appear:
Select a file to play and click “Open”.
In the Object inspector select the OutputPin property and click the button.
You should see the Pin Editor:
Click on the check box to make it look as in the picture, and then click OK.
Compile and run the application.
November 13, 2014 Basic Video 7.5-6-

You should see the movie playing:
Congratulations! You have just created your first “Basic Video” application.Here are the OpenWire connections in this application:
Creating a simple video player using DirectShow components
WARNING: In order to run the application in this example you must have DirectX 9.0 orhigher installed!From the Delphi/C++Builder menu select | File | New | Application |.
An empty form will appear on the screen.
From the “Component Palette” select the “Video Lab” tab:
November 13, 2014 Basic Video 7.5-7-

From the tab select and drop on the form the following two components:
- TVDSVideoPlayer
- TVLDSImageDisplay
Select the VLImageDisplay1 component on the form.
In the Object Inspector set the Align property to alClient:
Make the form relatively small.Select the VLDSVideoPlayer1.The form will look similar to this one:
November 13, 2014 Basic Video 7.5-8-

In the Object Inspector select the FileName property and click the button.
A File selection dialog will appear:
Select a file to play and click “Open”.
In the Object inspector select the OutputPin property and click the button.
You should see the Pin Editor:
Click on the check box to make it look as in the picture, and then click OK.
Compile and run the application.
November 13, 2014 Basic Video 7.5-9-

You should see the movie playing:
Congratulations! You have just created your first DirectShow “Basic Video” application.Here are the OpenWire connections in this application:
Creating a simple video capture application using DirectShow
WARNING: In order to run the application in this example you must have DirectX 9.0 orhigher installed!From the Delphi/C++Builder menu select | File | New | Application |.
An empty form will appear on the screen.
From the “Component Palette” select the “Video Lab” tab:
November 13, 2014 Basic Video 7.5-10-

From the tab select and drop on the form the following three components:
One - TVLDSCapture
One - TVLDSImageDisplay
One - TVLDSVideoLogger
On the form select the TVLDSImageDisplay component.Your form will look something like this:
In the Object Inspector set the Align property to alClient:
Select the TVLDSCapture component:
November 13, 2014 Basic Video 7.5-11-
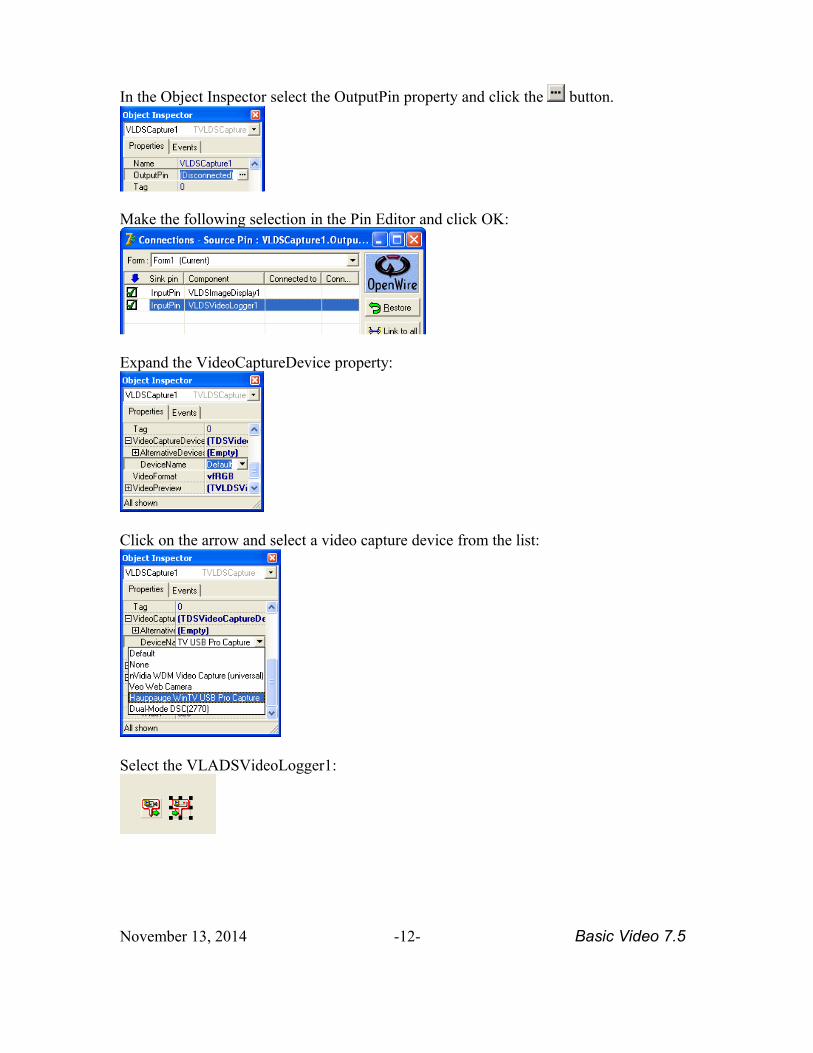
In the Object Inspector select the OutputPin property and click the button.
Make the following selection in the Pin Editor and click OK:
Expand the VideoCaptureDevice property:
Click on the arrow and select a video capture device from the list:
Select the VLADSVideoLogger1:
November 13, 2014 Basic Video 7.5-12-

In the Object Inspector set the “FileName” property to “CaptureVideo.avi”:
Compile and run the application.You should see the captured video. Here is an example of captured video from a TV Tuner:
Congratulations! You have created your first DirectShow video capture application with “Basic Video”.Here are the OpenWire connections in the application:
You probably have noticed that the application logs only the video, but not the audio. It would be even better if we can hear the audio as it is captured.We can easily do that.Stop the running application.
November 13, 2014 Basic Video 7.5-13-

Select the VLDSCapture1 component:
In the Object Inspector expand the AudioCaptureDevice property and select a device name for the DeviceName sub property from the list:
If you want to hear the captured audio, expand the AudioPreview property and set Enabled sub property to True:
WARNING: Setting the Enable to true if you are capturing from a microphone is not advised, as you may experience a feedback from the speakers!
In the Object Inspector select the AudioOutputPin property and click the button.
November 13, 2014 Basic Video 7.5-14-

Make the following selection in the Pin Editor and click OK:
Compile and run the application. This time you will hear the captured audio and the audiowill also be logged. Be aware that if you are capturing from the microphone, and it is near the speakers you may experience a very noisy feedback. To avoid that set the Enabled sub property of the AudioPreview to False.Here are the OpenWire connections in the application:
Now you have a fully featured video and audio capture application.
Creating a simple video capture application using Win32API
From the Delphi/C++Builder menu select | File | New | Application |.
An empty form will appear on the screen.From the Object Inspector change the form Caption to Video Capture Demo.
From the “Component Palette” select the “Standard” tab:
November 13, 2014 Basic Video 7.5-15-

select and drop on the form a TPanel.
- TPanel
Set the Align property of the Panel1 to alBottom:
Remove the text of the Caption of the Panel1.
Place 3 TButton components on the TPanel.
- TButton
Rename the buttons to “SourceButton”, “StartButton”, and “StopButton”.Set the button captions to “Select Source”, “Start”, and “Stop”.The form should look like this one:
November 13, 2014 Basic Video 7.5-16-

From the “Component Palette” select the “Video Lab” tab:
select and drop on the form the following three components:
- TVLCapture
- TVLImageDisplay
- TVLAVILogger
Select the VLImageDisplay1 component on the form.
In the Object Inspector set the Align property to alClient:
November 13, 2014 Basic Video 7.5-17-

The form should look similar to this one:
Select the VLAVILogger1 and set its “FileName” property to “CaptureVideo.avi” :
Select the VLCapture1 component on the form.
In the Object Inspector set the DriverName property to “Microsoft WDM Image Capture(Win32)”:
November 13, 2014 Basic Video 7.5-18-

In the Object Inspector set DriverIndex to 0. then select the OutputPin property and click the button.
You should see the Pin Editor:
Check the boxes as shown on the picture, and then click the OK button.This will connect the output pin of the VLCapture1 component to the input pins of VLImageDisplay1 and VLAVILogger1.
If you are using Delphi, Double click the “SourceButton” and write the following code in the OnClick event handler:procedure TForm1.SourceButtonClick(Sender: TObject);
begin
VLCapture1.ShowVideoSourceDialog();
end;
Double click the “StartButton” and write the following code in the OnClick event handler:procedure TForm1.StartButtonClick(Sender: TObject);
begin
VLCapture1.Enabled := True;
end;
Double click the “StopButton” and write the following code in the OnClick event handler:procedure TForm1.StopButtonClick(Sender: TObject);begin
VLCapture1.Enabled := False;
end;
If you are using C++ Builder, double click the “SourceButton” and write the following code in the OnClick event handler:void __fastcall TForm1::SourceButtonClick(TObject *Sender)
November 13, 2014 Basic Video 7.5-19-

{
VLCapture1->ShowVideoSourceDialog();
}
Double click the “StartButton” and write the following code in the OnClick event handler:void __fastcall TForm1::StartButtonClick(TObject *Sender)
{
VLCapture1->Enabled = true;
}
Double click the “StopButton” and write the following code in the OnClick event handler:void __fastcall TForm1::StopButtonClick(TObject *Sender)
{
VLCapture1->Enabled = false;
}
Compile and run the application.Press the “Select Source” button. A source dialog similar to the one below will appear.
November 13, 2014 Basic Video 7.5-20-

In this dialog you can select your video source, such as TV Tuner or video camera, as well as the TV channel, etc:
After you have set your source and the source properties, you can click the “Start” button on the main form. If you have picked a valid source you should see the captured video. Here is an example of video captured from a TV Tuner:
Congratulations! You have created your first video capture application with “Basic Video”.Here are the OpenWire connections in the application:
November 13, 2014 Basic Video 7.5-21-

Capturing a frame into a TBitmapFrom the Delphi/C++Builder menu select | File | New | Application |.
An empty form will appear on the screen.
From the “Component Palette” select the “Video Lab” tab:
From the tab select and drop on the form the following two components:
- TVLAVIPlayer
- TVLGenericFilter
From the “Component Palette” select the “Additional” tab:
select and drop on the form a TImage:
- TImage
November 13, 2014 Basic Video 7.5-22-

Arrange the form to look like this, and select the VLAVIPlayer1 on the form:
In the Object Inspector select the FileName property and click the button.
A File selection dialog will appear:
Select a file to play and click “Open”.In the Object Inspector select the OutputPin property and click the button.
November 13, 2014 Basic Video 7.5-23-

In the Pin Editor check the InputPin of the VLGenericFilter1 and click OK:
Double click the VLGenericFilter1 on the form:
If you are using Delphi, in the event handler add the following code:procedure TForm1.VLGenericFilter1ProcessData(Sender: TObject;
InBuffer: IVLImageBuffer; var OutBuffer: IVLImageBuffer;
var SendOutputData: Boolean);
begin
// Capture Image.
InBuffer.ToBitmap( Image1.Picture.Bitmap );
// Update Screen.
Image1.Refresh();
end;
If you are using C++ Builder, in the event handler add the following code:void __fastcall TForm1::VLGenericFilter1FilterData(TObject *Sender, TVLCVideoBuffer InBuffer, TVLCVideoBuffer &OutBuffer, bool &SendOutputData){ // Capture Image. InBuffer.ToBitmap( Image1->Picture->Bitmap );
// Update Screen. Image1->Refresh();}
November 13, 2014 Basic Video 7.5-24-

Compile and run the application.You should see the captured frames inside the TImage component:
You have just learned how to capture bitmaps from the video stream.
Creating your own filterFrom the Delphi/C++Builder menu select | File | New | Application |.
An empty form will appear on the screen.
From the “Component Palette” select the “Video Lab” tab:
From the tab select and drop on the form the following components:
One - TVLAVIPlayer
One - TVLGenericFilter
Two - TVLImageDisplay
November 13, 2014 Basic Video 7.5-25-

Arrange the form to look like this one, and select the VLAVIPlayer1 :
In the Object Inspector select the FileName property and click the button.
A File selection dialog will appear:
Select a file to play and click “Open”.
In the Object Inspector select the OutputPin property and click the button.
November 13, 2014 Basic Video 7.5-26-

In the Pin Editor check the following two pins, then click OK.
Select the VLGenericFilter1 on the form.
In the Object Inspector select the OutputPin property and click the button.
In the Pin Editor check the InputPin of the VLImageDisplay2 and click OK.
Double click the VLGenericFilter1 on the form:
If you are using Delphi, write the following event handler:procedure TForm1.VLGenericFilter1ProcessData(Sender: TObject;
InBuffer: IVLImageBuffer; var OutBuffer: IVLImageBuffer;
var SendOutputData: Boolean);
var
X, Y : Integer;
begin
November 13, 2014 Basic Video 7.5-27-

for X := 0 to OutBuffer.Width - 1 do
for Y := 0 to OutBuffer.Height - 1 do
OutBuffer[ X, Y ] := ( Integer( InBuffer[ X, Y ] ) and $C0C0C0 ) or $151515;
end;
If you are using C++ Builder, write the following event handler:void __fastcall TForm1::VLGenericFilter1ProcessData(TObject *Sender,
TVLCVideoBuffer InBuffer, TVLCVideoBuffer &OutBuffer,
bool &SendOutputData)
{
for ( int x = 0; x < OutBuffer.GetWidth(); x ++ )
for ( int y = 0; y < OutBuffer.GetHeight(); y ++ )
OutBuffer.Pixels[ x ][ y ] = ( InBuffer.Pixels[ x ][ y ] & 0xC0C0C0 ) | 0x151515;
}
Compile and run the application. You should see a result similar to this one:
This example demonstrated how you can access individual bits in the image.
Now we will change the event handler to the following one:If you are using Delphi:procedure TForm1.VLGenericFilter1ProcessData(Sender: TObject;
InBuffer: IVLImageBuffer; var OutBuffer: IVLImageBuffer;
var SendOutputData: Boolean);
var
X, Y : Integer;
begin
November 13, 2014 Basic Video 7.5-28-

for X := 0 to OutBuffer.Width - 1 do
for Y := 0 to OutBuffer.Height - 1 do
begin
OutBuffer.Red[ X, Y ] := InBuffer.Green[ X, Y ];
OutBuffer.Green[ X, Y ] := InBuffer.Blue[ X, Y ];
end;
end;
If you are using C++ Builder:void __fastcall TForm1::VLGenericFilter1ProcessData(TObject *Sender,
TVLCVideoBuffer InBuffer, TVLCVideoBuffer &OutBuffer,
bool &SendOutputData)
{
for ( int x = 0; x < OutBuffer.GetWidth(); x ++ )
for ( int y = 0; y < OutBuffer.GetHeight(); y ++ )
{
OutBuffer.Red[ x ][ y ] = InBuffer.Green[ x ][ y ];
OutBuffer.Green[ x ][ y ] = InBuffer.Blue[ x ][ y ];
}
}
Compile and run the application. You should see a result similar to this one:
This example demonstrated how you can access individual colors of a pixel in the image.
Now we will change the event handler to the following one:If you are using Delphi:procedure TForm1.VLGenericFilter1ProcessData(Sender: TObject;
November 13, 2014 Basic Video 7.5-29-

InBuffer: IVLImageBuffer; var OutBuffer: IVLImageBuffer;
var SendOutputData: Boolean);
var
BytePtrIn : PBYTE;
BytePtrOut : PBYTE;
Counter : Integer;
begin
BytePtrIn := InBuffer.Read();
BytePtrOut := OutBuffer.Write();
for Counter := 0 to OutBuffer.GetByteSize() - 1 do
begin
BytePtrOut^ := ( BytePtrIn^ ) and $C0;
Inc( BytePtrIn );
Inc( BytePtrOut );
end;
end;
If you are using C++ Builder:void __fastcall TForm1::VLGenericFilter1ProcessData(TObject *Sender,
TVLCVideoBuffer InBuffer, TVLCVideoBuffer &OutBuffer,
bool &SendOutputData)
{
const BYTE *InPtr = InBuffer.Read();
BYTE *OutPtr = OutBuffer.Write();
for ( int i = 0; i < OutBuffer.GetByteSize(); i ++ )
*OutPtr++ = *InPtr++ & 0xC0;
}
November 13, 2014 Basic Video 7.5-30-

Compile and run the application. You should see a result similar to this one:
This example demonstrated how you can access the whole frame buffer at once.
Now we will change the event handler to the following one:
If you are using Delphi:procedure TForm1.VLGenericFilter1ProcessData(Sender: TObject;
InBuffer: IVLImageBuffer; var OutBuffer: IVLImageBuffer;
var SendOutputData: Boolean);
var
ABitmap : TBitmap;
begin
ABitmap := TBitmap.Create();
InBuffer.ToBitmap( ABitmap );
ABitmap.Canvas.TextOut( 20, 20, 'Demo Text' );
OutBuffer.FromBitmap( ABitmap );
ABitmap.Free();
end;
If you are using C++ Builder:void __fastcall TForm1::VLGenericFilter1ProcessData(TObject *Sender,
TVLCVideoBuffer InBuffer, TVLCVideoBuffer &OutBuffer,
bool &SendOutputData)
{
Graphics::TBitmap *ABitmap = new Graphics::TBitmap;
November 13, 2014 Basic Video 7.5-31-

InBuffer.ToBitmap( ABitmap );
ABitmap->Canvas->TextOut( 20, 20, "Demo Text" );
OutBuffer.FromBitmap( ABitmap );
delete ABitmap;
}
Compile and run the application. You should see a result similar to this one:
This example demonstrated how you can access the whole frame as a bitmap.
By now you should have some good basic understanding how you can process the framesfrom within your code.
Using the TSLCRealBuffer in C++ Builder and Visual C++The C++ Builder version of the library comes with a powerful data buffer class, called TSLCRealBuffer.The TSLCRealBuffer is capable of performing basic math operations over the data as well as some basic signal processing functions. The data buffer also uses copy on write algorithm improving dramatically the application performance.The TSLCRealBuffer is an essential part of the SignalLab generators and filters, but it can be used independently in your code. You have seen already some examples of using TSLCRealBuffer in the previous chapters. Here we will go into a little bit more details about how TSLCRealBuffer can be used.In order to use TSLCRealBuffer you must include SLCRealBuffer.h directly or indirectly(trough another include file):#include <SLCRealBuffer.h>
Once the file is included you can declare a buffer:Here is how you can declare a 1024 samples buffer:TSLCRealBuffer Buffer( 1024 );
November 13, 2014 Basic Video 7.5-32-

Version 4.0 and up does not require the usage of data access objects. The data objects are now obsolete and have been removed from the library. You can obtain the current size of a buffer by calling the GetSize method:Int ASize = Buffer.GetSize(); // Obtains the size of the buffers
You can resize (change the size of) a buffer:Buffer.Resize( 2048 ); // Changes the size to 2048
You can set all of the elements (samples) of the buffer to a value:Buffer.Set( 30 ); // Sets all of the elements to 30.
You can access individual elements (samples) in the buffer:Buffer [ 5 ] = 3.7; // Sets the fifth elment to 3.7
Double AValue = Buffer [ 5 ]; // Assigns the fifth element to a vari-able
You can obtain read, write or modify pointer to the buffer data:const double *data = Buffer.Read() // Starts reading only
double *data = Buffer.Write()// Starts writing only
double *data = Buffer.Modify()// Starts reading and writing
Sometimes you need a very fast way of accessing the buffer items. In this case, you can obtain a direct pointer to the internal data buffer. The buffer is based on copy on write technology for high performance. The mechanism is encapsulated inside the buffer, so when working with individual items you don’t have to worry about it. If you want to access the internal buffer for speed however, you will have to specify up front if you are planning to modify the data or just to read it. The TSLCRealBuffer has 3 methods for accessing the data Read(), Write(), and Modify (). Read() will return a constant pointer tothe data. You should use this method when you don’t intend to modify the data and just need to read it. If you want to create new data from scratch and don’t intend to preserve the existing buffer data, use Write(). If you need to modify the data you should use Modify (). Modify () returns a non constant pointer to the data, but often works slower than Read() or Write(). Here are some examples:const double *pcData = Buffer.Read(); // read only data pointer
double Value = *pcData; // OK!
*pcData = 3.5; // Wrong!
November 13, 2014 Basic Video 7.5-33-

double *pData = Buffer.Write(); // generic data pointer
double Value = *pData; // OK!
*pData = 3.5; // OK!
You can assign one buffer to another:Buffer1 = Buffer2;
You can do basic buffer arithmetic:TSLCRealBuffer Buffer1( 1024 );
TSLCRealBuffer Buffer2( 1024 );
TSLCRealBuffer Buffer3( 1024 );
Buffer1.Set( 20.5 );
Buffer2.Set( 5 );
Buffer3 = Buffer1 + Buffer2;
Buffer3 = Buffer1 - Buffer2;
Buffer3 = Buffer1 * Buffer2;
Buffer3 = Buffer1 / Buffer2;
In this example the elements of the Buffer3 will be result of the operation ( +,-,* or / ) between the corresponding elements of Buffer1 and Buffer2.You can add, subtract, multiply or divide by constant:// Adds 4.5 to each element of the buffer
Buffer1 = Buffer2 + 4.5;
// Subtracts 4.5 to each element of the buffer
Buffer1 = Buffer2 - 4.5;
// Multiplies the elements by 4.5
Buffer1 = Buffer2 * 4.5;
// Divides the elements by 4.5
Buffer1 = Buffer2 / 4.5;
You can do “in place” operations as well:Buffer1 += Buffer2;
November 13, 2014 Basic Video 7.5-34-

Buffer1 += 4.5;
Buffer1 -= Buffer2;
Buffer1 -= 4.5;
Buffer1 *= Buffer2;
Buffer1 *= 4.5;
Buffer1 /= Buffer2;
Buffer1 /= 4.5;
Those are just some of the basic buffer operations provided by SignalLab.If you are planning to use some of the more advanced features of TSLCRealBuffer pleaserefer to the online help.SignalLab also provides TSLCComplexBuffer and TSLCIntegerBuffer. They work similar to the TSLCRealBuffer but are intended to be used with Complex and Integer data. For more information on TSLCComplexBuffer and TSLCIntegerBuffer please referto the online help.
Deploying your 32 bit application with the IPP DLLsThe compiled applications can be deployed to the target system by simply copying the executable. The application will work, however the performance can be improved by alsocopying the Intel IPP DLLs provided with the library.The DLLs are under the [install path]\LabPacks\IppDLL\Win32 directory( [install path] is the location where the library was installed). In 32 bit Windows to deploy IPP, copy the files to the [Windows]\System32 directory on the target system.In 64 bit Windows to deploy IPP, copy the files to the [Windows]\SysWOW64 directory on the target system.[Windows] is the Windows directory - usually C:\WINNT or C:\WINDOWSThis will improve the performance of your application on the target system.
Deploying your 64 bit application
The current version of the library requires when deploying 64 bit applications, the Intel IPP DLLs to be deployed as well.
The DLLs are under the [install path]\LabPacks\IppDLL\Win64 directory( [install path] is the location where the library was installed).
To deploy IPP, copy the files to the [Windows]\System32 directory on the target system.
[Windows] is the Windows directory - usually C:\WINNT or C:\WINDOWS
November 13, 2014 Basic Video 7.5-35-

This will improve the performance of your application on the target system.
November 13, 2014 Basic Video 7.5-36-