copyright © glencoe/mcgraw-hill carpentry & building construction laying out floor joists
TRANSCRIPT

Copyright © Glencoe/McGraw-HillCarpentry & Building ConstructionLaying Out Floor Joists
Laying Out Floor Joists

Copyright © Glencoe/McGraw-HillCarpentry & Building ConstructionLaying Out Floor Joists
The viewer is expressly advised to consider and use all safety precautions described in this presentation or that might also be indicated by undertaking the activities described herein. In addition, common sense should be exercised to help avoid all potential hazards.
Publisher assumes no responsibility for the activities of the viewer or for the subject matter experts who prepared this presentation. Publisher makes no representation or warranties of any kind, including but not limited to, the warranties of fitness for particular purpose or merchantability, nor for any implied warranties related thereto, or otherwise. Publisher will not be liable for damages of any type, including any consequential, special or exemplary damages resulting, in whole or in part, from viewer's use or reliance upon the information, instructions, warnings or other matter contained in this presentation.
Safety Notice

Copyright © Glencoe/McGraw-HillCarpentry & Building ConstructionLaying Out Floor Joists
Laying Out Floor Joists
Observe safety rules.Make sure tools and equipment are
available. Check materials.Follow the steps described here.

Copyright © Glencoe/McGraw-HillCarpentry & Building ConstructionLaying Out Floor Joists
Safety
If you are at a worksite, wear all the required safety equipment.

Copyright © Glencoe/McGraw-HillCarpentry & Building ConstructionLaying Out Floor Joists
Tools and Equipment
Tape measure Square Pencil
Copyright © Glencoe/McGraw-HillCarpentry & Building ConstructionLaying Out Floor Joists
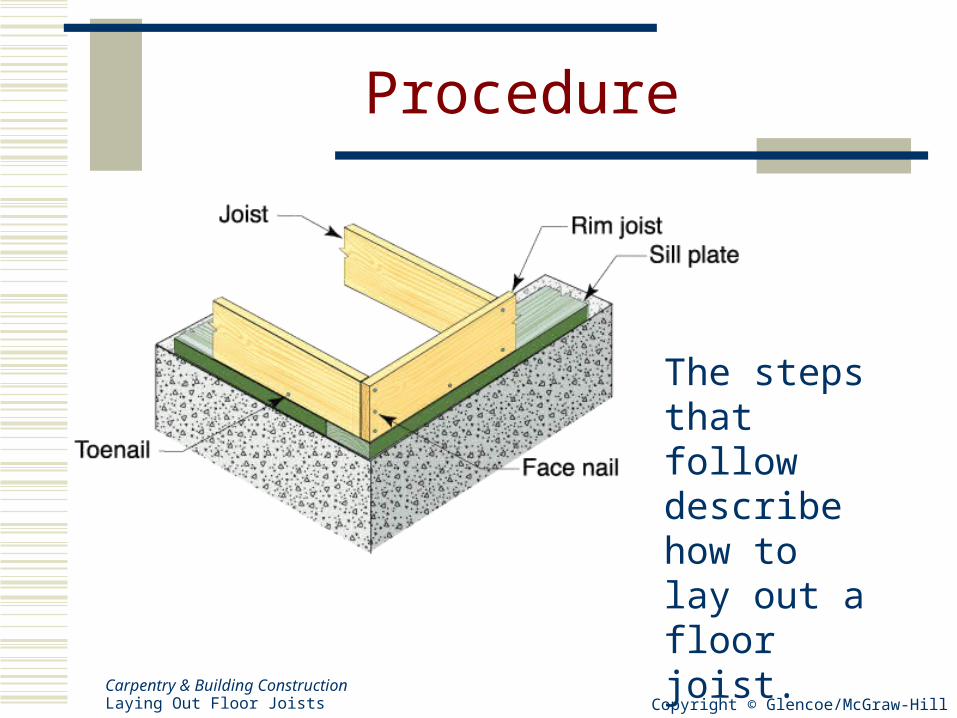
Procedure
The steps that follow describe how to lay out a floor joist.

Copyright © Glencoe/McGraw-HillCarpentry & Building ConstructionLaying Out Floor Joists
Step 1
a. Consult the plans to identify any special needs before you begin joist layout.
b. If no special needs exist, space joists evenly from one side of the house to the other.
c. If special needs do exist, make allowancefor them while laying out the joists.

Copyright © Glencoe/McGraw-HillCarpentry & Building ConstructionLaying Out Floor Joists
Step 2
To begin the layout:a. Measure from the corner of the sill plate.
b. Mark the location of the first joist on the sill plate 15 1/4" from the outside edge.
c. Make an X on the side of the mark where the joist will be placed.

Copyright © Glencoe/McGraw-HillCarpentry & Building ConstructionLaying Out Floor Joists
From the first mark, measure every 16" to lay out all the joists on the plate.
Step 3

Copyright © Glencoe/McGraw-HillCarpentry & Building ConstructionLaying Out Floor Joists
Step 4
Ensure that a joist is centered every 4´.

Copyright © Glencoe/McGraw-HillCarpentry & Building ConstructionLaying Out Floor Joists
Step 5
When joists will be overlapped at a girder or center support wall:

Copyright © Glencoe/McGraw-HillCarpentry & Building ConstructionLaying Out Floor Joists
Step 5
a. Mark the layout on one sill plate.
b. Make the same layout on the girder.
c. On the opposite side, offset the position of joists by 1 1/2" so that the joists can overlap at least 3".