copyright statement copyright © 2010 by zte corporation ... · pdf filezte corporation...
TRANSCRIPT

Copyright Statement
Copyright © 2010 by ZTE Corporation All rights reserved. No part of this publication may be excerpted, reproduced, translated or utilized in any form or by any means, electronic or mechanical, including photocopying and microfilm, without the prior written permission of ZTE Corporation. ZTE Corporation reserves the right to make modifications on print errors or update specifications in this manual without prior notice.
Edition 1.0 May 2010
Table of Contents
Introduction ............................................................................... 1 Safety Precautions .................................................................................... 1 Getting to Know Your FWT........................................................................ 3 Installing the Antenna................................................................................ 5 Installing the FWT ..................................................................................... 8 Switching on / off the FWT ...................................................................... 12
Call Function..............................................................................13 Making a Call .......................................................................................... 13 Dialing Extension Number....................................................................... 14 Dialing IP Number ................................................................................... 14 Receiving a Call ...................................................................................... 14 Mute........................................................................................................ 14 Menu Operations during a Call................................................................ 14 Emergency Call....................................................................................... 14
Metering Function .....................................................................15 SMS ...........................................................................................16
Create Message...................................................................................... 16 Inbox ....................................................................................................... 16 Outbox .................................................................................................... 16 Erase Messages ..................................................................................... 16 Pref Msg ................................................................................................. 17 Voice Mail................................................................................................ 17 SMS Settings .......................................................................................... 17 Send To Multi .......................................................................................... 17
Contacts ....................................................................................18 Find......................................................................................................... 18 Add to Phone .......................................................................................... 18 Add to R-UIM .......................................................................................... 19 In Phone / In R-UIM ................................................................................ 19 Group View ............................................................................................. 19
Copy the Contacts................................................................................... 19 Speed Dial............................................................................................... 20 Memory Status ........................................................................................ 20 Erase All.................................................................................................. 20
Data Service ..............................................................................21 Settings .....................................................................................22
Auto Key Guard ...................................................................................... 22 Call Setting.............................................................................................. 22 Supp. Services........................................................................................ 23 Sound ..................................................................................................... 23 Display .................................................................................................... 24 Local Number.......................................................................................... 24 Alert ........................................................................................................ 24 Security................................................................................................... 24
Recent Calls...............................................................................26 View Recent Calls ................................................................................... 26 Delete All Calls........................................................................................ 26 Call Time................................................................................................. 26
Extra ..........................................................................................27 Stop Watch.............................................................................................. 27 Alarm ...................................................................................................... 27 Scheduler................................................................................................ 27 Calculator................................................................................................ 28
Appendix ...................................................................................29 Input Methods ......................................................................................... 29 Troubleshooting ...................................................................................... 30

Introduction
1
Introduction Thank you for choosing WP560C / WP560CD / WP960C / WP960CD Fixed Wireless Terminal (FWT) of ZTE Corporation. To keep your FWT in the best condition, please read this manual carefully before use and keep it well for future use. The pictures in this user manual are only used to demonstrate your terminal’s functions, so they are maybe different from what you see on your FWT. Please refer to your FWT if there are any differences.
Safety Precautions During Operation
The FWT may interfere with heart pacemaker, hearing aid and other electronic medical devices. Therefore please follow the instructions given by your equipment suppliers or consult your doctor.
Do not attempt to disassemble the FWT and battery by yourself. Non-expert handling of the devices may cause damages.
If you want to clean your FWT, use only a dry, soft cloth with cleanser containing no alcohol, benzene or acetone.
Don’t drop the FWT or have it hit with great force. Please make sure that your FWT is powered off and the battery is taken
out before installing the antenna. Please turn off your FWT when you plug or unplug R-UIM card. Use only the original antenna. Do not use the antenna for any other
purpose. Press and hold key to turn off the FWT, instead of pulling out the plug /
socket directly.
Work Environment
The FWT can only be installed indoors. The working temperature is -10℃ ~ +55℃, so don’t operate it outside the
range. Operation under too high or too low temperature might cause problems.

2
Keep the FWT from dust, furnace or gas stove. Don’t put it under humid environment to avoid dampness, otherwise the
circuit board may be eroded and you may lose the data. Keep the FWT away from magnetic field and static electricity. Place the FWT out of the reach of small children. The FWT may cause
body injury if used as a toy. Don’t use the FWT outdoors during thunderstorms.
Battery & Power Adapter
Generally, your FWT is supplied by power adapter, and the backup battery is used only on special occasions such as blackout or other circumstances. The battery’s standby time depends on the network status.
If the battery is used for the first time, please pull out the power adapter, supply your FWT with the battery alone until the battery capacity is exhausted and your FWT is automatically powered off, then charge the backup battery until it is fully charged, and then supply your FWT with the battery alone until the battery capacity is exhausted and your FWT is automatically powered off. Circulate the procedure for three times.
During daily use, do not pull out the power adapter. The battery could be normally charged under the temperature range of 10℃~40℃. If the battery is charged under the temperature outside this range, the battery performance might be compromised or even the battery might be damaged.
Please press and hold key to turn off the FWT and then unplug the power adapter before replacing the battery.
Use only the original power adapter and battery. Using the power adapter from other manufacturers might damage the terminal. Don’t use the adapter for other purposes.
The power adapter must be used within the specified AC voltage range. When the FWT is only supplied by the battery instead of the power adapter,
please charge the battery in time to avoid over-discharging caused by low voltage.
Take out the battery if you won’t use your FWT for a long period of time and keep the battery well.
Don’t use the power adapter if the power cable is damaged. Contact the maintenance center immediately and replace the adapter.
Dispose the useless battery as required rather than throw it into the general domestic dustbin.

Introduction
3
Note: If the battery is damaged, you should avoid the contact of the substances in the battery. If your skin has contacted these substances, wash with a lot of clear water, and seek for help from your doctors if necessary.
Getting to Know Your FWT
① Handset ② Antenna ③ Host ④ LED

4
Bottom View
Rear View
① Battery cover ① Data Interface
② Power Interface
Keys
Keys Descriptions
Press this key to enter the main menu in idle mode; Use this key to select or confirm.
Press this key to enter Messages menu.
Press and hold this key to turn on / off FWT; Press this key to reject upon an incoming call; Press this key to return to the main menu; Hang up the call.
/ Left / right key
Use left / right key to move the cursor; In idle mode, press key to enter Extra; and press key to enter Contacts .
/ Up/down key
Use up/down key to select the menu option; In idle mode, press key to adjust the volume; and press
key to enter Recent Calls.
Press this key to dial a number or view the recent calls.
Press this key to return to the previous menu; Press this key to delete the inputs.

Introduction
5
Keys Descriptions
In idle mode, press this key to enter handsfree status; In other mode, press this key to return to the main menu.
Numeric / Letter Key
Press these keys to input numbers and characters; Under letter input method, press “1” key to enter common symbols.
* Key
Under any kind of input method, press * key to enter the list of symbols; When only the numbers are allowed to input, press * key to enter the symbol “*”; In idle mode, press and hold * key to mute.
# Key
Under text input method, press # key to switch among the input methods; Under digit input method, press # key to enter the symbol “#”; In idle mode, press and hold # key to lock the keypad.
Display Icons
Current signal strength Handset status indication
Unread short messages New voice mail
Keypad lockup indication Mute
Alarm on Supplied by external power
Supplied by battery
Installing the Antenna You can choose to install indoor or outdoor antenna. This chapter will describe in details how to install the antenna.
Note: Make sure to turn off your FWT, disconnect the power adapter and take out the battery before installing the antenna. Please do not dismantle the antenna after it is installed. Do not frequently revolve the antenna or circumrotate it by 360 degrees, otherwise it will affect signal reception capability and lifespan of the FWT.

6
Installing Indoor Antenna
When your FWT is close to the BTS and the signals are strong; you will just need the indoor antenna to get a good conversation quality. Please insert the indoor antenna to the antenna port on your FWT and screw it to make sure it’s well connected.
Installing Outdoor Antenna
Outdoor antenna has a better signal receiving capability than indoor antenna. When your FWT is far away from the BTS and the signals are weak, you should use outdoor antenna to get a better conversation quality. The following is the instructions for outdoor antenna installation.
Note: If you are already using an outdoor antenna, we will not provide extra indoor antennas.
1. Installing omni-directional outdoor antenna
You should install the omni-directional outdoor antenna perpendicular to the ground. Please follow the instructions given in the manual contained in the box. The antenna must be fixed with a non-metal pole.
2. Installing directional outdoor antenna
Choosing a good location for the directional outdoor antenna Directional outdoor antenna should be installed perpendicular to the ground in a higher place, e.g., roof, building top and hilltop, etc. In general, the higher the installation position is, the stronger the signal receiving capability is. If there are very tall buildings or hill-like barriers between the directional outdoor antenna and the BTS, you’d better install the antenna at least 50 meters away from the building or barrier. If possible, you should install the antenna directly over the barrier. At the same time, you’d better install the outdoor antenna as far as possible from the TV antenna to avoid interference.
Introduction
7
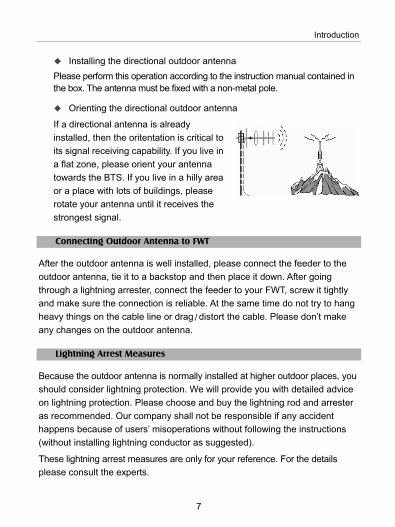
Installing the directional outdoor antenna Please perform this operation according to the instruction manual contained in the box. The antenna must be fixed with a non-metal pole.
Orienting the directional outdoor antenna
If a directional antenna is already installed, then the oritentation is critical to its signal receiving capability. If you live in a flat zone, please orient your antenna towards the BTS. If you live in a hilly area or a place with lots of buildings, please rotate your antenna until it receives the strongest signal.
Connecting Outdoor Antenna to FWT
After the outdoor antenna is well installed, please connect the feeder to the outdoor antenna, tie it to a backstop and then place it down. After going through a lightning arrester, connect the feeder to your FWT, screw it tightly and make sure the connection is reliable. At the same time do not try to hang heavy things on the cable line or drag / distort the cable. Please don’t make any changes on the outdoor antenna.
Lightning Arrest Measures
Because the outdoor antenna is normally installed at higher outdoor places, you should consider lightning protection. We will provide you with detailed advice on lightning protection. Please choose and buy the lightning rod and arrester as recommended. Our company shall not be responsible if any accident happens because of users’ misoperations without following the instructions (without installing lightning conductor as suggested).
These lightning arrest measures are only for your reference. For the details please consult the experts.
8
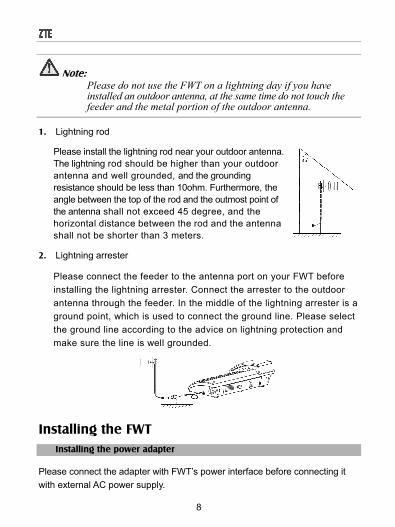
Note: Please do not use the FWT on a lightning day if you have installed an outdoor antenna, at the same time do not touch the feeder and the metal portion of the outdoor antenna.
1. Lightning rod
Please install the lightning rod near your outdoor antenna. The lightning rod should be higher than your outdoor antenna and well grounded, and the grounding resistance should be less than 10ohm. Furthermore, the angle between the top of the rod and the outmost point of the antenna shall not exceed 45 degree, and the horizontal distance between the rod and the antenna shall not be shorter than 3 meters.
2. Lightning arrester
Please connect the feeder to the antenna port on your FWT before installing the lightning arrester. Connect the arrester to the outdoor antenna through the feeder. In the middle of the lightning arrester is a ground point, which is used to connect the ground line. Please select the ground line according to the advice on lightning protection and make sure the line is well grounded.
Installing the FWT Installing the power adapter
Please connect the adapter with FWT’s power interface before connecting it with external AC power supply.

Introduction
9
Installing R-UIM card
(If your FWT doesn’t support R-UIM card, please skip this step.)
Note: If your FWT supports R-UIM card, you should install R-UIM card before use. Before installing R-UIM card, make sure your FWT is turned off and the power adapter is disconnected.
Please install the R-UIM card before installing the battery.
1. Remove the battery cover 2. Push the R-UIM card into the card holder in the direction indicated by the arrow (pay attention to R-UIM card’s cut corner position)
Installing the battery
Note: Before installing the battery, make sure your FWT is turned off and the power adapter is disconnected.
1. Remove the battery cover 2. Install battery (pay attention to polarity)

10
3. After the battery is installed 4. Install the battery cover
Charging the battery
The accompanying rechargeable battery can be used after being unpacked. To make the battery always in its best condition, please exhaust the capacity of the battery and then fully recharge it for the first three times.
The power adapter will be firstly used to supply the FWT. After the power adapter is inserted, the battery charging is automatically started. When the power adapter is unable to supply the FWT (blackout or uninserted), the battery will start to work.
When the battery capacity is low, “Low Battery” appears on the screen, and there is a sound prompt. At this point, you should charge the battery in time.
Attaching the handset

Introduction
11
Connecting the FWT to PC (only for WP560CD and WP960CD)
Wall-Mount Installation
During mount installation, plug out the handset retaining clip as shown in Fig.1, and then reverse it and plug it back as shown in Fig.2 to avoid the slip of handset in mounting position.
Fig. 1 Fig. 2
12
Switching on / off the FWT
Switch on the FWT
Hold the power key until the power-on animation appears on the LCD.
The FWT will automatically detect whether R-UIM card is inserted or available, and then the following will be displayed on the screen:
Enter PIN: if you set PIN code for R-UIM card.
Searching: search for available network.
Switch off the FWT
Hold the power key until the power-off animation appears on the LCD.

Call Function
13
Call Function
Making a Call
Directly Make a Call
1. Using the handset or hand-free key
In idle mode, pick up the handset or press key;
Dial the desired number after hearing the dialing tone;
Press key or wait for several seconds to dial automatically;
Hang up the handset or press key to end the call.
2. Preset dial
Dial the desired number directly in idle mode;
Press key to make the call;
Press key after the conversation is over.
Make a Call from Contacts
1. Press key in idle mode to enter menu and select Contacts;
2. Select Find or In Phone, search for the contact you desire;
3. Press key to dial the default number;
4. If you want to dial other type of number of the contact, press key to view the details, and press ▲/▼ key to select the number you desire, and then press key to dial the number.
Make a Call from Recent Calls
1. In idle mode, press key to enter the list of recent calls;
2. Select the number you want to dial and press key to make a call.

14
Dialing Extension Number 1. Input the direct number in idle mode, press key to select Pause and
then press key to add a “P” after the direct number;
2. Input the extension number and press key to dial.
Dialing IP Number 1. Input the number in idle mode, press key to select IP and then press
key to add “IP access number”;
2. Press key to dial.
Receiving a Call Upon an incoming call, pick up the handset or press
key to answer the call.
Mute
1. During the calling, press / key to select Mute , and then press key, the other side can’t hear your voice;
2. Press key again to return to the conversation.
Menu Operations during a Call During the calling, press / key to select Menu and then enter submenus. the call won’t be ended during the menu operations.
Emergency Call As long as your FWT can detect CDMA digital network signal, you could dial the emergency call numbers preset in the FWT to seek for help in case of emergencies.

Metering Function
15
Metering Function
Note: Only those metering models support metering function, therefore please consult your distributor if your FWT supports metering function or not.
Metering function requires network support. Please apply for this function to your local telecom operator if you need it.
The activation of metering function might affect the use of data service, but this mainly depends on the network settings. Please consult your local telecom operator for details.
After the metering function is activated, the remaining balance will be displayed on the LCD if you pick up the handset or press handsfree key in idle mode. If you have any question on the balances displayed on the LCD, please contact the operator for inquiry;
The talk duration, charges and phone number will appear on the screen during a call;
The final talk duration and charges will appear on the screen after the conversation. The FWT will automatically return to the standby mode after a few minutes or you could press key to return to the standby mode;
In call history, you could also view the talk duration and charges.
16
SMS You could send, view, reply, forward and delete short messages. The received messages are stored in the “InBox”, and the sent messages, unsent messages and the messages to be sent will be stored in the “OutBox”.
If your FWT supports R-UIM card, you could move the messages from the inbox to R-UIM card. If your FWT doesn’t support R-UIM card, please skip the contents about R-UIM card in this chapter.
Create Message 1. Enter Create Message, after inputting the text, select Continue (select
Priority to set the level); 2. Input the recipient’s number directly or select from Contacts; 3. After selecting Continue, you could:
Send: send out the message now. Save: save as draft. Send to multi-receiver: send out the message to multiple recipients.
Inbox 1. Enter Inbox, select the message, and press key to view the details;
2. Press ▲/▼ key to turn up/down the page, press ◄/► key to select Reply / Forward / Next / Erase / Sender / Move to R-UIM.
Outbox The sent messages, unsent messages and the messages to be sent will be stored in the Outbox.
Erase Messages You could delete Entire InBox, Entire OutBox, Entire R-UIM or Old InBox.
SMS
17
Pref Msg There are several preferred messages saved in the FWT. You could directly send it, edit it or insert it while creating a new message.
Voice Mail When you are unable to answer the call, you could make the other party leave a message to you through voice mail service, and then listen to your voice mail. In idle mode, hold “1” key to dial the preset voice mail number.
Note: This function requires network support.
SMS Settings Voice Mail Number: add voice mail number, please consult your local
telecom operator for the specific number. Message Alert: you could select Alert Once or Alert & Remind. Auto Erase Inbox: you could select Enable. If the inbox is full, the
terminal will automatically erase the old messages once receiving a new message.
LifeTime: LifeTime indicates the period, in which the FWT saves your messages when you fail in switching on the FWT upon the receipt of a new message.
Delivery ACK: this is to confirm if the FWT has already sent the message or not. You can activate or deactivate this function by choosing Yes or No.
Send To Multi 1. Select Add Receiver to add up to 10 recipients. Input the recipient’s
number directly or select from Contacts ; 2. After selecting the recipients, select List OK and then input the text and
send the message.

18
Contacts The contacts’ information could be saved either in the terminal or R-UIM card. You could classify the contacts saved in the terminal and manage the contacts’ information.
Note: If your terminal doesn’t need R-UIM card, the contacts’ information could be saved only in the terminal. Please skip the section that is related to R-UIM card.
Find Search by name
Input the name and then select Find to view all relevant contacts.
Search by number
1. Press key and key to select Mode;
2. Select According to Number, input the number, select Find to view all relevant contacts.
Add to Phone 1. Select from Phone / Email / Address / Web Page ; 2. Add the relevant information, and then select Next ; 3. Input the contact’s name, and then select Next ; 4. Select Options to perform the following operations:
Add New: add new information. Edit Name: edit the contact name. Classify Contact: classify the contacts into different groups. Erase Contact: delete new contacts.

Contacts
19
Add to R-UIM The new entries added into R-UIM card could only record contact’s name and single phone number.
In Phone / In R-UIM Select In Phone or In R-UIM to view all contacts saved in terminal or R-UIM card.
Modify a Contact
1. Select the desired contact , and press key to view details; 2. Select Options and then select Edit name or Add New; 3. Select the phone number of the contact, and press key, you can Edit or
Erase the number.
Delete a Contact
1. Select the desired contact, and press key to view details; 2. Press Options and then select Erase Contact.
Send a message to a Contact
1. Select the desired contact and press key to view details; 2. Select the phone number and press key, then select Send text msg.
Group View Select Group View to view the contacts in certain group.
Copy the Contacts Copy one
1. Select the contact, and press key to view the details; 2. Select the number and press key to select Save on R-UIM / Save on
Phone.
20
Copy All
Select Sync to RUIM to copy from Phone to R-UIM; select Sync from RUIM to copy from R-UIM to Phone.
Speed Dial The FWT provides 8 speed dial numbers ranging from 2 to 9.
Add
1. Select the contact , and press key to view details; 2. Select the number, press key to select Add to Speed Dial.
Make a call using speed dial number in idle mode
In idle mode, press and hold the corresponding numeric key of speed dial number to dial directly.
View all speed dial numbers
Select Speed Dial List to view all speed dial numbers.
Memory Status You can check the current memory status of the phonebook.
Erase All Select In Phone or In R-UIM to delete.

Data Service
21
Data Service (only for WP560CD and WP960CD)
Through the connection of your FWT and PC, you can get High-speed Packet Data Dial-up Internet Access, and receive / send a fax.
Please refer to <Data Services User Guide> in USB installation CD.

22
Settings
Auto Key Guard Auto Key Guard could prevent the misoperations caused by wrong keypress. As the keypad is locked, press key and * key to unlock.
Call Setting Originate Mode
You can choose the originate mode. You can select: After 3s: make a call automatically 3 seconds after inputting the number.
After 6s: make a call automatically 6 seconds after inputting the number. Sent Press: make a call only by pressing .
Call Restrict
Specified: set call barring of 5 incoming calls and outgoing calls. National: set call barring of domestic long-distance outgoing calls
(number started with “0”). International: set call barring of International long-distance outgoing
calls. Origination: set call barring of all outgoing calls (emergency number
and service number allowed). Password: change call restrict password.
Note: You need input the password (initial password is 0000) to enter National, International and Origination.
Hot Line
If hotline mode is activated, dial any number to call the hotline number (not including emergency number).

Settings
23
Voice Privacy
Voice Privacy allows you to encrypt your voice during a conversation, but system support is required for this service. If you need this service, please contact your local telecom operator.
IP Call
You can make IP calls conveniently. Please contact your local telecom operator to apply for the service and consult them for the operations.
1. Enter Setting to select ON or OFF;
2. Enter Edit to edit the IP access number.
Any Key Answer
Select ON to activate then you can press any key (except ▲/▼/◄/►key) to answer upon an incoming call.
Supp. Services Call Waiting
Call waiting allows you to answer the second call while you’re in the existing call.
Call Forwarding
Call forwarding allows you to forward the incoming call to the preset number. Please contact your local telecom operator for this function. You can select: All, Busy, No Answer, Default, Cancel All or Number.
Note: The above functions require network support.
Sound Volume: select Ringer Volume / Call Volume / Key Beep; press
▲/▼/◄/► key to adjust the volume.

24
Ringer Mode: select Ringer On or Ringer Off. Ringer Type: select the type of ringer. Key Beep: turn ON/OFF the key beep. Key Tone Length: select Normal or Long. SMS Alert Type: select the type of the alert upon the receiving of a
new message. Clock Ringer Type: select the type of the alert upon the alarm.
Display Backlighting: select Never, 5s or 10s. Banner: view and edit the banner on idle screen. Contrast: press ▲/▼ or / to adjust the contrast. Menu Format: select large or small icons for main menu. Time Format: select 12HR or 24HR. Date Format: select MM/DD/YYYY, DD/MM/YYYY or YYYY/MM/DD.
Local Number You could edit the local number under this menu.
Alert Missed Call: select if there is alert or not upon a missed call. Minute Alert: select to turn on / off alert during the calling every minute.
Security For the terminals requiring R-UIM card, you need input the PIN code (the default PIN code is “1234”). Please change the PIN code as soon as you can. For the terminals requiring no R-UIM card, simply input the code “0000”.
Phone Reset
You could restore the FWT to factory settings.

Settings
25
PIN Lock
As you set PIN Lock ON, the terminal will ask you to input PIN code after it is powered on. The terminal will be unlocked after you input the correct PIN code. Otherwise, only emergency call is allowed.
PIN Change
You could change PIN code under this menu.
Note: You need set/change PIN code only for those terminals requiring R-UIM card. The R-UIM card will be locked if you enter wrong PIN code three times in succession, and in this case you need PUK code to unlock. The PIN code and PUK code may be provided together with the R-UIM card. If not, contact your service provider. The default PIN code is normally 1234.
Sec Code Change
You need change security code for those terminals requiring no R-UIM card.

26
Recent Calls
View Recent Calls 1. Select Missed Calls, Incoming Calls, Outgoing Calls or All Recent Calls;
2. Select the record you want to view and press key to select:
Call Information: view details.
Edit Number: edit the number.
Delete Entry: delete the record.
Send text msg: send messages.
Save to Phone: save the number into phone.
Save to Existing: save to existing record.
3. Press key to directly dial this number.
Delete All Calls You could delete Missed Calls, Incoming Calls, Outgoing Calls or All Recent Calls.
Call Time You can check Outgoing Times, Incoming times and Total Times. When viewing the call time, select Clear to clear the relevant record.
Note: The call time here is just for reference, which can’t be regarded as the charging time.

Extra
27
Extra
Stop Watch Select Start to begin counting time; select Stop to stop counting time; select Reset to clear the records.
Alarm Set Alarm
1. Select Set to set the alarm;
2. Press alphanumeric keys or ▲/▼ to input the time, press / to switch between hour and minute;
3. Select the alarm mode Once / Daily / Weekdays;
4. Press key to confirm.
Turn off alarm during the alarm's ringing
When the alarm rings, select OFF to turn off the alarm; select Snooze to delay the alarm by 10 minutes.
Disable
Select Disable to turn off the alarm.
Note: The alarm can work only when the terminal is turned on.
Scheduler Add Event
1. Enter Add Event, Input the name of new scheduler, then select Next;

28
2. Press / to switch among Start, Duration or Alarm, press ▲/▼ to set;
3. After the setting, press key to input the contents of events and then select Next to confirm.
View the scheduler
You can view the scheduler per day or per month.
Edit
Enter one scheduler and select Edit to edit the schedule.
Erase
Enter one scheduler and select Erase to delete the schedule.
Options
Set Work Hours: set working time, namely, the beginning and ending time of work in scheduler every day.
Auto Delete: delete the record time for event after the event happened.
Default Alarm: set the default of alarm when you add the scheduler.
Calculator The calculator enables you to have basic mathematical computation.
Note: The definition of calculator is limited and rounding errors may occur.

Appendix
29
Appendix
Input Methods The FWT provides the following input methods: English word input method, English Letter (uppercase and lowercase) input method, Number input method and Symbol input method.
Input Method Operation Methods
English Letter (uppercase and lowercase) input method
1 In text input mode, press # key to switch to ABC/abc input method;
2 Press the corresponding alphanumeric key once to input the first letter, while press the key twice to input the second letter, and so on;
3 Wait for the cursor to move to the right, and input the next letter;
4 Press 1 key to input some common symbols, and press 0 key to input space.
Number input Method
1 In text input mode, press # key to switch to 123 input method;
2 Press the corresponding numeric keys to input numbers.
English word Input Method
1 In text input mode, press # key to switch to Word input method;
2 Press the corresponding alphanumeric keys until the desired word appeared on the screen;
3 If the word on the screen is not the one you want, you may press ▲/▼ key to view other suited words;
4 Select the desired word and then press key; 5 Press 0 key to input space.
Symbol Input Method
1 In non number input mode, press * key to enter the list of symbols;
2 Press ▲/▼ key to switch the screen, press the corresponding alphanumeric keys to input the symbols.
Delete Characters
Press key to delete the previous input; Press and hold key to delete all inputs.
Move the cursor to left or right
Press or key.

30
Troubleshooting
Problems Solutions
No display on the LCD after the FWT is switched on
Check the status of power switch; Check the quality of the adapter and battery, and check if the connection is reliable; Switch on the FWT after everything is OK.
No display on the LCD after the FWT is switched on and supplied by battery
Check if the battery is charged and correctly installed; Check if the battery socket and plug are well connected, and if the battery’s connection cable is broken or has welding problem; Switch on the FWT after everything is OK.
No signal strength indication
Change the antenna’s position; Change the FWT’s position; Switch off the FWT and switch it on to check if the FWT starts normally.
No dial tone after the handset is picked up
Hang up and pick up the handset again; Check the connection between the terminal and the handset.
“Adapter Error!” displayed on the LCD and there is a sound alert
Pull out the power adapter after switching off the FWT, and replace with the original power adapter.
No ring for a incoming call
Check the Settings in Sound, and check if Mute is enabled.
No Internet access (only for WP560CD and
WP960CD)
Firstly check if USB data cable connection is correct, and then operate according to the instructions in the CD; Switch off the FWT and switch it on.
Prompt to input PUK
R-UIM card is locked due to successive inputting false PIN code for three times. Please contact with operators.