core protection module 1. - ibm bigfix support center...
TRANSCRIPT
Core Protection Module 1.6 powered by
User’s Guide
July, 2010

BigFix® Core Protection Module 1.6 powered by
Copyright © 2010 BigFix, Inc. All rights reserved.
Copyright © 1998-2010 Trend Micro Incorporated. BigFix®, Fixlet®, Relevance Engine®, Powered by BigFix™ and related BigFix logos are trademarks of BigFix, Inc. Trend Micro, the Trend Micro t-ball logo, OfficeScan, Control Manager, Damage Cleanup Services, ScanMail, ServerProtect, and TrendLabs are trademarks or registered trademarks of Trend Micro, Inc. or its affiliated entities. All other product or company names may be trademarks or registered trademarks of their respective owners. BigFix and Trend Micro use of any other company’s trademarks, trade names, product names and logos or images of the same does not necessarily constitute: (1) an endorsement by such company of BigFix, Trend Micro, or their products, or (2) an endorsement of such company or its products by either BigFix or Trend Micro. No part of this documentation or any related software may be reproduced, transmitted, or otherwise distributed in any form or by any means (electronic or otherwise) without the prior written consent of BigFix, Inc. or Trend Micro, Inc. You may not use, modify, perform or display this documentation or any related software for any purpose except in connection with your use or evaluation of the BigFix/Trend Micro software delivered herewith as expressly set forth in a separate written agreement executed by BigFix, Inc. or Trend Micro, Inc. and any other use, including the reverse engineering of such software or creating compatible software or derivative works, is prohibited. If the license to the software that this documentation accompanies is terminated, you must immediately return this documentation and any related software to BigFix, Inc. or Trend Micro, Inc., or destroy all copies thereof that you may have and so certify upon request by BigFix, Inc. or Trend Micro Incorporated. Both BigFix, Inc. and Trend Micro, Inc. reserve the right to make changes to this document and to the products described herein without notice.
All rights reserved.
User’s Guide © 2010 BigFix, Inc. 2
BigFix® Core Protection Module powered by
User’s Guide © 2010 BigFix, Inc. 3
CONTENTS ontents C
Part 1 ________________________________________________________________________ 5
Prerequisites ____________________________________________________5 How CPM Works _________________________________________________________________________5 Types of Scanning in CPM __________________________________________________________________5 Process Overview _______________________________________________________________________ 6 Navigating CPM in the New BigFix Console ____________________________________________________7 Components_____________________________________________________________________________7 Working with Content____________________________________________________________________ 9
Composite View_______________________________________________________________________ 13 New Features in This Version ______________________________________________________________ 14 System Requirements ____________________________________________________________________ 16 Incompatible Software ___________________________________________________________________ 18
Part 2 _______________________________________________________________________ 19
Installation_____________________________________________________ 19 Installing Server Components______________________________________________________________ 19 Removing Conflicting Products ____________________________________________________________20 Installing Endpoints______________________________________________________________________ 21 Set ActiveUpdate Server Pattern Update Interval ______________________________________________22 Activating Analyses ______________________________________________________________________23 Upgrading from CPM Version 1.5 ___________________________________________________________25
Part 3 _______________________________________________________________________ 26
Configuration __________________________________________________26 Configuring Updates _____________________________________________________________________26
Manual Updates_______________________________________________________________________27 Automatic Updates ____________________________________________________________________29 Updating from the Cloud _______________________________________________________________29 Rolling Back Updates__________________________________________________________________ 30
Using the Configuration Wizards ___________________________________________________________ 31 Navigating Through a Configuration Wizard ________________________________________________32
Using the Client Console _________________________________________________________________ 36 Manually Scanning the Client Console ____________________________________________________ 39 Testing the CPM Client Console __________________________________________________________41
Part 4 _______________________________________________________________________ 43
Viewing Reports ________________________________________________43 Overview ______________________________________________________________________________43 Version _______________________________________________________________________________ 46 Infection_______________________________________________________________________________47 Web Reputation________________________________________________________________________ 48 Port Violations _________________________________________________________________________ 48
BigFix® Core Protection Module 1.6 powered by
Web Reports __________________________________________________________________________ 48
Part 5 ________________________________________________________________________51
General Tasks __________________________________________________ 51 Core Protection Module Tasks _____________________________________________________________ 51
Scanning_____________________________________________________________________________ 51 Enable Client Dashboards _______________________________________________________________ 51 Uploading Quarantined Files_____________________________________________________________53 Uploading Infection Logs _______________________________________________________________54
Web Reputation Tasks____________________________________________________________________54 Enabling Web Reputation _______________________________________________________________54 Setting the Security Level _______________________________________________________________54 Log Maintenance______________________________________________________________________55 Configuring Proxies ____________________________________________________________________55 Uploading Web Reputation Logs _________________________________________________________55 Enable/Disable Collection of Visited Sites__________________________________________________ 56
Common Firewall_______________________________________________________________________ 56 Uploading Firewall Logs _______________________________________________________________ 56
Appendix ______________________________________________________ 57 Viewing Analyses ________________________________________________________________________57 Troubleshooting _______________________________________________________________________ 58 Uninstalling CPM _______________________________________________________________________ 58 FAQs _________________________________________________________________________________ 59 Technical Support _______________________________________________________________________61
User’s Guide © 2010 BigFix, Inc. 4
BigFix® Core Protection Module powered by
Part 1
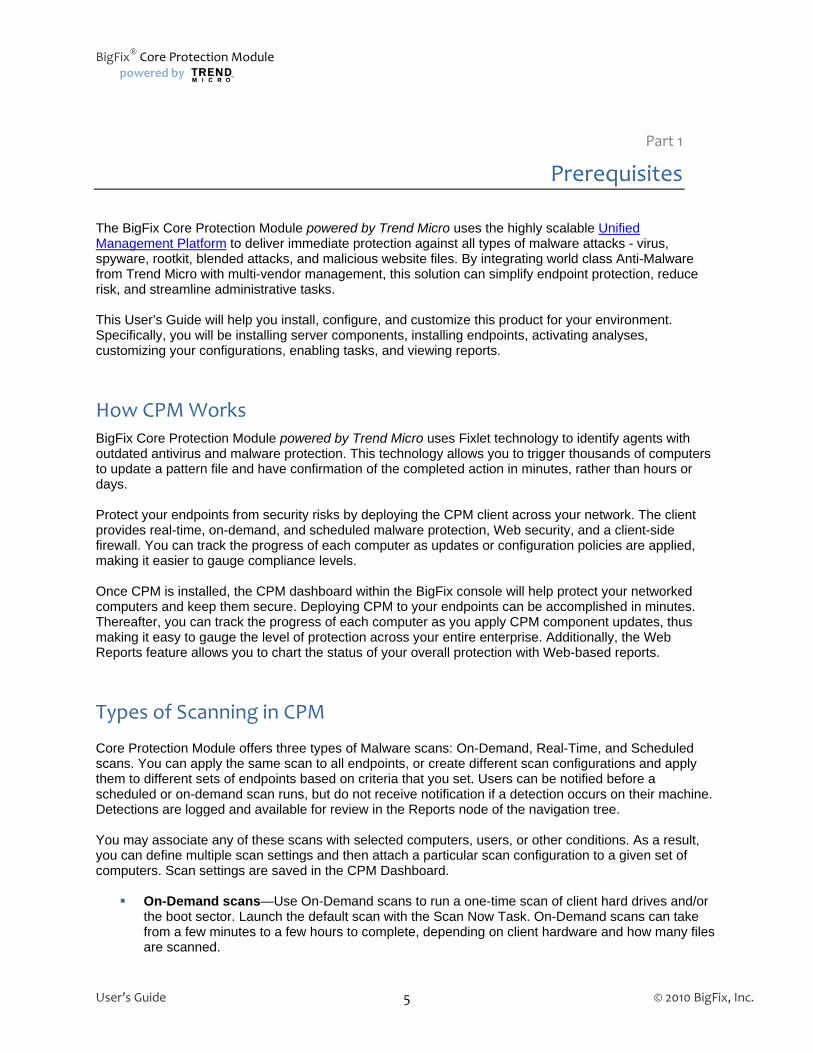
Prerequisites The BigFix Core Protection Module powered by Trend Micro uses the highly scalable Unified Management Platform to deliver immediate protection against all types of malware attacks - virus, spyware, rootkit, blended attacks, and malicious website files. By integrating world class Anti-Malware from Trend Micro with multi-vendor management, this solution can simplify endpoint protection, reduce risk, and streamline administrative tasks. This User’s Guide will help you install, configure, and customize this product for your environment. Specifically, you will be installing server components, installing endpoints, activating analyses, customizing your configurations, enabling tasks, and viewing reports.
How CPM Works BigFix Core Protection Module powered by Trend Micro uses Fixlet technology to identify agents with outdated antivirus and malware protection. This technology allows you to trigger thousands of computers to update a pattern file and have confirmation of the completed action in minutes, rather than hours or days. Protect your endpoints from security risks by deploying the CPM client across your network. The client provides real-time, on-demand, and scheduled malware protection, Web security, and a client-side firewall. You can track the progress of each computer as updates or configuration policies are applied, making it easier to gauge compliance levels. Once CPM is installed, the CPM dashboard within the BigFix console will help protect your networked computers and keep them secure. Deploying CPM to your endpoints can be accomplished in minutes. Thereafter, you can track the progress of each computer as you apply CPM component updates, thus making it easy to gauge the level of protection across your entire enterprise. Additionally, the Web Reports feature allows you to chart the status of your overall protection with Web-based reports.
Types of Scanning in CPM
Core Protection Module offers three types of Malware scans: On-Demand, Real-Time, and Scheduled scans. You can apply the same scan to all endpoints, or create different scan configurations and apply them to different sets of endpoints based on criteria that you set. Users can be notified before a scheduled or on-demand scan runs, but do not receive notification if a detection occurs on their machine. Detections are logged and available for review in the Reports node of the navigation tree. You may associate any of these scans with selected computers, users, or other conditions. As a result, you can define multiple scan settings and then attach a particular scan configuration to a given set of computers. Scan settings are saved in the CPM Dashboard.
On-Demand scans—Use On-Demand scans to run a one-time scan of client hard drives and/or the boot sector. Launch the default scan with the Scan Now Task. On-Demand scans can take from a few minutes to a few hours to complete, depending on client hardware and how many files are scanned.
User’s Guide © 2010 BigFix, Inc. 5

BigFix® Core Protection Module 1.6 powered by
Real-Time scans— This type of scan checks files for malicious code and activity as they are
opened, saved, copied or otherwise being accessed. These scans are typically imperceptible to the end-user. Real-time scans are especially effective in protecting against Internet-borne threats and harmful files being copied to the client.
Scheduled scans— You can schedule an On-Demand scan to trigger at a given time, day, or
date. You can also have the scan automatically reoccur according to the schedule you set to configure and run the default Start Scan Now task.
Process Overview
What you are about to do:
The purpose behind these actions:
1. Install Server Components Install components that gather pattern updates from Trend Micro 2. Deploy CPM Deploy the CPM engine onto each machine 3. Set ActiveUpdate Server Set interval at which the server checks if new pattern files have been published by Trend Micro 4. Activate Analyses Tell clients to report data on their configuration and status 5. Configure Endpoints Use Tasks and Wizards to customize settings used by your
endpoints and server 6. Monitor CPM Deployment Monitor the settings, details, and overall health of your
deployment 7. Web Reports View high level reports and information on endpoint status and
infections
User’s Guide © 2010 BigFix, Inc. 6
BigFix® Core Protection Module powered by
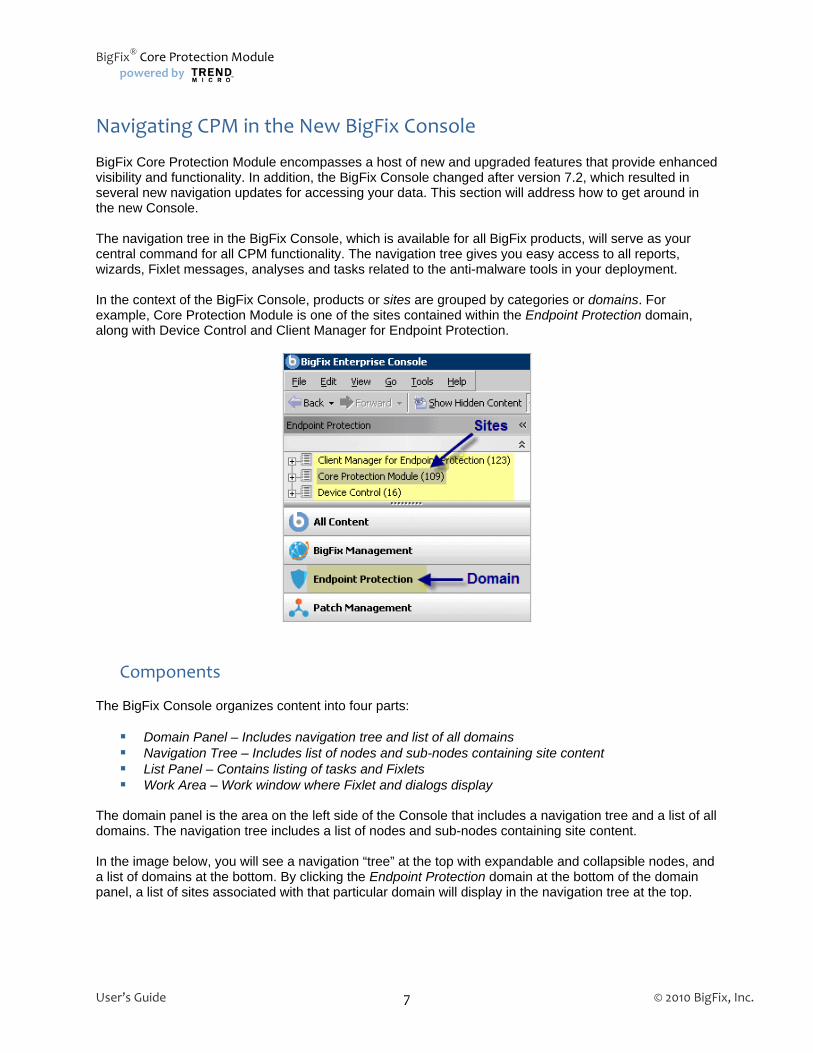
Navigating CPM in the New BigFix Console
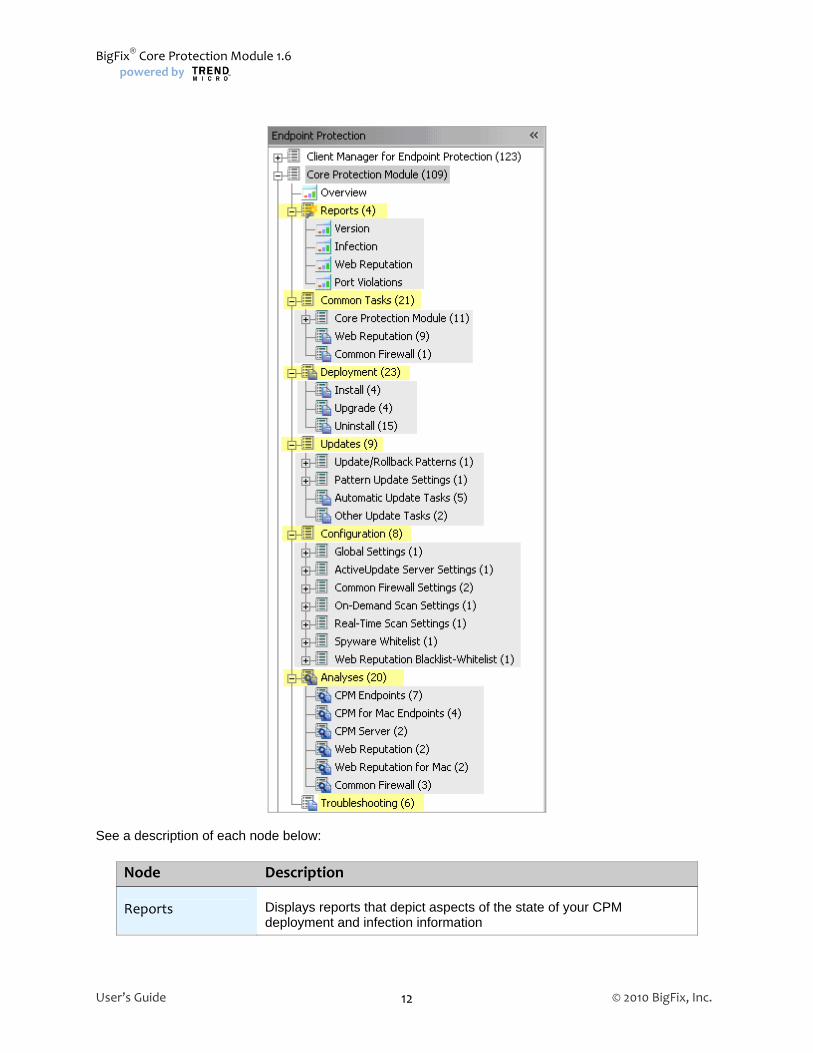
BigFix Core Protection Module encompasses a host of new and upgraded features that provide enhanced visibility and functionality. In addition, the BigFix Console changed after version 7.2, which resulted in several new navigation updates for accessing your data. This section will address how to get around in the new Console. The navigation tree in the BigFix Console, which is available for all BigFix products, will serve as your central command for all CPM functionality. The navigation tree gives you easy access to all reports, wizards, Fixlet messages, analyses and tasks related to the anti-malware tools in your deployment. In the context of the BigFix Console, products or sites are grouped by categories or domains. For example, Core Protection Module is one of the sites contained within the Endpoint Protection domain, along with Device Control and Client Manager for Endpoint Protection.
Components
The BigFix Console organizes content into four parts: Domain Panel – Includes navigation tree and list of all domains Navigation Tree – Includes list of nodes and sub-nodes containing site content List Panel – Contains listing of tasks and Fixlets Work Area – Work window where Fixlet and dialogs display
The domain panel is the area on the left side of the Console that includes a navigation tree and a list of all domains. The navigation tree includes a list of nodes and sub-nodes containing site content. In the image below, you will see a navigation “tree” at the top with expandable and collapsible nodes, and a list of domains at the bottom. By clicking the Endpoint Protection domain at the bottom of the domain panel, a list of sites associated with that particular domain will display in the navigation tree at the top.
User’s Guide © 2010 BigFix, Inc. 7
BigFix® Core Protection Module 1.6 powered by
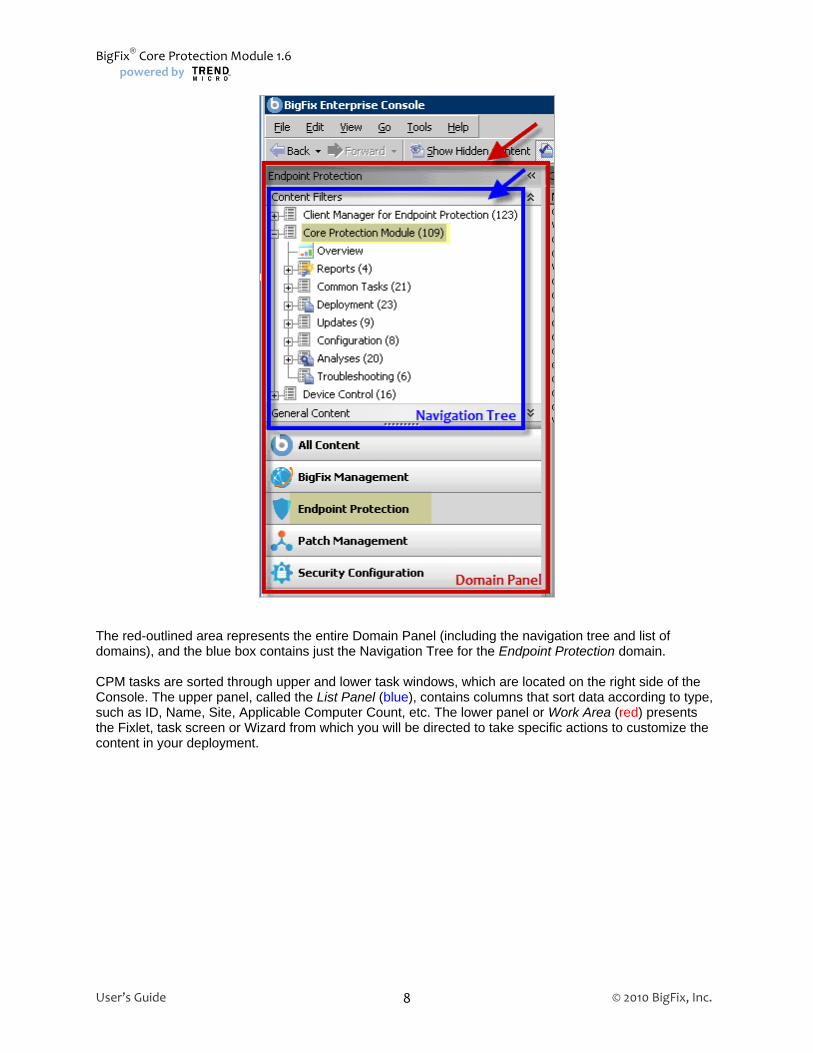
The red-outlined area represents the entire Domain Panel (including the navigation tree and list of domains), and the blue box contains just the Navigation Tree for the Endpoint Protection domain. CPM tasks are sorted through upper and lower task windows, which are located on the right side of the Console. The upper panel, called the List Panel (blue), contains columns that sort data according to type, such as ID, Name, Site, Applicable Computer Count, etc. The lower panel or Work Area (red) presents the Fixlet, task screen or Wizard from which you will be directed to take specific actions to customize the content in your deployment.
User’s Guide © 2010 BigFix, Inc. 8

BigFix® Core Protection Module powered by
Working with Content The navigation tree organizes CPM content into expandable and collapsible folders that enable you to easily navigate and manage relevant components in your deployment. Click the plus sign (+) to expand the navigation tree nodes and the minus sign (-) to collapse them.
When you click on the Endpoint Protection domain at the bottom of your screen, you will see content related to the CPM “site” organized into expandable nodes.
User’s Guide © 2010 BigFix, Inc. 9
BigFix® Core Protection Module 1.6 powered by
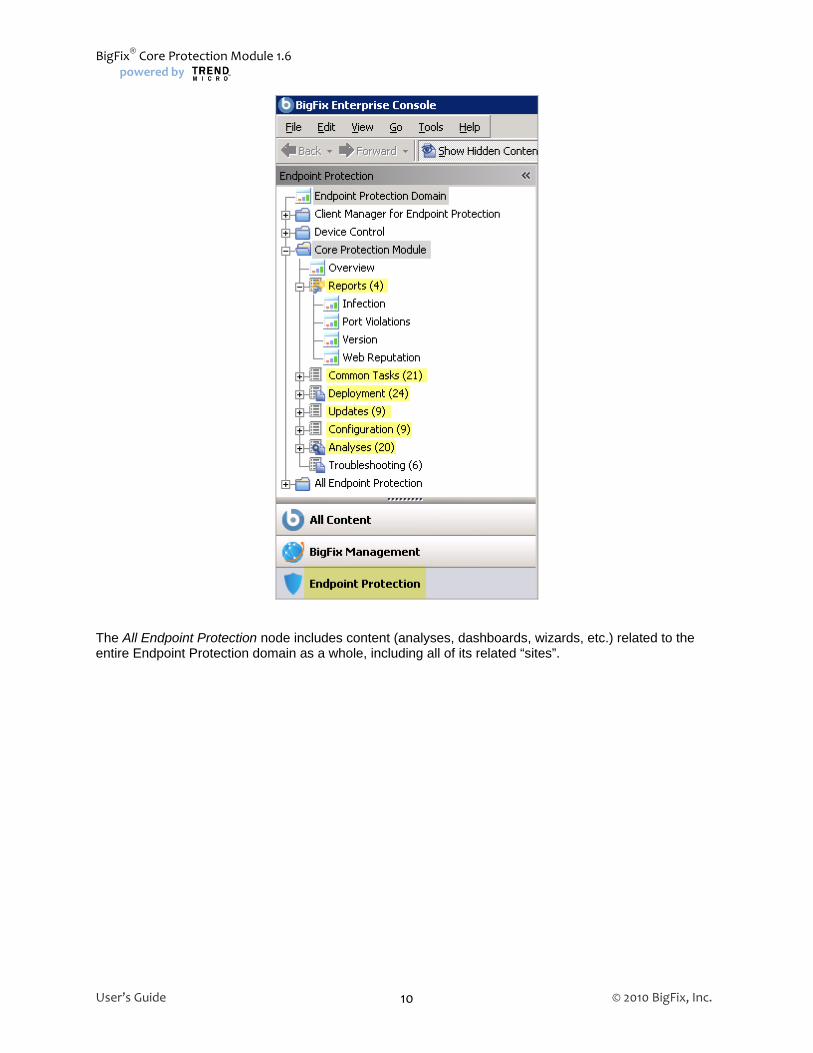
The All Endpoint Protection node includes content (analyses, dashboards, wizards, etc.) related to the entire Endpoint Protection domain as a whole, including all of its related “sites”.
User’s Guide © 2010 BigFix, Inc. 10
BigFix® Core Protection Module powered by
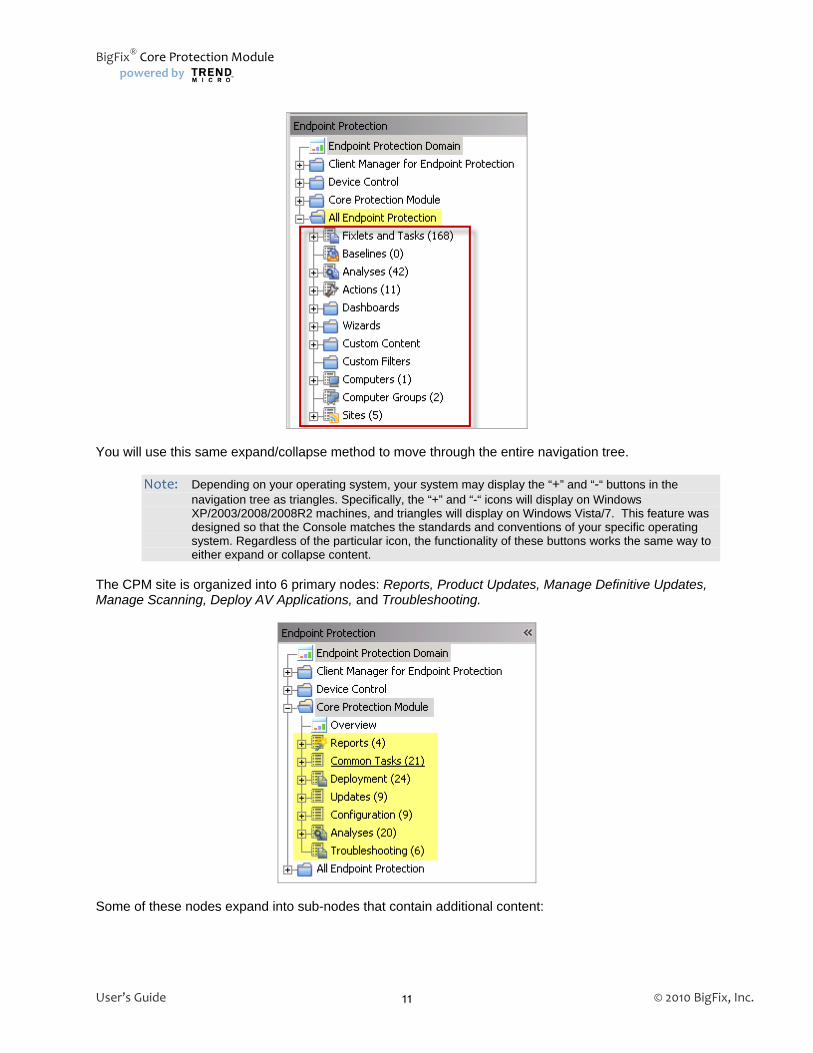
You will use this same expand/collapse method to move through the entire navigation tree.
Note: Depending on your operating system, your system may display the “+” and “-“ buttons in the navigation tree as triangles. Specifically, the “+” and “-“ icons will display on Windows XP/2003/2008/2008R2 machines, and triangles will display on Windows Vista/7. This feature was designed so that the Console matches the standards and conventions of your specific operating system. Regardless of the particular icon, the functionality of these buttons works the same way to either expand or collapse content.
The CPM site is organized into 6 primary nodes: Reports, Product Updates, Manage Definitive Updates, Manage Scanning, Deploy AV Applications, and Troubleshooting.
Some of these nodes expand into sub-nodes that contain additional content:
User’s Guide © 2010 BigFix, Inc. 11
BigFix® Core Protection Module 1.6 powered by
See a description of each node below:
Node Description
Reports Displays reports that depict aspects of the state of your CPM deployment and infection information
User’s Guide © 2010 BigFix, Inc. 12
BigFix® Core Protection Module powered by
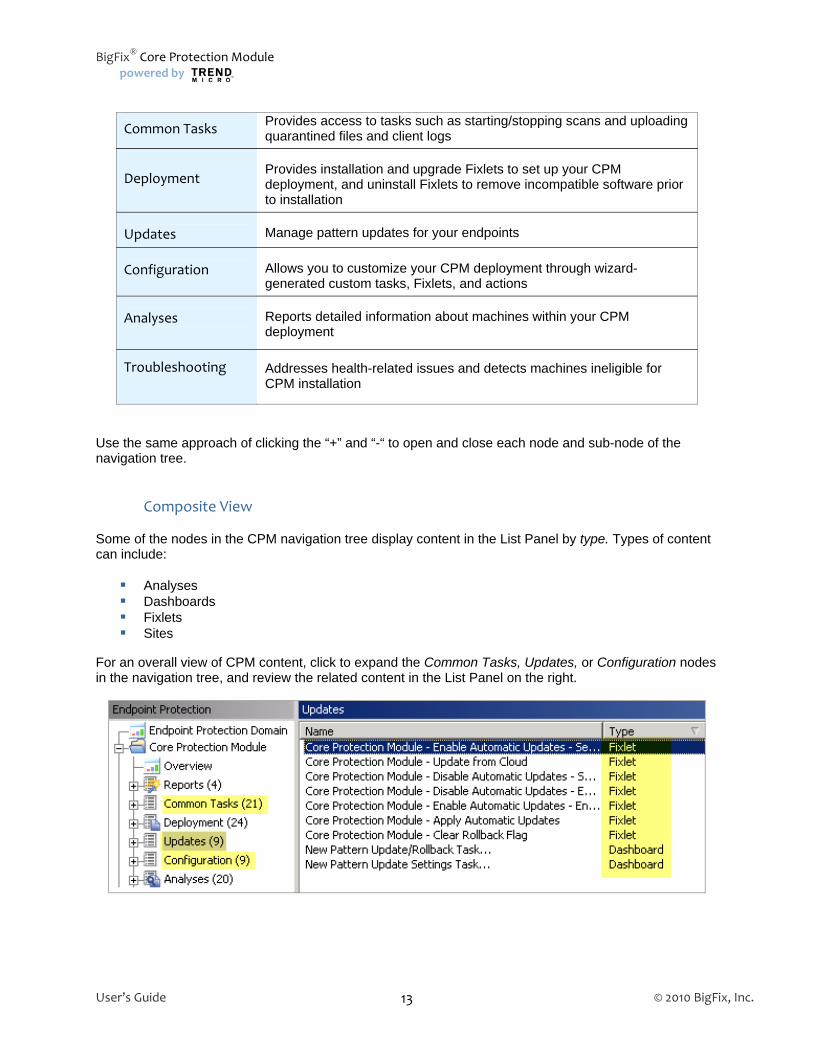
Common Tasks Provides access to tasks such as starting/stopping scans and uploading quarantined files and client logs
Deployment
Provides installation and upgrade Fixlets to set up your CPM deployment, and uninstall Fixlets to remove incompatible software prior to installation
Updates Manage pattern updates for your endpoints
Configuration Allows you to customize your CPM deployment through wizard-generated custom tasks, Fixlets, and actions
Analyses
Reports detailed information about machines within your CPM deployment
Troubleshooting Addresses health-related issues and detects machines ineligible for CPM installation
Use the same approach of clicking the “+” and “-“ to open and close each node and sub-node of the navigation tree.
Composite View Some of the nodes in the CPM navigation tree display content in the List Panel by type. Types of content can include: Analyses Dashboards Fixlets Sites
For an overall view of CPM content, click to expand the Common Tasks, Updates, or Configuration nodes in the navigation tree, and review the related content in the List Panel on the right.
User’s Guide © 2010 BigFix, Inc. 13

BigFix® Core Protection Module 1.6 powered by
New Features in This Version
Windows 7® and Windows 2008 R2® Platform Support Upgrade to ESP 7.2.5 agent, which supports Windows 7 and Windows 2008 R2 operating systems before attempting to install CPM.
New Client Console This new version of CPM offers a new Client Console for endpoints with Manual Scan, Scan Results, and Update Now features.
Automatic Pattern File Updates The previous version of CPM required you to manually deploy updates to your endpoints. The new Automatic Pattern File Updates feature now allows you to automatically flow pattern updates to your endpoints. This sophisticated feature enables you to optionally set up your BigFix deployment to automatically take downloaded pattern files and distribute them to specific clients without BigFix console operator action. When configured, this delivery method will automatically update ESP Clients with the latest pattern and engine files. Additional configuration steps are required to enable Automatic Updates. Refer to Page 29 of this document for more detail.
Pattern Set Rollback Pattern Set Rollback allows you to roll back recently deployed (the last 15) pattern sets if an issue or conflict is found with those patterns. Access this feature through the Updates node of the navigation tree, then select Update/Rollback Patterns. Select the Pattern Update wizard, deploy the rollback action, and target it to applicable machines. Once a client is in the rollback state, no pattern update actions will be relevant until the rollback flag is cleared. Use the Clear Rollback Flag task under Update > Other Update Tasks to clear the flag.
Spyware/Grayware Restore The Spyware/Grayware Restore feature allows you to restore (or essentially un-quarantine) objects that your system has quarantined as potential Spyware/Grayware. Quarantined Spyware/Grayware files are stored as a snapshot. Each “snapshot” can include multiple Spyware/Grayware files. CPM will store up to 15 of these snapshots on any given client. In the event that CPM tags a legitimate file as spyware, this feature gives you the flexibility to restore the file to its original location. From the navigation tree, select Tasks > CPM > Restore Spyware/Grayware Wizard. Then select the items you want to restore, click Restore, and target your action in the Take Action dialog.
User’s Guide © 2010 BigFix, Inc. 14
BigFix® Core Protection Module powered by
Update From the Cloud This new feature allows you to set BigFix clients to get pattern updates directly from the Trend Micro Smart Protection Network “in the cloud”. This feature is useful for laptops in your environment that operate remotely outside of your main corporate infrastructure. For details about how to configure this update, see page 24 of this document.
Client UI Dashboard The Client UI dashboard allows you to optionally display a client side dashboard containing basic computer information, CPM information and statistics, as well as recently detected viruses or spyware infections. There is also a hidden Technician Dashboard that will display more technical computer information and relevant Fixlet messages for that computer. To display the Technician Dashboard, enter the keyboard shortcut Control-Alt-Shift “T” from the Client Dashboard. You may enable/disable client side dashboards through the Tasks node of the navigation tree under CPM.
Note: This feature requires BigFix client version 7.2.4.60 or higher.
Web Reputation This version of the CPM has integrated the functionality and features of the previously standalone product, Web Protection Module. Within CPM, the integrated product is now called Web Reputation. The Web Reputation feature prevents Web-based malware from infecting your users’ computers by intercepting malware before it reaches your users’ computers. Access and enable Web Reputation tasks through the Reports and Configuration nodes of the navigation tree. Web Reputation also allows enabling and disabling the collection of visited sites. If you currently have the Web Protection Module deployed in your environment, it must be uninstalled prior to installation of CPM. You can use the Blacklist/Whitelist wizard available in the CPM Dashboard to migrate any Blacklist/Whitelist policies created using the standalone Web Protection Module.
Common Firewall Common Firewall will block attempts by applications to send network traffic over prohibited ports. This feature can be configured to protect against both inbound and outbound port violations on your endpoints. You can set the Firewall to low, medium, or high security levels, which can be configured through the Common Firewall wizards in the Configuration node. You can monitor firewall policies through the Port Violation reports found under the Reports node of the navigation tree.
Note: This feature will only appear in your CPM Dashboard if you have purchased and are subscribed to the Trend Micro Common Firewall site.
User’s Guide © 2010 BigFix, Inc. 15
BigFix® Core Protection Module 1.6 powered by
System Requirements Minimum requirements for the Core Protection Module endpoints are outlined below by operating system: For Windows 2000
Supported operating systems
Microsoft™ Windows™ 2000 with Service Pack 3 or 4 Microsoft Cluster Server 2000 Hardware Requirements
300MHz Intel Pentium processor or equivalent 512MB of RAM 700MB of available disk space Monitor that supports 800 x 600 resolution at 256 colors
For Windows XP / 2003 32-bit Edition
Supported operating systems
Microsoft Windows XP Professional 32-bit Edition with Service Pack 1 or 2 Microsoft Windows Server 2003 32-bit Edition with or without Service Pack 1 or 2 Microsoft Windows 2003 Web Edition, 32-bit Edition with or without Service Pack 1 or 2 Microsoft Windows Server 2003 R2 32-bit Edition with or without Service Pack 1 or 2 Microsoft Windows Storage Server 2003 32-bit Edition
Hardware requirements
300MHz Intel Pentium processor or equivalent; AMD(TM) x64 or Extended Memory 64
Technology (EM64T) processor architectures also supported 512MB of RAM 700MB of available disk space Monitor that supports 800 x 600 resolution at 256 colors
For Windows XP / 2003 64-bit Edition
Supported operating systems
Microsoft Windows XP Professional 64-bit Edition with Service Pack 1 or 2 Microsoft Windows Server 2003 64-bit Edition with or without Service Pack 1 or 2 Microsoft Windows 2003 Web Edition, 64-bit Edition with or without Service Pack 1 or 2 Microsoft Windows Server 2003 R2 64-bit Edition with or without Service Pack 1 or 2 Microsoft Windows Storage Server 2003 64-bit Edition Microsoft Cluster Server 2003 64-bit Edition Hardware requirements
Intel x64 processor, AMD x64 processor
User’s Guide © 2010 BigFix, Inc. 16
BigFix® Core Protection Module powered by
512MB of RAM 700MB of available disk space Monitor that supports 800 x 600 resolution at 256 colors
For Windows Vista
Supported operating systems
Microsoft Windows Vista Business 32-bit Edition (with latest service pack) Microsoft Windows Vista Enterprise 32-bit Edition (with latest service pack) Microsoft Windows Vista Ultimate 32-bit Edition Microsoft Windows Vista Business 64-bit Edition Microsoft Windows Vista Enterprise 64-bit Edition Microsoft Windows Vista Ultimate 64-bit Edition Hardware requirements
800MHz Intel Pentium processor or equivalent; AMD x64 or Extended Memory 64
Technology (EM64T) processor architectures also supported 1GB of RAM 700MB of available disk space Monitor that supports 800 x 600 resolution at 256 colors
For Windows Server 2008
Supported operating systems
Microsoft Windows Server 2008 32-bit Edition Microsoft Windows Server 2008 64-bit Edition Microsoft Windows Server 2008 R2 32-bit Edition Microsoft Windows Server 2008 R2 64-bit Edition Hardware requirements
800MHz Intel Pentium processor or equivalent; AMD x64 or Extended Memory 64
Technology (EM64T) processor architectures also supported 1GB of RAM 700MB of available disk space Monitor that supports 800 x 600 resolution at 256 colors
For Windows 7
Supported operating systems
Microsoft Windows 7 32-bit Edition Microsoft Windows 7 64-bit Edition Hardware requirements
800MHz Intel Pentium processor or equivalent; AMD x64 or Extended Memory 64
Technology (EM64T) processor architectures also supported
User’s Guide © 2010 BigFix, Inc. 17
BigFix® Core Protection Module 1.6 powered by
1GB of RAM 700MB of available disk space Monitor that supports 800 x 600 resolution at 256 colors
Incompatible Software
Other AntiVirus software Computer Associates ARCserve Backup HSM (Hierarchical Storage Management) Backup Software Symantec Software Virtualization Solution
In addition, the following list of products should be removed using their respective uninstallers prior to CPM deployment:
Trend Micro ServerProtect Trend Micro Internet Security 2008 Trend Micro Pc-cillin 2007 Trend Micro Pc-cillin 2006 Trend Micro Pc-cillin 2005 Trend Micro Pc-cillin 2004 (AV) Trend Micro Pc-cillin 2004 (TIS) Trend PC-cillin 2003 Trend PC-cillin 2002 Trend PC-cillin 2000(WinNT) Trend PC-cillin 2000 7.61(WinNT) Trend PC-cillin 98 Plus(WinNT) Trend PC-cillin NT 6 Trend PC-cillin NT Trend Micro HouseCall Pro Virus Buster 2000 for NT ver.1.20- Virus Buster 98 for NT Virus Buster NT ServerProtect for Windows NT
User’s Guide © 2010 BigFix, Inc. 18
BigFix® Core Protection Module powered by
Part 2
Installation This procedure assumes that you have already installed the BigFix Unified Management Platform and are familiar with the contents of the BigFix Console Operators Guide.
Installing Server Components
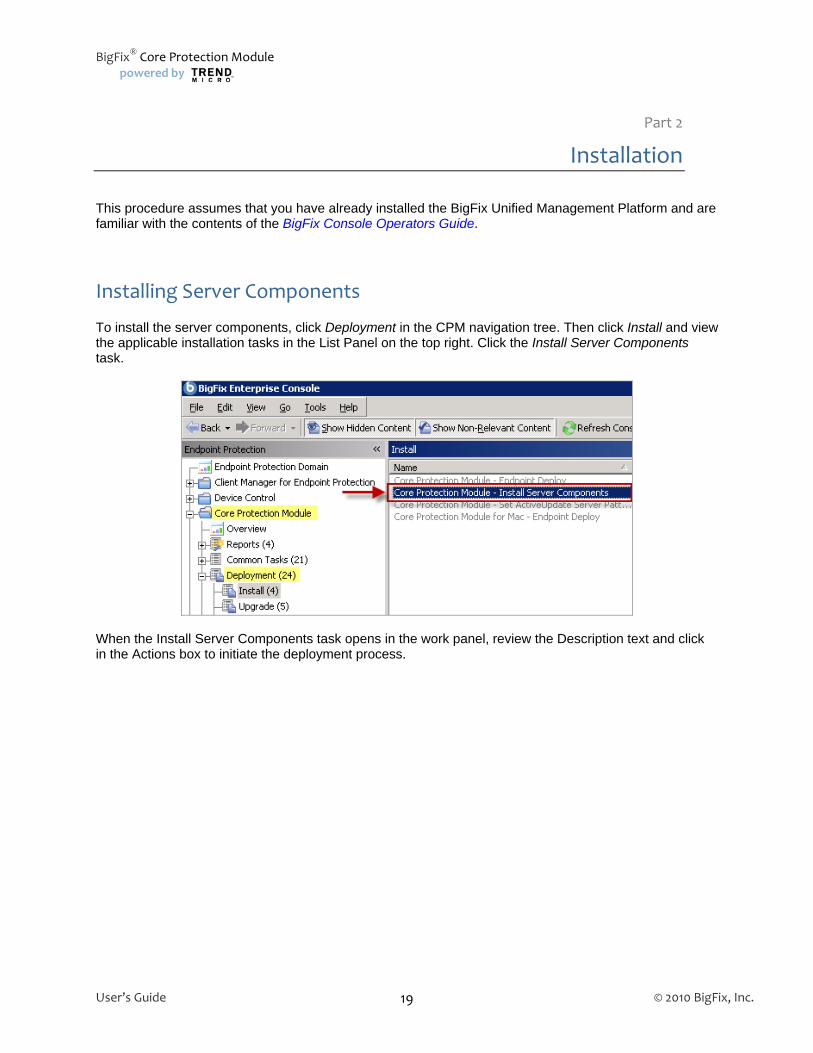
To install the server components, click Deployment in the CPM navigation tree. Then click Install and view the applicable installation tasks in the List Panel on the top right. Click the Install Server Components task.
When the Install Server Components task opens in the work panel, review the Description text and click in the Actions box to initiate the deployment process.
User’s Guide © 2010 BigFix, Inc. 19
BigFix® Core Protection Module 1.6 powered by
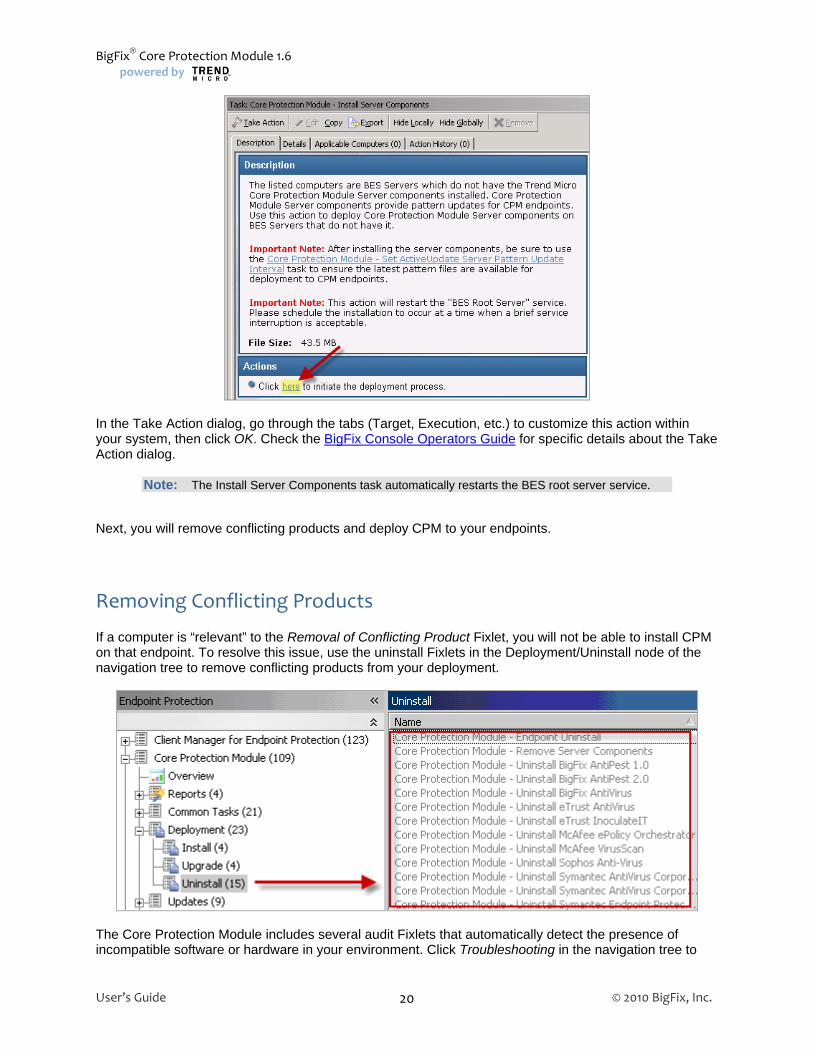
In the Take Action dialog, go through the tabs (Target, Execution, etc.) to customize this action within your system, then click OK. Check the BigFix Console Operators Guide for specific details about the Take Action dialog.
Note: The Install Server Components task automatically restarts the BES root server service.
Next, you will remove conflicting products and deploy CPM to your endpoints.
Removing Conflicting Products
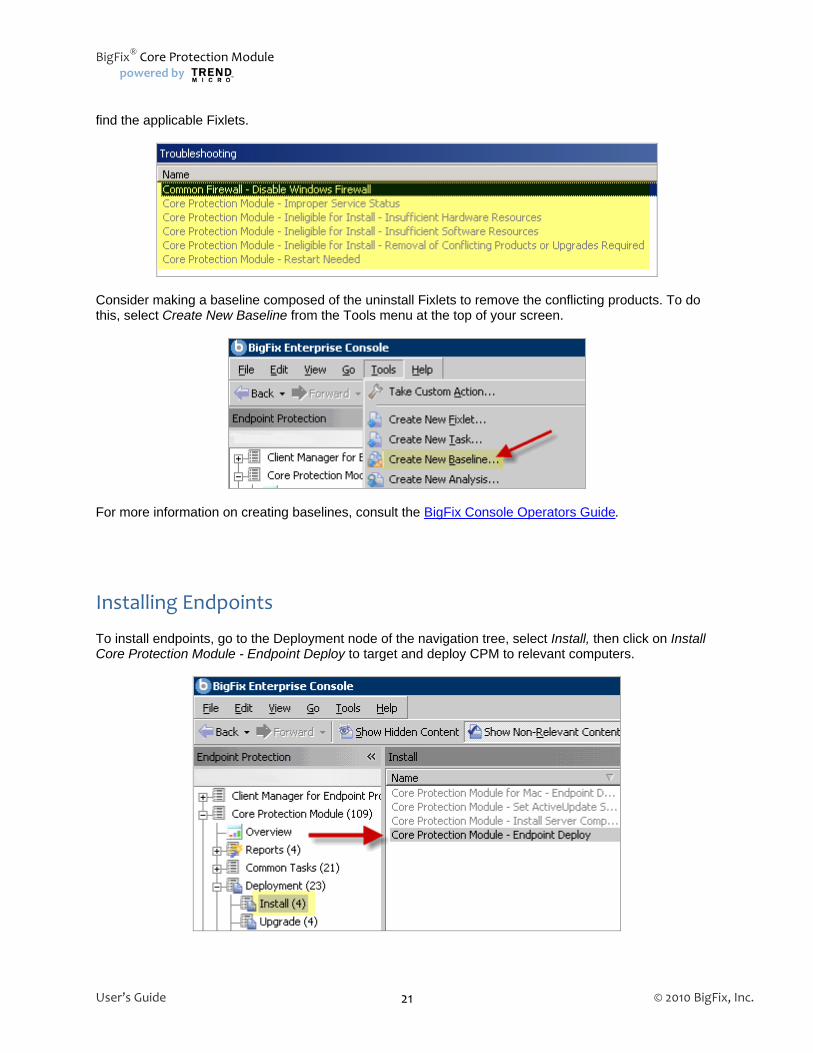
If a computer is “relevant” to the Removal of Conflicting Product Fixlet, you will not be able to install CPM on that endpoint. To resolve this issue, use the uninstall Fixlets in the Deployment/Uninstall node of the navigation tree to remove conflicting products from your deployment.
The Core Protection Module includes several audit Fixlets that automatically detect the presence of incompatible software or hardware in your environment. Click Troubleshooting in the navigation tree to
User’s Guide © 2010 BigFix, Inc. 20
BigFix® Core Protection Module powered by
find the applicable Fixlets.
Consider making a baseline composed of the uninstall Fixlets to remove the conflicting products. To do this, select Create New Baseline from the Tools menu at the top of your screen.
For more information on creating baselines, consult the BigFix Console Operators Guide.
Installing Endpoints
To install endpoints, go to the Deployment node of the navigation tree, select Install, then click on Install Core Protection Module - Endpoint Deploy to target and deploy CPM to relevant computers.
User’s Guide © 2010 BigFix, Inc. 21

BigFix® Core Protection Module 1.6 powered by
At the Endpoint Deploy Task window, go to the Actions box and click where indicated to initiate the deployment process.
For a custom installation, select an installation path. For a default installation, leave blank, click OK and enter your Private Key Password. This takes you to the Take Action dialog, where you can customize the parameters of the Action.
For more detailed information on using the Take Action dialog to deploy your endpoints, check the BigFix Console Operators Guide.
Set ActiveUpdate Server Pattern Update Interval
When this action is run, the CPM server will check if any new patterns have been published by Trend Micro. Any new patterns will be downloaded and made available for deployment using the Pattern Update/Rollback Wizard in the CPM navigation tree. If automatic updates have been configured and enabled for server components, endpoints configured for automatic updates will download and apply the new patterns immediately.
Click the Updates node of the navigation tree and click New Pattern Update/Rollback Task.
User’s Guide © 2010 BigFix, Inc. 22

BigFix® Core Protection Module powered by
You should set this action to run as a policy with periodic re-applicability behavior. It is recommended that you apply this Task through the Take Action dialog and select the following action parameters under the Execute tab:
Never expire Run once an hour Retry up to 99 times on failure Reapply an unlimited number of times
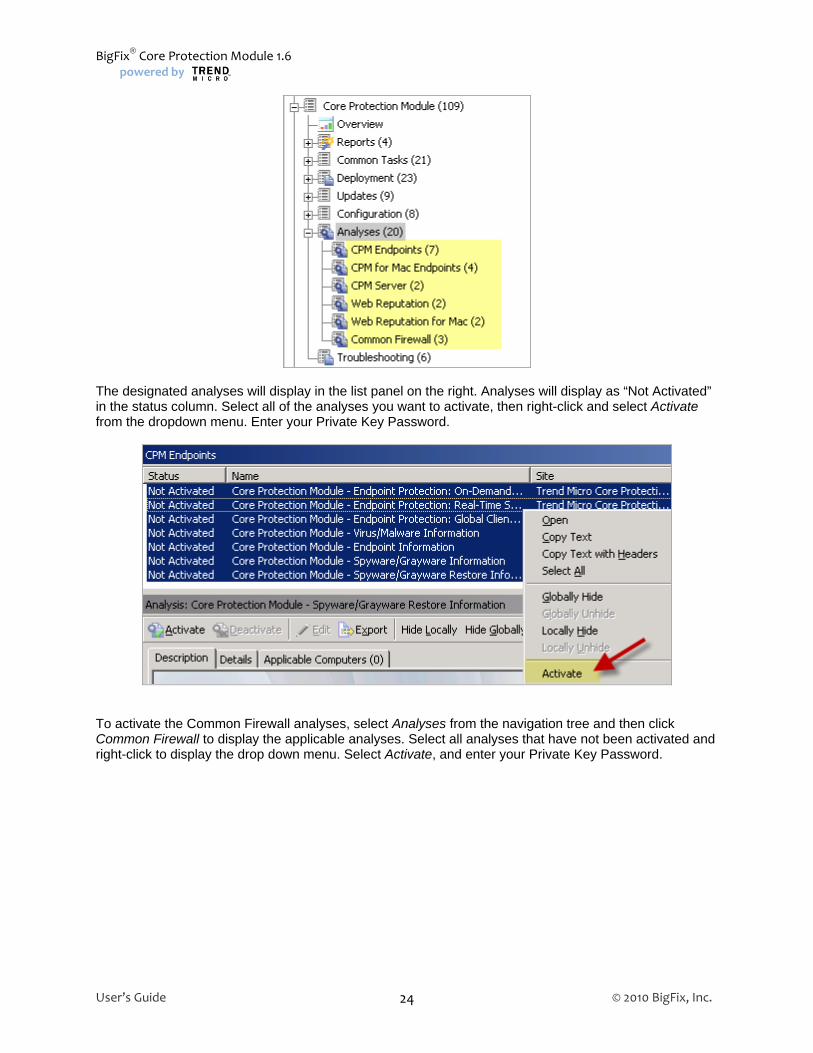
Activating Analyses Now, you will provide additional information about endpoints and activate the Analyses in the CPM site. As the analyses results feed the CPM reports and provide additional information about endpoints, activating analyses allows you to see those reports displayed in the CPM Dashboard. Click the Analyses node in the navigation tree. CPM analyses are organized into the following sub-groups: CPM, Web Reputation, and Common Firewall. You may activate analyses by sub-group or all at once.
User’s Guide © 2010 BigFix, Inc. 23
BigFix® Core Protection Module 1.6 powered by
The designated analyses will display in the list panel on the right. Analyses will display as “Not Activated” in the status column. Select all of the analyses you want to activate, then right-click and select Activate from the dropdown menu. Enter your Private Key Password.
To activate the Common Firewall analyses, select Analyses from the navigation tree and then click Common Firewall to display the applicable analyses. Select all analyses that have not been activated and right-click to display the drop down menu. Select Activate, and enter your Private Key Password.
User’s Guide © 2010 BigFix, Inc. 24

BigFix® Core Protection Module powered by
Upgrading from CPM Version 1.5 To upgrade to the latest version of CPM from an earlier version, click Upgrade under the Deployment node of the navigation tree. From here, you can upgrade your CPM server, your endpoints, and your Client Dashboard.
Note: Only client computers without conflicting software products can deploy Core Protection Module, and computers must meet minimum software and hardware requirements.
Click the appropriate Task from the list, and when the dialog opens, click where indicated in the Actions box to deploy the task.
If you’re using the Client Dashboard, you may also upgrade this to the latest version of CPM. Do this by clicking the Upgrade Client Dashboard task, and then click in the Actions box of the dialog to initiate.
Note: Any old ‘Check server for pattern update’ tasks should be stopped and a new policy action should be issued from the ‘Set ActiveUpdate Pattern Update Interval’ task.
Note the Following Prior to Upgrading From CPM 1.0 to 1.6:
Option 1. Update CPM clients to version 1.6 first. Once all CPM clients have been updated, update the CPM server components to version 1.6. You will not be able to update firewall patterns on any of your endpoints until you update the CPM server components.
Option 2. If you are unable to wait until all CPM clients have been updated to version 1.6, you may proceed with updating your CPM server component to version 1.6. Then use the “Server Settings Wizard” to change the update source to: CPM 1.0: http://cpm-p.activeupdate.trendmicro.com/activeupdate <http://cpm-p.activeupdate.trendmicro.com/activeupdate> You will not be able to update firewall patterns on your endpoints while the update source is set to the CPM 1.0 AU server. After you have updated all of your CPM clients to version 1.6, use the “Server Settings Wizard” to change the update source back to the CPM 1.5 AU Server: CPM 1.5: http://cpm15-p.activeupdate.trendmicro.com/activeupdate <http://cpm15-p.activeupdate.trendmicro.com/activeupdate>
User’s Guide © 2010 BigFix, Inc. 25

BigFix® Core Protection Module 1.6 powered by
Part 3
Configuration The Configuration node in the navigation tree includes content for customizing your CPM deployment.
Each sub-node under Configuration contains a related Wizard for customizing the CPM settings on your endpoints. Wizards are highlighted in blue below:
Configuring Updates
There are three ways to get updates with Core Protection Module version 1.6:
Manual Updates: ESP Administrator issues update action for each pattern-set Automatic Updates: ESP Administrator configures automatic updates once and issues update
policy action once Update from Cloud: Clients update from the Trend Micro ActiveUpdate (cloud) server
Note: These update types are not mutually exclusive. You may elect to use manual updates in some parts of your environment while other parts are set to use automatic updates.
User’s Guide © 2010 BigFix, Inc. 26
BigFix® Core Protection Module powered by
Similarly, Update from Cloud actions can be applied by clients using either automatic or manual updates.
Manual Updates
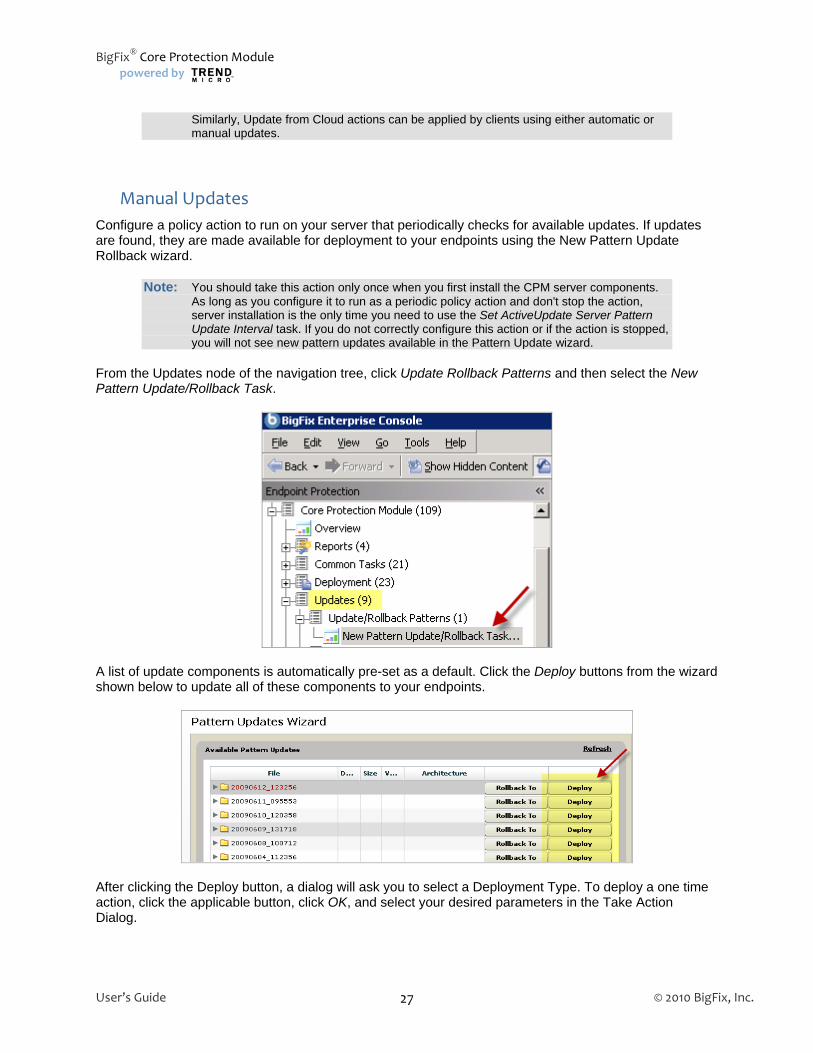
Configure a policy action to run on your server that periodically checks for available updates. If updates are found, they are made available for deployment to your endpoints using the New Pattern Update Rollback wizard.
Note: You should take this action only once when you first install the CPM server components. As long as you configure it to run as a periodic policy action and don't stop the action, server installation is the only time you need to use the Set ActiveUpdate Server Pattern Update Interval task. If you do not correctly configure this action or if the action is stopped, you will not see new pattern updates available in the Pattern Update wizard.
From the Updates node of the navigation tree, click Update Rollback Patterns and then select the New Pattern Update/Rollback Task.
A list of update components is automatically pre-set as a default. Click the Deploy buttons from the wizard shown below to update all of these components to your endpoints.
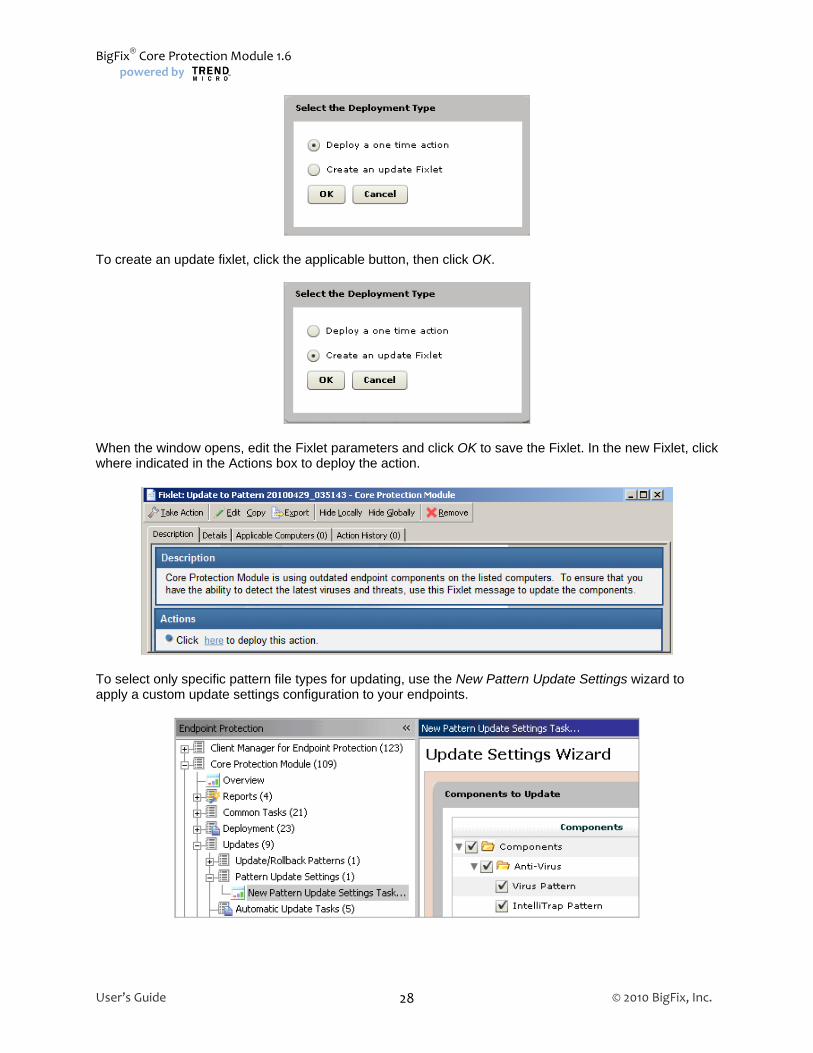
After clicking the Deploy button, a dialog will ask you to select a Deployment Type. To deploy a one time action, click the applicable button, click OK, and select your desired parameters in the Take Action Dialog.
User’s Guide © 2010 BigFix, Inc. 27
BigFix® Core Protection Module 1.6 powered by
To create an update fixlet, click the applicable button, then click OK.
When the window opens, edit the Fixlet parameters and click OK to save the Fixlet. In the new Fixlet, click where indicated in the Actions box to deploy the action.
To select only specific pattern file types for updating, use the New Pattern Update Settings wizard to apply a custom update settings configuration to your endpoints.
User’s Guide © 2010 BigFix, Inc. 28
BigFix® Core Protection Module powered by
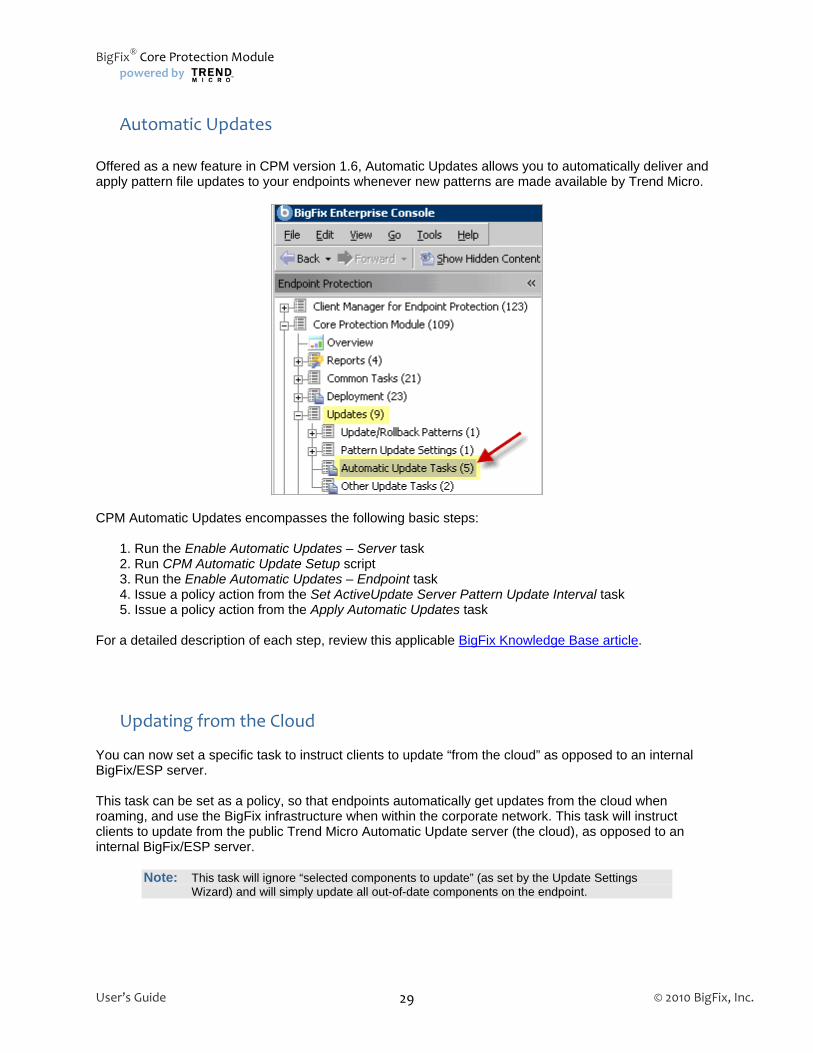
Automatic Updates
Offered as a new feature in CPM version 1.6, Automatic Updates allows you to automatically deliver and apply pattern file updates to your endpoints whenever new patterns are made available by Trend Micro.
CPM Automatic Updates encompasses the following basic steps:
1. Run the Enable Automatic Updates – Server task 2. Run CPM Automatic Update Setup script 3. Run the Enable Automatic Updates – Endpoint task 4. Issue a policy action from the Set ActiveUpdate Server Pattern Update Interval task 5. Issue a policy action from the Apply Automatic Updates task
For a detailed description of each step, review this applicable BigFix Knowledge Base article.
Updating from the Cloud You can now set a specific task to instruct clients to update “from the cloud” as opposed to an internal BigFix/ESP server. This task can be set as a policy, so that endpoints automatically get updates from the cloud when roaming, and use the BigFix infrastructure when within the corporate network. This task will instruct clients to update from the public Trend Micro Automatic Update server (the cloud), as opposed to an internal BigFix/ESP server.
Note: This task will ignore “selected components to update” (as set by the Update Settings Wizard) and will simply update all out-of-date components on the endpoint.
User’s Guide © 2010 BigFix, Inc. 29
BigFix® Core Protection Module 1.6 powered by
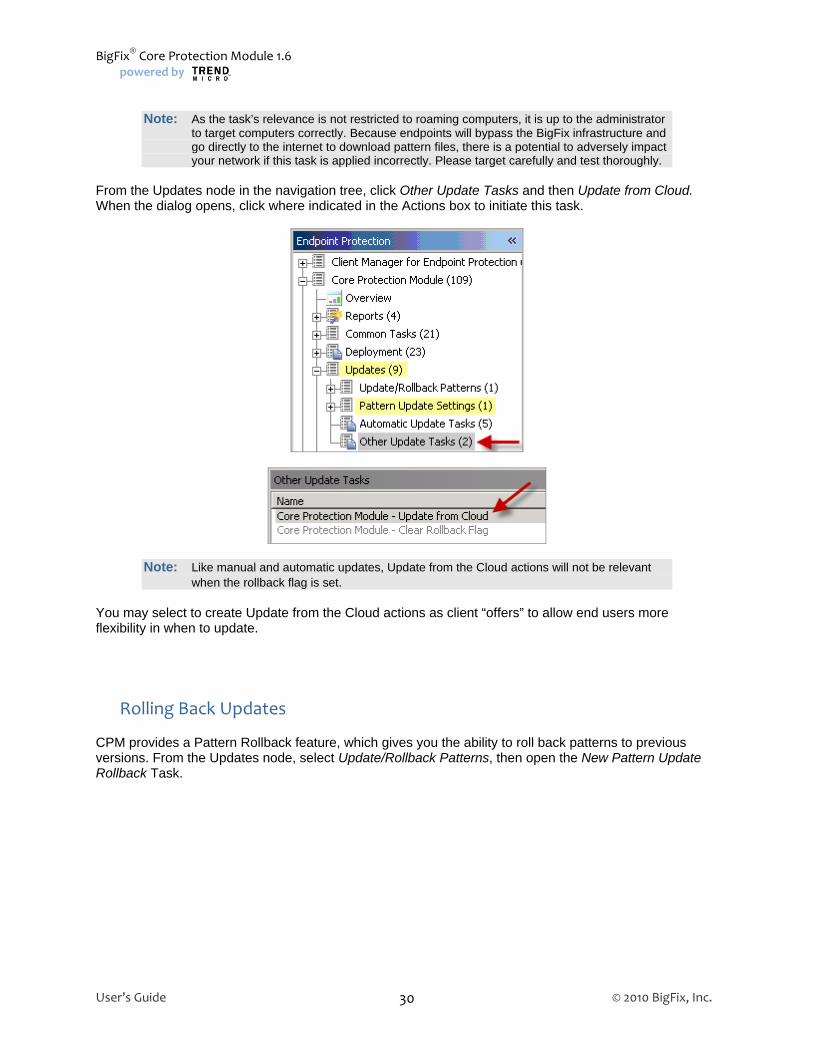
Note: As the task’s relevance is not restricted to roaming computers, it is up to the administrator
to target computers correctly. Because endpoints will bypass the BigFix infrastructure and go directly to the internet to download pattern files, there is a potential to adversely impact your network if this task is applied incorrectly. Please target carefully and test thoroughly.
From the Updates node in the navigation tree, click Other Update Tasks and then Update from Cloud. When the dialog opens, click where indicated in the Actions box to initiate this task.
Note: Like manual and automatic updates, Update from the Cloud actions will not be relevant when the rollback flag is set.
You may select to create Update from the Cloud actions as client “offers” to allow end users more flexibility in when to update.
Rolling Back Updates CPM provides a Pattern Rollback feature, which gives you the ability to roll back patterns to previous versions. From the Updates node, select Update/Rollback Patterns, then open the New Pattern Update Rollback Task.
User’s Guide © 2010 BigFix, Inc. 30

BigFix® Core Protection Module powered by
Note: Rollback actions are ordered. That means rollback tasks/actions will not be relevant after a newer rollback action has been applied.
Note: Once a client is in the rollback state, no pattern update actions will be relevant until the
rollback flag is cleared. Use the Clear Rollback Flag task under Update > Other Update Tasks to clear the flag.
Using the Configuration Wizards You will use the Configuration “wizards” to customize your deployment and create tasks and actions that define the behavior of your CPM endpoints and servers. In the navigation tree, click the Configuration node to expand the list of configuration options, and click the “+” beside each sub-node to display the corresponding wizards.
Click on the wizard to customize your settings, then click Create Configuration Task to generate a configuration task or action. Any configuration tasks you create will be displayed below the particular wizard that generated the task.
User’s Guide © 2010 BigFix, Inc. 31
BigFix® Core Protection Module 1.6 powered by
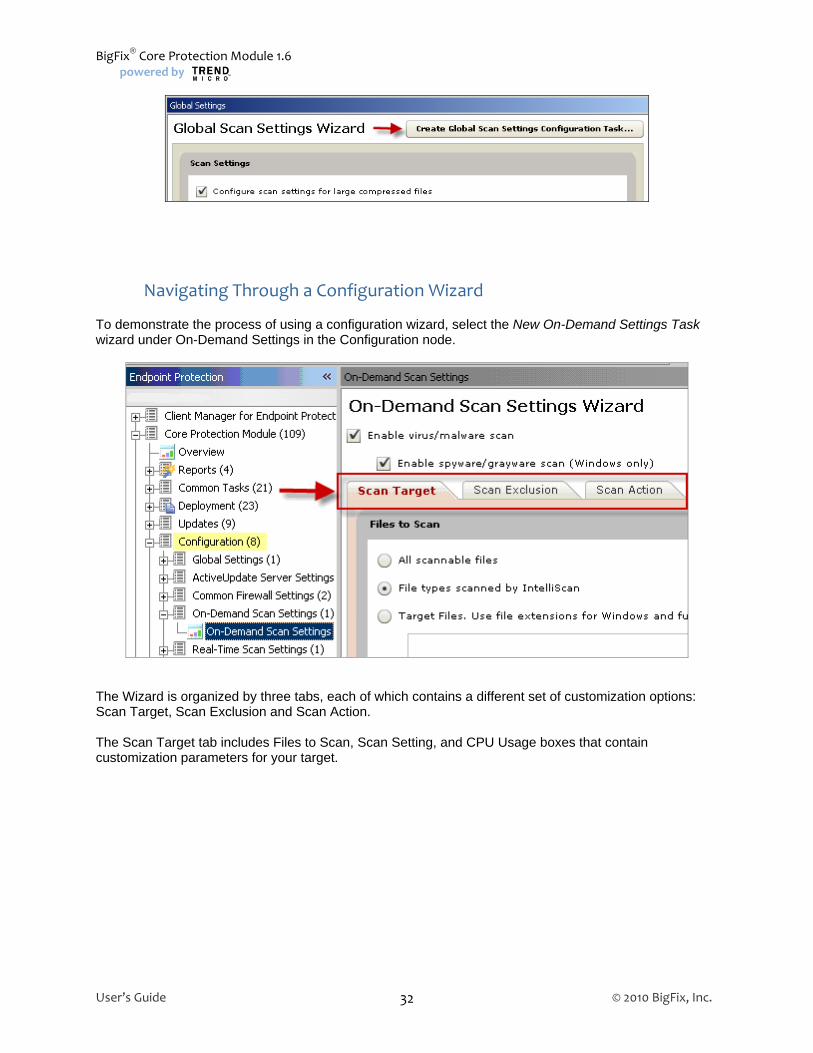
Navigating Through a Configuration Wizard To demonstrate the process of using a configuration wizard, select the New On-Demand Settings Task wizard under On-Demand Settings in the Configuration node.
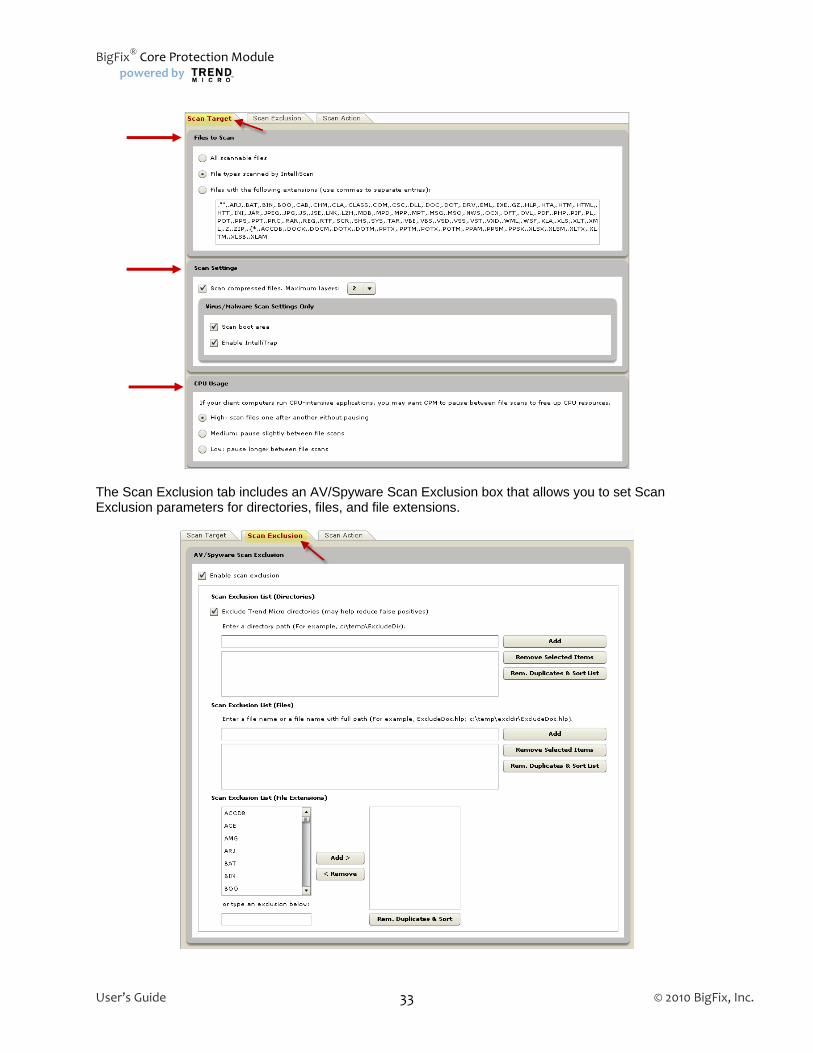
The Wizard is organized by three tabs, each of which contains a different set of customization options: Scan Target, Scan Exclusion and Scan Action. The Scan Target tab includes Files to Scan, Scan Setting, and CPU Usage boxes that contain customization parameters for your target.
User’s Guide © 2010 BigFix, Inc. 32
BigFix® Core Protection Module powered by
The Scan Exclusion tab includes an AV/Spyware Scan Exclusion box that allows you to set Scan Exclusion parameters for directories, files, and file extensions.
User’s Guide © 2010 BigFix, Inc. 33
BigFix® Core Protection Module 1.6 powered by
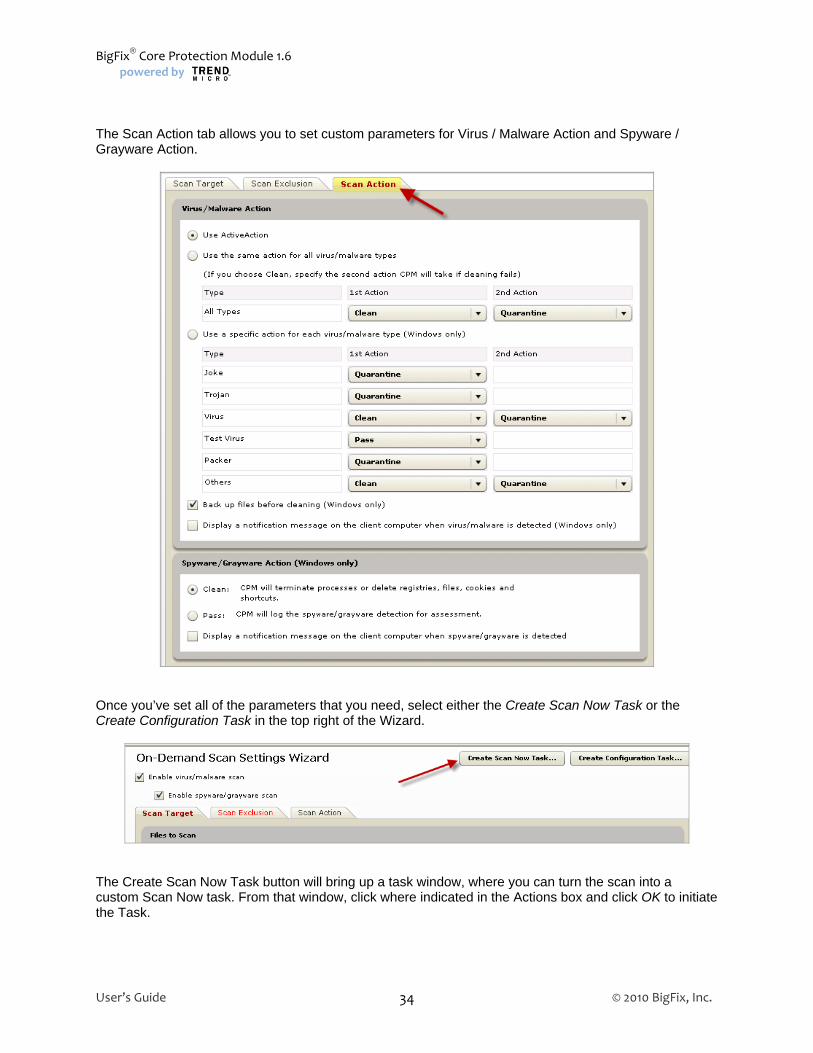
The Scan Action tab allows you to set custom parameters for Virus / Malware Action and Spyware / Grayware Action.
Once you’ve set all of the parameters that you need, select either the Create Scan Now Task or the Create Configuration Task in the top right of the Wizard.
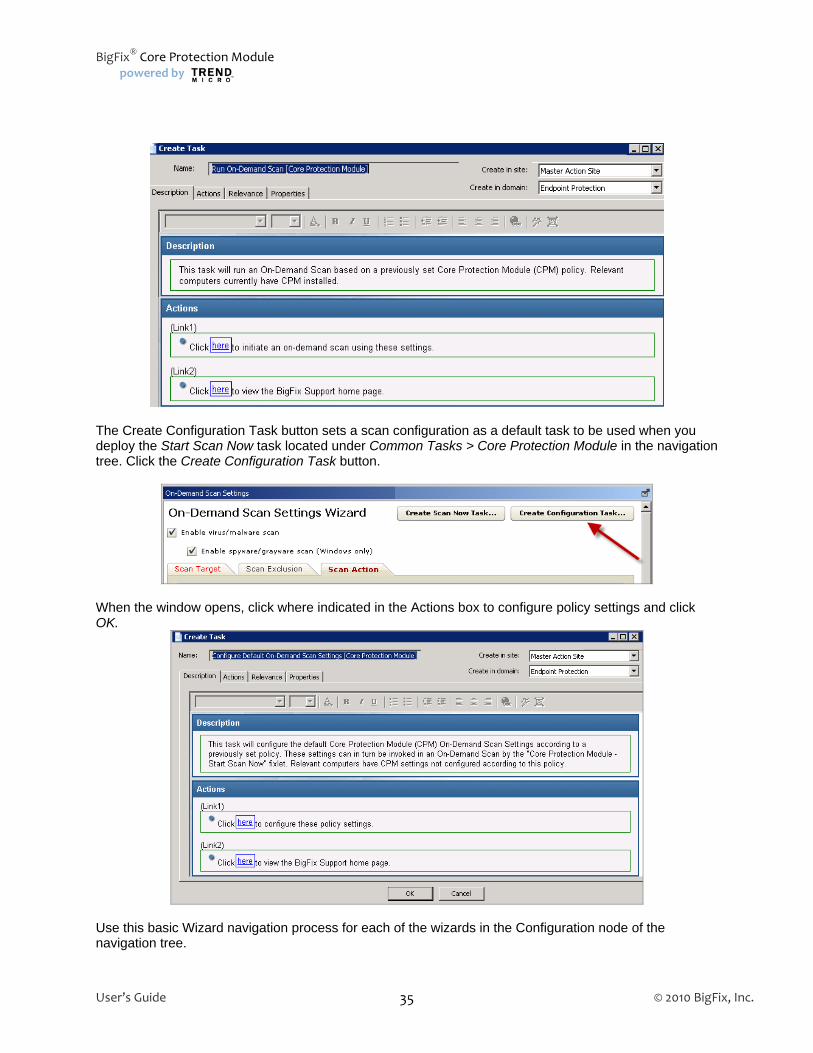
The Create Scan Now Task button will bring up a task window, where you can turn the scan into a custom Scan Now task. From that window, click where indicated in the Actions box and click OK to initiate the Task.
User’s Guide © 2010 BigFix, Inc. 34
BigFix® Core Protection Module powered by
The Create Configuration Task button sets a scan configuration as a default task to be used when you deploy the Start Scan Now task located under Common Tasks > Core Protection Module in the navigation tree. Click the Create Configuration Task button.
When the window opens, click where indicated in the Actions box to configure policy settings and click OK.
Use this basic Wizard navigation process for each of the wizards in the Configuration node of the navigation tree.
User’s Guide © 2010 BigFix, Inc. 35
BigFix® Core Protection Module 1.6 powered by
Global Settings Wizard – configures CPM global settings according to a previously set policy. ActiveUpdate Server Settings Wizard ‐ updates settings from Trend’s “in the cloud” server. Common Firewall Policy Wizard ‐ enables Common Firewall and configures firewall rules. Use
the Global Exception Rules Wizard to create and edit template rules. On‐Demand Scan Settings ‐ configures on-demand scan settings and/or runs on-demand scans
on CPM endpoints. Real‐Time Scan Settings ‐ configures real-time scan settings on CPM endpoints. Spyware Whitelist ‐ configures spyware whitelist settings on CPM endpoints. Web Reputation Blacklist‐Whitelist ‐ manages blacklist and whitelist policies and templates.
The Web Protection Module Blacklist-Whitelist Wizard enables you to create and maintain global lists of Web sites in the form of policies that you can use to control your users’ Web access. Once you have defined these policies, you use them to create Custom Tasks, which you can then apply to your endpoints. There are two types of URL lists you can create and group into policies using the Wizard: Blacklists These are lists of blocked Web sites. If the endpoint tries to access a Blacklisted
site, they receive a message in their Web browser indicating that access to the site is blocked.
Whitelists These are lists of Web sites you allow your endpoints to access without restriction.
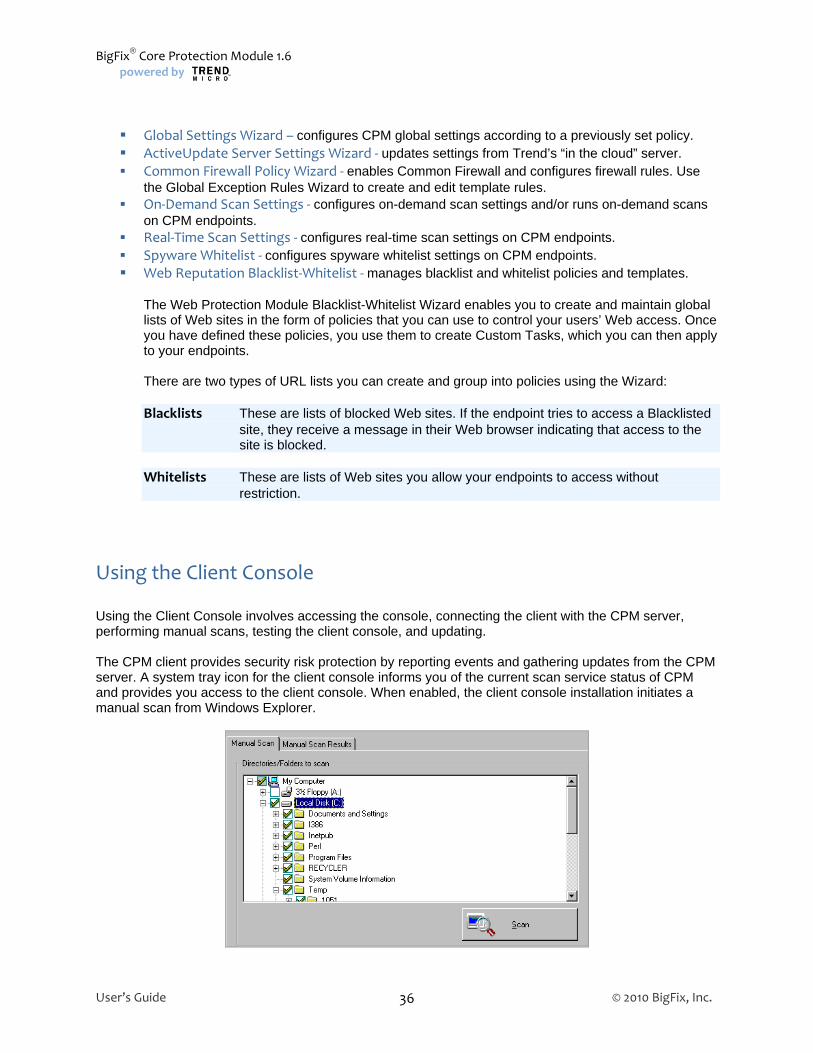
Using the Client Console Using the Client Console involves accessing the console, connecting the client with the CPM server, performing manual scans, testing the client console, and updating. The CPM client provides security risk protection by reporting events and gathering updates from the CPM server. A system tray icon for the client console informs you of the current scan service status of CPM and provides you access to the client console. When enabled, the client console installation initiates a manual scan from Windows Explorer.
User’s Guide © 2010 BigFix, Inc. 36
BigFix® Core Protection Module powered by
Enabling the Client Console
1. Go to Configuration > Global Settings > Global Scan Settings Wizard.
2. Scroll down to the Client Console Settings. 3. Check the appropriate check boxes:
Click the Enable System Tray icon to display the icon used to access the client console on the relevant endpoints
Click Enable the Manual Scan in the Windows Explorer menu to allow initiating a manual
scan
4. Click Create Global Scan Settings Configure Task. The Edit Task window opens. 5. Type a descriptive name for the Task such as “Enable Client Console.” 6. Click OK to close the Windows, then enter your Private Key Password and click OK to create the
new global policy.
The new settings now appear in the Configuration > Global Settings Dashboard.
Enabling Notifications on the Client Use the On-Demand or Real-Time Scan Settings wizards to display notifications on the client computer about virus/malware or spyware/grayware detections.
Client Dashboard and Client Console The CPM Client Dashboard offers display-only information about the client machine to the user and administrator. Before accessing it, it must be enabled from the CPM dashboard and deployed. The CPM Client Console provides on-demand scan information about the client machine to the client machine user. Before accessing it, it must be enabled from the CPM Dashboard and deployed.
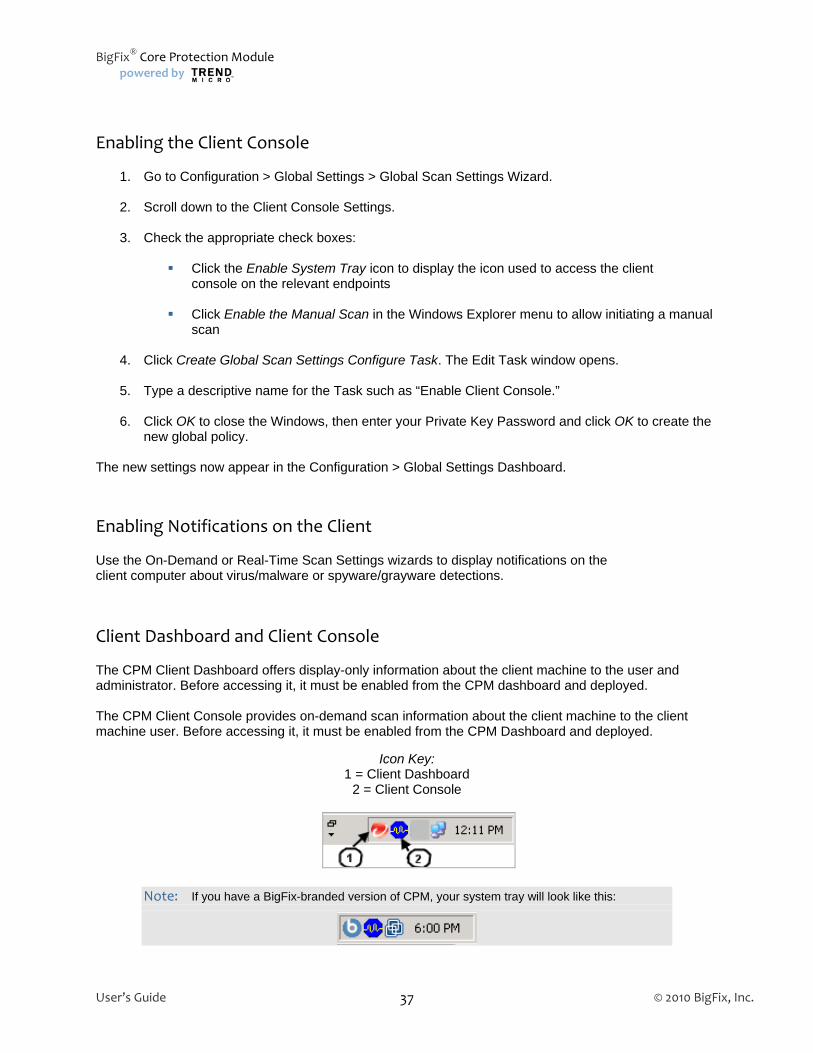
Icon Key: 1 = Client Dashboard
2 = Client Console
Note: If you have a BigFix-branded version of CPM, your system tray will look like this:
User’s Guide © 2010 BigFix, Inc. 37
BigFix® Core Protection Module 1.6 powered by
Client Dashboard
Client Console
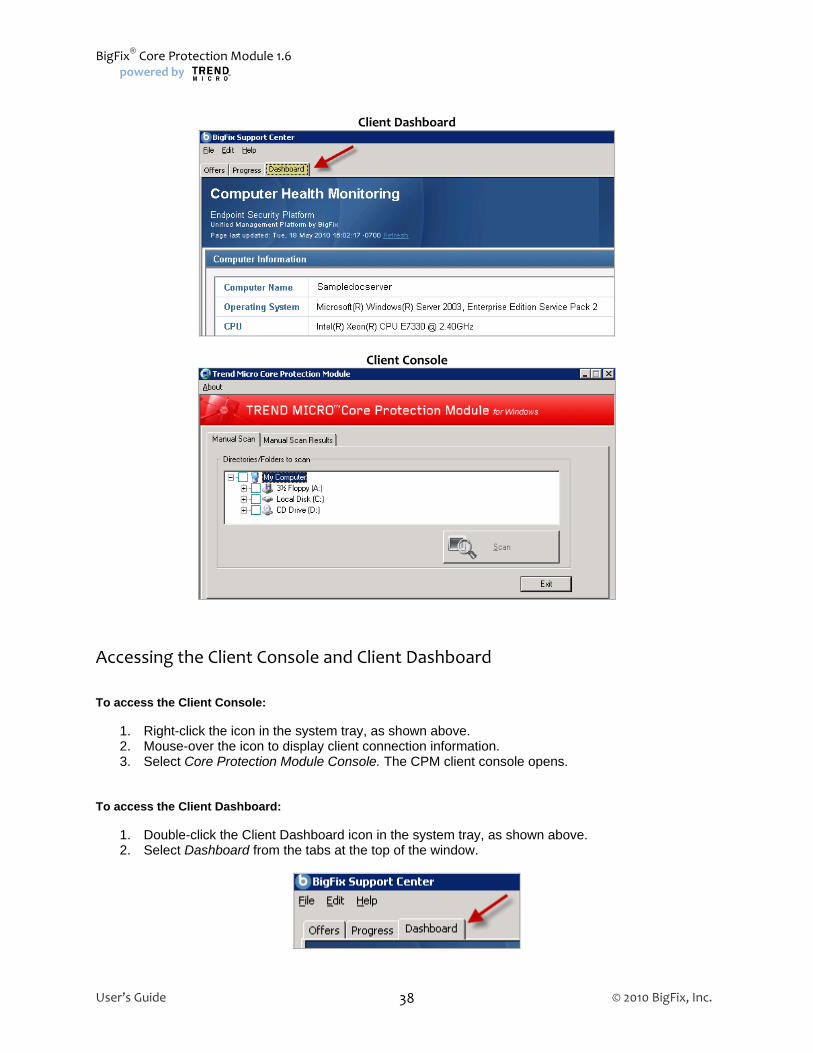
Accessing the Client Console and Client Dashboard To access the Client Console:
1. Right-click the icon in the system tray, as shown above. 2. Mouse-over the icon to display client connection information. 3. Select Core Protection Module Console. The CPM client console opens.
To access the Client Dashboard:
1. Double-click the Client Dashboard icon in the system tray, as shown above. 2. Select Dashboard from the tabs at the top of the window.
User’s Guide © 2010 BigFix, Inc. 38

BigFix® Core Protection Module powered by
Client Connection with CPM Server Icons on the client computer’s system tray indicate the client’s scan service status with the CPM server. See the table below for a description of each icon: Icon Purpose Description
Manual Scan All components are up-to-date and services work properly.
Manual or On-Demand Scan Scan is in progress.
Real time Scan Scan service is disabled.
All Scan Types Improper scan service status. User cannot perform scans.
Manually Scanning the Client Console A Manual Scan is an on-demand scan that starts immediately after clicking Scan Client Console. Scan duration time depends on the number of files scanned and the hardware resources of the client computer.
Note: When you initiate a Manual Scan from the CPM client console, the scan settings reflect the latest settings configured by the administrator for an On-Demand Scan.
Initiating a Manual Scan from the System Tray Icon To manually scan for security risks:
1. Right-click the client console icon ( ) in the system tray. 2. Select Core Protection Module Console.
3. Click the Manual Scan tab. 4. Select the drives, folders, and files you want to scan manually. (If a plus sign [+] appears next to
a drive or folder, it means that the drive or folder has at least one subfolder.)
5. Click Scan. 6. Click the Manual Scan Results tab immediately after completing the scan.
User’s Guide © 2010 BigFix, Inc. 39
BigFix® Core Protection Module 1.6 powered by
Note: Scan results are only available during the scan session. If the console is closed,
scan results are no longer available.
Initiating a Manual Scan from Windows Explorer This option must be enabled from the CPM dashboard before it is available.
To initiate a scan from Windows Explorer:
1. Open Windows Explorer on the endpoint computer.
2. Right-click on any folder or file to be scanned.
3. Select Scan with Core Protection Module to initiate the scan. Results will let you know if the scan was successful, as follows:
If nothing was found, click OK in the confirmation dialog box. If the scan found an issue, the action for handling malware (configured by the system administrator) occurs.
4. Click the Manual Scan Results tab immediately after completing the scan for details.
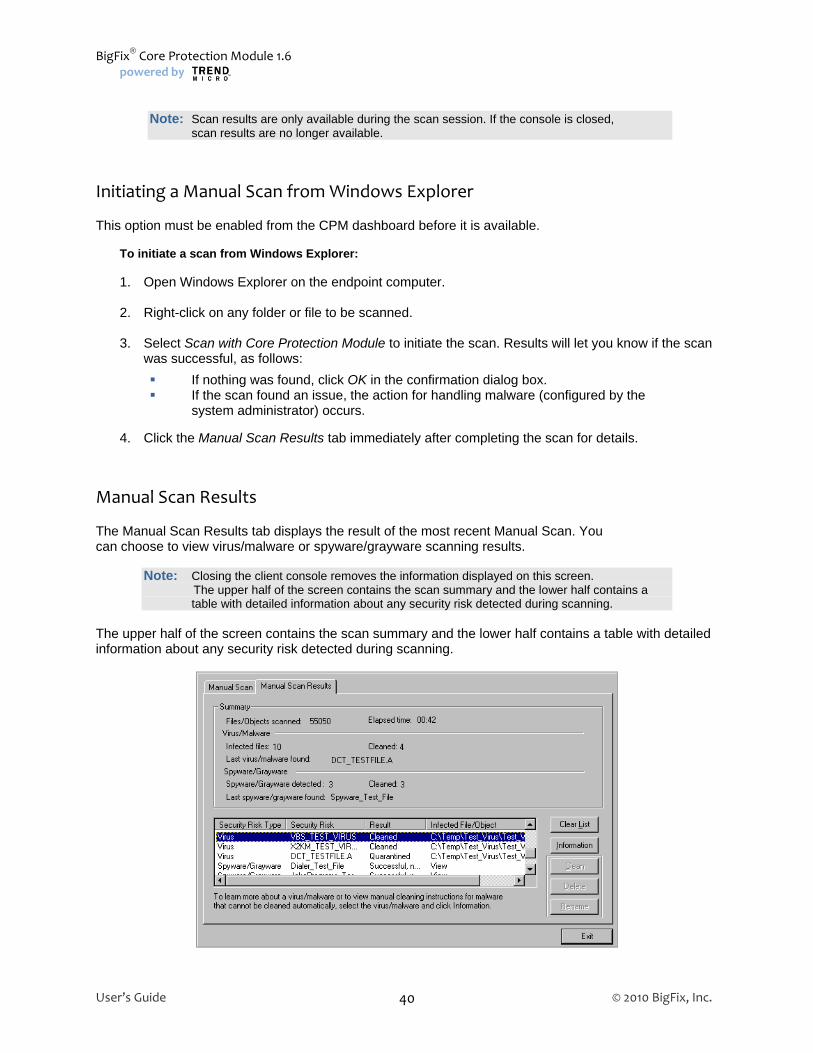
Manual Scan Results The Manual Scan Results tab displays the result of the most recent Manual Scan. You can choose to view virus/malware or spyware/grayware scanning results.
Note: Closing the client console removes the information displayed on this screen. The upper half of the screen contains the scan summary and the lower half contains a
table with detailed information about any security risk detected during scanning. The upper half of the screen contains the scan summary and the lower half contains a table with detailed information about any security risk detected during scanning.
User’s Guide © 2010 BigFix, Inc. 40

BigFix® Core Protection Module powered by
Button Usage
Clear List Click this button to remove the information in the table.
Information To learn more about the security risk, click the security risk name and then click this button
Note: The next three buttons apply only to virus/malware scan results if the scan action (configured by the CPM administrator) is Pass. Pass means that CPM detected the file but did not take any action. CPM allows you to clean, delete or rename the file.
Clear CPM may not be able to automatically clean some files because the file may be encrypted, in a location that does not allow it to be cleaned, or is a Trojan or worm. (See scan results for details.)
Delete Delete the virus or malware file.
Rename Click to change the extension of the file to .VIR, (or to .VI0, .VI1, and so on if there is more than one) to prevent users from opening it accidentally.
Viewing Scan Results To view the scan results:
1. Perform a Manual Scan as described above.
2. Click the Manual Scan Results tab. Summary details display at the top of the screen.
3. If CPM configured the scan action to pass, select a detected virus or malware.
4. Click Clean, Delete or Rename.
Testing the CPM Client Console After enabling the CPM console, your administrator may test it to verify that antivirus protection works. EICAR, the European Institute for Computer Antivirus Research, developed a test script as a safe way to confirm proper installation and configuration of antivirus software. Visit the EICAR website for more information at: http://www.eicar.org/ The EICAR test script is an inert text file with a .com extension. It is not a virus and does not contain any fragments of viral code, but most antivirus software applications react to it as if it were a virus.
WARNING: Never use real viruses to test your antivirus installation. Contact your CPM administrator for information about how to use the EICAR test script.
User’s Guide © 2010 BigFix, Inc. 41

BigFix® Core Protection Module 1.6 powered by
Updating the Client Keeping client components current is essential to ensuring that your computer stays protected. The Update Now feature allows updating at any time. The client connects to an update source to check for updates to security components that detect the latest viruses, spyware, and malware. If updates are available, the client automatically downloads the components.
Note: Update Now always updates from the cloud and not the ESP Server, whether the endpoint runs remotely or connects to the LAN.
To update the client manually:
1. Right-click on the CPM client console icon in the system tray. 2. Click Update Now from the console menu. 3. In the Update Status tab, click Update Now.
When complete, you will see the message, “Component update is complete.”
User’s Guide © 2010 BigFix, Inc. 42

BigFix® Core Protection Module powered by
Part 4
Viewing Reports CPM offers five graphical reports to provide a real-time view of the state of your CPM deployment – Overview, Versions, Infections, Web Reputation, and Port Violations reports. The Overview report is at the very top of the navigation tree, and all other reports are accessible through the Reports node.
Reports can be filtered according to the computers in your deployment that you wish to analyze. On the Overview report, click the edit link next to the Computer Filter pull down menu to select properties by which to include computers in your report.
Overview The Overview Report provides three graphs illustrating different aspects of your CPM deployment:
Endpoint Health Status - depicting the health of your CPM deployment AntiVirus / AntiSpyware Vendor Distribution - showing the anti-malware vendors in your system Time to Protection - showing how long it takes for an update to be applied to your endpoints
User’s Guide © 2010 BigFix, Inc. 43

BigFix® Core Protection Module 1.6 powered by
Endpoint Health Status
Status Category
Description
Healthy
Systems do not fall into any of the unhealthy categories and are, therefore, healthy.
N/A Systems are not relevant to any of the content in the CPM site.
Unknown Systems have not yet reported property results.
Improper service status Services required by CPM are not configured properly on systems.
Not installed Eligible systems have not installed CPM endpoint components.
Ineligible (Hardware) Systems have insufficient hardware or memory to install CPM.
Ineligible (Software) The system’s O/S is too old or out of date or is incompatible to install CPM.
Conflicting Product Systems have software installed that is incompatible with components of CPM.
Restart Needed Systems require a reboot to complete an update, installation or malware removal.
In Rollback State ESP Clients have taken a pattern-set rollback action - clients in rollback state cannot be updated until rollback flag is cleared.
Patterns Out of Date Systems do not have the latest available patterns.
Note: Each computer can be in only one health status category at a time.
User’s Guide © 2010 BigFix, Inc. 44

BigFix® Core Protection Module powered by
The criteria for a “Healthy” designation within the Endpoint Health Status pie chart are as follows:
Relevant to at least one Fixlet/Task/Analysis in the CPM site Not relevant to any of the following Fixlets:
- Deploy CPM Endpoint - Improper Service Status - Ineligible (software) - Ineligible (hardware) - Ineligible (conflicting product) - Restart Needed - Clear Rollback Flag
Patterns up-to-date - this is checked by comparing the values of the pattern version properties from the client (in the Endpoint Information analysis) against the values of the pattern version properties reported for the server (in the Server Information analysis).
AntiVirus/AntiSpyware Vendor Distribution The graph below displays how anti-malware vendors are distributed within your deployment.
User’s Guide © 2010 BigFix, Inc. 45
BigFix® Core Protection Module 1.6 powered by
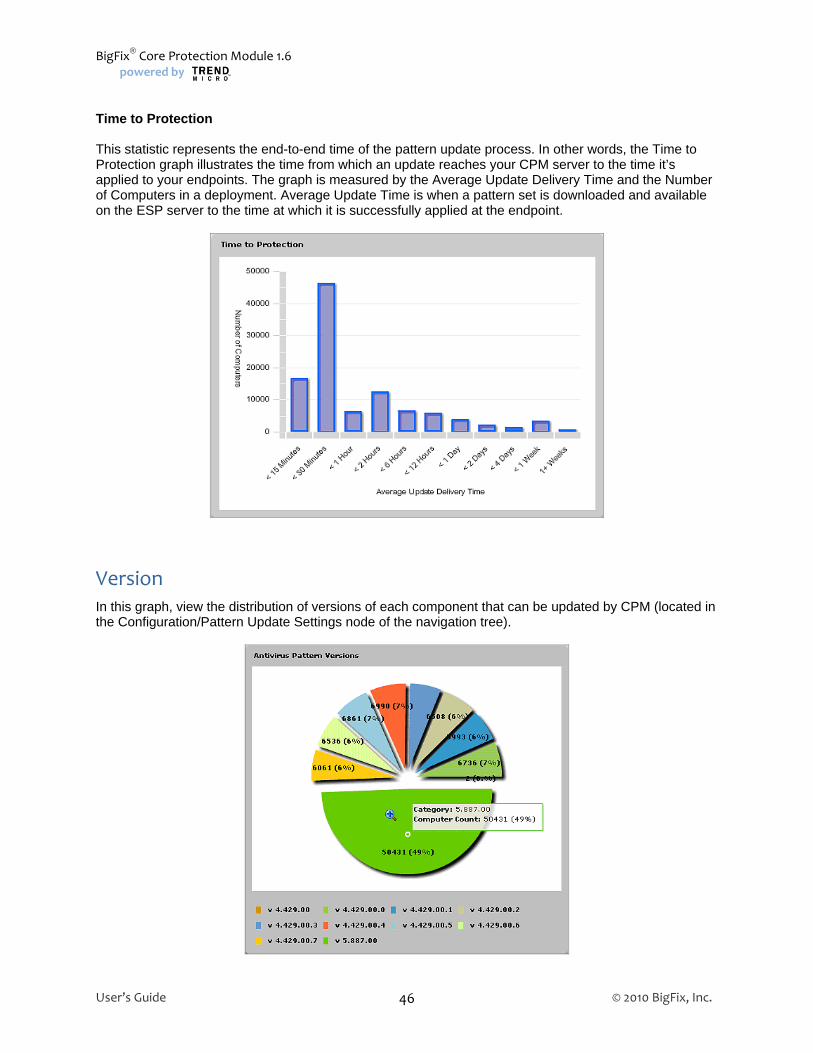
Time to Protection This statistic represents the end-to-end time of the pattern update process. In other words, the Time to Protection graph illustrates the time from which an update reaches your CPM server to the time it’s applied to your endpoints. The graph is measured by the Average Update Delivery Time and the Number of Computers in a deployment. Average Update Time is when a pattern set is downloaded and available on the ESP server to the time at which it is successfully applied at the endpoint.
Version In this graph, view the distribution of versions of each component that can be updated by CPM (located in the Configuration/Pattern Update Settings node of the navigation tree).
User’s Guide © 2010 BigFix, Inc. 46
BigFix® Core Protection Module powered by
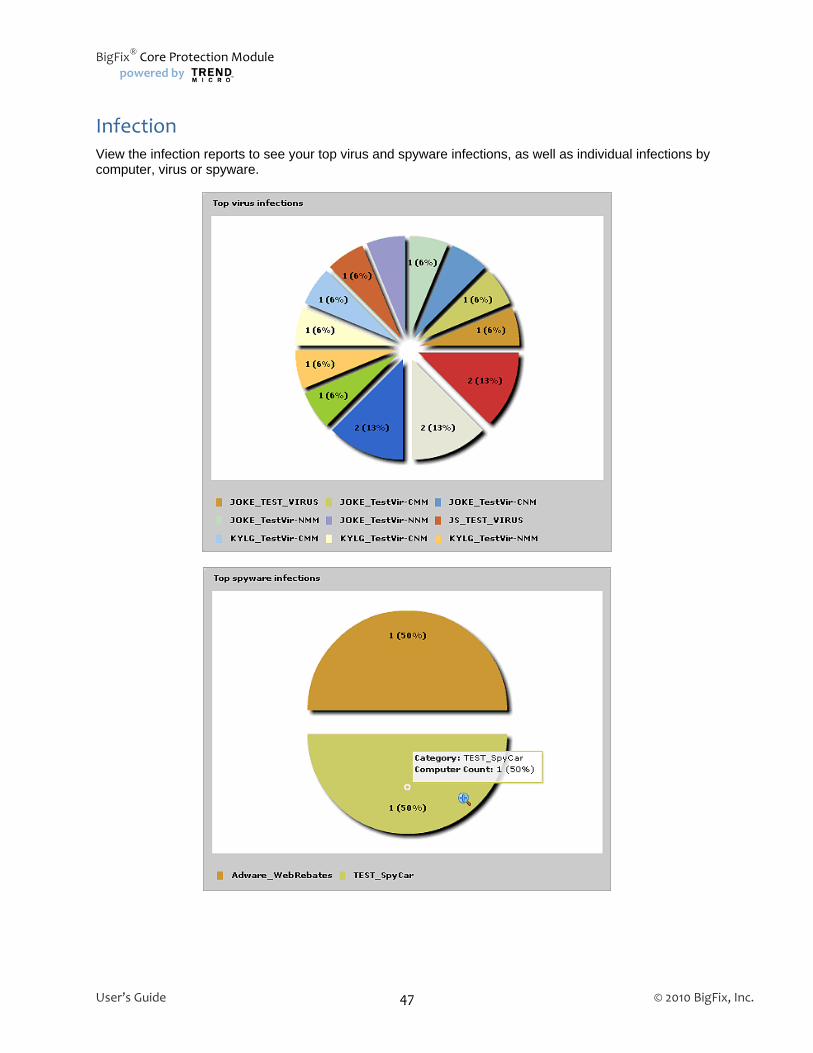
Infection View the infection reports to see your top virus and spyware infections, as well as individual infections by computer, virus or spyware.
User’s Guide © 2010 BigFix, Inc. 47
BigFix® Core Protection Module 1.6 powered by
Web Reputation
Web Reputation, which was formerly the standalone product Web Protection Module, is now an integrated feature of CPM. Its function is to intercept malware “in-the-cloud” before it reaches users’ systems, reducing the need for resource-intensive threat scanning and clean-up. Specifically, Web Reputation monitors outbound web requests, stops web-based malware before it’s delivered, and blocks users’ access to potentially malicious websites in real time.
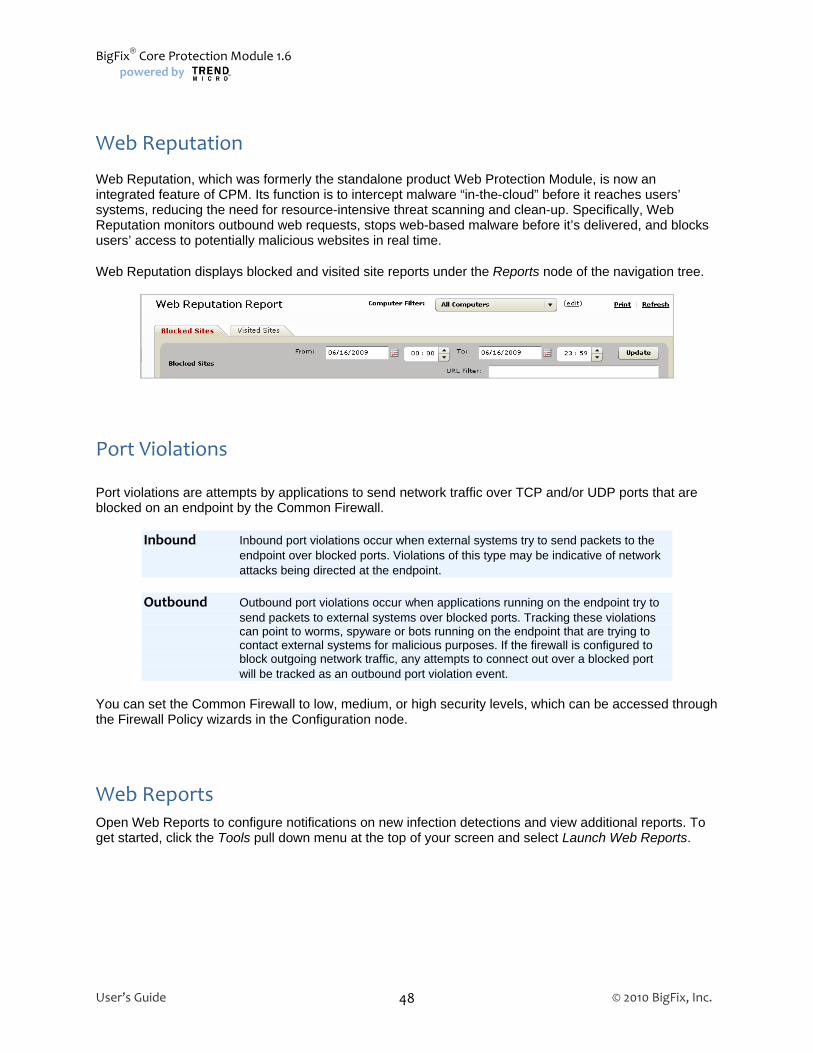
Web Reputation displays blocked and visited site reports under the Reports node of the navigation tree.
Port Violations Port violations are attempts by applications to send network traffic over TCP and/or UDP ports that are blocked on an endpoint by the Common Firewall.
Inbound Inbound port violations occur when external systems try to send packets to the endpoint over blocked ports. Violations of this type may be indicative of network attacks being directed at the endpoint.
Outbound Outbound port violations occur when applications running on the endpoint try to
send packets to external systems over blocked ports. Tracking these violations can point to worms, spyware or bots running on the endpoint that are trying to contact external systems for malicious purposes. If the firewall is configured to block outgoing network traffic, any attempts to connect out over a blocked port will be tracked as an outbound port violation event.
You can set the Common Firewall to low, medium, or high security levels, which can be accessed through the Firewall Policy wizards in the Configuration node.
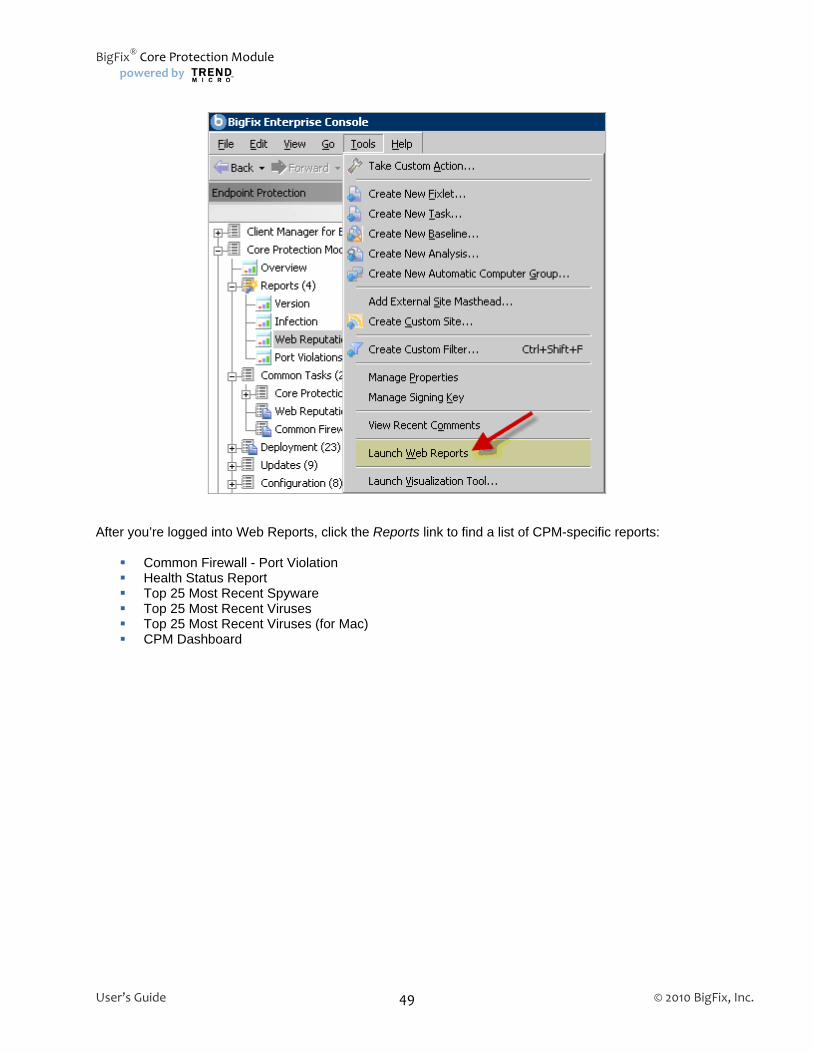
Web Reports Open Web Reports to configure notifications on new infection detections and view additional reports. To get started, click the Tools pull down menu at the top of your screen and select Launch Web Reports.
User’s Guide © 2010 BigFix, Inc. 48
BigFix® Core Protection Module powered by
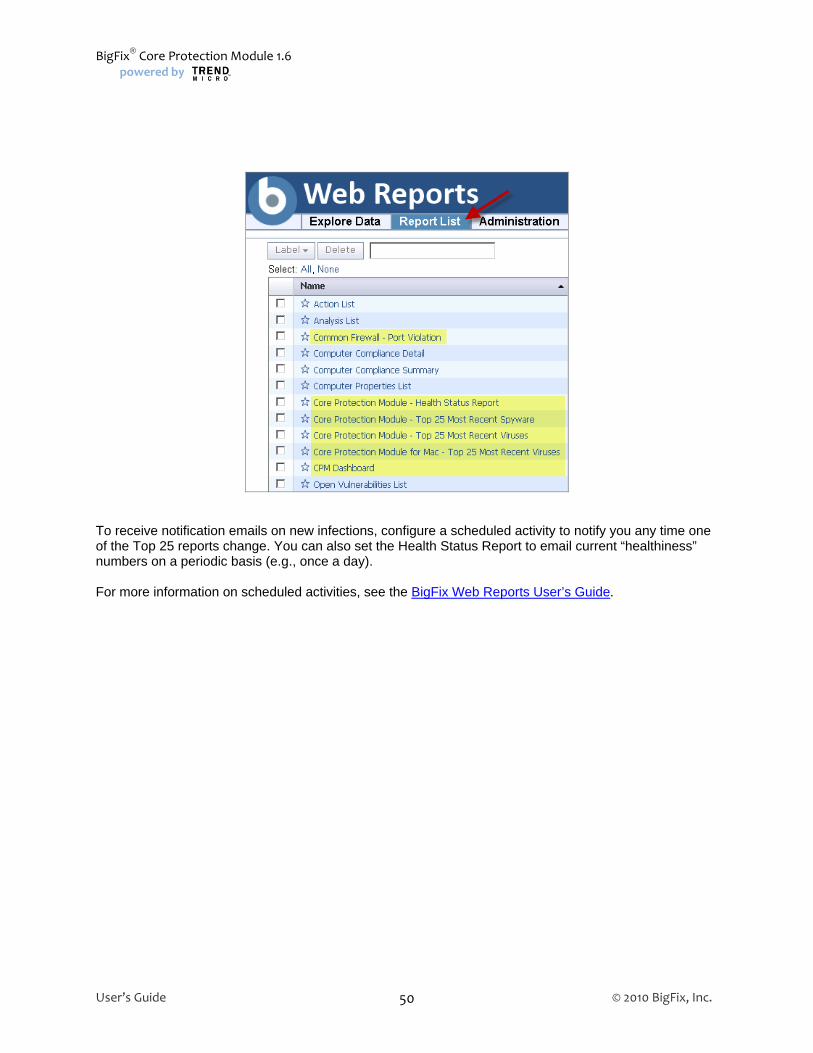
After you’re logged into Web Reports, click the Reports link to find a list of CPM-specific reports:
Common Firewall - Port Violation Health Status Report Top 25 Most Recent Spyware Top 25 Most Recent Viruses Top 25 Most Recent Viruses (for Mac) CPM Dashboard
User’s Guide © 2010 BigFix, Inc. 49
BigFix® Core Protection Module 1.6 powered by
To receive notification emails on new infections, configure a scheduled activity to notify you any time one of the Top 25 reports change. You can also set the Health Status Report to email current “healthiness” numbers on a periodic basis (e.g., once a day). For more information on scheduled activities, see the BigFix Web Reports User’s Guide.
User’s Guide © 2010 BigFix, Inc. 50
BigFix® Core Protection Module powered by
Part 5
General Tasks
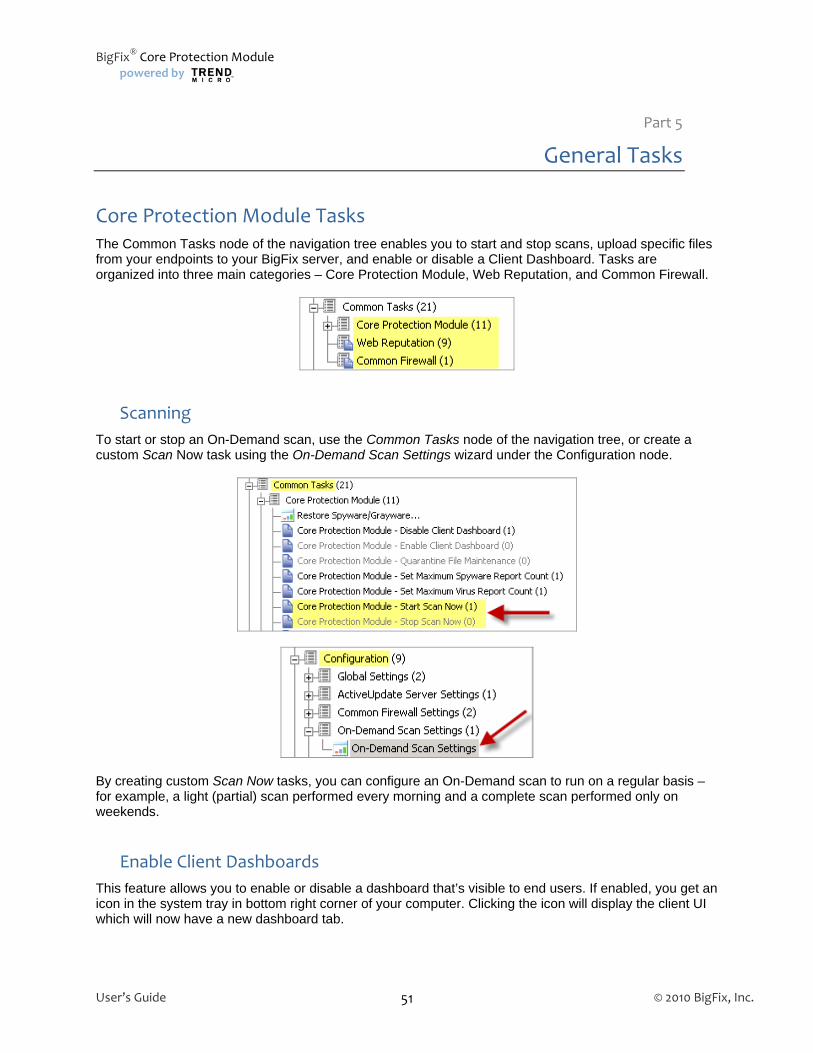
Core Protection Module Tasks The Common Tasks node of the navigation tree enables you to start and stop scans, upload specific files from your endpoints to your BigFix server, and enable or disable a Client Dashboard. Tasks are organized into three main categories – Core Protection Module, Web Reputation, and Common Firewall.
Scanning
To start or stop an On-Demand scan, use the Common Tasks node of the navigation tree, or create a custom Scan Now task using the On-Demand Scan Settings wizard under the Configuration node.
By creating custom Scan Now tasks, you can configure an On-Demand scan to run on a regular basis – for example, a light (partial) scan performed every morning and a complete scan performed only on weekends.
Enable Client Dashboards
This feature allows you to enable or disable a dashboard that’s visible to end users. If enabled, you get an icon in the system tray in bottom right corner of your computer. Clicking the icon will display the client UI which will now have a new dashboard tab.
User’s Guide © 2010 BigFix, Inc. 51
BigFix® Core Protection Module 1.6 powered by
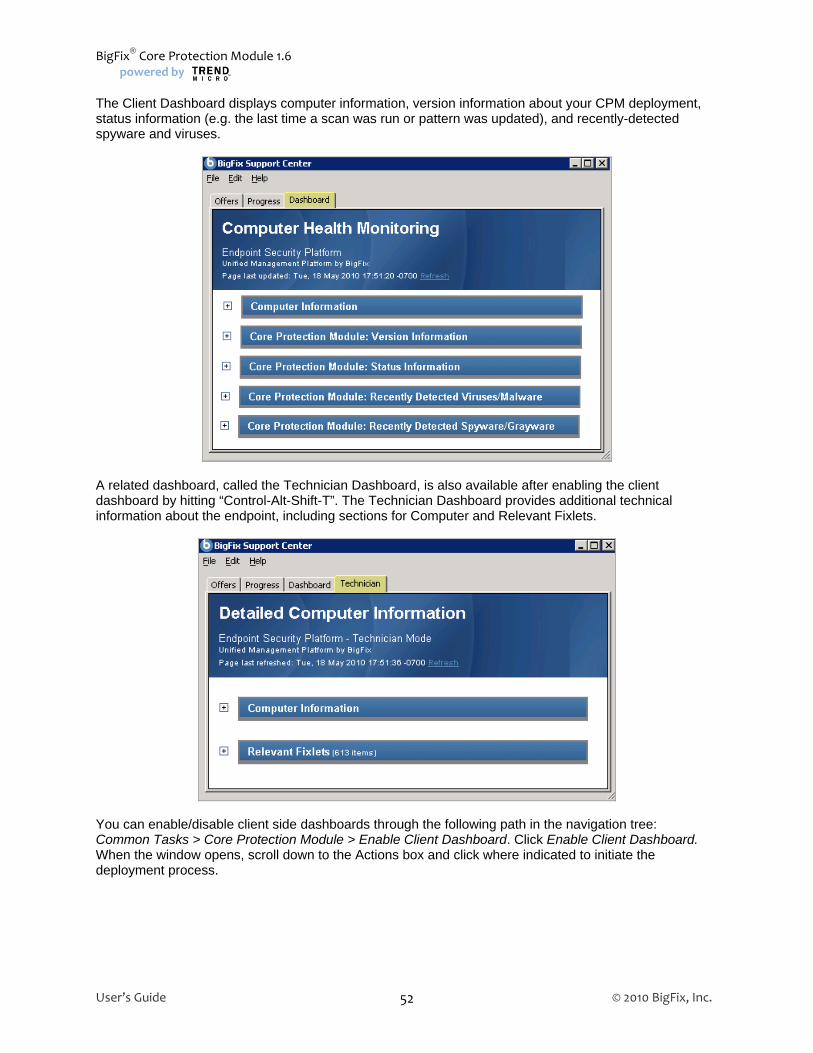
The Client Dashboard displays computer information, version information about your CPM deployment, status information (e.g. the last time a scan was run or pattern was updated), and recently-detected spyware and viruses.
A related dashboard, called the Technician Dashboard, is also available after enabling the client dashboard by hitting “Control-Alt-Shift-T”. The Technician Dashboard provides additional technical information about the endpoint, including sections for Computer and Relevant Fixlets.
You can enable/disable client side dashboards through the following path in the navigation tree: Common Tasks > Core Protection Module > Enable Client Dashboard. Click Enable Client Dashboard. When the window opens, scroll down to the Actions box and click where indicated to initiate the deployment process.
User’s Guide © 2010 BigFix, Inc. 52
BigFix® Core Protection Module powered by
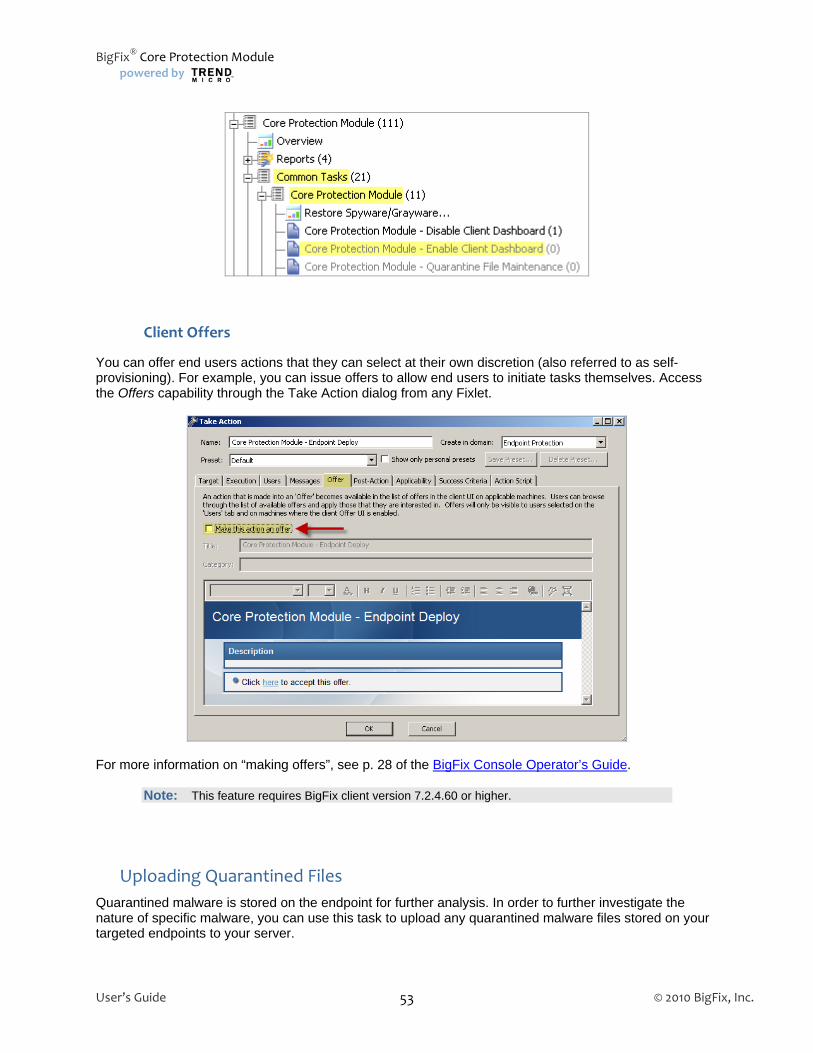
Client Offers
You can offer end users actions that they can select at their own discretion (also referred to as self-provisioning). For example, you can issue offers to allow end users to initiate tasks themselves. Access the Offers capability through the Take Action dialog from any Fixlet.
For more information on “making offers”, see p. 28 of the BigFix Console Operator’s Guide.
Note: This feature requires BigFix client version 7.2.4.60 or higher.
Uploading Quarantined Files
Quarantined malware is stored on the endpoint for further analysis. In order to further investigate the nature of specific malware, you can use this task to upload any quarantined malware files stored on your targeted endpoints to your server.
User’s Guide © 2010 BigFix, Inc. 53
BigFix® Core Protection Module 1.6 powered by
From the navigation tree, select Tasks > Core Protection Module > Upload Quarantined Files. When the dialog opens, scroll down to the Actions box and click where indicated to upload the designated files to the server.
Uploading Infection Logs
This task will enable you to upload virus and spyware log files on targeted endpoints to the BigFix Server. This can be useful if an Administrator needs further investigation of log files aside from what is already offered from the Infection Report in the CPM Dashboard. From the navigation tree, select Tasks > Core Protection Module > Upload Infection Logs. When the dialog opens, scroll down to the Actions box and click where indicated to upload logs to the BigFix server.
Web Reputation Tasks The Web Reputation feature prevents Web-based malware from infecting your users’ computers. Web Reputation reduces the need for threat scanning and clean-up by intercepting malware before it reaches your users’ computers. Specifically, Web Reputation monitors outbound web requests, stops web-based malware before it’s delivered, and blocks users’ access to potentially malicious websites.
Enabling Web Reputation
To enable CPM Web Reputation, select Tasks from the navigation tree, click Web Reputation, then select Enable Web Reputation. In the Actions box, click where indicated to enable the task. To disable Web Reputation, select that task from the Navigation bar under Web Reputation.
Note: Review the Knowledge Base article on the BigFix support website for details about how to migrate policies from Web Protection Module to the Web Reputation component of CPM.
Setting the Security Level
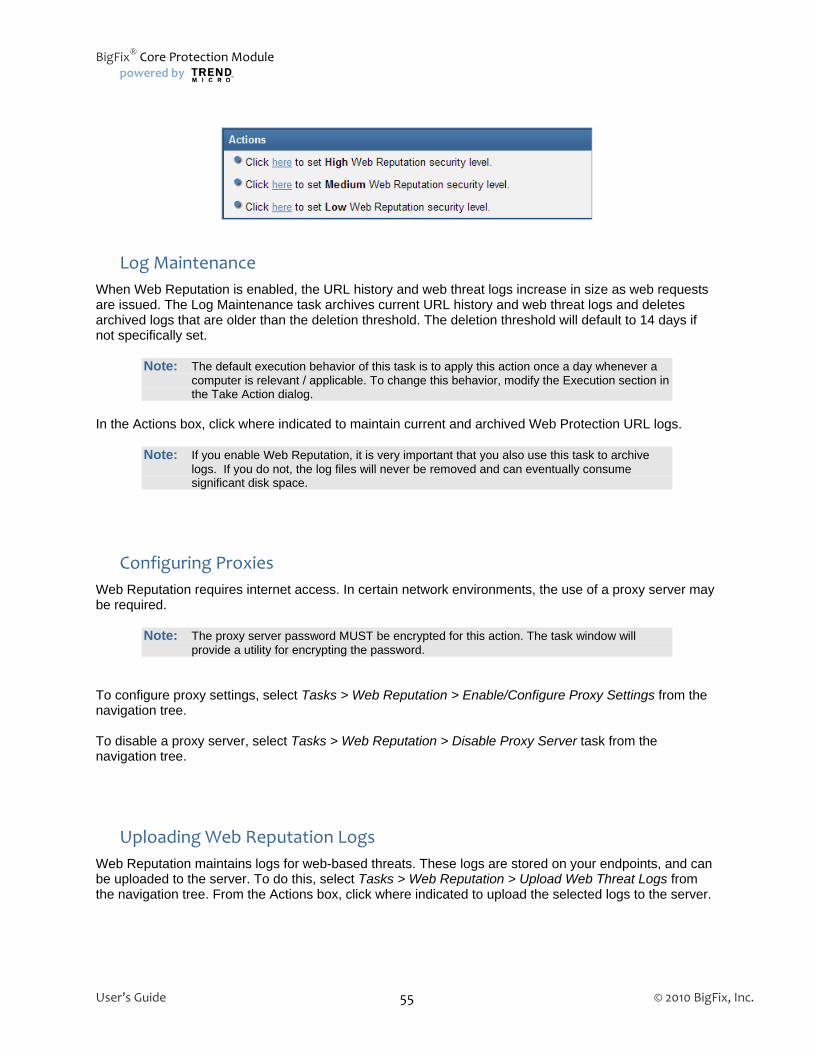
To set desired security levels for Web Reputation, select Tasks from the navigation tree, click Web Reputation, then select Configure Web Reputation Security Level. The following security levels determine how/if Web Reputation will allow or block access to a URL:
High: Blocks URLs that are unrated, a Web threat, very likely to be a Web threat, or likely to be a Web threat
Medium: Blocks URLs that are unrated, a Web threat, or very likely to be a Web threat
Low: Blocks only URLs that are a Web threat
In the Actions box, click where indicated next to your desired security level to deploy this task.
User’s Guide © 2010 BigFix, Inc. 54
BigFix® Core Protection Module powered by
Log Maintenance
When Web Reputation is enabled, the URL history and web threat logs increase in size as web requests are issued. The Log Maintenance task archives current URL history and web threat logs and deletes archived logs that are older than the deletion threshold. The deletion threshold will default to 14 days if not specifically set.
Note: The default execution behavior of this task is to apply this action once a day whenever a computer is relevant / applicable. To change this behavior, modify the Execution section in the Take Action dialog.
In the Actions box, click where indicated to maintain current and archived Web Protection URL logs.
Note: If you enable Web Reputation, it is very important that you also use this task to archive logs. If you do not, the log files will never be removed and can eventually consume significant disk space.
Configuring Proxies
Web Reputation requires internet access. In certain network environments, the use of a proxy server may be required.
Note: The proxy server password MUST be encrypted for this action. The task window will provide a utility for encrypting the password.
To configure proxy settings, select Tasks > Web Reputation > Enable/Configure Proxy Settings from the navigation tree. To disable a proxy server, select Tasks > Web Reputation > Disable Proxy Server task from the navigation tree.
Uploading Web Reputation Logs
Web Reputation maintains logs for web-based threats. These logs are stored on your endpoints, and can be uploaded to the server. To do this, select Tasks > Web Reputation > Upload Web Threat Logs from the navigation tree. From the Actions box, click where indicated to upload the selected logs to the server.
User’s Guide © 2010 BigFix, Inc. 55

BigFix® Core Protection Module 1.6 powered by
Enable/Disable Collection of Visited Sites
Take this action to stop the collection of visited sites information. Visited sites information will exist on the endpoint; however, that information will not be transferred to the ESP Server via the Web Reputation – Site Statistics analysis.
Common Firewall
Uploading Firewall Logs
Use this task to upload firewall log files on targeted endpoints to the server. From the navigation tree, select Common Tasks > Common Firewall > Upload Firewall Logs.
User’s Guide © 2010 BigFix, Inc. 56

BigFix® Core Protection Module powered by
Part 6
Appendix
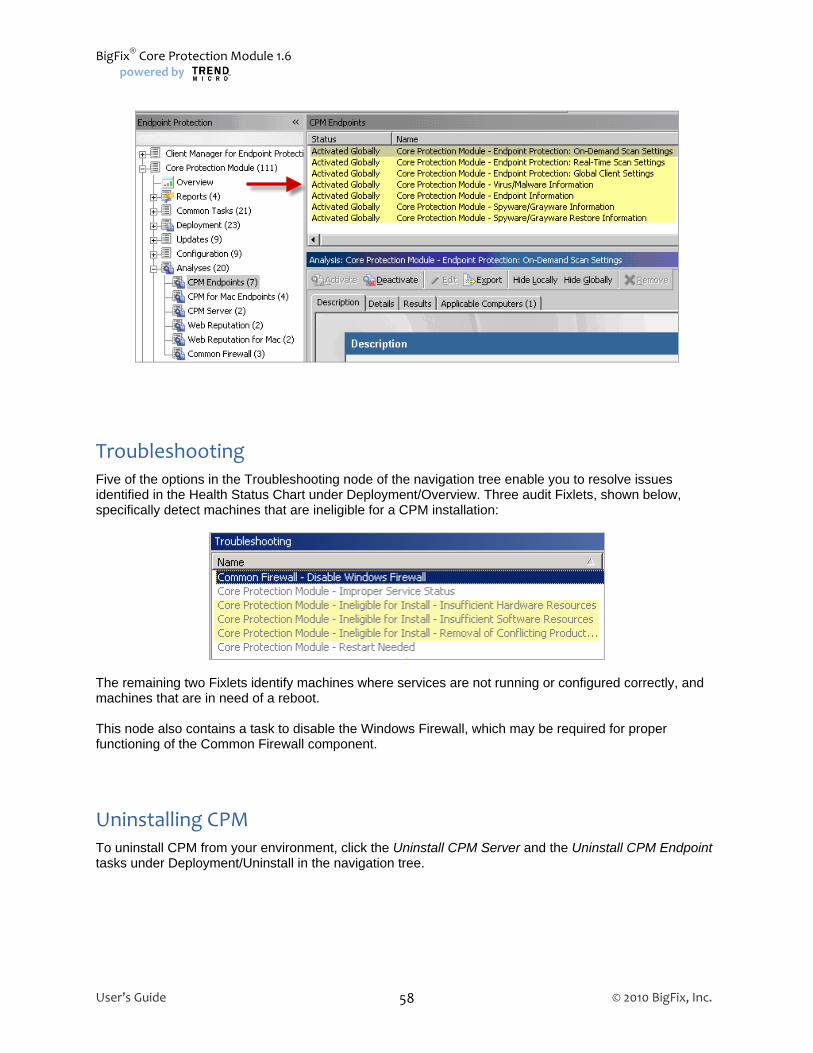
Viewing Analyses To locate information about CPM endpoints, use the Analyses node of the navigation tree.
Note: The data in some of the analyses is intended for viewing through the CPM Dashboard reports and may not be useful in its raw form.
Clicking on any of the items under the Analyses node in the navigation tree will populate a list of the related analyses in the list panel in the upper right of your screen.
User’s Guide © 2010 BigFix, Inc. 57
BigFix® Core Protection Module 1.6 powered by
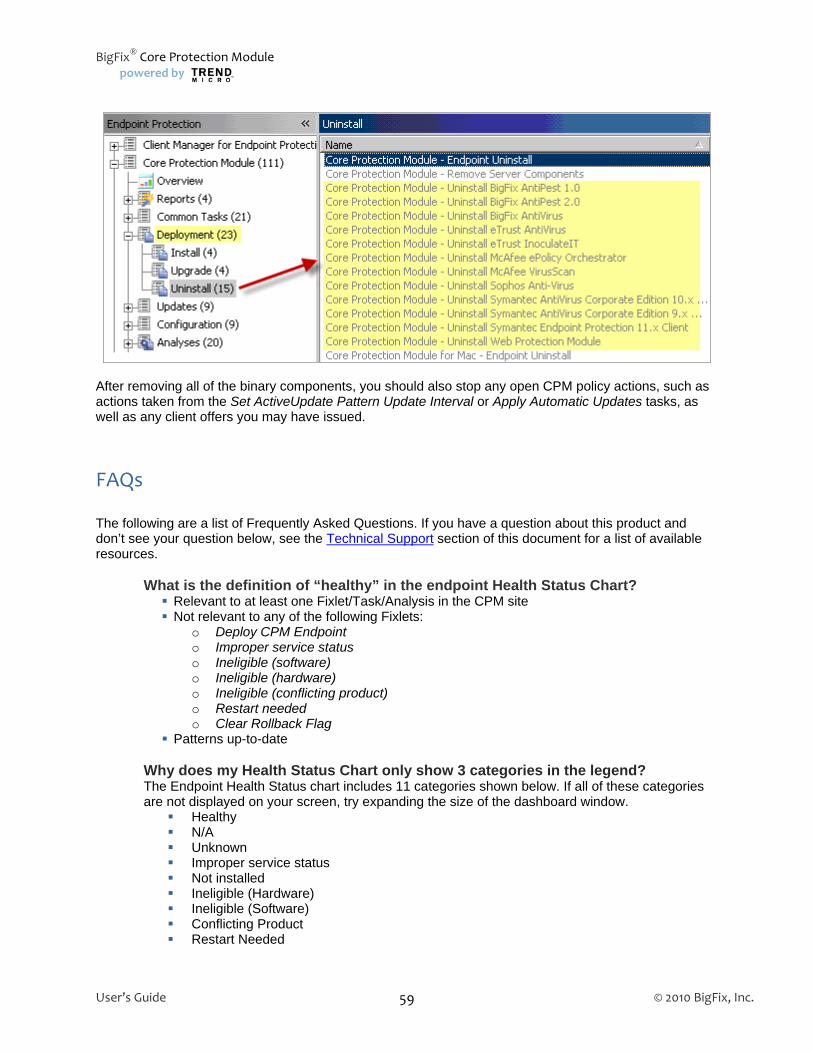
Troubleshooting Five of the options in the Troubleshooting node of the navigation tree enable you to resolve issues identified in the Health Status Chart under Deployment/Overview. Three audit Fixlets, shown below, specifically detect machines that are ineligible for a CPM installation:
The remaining two Fixlets identify machines where services are not running or configured correctly, and machines that are in need of a reboot. This node also contains a task to disable the Windows Firewall, which may be required for proper functioning of the Common Firewall component.
Uninstalling CPM To uninstall CPM from your environment, click the Uninstall CPM Server and the Uninstall CPM Endpoint tasks under Deployment/Uninstall in the navigation tree.
User’s Guide © 2010 BigFix, Inc. 58
BigFix® Core Protection Module powered by
After removing all of the binary components, you should also stop any open CPM policy actions, such as actions taken from the Set ActiveUpdate Pattern Update Interval or Apply Automatic Updates tasks, as well as any client offers you may have issued.
FAQs The following are a list of Frequently Asked Questions. If you have a question about this product and don’t see your question below, see the Technical Support section of this document for a list of available resources.
What is the definition of “healthy” in the endpoint Health Status Chart? Relevant to at least one Fixlet/Task/Analysis in the CPM site Not relevant to any of the following Fixlets:
o Deploy CPM Endpoint o Improper service status o Ineligible (software) o Ineligible (hardware) o Ineligible (conflicting product) o Restart needed o Clear Rollback Flag
Patterns up-to-date Why does my Health Status Chart only show 3 categories in the legend? The Endpoint Health Status chart includes 11 categories shown below. If all of these categories are not displayed on your screen, try expanding the size of the dashboard window.
Healthy N/A Unknown Improper service status Not installed Ineligible (Hardware) Ineligible (Software) Conflicting Product Restart Needed
User’s Guide © 2010 BigFix, Inc. 59

BigFix® Core Protection Module 1.6 powered by
In Rollback State Patterns Out of Date
How do I create exclusions? Go to the Scan Exclusion tab in the On Demand and Real Time wizards (Configuration node).
How do I configure an action when a virus is detected? Go to the Scan Action tab in the On Demand and Real Time wizards (Configuration node).
How do I tune spyware detection? You can set spyware detection to assessment mode in the “Spyware Grayware Scan Settings Only” section of the Global Settings wizard (Configuration node). Instead of quarantining spyware that’s been found, this feature allows you to simply report spyware so you can view the infection reports and set appropriate exclusions. Can I automatically flow updates through clients without operator approval? Yes. However, you need to manually enable Automatic Updates. See Page 29 of this document, or check the list of Knowledge Base articles located on the BigFix support site. How do I get notified when my system detects a new spyware or virus infection? Using Web Reports, configure a Scheduled Report based on the Top 25 Spyware and Virus reports, and set it to email you anytime it changes.
How can end users monitor infection information? By enabling the Client Dashboard.
What is IntelliTrap, referenced in the On Demand Scan Wizard? IntelliTrap helps reduce the risk of virus/malware entering your network by blocking files with real-time compressed executable files.
What is IntelliScan, referenced in the On Demand Scan Wizard? IntelliScan is a Trend feature that will only scan files known to potentially harbor malicious code, even those disguised by an innocuous-looking extension name.
User’s Guide © 2010 BigFix, Inc. 60
BigFix® Core Protection Module powered by
User’s Guide © 2010 BigFix, Inc. 61
Do the On Demand, Global, and Real Time settings features come with default settings, or do I need to set parameters on them before I use this product? CPM is packaged with default settings for each of these functions, but the wizards enable you to configure them with customized parameters (for example, use the wizard to customize exclusions to a scan).
What is ActiveAction, referenced in the Real Time Wizard Scan Action tab? ActiveAction is a set of pre-configured scan actions for specific types of viruses/malware. It is recommended to use ActiveAction if you are not sure which scan action is suitable for each type of virus/malware. What is the ActiveUpdate Server and what is it used for? TMAU, or the Trend ActiveUpdate Server, is Trend’s “In the Cloud” server from which our CPM server downloads pattern set files.
Technical Support
BigFix offers a suite of support options to help optimize your user-experience and success with this product. Here’s how it works:
First, check the BigFix website Documentation page Next, search the BigFix Knowledge Base for applicable articles on your topic Then check the User Forum for discussion threads and community-based support
If you still can’t find the answer you need, contact BigFix’s support team for technical assistance:
Phone/US: 866 752-6208 (United States) Phone/International: 661 367-2202 (International) Email: [email protected]