cornell cooperative extension herkimer county … · p age 2 h erkimer outdoors in dense grass,...
TRANSCRIPT
M A Y / J U N E 2 0 1 0
CORNELL COOPERATIVE EXTENSION HERKIMER COUNTY
Meadow Mice Cover
-2
Apply Fertilizer Early to Home
Fruit Trees 3
Horticulture Oils 3-4
Rotate Vegetables by
Family 5
Lawn Care Tips for May and
June 5
Days Between Flowering &
Harvest 6
Try Later Planting for Fall
Harvesting 6
Avoid the Late Blight Blues
7-9
Pruning Spring Flowering
Shrubs 9
Perennials for Season - Long
Bloom 10-12
Planting a Tree 12-14
Mulching Important for
Vegetable 15
INSIDE THIS ISSUE
HERKIMER OUTDOORS V O L U M E 9 , I S S U E 3
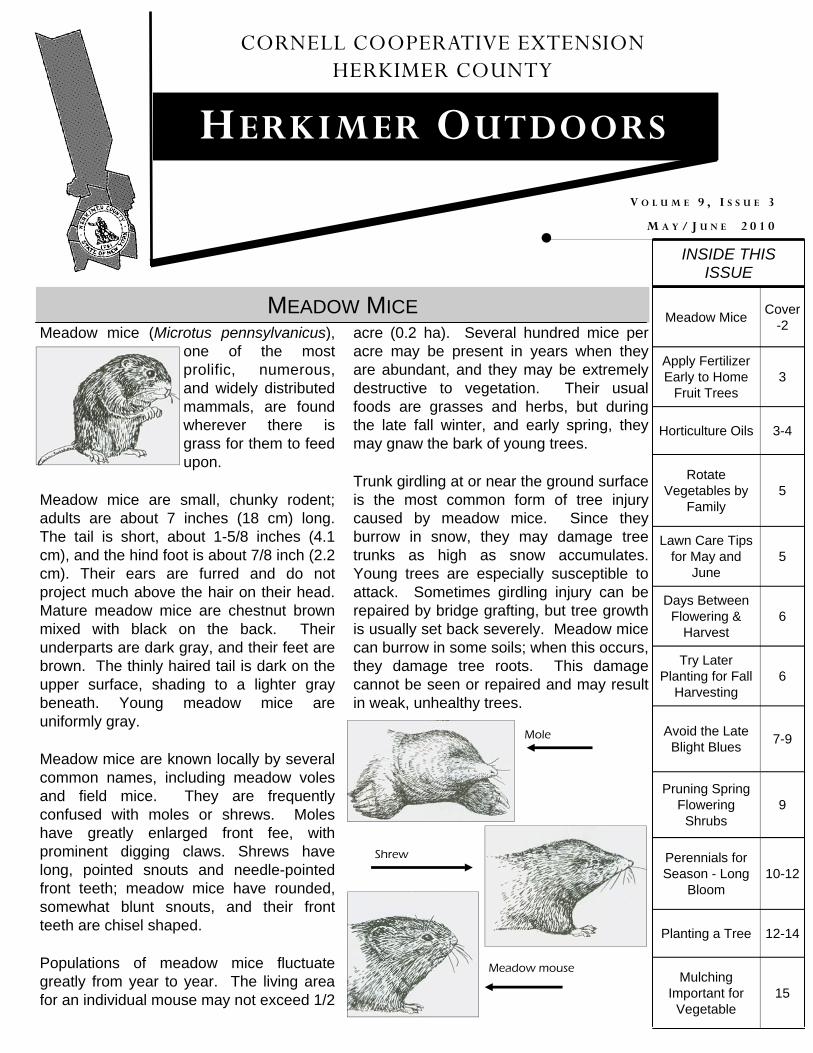
Meadow mice (Microtus pennsylvanicus), one of the most prolific, numerous, and widely distributed mammals, are found wherever there is grass for them to feed upon.
Meadow mice are small, chunky rodent; adults are about 7 inches (18 cm) long. The tail is short, about 1-5/8 inches (4.1 cm), and the hind foot is about 7/8 inch (2.2 cm). Their ears are furred and do not project much above the hair on their head. Mature meadow mice are chestnut brown mixed with black on the back. Their underparts are dark gray, and their feet are brown. The thinly haired tail is dark on the upper surface, shading to a lighter gray beneath. Young meadow mice are uniformly gray.
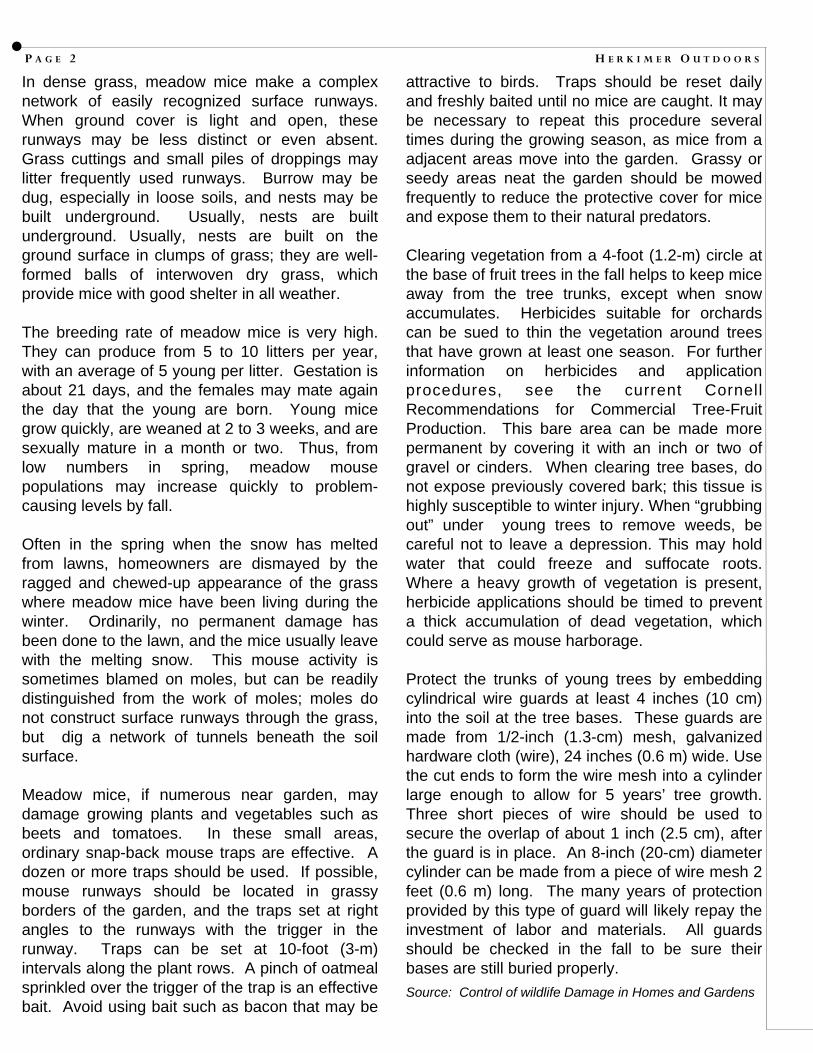
Meadow mice are known locally by several common names, including meadow voles and field mice. They are frequently confused with moles or shrews. Moles have greatly enlarged front fee, with prominent digging claws. Shrews have long, pointed snouts and needle-pointed front teeth; meadow mice have rounded, somewhat blunt snouts, and their front teeth are chisel shaped.
Populations of meadow mice fluctuate greatly from year to year. The living area for an individual mouse may not exceed 1/2
acre (0.2 ha). Several hundred mice per acre may be present in years when they are abundant, and they may be extremely destructive to vegetation. Their usual foods are grasses and herbs, but during the late fall winter, and early spring, they may gnaw the bark of young trees.
Trunk girdling at or near the ground surface is the most common form of tree injury caused by meadow mice. Since they burrow in snow, they may damage tree trunks as high as snow accumulates. Young trees are especially susceptible to attack. Sometimes girdling injury can be repaired by bridge grafting, but tree growth is usually set back severely. Meadow mice can burrow in some soils; when this occurs, they damage tree roots. This damage cannot be seen or repaired and may result in weak, unhealthy trees.
MEADOW MICE
Mole
Shrew
Meadow mouse
P A G E 2 H E R K I M E R O U T D O O R S
In dense grass, meadow mice make a complex network of easily recognized surface runways. When ground cover is light and open, these runways may be less distinct or even absent. Grass cuttings and small piles of droppings may litter frequently used runways. Burrow may be dug, especially in loose soils, and nests may be built underground. Usually, nests are built underground. Usually, nests are built on the ground surface in clumps of grass; they are well-formed balls of interwoven dry grass, which provide mice with good shelter in all weather.
The breeding rate of meadow mice is very high. They can produce from 5 to 10 litters per year, with an average of 5 young per litter. Gestation is about 21 days, and the females may mate again the day that the young are born. Young mice grow quickly, are weaned at 2 to 3 weeks, and are sexually mature in a month or two. Thus, from low numbers in spring, meadow mouse populations may increase quickly to problem-causing levels by fall.
Often in the spring when the snow has melted from lawns, homeowners are dismayed by the ragged and chewed-up appearance of the grass where meadow mice have been living during the winter. Ordinarily, no permanent damage has been done to the lawn, and the mice usually leave with the melting snow. This mouse activity is sometimes blamed on moles, but can be readily distinguished from the work of moles; moles do not construct surface runways through the grass, but dig a network of tunnels beneath the soil surface.
Meadow mice, if numerous near garden, may damage growing plants and vegetables such as beets and tomatoes. In these small areas, ordinary snap-back mouse traps are effective. A dozen or more traps should be used. If possible, mouse runways should be located in grassy borders of the garden, and the traps set at right angles to the runways with the trigger in the runway. Traps can be set at 10-foot (3-m) intervals along the plant rows. A pinch of oatmeal sprinkled over the trigger of the trap is an effective bait. Avoid using bait such as bacon that may be
attractive to birds. Traps should be reset daily and freshly baited until no mice are caught. It may be necessary to repeat this procedure several times during the growing season, as mice from a adjacent areas move into the garden. Grassy or seedy areas neat the garden should be mowed frequently to reduce the protective cover for mice and expose them to their natural predators.
Clearing vegetation from a 4-foot (1.2-m) circle at the base of fruit trees in the fall helps to keep mice away from the tree trunks, except when snow accumulates. Herbicides suitable for orchards can be sued to thin the vegetation around trees that have grown at least one season. For further information on herbicides and application procedures, see the current Cornell Recommendations for Commercial Tree-Fruit Production. This bare area can be made more permanent by covering it with an inch or two of gravel or cinders. When clearing tree bases, do not expose previously covered bark; this tissue is highly susceptible to winter injury. When “grubbing out” under young trees to remove weeds, be careful not to leave a depression. This may hold water that could freeze and suffocate roots. Where a heavy growth of vegetation is present, herbicide applications should be timed to prevent a thick accumulation of dead vegetation, which could serve as mouse harborage.
Protect the trunks of young trees by embedding cylindrical wire guards at least 4 inches (10 cm) into the soil at the tree bases. These guards are made from 1/2-inch (1.3-cm) mesh, galvanized hardware cloth (wire), 24 inches (0.6 m) wide. Use the cut ends to form the wire mesh into a cylinder large enough to allow for 5 years’ tree growth. Three short pieces of wire should be used to secure the overlap of about 1 inch (2.5 cm), after the guard is in place. An 8-inch (20-cm) diameter cylinder can be made from a piece of wire mesh 2 feet (0.6 m) long. The many years of protection provided by this type of guard will likely repay the investment of labor and materials. All guards should be checked in the fall to be sure their bases are still buried properly.
Source: Control of wildlife Damage in Homes and Gardens

P A G E 3
All fruit in a lawn or other sod area will benefit from an application of nitrogen once a year. The nitrogen must always be applied in the early spring - before April 20th. For practical purposes, most homeowners would be better off to use a complete fertilizer such as 10-10-10 (see chart below).
Spread all fertilizer evenly on the ground as far away from the trunk of the tree as the outer spread of branches. It is not necessary to drill fertilizer into the ground. If your fertilizer application can be applied in early March, so much the better.
Garden Fertilization
Vegetable gardens will benefit from fertilizer applications and produce more abundantly when using 5-10-10 granular fertilizer, Cornell soil scientists suggest the rate of application should be four pounds per 100 square feet (10x10). Two pounds should be spread or broadcast over the soil before spading or
rototilling, and the other two pounds applied before raking the soil into a level seed bed.
Farm manure from cows and horses can supply a large quantity of essential plant nutrients if it is supplemented with 1-1/2 lbs. of superphosphate to each bushel of manure, enough for 5-75 sq. ft. of garden area.
Poultry, sheep and goat manure, well rotted, should be used at the rate of no more than one bushel per 100 sq. ft. of garden. If not well rotted, it should be applied before plowing or spading and then turned over.
Source: Finger Lakes Horticulture Regional Program
Until recently, horticultural spray oils were primarily used as “dormant oils” applied before bud break in the spring. A new generation of “superior horticultural oils or summer oils” can be safely used on many woody ornamental and bedding plants during the growing season.
Horticultural oils are applied as sprays and function by direct contact with the insect control. However, the primary mode of action is through suffocation. This results when the spray forms a coating of oil on the insect’s body, blocking the spiracles or breathing opening. Horticultural oils also may interact with insect fatty acids disrupting cell membranes and metabolism. Horticultural oils may have repellent properties for some insects. For example, adult greenhouse whiteflies quickly leave poinsettia plants that are treated with horticultural oil. In one study, 95% fewer eggs were laid on plants treated with oil compared with poinsettias not treated with oil. Horticultural oil may act as an antifeedant (discouraging feeding) for the euonymus webworm and some leafrollers.
Continued on page 4
APPLY FERTILIZER EARLY TO HOME FRUIT TREES
Kind of Fruit
Age of Tree
Pounds/Tree
Sod 10-10-10
Pounds/Tree
Cultivate 10-10-10
Apples 1-2
3-5
5-10
10-15
15-20
Over-20
——
——
3-6
6-9
9-15
12-18
¼ - ½
½ - 2
2 - 4 ½
3 - 6
4 - 9
5 - 10
Pears 1-2
3-4
5-10
11-15
Over-15
——
——
2-3
3-5
4-8
¼ - ½
½ - 1
1 - 1 ½
1 ½ - 3
3 - 6
Peaches & Cherries
1 - 2
3 - 4
5 - 10
Over 15
——-
——-
——-
——-
¼ - ½
½ - 3
3-5
5-8
3-6
Prunes 1 - 2
3 - 4
5 - 10
——
——
1
5 - 10
¼ - ½
½ - 1½
1½ - 2½
2½ - 5
Suggested Fertilizer Rates
HORTICULTURAL OILS
V O L U M E 9 , I S S U E 3
P A G E 4 H E R K I M E R O U T D O O R S
Superior horticultural oils are made from a complex mixture of petroleum hydrocarbons produced from paraffinic crude oil. As such, oils cannot be identified by a specific chemical formula as are the more “traditional” pesticides. Factors such as the unsulfonated residue (u.r. rating) and distillation temperature, which are listed on the label, provide helpful information on the oil’s key characteristics.
The u.r. rating is the percentage of saturated compounds in the oil and represents the oil’s purity of degree of refinement. Horticultural oils are from 92 to 99 percent pure.
The distillation temperature, or the range over which an oil is distilled, is a measure of the oil’s volatility. Horticultural oils may have distillation temperatures from 414° Fahrenheit to 468° Fahrenheit. Lower distillation temperatures (i.e., 414° Fahrenheit), represent oils that are more volatile and may be used in the summer or dormant season. For these more volatile oils, the dilution rate may be adjusted from 3% for dormant applications to 25% for summer applications. When the distillation temperature is higher (i.e., 468° Fahrenheit), the oil is less volatile and should be used for dormant applications only.
Benefits of Horticultural Oils - Horticultural oils are most effective against many soft bodied pests including aphids, adelgids, spider mites, scale insects, greenhouse whiteflies, mealybugs, psyllids, plant bugs, lace bugs and some caterpillars. Recent research shows promise for horticultural oil’s future role as a fungicide against powdery mildew on lilac, rose, horse chestnut and other plant species.
Such oils are also safe to mammals (including humans), some birds and reptiles but are toxic to fish. Horticultural oil is not selective and, therefore, will kill any susceptible beneficial insects, as well as pests, that are coated by the oil. For example, when treating for spider mites, predatory mite eggs will be killed by the oil as
easily as spider mite eggs. However, horticultural oil evaporates rapidly, and, when dried, it will have little toxic activity. Thus, beneficial insects may safely reenter oil treated areas after the spray residue has dried. Spot treatments with oil will minimize the impact on beneficial insects, because only those individuals covered by the oil will be affected. During one hundred years of use, researchers have recorded only one example of resistance with horticulture oil.
Limitations of Horticultural Oils - In spite of these benefits, many potential users do not use horticultural oils because of a concern that phytotoxicity (toxicity to plants) will occur. The heavier, less-purified dormant oils used in the past, were more likely to cause phytotoxic reactions than the more highly refined oils in use today. Superior horticultural oils can now be safely used on more than forty-five different types of woody ornamentals. Many bedding plants including ageratum, marigolds, salvia, Vinca rosea, and others may also be safely treated with horticultural oil. Treating plants that are under moisture or drought stress during summer may result in marginal leaf burns. Oil sprays also should be avoided when the relative humidity is high may result in marginal leaf burns. Oil sprays also should be avoided when the relative humidity is high (over 90% for 48 hours), because the slower drying time of the oil on the foliage may cause phytotoxicity. During summer, leave at least a two-week interval between treatments. Also avoid dormant oil treatments in the fall, before true dormancy has taken place, or twig and shoot dieback on deciduous plants may occur the following spring. Phytotoxic symptoms may first appear as a general chlorosis as the foliage turns a light yellow. Treated leaves may appear water-soaked, turn dark purple and drop from the plant. Treating bedding plants in flower may result in spotting of the flowers. Oil sprays on wax begonia and coleus may cause pitting and speckling of the foliage
Source: CCE Otsego County, Master Gardener Newsletter; May 2002
HORTICULTURAL OILS

P A G E 5 V O L U M E 9 , I S S U E 3
Rotating the location you plant vegetable crops in your garden will go a long way to discourage a buildup off disease organisms and insect pests. Plants in the same family tend to have similar problems—beans and peas both suffer from powdery mildew and broccoli and cabbage both are beloved by the green cabbage worm. Allow two or three years between the times you plant members of the same crop family in an area of the garden. To help in planning your crop rotation, the following chart lists that most common vegetable families and their members:
MAY
Mowing: Keep up with the top growth, but do not remove more than one-third of the overall grass height with each mowing. This may require multiple mowing per week during periods of rapid growth.
Clean Up Debris: Remove leaves, sticks and other debris from your lawn. It is better to clean it up now before you start actively mowing and caring for your turf.
Sharpen Mower Blades: A sharp, clean cut is important to overall lawn health. Make sure your mower blade is sharp and balanced this spring. For best results, have it sharpened every 3 months.
JUNE
Mowing: Keep your lawn 3 inches tall to reduce stress and pest problems from mowing to short. However, studies have shown that mowing at the low end of the species tolerance on irrigated sites can reduce water use.
Fertilizing: Apply 1 lb. N/1,000 ft.2 Fall is the best time to fertilize your lawn.
Scouting: Walk your property (scout) in the early morning to help detect problems in the early stages when control methods are most effective.
Source: Cornell Gardening Resources, Timely Lawn Care Tips
ROTATE VEGETABLES BY FAMILY
Umbellifera Parsley Family Celery, carrot, dill, fennel, parsley
Compositae Sunflower Family Artichoke, lettuce
Cruciferae Mustard Family Broccoli, cauliflower, cabbage, Brussels sprouts, kale, turnip, collards, mustard, watercress, radish
Leguminosae Pea Family Beans, peas, peanuts
Gramineae Grass Family Corn
Cucurbitaceae Cucumber Family Squash, cucumber, melon, pumpkin
Lilaceae Lily Family Asparagus, onions, garlic
Solanceae Nightshade Family
Pepper, tomato, potato, eggplant
Chenopodiaceae Goosefoot Family Beets, Swiss chard, spinach
Source: “Grow Line,” CCE Saratogo County, February 2000, with minor edits
LAWN CARE TIPS FOR MAY AND JUNE
H E R K I M E R O U T D O O R S P A G E 6
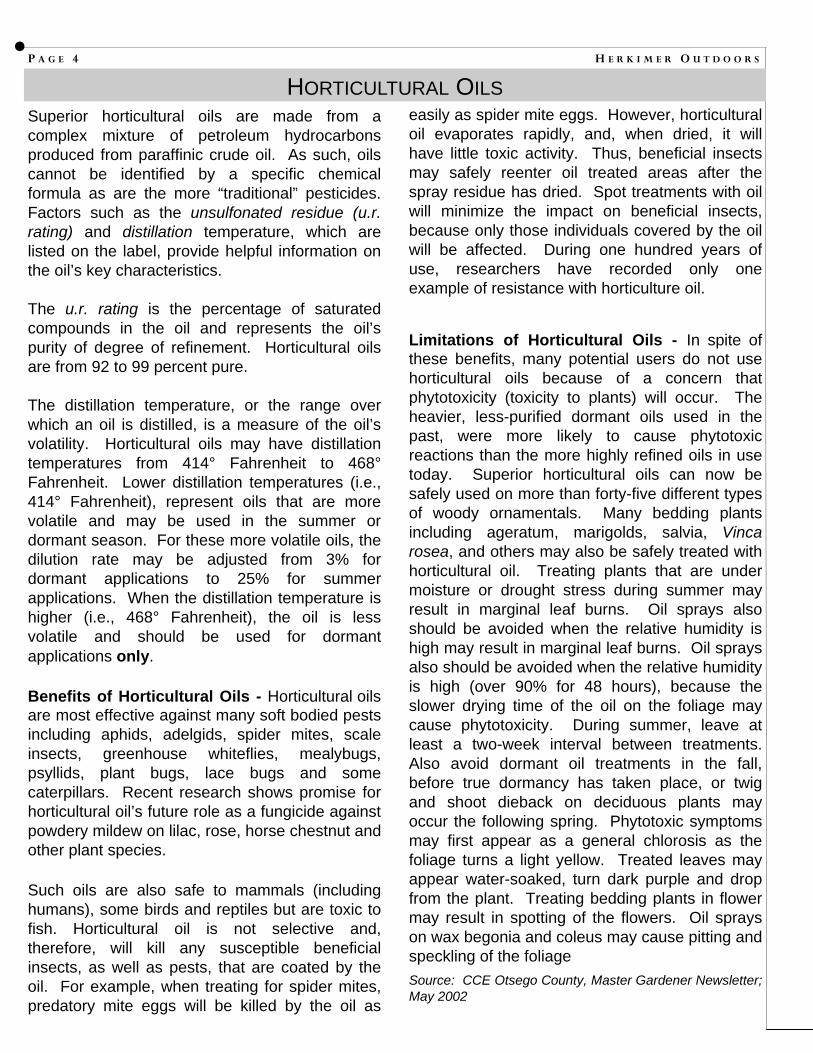
The number of days between flowering and harvest for many vegetable crops offers a means of a) predicting harvest dates, and b) explaining low yields or poor quality.
Please note that prediction of harvest dates is approximate since they can vary with conditions and varieties. Black plastic mulch may shorten flowering time by about a week.
These figures can be used to explain low yields or poor quality. The adverse effects of unusual weather are often delayed. A poor picking of snap beans on August 17 may have been the result of high temperatures on August 3 when the plants were in bloom. Cat-faced (malformed) tomatoes picked July 10 were probably caused by cold weather 45 to 50 days earlier when the flowers first opened.
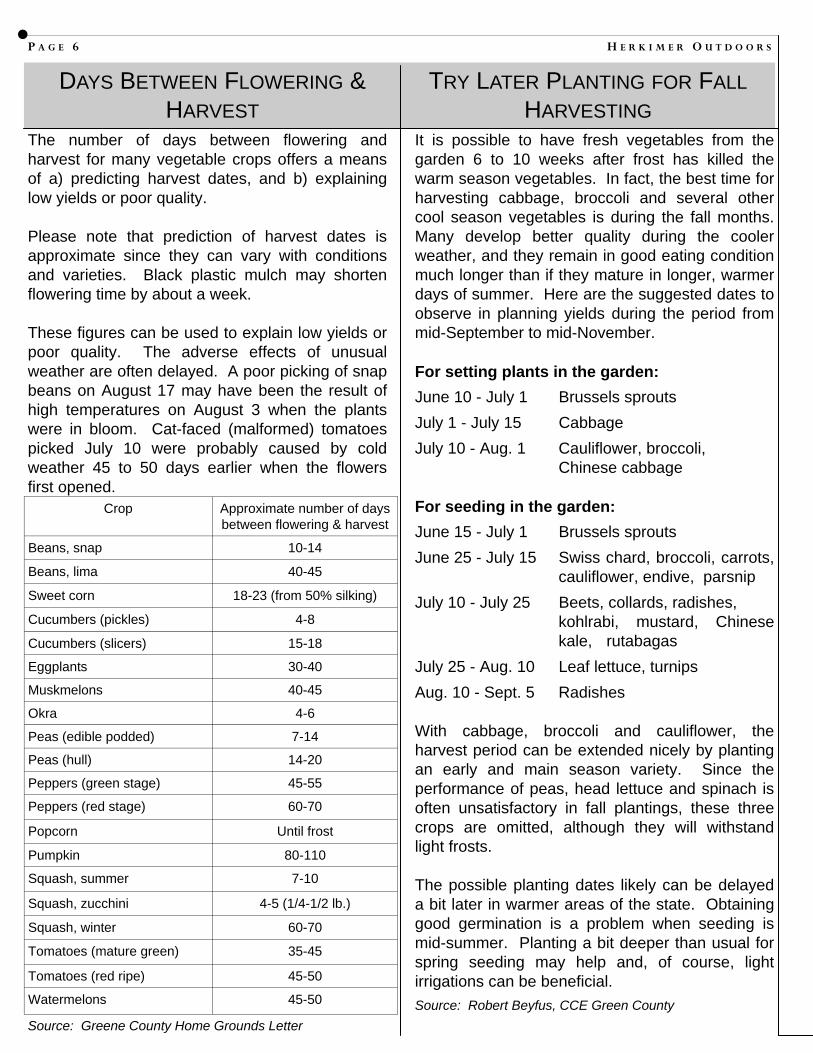
It is possible to have fresh vegetables from the garden 6 to 10 weeks after frost has killed the warm season vegetables. In fact, the best time for harvesting cabbage, broccoli and several other cool season vegetables is during the fall months. Many develop better quality during the cooler weather, and they remain in good eating condition much longer than if they mature in longer, warmer days of summer. Here are the suggested dates to observe in planning yields during the period from mid-September to mid-November.
For setting plants in the garden:
June 10 - July 1 Brussels sprouts
July 1 - July 15 Cabbage
July 10 - Aug. 1 Cauliflower, broccoli, Chinese cabbage
For seeding in the garden:
June 15 - July 1 Brussels sprouts
June 25 - July 15 Swiss chard, broccoli, carrots, cauliflower, endive, parsnip
July 10 - July 25 Beets, collards, radishes, kohlrabi, mustard, Chinese kale, rutabagas
July 25 - Aug. 10 Leaf lettuce, turnips
Aug. 10 - Sept. 5 Radishes
With cabbage, broccoli and cauliflower, the harvest period can be extended nicely by planting an early and main season variety. Since the performance of peas, head lettuce and spinach is often unsatisfactory in fall plantings, these three crops are omitted, although they will withstand light frosts.
The possible planting dates likely can be delayed a bit later in warmer areas of the state. Obtaining good germination is a problem when seeding is mid-summer. Planting a bit deeper than usual for spring seeding may help and, of course, light irrigations can be beneficial.
Source: Robert Beyfus, CCE Green County
DAYS BETWEEN FLOWERING & HARVEST
Crop Approximate number of days between flowering & harvest
Beans, snap 10-14
Beans, lima 40-45
Sweet corn 18-23 (from 50% silking)
Cucumbers (pickles) 4-8
Cucumbers (slicers) 15-18
Eggplants 30-40
Muskmelons 40-45
Okra 4-6
Peas (edible podded) 7-14
Peas (hull) 14-20
Peppers (green stage) 45-55
Peppers (red stage) 60-70
Popcorn Until frost
Pumpkin 80-110
Squash, summer 7-10
Squash, zucchini 4-5 (1/4-1/2 lb.)
Squash, winter 60-70
Tomatoes (mature green) 35-45
Tomatoes (red ripe) 45-50
Watermelons 45-50
Source: Greene County Home Grounds Letter
TRY LATER PLANTING FOR FALL HARVESTING
V O L U M E 9 , I S S U E 3 P A G E 7
Last year, many broken-hearted gardeners in the Northeast were denied their cherished homegrown tomatoes when late blight – the same disease that triggered the Irish potato famine – wiped out their plants.
This year, gardeners can play a key role to help avoid a repeat of 2009.
“Anyone growing susceptible plants needs to take responsibility to ensure they don’t become a ‘typhoid Mary,’” says Meg McGrath, plant pathologist at Cornell University’s Long Island Horticulture Research and Extension Center, Riverhead, N.Y.
“We need to treat this like a community disease,” she adds. “If infested, even a small garden can have a devastating impact on other plantings.”
The good news for gardeners is that they are starting with a relatively clean slate this year. Phytophthora infestans, the fungus-like pathogen that causes late blight in tomatoes, potatoes and other tomato-family plants (Solanaceae), currently requires living plant tissue to survive overwinter in the Northeast. That’s why the disease is relatively rare in the region.
The bad news is, potato tubers are living plant tissue. So any late-blight-infested potato tubers that survived in your soil, compost pile or root cellar could harbor the pathogen and give it an early start again this season.
“Destroy leftover potatoes and any volunteer potato plants as soon as they sprout,” McGrath urges. “Do not wait until you see symptoms. By then, new spores likely will have already developed and spread to other gardens or farmers’ fields.”
Infested potato tubers are usually the main source of the pathogen in the Northeast, says McGrath. But spores can also be carried by wind into the region from milder climates. Typically, these outbreaks occur later in the season, hence the name late blight.
And there is potentially worse news: If both mating types of the pathogen establish here in the Northeast, they can produce thick-walled spores that overwinter and survive several years in the soil without a living host. This has already happened in parts of Scandinavia and Europe, where late blight, as a result, occurs more commonly. While only one mating type was detected in the Northeast last year, both types appear now to be established in Florida.
Even though late blight cannot yet survive in the Northeast without a living host, it’s still a good idea to rotate crops and clean plant stakes and tomato cages to help prevent other diseases, suggests McGrath.
No silver bullet
One line of defense against plant diseases is to choose varieties that have some resistance to the disease. Researchers at North Carolina State University have developed two promising tomato hybrids – ‘Mountain Magic’ and ‘Plum Regal’. Both have excellent resistance to several strains of late blight. But seed of these hybrids is not expected to be widely available until 2011, says Tom Zitter, a vegetable disease specialist in the Department of Plant Pathology and Plant-Microbe Biology at Cornell University, Ithaca, N.Y.
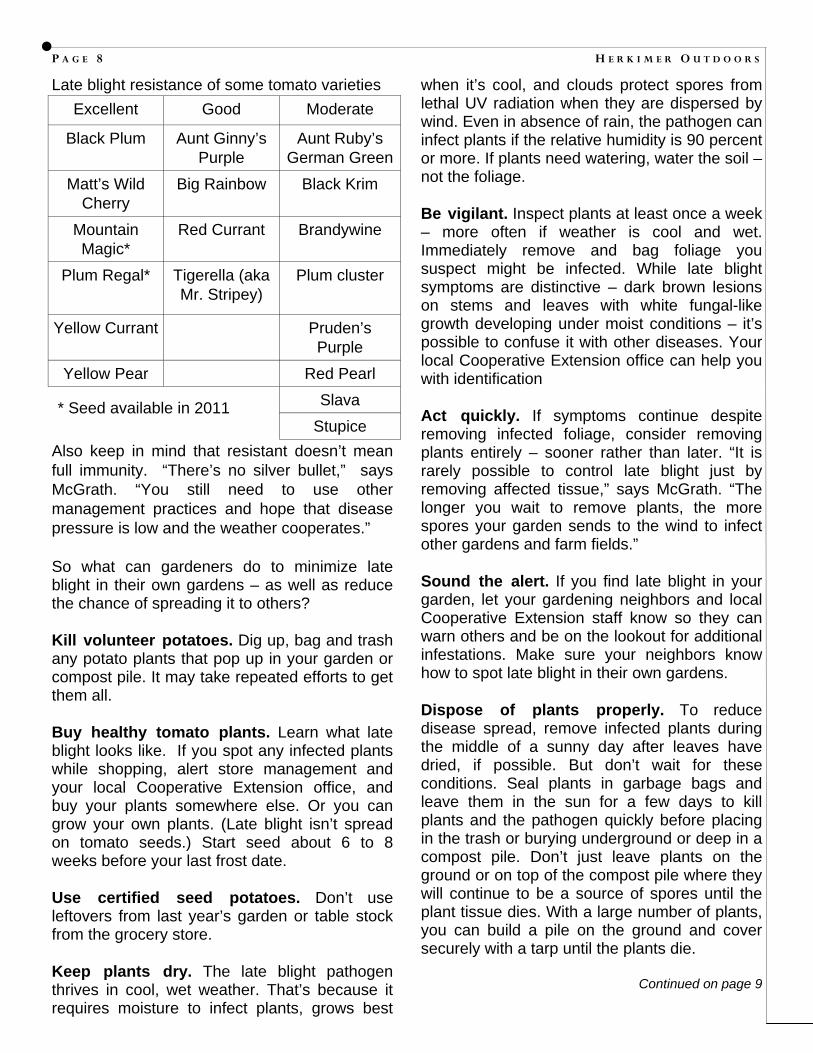
Zitter has summarized observations and research on the late blight resistance of certain tomato varieties to strains of the disease that recently plagued the Northeast. (See chart, below.) But even if a variety is resistant to one strain of the disease, that doesn’t mean that it’s resistant to all strains, Zitter points out. While some are better than others, no potato varieties are highly resistant to late blight.
Continued on page 8
AVOID THE LATE BLIGHT BLUES
H E R K I M E R O U T D O O R S P A G E 8
Also keep in mind that resistant doesn’t mean full immunity. “There’s no silver bullet,” says McGrath. “You still need to use other management practices and hope that disease pressure is low and the weather cooperates.”
So what can gardeners do to minimize late blight in their own gardens – as well as reduce the chance of spreading it to others?
Kill volunteer potatoes. Dig up, bag and trash any potato plants that pop up in your garden or compost pile. It may take repeated efforts to get them all.
Buy healthy tomato plants. Learn what late blight looks like. If you spot any infected plants while shopping, alert store management and your local Cooperative Extension office, and buy your plants somewhere else. Or you can grow your own plants. (Late blight isn’t spread on tomato seeds.) Start seed about 6 to 8 weeks before your last frost date.
Use certified seed potatoes. Don’t use leftovers from last year’s garden or table stock from the grocery store.
Keep plants dry. The late blight pathogen thrives in cool, wet weather. That’s because it requires moisture to infect plants, grows best
when it’s cool, and clouds protect spores from lethal UV radiation when they are dispersed by wind. Even in absence of rain, the pathogen can infect plants if the relative humidity is 90 percent or more. If plants need watering, water the soil – not the foliage.
Be vigilant. Inspect plants at least once a week – more often if weather is cool and wet. Immediately remove and bag foliage you suspect might be infected. While late blight symptoms are distinctive – dark brown lesions on stems and leaves with white fungal-like growth developing under moist conditions – it’s possible to confuse it with other diseases. Your local Cooperative Extension office can help you with identification
Act quickly. If symptoms continue despite removing infected foliage, consider removing plants entirely – sooner rather than later. “It is rarely possible to control late blight just by removing affected tissue,” says McGrath. “The longer you wait to remove plants, the more spores your garden sends to the wind to infect other gardens and farm fields.”
Sound the alert. If you find late blight in your garden, let your gardening neighbors and local Cooperative Extension staff know so they can warn others and be on the lookout for additional infestations. Make sure your neighbors know how to spot late blight in their own gardens.
Dispose of plants properly. To reduce disease spread, remove infected plants during the middle of a sunny day after leaves have dried, if possible. But don’t wait for these conditions. Seal plants in garbage bags and leave them in the sun for a few days to kill plants and the pathogen quickly before placing in the trash or burying underground or deep in a compost pile. Don’t just leave plants on the ground or on top of the compost pile where they will continue to be a source of spores until the plant tissue dies. With a large number of plants, you can build a pile on the ground and cover securely with a tarp until the plants die.
Continued on page 9
Excellent Good Moderate
Black Plum Aunt Ginny’s Purple
Aunt Ruby’s German Green
Matt’s Wild Cherry
Big Rainbow Black Krim
Mountain Magic*
Red Currant Brandywine
Plum Regal* Tigerella (aka Mr. Stripey)
Plum cluster
Yellow Currant Pruden’s Purple
Yellow Pear Red Pearl
Slava
Stupice
Late blight resistance of some tomato varieties
* Seed available in 2011

V O L U M E 9 , I S S U E 3 P A G E 9
Keep an eye on other tomato-family plants. Some strains of late blight can infect other tomato-family plants, including weeds such as hairy nightshade and bittersweet nightshade. Control them early so that late blight on these plants doesn’t go unnoticed. Petunias and tomatillos are also vulnerable to attack.
Use fungicides with care. Fungicides can control late blight. (Chlorothalonil and copper-based products are both available to home gardeners.) But if you wait until late blight symptoms appear, it might be too late to rescue plants. For fungicides to work effectively on late blight requires a regular preventive spray schedule and thorough spray coverage. Follow all label directions, including use of respirator, waterproof gloves and protective eyewear.
The blooms of spring flowering shrubs are formed on growth produced the previous year. If you prune these shrubs in the winter months you will remove buds that would produce blooms the following spring. Spring flowering shrubs should be pruned as soon as the flowers fade in the spring before new growth starts. Pruned plants will have larger flowers than unpruned ones.
Some common spring flowering shrubs and their pruning requirements are as follows:
Barberry (Berberis) - Prune to shape the plant and to remove old branches so new growth can develop.
Burnigbush (Euonymus) - Prune to control shape and size when used as hedge. Remove crowded branches of single plants.
Crabapple (Malus) - Prune to shape the plant and to remove old wood so new growth can develop.
Deutzia - Remove 3-year old wood to promote new growth.
Dogwood (Cornus florida and C. mas) - Prune 3 year old stems of shrubs to promote new growth. Trees may be grown to their natural shape without pruning.
Firethorn (Pyracantha) - Prune lightly to control size and shape. Server pruning reduces the number of berries on the plant.
Forsythia - Cut old stems to the ground as necessary to promote new growth.
Honeysuckle (Lonicera fragrantissima) - Prune old stems and branches as necessary to control size and promote new growth.
Lilac (Syringa) - Remove suckers and old flowers.
Mockorange (Philadelphus) - Prune 3-year-old wood to promote new growth.
Privet (Ligustrum) - Cut old wood to ground to promote new growth. Clip several times in summer to shape the plants when used as a hedge.
Quince, flowering (Chaenomeles) - Cut out old wood as necessary to promote new growth.
Rockspray (Cotoneaster) - Prune branches to control size and shape.
Rose (Rosa) - Prune shrub roses to shape the plant and thin crowded branches; cut stems back to a healthy bud. Cut some of the old stems of rambling and climbing roses back to young shoots every year to thin the plants and promote new growth and larger flowers.
Spirea (Spiraea) - Some common early flowering types are bridal wreath, garland, Reeves, Thunberg, and vanhoutte. Remove 3-year-old wood and prune branches to shape the plant.
Viburnum - Many kinds of Viburnum are grown for flowers and fruit. Prune to control shape and height.
Weigela - Prune old branches and growth as necessary to prevent crowding.
Source: “Pruning Ornamental Shrubs and Vines”, U.SDA. Bulletin #165
PRUNING SPRING FLOWERING SHRUBS
Source: http://blogs.cornell.edu/hort/2010/04/12/avid-th-late-blight-blues

P A G E 1 0 H E R K I M E R O U T D O O R S
There’s been a tremendous upsurge of interest in growing perennial flowers. You must plan your perennial garden carefully, however, since most perennials actually bloom only three to four weeks, some even less. Without knowing when they bloom, you could end up with lost of color in late June and early July, but very sparse color in August and September, or vice-versa.
Foliage plays an important part in the perennial garden, too. Even though a plant isn’t blooming, its leaves add color, from and texture. This may be particularly valuable in shady garden, where fern fronds and hosta leaves can be as important as any perennial flowers that might bloom there.
Many people combine both annuals and perennials in the garden. Flowering annuals such as petunias, sweet alyssum or dwarf marigolds that bloom all summer long can provide continuity of color when perennials may be in a ‘down’ period.
Fortunately, there are some perennials that bloom for extended periods of time, eight to ten weeks or more. Choosing liberally from this group simplifies planning for season-long bloom.
PERENNIALS FOR SEASON-LONG BLOOM
Perennials that Bloom for Many Weeks Botanical Name Common Name or
Additional Comments
Achillea millefolium ‘Fire King’ Fire King Yarrow
Aster x frikartii ‘Wonder of Staffa’
Needs winter protection
Chrysopsis villosa ‘Golden Sunshine’
Golden Aster
Coreopsis verticillata “Moonbeam’
Threadleaf Coreopsis
Dicentra eximia ‘Alba’ White fringed Bleeding-heart
Dicentra eximia ‘Luxuriant’ Fringed Bleeding-heart
Gailardia x grandiflora ‘Baby Cole’
Very compact gaillardia
Geranium sanguineum ‘Striatum’
Cranesbill
Botanical Name Common Name or Additional Comments
Hemerocallis ‘Happy Returns’
Happy Returns Daylily
Nepeta x faassenii ‘Dropmore’
Dropmore Catmint
Perovskia atriplicifolia Russian Sage
Platycodon grandiflorus Balloon Flower
Rudbeckia nitida ‘Goldquelle’
Grows 5 to 6 feet tall
Salvia x superb ‘East Friesland’, ‘Lubeca’,. And ‘May Night’
Scabiosa caucasica ‘Butterfly Blue Beauty’
Pincushion
Sedum ‘Autumn Joy’ Flowers start rose, age to copper, then rust color
Foliage for Season-Long Interest
Botanical Name Common Name or Additional Comments
Alchemilla mollis Lady’s-Mantle
Amsonia tabernaemontana
Artemesia ‘Silver King’, ‘Silver Quenn’, and ‘Silver Mound’
Baptisia australis Blue False Indigo
Cimicifuga racemosa Black Snakeroot
Hosta species Hosta, Plantain Lily
Iberis sempervirens Candytuft
Lamium maculatum ‘White Nancy’
Spotted Dead Nettle
Macleaya cordata Plume Poppy
Paeonia lactiflora Common Garden Peony
Pulmonaria saccharat ‘Mrs. Moon’
Bethlehem Sage
Sedum ‘Ruby Glow’ & ‘Vera Jameson’

P A G E 1 1 V O L U M E 9 , I S S U E 3
Perennials for Moist soils
Botanical name Comments
Common names
Hardiness zone
Flower color Light requirement
s
Plant height Season of Bloom
Standing water OK?
Acorus species Cultivars with variegated
foliage are available.
Sweet flag
3
Yellow
Full sun
3-6 feet
July-August
Yes
Aruncus dioicus Goat’s beard 3 White Sun-part shade
4-6 feet July-August No
Asclepias incarnate Swamp milkweed
3 Rose-purple Full sun 3-4 feet August No
Brunnera macrophylla
Siberian bugloss
3 Blue Sun-part shade
1-2 feet May No
Caltha
Palustris
Marsh marigold
3 Golden yellow
Sun-part shade
1-2 feet May Yes
Chelone glabra Turtle head 3 White Part shade 2-5 feet August-September
No
Chelone lyonii Turtle head 4 Pink Part shade 2-5 feet August-September
No
Chelone oblique Turtle head 3 Purple Part shade 2-5 feet August-September
No
Eupatorium maculatum
Spotted joe-pye weed
3 Distinctive brownish or rosy-purple
Sun-part shade
4-6 feet August-September
No
Epatorium purpureum
Green-stemmed Joe-
pye weed
3 Distinctive brownish or rosy-purple
Sun-part shade
4-6 feet August-September
No
Filipendula palmate Siberian meadowsweet
2 Pink Sun-part shade
4-6 feet June-August No
Filipendula rubra Queen of the prairie
3 Pink Sun-part shade
4-6 feet June-August No
Filipendula ulmaria Queen of the meadow
3 White Sun-part shade
4-6 feet June-August No
Iris pseudacorus The cultivar
‘Variegata’ has variegated foliage
Yellow flag iris 4 Pale to deep yellow
Full 2-3 feet June Yes
Iris sibirica Many named cultivars are
available
Siberian iris 4 Purple, blue, white, bi-
colors
Full 2-3 feet June No
Iris versicolor Blue blag iris 3 Purple Full sun 2-3 feet June Yes
Ligularia species Golden ray 4 Golden yellow
Part shade 1 foot July-September
No
Continued on page 12

H E R K I M E R O U T D O O R S P A G E 1 2
The physical and social benefits of a vigorous healthy tree are as desirable as clean drinking water. The achievement of green spaces in communities that trees create is by no accident. True success of a long-lived, vigorous tree is achieved through careful, planned tree selection, planting technique, and maintenance.
Site Selection - The first step in planning a tree planting is assessing the tree planting site and fitting the appropriate tree species to that site. Here are several factors that need to be assessed in site selection: Please contact your local tree commission or
municipality for recommendations and master plan guidelines that they may have.
What size tree will the planting site allow, large, medium, or small tree?
Space constraints such as pavement, walkways, buildings, or other trees?
Soil conditions: soil depth, fertility, and drainage?
Sun and wind exposure? Human activity: soil compaction, vandalism,
construction damage?
Species Selection - The next step is to select “the right tree for the right site.” Utilize the information gained during site selection to fit the appropriate species. The species must be: Suitable for the geographic region Tolerant to the moisture and drainage
conditions of your soil Resistant to area insect and disease problems Mature size is appropriate for the site In a community setting, choose a diverse
variety of species. Season to Plant Proper planting can occur any season of the year. However, planting in the late summer and fall have advantages. During this time of year the soil temperature is warm for root establishment and development. Also the air temperature cooling down added with more fall rain produces a moderated environment for the newly planted tree to become adjusted to its new home.
Continue on page 13
Lobelia cardinalis Red cardinal flower
2 Red, pink, bi-colors
Full sun 2-3 feet July-September
No
Lobelia siphilitica Dwarf varieties are
available
Blue cardinal flower, blue
lobelia
4 Blue, white Full sun 2-3 feet August-September
No
Lysimachia ciliate *fringed loosestrife
3 Yellow Full sun 2-4 feet July-August No
Lysimachia clethroides
*gooseneck loosestrife
3 White Full sun 2-4 feet July-August No
Lysimachia punctata *these three are not
related to the invasive purple
loosestrife
*garden loosestrife
4 Yellow Full sun 2-4 feet July-August No
Macleaya cordata species
Plume poppy 4 White Full sun 1 foot July-August No
Myosotis scorpioides True forget-me-not
3 Blue Sun-part shade
1-2 feet May-June No
Trollius species Globe flower 3 Yellow Full sun 1-2 feet May-June No
Perennials for Moist soils
Source: CCE Otsego County Master Gardener Newsletter; June 2002
PLANTING A TREE

V O L U M E 9 , I S S U E 3 P A G E 1 3
Utilities - Proper site and species selection ensures that the tree you plant will grow to be beautiful and healthy and won’t be disturbed by future digging or excessive pruning. Avoid planting trees newer over-head wires. Trees planted within 25 feet of wires must be a low growing species (under 30-ft mature height). It is very important that you know the location of underground utilities before you dig. The Underground Facilities Protection Organization (U.F.P.O.) number is 1-800-962-7962 and should be called at least 3 days prior to work but no longer than ten days prior to work. Trees planted unwittingly over utilities also run the risk of being destroyed due to necessary future maintenance. Planting the Tree - The greatest threat to planting a tree is “transplanting shock.” Proper site preparation before and during planting,
coupled with good follow-up care will reduce transplanting shock. The following steps should be followed when planting a tree: 1. Dig a shallow, broad planting hole. Make the
hole wide but only as deep as the root ball. Breaking up the soil in a large area around the tree provides the newly emerging roots room to expand into loose soil to hasten establishment.
2. Place the tree at the proper height. The majority of the roots on the newly planted tree will develop in the top 12” of soil. It is better to plant the tree a little high, 1-2” above the base of the trunk flare, than to plant it at or below the original growing level.
3. Straighten the tree in the hole. 4. Fill the hole, gently but firmly. It is not
recommended to apply fertilizer at the time of planting.
Continued on page 14

H E R K I M E R O U T D O O R S P A G E 1 4
Post-Planting Care The time following planting is a critical period that will determine the degree to which the tree will survive. This is the period that transplanting shock occurs since the tree has lost much of its root system a the nursery and placed in a different environment. Tender care in the form of watering, chemicals, mulching, pruning, and staking can result in a vigorous tree. Watering: Allow water to run slowly, soaking the soil 1-2 times a week in the absence of rain for the first two years. When the soil is dry below the surface of the mulch, it is time to water. Mulching: Mulch the base of the tree, but allow no mulch to touch the tree’s trunk or be piled higher than 3 inches. Mulch suppresses competing weeds, retains soil moisture, protects from lawnmower damage, and helps prevent soil compaction. Pruning: Prune only as necessary. Remove only dead, injured, or rubbing branches. Do not paint or otherwise “treat” wounds. Prune for shape only after 2 years. Staking: Staking should be done only if support is necessary or if there are concerns over vandalism. If staking is used, follow these guidelines: 1. Place the support ties at the point above
which the top can stand up on its own 2. Use two ties to minimize the chance of bark
damage from rubbing and ties made out of cloth or polyethylene
3. Allow slack for the top to sway 4. Avoid driving stakes through the root ball 5. Remove support ties after one or two years.
Leave as much leaf area as possible to help the tree build food reserves. Properly prune out dead or broken limbs, or those that rub. Do corrective pruning for the shape the second year.
Inexpensive For narrow spaces
For large trees. Springs in the guy provide flexibility.
Stakes vary with space available and personal preference, but should be used only when absolutely necessary.
Mulch is any material placed on soil protect it and that does not cause the plant problems Common mulches include bark, wood chips, decorative gravel and crushed lava.

V O L U M E 9 , I S S U E 3 P A G E 1 5
Whether the season is dry or stormy, a thick layer of mulch will help your vegetable garden survive extremes of weather and provide you with a bountiful harvest.
Many gardeners know that mulch can help protect plants during dry weather by conserving the soil moisture. Bur if the season is wetter than normal, with heavy rainfall and drenching storms, mulch is protective in those circumstances too: it allows rain to penetrate the soil slowly, eliminating run off.
And of course, gardeners won’t want to forget another great reason for mulching around those tomato and broccoli plants: mulch keeps down weeds, reducing the labor needed to keep the garden weed-free and thriving. Mulch also results in cleaner, more disease free vegetables and fewer rotting problems.
What mulch to use? There are, according to Stephen Reiners, vegetable crop specialist at the Cornell University Agricultural Experiment Station, several choices.
“There are two basic types of mulches,” he says, “natural and synthetic.”
Natural mulches are organic materials like grass clippings and leaves. They add organic matter to the soil as they decompose, but this decomposition action also means that additional nitrogen must be added to soils mulched with organic matter.
Natural mulches should be at least three inches deep to be effective. Because these mulches tend to keep soil temperatures cooler, they shouldn’t be applied in early spring before the soil has warmed.
Bales of straw are relatively cheap and easy to find at garden centers. Straw is one of the best natural mulches, but be certain the straw is weed free before adding it to the garden. Grass clippings are less desirable than hay because they can get moldy and may add weeds to the garden. The main advantage of grass clippings is that they are readily available. If you use them, dry the grass slightly before applying to the garden and don’t use clippings from lawns
that have been treated with herbicides.
Leaves, as a mulch, can form troublesome mats, over-acidify the soil, and break down very slowly. If you use leaves, shred them first and add a little lime to the soil. Newspapers can be used as a mulch in the vegetable garden, but they tend to blow away and are unsightly. Save them for the recycling bin, Reiners recommends.
“Wood chips, pine bark nuggets, licorice root, and woody materials are fine mulches for shrubs and perennial plants but have no place in the vegetable garden,” He says. “They decompose slowly, rob nitrogen from the soil, and due to their bulk, may interfere with next spring’s garden preparations.”
Of the synthetic mulches, most gardeners are probably already familiar with the black plastic that comes in rolls or sheets. It is, Reiners says, excellent for use with transplants. Apply the plastic to moist soil before planting. Bury the edges of the plastic in the soil to secure and cut holes where the transplants are to go.
The growing plants can e watered fro the top, or more effectively, by placing a soaker hose under the plastic before laying it down.
Clear plastic is also available for mulching, but since it does not control weed as effectively as black plastic, Reiners does not recommend it for the home vegetable garden.
Other synthetic mulches are available but even though they offer advantages over plain black plastic, their greater cost makes them undesirable for most vegetable gardens, Reiner says.
Perforated black plastic, for instance, allows water to move through rather than runoff, but may cost twice as much as plain black plastic. Photodegradable mulch breaks down slowly over the season, making garden clean-up easier in the fall, but usually comes in quantities too large for home garden use. Aluminum foil coated paper and mulch repel some virus but are expensive and may not be readily available Source: CCE Otsego County - Master Gardener Newsletter, May 2001
MULCHING IMPORTANT FOR VEGETABLE GARDEN

We’re on the web!!
www.cce.cornell.edu/herkimer
Herkimer County CCE Staff Executive Director/Agriculture
Bernard Armata
Assistant Director/Nutrition Education
Linda Robbins
4-H Program
Jennifer Collins
JoAnn Richards
Administrative Assistants
Barbara Johnson
Rachel Shaver
Bookkeeper
Veronique Stormes
Nutrition Staff
Joan Clanton
Melissa Graepel
Lorrie Serow
Valerie Walrath
CNY Dairy & Field Crops Team Kevin Ganoe David Balbian
Precision Feed Management Project Matthew Korona
Editor: Bernard Armata
Outdoors is published six times a year by Cornell Cooperative Extension of Herkimer County. Newsletter fee $5.00 to help defray expenses.
Whenever trade names are used herein, it is with the understanding that no discrimination is intended and no endorsement by Cornell Cooperative Extension is implied.
Reprinting: Unless otherwise noted, permission is granted to reproduce material appearing in this magazine upon notification of the author, providing that full acknowledgement is made of the source and no charge is made without approval.
Readers’ comments are always welcome.
Please contact: Cornell Cooperative Extension of Herkimer County
5657 State Route 5 Herkimer, NY 13350 Phone: 315.866.7920
Email: [email protected]
Cornell Cooperative Extension of Herkimer County provides equal program and employment opportunities
CORNELL COOPERATIVE EXTENSION OF HERKIMER COUNTY 5657 STATE ROUTE 5 HERKIMER, NY 13350
RETURN SERVICE REQUESTED
CORNELL COOPERATIVE EXTENSION HERKIMER COUNTY
NON PROFIT U.S. POSTAGE PAID HERKIMER, NY 13350 PERMIT NO. 25