cornell cooperative extension herkimer ......microtus species in the united states. it’s total...
TRANSCRIPT

J U L Y / A U G U S T 2 0 1 0
CORNELL COOPERATIVE EXTENSION HERKIMER COUNTY
Voles Cover
– 4
Earthworms 5-7
Weed Control for the Home
Vegetable Garden
8-14
Cornell Cooperative Extension
Mater Gardener Training
15
CNY Farm Progress
Show 15
Average Last Spring Frost Date for NY
15
“Food Preservation
101” 14
INSIDE THIS ISSUE
HERKIMER OUTDOORS
V O L U M E 9 , I S S U E 4
Voles, also called meadow mice or field mice, belong to the genus Microtus. Voles are compact rodents with stocky bodies, short legs, and short tails. Their eyes are small and their ears partially hidden. Their underfur is generally dense and covered with thicker, longer guard hairs, they usually are brown or gray, though many color variations exist.
There are 23 vole species in the United States. This chapter provides range maps, descriptions, and habitat characteristics for seven species that are widespread or cause significant economic damage. Tentative identification of a particular animal may be made using this information. For positive identification, use a field guide or contact an expert.
Damage Prevention and Control Methods
Exclusion
Recommended to protect trees, ornamental plants, and small areas.
Habitat Modification
Eliminating ground cover reduces populations.
Soil cultivation destroys burrows and reduces cover.
Frightening
Not effective
Repellents
Effectiveness uncertain.
Toxicants
Zinc phosphide
Anticoagulants (registered in most states).
Fumigants
Not usually effective.
Trapping
Mouse snap traps.
Live traps (Sherman or box-type traps).
Shooting
Not practical or effective
Meadow Vole (M. pennsylvanicus)-The meadow vole is the most widely distributed Microtus species in the United States. It’s total length is 5½ to 7½ inches (14 to 19 cm) and its fur is gray to yellow-brown, obscured by black-tipped hairs. Northern subspecies may also have some red in their fur. Its under- parts are gray, at times washed with silver or buff. The tail is bi-colored.
Long-tailed Vole (M. longicaudus)-The long-tailed vole can be distinguished from other Microtus species by its tail, which comprises 30% or more of its total length of 6 to 8½ inches (15 to 21 cm). The long-tailed vole has gray to dark brown fur with many black-tipped hairs. The underparts are gray mixed with some white or yellow. The tail is indistinctly to sharply bicolored.
Pine or Woodland Vole (M. pinetorum)-The pine vole is a small vole. Its total length is 4 to 6 inches (10 to 15 cm). Its brown fur is soft and dense. The underparts are gray mixed with some yellow to cinnamon. The tail is barely bicolored or unicolored.
Continued on page 2
VOLES
P A G E 2 H E R K I M E R O U T D O O R S
Montane (or Mountain) Vole (M. montanus)- The montane vole is 5½ to 8½ inches (15 to 20 cm) in total length. Its fur is brown, washed with gray or yellow, and mixed with some black-tipped hairs. Its feet are usually silver-gray and its body under parts are whitish. The tail is bicolored.
Oregon Vole (M. oregoni)-The Oregon vole is 5½ to 6½ inches (14 to 16 cm) in length. Its fur is gray to brown or yellow-brown. Under parts are darkish, washed with yellow to white. The tail is indistinctly bicolored.
California Vole (M. californicus)-The California vole is 6 to 8½ inches (15 to 20 cm) in total length. Its fur is tawny olive to cinnamon brown with brown to black over hairs. The under parts are grayish. The tail is bicolored.
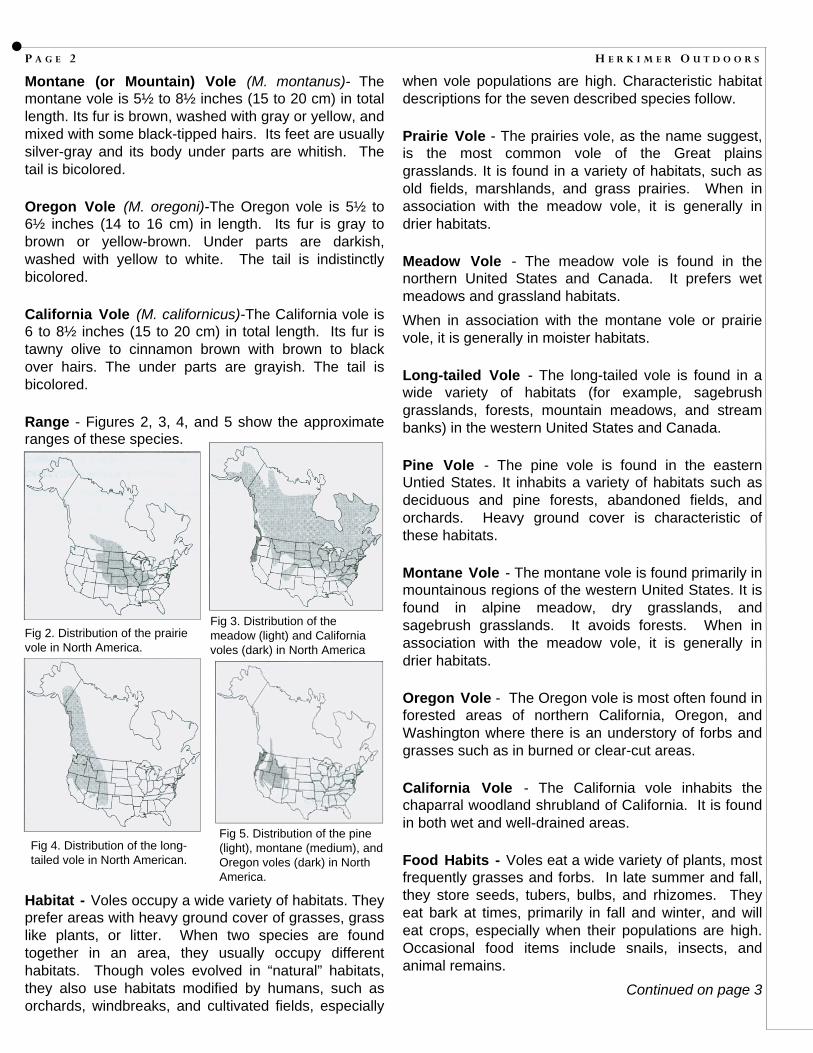
Range - Figures 2, 3, 4, and 5 show the approximate ranges of these species.
Habitat - Voles occupy a wide variety of habitats. They prefer areas with heavy ground cover of grasses, grass like plants, or litter. When two species are found together in an area, they usually occupy different habitats. Though voles evolved in “natural” habitats, they also use habitats modified by humans, such as orchards, windbreaks, and cultivated fields, especially
when vole populations are high. Characteristic habitat descriptions for the seven described species follow.
Prairie Vole - The prairies vole, as the name suggest, is the most common vole of the Great plains grasslands. It is found in a variety of habitats, such as old fields, marshlands, and grass prairies. When in association with the meadow vole, it is generally in drier habitats.
Meadow Vole - The meadow vole is found in the northern United States and Canada. It prefers wet meadows and grassland habitats.
When in association with the montane vole or prairie vole, it is generally in moister habitats.
Long-tailed Vole - The long-tailed vole is found in a wide variety of habitats (for example, sagebrush grasslands, forests, mountain meadows, and stream banks) in the western United States and Canada.
Pine Vole - The pine vole is found in the eastern Untied States. It inhabits a variety of habitats such as deciduous and pine forests, abandoned fields, and orchards. Heavy ground cover is characteristic of these habitats.
Montane Vole - The montane vole is found primarily in mountainous regions of the western United States. It is found in alpine meadow, dry grasslands, and sagebrush grasslands. It avoids forests. When in association with the meadow vole, it is generally in drier habitats.
Oregon Vole - The Oregon vole is most often found in forested areas of northern California, Oregon, and Washington where there is an understory of forbs and grasses such as in burned or clear-cut areas.
California Vole - The California vole inhabits the chaparral woodland shrubland of California. It is found in both wet and well-drained areas.
Food Habits - Voles eat a wide variety of plants, most frequently grasses and forbs. In late summer and fall, they store seeds, tubers, bulbs, and rhizomes. They eat bark at times, primarily in fall and winter, and will eat crops, especially when their populations are high. Occasional food items include snails, insects, and animal remains.
Continued on page 3
Fig 2. Distribution of the prairie vole in North America.
Fig 3. Distribution of the meadow (light) and California voles (dark) in North America
Fig 4. Distribution of the long-tailed vole in North American.
Fig 5. Distribution of the pine (light), montane (medium), and Oregon voles (dark) in North America.

P A G E 3 V O L U M E 9 , I S S U E 3
General Biology, Reproduction, and Behavior - Voles are active day and night, year round. They do not hibernate. Home range is usually 1/4 acre (0.1 ha) or less but varies with season, population density, habitat, food supply, and other factors. Voles are semifossorial and construct many tunnels and surface runways with numerous burrow entrances. A single burrow system may contain several adults and young.
Voles may breed throughout the year, but most commonly in spring and summer. In the field, they have 1 to 5 litters per year. They have produced up to 17 litters per year in a laboratory. Litter sizes range from 1 to 11, but usually average 3 to 6. The gestation period is about 21 days. Young are weaned by the time they are 21 days old, and females mature in 35 to 40 days. Life spans are short, probably ranging from 2 to 16 months. In one population, there was 88% mortality during the first month of life.
Large population fluctuations are characteristic of voles. Population levels generally peak every 2 to 5 years; however, these cycles are not predictable. Occasionally during population eruptions, extremely high vole densities are reached. Dispersal, food quality, climate, predation, physiological stress, and genetics have been shown to influence population levels. Other factors probably also play a part.
Many voles are excellent swimmers. The water voles are excellent swimmers. The water vole, in fact, escapes predators by swimming and diving. The climbing ability of voles varies. The long-tailed vole, for example, is a good climber (Johnson and Johnson 1982) while the pine vole is a bit clumsy in this regard.
Voles are prey for many predators (for example, coyotes, snakes, hawks, owls, and weasels); however, predators do not normally control vole populations.
Damage and Damage Identification - Voles may cause extensive damage to orchards, ornamentals, and tree plantings due to their girdling of seedlings and mature trees. Girdling damage usually occurs in fall and winter. Field crops (for example, alfalfa, clover, grain, potatoes, and sugar beets) may be damaged or completely destroyed by voles. Voles eat crops and also damage them when they build extensive runway and tunnel systems. These systems interfere with crop irrigation by displacing water and causing levees and checks to wash out. Voles also can ruin lawns, golf courses, and ground covers.
Girdling and gnaw marks alone are not necessarily indicative of the presence of voles, since other animals, such as rabbits, may cause similar damage. Vole girdling can be differentiated from girdling by other animals by the non-uniform gnaw marks. They occur at various angles and in irregular patches. Marks are about 1/8 inch (0.3 cm) wide, 3/8 inch (1.0 cm) long, and 1/16 inch (0.2 cm) or more deep. Rabbit gnaw marks are larger and not distinct. Rabbits neatly clip branches with oblique clean cuts. Examine girdling damage and accompanying signs (feces, tracks, and burrow systems) to identify the animal causing the damage.
The most easi ly identifiable sign of voles is an extensive surface runway system with numerous bu r row opening Figure 6. Runways are 1 to 2 inches (2.5 to 5 cm) in width. Vegetation near well-traveled runways may be clipped close to
the ground. Feces are small pieces of vegetation are found in the runways.
The pine vole does not use surface runways. It builds an extensive system of underground tunnels. The surface runways of long-tailed voles are not as extensive as those of most other voles. Voles pose no major public health hazard because of their infrequent contact with humans; however, they are capable of carrying disease organisms, such as plague (Yersinia pestis) and tularemis (Francisilla tularensis). Be careful and use protective clothing when handling voles.
Legal Status - Voles are classified as nongame mammals and can be controlled when causing damage. Contact your local state wildlife agency for details regarding applicable codes and regulations.
Damage Prevention and Control Methods - Exclusion - Hardware cloth cylinders exclude voles from seedlings and young trees. The mesh should be 1/4 inch (0.6 cm) or less in size. Bury the wire 6 inches (15 cm) to keep voles from burrowing under the cylinder. Large scale fencing of areas is probably not cost-effective. Drift fences with pit traps may be used to monitor populations and can indicate when voles are immigrating to crops, orchards, or other cultivated areas. Continued on page 4
Figure 6
P A G E 4 H E R K I M E R O U T D O O R S
Cultural Methods and Habitat Modification-Cultural and habitat modification practices can reduce the likelihood and severity of vole damage. Eliminate weeds, ground cover, and litter in and around crops, lawns, and cultivated areas to reduce the capacity of these areas to support voles. Lawn and turf should be mowed regularly. Mulch should be cleared 3 feet (1m) or more from the bases of trees.
Voles can live in dense populations in ditch banks, rights-of-way, and water ways that are unmanaged. Adjacent crop fields can be cost-effectively protected by controlling vegetation through mowing, spraying, or grazing.
Soil tillage is effective in reducing vole damage as it removes cover, destroys existing runway-burrow systems and kills some voles outright. Because of tillage, annual crops tend to have lower vole population levels than perennial crops. Voles are never the less capable of invading and damaging annual crops, especially those that provide them with cover for extended periods of time.
Frightening-Frightening agents are not effective in reducing vole damage.
Repellents-Repellents utilizing thiram (also a fungicide) or capsaicin (the “hot” in chilis) as an active ingredient are registered for meadow voles. These products (or repellents registered for other species) may afford short-term protection, but this has not been demonstrated. Check with your state pesticide regulatory agency for availability.
Toxicants-Zinc phosphide is the most commonly used toxicant for vole control. It is a single-dose toxicant available in pelleted and grain bait formulations and as a concentrate. Zinc phosphide baits generally are broadcast at rates of 6 to 10 pounds per acre (7 to 11 kg/ha), or are placed by hand in runways and burrow openings. Although pre-baiting (application of similar non-treated bait prior to applying toxic bait) is not usually needed to obtain good control, it may be required in some situations, such as when a population has been baited several times and bait shyness has developed. Zinc phosphide baits are potentially hazardous to ground-feeding birds, especially water fowl. Placing bait into burrow opening may reduce this hazard.
Anticoagulant baits are also effective in controlling voles. Anticoagulants are slow-acting toxicants
requiring from 5 to 15 days to take effect. Multiple feedings are needed for most anticoagulants to be effective. In many states, one or more anticoagulant baits are registered for controlling voles.
In addition to broadcast and hand placement, anticoagulant baits also can be placed in various types of bait containers. Water repellent paper tubes with an anticoagulant bait glued to the inside surface make effective, disposable bait containers. Tube size is about 5 inches (12 cm) long 1 ½ inches (4 cm) in diameter. Bait containers protect bait from moisture and reduce the likelihood of non-target animals and small children consuming bait.
Fumigants-Fumigants usually are not effective because the complexity and shallowness of vole burrow systems allow the fumigant to escapes. They may work in new, small burrow systems with only one or two entrances.
Trapping-Trapping is not effective in controlling large vole populations because time and labor costs are prohibitive. Mouse snap traps can be used to control a small population by placing the trap perpendicular to the runway with the trigger end in the runway. A peanut butter-oatmeal mixture or apple slices make good baits. Fall and late winter are periods when many vole species are easiest to trap.
Although voles rarely invade houses, in the event that they do, they can be controlled by setting snap traps or live traps as you would for house mice.
Shooting - Shooting is not practical or effective in controlling voles.
Other Methods - A wide variety of predators feed on voles. Voles are relatively easy for most predators to catch and are active, and therefore available, day and night year-round. Despite their vulnerability and availability, voles are not usually “controlled” by predators. This is because voles have a high reproductive potential. Postpartum breeding is common and females may breed as early as 2 weeks of age. Synchronous breeding also occurs. These factors enable voles to increase at a faster rate than predators.
Source: John M. O’Brien, Agricultural Programs Coordinator, Nevada Department of Agriculture, Reno, Nevada
H E R K I M E R O U T D O O R S P A G E 5
Benefits of earthworms-The burrowing and feeding activity of earthworms have numerous beneficial effects on overall soil quality for crop production. The following soil properties can be improved by earthworms.
Water infiltration-Some earthworm species create vertical burrow, whereas other species live in horizontal burrows in the soil. The vertical burrows are typically open, although the worms cap the top with residue and excrement. The vertical burrows are very important points of entry for quick water infiltration into the soil, especially in no-till systems.
Soil aeration-Air-filled porosity critical in helping plant roots to thrive. Roots need oxygen for their growth, whereas they produce carbon dioxide that needs to leave the soil. Because earthworms improve soil porosity, they improve the exchange of these gases with the atmosphere. Earthworms increase porosity by two mechanisms: (1) by creating permanent burrows, and (2) by improving soil aggregation. Aggregation is improved by the mixing of soil and organic matter in the earthworms guts. These highly stable aggregates are deposited by some earthworms in their burrow, and by others at the surface of the soil. In one pasture study, earthworm consumed between 20 and 40 tons of soil per acre per year. In another study, earthworms were estimated to consume 4 to 10 percent of the top 6 inches of the soil annually. This only goes to show the enormous amounts of soil that can be processed by earthworms.
Soil compaction and soil tilth-Soil compaction reduces the porosity of the soil. Because earthworms increase porosity, they reduce the effects of compaction. In addition, the excrement of earthworms has a very stable structure, which makes the soil more resistant to compaction and improves its tilth.
Soil organic matter-Typically earthworm population can easily consume 2 tons of dry matter per acre per year, partly digesting and mixing it with soil. The importance of earthworms to mix surface residue with soil becomes very clear in soils that do not have any earthworms. Most of our soils have at least some earthworms and the effect of their complete absence therefore cannot be noted. In the Netherlands, some soils reclaimed from the sea at first did not have any earthworms. In these soils the formation of topsoil with reasonable organic matter content did not take place, resulting in poor crop growth. Once the cause was established, the government of the Netherlands started
a campaign to introduce earthworms. After the introduction of the earthworms, a dark topsoil layer was formed, and crop growth increased substantially.
Plant available nutrients-Earthworm casts have higher available nitrogen, phosphorus, potassium, and calcium contents than surrounding soil, as well as a higher cation-exchange capacity. Some micronutrients, such as zinc and boron, are more available in the excrement of earthworms through chelation of the micronutrients.
Soil pH-Soil passed through the gut of earthworms has a neutral pH. This is probably due to the pH buffering action of organic molecules produced in the gut of worms.
Beneficial microbes-Earthworms excrete material that has high concentrations of beneficial microbes that help decompose crop residue.
Nematode control-Some earthworms eat harmful nematodes, thus decreasing the concentration of these harmful organisms in soil.
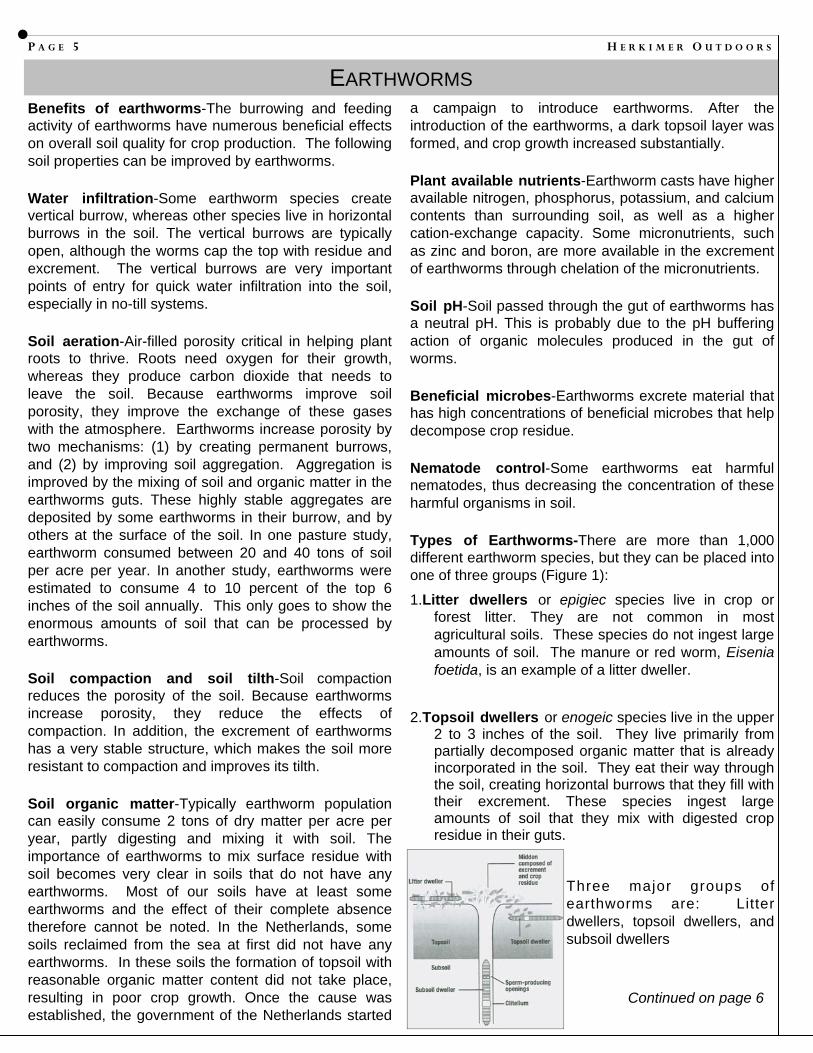
Types of Earthworms-There are more than 1,000 different earthworm species, but they can be placed into one of three groups (Figure 1):
1.Litter dwellers or epigiec species live in crop or forest litter. They are not common in most agricultural soils. These species do not ingest large amounts of soil. The manure or red worm, Eisenia foetida, is an example of a litter dweller.
2.Topsoil dwellers or enogeic species live in the upper 2 to 3 inches of the soil. They live primarily from partially decomposed organic matter that is already incorporated in the soil. They eat their way through the soil, creating horizontal burrows that they fill with their excrement. These species ingest large amounts of soil that they mix with digested crop residue in their guts.
Continued on page 6
EARTHWORMS
Three major groups of earthworms are: Litter dwellers, topsoil dwellers, and subsoil dwellers

V O L U M E 9 , I S S U E 3 P A G E 6
Subsoil dwellers or anecic species live in permanent vertical burrows that can be 5 or 6 feet deep. These earthworms need surface crop residue to live. Their burrows remain open, although they cap the top with crop residue that they pull to the entrance. These species ingest substantial amounts of soil that they mix with digested residue in their guts. Their excrement is primarily deposited at the surface of the soil. The night crawler Lulmbricus lerrestris is the most prominent member of this group.
Earthworm Biology-Earthworms are invertebrates composed of many segments (Fig 1). They don’t have bones and move by contracting and relaxing the body segments in sequence. They also have little bristle-like organs that help them cling to slippery surfaces. Most earthworms have both male and female organs. Typically, however, they still need a partner to reproduce. When earthworms mate, they lay side by side in reverse position. At that moment they exchange sperm. The sperm of the partner is stored in a little chambers called spermathecal apertures. These are positioned in front of the egg-producing organs. After mating, the swollen external gland, call clitellum, produces egg cases called cocoons. A cocoon case slides slowly forward, picking up eggs and sperm as it moves over the head of the earthworm. From 3 to 1,000 cocoons can be produce per year, depending on species and environmental conditions. Typically, an earthworm will produce 20 to 30 cocoons per year, with each cocoon containing 1 to 10 eggs. Peak cocoon production is in the spring or early summer.
The eggs in the cocoons hatch when conditions are right. Under ideal conditions, it may take from 1 to 5 months for the eggs to hatch. It may take from 3 to 12 months before these worms are sexually mature. Worms typically live only a few months because of the many environmental threats they face. They have been observed to live for 10 years in a protected environment. In a favorable environment previously with earthworms, earthworm populations increased 80-fold in 4 years after introduction.
Moisture-Earthworms absorb and lose moisture through their skin. If soils are dry, earthworms may move to deeper soil layers, die, or revert to a hibernation condition called diapauses. Earthworms in diapauses are tied up in a knot in a little hole that is lined with a slimy substance to avoid moisture loss. Eggs in cocoons survive prolonged drought, allowing earthworm populations to survive drought periods. Because of dry conditions, earthworm populations in Pennsylvania are low in the summer.
Earthworms can live under submerged conditions if the oxygen content of the water is high enough. In most cases, however, earthworms will die when exposed to excessive water logging. They move to the surface when the soil is saturated to avoid suffocation.
Temperature-Most earthworms don’t tolerate temperatures below freezing, nor do they tolerate high temperatures. Prolonged exposure to temperatures about 95°F kills them. They can move down into the soil to escape these adverse temperatures. Optimum temperatures are between 50 and 60°F.
pH-Earthworms commonly found in agricultural fields thrive at neutral pH, but can tolerate a pH from 5.0 to 8.0.
Soil texture-Earthworms prefer soils with loamy texture. Coarse sand can be a negative factor either because the abrasive action of sand grains damages their skin, or because these soils dry out more easily. In some studies, clay soils had fewer earthworms than lighter-textured soils. The reason for this phenomenon is not clear.
Food supply-Quantity, quality, and placement of food influence earthworm populations. Earthworms eat organic residue that needs to be present in sufficient quantity. The quality of residue is also important. Residue with a high carbon to nitrogen (C:N) ratio is not very palatable for earthworms. Manure can help make it more palatable.
Packed manure is an excellent food source for earthworms. In some cases, residue has to undergo some weathering before earthworms are able to digest it. Topsoil dwellers need smaller particles than subsoil dwellers, which can use large leaves, for example. The placement of food becomes a critical issue for some earthworm species. Topsoil dwellers prefer small organic residue particles incorporated into the soil, but subsurface dwellers need residue at the surface of the soil.
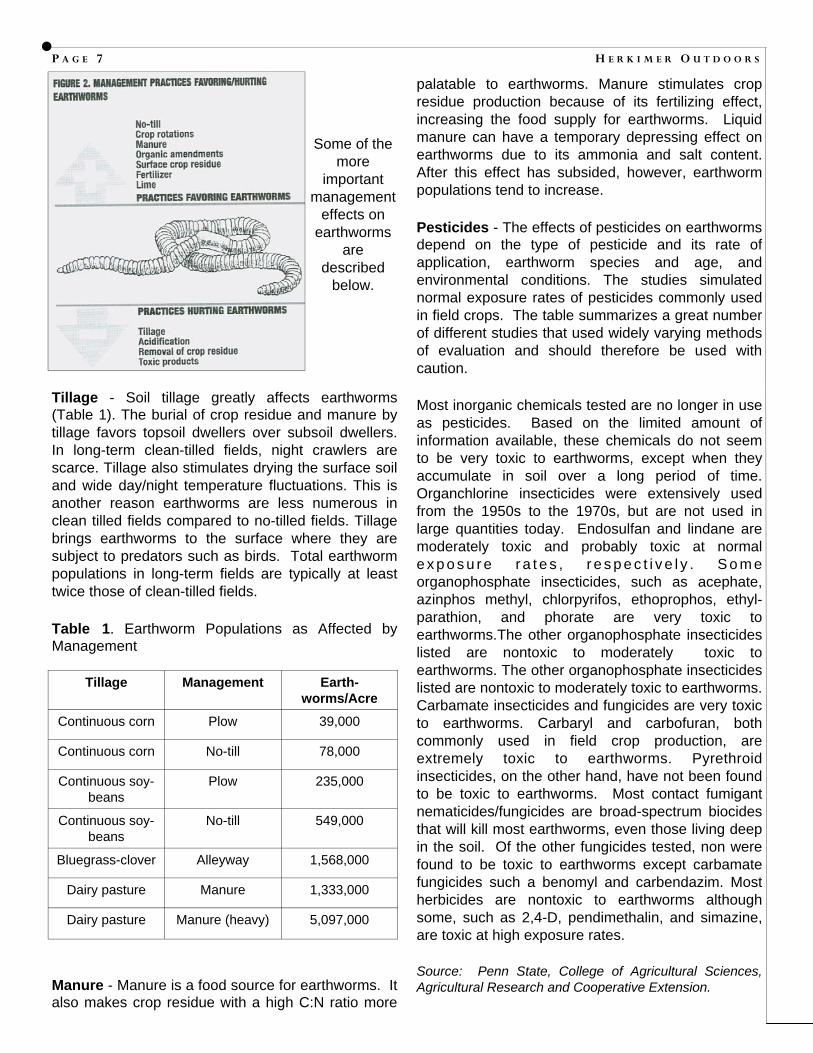
Management effects on earthworms - Soil and crop management practices can influence many soil properties that affect earthworms (Fig. 2). Some practices can have immediate effects on earthworms, whereas others may gradually change earthworm population and activities over several years. So when you are considering management options, you should also think about their effects on earthworms. Continued on page 7
H E R K I M E R O U T D O O R S P A G E 7
Tillage - Soil tillage greatly affects earthworms (Table 1). The burial of crop residue and manure by tillage favors topsoil dwellers over subsoil dwellers. In long-term clean-tilled fields, night crawlers are scarce. Tillage also stimulates drying the surface soil and wide day/night temperature fluctuations. This is another reason earthworms are less numerous in clean tilled fields compared to no-tilled fields. Tillage brings earthworms to the surface where they are subject to predators such as birds. Total earthworm populations in long-term fields are typically at least twice those of clean-tilled fields.
Table 1. Earthworm Populations as Affected by Management
Manure - Manure is a food source for earthworms. It also makes crop residue with a high C:N ratio more
palatable to earthworms. Manure stimulates crop residue production because of its fertilizing effect, increasing the food supply for earthworms. Liquid manure can have a temporary depressing effect on earthworms due to its ammonia and salt content. After this effect has subsided, however, earthworm populations tend to increase.
Pesticides - The effects of pesticides on earthworms depend on the type of pesticide and its rate of application, earthworm species and age, and environmental conditions. The studies simulated normal exposure rates of pesticides commonly used in field crops. The table summarizes a great number of different studies that used widely varying methods of evaluation and should therefore be used with caution.
Most inorganic chemicals tested are no longer in use as pesticides. Based on the limited amount of information available, these chemicals do not seem to be very toxic to earthworms, except when they accumulate in soil over a long period of time. Organchlorine insecticides were extensively used from the 1950s to the 1970s, but are not used in large quantities today. Endosulfan and lindane are moderately toxic and probably toxic at normal e x p o s u r e r a t e s , r e s p e c t i v e l y . S o m e organophosphate insecticides, such as acephate, azinphos methyl, chlorpyrifos, ethoprophos, ethyl-parathion, and phorate are very toxic to earthworms.The other organophosphate insecticides listed are nontoxic to moderately toxic to earthworms. The other organophosphate insecticides listed are nontoxic to moderately toxic to earthworms. Carbamate insecticides and fungicides are very toxic to earthworms. Carbaryl and carbofuran, both commonly used in field crop production, are extremely toxic to earthworms. Pyrethroid insecticides, on the other hand, have not been found to be toxic to earthworms. Most contact fumigant nematicides/fungicides are broad-spectrum biocides that will kill most earthworms, even those living deep in the soil. Of the other fungicides tested, non were found to be toxic to earthworms except carbamate fungicides such a benomyl and carbendazim. Most herbicides are nontoxic to earthworms although some, such as 2,4-D, pendimethalin, and simazine, are toxic at high exposure rates.
Source: Penn State, College of Agricultural Sciences, Agricultural Research and Cooperative Extension.
Tillage Management Earth-worms/Acre
Continuous corn Plow 39,000
Continuous corn No-till 78,000
Continuous soy-beans
Plow 235,000
Continuous soy-beans
No-till 549,000
Bluegrass-clover Alleyway 1,568,000
Dairy pasture Manure 1,333,000
Dairy pasture Manure (heavy) 5,097,000
Some of the more
important management
effects on earthworms
are described
below.

H E R K I M E R O U T D O O R S P A G E 8
Home Gardening is enjoyable and rewarding. Gardens provide opportunity for hours of exercise, communion with nature, and fresh vegetables for eating.
But the curse of every gardener is weeds. The purpose of this bulletin is to enable home gardeners to identify the most common weeds and to select the most suitable strategies for controlling them.
The first section discusses weed life cycles, which you’ll need to know to select the best control method. Then the 18 weeds most troublesome in Northeast vegetable gardens are described, with photographs and descriptions to help you identify those weeds in your garden. In the final section, mechanical, cultural, and chemical strategies to control weeds are presented.
The biggest problem with weeds is that they compete with garden plants for water, nutrients, and light—all essential for plant growth and development..
The time weeds emerge in relation to vegetable emergence is also important. Weeds emerging prior to or simultaneously with garden plants decrease plant yields more than those emerging afterward. This is particularly true with small-seeded vegetables, such as lettuce or carrots.
Generally weed completion during the first 6 weeks after planting lowers yields. Competition late in the growing season interferes with harvesting and decreases the quality of the harvested product. For example, weed competition can reduce the size of potatoes, and quackgrass or nutsedge can actually puncture potatoes.
In addition to competing with crop plants, weeds harbor insects that attack crops. For example, weeds of the nightshade family host Colorado potato beetles, which attack potatoes, tomatoes and eggplants. Aphids, frequent carriers of disease, commonly live on weeds and move easily from weedy borders into the garden.
A single weed commonly produces thousands of seeds—both dormant and non-dormant—which can live from 3 to more than 30 years. Table 1 lists a few
common weed species and the number of seeds produced per plant per year.
Some weed seeds lie on the surface of the soil but others are buried deeply. The top inch of soil in 1 acre contains an estimated 3 million weed seeds.
New flushes of weeds appear shortly after every cultivation because stirring the soil exposes the seeds to light (triggering germination) and to environmental conditions that favor seedling emergence. Often more weed seedlings emerge when the soil surface is smooth and compact than when the surface is rough and loose because close seed-soil contact is essential fro germination.
Table 1. Number of seeds produced per plant in a year
Weed Types and Life Cycles - You need to be familiar with weeds and understand their life cycles to select the stage most easily controlled. To begin with, you need to know whether a weed is a broadleaf or a grass and whether it is an annual, biennial, or perennial plant. Weed life cycles are illustrated in figure 1.
Figure 1. Weed Life Cycles
Continued on page 9
WEED CONTROL FOR THE HOME VEGETABLE GARDEN
Species Number
Redroot pigweed 117,400
Common lambsquarters 72,450
Purslane 52,300
Shepherdspurse 38,500
Dodder 16,000

V O L U M E 9 , I S S U E 3 P A G E 9
Broadleaves. Broadleafed plants have broad leaves, with small veins radiating from larger veins like fingers. The flower parts are often in fours or fives. They may have taproots or fibrous roots that develop from a primary root. A taproot is a large primary root with branches growing from it; for example, a carrot has a taproot. In a fibrous root system, all roots are of about equal size.
Grasses. Grasses are characterized by long, narrow leaves with parallel veins. They have a fibrous root system, and flower parts are mostly in threes or multiples of three.
Annuals. Annuals germinate, grow, flower, and set seed in 1 year or less. The group can be divided into winter and summer annuals. Winter annual and summer annuals.
Winter annuals germinate in the fall or early winter die the next summer; summer annuals germinate in the spring and die in the fall. Temperature and light are two important mechanisms that trigger germination of annuals.
Day length is also a critical trigger, causing the plant to shift from vegetative (leaf) to reproductive (flower) growth. Seedlings that emerge early (when days are longer) are likely to become large plants before flowering, and produce thousands of seeds. Seedlings that emerge later are soon exposed to shortening day lengths and thus are quite small when flowering begins. Such plants produce fewer seeds.
A few annuals, such as purslane and galinsoga, are not sensitive to day length. They may produce 4 or 5 generations in a single growing season. Annuals are best controlled when they are very small seedlings but, at all costs, should be removed before they set seed.
Biennials. Biennials complete their life cycles in two growing seasons. During the first year, they germinate but form only a leafy rosette (a cluster of leaves radiating from one point and lying close to the ground). In the second year they form a leafy stem that matures and produces flowers and seeds.
Biennials may be found any time of year and are most easily controlled in the early growing stage of the first year. Yellow rocket is an example of a biennial.
Perennials. Perennials grow for many years and usually produce seeds each year. Many seeds are incapable of growing, however.
What makes the plants perennial are their under ground reproductive organs—tuber, bulbs, stolons or rhizomes—which live from year to year and produce new top growth annually.
At the start of the season, new plants sprout from buds on the underground parts often found deep in the soil.
Few roots are found because initial plant nourishment comes from the parent rhizome, tuber, bulb, or stolon.
First growth is rapid and neither mechanical nor chemical weed control early in the season does much to reduce the vigor of the underground reproductive structures.
Like annuals, perennials are influenced by day length. Day length also controls transportation of food reserves as well as the vegetative growth of perennials. As days shorten in late summer, food reserves move to the underground reproductive organs for storage.
Control measures must take advantage of this flow of food reserves. Repeated top kill or removal during the summer “starves” the reserve organs. Some chemicals penetrate the leaves and attach to the food reserves being stored. When the chemical moves to the under ground reproductive structures it kills the plant.
Control of perennials, particularly chemical control, is often most successful in the fall or occasionally in the early spring following harvest and before planting. Quackgrass is a perennial weed.
Mechanical Control - Home gardeners can control weeds successfully throughout the season with mechanical techniques. A considerable amount of hand labor is necessary, however.
Weed control practices should begin when a garden site is chosen. Many new gardens are situated on abandoned land or grassy area that have not been cultivated for many years.
Continued on page 10

P A G E 1 0 H E R K I M E R O U T D O O R S
Such land very likely has a heavy infestation of quackgrass and possibly other perennial weeds.
If you must plant a garden plot following sod, it should be treated with a herbicide that is both nonselective and systemic before plowing or hand-turning the soil (non-selective herbicides kill all types of plants; systemic herbicides are absorbed by one part of a plant and distributed internally to other parts.) The herbicide should be applied in early to mid-fall well before a hard killing frost and when the weeds are green and actively growing. The herbicide will be trans-located to the underground portions of most plants, where it will destroy their root and rhizome systems. The nonselective, systemic herbicide may be applied 1 to 2 weeks before plowing in the spring, but systemic herbicides work less effectively when plants are beginning their spring growth.
Hand weeding. Hand pulling weeds as they appear gives good temporary results and is good exercise. It is effective for controlling all seedlings and annual and biennial weed species. It is less effective in controlling established perennials because it is nearly impossible to pull our all the underground reproductive structures. Weeds pull out more easily after heavy rain or watering.
Tilling. Rototilling does an excellent job of preparing a seedbed in a garden that has been established for several years, but it should be kept to a minimum.
Although a tiller chops up the previous year’s vegetable and weed residue and incorporates it into the soil, its shearing action compacts and destroys the soil structure, especially when wet. Adding compost, manure, or other organic matter to the soil minimizes the compacting effects of rototilling.
Many people misuse the tiller by running the machine either too deeply (2 inches is sufficient) or too fast. A tiller should not be run at a speed that controls the operator; the operator should always be in full control of the machine. You can maintain control by operating the tiller at a low rpm and by adjusting the depth so by adjusting the depth so the tiller digs into the soil rather than walking over the surface.
To cultivate a growing garden, set the rototiller at a shallow depth—about 1 inch—and till when weeds
are tiny. Otherwise the tiller will transplant rather than eliminate weeds.
Hoeing. Lightly scraping the soil surface is the most effective way to control small weeds (less than ½ inch tall). Weeds are cut off just below the surface and no new weed seeds are brought up. In addition, vegetable roots are not damaged or severed.
Another reason for hoeing is to create a shallow (¼ inch to ½ inch) surface layer of dry soil mulch. Keeping that layer from sprouting conserves moisture by slowing evaporation of surface water.
Hoeing should be done when weeds are tiny. Always when weeds are tiny. Always hoe 3 to 4 days after a rain. By then, many weed seeds have swelled and are ready to germinate or have already germinated. A shallow hoeing at this time dries out to soils surface and prevents seedlings from becoming established.
Many people misuse a hoe by treating it as if it were a shovel. It is important to choose an appropriate hoe design and understand hoeing techniques.
Many shapes and designs of hoes are available, but gardeners should avoid a few that are poorly designed. Look for a hoe with a blade that is in one piece rather than two welded pieces; repeated use will break the hoe at the weld point.
Several types of hoes are illustrated in figure 2.
Scraping is most readily accomplished with a wheel hoe, scuffle hoe, or onion hoe.
The blades of chopping hoes tend to dig holes or craters rather than scrape the soil surface. Soil builds up behind the blade and is deposited unevenly in small piles. The chopping hoe is more appropriate in rocky soils or for thinning crops.
Continue on page 11
Chopping Onion or tobacco
Warren Scuffle Wheel

P A G E 1 1 V O L U M E 9 , I S S U E 3
The warren hoe is an excellent tool for making rows and shallow ditches but poorly designed for severing weeds.
A rectangular hoe is called an onion or tobacco-thinning hoe is shaped best for weeding. This hoe allows you to scrape the soil and, if it is held at the correct angle, the soil flows over it rather than builds up behind it. Where rocks are to common, the well-designed scuffle hoe and wheel hoe are also effective.
Gently scratching the soil surface a few days before your crops emerge controls weed seedlings on or just below the soil surface. A bamboo or metal leaf rake is the best choice for this purpose. This technique is very effective on slowly emerging, small-seeded vegetables such as carrots, parsley, New Zealand spinach, and parsnips. Be sure, though, that your vegetable plants are seeded deeply enough so they aren’t disturbed.
Mulch-Mulch spread over garden soil suppresses weed growth by blocking light. Used correctly, mulch not only controls weeds but also conserves soil moisture by reducing water evaporation.
Before laying any mulch, allow the soil to warm in the spring sun. Mulch should not normally be applied in the Northeast before May. Very early vegetables can be mulched after they have grown.
The area must be well watered before mulch is laid, especially if black mulch is laid, especially if black plastic is to be used. That initial watering will supply the young plants with moisture until their roots grow far enough to find other water.
Using mulch to control weeds in the home garden saves labor and time during the growing season but requires an expenditure of labor and time early in the season. Laying plastic may take one minute per foot; laying straw or grass clippings takes less time.
After that initial investment, however, you need only monitor the weeds. If some escape, pull them out or put on another layer of mulch.
Because of its cost, mulch is usually laid over the planted garden row; other weed control methods can be used to control weeds between the rows. If aisles are left uncovered, weed them by hand or cultivate them. Hoeing or tilling complement the use of mulch. Various materials are used as mulch. Some are
organic, meaning they are degradable and can be incorporated into the soil at the end of the season. Others are inorganic, thus non-degradable, and must be removed.
Degradable plastics are being developed to break down by the end of the growing season. Because they are activated by sunlight, the degree of deterioration varies depending on the amount of sunlight and on the shade cast by the vegetable and weed plants. Some types are further degraded by microorganisms after being partially broken down by the sun and then plowed or tilled into the soil.
Materials used as mulch include straw, grass clippings, plastic, newspaper, leaves, shredded bark, and seed hulls. Selection depends on the availability, effectiveness, cost, and even the appearance of the mulching material.
Clear and white plastic are not recommended for home gardens. They promote the growth of many vegetables, but also accelerate weed growth because they allow light to pass through.
The type of weeds to be controlled is also important. Annual weeds, which reproduce by seed, can be controlled by almost all mulches. Control of perennials, which reproduce by roots or other vigorous plant structures, requires thicker, less penetrable mulches.
If weeds are too tall to be covered by a mulch, first mow or hoe them, then cover the area with a dense mulch—for example, sawdust, cardboard, tarpaper, or black plastic.
Other considerations are important when choosing mulching material. Grass clippings from lawns treated with herbicides may damage vegetables. The hulls buckwheat and some other seeds may contain plant growth inhibitors that could retard the growth of young plants. Manure frequently contains live weed seeds. Hay contains unwanted grass seed. Almost all mulches harbor and encourage a population of slugs and rodents. Too much organic mulch may absorb rain and over head irrigation water, causing the vegetables to suffer from water stress (lack of water).
Because mulch works by blocking light to the germinating weed seed, it must be dense. The density depends on the thickness and type of mulching material. Continue on page 12

V O L U M E 9 , I S S U E 3 P A G E 1 2
A layer of grass clippings, for example, needs to be only 1 to 2 inches thick to exclude the same amount of light as 4 to 6 inches of straw. Black plastic is normally 1 to 1½ mils (thousandths of an inch) thick. Thinner plastic allows light to penetrate and weeds to grow beneath it.
Black plastic raises the temperature of the topsoil by up to 10° F at certain times o the day. Organic mulches such as straw or grass clippings insulate the soil and hold the temperature lower and more uniform than that of bare soil.
At the end of the season, black plastic mulch should be lifted carefully out of the ground, leaving no remnants, and either saved for a second year or, if damaged, thrown away. It is not biodegradable.
Incorporate organic mulches into the soil so they have the winter to decompose. If mulch is removed before the end of the season, however, a new flush of weeds may grown where the mulch had been.
Black plastic mulch is a very effective deterrent to both annual and perennial weeds. It is available in garden supply stores, usually in 3– or 4-foot wide rolls.
Black plastic, 1 mil thick, may cost about one cent per square foot when purchased by the roll. By comparison, a 4-sheet thick mulch made of the Sunday New York Times costs about two cents per square foot, although this is a secondary use.
Steps in laying black plastic mulch are shown in figure 3. Seeds may be planted or plants transplanted into the black plastic through holes made by a bulb setter or dibble as shown below.
Stale seedbed. The stale seedbed technique
promotes early germination of the seed in the upper 1 to 2 inches of soil so the weeds may sprout and be eradicated before vegetables are planted.
To use the stale seedbed method, prepare the garden compost, manure, lime (if needed), fertilizer, or other materials, and till or plow it as deeply as you can (6 inches or more is good). After that , do not disturb the soil again before planting, as most deep-lying weed seeds do not germinate without light.
Mechanically or chemically destroy the first flush of young weed seedlings and plant your vegetables with as little disturbance to the soil as possible. When a second flush of weeds occurs, it will be much less dense and thus easier to control manually.
If you wish to plant early, lay clear plastic over the area of the stale seedbed. The temperature under the plastic will rise, enhancing early germination of weed seed.
The width of the area to be mulched should be 6 inches narrower than the width of the plastic (The hoe may be marked in 6-inch increments and used as a measuring tool.) Dig a trench 3 inches deep all the around the mulching area. You can keep the trenches straight by running a string from corner to corner along each edge.
Smooth the center of the area with a rake and remove any large stones or debris that might tear the plastic.
Continued on page 13

P A G E 1 3 V O L U M E 9 , I S S U E 3
Beginning at the end trench, roll out the plastic over the prepared area 3 to 4 feet at a time, tucking first the end and then the side edges into the trenches. With a hoe, pull in soil to bury the edges of the plastic. To secure it, you may need to step on the opposite edge, pressing it into the furrow as you bury it. If the plastic is too loose, it will billow in the wind and may pull out or tear.
When the flush of weeds is growing but still young, remove the plastic and destroy the weeds by hoeing or raking, by carefully burning them with an open flame from a propane or kerosene torch, or by applying a non-selective herbicide that leaves no residue.
The stale seedbed method, because it delays planting of vegetable, should be used for warm-weather vegetables in half the garden. In the other half use other weed control practices so early spring vegetables can be planted. Next year reverse the two sections.
Vegetables with dense foliage (left) have competitive advantage over weeds, Vegetables with thin, sparse foliage (right) are easily choked by weeds.
Planting early - You can give a vegetable crop competitive advantage by planting it early enough to permit good growth before weeds emerge. Peas and spinach, for example, can be planted early because they can tolerate the cool soils of early
spring, although they may take several extra days to germinate and emerge.
Because a plant with rapid early growth has a competitive advantage, transplants compete better with weeds than plants that are seeded directly into the garden. In the spring you can transplant such vegetables as lettuce, onions, cabbage, and broccoli, Later you can transplant squash, melons, cucumbers, celery, tomatoes, eggplants and peppers.
Successive planting and intercropping. Keeping the garden soil occupied by vegetables reduces the chance for weeds to grow. We recommend that you plant one vegetable crop after another (successive planting) and that you plant a variety of vegetables for the best cover and utilization of garden soil.
The principle behind successive planting is this: when the soil is alternately utilized and worked often, individual weed species have little chance to become established or grow to produce seeds.
For example, spinach followed by sweet corn or beans offers a diversity of competition against weeds. Early radishes might permit weeds to grow, but a dense foliage cover of potatoes following that will suppress later weed growth.
Intercropping—growing on crop between rows or interspersed with another vegetable—also helps protect the soil from erosion, offers multiple crops, crowds out weeds, and makes the most efficient use of garden space.
In vegetables that grow slowly or are in widely spaced rows, such as squash or pumpkins, rapidly growing crops are ideal for inter-cropping. The second crop can be planted in the aisles or in the rows between the main crop plants, depending on the spacing of the primary crop. They should be harvested before the main crop begins to mature.
Good crop management - In addition to selecting the best plant variety for your area and planting at the appropriate time, you can give vegetables competitive advantage by using good growing practices.
Continue on page 14
H E R K I M E R O U T D O O R S P A G E 1 4
Any practice that favors good vegetable production helps the vegetable compete with weeds.
Proper fertilizer types and amounts should be applied, soil pH should be adjusted if necessary, water should be in good supply, and vegetables should be rotated from year to year.
Generally, use standard planting and density rates that are recommended in gardening books, large vegetables, which demand a lot of space, permit weed growth when they are young and small because of the open ground around them.
To give competitive advantage you could plant a vine crop in a smaller area than recommended, such as a 3-by-4-foot plot instead of a 4-by 10-foot plot. Tomatoes can be planted in a 1-by-4-foot area instead of a 2-by-4-foot plot. Denser plantings require extra water and more effective in competing with weeds.
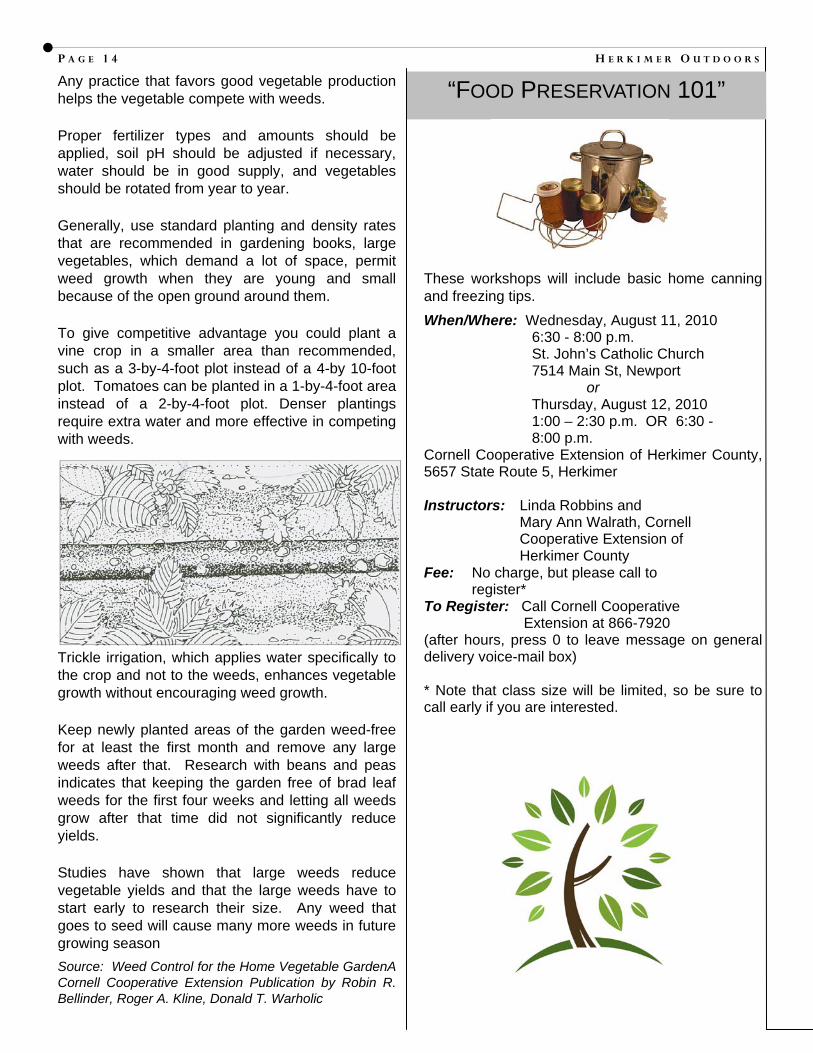
Trickle irrigation, which applies water specifically to the crop and not to the weeds, enhances vegetable growth without encouraging weed growth.
Keep newly planted areas of the garden weed-free for at least the first month and remove any large weeds after that. Research with beans and peas indicates that keeping the garden free of brad leaf weeds for the first four weeks and letting all weeds grow after that time did not significantly reduce yields.
Studies have shown that large weeds reduce vegetable yields and that the large weeds have to start early to research their size. Any weed that goes to seed will cause many more weeds in future growing season
Source: Weed Control for the Home Vegetable GardenA Cornell Cooperative Extension Publication by Robin R. Bellinder, Roger A. Kline, Donald T. Warholic
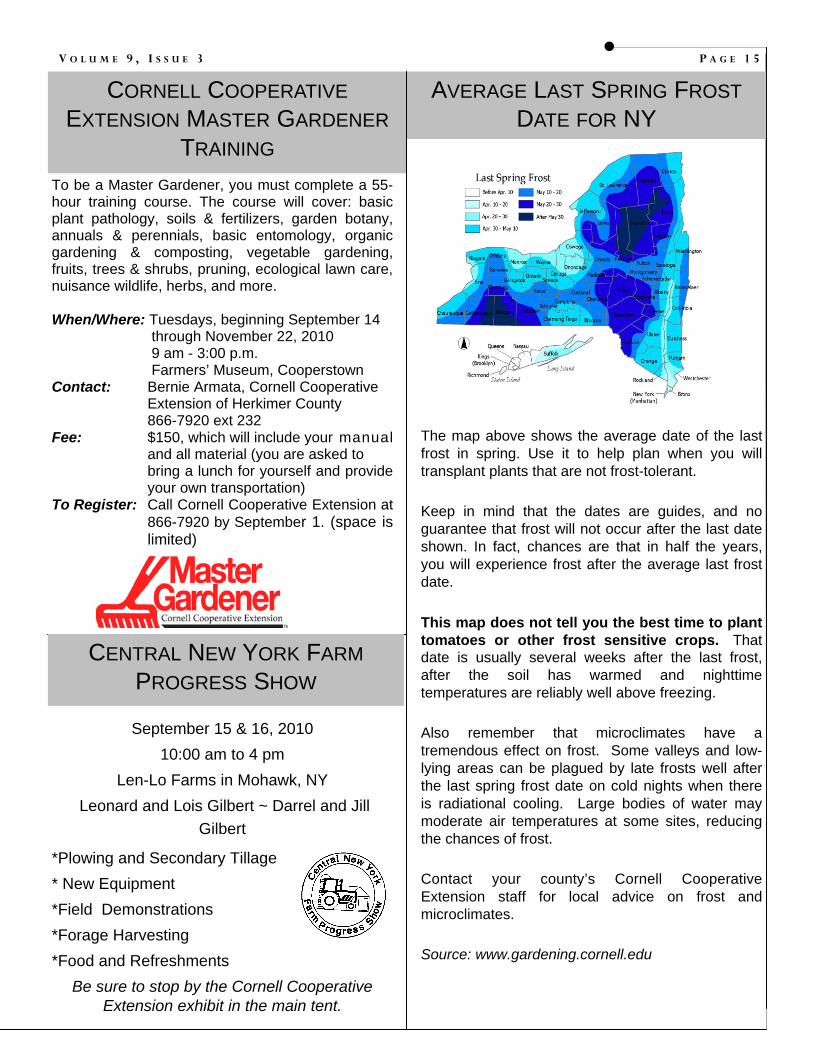
These workshops will include basic home canning and freezing tips.
When/Where: Wednesday, August 11, 2010 6:30 - 8:00 p.m. St. John’s Catholic Church 7514 Main St, Newport
or Thursday, August 12, 2010 1:00 – 2:30 p.m. OR 6:30 - 8:00 p.m. Cornell Cooperative Extension of Herkimer County, 5657 State Route 5, Herkimer Instructors: Linda Robbins and Mary Ann Walrath, Cornell Cooperative Extension of Herkimer County Fee: No charge, but please call to register* To Register: Call Cornell Cooperative Extension at 866-7920 (after hours, press 0 to leave message on general delivery voice-mail box) * Note that class size will be limited, so be sure to call early if you are interested.
“FOOD PRESERVATION 101”
V O L U M E 9 , I S S U E 3 P A G E 1 5
CORNELL COOPERATIVE EXTENSION MASTER GARDENER
TRAINING
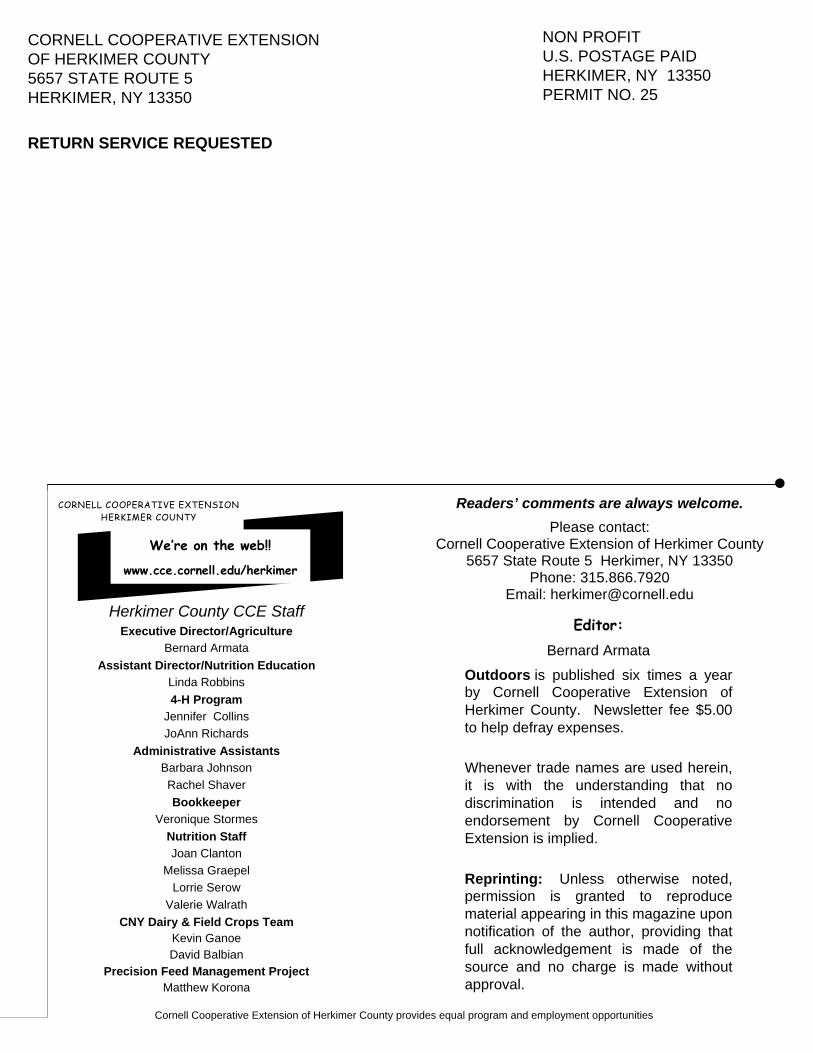
AVERAGE LAST SPRING FROST DATE FOR NY
To be a Master Gardener, you must complete a 55-hour training course. The course will cover: basic plant pathology, soils & fertilizers, garden botany, annuals & perennials, basic entomology, organic gardening & composting, vegetable gardening, fruits, trees & shrubs, pruning, ecological lawn care, nuisance wildlife, herbs, and more. When/Where: Tuesdays, beginning September 14 through November 22, 2010 9 am - 3:00 p.m. Farmers’ Museum, Cooperstown Contact: Bernie Armata, Cornell Cooperative Extension of Herkimer County 866-7920 ext 232 Fee: $150, which will include your manual and all material (you are asked to bring a lunch for yourself and provide your own transportation) To Register: Call Cornell Cooperative Extension at 866-7920 by September 1. (space is limited)
September 15 & 16, 2010
10:00 am to 4 pm
Len-Lo Farms in Mohawk, NY
Leonard and Lois Gilbert ~ Darrel and Jill
Gilbert
*Plowing and Secondary Tillage
* New Equipment
*Field Demonstrations
*Forage Harvesting
*Food and Refreshments
Be sure to stop by the Cornell Cooperative Extension exhibit in the main tent.
The map above shows the average date of the last frost in spring. Use it to help plan when you will transplant plants that are not frost-tolerant.
Keep in mind that the dates are guides, and no guarantee that frost will not occur after the last date shown. In fact, chances are that in half the years, you will experience frost after the average last frost date.
This map does not tell you the best time to plant tomatoes or other frost sensitive crops. That date is usually several weeks after the last frost, after the soil has warmed and nighttime temperatures are reliably well above freezing.
Also remember that microclimates have a tremendous effect on frost. Some valleys and low-lying areas can be plagued by late frosts well after the last spring frost date on cold nights when there is radiational cooling. Large bodies of water may moderate air temperatures at some sites, reducing the chances of frost.
Contact your county’s Cornell Cooperative Extension staff for local advice on frost and microclimates.
Source: www.gardening.cornell.edu
CENTRAL NEW YORK FARM PROGRESS SHOW
We’re on the web!!
www.cce.cornell.edu/herkimer
Herkimer County CCE Staff Executive Director/Agriculture
Bernard Armata
Assistant Director/Nutrition Education
Linda Robbins
4-H Program
Jennifer Collins
JoAnn Richards
Administrative Assistants
Barbara Johnson
Rachel Shaver
Bookkeeper
Veronique Stormes
Nutrition Staff
Joan Clanton
Melissa Graepel
Lorrie Serow
Valerie Walrath
CNY Dairy & Field Crops Team Kevin Ganoe David Balbian
Precision Feed Management Project Matthew Korona
Editor: Bernard Armata
Outdoors is published six times a year by Cornell Cooperative Extension of Herkimer County. Newsletter fee $5.00 to help defray expenses.
Whenever trade names are used herein, it is with the understanding that no discrimination is intended and no endorsement by Cornell Cooperative Extension is implied.
Reprinting: Unless otherwise noted, permission is granted to reproduce material appearing in this magazine upon notification of the author, providing that full acknowledgement is made of the source and no charge is made without approval.
Readers’ comments are always welcome.
Please contact: Cornell Cooperative Extension of Herkimer County
5657 State Route 5 Herkimer, NY 13350 Phone: 315.866.7920
Email: [email protected]
Cornell Cooperative Extension of Herkimer County provides equal program and employment opportunities
CORNELL COOPERATIVE EXTENSION OF HERKIMER COUNTY 5657 STATE ROUTE 5 HERKIMER, NY 13350
RETURN SERVICE REQUESTED
CORNELL COOPERATIVE EXTENSION HERKIMER COUNTY
NON PROFIT U.S. POSTAGE PAID HERKIMER, NY 13350 PERMIT NO. 25