course planning using purple pen - university of sussex · unfortunately it is not easy to mark...
TRANSCRIPT

Course setting using Purple Pen
An introduction
~
Neil Crickmore

What you need
• A computer running Windows
• Purple Pen software. Freeware and
downloadable from
• http://purplepen.golde.org/download.htm
• An map file of the area. This will normally
be sent to you, most likely as an OCAD file
but possibly also PDF / JPG etc.

The basic concept
• Course planning works in two layers which exist
as two separate files.
• The bottom layer (background map) is the actual
map. You will not be altering this map.
• The top layer / file consists of the course
overprints. It is this layer that you will create and
modify.
• The person checking/printing your courses will
need both files.

Create a new course planning file
Create a new event and give the event a title

Load the map
Locate the map file (in ocad format normally)

Checking the scale
Hopefully the values that appear in the boxes will be the same as the
scale written on the front of the map. If not change the default printing
scale to whatever is written on the map. Before going much further
though check with the person who sent you the map file that the scale is
correct
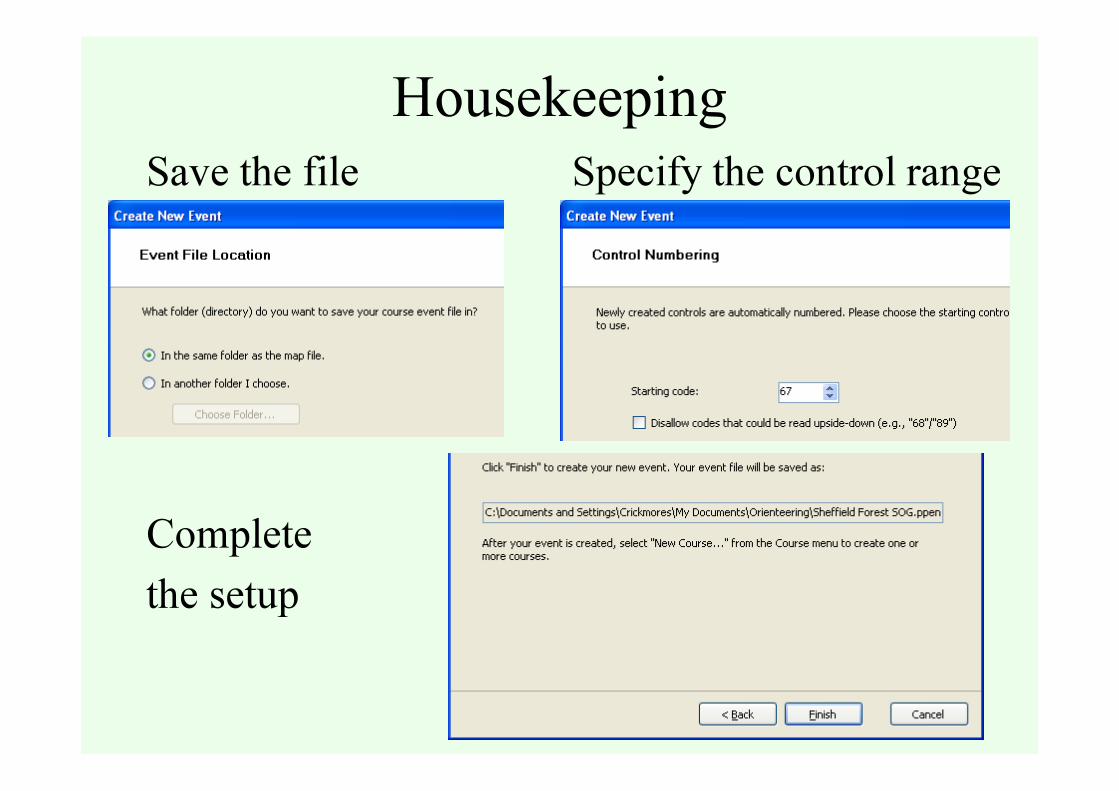
Housekeeping
Save the file Specify the control range
Complete
the setup

Viewing the map
Scroll around the window
Use the slider to zoom in or out (or use mouse wheel)

Confirming the scale
Most of us have been to an event where the planner has got
the scale wrong and planned courses too long or too short.
This step is therefore recommended for every new event.
Select the uncrossable boundary symbol from the special
items pull down menu.

Confirming the scale II
Draw a line along the scale bar
Check that the length of the line is
the same as the scale bar
Delete the line when you are done

Start entering items on the master map

To place the start I
Below the menu bar you
will find the Add Start button
click this
Using the cross hairs position the start over the correct feature then left click to place it there.
Click elsewhere on the map and the symbol will turn purple

To place the start II
By clicking the yellow
boxes you can add the
description for the start.

Placing controls
Use the same procedure as with
the start but using the Add
Control button
Don’t forget the descriptions
Enter all the controls for all the courses

If you need to move a control
…or start or finish or anything else
Left click on the symbol. It will turn red and the cross hairs will appear.
Left click and hold to drag the symbol to the new location.
Don’t forget to change the description.

If you need to delete a control
…or start or finish or anything else
Left click on the object until it turns red.
Click on the delete icon
to remove the object
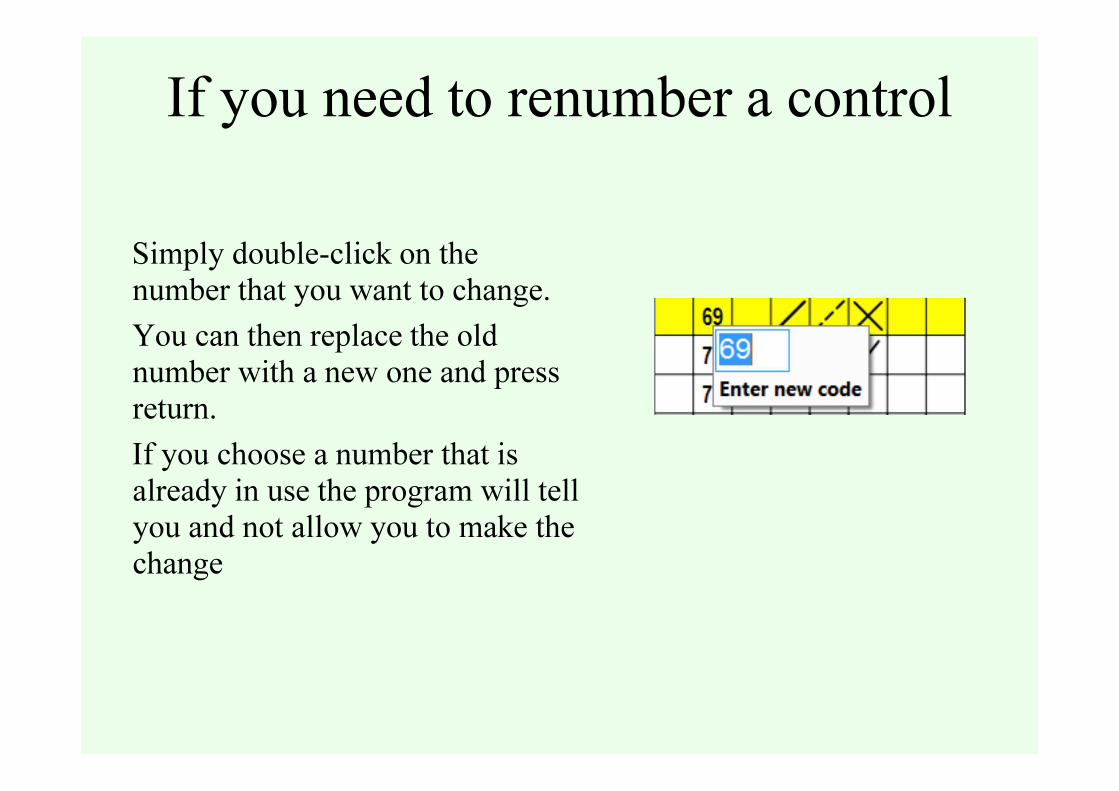
If you need to renumber a control
Simply double-click on the
number that you want to change.
You can then replace the old
number with a new one and press
return.
If you choose a number that is
already in use the program will tell
you and not allow you to make the
change

Creating courses
When you have added all the controls it’s time to define the courses
From the Course pull down menu select Add Course
Fill in the appropriate details

Defining the course
The new course will now have appeared as a tab by the control list
The course will initially be shown as a line between the start and finish.
Click on the Add Control button and the location of the other controls will appear

Defining the course II
Drag the red circle to the intended first control and left click. This will set the first control on the course.

Defining the course III
Click on Add Control again and move the circle to the next control on the course.
Continue this process until all the controls have been added.
You can if you wish drag the red circle to a new location and create a new control site.
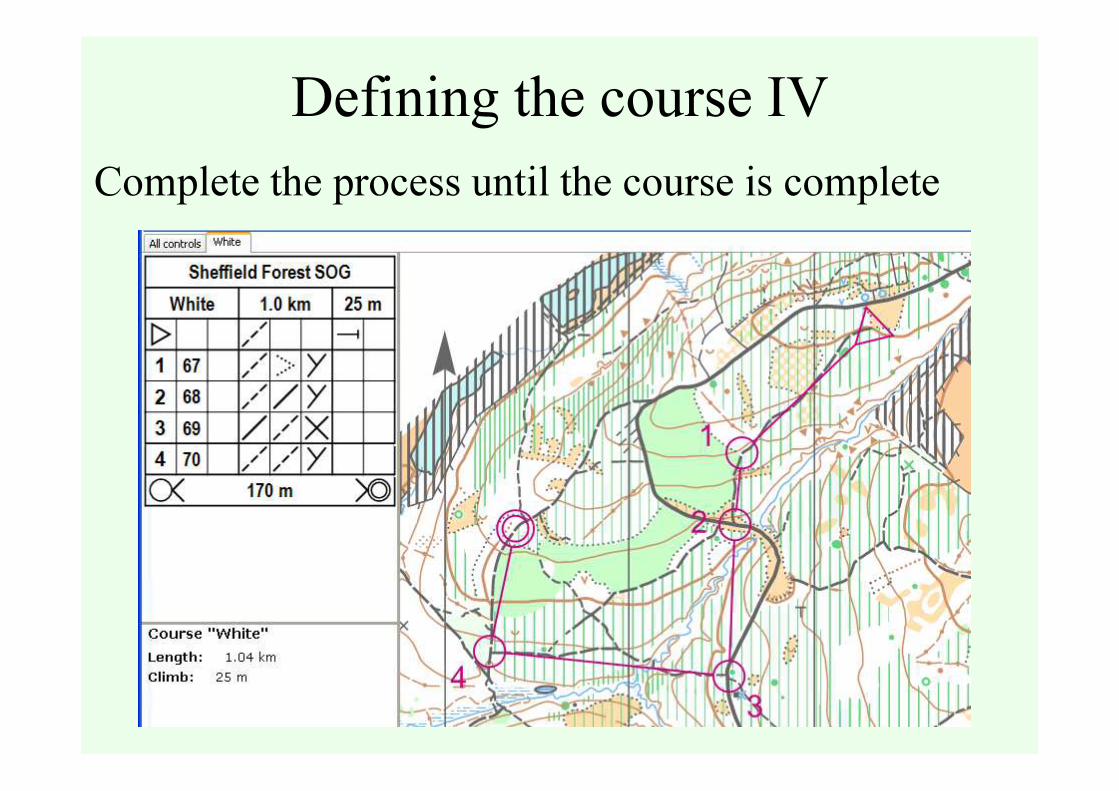
Defining the course IV
Complete the process until the course is complete
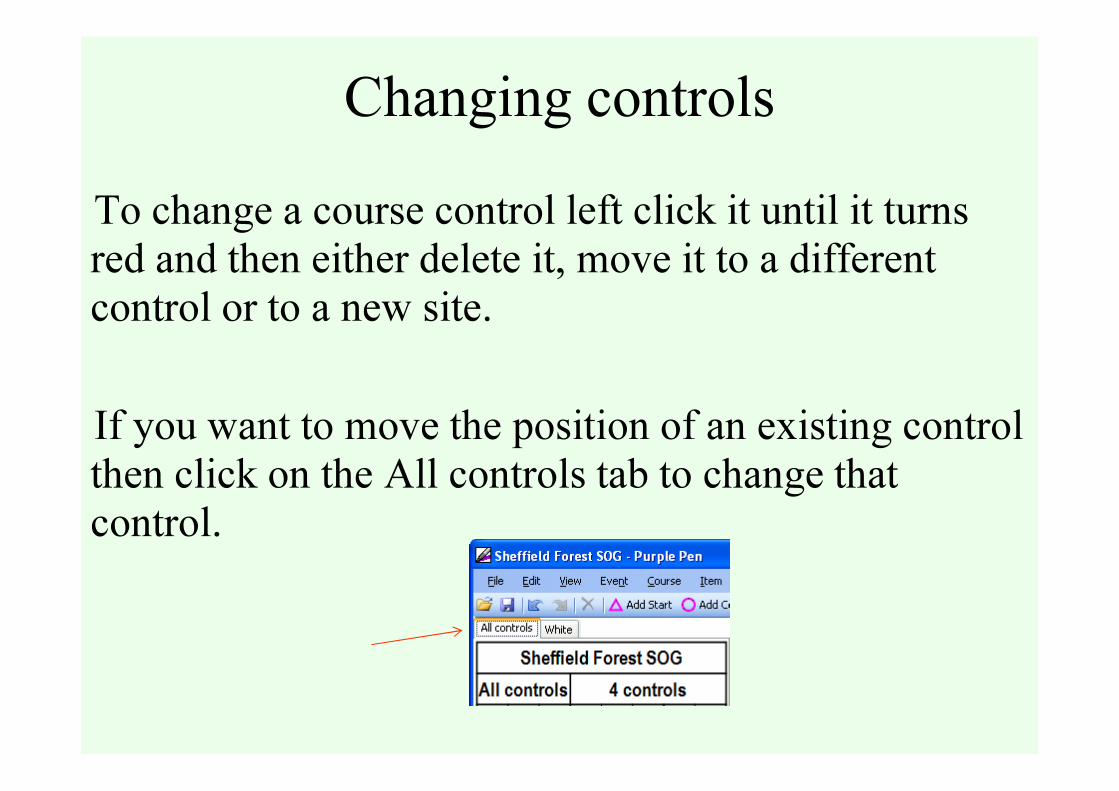
Changing controls
To change a course control left click it until it turns
red and then either delete it, move it to a different
control or to a new site.
If you want to move the position of an existing control
then click on the All controls tab to change that
control.

Inserting a line of text
To insert a line of text in
a course description first
select the control above
where you want the text
to go. Then from the
Item pull down menu
select Add Text Line
This will bring up a
dialog box into which
the text can be added.
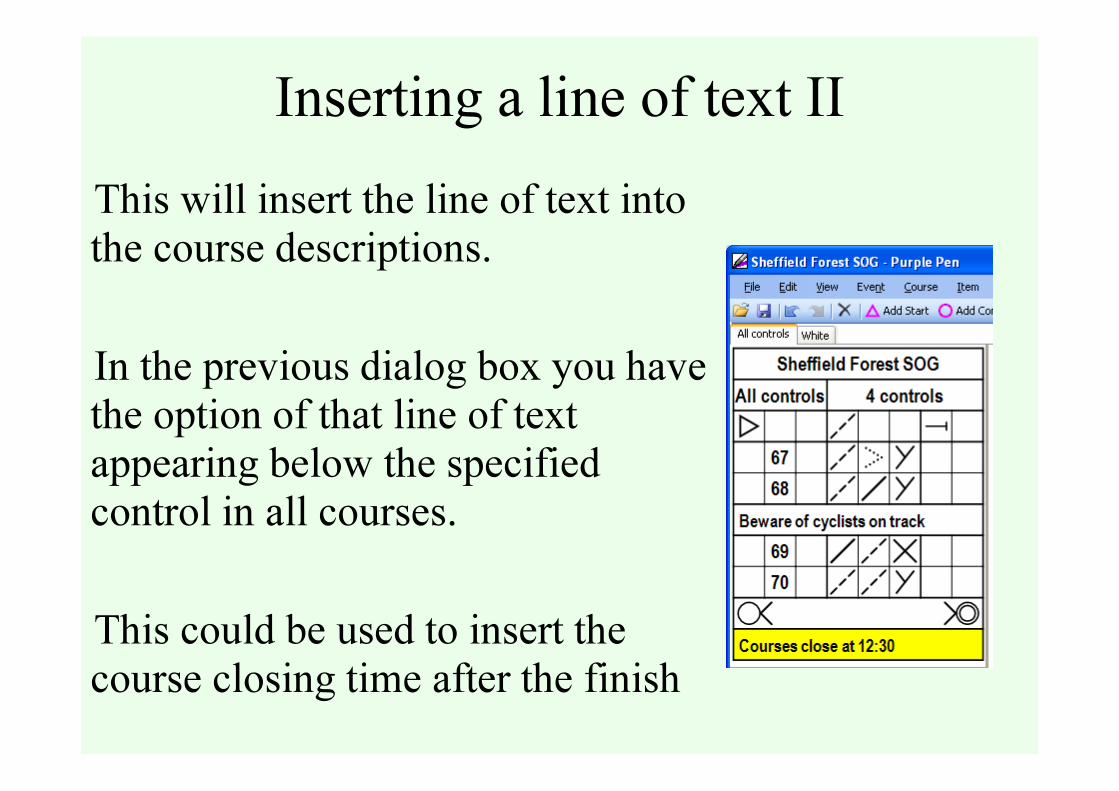
Inserting a line of text II
This will insert the line of text into
the course descriptions.
In the previous dialog box you have
the option of that line of text
appearing below the specified
control in all courses.
This could be used to insert the
course closing time after the finish

Modifying the course
You will almost certainly need to move the control numbers around – to do this first go to the course that you want to tidy up. Left click on a control – the circle and number will turn red. You can then move the number around.

Adding control descriptions
Select the Add Descriptions
button. description placement
icon.
Left click, hold and drag out the location of the descriptions on the map.

English and/or IOF descriptions
You can decide whether to
have text, pictoral or both
descriptions in the Course
Properties dialog box (see
earlier). If space allows you
may consider having both.

Improving print clarity
To avoid the connecting lines obscuring underlying
detail (eg a path) you have the option of moving, bending or
cutting the line. To do this first click on the line until it turns
red. Then select the Add bend symbol
Click on the line and a blue square will appear
Left click, hold and drag to move
the line (in this case off the path)

Removing a bend
If you want to remove a bend that you have added first click
on the line containing the bend
Then from the Item menu
select remove bend
Using the cross icon click on the bend to be
removed

Cutting lines
To cut a line first select the line until it turns
red. Then select the Add Gap symbol.
Left click and hold at one end of where you
want the gap and then drag to the other end. A
gap will appear in the line. By clicking and
holding on the squares you can adjust the
length of the gap
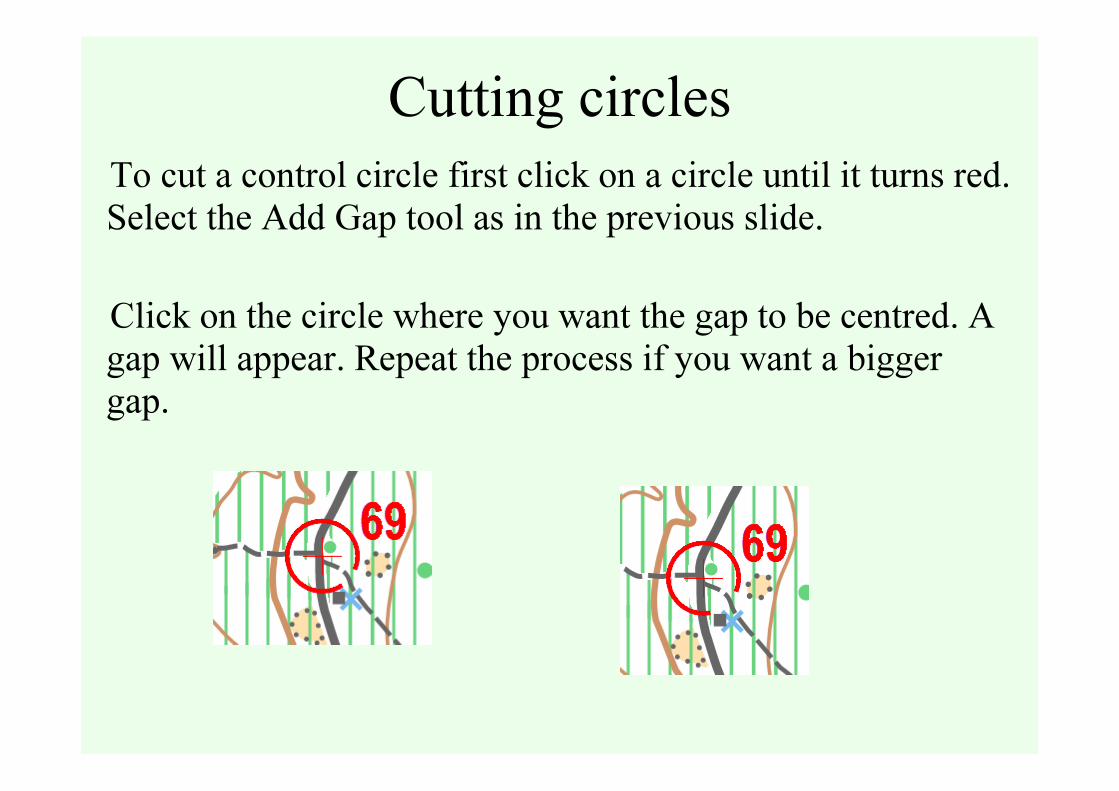
Cutting circles
To cut a control circle first click on a circle until it turns red.
Select the Add Gap tool as in the previous slide.
Click on the circle where you want the gap to be centred. A
gap will appear. Repeat the process if you want a bigger
gap.

Adding marked routesA marked route is a specified route that competitors must take
during their course eg across fields via a public footpath.
Unfortunately it is not easy to mark this using Purple Pen. The
only way to do this properly is to place a control either side of
the marked route.
As an example

Adding marked routes IITo convert this leg into a marked route insert sufficient bends
into the connecting line to mark the required route.
Then from the Item menu
select the flag entire leg option

Adding marked routes III
If only part of the leg is marked you have the option of
converting the start or finish of a leg to a marked section.
If you select the flag at beginning option the entire leg up until
the last bend mark will be marked
If you select the flag at end option the entire leg after the first
bend mark will be marked
It is not possible to mark only the middle of a leg

Adding other objects to the map
These symbols can
be selected and
inserted at the
appropriate place on
the map

You have the option of changing the appearance of some of the course features.
You shouldn’t need to do this though.
Other Display Options

Splitting a course onto 2 maps
Sometimes when using a small area it is necessary to split a
course onto two maps for clarity. This can be done by
inserting a map exchange.
Two options are given but in most cases you will only be
using the map exchange at control point option.
Select this option and then click on the course control
where you want the 2nd part of the course to start

Splitting a course onto 2 maps
An extra line will appear in the control descriptions.
And you will be able to view the course as a wholeor as separate
parts.
In this example
part one will
show controls 1-
4 and part 2
controls 4
onwards

Exporting course information
The course information (distances, control order etc) can be exported in an xml file that can be imported into various results software etc.
From the File menu select Create E-punch
Interchange File.
This will then prompt you for a location
At which to save this .xml file

Printing loose control descriptions
From the File menu select Print Descriptions.
This will bring up a
dialog box with
various options
regarding the
printing of loose
descriptions.

Exporting the courses
There may be occasions where you need to export the courses as OCAD
files. To do this select Create OCAD Files from the File menu.
The dialog box gives
you various options.
Note that the
descriptions do not
appear to be exported
along with the course.
The courses can also be exported as PDF files

Other Features
The information presented in the preceding files should be sufficient
to allow you to plan your courses properly.
The program does contain various other features that you may wish to
play with.
More information can be found using the help facility within the
program and also via the support group. Details of this group can be
found on the Purple Pen web page.