cp3100 - introduction to android mobile...
TRANSCRIPT

CP3100 - Introduction to Android Mobile Development
Philippe Leefsma, [email protected] Autodesk Inc. Developer Technical Services CP3100 Learn how quick and easy it is to start programming for Android devices. We will create from
scratch a simple Android application with traditional UI elements like buttons, tabs, and lists. We will then
deploy this app on an Android device and show it running. We will finally show how you can debug and
test Android applications. In the process of these demonstrations, you will learn where you need to go
and what you need to do to start programming for the Android operating system. We will also talk about
the SDKs that would be important to a CAD developer and illustrates how to consume REST web
services from an Android device.
Target Audience
Programmers and Software Developers with no or beginner experience developing applications on the
Android platform. Knowledge of Java is not required to attend this class, although a previous experience
with it or a similar programming language such as C++ or C# will be a plus.
Key Learning Objectives
At the end of this class, you will be able to:
� Understand the basic components of the Android OS
� Start developing applications for Android devices
� Create apps with simple UI
� Consume REST web services from Android
� Get a taste of some more advanced part of the API
About the Author
Philippe has a master's degree in Computer Sciences. He carried his studies in Paris at I.S.E.P and in
USA, at Colorado School of Mines. He started his career as software engineer for a French company
where he participated to the implementation of a simulator for the French Navy combat frigate Horizon.
He joined Autodesk 6 years ago where he works as developer consultant for Autodesk Developer
Network. He supports various products APIs such as AutoCAD®, AutoCAD Mechanical®, and Autodesk®
Inventor®. He also focuses on Cloud and Mobile technologies. He likes to travel, meet developers from
around the world to work with them around programming, CAD and manufacturing challenging topics.
During his free time, Philippe enjoys doing sport, especially swimming, running, snowboarding or
trekking in Swiss mountains, where he is living now.
CP3100 - Introduction to Android Mobile Development
2
I. The Android Operating System
1.1 A bit of History…
� 2003 - Android, Inc. is founded by Andy Rubin, Rich Miner, Nick Sears and Chris White with the goal
of developing smarter mobile devices
� 2005 - Google seeing a large growth of Internet use and search in mobile devices, acquires Android
Inc.
� 2007 - Apple introduces the iPhone with some ground-breaking ideas:
� Multi-touch, Open market for applications
� Android is quickly adapted to include these features & other distinctions such as more control
for developers, multitasking, Enterprise requirements support: Exchange, VPN, …
� 2008 - First Android-powered phone sold: the HTC Dream T-Mobile G1
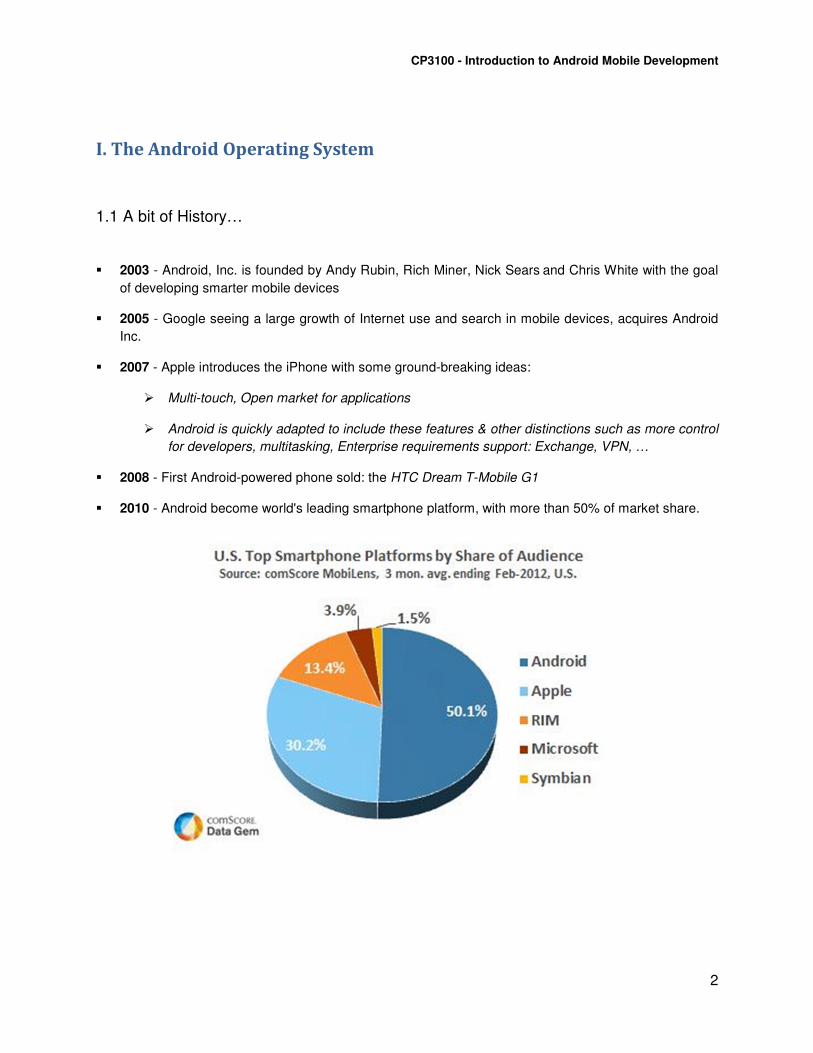
� 2010 - Android become world's leading smartphone platform, with more than 50% of market share.

CP3100 - Introduction to Android Mobile Development
3
1.2 What Android is and isn’t
� Android is a Linux-based embedded operating system designed primarily for touchscreen mobile
devices such as smartphones and tablet computers. Although it relies on Linux kernel for core
services, it is not embedded Linux.
� Several standard Linux utilities such as X-windows or the GNU C libraries are not supported under
Android.
� The Android applications use Java framework but some standard Java libraries such as Swing are
not supported.
� Several libraries have been replaced by Android own libraries, which are optimized for resource-
constrained embedded environment.
The Android OS is open source, which means developers can view and use any of the system source
code, including the radio stack. This source code is one of the first resources for seeing examples of
Android code in action, and it helps clarify the usage when documentation is lacking. It is available from
the following address: http://source.android.com
This also means developers can utilize the system in the same way as any core application and can
swap out system components for their own components. However, Android devices do contain some
proprietary software that is inaccessible to developers such as the GPS navigation.
1.3 Android Images
The Android OS is organized into the following images:
� Bootloader
Initiates loading of the boot image during startup
� Boot image
Kernel and RAMdisk
� System image
Android operating system platform and apps
� Data image
User data saved across power cycles
� Recovery image
Files used for rebuilding or updating the system
CP3100 - Introduction to Android Mobile Development
4
� Radio image
Files of the radio stack
These images are stored on nonvolatile flash memory, so they are protected when the device powers
down. The flash memory is used like read-only memory (hence, some call it ROM), but can it be rewritten
as necessary (for example, with over-the-air Android operating system updates).
On startup, the microprocessor executes the bootloader to load the kernel and RAMdisk to RAM for
quick access. The microprocessor then executes instructions and pages portions of the system and data
images into RAM as needed.
The radio image resides on the baseband processor, which connects to the radio hardware.The
Android Open Source Project provides a Radio Interface Layer (RIL) between Android telephony services
(android.telephony) and the radio hardware. It consists of a stack of two components: a RIL Daemon and
a Vendor RIL. The RIL Daemon talks to the telephony services and dispatches "solicited commands" to
the Vendor RIL. The Vendor RIL is specific to a particular radio implementation, and dispatches
"unsolicited commands" up to the RIL Daemon
1.4 Android Application Components
Every application is made up of one or more of these components. They are instantiated by the
Android operating system as needed:
Functionality Android Base Class Example
Focused thing a user can do Activity Edit note, play game
Background process Service Play music, update weather icon
Receive messages BroadcastReceiver Trigger alarm upon event
Store and retrieve data ContentProvider Open phone contact
Other applications are allowed to use them, too, within the specified permissions. With the
exception of ContentProvider, each component is activated by an asynchronous message called Intent.
The Intent can contain a Bundle of supporting information describing the component. This provides a
method of passing information between components.
CP3100 - Introduction to Android Mobile Development
5
II. Getting Started with Android programming
2.1 Setting up your Android Programming Environment
Here are links to the basic resources and components you will have to install in order to get your
Android programming environment set up:
� Install Eclipse
http://www.eclipse.org/downloads
� Install Android SDK
http://developer.android.com/sdk/installing.html
� Get started with Android development
http://developer.android.com/guide/index.html
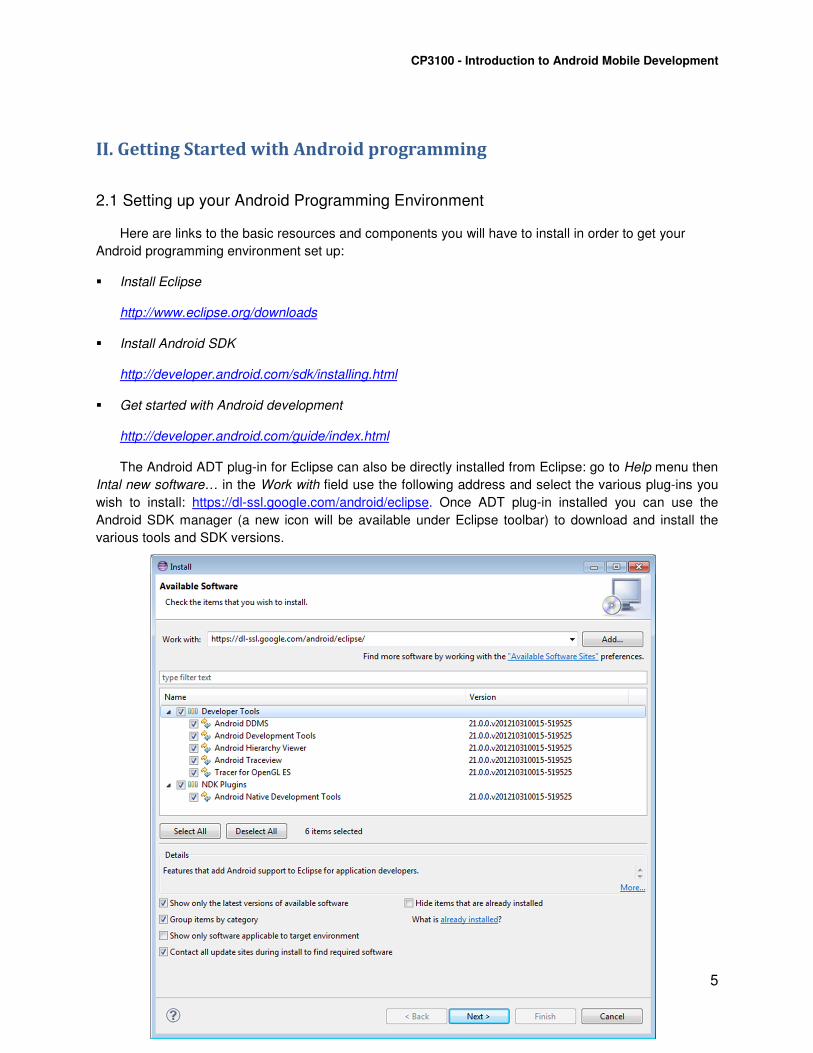
The Android ADT plug-in for Eclipse can also be directly installed from Eclipse: go to Help menu then
Intal new software… in the Work with field use the following address and select the various plug-ins you
wish to install: https://dl-ssl.google.com/android/eclipse. Once ADT plug-in installed you can use the
Android SDK manager (a new icon will be available under Eclipse toolbar) to download and install the
various tools and SDK versions.
CP3100 - Introduction to Android Mobile Development
6
2.2 Android project basic components
Here is a brief description of the basic components of each Android project and their purpose:
� AndroidManifest.xml
The manifest file describes the fundamental characteristics of the app and defines each of its
components. This is, among other things, where you need to declare which permission the application is
going to require and what are the activities that may be generated by the application.
� src/
Directory for your app's main source files. By default, it includes an Activity class that runs when your
app is launched using the app icon.
� res/
The res directory contains several sub-directories for app resources. Here are just a few:
� drawable-hdpi/
Directory for drawable objects (such as bitmaps, jpeg, png, …) that are designed for high-
density (hdpi) screens. Other drawable directories contain assets designed for other screen
densities.
� layout/
Directory for files that define your app's user interface.
� values/
Directory for other various XML files that contain a collection of resources, such as string
and color definitions
2.3 Creating your first Android project
Here is a step-by-step description to create your first Android application under Eclipse:
1. From Eclipse menu select File > New > Android Application Project
This brings a new dialog like the one below, allowing you to set some of your project properties:
- We name our application and project AndroidDemoApp
- And for the package name: com.Autodesk.AU.AndroidDemo
- The target SDK: 4.0.3. This allows devices running that same version of the firmware to
disable compatibility mode and may improve performances
- The minimum required SDK is set to Android 2.2 but it could be lower as we are going to use
very basic functionalities

CP3100 - Introduction to Android Mobile Development
7
2. If you checked the “Create custom launcher icon” in the previous dialog, you will get the
opportunity to select a custom picture for your application icon:
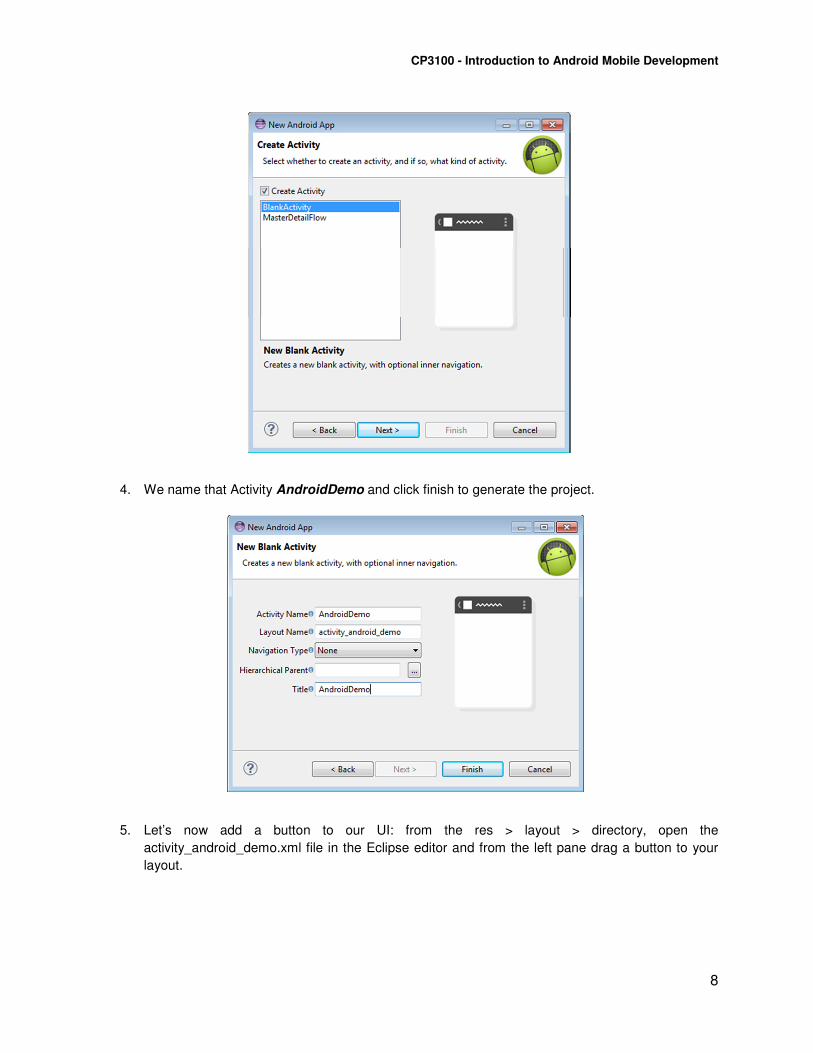
3. The next dialog lets you select a template for the project activity: we are going to create a new
blank Activity, the most basic one.
CP3100 - Introduction to Android Mobile Development
8
4. We name that Activity AndroidDemo and click finish to generate the project.
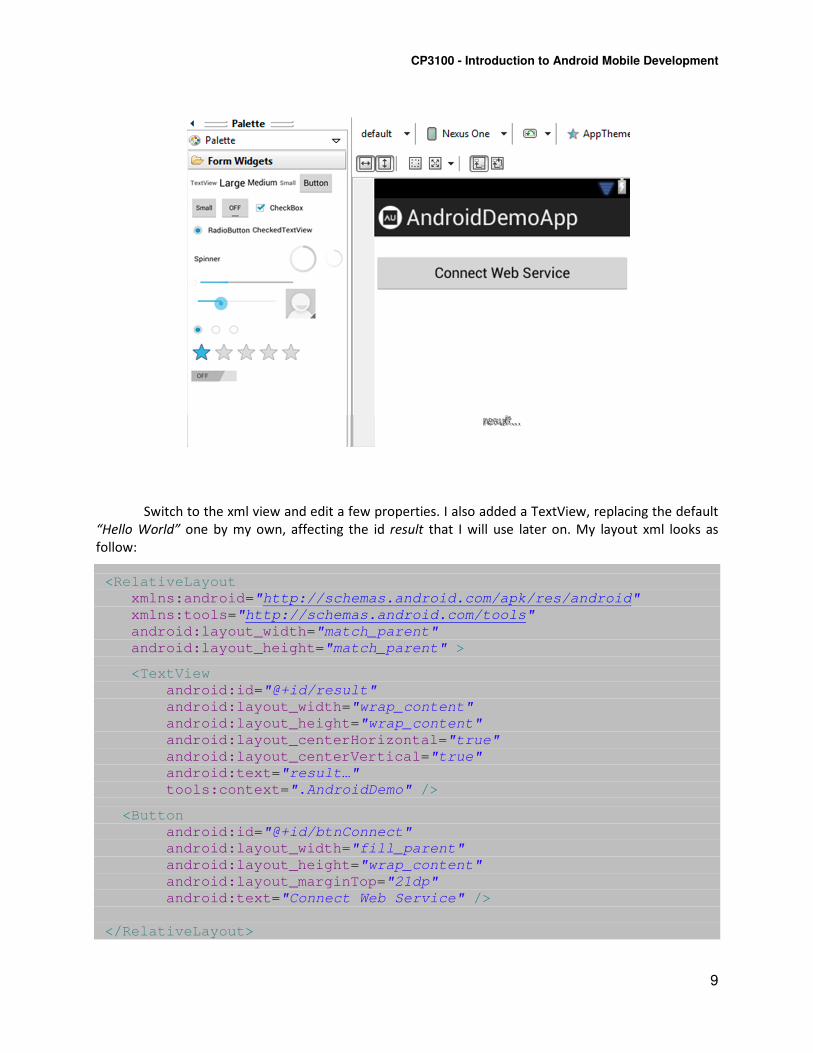
5. Let’s now add a button to our UI: from the res > layout > directory, open the
activity_android_demo.xml file in the Eclipse editor and from the left pane drag a button to your
layout.
CP3100 - Introduction to Android Mobile Development
9
Switch to the xml view and edit a few properties. I also added a TextView, replacing the default
“Hello World” one by my own, affecting the id result that I will use later on. My layout xml looks as
follow:
<RelativeLayout
xmlns:android="http://schemas.android.com/apk/res/android"
xmlns:tools="http://schemas.android.com/tools"
android:layout_width="match_parent"
android:layout_height="match_parent" >
<TextView
android:id="@+id/result"
android:layout_width="wrap_content"
android:layout_height="wrap_content"
android:layout_centerHorizontal="true"
android:layout_centerVertical="true"
android:text="result…"
tools:context=".AndroidDemo" />
<Button
android:id="@+id/btnConnect"
android:layout_width="fill_parent"
android:layout_height="wrap_content"
android:layout_marginTop="21dp"
android:text="Connect Web Service" />
</RelativeLayout>

CP3100 - Introduction to Android Mobile Development
10
6. Time for a bit of coding now: I’m going to implement the behavior of my button by displaying
some pop up text while it gets clicked. This can be done as follow, inside the onCreate method,
which gets called when our application gets started
public class AndroidDemo extends Activity {
@Override
public void onCreate(Bundle savedInstanceState)
{
super.onCreate(savedInstanceState);
setContentView(R.layout.activity_android_demo);
final AndroidDemo activity = this;
Button btn = (Button) findViewById(R.id.btnConnect);
btn.setOnClickListener(new OnClickListener()
{
public void onClick(View v)
{
Toast.makeText(
activity,
"Button was clicked!",
Toast.LENGTH_SHORT).show();
}
});
}
@Override
public boolean onCreateOptionsMenu(Menu menu)
{
getMenuInflater().inflate(
R.menu.activity_android_demo, menu);
return true;
}
}
Our application should be ready to run now. Let’s take a look in the next section at our options in
term of debugging
CP3100 - Introduction to Android Mobile Development
11
2.4 Testing and Debugging Applications
Your first option in order to test and debug your Android application is to run it in the emulator that comes with the SDK. To start using the emulator, you first have to create a new Android Virtual Device (AVD) under Eclipse. An AVD is an emulator configuration that lets you model an actual device by defining hardware and software options to be emulated by the Android Emulator.
The easiest way to create an AVD is to use the graphical AVD Manager, which you launch from Eclipse by clicking Window > AVD Manager. You can also start the AVD Manager from the command line by calling the android tool with the avd options, from the <sdk>/tools/ directory.
After giving a try at the emulator, you will soon notice that it is painfully slow, especially to start up, this is mainly due to the fact that it simulates a real ARM processor, which can have pros and cons. In order to speed up your test process, I listed below several different options that allow faster debugging of Android applications.
1. Using emulator snapshots
The Android emulator now has the ability to save and restore its state to a snapshot file in each AVD (Android Virtual device). Once a snapshot has been saved, no booting is required, so loading will be faster (about few seconds).
You can find more info on that feature here: http://tools.android.com/recent/emulatorsnapshots
2. Using the new GPU-enabled emulator
In order to make the Android emulator run faster and be more responsive, you can configure it to
take advantage of hardware acceleration, using a combination of configuration options, specific Android
system images and hardware drivers. All details about that feature and how to enable it are described at
the following page: http://developer.android.com/tools/devices/emulator.html
3. Connecting a physical device to your development machine through USB cable
That’s a rather straightforward option although it may have potential inconvenient: first you obviously need to own or have access to an Android device, which is most likely going to be the case if you do some serious development on that platform but not necessarily if you just want to give a shot at Android programming. Second, and more annoying, is that for Windows programmers, it is required to install a device specific driver on your machine in order to have it recognized. It might be an issue searching and finding that driver. For Mac users, no driver required. Plug the device to the machine through USB and it should just appear as selectable choice when you run your app in debug mode through Eclipse, as simple as that!
In both cases you will most likely need to enable debugging in your device settings: Settings > Development > Enable Android debug mode.
4. Remote TCP/IP debugging over network
That’s a cool feature that allows you to connect your device through TCP/IP and remotely debug into it. The drawback is that you need to have rooted access to the device in order to allow that feature.
CP3100 - Introduction to Android Mobile Development
12
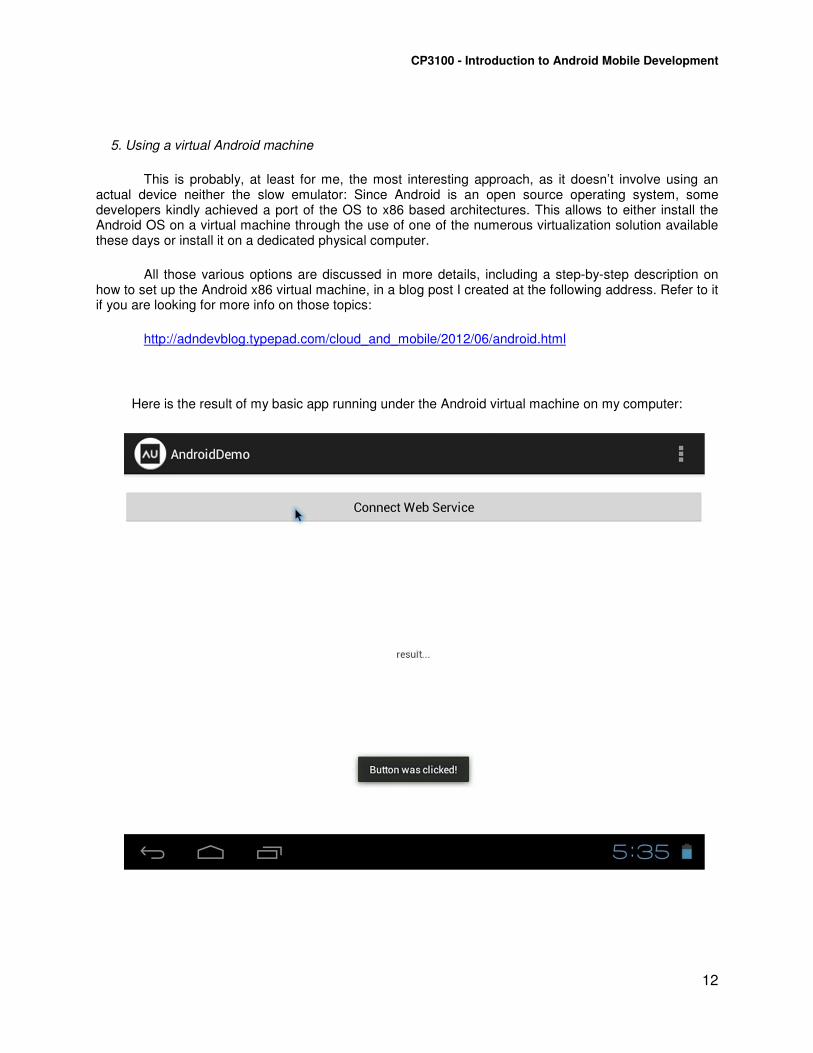
5. Using a virtual Android machine
This is probably, at least for me, the most interesting approach, as it doesn’t involve using an actual device neither the slow emulator: Since Android is an open source operating system, some developers kindly achieved a port of the OS to x86 based architectures. This allows to either install the Android OS on a virtual machine through the use of one of the numerous virtualization solution available these days or install it on a dedicated physical computer.
All those various options are discussed in more details, including a step-by-step description on how to set up the Android x86 virtual machine, in a blog post I created at the following address. Refer to it if you are looking for more info on those topics:
http://adndevblog.typepad.com/cloud_and_mobile/2012/06/android.html
Here is the result of my basic app running under the Android virtual machine on my computer:
CP3100 - Introduction to Android Mobile Development
13
III. Web Services & Other APIs
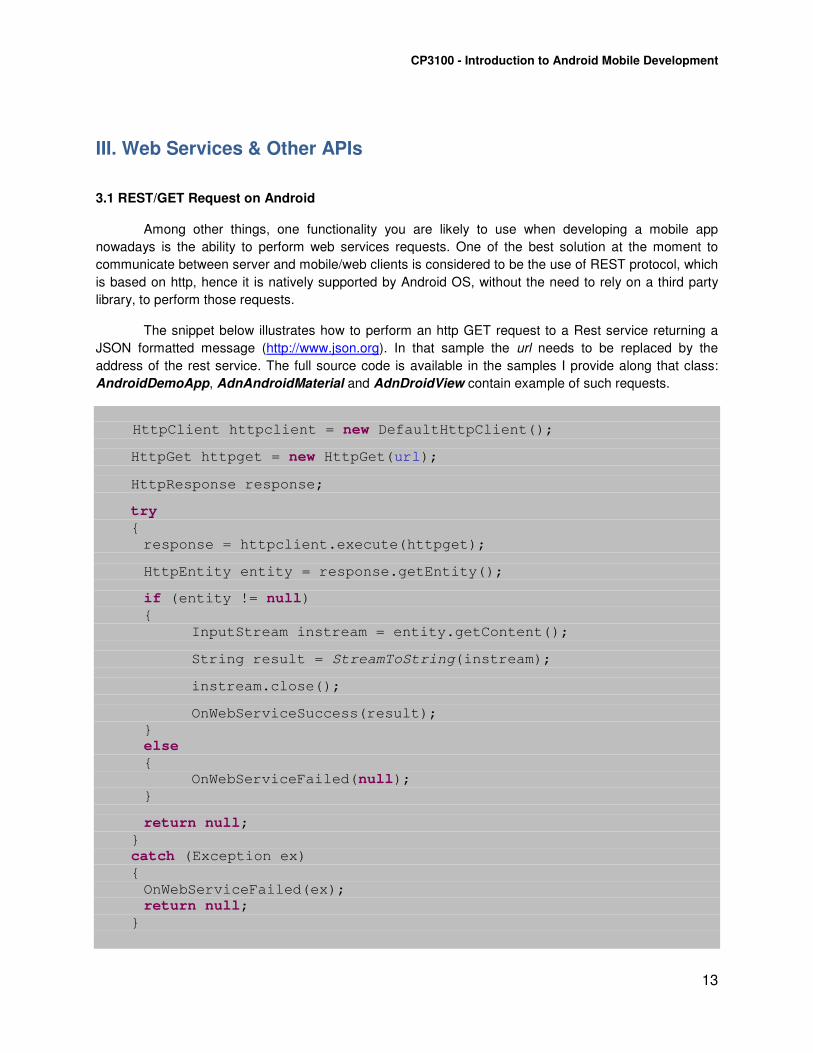
3.1 REST/GET Request on Android
Among other things, one functionality you are likely to use when developing a mobile app
nowadays is the ability to perform web services requests. One of the best solution at the moment to
communicate between server and mobile/web clients is considered to be the use of REST protocol, which
is based on http, hence it is natively supported by Android OS, without the need to rely on a third party
library, to perform those requests.
The snippet below illustrates how to perform an http GET request to a Rest service returning a
JSON formatted message (http://www.json.org). In that sample the url needs to be replaced by the
address of the rest service. The full source code is available in the samples I provide along that class:
AndroidDemoApp, AdnAndroidMaterial and AdnDroidView contain example of such requests.
HttpClient httpclient = new DefaultHttpClient();
HttpGet httpget = new HttpGet(url);
HttpResponse response;
try
{
response = httpclient.execute(httpget);
HttpEntity entity = response.getEntity();
if (entity != null)
{
InputStream instream = entity.getContent();
String result = StreamToString(instream);
instream.close();
OnWebServiceSuccess(result);
}
else
{
OnWebServiceFailed(null);
}
return null;
}
catch (Exception ex)
{
OnWebServiceFailed(ex);
return null;
}

CP3100 - Introduction to Android Mobile Development
14
3.2 REST/POST Request on Android
The sample below illustrates how to perform a POST request to a REST service, still using JSON
formatted message. Again the complete code is available in the attached samples: AdnAndroidMaterial
and AdnDroidView. The POST request contains a bit more information than GET as you need to fill up
the header of the request:
HttpClient httpclient = new DefaultHttpClient();
HttpPost httppost = new HttpPost(url);
httppost.setHeader("Accept", "application/json");
httppost.setHeader("Content-type", "application/json");
try
{
StringEntity strEntity =
new StringEntity(jsonParam, HTTP.UTF_8);
strEntity.setContentEncoding(
new BasicHeader(HTTP.CONTENT_TYPE, "application/json"));
httppost.setEntity(strEntity);
HttpResponse response = httpclient.execute(httppost);
HttpEntity entity = response.getEntity();
if (entity != null)
{
InputStream instream = entity.getContent();
String result = ConvertStreamToString(instream);
instream.close();
return result;
}
return null;
}
catch (Exception e)
{
return null;
}

CP3100 - Introduction to Android Mobile Development
15
3.3 JSON library on Android
JSON (JavaScript Object Notation) is a lightweight data-interchange format. It is easy for humans
to read and write. It is easy for machines to parse and generate. It is based on a subset of the JavaScript
Programming Language. This is a text format that is completely language independent but uses
conventions that are familiar to programmers of the C-family of languages. These properties make JSON
an ideal data-interchange language and it is currently considered as one of the best data format to
exchange information between server and mobile clients.
Jackson and Gson are two of the most complete Java JSON packages compatible with Android
regarding actual data binding support. They allow easy serializing and deserializing of JSON encoded
messages, enabling your application to convert a message to a custom Java class and vice-versa.
� http://jackson.codehaus.org
� https://sites.google.com/site/gson/Home
Here is an example of use of the Gson lib deserializing a json message into objects:
Gson parser = new Gson();
Type collectionType = new TypeToken<AdnMaterial[]>(){}.getType();
AdnMaterial[] materials = (AdnMaterial[])
parser.fromJson(JsonMsg , collectionType);
public class AdnMaterial
{
public String Name;
public String Price;
public String Manufacturer;
}
The following example is to serialize an object into a json string:
Gson parser = new Gson();
String jsonParameters = parser.toJson(material);

CP3100 - Introduction to Android Mobile Development
16
3.4 OpenGL on Android
Here are the various OpenGL packages available under Android:
� OpenGL ES 1.0/1.1
javax.microedition.khronos.opengles: Standard implementation of OpenGL ES 1.0/1.1
android.opengl: Better performance than javax.microedition.khronos
� OpenGL ES 2.0
android.opengl.GLES20: Interface to OpenGL ES 2.0 and available from Android 2.2
Choosing an OpenGL API Version
OpenGL ES API version 1.0 (and the 1.1 extensions) and version 2.0 both provide high
performance graphics interfaces for creating 3D games, visualizations and user interfaces. Graphics
programming for the OpenGL ES 1.0/1.1 API versus ES 2.0 differs significantly, and so developers
should carefully consider the following factors before starting development with either API:
Performance - In general, OpenGL ES 2.0 provides faster graphics performance than the ES
1.0/1.1 APIs. However, the performance difference can vary depending on the Android device your
OpenGL application is running on, due to differences in the implementation of the OpenGL graphics
pipeline.
Device Compatibility - Developers should consider the types of devices, Android versions and
the OpenGL ES versions available to their customers. For more information on OpenGL compatibility
across devices, see the OpenGL Versions and Device Compatibility section.
Coding Convenience - The OpenGL ES 1.0/1.1 API provides a fixed function pipeline and
convenience functions which are not available in the ES 2.0 API. Developers who are new to OpenGL
may find coding for OpenGL ES 1.0/1.1 faster and more convenient.
Graphics Control - The OpenGL ES 2.0 API provides a higher degree of control by providing a
fully programmable pipeline through the use of shaders. With more direct control of the graphics
processing pipeline, developers can create effects that would be very difficult to generate using the
1.0/1.1 API.
CP3100 - Introduction to Android Mobile Development
17
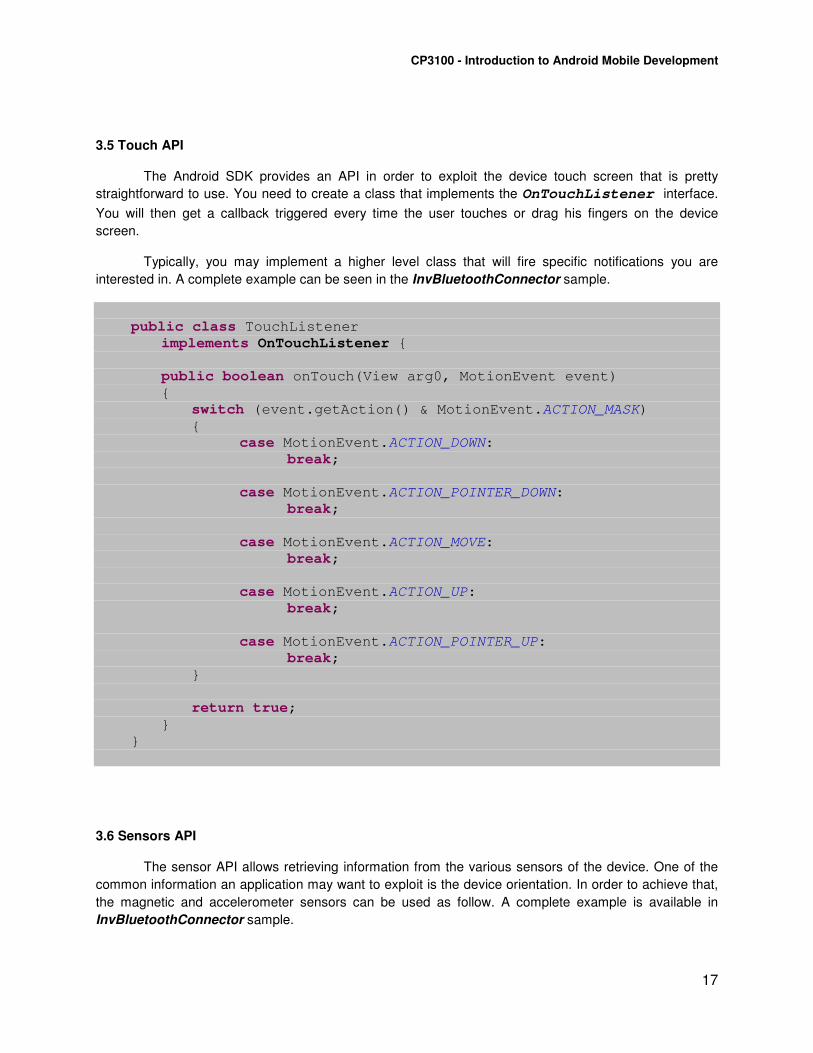
3.5 Touch API
The Android SDK provides an API in order to exploit the device touch screen that is pretty
straightforward to use. You need to create a class that implements the OnTouchListener interface.
You will then get a callback triggered every time the user touches or drag his fingers on the device
screen.
Typically, you may implement a higher level class that will fire specific notifications you are
interested in. A complete example can be seen in the InvBluetoothConnector sample.
public class TouchListener
implements OnTouchListener {
public boolean onTouch(View arg0, MotionEvent event)
{
switch (event.getAction() & MotionEvent.ACTION_MASK)
{
case MotionEvent.ACTION_DOWN:
break;
case MotionEvent.ACTION_POINTER_DOWN:
break;
case MotionEvent.ACTION_MOVE:
break;
case MotionEvent.ACTION_UP:
break;
case MotionEvent.ACTION_POINTER_UP:
break;
}
return true;
}
}
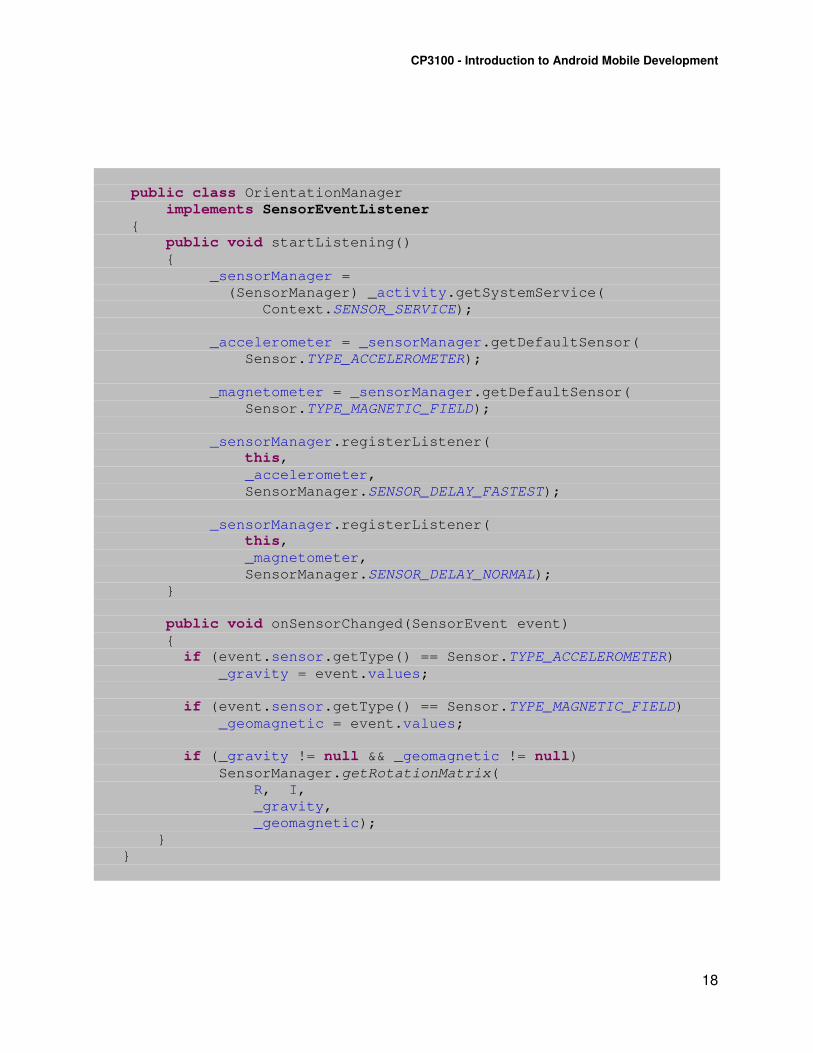
3.6 Sensors API
The sensor API allows retrieving information from the various sensors of the device. One of the
common information an application may want to exploit is the device orientation. In order to achieve that,
the magnetic and accelerometer sensors can be used as follow. A complete example is available in
InvBluetoothConnector sample.
CP3100 - Introduction to Android Mobile Development
18
public class OrientationManager
implements SensorEventListener
{
public void startListening()
{
_sensorManager =
(SensorManager) _activity.getSystemService(
Context.SENSOR_SERVICE);
_accelerometer = _sensorManager.getDefaultSensor(
Sensor.TYPE_ACCELEROMETER);
_magnetometer = _sensorManager.getDefaultSensor(
Sensor.TYPE_MAGNETIC_FIELD);
_sensorManager.registerListener(
this,
_accelerometer,
SensorManager.SENSOR_DELAY_FASTEST);
_sensorManager.registerListener(
this,
_magnetometer,
SensorManager.SENSOR_DELAY_NORMAL);
}
public void onSensorChanged(SensorEvent event)
{
if (event.sensor.getType() == Sensor.TYPE_ACCELEROMETER)
_gravity = event.values;
if (event.sensor.getType() == Sensor.TYPE_MAGNETIC_FIELD)
_geomagnetic = event.values;
if (_gravity != null && _geomagnetic != null)
SensorManager.getRotationMatrix(
R, I,
_gravity,
_geomagnetic);
}
}

CP3100 - Introduction to Android Mobile Development
19
3.7 Android NDK
� NDK (Native Development Kit) is a toolset that allows to implement parts of your app using
native-code languages such as C and C++
� Reuse existing libraries
� Potentially increases performances
� NDK will NOT benefit most apps
� Native code on Android generally does not result in a noticeable performance
� Increases your app complexity
� Do not use NDK because you simply prefer to program in C++
� Good candidates for the NDK
� Self-contained, CPU-intensive operations that don't allocate much memory
For more details about the Android NDK, please refer to the following documentation:
http://developer.android.com/tools/sdk/ndk/index.html

CP3100 - Introduction to Android Mobile Development
20
Resources for Android Programmers
� Android Developer Center
http://developer.android.com/index.html
� Android Cookbook
http://androidcookbook.com/home.seam
� ADN Cloud And Mobile DevBlog
http://adndevblog.typepad.com/cloud_and_mobile
� Forums
http://stackoverflow.com
http://www.codeproject.com/KB/android
Thank you!
The Author: Philippe Leefsma