crayon box - janome
TRANSCRIPT

Crayon Box
WHAT’S NEXTwww.janome.comPage 1
Janome Supplies Required:
• HMC8900QCP Special Edition
• ¼” Seam foot O
• Convertible free motion quilting foot QB-S
• Dual feed foot holder
• Dual feed foot AD
• Blue tip needle
• Pre-wound bobbin
• Empty bobbin
Fabrics/Notions Required:
• Michael Miller Cotton Couture fabric bundle • 2⁄3 yard of each Cotton Couture:
– Sailor
– Cobalt
– Luna
– Lagoon
– Avocado
– Gold
– Lava
– Lipstick
– Jewel
– Plum
• 3 yards Soft White
• 4 yards backing fabric
• ½ yard for binding (if not using scrappy binding method)
• 4 yards batting
• 1 spool 50 wt thread for piecing
• 1 spool of thread for quilting
• Marking pen/tailors chalk
• Rotary cutter/ruler/mat
• Safety Pins
• Iron
Cut List
(Tip: For cutting the 6.5” and 5” squares, save time by cutting a strip the width of the fabric by 6.5” or 5”, then cutting individual squares. You can also stack the strips to cut multiples at once, but be cautious that the fabric doesn’t shift while cutting.) Use ¼” seam allowance unless otherwise stated. Press seams open or toward darker fabrics.
• Cut the following pieces from the MM Cotton Couture colors:
– From each of the 10 colors cut (10) 6.5” x 6.5” squares
• Cut from the Soft White
– (160) 5” x 5” squares
• Backing fabric (Used Anna Maria Horner Loominous-Traffic in Denim
– (2) WOF x 72”
By Joanna Marsh for JanomeFinished quilt dimensions: 60” 60”Skill Level: Intermediate
Crayon Box
WHAT’S NEXTwww.janome.comPage 2
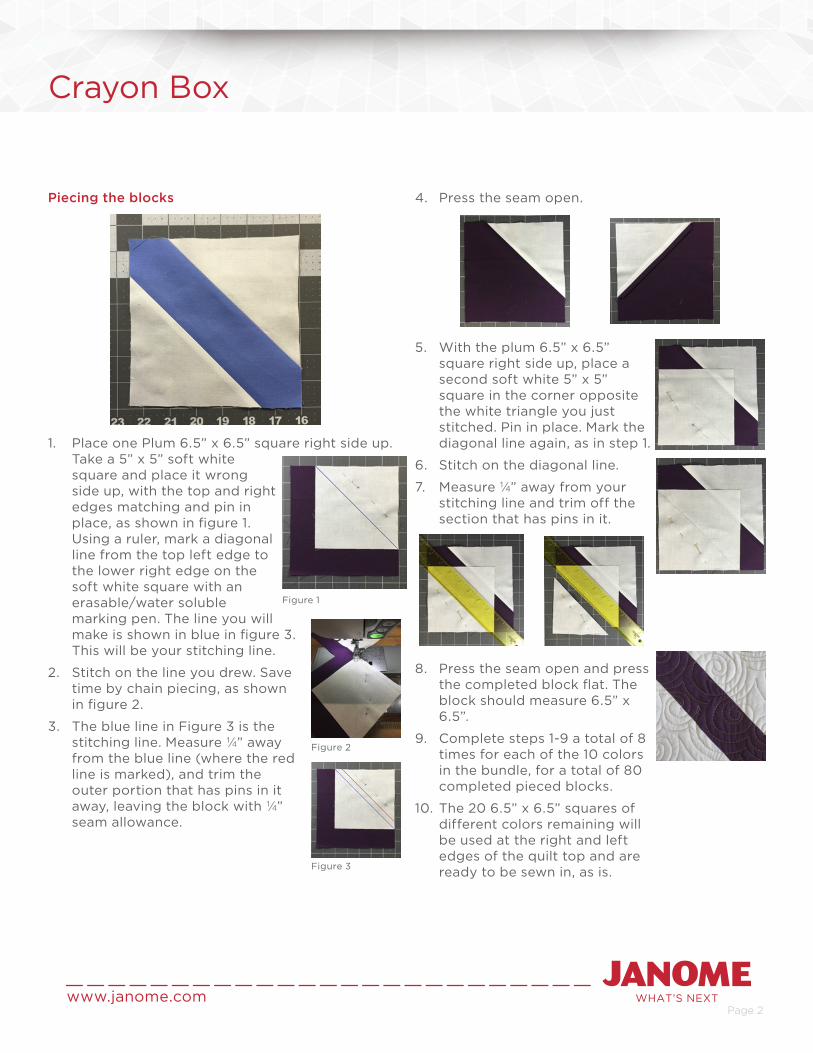
Piecing the blocks
1. Place one Plum 6.5” x 6.5” square right side up. Take a 5” x 5” soft white square and place it wrong side up, with the top and right edges matching and pin in place, as shown in figure 1. Using a ruler, mark a diagonal line from the top left edge to the lower right edge on the soft white square with an erasable/water soluble marking pen. The line you will make is shown in blue in figure 3. This will be your stitching line.
2. Stitch on the line you drew. Save time by chain piecing, as shown in figure 2.
3. The blue line in Figure 3 is the stitching line. Measure ¼” away from the blue line (where the red line is marked), and trim the outer portion that has pins in it away, leaving the block with ¼” seam allowance.
4. Press the seam open.
5. With the plum 6.5” x 6.5” square right side up, place a second soft white 5” x 5” square in the corner opposite the white triangle you just stitched. Pin in place. Mark the diagonal line again, as in step 1.
6. Stitch on the diagonal line.
7. Measure ¼” away from your stitching line and trim off the section that has pins in it.
8. Press the seam open and press the completed block flat. The block should measure 6.5” x 6.5”.
9. Complete steps 1-9 a total of 8 times for each of the 10 colors in the bundle, for a total of 80 completed pieced blocks.
10. The 20 6.5” x 6.5” squares of different colors remaining will be used at the right and left edges of the quilt top and are ready to be sewn in, as is.
Figure 1
Figure 2
Figure 3
Crayon Box
WHAT’S NEXTwww.janome.comPage 3
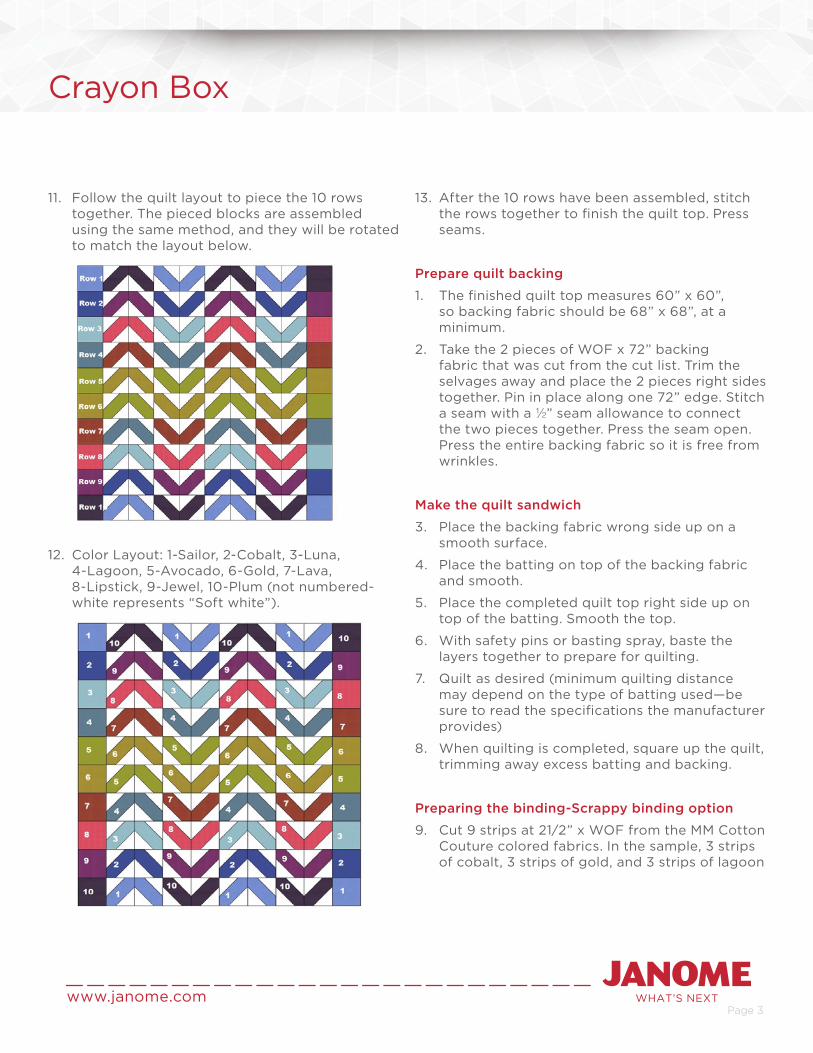
11. Follow the quilt layout to piece the 10 rows together. The pieced blocks are assembled using the same method, and they will be rotated to match the layout below.
12. Color Layout: 1-Sailor, 2-Cobalt, 3-Luna, 4-Lagoon, 5-Avocado, 6-Gold, 7-Lava, 8-Lipstick, 9-Jewel, 10-Plum (not numbered-white represents “Soft white”).
13. After the 10 rows have been assembled, stitch the rows together to finish the quilt top. Press seams.
Prepare quilt backing
1. The finished quilt top measures 60” x 60”, so backing fabric should be 68” x 68”, at a minimum.
2. Take the 2 pieces of WOF x 72” backing fabric that was cut from the cut list. Trim the selvages away and place the 2 pieces right sides together. Pin in place along one 72” edge. Stitch a seam with a ½” seam allowance to connect the two pieces together. Press the seam open. Press the entire backing fabric so it is free from wrinkles.
Make the quilt sandwich
3. Place the backing fabric wrong side up on a smooth surface.
4. Place the batting on top of the backing fabric and smooth.
5. Place the completed quilt top right side up on top of the batting. Smooth the top.
6. With safety pins or basting spray, baste the layers together to prepare for quilting.
7. Quilt as desired (minimum quilting distance may depend on the type of batting used—be sure to read the specifications the manufacturer provides)
8. When quilting is completed, square up the quilt, trimming away excess batting and backing.
Preparing the binding-Scrappy binding option
9. Cut 9 strips at 21⁄2” x WOF from the MM Cotton Couture colored fabrics. In the sample, 3 strips of cobalt, 3 strips of gold, and 3 strips of lagoon

Crayon Box
WHAT’S NEXTwww.janome.comPage 4
were cut to coordinate with the backing fabric. You can select more than 3 colors if you choose, but you will need a total of 9 strips cut at 21⁄2” x WOF.
10. Alternate the colors in the arrangement you choose and stagger the strips approximately 13⁄4” to avoid wasting fabric in a later step. Sew together with a ¼” seam allowance. Press each seam open to avoid excess bulk.
11. Press flat, and be certain all seams are pressed open.
12. Using a ruler with a 45 degree angle line, align the 45 with the top long edge of a strip. Align the diagonal edge of the ruler with the jagged short pieces of the strips to trim off all uneven pieces.
13. For the binding of the quilt, about 252” of binding is needed. Cut approximately 10 strips, each 21⁄2” wide, from your pieced binding fabric on the 45 degree angle.
14. Attach the strips by placing right sides together as shown below, with a ¼” seam allowance. Press the connecting seams open as well.
Crayon Box
WHAT’S NEXTwww.janome.comPage 5
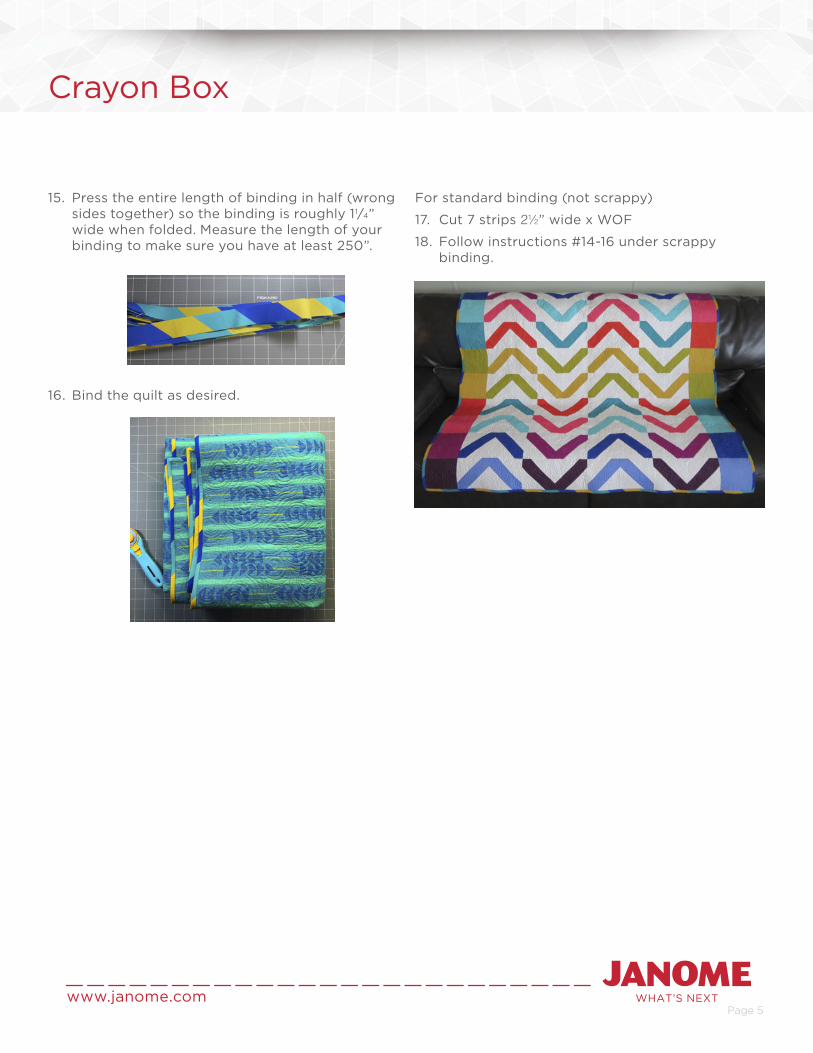
15. Press the entire length of binding in half (wrong sides together) so the binding is roughly 11⁄4” wide when folded. Measure the length of your binding to make sure you have at least 250”.
16. Bind the quilt as desired.
For standard binding (not scrappy)
17. Cut 7 strips 21⁄2” wide x WOF
18. Follow instructions #14-16 under scrappy binding.