creating a wildlife logorev 02/22/2016 - duquesne … notes... · web viewcircles now, change the...
TRANSCRIPT

Creating a Wildlife logo rev 02/22/2016
If you observe logos you will often see that they are round with text around their borders and symbols and shapes in the center. We saw examples in previous lectures.
Ours will have four ellipses: One for the overall outside logo (light green above), a second for text on a path at the top (The American…), a third for text on the bottom, (Pittsburgh …) and a fourth to hold clip art (symbols) and a fill color.
Getting Started Start a new document. The default values are fine. Name the document Wildlife. Open the Layers panel and re-name the single layer Background
Wildlife Page 1

Deselect the Background layer
If you don’t do this, when you do the next step, you’ll end up with a sub-layer rather than a new layer
Use the Create New Layer tool to create an empty layer named Logo Elements: Drag On top of Background
If necessary, move the Background layer below Logo Elements.
Compare your version to the one above
Lock Logo Elements: and select Background layer
Wildlife Page 2

Select the Background Layer (…the text-based ellipses will eventually go here)
Creating the Main Ellipse ShapeWe’re going to create a main ellipse and then copy and paste it on top of the original ellipse: That will give us two identical ellipses.
Select the Ellipse Tool (be sure you selected the Background Layer )
Width: 6.19” Height: 6.26” Fill: black Stroke: none
Wildlife Page 3

Click OK Move it so it’s completely on the artboard Select your ellipse then Edit>Copy and Edit>Paste in front The copy will be on top, as shown below. To verify this, hide/show
the top Layer:
Note we now have two ellipses (<Path>s ) inside the Background layer:
Wildlife Page 4

Name the top ellipse Outer Ellipse Name the other one Text Path
If you can’t tell which ellipse is which, click the blue dot in the Layers panel: The selected object will be obvious:
Move the Text Path layer above the Outer Ellipse: (mine was already)
Wildlife Page 5

Adding Type on a pathThe Text Path ellipse will be used as a path for some text to follow.
We will use Transform panel to make the Text Path ellipse a bit smaller than the original one, because it has to fit inside the outer ellipse
Using the Transform panel to resize objects Select the Text path sub-layer Click the blue dot to select the content in the Text Path sub-layer.
Wildlife Page 6

Open the Transform panel o Use 5.3” x 5.3” as the new width and height:
Press Tab key With that re-sized ellipse selected, choose Type on a Path tool.
Wildlife Page 7

Click near the middle anchor point on the left of the ellipse and it will look like the ellipse disappeared. Your document should look like this
Hide the Outer Ellipse sub layer to make it easier to work on the Text Path ellipse
Type “The American Society for Wildlife Advancement”
Changing the FontNow we need to change the font. To do so:
Select the text :Use the Selection tool (black arrow) and Triple click the text to select it
Open the Character panel: o Click Character in Control Area or Window>Type>Character
Because we will use the logo on a Web site, choose a sans serif font: Trebuchet MS, 24 points:
Wildlife Page 8

Select the path (ellipse) Use the handle (bracket) to center the text :
If you don’t see the handle, re-select the ellipse with the Selection tool
And
Wildlife Page 9

Click OK
Result:
Wildlife Page 10

Drag the smaller ellipse, the one with type on top of the main ellipse:
We want to center align the two ellipses
Select both ellipses Use the Align tools and center vertically and horizontally
Wildlife Page 11

It is good practice to periodically save your work. As we have done in other modules, we can save the document with a different name so we can revert back to a previous state.
So far: Two ellipses
Save as WildlifeV1.ai inside InClass/Illustrator
Adding another Text Path Ellipse
We’re going to add a third ellipse to add more Type on a Path .
This new text is to be at the bottom of the main ellipse (Pittsburgh Pennsylvania)
Add another ellipse: 5.3” x 5.3” as shown below
Wildlife Page 12

Fill color doesn’t matter. No stroke I named it Text Bottom:
It will contain “Pittsburgh Pennsylvania”
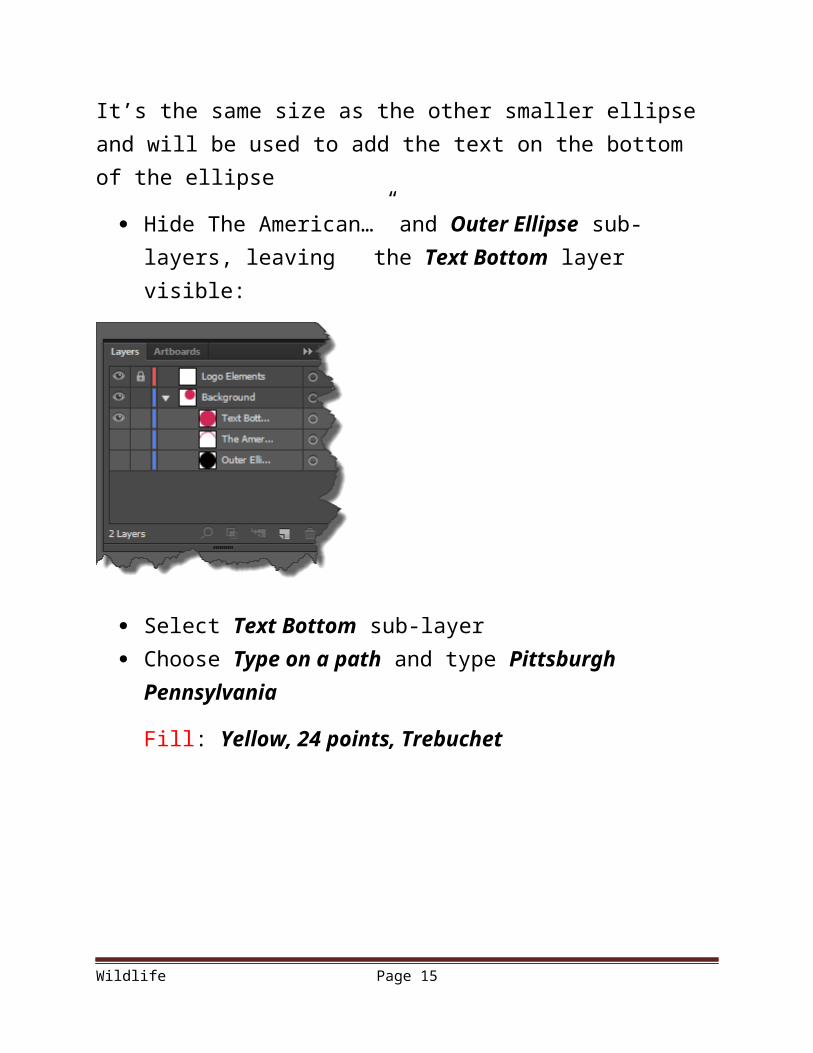
It’s the same size as the other smaller ellipse and will be used to add the text on the bottom of the ellipse
Hide The American…” and Outer Ellipse sub-layers, leaving the Text Bottom layer visible:
Wildlife Page 13

Select Text Bottom sub-layer Choose Type on a path and type Pittsburgh Pennsylvania
Fill: Yellow, 24 points, Trebuchet
But, we want the text to be at the bottom of the main ellipse, not the top
Wildlife Page 14
Try pulling down on the handle (bracket) on the right…the text is at the bottom; however, may be upside down.
IF THE TEXT IS UPSIE DOWN, click the handle and push it towards the inside of the ellipse called reflecting), Zoom in to get close up view
No matter how small the bracket gets, always select it to move the text
Show all the sub-layers Drag the new ellipse on top of the others
Wildlife Page 15

Now, select all and use Align panel or the Control area to center vertically and horizontally:
Save as WildlifeV2.ai
Adding the logo elements Be sure to Unlock the Logo Elements layer and lock the
Background layer:
The Logo Elements layer is where we add another ellipse plus some symbols
We need a fourth ellipse; this one we will fill feather, fill with a blue color and add symbols such as: rocks, trees, clouds and so on
Wildlife Page 16

Create a new ellipse: 5.0” by 5.0” Make it a light blue …the CMYK values are below
I used:
C: 52% M:0% Y:11 % K:0%
Wildlife Page 17

Softening Edges of a Shape
To soften the edges of the new ellipse:
Choose Effects>Stylize>Feather Make it be 1” Check the Preview box
Position it inside the other ellipses As usual, use the Align panel to center everything (You will probably
need to unlock the Background Layer
Wildlife Page 18

You might lock the blue ellipse <Path> and Background so you don’t move them accidentally,
Unlock logo elements, if necessary, because that’s where we’ll add the symbols
Wildlife Page 19

Adding Symbols Let’s add some nature-related symbols. Select the logo elements layer
Selecting a Library…you should recall how to do this Open the Symbol panel Click the panel menu Choose Open Symbol Library
o Nature:
(Or: window>Symbol Libraries)
Wildlife Page 20

If you drag the mouse over a symbol, the tool tip provides a brief description of that symbol.
Drag a tree or two: and some rocks, grass
Practice: Scale, change stacking order to move objects around. My current layer stack:
Wildlife Page 21

Save as WildlifeV3 Add a few more symbols, make sure clouds are on top of stacking
order:
Wildlife Page 22

Changing the Stacking OrderNotice anything unusual? It would make more sense if the clouds were behind everything. To do so, drag the cloud elements down in the list you see. That way, clouds will be below the other objects
Save as wildlifev4.ai
Using Related ColorsIn a previous module, we discussed Kuler harmonious colors. Let’s use the concept of using related colors and modify our logo to use nature-related colors.
Instead of Kuler, we’ll use some Illustrator harmonious colors. First, we need to open the Swatch panel.
There are many ways to show colors of a particular genre. Here is one such method.
Find/show the Nature>Landscape color swatches (You should be able to this on your own, by now):
Wildlife Page 23

This displays the color swatches shown next
Lock the Logo Elements layer, and unlock the Background layer because that is what contains the original objects we will re-color :the ellipses and text on a path.
Wildlife Page 24

We will first change the fill color of the large originally black, ellipse.
Select the Outer Ellipse
Make sure the Fill tool is selected, not the Stroke
Click the small circle
Click in the Landscape panel on the color you want. I chose a dark green; I selected the last one in the second row
Wildlife Page 25

Select the inner ellipse, the one that’s feathered-blue and named <path> …
Make sure it’s at the top of the Background layer
Mine was in Logo Elements, so had to drag to the Background Layer
Click the blue ellipse to select it Select the Fill tool: Choose a lighter green: Choose the color that is third from the
right
Wildlife Page 26

Result:
NOTE: LAYERS DON’T SELECT OBJECTS; THEY SELECT LAYERS SO THEY CAN BE MOVED. TO SELECT ART, CLICK THE TINY CIRCLES
Now, change the text colors. Let’s make both text items be the same green color. We want a contrasting color so the text stands out from the background.
Select both text layers: Shift-Click on the blue circleso Select the sub layer for “The American…” And shift-click on
the Pittsburgh…layer
Wildlife Page 27

See that they are both selected (Click the small circles to actually select the text):
Click on Fill tool
Change the color to a light green (2nd from the left):
Wildlife Page 28

Result:
Let’s add a black stroke to the main ellipse border
Select the outer ellipse (Click its small circle again)
Select the stroke Make it black, 8 points:
Wildlife Page 29

Decide to change mind: Change stroke color to be a Landscape light green: Choose 4th from right
Wildlife Page 30

Save the logo as WildLifeFinal.ai
Grouping and Resizing Drag over everything
o Or use Select>All or Ctrl-A Object>Group Show bounding box Hold down Shift key, which maintains the aspect ratio, and drag
the bounding box to resize: (or transform, or scale tools)
My elements didn’t get selected: Check to see if Logo Elements is locked; If so, unlock
OOPs…maybe the strokes didn’t resize... mine did
Scaling a StrokeYou can force the stroke to scale if you open the menu options menu on the Transform panel, and check Scale Strokes & Effects, as shown next
Wildlife Page 31

If you didn’t scale the stroke, then manually, reset stroke to 2 points
Save as WildlifeFinal.ai
Saving for the WebNow, we want to save the logo for a Web site. We don’t want entire page, just the object. Recall, If you Save for Web, the entire page will be selected.
We need to crop the artboard...have shown before… skip
Crop Choose the Artboard tool
Resize the artboard
Wildlife Page 32

Choose File>Save for Web Choose gif or png-8, and make white the transparent color
One final reminder: When saved for Web, the vector object becomes a bitmap, which you shouldn’t modify thereafter
Questions?
Wildlife Page 33

Wildlife Page 34