creating accessible slide presentations - san jose state ... · pdf filewith descriptive...
TRANSCRIPT

Creating Accessible PowerPoint
Presentations and Basics
Elizabeth Tu
Instructional Designer and Instructor
Center for Faculty Development and Support
at http://www.sjsu.edu/cfd/

Agenda
PowerPoint Basics Demo and Practices
What is an accessible PowerPoint presentation?
Why is it important?
How to create accessible slide presentation The S.L.I.C. elements
Basic Printing and Saving
Listening to a slide presentation
Review and Video
2 Center for Faculty Development and Support

PowerPoint Basics
Navigating a PowerPoint window The Tabs
The Ribbon – Hide vs. show
The Normal slide, slide/outline pane, slide number, the View buttons, Zoom slider and refit button

PowerPoint Basics (cont.)
The “More” buttons
The down arrow
The arrow button on the lower right corner
A line with a down arrow (under Design tab) to
display the entire gallery by hovering over each option
The quick access toolbar (QAT)
to add, remove, or right-click any button or command
Keyboard shortcuts – the ALT key

PowerPoint Basics (cont.)
Practices
1. File tab: New, template (slide title)
2. Checking accessibility: Outline pane (title, text + layout next)
3. Home tab: New slide; Reuse slide= ALT+hir, keep source formatting; Clipboard; Font formatting; Paragraph groups, etc.
4. Insert tab: insert logo; Links; slide #, etc. + On-demand tab + Right-click
5. Checking accessible images: alt text
6. Design tab: choose a theme
Center for Faculty Development and Support 6

PowerPoint Basics (cont.)
Practices (cont.)
7.Acc: Links – mini toolbar
8.Acc: Chart, Excel source data, Chart Tools tab
Design, Layout & Format tabs
9.View tab (slide 39)
10. Basic Printing & Saving(slides 40 - 42)
11. Listening to your slides (slides 43 - 44)
Center for Faculty Development and Support 7

What is an Accessible Slide
Presentation?
Individuals bring in different skills, needs and interests to learning.
"Diversity" in our student population is more than cultural; it includes a wide range of physical, visual [sensory], hearing, learning [cognitive], attention, and communication abilities.2
An accessible slide presentation is a digital one that can be read by screen reader software for users with disabilities.
10 Center for Faculty Development and Support
Why is it important? (cont.)
US Census, 2006, American Community Survey:
15% of the population five years old and over report having one or more disabilities; this equates to about 50 million people.
13.9% of 18-34 year olds enrolled in college report the presence of a disability, with hidden disabilities being the largest population.
Center for Faculty Development and Support 11

Why is it important? (cont.)
SJSU DRC student registration data from 2004
to 2011
Center for Faculty Development and Support 12
Semester Total Total + Open U SJSU Enrollment
Spring 2004 553 (2%) 783 (3%) 28,800
Fall 2005 890 (3%) 913 (3%) 29,975
Fall 2006 933 (3%) 1021 (3%) 29,604
Fall 2007 1073 (3%) 1136 (4%) 31,906
Fall 2008 1124 (3%) 1221 (4%) 32,746
Fall 2009 1127 (3.6%) 1257 (4%) 31,280
Fall 2010 1058 (3.6%) 1114 (3.8%) 29,076
Fall 2011 1127 (3.7%) 1170 (3.9%) 30,236
Spring 2012 1102 (3.9%) 1176 (4.2%) 28,002

Why is it important?
DRC Fall 2011 student registration data
Communication: 5 (.44%)
Visually impaired: 18 (1.6%)
Deaf/HOH: 28 (2.48%)
Mobility impaired: 85 (7.54%)
Functional : 557 (49.4%)
Learning : 434 (38.5%)
Total = 1127
Center for Faculty Development and Support 13
Functional
49.4%
Learning
38.5%
Mobility
8.98%
Deaf/HoH
2.48% Blind
1.6%
Fall 2011

What is an Accessible Slide
Presentation?
The SLIC Elements
Structure - via Outline pane and Slide Layouts
Links – with meaningful website name,
hyperlink, and url
Images, graphics, or any non-text information –
with descriptive alternative text or caption
Chart or table: created within PowerPoint or
include source file
14 Center for Faculty Development and Support

INSTRUCTIONS ON CREATING
ACCESSIBLE SLIDE PRESENTATIONS
15 Center for Faculty Development and
Support

Structure
Why is it important to have a structure for my slide
presentation?
A: Screen reader software can provide a listing of heading
styles for users with disabilities to navigate quickly to any
parts of the document. See a sample of the Heading list
generated by JAWS below.
16 Center for Faculty Development and Support
Structure (continued)
There are two ways to ensure your slide presentations have
structure in Microsoft PowerPoint for windows:
A. Using the Slide Layouts
B. Viewing the Outline pane
See instructions starting on the next slide
17 Center for Faculty Development and Support

Structure (continued)
A. Slide Layouts in Microsoft
PowerPoint 1. On Home tab, in Slides group, click
the down arrow in the lower right
corner of the New Slide icon.
2. Select title slide or any appropriate
layout to start building your
slide presentation.
NOTE: Slide layouts help define the sequence of titles,
subtitles, content texts, and objects in the entire
slide presentation.
18 Center for Faculty Development and Support

Structure (continued)
B. Outline Pane in Microsoft
PowerPoint
1. Click Outline tab in the Slide and
Outline area. Only text displayed on
the outline pane will be read by
screen reader software.
NOTE: Make sure each slide has a slide
title. The slide title serves as the
structure in navigating and
understanding the logical flow of the
slide presentation.
19 Center for Faculty Development and Support

Links
If there are any web links in your slides, make
sure to include the following information
A meaningful name for the website
The URL web address
Hyperlink the name of the website
20 Center for Faculty Development and Support

Links (continued)
Instructions on how to create hyperlinks for your
documents in Microsoft PowerPoint:
1. Highlight the text
you want to
hyperlink.
2. Right click the
highlighted text and
select Hyperlink in
the pop-up box.
21 Center for Faculty Development and Support

Links (continued)
3. In the Insert Hyperlink window, enter the URL in the
Address box at the bottom.
4. Click OK.
22 Center for Faculty Development and Support

Links (continued)
Sample of a hyperlinked website name with URL
displayed
Note: The more relevant links included in your document and the
more links pointing to your website, the more traffic you will have
for your page.
23 Center for Faculty Development and Support

Links (continued)
Why do I need to hyperlink the name of the website?
A: Screen reader software such as, JAWS, can provide a
list of hyperlinks for users with disabilities. It is more
meaningful to read the name of the website than the
long URL or “click here.” See a sample of the Links
list generated by JAWS below.
24 Center for Faculty Development and Support

Images
If there are images, graphics, or any non-text
information in your presentation, make sure
to include descriptive alternative texts or
captions.
1. Right-click on the image
and select Size and Position
toward the bottom.
25 Center for Faculty Development and Support
Images (continued)
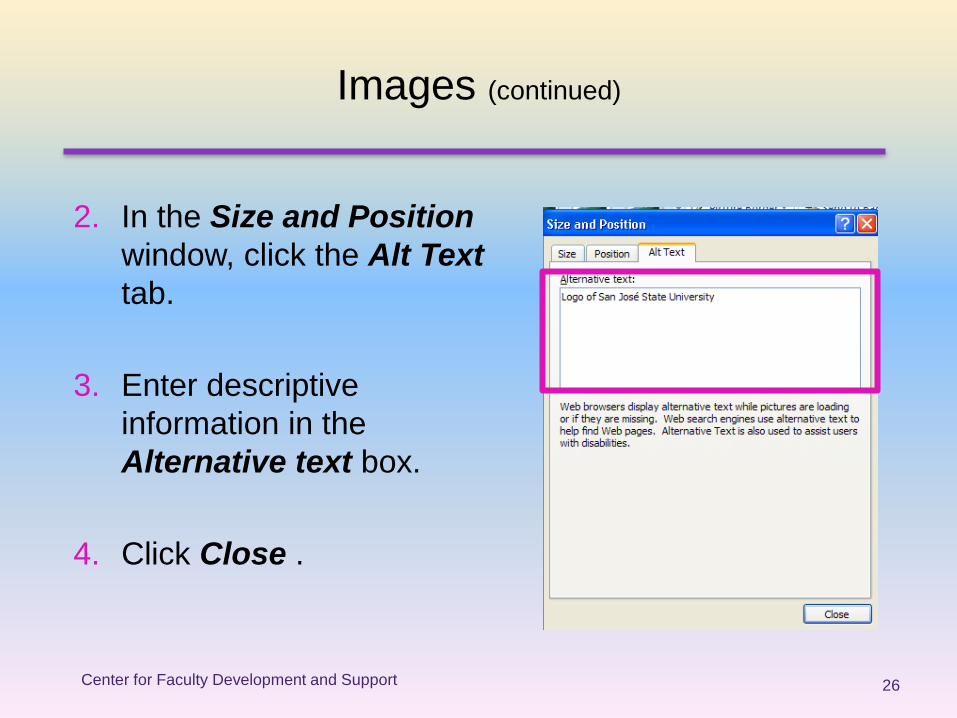
2. In the Size and Position
window, click the Alt Text
tab.
3. Enter descriptive
information in the
Alternative text box.
4. Click Close .
26 Center for Faculty Development and Support

Images (continued)
Q: Sometimes I may use several images to illustrate
the same key point on one slide. Do I have to
add alternative texts for each one of the images?
A: No, since you are trying to convey the same
content or message with several images, you
can group all images into one big image then
add alt text or caption for this one grouped
image.
27 Center for Faculty Development and Support

Images (continued)
5. Hold down Shift key and
click on each images
6. Right click the grouped
image and select Group
under Group in the pop-up
box.
7. Repeat steps 1 and 2 to
add alternative text for this
grouped image.
28 Center for Faculty Development and Support

Charts or Tables
Q: What do I need to do if I include Charts or
Tables in my slide presentation?
A:
a) For simple tables or charts, create them within
the built-in PowerPoint slide layout. They can
be read more easily by a text reader than those
imported from Word or Excel.
b) You can also import the data from Word or
Excel and attach the source document.
29 Center for Faculty Development and Support

Charts or Tables (continued)
For simple tables or charts, click on either the table
or chart icon on your slide layout to build your
slide content.
30 Center for Faculty Development and Support

Charts or Tables (continued)
Center for Faculty Development and Support 31
To import the tabular data from Word,
– Click on the table icon, decide the
appropriate columns and rows, copy your
table from the source document and
paste it into the slide
presentation.

Charts (continued)
To import the chart from source document into
the slide presentation,
1. Click on the Chart icon on the slide
layout.
2. From the Insert Chart
window, select your
desirable chart type.
32 Center for Faculty Development and Support

Charts (continued)
3. Double click on your selected chart. A new
Excel spreadsheet will open with a sample
staging data and a sample staging chart on
the PowerPoint slide side by side.
33 Center for Faculty Development and Support

Charts (continued)
4. Copy the source data from your original Excel
spreadsheet and paste them onto the new Excel
spreadsheet. Follow instructions to resize chart data
range if necessary to reflect your source data correctly.
NOTE: Screen reader software cannot read the context
information for tables or charts. Use Notes pane to
explain the information in the chart and table.
Reference and attach this notes page as a separate
document to the slide presentation.
Center for Faculty Development and Support 34

Charts (continued)
If you use Notes pane to explain your charts, tables
complex images, or audio files, here is how to save
your notes page as a separate document.
5. Select Publish from Office button drop down menu.
6. Select Create Handouts
in Microsoft Office Word
in the pop-up box.
Center for Faculty Development and Support 35

Charts (continued)
7. In the Send to Microsoft Office Word window select
your desirable page layout in Microsoft Office Word by
clicking the appropriate radio button such as Notes
next to slides.
8. Click OK to save your Notes
as a separate Word file.
Attach this separate Notes
document to your
slide presentation.
Center for Faculty Development and Support 36

PowerPoint Basics (cont.)
Back to more basic features
On-demand tabs
View tab
Print a document (Office button)
Save & Package for CD
Center for Faculty Development and Support 37

Printing
There are several options to print your slides.
Select Print under Office button
In the Print window, next to the
Print What drop down box,
click the down arrow to select
your desirable options such as,
Slides, Handouts,
Notes pages,
or Outline View.
Click OK.
Center for Faculty Development and Support 38

Printing (continued)
More options are available
if you select Handouts.
Click the drop down arrow
to select 1, 2, 3, 4, 6, or 9
in the Slides per page. A
preview of your selected 3
slides per page is shown at
the right.
Center for Faculty Development and Support 39

Listening to Your Slides
You can listen to the slides to
test whether your
presentation is readable.
1. Under Office Button, select
Save As and Adobe PDF.
Center for Faculty Development and Support 40

Listening to Your Slides (continued)
2. In the Save As window, enter a file name.
3. In the Save as type drop down box, ensure PDF
files is selected and click Save.
Center for Faculty Development and Support 41

Listening to Your Slides (continued)
4. Go to the PDF version of
your slides.
5. Under the View menu,
select Read Out Loud to
activate it.
6. Go back to View menu and
select Read this page only
or Read to End of
Document . Your
slides will be read
to you.
Center for Faculty Development and Support 42

A Quick Recap
Name 3 basic features you have learned
today.
What does S.L.I.C. stand for?
How do you know whether your slide
presentation is accessible?
Center for Faculty Development and Support 43