creating and managing shortcuts icons screentips the ... mouse pointer over an icon usually displays...
TRANSCRIPT
This workshop covers the following topics:
• Identifying elements of the Windows desktop • Creating and managing shortcuts • Using the taskbar • File management • Computer Maintenance
Windows Desktop Elements Icons ScreenTips The Mouse Taskbar System tray Quick launch Other properties Custom toolbars Start Menu Moving between windows Display Properties File and Folder Management Files and Folders File names & extensions Computer Exploration Folders view Task view Folder & File path View option File searching Software & Device basics Printer installation Storage Devices Computer Maintenance Hard Disk Cleanup Disk Defragmenter Windows Update Helping yourself
Lara Niles | [email protected] | http://www.austincc.edu/hr/profdev/eworkshops/docs/pcbasics_handout.pdf
1
Windows 2000 and XP are operating systems used to perform computer functions. When you start the computer, you see the Desktop (main screen). You can have as much or as little on your desktop as you like. However, the more you have, the longer it takes for your computer to boot (start up).
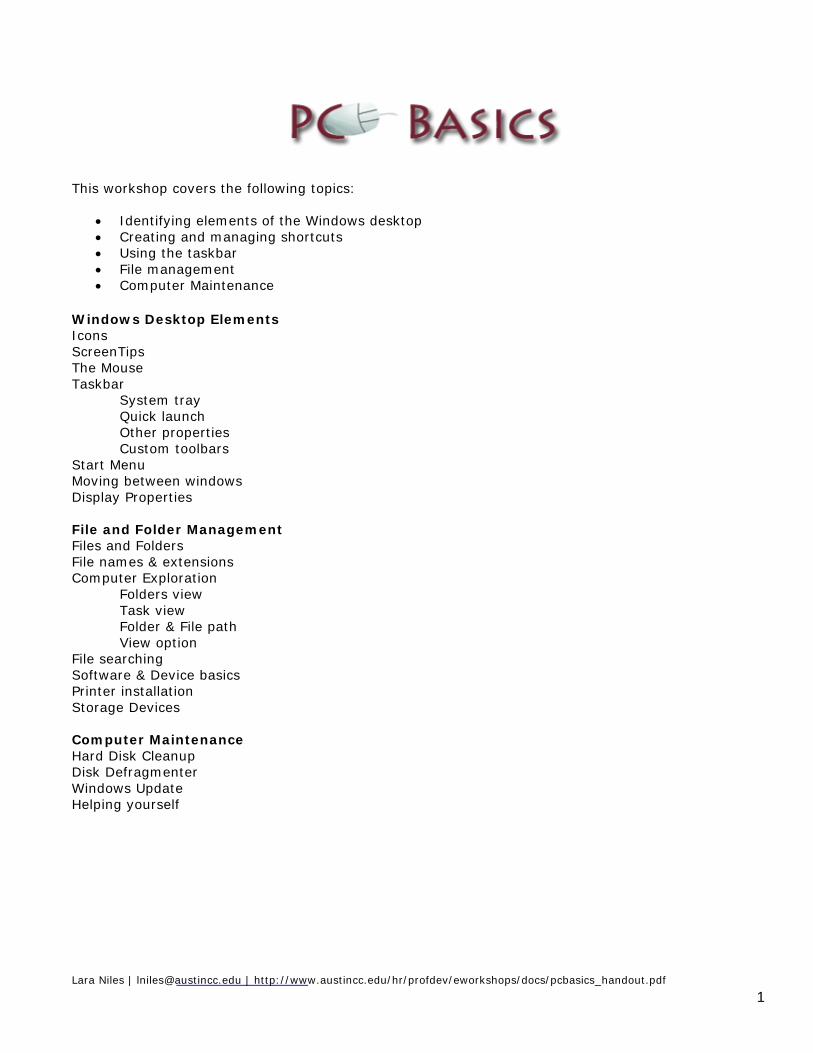
Working with Windows Desktop Graphical User Interface - Each type of file is represented by a picture and description, and each command is represented by a button. Programs are arranged on a series of menus to make them easy to locate.
Windows XP Desktop
Desktop and Taskbar - The most basic element of the Windows user interface is a background screen called the desktop. All programs are opened over this background screen. The taskbar at the bottom of the screen is used by Windows to give you information regarding tasks on your computer and provides a way of easily opening and closing programs. Icons - Icons are graphics that identify programs and can be double-clicked to start the associated program. How many icons are on your computer? Go to Start > Find > Files or Folders and type *.ico into the Named box and Look in: (C:).
Screen Tip
ScreenTips - Below the icon is the name of the element it represents. If the name is too long, it is truncated by an ellipsis (...) when it is not selected, and displayed in full when you click it. Positioning the mouse pointer over an icon usually displays a box, called a ScreenTip, with information about the program.
2
The Mouse Clicking buttons on the mouse issues various commands. The command varies according to where the pointer is on the screen and how the clicks are done.
Click – To click, use the left-most button. Don’t move the mouse as you click, that will select text instead. Clicking can do numerous things. It is used to place a cursor in an appropriate place in a box or text document so that typing will go in the right place. It can be used to activate a toolbar button or drop-down menu. It can be used to follow an Internet link, resize a window or many other things. Double-Click – This command is executed using the same button as a click, but in this case, you click twice quickly. Usually, you double-click to open a program or a file and single-click the rest of the time, but there are exceptions. Right-Click – Clicking the right button will often bring up a short menu on your screen from which you can select (by moving your mouse pointer over a choice and left-clicking). If you don’t want to select from the resulting menu, click somewhere on the screen away from it. Drag and Drop – If you click and hold down instead of letting up, your pointer turns into something like a magnet, grabbing the objects your arrow is over and dragging them to wherever the mouse moves.
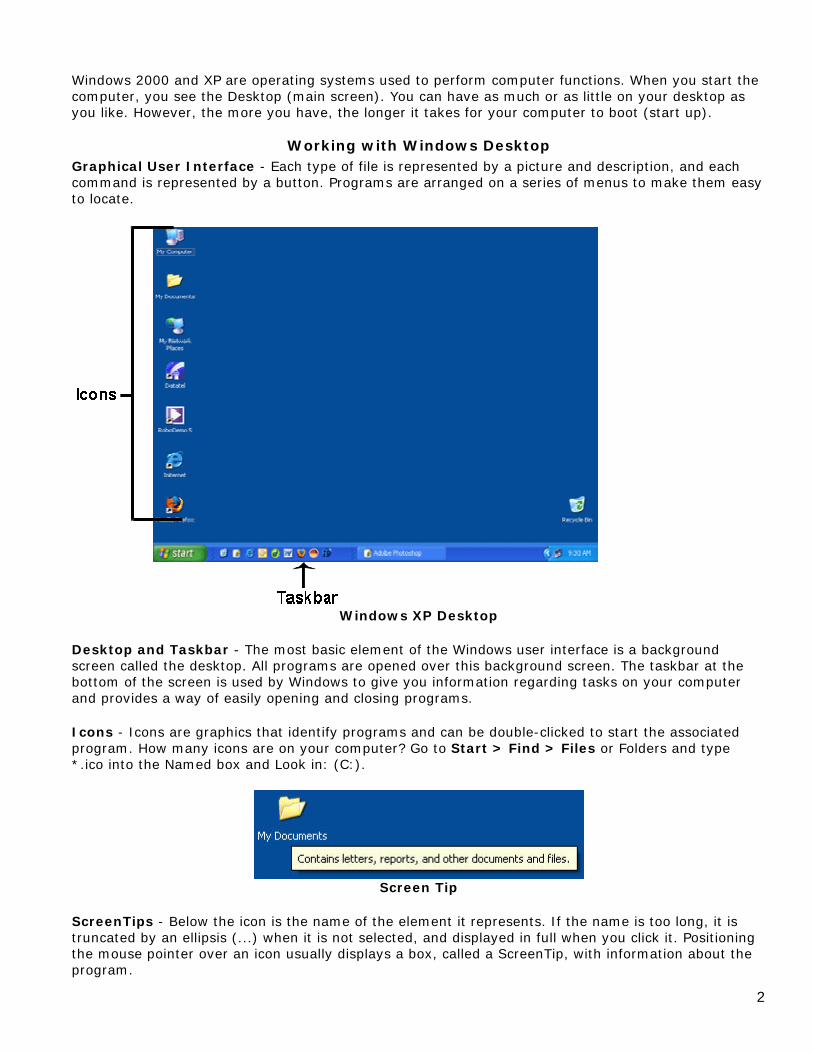
Recycle Bin Icons
Using the Recycle Bin - This is where Windows temporarily stores files you have deleted and where you can manage deleted files. You can recover deleted files from the Recycle Bin, or you can empty the Recycle Bin and permanently delete the files to free up space on your hard drive
Shortcut
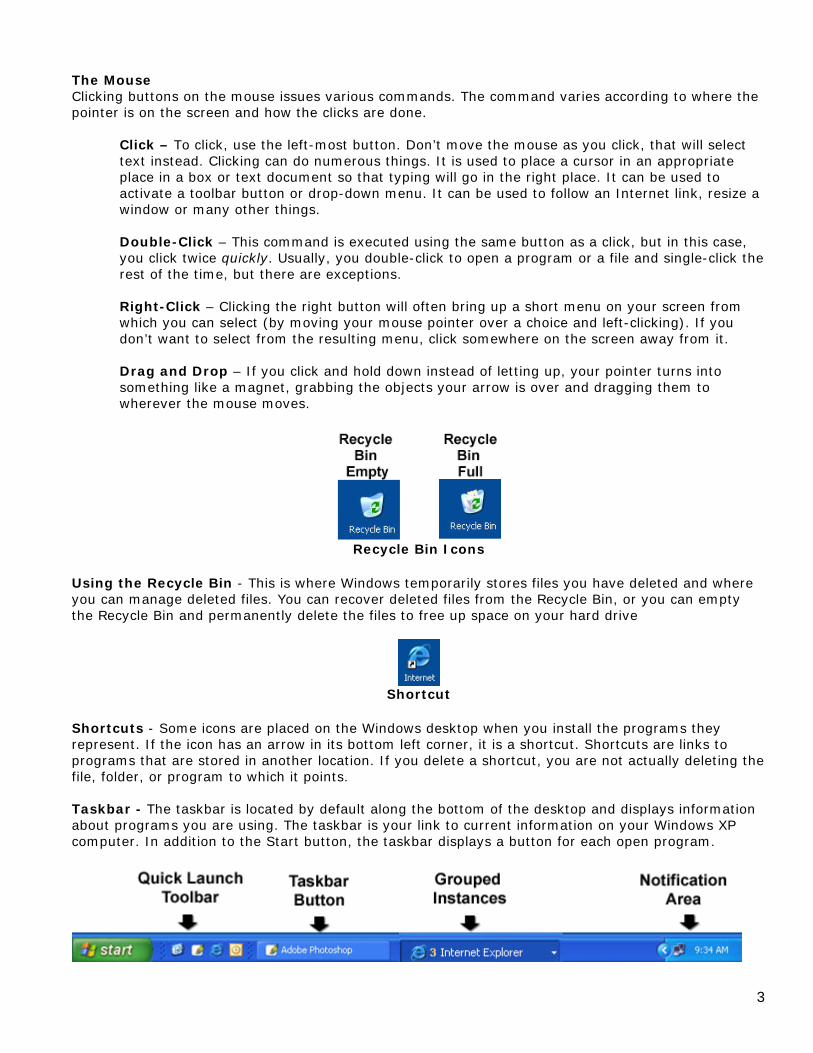
Shortcuts - Some icons are placed on the Windows desktop when you install the programs they represent. If the icon has an arrow in its bottom left corner, it is a shortcut. Shortcuts are links to programs that are stored in another location. If you delete a shortcut, you are not actually deleting the file, folder, or program to which it points. Taskbar - The taskbar is located by default along the bottom of the desktop and displays information about programs you are using. The taskbar is your link to current information on your Windows XP computer. In addition to the Start button, the taskbar displays a button for each open program.
3
Taskbar Buttons - You click a taskbar button to activate the window of the program it represents. The taskbar buttons are resized depending on the number of programs that are currently open, and they disappear when you close the programs they represent.
• Taskbar Location - By default, the taskbar displays one row of buttons and is docked at the bottom of the desktop, but you can control its size and position.
• Notification Area (System Tray) - The notification area is located at the right end of the
horizontal taskbar or at the bottom of the vertical taskbar. By default, the notification area displays the current time. You can expand the area, to show more icons, by clicking the arrow
.
• Quick Launch Toolbar - The taskbar can also display its own set of toolbars. The most frequently used of these is the Quick Launch toolbar, which displays single-click links to programs and commands.
o Toolbar Links - Windows XP installs links to Microsoft Internet Explorer , Microsoft
Windows Media Player , and the Show Desktop command on the Quick Launch toolbar. You can add more program shortcuts to the Quick Launch toolbar at any time by dragging a program or shortcut icon onto it.
• Grouped Instances - If you start the same program more than once so that several instances
of the program are open at the same time -- for example, two Microsoft Word documents -- similar windows are grouped onto one button that is labeled with the name of the program.
• Other Properties - When the taskbar is docked on the left or right, you can adjust its width
from nothing (only the border is visible) to up to half the width of your screen. You can also stipulate that the taskbar should be hidden when you are not using it, or that it should always stay on top of other windows so that it is not accidentally hidden.
• Taskbar Lock - You can lock the taskbar to prevent it from being changed; however, you
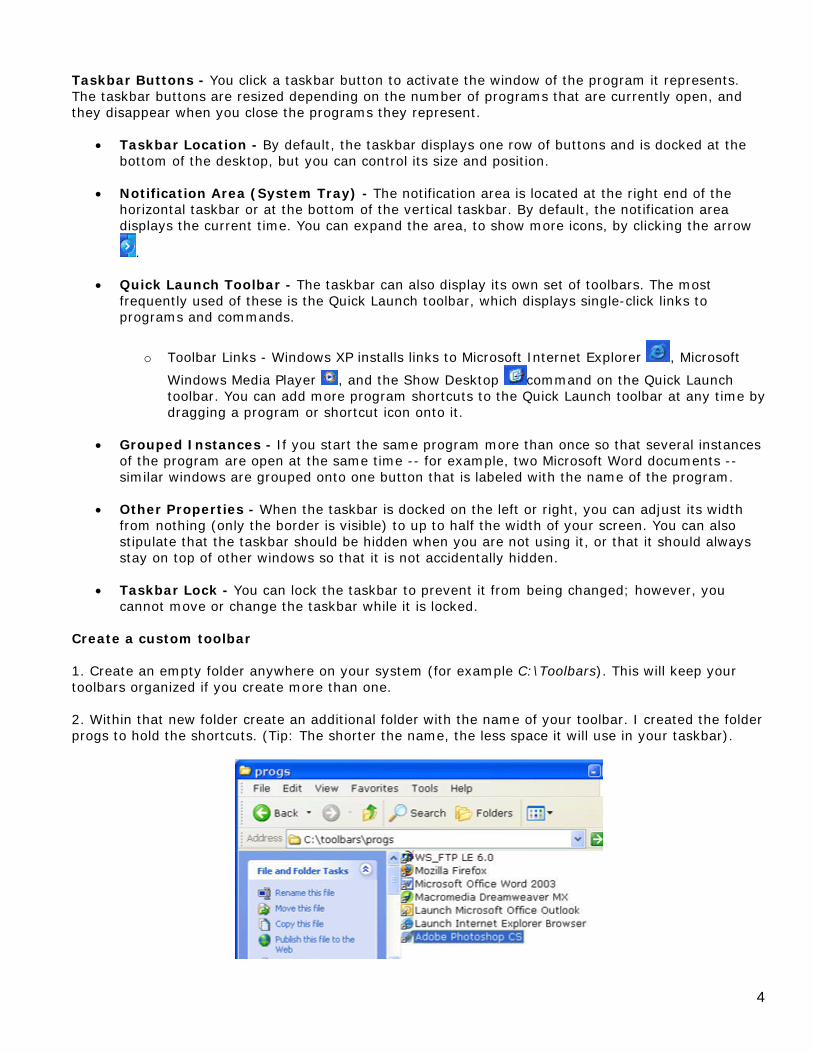
cannot move or change the taskbar while it is locked. Create a custom toolbar 1. Create an empty folder anywhere on your system (for example C:\Toolbars). This will keep your toolbars organized if you create more than one. 2. Within that new folder create an additional folder with the name of your toolbar. I created the folder progs to hold the shortcuts. (Tip: The shorter the name, the less space it will use in your taskbar).
4

3. Now create the shortcuts for your new toolbar in that folder by dragging them in there or right click and select New Shortcut 4. Now right-click the toolbar and select Toolbars > New.
5. In the New Toolbar dialog box, navigate to the folder you just created. Select it and click OK.
6. There is your new toolbar, click on it and it will pop up all the shortcuts you created. It will initially expand, but you can size it by dragging. Once it's resized, it will remain like that. You can create multiple toolbars and turn them on or off as you need them (right click and select Toolbars, then check the ones you want to show. Tip - There are almost always two and often three or more ways to do the same thing in Windows.
5
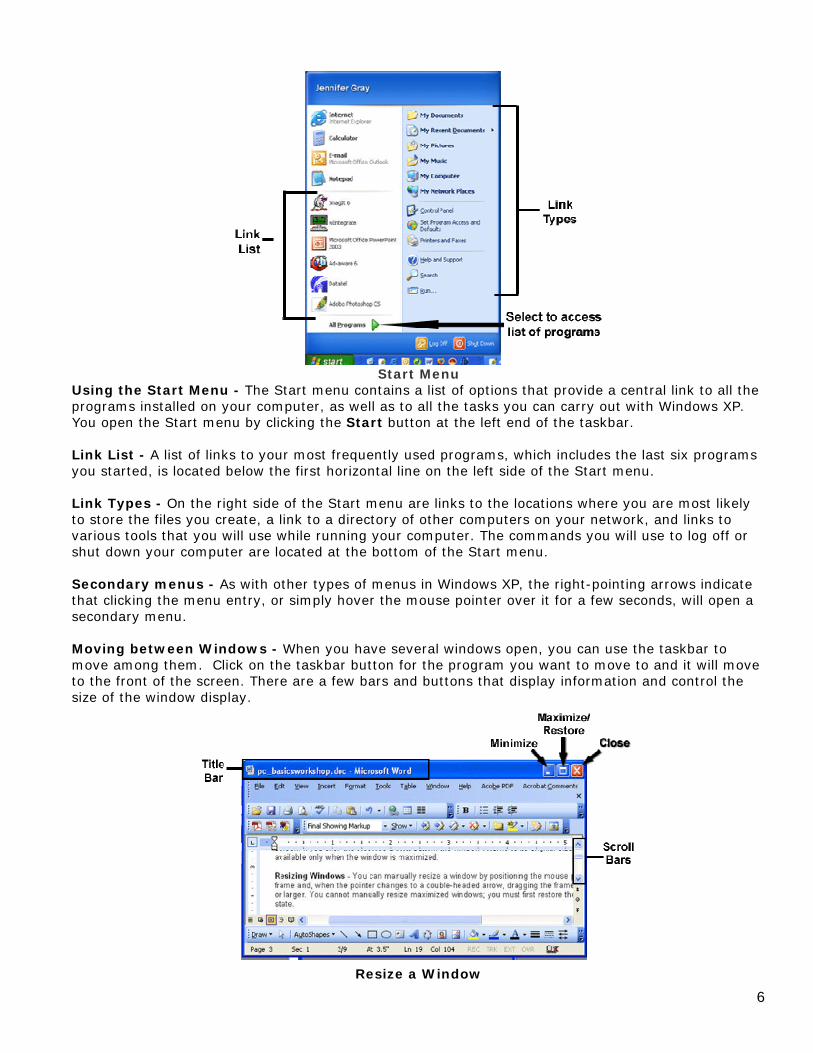
Start Menu
Using the Start Menu - The Start menu contains a list of options that provide a central link to all the programs installed on your computer, as well as to all the tasks you can carry out with Windows XP. You open the Start menu by clicking the Start button at the left end of the taskbar. Link List - A list of links to your most frequently used programs, which includes the last six programs you started, is located below the first horizontal line on the left side of the Start menu. Link Types - On the right side of the Start menu are links to the locations where you are most likely to store the files you create, a link to a directory of other computers on your network, and links to various tools that you will use while running your computer. The commands you will use to log off or shut down your computer are located at the bottom of the Start menu. Secondary menus - As with other types of menus in Windows XP, the right-pointing arrows indicate that clicking the menu entry, or simply hover the mouse pointer over it for a few seconds, will open a secondary menu. Moving between Windows - When you have several windows open, you can use the taskbar to move among them. Click on the taskbar button for the program you want to move to and it will move to the front of the screen. There are a few bars and buttons that display information and control the size of the window display.
Resize a Window
6
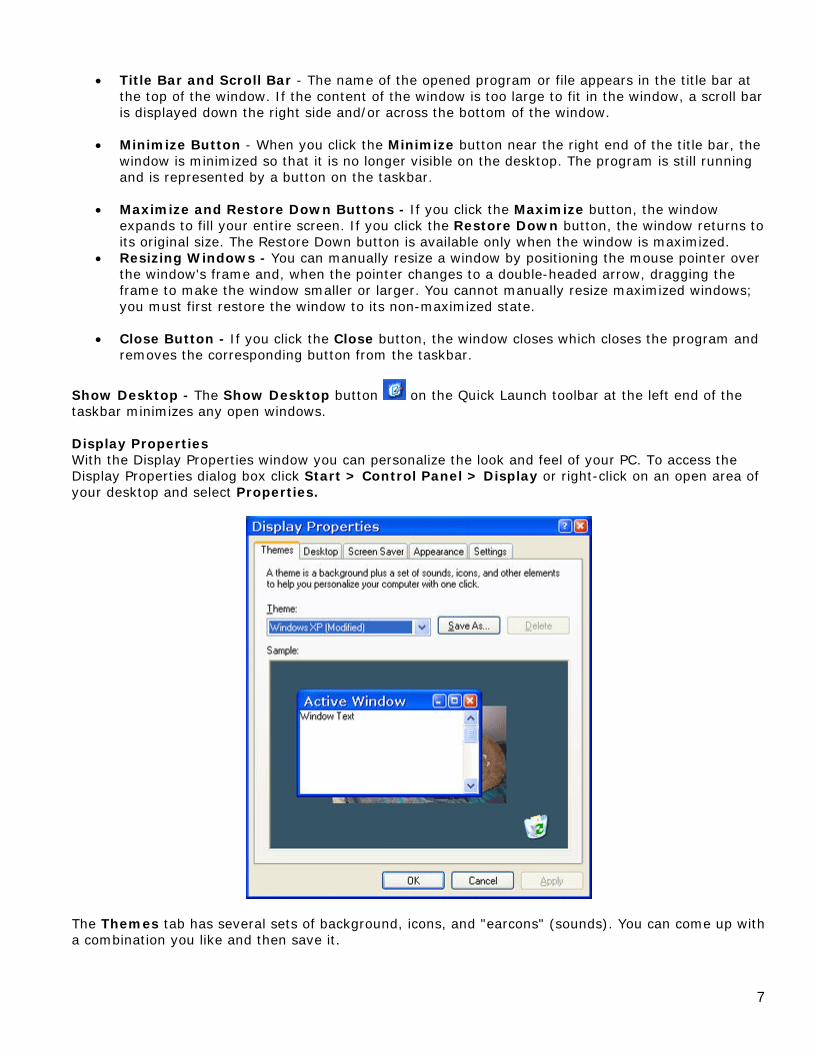
• Title Bar and Scroll Bar - The name of the opened program or file appears in the title bar at the top of the window. If the content of the window is too large to fit in the window, a scroll bar is displayed down the right side and/or across the bottom of the window.
• Minimize Button - When you click the Minimize button near the right end of the title bar, the
window is minimized so that it is no longer visible on the desktop. The program is still running and is represented by a button on the taskbar.
• Maximize and Restore Down Buttons - If you click the Maximize button, the window
expands to fill your entire screen. If you click the Restore Down button, the window returns to its original size. The Restore Down button is available only when the window is maximized.
• Resizing Windows - You can manually resize a window by positioning the mouse pointer over the window's frame and, when the pointer changes to a double-headed arrow, dragging the frame to make the window smaller or larger. You cannot manually resize maximized windows; you must first restore the window to its non-maximized state.
• Close Button - If you click the Close button, the window closes which closes the program and
removes the corresponding button from the taskbar.
Show Desktop - The Show Desktop button on the Quick Launch toolbar at the left end of the taskbar minimizes any open windows. Display Properties With the Display Properties window you can personalize the look and feel of your PC. To access the Display Properties dialog box click Start > Control Panel > Display or right-click on an open area of your desktop and select Properties.
The Themes tab has several sets of background, icons, and "earcons" (sounds). You can come up with a combination you like and then save it.
7
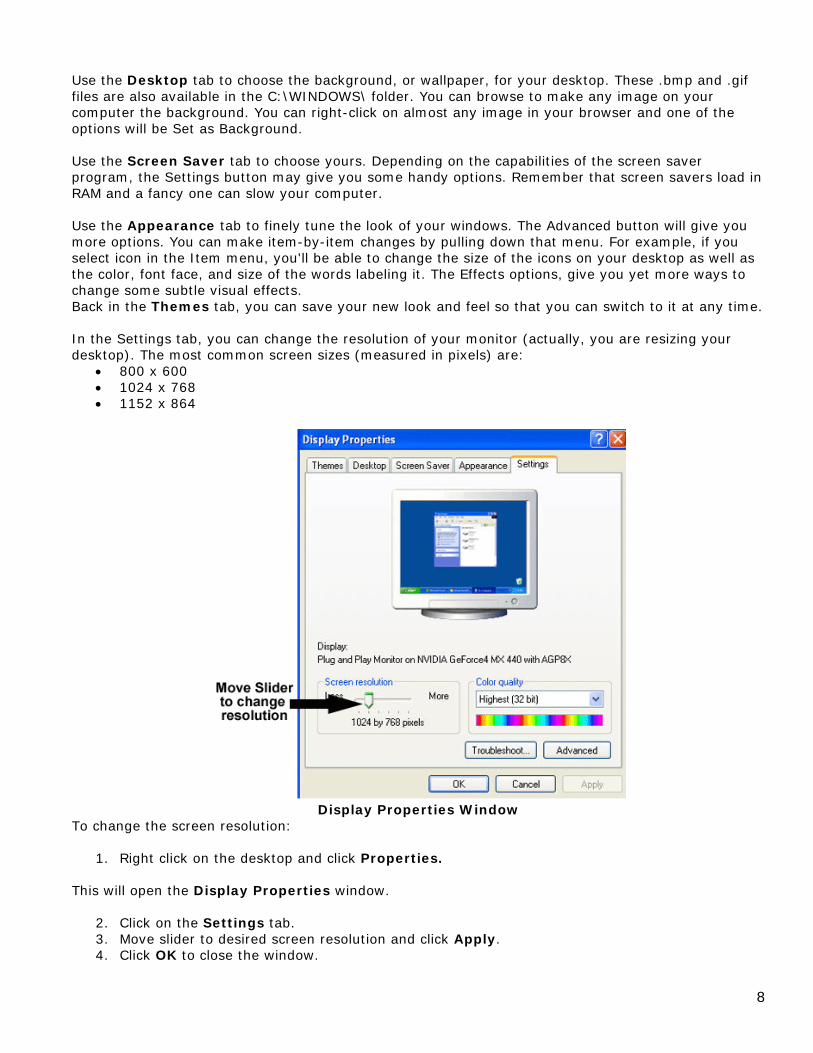
Use the Desktop tab to choose the background, or wallpaper, for your desktop. These .bmp and .gif files are also available in the C:\WINDOWS\ folder. You can browse to make any image on your computer the background. You can right-click on almost any image in your browser and one of the options will be Set as Background. Use the Screen Saver tab to choose yours. Depending on the capabilities of the screen saver program, the Settings button may give you some handy options. Remember that screen savers load in RAM and a fancy one can slow your computer. Use the Appearance tab to finely tune the look of your windows. The Advanced button will give you more options. You can make item-by-item changes by pulling down that menu. For example, if you select icon in the Item menu, you'll be able to change the size of the icons on your desktop as well as the color, font face, and size of the words labeling it. The Effects options, give you yet more ways to change some subtle visual effects. Back in the Themes tab, you can save your new look and feel so that you can switch to it at any time. In the Settings tab, you can change the resolution of your monitor (actually, you are resizing your desktop). The most common screen sizes (measured in pixels) are:
• 800 x 600 • 1024 x 768 • 1152 x 864
Display Properties Window
To change the screen resolution:
1. Right click on the desktop and click Properties. This will open the Display Properties window.
2. Click on the Settings tab. 3. Move slider to desired screen resolution and click Apply. 4. Click OK to close the window.
8

File and Folder Management Files and Folders - Windows Explorer is the interface designed to help you manage and manipulate your files and folders. Your computer stores information in the form of files, of which there are many types. Some are used to run programs, some are created by programs, and some are created by you.
• System Folders - Files are organized on your computer in folders. When Microsoft Windows XP is installed on a computer, it creates four system folders, which are Documents and Settings, Program Files, temp, and WINDOWS or WINNT.
• Documents and Settings - The Documents and Settings folder contains a subfolder for each
user profile -- each user who has logged on to the computer or who has logged on to a network domain through the computer.
• Program Files - The Program Files folder is the folder where most programs install the files
they need in order to run.
• Temp and WINDOWS or WINNT - The operating system and various other programs might store temporary files in the temp folder. Most of the critical operating system files are stored in the WINDOWS or WINNT folder. It is highly recommended that you do not alter these files in any way.
Tip - The terms directory and folder are used interchangeably by most people.
Anatomy of a File Name
File Names and Extensions - All files have names, and all file names consist of two parts - the name and the extension separated by a period. The type of file or the program in which it was created is indicated by the extension. The extension is a short abbreviation of the file type, usually consisting of three letters, sometimes two or four. By default, Windows XP hides file extensions. Regardless of what you name the extension, the information in the file still has a certain type of content. A text file is very different from an audio file. If you try to open a spreadsheet with an image editor, it won't work. Nor can you turn a text file into an image just by changing the extension. As long as the extension is appropriate to that content type, then the question becomes, what application will open or view or play it? You have dozens of choices, but you have to settle on one. For a list of every available file format, go to this link: Whatis?com's - http://whatis.techtarget.com/fileFormatA/0,289933,sid9,00.html Tip - If your file extensions aren't showing, in Windows Explorer, pull down the Tools menu and select Folder Options > View. Uncheck the box next to "Hide file extensions for known file types". File Icons - Files also have icons, which are graphic representations of the file type. Depending on the way you are looking at your files, you might see a large icon, a small icon, or no icon.
9
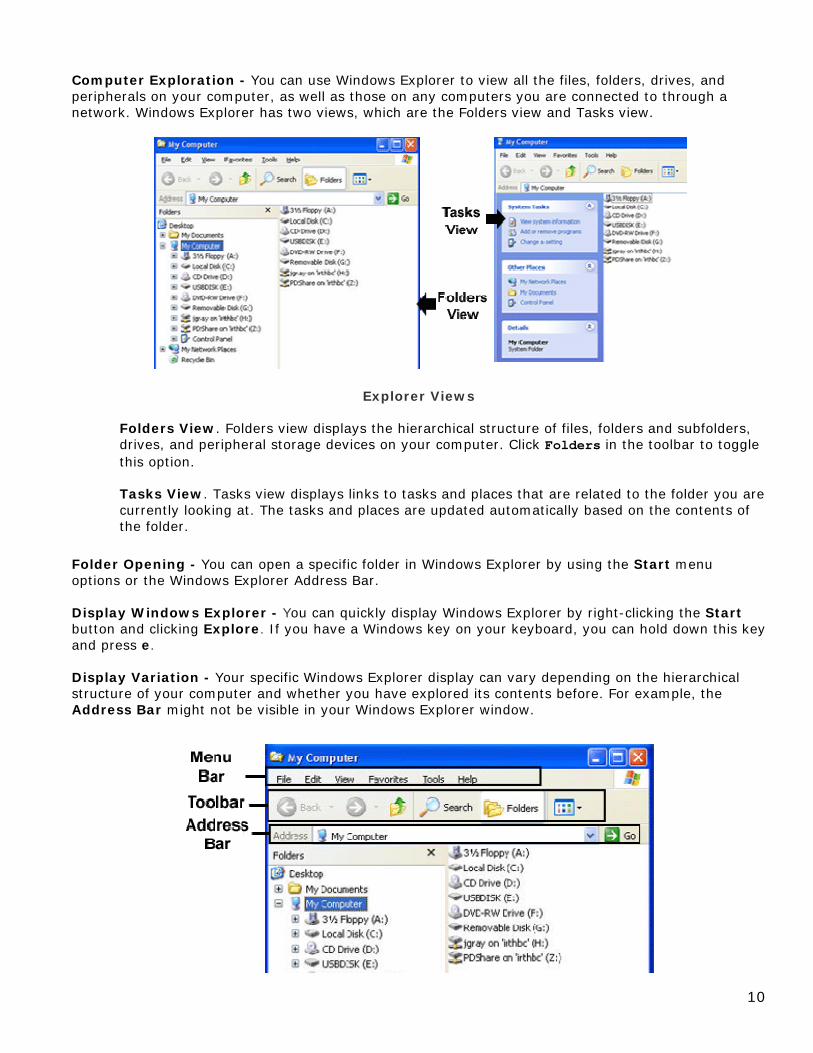
Computer Exploration - You can use Windows Explorer to view all the files, folders, drives, and peripherals on your computer, as well as those on any computers you are connected to through a network. Windows Explorer has two views, which are the Folders view and Tasks view.
Explorer Views
Folders View. Folders view displays the hierarchical structure of files, folders and subfolders, drives, and peripheral storage devices on your computer. Click Folders in the toolbar to toggle this option.
Tasks View. Tasks view displays links to tasks and places that are related to the folder you are currently looking at. The tasks and places are updated automatically based on the contents of the folder.
Folder Opening - You can open a specific folder in Windows Explorer by using the Start menu options or the Windows Explorer Address Bar. Display Windows Explorer - You can quickly display Windows Explorer by right-clicking the Start button and clicking Explore. If you have a Windows key on your keyboard, you can hold down this key and press e. Display Variation - Your specific Windows Explorer display can vary depending on the hierarchical structure of your computer and whether you have explored its contents before. For example, the Address Bar might not be visible in your Windows Explorer window.
10

Windows Explorer Window Menu Bar Contents - Below the title bar, most windows have a menu bar with several categories of actions, called menus. Each menu lists a number of commands that you can carry out on the files and folders displayed in the window. Below the menu bar you see one or more toolbars of various types. These toolbars provide buttons that enable you to carry out common actions, often with a single mouse click. Folders View - Folders view in Windows Explorer displays the folder structure on the left and the contents of the selected folder on the right. For example, when the My Documents folder is selected on the left, its contents are shown on the right. This is the traditional Windows way of viewing folders and their contents. Root Directory - The folders and files stored directly on a drive are said to be stored in that drive's root directory. The first time you attempt to display the contents of the root directory, you might see a warning message telling you to click a link to display the files. This is because the root directory often contains system files that should not be modified or moved in any way. The right pane of Windows Explorer displays the contents of the root directory. The subfolders displayed in the right pane are the same as those listed in the left pane. It is extremely important that you never delete files from the root directory or any of the system folders created by Windows unless you are absolutely sure you know their function.
File Path
Folder and File Path - The path of a folder or file gives the address where the folder or file is stored on your hard disk. A typical path starts with the drive letter and lists the folders and subfolders you have to go to, separated by backslashes (\), to find the folder or file. If the Address Bar is not visible, you can turn it on by right-clicking the toolbar and clicking Address Bar on the shortcut menu. Back and Forward Buttons - On the toolbar, click Back. You return to your last location. On the toolbar, click Forward. You return to the previous folder. On the toolbar, click the Up button. You move up one folder.
11
12
View Options View Options - The view options for each folder are available on that folder window's toolbar, and they vary depending on the contents of the folder. Available views include the Details view, Filmstrip view, Icons view, List view, Thumbnails view, and Tiles view.
Details View. Details view displays a list of files or folders and their properties. The properties shown by default for each file or folder are Name, Size, Type, and Date Modified.
Filmstrip View. Filmstrip view displays the currently selected picture at the top of the window above a single row of smaller versions of all the pictures in the current folder. This view is only available for folders with images. Icons and List Views. Icons view displays the icon and file name for each file or folder in the current folder. List view displays a list of the files and folders in the current folder, with no additional information other than the file name and a small icon representing the file type. Thumbnails View. Thumbnails view displays up to four miniature representations of the files contained in each folder. Tiles View. Tiles view displays a large file type icon or folder icon, the file or folder name, and up to two additional pieces of information for each file in the current folder.
Folder Properties - To view the properties of a folder right-click the folder and click Properties. The Properties dialog box appears. Look at the information on the General, Sharing, and Security tabs. Depending on where you are, there are at least three ways to get to the windows that let you change your folder properties; Start > Control Panel > Folder Options, My Computer > View > Folder Options, or Windows Explorer > View > Folder Options. Organization - Proper file and folder organization and storage will ease your Windows use. Each application on your computer creates files of a particular type. As you create these files, you will want to create folders in which to organize the files for easy retrieval. Disk Space – Your computer likely comes with a hard disk that will store several gigabytes (GB) of information. A gigabyte is 1 billion bytes, and a byte is a unit of information that is the equivalent of one character. Copies - There are a number of ways to make copies of files and folders, including buttons and keyboard shortcut commands. The organization methods of copying, pasting, moving, and renaming are the same for both files and folders. Right click on any icon, file or folder to access the menu for copying and pasting. See the Keyboard Shortcuts list for a complete listing of keyboard commands for copying and pasting. Washing Text Sometimes you want to copy files from one program or application to another. A common example is copying text from a browser or word processor to a web page, that is, from Microsoft's Internet Explorer or Word to FrontPage or Dreamweaver. Using the standard buttons or CTRL-C / CRTL-V will give the appearance of copying text, but will bring Microsoft's proprietary and unseen formatting code along with it. The unseen (hidden) part can create a file ten times the size it needs to be full of pesky formatting you can't get rid of. The best technique is to wash the text first. You wash off the proprietary hidden formatting code by pasting into a text editor first and then copying again to FrontPage. At first, this seems unnecessary and time-consuming. If you don't do it, however, you'll find out that the resulting mess is very time-consuming.
To wash text:
1. In browser or Word window, highlight text - hold down left mouse button and drag. 2. Copy text to clipboard - CTRL-C (hold down CTRL key and press C). 3. Switch to text editor. 4. Paste text - CTRL-V (hold down CTRL key and press V). 5. Highlight text again or pull down Edit menu and Select All. 6. Repeat step 2 by coping text to clipboard. 7. Switch to the program where you want to paste the text. 8. Repeat step 4 by pasting text.
File Renaming - Once you copy files or folders to their new location, you should probably rename them so you do not have multiple files with the same name. File names should reflect the file and be kept short in length. Avoid using blank spaces, hyphens or special characters such as &, * , . , or @. An example would be pc_basics.doc.
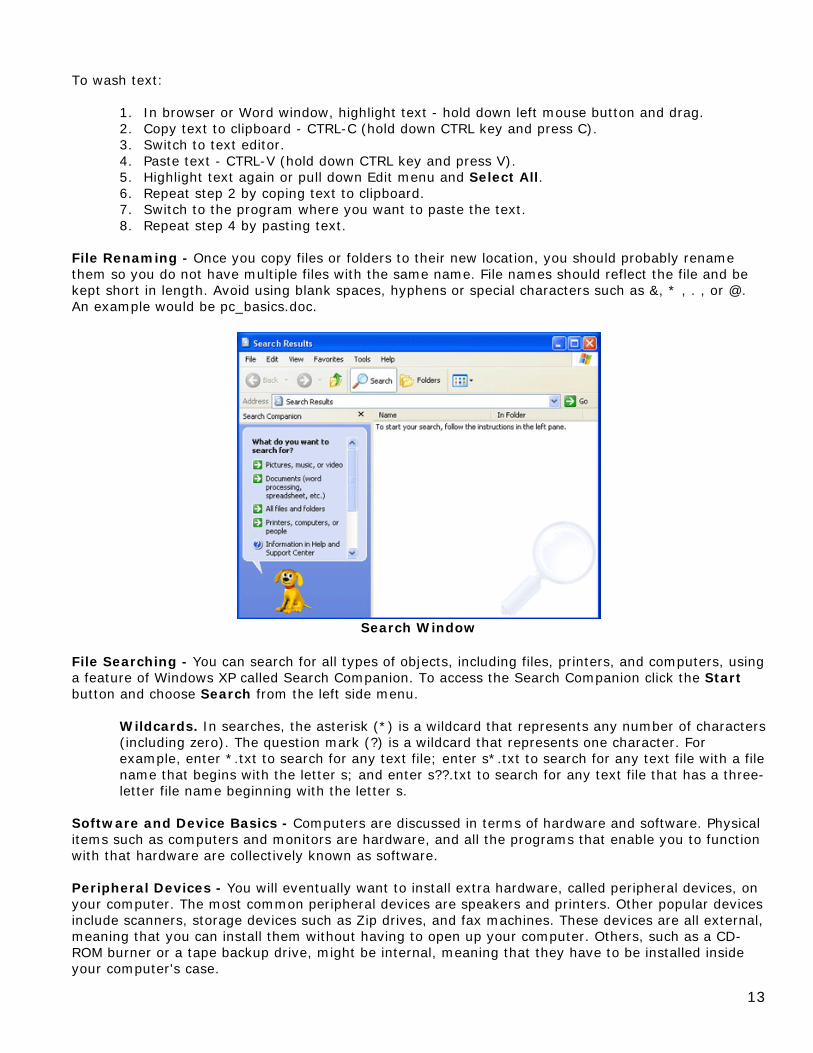
Search Window
File Searching - You can search for all types of objects, including files, printers, and computers, using a feature of Windows XP called Search Companion. To access the Search Companion click the Start button and choose Search from the left side menu.
Wildcards. In searches, the asterisk (*) is a wildcard that represents any number of characters (including zero). The question mark (?) is a wildcard that represents one character. For example, enter *.txt to search for any text file; enter s*.txt to search for any text file with a file name that begins with the letter s; and enter s??.txt to search for any text file that has a three-letter file name beginning with the letter s.
Software and Device Basics - Computers are discussed in terms of hardware and software. Physical items such as computers and monitors are hardware, and all the programs that enable you to function with that hardware are collectively known as software. Peripheral Devices - You will eventually want to install extra hardware, called peripheral devices, on your computer. The most common peripheral devices are speakers and printers. Other popular devices include scanners, storage devices such as Zip drives, and fax machines. These devices are all external, meaning that you can install them without having to open up your computer. Others, such as a CD-ROM burner or a tape backup drive, might be internal, meaning that they have to be installed inside your computer's case.
13
14
Device Types - Many peripheral devices fall into a category called Plug and Play, which quite literally means that you can plug them in and use them; no setup is required. Others might require that you supply some kind of information, usually through a wizard, or might require a specific device driver in order to work properly. Driver Files - Device drivers are files that contain information that Windows needs to run your printer, fax machine, scanner, camera, or other device. Drivers can be specific to an individual device or to a family of devices, such as all Dell LaserJet printers, and they are often specific to a certain version of Windows. Device drivers can be found on the Web site of the device manufacturer or on certain Web sites that centralize driver information. New Software Programs - In order to install new software or optional Windows XP components on your computer, you must run an executable file of some type, usually called Setup.exe. Many software manufacturers use files called autorun files, which are located in the root directory of the place from which the program is being installed -- usually a CD-ROM. Installation Options - Many programs offer multiple installation options, such as default, complete, and custom. Some programs that are installed from a CD-ROM offer the option of copying large files to your computer or accessing them from the CD-ROM when needed.
Considerations. When choosing your installation type, consider how you will use the application, the amount of space the application requires, and the amount of space available on your hard disk. Also think about whether the installation source will be available to you later, in case you need to access files that are not installed to your computer or you want to re-install the application. In most cases, the default installation fits the needs of the average user and is the best choice.
Control Panel - To learn more about your PC, you should explore the Control Panel. You can change a program's settings or remove the program altogether through the Add or Remove Programs dialog box, which is available from Control Panel. Uninstall a Program - You may at some point need to uninstall a program from your computer. Always use Add or Remove Programs to uninstall a program. If you just delete the folder containing the program many extra files are left on your drive. To remove a program:
1. On the Start menu, click Control Panel. 2. In the Control Panel window, click Add or Remove Programs. The Add or Remove Programs
window opens, displaying a list of your currently installed programs. 3. Click the name of the new program. The program listing expands. 4. Click the Remove button. The uninstall program starts. 5. Accept the default uninstall options to remove the program from your computer.
When the uninstall process is complete, the icon no longer appears on your desktop. Local Printer Installation - A local printer is a printer that is connected directly to your computer. The software to run the printer is installed on and run from your computer. When you connect a printer to your Windows XP computer, Windows XP often identifies that the printer has been connected. It then searches through its database of drivers to locate the appropriate software to run the printer. Network Printer - A network printer is a printer that is not connected directly to your computer. Instead, you access the printer over the network, either as a free-standing networked printer, through someone else's computer, through a print server, or through a printer hub. Contact Help Desk for assistance with networked printers.
Storage Device Fundamentals - A variety of data storage devices are available; the most common are hard disk drives and floppy disk drives. When you need extra storage space, it is quite simple to install a Zip disk drive, CD-Read-Write drive or USB drive. Port Types - Most computers come equipped with a standard set of ports that you use to connect a keyboard, mouse, monitor, or printer. If your computer has a sound card and a network card, you also have audio and network ports. Many desktop and laptop computers now also have USB ports to handle the growing number of devices that are designed to work with this method of connection.
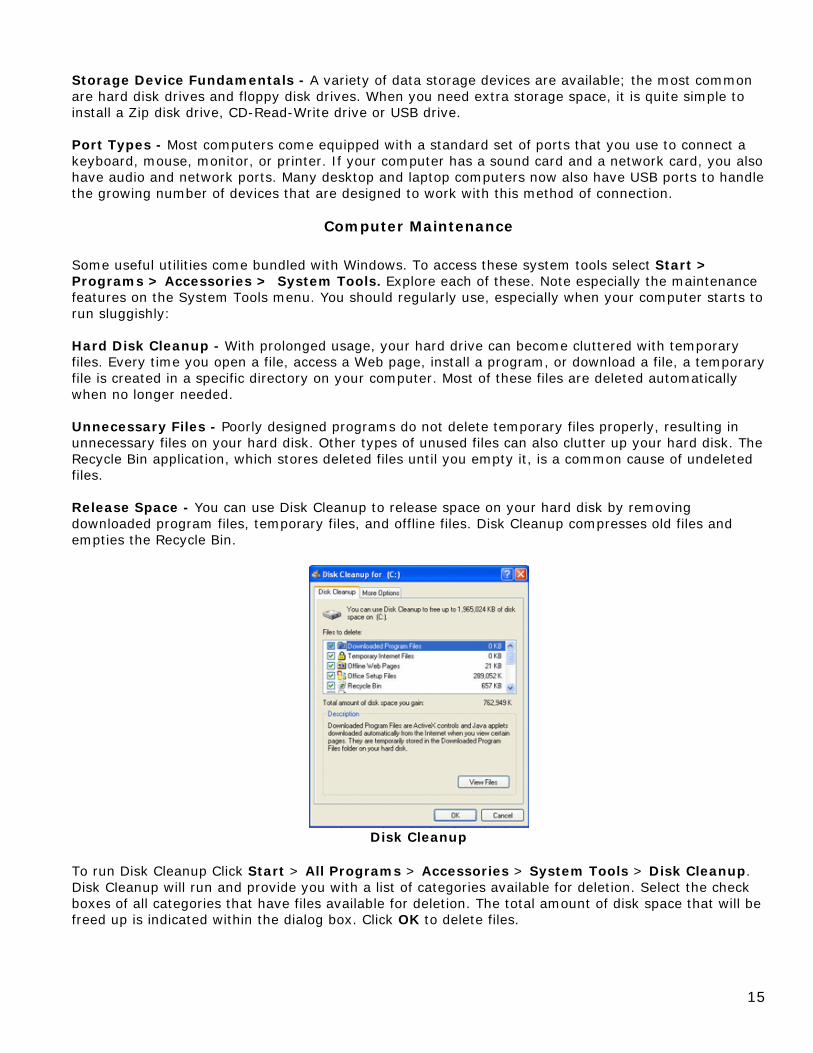
Computer Maintenance Some useful utilities come bundled with Windows. To access these system tools select Start > Programs > Accessories > System Tools. Explore each of these. Note especially the maintenance features on the System Tools menu. You should regularly use, especially when your computer starts to run sluggishly: Hard Disk Cleanup - With prolonged usage, your hard drive can become cluttered with temporary files. Every time you open a file, access a Web page, install a program, or download a file, a temporary file is created in a specific directory on your computer. Most of these files are deleted automatically when no longer needed. Unnecessary Files - Poorly designed programs do not delete temporary files properly, resulting in unnecessary files on your hard disk. Other types of unused files can also clutter up your hard disk. The Recycle Bin application, which stores deleted files until you empty it, is a common cause of undeleted files. Release Space - You can use Disk Cleanup to release space on your hard disk by removing downloaded program files, temporary files, and offline files. Disk Cleanup compresses old files and empties the Recycle Bin.
Disk Cleanup
To run Disk Cleanup Click Start > All Programs > Accessories > System Tools > Disk Cleanup. Disk Cleanup will run and provide you with a list of categories available for deletion. Select the check boxes of all categories that have files available for deletion. The total amount of disk space that will be freed up is indicated within the dialog box. Click OK to delete files.
15
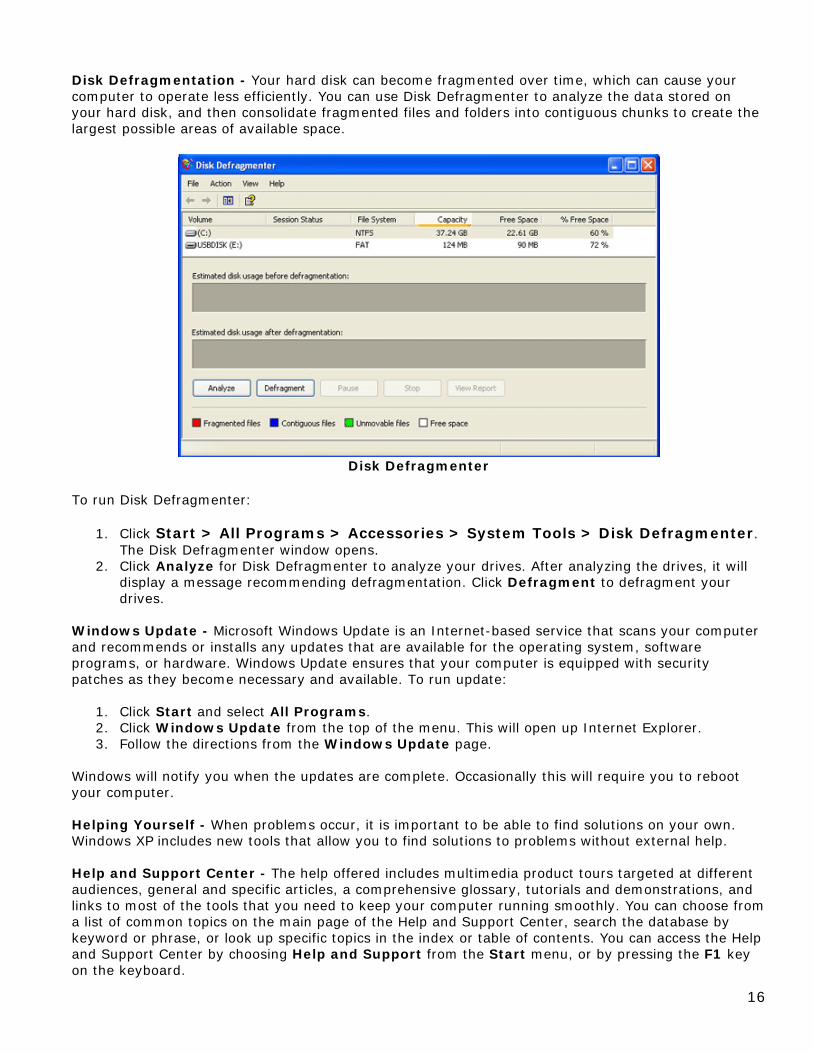
Disk Defragmentation - Your hard disk can become fragmented over time, which can cause your computer to operate less efficiently. You can use Disk Defragmenter to analyze the data stored on your hard disk, and then consolidate fragmented files and folders into contiguous chunks to create the largest possible areas of available space.
Disk Defragmenter
To run Disk Defragmenter:
1. Click Start > All Programs > Accessories > System Tools > Disk Defragmenter. The Disk Defragmenter window opens.
2. Click Analyze for Disk Defragmenter to analyze your drives. After analyzing the drives, it will display a message recommending defragmentation. Click Defragment to defragment your drives.
Windows Update - Microsoft Windows Update is an Internet-based service that scans your computer and recommends or installs any updates that are available for the operating system, software programs, or hardware. Windows Update ensures that your computer is equipped with security patches as they become necessary and available. To run update:
1. Click Start and select All Programs. 2. Click Windows Update from the top of the menu. This will open up Internet Explorer. 3. Follow the directions from the Windows Update page.
Windows will notify you when the updates are complete. Occasionally this will require you to reboot your computer. Helping Yourself - When problems occur, it is important to be able to find solutions on your own. Windows XP includes new tools that allow you to find solutions to problems without external help. Help and Support Center - The help offered includes multimedia product tours targeted at different audiences, general and specific articles, a comprehensive glossary, tutorials and demonstrations, and links to most of the tools that you need to keep your computer running smoothly. You can choose from a list of common topics on the main page of the Help and Support Center, search the database by keyword or phrase, or look up specific topics in the index or table of contents. You can access the Help and Support Center by choosing Help and Support from the Start menu, or by pressing the F1 key on the keyboard.
16
17
Shortcut Keys General Keystrokes
Use this key: To do this:
Windows key or CTRL+Esc Open the Start menu.
Windows key+E Open Windows Explorer.
Windows key+R Open Run dialogue.
Windows key+M Minimize all applications.
Alt+TAB Switch between applications.
ALT+SPACEBAR Opens the shortcut menu for the active window.
ALT+ENTER View properties for the selected item.
ALT+ESC Cycle through items in the order they were opened.
ALT+F4 Close the active item, or quit the active program.
CTRL+A Select all.
CTRL+C Copy.
CTRL+X Cut.
CTRL+V Paste.
CTRL+Z Undo.
CTRL while dragging an item Copy selected item.
CTRL+SHIFT while dragging an
item Create shortcut to selected item.
CTRL+SHIFT with any of the
arrow keys Highlight a block of text.
SHIFT with any of the arrow keys Select more than one item in a window or on the desktop, or
select text within a document.
SHIFT+F10 Display the shortcut menu for the selected item.
SHIFT+DELETE Delete selected item permanently without placing the item in the
Recycle Bin.
SHIFT when you insert a CD into
the CD-ROM drive Prevent the CD from automatically playing.
F2 Rename selected item.
F4 Display the Address bar list in My Computer or Windows Explorer.
F5 Refresh the active window.
18
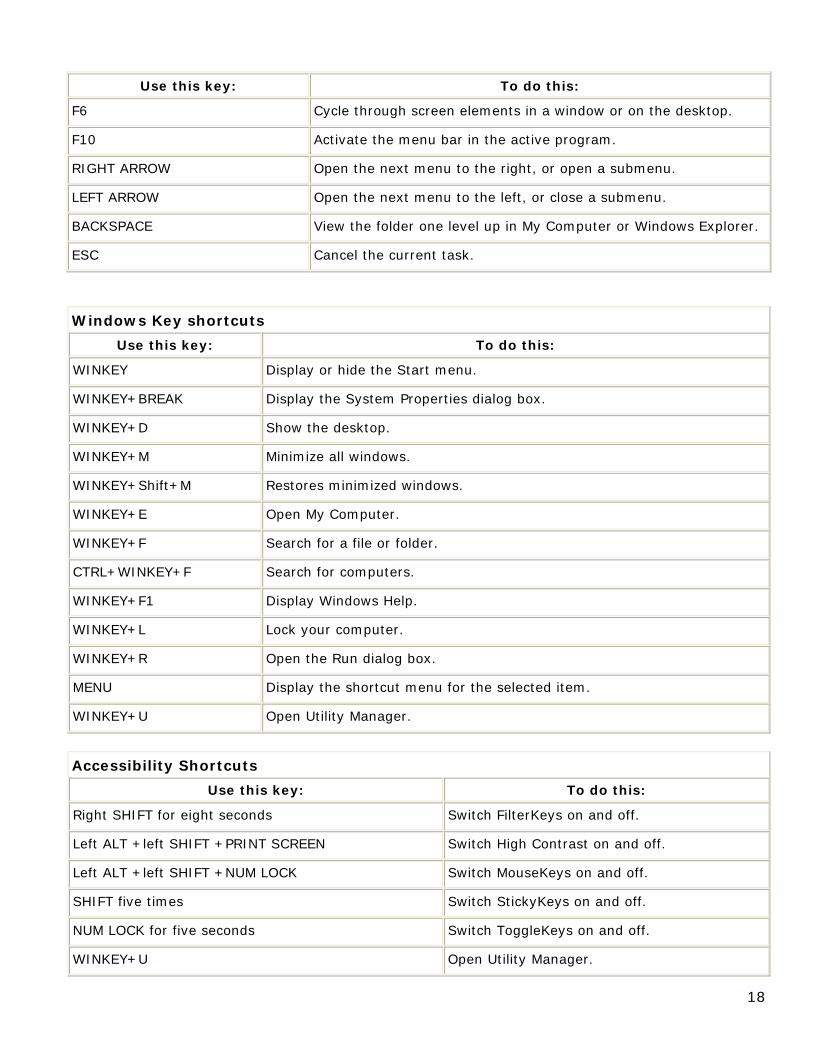
Use this key: To do this:
F6 Cycle through screen elements in a window or on the desktop.
F10 Activate the menu bar in the active program.
RIGHT ARROW Open the next menu to the right, or open a submenu.
LEFT ARROW Open the next menu to the left, or close a submenu.
BACKSPACE View the folder one level up in My Computer or Windows Explorer.
ESC Cancel the current task.
Windows Key shortcuts
Use this key: To do this:
WINKEY Display or hide the Start menu.
WINKEY+BREAK Display the System Properties dialog box.
WINKEY+D Show the desktop.
WINKEY+M Minimize all windows.
WINKEY+Shift+M Restores minimized windows.
WINKEY+E Open My Computer.
WINKEY+F Search for a file or folder.
CTRL+WINKEY+F Search for computers.
WINKEY+F1 Display Windows Help.
WINKEY+L Lock your computer.
WINKEY+R Open the Run dialog box.
MENU Display the shortcut menu for the selected item.
WINKEY+U Open Utility Manager.
Accessibility Shortcuts
Use this key: To do this:
Right SHIFT for eight seconds Switch FilterKeys on and off.
Left ALT +left SHIFT +PRINT SCREEN Switch High Contrast on and off.
Left ALT +left SHIFT +NUM LOCK Switch MouseKeys on and off.
SHIFT five times Switch StickyKeys on and off.
NUM LOCK for five seconds Switch ToggleKeys on and off.
WINKEY+U Open Utility Manager.
Tips
Turning on StickyKeys
StickyKeys is designed for people who have difficulty holding down two or more keys simultaneously. When a shortcut requires a key combination, such as CTRL+P, StickyKeys will enable you to press a modifier key (CTRL, ALT, or SHIFT), or the Windows logo key (WINKEY), and have it remain active until another key is pressed.
1. Click Start, point to Settings, click Control Panel, and then double-click Accessibility
Options. 2. On the Keyboard tab, under StickyKeys, select the Use StickyKeys check box.
To turn off StickyKeys, clear the Use StickyKeys check box.
If the Use shortcut check box in the Settings for StickyKeys dialog box is selected, you can turn StickyKeys on or off by pressing the SHIFT key five times.
How do you make a new icon? In a graphics editor, make a 16 pixel by 16 pixel bitmap (.bmp file) and save it with a .ico extension. Then browse to it from this Effects tab in the Display Properties dialog box.
Resizing an active window without your mouse. To resize an active window without your mouse:
• When the window is active, press Alt + Spacebar. • Press S. • Now, simply press the arrow key that corresponds with the side of the window you want to
change. • For example, if you want to drag the top of the window to make it bigger, press the up arrow
until you are happy with its size. • When finished resizing, press Enter.
Grouping Similar Taskbar Buttons When you open more than one document in the same program and then minimize each document, rather that showing separate icons on the taskbar for each document, WindowsXP groups them under a single icon for that application.
If you want to group, or ungroup, similar taskbar buttons,
1. Right click on the Taskbar 2. Select Properties 3. Check or Uncheck Group similar taskbar buttons
My Taskbar has disappeared - how do I get it back? • Move the mouse to the bottom of the screen until the mouse cursor looks like you're about to
resize something. • Stretch the Taskbar up, so that it is visible. • Note: this is the most commonly asked question by new users of Windows 98. • To do this with the keyboard, type Ctrl-ESC, Alt-Space, S, and then use the Up Arrow to
resize the taskbar.
http://www.bizfetch.com/win98_tips/index_main_temp.htm
19