creating content with microsoft powerpoint · microsoft powerpoint has been the standard for slide...
TRANSCRIPT

CREATING CONTENT WITH
MICROSOFT POWERPOINT Simple Tips And Tricks
Presented by Amy Harrop

CREATING CONTENT WITH POWERPOINT – SIMPLE TIPS & TRICKS
Amy Harrop http://www.AmyHarrop.com
Page 1
TABLE OF CONTENTS Introduction ............................................................................................... 2 Design Tips ................................................................................................ 3 Advanced Tips ............................................................................................ 4
ShortCut Keys for Microsoft PowerPoint ....................................................... 5 How-Tos ..................................................................................................... 6
How To #1: Use a Slide Master .................................................................. 6 How To #1: Insert Shapes ....................................................................... 11 How To #3: Record Your Presentation ....................................................... 15 How To #4: Insert Action Buttons ............................................................ 19 How To #5: Use Action Buttons to Create a Question/Answer Model ............. 23 How To #6: Animate Objects ................................................................... 31 How To #7: Change the Slide Size............................................................ 35
Bonus Tips ............................................................................................... 38
DISCOVER THE SECRETS TO SELLING BOOKS ON AMAZON WITH LITTLE TO NO WRITING REQUIRED!
You'll Discover:
• What Are Low and No Writing Books • How You can Easily Create These Popular Books
That Sell • The 5 Most Popular Types of No/Low Content Books • The Easiest Two Ways to Profit From These Books • The Most Popular Types of Books to Publish
Click here to learn more…

CREATING CONTENT WITH POWERPOINT – SIMPLE TIPS & TRICKS
Amy Harrop http://www.AmyHarrop.com
Page 2
INTRODUCTION Microsoft PowerPoint has been the standard for slide presentation software from its inception, but rarely do people go beyond the basics of titles and bullet points. For many, those fancier presentations and videos seem far too difficult to learn how to create. That’s just not true! The newer versions of PowerPoint have features and menus that make it easy for anyone to produce professional quality content – and not just in slide format. In this report, we’re going to show you some easy-to-learn tips and tricks for creating content with PowerPoint. Even if you only try a couple of the tips, you’ll already be well on your way to becoming a master PowerPoint creator. NOTE: These tips apply specifically to the Microsoft Office 2011 suite for Macintosh and 2010 for Windows, but many of the tips can be applied with other version of the software too.

CREATING CONTENT WITH POWERPOINT – SIMPLE TIPS & TRICKS
Amy Harrop http://www.AmyHarrop.com
Page 3
DESIGN TIPS
1. Think about how easy your slides are to read. Use a color scheme that provides good contrast between the background and text itself.
2. If you NEED to use a background that is difficult to place text on, give the text itself a solid background box to frame and define it.
3. Try to stick to Sans Serif fonts – they are much easier to read; especially from a distance.
4. Similarly, standard fonts look much more professional – resist the urge to throw wacky typography on your slides!
5. Don’t forget how important first impressions are and make sure you create a captivating title page that gets across the theme of the presentation, yet doesn’t give too much away.
6. Use custom slides where possible – Differing from the built-in PowerPoint themes will make sure your presentation is unique and give it an edge.
7. If you are going to use imagery, make sure it’s of a high quality. Remember your presentation might be shown on a large screen so the higher quality the image the better.
8. Don’t underestimate solid colors. They’re easy to use and extra easy for the viewer to read text.
9. Keep the text down to a minimum; it is a presentation, after all. The information within the slides themselves should be brief and an explanation should be provided by the speaker.
10. The same goes for bullet points. Used wisely, they can be a fantastic tool, but keep them to a minimum or else you may as well be writing a few paragraphs of text!
11. Highlighting, bolding, underlining or enlarging text can draw focus to key points in your presentation.
12. You don’t need to create fireworks with slide transitions. Keep these simple since a slide jumping in from every angle can get a little irritating.

CREATING CONTENT WITH POWERPOINT – SIMPLE TIPS & TRICKS
Amy Harrop http://www.AmyHarrop.com
Page 4
ADVANCED TIPS
1. Before you begin to create your presentation, lay out what you want to say. You could start by writing down everything that needs to be included, then breaking it up into specific areas and finally, key points.
2. When creating objects in PowerPoint, hold down the shift key. This will keep a line perfectly straight and the height and width distributed the same on any shape.
3. Remember to credit the sources of anything you may have used in your presentation. You can insert a ‘Credits’ slide at the end.
4. Use the Slide Master tool to automate and coordinate your slides. 5. Compressing graphics will also help with file size. To do this, simply right
click on the graphic itself, click ‘Format Pictures’ then Compress. Mark Apply to all pictures in Document and Change Resolution to Web/Screen, then hit Ok.
6. Use the Action buttons available to manage your presentation. 7. Learning the CTRL shortcuts will save you a surprising amount of time
when working on your presentation. See a list of the most common ones on the next page.
CREATING CONTENT WITH POWERPOINT – SIMPLE TIPS & TRICKS
Amy Harrop http://www.AmyHarrop.com
Page 5
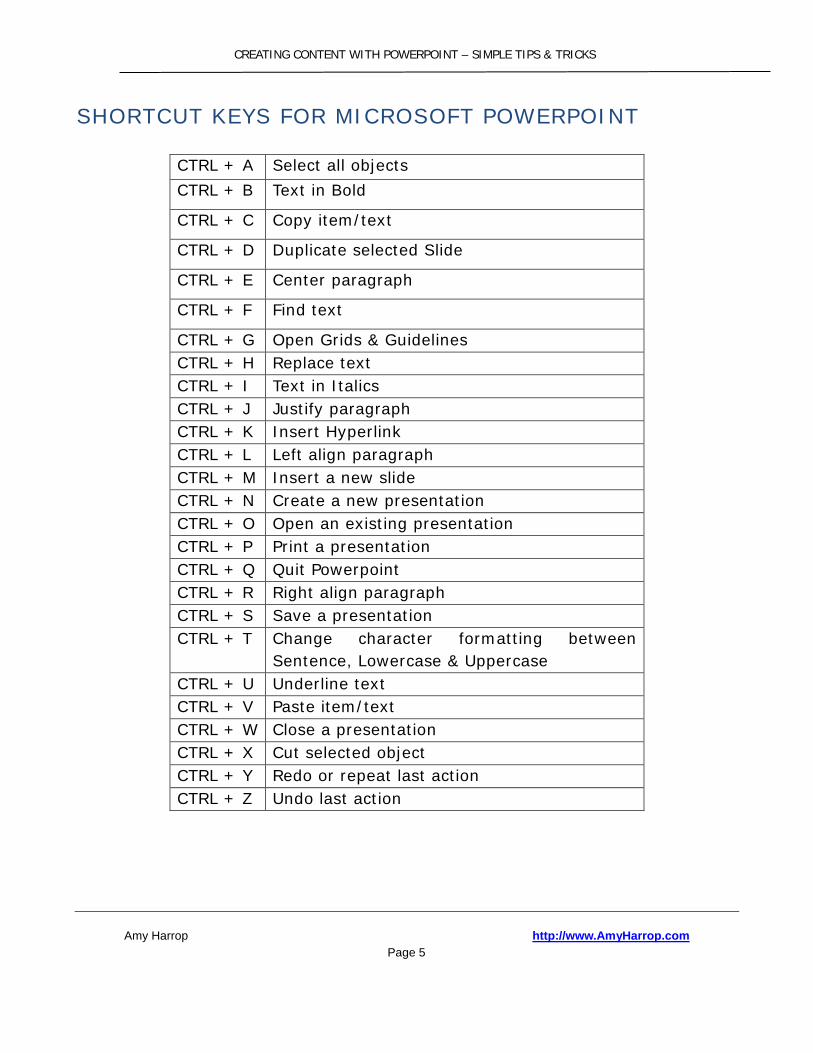
SHORTCUT KEYS FOR MICROSOFT POWERPOINT
CTRL + A Select all objects CTRL + B Text in Bold
CTRL + C Copy item/text
CTRL + D Duplicate selected Slide
CTRL + E Center paragraph
CTRL + F Find text
CTRL + G Open Grids & Guidelines CTRL + H Replace text CTRL + I Text in Italics CTRL + J Justify paragraph CTRL + K Insert Hyperlink CTRL + L Left align paragraph CTRL + M Insert a new slide CTRL + N Create a new presentation CTRL + O Open an existing presentation CTRL + P Print a presentation CTRL + Q Quit Powerpoint CTRL + R Right align paragraph CTRL + S Save a presentation CTRL + T Change character formatting between
Sentence, Lowercase & Uppercase CTRL + U Underline text CTRL + V Paste item/text CTRL + W Close a presentation CTRL + X Cut selected object CTRL + Y Redo or repeat last action CTRL + Z Undo last action

CREATING CONTENT WITH POWERPOINT – SIMPLE TIPS & TRICKS
Amy Harrop http://www.AmyHarrop.com
Page 6
HOW-TOS
HOW TO #1: USE A SLIDE MASTER A Slide Master stores information about all the slides included in the presentation. You can use it to make universal style changes to every slide in the presentation; including background colors, font, effects and positions. STEP 1. Create a new presentation and then in the View menu, find Master > Slide Master. In some other versions of PowerPoint, it can be found under Presentation Views > Slide Master.
MAC
WINDOWS
STEP 2. The sidebar to the left of the screen shows the Slide Master as the larger

CREATING CONTENT WITH POWERPOINT – SIMPLE TIPS & TRICKS
Amy Harrop http://www.AmyHarrop.com
Page 7
image and the layouts associated with it that are beneath it and a bit smaller. Notice how changes you make to the master slide – Font style/size, etc – are automatically made throughout the master and other layout slides. Go to Themes and click a theme to add it to your presentation.
MAC

CREATING CONTENT WITH POWERPOINT – SIMPLE TIPS & TRICKS
Amy Harrop http://www.AmyHarrop.com
Page 8
WINDOWS
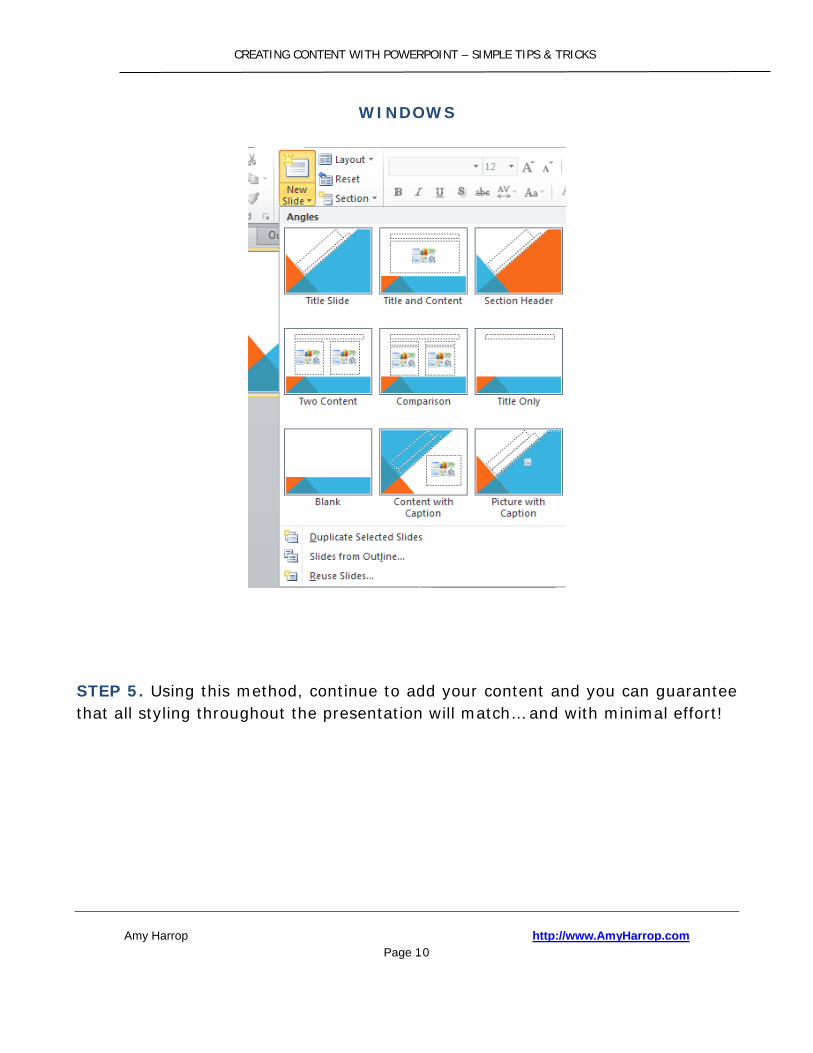
STEP 3. Close the slide master view and return to the normal formatting screen. Here you will see that the theme you chose, as well as changes you made can be seen on the first slide of your presentation. STEP 4. You can begin to add your content to your presentation. Click on new slide and then select one of the associated formats that correspond with how you want your slide. If you don’t see a predesigned layout that meets your needs, you can go back to master slide view and click ‘New Layout’ where you can create your own.

CREATING CONTENT WITH POWERPOINT – SIMPLE TIPS & TRICKS
Amy Harrop http://www.AmyHarrop.com
Page 9
MAC
CREATING CONTENT WITH POWERPOINT – SIMPLE TIPS & TRICKS
Amy Harrop http://www.AmyHarrop.com
Page 10
WINDOWS
STEP 5. Using this method, continue to add your content and you can guarantee that all styling throughout the presentation will match… and with minimal effort!

CREATING CONTENT WITH POWERPOINT – SIMPLE TIPS & TRICKS
Amy Harrop http://www.AmyHarrop.com
Page 11
HOW TO #2: INSERT SHAPES You can use the shapes available within the program to create your own designs. STEP 1. Go to Insert > Shapes and select the shapes you need. As an example, you could create a stick man, so select a smiley face for the head.
MAC
WINDOWS
STEP 2. Using different shapes, you can create a unique design.

CREATING CONTENT WITH POWERPOINT – SIMPLE TIPS & TRICKS
Amy Harrop http://www.AmyHarrop.com
Page 12
MAC
WINDOWS
STEP 3. Using the Format ribbon, add a little color to each component.

CREATING CONTENT WITH POWERPOINT – SIMPLE TIPS & TRICKS
Amy Harrop http://www.AmyHarrop.com
Page 13
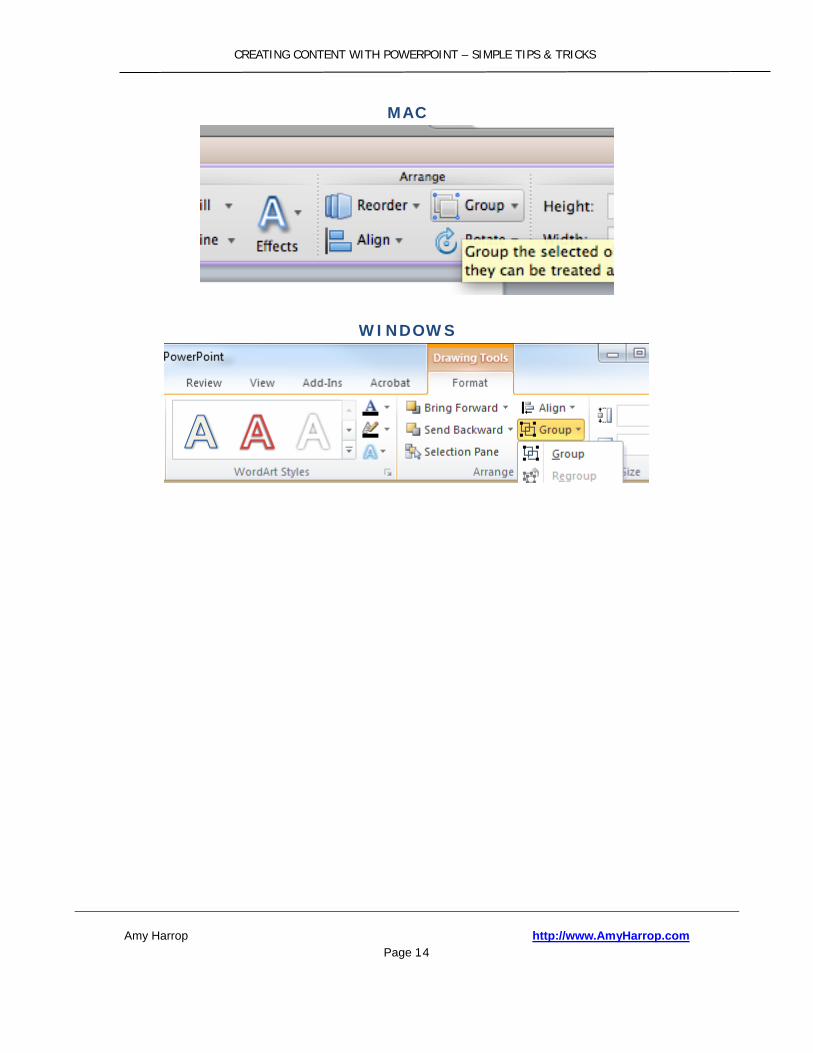
STEP 4. When you’re done, select all of the components and click the ‘Group’ button in the Format ribbon. This will bring everything together and enable you to use it as if it were one image.
CREATING CONTENT WITH POWERPOINT – SIMPLE TIPS & TRICKS
Amy Harrop http://www.AmyHarrop.com
Page 14
MAC
WINDOWS

CREATING CONTENT WITH POWERPOINT – SIMPLE TIPS & TRICKS
Amy Harrop http://www.AmyHarrop.com
Page 15
HOW TO #3: RECORD YOUR PRESENTATION If you are unable to make your presentation in person, recording it is a great way to distribute it. You can also share your recording on video sharing sites like YouTube or even “pin it” to Pinterest. STEP 1. With your presentation complete, go to Slide Show and Record Slide Show. You can record audio narration at the same time with a microphone plugged into the computer. You can also choose whether to record the animation and any laser pointers too.
MAC
WINDOWS

CREATING CONTENT WITH POWERPOINT – SIMPLE TIPS & TRICKS
Amy Harrop http://www.AmyHarrop.com
Page 16
STEP 2. The slide show should automatically begin to record. If you are recording audio, simply begin to speak where necessary and use the next slide buttons or space button to move on. When you are done click ‘Exit Show’. It will also automatically end if you try to go to the next slide at the end of the presentation. PowerPoint keeps a log of the time you’ve spent on each slide and an overall presentation time (Mac), which can be very useful.
MAC
WINDOWS
STEP 3. To review your presentation, click ‘Play Slide Show’ from start or from

CREATING CONTENT WITH POWERPOINT – SIMPLE TIPS & TRICKS
Amy Harrop http://www.AmyHarrop.com
Page 17
current slide (Mac), or just click ‘From Beginning’ or ‘From Current Slide’ (Windows). The slides that contain audio will have a speaker icon in the bottom right hand corner. Simply delete the speaker to remove the audio on a slide.
MAC
WINDOWS
STEP 4. To record your presentation as a video, on a Mac go to File > Save as movie.

CREATING CONTENT WITH POWERPOINT – SIMPLE TIPS & TRICKS
Amy Harrop http://www.AmyHarrop.com
Page 18
MAC
In Windows, go to File > Save & Send > Create a Video. Click on ‘Create a Video’
WINDOWS

CREATING CONTENT WITH POWERPOINT – SIMPLE TIPS & TRICKS
Amy Harrop http://www.AmyHarrop.com
Page 19
HOW TO #4: INSERT ACTION BUTTONS Action buttons can take your PowerPoint presentation to another level. If you are going to give a presentation that is a little more complicated than just a linear story, Action Buttons are a great addition to aid with navigation. STEP 1. Pick the slide you want your action button to appear and go to Insert > Shape.
MAC
WINDOWS
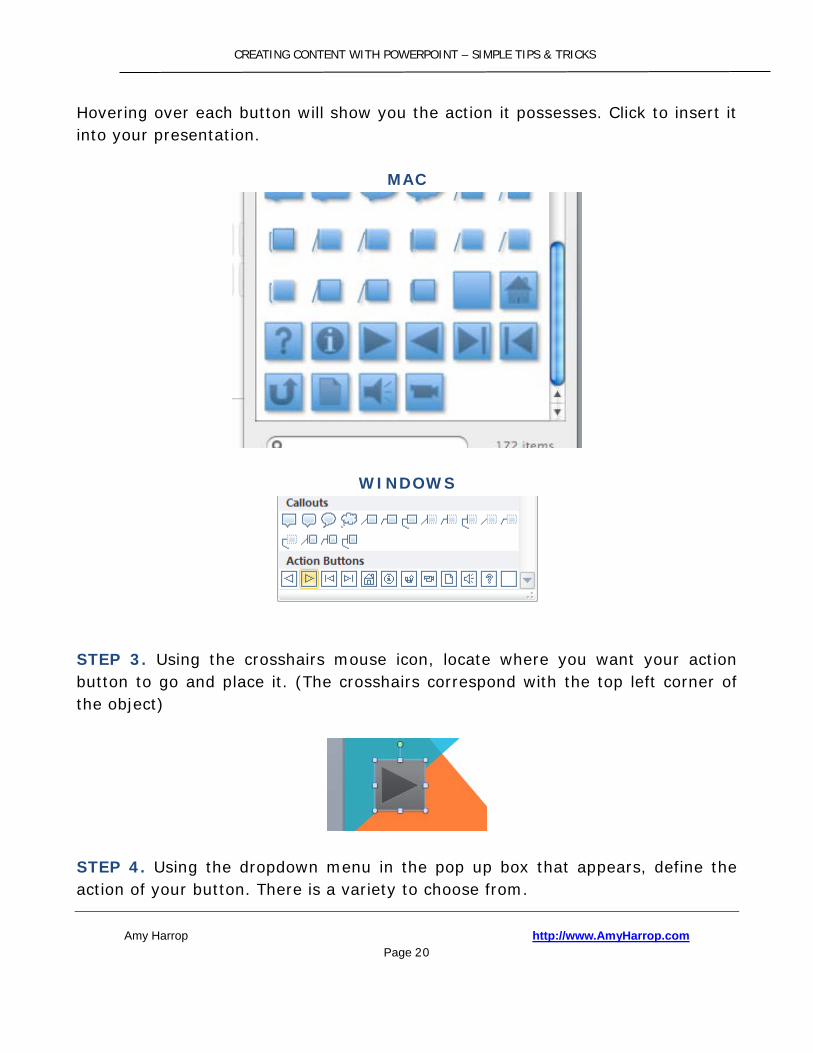
STEP 2. Scroll to the bottom of the gallery and find the Action Buttons options.
CREATING CONTENT WITH POWERPOINT – SIMPLE TIPS & TRICKS
Amy Harrop http://www.AmyHarrop.com
Page 20
Hovering over each button will show you the action it possesses. Click to insert it into your presentation.
MAC
WINDOWS
STEP 3. Using the crosshairs mouse icon, locate where you want your action button to go and place it. (The crosshairs correspond with the top left corner of the object)
STEP 4. Using the dropdown menu in the pop up box that appears, define the action of your button. There is a variety to choose from.

CREATING CONTENT WITH POWERPOINT – SIMPLE TIPS & TRICKS
Amy Harrop http://www.AmyHarrop.com
Page 21
MAC
WINDOWS
STEP 5. If you want to, you can also add an audio clip to be played upon the click.

CREATING CONTENT WITH POWERPOINT – SIMPLE TIPS & TRICKS
Amy Harrop http://www.AmyHarrop.com
Page 22
MAC
WINDOWS

CREATING CONTENT WITH POWERPOINT – SIMPLE TIPS & TRICKS
Amy Harrop http://www.AmyHarrop.com
Page 23
HOW TO #5: USE ACTION BUTTONS TO CREATE A QUESTION/ANSWER MODEL Using Action Buttons, you can turn your presentation into an interactive Question and Answer session. You’ll simply have an action button for each of your answer options. Clicking on the right answer will take people to the ‘Right Answer’ slide. Click on one or more of the wrong answers will take people to the ‘Wrong Answer’ slide. STEP 1. Create a Question slide.

CREATING CONTENT WITH POWERPOINT – SIMPLE TIPS & TRICKS
Amy Harrop http://www.AmyHarrop.com
Page 24
STEP 2. Create a Right Answer slide.
STEP 3. Create a Wrong Answer slide.
CREATING CONTENT WITH POWERPOINT – SIMPLE TIPS & TRICKS
Amy Harrop http://www.AmyHarrop.com
Page 25
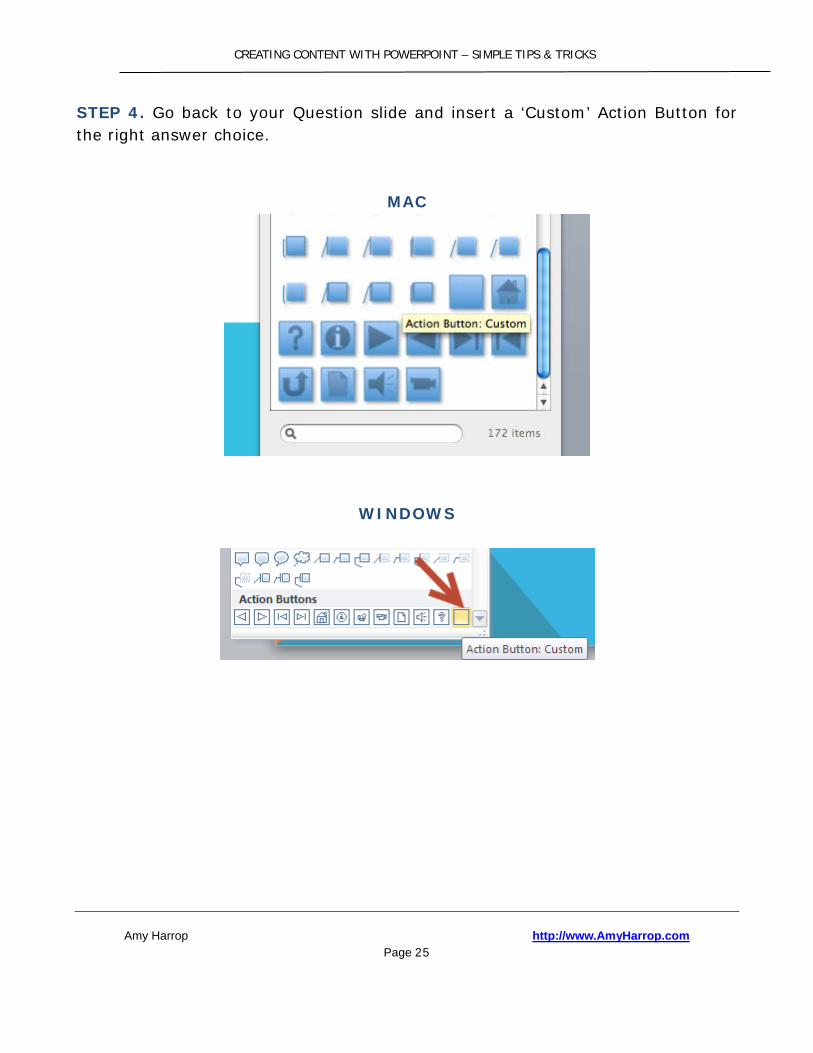
STEP 4. Go back to your Question slide and insert a ‘Custom’ Action Button for the right answer choice.
MAC
WINDOWS

CREATING CONTENT WITH POWERPOINT – SIMPLE TIPS & TRICKS
Amy Harrop http://www.AmyHarrop.com
Page 26
STEP 5. On a Mac, in the pop-up box, select the ‘Slide…’ option in the action drop down menu. In the next box, select the ‘Right Answer’ slide.
For Windows, after you draw your action button on your slide, you’ll get a slightly different pop-up menu. Click on ‘Hyperlink to:’, click on the down arrow, and scroll down to find ‘Slide’.

CREATING CONTENT WITH POWERPOINT – SIMPLE TIPS & TRICKS
Amy Harrop http://www.AmyHarrop.com
Page 27
Now pick which slide you want your viewer to go to when they click that action button. You can see a little preview of each slide when you click on it. Click on ‘OK’ and that button will now be linked.
STEP 6. Using a ‘Text Box’, place the right answer in the button you just created.
MAC

CREATING CONTENT WITH POWERPOINT – SIMPLE TIPS & TRICKS
Amy Harrop http://www.AmyHarrop.com
Page 28
WINDOWS
STEP 7. Repeating steps 4 – 6, create another button, but with a hyperlink to the Wrong Answer slide and the wrong answer in the button itself.
MAC

CREATING CONTENT WITH POWERPOINT – SIMPLE TIPS & TRICKS
Amy Harrop http://www.AmyHarrop.com
Page 29
WINDOWS
STEP 8. Your slide should look like the following. Simply ask your viewers to click the answer they think is correct. You can enhance this method a step further by putting additional information in the Right and Wrong slides.

CREATING CONTENT WITH POWERPOINT – SIMPLE TIPS & TRICKS
Amy Harrop http://www.AmyHarrop.com
Page 30
You should also test your action buttons by playing the slide show from the current slide and clicking on the action button.

CREATING CONTENT WITH POWERPOINT – SIMPLE TIPS & TRICKS
Amy Harrop http://www.AmyHarrop.com
Page 31
HOW TO #6: ANIMATE OBJECTS Sometimes adding an animation to an object on a slide can make it more interesting… But be careful not to go overboard with animations! STEP 1. Go to the slide where you wish to add an animation and then Insert > Shape.
MAC
WINDOWS

CREATING CONTENT WITH POWERPOINT – SIMPLE TIPS & TRICKS
Amy Harrop http://www.AmyHarrop.com
Page 32
STEP 2. Choose the shape you wish to place in the slide and animate.
MAC
STEP 3. Place your shape on the slide. Alter the color, size and any other format options you require.

CREATING CONTENT WITH POWERPOINT – SIMPLE TIPS & TRICKS
Amy Harrop http://www.AmyHarrop.com
Page 33
STEP 4. Go to the ‘Animation’ menu in the ribbon and select the animation you want your object to perform. You can select an entrance, emphasis or exit animation.
MAC
WINDOWS

CREATING CONTENT WITH POWERPOINT – SIMPLE TIPS & TRICKS
Amy Harrop http://www.AmyHarrop.com
Page 34
STEP 5. Your object is now animated!
Play around with different animation effects and timings. In Windows, try opening the Animation Pane to try different timings and order of animation.

CREATING CONTENT WITH POWERPOINT – SIMPLE TIPS & TRICKS
Amy Harrop http://www.AmyHarrop.com
Page 35
HOW TO #7: CHANGE THE SLIDE SIZE Sometimes you don’t want the standard slide size, depending on how you’ll be using them. For example, larger slides enable you to create imagery such as infographics with Powerpoint. STEP 1. Create a new presentation.
STEP 2. Go to File > Page Setup (Mac), Design > Page Setup (Windows). Enter the desired sizes. A good size for an infographic is the standard width of 25.4cm x 40cm, or 6” x 16” – you could even go up to 25” in height.

CREATING CONTENT WITH POWERPOINT – SIMPLE TIPS & TRICKS
Amy Harrop http://www.AmyHarrop.com
Page 36
MAC
WINDOWS
STEP 3. Click ok to return to the presentation and your altered slide. Now you’re ready to start adding content and getting creative!

CREATING CONTENT WITH POWERPOINT – SIMPLE TIPS & TRICKS
Amy Harrop http://www.AmyHarrop.com
Page 37
DISCOVER THE SECRETS TO SELLING BOOKS ON AMAZON WITH LITTLE TO NO WRITING REQUIRED!
You'll Discover:
• What Are Low and No Writing Books • How You can Easily Create These Popular Books
That Sell • The 5 Most Popular Types of No/Low Content Books • The Easiest Two Ways to Profit From These Books • The Most Popular Types of Books to Publish
Click here to learn more…

CREATING CONTENT WITH POWERPOINT – SIMPLE TIPS & TRICKS
Amy Harrop http://www.AmyHarrop.com
Page 38
BONUS TIPS 1. A good presentation will keep the text to a minimum and rely on the
speaker to present the in-depth information. Use the speaker notes to include this text and then use a printed hand-out when making the presentation itself.
2. When appropriate, add a little humor. A long presentation can get boring and you can quickly lose the attention of your viewers. Add a joke or two to keep them engaged.
3. Think about who you are talking to. Will your audience understand technical terminology?
4. Try and structure your presentation like a story to keep focus. Use a Beginning, Middle and End… or an Introduction, Information and Conclusion format.
5. Keep it simple – focus on key points/ideas and don’t bog your viewers down with unimportant information.
6. Do a test run to go over any issues you might have before giving your presentation.
7. Make sure you time your explanation with your slides. If you are talking about a point and the next slide is on the screen, your audience will be reading what’s in front of them and not listening to you.
8. Keep your audience involved by encouraging them to ask questions, or asking them questions about the presentation yourself.
9. Try to avoid monotone, boring speaking. A good rule of thumb is, when appropriate, talk to your audience as if you were talking to a friend to keep them interested in what you have to say.
10. Prepare! Create a checklist for every presentation and follow it.