creating custom .net dlls in vijeo citect 2015 · creating custom .net dlls in vijeo citect 2015...
TRANSCRIPT

Creating Custom .NET DLLs in
Vijeo Citect 2015
July 2015 – Whitepaper
Warwick Black Validation Specialist
Make the most of your energy

Contents
1. Creating Custom .NET DLLs ........................................................................................................... 4
1.1. Anatomy of a .NET DLL or ‘Class Library’ .............................................................................. 4
1.2. C# - “Hello World” DLL ............................................................................................................ 5
1.2.1. C# - Creating a new class library .................................................................................... 5
1.2.2. C# - Constructor .............................................................................................................. 6
1.2.3. C# - Properties ................................................................................................................ 7
1.2.4. C# - Methods ................................................................................................................... 7
1.2.5. C# - Building the DLL .................................................................................................... 10
1.3. VB .NET - “Hello World” DLL ................................................................................................ 11
1.3.1. VB .NET - Creating a new class library ......................................................................... 11
1.3.2. VB .NET - Constructor .................................................................................................. 12
1.3.3. VB .NET - Properties ..................................................................................................... 12
1.3.4. VB .NET - Methods ....................................................................................................... 13
1.3.5. VB .NET - Building the DLL ........................................................................................... 13
1.4. C++ .Net - Hello World .......................................................................................................... 15
1.5. C++ .NET - Creating a new class library ............................................................................... 15
1.5.1. C++ .NET - Constructor ................................................................................................ 16
1.6. C++ .NET - Properties ........................................................................................................... 17
1.6.1. C++ .NET - Methods ..................................................................................................... 18
1.6.2. C++ .NET – Building the DLL ........................................................................................ 19
1.7. Interfacing with .NET DLLs using Cicode ............................................................................. 20
1.7.1. Cicode Example ............................................................................................................ 20
1.8. Advanced C# example – Completing the loop via CTAPI .................................................... 21
1.8.1. Advanced C# example – Overview: .............................................................................. 21
1.8.2. Advanced C# example – Creating a new class library.................................................. 22
1.8.3. Advanced C# example – Add Reference to CTAPI libraries ........................................ 23
1.8.4. Advanced C# example – Constructor ........................................................................... 24
1.8.5. Advanced C# example – Properties.............................................................................. 25
1.8.6. Advanced C# example – Methods ................................................................................ 26

1.8.7. Advanced C# example – Building the DLL ................................................................... 26
1.8.8. Advanced C# example – Cicode ................................................................................... 27
1.9. Appendix A – ‘Hello World’ (C#) – full code .......................................................................... 28
1.10. Appendix B – ‘Hello World’ (VB .NET) – full code................................................................. 31
1.11. Appendix C – ‘Hello World’ (C++ .NET) – full code .............................................................. 32
1.12. Appendix D – Advanced C# Example – Full code ................................................................ 33

1. Creating Custom .NET DLLs
Prior to SCADA Expert Vijeo Citect 2015 we could only access ‘native’, or unmanaged, DLLs via the
CiCode functions:
DllOpen, DllCall, DllCallEx, DllClose
As of v7.50, we have added the following new CiCode functions to support ‘managed’ .NET Dlls:
DllClassCreate, DllClassIsValid, DllClassCallMethod,
DllClassSetProperty, DllClassGetProperty, DllClassDispose
This guide shows how to use Visual Studio 2013 Professional to create simple .NET DLLs that can be
hosted in SCADA Expert Vijeo Citect 2015.
First, we will create simple ‘Hello World’ style examples in the main .NET languages; C#, VB .NET
and C++ .NET. Then we will finish off by showing a more complex example (in C# only), which will
use CTAPI to push data from the DLL back into SCADA Expert Vijeo Citect 2015.
The full code for all examples will be contained in the appendices.
1.1. Anatomy of a .NET DLL or ‘Class Library’
The basic anatomy of a .NET DLL, or Class Library, is the same, regardless of the language used.
They consist of the following:
Constructor
A Constructor is essentially just an initialization routine. The routine runs automatically when an
instance of a Class is created, and its purpose is to set default values for that new instance.
With respect to SCADA Expert Vijeo Citect 2015, the Constructor is triggered when we call the
DllClassCreate Cicode function.
Methods
Methods are simply functions defined in the DLL that have been made accessible from an external
host. After instantiating a Class in SCADA Expert Vijeo Citect 2015, we can call methods via the
Cicode function DllClassCallMethod.
Properties
Properties are essentially Variables defined in the DLL that have been made accessible from an
external host. After instantiating a Class in SCADA Expert Vijeo Citect 2015, we can ‘get’ and ‘set’
the values of these properties via the DllClassGetProperty and DllClassSetProperty
functions.

1.2. C# - “Hello World” DLL
This is a simple example of a C# .Net DLL. The full code for this example can be found in Appendix A
– ‘Hello World’ (C#) – full code.
1.2.1. C# - Creating a new class library
The first thing that we need to do is start Visual Studio and create a new project.
Select File > New > Project to open the following dialog:
Ensure you have selected Visual C# in the left pane, and Class Library on the right.
Then be sure to fill out the Name field for your project, ours is HelloWorldCsharp
Once you have done this, press OK.

The following code will be generated and ‘Class.cs’ is automatically opened:
Change the line public class Class1 to public class HelloWorld
Your code will now look like this:
Save your code by clicking on the “Save All” button, or ‘Ctrl + Shift + S’.
1.2.2. C# - Constructor
In C# the constructor must have the same name as the Class. In this case our Constructor needs to
be called ‘HelloWorld’.
The constructor for this DLL simply sets the value of an internal variable _helloWorldString to a
default value of “Hello World!”.
using System; using System.Collections.Generic; using System.Linq; using System.Text; using System.Threading.Tasks; namespace HelloWorldCsharp { public class HelloWorld { } }
… public class HelloWorld { private string _helloWorldString; //Internal variable public HelloWorld() //Our Constructor { _helloWorldString = "Hello World!"; } } …

1.2.3. C# - Properties
In C#, properties are defined by creating a public variable, with defined Get and Set routines.
For our example, we will create a new property called Message, and we will use its Get and Set
routines to read / write to our internal variable, _helloWorldString.
The code for this is as follows:
1.2.4. C# - Methods
In this example, our Method will simply display a ‘MessageBox’, containing the text value of our
property ‘Message’.
The ‘MessageBox’ functionality is not already included in our program by default, so we need to add
its library as a reference to our project.
To do this:
Right click on “References” in the ‘Solution Explorer’ and select “Add Reference…”
… public class HelloWorld { …
public string Message //Our Property ‘Message’ { get //Called By Cicode: DLLClassGetProperty(){
return _helloWorldString; } set //Called By Cicode: DLLClassSetProperty(){ _helloWorldString = value; }
} …
} …

In the resulting popup, scroll down until you find System.Windows.Forms
Select the checkbox to the left of it
Press “OK”.
Now we have added a reference to System.Windows.Forms to our project
We still need to reference the new namespace in our code using the line
o using System.Windows.Forms
We can now reference the MessageBox.Show() function in the definition of our Method
DisplayMessage.
using System; using System.Collections.Generic; using System.Linq; using System.Text; using System.Threading.Tasks; using System.Windows.Forms; namespace HelloWorldCsharp { public class HelloWorld //Our class definition { … public void DisplayMessage() //Method ‘DisplayMessage’, called by Cicode: DLLClassCallMethod() { MessageBox.Show(Message); } } }

1.2.5. C# - Building the DLL
Ensure you have selected the ‘Release’ build profile:
Select Build > Build Solution
The Output dialog should show that the Build was successful, and the location of the
generated DLL
Navigate to this DLL and copy it to the directory of your SCADA Expert Vijeo Citect
2015 test project.

1.3. VB .NET - “Hello World” DLL
This is a simple example of a VB .Net DLL. The full code for this example can be found in Appendix B
– ‘Hello World’ (VB .NET) – full code.
1.3.1. VB .NET - Creating a new class library
The first thing that we need to do is start Visual Studio and create a new project.
Select File > New > Project to open the following dialog:
Ensure you have selected Visual Basic in the left pane, and Class Library on the right.
Then be sure to fill out the Name field for your project, ours is HelloWorldvbnet
Once you have done this, press OK.

The following code will be generated and ‘Class1.vb’ is automatically opened:
Rename the class “Class1” to “HelloWorld”. This will leave you with the following code.
Save your code by clicking on the “Save All” button, or ‘Ctrl + Shift + S’.
1.3.2. VB .NET - Constructor
A constructor is defined in VB .Net through a subroutine called ‘New’. It can take arguments, however
our example does not.
The constructor for this DLL simply sets the value of an internal variable _helloWorldString to a
default value of “Hello World!”.
1.3.3. VB .NET - Properties
In VB.NET, properties are via a ‘Property’ datatype, and making them Public, ReadOnly or
WriteOnly. You can define the Get and Set routines for them manually, although it may also be
handled automatically. (Note: for a ReadOnly property you would also omit a Set routine, and for a
WriteOnly property you would also omit a Get routine)
For our example, we will create a new public read / write property called Message, and we will use its
Get and Set routines to read / write to our internal variable, _helloWorldString.
Public Class HelloWorld End Class
Public Class HelloWorld Private _helloWorldString As String Public Sub New() 'Our Class Constructor _helloWorldString = "Hello World!" End Sub End Class

1.3.4. VB .NET - Methods
In VB .Net, methods can be Subroutines, or Functions. The difference between the two is that a
Subroutine cannot return a value, whereas a Function can. Either type can accept arguments.
1.3.5. VB .NET - Building the DLL
Ensure you have selected the ‘Release’ build profile:
Select Build > Build Solution
The Output dialog should show that the Build was successful, and the location of the
generated DLL
… Public Property Message As String 'Our Public read/write property 'rwMessage' Get Return CStr(_helloWorldString) End Get Set(value As String) _helloWorldString = value End Set End Property …
Public Sub DisplayMessage() 'Our Public Method 'DisplayMessage' MsgBox(rwMessage) End Sub Public Function DisplayThisMessage(ByVal sMessage As String) 'Our Public Method takes an argument, and returns a value MsgBox(sMessage) Return sMessage End Function

Navigate to this DLL and copy it to the Directory of you SCADA Expert Vijeo Citect 2015
test project.

1.4. C++ .Net - Hello World
This example will lead you through creating a C++ Managed Class Library (DLL), this example is
written in Visual Studio Professional 2013.
C++ is traditionally unmanaged, however, it is also possible to write a C++ application based on CLR
(Common Language Runtime) of the .NET framework, which is managed.
The C++ code for this example can be found in Appendix C – ‘Hello World’ (C++ .NET) – full code.
1.5. C++ .NET - Creating a new class library
The first thing that we need to do is start visual studio and create a new project.
Select File | New | Project to open the following dialog:
Ensure you have selected Visual C++ and its sub-item CLR in the left pane
Select Class Library on the right pane.
Then be sure to fill out the Name field for your project, ours is HelloWorldCplusplus
Once you have done this, press OK.

The following code will be generated and HelloWorldCplusplus.h is automatically
opened:
All our changes will be in either HelloWorldCplusplus.h (Header file) or
HelloWorldCplusplus.cpp (Program File).
The Header file is for declarations, and the Program file is for the Program code.
Rename the class Class1 to HelloWorld. This will leave you with the following code:
Save your code by clicking on the “Save All” button, or ‘Ctrl + Shift + S’.
1.5.1. C++ .NET - Constructor
In C++ a constructor is declared as a Public function, with the same name as the class.
This constructor sets the default value of a private variable.
// HelloWorldCplusplus.h #pragma once using namespace System; namespace HelloWorldCplusplus { public ref class HelloWorld { // TODO: Add your methods for this class here. }; }

In the Header file, add the following code to define the private variable MessageString, and
declare the public function HelloWorld:
In the Program File, add the following code to define the behavior of the HelloWorld function.
1.6. C++ .NET - Properties
In C++ .NET, properties are defined by creating Public Property data types in the Header file, with
defined Get and Set methods.
// HelloWorldCplusplus.h #pragma once namespace HelloWorldCplusplus { public ref class HelloWorld {
private: System::String^ MessageString; //Internal Variable
…
public: // Constructor - sets default values HelloWorld();
… }; }
// HelloWorldCplusplus.cpp #include "stdafx.h" #include "HelloWorldCplusplus.h" // Constructor implementation HelloWorldCplusplus::HelloWorld::HelloWorld() { MessageString = "Hello World!"; //Defined default Value }

1.6.1. C++ .NET - Methods
In C++ .NET, methods are declared in the Header file as a public function, and defined in the Program
file.
In the header file, add the function declaration:
Add the definition for the Method, into the Program File:
// HelloWorldCplusplus.h #pragma once using namespace System; namespace HelloWorldCplusplus { public ref class HelloWorld { private: System::String^ MessageString; //Internal Variable
public: // Property property System::String^ Message { System::String^ get() { return MessageString; } void set(System::String^ value) { MessageString = value; } } }; }
// HelloWorldCplusplus.h #pragma once #using <System.Windows.Forms.dll> using namespace System; namespace HelloWorldCplusplus { public ref class HelloWorld {
… public: int DisplayMessage(); // Method
… }; }
// HelloWorldCplusplus.cpp #include "stdafx.h" #include "HelloWorldCplusplus.h" int HelloWorldCplusplus::HelloWorld::DisplayMessage() { System::Windows::Forms::MessageBox::Show(MessageString); return 1; }
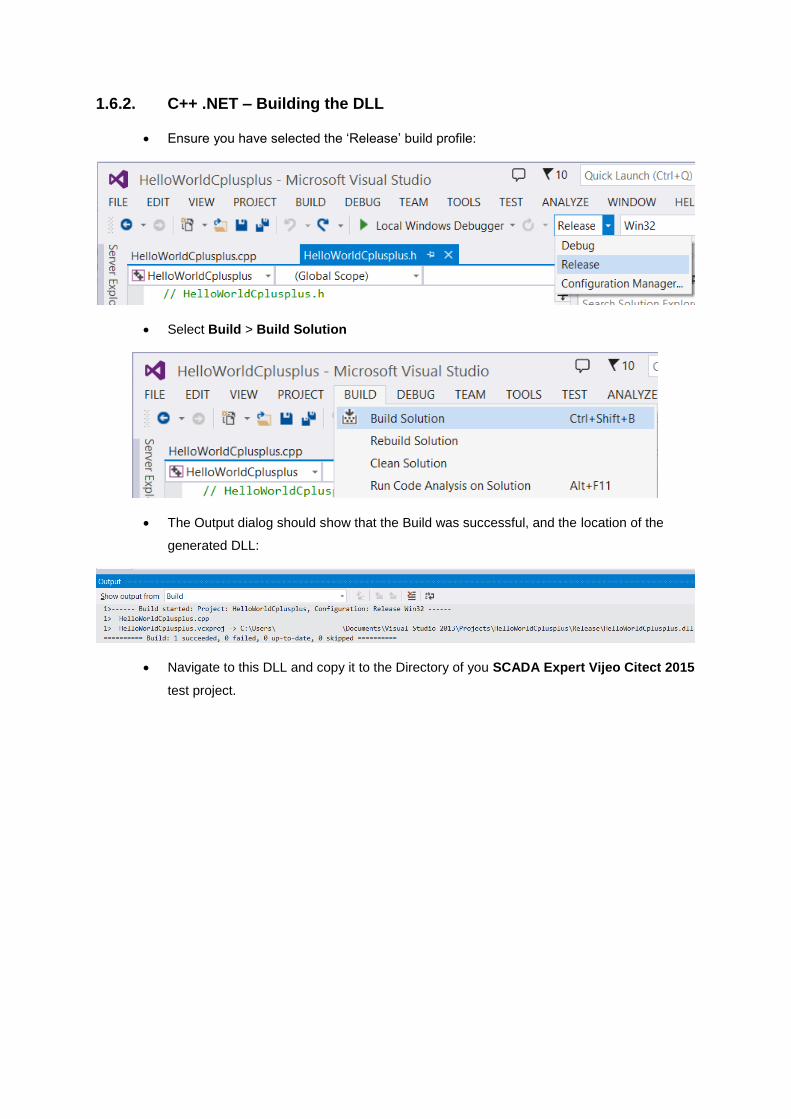
1.6.2. C++ .NET – Building the DLL
Ensure you have selected the ‘Release’ build profile:
Select Build > Build Solution
The Output dialog should show that the Build was successful, and the location of the
generated DLL:
Navigate to this DLL and copy it to the Directory of you SCADA Expert Vijeo Citect 2015
test project.

1.7. Interfacing with .NET DLLs using Cicode
The following CiCode functions are provided to interact with .NET DLLs. Their implementation
remains the same regardless of the Programming Language used to write the DLL.
DllClassCreate, DllClassIsValid, DllClassCallMethod,
DllClassSetProperty, DllClassGetProperty, DllClassDispose
1.7.1. Cicode Example
Because we used the same Class Names, Property Names, and Method Names, we can use the
same Cicode below to interact with any of the 3 DLLs we created, C#, VB or C++.
The only line that needs to change is the line which refers to the DLL’s name:
dllHandle = DllClassCreate(PathToStr("[RUN]:MyDLL.dll"),"HelloWorld")
FUNCTION testDll() STRING sResult; INT iResult; OBJECT dllHandle; ErrSet(1); //The enable capturing of IsError() //Instantiate Class. //This will trigger the Constructor in our DLL, which will set the //default values, and return a handle. dllHandle = DllClassCreate(PathToStr("[RUN]:MyDLL.dll"),"HelloWorld") //Check Validity of handle INT bResult = DllClassIsValid(dllHandle) IF (bResult) THEN //If Class is Valid, then our DLL was loaded properly //Try to read our Property 'Message'. //The value of this property will be the default value, "Hello World!" sResult = DllClassGetProperty(dllHandle,"Message") //Set the property to a different string: iResult = DllClassSetProperty(dllHandle,"Message", "My New Test Message") IF (iResult <> 0) THEN ErrLog("Error (Error Code = " + IntToStr(IsError()) + ")"); END //Call our Method to open a popup containing our new message iResult = DllClassCallMethod(dllHandle,"DisplayMessage") IF (iResult <> 0) THEN ErrLog("Error (Error Code = " + IntToStr(IsError()) + ")"); END END ErrSet(0) //The disable capturing of IsError() END

1.8. Advanced C# example – Completing the loop via CTAPI
So far, all the interaction with our DLL has been initiated from the SCADA Expert Vijeo Citect 2015
side.
But how can we send unsolicited data to SCADA Expert Vijeo Citect from your DLL? For instance,
your DLL may be collecting data from an external source and you want to push data into SCADA
Expert Vijeo Citect whenever a new value is received.
The only way of passing data back to the host, unsolicited, is to use the CTAPI interface, which we
will demonstrate in this advanced example.
1.8.1. Advanced C# example – Overview:
This DLL will generate random values, at a configurable time interval, for a configurable tag name,
and send unsolicited updates to the locally running Citect instance via CTAPI.
This DLL will expose the following:
Properties:
target – The name of the Citect Tag you wish to update (read / write)
value – The current tag value (read-only)
minValue – The lower bound to the randomly generated data (read / write)
maxValue – The upper bound to the randomly generated data (read / write)
interval – The interval at which data is randomly generated (read / write)
Methods:
StartGenerating() – Starts generating data, and pushes results via CTAPI
StopGenerating() – Stops generating data, stop notifying Citect.
CTAPI client:
Includes code to communicate to Citect SCADA via CTAPI and push data into it.

1.8.2. Advanced C# example – Creating a new class library
The first thing that we need to do is start Visual Studio and create a new project.
Select File > New > Project to open the following dialog:
Ensure you have selected Visual C# in the left pane, and Class Library on the right.
Then be sure to fill out the Name field for your project, ours is DLL_CtapiEvents
Once you have done this, press OK.
The following code will be generated and ‘Class1.cs’ is automatically opened:
Change the line public class Class1 to public class DLL_Ctapi

Your code will now look like this:
Save your code by clicking on the “Save All” button, or ‘Ctrl + Shift + S’.
1.8.3. Advanced C# example – Add Reference to CTAPI libraries
The easiest way to add CTAPI support to a C# program is to add existing file (available here) called
CTAPI.cs, which already contains the mapping to the unmanaged CTAPI DLLs.
Add this file as a reference to your project, then add it’s namespace to your ‘class1.cs’ file.
Right click your project, select Add, then Existing Item, then navigate to your
downloaded copy of CTAPI.cs.
Add the namespace Citect.Util to your ‘class1.cs’ file.
using System; using System.Collections.Generic; using System.Linq; using System.Text; using System.Threading.Tasks; namespace DLL_CtapiEvents { public class DLL_Ctapi { } }

1.8.4. Advanced C# example – Constructor
In C# the constructor must have the same name as the Class. In this case our Constructor needs to
be called Dll_Ctapi.
We have defined private variables outside the constructor, and in the constructor we give these
variables some default values.
using System; using System.Collections.Generic; using System.Linq; using System.Text; using System.Threading.Tasks; using Citect.Util; namespace DLL_CtapiEvents { public class DLL_Ctapi { } }
using System.Timers; … public class DLL_Ctapi { static Timer _timer; // From System.Timers
private int _timerInterval; private string _target; private double _value; private double _minValue; private double _maxValue; public DLL_Ctapi() //Class Constructor, called by Cicode: DLLClassCreate() { _timerInterval = 3000; //Set default interval to 30 seconds. _target = "Tag1"; //Set default name to 'Tag1' _minValue = 0; _maxValue = 100; } } …

1.8.5. Advanced C# example – Properties
We expose the requisite properties with the below code:
//READ/WRITE, Tag name of the Targeted Tag public string target { get //Called By Cicode: DLLClassGetProperty() { return _target; } set //Called By Cicode: DLLClassSetProperty() { _target = value; } } //READ ONLY, This is the current value public double value { get //Called By Cicode: DLLClassGetProperty() { return _value; } } //READ/WRITE, This is the lowest generated value public double minValue { get //Called By Cicode: DLLClassGetProperty() { return _minValue; } set //Called By Cicode: DLLClassSetProperty() { _minValue = value; } } //READ/WRITE, This is the highest generated value public double maxValue { get //Called By Cicode: DLLClassGetProperty() { return _maxValue; } set //Called By Cicode: DLLClassSetProperty() { _maxValue = value; } } //READ/WRITE, The interval that our random data is updated at. public int interval { get //Called By Cicode: DLLClassGetProperty() { return _timerInterval; } set //Called By Cicode: DLLClassSetProperty() { _timerInterval = value; _timer.Interval = _timerInterval; //set the interval
} } …

1.8.6. Advanced C# example – Methods
The public methods can be defined as show below, along with some internally called private
functions:
1.8.7. Advanced C# example – Building the DLL
Ensure you have selected the ‘Release’ build profile:
Select Build > Build Solution
The Output dialog should show that the Build was successful, and the location of the
generated DLL
Navigate to this DLL and copy it to the Directory of you SCADA Expert Vijeo Citect 2015
test project.
//Non-default libraries: using Citect.Util; //Our CTAPI class, defined in CTAPI.cs using System.Timers; //For our timer task … public int startGenerating() { _timer = new Timer(interval); //sets up new timer, at our interval rate. _timer.AutoReset = true; //So it triggers everytime, not just once. _timer.Elapsed += new ElapsedEventHandler(_timer_Elapsed)//Event handler _timer.Enabled = true; // Enable Timer return 0; } private void _timer_Elapsed(object sender, ElapsedEventArgs e) { Random random = new Random(); _value = Math.Round(random.NextDouble() * (_maxValue - _minValue) +
_minValue,2); string sResult = sendViaCTAPI(_target, _value.ToString()); } public int stopGenerating() { _timer.Enabled = false; // Disable Timer _timer.Dispose(); return 0; } //Send data via CTAPI to the local running Citect Client private string sendViaCTAPI(string tagName, string tagValue) { StringBuilder sResultBuffer = new StringBuilder(255); uint hCTAPI = CTAPI.ctOpen("", "", "", CTAPI.CT_OPEN_BATCH); CTAPI.ctTagWrite(hCTAPI, tagName, tagValue); return sResultBuffer.ToString(); }

1.8.8. Advanced C# example – Cicode
The following Cicode shows how to change the properties from their default values, start, stop and
update the interval at which the random data is generated.
Note: C# is Case Sensitive, calling methods without the exact syntax will fail.
GLOBAL OBJECT hComplexDLL; FUNCTION MyComplexDll() INT iResult; hComplexDLL = DllClassCreate(PathToStr("[RUN]:DLL_CtapiEvents.dll"),"DLL_Ctapi") INT currentInterval,currentMin,currentMax, currentValue; STRING currentTarget; IF DllClassIsValid(hComplexDLL) THEN iResult = DllClassSetProperty(hComplexDLL,"interval","10000"); ErrLog("setInterval: " + IntToStr(iResult)); iResult = DllClassSetProperty(hComplexDLL,"target","MyTagOne"); ErrLog("setTarget: " + IntToStr(iResult)); iResult = DllClassSetProperty(hComplexDLL,"minValue","10"); ErrLog("setMinValue: " + IntToStr(iResult)); iResult = DllClassSetProperty(hComplexDLL,"maxValue","1100"); ErrLog("setMaxValue: " + IntToStr(iResult)); currentInterval = DllClassGetProperty(hComplexDLL,"interval"); currentTarget = DllClassGetProperty(hComplexDLL,"target"); currentMin = DllClassGetProperty(hComplexDLL,"minValue"); currentMax = DllClassGetProperty(hComplexDLL,"maxValue"); currentValue = DllClassGetProperty(hComplexDLL,"value"); //Start Generating Values iResult = DllClassCallMethod(hComplexDLL,"startGenerating"); ErrLog("startGenerating: " + IntToStr(iResult)); END END FUNCTION stopComplexDll() INT iResult; iResult = DllClassCallMethod(hComplexDLL,"stopGenerating"); ErrLog("stopGenerating: " + IntToStr(iResult)); iResult = DllClassDispose(hComplexDLL); ErrLog("Dispose: " + IntToStr(iResult)); END FUNCTION updateComplexDll1() INT iResult; iResult = DllClassSetProperty(hComplexDLL,"interval","1000"); ErrLog("setInterval: " + IntToStr(iResult)); END FUNCTION updateComplexDll5() INT iResult; iResult = DllClassSetProperty(hComplexDLL,"interval","5000"); ErrLog("setInterval: " + IntToStr(iResult)); END

1.9. Appendix A – ‘Hello World’ (C#) – full code
//A Simple Class library that will generate random values at a defined interval, and update a defined tag via CTAPI. // Author: Warwick Black 2015. using System; using System.Collections.Generic; using System.Linq; using System.Text;
using System.Threading.Tasks;
//Non-default libraries: using Citect.Util; //Our CTAPI class, defined in CTAPI.cs using System.Timers; //For our timer task namespace DLL_CtapiEvents { public class DLL_Ctapi { static Timer _timer; // From System.Timers private int _timerInterval; private string _target; private double _value; private double _minValue; private double _maxValue; public DLL_Ctapi() //Class Constructor, called by Cicode: DLLClassCreate() { _timerInterval = 3000; //Set default interval to 30 seconds. _target = "Tag1"; //Set default name to 'Tag1' _minValue = 0; _maxValue = 100; } //READ/WRITE, Tag name of the Targeted Tag public string target { get //Called By Cicode: DLLClassGetProperty() { return _target; } set //Called By Cicode: DLLClassSetProperty() { _target = value; } } //READ ONLY, This is the current value public double value { get //Called By Cicode: DLLClassGetProperty() { return _value; } }

//READ/WRITE, This is the lowest generated value public double minValue { get //Called By Cicode: DLLClassGetProperty() { return _minValue; } set //Called By Cicode: DLLClassSetProperty() { _minValue = value; } } //READ/WRITE, This is the highest generated value public double maxValue { get //Called By Cicode: DLLClassGetProperty() { return _maxValue; } set //Called By Cicode: DLLClassSetProperty() { _maxValue = value; } } //READ/WRITE, The interval that our random data is updated at. public int interval { get //Called By Cicode: DLLClassGetProperty() { return _timerInterval; } set //Called By Cicode: DLLClassSetProperty() { _timerInterval = value; _timer.Interval = _timerInterval; //set the interval } } public int startGenerating() { _timer = new Timer(interval); //sets up new timer, at our interval rate. _timer.AutoReset = true; //So it triggers everytime, not just once. _timer.Elapsed += new ElapsedEventHandler(_timer_Elapsed); //Defines event handler for when the timer elapses. _timer.Enabled = true; // Enable Timer return 0; } private void _timer_Elapsed(object sender, ElapsedEventArgs e) { Random random = new Random(); _value = Math.Round(random.NextDouble() * (_maxValue - _minValue) + _minValue,2); string sResult = sendViaCTAPI(_target, _value.ToString()); } public int stopGenerating() { _timer.Enabled = false; // Disable Timer _timer.Dispose(); return 0; }

//Send data via CTAPI to the local running Citect Client private string sendViaCTAPI(string tagName, string tagValue) { StringBuilder sResultBuffer = new StringBuilder(255); uint hCTAPI = CTAPI.ctOpen("", "", "", CTAPI.CT_OPEN_BATCH); CTAPI.ctTagWrite(hCTAPI, tagName, tagValue); return sResultBuffer.ToString(); } } }

1.10. Appendix B – ‘Hello World’ (VB .NET) – full code
Public Class HelloWorld Private _helloWorldString As String Public Sub New() 'Class Constructor _helloWorldString = "Hello World!" End Sub Public Property rwMessage As String 'A Public read/write property 'rwMessage' Get Return CStr(_helloWorldString) End Get Set(value As String) _helloWorldString = value End Set End Property ReadOnly Property rMessage As String 'A readonly property 'rMessage' Get Return CStr(_helloWorldString) End Get End Property WriteOnly Property wMessage As String 'A writeonly property 'wMessage' Set(value As String) _helloWorldString = value End Set End Property Public Sub DisplayMessage() 'A Public Method (Subroutine) 'DisplayMessage' that cannot return a value MsgBox(rwMessage) End Sub 'Our Public Method (Function) 'DisplayThisMessage' which takes an argument, and returns a value Public Function DisplayThisMessage(ByVal sMessage As String) MsgBox(sMessage) Return sMessage End Function End Class

1.11. Appendix C – ‘Hello World’ (C++ .NET) – full code
// HelloWorldCplusplus.h
#pragma once
#using <System.Windows.Forms.dll>
using namespace System;
namespace HelloWorldCplusplus {
public ref class HelloWorld
{
private:
System::String^ MessageString; //Internal Variable
public:
// Constructor - sets default values
HelloWorld();
// Method
int DisplayMessage();
// Property
property System::String^ Message
{
System::String^ get() {
return MessageString;
}
void set(System::String^ value) {
MessageString = value;
}
}
};
}
// HelloWorldCplusplus.cpp
#include "stdafx.h"
#include "HelloWorldCplusplus.h"
// Constructor implementaion
HelloWorldCplusplus::HelloWorld::HelloWorld()
{
MessageString = "Hello World!"; //Defined default Value
}
int HelloWorldCplusplus::HelloWorld::DisplayMessage()
{
System::Windows::Forms::MessageBox::Show(MessageString);
return 1;
}

1.12. Appendix D – Advanced C# Example – Full code
//A Simple Class library that will generate random values at a defined
interval, and update a defined tag via CTAPI.
// Author: Warwick Black 2015.
using System;
using System.Collections.Generic;
using System.Linq;
using System.Text;
using System.Threading.Tasks;
//Non-default libraries:
using Citect.Util; //Our CTAPI class, defined in CTAPI.cs
using System.Timers; //For our timer task
namespace DLL_CtapiEvents
{
public class DLL_Ctapi
{
static Timer _timer; // From System.Timers
private int _timerInterval;
private string _target;
private double _value;
private double _minValue;
private double _maxValue;
public DLL_Ctapi() //Class Constructor, called by Cicode:
DLLClassCreate()
{
_timerInterval = 3000; //Set default interval to 30 seconds.
_target = "Tag1"; //Set default name to 'Tag1'
_minValue = 0;
_maxValue = 100;
}
//READ/WRITE, Tag name of the Targeted Tag
public string target
{
get //Called By Cicode: DLLClassGetProperty()
{
return _target;
}
set //Called By Cicode: DLLClassSetProperty()
{
_target = value;
}
}
//READ ONLY, This is the current value
public double value
{
get //Called By Cicode: DLLClassGetProperty()
{
return _value;
}
}

//READ/WRITE, This is the lowest generated value
public double minValue
{
get //Called By Cicode: DLLClassGetProperty()
{
return _minValue;
}
set //Called By Cicode: DLLClassSetProperty()
{
_minValue = value;
}
}
//READ/WRITE, This is the highest generated value
public double maxValue
{
get //Called By Cicode: DLLClassGetProperty()
{
return _maxValue;
}
set //Called By Cicode: DLLClassSetProperty()
{
_maxValue = value;
}
}
//READ/WRITE, The interval that our random data is updated at.
public int interval
{
get //Called By Cicode: DLLClassGetProperty()
{
return _timerInterval;
}
set //Called By Cicode: DLLClassSetProperty()
{
_timerInterval = value;
_timer.Interval = _timerInterval; //set the interval
}
}
public int startGenerating()
{
_timer = new Timer(interval); //sets up new timer, at our
interval rate.
_timer.AutoReset = true; //So it triggers everytime, not
just once.
_timer.Elapsed += new ElapsedEventHandler(_timer_Elapsed);
//Defines event handler for when the timer elapses.
_timer.Enabled = true; // Enable Timer
return 0;
}
private void _timer_Elapsed(object sender, ElapsedEventArgs e)
{
Random random = new Random();
_value = Math.Round(random.NextDouble() * (_maxValue -
_minValue) + _minValue,2);
string sResult = sendViaCTAPI(_target, _value.ToString());
}

public int stopGenerating()
{
_timer.Enabled = false; // Disable Timer
_timer.Dispose();
return 0;
}
//Send data via CTAPI to the local running Citect Client
private string sendViaCTAPI(string tagName, string tagValue)
{
StringBuilder sResultBuffer = new StringBuilder(255);
uint hCTAPI = CTAPI.ctOpen("", "", "", CTAPI.CT_OPEN_BATCH);
CTAPI.ctTagWrite(hCTAPI, tagName, tagValue);
return sResultBuffer.ToString();
}
}
}