creating open source repository of 3d models of...
TRANSCRIPT
Creating Open Source Repository of 3D Models of
Laboratory Equipments using Blender
Abstract— Laboratory experiments provide hands on experience to students, thereby enhancing their understanding of the given topic. Often, due to lack of resources, interactive simulations of laboratory experiments are an attractive substitute. Simulations could be two dimensional (2D) or they could be three dimensional(3D). 3D has added advantages of multiple viewing angles, more realistic views with textures and lights, and cross-section walk-through.The process of creating a 3D simulation for a lab
experiment is time consuming. Typically, it has 3 stages: Modeling, Animation and Adding Interactivity. We believe that a significant amount of time, money and effort could be saved if a repository of 3D models created using some Open Source software (such as Blender) is available. This will allow animators and programmers to concentrate on the further stages. In this paper we have identified the key design goals and
present a methodology to create a repository of 3D models. We have used this methodology to create more than 40 models in Blender, in about 4 months. These models can be downloaded and directly used by anyone. Moreover others can use this methodology to create their own model repository.
Keywords- 3D animation repositories; Content creation methodologies; Open Source content;
I.INTRODUCTION
It is well-known that laboratory experiments provide hands on experience to students, thereby enhancing their understanding of the given topic. However, well-equipped laboratories are not available in many universities, especially in developing countries, due to the expensesinvolved in terms of infrastructure setup, trained manpower and maintenance.
So, simulations of laboratory experiments are an attractive substitute. Simulations are not only reusable and accessible to large numbers of users, but also can be maintained, modified or upgraded with minimal resources. When such simulations have sufficient interactivity and user control, they can be a close approximation to performing the experiment in a real-life laboratory [18]. As an added advantage, simulations could even go a step further and allow user to experiment with parameter values that cannot be done in a real-life laboratory. For example, in a
simulation of electric circuit, the value of the current can be increased to levels that would be dangerous in a real-life experiment. Hence it is desirable to build a repository of simulations of laboratory experiments.
These simulations could be two dimensional (2D) and built using tools such as Flash, Java, or they could be three dimensional(3D) and built using tools such as 3-D Max, Blender. Often 3D simulations of laboratory experiments offers more facilities to the user, as compared to 2D. Forexample, multiple viewing angles, more realistic views with textures and lights, and cross-section walk-through, etc. Hence it is desirable to create 3D simulations for lab experiments. These could be of two types: (i) Simulations - Visualizations having user-driven interactivity and (ii) Animations - Visualizations without user-control. Both these types could be created using 3D animation software.
Now there are many 3D animation software available. Most of these, such as 3-D Max and Maya, are proprietary. The usefulness of the experiments built using such software is limited to those colleges that can afford them. On the other hand, 3D simulations/animations built using Open Source tools, such as Blender, can be more widely disseminated, have scope for customization by users, etc. In general, using Blender gives us all the advantages of any Open Source software.[20]
Now the process of creating a 3D simulation for a lab experiment is time consuming. Typically, it has 3 stages: Modeling, Animation and Adding Interactivity. One way to reduce the overall time taken would be to pipeline these stages, using people who specialize in each stage. So a Modeler would go on creating models, which can be input to an Animator, thereby gaining the standard advantages of pipelining.[19]Another way to reduce the overall time taken to create 3D simulations is to build a repository of commonly used models. This is more useful than even the pipelining strategy, since the time taken to create the Modelneed not be considered as part of the development effort. Animators and Programmers can in corporate readily available models and concentrate on the further stages of developing the simulation. Hence we believe that it would be useful to create a repository of models of laboratoryequipment. Moreover, if these models are created using Open Source software, their usefulness is further increased.
In this paper, we present a methodology to create a repository of 3D models. Using Blender as the Open
Source software, we have created 40 models of laboratory equipment, in about 4months. Our key contributions are: (i) A repository of models that could be downloaded and directly used by anyone, (ii) Identification of key design goals that should be met by any such model repository and (iii) A well-defined methodology for creating the repository,in line with the design goals. As a result,anyone can use this methodology to create their own model repository and/or contribute to our/other open source efforts. In section II, we give the background on 3D modeling process. In section III, we present the key design goals identified and in section IV our detailed methodology. In section V, we show examples that validate how our methodology meets the design goals. In Section VI we conclude with directions of our future work.
II.BACKGROUND
Scientific visualization has the potential to make science education more accessible [14]. Students often find it difficult to conceptualize the scientific diagrams of the experiments in the textbooks. Animation provides the ability to add motion to these static diagrams. Positive learning effects of animation have been seen in many areas [13] like Physics, Microbiology and Mathematics.
Two dimensional (2D) animation is widely prevalent, and has been shown to be successful in many areas [1]. It also has its own limitations mainly regarding the visualization possibilities of showing the depth of the objects apart from the length and breadth. Advent of three dimensional (3D) animation has expanded the possibilities and scope of the content in many ways especially for the laboratory experiments. 3D animation not only continues to have the advantages offered by 2D, like interactivity and reusability, but also adds a whole new dimension of visualization possibilities. It makes it feasible to go beyond the flat view and see the experiments from multiple angle.[10] For example: Internal organs of human body right up to micro/nano level of DNA strands, walk through of a solar system and cross sections of mechanical engine. We focus on creating repository of 3D models for animation in this paper.
A.Advantages of 3D Animation repositories
Access to 3D animation, especially for educational content is increasing. Availability and accessibility of animation is an important area to be looked at. Instructors today, plan to use animated content in classrooms, but often don’t have time to create it themselves. The web search of animation is often time consuming problem faced by the users is typically of the filtering of the content. That is it becomes a huge task to weed out the unnecessary links, and pages where the required animation is not present [15]. A collection with a specific categorization as per the domains, may be preferable option. A repository is a collection of resources that can be accessed to retrieve information [12]. 3D animation repositories could be one of the option to solve the problems mentioned above.
B.Process of creating 3D animation
The process of animation production is typically split in three stages. These are (i) modeling, (ii) animation and (iii) adding interactivity. These stages are dependent on each other, and need artists/developers with specific skill sets respectively. For example: Modelers focus on the 3D look and feel of the mesh, and animators, mainly concentrate on the motion of those models. Further to this, when it comes to adding interactivity, a new skill set is required such as scripting.
This makes the process resource intensive in terms of man power as well as hardware/software required. In such conditions online repositories of animation are likely to be useful.
Repositories can have a collection of 3D models, in a format that can be used by any 3D software. The users can then use the 3D models and create their own animation or interactivity as per their requirement [15]. We have seen that there can be multiple experiments using the same apparatus. For example: Resistance box is used in the experiment explaining Ohm's law, and also in the experiment to determine the internal resistance of a cell by using a potentiometer.
If models are readily available, then the total time for production of 3D content will reduce as illustrated below. We have considered three different approaches of
creating three animations for laboratory experiment. The first approach is Monolithic approach. Here
the animator starts from modeling and creates animations. Other approach is Modular pipeline approach where a team of three(an animator, a modeler, a programmer) starts their tasks one by one, that is when the modeler finish modeling animator starts its animation and after the animation is completed interactivity is added to the animation by programmer. Third approach is where two persons(an animator and a programmer) make use of the models that are already created for creating the same three animations. It is assumed that teams in all the approaches have undergone basic training in an appropriate 3D animation software. Consider an experiment of Ohm's law from High
school Physics curriculum. This experiment has 6 objects (Resistance box, Voltmeter, Milliammeter, Battery, Connecting wires, Rheostat). For a modeler it takes 2 days(5hrs a day) that is 10 hrs to create a 3D model of an object of above mentioned experiment. Considering the complexity of the objects on an average it will take 12 days that is(12*5)60 hrs to model these six objects.After this an animator will take maximum 6 days (6*5)30 hrs to animate the experiment. Further a programmer will need 2 days that is(2*5) 10 hrs. Hence, it takes 100 hrs to create animation.
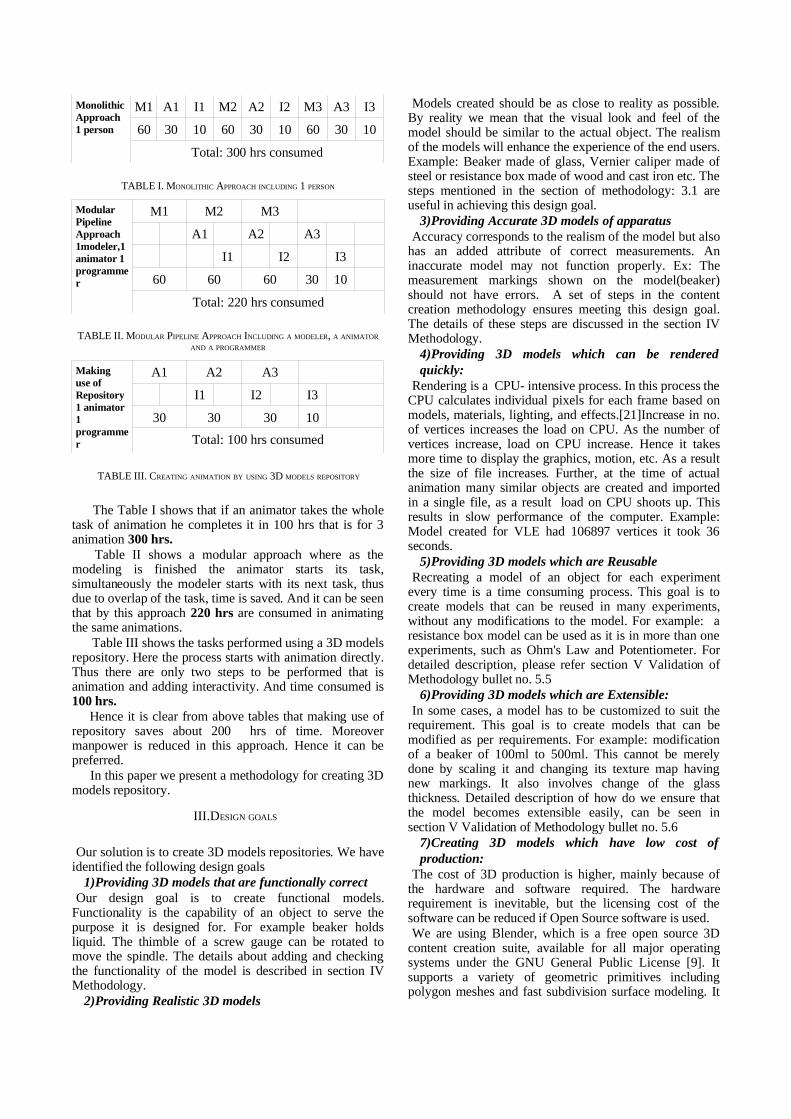
Monolithic Approach1 person
M1 A1 I1 M2 A2 I2 M3 A3 I3
60 30 10 60 30 10 60 30 10
Total: 300 hrs consumed
TABLE I. MONOLITHIC APPROACH INCLUDING 1 PERSON
Modular Pipeline Approach1modeler,1 animator 1 programmer
M1 M2 M3
A1 A2 A3
I1 I2 I3
60 60 60 30 10
Total: 220 hrs consumed
TABLE II. MODULAR PIPELINE APPROACH INCLUDING A MODELER, A ANIMATOR AND A PROGRAMMER
Makinguse of Repository1 animator 1 programmer
A1 A2 A3
I1 I2 I3
30 30 30 10
Total: 100 hrs consumed
TABLE III. CREATING ANIMATION BY USING 3D MODELS REPOSITORY
The Table I shows that if an animator takes the whole task of animation he completes it in 100 hrs that is for 3 animation 300 hrs. Table II shows a modular approach where as the modeling is finished the animator starts its task, simultaneously the modeler starts with its next task, thus due to overlap of the task, time is saved. And it can be seen that by this approach 220 hrs are consumed in animating the same animations. Table III shows the tasks performed using a 3D models repository. Here the process starts with animation directly. Thus there are only two steps to be performed that is animation and adding interactivity. And time consumed is 100 hrs. Hence it is clear from above tables that making use of repository saves about 200 hrs of time. Moreover manpower is reduced in this approach. Hence it can be preferred. In this paper we present a methodology for creating 3D
models repository.
III.DESIGN GOALS
Our solution is to create 3D models repositories. We have identified the following design goals
1)Providing 3D models that are functionally correctOur design goal is to create functional models.
Functionality is the capability of an object to serve the purpose it is designed for. For example beaker holds liquid. The thimble of a screw gauge can be rotated to move the spindle. The details about adding and checking the functionality of the model is described in section IV Methodology.
2)Providing Realistic 3D models
Models created should be as close to reality as possible. By reality we mean that the visual look and feel of the model should be similar to the actual object. The realism of the models will enhance the experience of the end users. Example: Beaker made of glass, Vernier caliper made of steel or resistance box made of wood and cast iron etc. The steps mentioned in the section of methodology: 3.1 are useful in achieving this design goal.
3)Providing Accurate 3D models of apparatusAccuracy corresponds to the realism of the model but also
has an added attribute of correct measurements. An inaccurate model may not function properly. Ex: The measurement markings shown on the model(beaker) should not have errors. A set of steps in the content creation methodology ensures meeting this design goal. The details of these steps are discussed in the section IV Methodology.
4)Providing 3D models which can be rendered quickly:
Rendering is a CPU- intensive process. In this process the CPU calculates individual pixels for each frame based on models, materials, lighting, and effects.[21]Increase in no. of vertices increases the load on CPU. As the number of vertices increase, load on CPU increase. Hence it takes more time to display the graphics, motion, etc. As a result the size of file increases. Further, at the time of actual animation many similar objects are created and imported in a single file, as a result load on CPU shoots up. This results in slow performance of the computer. Example: Model created for VLE had 106897 vertices it took 36 seconds.
5)Providing 3D models which are ReusableRecreating a model of an object for each experiment
every time is a time consuming process. This goal is to create models that can be reused in many experiments, without any modifications to the model. For example: a resistance box model can be used as it is in more than one experiments, such as Ohm's Law and Potentiometer. For detailed description, please refer section V Validation of Methodology bullet no. 5.5
6)Providing 3D models which are Extensible:In some cases, a model has to be customized to suit the
requirement. This goal is to create models that can be modified as per requirements. For example: modification of a beaker of 100ml to 500ml. This cannot be merely done by scaling it and changing its texture map having new markings. It also involves change of the glass thickness. Detailed description of how do we ensure that the model becomes extensible easily, can be seen in section V Validation of Methodology bullet no. 5.6
7)Creating 3D models which have low cost of production:
The cost of 3D production is higher, mainly because of the hardware and software required. The hardware requirement is inevitable, but the licensing cost of the software can be reduced if Open Source software is used. We are using Blender, which is a free open source 3D
content creation suite, available for all major operating systems under the GNU General Public License [9]. It supports a variety of geometric primitives including polygon meshes and fast subdivision surface modeling. It
has advanced tools for key framed animation, including inverse kinematics and armature (skeletal). It also has a game engine for adding interactivity to the
animations. Currently, Blender has been used in different entertainment domains like animated movies, short films, television commercials, and gaming. [11]As Blender is a free software, we plan to utilize this
aspect and release the models created in Blender, in Open Source (OS) domain.We show validation examples of the design goals explained above in the section V Validation of Methodology.
IV.METHODOLOGY
TABLE IV:
Process of 3D animation
Stages of Modeling Steps involved
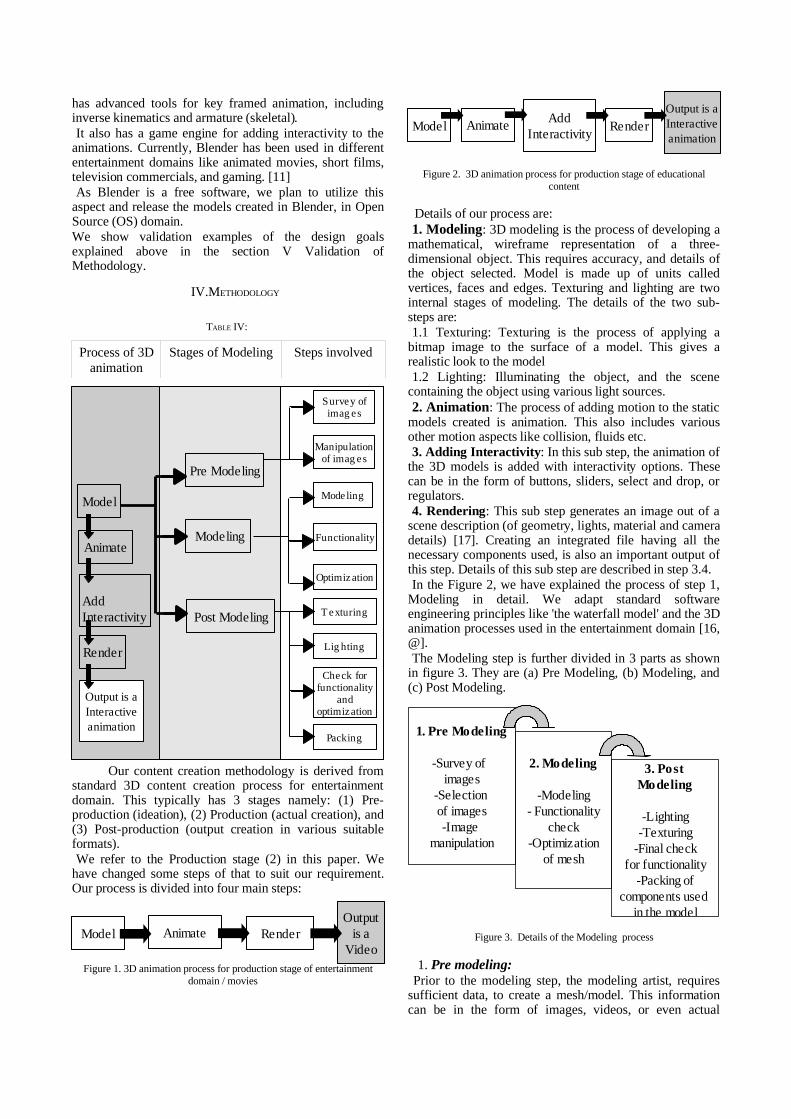
Our content creation methodology is derived from standard 3D content creation process for entertainment domain. This typically has 3 stages namely: (1) Pre-production (ideation), (2) Production (actual creation), and (3) Post-production (output creation in various suitable formats). We refer to the Production stage (2) in this paper. We
have changed some steps of that to suit our requirement. Our process is divided into four main steps:
Figure 1. 3D animation process for production stage of entertainment domain / movies
Figure 2. 3D animation process for production stage of educational content
Details of our process are:1. Modeling: 3D modeling is the process of developing a
mathematical, wireframe representation of a three-dimensional object. This requires accuracy, and details of the object selected. Model is made up of units called vertices, faces and edges. Texturing and lighting are two internal stages of modeling. The details of the two sub-steps are:1.1 Texturing: Texturing is the process of applying a
bitmap image to the surface of a model. This gives a realistic look to the model1.2 Lighting: Illuminating the object, and the scene
containing the object using various light sources.2. Animation: The process of adding motion to the static
models created is animation. This also includes various other motion aspects like collision, fluids etc. 3. Adding Interactivity: In this sub step, the animation of
the 3D models is added with interactivity options. These can be in the form of buttons, sliders, select and drop, or regulators.4. Rendering: This sub step generates an image out of a
scene description (of geometry, lights, material and camera details) [17]. Creating an integrated file having all the necessary components used, is also an important output of this step. Details of this sub step are described in step 3.4.In the Figure 2, we have explained the process of step 1,
Modeling in detail. We adapt standard software engineering principles like 'the waterfall model' and the 3D animation processes used in the entertainment domain [16, @]. The Modeling step is further divided in 3 parts as shown
in figure 3. They are (a) Pre Modeling, (b) Modeling, and (c) Post Modeling.
Figure 3. Details of the Modeling process
1. Pre modeling: Prior to the modeling step, the modeling artist, requires sufficient data, to create a mesh/model. This information can be in the form of images, videos, or even actual
Model Animate Render
Model Animate RenderAdd
Interactivity
1. Pre Modeling
-Survey of images
-Selection of images-Image
manipulation
2. Modeling
-Modeling- Functionality
check-Optimization
of mesh
3. Post Modeling
-Lighting-Texturing
-Final checkfor functionality
-Packing ofcomponents used
in the model
Output is aInteractive animation
Model
Animate
Add Interactivity
Render
Output is aInteractive animation
Pre Modeling
Modeling
Post Modeling
Survey of imag es
Manipulation of imag es
Mode ling
Functionality
Optimiz ation
T exturing
Lig hting
Check for functionality
and optimization
Packing
Output is a
Video
handling of the objects. Following are the sub-steps that are followed in this step:
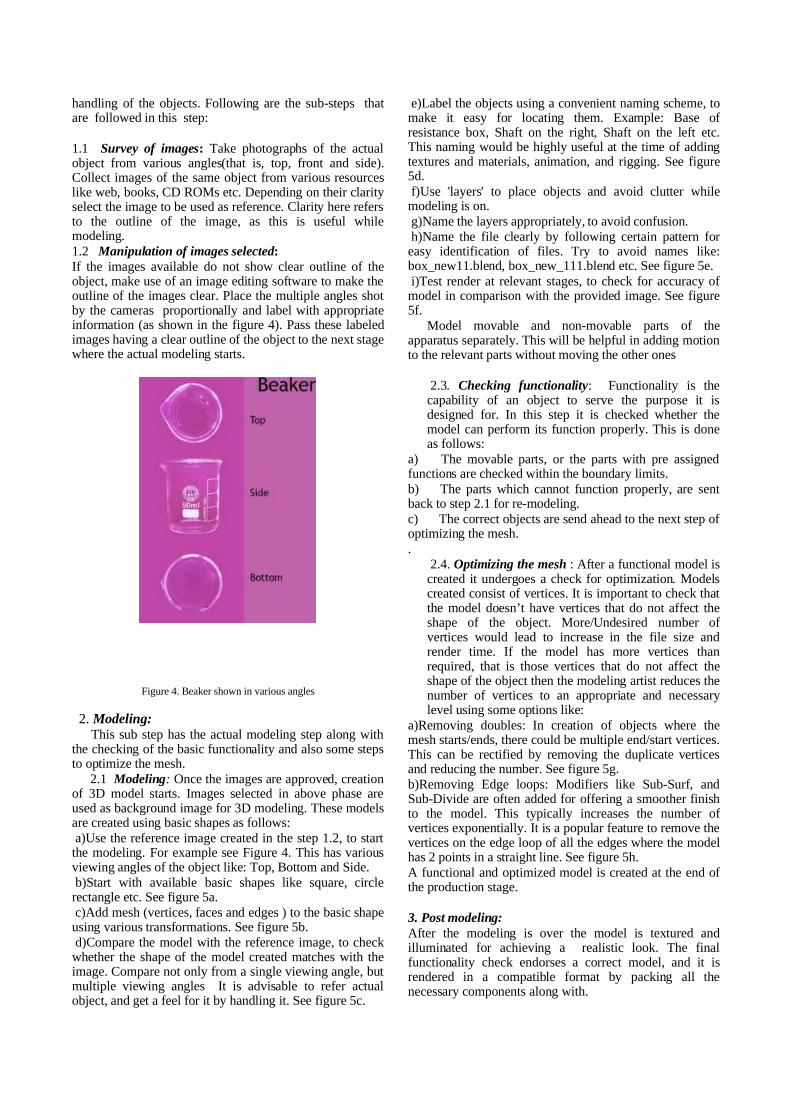
1.1 Survey of images: Take photographs of the actual object from various angles(that is, top, front and side). Collect images of the same object from various resources like web, books, CD ROMs etc. Depending on their clarity select the image to be used as reference. Clarity here refers to the outline of the image, as this is useful while modeling. 1.2 Manipulation of images selected:If the images available do not show clear outline of the object, make use of an image editing software to make the outline of the images clear. Place the multiple angles shot by the cameras proportionally and label with appropriate information (as shown in the figure 4). Pass these labeled images having a clear outline of the object to the next stage where the actual modeling starts.
Figure 4. Beaker shown in various angles
2. Modeling:This sub step has the actual modeling step along with
the checking of the basic functionality and also some steps to optimize the mesh. 2.1 Modeling: Once the images are approved, creation of 3D model starts. Images selected in above phase are used as background image for 3D modeling. These models are created using basic shapes as follows: a)Use the reference image created in the step 1.2, to start the modeling. For example see Figure 4. This has various viewing angles of the object like: Top, Bottom and Side. b)Start with available basic shapes like square, circle rectangle etc. See figure 5a. c)Add mesh (vertices, faces and edges ) to the basic shape using various transformations. See figure 5b. d)Compare the model with the reference image, to check whether the shape of the model created matches with the image. Compare not only from a single viewing angle, but multiple viewing angles It is advisable to refer actual object, and get a feel for it by handling it. See figure 5c.
e)Label the objects using a convenient naming scheme, to make it easy for locating them. Example: Base of resistance box, Shaft on the right, Shaft on the left etc. This naming would be highly useful at the time of adding textures and materials, animation, and rigging. See figure 5d. f)Use 'layers' to place objects and avoid clutter while modeling is on. g)Name the layers appropriately, to avoid confusion. h)Name the file clearly by following certain pattern for easy identification of files. Try to avoid names like: box_new11.blend, box_new_111.blend etc. See figure 5e. i)Test render at relevant stages, to check for accuracy of model in comparison with the provided image. See figure 5f.
Model movable and non-movable parts of the apparatus separately. This will be helpful in adding motion to the relevant parts without moving the other ones
2.3. Checking functionality: Functionality is the capability of an object to serve the purpose it is designed for. In this step it is checked whether the model can perform its function properly. This is done as follows:
a) The movable parts, or the parts with pre assigned functions are checked within the boundary limits.b) The parts which cannot function properly, are sent back to step 2.1 for re-modeling. c) The correct objects are send ahead to the next step of optimizing the mesh. .
2.4. Optimizing the mesh : After a functional model is created it undergoes a check for optimization. Models created consist of vertices. It is important to check that the model doesn’t have vertices that do not affect the shape of the object. More/Undesired number of vertices would lead to increase in the file size and render time. If the model has more vertices than required, that is those vertices that do not affect the shape of the object then the modeling artist reduces the number of vertices to an appropriate and necessary level using some options like:
a)Removing doubles: In creation of objects where the mesh starts/ends, there could be multiple end/start vertices. This can be rectified by removing the duplicate vertices and reducing the number. See figure 5g.b)Removing Edge loops: Modifiers like Sub-Surf, and Sub-Divide are often added for offering a smoother finish to the model. This typically increases the number of vertices exponentially. It is a popular feature to remove the vertices on the edge loop of all the edges where the model has 2 points in a straight line. See figure 5h.A functional and optimized model is created at the end of the production stage.
3. Post modeling:After the modeling is over the model is textured and illuminated for achieving a realistic look. The final functionality check endorses a correct model, and it is rendered in a compatible format by packing all the necessary components along with.
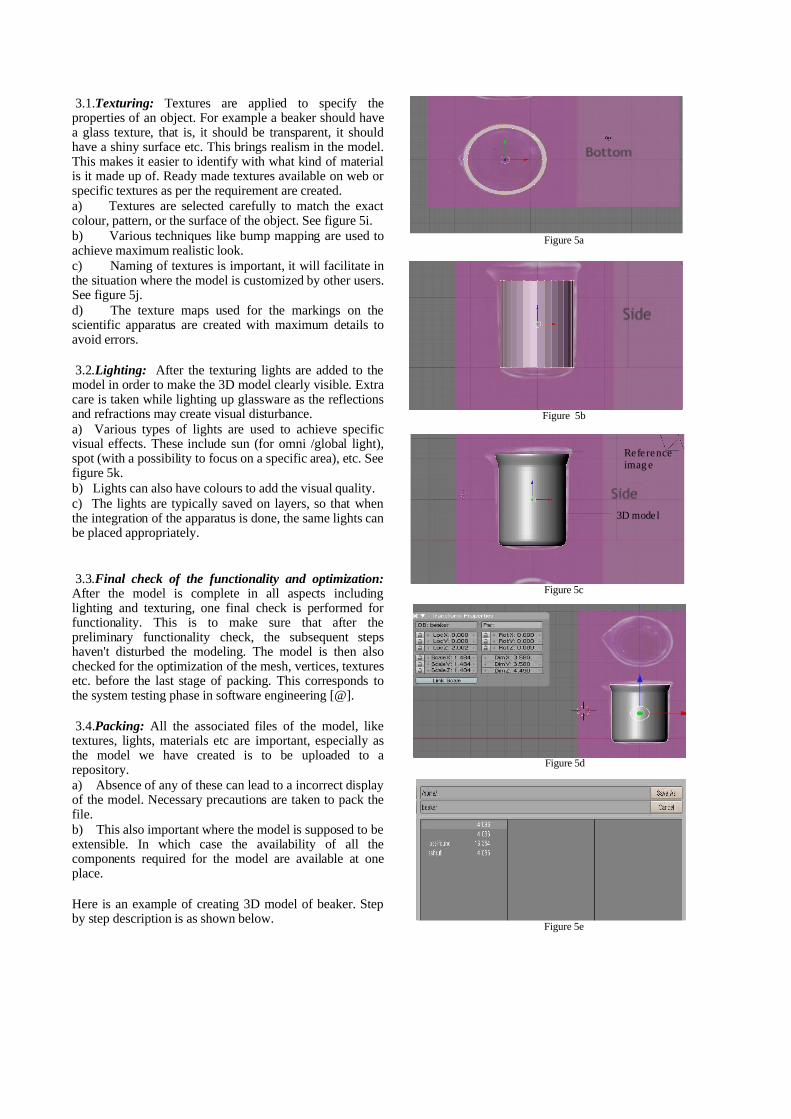
3.1.Texturing: Textures are applied to specify the properties of an object. For example a beaker should have a glass texture, that is, it should be transparent, it should have a shiny surface etc. This brings realism in the model. This makes it easier to identify with what kind of material is it made up of. Ready made textures available on web or specific textures as per the requirement are created.a) Textures are selected carefully to match the exact colour, pattern, or the surface of the object. See figure 5i.b) Various techniques like bump mapping are used to achieve maximum realistic look.c) Naming of textures is important, it will facilitate in the situation where the model is customized by other users. See figure 5j.d) The texture maps used for the markings on the scientific apparatus are created with maximum details to avoid errors.
3.2.Lighting: After the texturing lights are added to the model in order to make the 3D model clearly visible. Extra care is taken while lighting up glassware as the reflections and refractions may create visual disturbance. a) Various types of lights are used to achieve specific visual effects. These include sun (for omni /global light), spot (with a possibility to focus on a specific area), etc. See figure 5k.b) Lights can also have colours to add the visual quality.c) The lights are typically saved on layers, so that when the integration of the apparatus is done, the same lights can be placed appropriately.
3.3.Final check of the functionality and optimization: After the model is complete in all aspects including lighting and texturing, one final check is performed for functionality. This is to make sure that after the preliminary functionality check, the subsequent steps haven't disturbed the modeling. The model is then also checked for the optimization of the mesh, vertices, textures etc. before the last stage of packing. This corresponds to the system testing phase in software engineering [@].
3.4.Packing: All the associated files of the model, like textures, lights, materials etc are important, especially as the model we have created is to be uploaded to a repository. a) Absence of any of these can lead to a incorrect display of the model. Necessary precautions are taken to pack the file.b) This also important where the model is supposed to be extensible. In which case the availability of all the components required for the model are available at one place.
Here is an example of creating 3D model of beaker. Step by step description is as shown below.
Figure 5a
Figure 5b
Figure 5c
Figure 5d
Figure 5e
3D mode l
Refe rence imag e
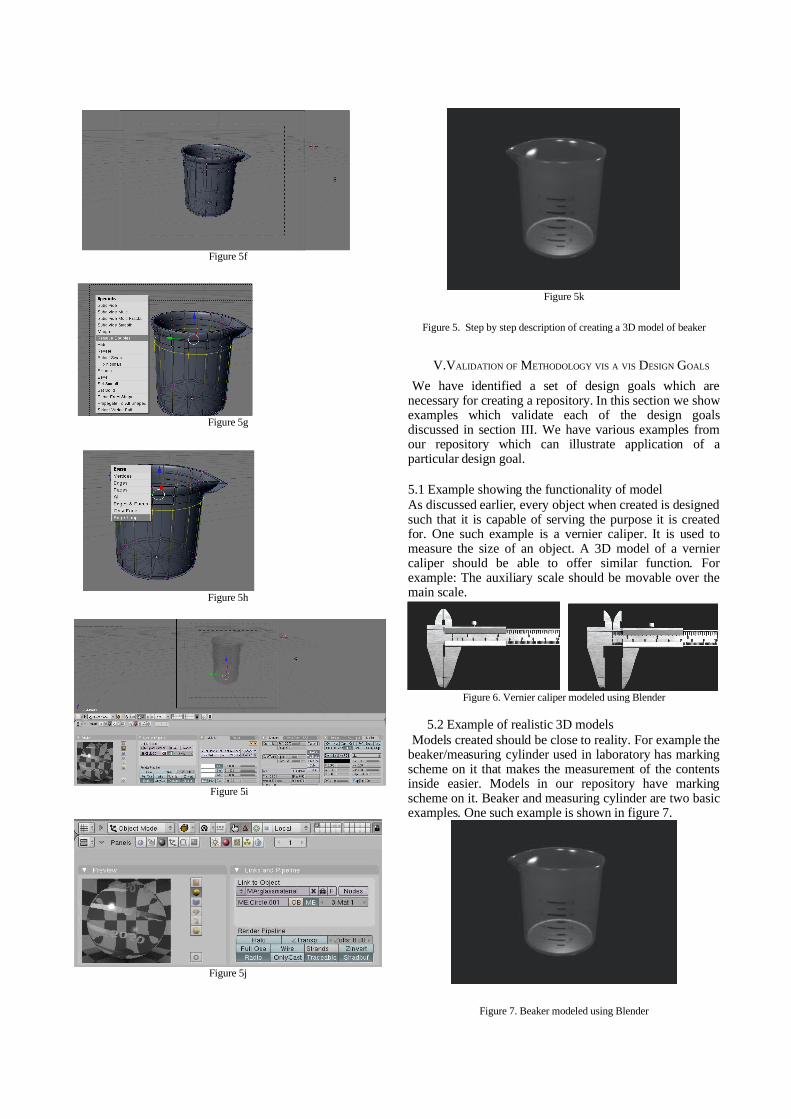
Figure 5f
Figure 5g
Figure 5h
Figure 5i
Figure 5j
Figure 5k
Figure 5. Step by step description of creating a 3D model of beaker
V.VALIDATION OF METHODOLOGY VIS A VIS DESIGN GOALS
We have identified a set of design goals which are necessary for creating a repository. In this section we show examples which validate each of the design goals discussed in section III. We have various examples from our repository which can illustrate application of a particular design goal.
5.1 Example showing the functionality of modelAs discussed earlier, every object when created is designed such that it is capable of serving the purpose it is created for. One such example is a vernier caliper. It is used to measure the size of an object. A 3D model of a vernier caliper should be able to offer similar function. For example: The auxiliary scale should be movable over the main scale.
Figure 6. Vernier caliper modeled using Blender
5.2 Example of realistic 3D modelsModels created should be close to reality. For example the
beaker/measuring cylinder used in laboratory has marking scheme on it that makes the measurement of the contents inside easier. Models in our repository have marking scheme on it. Beaker and measuring cylinder are two basic examples. One such example is shown in figure 7.
Figure 7. Beaker modeled using Blender
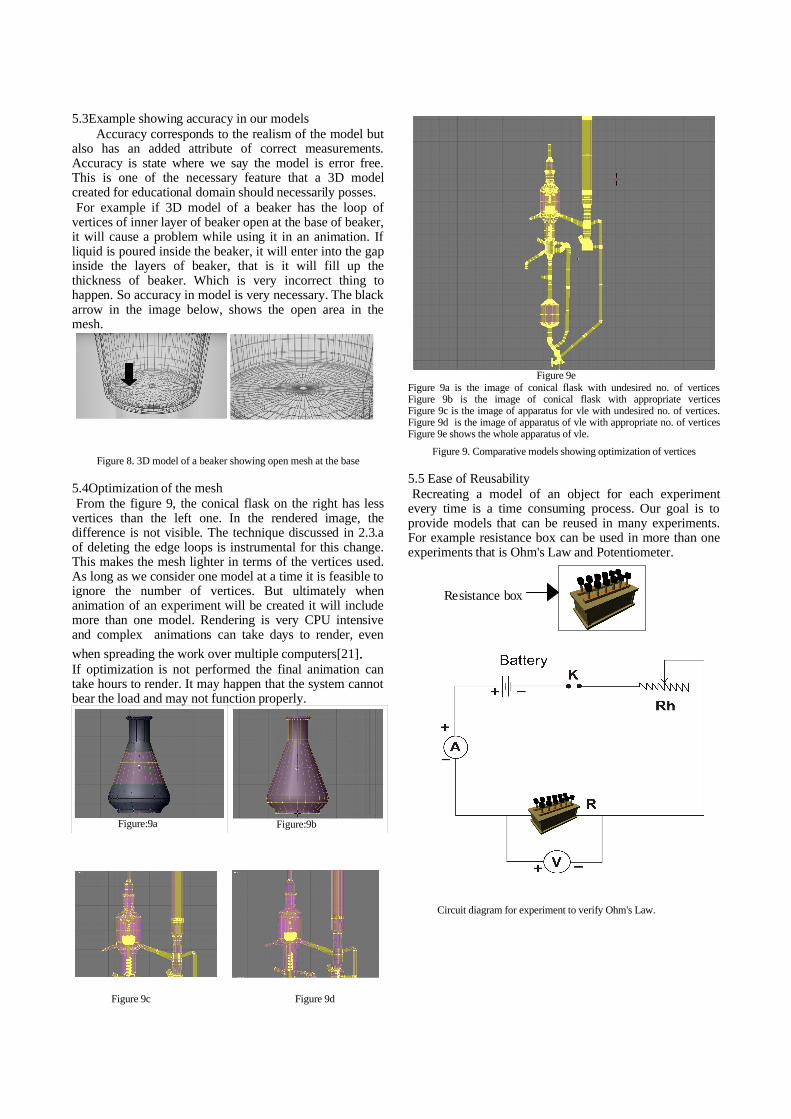
5.3Example showing accuracy in our models Accuracy corresponds to the realism of the model but also has an added attribute of correct measurements. Accuracy is state where we say the model is error free. This is one of the necessary feature that a 3D model created for educational domain should necessarily posses. For example if 3D model of a beaker has the loop of
vertices of inner layer of beaker open at the base of beaker, it will cause a problem while using it in an animation. If liquid is poured inside the beaker, it will enter into the gap inside the layers of beaker, that is it will fill up the thickness of beaker. Which is very incorrect thing to happen. So accuracy in model is very necessary. The black arrow in the image below, shows the open area in the mesh.
Figure 8. 3D model of a beaker showing open mesh at the base
5.4Optimization of the meshFrom the figure 9, the conical flask on the right has less
vertices than the left one. In the rendered image, the difference is not visible. The technique discussed in 2.3.a of deleting the edge loops is instrumental for this change. This makes the mesh lighter in terms of the vertices used. As long as we consider one model at a time it is feasible to ignore the number of vertices. But ultimately when animation of an experiment will be created it will include more than one model. Rendering is very CPU intensive and complex animations can take days to render, even
when spreading the work over multiple computers[21].If optimization is not performed the final animation can take hours to render. It may happen that the system cannot bear the load and may not function properly.
Figure:9a Figure:9b
Figure 9c Figure 9d
Figure 9eFigure 9a is the image of conical flask with undesired no. of vertices Figure 9b is the image of conical flask with appropriate vertices Figure 9c is the image of apparatus for vle with undesired no. of vertices. Figure 9d is the image of apparatus of vle with appropriate no. of vertices Figure 9e shows the whole apparatus of vle.
Figure 9. Comparative models showing optimization of vertices
5.5 Ease of ReusabilityRecreating a model of an object for each experiment
every time is a time consuming process. Our goal is to provide models that can be reused in many experiments. For example resistance box can be used in more than one experiments that is Ohm's Law and Potentiometer.
Circuit diagram for experiment to verify Ohm's Law.
Resistance box
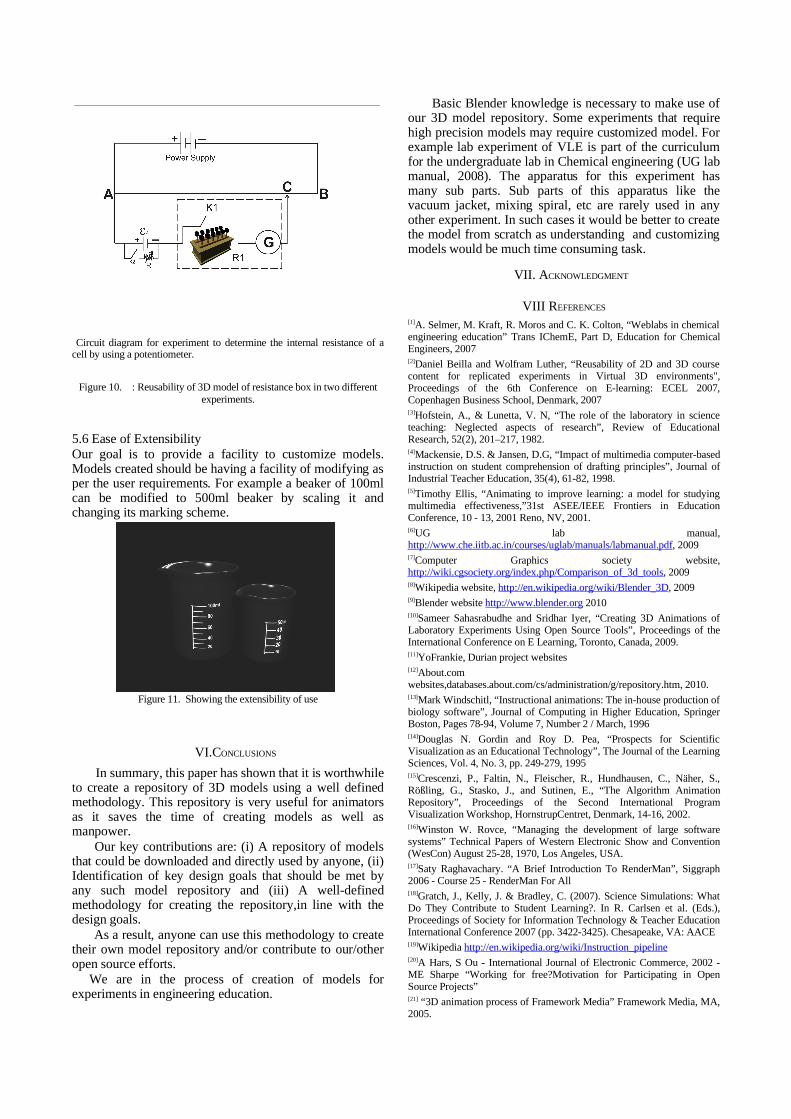
Circuit diagram for experiment to determine the internal resistance of a cell by using a potentiometer.
Figure 10. : Reusability of 3D model of resistance box in two different experiments.
5.6 Ease of ExtensibilityOur goal is to provide a facility to customize models. Models created should be having a facility of modifying as per the user requirements. For example a beaker of 100ml can be modified to 500ml beaker by scaling it and changing its marking scheme.
Figure 11. Showing the extensibility of use
VI.CONCLUSIONS
In summary, this paper has shown that it is worthwhile to create a repository of 3D models using a well defined methodology. This repository is very useful for animators as it saves the time of creating models as well as manpower. Our key contributions are: (i) A repository of models that could be downloaded and directly used by anyone, (ii) Identification of key design goals that should be met by any such model repository and (iii) A well-defined methodology for creating the repository,in line with the design goals. As a result, anyone can use this methodology to create their own model repository and/or contribute to our/other open source efforts. We are in the process of creation of models for experiments in engineering education.
Basic Blender knowledge is necessary to make use of our 3D model repository. Some experiments that require high precision models may require customized model. For example lab experiment of VLE is part of the curriculum for the undergraduate lab in Chemical engineering (UG lab manual, 2008). The apparatus for this experiment has many sub parts. Sub parts of this apparatus like the vacuum jacket, mixing spiral, etc are rarely used in any other experiment. In such cases it would be better to create the model from scratch as understanding and customizing models would be much time consuming task.
VII. ACKNOWLEDGMENT
VIII REFERENCES
[1]A. Selmer, M. Kraft, R. Moros and C. K. Colton, “Weblabs in chemical engineering education” Trans IChemE, Part D, Education for Chemical Engineers, 2007[2]Daniel Beilla and Wolfram Luther, “Reusability of 2D and 3D course content for replicated experiments in Virtual 3D environments", Proceedings of the 6th Conference on E-learning: ECEL 2007, Copenhagen Business School, Denmark, 2007[3]Hofstein, A., & Lunetta, V. N, “The role of the laboratory in science teaching: Neglected aspects of research”, Review of Educational Research, 52(2), 201–217, 1982.[4]Mackensie, D.S. & Jansen, D.G, “Impact of multimedia computer-based instruction on student comprehension of drafting principles”, Journal of Industrial Teacher Education, 35(4), 61-82, 1998.[5]Timothy Ellis, “Animating to improve learning: a model for studying multimedia effectiveness,”31st ASEE/IEEE Frontiers in Education Conference, 10 - 13, 2001 Reno, NV, 2001.[6]UG lab manual, http://www.che.iitb.ac.in/courses/uglab/manuals/labmanual.pdf, 2009[7]Computer Graphics society website, http://wiki.cgsociety.org/index.php/Comparison_of_3d_tools, 2009[8]Wikipedia website, http://en.wikipedia.org/wiki/Blender_3D, 2009[9]Blender website http://www.blender.org 2010[10]Sameer Sahasrabudhe and Sridhar Iyer, “Creating 3D Animations of Laboratory Experiments Using Open Source Tools”, Proceedings of the International Conference on E Learning, Toronto, Canada, 2009.[11]YoFrankie, Durian project websites[12]About.com websites,databases.about.com/cs/administration/g/repository.htm, 2010.[13]Mark Windschitl, “Instructional animations: The in-house production of biology software”, Journal of Computing in Higher Education, Springer Boston, Pages 78-94, Volume 7, Number 2 / March, 1996[14]Douglas N. Gordin and Roy D. Pea, “Prospects for Scientific Visualization as an Educational Technology”, The Journal of the Learning Sciences, Vol. 4, No. 3, pp. 249-279, 1995[15]Crescenzi, P., Faltin, N., Fleischer, R., Hundhausen, C., Näher, S., Rößling, G., Stasko, J., and Sutinen, E., “The Algorithm Animation Repository”, Proceedings of the Second International Program Visualization Workshop, HornstrupCentret, Denmark, 14-16, 2002.[16]Winston W. Rovce, “Managing the development of large software systems” Technical Papers of Western Electronic Show and Convention (WesCon) August 25-28, 1970, Los Angeles, USA.[17]Saty Raghavachary. “A Brief Introduction To RenderMan”, Siggraph 2006 - Course 25 - RenderMan For All[18]Gratch, J., Kelly, J. & Bradley, C. (2007). Science Simulations: What Do They Contribute to Student Learning?. In R. Carlsen et al. (Eds.), Proceedings of Society for Information Technology & Teacher Education International Conference 2007 (pp. 3422-3425). Chesapeake, VA: AACE[19]Wikipedia http://en.wikipedia.org/wiki/Instruction_pipeline[20]A Hars, S Ou - International Journal of Electronic Commerce, 2002 - ME Sharpe “Working for free?Motivation for Participating in Open Source Projects”[21] “3D animation process of Framework Media” Framework Media, MA, 2005.